 I try very hard to keep things simple around here. Recipes, techniques, flavors, everything. That doesn’t mean super easy or uncomplicated—just not over-complicated. No more steps or ingredients than absolutely necessary, you know?
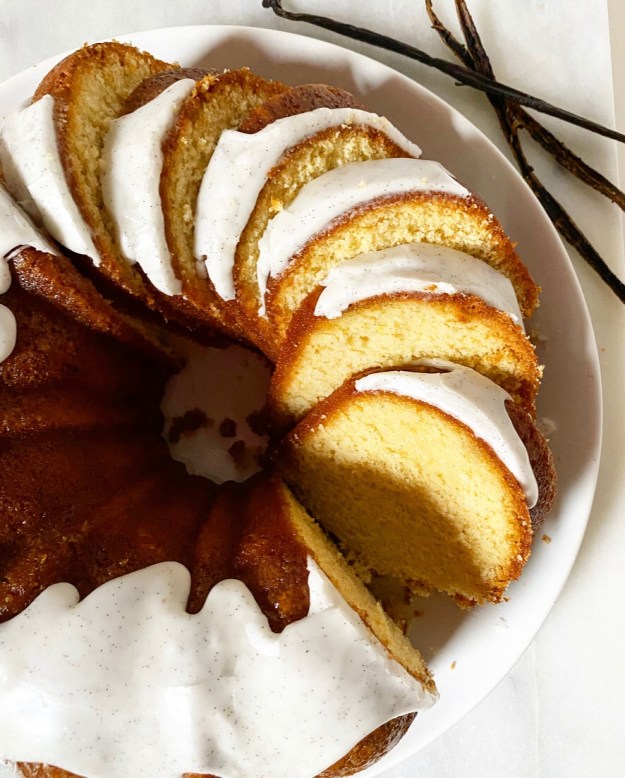 That said, sometimes a simple recipe like this Vanilla Bean Bundt requires several tries, each with a different technique or ingredient, all resulting in…excellent cakes. Really.
You know what’s not simple? Deciding which of those cakes to post.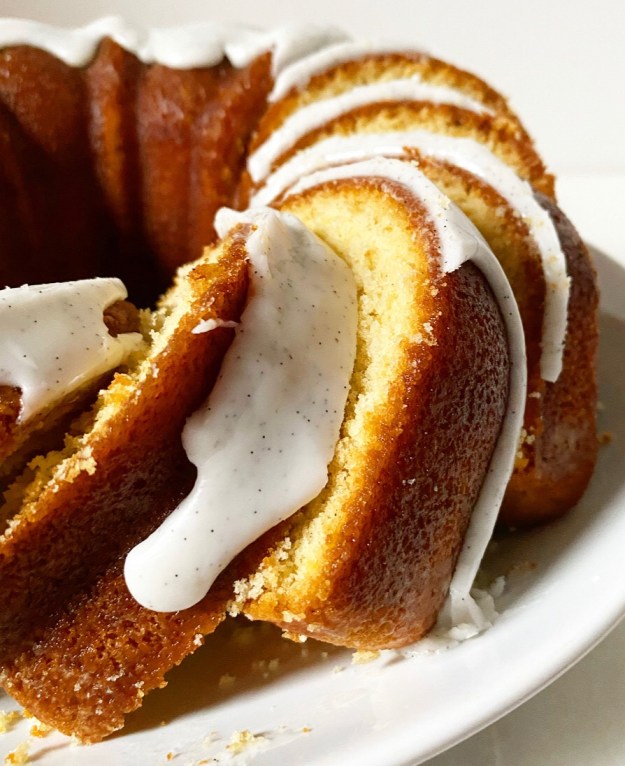 Each one began with the same basic recipe that I’ve used for my Orange Cardamom Cake, Meyer Lemon Drizzle Cakes, and Marble Bundt, but with vanilla bean, of course. My options were:
- a cake with one vanilla bean in the batter, one vanilla bean in the icing, and a vanilla syrup made from the empty pods painted on.
- a cake with two vanilla beans in the batter and one in the icing. No syrup.
- a cake and icing made with vanilla bean paste instead of the real deal. No syrup.
I cannot overstate how delicious all of them were—buttery and bursting with vanilla bean flavor! And those signature specks, of course.
If I felt like I could get away with posting three Vanilla Bean Bundt recipes, I would. Faced with making a decision however, I took into account the flavor, aesthetics, ease and cost of each one, and the winner just barely emerged.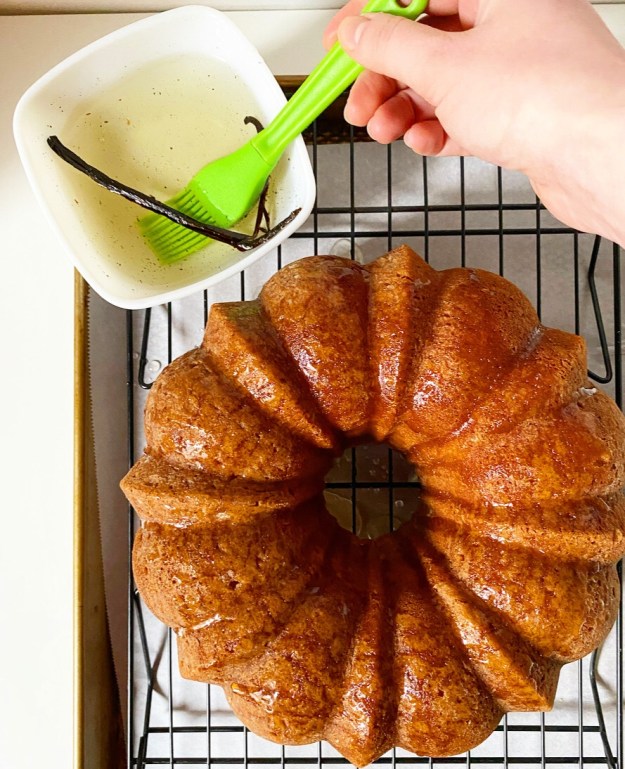
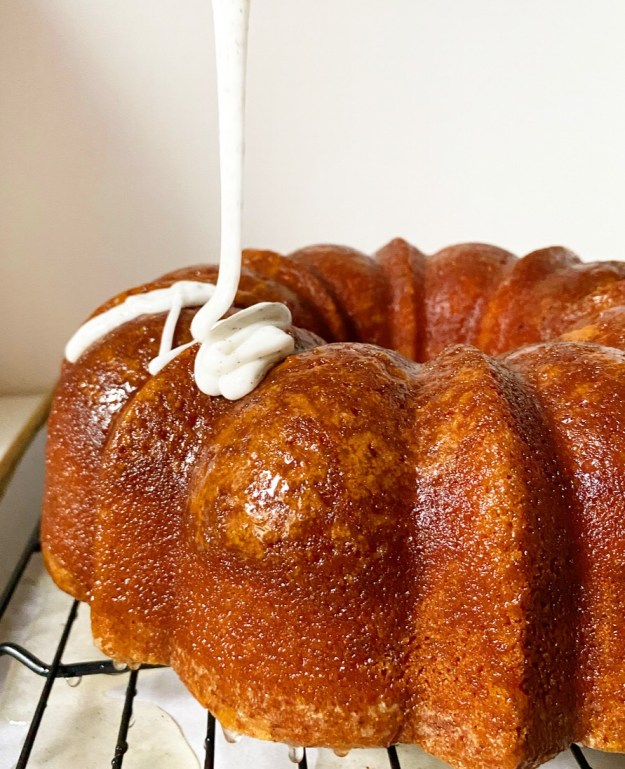
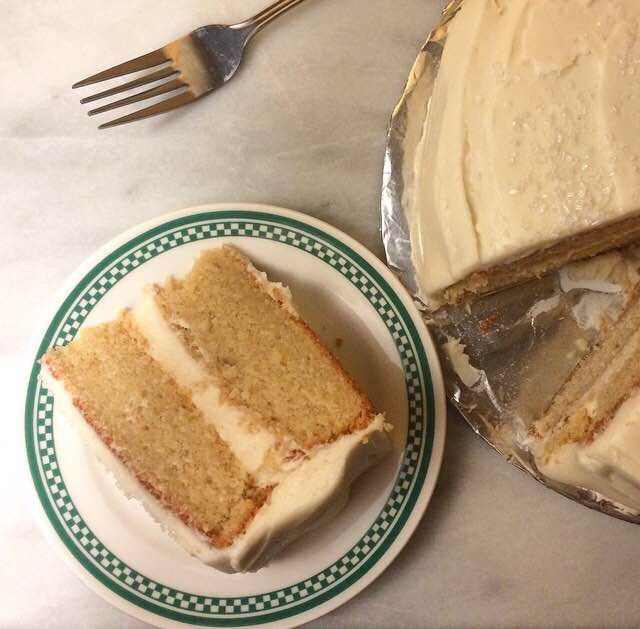
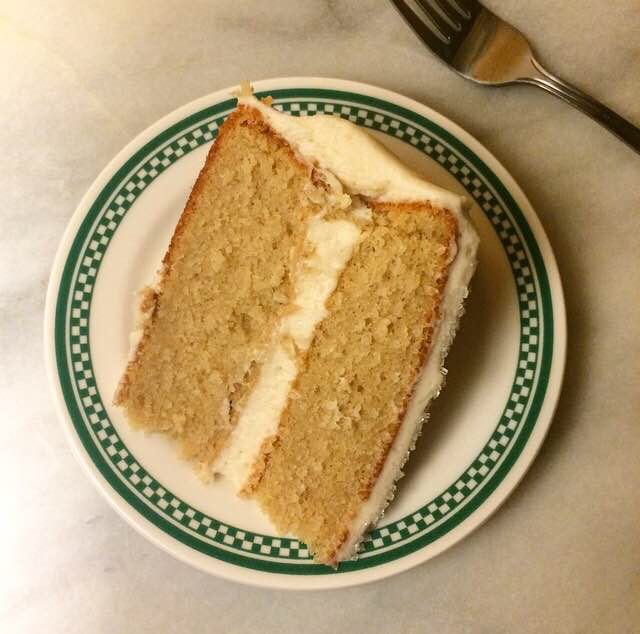
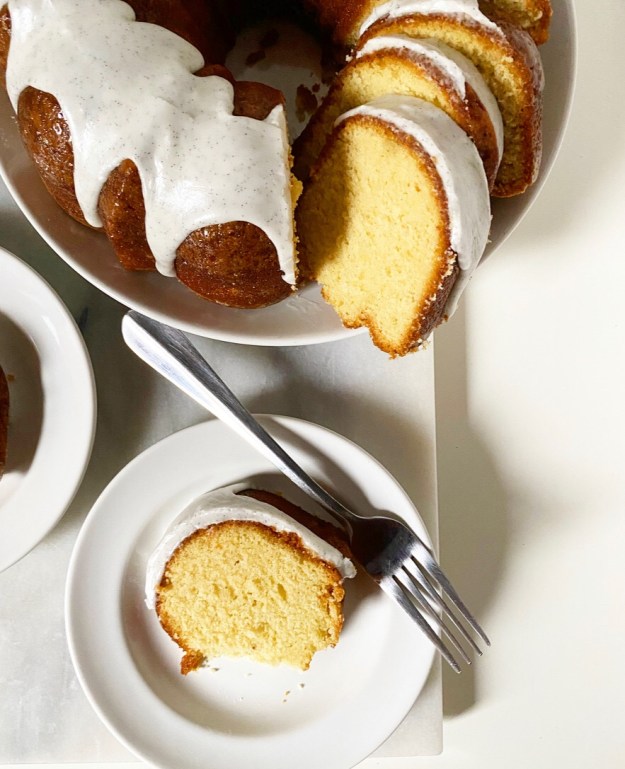
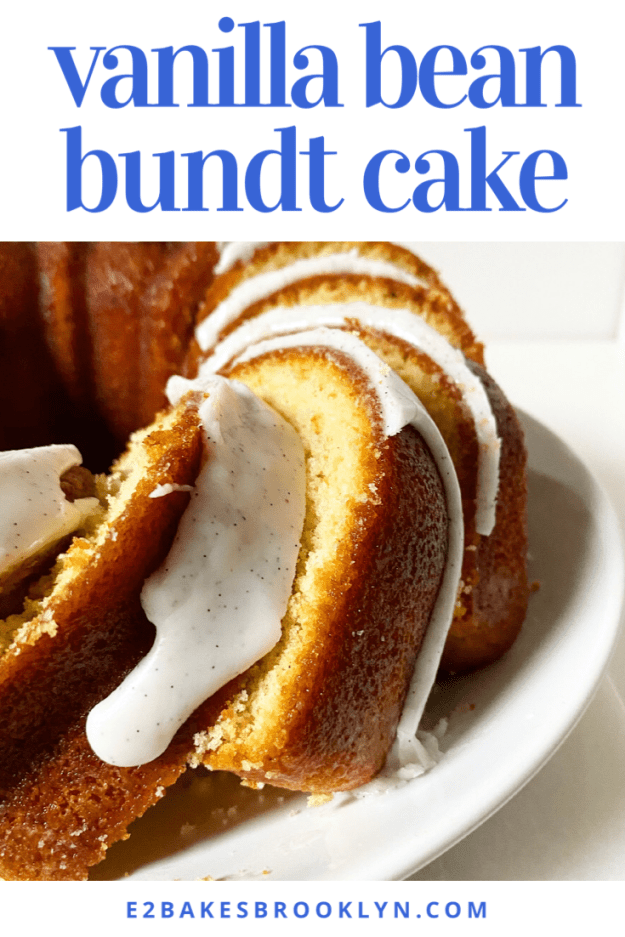
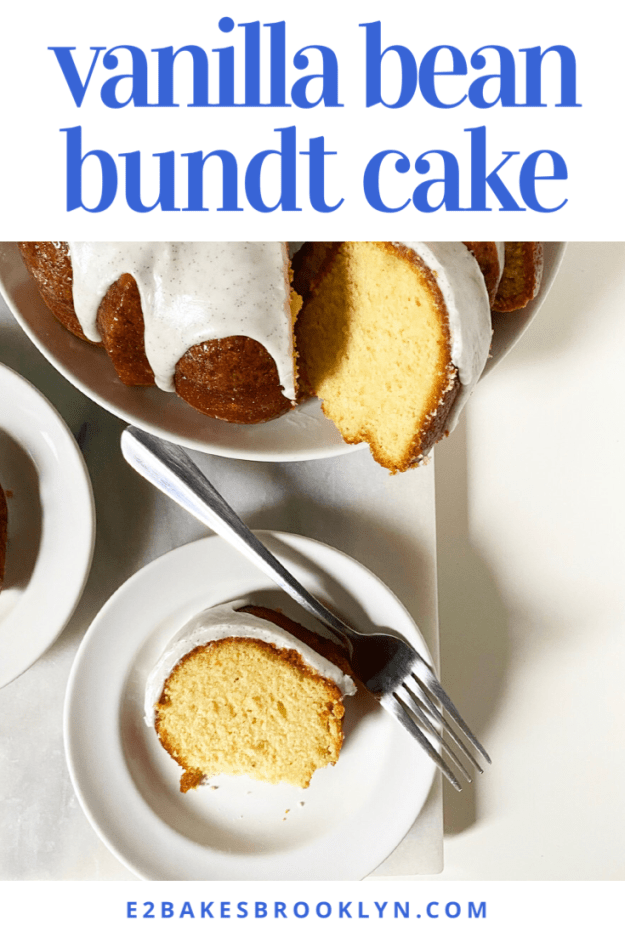
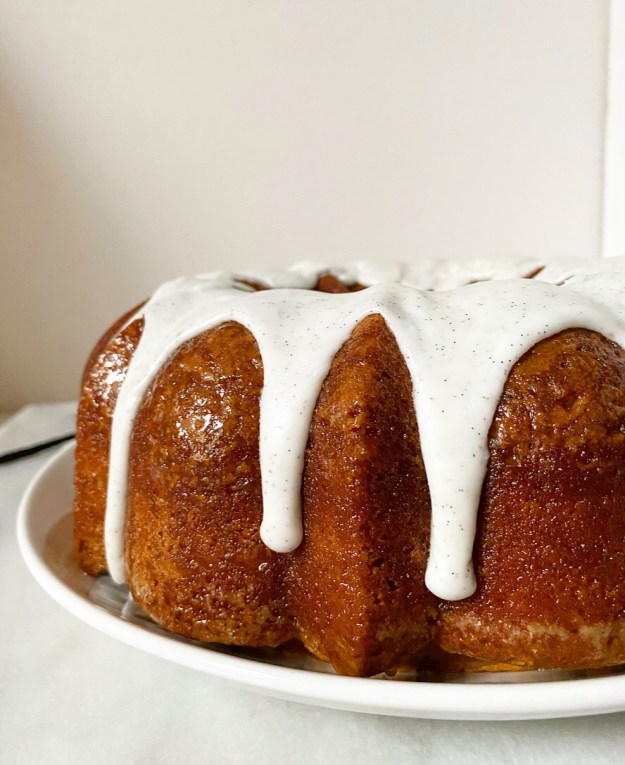 The cake I love the most is #1, so it’s the one I’ve posted below. The seeds of one vanilla bean are whirled into the batter, and the leftover pod is used to make a syrup that is brushed onto the baked cake before icing is poured over the top. The syrup is the element that makes all the difference here—it keeps the cake from being even the slightest bit crumbly, gives it a subtle glossiness, and makes it so that you can smell its dreamy vanilla aroma within a 6 foot radius. Yes, really!
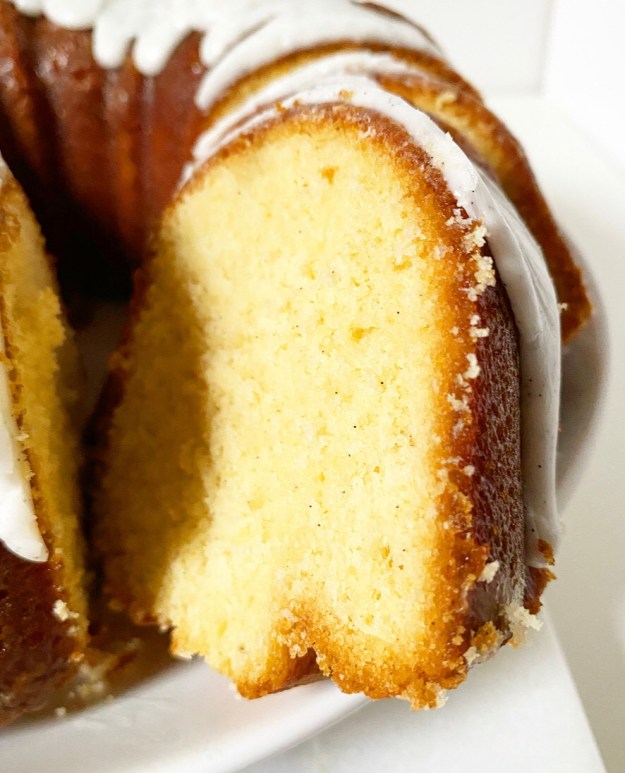 I also like that the pods in the recipe don’t go to waste. I’ve seen other bakers suggest using empty vanilla pods to make vanilla sugar, but how much vanilla sugar does anyone actually use? You could use them to make extract, I suppose, but that takes weeks or months. This way at least one of the pods is used directly in the cake. As for the second, let me know what you do with leftover vanilla pods. I’m interested!
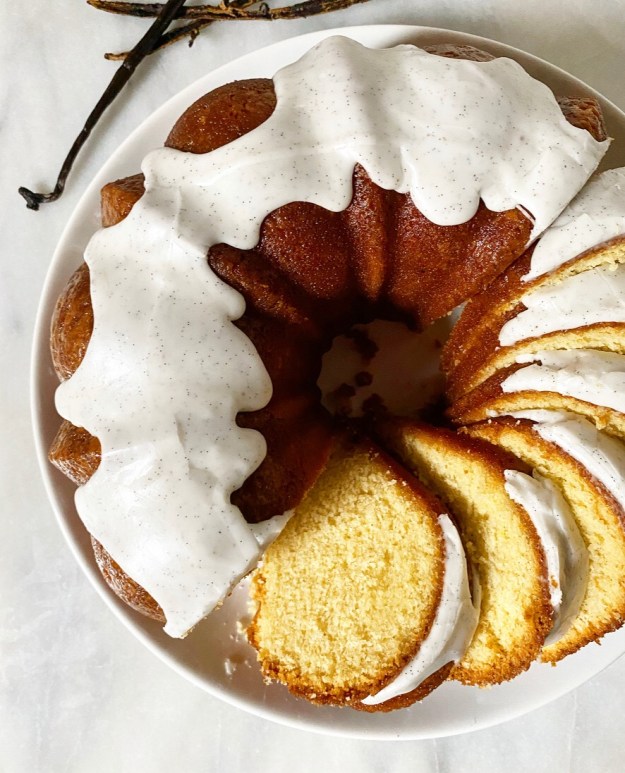 For those of you wondering about the cost of this whole operation, I won’t lie to you: vanilla bean anything is pricey. I buy my vanilla beans at Costco and Sahadi’s, and they run about $6 apiece. You could use two tablespoons of vanilla bean paste (1 per pod) instead, but the paste is about $35 upfront. A single jar contains enough to make this cake four times though, so it’s worth the investment. Oh, and this is a warning that the dark color of the vanilla bean paste will affect the aesthetic outcome of the cake, but only slightly. It will still be absurdly delicious, as all vanilla bean things are.
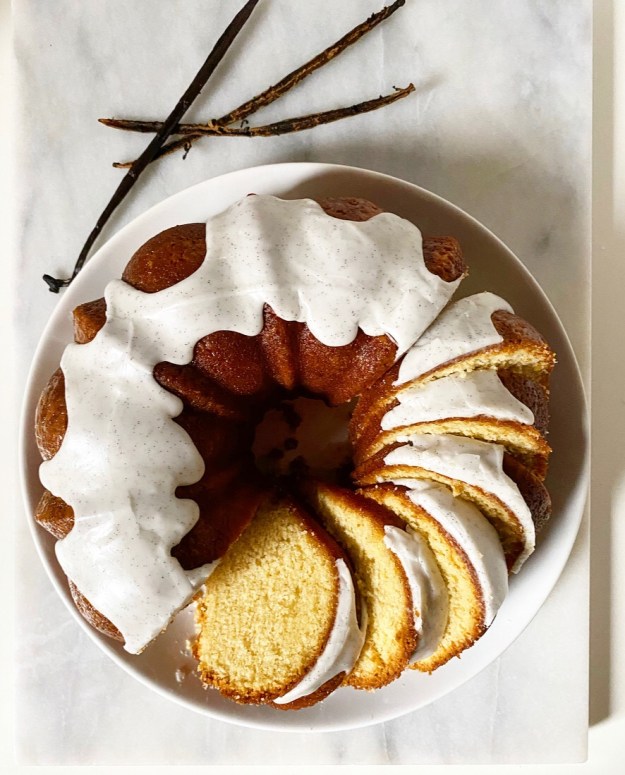 Keep it simple, y’all.
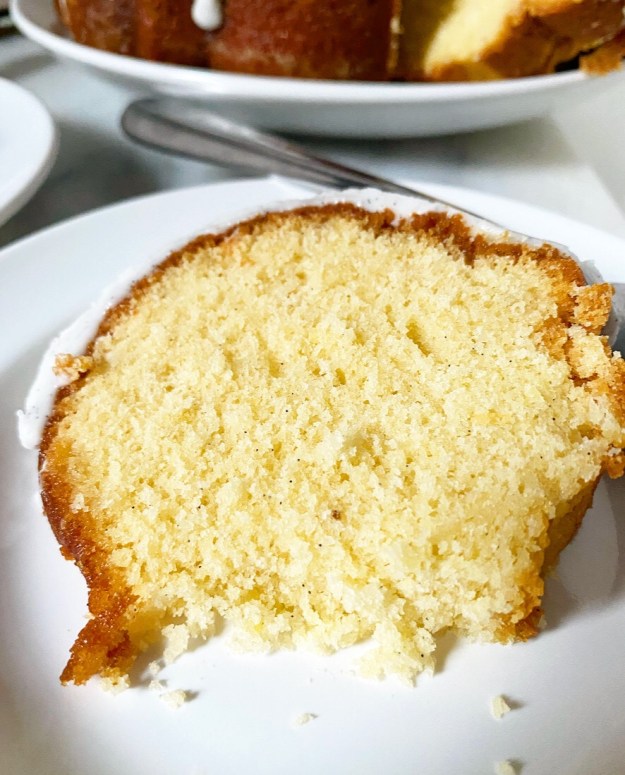
Vanilla Bean Bundt Cake
makes one 10-cup capacity bundt
Cake:
1 1/2 cups granulated sugar
1/2 cup light brown sugar, packed
scraped seeds of 1 vanilla bean
1 cup (2 sticks) unsalted butter, room temperature, cut into 16 pieces
4 large eggs, room temperature
2 teaspoons pure vanilla extract
3 cups all-purpose flour
2 teaspoons baking powder
1/2 teaspoon Kosher or sea salt
1 cup milk (preferably whole), room temperature
Simple Syrup:
1/3 cup water
2/3 cup granulated sugar
1 scraped/empty vanilla pod
Icing:
1 1/2 cups confectioner’s sugar
2 tablespoons whole milk
scraped seeds of 1 vanilla bean
pinch of Kosher or sea salt
Place an oven rack in the center position. Preheat oven to 325F. Heavily grease a bundt pan with softened butter (or shortening) and dust with flour. Set aside.
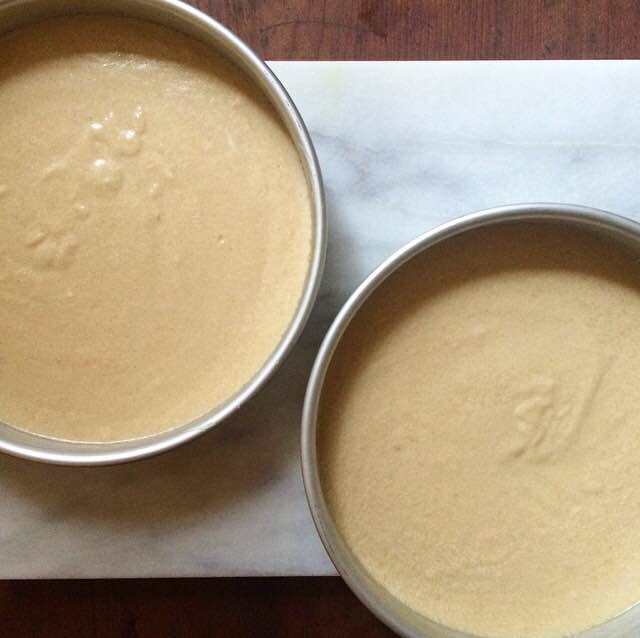
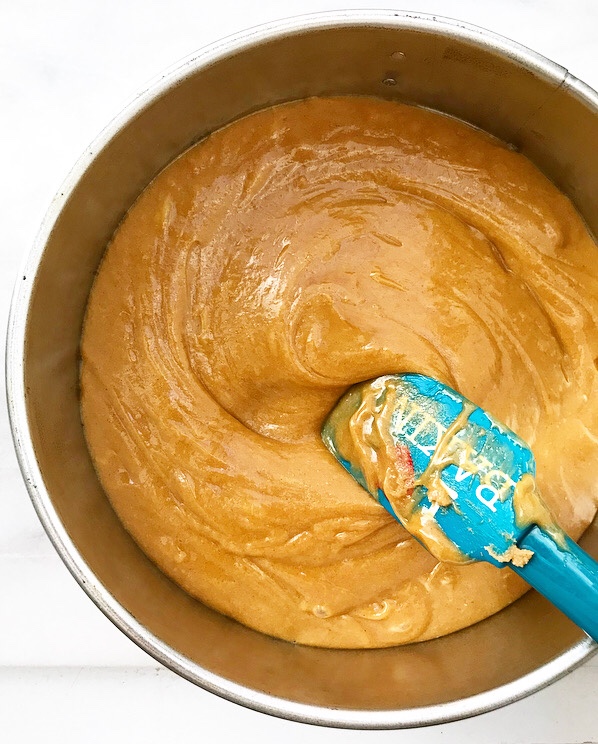
Make the cake. Combine all ingredients in a large mixing bowl. Use an electric mixer to mix on low for 30 seconds. Increase speed to medium and mix for 3 minutes. Batter will be thick.
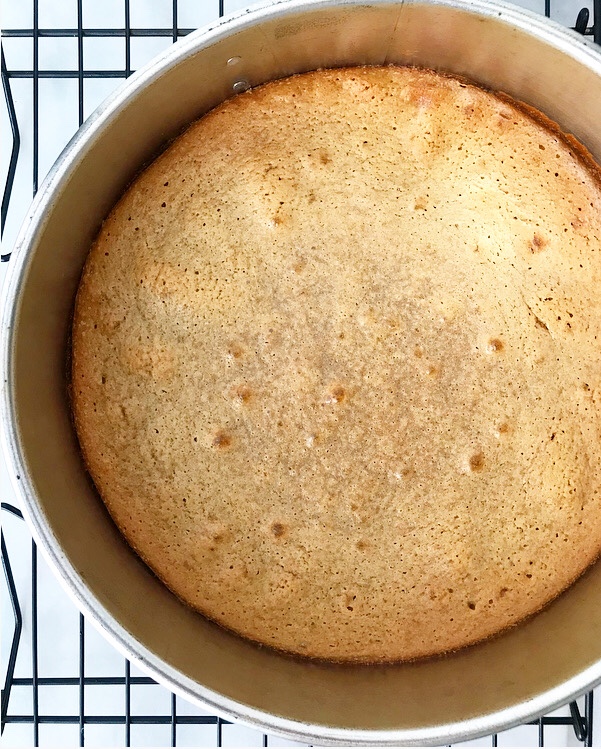
Transfer batter to prepared pan and smooth the top with a silicone spatula or wooden spoon. Tap full pan on the counter five times to release any large air bubbles. Bake 65-75 minutes, or until a toothpick inserted in several places comes out clean.
Let cake cool in the pan for 15 minutes. Run a thin, flexible knife around all exposed edges. Invert cake onto a cooling rack and let cake cool completely. Cake may be made up to a day in advance; it will keep double-wrapped in plastic wrap.
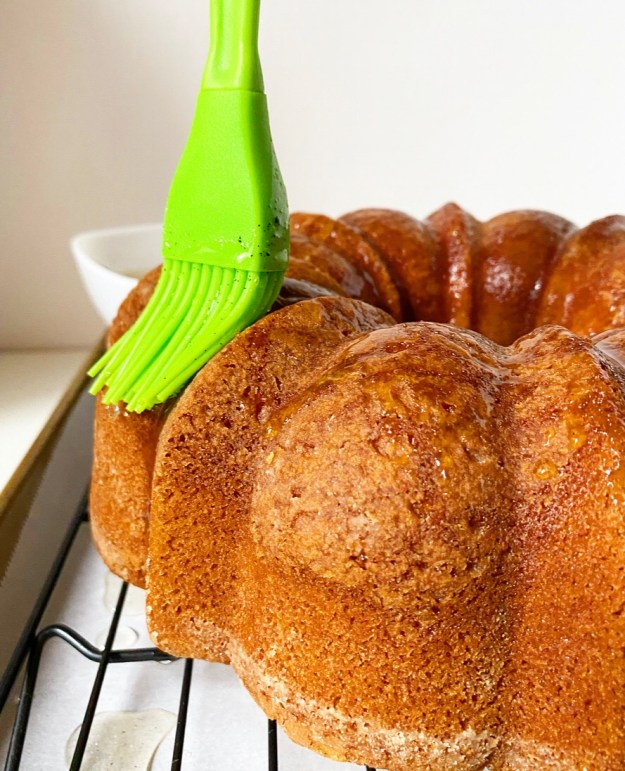
Set the cooled cake, still on the rack, over a rimmed baking sheet. Make the simple syrup. Combine water, sugar, and scraped vanilla pod in a small saucepan. Heat over medium heat, stirring occasionally, until sugar has dissolved. Remove from heat.
Use a pastry brush to paint syrup all over the cake. Continue brushing until you’ve used all the glaze. Some will run off onto the rimmed baking sheet—that is okay. Let cake sit for 30 minutes to absorb the syrup.
Make the icing. In a small bowl, use a fork to whisk together confectioners sugar, milk, vanilla seeds and salt. Mixture should be very thick, but pourable. If it’s too thick, add more milk by the teaspoon up to 3 teaspoons (1 tablespoon); if it’s too thin, add more confectioners sugar in 2 tablespoon increments. Pour over cake. Let sit for 20 minutes to set. Move cake to a serving plate before slicing and serving.
Leftover cake will keep covered at room temperature for up to three days or in the refrigerator for up to five.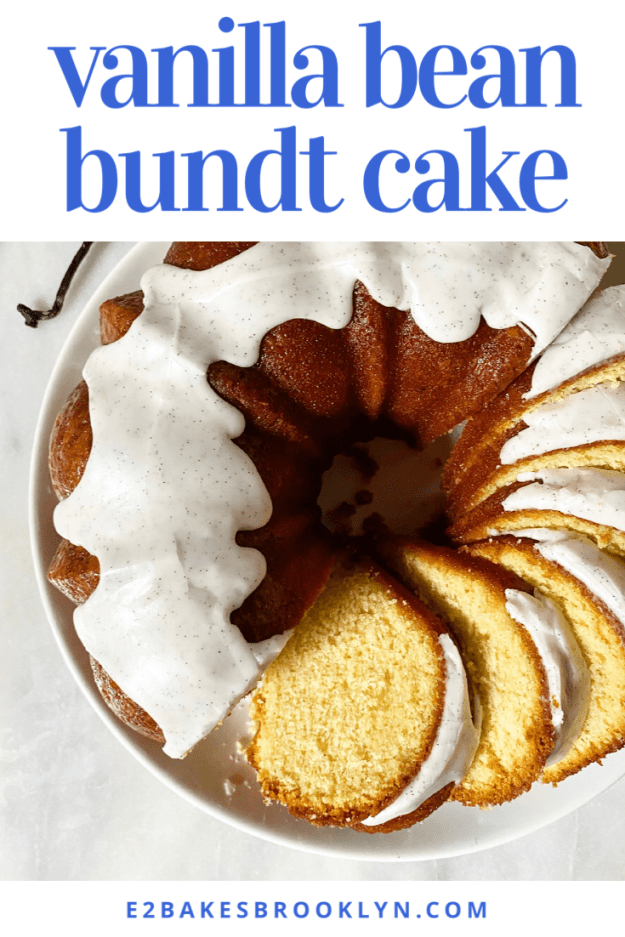
 In years past, I would take this time to go on about the number of posts/recipes I’ve written (332/322, if you care about that sort of thing) and how I had no idea that the blog would go on this long. I have a tendency toward sentimentality and I’m working on reining it in, but I’m not perfect yet…so, um, I’ll be brief. And then we’ll talk about Peanut Butter Mousse Cake.
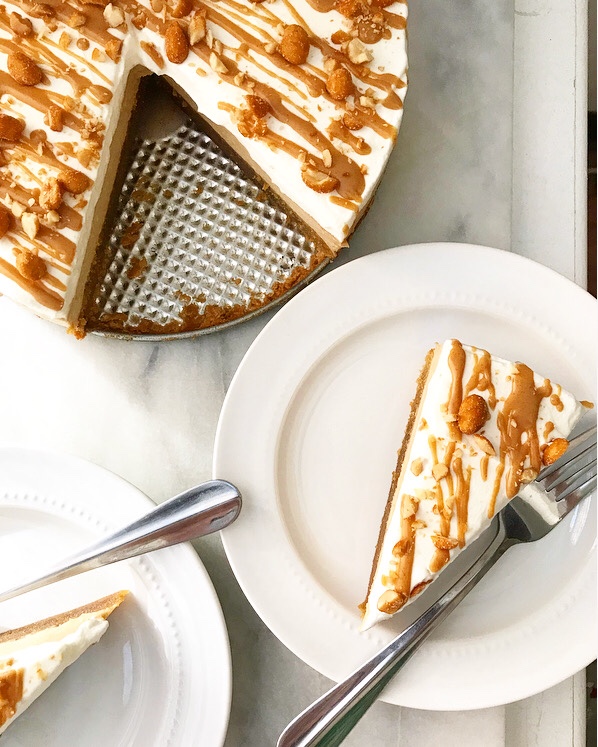 This blog is the thing of which I am proudest. I spend more time and energy working on content for this site than basically anything else, but it has been worth every late night and working weekend. I hope to continue baking and writing here for years to come.
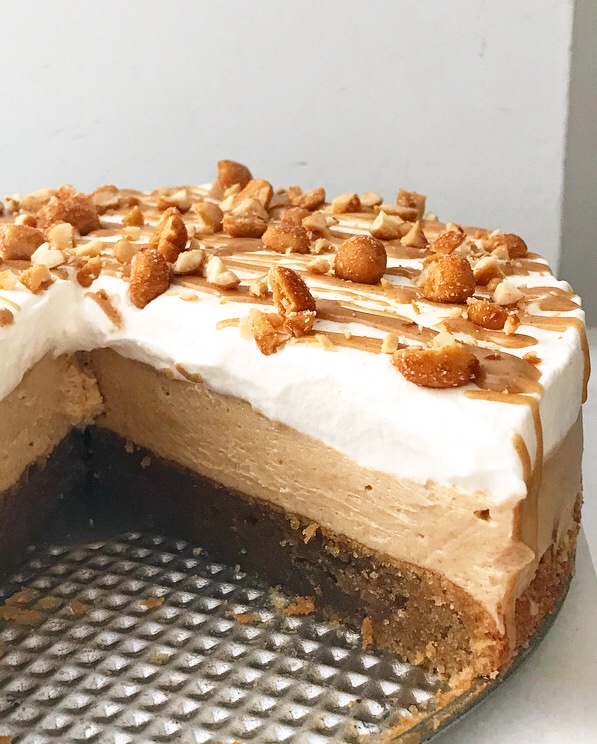 I blog because I love it, but it wouldn’t be nearly as much fun without y’all. Thank you for reading, commenting, providing encouragement and feedback, and making my recipes in your own kitchens!
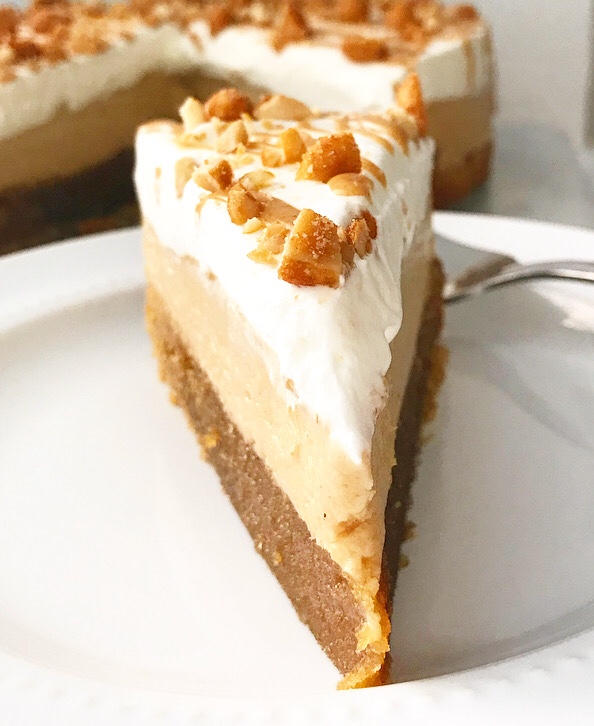 This community has grown by leaps and bounds over the last year. For those of you who are new around here, welcome! I’m glad you’re here.
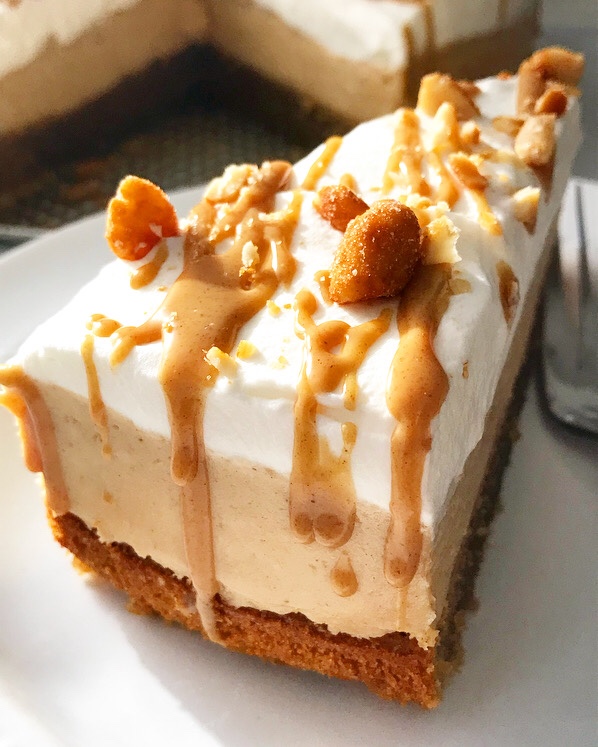 As for the future, lot of exciting things are coming in year four! Recipes, of course, but also bigger, better, blog-altering things. I can’t say much now, but know that good things are happening and I’m psyched to share them with you soon ❤
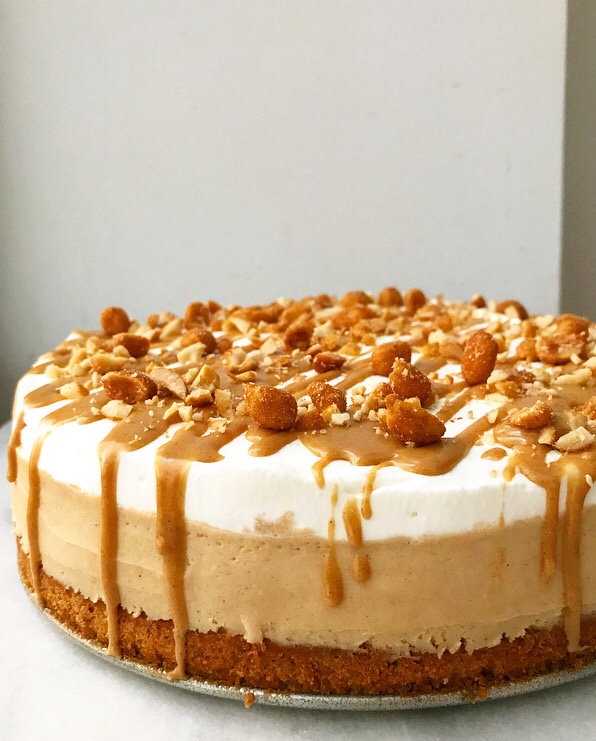
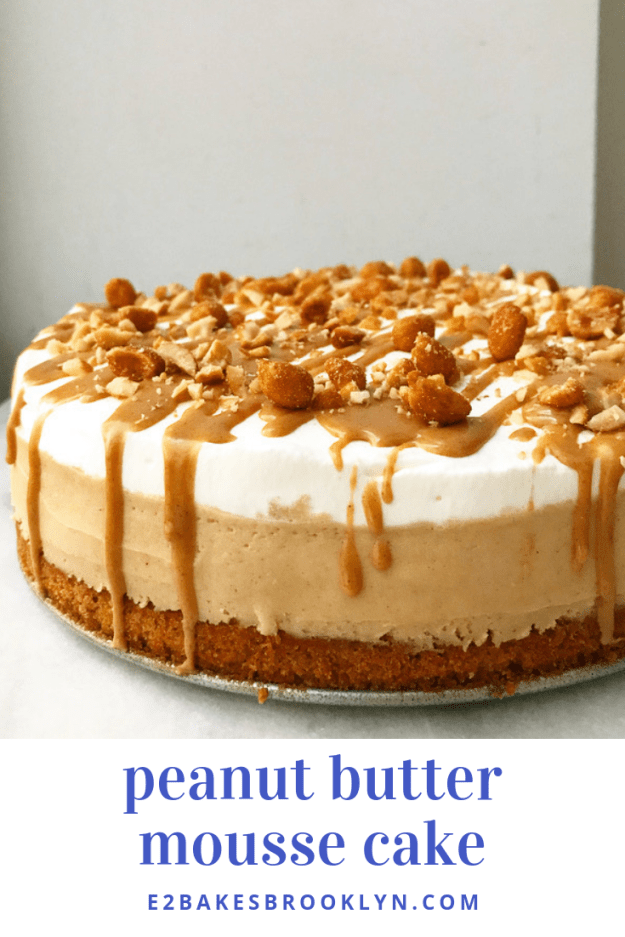
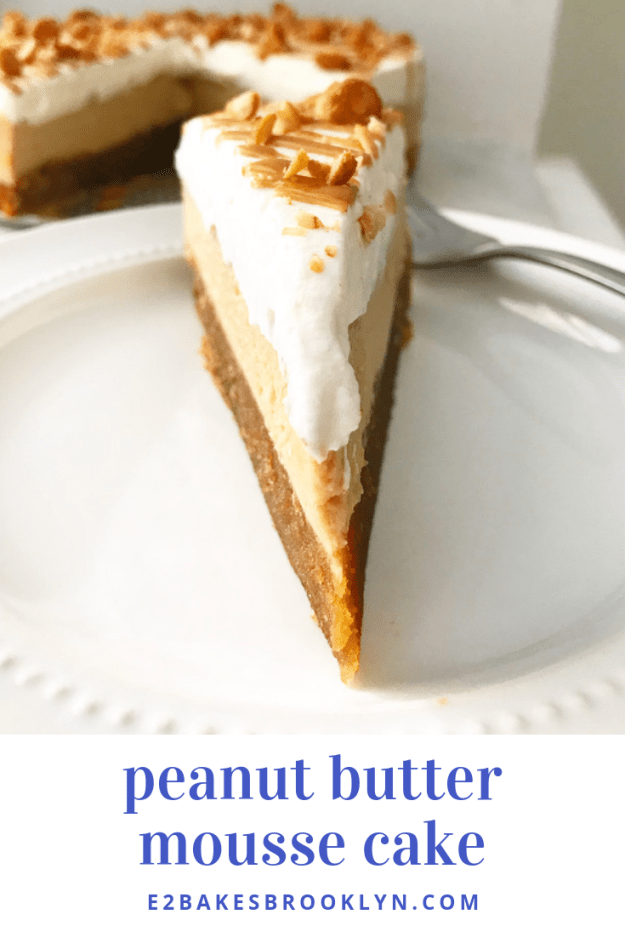
  For now though, let’s talk about Peanut Butter Mousse Cake. It’s the peanut butteriest peanut butter cake I’ve ever had. So. freaking. good!
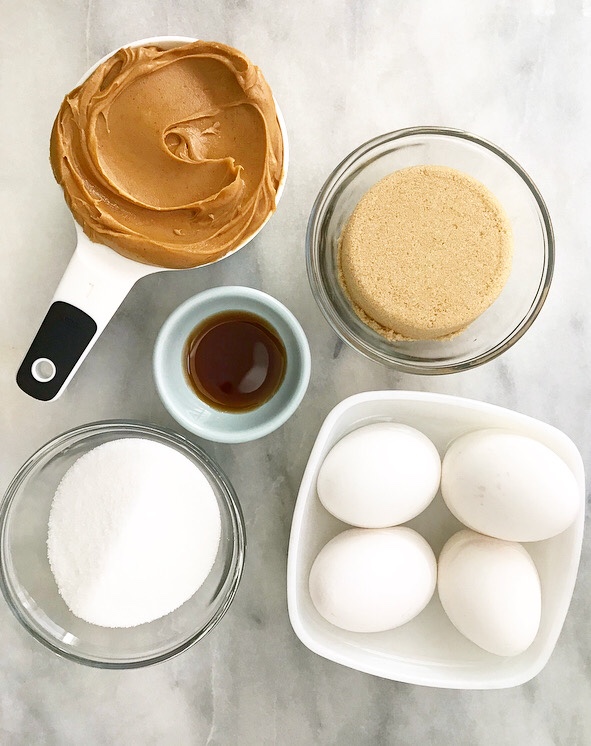
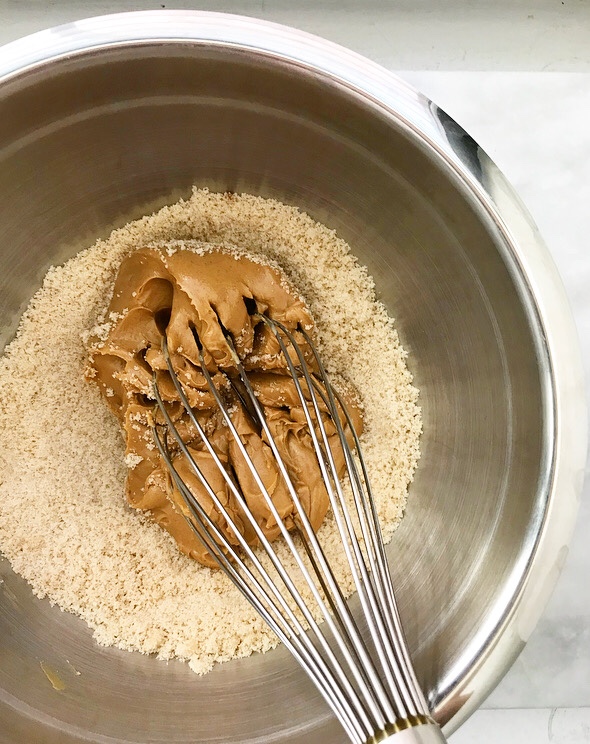
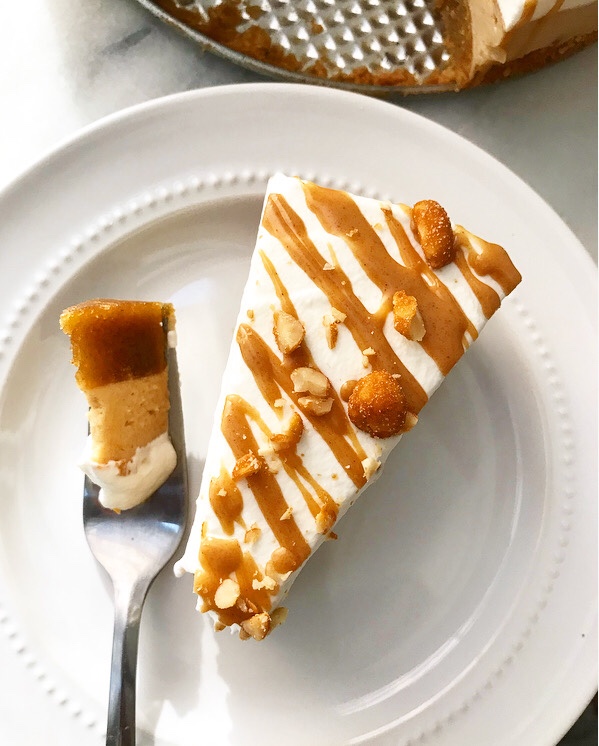
 It starts with a flourless peanut butter cake. This super-easy cake comes together with just five ingredients, one bowl, and a whisk. It’s rich and dense—since it relies on peanut butter and eggs for texture and structure, it’s like a cross between a cake, cookie, and a blondie. YUM.
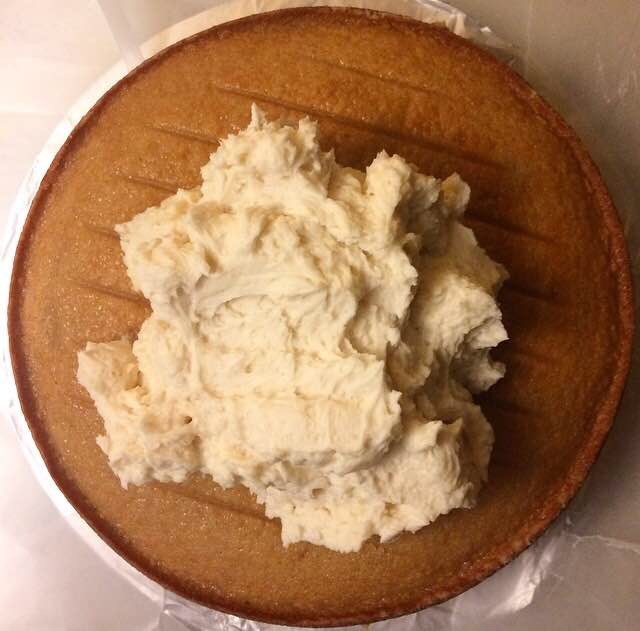
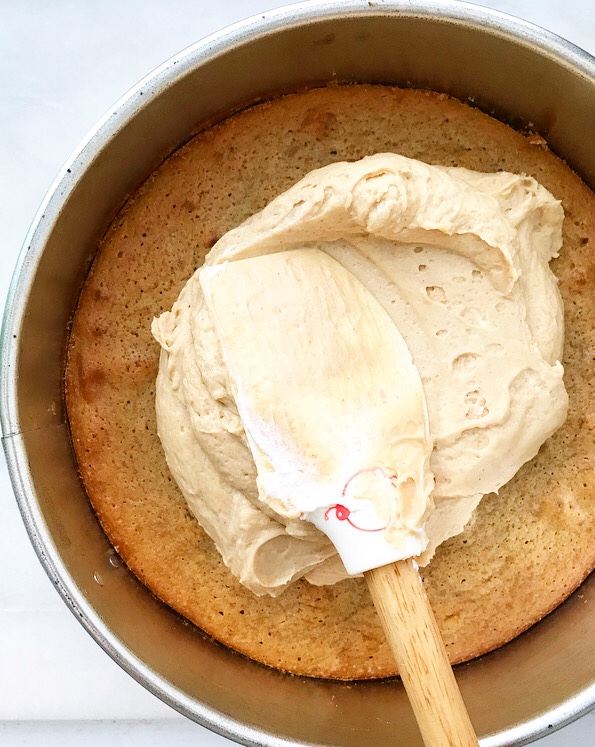 After the cake is baked and cooled, it’s topped with a thick layer of creamy peanut butter mousse. If this recipe looks familiar, that’s because it is—it’s the filling from my
 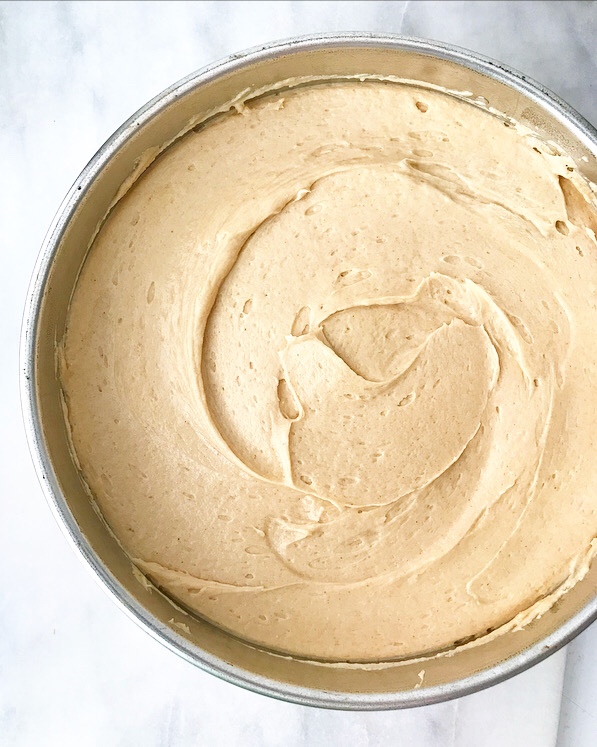 Spread the mousse layer on and chill the cake until everything is firm.
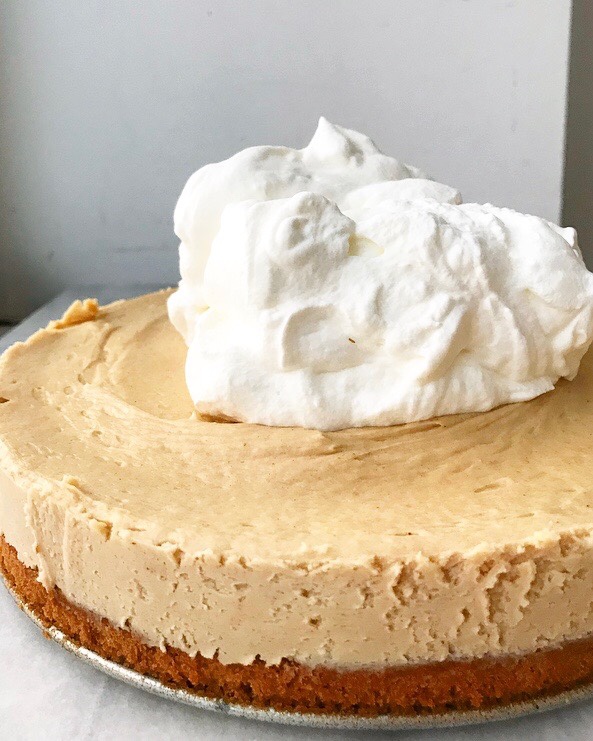
 Top it with a thick layer of whipped cream. Yaaaaaaas.
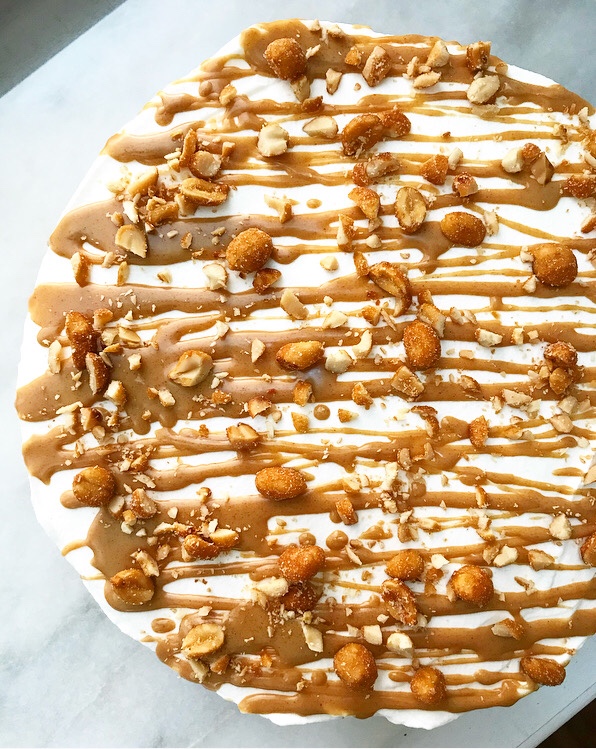 Don’t forget the peanut butter magic shell and honey roasted peanuts.
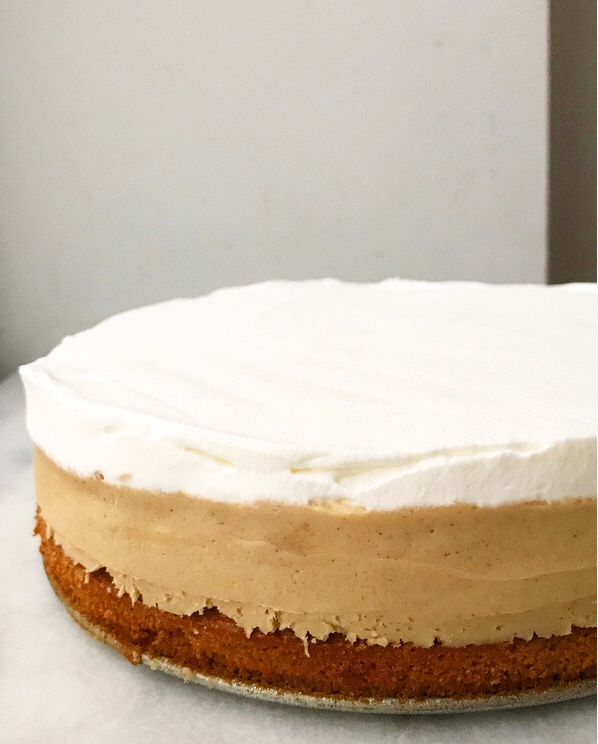
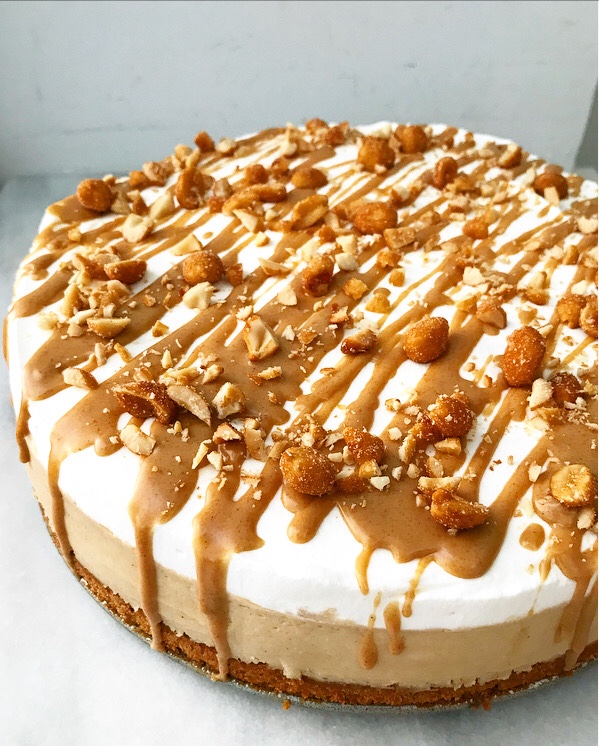 How gorgeous is that?! I love the triple-layered look.
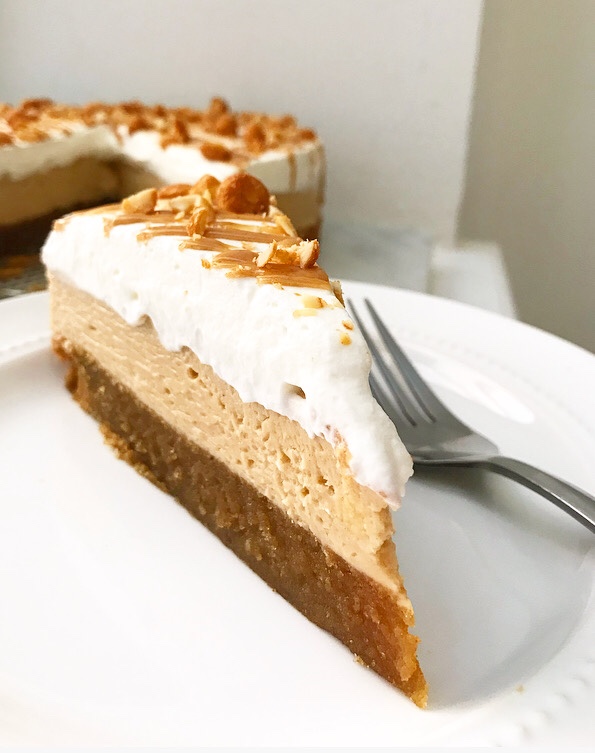 And the creamy, dreamy peanut butter flavor.
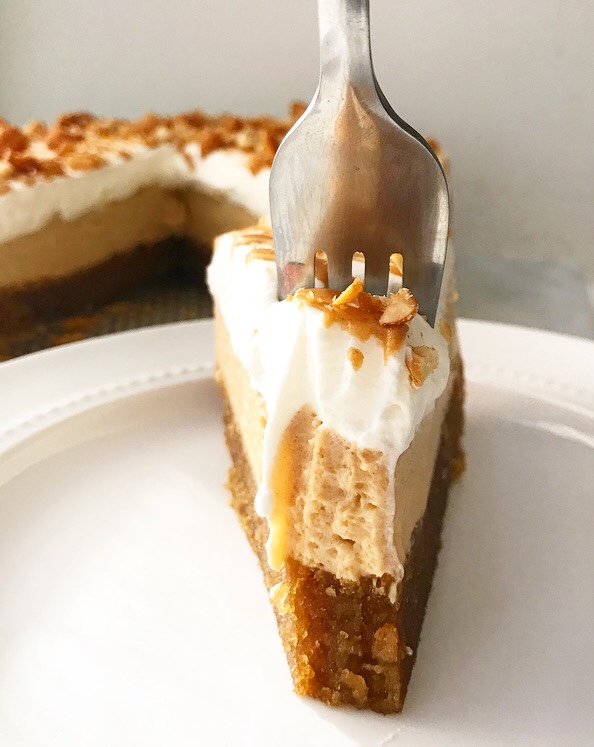 This cake is shockingly simple to make (don’t let the length of the recipe scare you away!) and perfect for nearly any occasion…
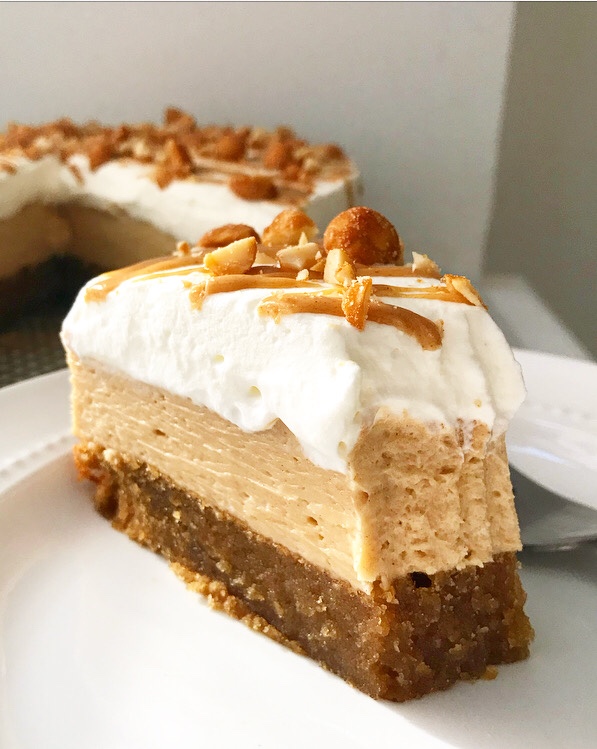
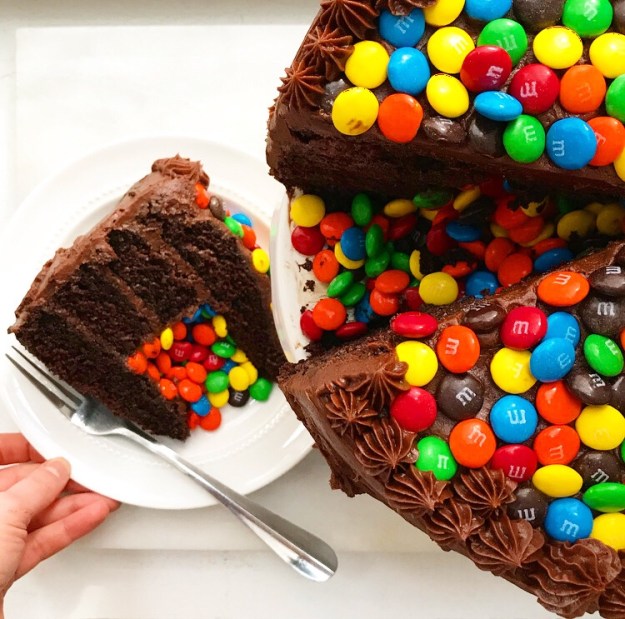
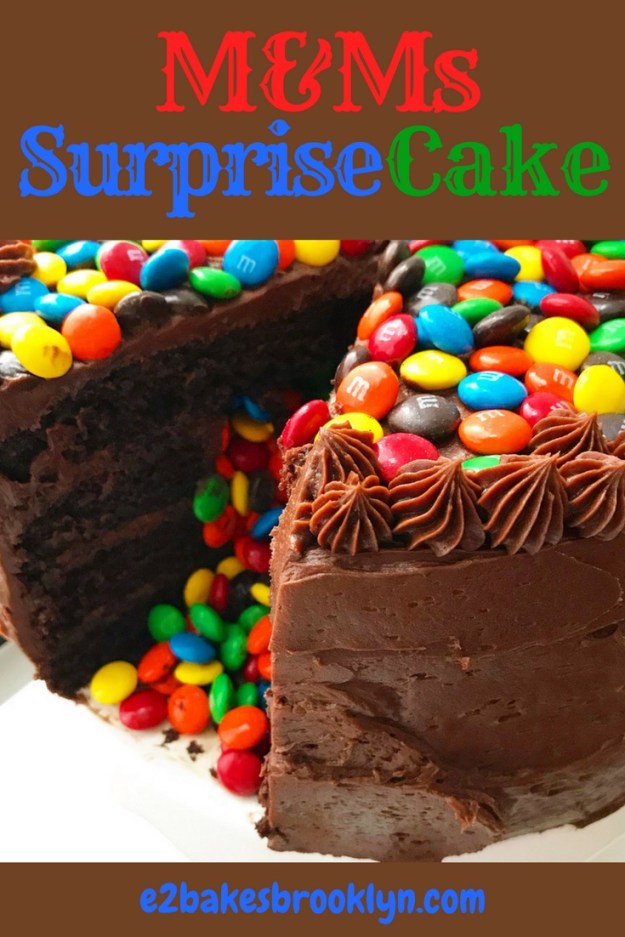
 I posted pictures of a big M&Ms-stuffed chocolate cake on my
 I get it—chocolate cake + buttercream + M&Ms inside + more M&Ms on top = MAGIC.
 That original cake was for a friend and not intended for the blog, but given the response, I thought you might like to know how to make your own!
 First things first. You’re going to need four 9-inch round layers of chocolate cake. This one is a super easy no-mixer recipe that makes four soft, moist, perfect layers. You may recognize this recipe from my my
  Place one of the layers on a serving plate or your favorite of all your cakestands. Spread a little frosting on top.
 Take two of the layers and punch out holes in the centers. I use a 6-inch ring for this, but you can use a wide-mouthed glass or even just a paring knife and a circle of parchment. Layer those on top of that bottom round, frosting between and on top.
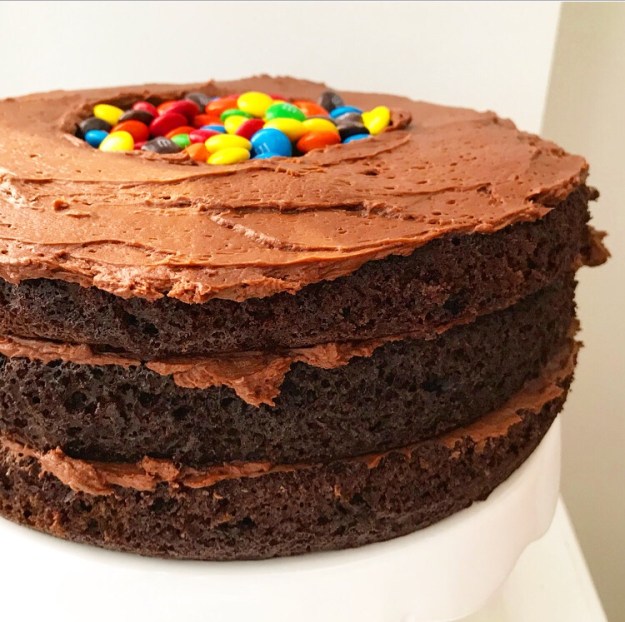
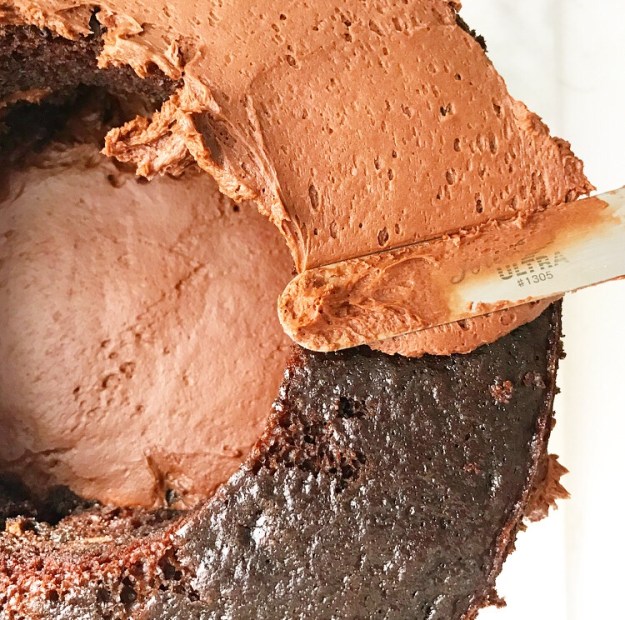 At this point, you’ll have a three layer cake with a hole in it. That’s where the surprise M&Ms are going to go ❤
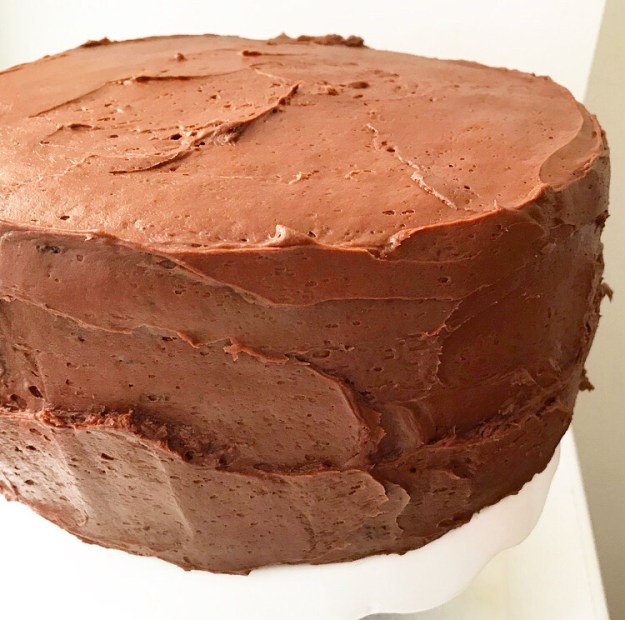
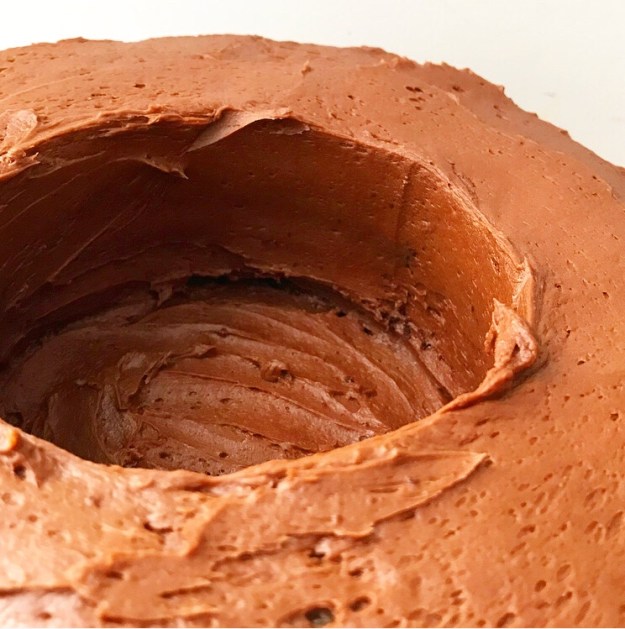 Spread a thin layer of buttercream on the “walls.” This will help keep the moist cake from melting the color off the M&Ms too quickly. And speaking of M&Ms…
 …pour in almost 2 cups of them ❤ ❤ ❤
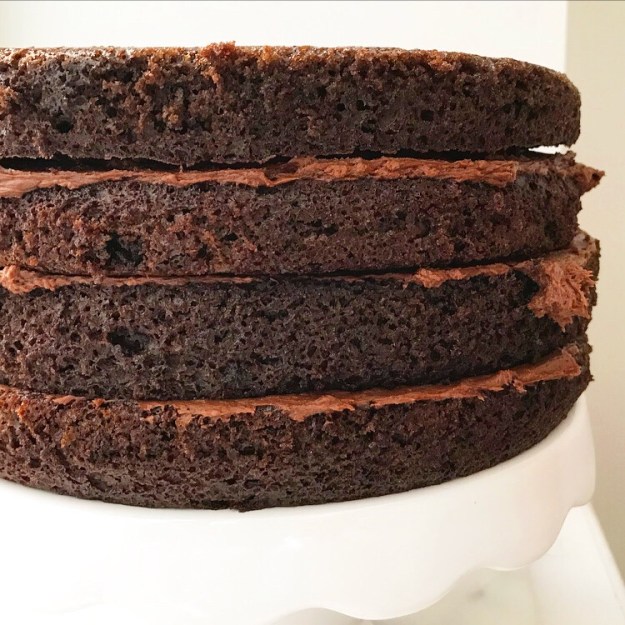
 Place your last intact layer of cake on top, effectively hiding all that surprise candy. Frost the cake. For a sort-of photo tutorial on that, see last week’s
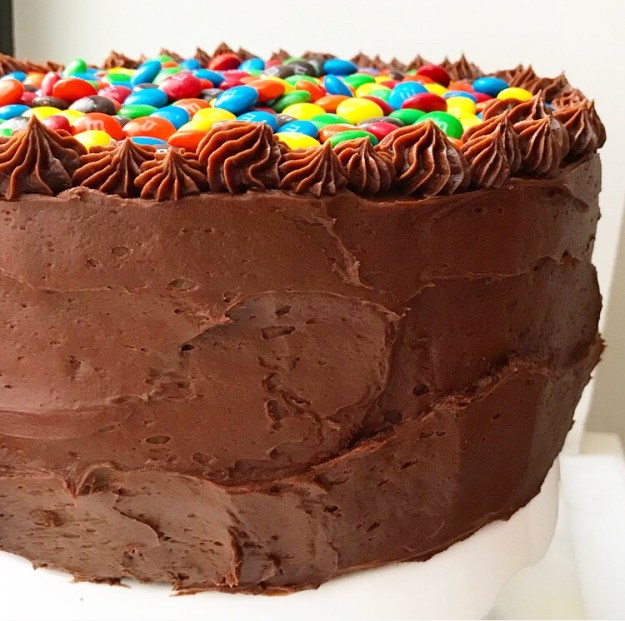
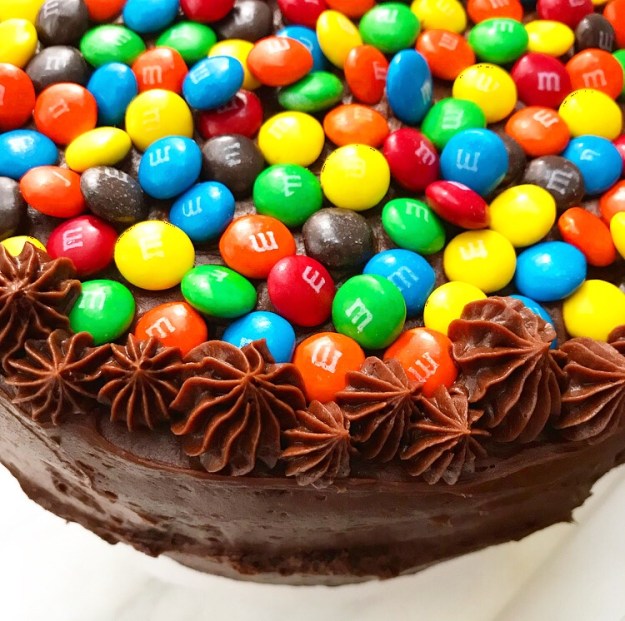 I decorated the top with even more M&Ms and used the last of the frosting to pipe a border. The dollops are all different sizes and I love it!
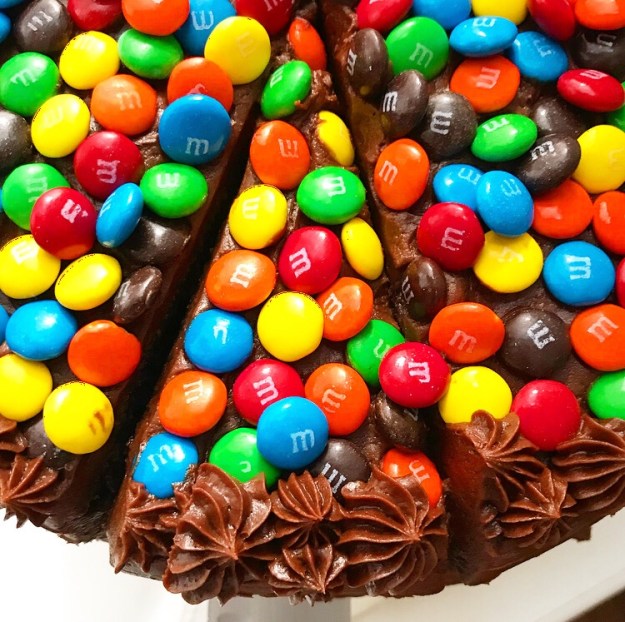


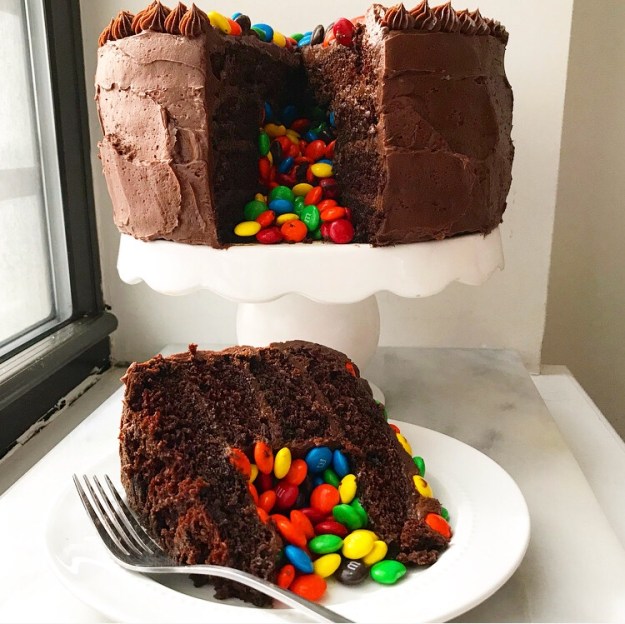
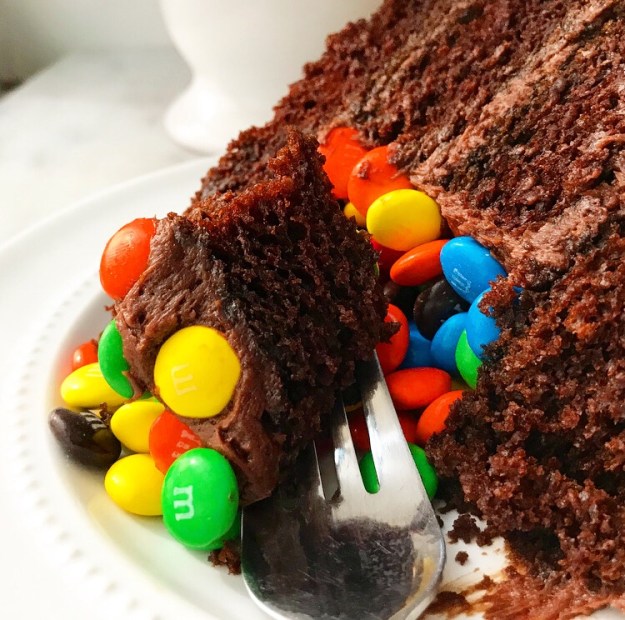 Then again, I was alone when I sliced this sucker open and it was still pretty damn magical. But I also took 200+ photos of it for you, so I suppose you were practically there.