 I’ve made petit fours for a couple of Easters over the last few years, and I think I might finally be getting the hang of them. These tiny, poured fondant-glazed cakes are a childhood favorite of mine, but past attempts to make them have driven me to dark places. When I tested the carrot cake version I had to take a day off of work to recover! It’s taken me two years to give petit fours another go, and while I expected some agony, these White Almond beauties were surprisingly fun and simple to make.
Don’t get me wrong—these are still a labor of love, but they weren’t backbreaking, day-ruining work this time, and I think I know why. I took my time, y’all. I didn’t rush a thing. Every step in this process was done when I had the time and energy. While you can certainly make these over the course of a single day, the batch pictured was assembled over four days with lots of down time. It was leisurely and practically luxurious as far as petit fours go.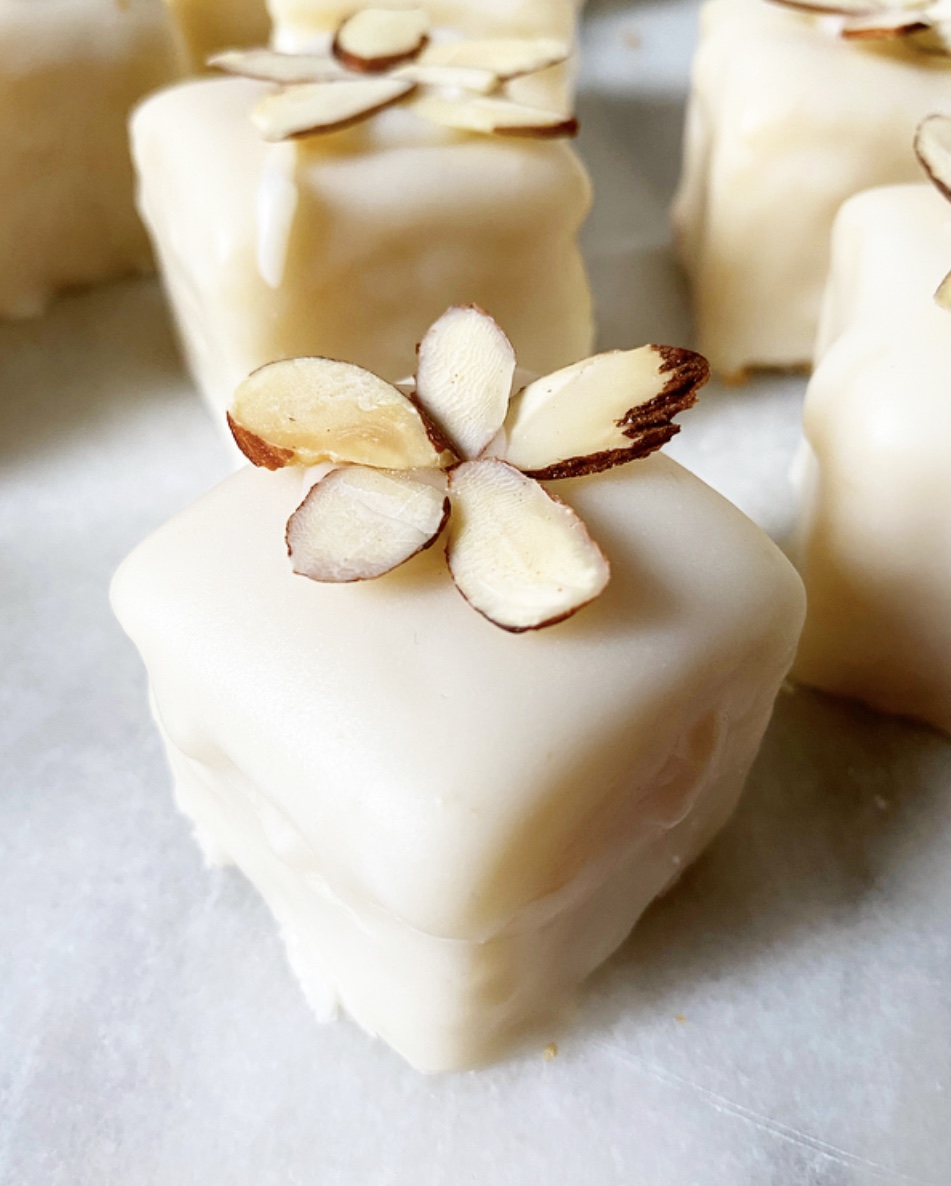 Let me lay it out for you. On Monday, I made the cake—a sprinkle-free, rectangular version of this white bundt recipe—and then refrigerated it. Tuesday is my long day every week, so nothing happened petit four-wise.
On Wednesday, I trimmed the cake, painted on an almond simple syrup, and adhered a thin sheet of marzipan to the top. Then I popped the whole thing back into the fridge.
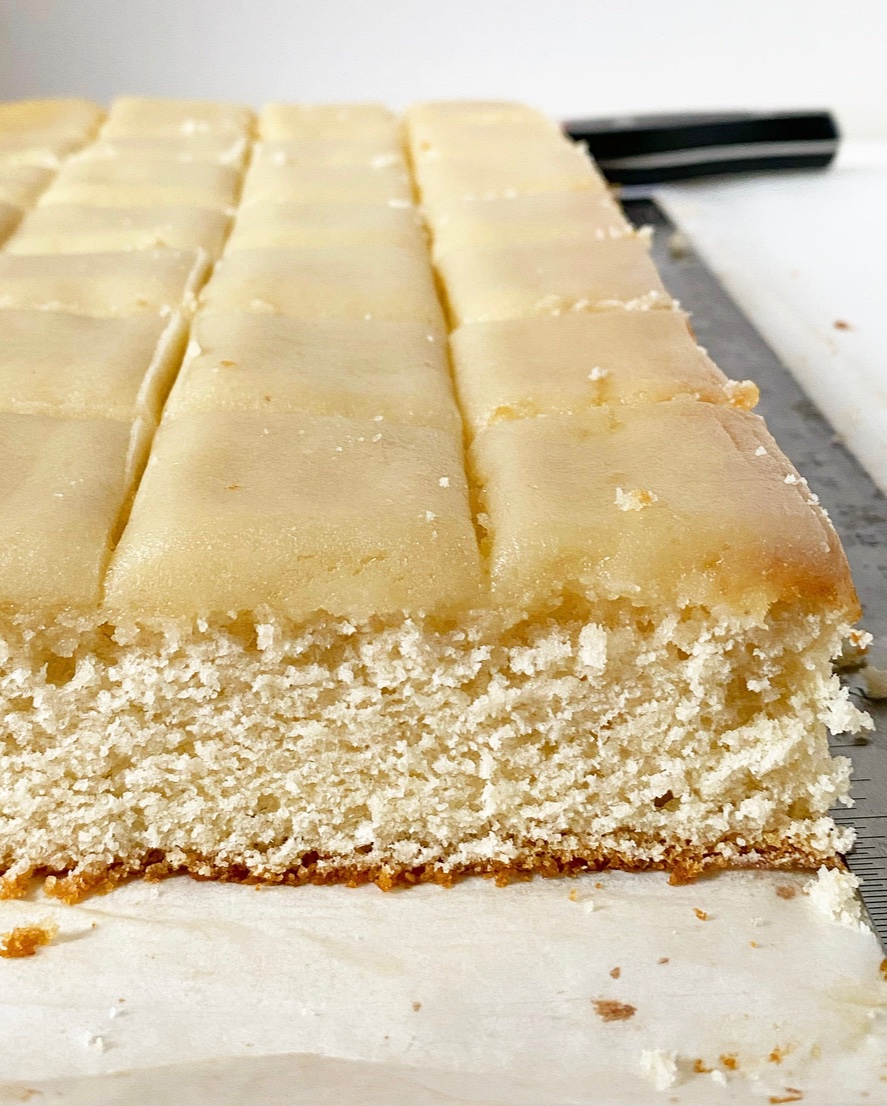 The next day (Thursday), I trimmed the edges and cut the cake into 1 1/2-inch squares. Since marzipan is moldable, I scored my squares before slicing—it made the whole process super simple.
Next up, I made the poured fondant coating, which is really just melting a whole bunch of things together. Usually coating is my least favorite part of this process, but these weren’t much trouble. I think using cold, dense-crumbed bundt cake was the secret to my success here—it held together so well that I was able to coat these squares by dipping instead of fiddling with squeeze bottles.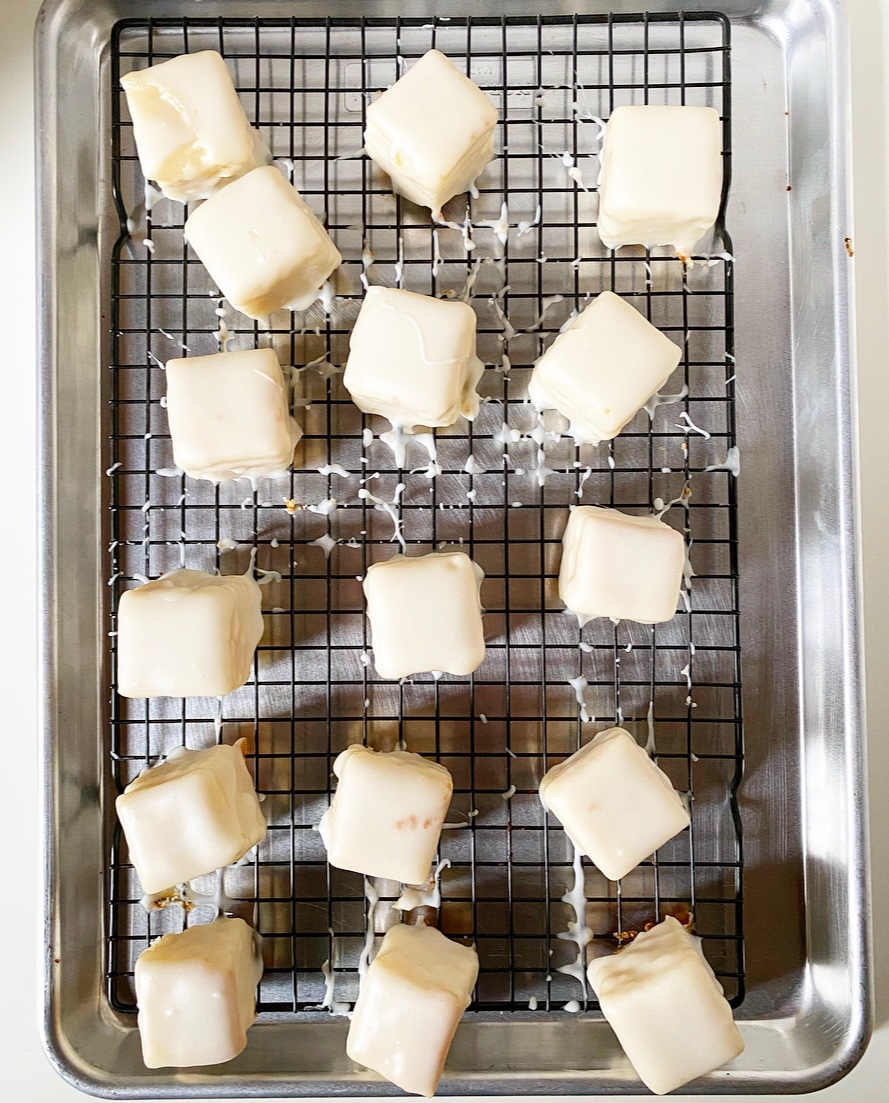
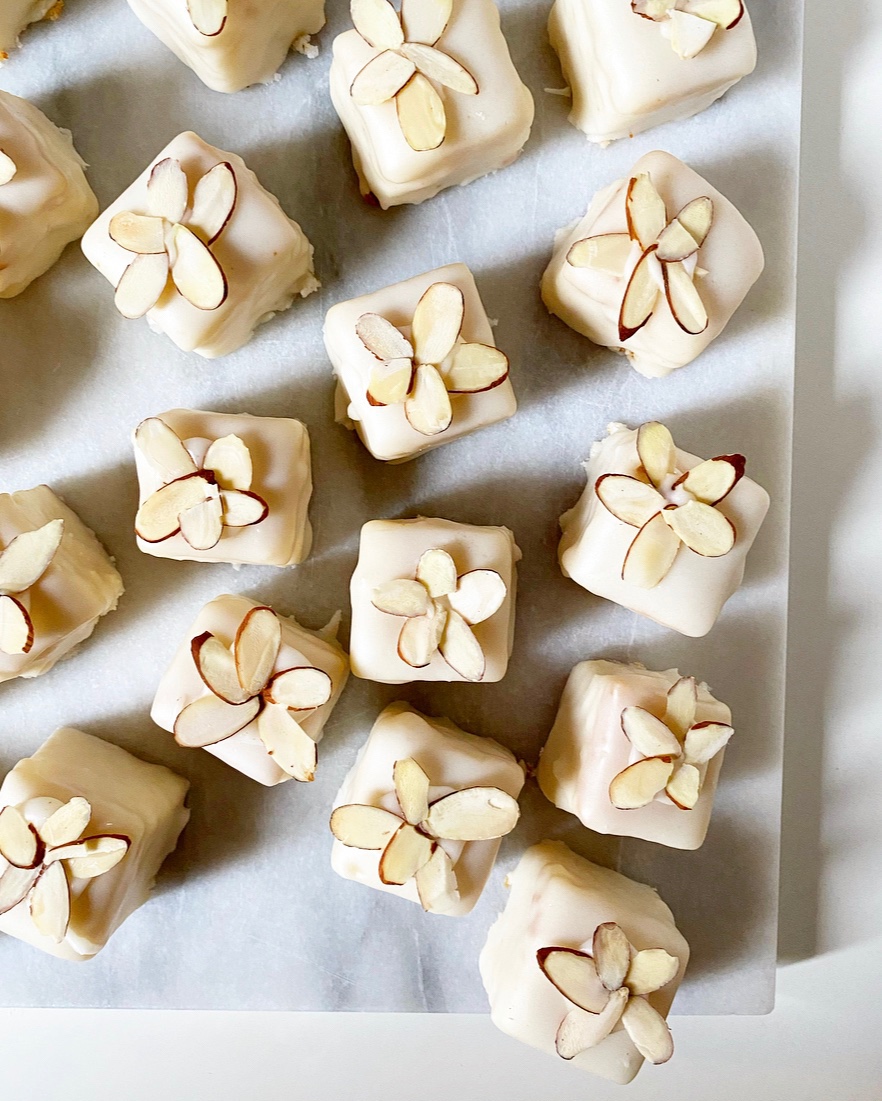
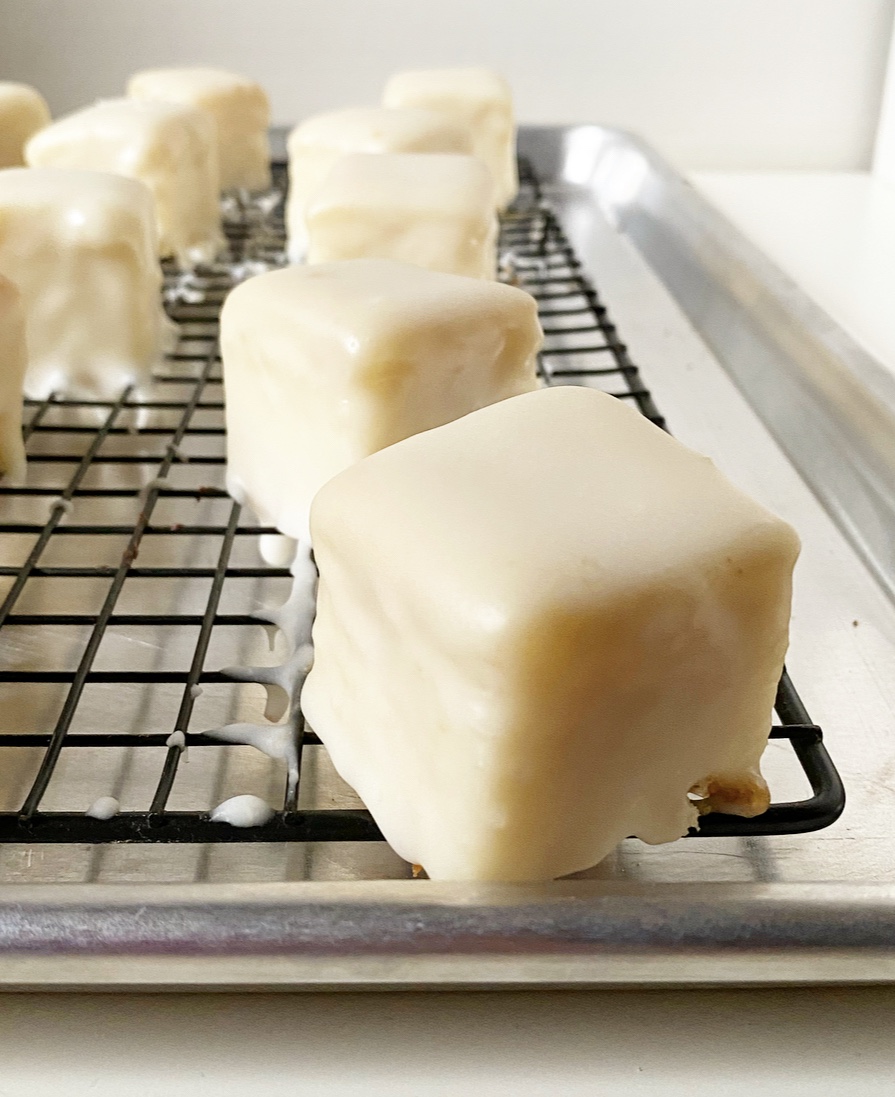 My process went something like this. I stuck a fork in the bottom of a petit four and dipped it in the warm fondant, quickly moving the bowl around to cover the sides. Then I used another fork to help ease the petit four onto a rack to set before moving onto the next.* I had a few casualties, but the solution was to slightly reheat the fondant and keep going. Make no mistake, this was still a tedious process, but it’s nothing compared to the squeeze bottle nightmares of petit fours past! Are there a few crumbs on these little cakes? Sure! But perfection is the enemy of joy here. Also, toasted almond flowers are quite handy for hiding flaws. Aren’t they pretty? I’m obsessed.
*Here’s a video from another baker whose process is similar to my own.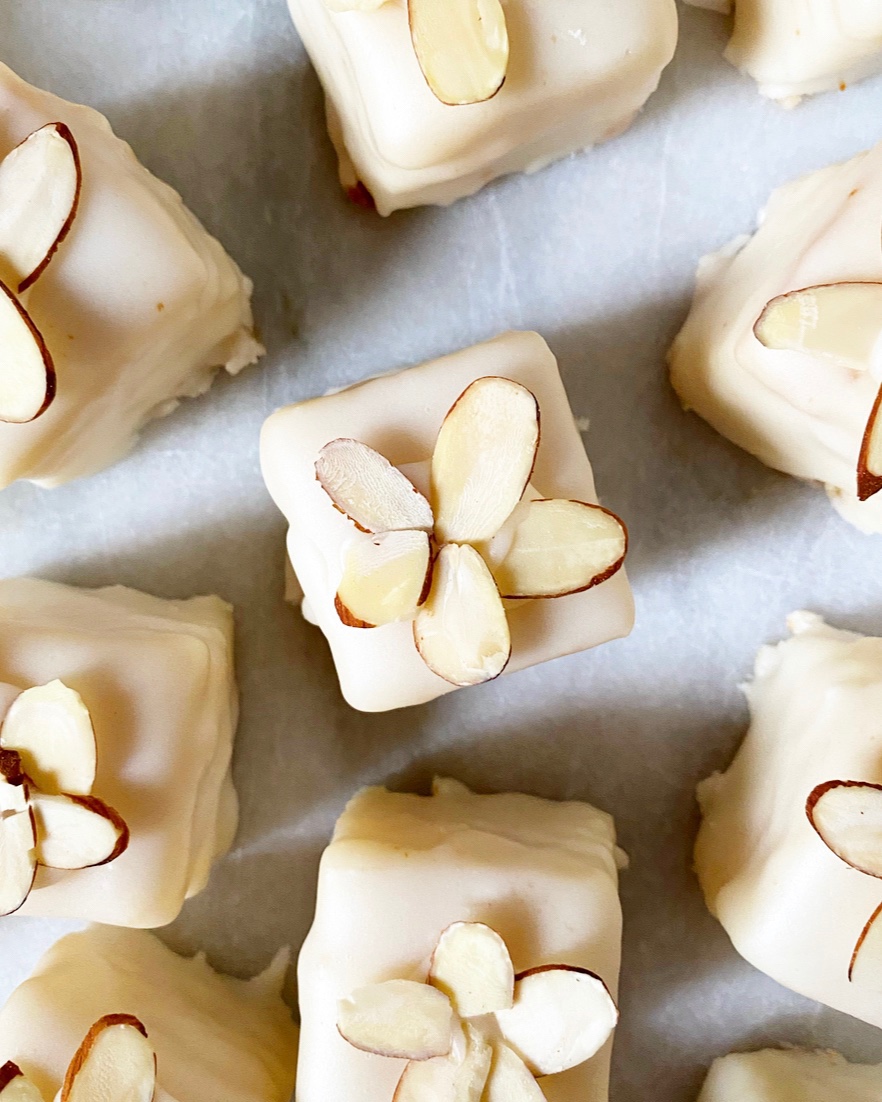 As far as flavor goes, White Almond Petit Fours are sweet almond through and through! If you love marzipan, these are for you. The cake is dense and moist, the marzipan somehow both melts and remains distinct, and the fondant is almost too much…but it’s also not enough. I always need a second petit four.
 The petit fours of my childhood were super-sweet so I love the intensity here, but if you need some sharpness to cut through all the almond, you could soak the cake in a lemon syrup, or torte and fill it with a layer of raspberry jam or lemon curd. For me though, it’s all about that moist sweet almond cake, especially when enjoyed cold from the fridge at midnight on Easter Day. Or any day, really. I’m not picky.
White Almond Petit Fours
makes about 35 1 1/2-inch petit fours
Cake:
2 3/4 cups all-purpose flour
2 cups granulated sugar
2 1/2 teaspoons baking powder
1/2 teaspoon Kosher or sea salt
1 cup (2 sticks) unsalted butter, room temperature, cut into 16 pieces
4 large egg whites, room temperature
1 tablespoon pure vanilla extract
1/2 teaspoon pure almond extract
3/4 cup full-fat sour cream, room temperature
1/4 cup whole milk, room temperature
Syrup:
1/4 cup granulated sugar
1/2 cup water
1 teaspoon pure vanilla extract
1/4 teaspoon pure almond extract
Marzipan:
12 ounces prepared marzipan (not almond paste)
Poured Fondant:
2/3 cup hot tap water
1/2 cup light corn syrup
2 teaspoons pure vanilla extract
12 ounces white chocolate chips
2 pounds (7 1/2 cups) confectioners sugar
Garnish:
sliced almonds
~3 tablespoons poured fondant
This recipe is long and requires many steps and chills. Please read through carefully before beginning.
Place an oven rack in the center position. Preheat oven to 350F. Grease a 9×13-inch pan and line with parchment. Grease again. Set aside.
Make the cake. Combine flour, sugar, baking powder, salt, butter, egg whites, vanilla, almond extract, sour cream and milk in a large mixing bowl. Use an electric mixer to mix on low for 30 seconds. Increase speed to medium and mix for 3 minutes. Batter will be thick.
Transfer batter to prepared pan and smooth the top with a silicone spatula or wooden spoon. Tap full pan on the counter five times to release any large air bubbles. Bake 45-55 minutes, or until a toothpick inserted in the center comes out clean.
Allow to cool in the pan for 30 minutes. Use a thin, flexible knife to release cake, and then remove to a rack. Allow to cool completely. Wrap tightly in plastic wrap and refrigerate for 2 hours or up to 2 days.
Remove cake from the refrigerator, unwrap and place on a cutting board. Use a serrated knife to trim the top so that it’s even and the crumb is exposed. Discard (eat!) the scraps.
Make the syrup. Combine sugar and water in a small saucepan over low heat. Stir constantly until sugar dissolves, about 3-5 minutes. Remove from heat. Stir in vanilla and almond extracts. Paint syrup all over the top of the cake. It will seem like too much, but it’s not.
Roll out the marzipan. Dust a surface and rolling pin with flour or confectioner’s sugar. Use your hands to form marzipan into a rectangle shape and place it on the surface. Use the rolling pin to roll marzipan into an 8×12-inch rectangle, lifting and turning it occasionally so it doesn’t stick to your surface.
Lay marzipan over the top of the cake so that the crumb is no longer exposed. Use rolling pin to roll over it lightly a few times to adhere. Wrap assembled cake tightly in plastic wrap and refrigerate for another 2 hours or up to a day.
Remove cake from the refrigerator to a large cutting board. Use a serrated knife to trim off crispy cake edges (about 1/4-inch on all sides). Slice cake into 1 1/2-inch squares. Freeze for 30 minutes while you prepare the poured fondant.
On a surface, place a cooling rack over a sheet of parchment.
Make poured fondant. In a liquid measuring cup, stir together hot water, light corn syrup, and vanilla.
Fill a small pot with 1-2 inches of water. Set a heatproof bowl over the top, ensuring that the water does not touch the bottom of the bowl. Remove bowl and bring water to a simmer.
Place white chocolate chips in the heatproof bowl. When water simmers, place bowl back over the water. Whisk until melted. Alternate adding confectioners sugar and liquid ingredients, whisking constantly until smooth. Remove from heat and let cool a few minutes (it works best around 100F).
Working quickly, stab a fork into the bottom of on petit four. Gently lower it into the fondant and manipulate the bowl so that the sides get some coverage. Use another fork or an offset icing spatula to remove the petit four off the fork and onto the prepared cooling rack. Re-warm fondant as needed by placing it back over the double boiler for a few minutes. Here is a video for clarity.
This process may also be done by filling a squeeze bottle with fondant and using it to cover the the top and sides of each square. Use an offset icing knife to adjust sides as necessary. This may be done with a spoon as well, although a squeeze bottle is simpler.
Let poured fondant set for about an hour. Reserve any excess fondant for decorating.
To decorate, toast almonds in a 350F oven for 5-7 minutes, until fragrant. Let cool completely. When petit fours have set, warm excess fondant slightly and load into a piping bag. Snip off a small corner and dot about a dime-size blob on top off one petit four, then immediately arrange five almond slices as a flower. Continue with remaining petit fours. Let set for another 20 minutes before serving.
Petit course may be served at room temperature or cold. Leftovers will keep in an airtight container in the refrigerator for 7-10 days.


 How cute are these Easter Egg Hunt Cupcakes?! They’re a miniature version of the towering surprise-inside
 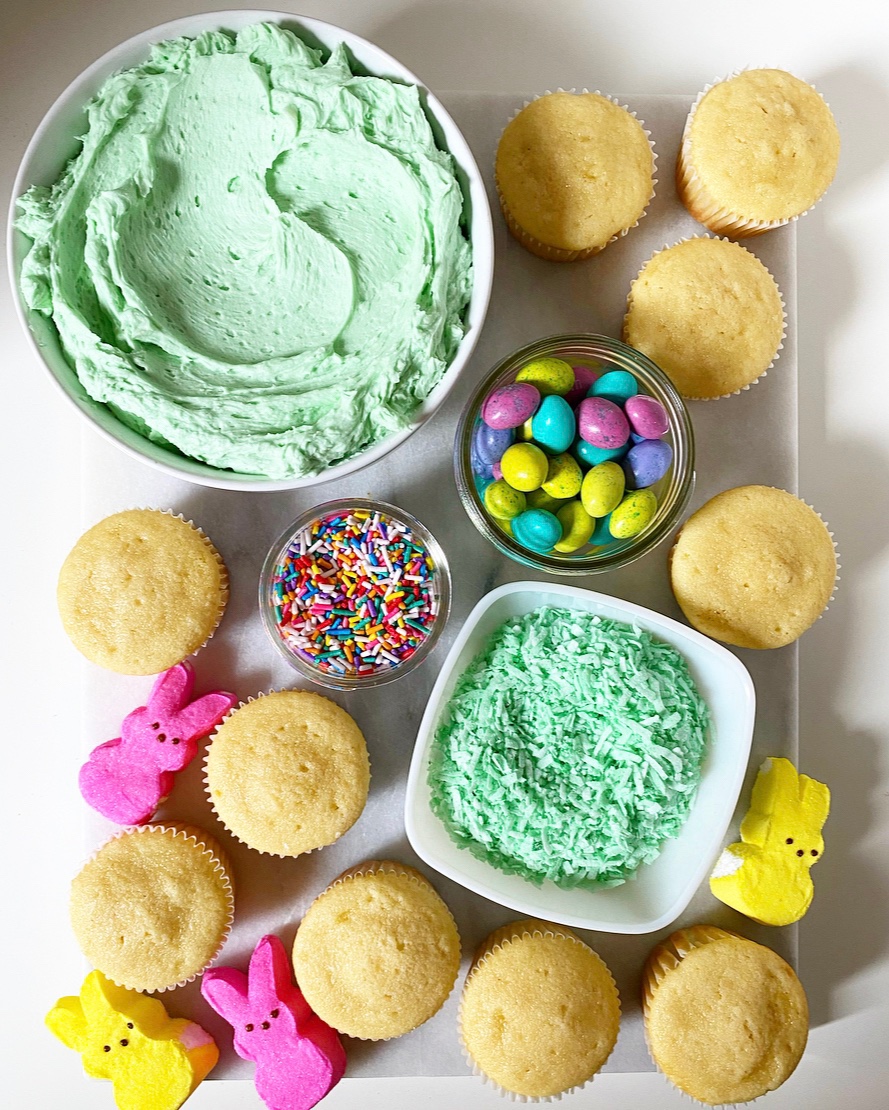 Easter Egg Hunt Cupcakes start with the same vanilla sour cream cupcake base I used for my
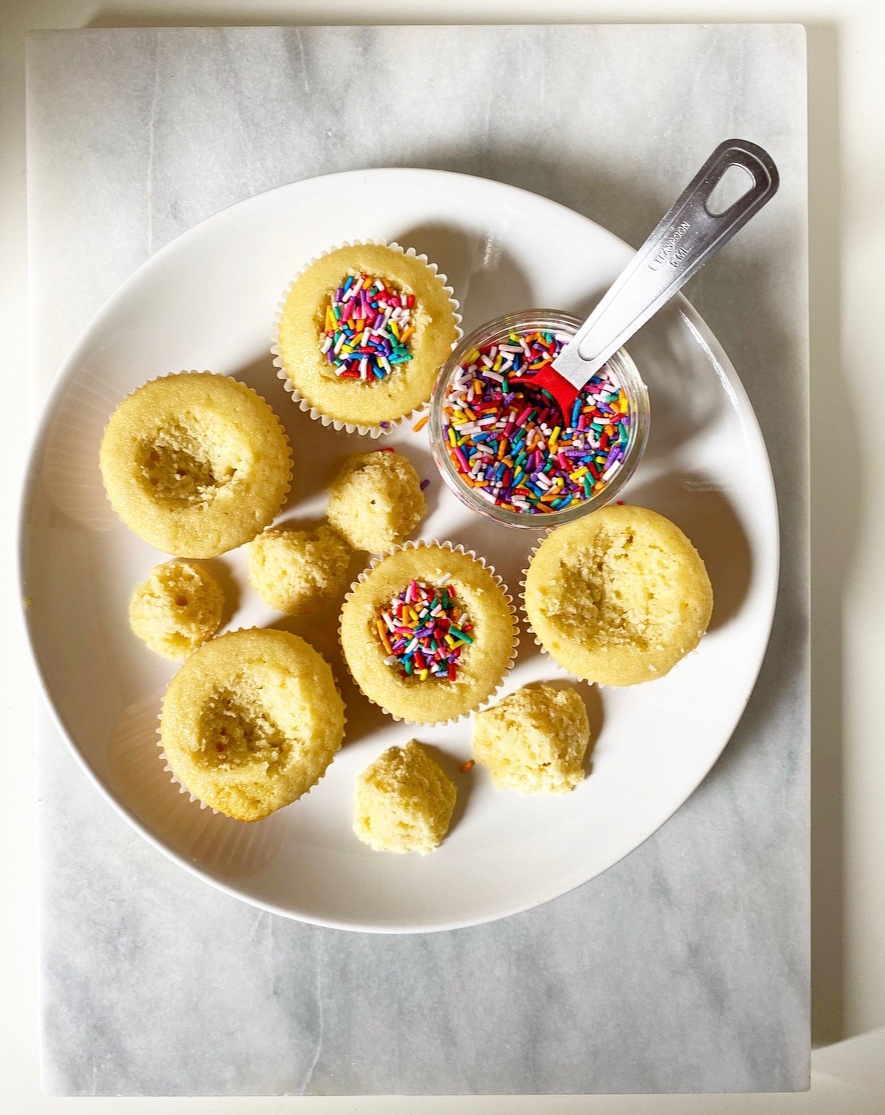
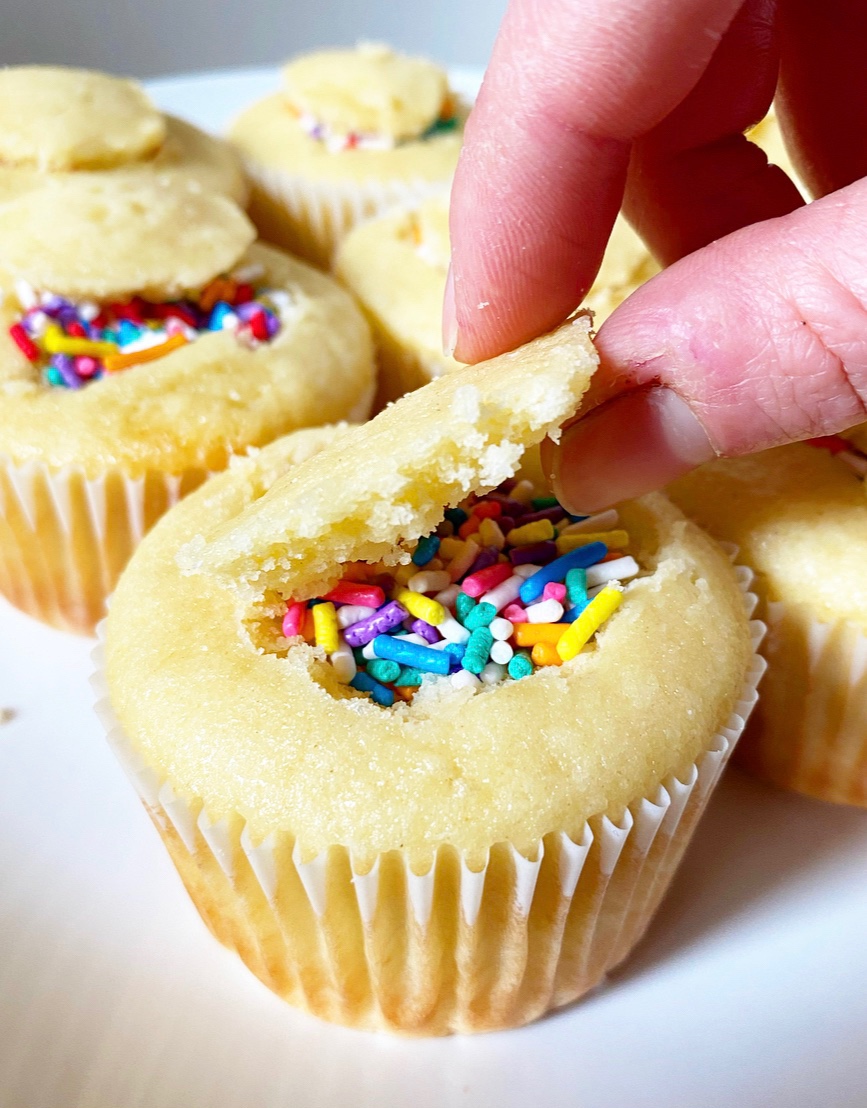 Before frosting, each cupcake is filled with sprinkles for a surprise effect. To achieve this, a cone-shaped piece of cake is cut out of the top of each cupcake, leaving behind just enough room for a teaspoon of sprinkles. Then the little conical toppers are trimmed into disks so that they fit right back on top of the cupcakes, concealing the surprise inside. Once the cupcakes are frosted, the cut-outs won’t be visible, making it all the more fun when your family and friends bite in and sprinkles come running out!
 Like the layer cake that inspired them, these cupcakes are frosted with green-tinted vanilla buttercream and decorated with little Easter scenes made of green coconut “grass,” egg-shaped candies and Peeps bunnies.
 I can’t get over how festive these are! I say this about at least one recipe a year, but these might be the cutest things I’ve ever made. And maybe soon they’ll be the cutest things you’ve ever made.