It may be December 23rd, and I may be writing this post at the airport, but can we take a moment to acknowledge that this is my third blog post in the last five days?
Three blog posts in a week? Who am I?!
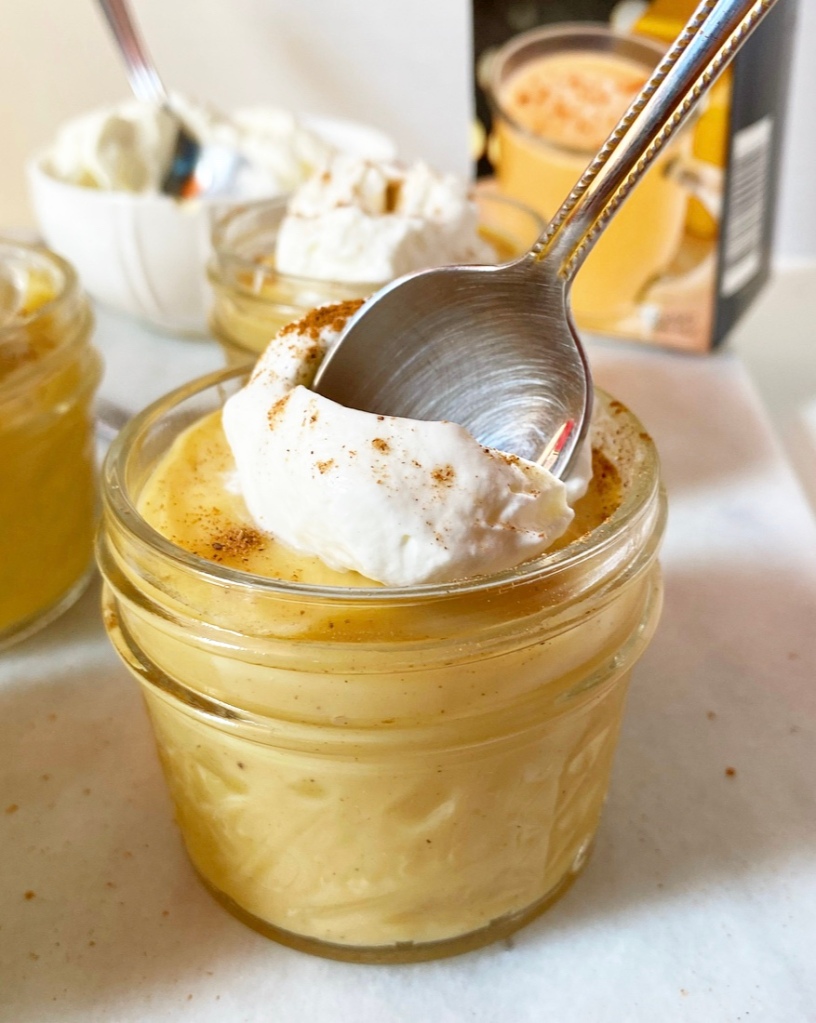
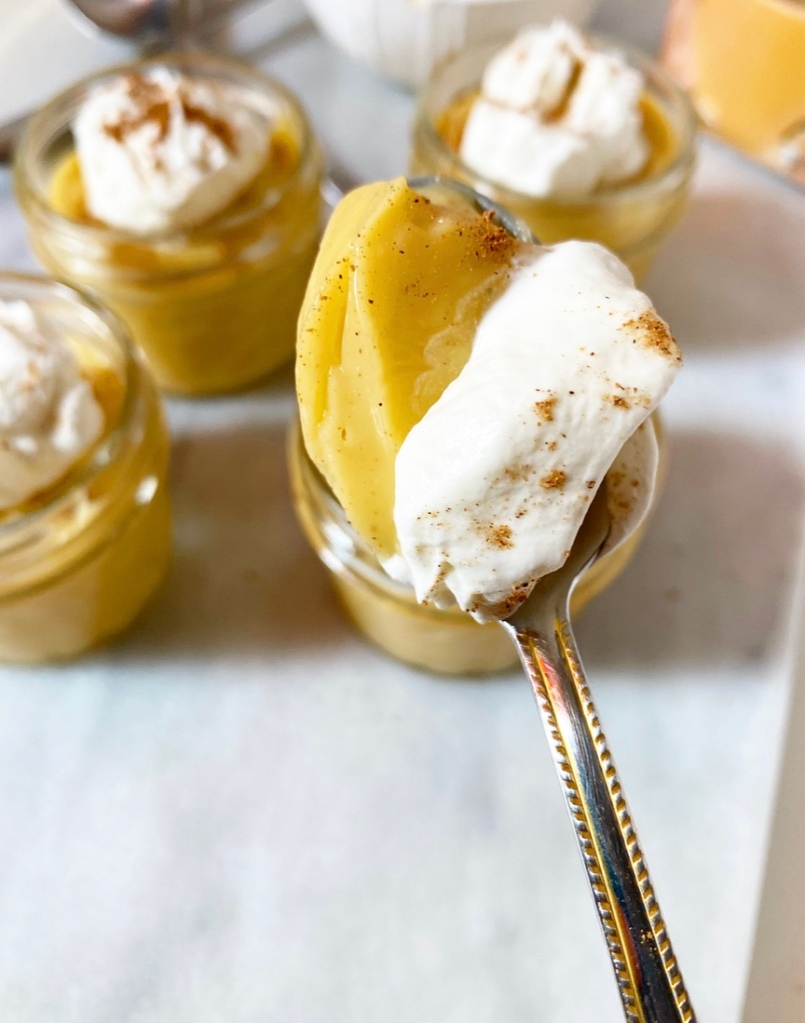
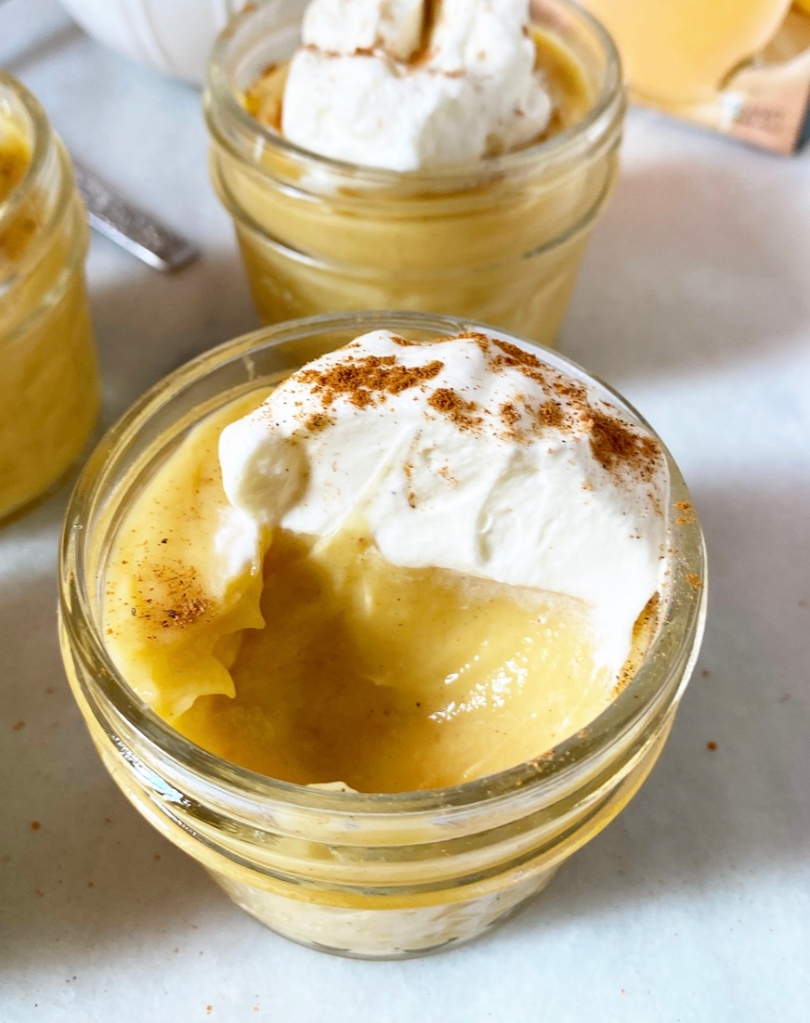
Someone who loves Eggnog Pudding, that’s who. You could not pay me to drink a glass of eggnog (liquid dairy skeeves me out), but thicken it to a spoonable consistency and add a little spice and I’m in.
So in, in fact, that I made two batches of this Eggnog Pudding back to back. With only about 15 minutes of actual work, this holiday recipe is an absolute breeze.
Once cool, Eggnog Pudding is pretty irresistible. Cold, creamy and just set—it has all the best parts of eggnog, but with a spoonable texture.
Oh yeah, and whipped cream. Always whipped cream.
Happy holidays! Wishing you and yours a safe and happy end to 2023 and every good thing in 2024.
Eggnog Pudding
makes 4 servings

2 large egg yolks
1/3 cup granulated sugar
2 tablespoons cornstarch
1/8 teaspoon ground cinnamon
1/8 teaspoon ground nutmeg
1/4 teaspoon Kosher or sea salt
1 1/2 cups eggnog
1/4 cup milk of choice (I used whole)
1 1/2 teaspoons vanilla extract
1 tablespoon unsalted butter

For serving (optional):
whipped cream
sprinkle of cinnamon and/or nutmeg

Place a wire mesh sieve over a medium heatproof bowl. Set aside.

Whisk egg yolks together in a small heatproof bowl. Set near the stove.

In a medium heavy-bottomed pot, whisk together sugar, cinnamon, nutmeg, cornstarch, and salt. Whisking constantly, slowly whisk the eggnog into the dry ingredients. Whisk in milk. Place pot over medium heat. Continue to whisk until the mixture boils for 1 minute. Reduce the heat to low.

Remove 1/3 of the warm mixture from the pot. Whisking constantly, slowly pour mixture into the egg yolks until completely combined. Add egg yolk mixture to the pot and turn heat back up to medium. Continue to whisk until mixture boils for 30 seconds. Remove from heat. Whisk in vanilla and butter.

Pour pudding through the wire mesh sieve, using a silicone spatula or wooden spoon to coax it along. Discard anything caught in the sieve (egg bits).

Divide pudding into four small heatproof serving dishes (I used 4 ounce mason jars). Press plastic wrap to the surfaces. Refrigerate for a few hours, until cold.

When ready to serve pudding, peel off and discard plastic wrap. Lightly stir pudding, top with whipped cream, cinnamon and/or nutmeg (if desired) and serve.

Leftover pudding will keep covered in the fridge for 3-4 days.
Someday I’ll get recipes up with time to spare (again), but that isn’t going to happen this year. I put these Frosted Maple Spice Cookies on my Instagram stories a few weeks ago, then took them to an event where they got raves. I made a second batch for photos, and then…well, two weeks went by and now Christmas is in four days. Oops.
The good news is that Frosted Maple Spice Cookies will still taste good even if you make them after December 25th. I have it on good authority that you can even make them in February with no adverse effects.
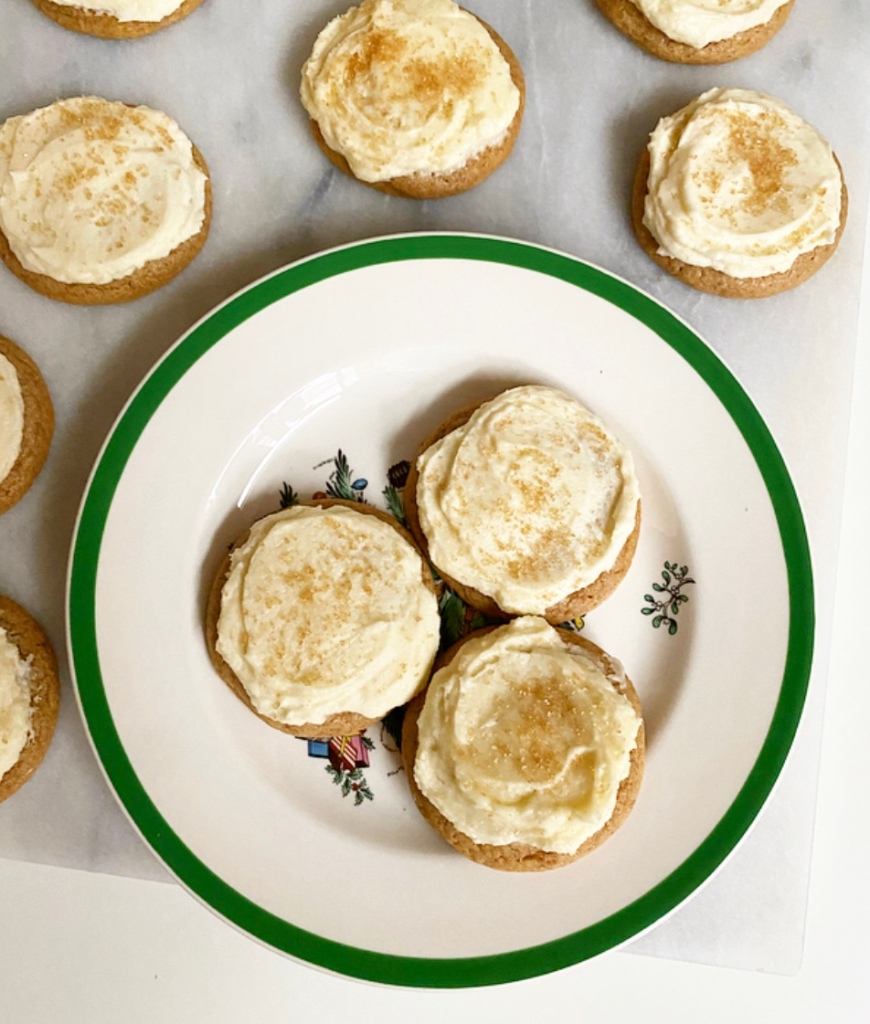
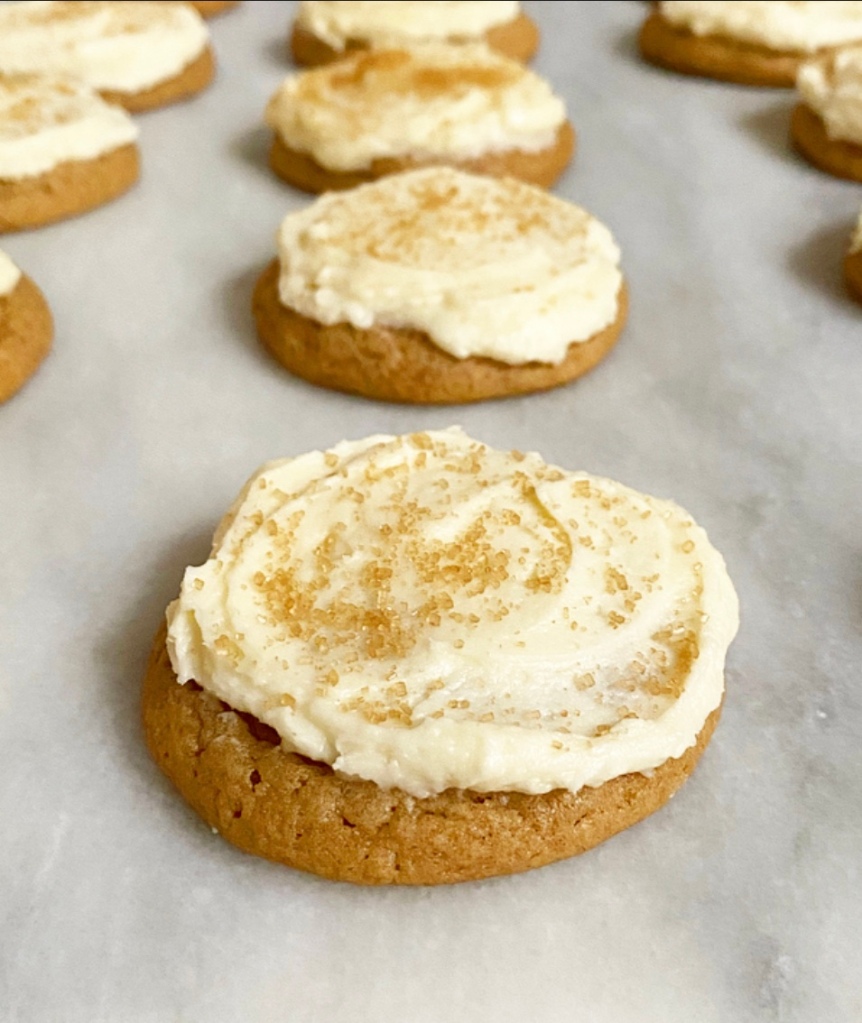
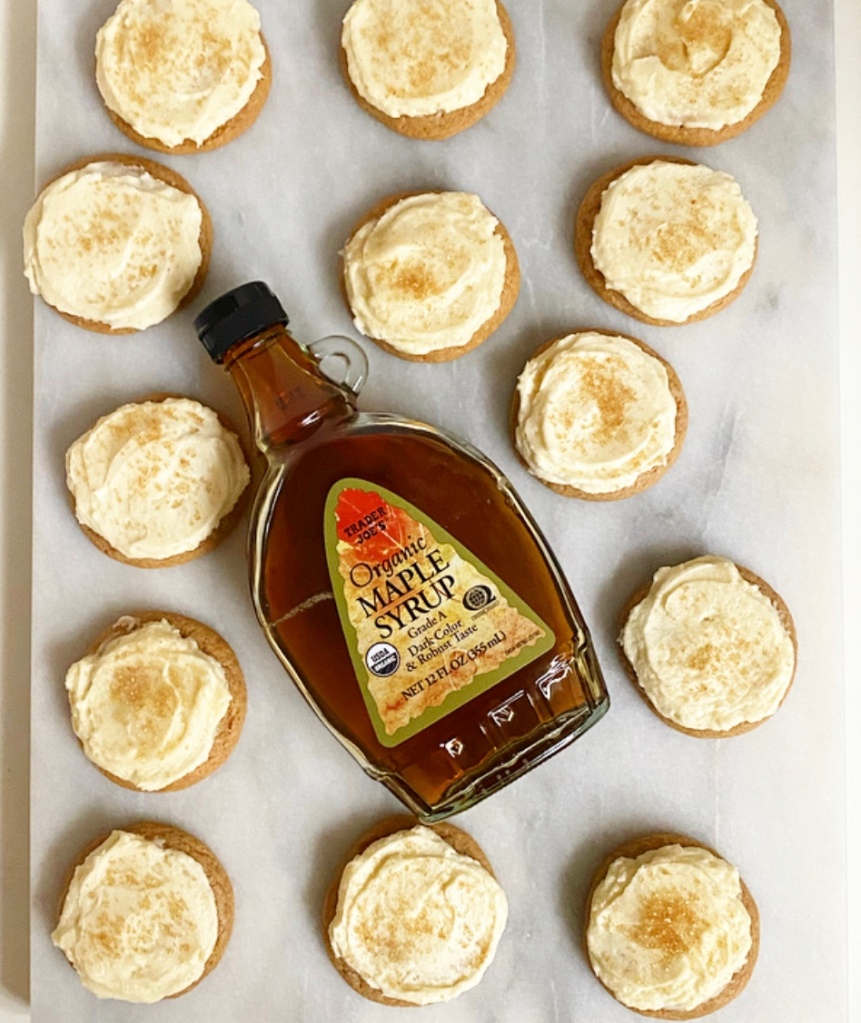
Frosted Maple Spice Cookies are a cross between my Maple Spice Stars and my Soft Sour Cream Sugar Cookies. Imagine the tenderest ginger cookie you can fathom, without the darkness of molasses, but with with the dreamiest buttercream in my repertoire. If you’re imagining one outstanding cookie, you’re correct.
These cookies stay super soft for days, owing to ingredients like brown sugar, a hefty spoonful of sour cream, and the titular maple syrup, of course. Blankets of maple frosting help keep them tender, too, but mostly they’re just there for deliciousness reasons.
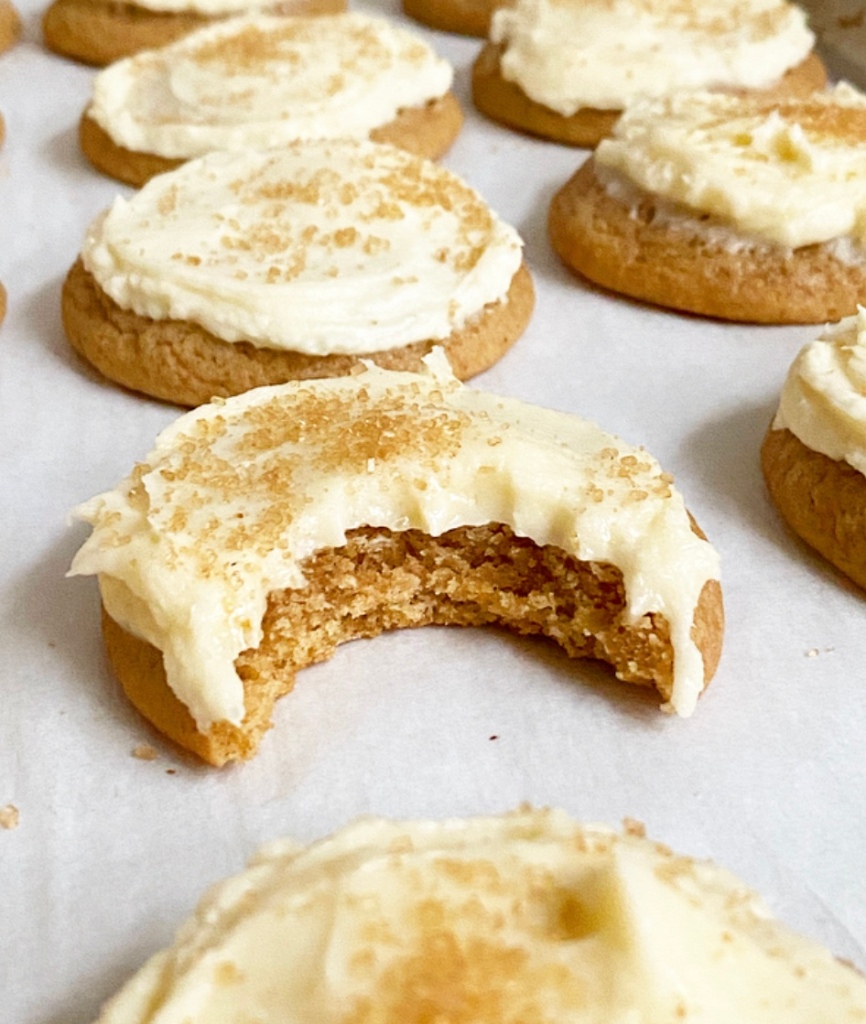
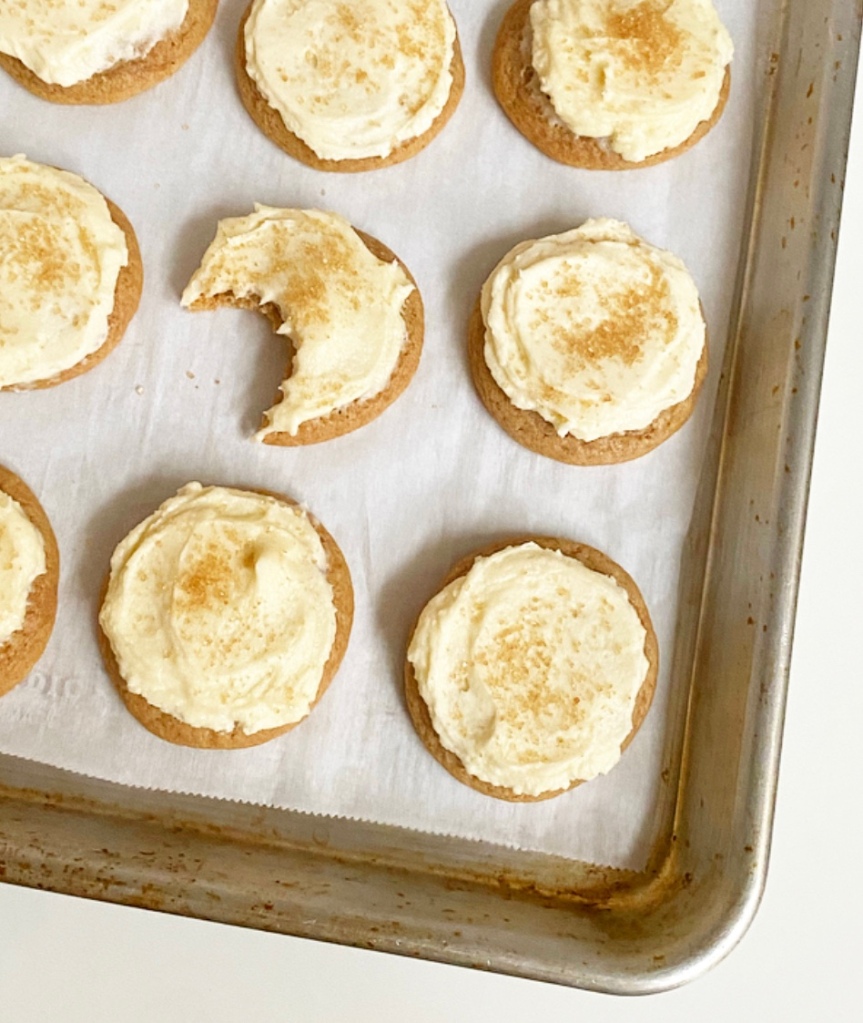
Look at that texture! Soft, chewy, creamy, with a little crunch from the coarse sugar topping—just glorious. Perfect for Christmas, but I dare you to find a time these wouldn’t be outstanding. Go ahead. I’ll wait.
Frosted Maple Spice Cookies
makes about 3 dozen medium cookies

Cookie Dough:
3 1/3 cups all-purpose flour
1/2 cup confectioner’s sugar
1 1/2 tablespoons ground ginger
1 tablespoon ground cinnamon
1 1/4 teaspoons baking powder
1/8 teaspoon baking soda
1 teaspoon Kosher or sea salt
1 cup (2 sticks) unsalted butter, softened to room temperature
1 cup dark brown sugar, packed
1 large egg, room temperature
4 tablespoons pure maple
4 tablespoons sour cream
2 teaspoons pure vanilla extract

For Decorating:
Maple Buttercream (recipe below)
coarse sugar, if desired

Make the cookie dough. In a small bowl, whisk together flour, confectioner’s sugars, ginger, cinnamon, baking powder, baking soda, and salt. Set aside.

In a medium-large mixing bowl, use an electric mixer to beat butter until light and fluffy, about 2 minutes. Beat in brown sugar until creamy. Mix in egg, followed by maple syrup, sour cream, and vanilla. Add dry ingredients in 2 installments, beating until combined. Dough may be a bit sticky.

Divide dough into halves and wrap each in plastic wrap. Chill for at least 2 hours or up to 3 days.

Place oven racks in central positions. Preheat oven to 350F. Line 2 rimmed sheet pans with parchment paper. Set aside.

Remove cookie dough from the refrigerator. Scoop in 1 1/2 tablespoon increments. Roll into balls and place 2 inches apart on prepared pans. Bake 10-11 minutes, rotating top-to-bottom and back-to-front at the 5 minute mark. Cookies are done when no-longer raw-looking.

Let cookies cool on the pans for 8-10 minutes before removing to a rack to cool completely. Let sheet pans come to room temperature before proceeding with the next batch. Repeat scooping, rolling, and baking with remaining dough.

After cookies have cooled completely, use an offset icing spatula to frost each one with about 1 tablespoon of Maple Buttercream. Garnish with coarse sugar immediately after frosting. Buttercream will crust after an hour or so. You may serve the cookies immediately after frosting, but they are softest and most flavorful the next day.

After they’ve crusted, leftovers may be layered with wax or parchment paper and kept in an airtight container. They will keep at room temperature for 2-3 days or in the refrigerator for up to a week.

Maple Buttercream
makes enough for 3 dozen cookies (with a little leftover)

1 1/2 cups (3 sticks) unsalted butter, softened to room temperature
4 cups confectioners sugar
1/2 teaspoon Kosher or sea salt
1 teaspoon pure vanilla extract
1/2 cup pure maple syrup
3 tablespoons heavy cream

Make the frosting. In a large mixing bowl, use an electric mixer to beat butter until light and fluffy, about two minutes. Beat in confectioner's sugar in two installments, scraping down the bowl as necessary. Beat in salt, followed by vanilla. Beat in maple syrup, followed by heavy cream.
I’ve been generally bad at posting regularly for the last year or so, but I have recently made it a bit of a habit to post my early morning baking adventures over on my Instagram stories. Whether those recipes make it onto this website is not the point—the point is to share what’s happening in my kitchen. Last week, I posted a picture of a Star Bread on there and got so many compliments, which is really kind and validating. There was one bit of feedback from an old friend that really stuck out to me though:
“I cannot imagine being able to go in my kitchen and make something like this.”
It was followed up by compliments, but that statement has stayed with me. I mean, if I’m not over here convincing you that you can indeed go in your kitchen and make Star Bread, then what exactly am I doing?
Ten years ago, I was convinced by food blogs that I could make vanilla wafers at home. Which I did. And then I made it my whole personality. And while vanilla wafers and yeast doughs are not the same level of difficulty, I want you to know that you almost certainly can go in your kitchen and make Star Bread. You can.
If you can make cinnamon rolls, you can make Star Bread. If you can make pull-aparts, you can make Star Bread. Same goes for monkey bread and cinnamon swirl bread. They are all fundamentally the same—cinnamon-sugar and a simple enriched yeast dough wrapped together, sliced, and baked. If you’ve got time and a basic kitchen set-up with a fridge and an oven, you, my friend, can make a Star Bread.
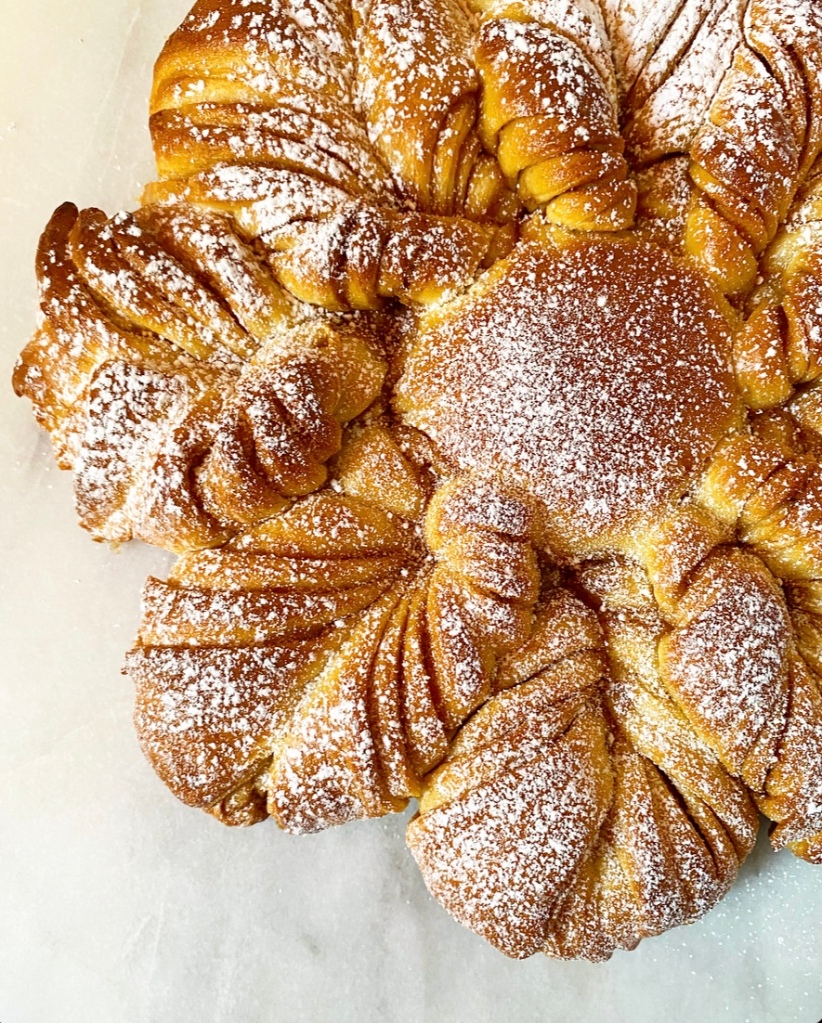
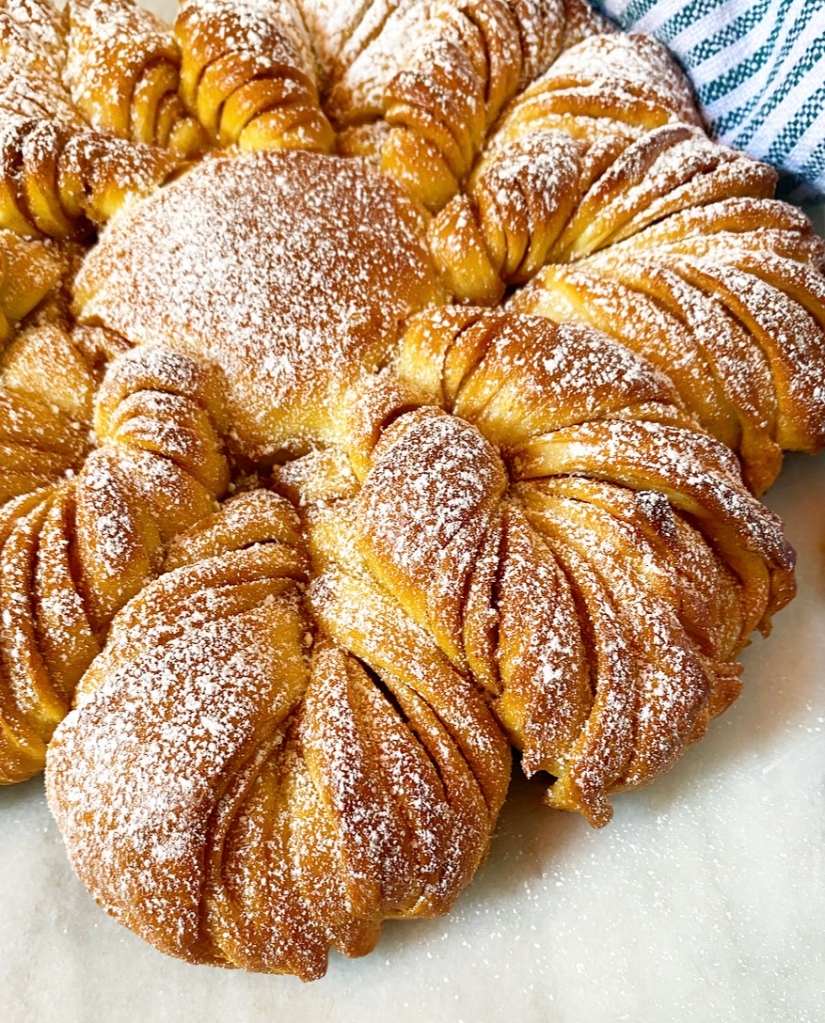
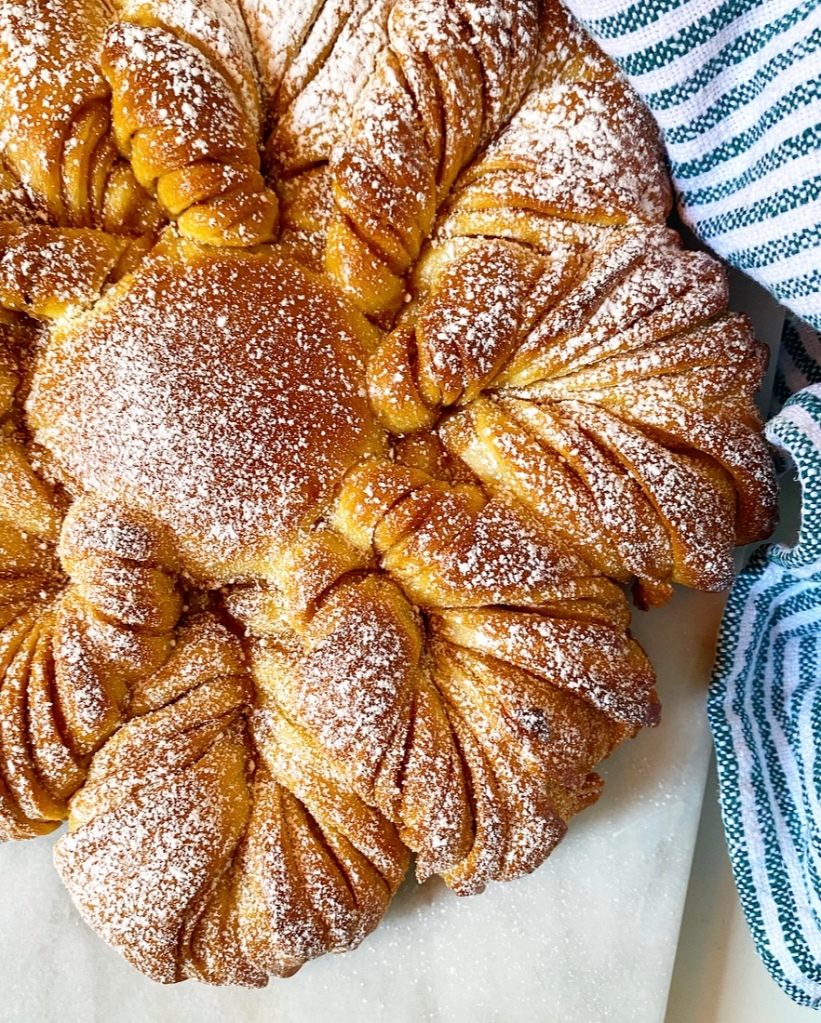
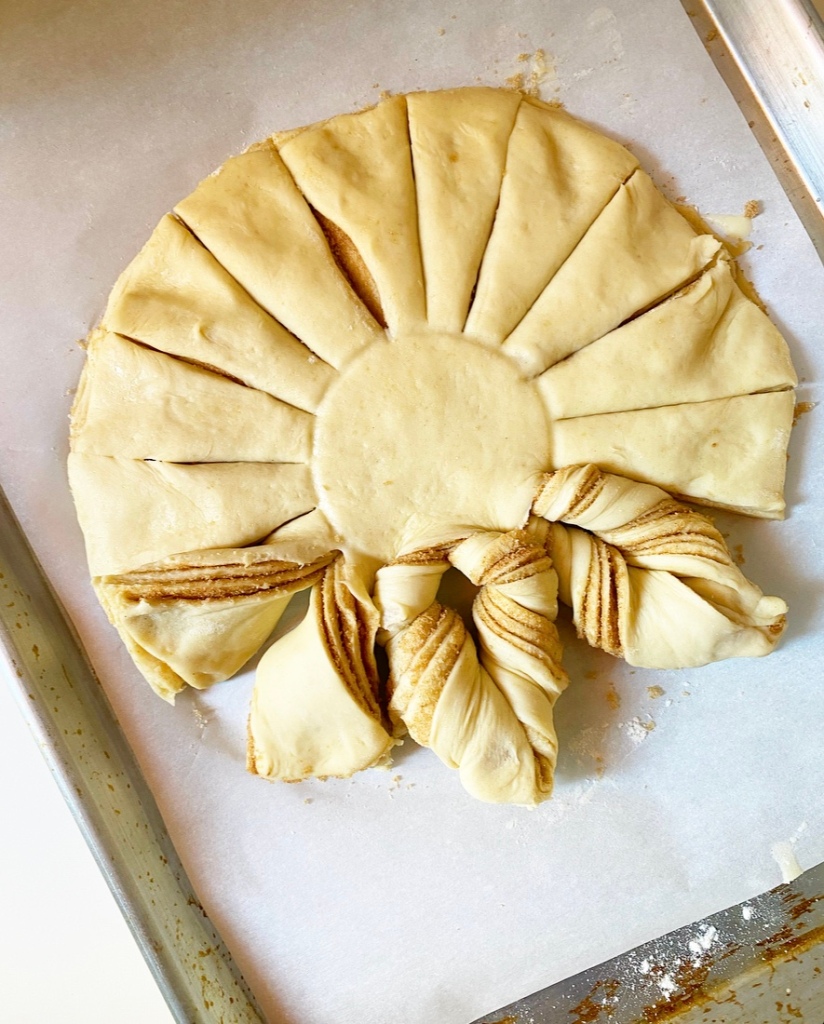
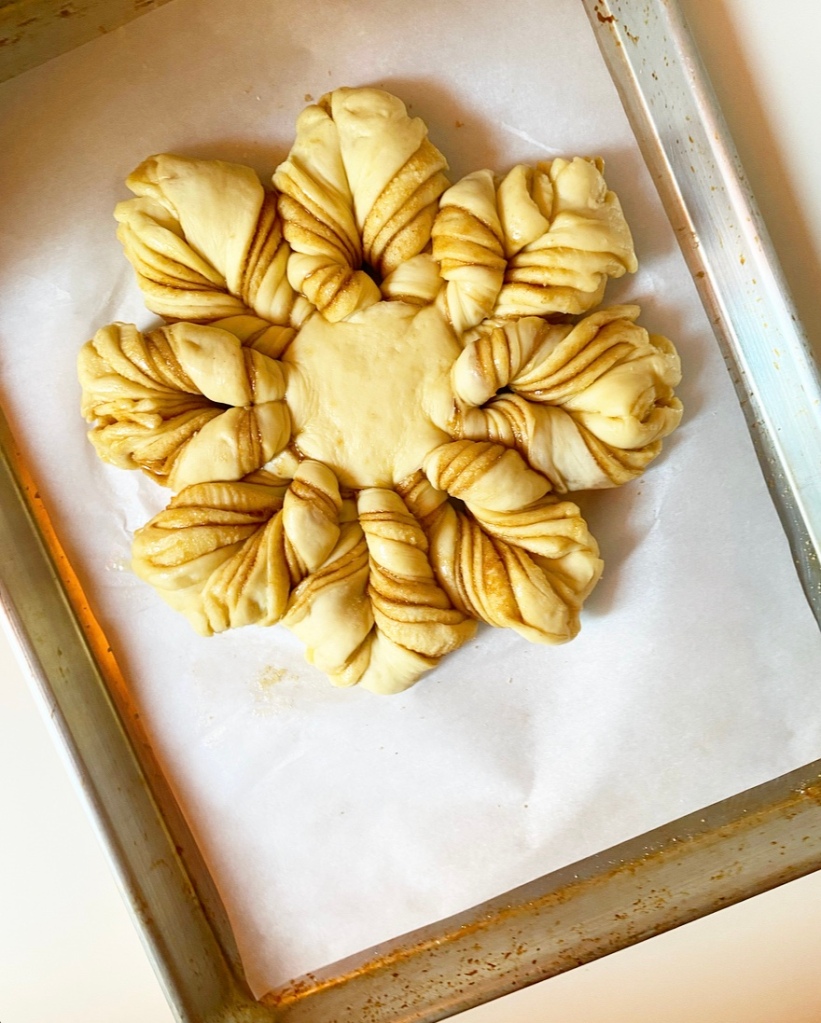
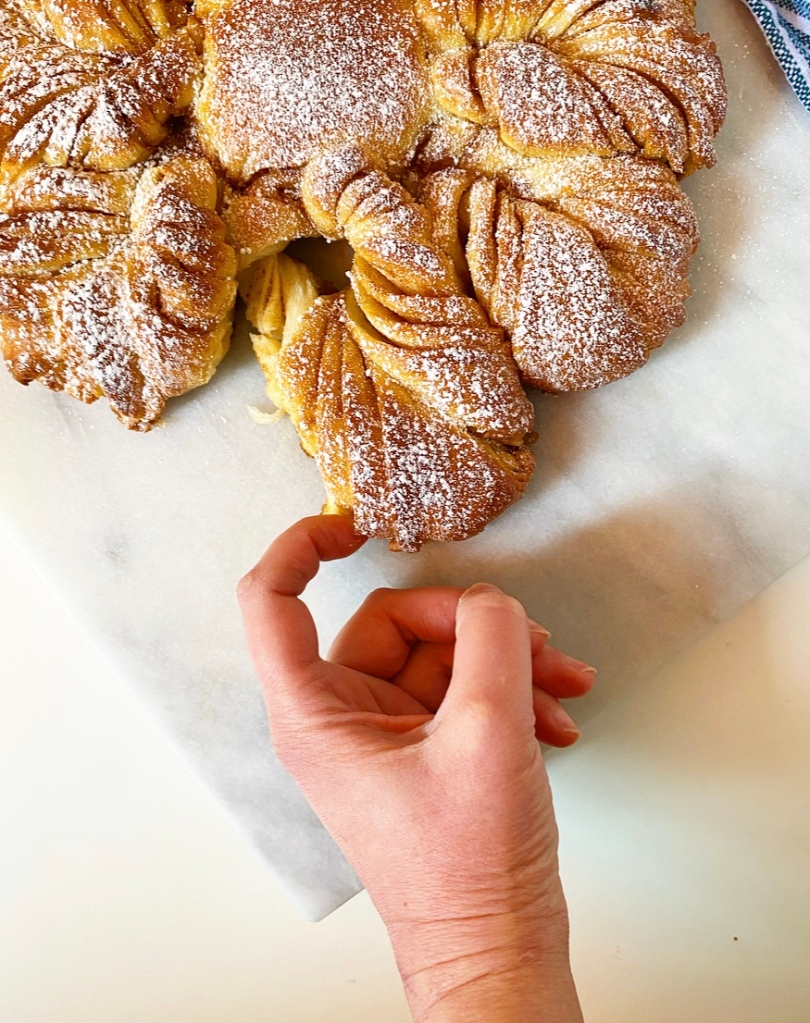
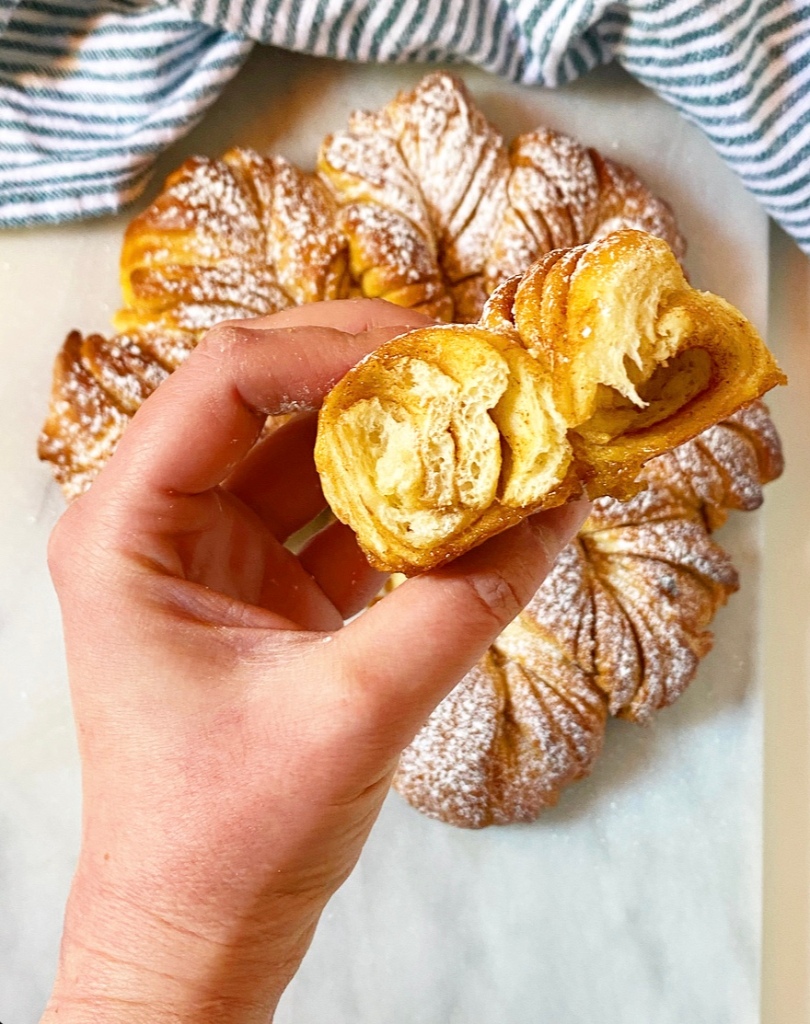
In this case, it’s just a matter of dividing and stacking the dough with the cinnamon-brown sugar, then slicing it so that it resembles a sun. The signature shape comes in when pairs of the sun’s rays are twisted away from one another, creating a festive eight-point loaf.
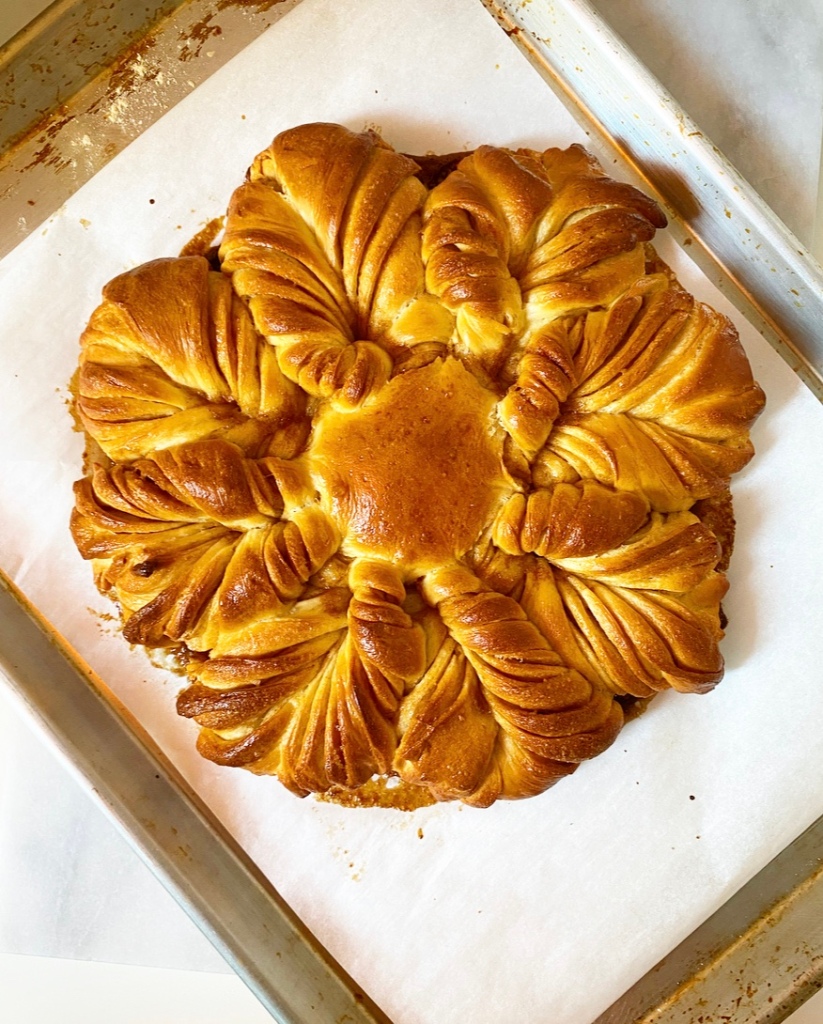
Let it rest and rise a second time, then paint it with egg wash to encourage a burnished final product, and bake until beautiful. Star Bread can certainly be served by its lonesome, but I like a light dusting of confectioner’s sugar for garnish. It gives a snowy day vibe that works super well this time of year.
I know cinnamon rolls are a popular Christmas breakfast, but perhaps this year you can use your skills to make a Star Bread instead. They’re the same in so many ways, and while they’re both showstoppers, Star Bread clearly has a bit more of a…well, a star quality. And you do too, my friend. You can make a Star Bread. I believe in you.
Star Bread makes 1 loaf (about 8-10 servings)
Dough: 2 3/4-3 cups all-purpose flour 3 tablespoons granulated sugar 1 packet (2 1/4 teaspoons) instant yeast 1 teaspoon fine sea salt 3 tablespoons unsalted butter 1 cup whole milk 1 large egg, room temperature
Filling: 6 tablespoons light or dark brown sugar, packed 1 teaspoon ground cinnamon pinch of Kosher or sea salt 2 tablespoons unsalted butter, melted
Egg Wash: 1 large egg 1 teaspoon water
For Finishing: confectioner’s sugar
Make the dough. In a medium-large mixing bowl, whisk together all-purpose flour, sugar, instant yeast, and salt. Set aside.
In a small saucepan over medium-low heat, melt butter and milk together until just warm to the touch, about 95-110 degrees.
Crack the egg into a small mixing bowl. Whisking constantly, add the butter/milk mixture in a thin stream until completely combined. Add mixture to the dry ingredients and fold together.
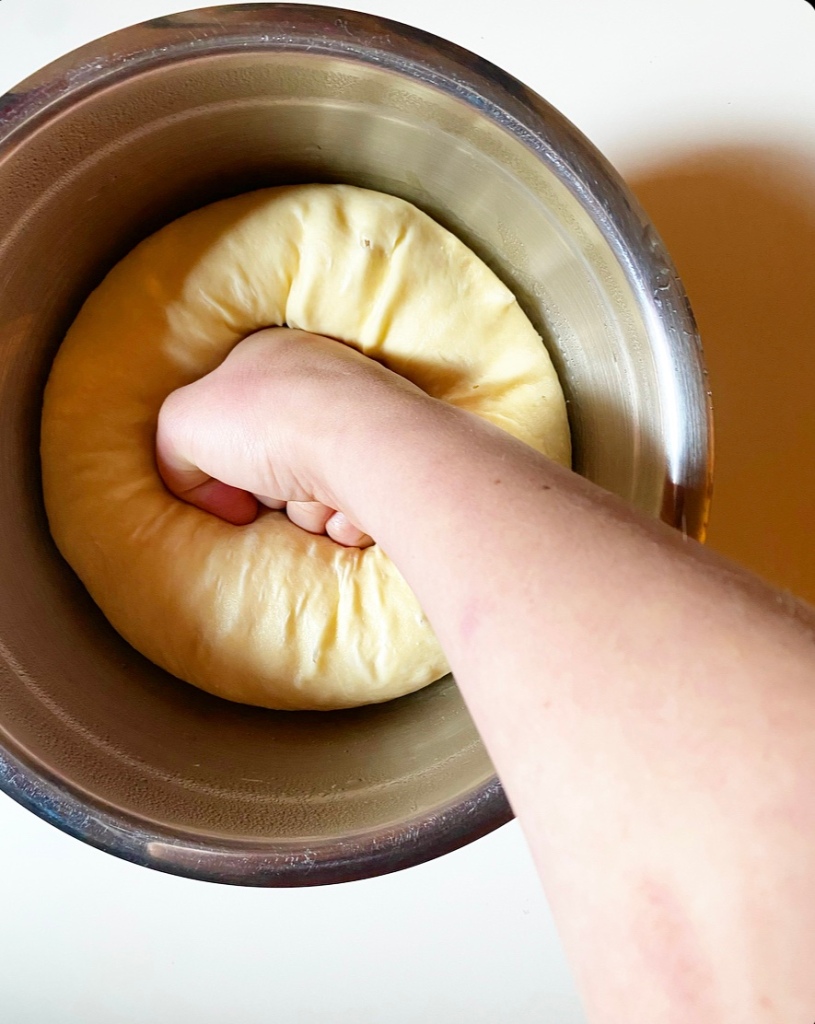
Turn dough onto a floured surface and knead 5-6 minutes, until smooth. Gather dough into a ball and place it in an oiled bowl, making sure to get a little oil on all sides. Stretch some plastic wrap over the top and allow dough to rise in a warm, draft-free environment for 40 minutes or until doubled in bulk. Alternatively, place wrapped bowl in the refrigerator for 12-24 hours (a cold proof).
Make the filling. In a small bowl, use a fork to whisk together brown sugar, cinnamon, and salt. Set aside.
Line a rimmed half-sheet pan with parchment paper.
Flour a surface, your hands, a rolling pin, and a large, sharp knife or bench scraper. Punch down your dough. Turn it onto the surface, then use the knife or bench scraper to divide it into four even pieces.
Working with one piece at a time, roll it to a circle 9-inches in diameter (or larger and cut off excess). Gently transfer the first circle to the center of the prepared baking sheet. Paint it with melted butter and sprinkle with 1/3 of the filling mixture. Roll out two more circles, then paint with butter and sprinkle with the remaining 2/3 of the filling mixture. Top with the fourth and final circle. Gently press down on top to adhere everything. Slice off and discard any scraggly bits.
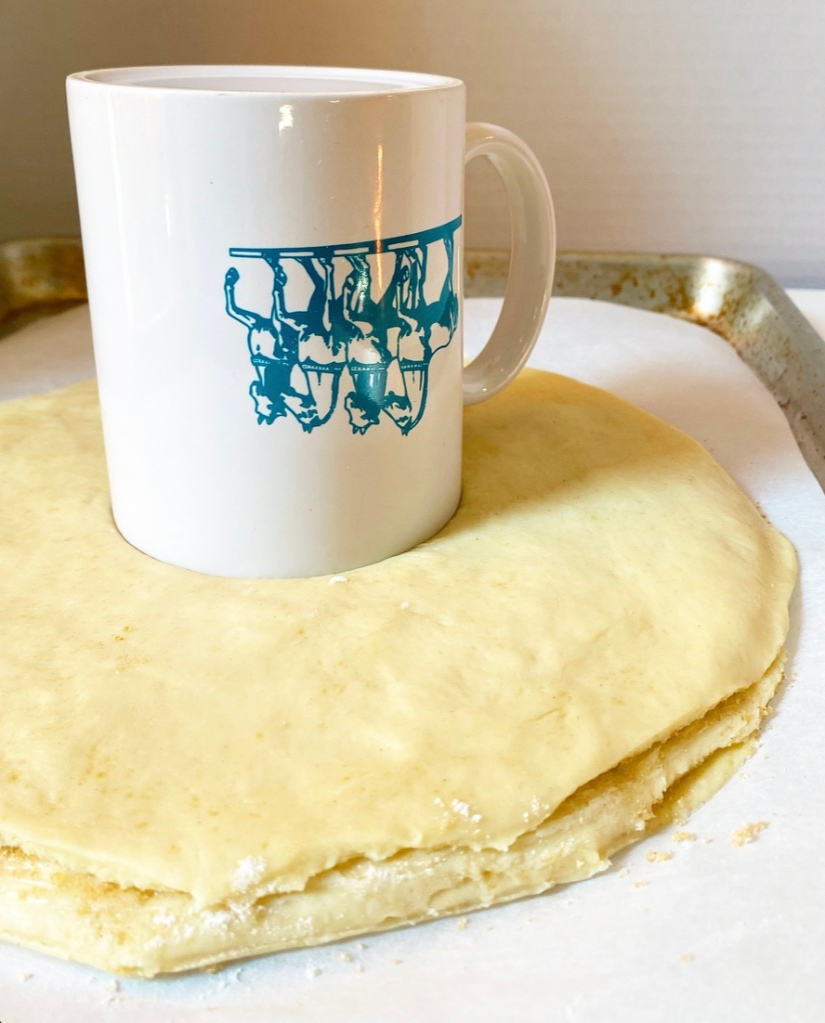
Shape the bread. Use a coffee mug or other 3-inch stencil to mark a 3-inch circle on the top of your stack. Then, use the large sharp knife or bench scraper to slice the portion outside of the 3-inch circle into 16 strips. This should look like a sun with rays.
Working with two neighboring rays at a time, twist them away from each other 3-4 times before pinching them together at the ends. Repeat until you have 8 little points on your Star bread. Gently tuck in scraggly ends and nudge the points into a shape you find pleasing. Cover with bread with plastic wrap and a tea towel, then let rise 40-50 minutes, or until risen. You’ll know it’s ready when you poke it with your finger and it doesn’t immediately bounce back.
During rising, preheat the oven to 350F. Make the egg wash by whisking the egg and water together in a small bowl or mug.
When the bread has risen, remove the plastic wrap and tea towel. Discard plastic wrap. Paint the entire surface of the star bread with egg wash. Bake for 25-30 minutes until golden and burnished.
Let bread cool 10 minutes. Gently transfer to a serving plate. Dust with confectioner’s sugar, if desired. Serve warm.
Star Bread is best the day it’s made, but may be kept covered for up to 48 hours.
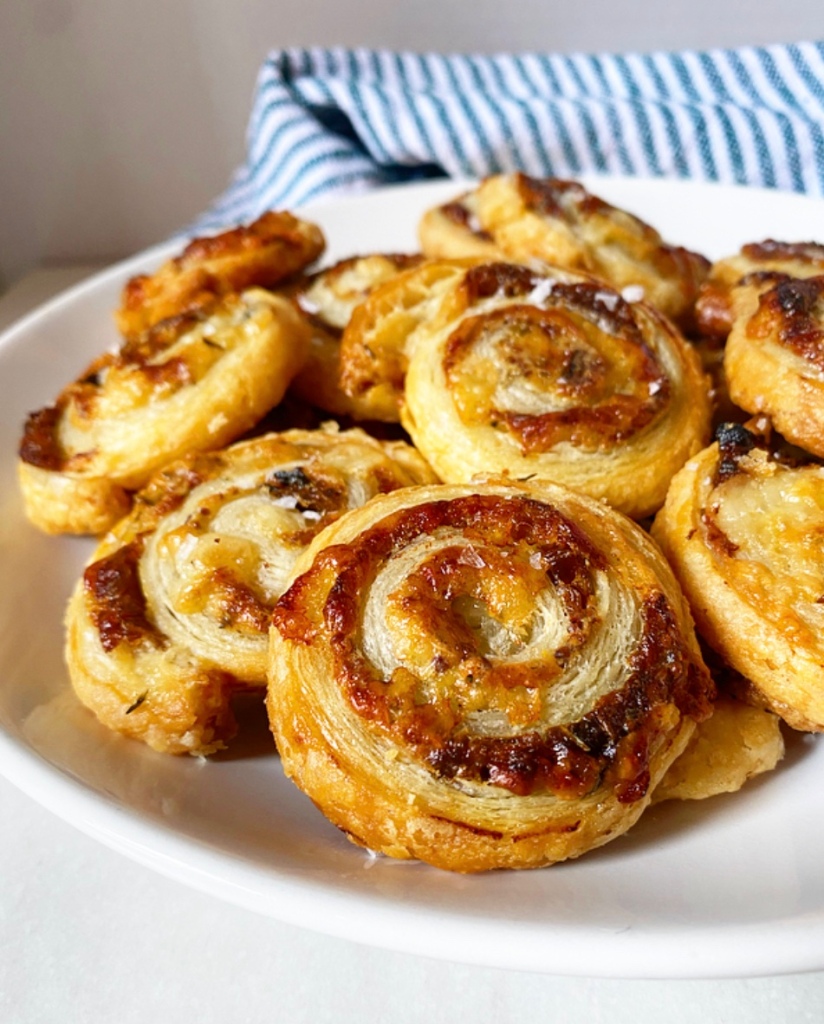
I usually concentrate on pie this time of year, and that’s great—pie is great!—but my favorite part of Thanksgiving is the hors d’oeuvres. Especially if there’s cheese involved (which there absolutely should be).
Over the years, I’ve made a cheesy tarte soleil, a flaky baked brie, savory cheddar shortbread, baked feta, and twisty rosemary Parmesan straws, all of which are worthy of the pre-meal spotlight. This year’s recipe finds you while I’m in the middle of a French Onion hyperfixation, so it’s all about caramelized onions and gruyere wrapped up in homemade (or not) flaky pastry.
Simply take a sheet of puff pastry (I used homemade rough puff) and layer on everything good.
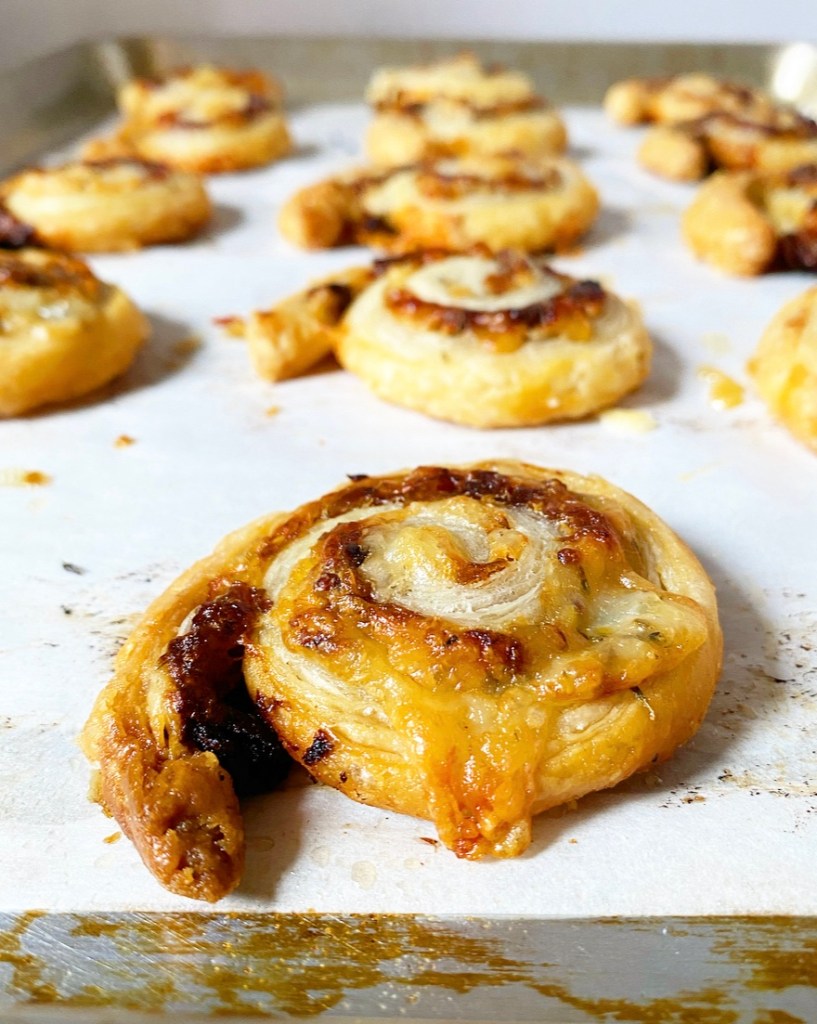
…or to be more specific, layer on melted butter, dijon or grainy mustard, gruyere, dried thyme and the caramelized onions you made in your oven while making some side dishes. Roll the whole thing up into a cylinder, give it a brief chill, then slice and bake.
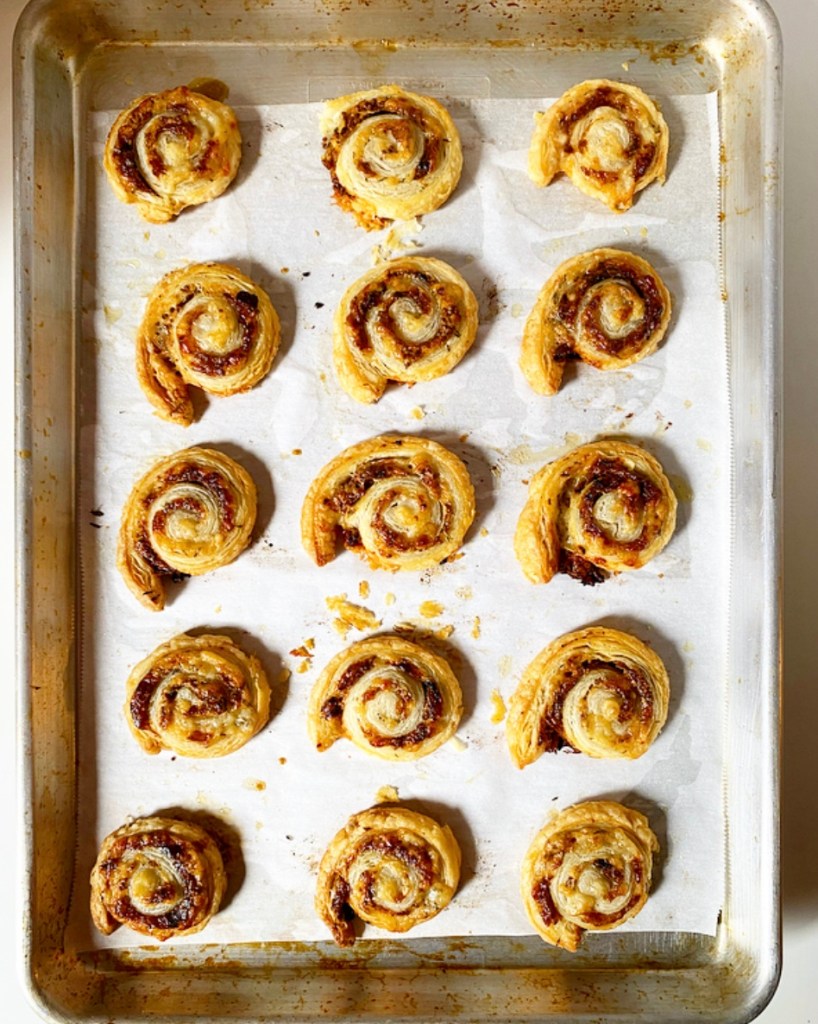
Ugh, can you even take how delicious these look? Golden and flaky, with bubbly cheese puddles and onions peeking through—simply gorgeous. And delicious, too.
Make the egg wash. In a small bowl, use a fork to whisk together egg and water. Set aside.
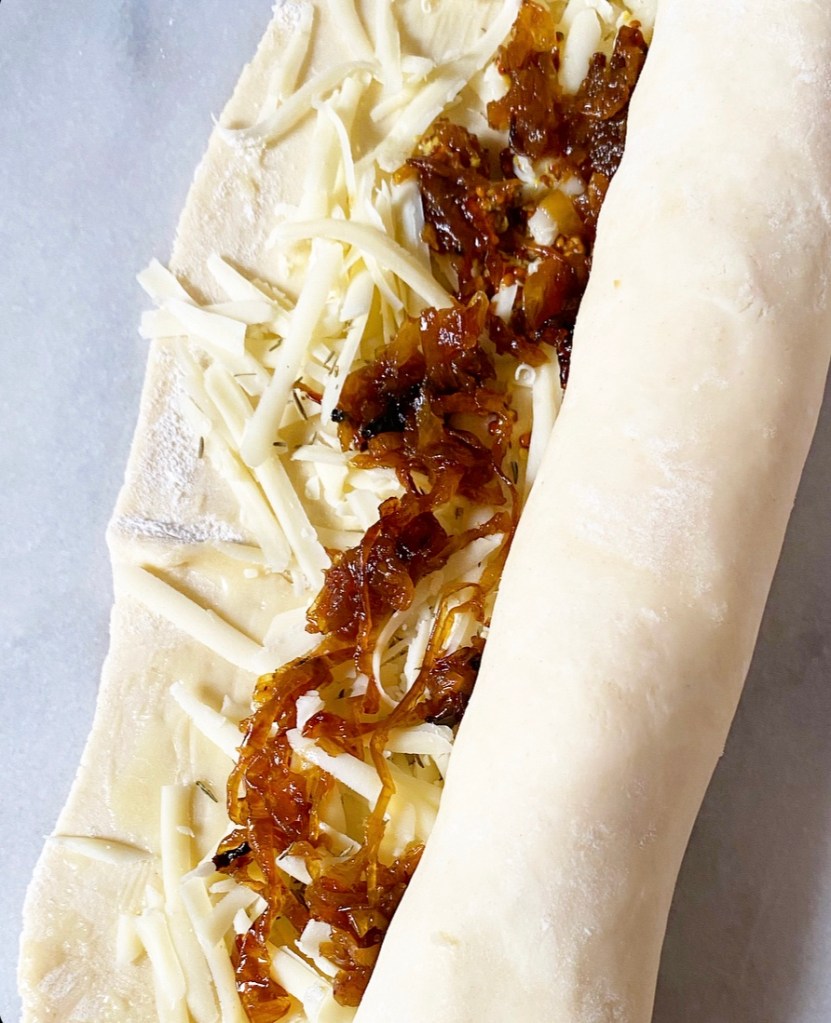
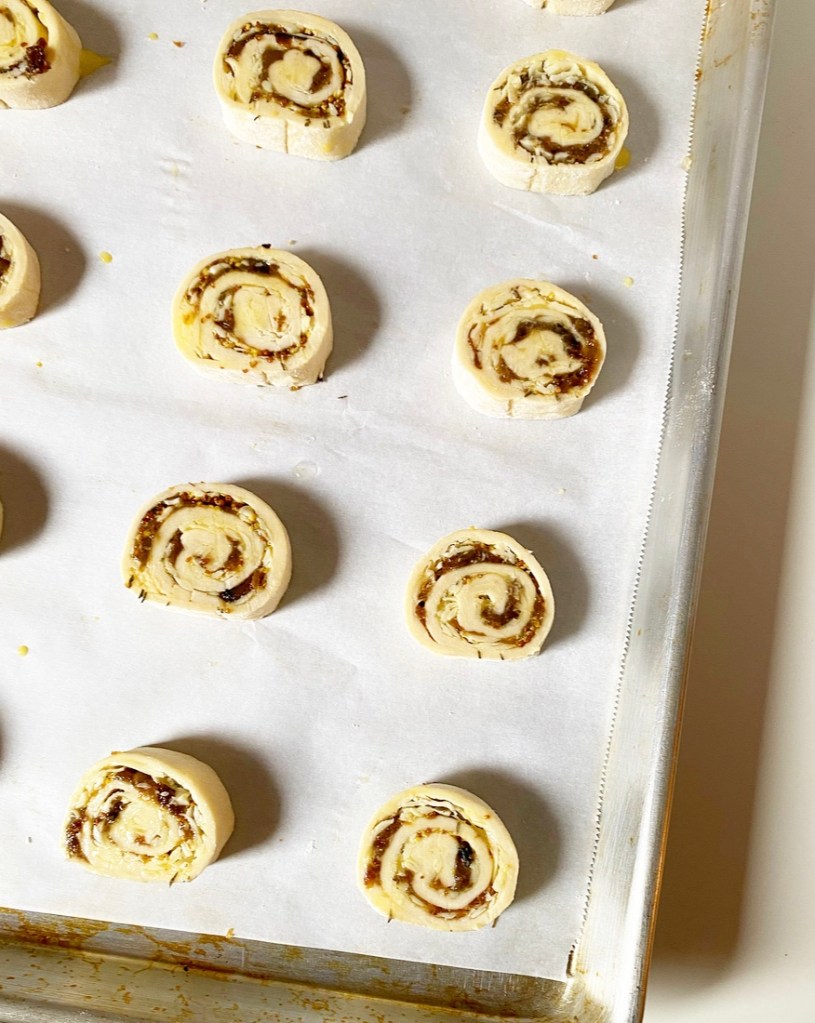
Make the pinwheels. Flour a surface and a rolling pin. Unfold puff pastry and roll to a 10x14-inch rectangle.
Use a pastry brush to brush a thin layer of butter over the surface of the pastry, leaving a 1/2-inch border on all sides.
Spread mustard over the butter. I find this easiest to do by dropping it in spoonfuls over the top, then spreading it out. It doesn’t have to be perfect; it’s going to be rolled up!
Scatter grated gruyere over the top, then sprinkle on the thyme. Drop caramelized onions over the cheese.
Paint the 1/2-inch border on one 14-inch side with egg wash. Starting at the other 14-inch side, tightly roll pastry together like you would cinnamon rolls. Lightly flour a pan or cutting board and place the rolled pastry on top. Freeze for 30 minutes or refrigerate for up to a day.
Preheat oven to 400F. Line two rimmed sheet pans with parchment paper. Set aside.
When freezing time is up, remove the rolled pastry back to the floured surface. Flour a large, sharp chef’s knife and use it to slice the roll into 1/2-inch pieces. Place them 2 inches apart on prepared pans. Brush each with egg wash.
Bake 18-20 minutes, or until golden and puffed. Let cool on their pans for about 5-10 minutes. Serve warm or at room temperature.
Leftovers should be kept in the refrigerator for up to 3 days.
Rough Puff Pastry
makes 1 sheet

1 cup all-purpose flour
1/4 teaspoon Kosher or sea salt
5 ounces unsalted European-style butter, very cold, cut into small pieces
1/4 cup water or milk, very cold

In a large mixing bowl, whisk together flour and salt. Use a pastry blender or two forks to cut butter into dry ingredients until the largest pieces are the size of small peas. Pour in cold water or milk and stir with a silicone spatula or wooden spoon until a shaggy dough forms.

Flour a surface and a rolling pin. Turn dough out onto surface, and use your hands to pat it into a rough rectangle. Roll the dough into an 8x10" rectangle. Fold dough in thirds, and give it one quarter turn. Roll into an 8x10" rectangle again, fold, and turn. Repeat rolling, folding, and turning until it has been done six times total. Wrap folded dough in plastic wrap and refrigerate for at least one hour, or up to 48 hours.
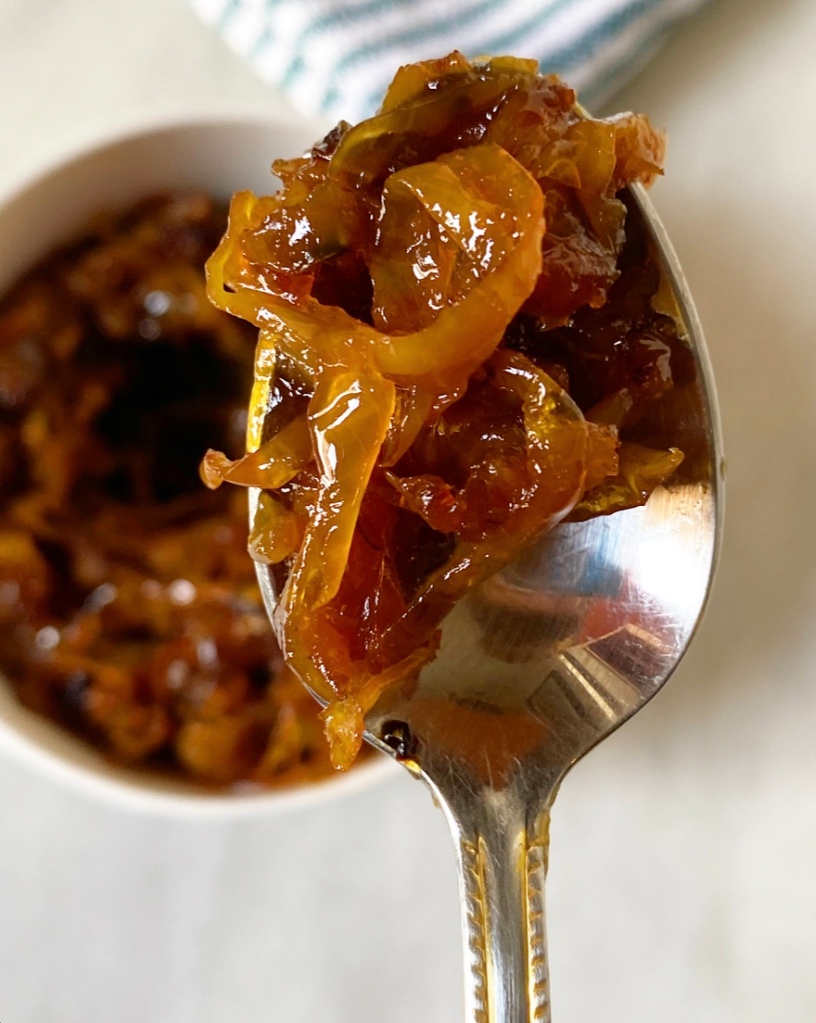
Caramelized Onions may have hit peak popularity in the 80s, but they’re always in style in my kitchen. They add depth and sweetness to any savory dish—an ideal quality when you’re planning a holiday meal.
Need to jazz up your mashed potatoes? Add caramelized onions. Looking for a quick compound butter? Caramelized onions to the rescue. Want to change up your cheese plate? Four words: Caramelized Onion Baked Brie.
Truly, there’s no wrong way to use them. The problem is that caramelizing onions takes time and attention. If someone tells you that they can caramelize onions in fifteen minutes, they are lying—this is more of an hour spent over the stove kind of project. Or at least, it was.
Nowadays, I’ve taken to caramelizing onions in the oven. It takes a while—a couple of hours at least—but it’s mostly inactive work time. If I’ve got the oven on for something, there’s a decent chance that I have a foil-wrapped casserole dish full of onions somewhere in there too, using up that heat. It’s a hack I use often, and it’s particularly perfect for a time of year when the oven is almost always on. Two birds and all.
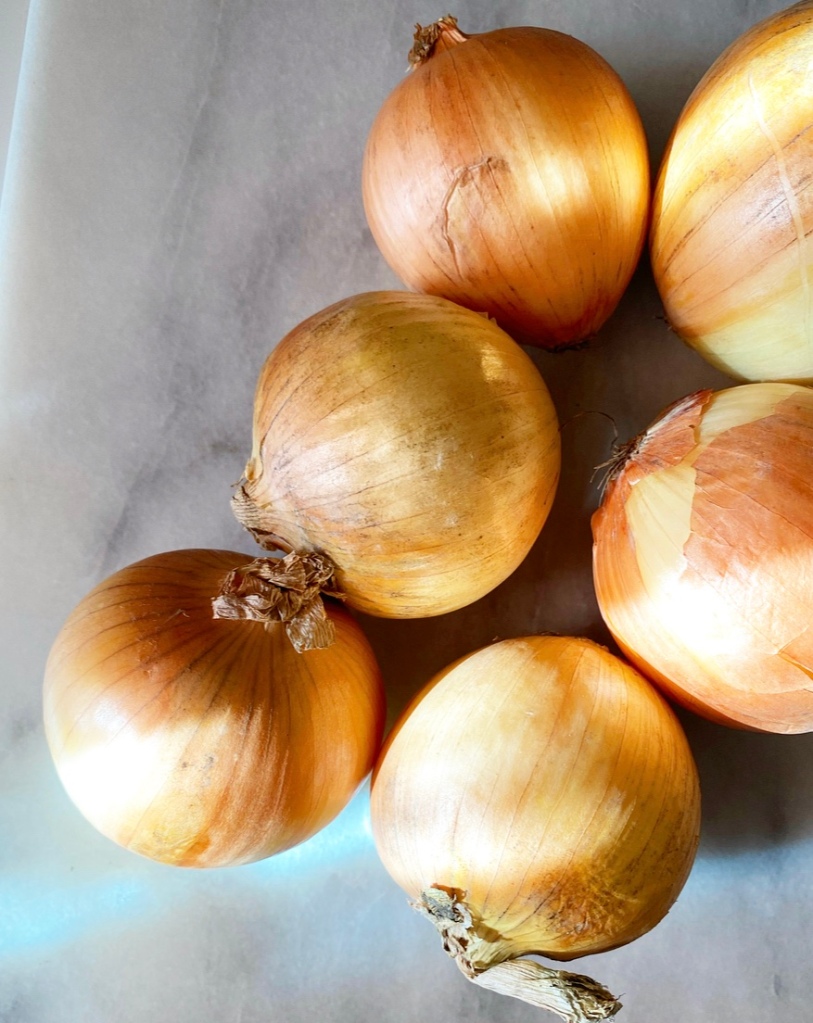
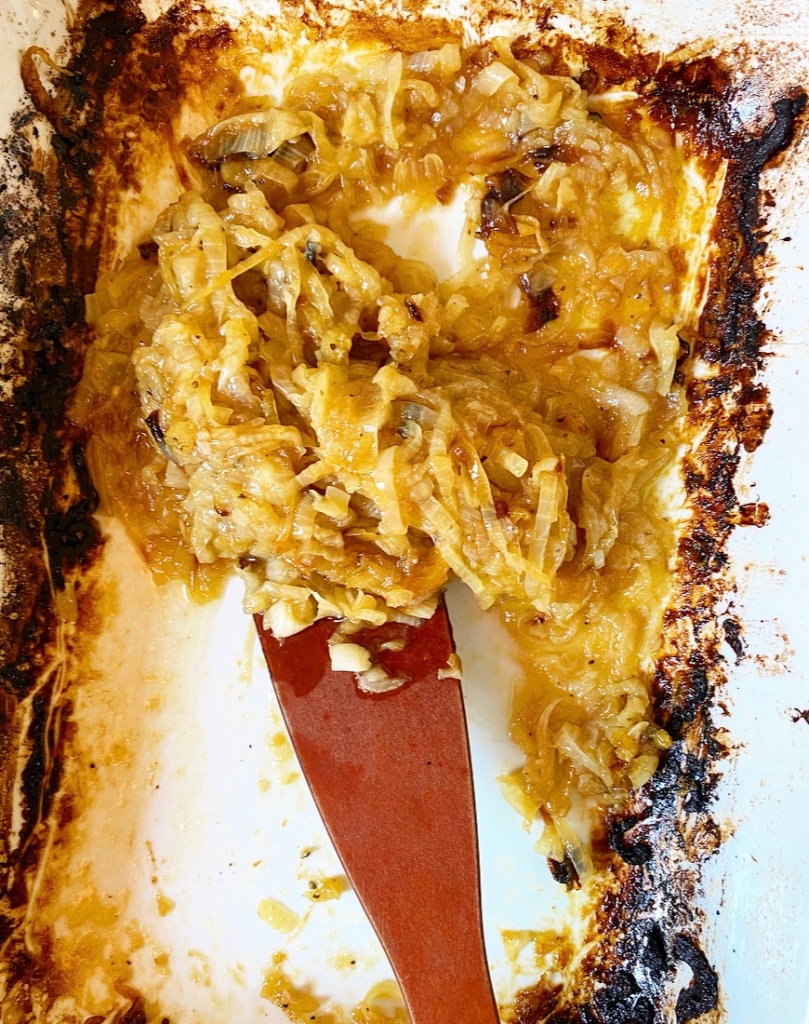
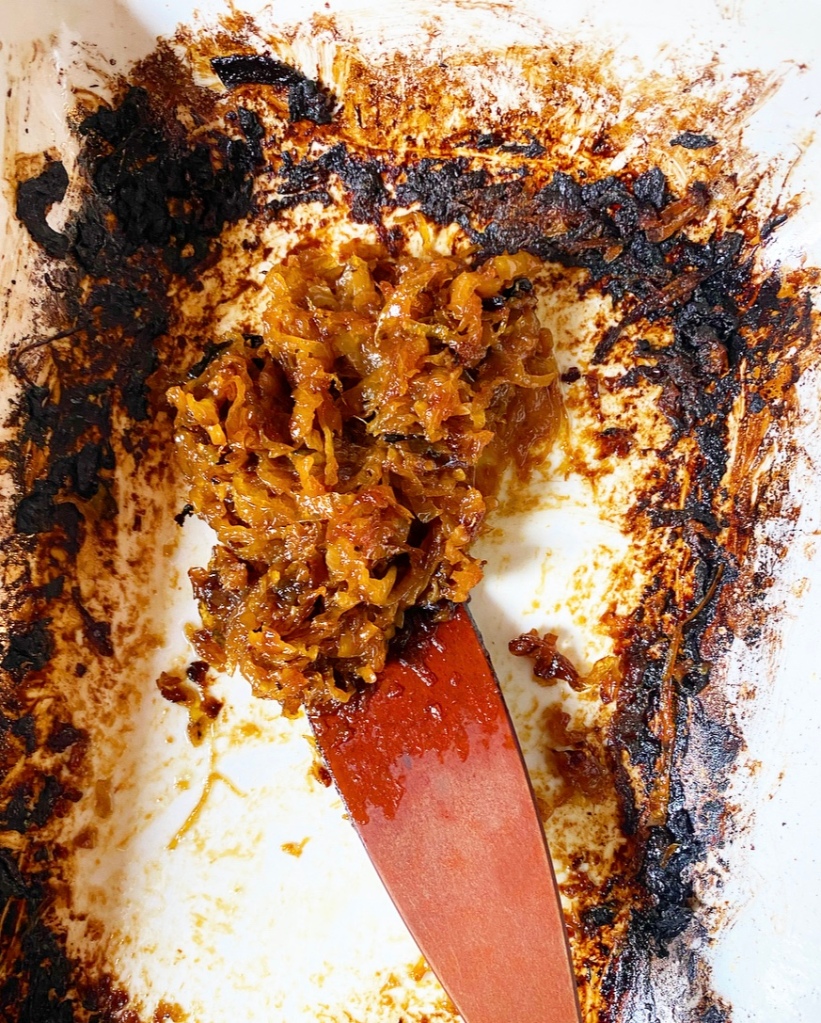
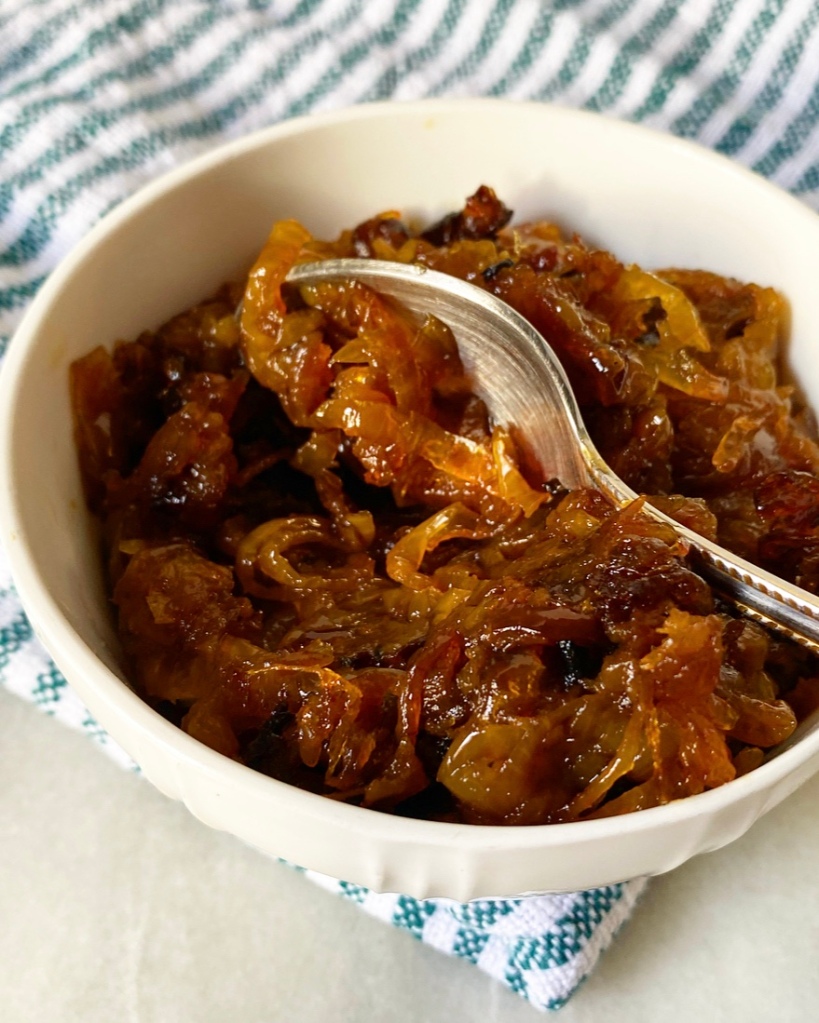
An added benefit to caramelizing onions in the oven is that you can make a ton at once. The onions pictured started as two full pounds, but cooked down to less than a cup all told. If you’ve got the oven space, there’s no reason not to start with four or even six pounds of onions. If you make too many for your intended project, you can easily freeze them for another day.
You know, like tomorrow…hint, hint.
How to Caramelize Onions in the Oven makes about 3/4 cup
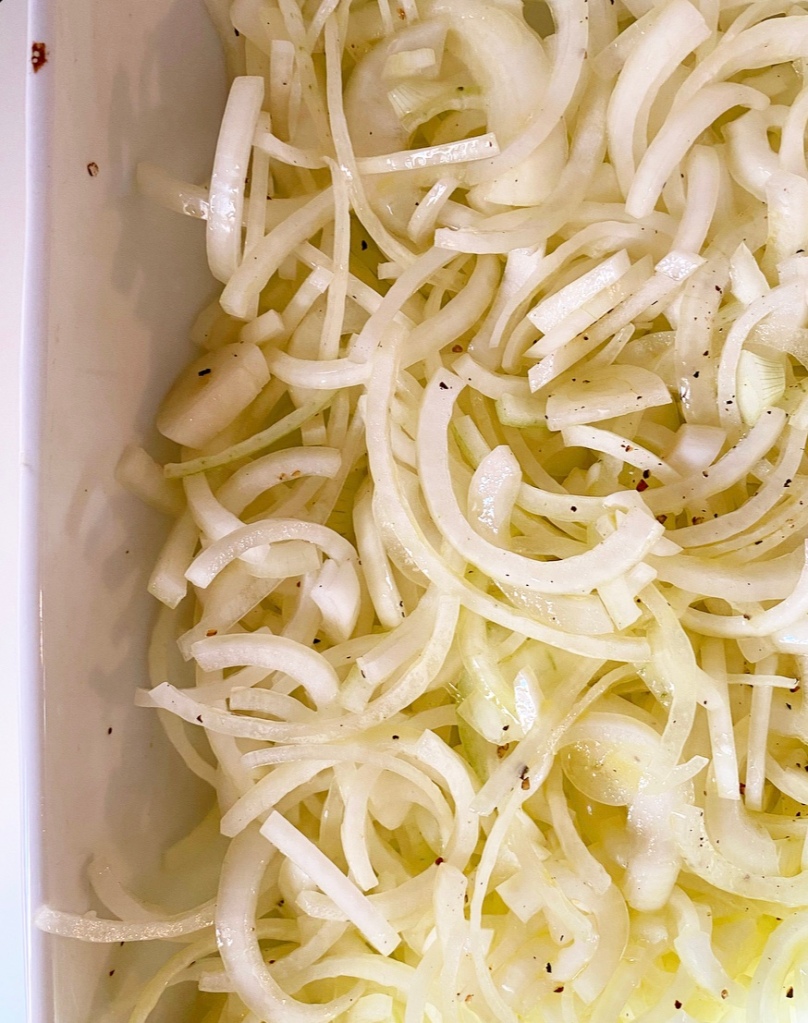
2 pounds Spanish, white or red onions, sliced 1/4-1/8-inch thick 2 tablespoons olive oil Kosher or sea salt, to taste (I like a heaping 1/4 teaspoon) few grinds black pepper
Equipment: 9x13” casserole dish aluminum foil a stirring implement
Preheat the oven to 350F.
Place sliced onions in a 9x13-inch casserole dish. Add olive oil, salt and pepper, and toss to combine. Cover the pan with foil and bake for 1 hour.
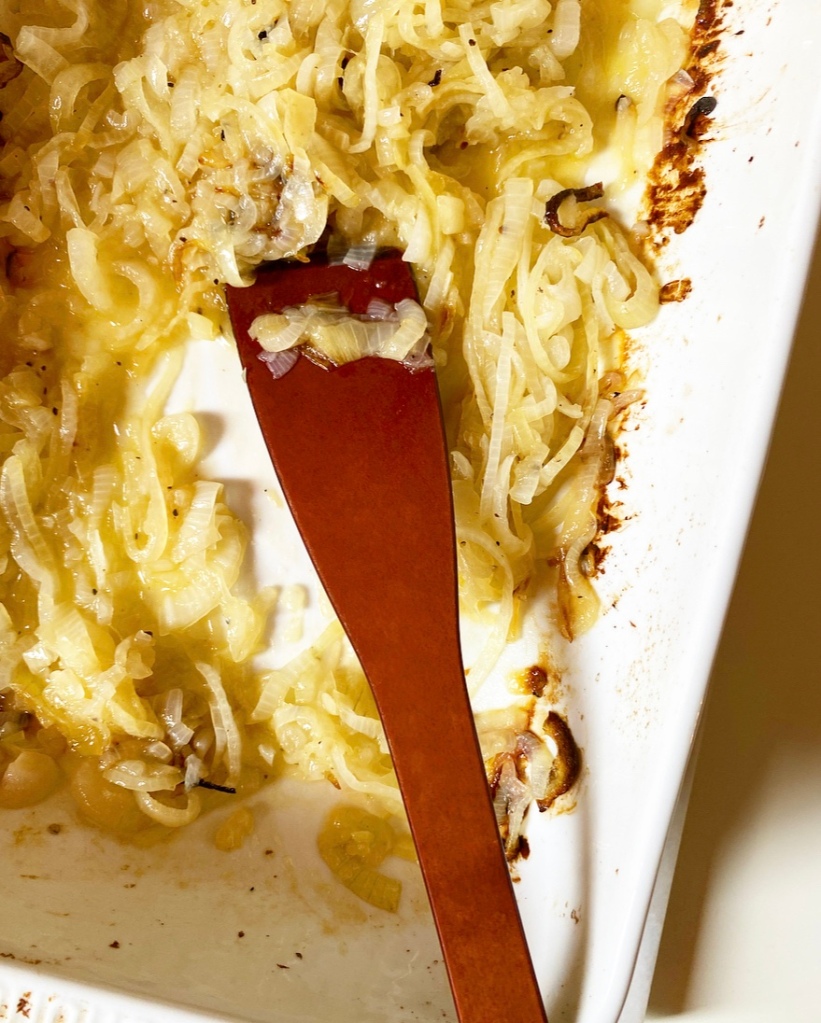
Remove the pan from the oven, lift the foil, and stir the onions. They should be fully soft and translucent at this point, and starting to turn a very pale brown.
Cover the pan with foil again, then bake for another 30 minutes before stirring again. The onions should be turning darker at this point. If any of the edge pieces have burned, lift them out and discard. Some of the sugars in the onions may char at the edges of the pan—this is normal.
Cover the pan again and bake in 15-20 minute increments, stirring between, until your desired color and consistency has been reached. The onions pictured went about 2.5 hours.
Once your onions are to your liking, remove them from the oven and let cool. Use as desired. Leftovers may be refrigerated for a few days or frozen.