Tag Archives: chocolate chip

Easy Nutella Cookies {Grain-Free}

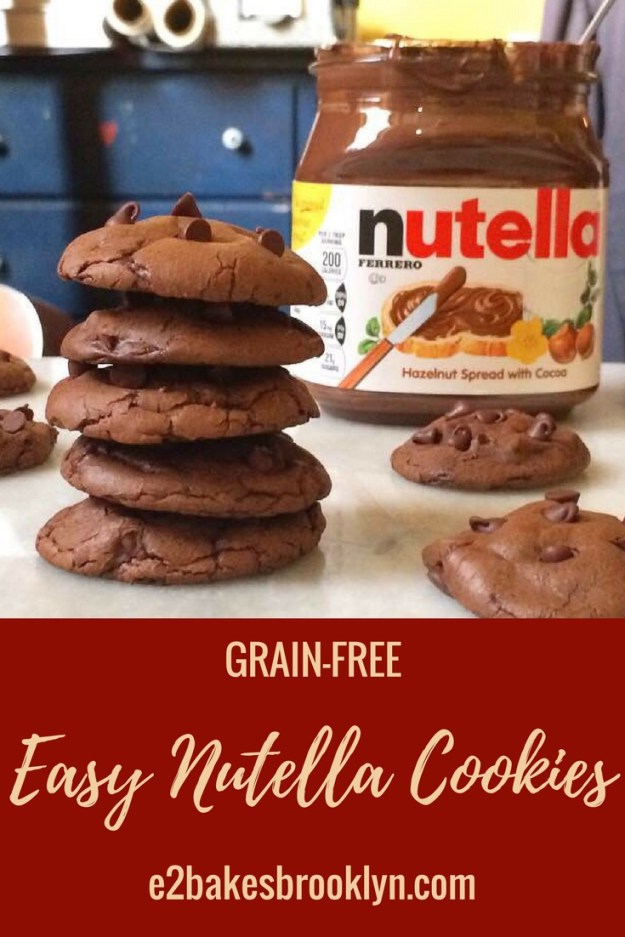
Have you seen the three-ingredient peanut butter cookie recipe? It’s all over the Internet–1 cup creamy peanut butter, 1 egg, and 1 cup of granulated sugar. Mix ’em together, bake, and you have a pretty rockin’ batch of peanut butter cookies. And they’re gluten-free to boot! They were some of the first cookies I ever made successfully, and following that small triumph, I tried the magic peanut butter cookie formula with Nutella. I thought I was so smart and so clever. I mixed together most of a jar of Nutella, an egg, and some sugar, scooped the mixture onto a baking sheet, and had a giant fail. The cookies spread all over the place and got almost as lacy as my Apple Cider Snaps. It wasn’t until this week that I thought to try them again. It took me two additional batches, but I finally got them right.

I considered saving this recipe for February, given that I’m supposed to be sharing healthier recipes this month, but these are just too good to keep all to myself. Nutella isn’t exactly health food–the ad campaign may be all about skim milk, but sugar is the first ingredient on the nutrition label. If you’re limiting grains this New Year, but still need a cookie or two (and after the first week back to work, who doesn’t?), these are the ones you should make.

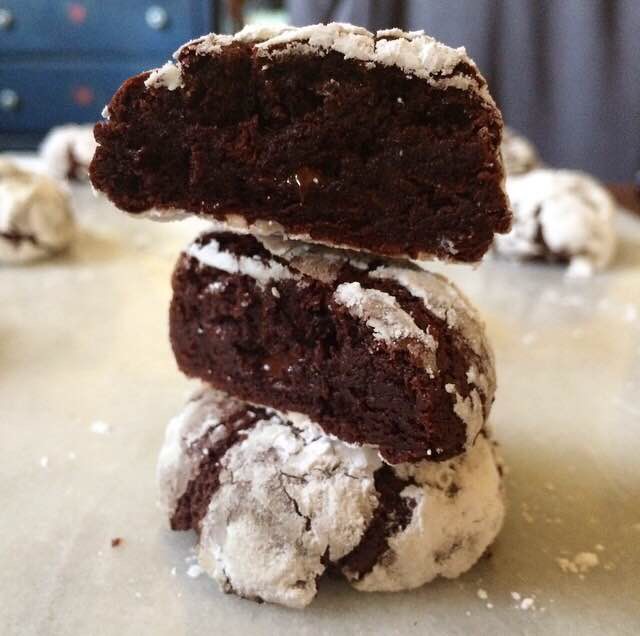
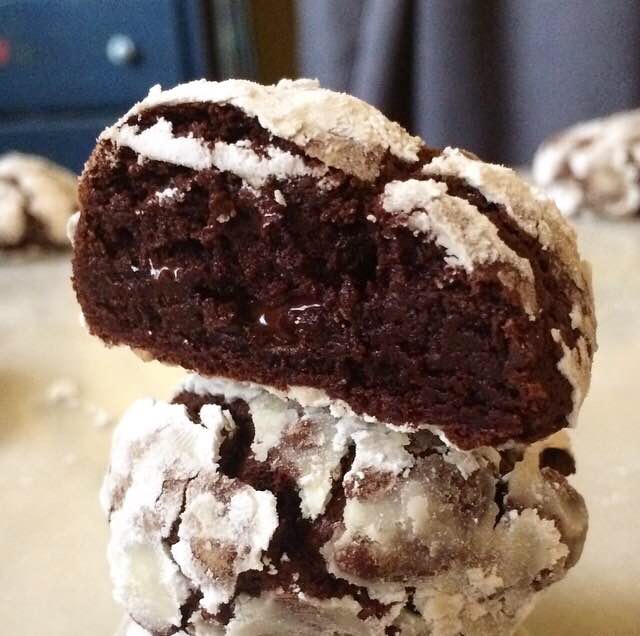
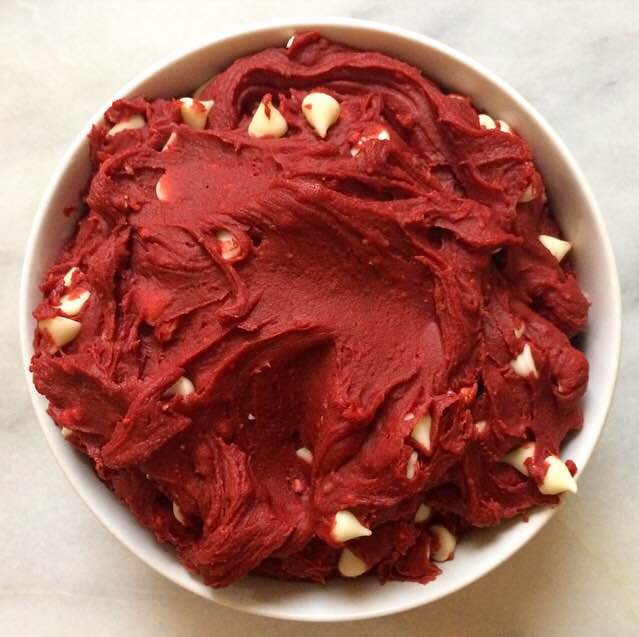
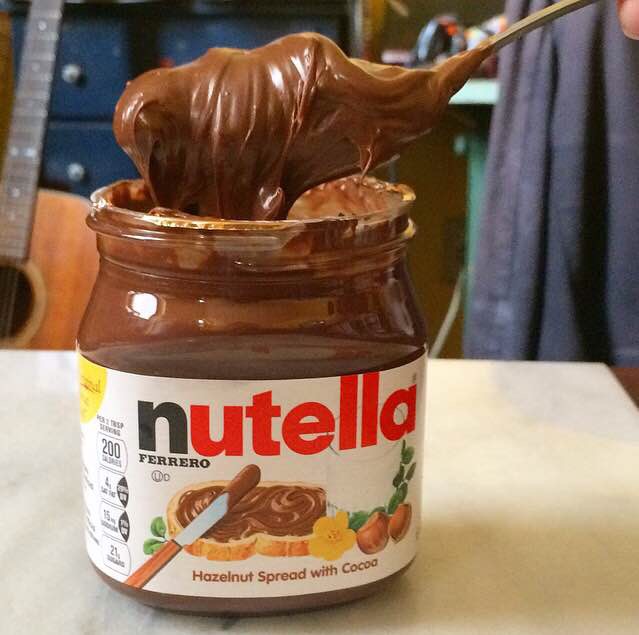
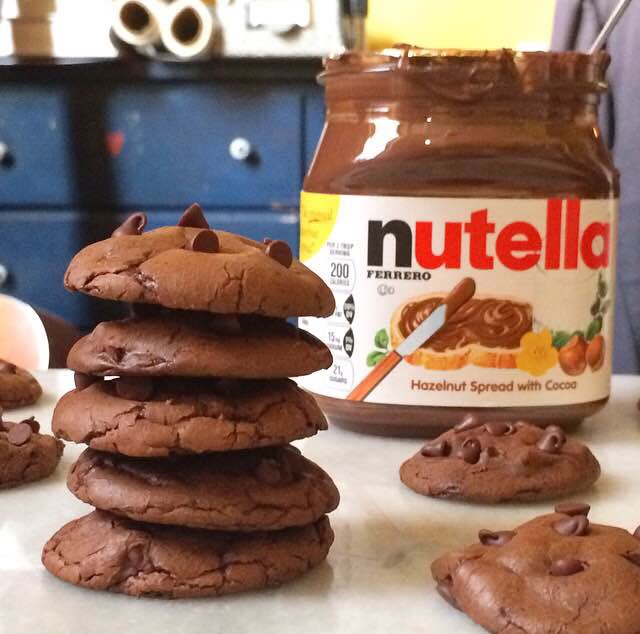
These cookies start by beating six tablespoons of granulated sugar, a large egg, and an egg yolk together with an electric mixer until the mixture gets foamy and lightens in color. By only using a little added sugar and really frothing up the eggs, we are giving the cookies a lot of structure, allowing them to be soft and puffy instead of hard and thin. Measure 1 cup of Nutella (most of a small jar) in a dry-ingredient measuring cup, and scrape that into the mix before beating it all together. The Nutella provides structure, and will give these cookies a decidedly brownie-like texture. And of course, it will also make them taste like chocolate and hazelnuts. Yum.


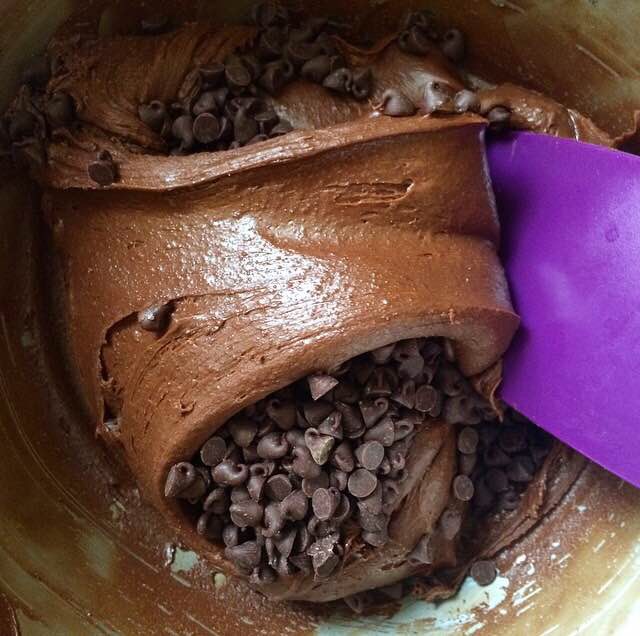
 Nutella is a bit on the thin side, so we have to mitigate any excessive spreading with cocoa powder. Cocoa powder can really dry things out, so we only need a little (1/4 cup) to thicken the dough. Any more than this, and the dough will be too crumbly to work with. Next, we have to add the tiniest bit of baking powder, just so the quantity of Nutella doesn’t make our cookies too dense. A little salt mitigates the potential for overwhelming sweetness from all the sugar. And the mini chocolate chips are just for fun!

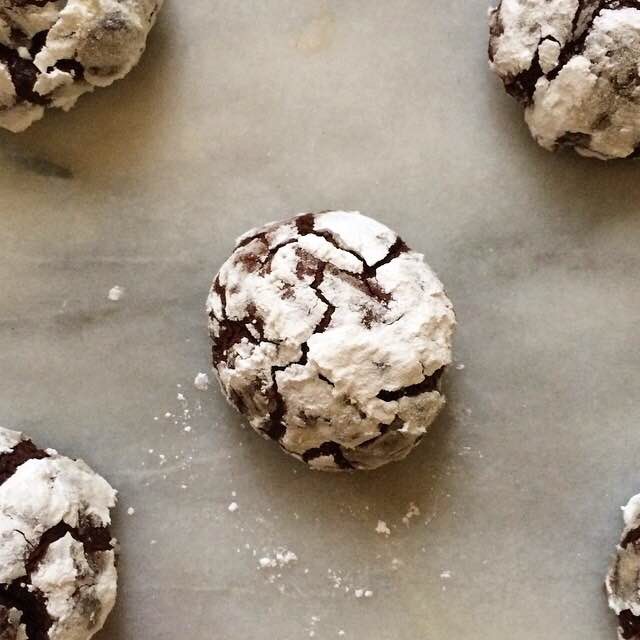
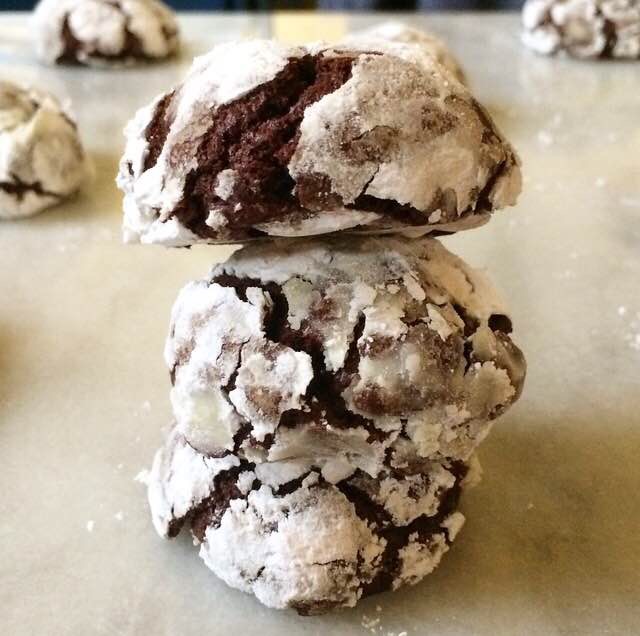
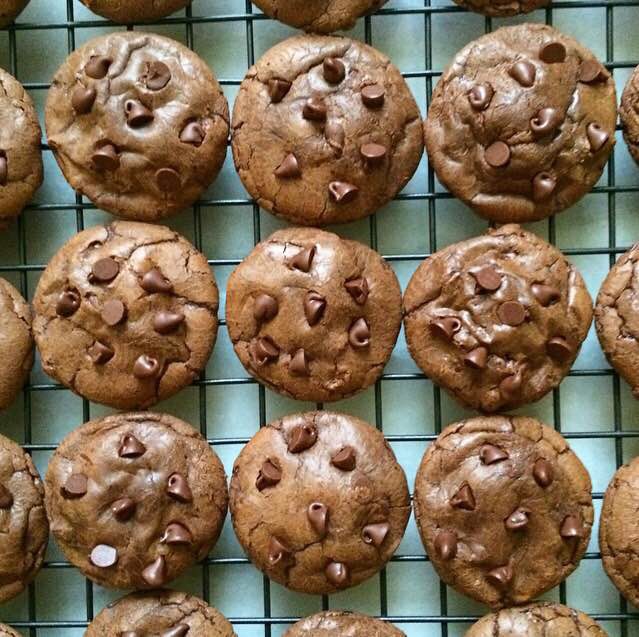
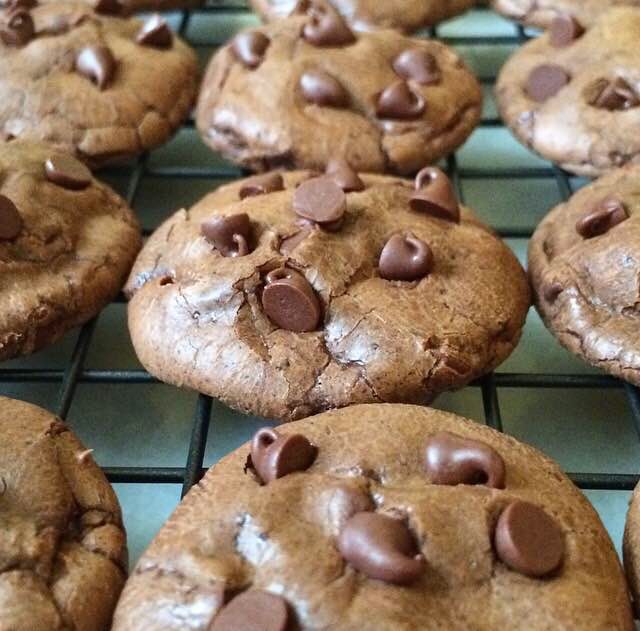
The absolute best part of this cookie dough: no chilling required! Just scoop it by the 1/2 tablespoon (1 1/2 teaspoons), roll into balls, and bake for 6 minutes. That’s it! They will look a little shiny, but they will continue to cook on the pan, so don’t worry. I love tedious projects and decorated each individual cookie with more mini chocolate chips, but this is purely for aesthetics. If you aren’t as crazy as I am, feel free to skip that.

Easy Nutella Cookies are a wonderful first baking project for 2016. With the flavor of Nutella, the texture of fudgy brownies, and ease of preparation, what’s not to like? Add to that the fact that they are grain-free (which means they are gluten-free!), and you’ve got a winner.

Easy Nutella Cookies
makes about 3.5 dozen small cookies*

6 tablespoons granulated sugar
1 large egg + 1 large egg yolk, room temperature
1 cup Nutella
1/4 cup cocoa powder (natural or Dutch process)
1/4 teaspoon baking powder
1/2 teaspoon Kosher or sea salt
tablespoons miniature chocolate chips, plus extra for decorating (optional)

Preheat oven to 350F. Line two baking sheets with parchment paper. Set aside.

In a large mixing bowl, use an electric mixer or a whisk to combine sugar, egg, and egg yolk until foamy and lighter in color, about one minute. Beat in Nutella. Add cocoa powder, baking powder, and salt, scraping down the bowl as necessary. Use a silicone spatula or wooden spoon to fold in miniature chocolate chips.

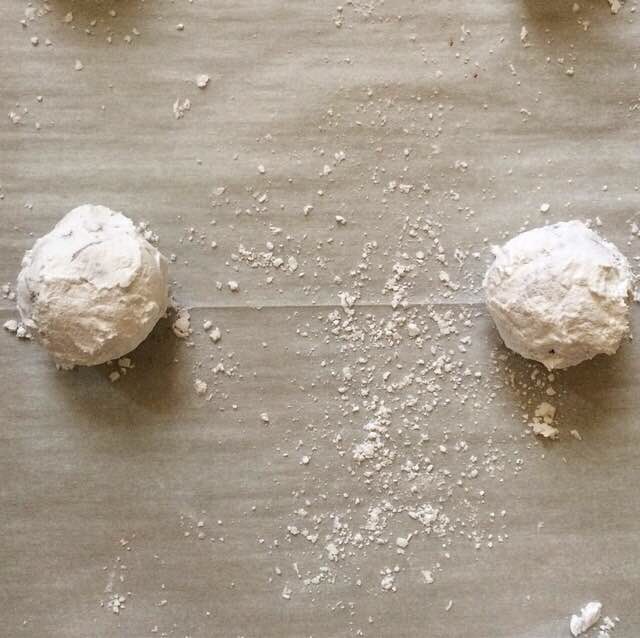
Scoop dough in 1/2 tablespoon (1 1/2 teaspoons) increments and roll into balls. Set on the baking sheets at least 1.5 inches apart. Bake 6-7 minutes, until they look cooked, but are still a little bit shiny. Let cool on the baking sheets for ten minutes before removing to a rack to cool completely.

Cookies keep covered at room temperature for up to a week.

Note: If you would like larger cookies, scoop in 1 tablespoon increments and place the dough balls two inches apart. Bake for 8-9 minutes.

Easy Nutella Cookies {Grain-Free}

Chocolate Crinkles {Gluten-Free}

  Welcome back to Twelve Days of Cookies! Today is day 8, and I am bringing you a classic: Chocolate Crinkles. And they just happen to be gluten-free! There are so many people with various diets and allergies these days that it’s nice to have options for everyone that don’t involve a special trip to the grocery store. I recently posted a recipe for Chewy Pumpkin Ginger Cookies that are very easily made vegan, so now you have options that can please a wide variety of your friends and family members in the coming weeks. Let’s get to the recipe. 

 These cookies start by melting a pound of bittersweet chocolate with some butter. Yes, I said a pound of chocolate. As these cookies have no flour and only 1/2 cup of dry ingredients, the chocolate helps with structure…and overall deliciousness. Use the good stuff–I know it’s expensive, but it’s worth it since it makes up so much of the flavor and texture here. While the chocolate and butter are cooling, beat granulated sugar, brown sugar, and four eggs for five minutes with an electric mixer. The eggs will supply the rest of the structure in this recipe, so they need to be beaten until they are super fluffy, frothy, and pale yellow. Then beat in some vanilla and a bit of espresso powder. The espresso flavor isn’t noticeable here (it just intensifies the chocolate flavor), but if you are serving these to children, you could use decaf instant coffee or leave it out entirely. Then, beat in cocoa powder, cornstarch, baking powder, and salt, until it’s well-mixed and gooey. Stir in two cups of semisweet chocolate chips. If you’re keeping count, that’s three doses of chocolate. Three! Best cookies ever. 

 
   Let the dough chill for 30 minutes, just enough time for the melted chocolate to solidify a bit. Scoop it in two tablespoon increments or use a medium cookie scoop. Roll dough into balls and then roll those in confectioner’s sugar. You want to make sure that the coating is nice and thick; the cookies should basically be completely white. Place them on prepared sheet pans and bake for 11-13 minutes at 350F. Don’t overbake these cookies! You want them to just barely be done. Mine are ready at exactly 11 minutes. They have a crackly outer crust dusted with confectioner’s sugar, and the interior is soft and literally bursting with chocolate. Does it get any better than that?! 

 Everyone will love these Chocolate Crinkles! Between the triple hit of chocolate, the confectioner’s sugar, and the classic cookie nostalgia, these are sure to be a hit at your holiday get-togethers! These are also great for cookie exchanges and gifting. Plus they’re gluten-free, so you’ll have something for everyone 😊 Bottom line: make these cookies. They’re sure to be a crowd-pleaser.

 Need more holiday cookie recipes? Check out these Red Velvet Peppermintdoodles, Eggnog Sandwich Cookies, Whipped Shortbread Snowballs, Apple Cider Snaps, Oreo-Stuffed Andes Peppermint Crunch Cookies, Peppermint Mocha Cookies, and Salted Caramel Chocolate-Covered Pecan Cookies! And there are still four more recipes to come! Stay tuned.

Chocolate Crinkles {Gluten-Free}
adapted from Chocolate Rads on Orangette
makes 3.5 dozen cookies

7 tablespoons natural unsweetened cocoa powder
1 tablespoon cornstarch
1 teaspoon baking powder
1/2 teaspoon Kosher or sea salt
1 pound (16 ounces) good quality bittersweet chocolate, chopped*
4 tablespoons unsalted butter, cut into cubes
3/4 cup granulated sugar
1/2 cup light brown sugar, packed
4 large eggs, room temperature
2 teaspoons pure vanilla extract
1 1/2 teaspoons instant espresso granules
2 cups semisweet chocolate chips
1 cup confectioner’s sugar

In a small bowl, whisk together cocoa powder, cornstarch, baking powder, and salt. Set aside.

In a double boiler or the microwave, melt the bittersweet chocolate and butter together, stirring frequently, until smooth. Set aside to cool a bit.

In a large mixing bowl, beat granulated sugar, light brown sugar, and room temperature eggs with an electric mixer for 5 minutes. The mixture should be frothy and pale yellow in color. Add in the vanilla and espresso and beat for an additional 30 seconds. Beat in the melted chocolate mixture in two installments. Turn the mixture to low and beat in the dry ingredients. Stir in the chocolate chips. Let the dough chill in the refrigerator for 30 minutes.

Preheat the oven to 350F. Line two sheet pans with parchment paper.

Scoop dough in 2 tablespoon increments* and roll into balls. Roll dough balls in confectioner’s sugar and set at least three inches apart on prepared pans. Bake for 11-13 minutes, until set. Do not overbake. Let cool on the pans for ten minutes before removing to a rack to cool completely. Repeat with all remaining dough.

Cookies keep covered at room temperature for up to a week.

Notes:

1. I used Ghirardelli Intense Dark 72%, but have also had success with Trader Joe’s Pound Plus Dark Chocolate. Do not use chocolate chips for this step as the stabilizers will prevent them from melting properly.
2. I used a medium cookie scoop.

Chocolate Crinkles {Gluten-Free}

Red Velvet Cookies

image

I have a cookie commitment every Wednesday night. I can make whatever I want, as long as there are five dozen. Whatever I want! I usually just take recipes I am testing/experimenting with that week. Lately, it’s been a lot of shortbread and sandwich cookies. Sometimes it’s brownies (bar cookies are still cookies). Everyone is always very kind and interested to see what I’ve brought, with the exception of the time I brought a truly sad batch of chocolate roll-out cookies. You know they’re bad when there are still two dozen left the next week…oops. But back to the point. On very rare occasions, all the cookies disappear in twenty minutes, I get high fives left and right, and a slightly curmudgeonly friend of mine holds a half-eaten cookie in his hand and says “Liz. Liz! These are a home run.” Since these people eat my cookie experiments literally all the time, that says something. When I made these Red Velvet Cookies last spring, I had a home run kind of night.

image

imageimageRed Velvet is shrouded in mystery. Is it chocolate or vanilla? It’s both. Like a chocolate-vanilla swirl soft-serve cone, it’s the absolute best of both worlds. Why is it red? In the old days, it was because acid reacted with baking soda and cocoa powder, giving the finished product a reddish hue. (Devil’s Food cake has a similar backstory, except that it is decidedly chocolate.) These days, most bakers rely on red food coloring or beet juice to achieve a red final product. At the end of the day, there are only five requirements for something to be Red Velvet, and none of them are cream cheese frosting. I know. It’s a travesty! Red Velvet must have:

  1. Vanilla. In these cookies, we use 1 1/2 teaspoons for a pronounced vanilla flavor. It won’t get lost here.
  2. Natural Unsweetened Cocoa Powder. Some recipes use as little as a tablespoon, some use as much as 1/2 cup. I like to use 1/4 cup–just enough to say “there’s chocolate in here, but this is not a chocolate dessert.” Also, cocoa powder can really dry out baked goods. The smallish amount in this recipe makes sure that our final product is soft and chewy, rather than dry and crumbly. This (and pretty much any Red Velvet recipe) is not a good recipe for Dutch Process Cocoa, which will have a metallic-tasting result.
  3. Acid in the form of buttermilk and/or vinegar. In the case of these cookies, it’s powdered buttermilk. It reacts with both the baking soda and the cocoa powder to give these cookies a pleasant tang. The buttermilk powder will also give these cookies some additional tenderness, along with the acid in the brown sugar.
  4. A reddish color (duh). Here, we use one teaspoon of regular liquid red food coloring. I know that food coloring is terrible for us, but I don’t often have beet juice, and I kind of believe that dessert has some wiggle room. If you aren’t comfortable using food coloring, just leave it out. These will be delicious no matter their color.
  5. A velvety texture. That’s where the “Velvet” comes from. Now, cookies and velvety texture are not synonymous. Unless they’re cakey cookies, and I don’t see the point of eating cakey cookies when I could just have cake instead. For me, the velvet factor comes in the form of soft centers. Softness comes from the addition of cornstarch, which allows for tenderness here, just like it does in cake flour. Also, the cookies bake for just a few minutes–when they come out of the oven, the edges are chewy and the centers are soft and a little underbaked. Velvety, if you will.

Whew! That’s a lot of information for a Friday. All of that said, these are cookies. Making cookies should be fun. And these red, chocolate-vanilla cookies studded with white chocolate chips are really, really fun. Whether you’re making them for your family or as holiday gifts, they’re a total home run.

image

Red Velvet Cookies
makes about four dozen cookies

2 1/4 cups all purpose flour
1/4 cup natural unsweetened cocoa powder*
1/4 cup buttermilk powder
1/4 cup cornstarch
1 teaspoon baking soda
1 teaspoon Kosher or sea salt
1 cup (2 sticks) unsalted butter, melted and cooled slightly
3/4 cup light brown sugar*
1/2 cup granulated sugar
2 large eggs
1 1/2 teaspoons real vanilla extract
1 teaspoon liquid red food coloring*
1 1/4 cups white chocolate chips, plus optional extra for decorating*

In a medium mixing bowl, whisk together flour, cocoa powder, buttermilk powder, cornstarch, baking soda, and salt. Set aside.

In a large mixing bowl, whisk together melted butter, light brown sugar, and granulated sugar. One at a time, add in eggs, whisking until completely combined. Add in vanilla extract, followed by red food coloring. Add dry ingredients in two installments, stirring with a silicone spatula or wooden spoon until combined. Fold in 1 1/4 cups white chocolate chips. Cover dough with plastic wrap and chill for at least two hours, or up to three days.*

Preheat the oven to 350F. Line two baking sheets with parchment paper or silicone baking sheets. Scoop chilled dough in 1 tablespoon increments and roll into balls. Set dough balls at least two inches apart on the prepared baking sheets. Bake for 8-10 minutes, just until the tops are no longer raw-looking. Let the cookies sit on the baking sheets for 5-10 minutes before removing to a rack to cool completely. Repeat rolling, baking, and cooling until all cookie dough has been used.

Cookies will keep in an airtight container at room temperature for up to one week.

Notes:

  1. Do not use Dutch process cocoa here. Your cookies will have an unpleasant metallic flavor.
  2. Dark brown sugar may be substituted.
  3. If you are not comfortable using food coloring, just leave it out. The cookies will still taste great.
  4. I like to press a few extra white chocolate chips into the tops of the baked cookies, but this is purely for aesthetics.
  5. If the chilled dough is too difficult to scoop, let it sit on the counter for ten minutes before proceeding.

Chocolate Chip Shortbread Cookies

image

While I don’t often work in the mornings, I make a point to get up by 8am on weekdays. I have a sort of pattern that I follow nearly religiously, which goes as follows. Every weekday morning, I make a trip to my local bodega to get a coffee. I’m one of those that would love to make coffee, but has to be caffeinated to do so, lest I break the French press. I’ve gone to the same place for so long that the owner, Mr. Moon, no longer has to ask for my order; the only question is “Hot or cold?” Then I head home, turn the radio to BBC World Service News Hour (nerd alert!), and eat a bowl of granola with Icelandic yogurt, fruit, and a drizzle of maple syrup. I make granola in three-quart batches every few weeks, and go through it 1/2 cup at a time. But on the rare day that we don’t have a jar-full on top of the fridge, I make a trip to Bien Cuit for a coffee and a pastry.

Bien Cuit is a fantastic bakery on Smith Street in Boerum Hill. They make beautiful breads and pastries that change with the seasons; I am partial to the Tebirke (a flaky pastry filled with almond paste and rolled in poppyseeds) and Apple Cardamom Danish, but I’ve enjoyed nearly everything in the pastry case. And if that’s not enough to convince you to find a reason to go there right this minute, the baristas make one hell of a cappuccino. By the cashier, you’ll find a few cookie jars. They all look wonderful–and with flavors like Almond Sable and Malted Muesli, how couldn’t they be?–but the jar that always catches my eye is Diamond Chocolate Chip Shortbread. While I notice them every time I go to pay for my breakfast, I’ve never gotten one. Instead, I just dream about them while I go about my day. There are worse things to daydream about than crunchy, buttery cookies chock-full of miniature chocolate chips.

When Henry and I were invited to dinner at our friend David’s last week, I was asked to bring something simple to go with after-dinner tea. The first thing to come to mind was that jar of chocolate chip shortbread. I got to work making my own version. The result was just what he asked for: simple little cookies with the flavor of a chocolate chip cookie and a crunchy texture perfect for dunking in tea or coffee.

image

These really are the simplest cookies. They start with creaming room temperature butter, dark brown sugar, and granulated sugar. We use 3 parts brown sugar to 1 part granulated to ensure the rich caramel flavor of a great chocolate chip cookie. Then, we add in a little vanilla to round out the flavor of the cookie itself. The next step is adding flour and salt in two installments, followed by folding in miniature chocolate chips. The dough will seem very crumbly, but should hold together when you pinch some together. Then we divide the dough in half and roll each half into a log, wrap it in plastic, and let chill for 45 minutes to solidify the butter and meld the flavors. When that time is up, unwrap the dough, and slice into 1/4″-thick rounds. Bake for 15-17 minutes, or until the tops are no longer doughy and the edges are starting to brown. Then make yourself a pot of coffee or tea, and dunk away!

Chocolate Chip Shortbread Cookies keep well covered at room temperature for at least a week. They are a perfect casual dessert or afternoon treat for these colder months, and I think a little bag of them would be a great holiday gift with a pound of coffee and a cute ribbon! They would also make fantastic little ice cream sandwiches. Actually, that’s a great idea. I think I’ll go have one right now…

image

Chocolate Chip Shortbread Cookies
makes about six dozen

1 3/4 cups all purpose flour
1/2 teaspoon Kosher or sea salt
3/4 cup unsalted butter, softened to room temperature
6 tablespoons dark brown sugar, packed*
2 tablespoons granulated sugar
3/4 teaspoon pure vanilla extract
1/2 cup + 2 tablespoons mini chocolate chips*

In a medium mixing bowl, whisk together flour and salt. Set aside.

With a hand mixer in a large mixing bowl, beat butter until it is light and fluffy (about two minutes). Add dark brown and granulated sugars followed by vanilla, and beat until they are completely incorporated. With the mixer running on low, incorporate flour mixture in two installments, making sure to scrape down the sides of the bowl. Mix in mini chocolate chips.

Divide dough in half. Take one half and lay it on a piece of plastic wrap. Using the plastic wrap and clean hands, form the dough into a 9″ long x 1.5″ thick log. Wrap tightly in the plastic wrap. Repeat with the other half of the dough. Refrigerate wrapped dough for at least 45 minutes, or up to three days.

Preheat the oven to 325F. Line two cookie sheets with parchment paper, and set aside.

Unwrap one log of dough. Using a large, sharp chef’s knife, slice the dough in 1/4″ installments and lay them on the prepared pans one inch apart. Bake for 15-17 minutes, or until the tops no longer look doughy and the edges are starting to brown. Let cool on the pans for for 10 minutes before removing to a rack to cool completely. Repeat slicing and baking with remaining dough.

These keep well in an airtight container at room temperature for at least a week.

Notes:

  1. Light brown sugar may be substituted.
  2. Regular-sized chocolate chips are not recommended.