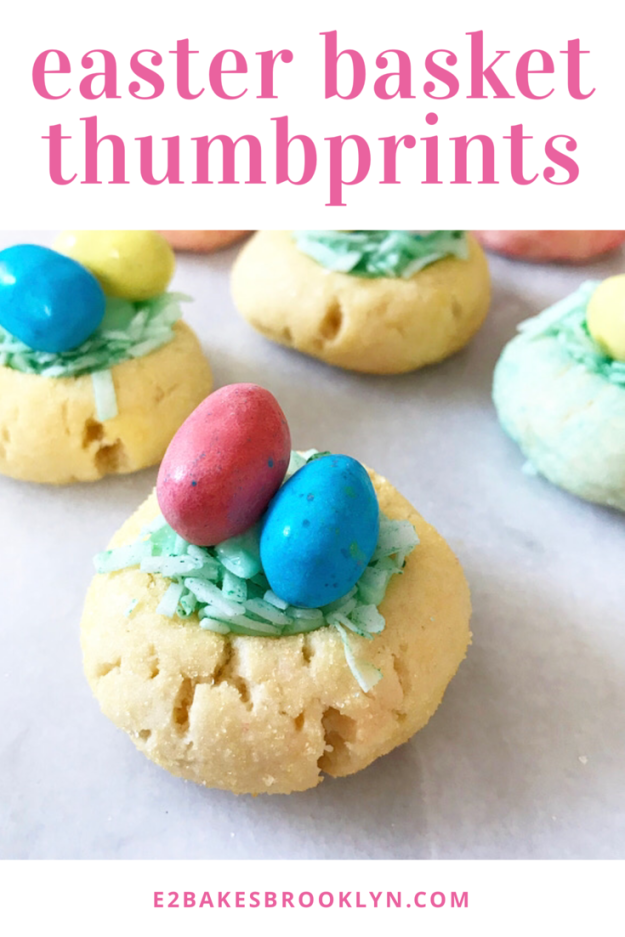
 If you’re looking for something easy and adorable to contribute to this year’s Easter desserts spread, your search is over.
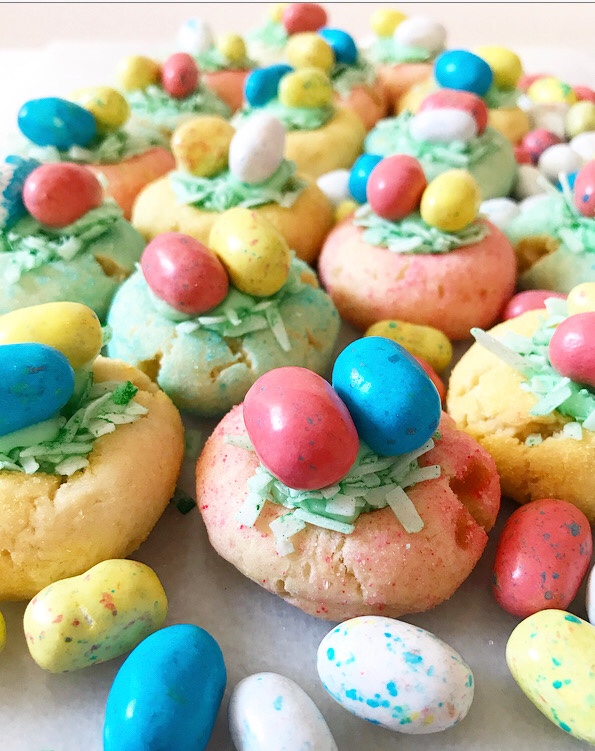 Easter Basket Thumbprints are just as festive as my Easter Egg Hunt Cake and only 1/4 of the work! Who can resist their pastel cuteness?! Not this lady.
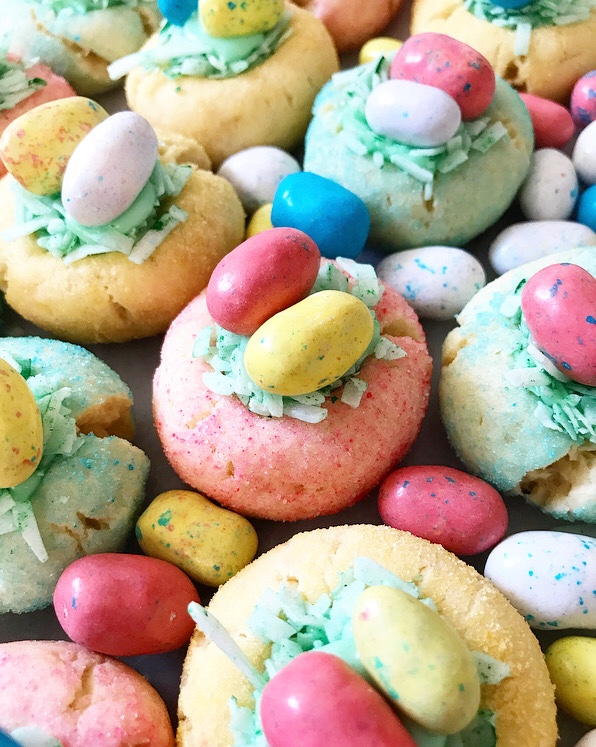 This recipe is simply an Eastered-up take on the Holiday Icing Thumbprints I posted last Christmas. They are meant to resemble little two-bite Easter baskets 🙂
 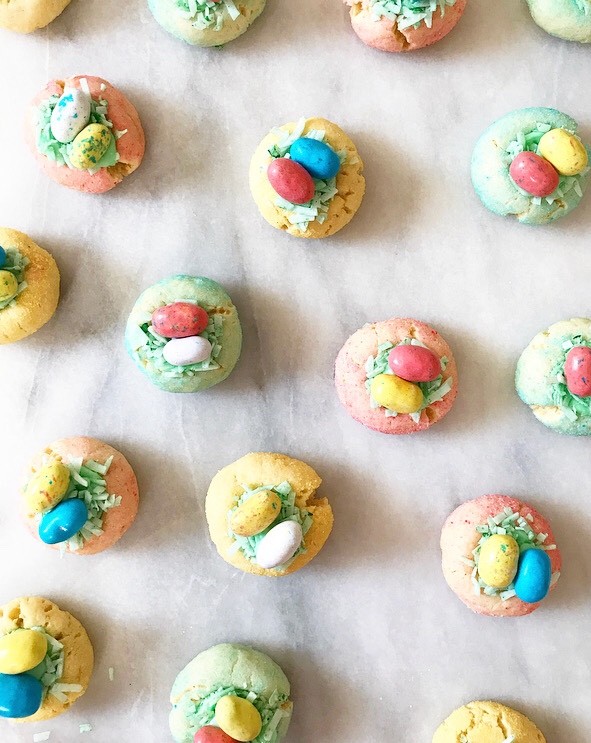 They are simple to make, too. I don’t have children, but I definitely would have made these with my older kids back in my nanny days.
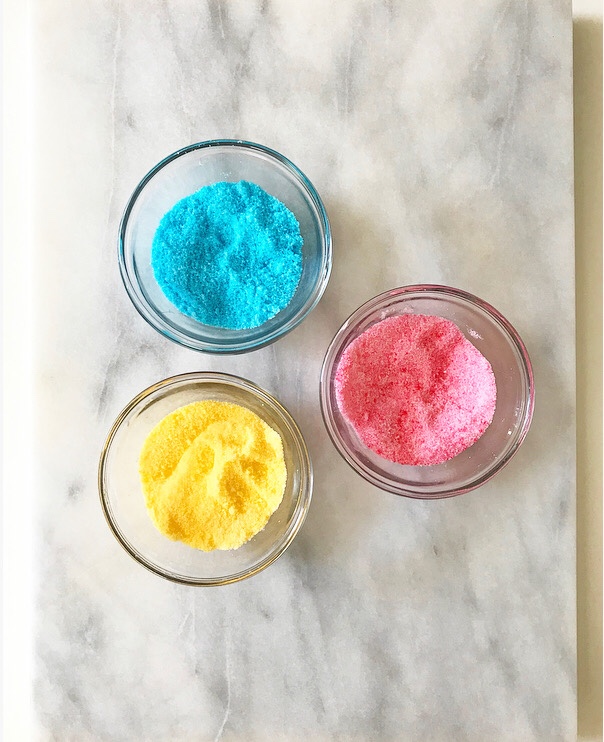
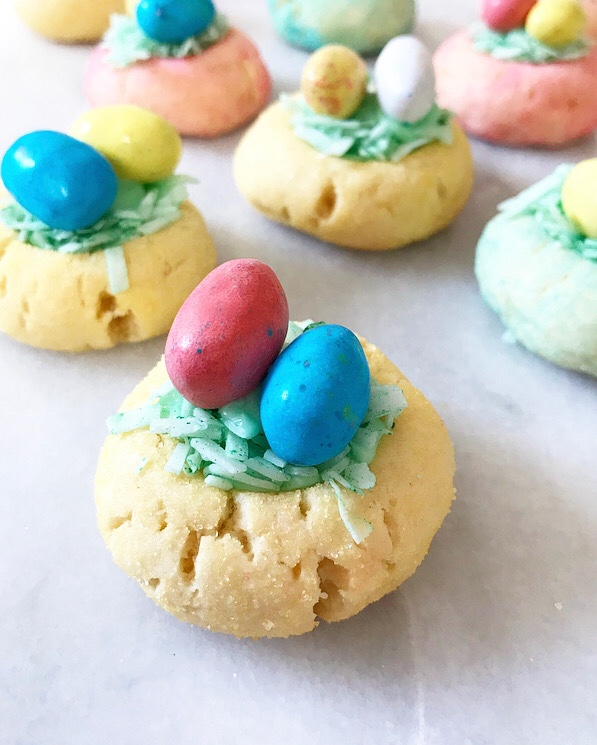
 The sugar cookie dough bases are rolled in pastel sparkling sugar for color and texture (crispy edges!) before baking.
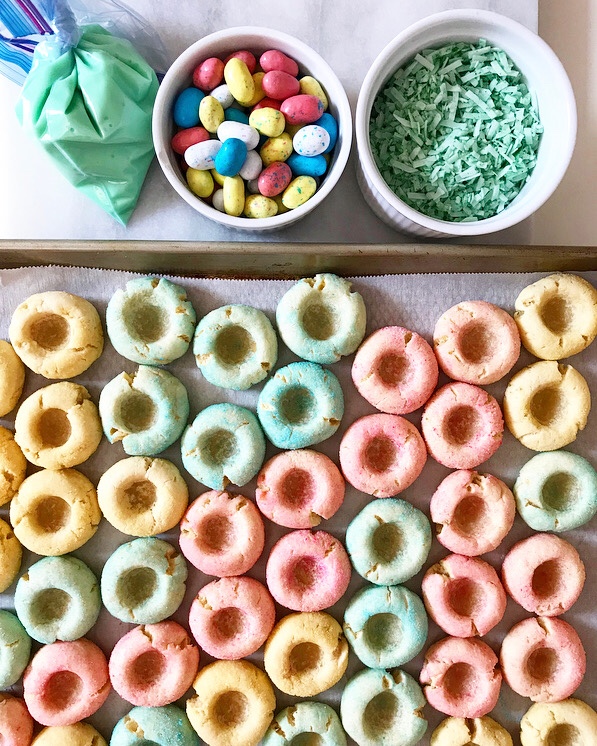 Then, immediately after baking, a well is pressed into the center of each cookie. These are the “thumbprints,” even though they’re made with the back of a 1/2 teaspoon. They’re filled with green icing…
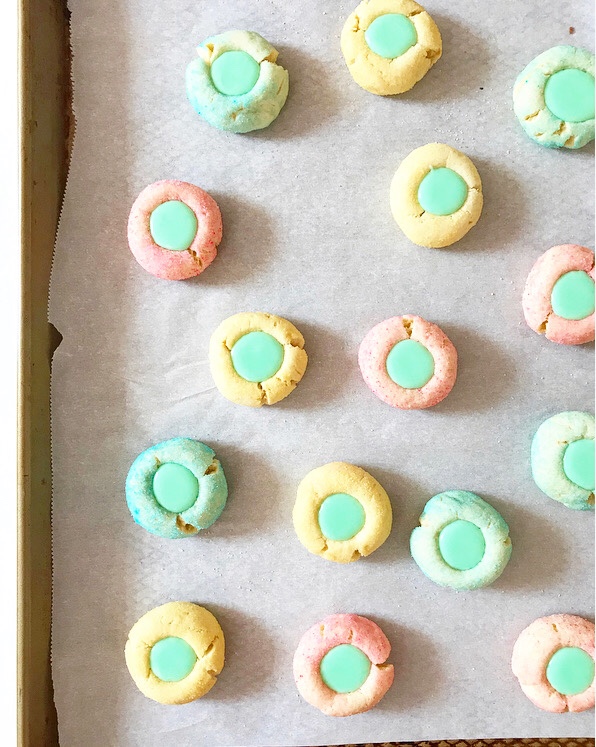
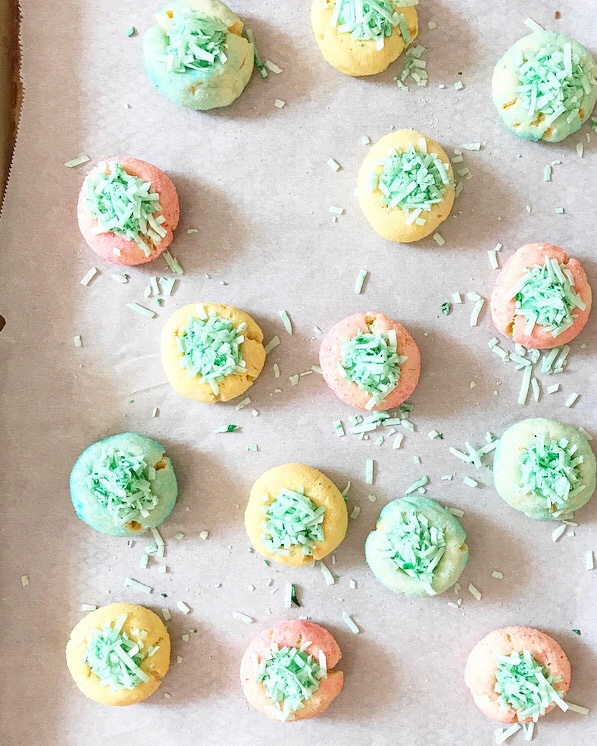 and topped with some coconut “Easter grass.”
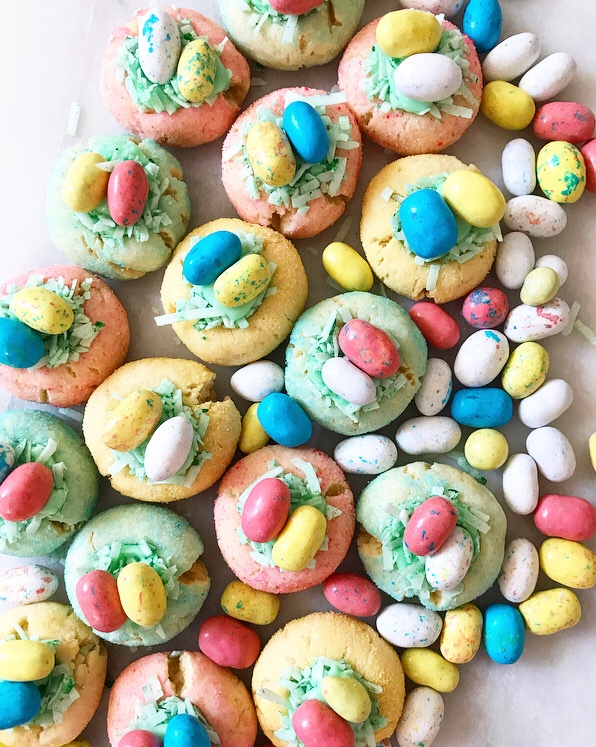 Dot on a little extra icing and finish your cookies with a couple of Easter egg candies. I went with these candy-coated malted milk balls. Let’s not discuss how many I ate during this little photoshoot.
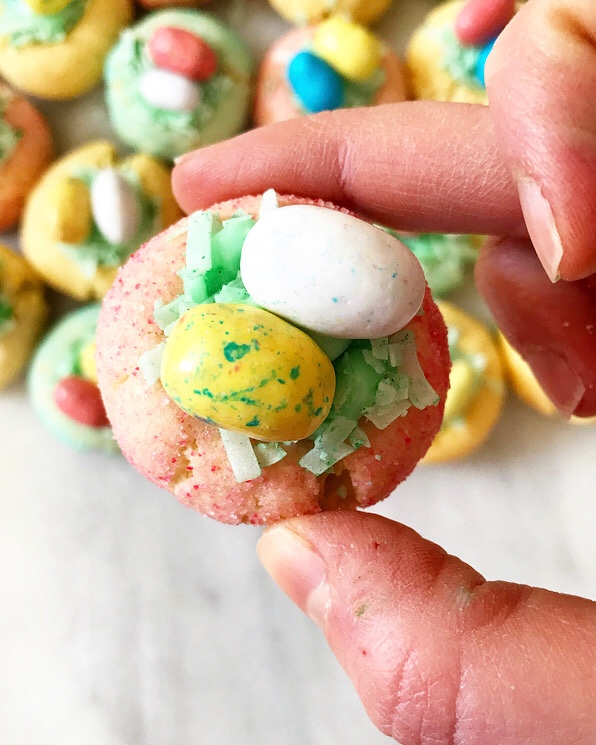 Or how many of these cheerful Easter Basket Thumbprints I ate in the days that followed.
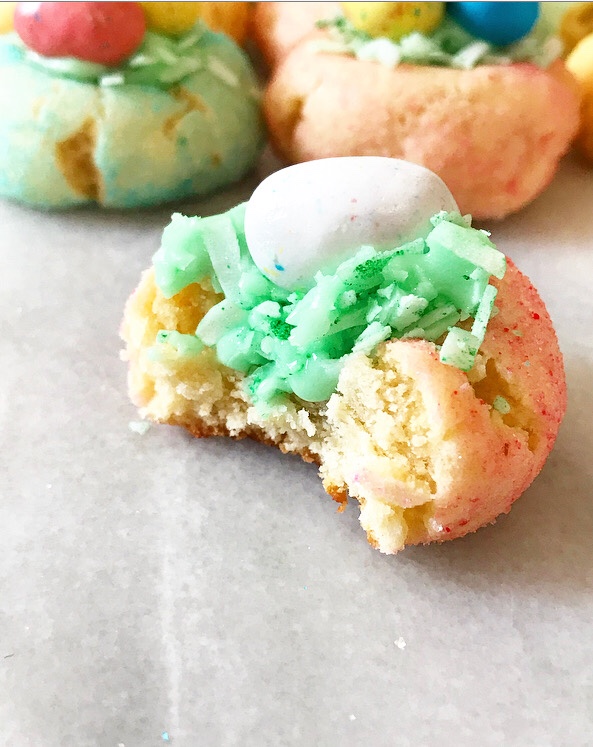 No regrets.
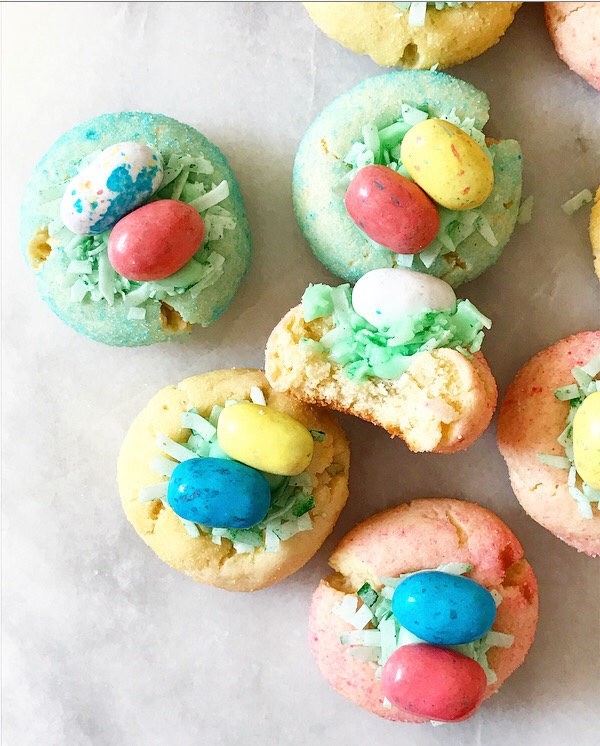
Easter Basket Thumbprints
makes about 3.5 dozen cookies
Cookie Dough:
3 1/4 cups all-purpose flour
1 teaspoon baking powder
1/2 teaspoon Kosher or sea salt
1/2 cup unsalted butter, softened to room temperature
4 oz (1/2 brick) full-fat brick-style cream cheese, softened to room temperature
3/4 cup granulated sugar
1/4 cup light brown sugar, packed
1 large egg, room temperature
2 teaspoons pure vanilla extract
1/4 teaspoon pure almond extract (optional)
For Sugar Coating:
3/4 cup granulated sugar, divided
1-2 drops each pink, blue, and yellow food colorings (liquid or gel)
Coconut:
1 cup flaked coconut (sweetened or unsweetened)
3-5 drops green food coloring (preferably liquid)
Icing & Garnish:
1 1/3 cups confectioners sugar, divided
2-3 tablespoons (6-9 teaspoons) milk
2-3 drops green food coloring (liquid or gel)
1 package Easter egg candies (I like Whoppers Mini Robin Eggs)
In a large mixing bowl, whisk together flour, baking powder, and salt. Set aside.
In a separate large mixing bowl, use an electric mixer to beat butter and cream cheese until light and fluffy, about 2 minutes. Cream in granulated and light brown sugars, followed by the egg, vanilla, and peppermint extract. Add dry ingredients in 3 installments, combining completely after each. Cover dough with plastic wrap and chill for at least 3 hours or up to 3 days.
Preheat oven to 350F. Line two baking sheets with parchment. Set aside.
Make the sugar coating. Place 1/4 cup granulated sugar in each of 3 small bowls. Add 1 drop food coloring to each bowl (I used pink, blue, and yellow) and use a fork to stir in the color. If you use gel coloring, you may need a drop of water to ease the color onto the sugar. Add another drop of food coloring, if needed to reach desired color.
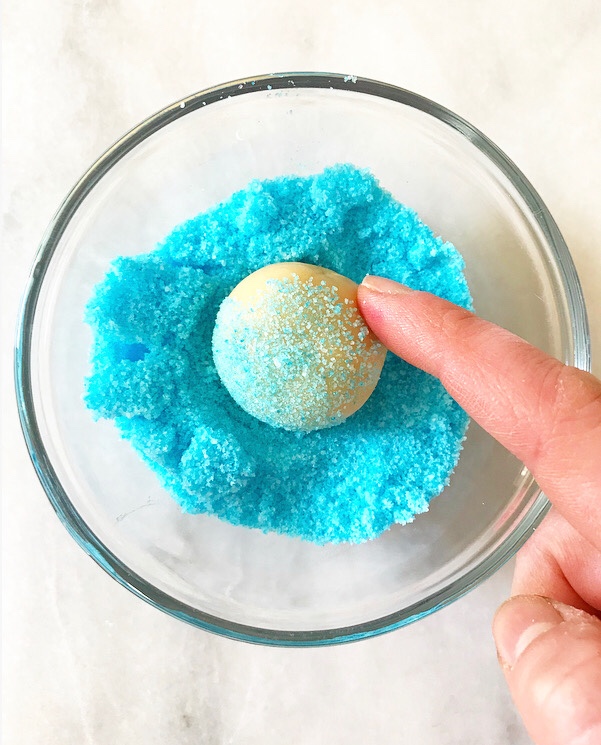
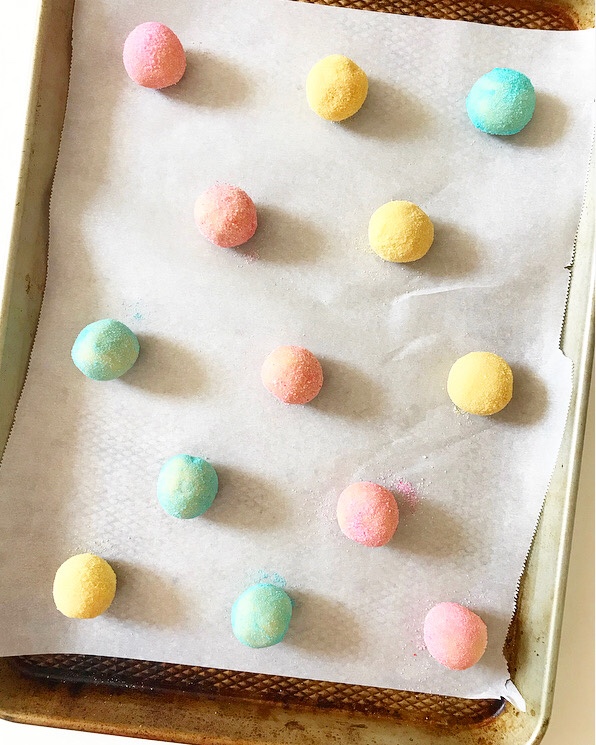
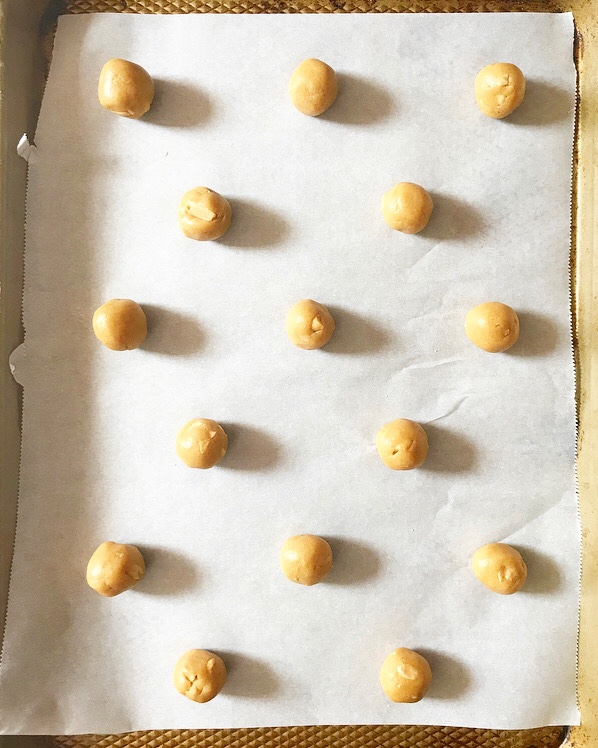
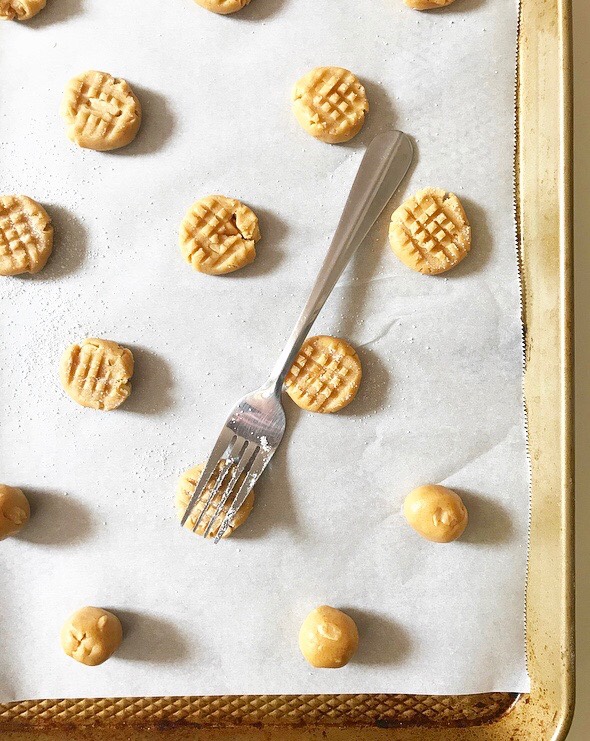
Remove dough from the refrigerator. Scoop dough by the tablespoon and roll each into a ball. Roll balls in colored sugar before placing at least 2 inches apart on prepared pans. Use the back of a very small spoon (like a 1/2 teaspoon) to slowly press a well into each dough ball. They may crack a bit—this is okay.
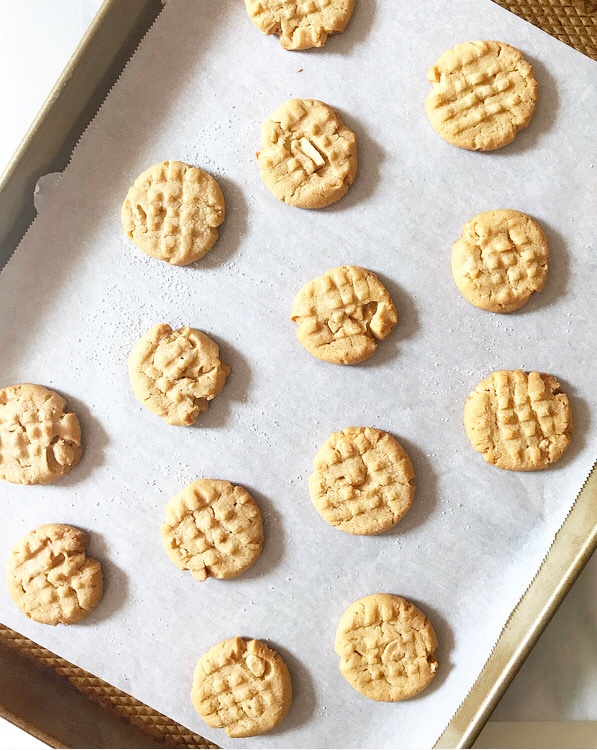
Bake cookies 12-13 minutes. Cookies are done when puffed and no longer raw-looking. When you remove the cookies from the oven, press the back of the small spoon into the centers again. Let cookies cool on the pans for 10 minutes before carefully removing to a rack to cool completely. Repeat rolling, coating, and baking process with all remaining dough, letting the cookie sheets come back to room temperature between batches.
Dye the coconut. Place flaked coconut in a small bowl and add 3 drops green food coloring. Use a fork (or your fingers) to distribute the dye evenly. Add another drop or 2 of coloring, as needed to achieve desired color.
Make the icing. Place confectioners sugar in a small bowl. Stir 2 tablespoons (6 teaspoons) of milk into each bowl. Add 2-3 drops green food coloring and whisk with a fork until combined. Add more milk by the 1/2 teaspoon until icing is very thick, but pourable.
Transfer icing to a piping bag (or ziptop sandwich bag), twist it tight and snip off a very small corner. Fill wells in cookies as desired. Sprinkle/press on coconut.
Add a drop of icing to each cookie to adhere Easter egg candies.
Icing will set over time. Cookies will keep in an airtight container at room temperature for a few days. Place wax paper between layers for easiest storage.
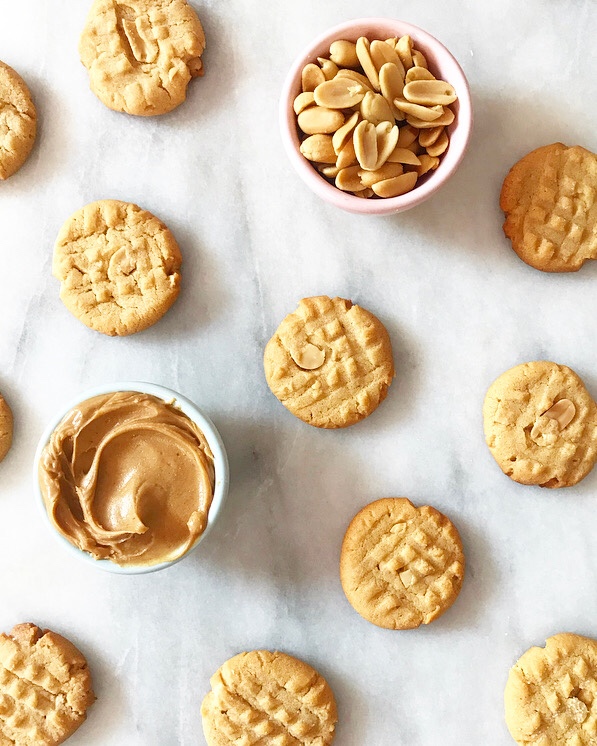 There is a small town between Austin, Texas, and my hometown of Fort Worth that is called Hamilton. From the passenger seat of my parents’ SUV, it looks like any other small Texas town—there’s nothing remarkable about it from that particular vantage point, except that it is home to my family’s favorite pit stop,
 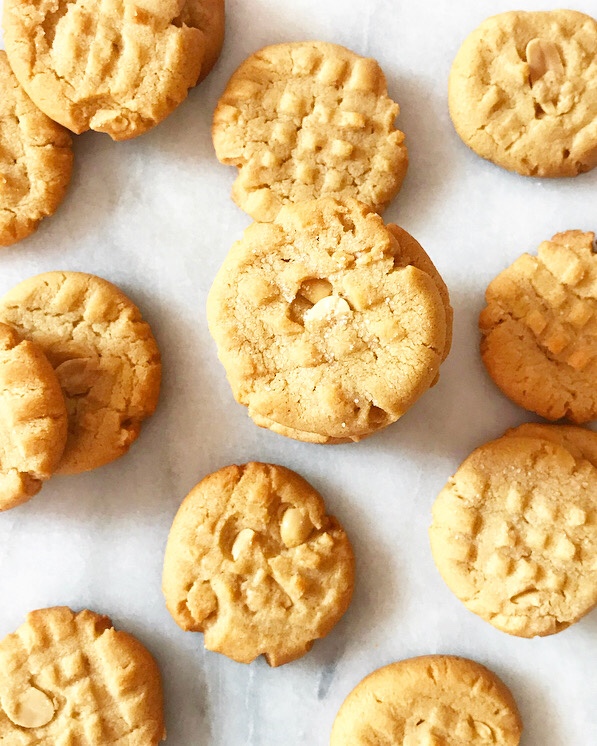 I should say that we have always called it The Flying Dutchman. I don’t know why—that’s just what we’ve always called it. I’d like to tell you that we will change our ways and call it Dutchman’s Hidden Valley from here on out, but we won’t so I won’t. A 35+ year family habit is not easily broken.
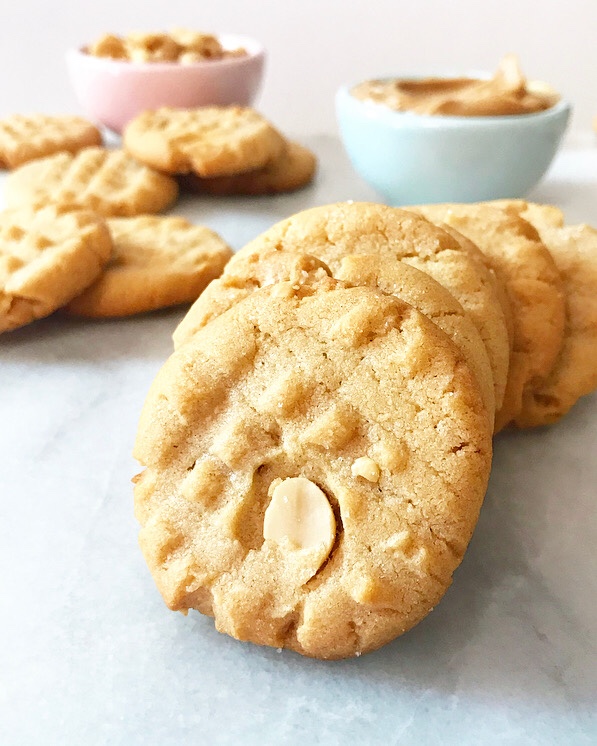 My dad began stopping at Dutchman’s Hidden Valley in the early 1980s on his way to visit my older sister down in Fredericksburg. He’d stretch his legs and grab a Bavarian ham sandwich before getting back on the road. When he met my mom, he introduced her to the store. Fast forward ten or so years, and she and my grandma began taking Eliot and me to Dutchman’s on our way to family reunions in Kerrville. And now, twenty years beyond that, my parents take the back route to visit my older sister again, this time in Austin. They say it’s because I-35 is a mess, which is true, but I think it’s actually so they can get a sandwich.
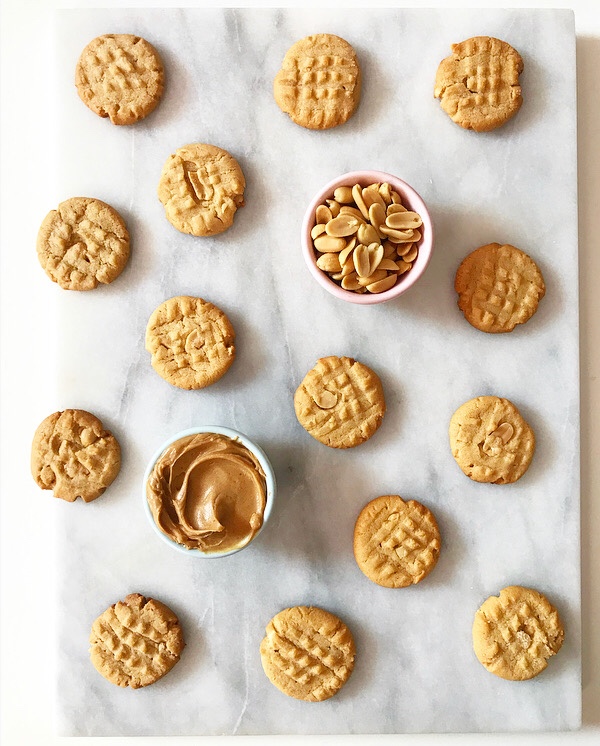 I haven’t lived in Texas or driven the back roads in a very long time now, but a couple of Christmases ago I had the pleasure of riding with my mom from my sister’s home in Austin to my parents’ in Fort Worth. We were listening to
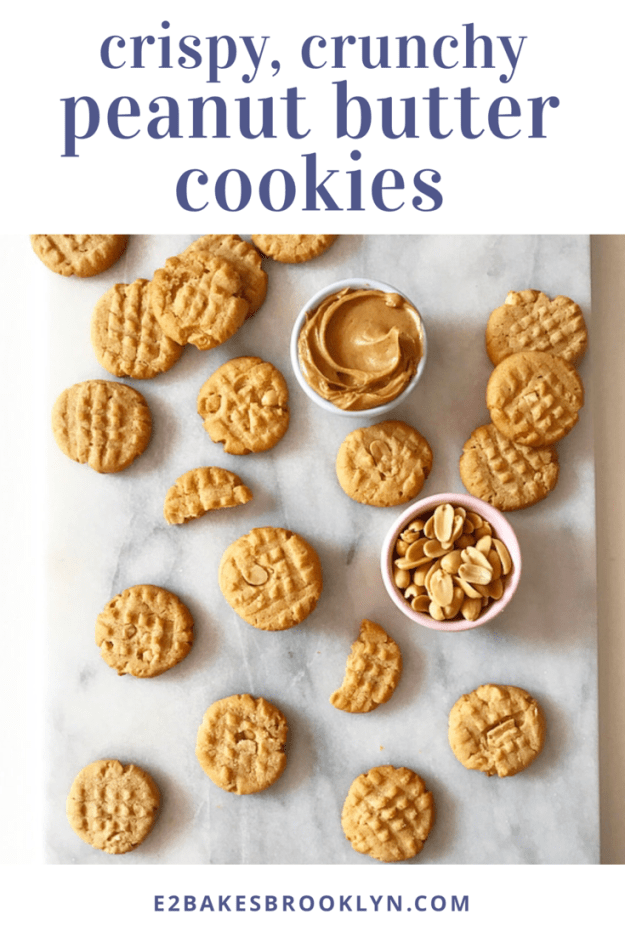
 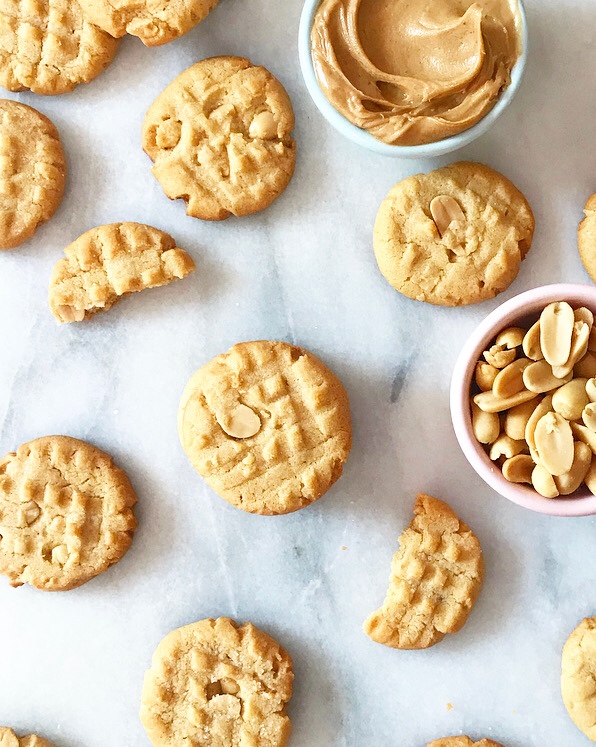 Crispy, crunchy and not-too-sweet, with an almost-savory peanut butter flavor, my mom and I talked about them all the way home. Dutchman’s peanut butter cookies are probably the best I’ve ever had in my life, and I have thought of them frequently and fondly for the last 15 months. I’m still kicking myself for not grabbing another on the way out the door—I think they were 60 cents each.
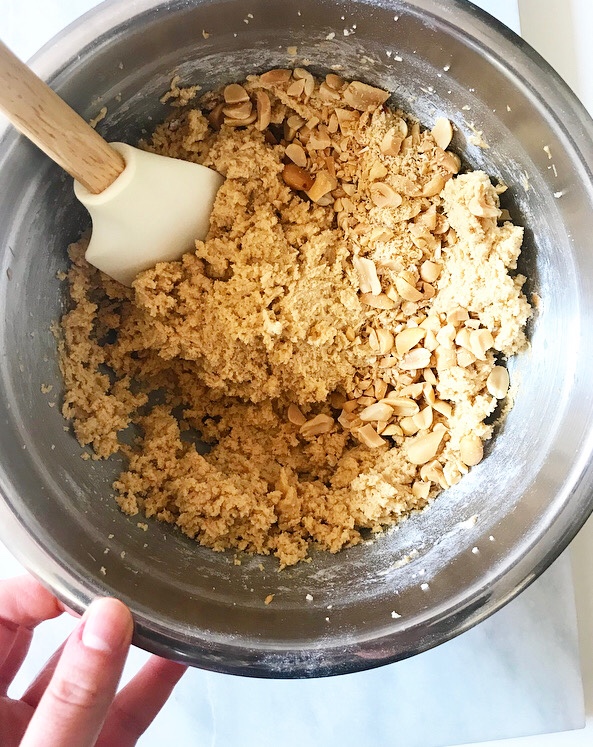
 Now, I am sure I will end up in Texas at some point this year, but I don’t know when, and I am highly unlikely to find myself passing through the sleepy metropolis of Hamilton. My trips are rarely more than a few days, so road trips to get Bavarian ham sandwiches and chips and my newfound-favorite peanut butter cookies are difficult to squeeze in.
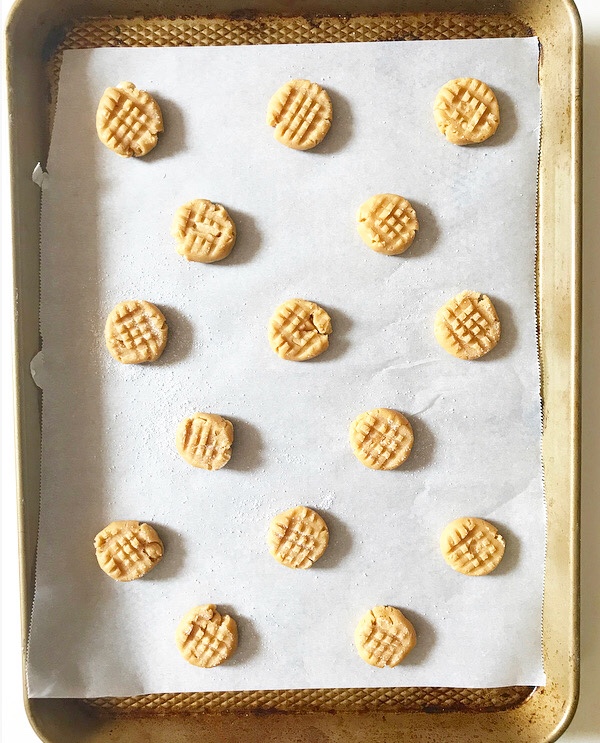
 This is all a very long way of saying that I have done my best to recreate Dutchman’s peanut butter cookies in my New York kitchen. I’ve done a pretty good job, if I do say so myself 🙂
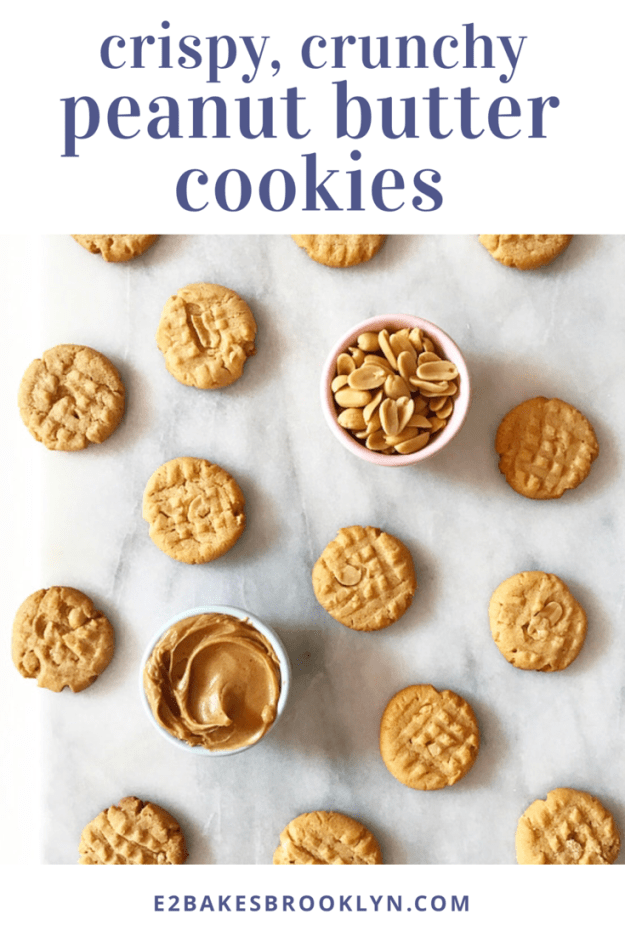
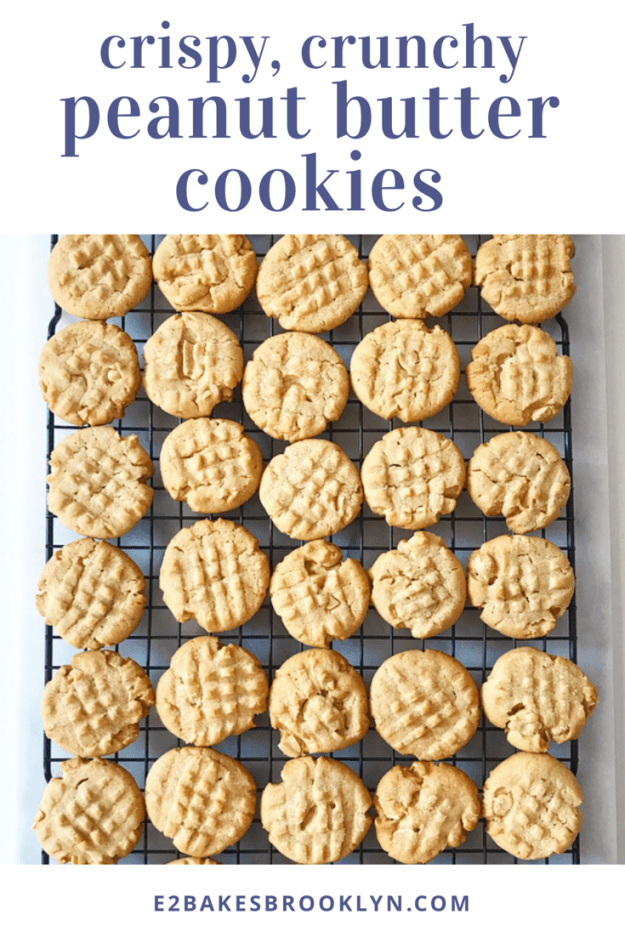
 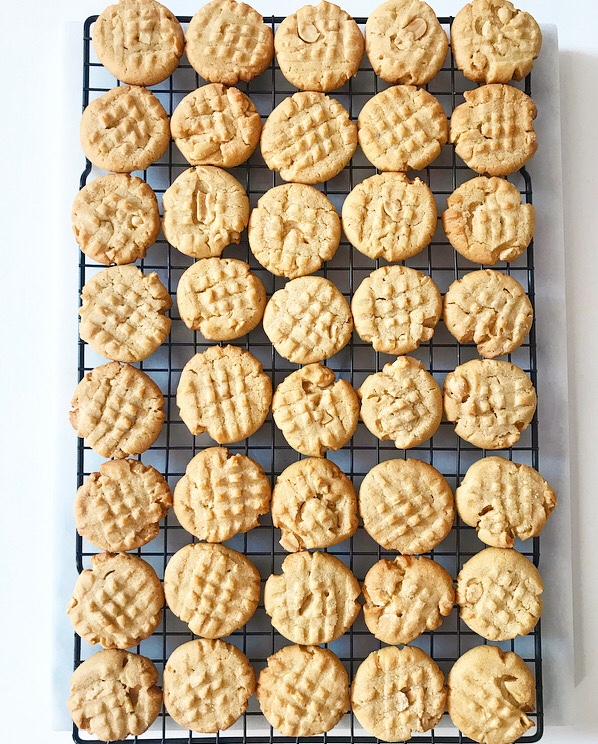 These Crispy, Crunchy Peanut Butter Cookies are crispy and crunchy (duh) and sort of sandy. They aren’t overly sweet—there’s barely 1/2 teaspoon of added sugar in each one—and while I believe Dutchman’s cookies’ savory edge may come from lard (rural Texas, y’all), mine comes from a smattering of roasted peanuts. If you want a sweeter cookie, you can swap all or part of the peanuts for chocolate chips, or leave the add-ins out entirely.
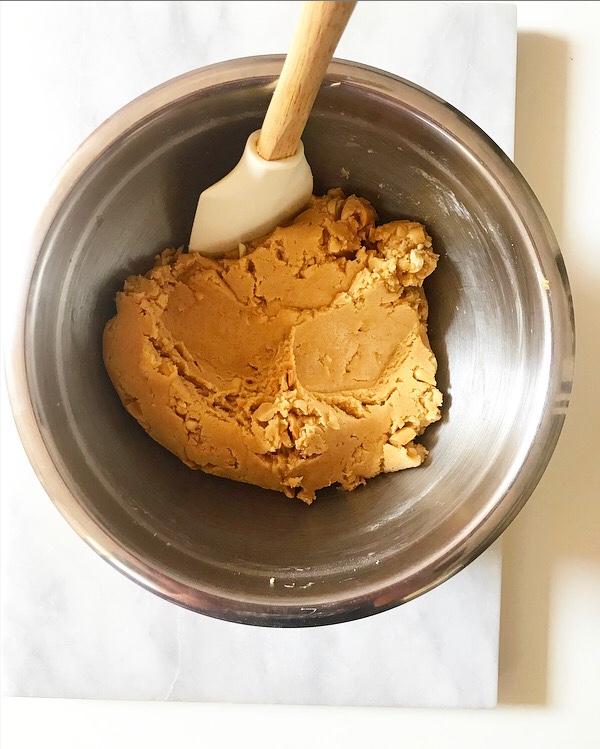
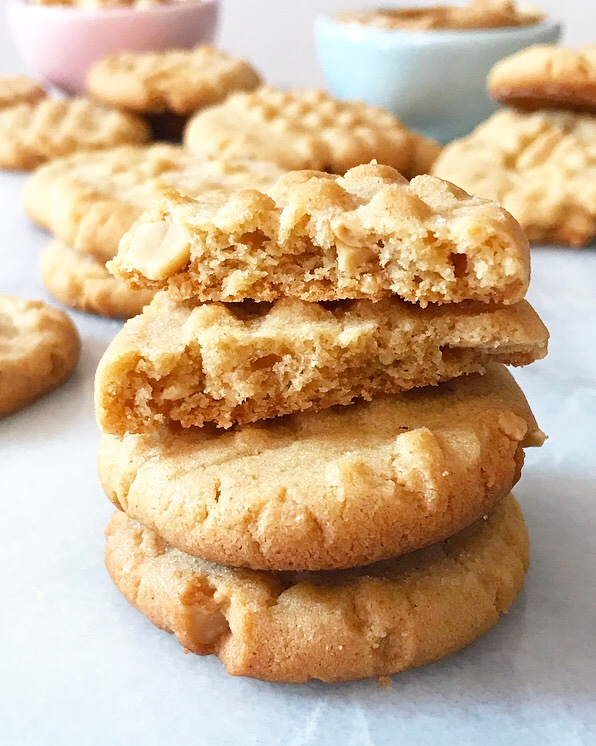 Hands-down, my favorite part of this recipe is that it doesn’t require a chill. The dough is sturdy and easy to roll from the get-go, so the time between the moment the peanut butter cookie craving strikes and when they are baked and ready is mercifully brief. Oh, and these cookies hold up well for at least ten days and develop deeper peanut butter flavor over time, so you can eat them frequently and think of them fondly and not have to worry about when you’ll have time to bake more, or when you can get to a roadside antique store & sandwich counter in Hamilton, Texas, to get your fix.
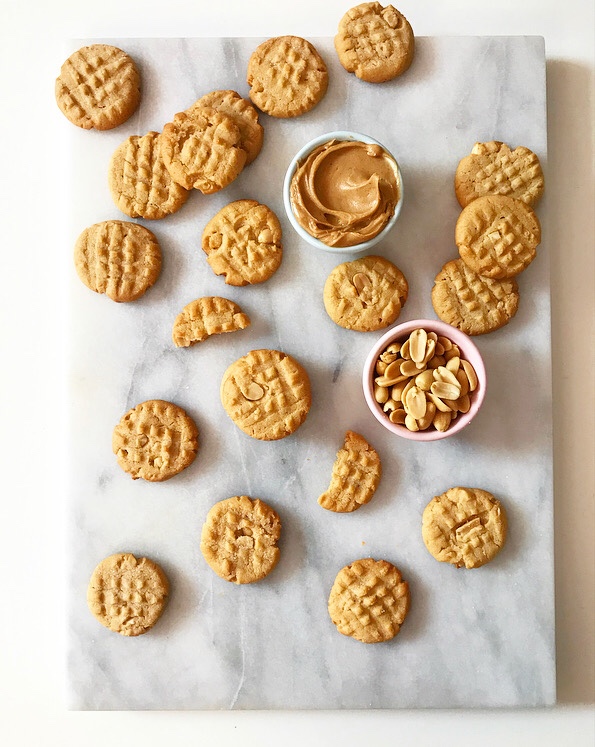
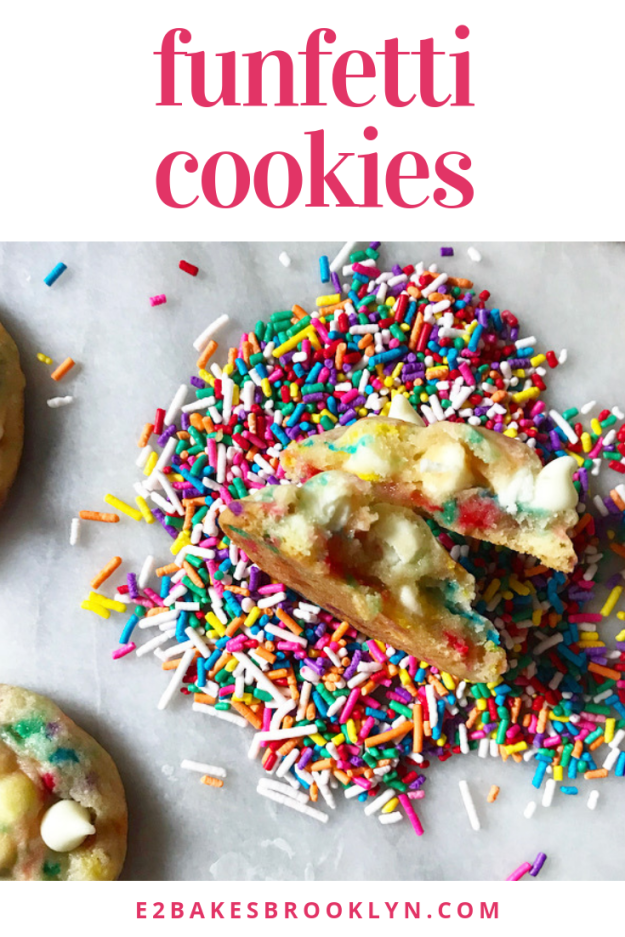
 It’s no secret that I love sprinkles. Like big pink puffy heart ❤ ❤ ❤ them. You’d be surprised at the amount of restraint I have to practice so that half the recipes on this site aren’t loaded with rainbow-colored
  I know it’s silly, but I don’t care. You can tell me all you want that
  Sprinkles make me happy. Don’t rain on my
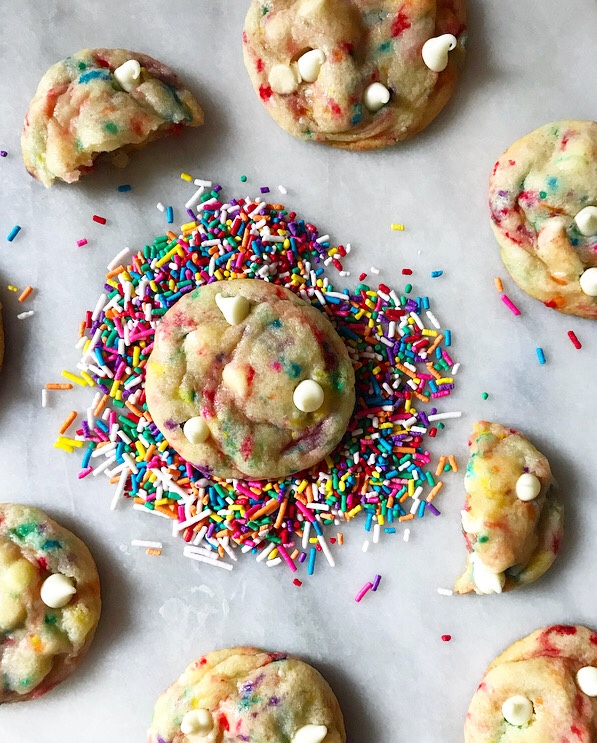
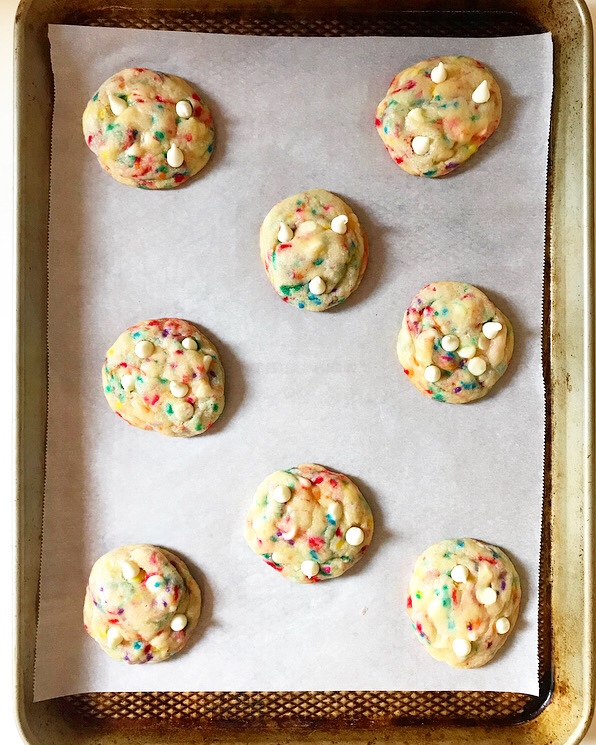
  I mean, how could anyone be anything but beaming while eating a soft, chewy sugar cookie bursting with color and studded with white chocolate chips? This batch is long gone, but just looking at the photos makes me smile 🙂
 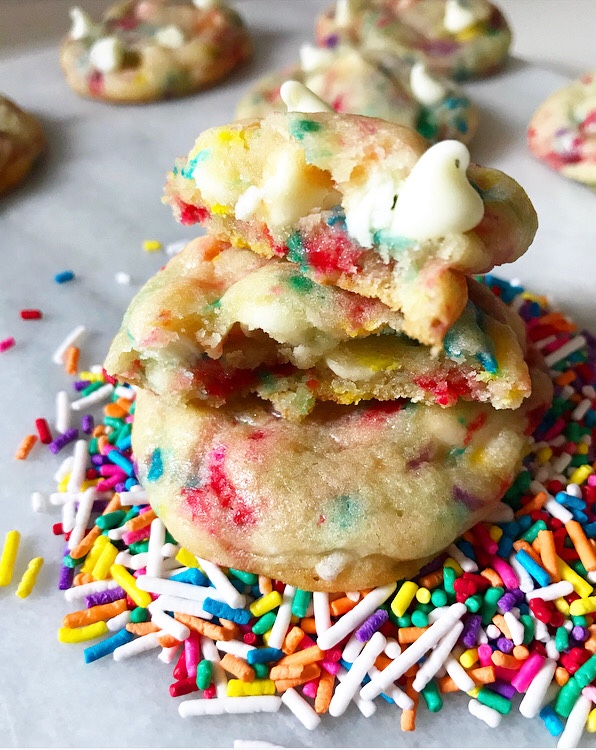 You know what else makes me smile? Miniature schnauzers (also all dogs ever),
 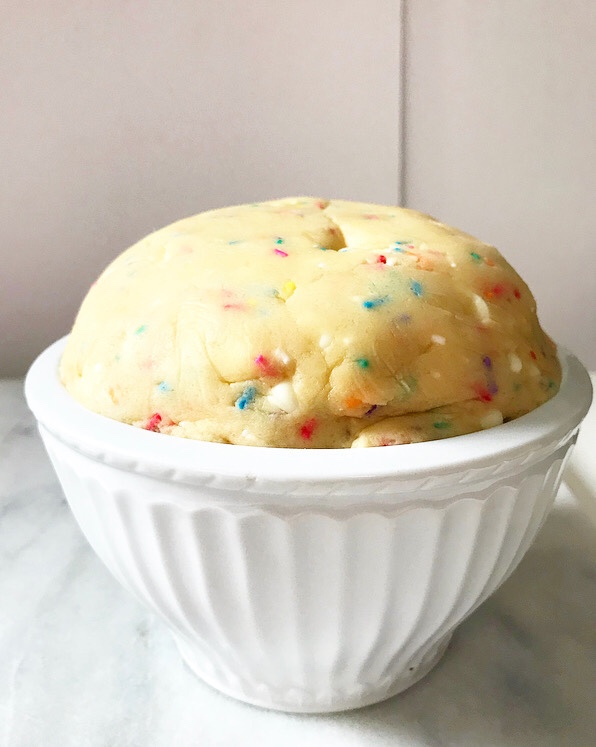 This recipe starts with a buttery drop sugar cookie dough that you probably have all the ingredients for right now! #score
 You could, of course, skip the accoutrements and bake up a batch of really delicious plain sugar cookies, but I promise the sprinkles and white chocolate chips are worth the extra trip to the grocery store. They take an already great recipe and turn it up to 11.
 I don’t know about you, but I simply don’t have time or spare calories for cookies that aren’t an 11.


 I don’t like Halloween. There, I said it. I was ambivalent toward it as a kid and I straight-up don’t like it now.
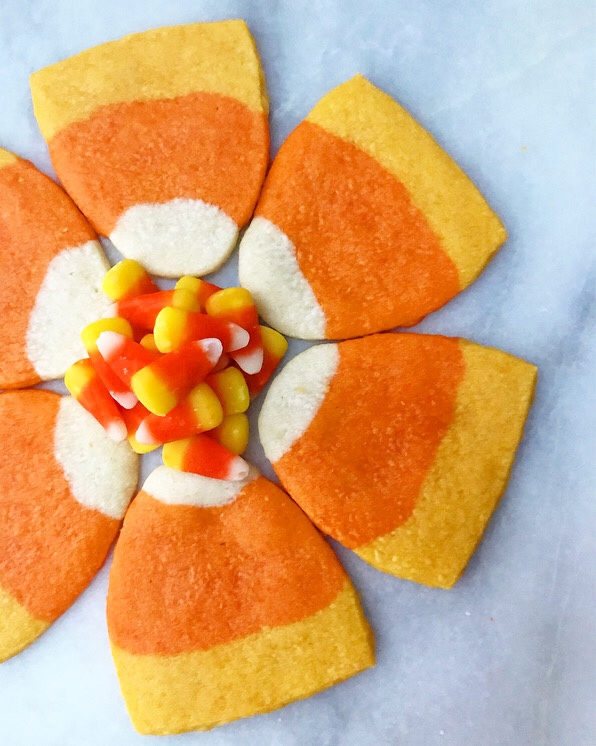
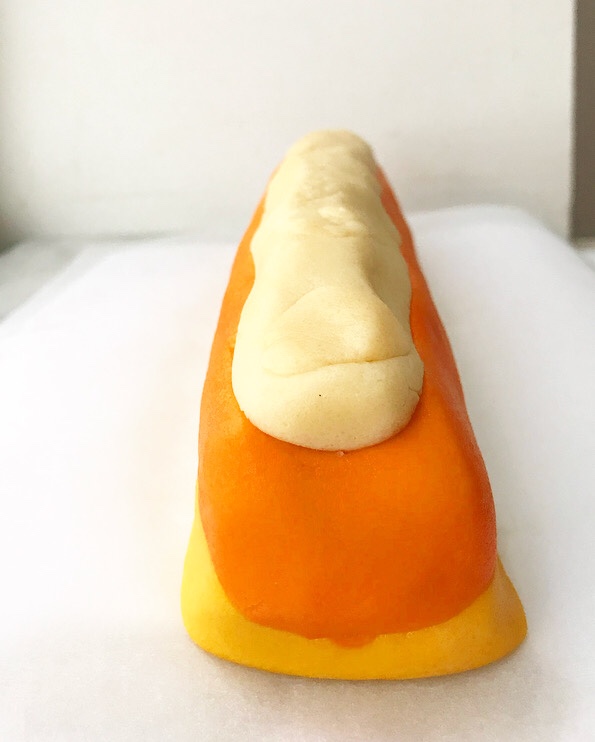
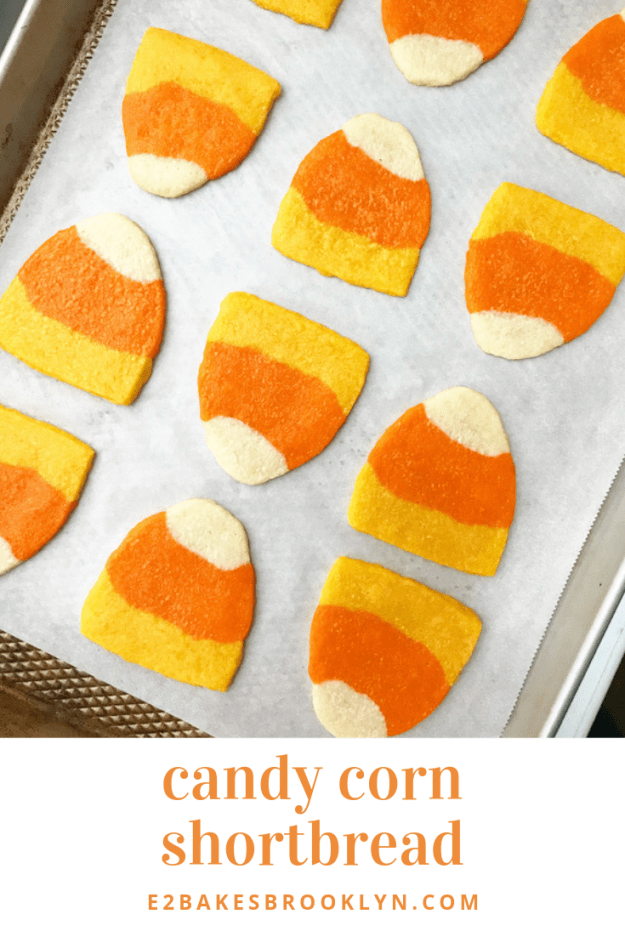
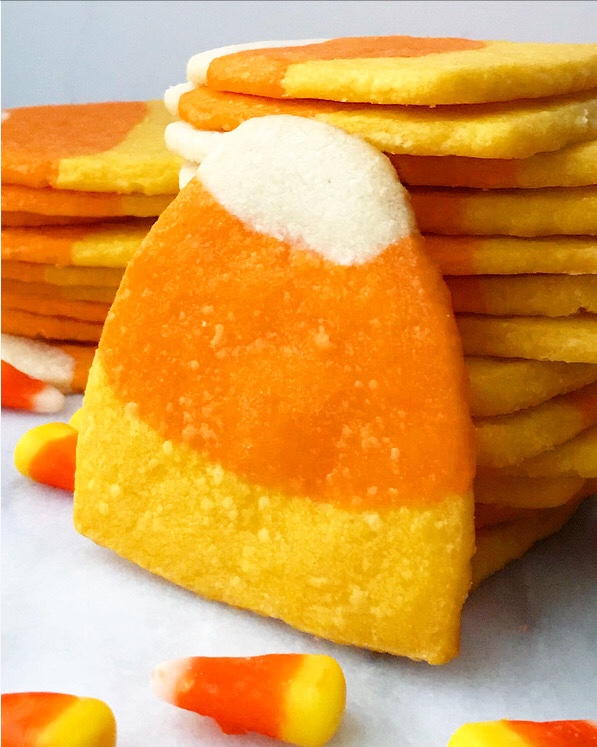 One Halloween-ish thing that I do love? Candy corn. For proof, see
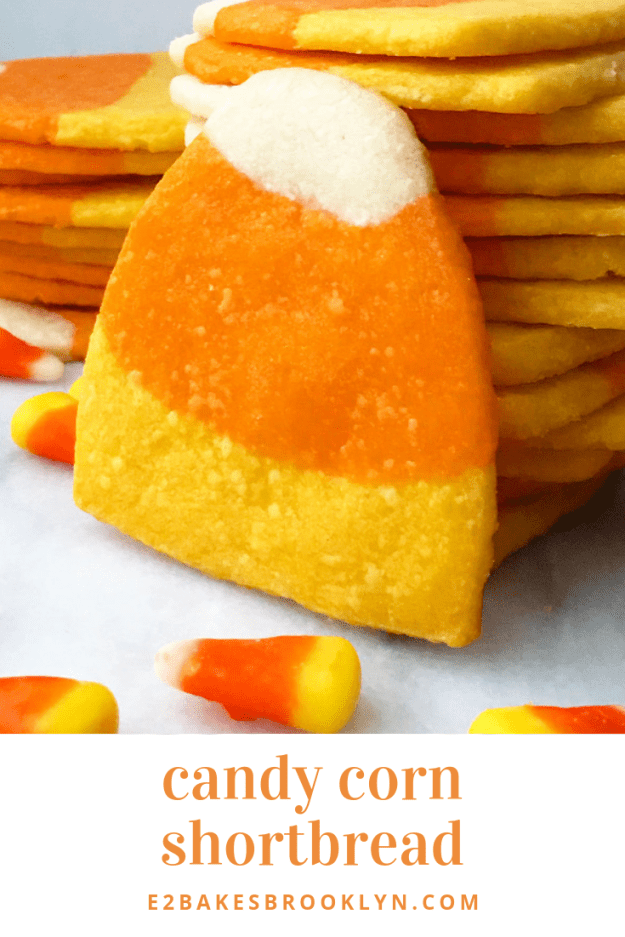
 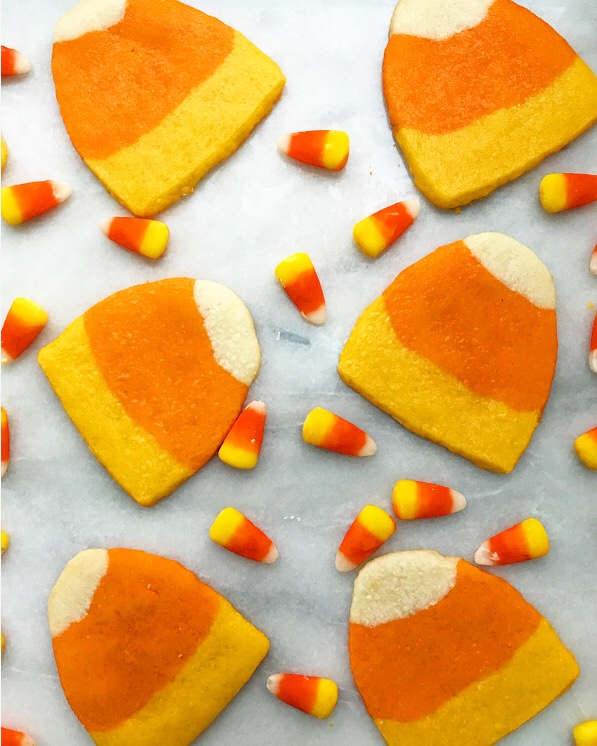 I know not everyone feels the way I do, but I think we can all get behind easy, festive, made-from-scratch treats. Exhibit A: Candy Corn Shortbread! How cute are these cookies, y’all?!
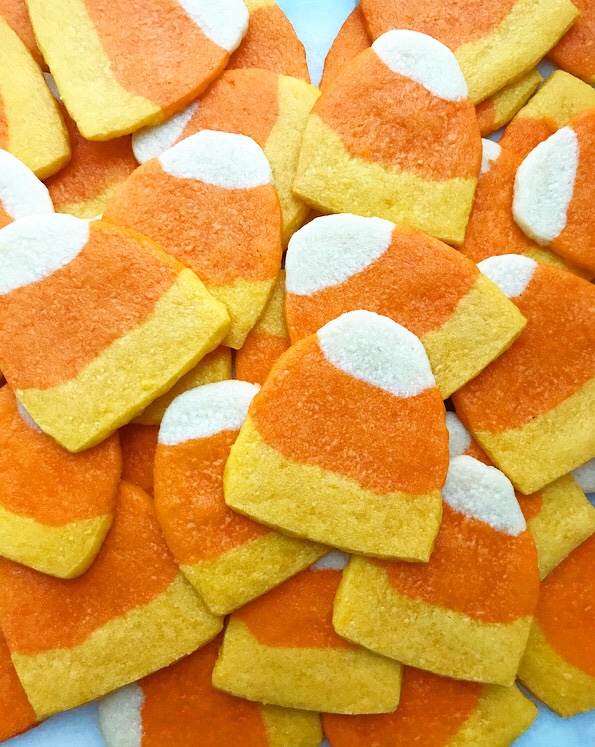 This recipe is made from very straightforward six-ingredient dough—literally just a vanilla shortbread with a little honey to reflect its “made with real honey” candy corn inspiration. After mixing (which takes all of five minutes) it’s divided into three sections, like so.
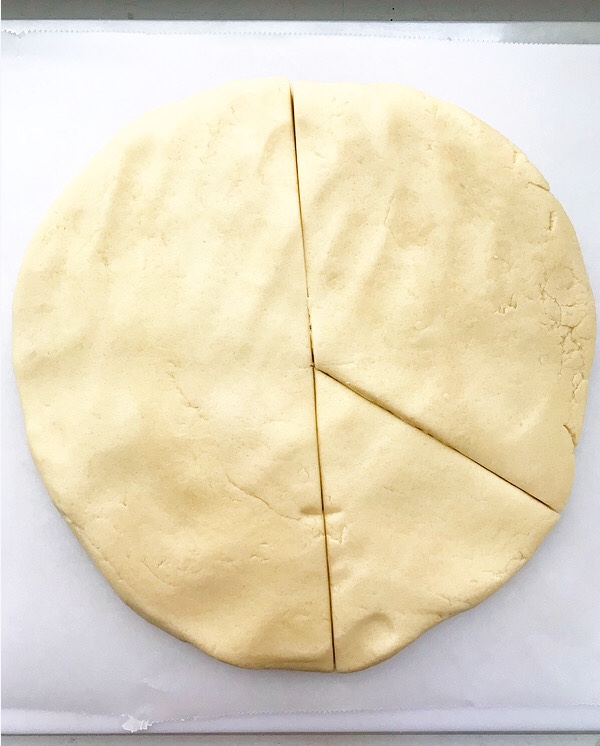 The smallest is set aside, while the medium piece is dyed yellow and the largest is dyed orange. I like to use gel food coloring here, but did have success testing with liquid.
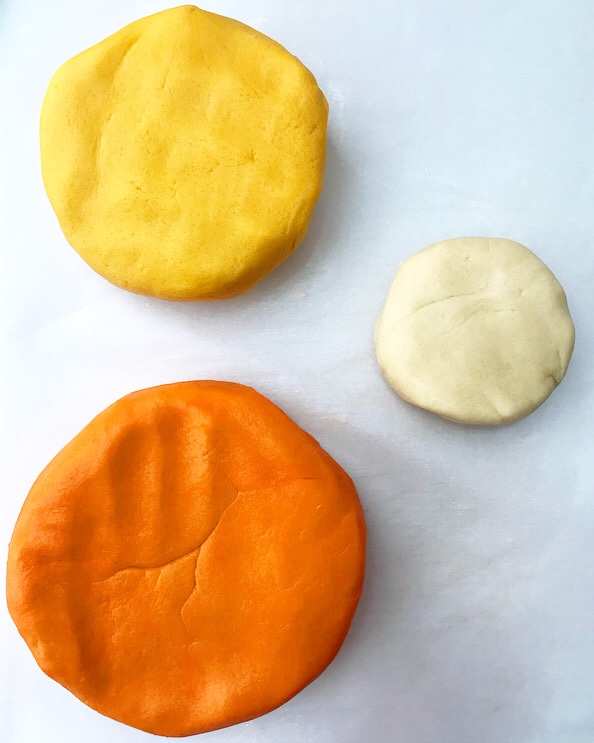 After the dough colors are to your liking, it’s time to assemble it all so that it can be sliced later. This process is really very simple: just shape the yellow portion into a rectangle…
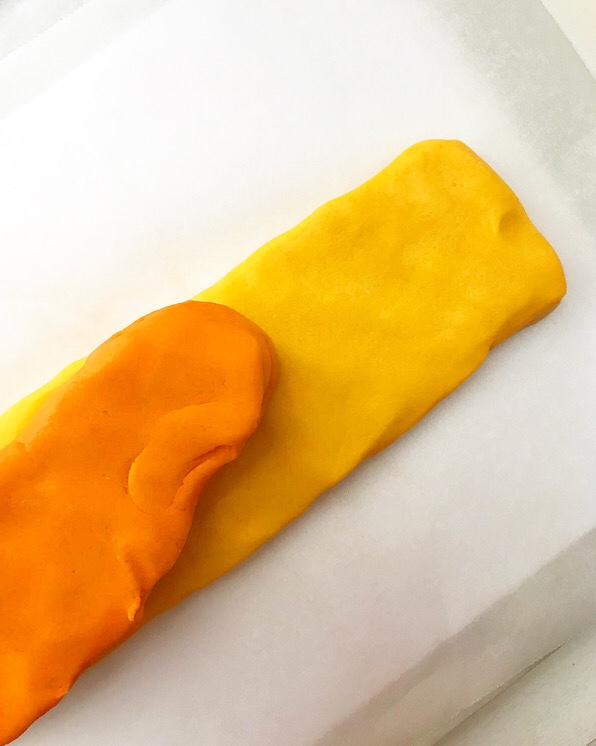
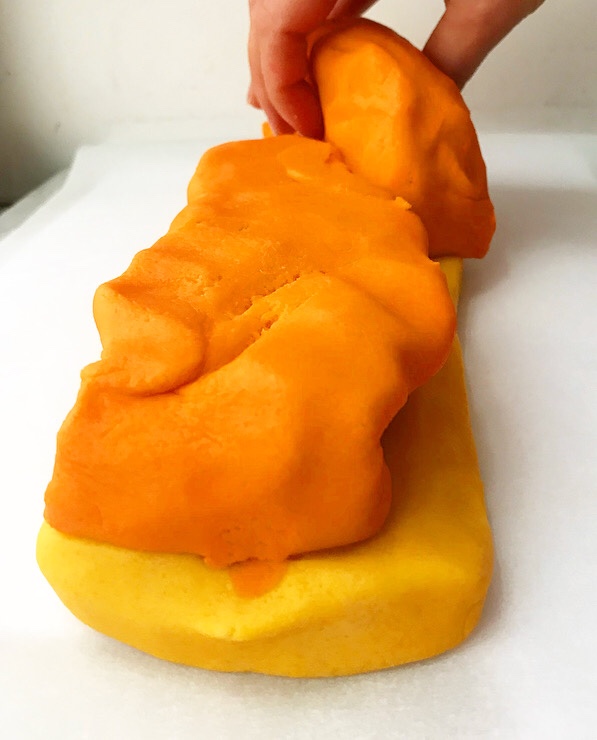
 stack the orange on there…
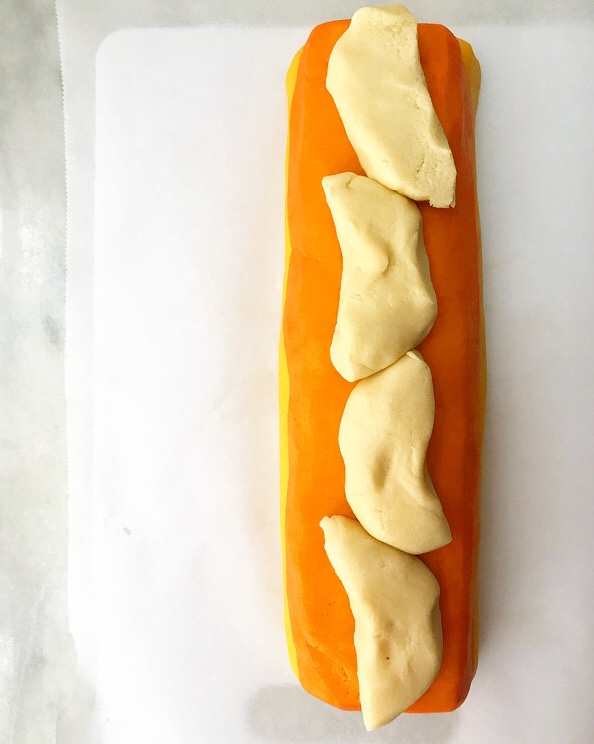
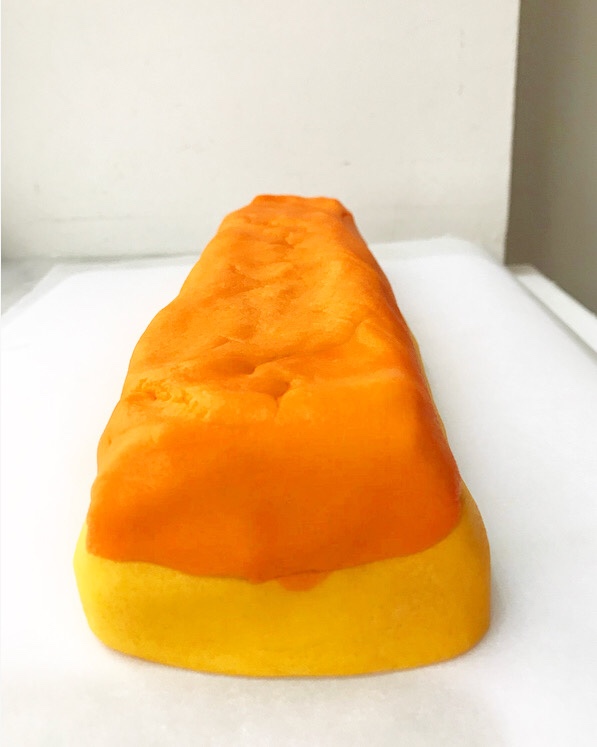
 and top it with the white dough. Use your hands to press it into a triangle shape before chilling for a few hours.
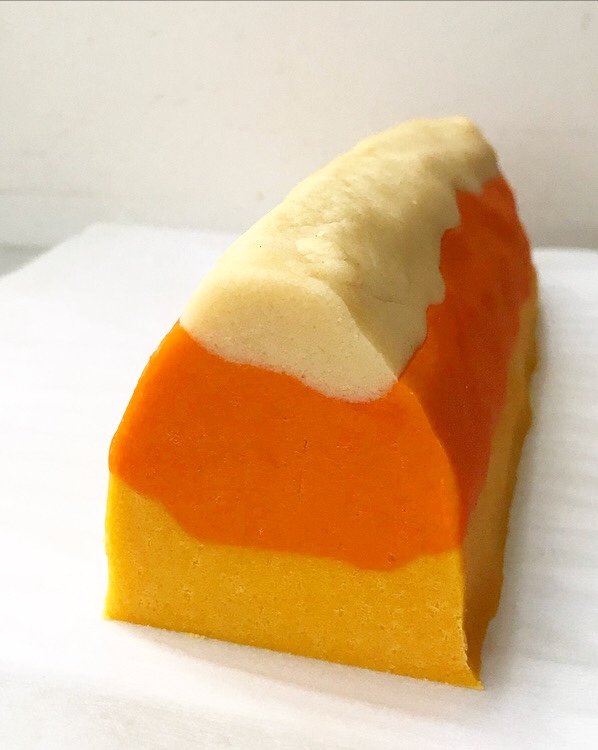 Then it’s just slicing and baking.
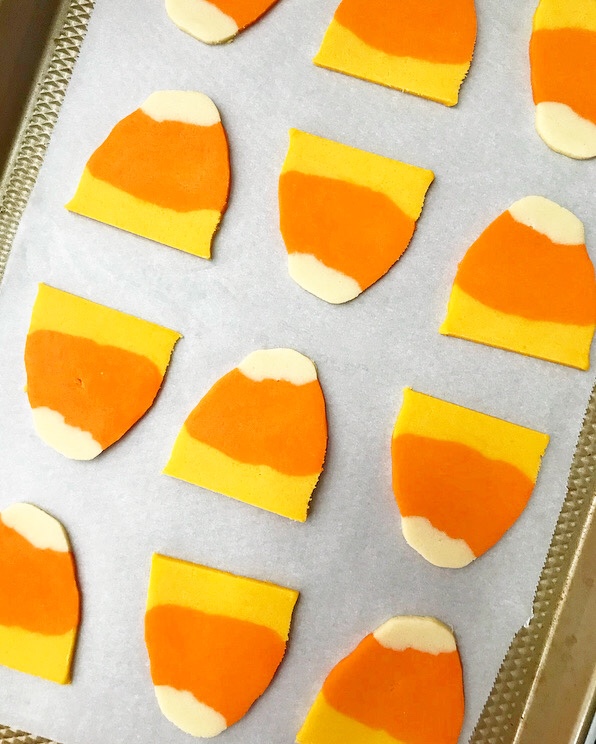 Oh, and fawning over how adorable these cookies are. That’s a big part of this process. Don’t forget to text pictures of them to everyone you know 🙂
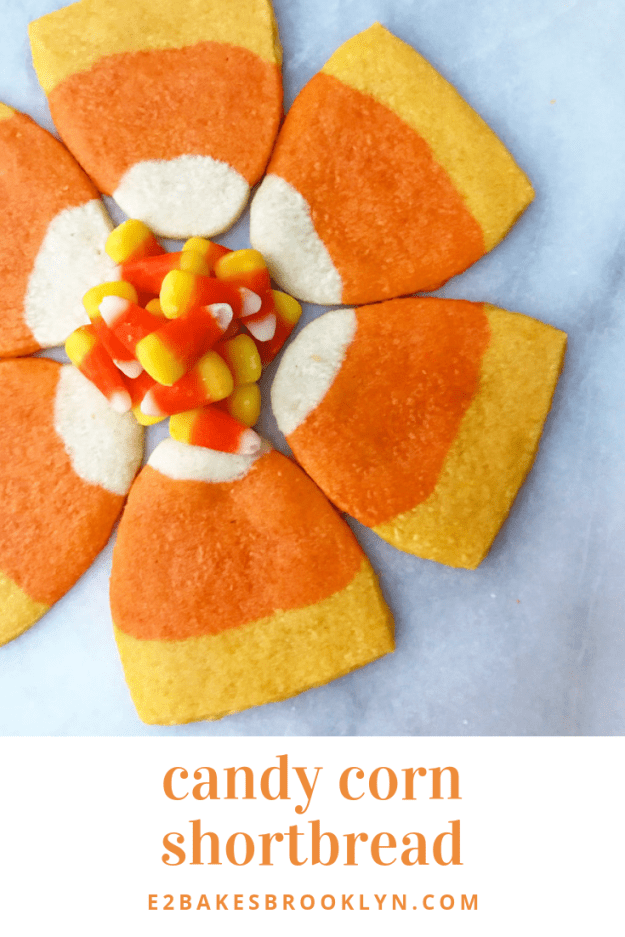
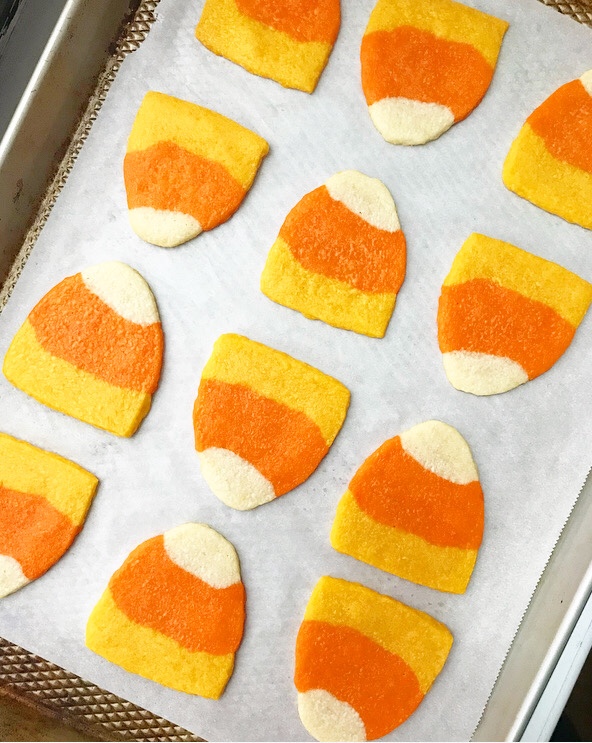 I love how these cookies are imperfect, but are absolutely still recognizable. I’m sure you have better motor skills than I do–maybe you could mold yours to look taller and narrower like the real deal. I like to think mine look authentic because they look a little busted, just like the candy corn I bought last week. Let’s not discuss how long it took to dig through the bag and find all these whole pieces. Anyway…
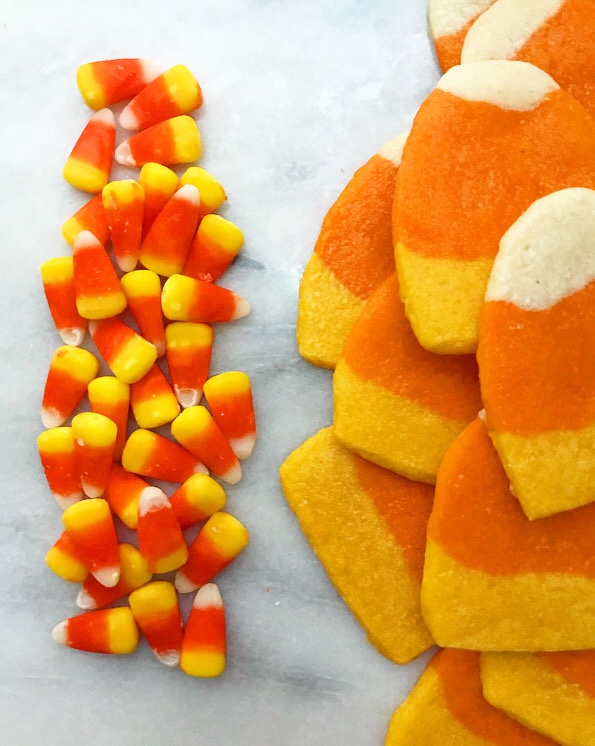 Candy Corn Shortbread are as delicious as they are festive! When they are fresh, they have crisp edges and slightly chewy centers. They’ll soften a bit over time, but they’ll remain sweet, buttery, and totally delectable.
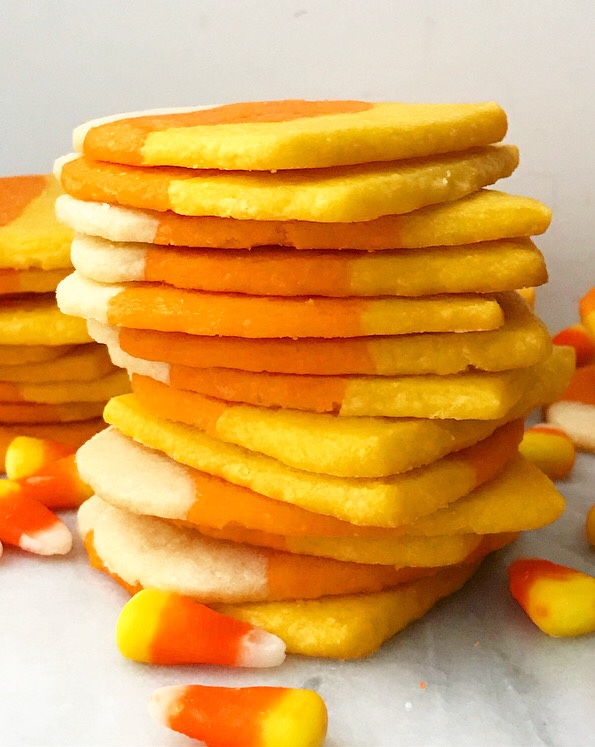 I think these could turn even the most Halloween-averse among us. Who knows–maybe I’ll wear a costume after all.
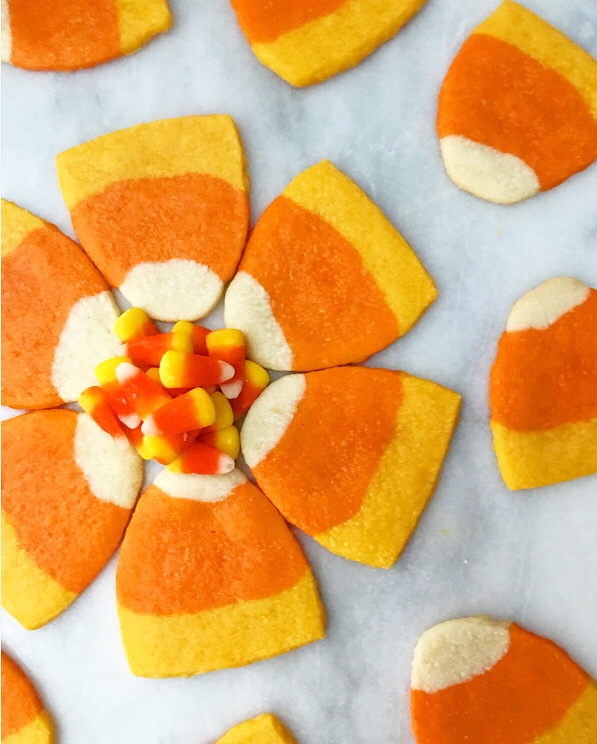
 In the last few weeks, I’ve been posting recipes I developed in my pre-blog days. It’s been way fun to revisit all the things I was making back then! And by “back then,” I mean four years ago 😛
 I inadvertently started this little project when I posted some
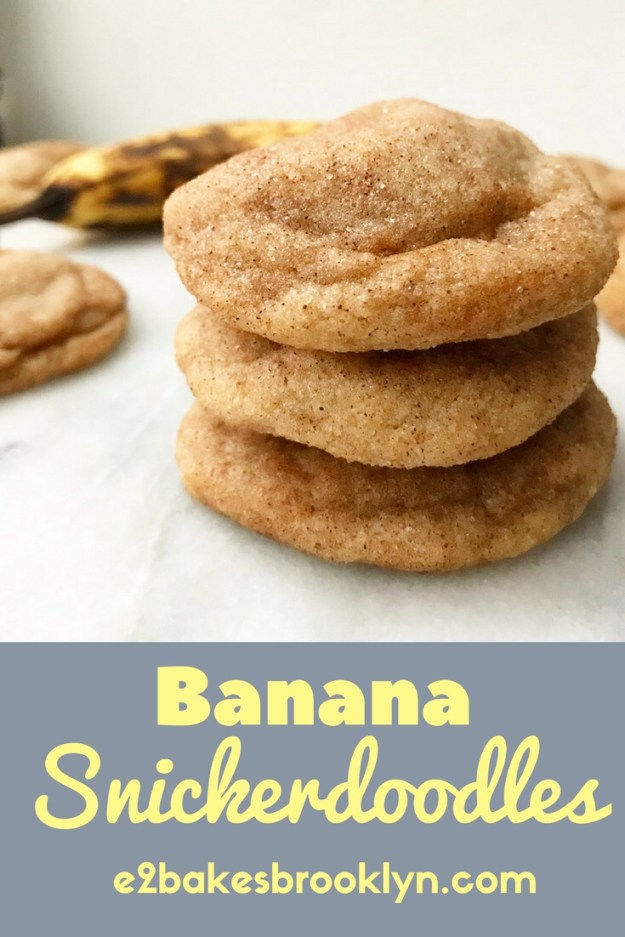
 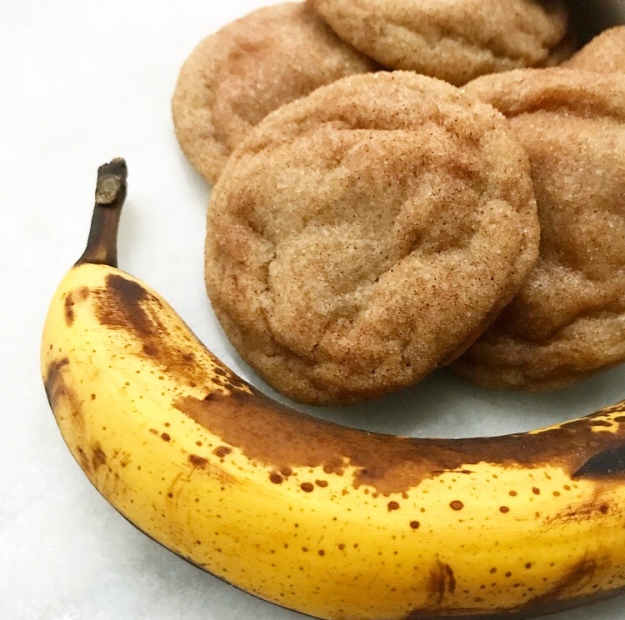 Y’all, these cookies are as easy as they are delicious…and they’re really delicious. If you are into banana and cinnamon, you’ll love these rumpled beauties ❤
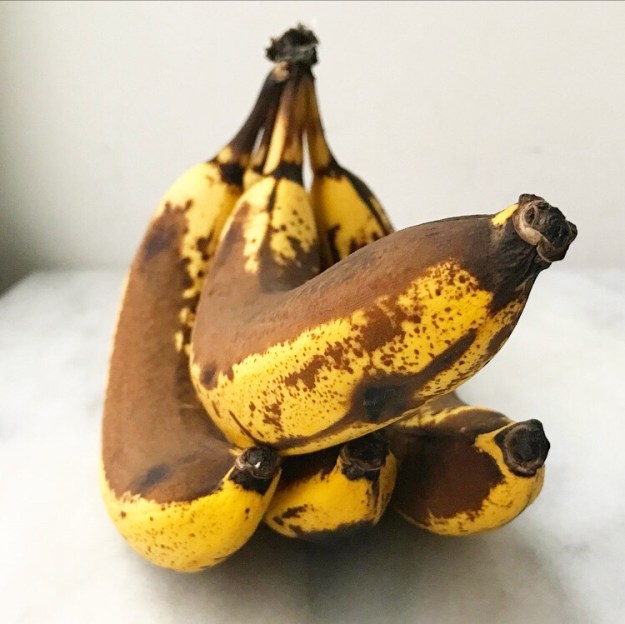
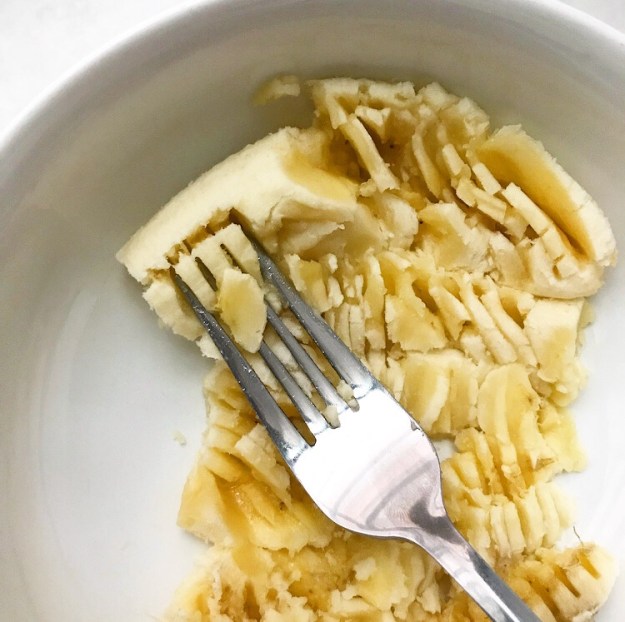 We’re having a blizzard here in NYC, so it’s a great day to stay home and bake. You likely already have all the ingredients for this simple dough, with the exception of the overripe bananas. If you have any bananas at all though, you can give them a quick bake and they’ll be recipe-ready!
 The dough comes together in just a few minutes. You’ll notice there are no eggs in this recipe—adding them would make the cookies cakey, and I don’t go for cakey cookies. Let the dough chill for an hour; this will allow the butter to firm up and the cinnamon and banana flavors to meld.
 When you’re ready to bake, roll the dough into balls and coat them in cinnamon-sugar. There’s already cinnamon in the dough, but they’re not snickerdoodles without the sweet, crispy coating!
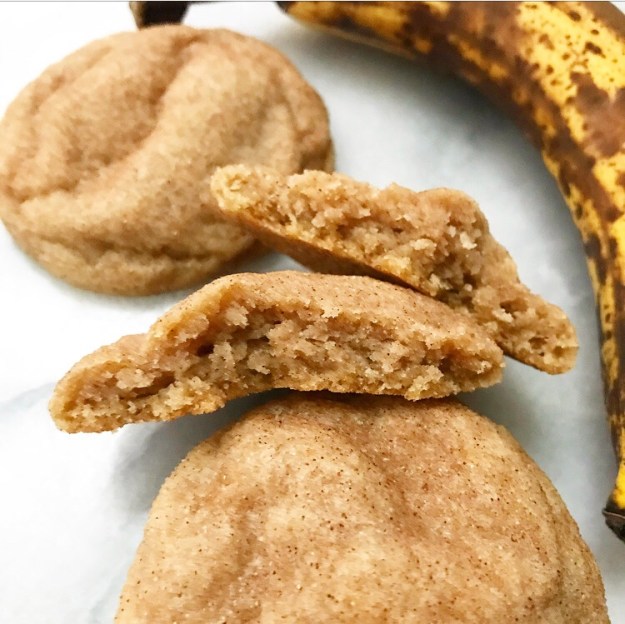 Banana Snickerdoodles bake up thick and chewy with big banana flavor and just enough cinnamon. You’ll dig the contrast of the soft centers and crispy edges, too. Trust me–you’re going to love these ❤