Category Archives: Breakfast

Glazed Cream Cheese Cake Doughnuts

 Nothing says love quite like doughnuts. When my sisters and I were little, my dad would very occasionally drive 45 seconds down the street to Dale’s Donuts #9 and have a dozen fresh doughnuts on the table before we ever got out of bed. He did it because he loved us…and maybe because he wanted a doughnut and knew we’d never stop complaining if we didn’t get some, too.

And doughnuts were pivotal in what remains one of the most important relationships in my life, the one with my little sister, Eliot (E3). We always loved each other, but like many siblings, we didn’t really get along for the first sixteen years or so. When I was a senior in high school, she was a freshman, so I drove us both to school everyday. And what did we do with our newfound freedom? Get doughnuts for breakfast, of course! Our little fifteen minute drives were spent chatting about the perfection that is John Cusack and eating chocolate sprinkle twists. We became best friends that year. I know the doughnuts weren’t the reason for it, but they sure didn’t hurt 😜

One of the only things I miss about Texas food (apart from Tex-Mex and great barbecue), is Dale’s Donuts #9. I’ve tried to find a good doughnut shop over the last eight years in NYC, but have been mostly unlucky. The Doughnut Plant is too flashy for me. I don’t need my doughnuts to be gourmet. I really love the 7th Avenue Donut Diner in Park Slope (get the Toasted Coconut Doughnut!), but it’s too far from home to be a viable option. There’s always Dunkin’ Donuts, but their doughnuts just aren’t great. They work in a pinch (and there have been many pinches), but they leave me underwhelmed. So what’s a woman to do? Make them at home! 

You might think I’m insane, but trust me, making your own doughnuts is worth it, if only to say “Hey! I made these doughnuts!” to everyone you meet. The doughnuts I’ve been making lately are cake doughnuts, so they take 90 minutes start-to-finish, instead of the 3+ hours that the yeast-raised variety can take. Yes, you can have shop-quality doughnuts on your table in less than two hours! 

And oh, are they ever good. These cake doughnuts are made with cream cheese, which keeps them extra soft. Sour cream is traditional, but cream cheese is just…cream cheese! It makes these doughnuts so light (something difficult to achieve with fried dough), but still rich enough to taste like the real deal. The dough also has a few tablespoons of softened butter and two eggs plus a yolk, just to keep everything really moist and fluffy.

These doughnuts are made with a combination of flour and cornstarch. As I’ve mentioned so many times, cornstarch lightens flour in cakes and cookies, and it does the same thing here. I made one batch with all all-purpose flour, and they were fine, but too dry and crumbly for me to want to make them again. The cornstarch is the “secret” ingredient in this recipe 😊 Also, add a dash of nutmeg. It’s traditional in doughnuts, and adds a little depth without being front-and-center. And of course, since these are cake doughnuts, they are leavened with baking powder instead of yeast, which makes them come together fairly quickly and easily. 

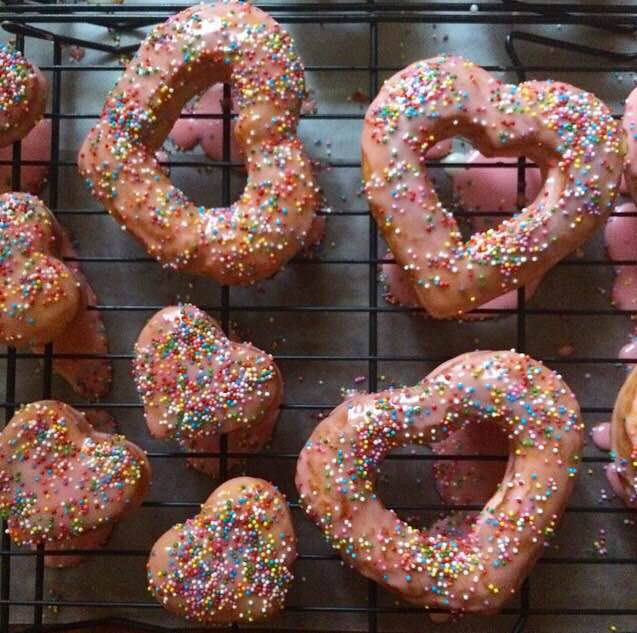
  Once your dough is made, let it rest at room temperature for 30 minutes. The rest allows for the dry ingredients to become fully saturated and for the proteins in the flour to develop properly. Once half an hour is up, flour a surface and roll out the dough, then use graduated cookie cutters (or a doughnut cutter, if you have one) to cut out doughnuts. I used a set of circles (the larger being 2 inches), and also some cute hearts for Valentine’s Day 💗  

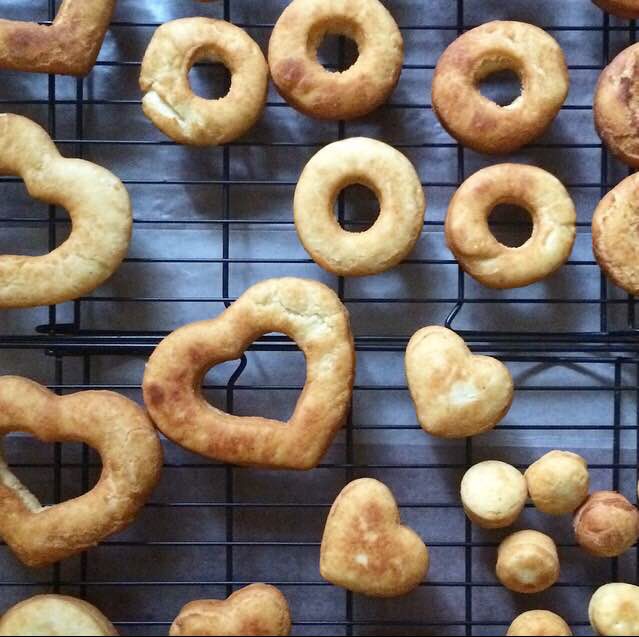
Fry the doughnuts in batches of three or four. These cook in 350F oil, and only take 1-2 minutes per side. Once they start to puff and turn golden, they need to be flipped. They will darken a bit more as they cool. 

 
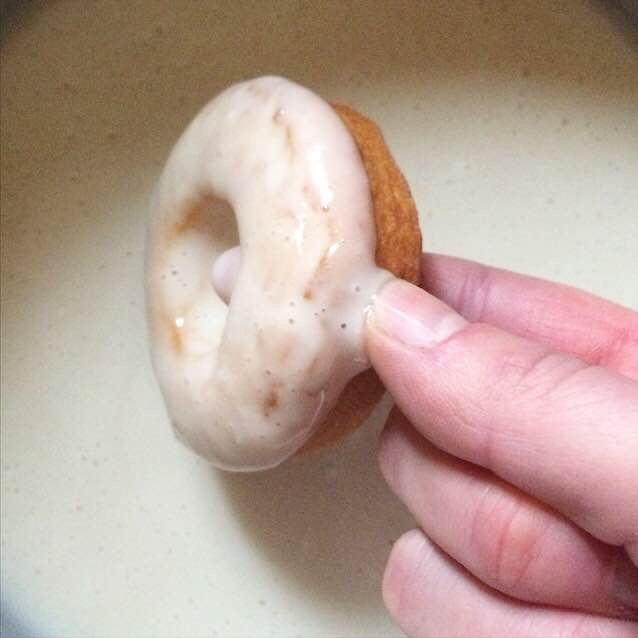
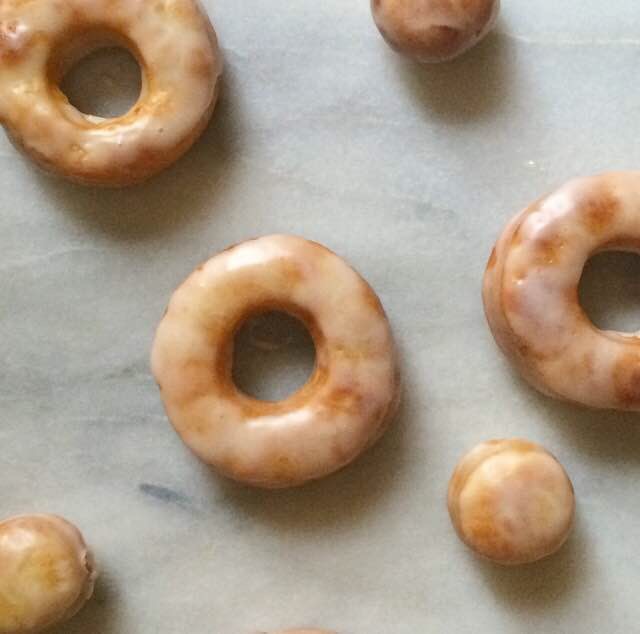
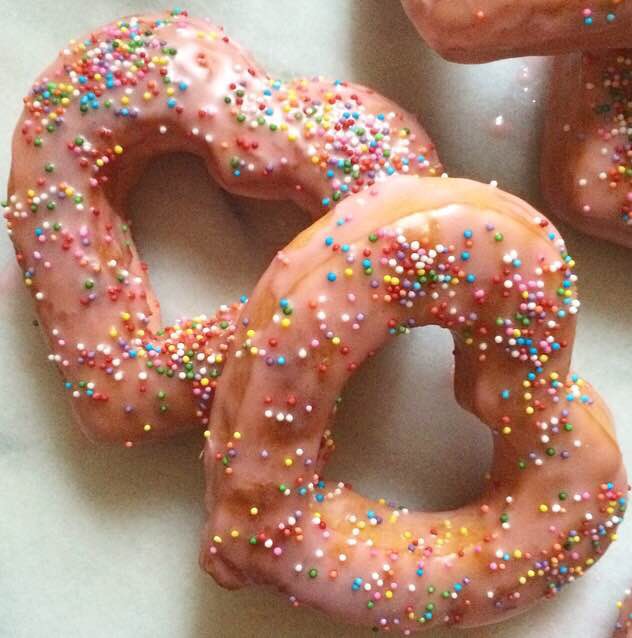
Once your doughnuts are cooked, whisk up the glaze. Confectioner’s sugar, corn syrup, vanilla, salt, and hot tap water ensure that it will set just like the glazes at your favorite doughnut shop! If you are wary of corn syrup, I recommend Lyle’s Golden Syrup as a substitute. Just whisk all the ingredients until smooth. If you want a pink glaze, add a couple of drops of liquid red food coloring. Dip each doughnut individually with your finger or chopsticks before setting it back on the rack to set. If you want to add sprinkles, do it immediately after dipping. The glaze will set after 20 minutes, and then…breakfast time!

This recipe is long and detailed, but trust me when I say that you can make shop-quality doughnuts at home! Soft and cakey with crispy edges, they’re totally irresistible. 

So, this Valentine’s Day (or any day!), invite some of your nearest and dearest for coffee and Glazed Cream Cheese Cake Doughnuts. Have them bring the coffee–you’re frying homemade doughnuts. You’ve done enough.

It’s a great way to let people know you love them 💗🍩 

 Glazed Cream Cheese Cake Doughnuts
glaze barely adapted from Handle the Heat
makes about 21 2-inch doughnuts and doughnut holes

Doughnuts:
2 3/4 cups all-purpose flour
1/4 cup cornstarch
1/4 teaspoon ground nutmeg
1 tablespoon baking powder
1/2 teaspoon Kosher or sea salt
4 ounces full-fat cream cheese, softened to room temperature
3 tablespoons unsalted butter, softened to room temperature
2/3 cup granulated sugar
2 large eggs + 1 large egg yolk, room temperature
2 teaspoons pure vanilla extract
vegetable or canola oil, for frying

Glaze:
1 pound confectioner’s sugar
1/2 teaspoon Kosher or sea salt
2 teaspoons light corn syrup*
2 teaspoons pure vanilla extract
5-6 tablespoons hot tap water
2-3 drops liquid food coloring, if desired
sprinkles, if desired

Whisk together flour, cornstarch, nutmeg, baking powder, and salt in a large mixing bowl. Set aside.

In a separate large mixing bowl, use an electric mixer to beat cream cheese and butter together for two minutes, until very light and fluffy. Beat in sugar. Add eggs and egg yolk and beat the mixture for five minutes until the volume is increased, and the mixture is thick, frothy, and light yellow.* Beat in vanilla. Add flour mixture in two installments, stopping frequently to scrape the bowl. Gather dough into a ball and cover it with plastic wrap, leaving it to rest in the mixing bowl for 30 minutes at room temperature.

Line a baking sheet with parchment paper. Set two cooling racks over wax paper.

On a floured surface, use a rolling pin to roll dough to 1/2-inch thickness. Use a doughnut cutter or graduated cookie cutters to cut doughnuts. Re-roll as necessary. Lay cut doughnuts and doughnut holes on prepared baking sheet.

Pour vegetable oil in a large heavy pot, until it is about 1 1/2 inches deep. Heat oil until it reaches 350F. Add cut doughnuts in batches of three or four. Let fry until golden, about 1-2 minutes per side. Remove cooked doughnuts to prepared racks. Continue frying until all doughnuts have been cooked.

Make the glaze. In a large mixing bowl, whisk together confectioner’s sugar and salt. Add corn syrup, vanilla, hot water, and optional food coloring, and continue whisking until smooth. Dip doughnuts one at a time before placing back on the cooling racks. Add sprinkles immediately after dipping, if desired. Let glaze set for twenty minutes before enjoying. Doughnuts are best eaten the day they are made.

Notes:

1. Lyle’s Golden Syrup may be substituted.
2. Mixture may have a few small lumps.

Salted Grapefruit Scones

Winter food can get dull. Don’t get me wrong, I love a good pot pie or stew, and lord knows I could eat my weight in mashed potatoes, but after a while, I just want to eat fresh produce that isn’t a) a root vegetable, or b) kale. I love them both, but being at least three months away from really great berries and five away from a tomato that is good enough to be eaten like an apple has got me in a winter produce funk.

This happens every year though, until that wonderful, shining moment when I remember winter citrus. It’s a welcome taste of sunshine in the midst of all the wind and snow. Meyer lemons and key limes and clementines are all in season, waiting to be made into cakes and pies, or even thrown into salads! But the thing that always gets me is the grapefruit. Being from Texas, I prefer Ruby Red, but those are hard to come by in New York City. White and pink are delicious and all, but Ruby Red is just a cut above. It’s a little sweeter than other varieties, but still bitter enough to taste like grapefruit. Imagine my surprise when, after years of not seeing one Ruby Red in New York, I saw a whole box at my local green grocer. And they were on sale! Without a second thought, I grabbed two, handed over some change and ran home to make these scones.

I love a good scone. Soft in the middle with crunchy edges, not too sweet, great with a huge cup of coffee or tea. But good scones are hard to come by at coffee shops–they can be dry and cakey throughout, with very little depth of flavor. They’re simply not worth the cash or the calories, as far as I’m concerned. But these scones? They’re soft and buttery, sweetened with just a bit of honey and sugar, dotted with juicy pieces of fresh grapefruit, and topped with sea salt both for crunch and because sea salt and grapefruit are divine together. It may sound a little odd, but the salt makes the sweetness of the grapefruit shine. It’s so, so good.

These scones are quick and easy to whip up, and take less than an hour start-to-finish. Mix together some half-and-half and honey, and put it in the fridge to chill while you prepare the other ingredients. Use your fingers to rub the zest of one grapefruit into two tablespoons of granulated sugar until it’s well-combined and a little pasty (it’s better than it sounds). Peel that zested grapefruit and segment it, trying to avoid as much of the pith, membrane, and seeds as possible. This will keep the grapefruit from making the scones too bitter. Don’t worry too much about having perfect segments–they’ll break apart anyway when they’re mixed into the dough.

In a large mixing bowl, whisk together flour, baking powder, salt, and the zest-sugar mixture. This may look a little clumpy because of the oils in the zest, but it’ll all even out with the other ingredients. Use a pastry blender or two forks to cut in one stick of cold butter until the largest pieces are the size of small peas. Then use a silicone spatula or wooden spoon to fold in the half-and-half mixture and the segmented grapefruit. The dough will be pretty wet, but should still have some body to it.

  Turn the dough out onto a very well-floured surface. Don’t skimp on the flour. If you do, you’ll have dough stuck to everything and probably start cursing my name, and that’s no good when there are awesome scones to be had! Flour your hands and pat the dough into a 1-inch thick disc. Use a sharp knife or bench scraper (my tool of choice) to cut the disc into eight wedges. Transfer the wedges to a parchment-lined baking sheet and bake at 425F for 18-20 minutes, until cooked-through and light golden. Then stir up a glaze with some confectioner’s sugar and the juice of a second grapefruit, drizzle it over the scones, and sprinkle with crunchy coarse sea salt! All you need is a hot cup of coffee or tea and some good company 😊

Break out of the heavy winter food rut with these Salted Grapefruit Scones! Sweet and salty, soft and buttery, they’re a wonderful way to start these cold, snowy days.

 Salted Grapefruit Scones
makes 8 scones

3/4 cup half-and-half + more for brushing, very cold
2 tablespoons honey
2 medium Ruby Red grapefruits**, divided
2 tablespoons granulated sugar
2 cups all-purpose flour
2 teaspoons baking powder
1/2 teaspoon Kosher or sea salt
1/2 cup (1 stick) unsalted butter, very cold, cut into pieces
3/4-1 cup confectioner’s sugar
coarse sea salt*, for sprinkling

Preheat oven to 425F. Line a baking sheet with parchment paper. Set a cooling rack over a piece of wax paper. Set aside.

Whisk together half-and-half and honey, and place it in the refrigerator to stay cold.

Zest one grapefruit. In a small bowl, rub together the zest and the granulated sugar. Set aside.

Peel the zested grapefruit, and segment it, removing as much of the pith and membranes as possible, as well as all of the seeds. Set aside.

In a large mixing bowl, whisk together flour, baking powder, salt, and zest-sugar mixture. Use a pastry blender or two forks to cut the butter into the flour mixture until the largest pieces are the size of small peas. Add in the half-and-half mixture and grapefruit segments and use a silicone spatula or wooden spoon to incorporate them into a wet dough, making sure to scrape the sides and bottom of the bowl. If the dough is too sticky to handle, add up to 2 tablespoons more flour.

Turn the dough out onto a very well floured surface and use floured hands to pat it into a 1-inch thick disc. Flour a sharp knife (not serrated) or bench scraper and use it to cut the dough into eight wedges. Remove wedges to prepared pan, and brush the tops with additional half-and-half. Bake for 18-20 minutes, until light golden. Let scones cool on the pan for five minutes before removing to the prepared rack.

Make the glaze. Slice the second grapefruit in half. Seed one half of the grapefruit and squeeze the juice into a small bowl. Pour confectioner’s sugar into a second small bowl and add two tablespoons of the fresh grapefruit juice. Whisk with a fork until no lumps remain, adding juice or confectioner’s sugar until the glaze is to the desired consistency. Use a fork or small squeeze bottle to drizzle the glaze over the scones. Sprinkle wet glaze with coarse sea salt. Enjoy!

Glaze will fully set after a couple of hours. Scones are best the day they are made, but may be kept in an airtight container at room temperature for up to 48 hours.

Notes:

1. My grapefruits were about the size of a large orange.
2. If you can’t find Ruby Red, white or pink grapefruits may be substituted.
3. I use Trader Joe’s Pyramid Salt.

Salted Grapefruit Scones

Puff Pancake {Dutch Baby}

 When I was growing up, breakfast was always a last thought. More often than not, my little sister and I would be stuffed into the back of a Ford Explorer with a cold un-toasted Brown Sugar-Cinnamon Pop Tart and an apple to inhale while my mom sped down I-30 to get us to school three minutes before classes started. My family and I…we’re just not punctual. We play with fire when it comes to scheduling, much to my dad’s chagrin. We all try really hard to be on time, but we really should invest in hats or t-shirts that say “Sorry I’m late.”

But back to breakfast. When Saturday mornings came around, things were different. E3 and I would wake late and park ourselves (and our trusty miniature schnauzer) in front of the TV, while Mom actually got to read the paper. At some point, she’d ask us what we wanted for breakfast, and the answer was almost always a Dutch Baby pancake, but we always called it a Puff. It’s a much better name, if you ask me. 

Puffs are oven pancakes made with a thin batter and no chemical leavening, very similar to a Yorkshire pudding. The batter is poured into a hot skillet or cast iron pan and then baked until the whole thing rises and puffs from the heat of the oven, hence the name. When it’s removed, it starts to deflate quickly, leaving a light, custard-like pancake in the shape of whatever dish it was baked in. Traditionally, they are served with confectioner’s sugar and a squeeze of lemon, but I prefer maple syrup 😊 

 
The batter takes almost no effort at all. Add some eggs, milk, vanilla, flour, sugar, and salt to the bowl of a food processor or high-powered blender, and blitz until no lumps remain. Then, let it sit at least five minutes so the flour starts to thicken things and the air bubbles dissipate. While it’s resting, melt butter in a heavy pan that’s been heating in a 400F oven. Once the butter is melted and the pan is coated, pour in the batter and put it in the oven. 

 This is important: do NOT open the oven door while the Puff is in the oven. Just don’t do it. That little blast of room temperature air will deflate your pancake and destroy the amazing texture. Instead, set a timer for 19 or 20 minutes and go play with your kids or read the paper or watch an episode of Arrested Development. Just before your timer is going to go off, put on your oven mits. Puffs brown quickly and dramatically (especially around the edges), so they need to be taken out of the oven exactly when the timer dings.

If you have children or breakfast guests, you might think about having them around (but standing at a safe distance from the oven) to see the big, puffy masterpiece come out of the oven. And it will be huge! Like a giant golden brown bubble! But it will also be fleeting. The puff will deflate completely in 90 seconds or less, leaving behind a pancake in the shape of the pan, with crisp-chewy brown edges and a soft, custardy center. Trust me, it’s amazing. 

The puff will only need to rest for a couple of minutes before slicing. Make sure to have your oven mits handy as the pan will still be raging hot. I get four large or six medium servings out of a pancake this size. Top with whatever suits your fancy. If you want to be traditional, go with confectioner’s sugar and a squeeze of fresh lemon juice. If you’re like me, maple syrup and confectioner’s sugar with a dash of sea salt is the ticket. My mom says puffs are fantastic with yogurt and fruit, but I’ve never actually tried that. I think a drizzle of barely-warmed Nutella and some sliced strawberries would be amazing. However you go about it, this is guaranteed to be a good breakfast.

Puffs are, to this day, my weekend breakfast of choice. The recipe halves and quarters easily, so if you’re the only one home, you can make a personal-sized fancy breakfast, permitting of course that you have a 6-inch pan to make it in. (I’ve written instructions for adjusting the quantity in the note below.) A puff is a great option if you are having a small brunch at home or want to make an impressive breakfast for your valentine. If you observe Shrove Tuesday, a puff would be an out-of-the-ordinary way to celebrate at home, instead of traditional pancakes. But of course, it’s a fantastic breakfast any old Saturday.

Do something nice for yourself this weekend. 

 Puff Pancake {Dutch Baby}
makes 4-6 servings**

4 large eggs
1 cup milk (not skim or fat free)
2 teaspoons pure vanilla extract
1 cup all-purpose flour
3-4 tablespoons granulated sugar
1/2 teaspoon Kosher or sea salt
3 tablespoons butter (unsalted or salted)

Toppings:
confectioner’s sugar
lemon wedges
pure maple syrup
berries
yogurt

Place a large ovenproof cast iron or stainless steel pan in a cold oven. Preheat oven to 400F.

In the bowl of a food processor or high-powered blender*, combine eggs, milk, vanilla, flour, sugar, and salt. Process 30 seconds, or until no lumps remain. Let batter rest five minutes.

Once the oven has reached 400F, remove the hot pan. Add the butter and swirl to coat the pan; there will still be a bit of solid butter. Place pan back in the oven for one minute, until remaining butter has melted and started to bubble. Remove pan from the oven, and pour in batter. Bake 19-20 minutes, until puffed and golden. Do NOT open the oven door during baking.

Let pancake cool 2-5 minutes before slicing. Serve immediately with toppings of choice.

Notes:

1. If you’d like to make a personal-sized puff, use 1 large egg, 1/4 cup milk, 1/2 teaspoon vanilla, 1/4 cup all-purpose flour, 1 tablespoon granulated sugar, a small pinch of salt, and 1/2 tablespoon butter. I recommend using a 6-inch cast iron pan for this much batter. Follow all instructions as written, changing the baking time to 16 minutes.
2. If you’d like to make a 3-4 serving puff, use 3 large eggs, 3/4 cup milk, 1 1/2 teaspoons vanilla, 3/4 cup all-purpose flour, 2-3 tablespoons granulated sugar, 1/4 teaspoon salt, and 2 tablespoons butter. Follow all instructions as written, changing the baking time to 18-19 minutes.
3. If you do not have a food processor or blender, you may whisk all of the ingredients together and then push them through a wire mesh sieve to remove any lumps of flour. Let batter rest five minutes before proceeding as written.

Puff Pancake {Dutch Baby}

Dark Chocolate Pecan Butter

Well, we survived the blizzard. With the exception of a two hour excursion to the fancy grocery store for provisions (read: lots of cheese and some kimchi), Henry and I stayed home all day Saturday while New York City was brought to a standstill by Jonas. We watched PBS (because we’re big nerds) and made a pot of sausage and white bean soup before the real cabin fever set in. But that was solved by taking a slippery walk down to Smith Street and making some snow angels. Really, there was nothing to complain about: we had a warm apartment, plenty of food, Netflix, and good company. But now, the snow is a problem. It’s everywhere, gray and slushy. I literally had to hike to the coffee shop across the street yesterday morning. Gross. But, then I came home, turned on BBC World Service (again, big nerd), ate some toast with bananas and this Dark Chocolate Pecan Butter, and briefly, blissfully forgot about the mayhem outside…until I left for Target and fell in a gray snowbank. So much for peace.

This Dark Chocolate Pecan Butter is so good. Chocolaty and lightly sweetened, with the deep caramel flavor that only toasted pecans can provide. It’s made with everyday ingredients like pecan halves (duh), cocoa powder, maple syrup, and coconut oil. Nothing weird. No palm oil, no copious amounts of refined sugar. No refined sugar at all, actually! There’s no dairy here either, so this nut butter is vegan!

Making homemade nut butters couldn’t be simpler. You will need a food processor or high-powered blender, but that is the only special equipment. If you don’t have one, I recommend this Hamilton Beach food processor. I’ve had mine for five years and it hasn’t failed me yet.

But back to the Dark Chocolate Pecan Butter. It starts with toasting pecan halves. Just spread them on a dry cookie sheet and bake at 400F for 5-7 minutes. You’ll know they’re ready the second you start to smell them. If you don’t trust your nose, start checking them every thirty seconds or so from the five minute mark until you deem them done. Whatever you do, don’t leave the room. The pecans can burn in a split second, and burnt pecan butter is decidedly not delicious.

  Once the pecans are toasty, put them in your food processor with a touch of salt and some cocoa powder. I prefer to use Dutch process cocoa here because I think its flavor is richer than natural. Dutch process cocoa is a little less widely available than natural, but it’s really not hard to find at all. In NYC, it’s available at Whole Foods, Sahadi’s, Union Market, and many specialty stores. N.Y. Cake Supply sells Valrhona cocoa at wholesale prices, but if Valrhona is a little too pricey for your liking, Droste is another brand I love. If you just want to stick with classic Hershey’s, do it. It will be delicious! Don’t let something as silly as some fancy cocoa stop you from making this Dark Chocolate Pecan Butter.

…anyway…

Process the pecans, cocoa powder, and salt until a nut butter forms. Then, add a bit of coconut oil, a few tablespoons of maple syrup, and a splash of vanilla, before blitzing for an additional 3-5 minutes. You might be thinking that the coconut oil seems unnecessary with all the oils in the pecans. And you’d be right, except that the cocoa powder dries everything out. The two teaspoons of coconut oil keep everything loose and spreadable. As far as sweetening goes, it’s up to you. I don’t like this butter to be very sweet. I use three tablespoons of maple syrup, but just add it to your preferred sweetness. Keep in mind that the maple will cause the butter to seize when you add it, but after a minute or two, everything will loosen back up. When the Dark Chocolate Pecan Butter is to your preferred consistency, transfer it to an airtight container for storage. The oils will separate a bit as it sits, so just give it a quick stir before use.

Now, how to serve this… Well, there’s always eating it by the spoonful. Or on oatmeal. Or stirred into yogurt. All of those would be great! But my favorite is on toasted country bread with bananas. Try it. Trust me.

Want more chocolate and pecans? Check out my Salted Caramel Chocolate-Covered Pecan Cookies!

Dark Chocolate Pecan Butter
makes about two cups

3 cups pecan halve
3 tablespoons cocoa powder*
1/4 teaspoon salt
3-4 tablespoons pure maple syrup*
2 teaspoons coconut oil
1/2 teaspoon pure vanilla extract

Preheat oven to 400F. Spread pecan halves on a baking sheet (not greased). Roast for 5-7 minutes, until fragrant. Let cool five minutes before transferring to a food processor or high-powered blender.

Add cocoa powder and salt to pecans and process until a nut butter forms, about 5 minutes. Scrape down the sides of the bowl as necessary. Add in maple syrup, coconut oil, and vanilla. Process for an additional 3-5 minutes. Butter will seize initially before becoming smooth again. Once it’s smooth, transfer the butter to an airtight container.

Store Dark Chocolate Pecan Butter at room temperature for up to a week, or indefinitely in the refrigerator. Butter will harden in the refrigerator, so bring it to room temperature before spreading. Stir before using.

Notes:
1. I prefer Dutch process cocoa here, but any cocoa powder will do.
2. Honey or agave may be substituted.

Dark Chocolate Pecan Butter

Apple Breakfast Crumble

 
I love recipes that can work at multiple times of day. Take poached eggs, for example. They are great with toast at breakfast, on spinach salad at lunch, and in tomato sauce at dinner. They cover all the bases. Side note: isn’t breakfast for dinner the best? But I digress. Today, I’m bringing you an apple crumble. Apples and pie spices, topped with a crunchy oat crust. It’s a classic, home-style dessert. But I have an odd serving suggestion: make it for breakfast. 

Before you go thinking I’ve done a swan dive off the deep end, know that this was not my idea originally. You can blame Deb Perelman for all of this. Do you read her blog, Smitten Kitchen? You should–there’s a reason why it’s one of the most popular food blogs out there. She’s like Martha Stewart, Ina Garten, and Julia Child morphed into one hilarious, cooking-obsessed Manhattan mom. Deb makes things like Saltine Crack Ice Cream Sandwiches and Apricot Pistachio Squares, not to mention all the salads and impressive main dishes. She daydreams about food the way I do (or at least, I like to think we have that in common). This is all a very long way of saying that I was flipping through her cookbook a year or two ago and became obsessed with her recipe for Breakfast Apricot Crisp. I made it as-written a couple of times and have since gone a little crazy with adaptations. I’ve made it with plums, rhubarb, blueberries and raspberries, and pears and cranberries. It can take pretty much anything you throw at it and still be divine.

Today we’re going with apples. It’s very cold and windy here in New York City–the kind of weather that just demands comfort food. And nothing says comfort quite like a bowl of steamy cinnamon apples and crunchy crust. Let’s get started.

  The apples are diced small so that they cook quickly. They’re tossed with a couple of tablespoons of brown sugar, some cinnamon and other pie spices, a bit of cornstarch, and a touch of apple cider vinegar. The crumble itself is made by cutting butter into a mixture of oats, white whole wheat flour, brown sugar, and chopped nuts. Place the apples in a prepared pie plate and top with the crumble mixture. Then, dot everything with butter before baking for 30 minutes at 400F. The apples will be soft, but not too soft, and the crumble will be reminiscent of granola, with plenty of nubbly bits between the oats and nuts. All it needs is a dollop of yogurt (I like Siggi’s), and it’s good to go. 

Now, you might be thinking that this sounds great for a weekend brunch, but too decadent for everyday breakfasting. Let me point out a few things that might (just might!) sway you. This crumble is full of diced apples, whole grains, and nuts. There’s no pie crust full of butter and empty carbs. Instead, there are oats and white whole wheat flour, keeping this recipe whole grain. There are nuts which are, of course, high in protein and healthy fats. If you have an allergy or simply don’t want to use the nuts, they can be omitted without any negative effect on the final product. There’s butter here, but it’s not much for a recipe that feeds six–only five tablespoons. It could be cut to four if you don’t dot the top before baking, but I really love how well the crumble browns with that extra tablespoon. The least nutritious part of this crumble is probably the sugar, and there really isn’t much to be spoken of–less than 1/2 cup in the entire recipe. There is plenty of sweetness from the fruit, so a ton of sugar really isn’t necessary.

Now, I’m not a nutritionist or anything, but given the low added sugar, low fat, high volume of fresh fruit, and whole grains, I can’t see any glaring reason why this Apple Breakfast Crumble isn’t perfect for breakfast any day of the week. I am fond of keeping it in the fridge so I can dip into it whenever the mood strikes. Most people would probably warm it up, but I think it’s great cold. And on that note, instead of becoming Martha or Ina or Julia, I am slowly morphing into my mother. 

 Apple Breakfast Crumble
adapted from Breakfast Apricot Crisp by Deb Perelman
makes one 9-inch pie plate, about six servings

Filling:
4 large baking apples*, peeled and 1/2-inch diced
2 tablespoons light or dark brown sugar, packed
1 tablespoon cornstarch
1 1/2 teaspoons ground cinnamon
1/4 teaspoon ground allspice
1/4 teaspoon ground ginger
1/4 teaspoon ground nutmeg
pinch of Kosher or sea salt
1 teaspoon apple cider vinegar*

Crumble:
1/2 cup old fashioned oats
1/2 cup white whole wheat flour*
1/3 cup light or dark brown sugar, packed
1/2 teaspoon Kosher or sea salt
2 tablespoons chopped nuts*, optional
5 tablespoons cold unsalted butter, divided
yogurt, for serving*

Preheat oven to 400F. Grease a 9-inch pie plate. Set aside.

In a large bowl, combine diced apples, brown sugar, cornstarch, cinnamon, allspice, ginger, nutmeg, salt, and apple cider vinegar. Toss with your hands until evenly mixed. Pour into the pie plate.

Make the crumble. In a separate mixing bowl, stir together oats, white whole wheat flour, brown sugar, and salt. Stir in chopped nuts. Using a pastry blender or two forks, cut four tablespoons of butter into the mixture until the largest pieces are the size of small pieces. Pour mixture over the apples and use your hands to press it into an even layer. Cut one tablespoon of butter into very small pieces and use them to dot the top of the crumble. Bake for 30 minutes, until the apples are tender and the crumble is golden. Let cool ten minutes before serving with yogurt.

Apple Breakfast Crumble will keep covered in the refrigerator for up to five days.

Notes:

1. I recommend using a mix of tart and sweet apples. This crumble was made with two Granny Smith and two Fuji.
2. Fresh lemon juice may be substituted.
3. Regular whole wheat flour or all-purpose flour may be substituted. 
4. I used walnuts here, but have also used pecans and almonds.