Category Archives: Cookies

Chewy Pumpkin Ginger Cookies {with Vegan Option}

  
Hey there! How was your Thanksgiving? Did you eat too much pie and not feel even the teensiest bit guilty? I hope so 😊 We are on our way back to Brooklyn from Henry’s family’s home. Anyway, let’s talk about cookies.

I’m torn. It’s the day after Thanksgiving. Am I allowed to post Christmas cookies now? It’s still November. Is pumpkin season over? I don’t even know. Figuring out the ins and outs of this food blogging stuff is hard. How about a combination? A gingery pumpkin cookie that would be totally welcome at a holiday cookie exchange. With a crunchy, sugary crust because yum. And, if that’s not enough, a simple optional vegan swap so you can have something for everyone at your holiday parties. The holidays are about being inclusive and good to people we love, right?! Right! So let’s make some Chewy Pumpkin Ginger Cookies.

   
This dough is super simple–no mixer required! It starts by stirring melted butter (or coconut oil, if you’re going vegan) with light brown sugar. Then add in 1/4 cup of pumpkin. The pumpkin acts as an egg substitute here–if we added pumpkin and eggs, we’d have cakey cookies. No, thank you! Chewy all the way. Anyway, after we add the pumpkin, it’s time for a hefty dose of dark molasses, followed by just enough vanilla to mellow out the spices. Speaking of spices, add one full tablespoon each of ground ginger and pumpkin pie spice. Then, it’s time for some dry ingredients: flour, baking powder and soda, and salt. Whisk those up and add them in two installments, making sure to scrape the bottom and sides of the bowl as you go. This dough needs only thirty minutes of chilling before it’s ready to roll.

A note on chilling cookie dough: it’s mandatory if you want soft, puffy, chewy cookies. There’s no way around it. Embrace the chill! Your cookies will be better for it. Plus, it means you can make the dough 24 hours in advance, and I am all for working ahead. But let’s get back to the rolling.


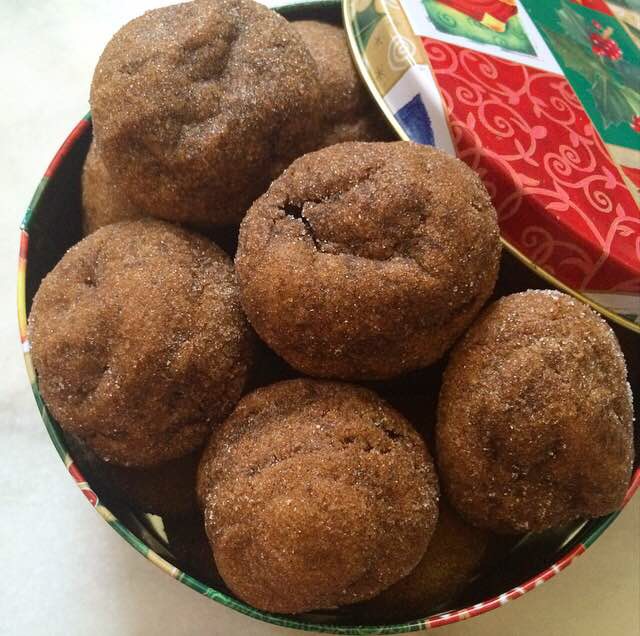
Roll your chilled dough in two tablespoon increments, and then roll the dough balls in granulated sugar before placing them on the baking sheets. This will give them a crispy outer crust, and has the added benefit of making them look stunning! Pretty food just tastes better. Bake these for 10-11 minutes. Then let them cool, and enjoy. Easy peasy.  

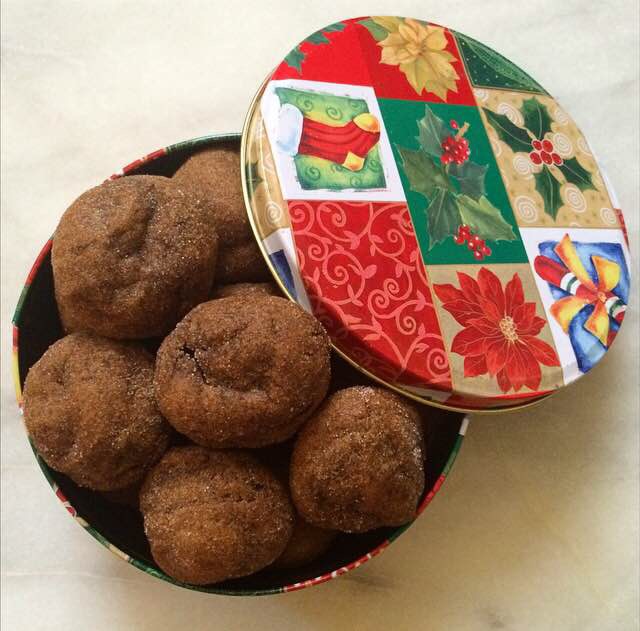
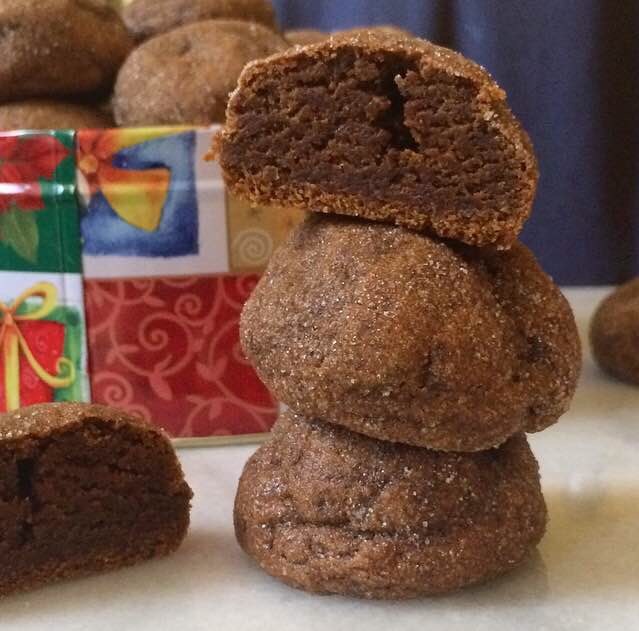
Chewy Pumpkin Ginger Cookies are good on the first day, but the pumpkin flavor really shines through on day two. They’ll stay soft and delicious for up to a week, so they’re perfect for adding a little holiday cheer to lunches, or for preparing ahead of time for your cookie exchange. I think they’d make a really good ice cream sandwich with a small scoop of vanilla. Or chocolate. Chocolate and ginger are sooo good together.

Start the Christmas season right–make these cookies! I’ll be posting twelve holiday cookie recipes leading up to Christmas Eve, so prepare to wow at your cookie exchanges and holiday parties. Make sure to check back over the next few weeks for a hefty dose of holiday cheer 😊

 Chewy Pumpkin Ginger Cookies
adapted from Soft-Baked Gingersnap Molasses Cookies from Sally’s Baking Addiction
makes about two dozen cookies

3 cups all-purpose flour
1/2 teaspoon baking powder
1/4 teaspoon baking soda
1 teaspoon sea salt or Kosher salt
1 tablespoon ground ginger
1 tablespoon pumpkin pie spice
3/4 cup unsalted butter, melted and cooled slightly*
3/4 cup light brown sugar, packed
1/4 cup pumpkin purée
1/3 cup molasses*
1 1/2 teaspoons real vanilla extract
1/3 cup granulated sugar, for rolling

In a large mixing bowl, whisk together flour, baking powder, baking soda, and salt. Set aside.

In another mixing bowl, mix together melted butter and light brown sugar until there are no more lumps. Add in pumpkin, molasses, spices, and vanilla, stirring after each addition. Stir in 1/3 flour mixture at a time, until a thick soft dough has formed. Refrigerate 30 minutes to 24 hours.

Preheat oven to 350F. Line two sheet pans with parchment or a silicone baking mat.

Roll two tablespoon* increments of dough into balls. Roll dough balls in granulated sugar and place 2 inches apart on prepared pans. Bake 10-11 minutes, until puffy and no longer wet-looking. Let cool for five minutes on the pans before removing to a wire rack to cool completely. Repeat rolling and baking until all dough has been used.
Cookies will keep covered at room temperature for up to a week.

Notes:

1. Vegan option: use 3/4 cup melted coconut oil in place of the melted butter.
2. Do not use blackstrap molasses–it’s too robust for this recipe.
3. A medium cookie scoop may also be used.

Chewy Pumpkin Ginger Cookies {with Vegan Option}

Pumpkin Oatmeal Creme Pies

imageRemember Little Debbie Oatmeal Creme Pies? I had totally forgotten about them until a few weeks ago. I had just finished a nine hour day nannying…a day when I had forgotten to eat. It doesn’t happen often, but when it does, it’s bad. I’ll eat anything that’s not nailed down. As I neared the subway, I realized that I was not going to make it home in one piece if I didn’t eat something immediately. I swung into the nearest bodega thinking I’d grab a Kind Bar, but they didn’t have any. I went for Cheez-Its, but they didn’t have those either. And that’s when I saw it: the familiar cellophane wrapper with two suuuuuper soft cookies sandwiched with marshmallow filling and a hefty dose of nostalgia. I gave the cashier a handful of change and promptly demolished that cookie. Once I had my brain functioning again, I got to thinking about Little Debbie Oatmeal Creme Pies. They are so soft that they can practically be rolled into a ball, there are no discernible oats, and they have an ingredient list that I would find horrifying on an occasion when I don’t feel like I’m about to pass out. I could do better. And as the weather was starting to turn cooler, I decided that I could make them pumpkin. And tiny. Little food just tastes better.

image

When writing and testing this recipe, I tried to stay true to the Little Debbie classic. I wanted them to feel and taste authentic…but better, and with pumpkin spice. I didn’t want to take two Quaker Oatmeal Cookies, sandwich them with vanilla buttercream, and call them Oatmeal Creme Pies. Nope. I wanted for these cookies to be soft, sweet, not too oatey, chock-full of marshmallow–I wanted them to be nostalgia-inducing. But also pumpkin, because pumpkin. So I got to work.

Texture is key. These cookies have to be extra soft and puffy. Enter dark brown sugar and a bit of cornstarch. Egg yolks for richness. Pumpkin purée in place of egg whites (if we added both, these cookies would be cakey, and you know how I feel about cakey cookies 😭). Cinnamon and a hefty amount of my trusty pumpkin pie spice round out the pumpkin flavor. Yum.

Let’s talk about oats. I’ve never noticed any in Little Debbie’s cookies, which is probably why they are so incredibly soft. I thought about using oat flour to match their version, but instead went with quick oats. You can buy them in the store, but I just blitzed two cups of old-fashioned oats in the food processor until there were no visible whole oats. This gives our version a tiny bit of chew, but still keeps them feeling authentic. It’s an update worth making.

image

image

The filling is made with marshmallow fluff, confectioner’s sugar, vanilla, and one very controversial ingredient. I’m kind of afraid to even talk about it because, well…it’s shortening. And it seems like today everybody hates shortening. And I understand! Hydrogenated oils are horrible for us! But if you want to keep the filling close to the original, shortening is a necessary evil. I use Spectrum brand, which I find at Whole Foods. I’m pretty sure an equal volume of room temperature butter would work in its place, but I haven’t actually attempted it. If you do, let me know in the comments! The filling is sticky (but not too sticky), and keeps these cookies soft and delicious for days. If you make a batch on Sunday, you’ll be able to tuck them in lunches all week long.

Now that I’ve mentioned shortening, is there anyone still reading this?! Maybe not, but if you are, make plans to make these this weekend and then send Little Debbie packing. These Pumpkin Oatmeal Creme Pies are so, so good. You’ll never go back.

image

Pumpkin Oatmeal Creme Pies
makes about five dozen sandwich cookies

Cookies:
1 1/2 cups all-purpose flour
1 Tablespoon cornstarch
1 teaspoon baking soda
1 teaspoon Kosher or sea salt
1 cup (2 sticks) unsalted butter, softened to room temperature
1 cup dark brown sugar, packed
1/4 cup granulated sugar
1/2 teaspoon ground cinnamon
2 teaspoons pumpkin pie spice
4 tablespoons pure pumpkin purée
2 large egg yolks, room temperature
1 1/2 teaspoons real vanilla extract
1 1/4 cups quick oats*

Filling:
7oz marshmallow fluff (about 1 1/2 cups)
1/2 cup shortening, room temperature*
1 cup confectioner’s sugar
1/2 teaspoon Kosher or sea salt
1 teaspoon real vanilla extract
2 teaspoons hot water (from the tap is fine)

In a small mixing bowl, whisk together flour, cornstarch, baking soda, and salt. Set aside.

In a large mixing bowl, cream butter with an electric mixer until light and fluffy, about one minute. Beat in cinnamon and pumpkin pie spice until evenly dispersed. Add in dark brown and granulated sugars, and mix to combine. Beat in pumpkin purée, followed by the egg yolks and vanilla extract. With the mixer on low, add the flour mixture in three installments, until completely combined. Mix in quick oats. Cover dough with plastic wrap and refrigerate for at least one hour, or up to three days.

Preheat oven to 350F. Line two sheet pans with parchment paper.

Scoop cookie dough in one teaspoon increments. Roll into balls and set them two inches apart on prepared pans. Bake for 6-8 minutes, until the tops of the cookies no longer look wet. Let cool on the pans for five minutes before removing to a rack to cool completely. Repeat rolling and baking until you have used all the dough.

To make the filling, cream the marshmallow fluff and shortening with an electric mixer until light and fluffy. Beat in confectioner’s sugar and salt. Add in vanilla and hot water and mix on high until the filling is very fluffy. There are two options from here:

  1. To assemble a sandwich cookie by piping, apply filling by pipe a circle in the middle of the underside of one cookie, leaving about 1/4″ around the edge.
  2. Top with a second plain cookie, with the underside filling-side-in. Repeat until all cookies have been used. To assemble a sandwich cookie by spreading, use an offset frosting knife to spread 1/2-1 teaspoon on the underside of one cookie. Top with a second plain cookie, with the underside filling-side-in. Repeat until all cookies have been used.

Cookies will keep very well covered at room temperature for up to a week.

Notes:

  1. If you don’t have quick oats, you may blitz two cups of old fashioned oats in the food processor until there are no whole oats visible. Steel cut oats will not work in this recipe.
  2. If you don’t want to use shortening, you may use 1/2 cup of room temperature butter.

Vanilla-Almond Shortbread Cookies

image

My first blog post centered around my dad’s love of chocolate, particularly brownies. While my whole family loves it when he makes brownies, I neglected to mention one thing: my mom doesn’t like chocolate all that much. She can take it or leave it. She doesn’t hate it. She just doesn’t love it. My parents have been happily married for 32 years, raised three daughters and two miniature schnauzers, and this is probably the biggest thing they disagree on.

For years, my mom never mentioned this. I remember many birthdays where my little sister and I gave her boxes of Russell Stover Chocolate Covered Cherries, having zero idea that she didn’t love chocolate. A few years ago, she revealed the truth to me over a ritual ice cream lunch date: she’s a vanilla person. That’s not to say she’s boring. No, my mom is anything but boring. The woman is fearless. She’s the kind of person who isn’t afraid to travel around the country with sixty teenagers in tow. She’s the kind of person who, upon finding out that Justin Timberlake’s mom is her friend’s neighbor and JT himself is visiting, will scream “JUUUUUSTIIIIIN!” like a banshee in an effort to get his autograph for her diehard *NSYNC fan daughters. My mom works a full-time job, takes a two mile walk with the dog, makes dinner for my dad, and still takes the time to have an hour phone conversation with you about whether it’s appropriate to wear velveteen pants to a black tie event. She’s the kind of mom that your friends absolutely love, and the kind of mom that is friends with her adult children first and foremost. Bottom line: my mom straight-up rules. And today is her birthday, so let’s make her something vanilla.

image

image

I’ve been on a shortbread kick lately. As the weather is (sort of, not really) starting to turn cooler in New York, I have been drinking a lot of tea. Obviously that requires cookies. Really buttery, crunchy cookies. And, since we’re giving my mom a cookie shout-out, let’s make them vanilla-almond and slice-and-bake. I think she’d approve.

These vanilla-almond shortbread are a breeze to put together. We cream butter and sugar together before adding in vanilla bean paste and just a touch of almond extract. Then we mix in flour and salt, followed by sliced almonds. Next, we form the dough into two logs, wrap them in plastic wrap, and throw them in the fridge for a little bit. Then we just slice them and bake at 325F for 14-17 minutes. All that’s left to do is make a pot of tea and dunk away.

image

Vanilla-Almond Shortbread Cookies keep very well at room temperature for at least a week. This makes them perfect for your cookie jar, holiday gifting, or shipping a box to your mom since you can’t be there for her birthday this year.

Happy birthday, Mom. I love you more than chocolate.

image

Vanilla-Almond Shortbread Cookies
makes about five dozen

1 3/4 cups all purpose flour
1/2 teaspoon Kosher or sea salt
3/4 cup unsalted butter, softened to room temperature
1/2 cup granulated sugar
1 1/2 teaspoons vanilla bean paste*
1/4 teaspoon pure almond extract*
1/2 cup sliced almonds, optional

In a small bowl, whisk together flour and salt. Set aside.

In a large mixing bowl, cream butter with an electric mixer until light and fluffy, about two minutes. Add sugar and mix until it is completely combined with the butter. Add in the vanilla bean paste and almond extract, and combine. With the mixer running on low, add in flour mixture in two installments, mixing until it is just incorporated. Fold in sliced almonds. Dough will be crumbly, but should hold together when pinched.

Divide dough in half. Take one half and lay it on a piece of plastic wrap. Using the plastic wrap and clean hands, form the dough into a log. Wrap tightly in the plastic wrap. Repeat with the other half of the dough. Refrigerate wrapped dough for at least 45 minutes, or up to three days.

Preheat the oven to 325F. Line two cookie sheets with parchment paper, and set aside.

Unwrap one log of dough. Using a large, sharp chef’s knife, slice the dough in 1/4″ installments and lay them on the prepared pans at least one-inch apart. Bake for 14-17 minutes, until the tops no longer look doughy and the edges are starting to brown. Let cool on the pans for for 10 minutes before removing to a rack to cool completely.

These keep well in an airtight container at room temperature for at least a week.

Notes:

  1. If you do not have vanilla bean paste, or simply don’t want to use it, you may use the scraped seeds of one vanilla bean in addition to one teaspoon of vanilla extract. If you do not want to use vanilla bean at all, you may use two teaspoons of vanilla extract.
  2. If you would like a more pronounced almond flavor, you may use 1/2 teaspoon of almond extract. Be careful though–almond extract is very potent.

Red Velvet Cookies

image

I have a cookie commitment every Wednesday night. I can make whatever I want, as long as there are five dozen. Whatever I want! I usually just take recipes I am testing/experimenting with that week. Lately, it’s been a lot of shortbread and sandwich cookies. Sometimes it’s brownies (bar cookies are still cookies). Everyone is always very kind and interested to see what I’ve brought, with the exception of the time I brought a truly sad batch of chocolate roll-out cookies. You know they’re bad when there are still two dozen left the next week…oops. But back to the point. On very rare occasions, all the cookies disappear in twenty minutes, I get high fives left and right, and a slightly curmudgeonly friend of mine holds a half-eaten cookie in his hand and says “Liz. Liz! These are a home run.” Since these people eat my cookie experiments literally all the time, that says something. When I made these Red Velvet Cookies last spring, I had a home run kind of night.

image

imageimageRed Velvet is shrouded in mystery. Is it chocolate or vanilla? It’s both. Like a chocolate-vanilla swirl soft-serve cone, it’s the absolute best of both worlds. Why is it red? In the old days, it was because acid reacted with baking soda and cocoa powder, giving the finished product a reddish hue. (Devil’s Food cake has a similar backstory, except that it is decidedly chocolate.) These days, most bakers rely on red food coloring or beet juice to achieve a red final product. At the end of the day, there are only five requirements for something to be Red Velvet, and none of them are cream cheese frosting. I know. It’s a travesty! Red Velvet must have:

  1. Vanilla. In these cookies, we use 1 1/2 teaspoons for a pronounced vanilla flavor. It won’t get lost here.
  2. Natural Unsweetened Cocoa Powder. Some recipes use as little as a tablespoon, some use as much as 1/2 cup. I like to use 1/4 cup–just enough to say “there’s chocolate in here, but this is not a chocolate dessert.” Also, cocoa powder can really dry out baked goods. The smallish amount in this recipe makes sure that our final product is soft and chewy, rather than dry and crumbly. This (and pretty much any Red Velvet recipe) is not a good recipe for Dutch Process Cocoa, which will have a metallic-tasting result.
  3. Acid in the form of buttermilk and/or vinegar. In the case of these cookies, it’s powdered buttermilk. It reacts with both the baking soda and the cocoa powder to give these cookies a pleasant tang. The buttermilk powder will also give these cookies some additional tenderness, along with the acid in the brown sugar.
  4. A reddish color (duh). Here, we use one teaspoon of regular liquid red food coloring. I know that food coloring is terrible for us, but I don’t often have beet juice, and I kind of believe that dessert has some wiggle room. If you aren’t comfortable using food coloring, just leave it out. These will be delicious no matter their color.
  5. A velvety texture. That’s where the “Velvet” comes from. Now, cookies and velvety texture are not synonymous. Unless they’re cakey cookies, and I don’t see the point of eating cakey cookies when I could just have cake instead. For me, the velvet factor comes in the form of soft centers. Softness comes from the addition of cornstarch, which allows for tenderness here, just like it does in cake flour. Also, the cookies bake for just a few minutes–when they come out of the oven, the edges are chewy and the centers are soft and a little underbaked. Velvety, if you will.

Whew! That’s a lot of information for a Friday. All of that said, these are cookies. Making cookies should be fun. And these red, chocolate-vanilla cookies studded with white chocolate chips are really, really fun. Whether you’re making them for your family or as holiday gifts, they’re a total home run.

image

Red Velvet Cookies
makes about four dozen cookies

2 1/4 cups all purpose flour
1/4 cup natural unsweetened cocoa powder*
1/4 cup buttermilk powder
1/4 cup cornstarch
1 teaspoon baking soda
1 teaspoon Kosher or sea salt
1 cup (2 sticks) unsalted butter, melted and cooled slightly
3/4 cup light brown sugar*
1/2 cup granulated sugar
2 large eggs
1 1/2 teaspoons real vanilla extract
1 teaspoon liquid red food coloring*
1 1/4 cups white chocolate chips, plus optional extra for decorating*

In a medium mixing bowl, whisk together flour, cocoa powder, buttermilk powder, cornstarch, baking soda, and salt. Set aside.

In a large mixing bowl, whisk together melted butter, light brown sugar, and granulated sugar. One at a time, add in eggs, whisking until completely combined. Add in vanilla extract, followed by red food coloring. Add dry ingredients in two installments, stirring with a silicone spatula or wooden spoon until combined. Fold in 1 1/4 cups white chocolate chips. Cover dough with plastic wrap and chill for at least two hours, or up to three days.*

Preheat the oven to 350F. Line two baking sheets with parchment paper or silicone baking sheets. Scoop chilled dough in 1 tablespoon increments and roll into balls. Set dough balls at least two inches apart on the prepared baking sheets. Bake for 8-10 minutes, just until the tops are no longer raw-looking. Let the cookies sit on the baking sheets for 5-10 minutes before removing to a rack to cool completely. Repeat rolling, baking, and cooling until all cookie dough has been used.

Cookies will keep in an airtight container at room temperature for up to one week.

Notes:

  1. Do not use Dutch process cocoa here. Your cookies will have an unpleasant metallic flavor.
  2. Dark brown sugar may be substituted.
  3. If you are not comfortable using food coloring, just leave it out. The cookies will still taste great.
  4. I like to press a few extra white chocolate chips into the tops of the baked cookies, but this is purely for aesthetics.
  5. If the chilled dough is too difficult to scoop, let it sit on the counter for ten minutes before proceeding.

Chocolate Chip Shortbread Cookies

image

While I don’t often work in the mornings, I make a point to get up by 8am on weekdays. I have a sort of pattern that I follow nearly religiously, which goes as follows. Every weekday morning, I make a trip to my local bodega to get a coffee. I’m one of those that would love to make coffee, but has to be caffeinated to do so, lest I break the French press. I’ve gone to the same place for so long that the owner, Mr. Moon, no longer has to ask for my order; the only question is “Hot or cold?” Then I head home, turn the radio to BBC World Service News Hour (nerd alert!), and eat a bowl of granola with Icelandic yogurt, fruit, and a drizzle of maple syrup. I make granola in three-quart batches every few weeks, and go through it 1/2 cup at a time. But on the rare day that we don’t have a jar-full on top of the fridge, I make a trip to Bien Cuit for a coffee and a pastry.

Bien Cuit is a fantastic bakery on Smith Street in Boerum Hill. They make beautiful breads and pastries that change with the seasons; I am partial to the Tebirke (a flaky pastry filled with almond paste and rolled in poppyseeds) and Apple Cardamom Danish, but I’ve enjoyed nearly everything in the pastry case. And if that’s not enough to convince you to find a reason to go there right this minute, the baristas make one hell of a cappuccino. By the cashier, you’ll find a few cookie jars. They all look wonderful–and with flavors like Almond Sable and Malted Muesli, how couldn’t they be?–but the jar that always catches my eye is Diamond Chocolate Chip Shortbread. While I notice them every time I go to pay for my breakfast, I’ve never gotten one. Instead, I just dream about them while I go about my day. There are worse things to daydream about than crunchy, buttery cookies chock-full of miniature chocolate chips.

When Henry and I were invited to dinner at our friend David’s last week, I was asked to bring something simple to go with after-dinner tea. The first thing to come to mind was that jar of chocolate chip shortbread. I got to work making my own version. The result was just what he asked for: simple little cookies with the flavor of a chocolate chip cookie and a crunchy texture perfect for dunking in tea or coffee.

image

These really are the simplest cookies. They start with creaming room temperature butter, dark brown sugar, and granulated sugar. We use 3 parts brown sugar to 1 part granulated to ensure the rich caramel flavor of a great chocolate chip cookie. Then, we add in a little vanilla to round out the flavor of the cookie itself. The next step is adding flour and salt in two installments, followed by folding in miniature chocolate chips. The dough will seem very crumbly, but should hold together when you pinch some together. Then we divide the dough in half and roll each half into a log, wrap it in plastic, and let chill for 45 minutes to solidify the butter and meld the flavors. When that time is up, unwrap the dough, and slice into 1/4″-thick rounds. Bake for 15-17 minutes, or until the tops are no longer doughy and the edges are starting to brown. Then make yourself a pot of coffee or tea, and dunk away!

Chocolate Chip Shortbread Cookies keep well covered at room temperature for at least a week. They are a perfect casual dessert or afternoon treat for these colder months, and I think a little bag of them would be a great holiday gift with a pound of coffee and a cute ribbon! They would also make fantastic little ice cream sandwiches. Actually, that’s a great idea. I think I’ll go have one right now…

image

Chocolate Chip Shortbread Cookies
makes about six dozen

1 3/4 cups all purpose flour
1/2 teaspoon Kosher or sea salt
3/4 cup unsalted butter, softened to room temperature
6 tablespoons dark brown sugar, packed*
2 tablespoons granulated sugar
3/4 teaspoon pure vanilla extract
1/2 cup + 2 tablespoons mini chocolate chips*

In a medium mixing bowl, whisk together flour and salt. Set aside.

With a hand mixer in a large mixing bowl, beat butter until it is light and fluffy (about two minutes). Add dark brown and granulated sugars followed by vanilla, and beat until they are completely incorporated. With the mixer running on low, incorporate flour mixture in two installments, making sure to scrape down the sides of the bowl. Mix in mini chocolate chips.

Divide dough in half. Take one half and lay it on a piece of plastic wrap. Using the plastic wrap and clean hands, form the dough into a 9″ long x 1.5″ thick log. Wrap tightly in the plastic wrap. Repeat with the other half of the dough. Refrigerate wrapped dough for at least 45 minutes, or up to three days.

Preheat the oven to 325F. Line two cookie sheets with parchment paper, and set aside.

Unwrap one log of dough. Using a large, sharp chef’s knife, slice the dough in 1/4″ installments and lay them on the prepared pans one inch apart. Bake for 15-17 minutes, or until the tops no longer look doughy and the edges are starting to brown. Let cool on the pans for for 10 minutes before removing to a rack to cool completely. Repeat slicing and baking with remaining dough.

These keep well in an airtight container at room temperature for at least a week.

Notes:

  1. Light brown sugar may be substituted.
  2. Regular-sized chocolate chips are not recommended.