 Over the past couple of years, I’ve learned that a shocking number of people I know and love don’t know how to make one of the simplest recipes in the wide world: Grilled Cheese. It’s not because they’re incapable in the kitchen—it’s just that nobody ever taught them how to make it so that the bread cooks and the cheese melts at similar rates, and the butter doesn’t blacken and smoke up the house.
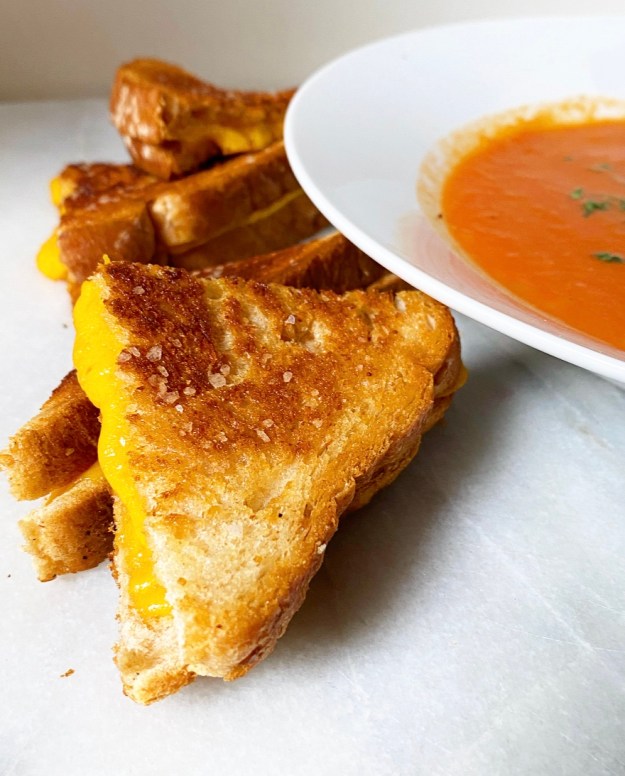 Luckily (maybe?), they’re friends with me, a person who will make them a grilled cheese in the moment and then spend four months dwelling on the (non-)event until the middle of January when she decides to write a blog post about the whole (inconsequential) thing. And that’s how we got here. Luckily. Maybe.
Anyway…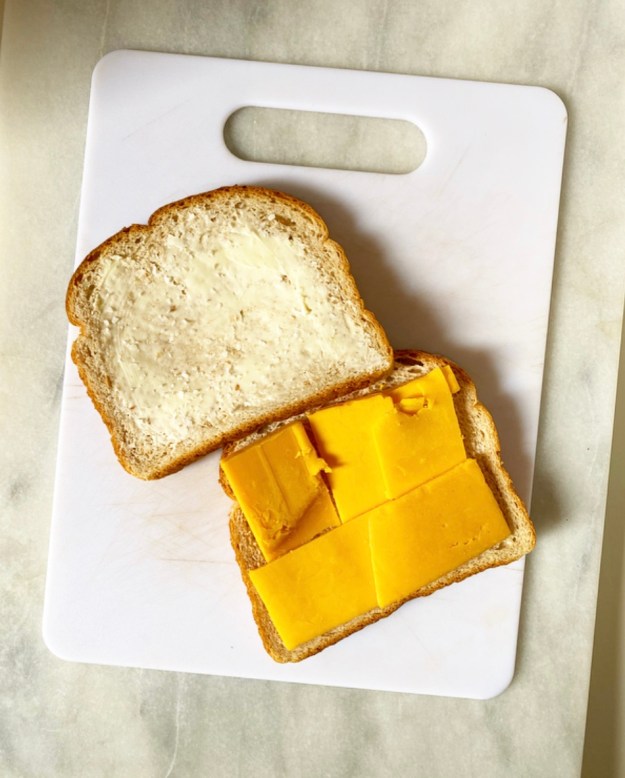 I make Grilled Cheese for dinner at least once a week because a) it’s easy and I don’t have to think about it too hard, and b) I always have sandwich bread, butter and some sort of melting cheese (usually extra sharp cheddar). It only takes a couple of minutes to butter two pieces of bread and layer cheese in the middle. You’ll notice I don’t use sliced cheese here—that’s simply because I prefer to buy the brick and slice it myself. Do whatever works for you, with the exception of pre-shredded cheese because it’s coated in an anti-caking agent that prevents proper melting. You do not want to impede proper melting on a Grilled Cheese!
 As far as cooking goes, I think it’s a pretty human thing to want to cook crispy foods over the highest heat for a couple of minutes, but when it comes to Grilled Cheese (and so many other things), it’s best to ignore that thought, turn down the flame and take your time. Whereas 3-4 minutes over high will yield cold cheese between burnt slices of bread, 7-8 over medium-low will give you perfect melted cheese and buttery, golden edges every time. Those extra four minutes make all the difference in the world.
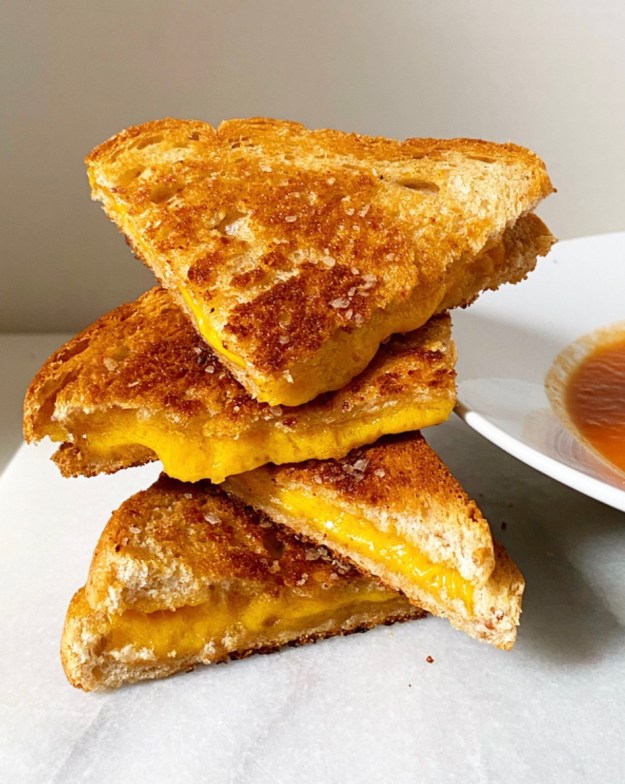 Boom! That’s all you need to know to make a basic Grilled Cheese. You can change up the cheese and bread depending on your mood, but as long as you butter the outsides of the bread instead of melting butter in the skillet and cook things low and slow, you will always have perfect Grilled Cheese.
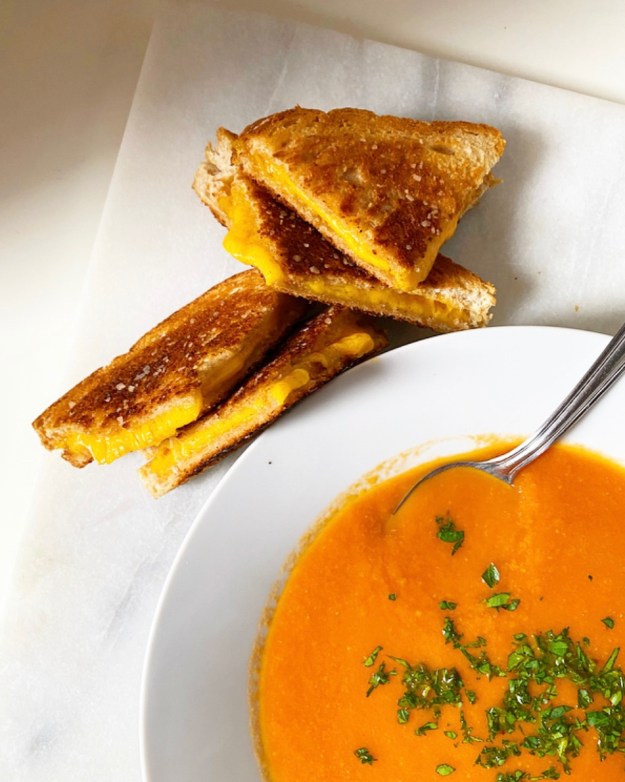
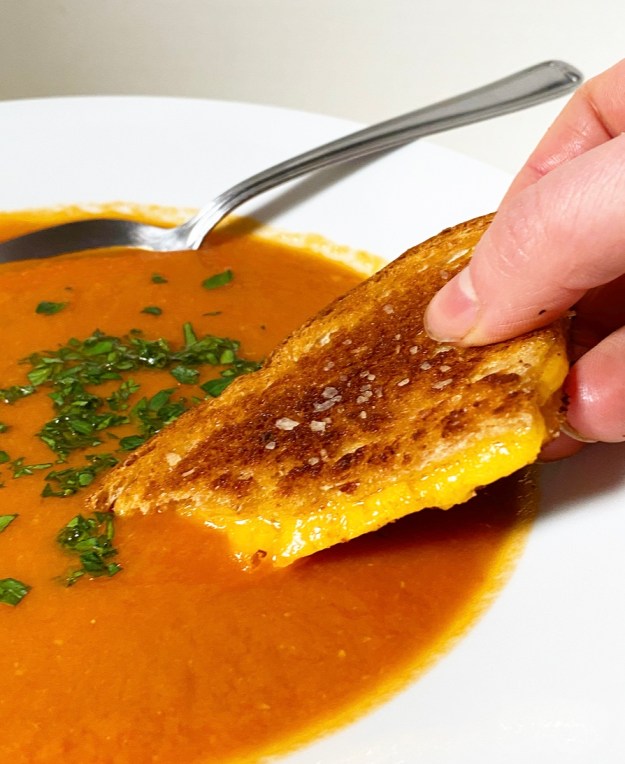 And what’s Grilled Cheese without Tomato Soup? This combination is a classic for a reason—the tang of tomato pairs perfectly with the rich, cheesy, crispy sandwich, making for a simple, satisfying meal.
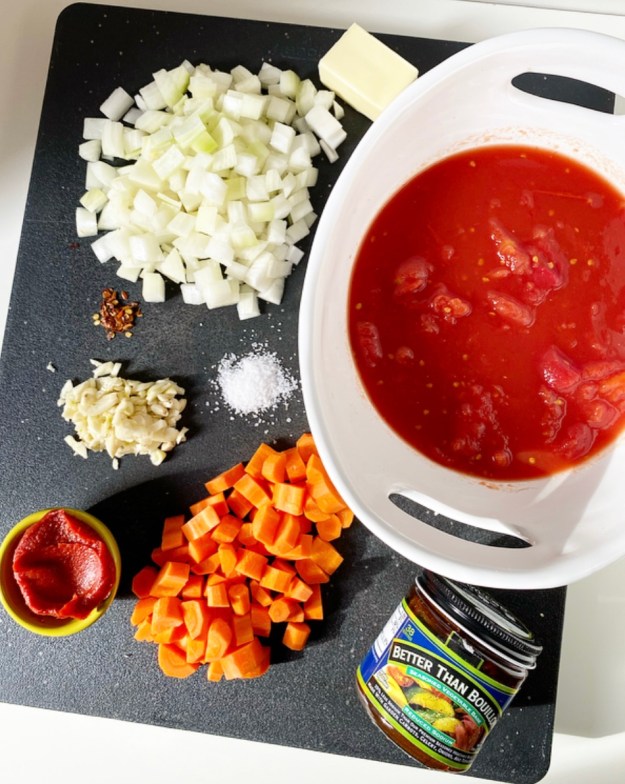 As with Grilled Cheese, my go-to Tomato Soup recipe is easy as can be. Whole peeled tomatoes are crushed by hand, then simmered in vegetable stock with carrots, onion, garlic, tomato paste and spices before being puréed until velvety smooth. Easy peasy.
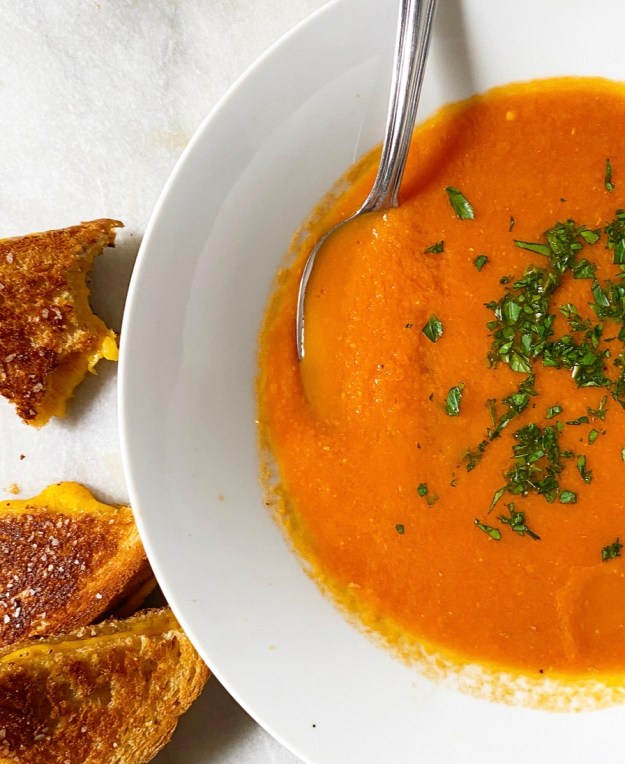 Two things to note:
• I prefer to use canned whole peeled tomatoes instead of fresh. This is for a few reasons, but mainly because canned tomatoes give consistently delicious results. I love fresh tomatoes, but they are only in season for a few months of the year and January isn’t one of them.
• You’ll notice I like to add a pinch of baking soda at the end of cooking to neutralize some of the acidity, but you may also use a teaspoon of sugar or honey. Whatever works for you.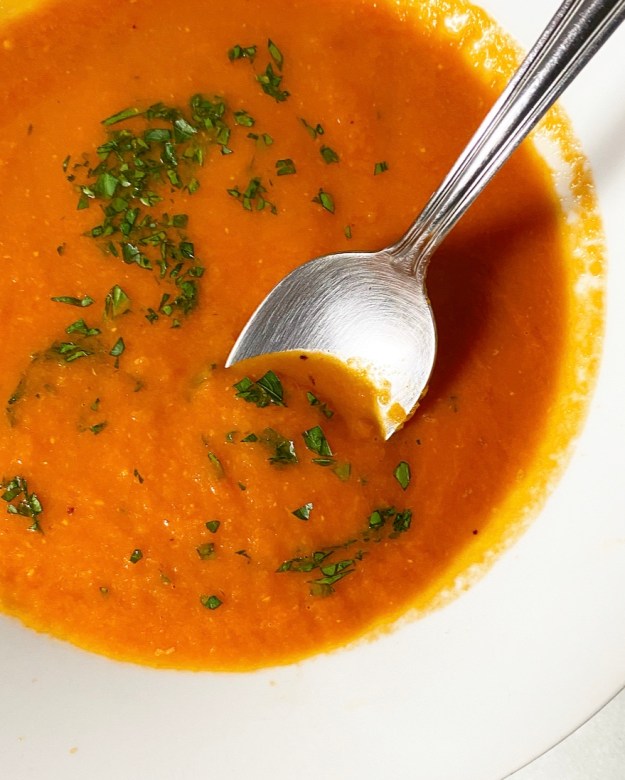 So there you have it—one of the simplest meals in the world, explained. Maybe you knew all this or maybe you didn’t. Either way, I hope you treat yourself this weekend. I know we could all use some comfort. No “maybe” about it.
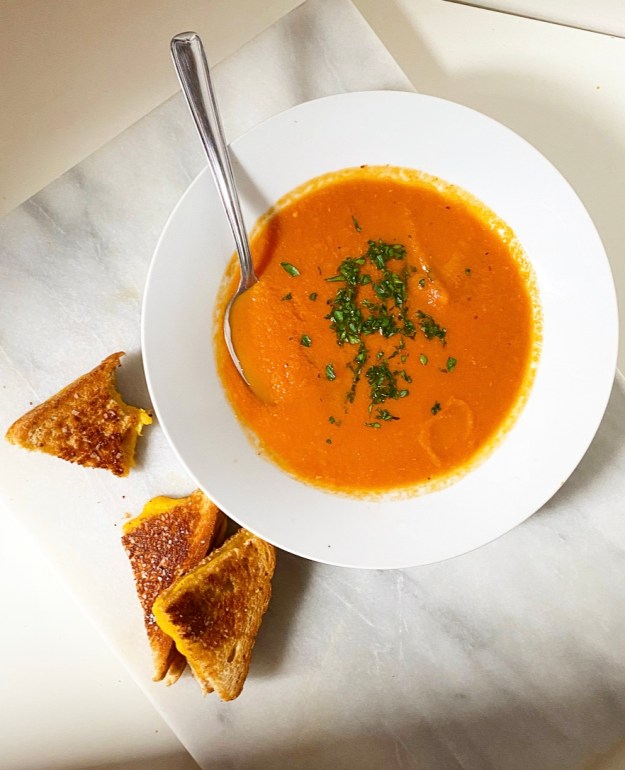
Grilled Cheese Sandwiches
makes 2 sandwiches
4 slices sandwich bread (I like Dave’s Killed Bread White Bread Done Right)
2 tablespoons butter, softened
small pinch of salt, if using unsalted butter
4 ounces extra sharp cheddar or other melting cheese, thinly sliced
Spread 1/2 tablespoon of softened butter over one side of each piece of sandwich bread. If using unsalted butter, sprinkle butter with a small pinch of salt.
Turn 2 pieces of bread plain-side-up. Lay sliced cheese evenly over each plain side. Top cheese with remaining pieces of bread, buttered-side-up, so that the buttered sides of each slice of bread are on the outsides of the sandwiches.
Heat a medium-large heavy-bottomed skillet over medium-low heat. Add sandwiches and let cook, without moving or squishing, until they are golden on the bottom, about 4 minutes. Flip sandwiches and let cook, without moving or squishing, until they are golden on the other side, about 3-4 more minutes.
Serve immediately, with tomato soup (recipe below), if desired.
Tomato Soup
makes about 4 servings
1 28-ounce can whole peeled tomatoes
3 tablespoons unsalted butter
1 medium-large Spanish onion, diced
3-4 medium carrots, peeled and diced (about 1 cup)
1/2-1 teaspoon Kosher or sea salt, divided
4 cloves garlic, smashed, peeled & sliced
1/4 cup tomato paste
1/8-1/4 teaspoon red pepper flakes (or a pinch of ground cayenne)
4 cups vegetable stock (I use Better than Bouillon)
small pinch of baking soda or teaspoon of sugar, optional
chopped parsley, optional
Place tomatoes and any liquid in a mixing bowl. Use your clean hands to crush the tomatoes. Set aside.
Melt butter in a heavy-bottomed pot over medium heat. Add onion, carrots and pinch of salt, and cook for 5-7 minutes, until onion is starting to turn translucent but nothing has browned. Add minced garlic and cook about 1 minute or until fragrant. Add tomato paste and cook, stirring frequently, for about 5 minutes, until starting to darken.
Stir in red pepper flakes, hand-crushed tomatoes & their liquid, followed by vegetable stock. Bring to a boil, reduce to a simmer, and let cook for 20-25 minutes, until carrots have softened.
Purée soup with a hand blender. Alternatively, let hot soup cool for 15 minutes before transferring to a high-powered blender and puréeing. Be careful, as hot liquids expand during blending.
Taste soup and add salt as desired. If soup is too acidic, stir in a small pinch of baking soda or a teaspoon of sugar. Garnish with parsley and serve, with Grilled Cheese (recipe above) if desired.
Leftover soup will keep in an airtight container in the refrigerator for up to four days.


 This is the last
 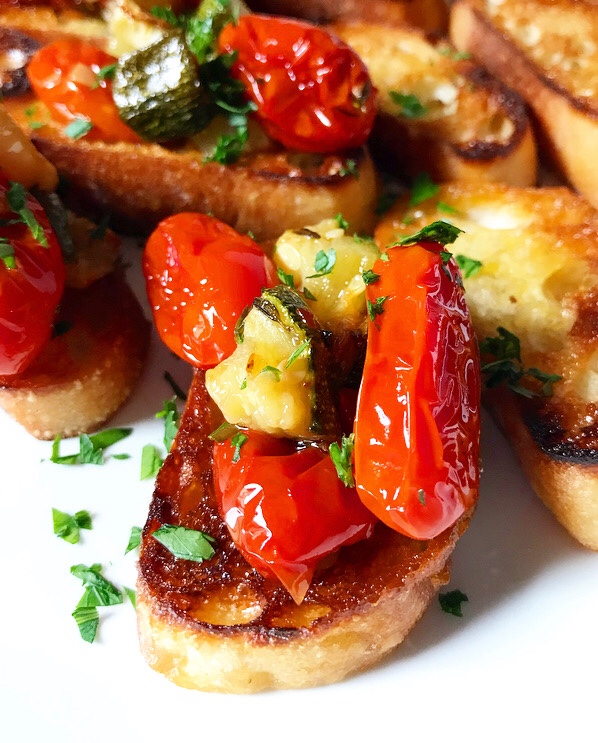 Unlike the
 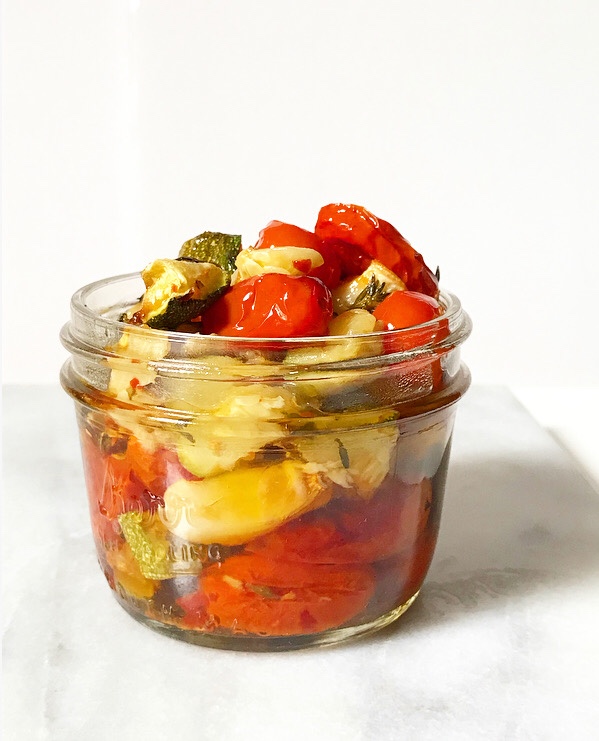 Now, you’ve almost certainly heard of confit, most likely in association with duck. The word itself comes from the
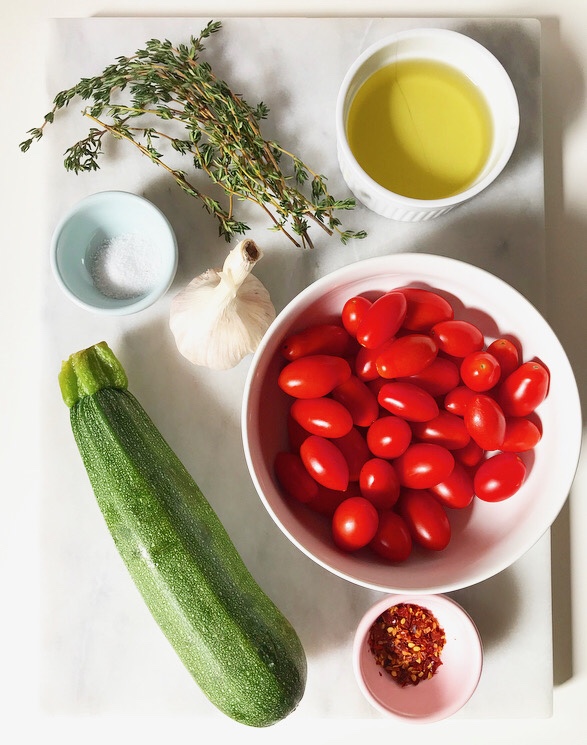
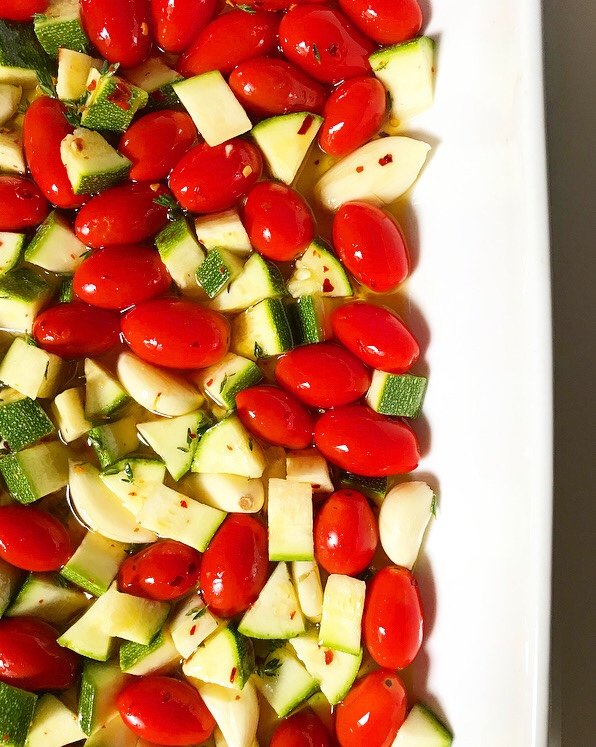
 Making this confit couldn’t be simpler. Start by tipping a pint of grape tomatoes, some diced zucchini and an entire head’s-worth of garlic cloves into a casserole dish. Season them with thyme, red pepper flakes and salt. Stir in 3/4 cup of olive oil and slow-roast until it’s all soft, caramelized, and fragrant. That’s it.
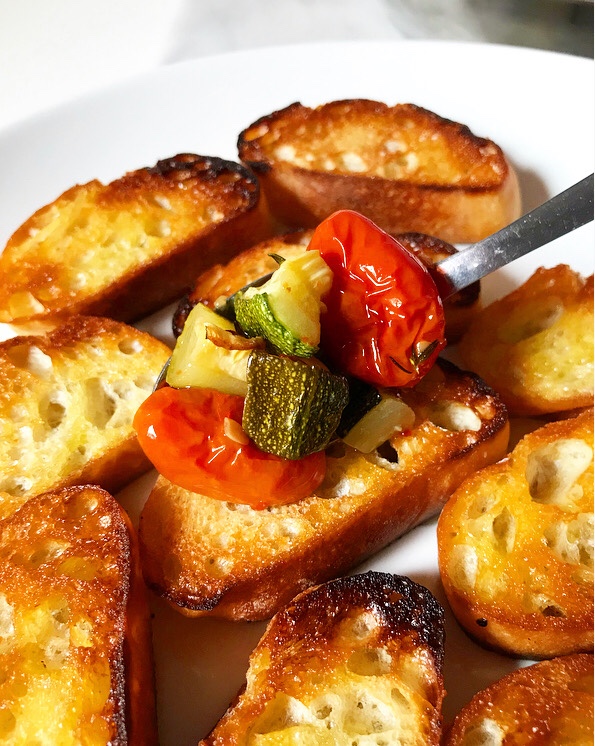 The sky’s the limit on applications. Tomato & Zucchini Confit can be stirred into pasta , grains or beans for a quick meal, or used to garnish chicken or fish. For this post, I just spooned it onto some baguette slices that were toasted in olive oil and called it crostini. Really, put this on anything that could use a touch of herby, savory, garlicky tomato & zucchini. (I think you’ll find that that’s most things.)
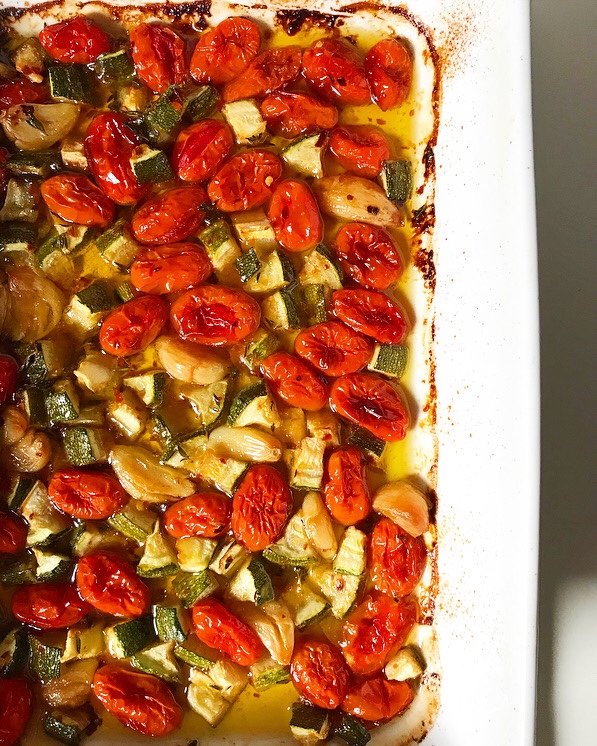
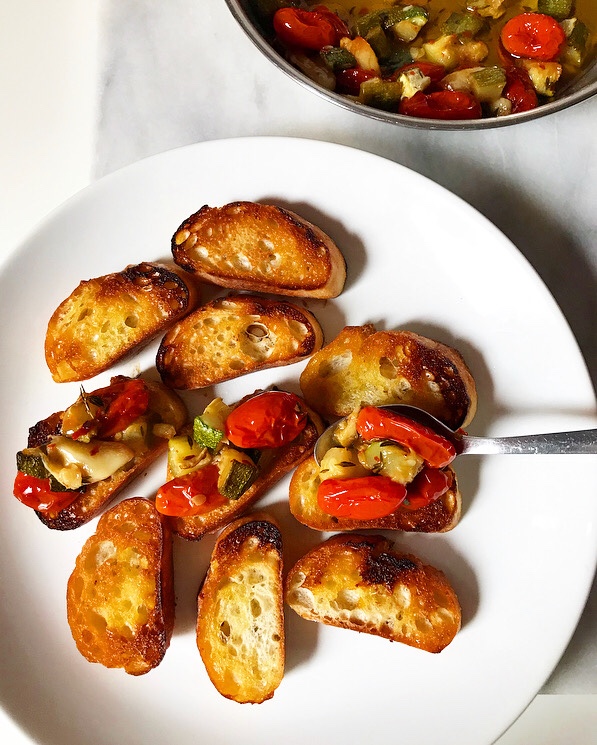 I’ve written this recipe so that the oven is at 300F and the confit cooks for about an hour, but you can go even lower and slower (think 250F for 2 or even 3 hours) for greater depth of flavor. I think it’s pretty wonderful as is though.
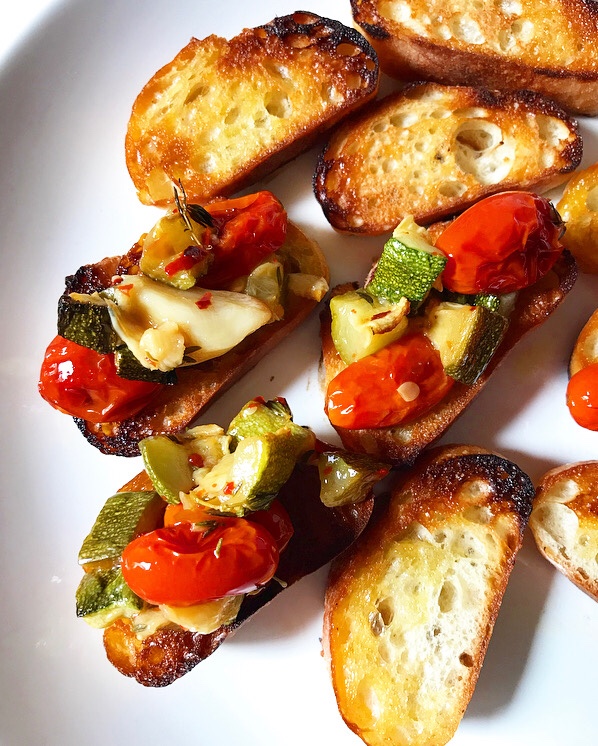 Tomato & Zucchini Confit is great the day it’s made, but since it’s a preserve, one batch can last a while. Once it has cooled, just pile it into a jar, top it off with olive oil so that none of the tomato, zucchini or garlic is exposed, and store it in the fridge. When you’re ready to serve it, bring the confit back to room temperature. When you’ve had your fill, top the leftovers with more oil and refrigerate the jar again for up to two weeks. If you’re anything like me though, it won’t be around longer than a few days.
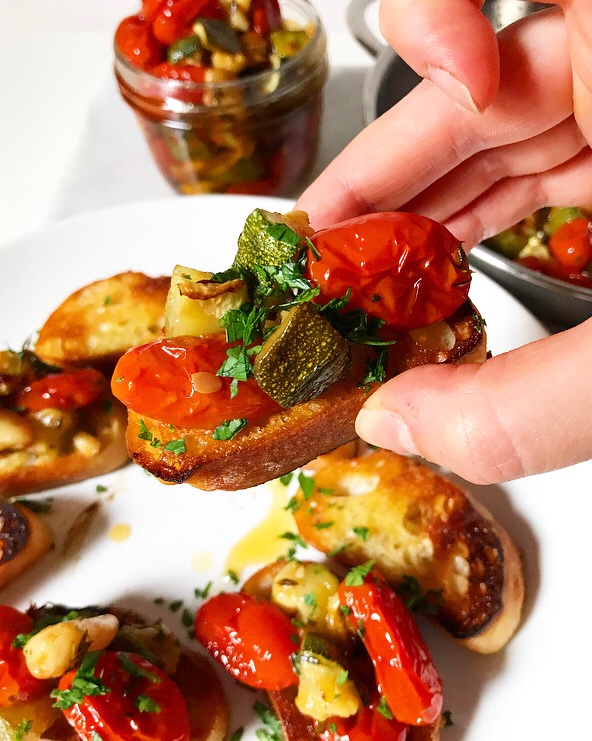


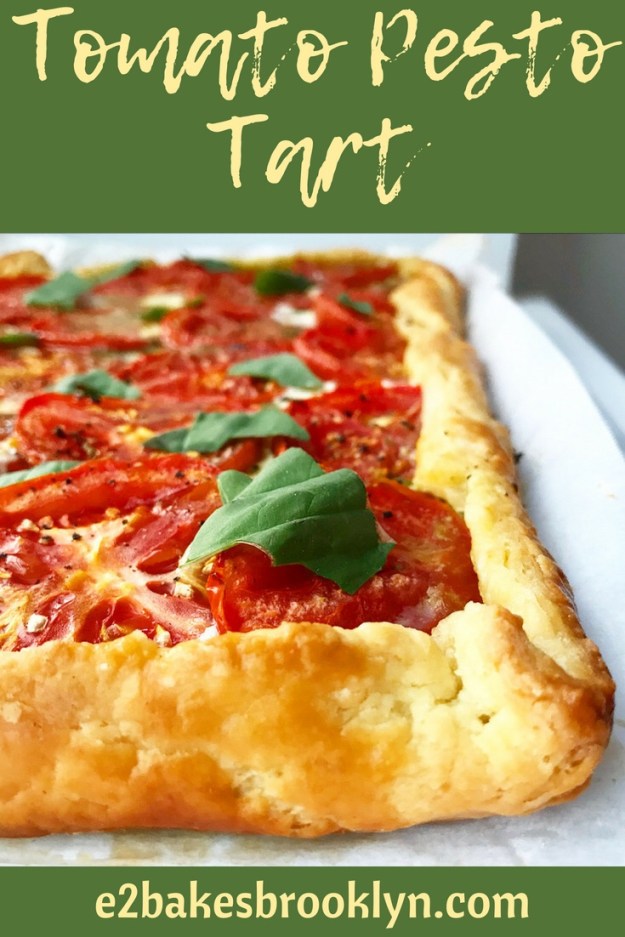
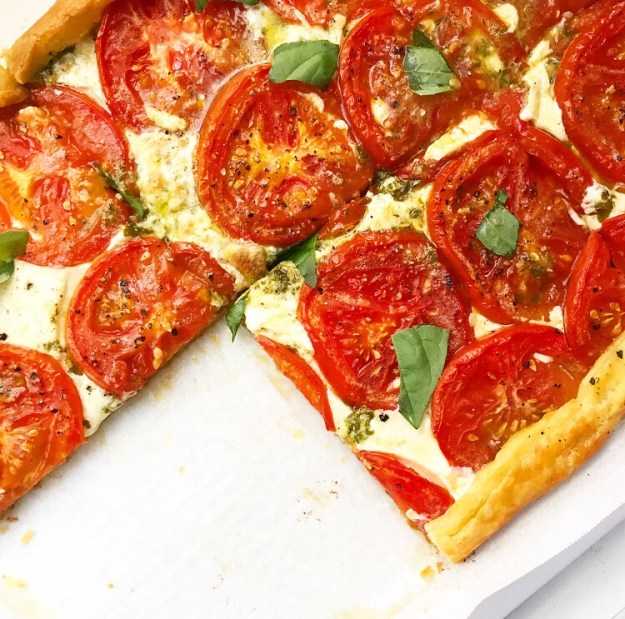
 I can’t believe it’s taken me so long to post this Tomato Pesto Tart. I’ve been thinking about it for years!
 I always intend to bake something savory during the summer, but I inevitably become consumed with berries and cherries and peaches, and before I know it, I’m cracking open a can of pumpkin. I’m in my third year as a blogger and I’m pretty sure that this is my very first savory, summery baked main course!
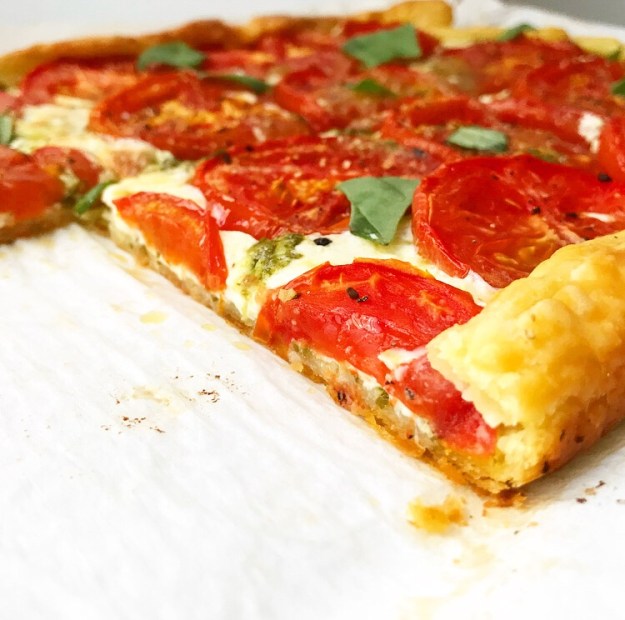 This Tomato Pesto Tart is basically everything you love about caprese salad, wrapped up in crazy-flaky
  There’s a layer of
 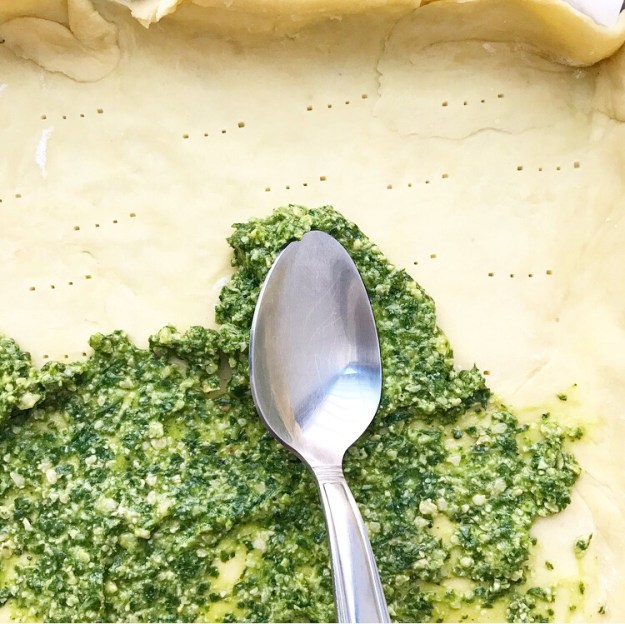 a layer of torn fresh mozzarella cheese…
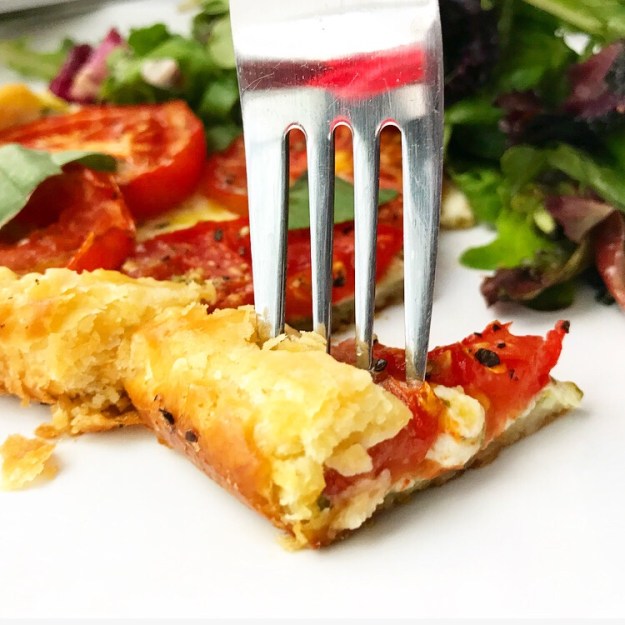
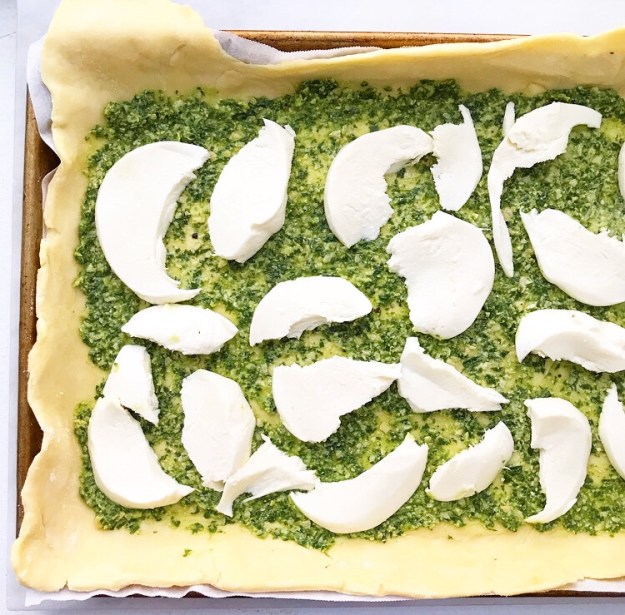 and a layer of sliced fresh tomatoes.
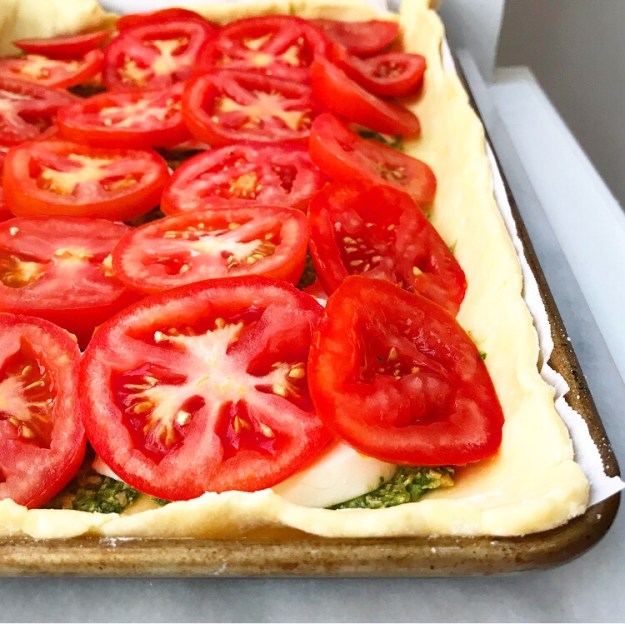 I used some vine-ripened tomatoes that looked good at the green market, but feel free to use heirloom tomatoes, cherry tomatoes, or any other variety you like! Just make sure to drain them on paper towels so they don’t make the tart too wet.
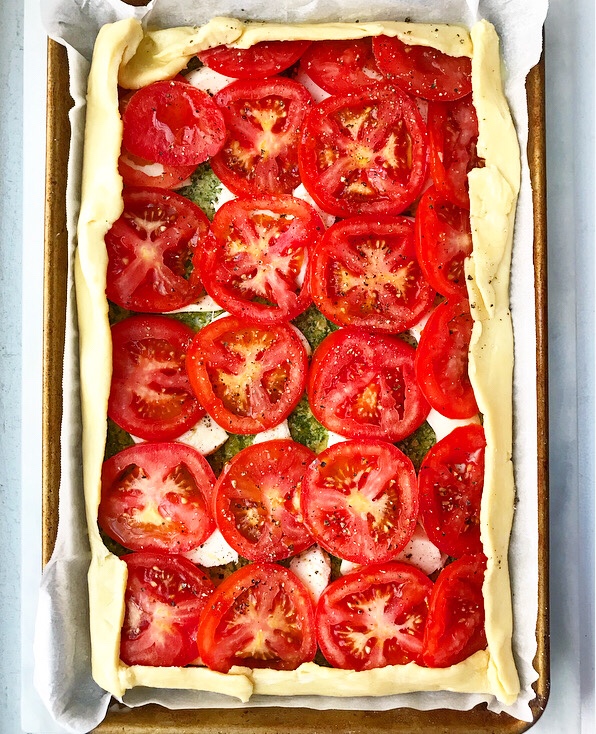 Drizzle the tart filling with olive oil and give it a good sprinkle of salt and pepper before baking for about half an hour. You’ll know it’s ready when the filling is a little bubbly and the crust is golden.
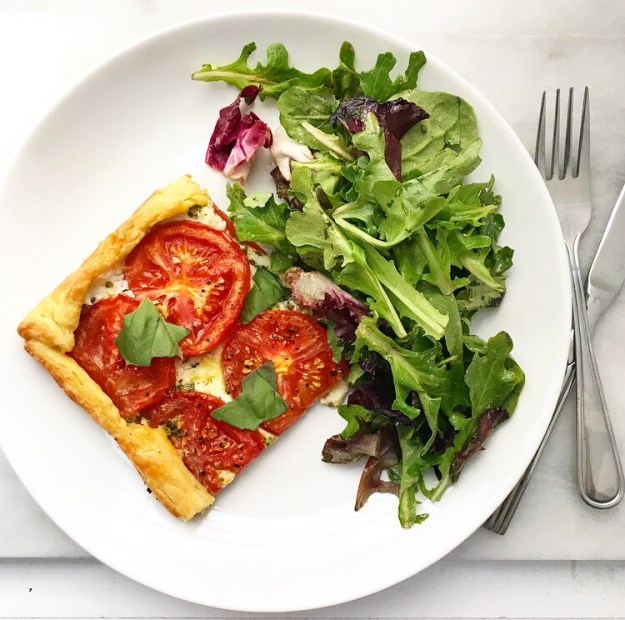
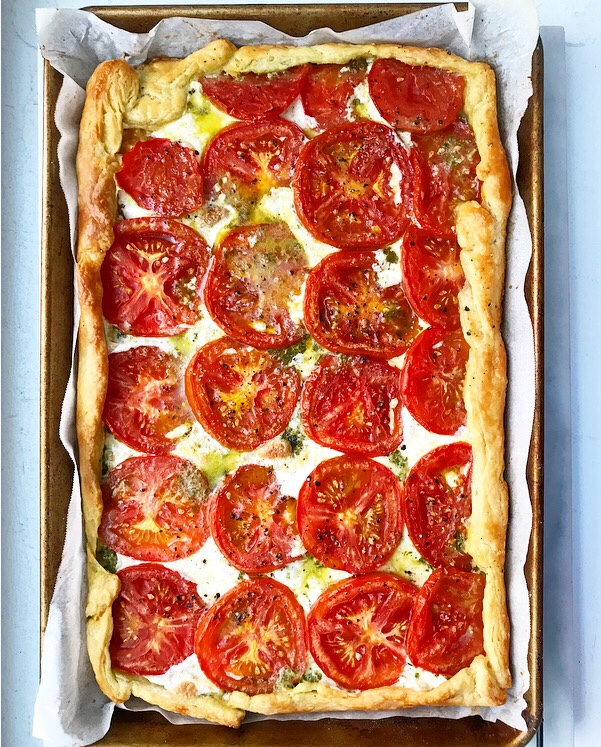 Let the tart cool for a few minutes before slicing it up. Add a side salad and you’ve got a great weeknight meal! This would also be a good dinner party option.
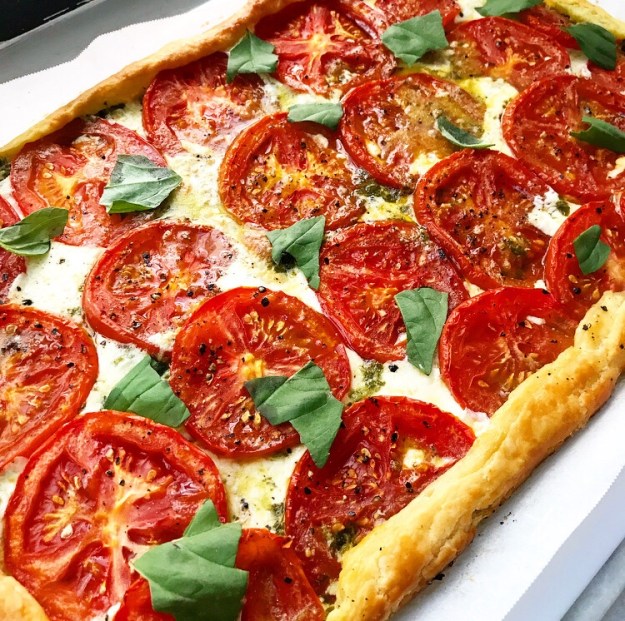
 Oooh, or a garden party! I don’t have a garden, nor do I throw very many parties, but I could see this being absolutely perfect for a garden party.
 I also don’t know anyone who throws garden parties (because New York), but if you have a garden and want to throw a party in it (or if you are buddies with the garden party queen,