 A few weeks ago, there was a Facebook poll going around asking if a cinnamon roll is a doughnut. I don’t know where or why it started, but I compulsively swiped it every time it came up on my feed just to make sure everyone I know understands that cinnamon rolls are not doughnuts.
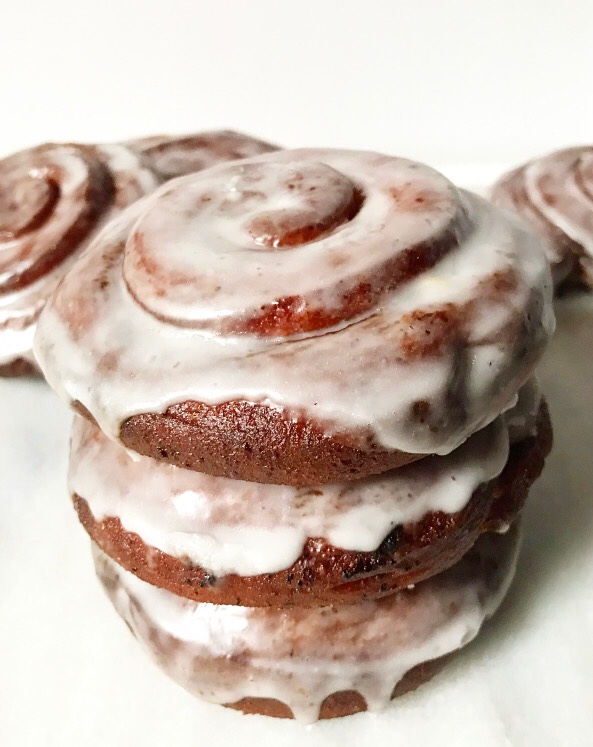 Cinnamon Rolls = baked pastry.
Doughnuts = fried* pastry.
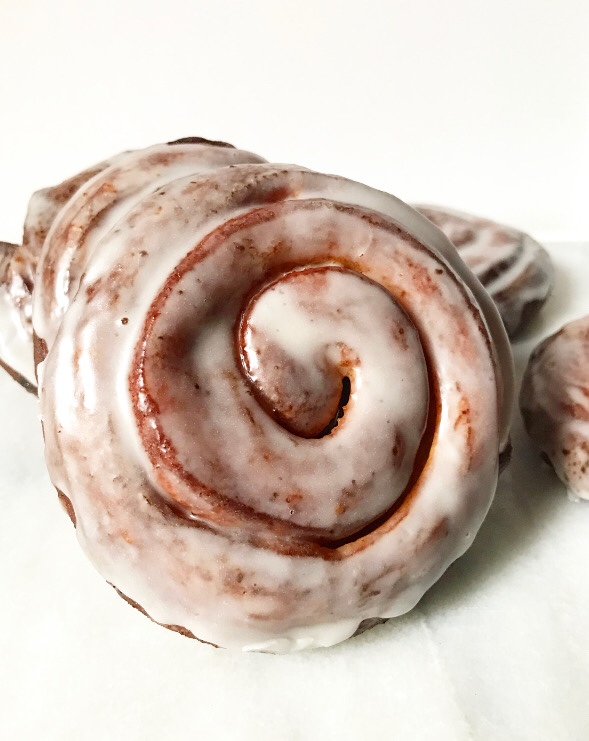
*Baked Doughnuts = muffins in disguise. Of course, there are exceptions to every rule and, oh, do I love finding an exception. Today’s recipe, Cinnamon Roll Doughnuts, are exactly what they sound like: fluffy, brown sugary cinnamon rolls made from doughnut dough, fried ‘til golden and dunked in a classic sugar glaze. They are both cinnamon roll and a doughnut and they are exactly as delicious as they sound.
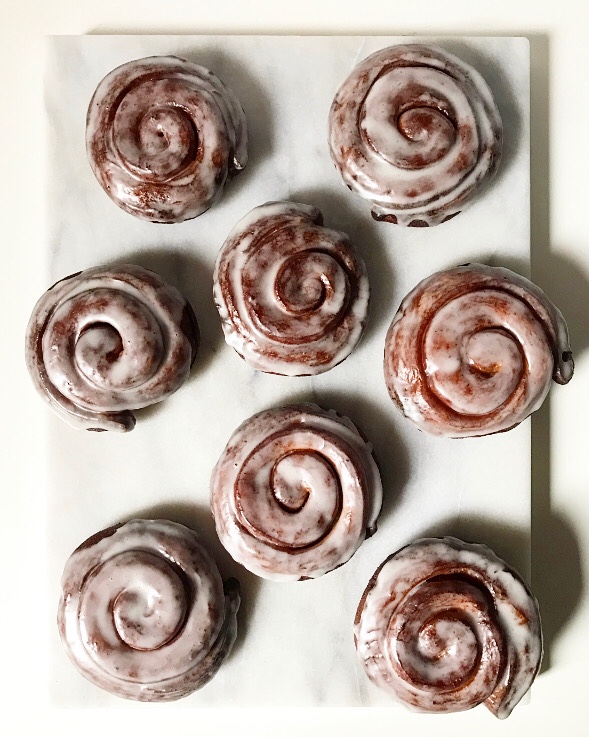 The inspiration for these comes from my childhood doughnut shop, Dale’s Donuts #9.* They made (and I assume that they still make) a version of these, and since I didn’t grow up with much home baking, I just assumed that all cinnamon rolls were doughnuts. As has been established, they are not, but I didn’t know at the time and I don’t think I would have cared…unless there wasn’t one left for me after a Sunday doughnut run.
*I have never encountered Dale’s Donuts #1-#8. If you ever do, please tell me. I would love to know they exist.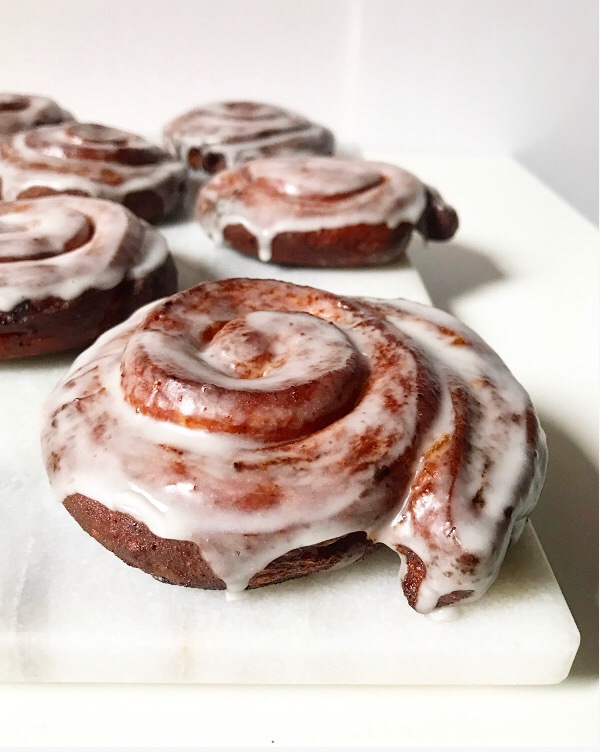 Anyway…I’ve since learned to make great cinnamon rolls and doughnuts, but the cinnamon roll doughnuts of my youth have eluded me. I’ve looked for something comparable in every doughnut shop I’ve encountered over the years (which has been a lot), but have come up empty-handed…so I figured it out myself.
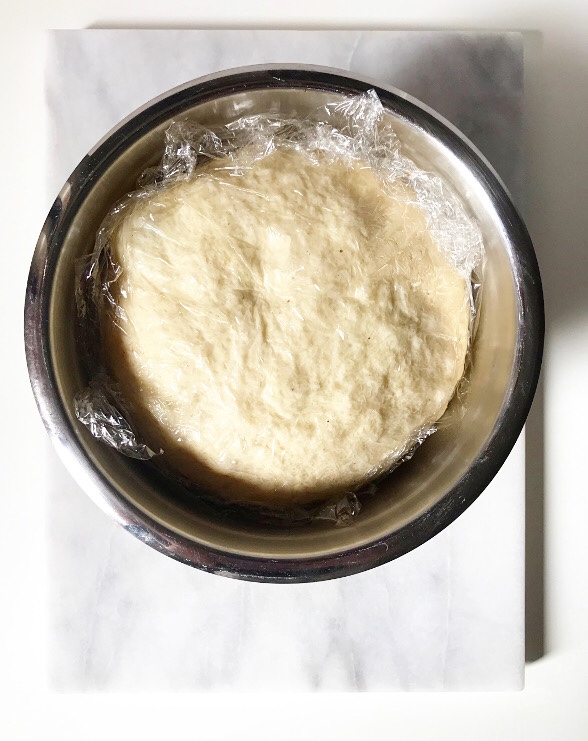
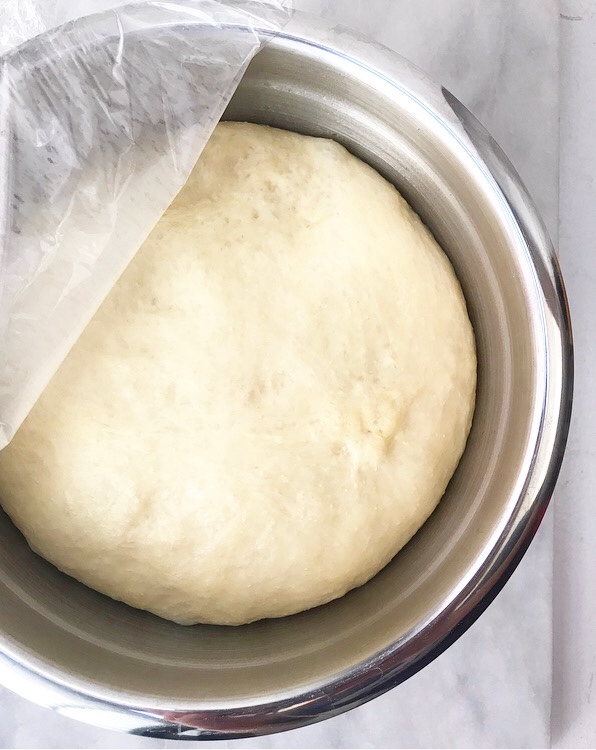
 Cinnamon Roll Doughnuts are as simple to make as any of my other yeasted doughnuts. They begin like many sweet rolls and doughnuts do: by making a dough and letting it rise slowly in the refrigerator overnight. This makes for prime gluten development (critical for softness and chew) and nuanced flavor, and it means you don’t have to get up at 5am to make doughnuts in time for breakfast.
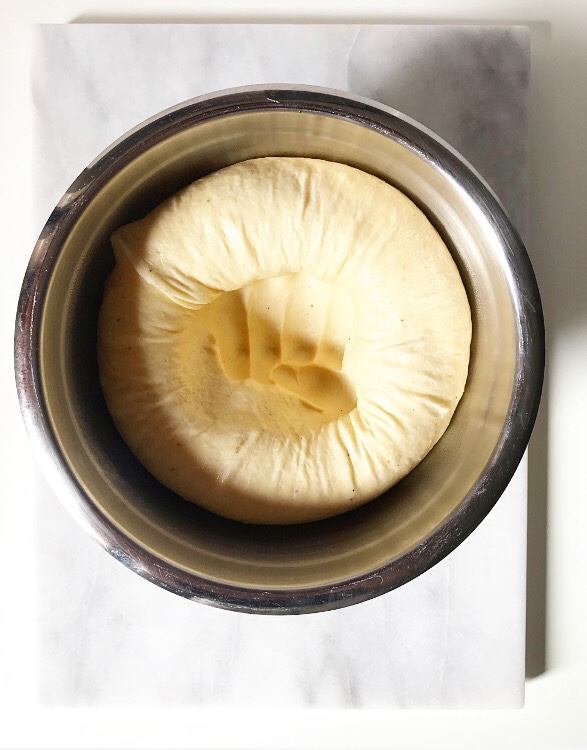
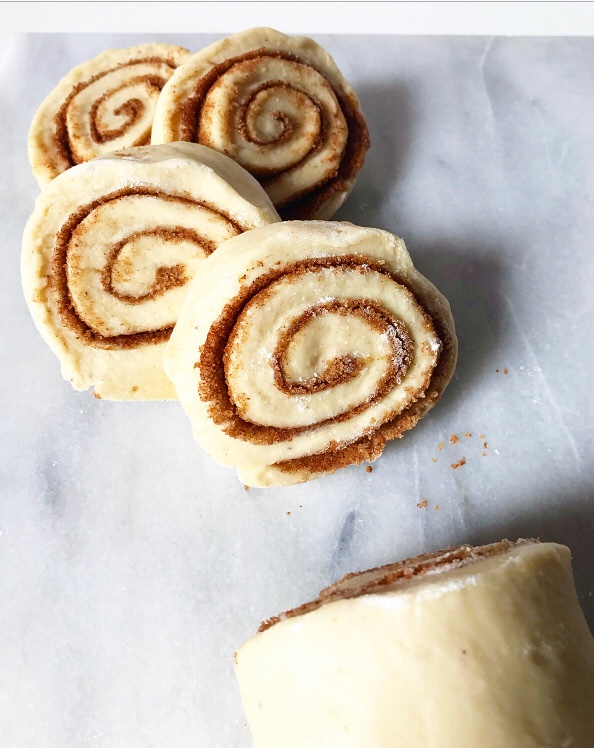 The next day, the dough is punched down, rolled into a rectangle, filled with cinnamon & brown sugar, rolled back up, and sliced.
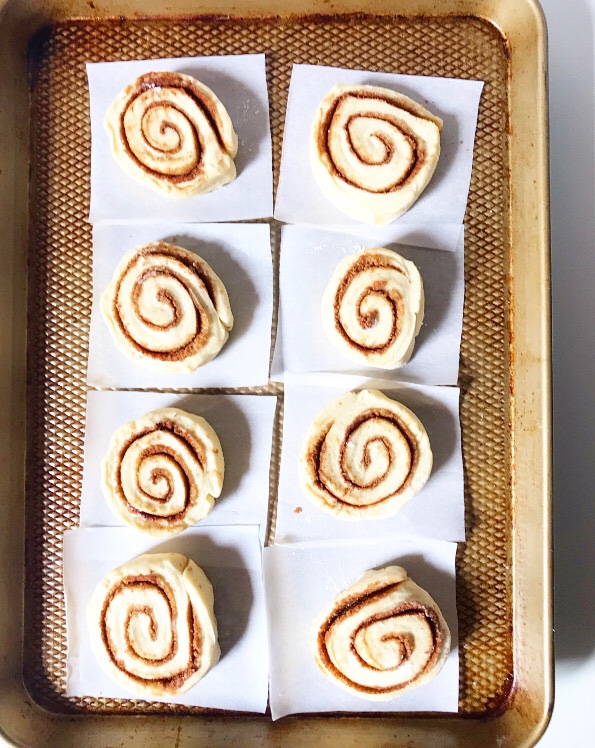

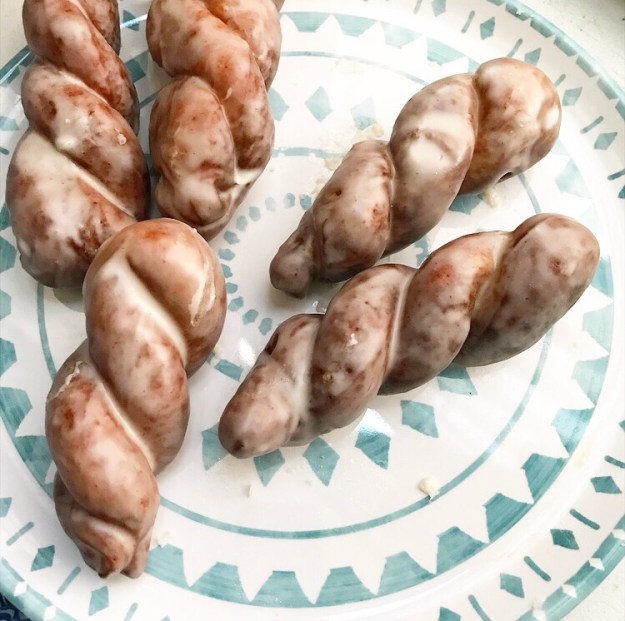
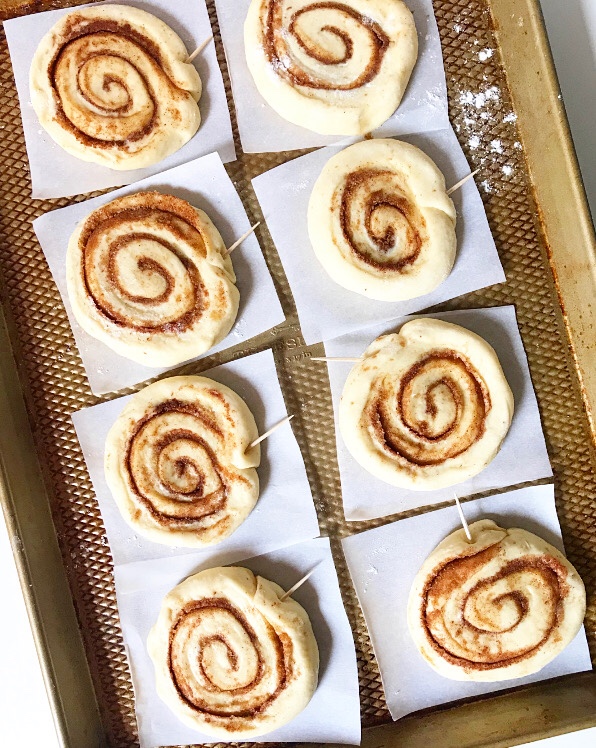 Then the rolls are then pressed down with the heel of your hand and the ends are secured with toothpicks before a short second rise. These steps will keep them unraveling while rising and frying.
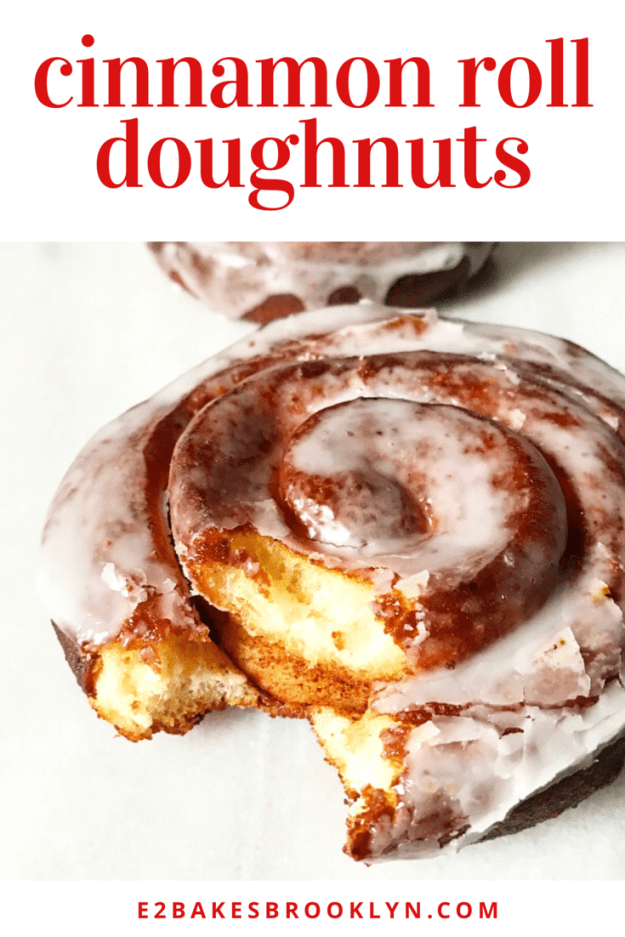
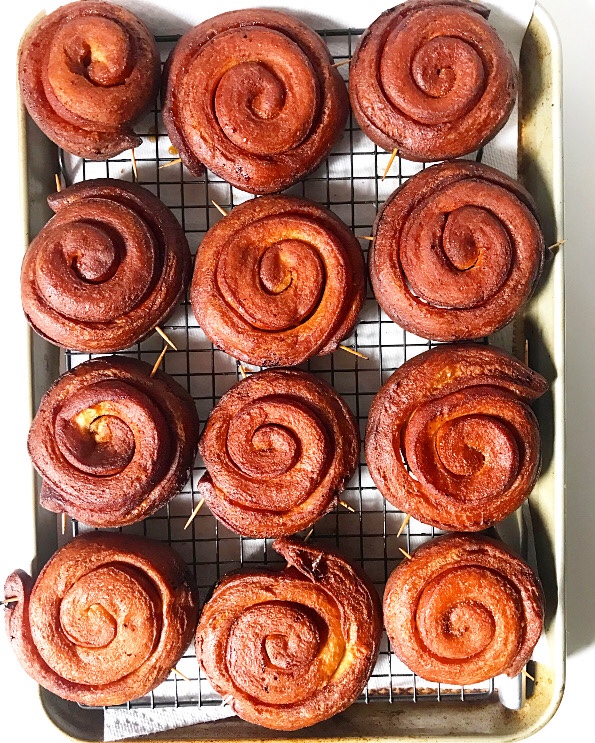 And speaking of frying, this is when these rolls take a decidedly doughnut-esque turn. Each one is fried in hot oil until golden and fully cooked in the middle. Some filling will escape during frying—that’s the nature of the beast—but trust me when I say your doughnuts will still be plenty cinnamony.
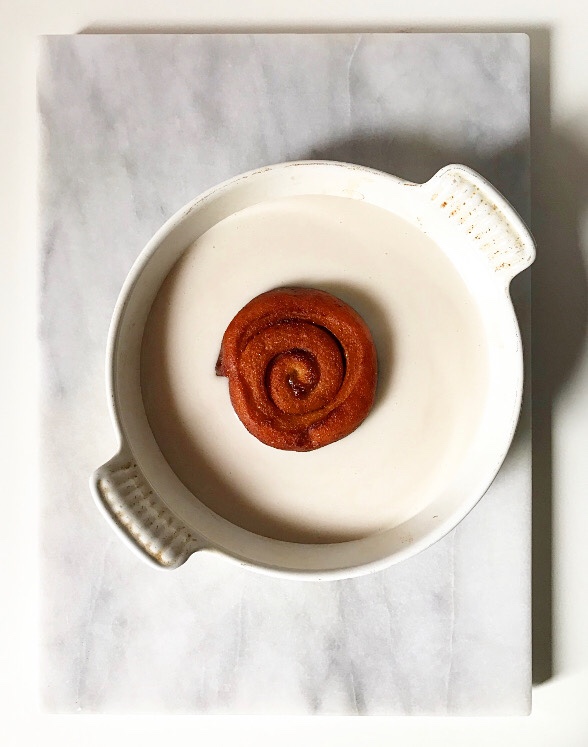
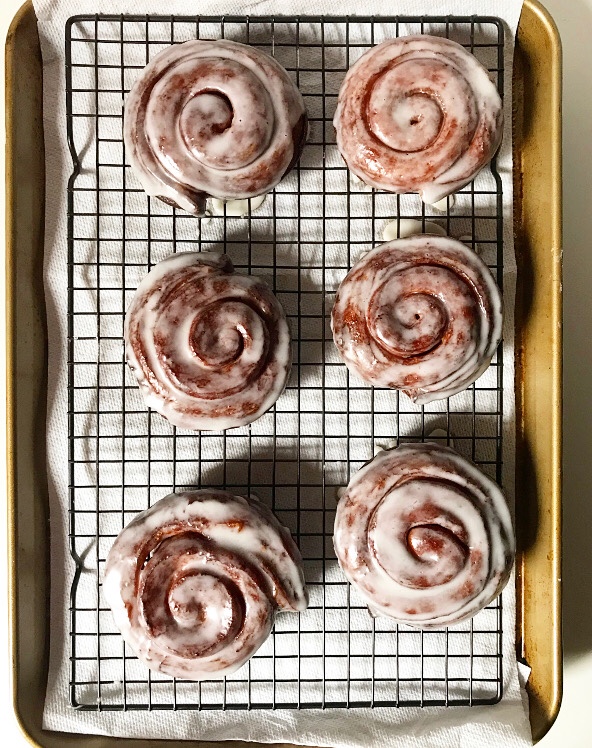
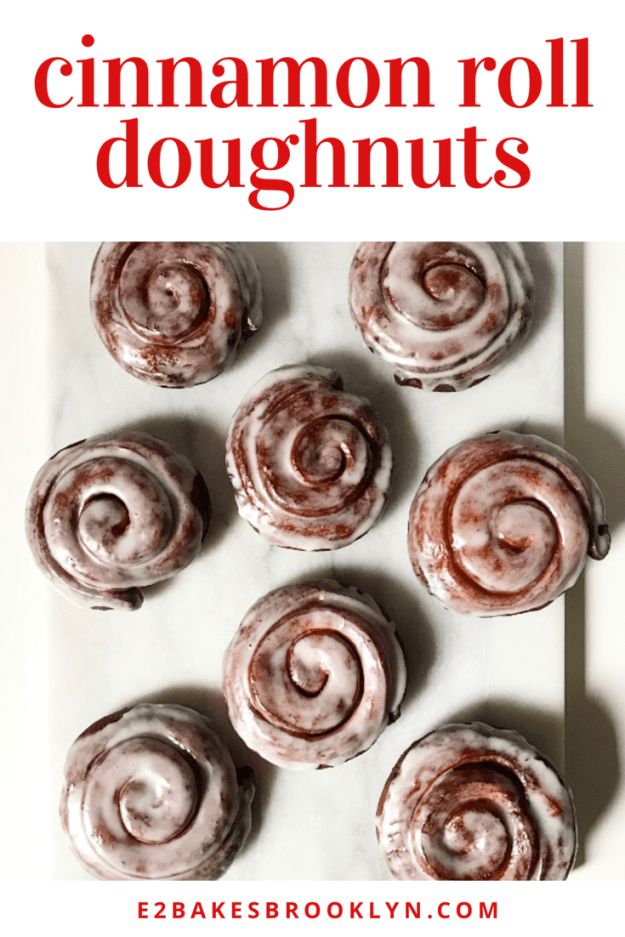
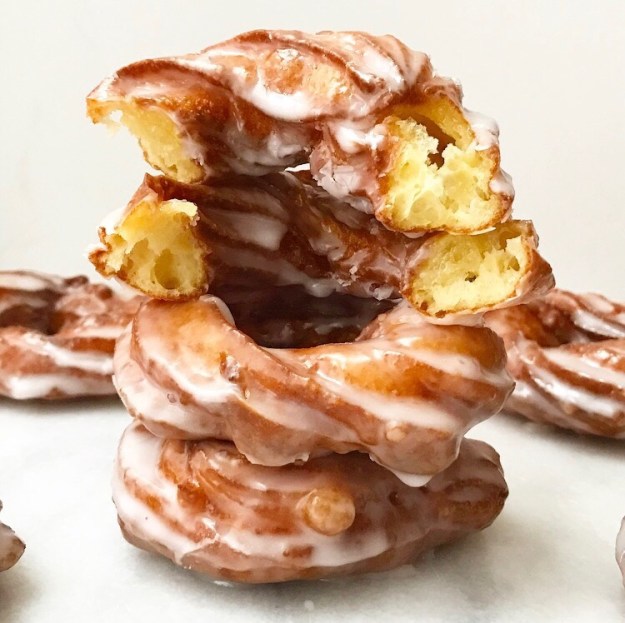
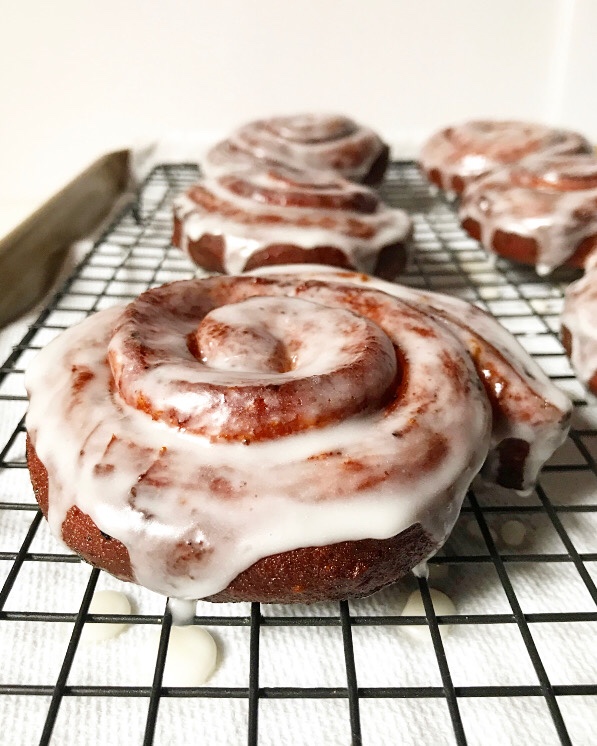 Once they’re all fried and golden, the Cinnamon Roll Doughnuts get a dip in a sugar glaze. You could spread them with cream cheese frosting instead, but I really love the contrast of soft doughnut, buttery cinnamon filling and shattering sugar glaze.
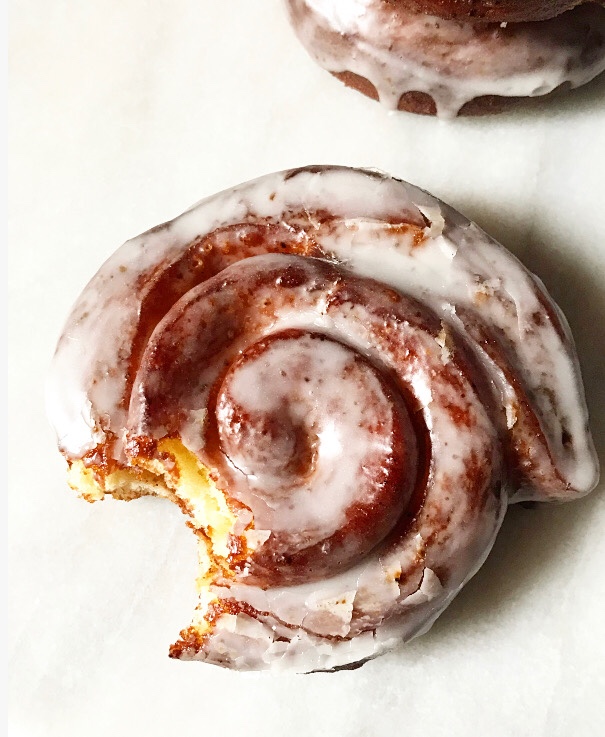 It tastes like childhood and doughnut victory and a very delicious exception to the rules. The best.
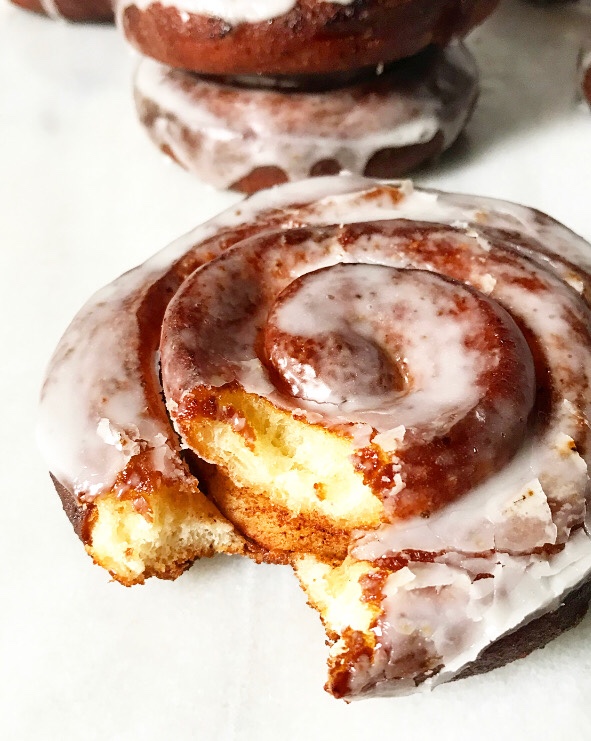
Cinnamon Roll Doughnuts
makes 16 doughnuts
Doughnut Dough:
2 cups bread flour*
2 cups all-purpose flour
1/3 cup granulated sugar
1/4 teaspoon ground nutmeg
1 teaspoon Kosher or sea salt
1 packet (2 1/4 teaspoons) instant yeast (I used Red Star Platinum)
1 cup buttermilk,* room temperature
3/4 cup (1 1/2 sticks) unsalted butter
2 large eggs, beaten, room temperature
2 quarts shortening or frying oil (like peanut, safflower, or canola), for frying
Filling:
4 tablespoons unsalted butter, melted
1/2 cup light or dark brown sugar, packed
1 tablespoon ground cinnamon
Glaze:
2 pounds confectioners sugar
1 teaspoon Kosher or sea salt
1 tablespoon pure vanilla extract
1 tablespoon light corn syrup
3/4 cup hot tap water
For Assembly:
parchment
wooden toothpicks
Make the dough the night before. In a large mixing bowl, whisk together bread flour, all-purpose flour, sugar, nutmeg, salt, and instant yeast. Set aside.
Combine buttermilk and butter in a small saucepan over medium heat. Warm until hot to the touch, about 115F. Use a silicone spatula to fold liquid into dry ingredients. Fold in eggs until a sticky, shaggy dough forms. Turn dough onto a floured surface and knead for 6-8 minutes, until dough is smooth. Shape dough into a ball and place in an oiled bowl. Cover with plastic wrap and refrigerate overnight.
The next morning, cut a large sheet of parchment into 16 4-inch squares. Place squares on two rimmed baking sheets. Place a separate whole sheet on a third pan.
Fill the dough and form the rolls. Remove plastic wrap from dough and punch down. On a lightly floured surface, roll dough into a 14×17-inch rectangle. Use a pastry brush to apply butter to the surface of the dough. Combine brown sugar and cinnamon in a small bowl and whisk to combine. Sprinkle over the surface of the dough, leaving a 1/2-inch border on all sides.
Starting with the long edge furthest from your body, tightly roll filled dough toward you, smoothing any seams with your thumbs. Slice dough into 16 rolls. Place each on a square of parchment.
Flour the heel of your hand and press each roll down so that it’s flat and squat. Use toothpicks to secure the end of each roll and use another toothpick to secure the other side of the roll. Do not skip these steps.
Gently lay plastic wrap or a sheet of wax paper over the tops of the pans and allow doughnuts to rise in a warm, draft-free environment* for 45 minutes. Once puffy, remove doughnuts from oven.
Place a cooling rack over a rimmed baking sheet, and set in close proximity to the stove.
Heat shortening or oil to 375F. Working in small batches, fry doughnuts 1.5-2 minutes per side, until deeply golden. Remove to rack. Continue with remaining doughnuts.
Make classic doughnut glaze. In a large mixing bowl, whisk all ingredients together until smooth. Pour glaze into a shallow dish. Dip one doughnut at a time before transferring back to rack. Repeat with all remaining doughnuts. Glaze will set after 15-20 minutes.
Doughnuts are best the day they are made. Leftovers will keep in an airtight container at room temperature for about a day.
Dipped doughnuts are best the day they are made.
Notes:
1. If you do not have bread flour, you may substitute an equal volume of all-purpose flour. Your doughnuts will not have as much chew as those made with bread flour, but they will still be delicious.
2. If you do not have buttermilk, you may make a substitute with lemon juice (or vinegar) and milk. Pour 1 tablespoon of vinegar into a liquid measuring cup. Pour in milk until the liquid reaches the 1 cup mark. Let sit for five minutes before proceeding with the recipe as written. Whole and low-fat milks are fine, but I do not recommend skim or nonfat.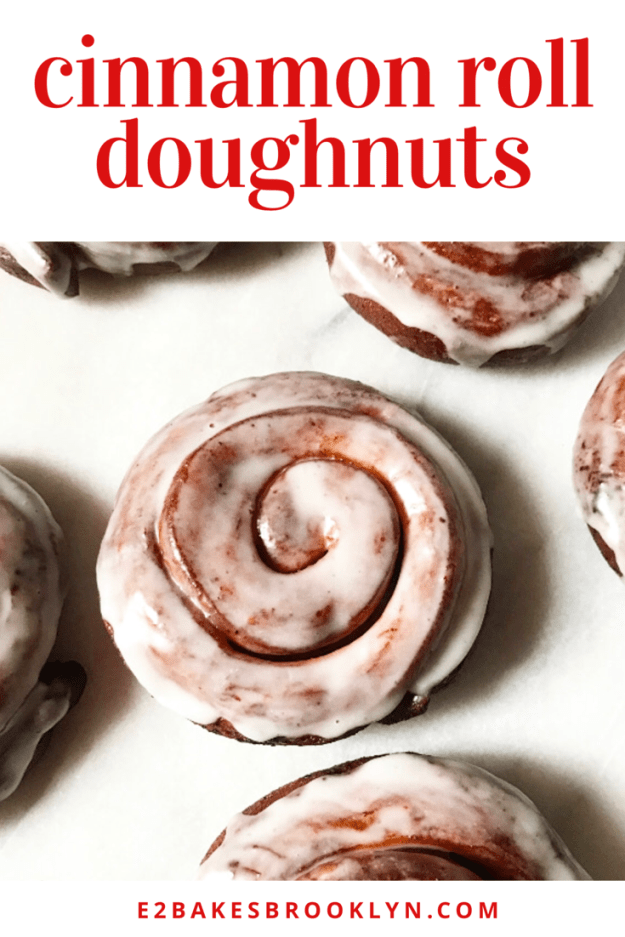
 Have you made these or any of my other doughnuts? Let me know in the comments or on
 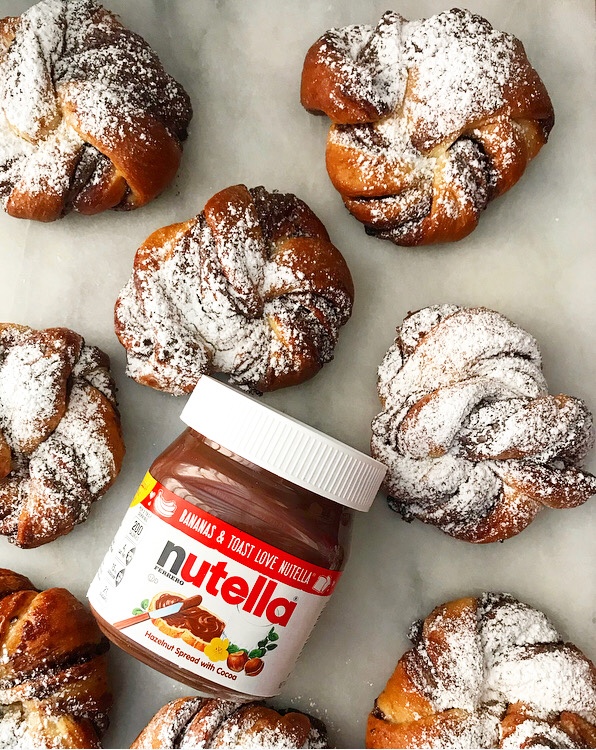 If I could change one thing about myself, I think I’d like to be a morning person. I really like mornings (especially the lazy variety), but I have such difficulty getting myself out of bed that I rarely enjoy them. It’s a whole horrible, eight-alarm ordeal on weekdays and I almost always sleep past 11 on the weekends, so I’m either a bleary-eyed mess or out like a light for the start of most days. But, on extremely rare occasions, I wake up early of my own volition—usually with the aid of jackhammers outside my window or the sun shining in my eyes—and I get to enjoy the morning, starting with making myself a nice breakfast.
 Sometimes mixing flour, sugar, and butter is an act of self-care.
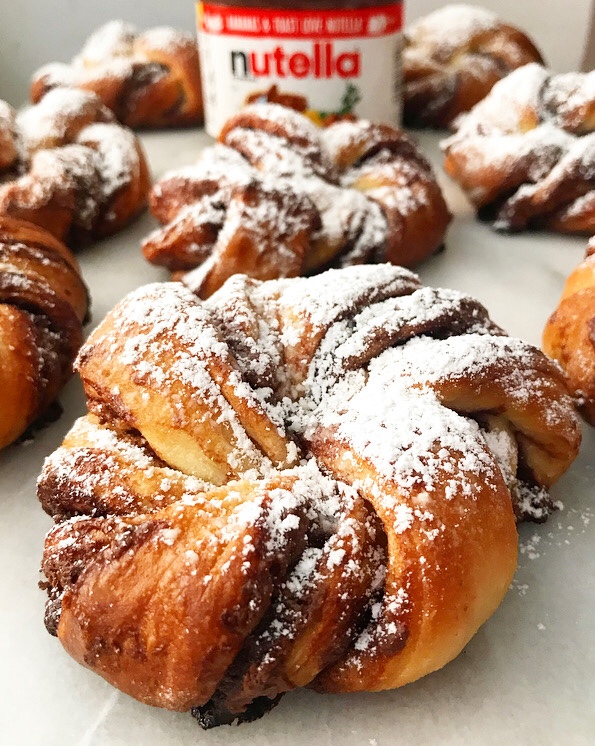
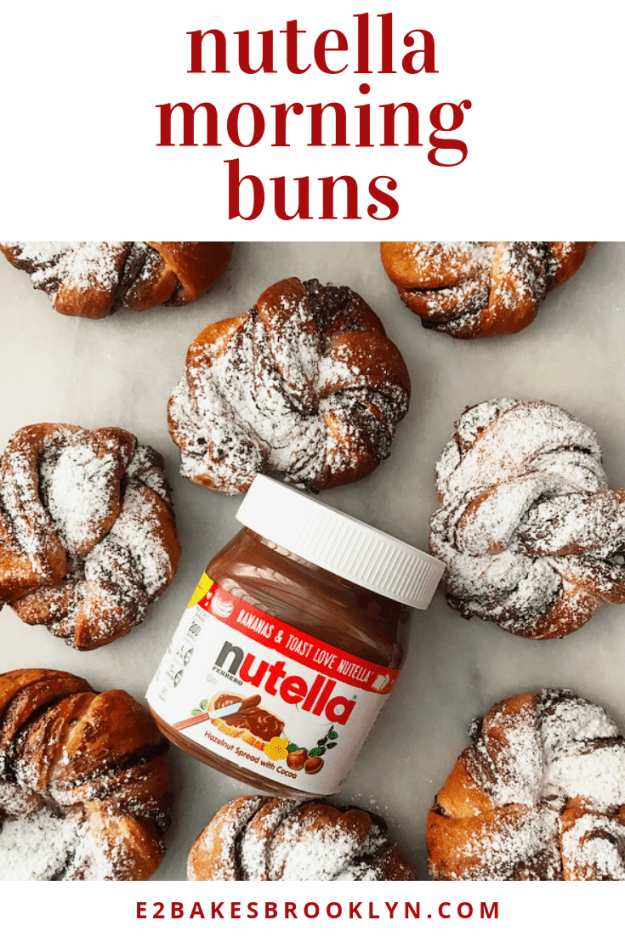
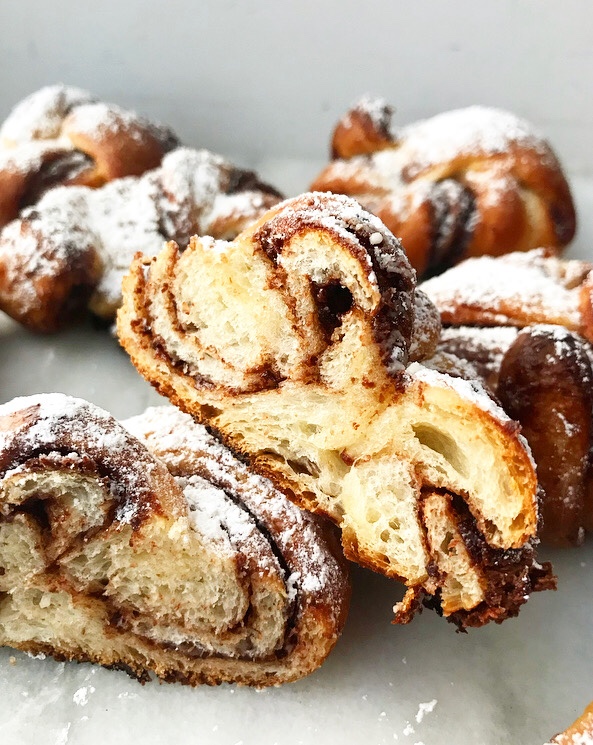 For something so rustic and beautiful, Nutella Morning Buns are surprisingly simple to make and come together in a pretty reasonable amount of time. It takes me about two hours to make a batch from the time I decide that a soft, warm bun full of chocolate-hazelnut spread might be nice to the time I dust them with confectioner’s sugar and dig in.
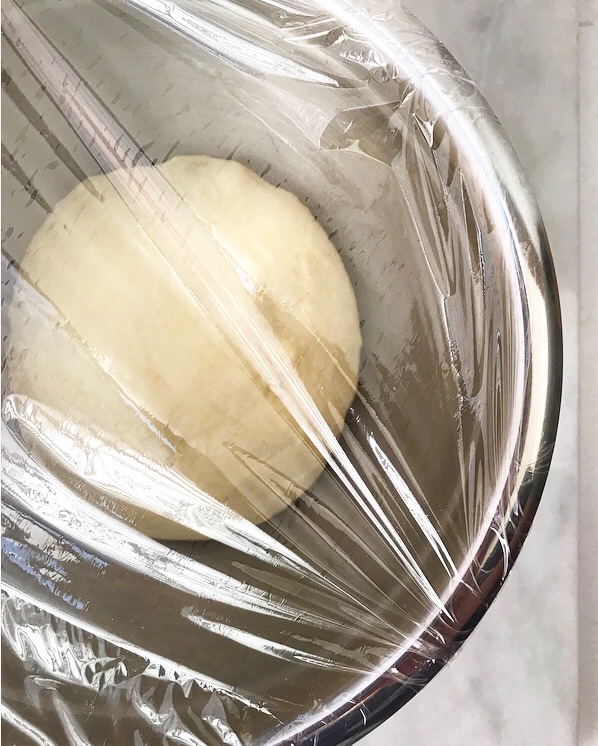
 The dough is very straightforward. It’s got all the usual suspects: flour, a little sugar, butter, milk, and an egg. It requires yeast, of course, but I use the instant stuff here, which simplifies the already simple process, making these buns incredibly approachable.
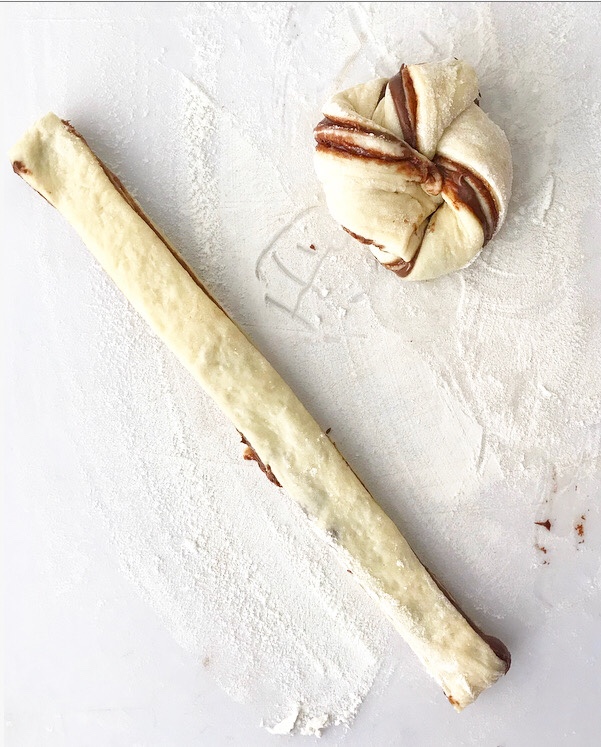
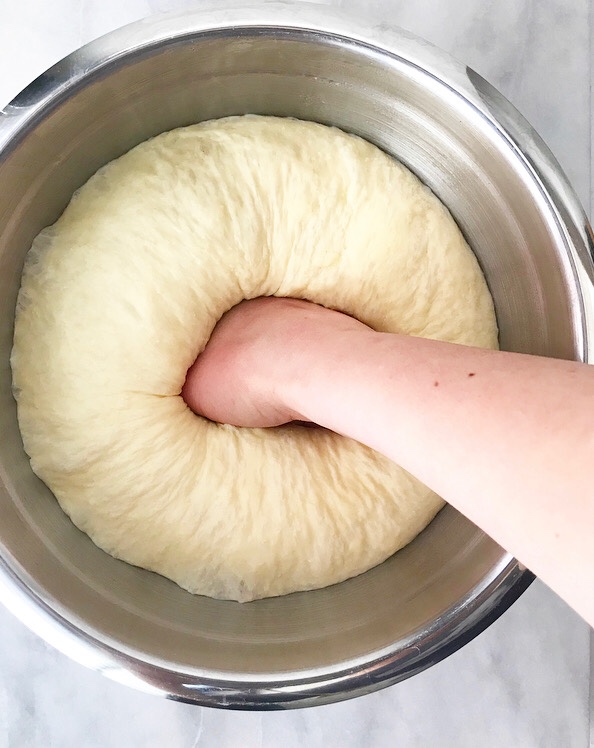 If there’s anything that’s intimidating about making Nutella Morning Buns, it’s probably shaping. Never fear though—it’s really simple and satisfying. Once your dough has risen for 40 minutes, punch it down and roll it into a large rectangle. Spread it with a thin layer of Nutella and then fold it like a letter, so that you have alternating layers of dough and filling. Use a sharp chef’s knife to trim off the ends and slice the rest into a dozen 8×1” strips.
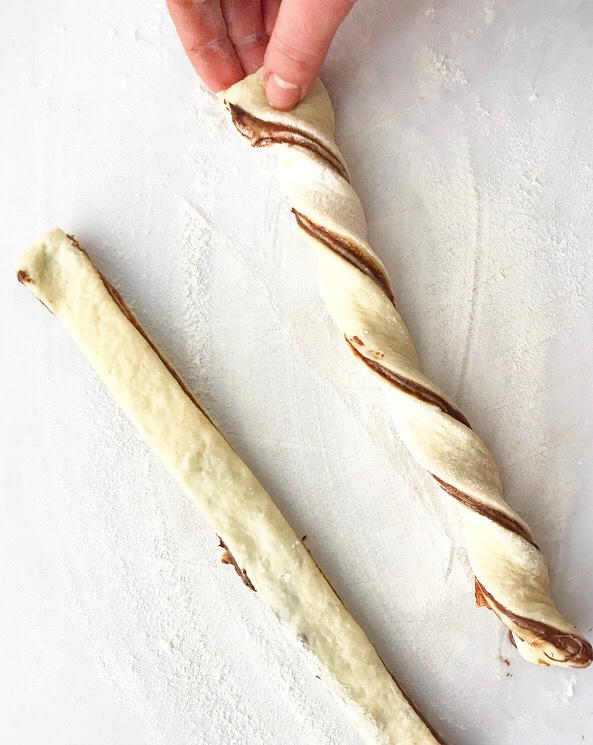
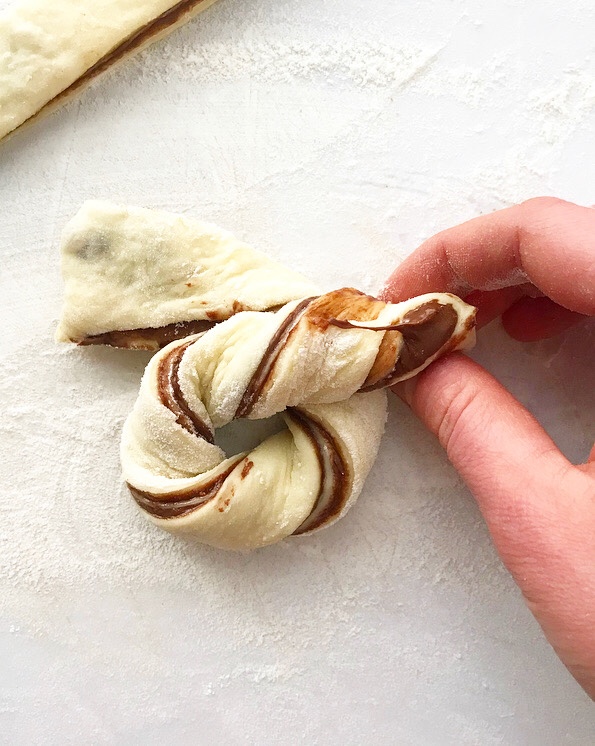
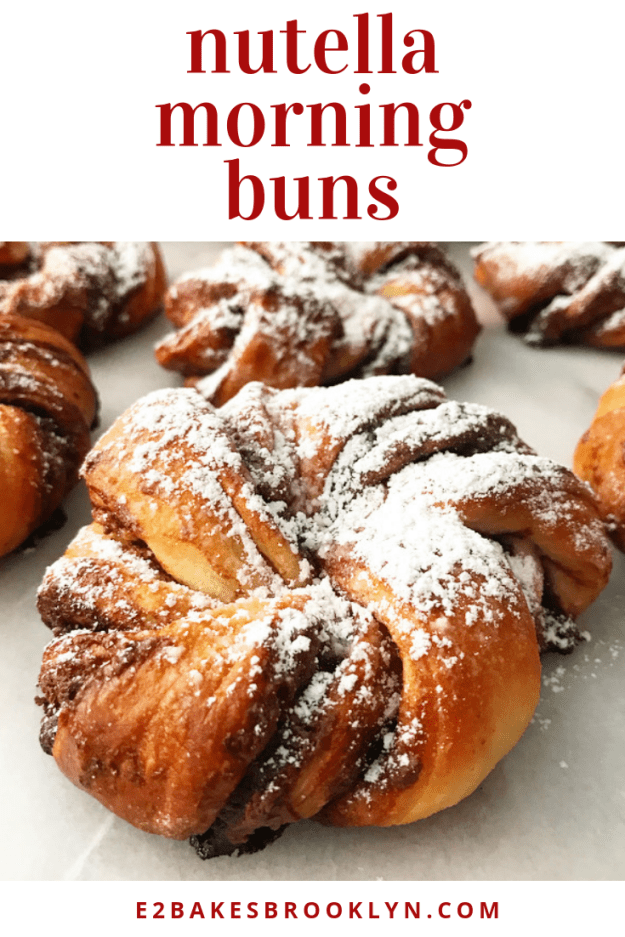
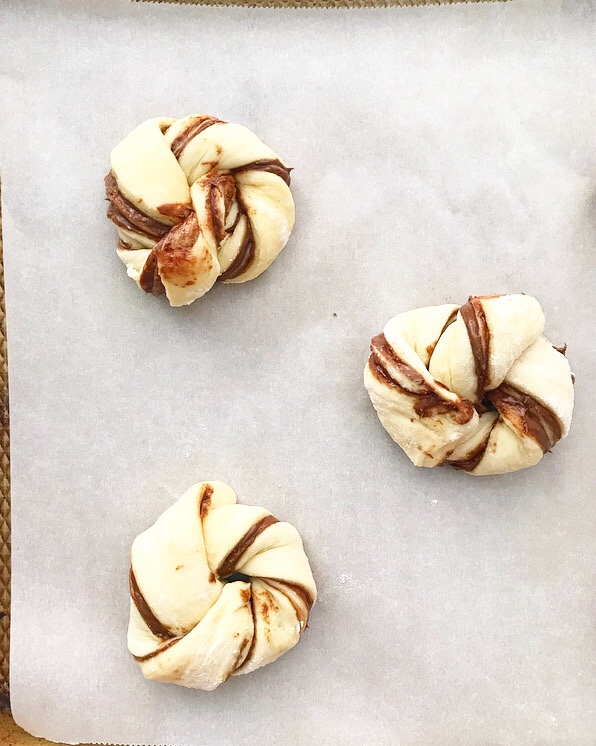 Working with one strip at a time, twist it up. Then cross the two ends over each other and tuck them into the hole that forms in the center. BOOM! Dough shaped!
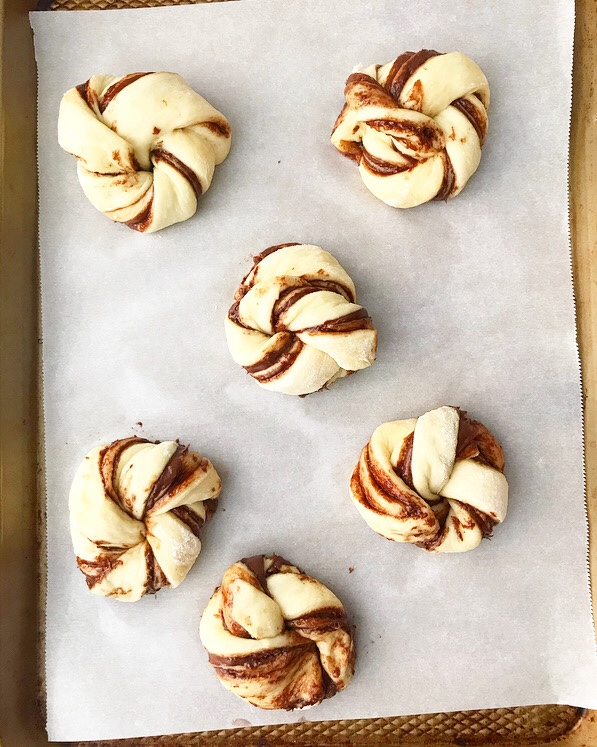
 Repeat with the rest of your strips and then let them rise a little longer. If some ends come untucked, just nudge ‘em back with your fingers before baking. Or don’t. These are the sort of buns that can take all sorts of manipulation and still look gorgeous when all is said and done. And even if they don’t, a swipe of melted butter and a dusting of confectioner’s sugar can cure all manner of ugly pastry.
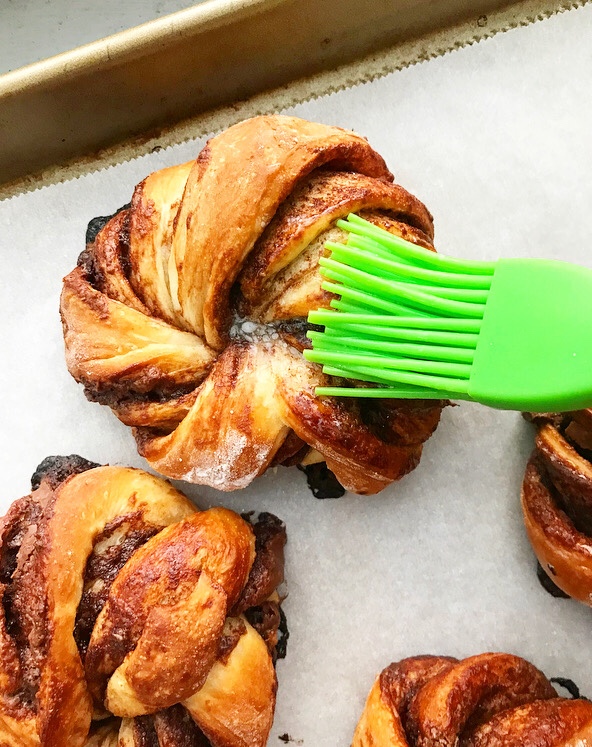
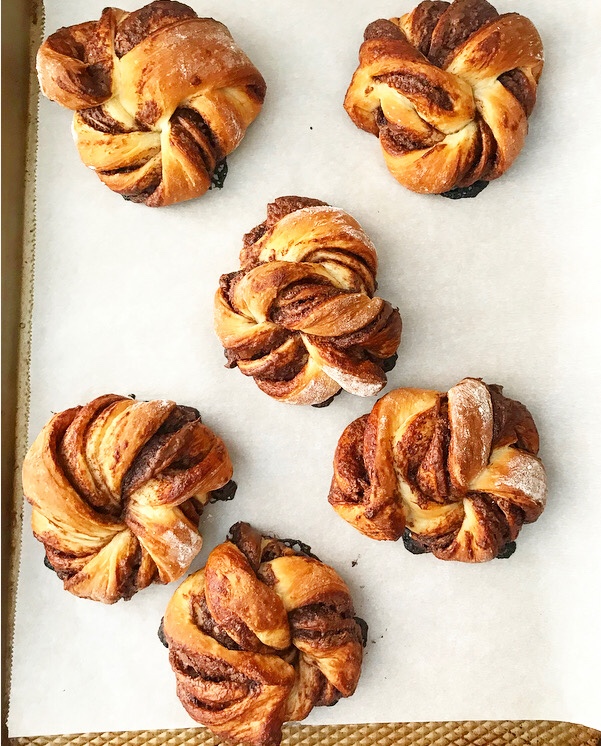
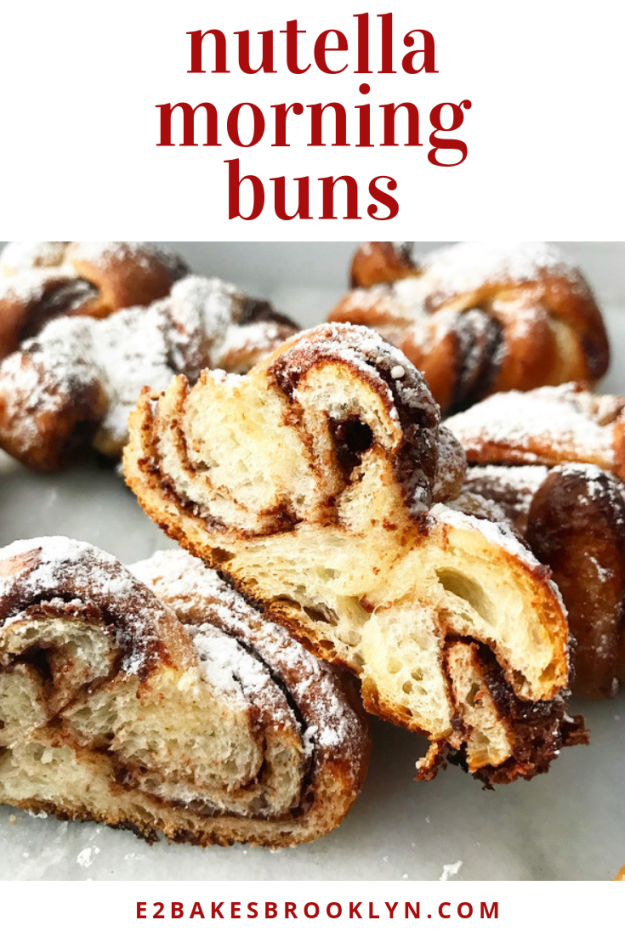
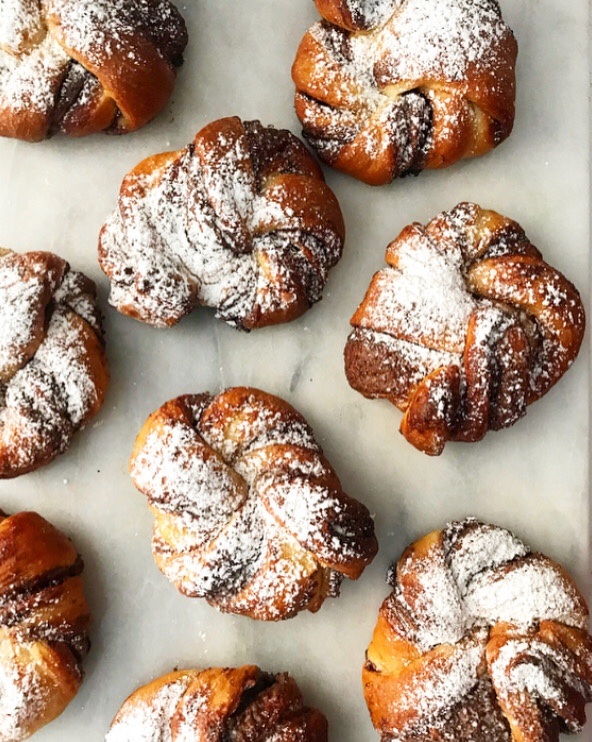 But is there such a thing as ugly pastry when Nutella is involved? I don’t think so. Or if there is, nobody who tried one of these buns during testing found the time to tell me. Oh, and all the test batches were gone (GONE!) within 45 minutes of coming out of the oven, so I’ll just let that speak for itself.
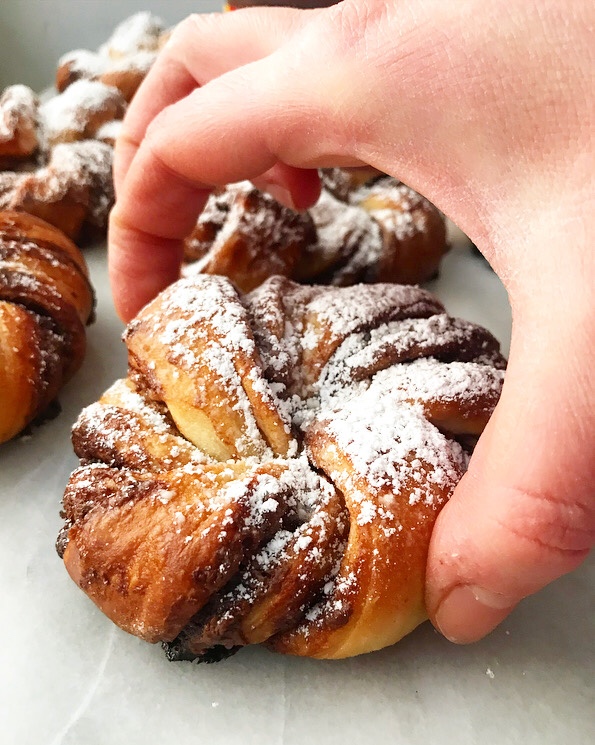 I’m pretty sure it’s impossible to have anything but a beautiful morning when these are around.
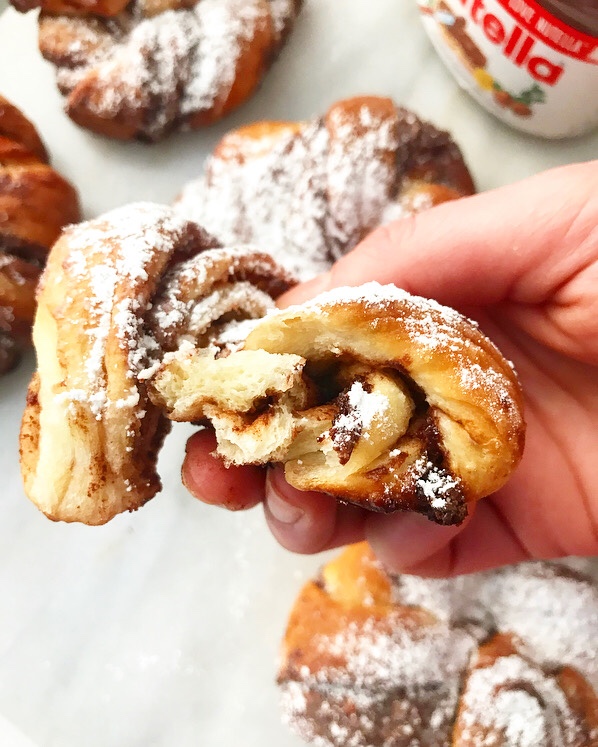
 We may not have done any holiday baking when I was a kid, but we still had plenty of Christmas food traditions. When I was growing up, my mom used to make a breakfast casserole every Christmas morning. While I was (and, honestly, continue to be) wary of any dish with “casserole” in the name, I made an exception for that one. Paired with Mom’s traditional all-citrus fruit salad,* it was impossible for even the pickiest of us to resist. It was so good that we didn’t complain when we were told we had to eat breakfast before opening our gifts. It was magic, I tell you.
 Now, you may have noticed that I am speaking about my mom’s breakfast casserole in the past tense. That’s because she stopped making it about ten years ago, right about the time that my sisters and I started wanting more input in our holiday menu.
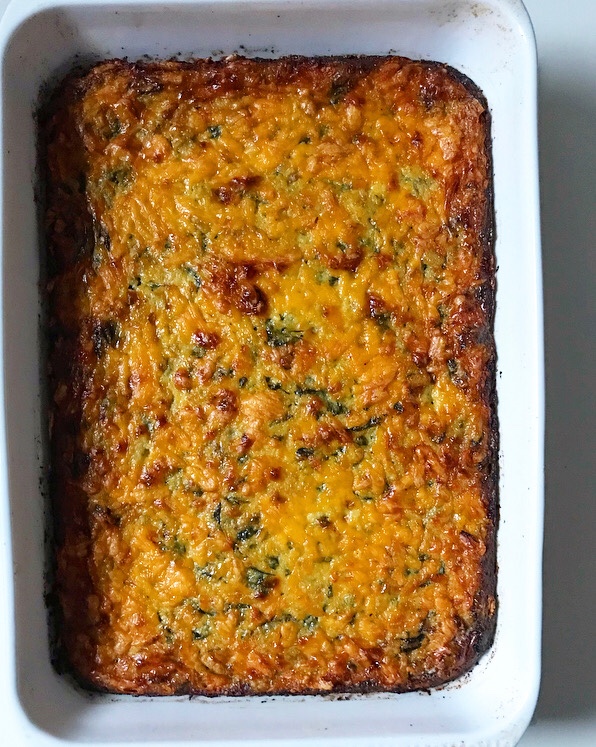
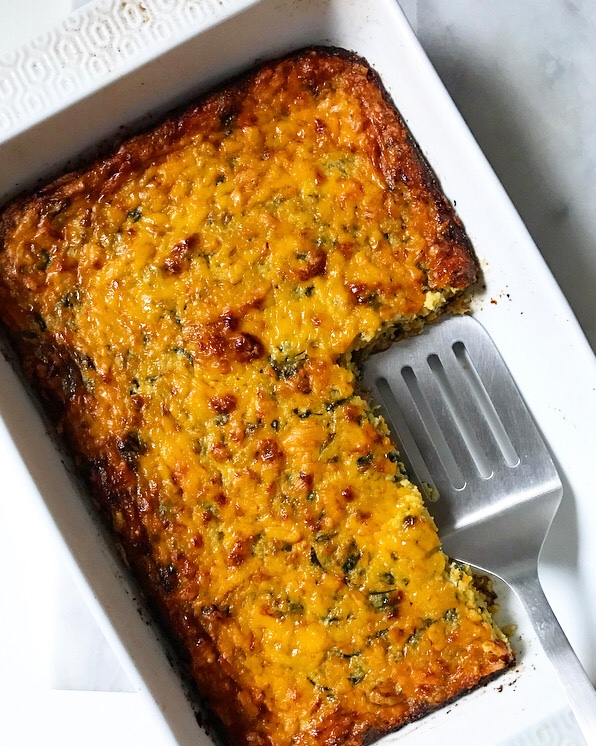 Long story short: today’s Polenta Breakfast Bake is an homage to the Christmas Morning Casserole of my childhood, minus the Bisquick, plus a creamy polenta base and some extra greens. It’s not my mom’s recipe, but it’s damn good.
 Also, it’s naturally gluten-free (thanks, coarse ground cornmeal!). And people think you’re fancy when you say you made polenta anything, so there’s that.
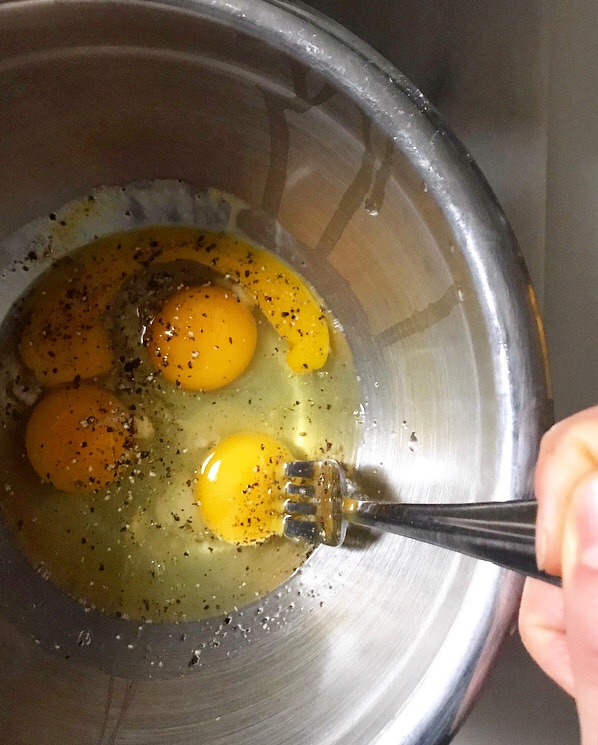
 My favorite thing about this recipe is that, like my mom’s, it doesn’t require any specific timetable. Flexibility is important when it comes to any holiday meal planning, but I am particularly opposed to any recipe that might require me to get up and start puttering around the kitchen when it’s still dark outside. I’ve said it before and I’ll say it again: sleep > baking (and, um, cooking too).
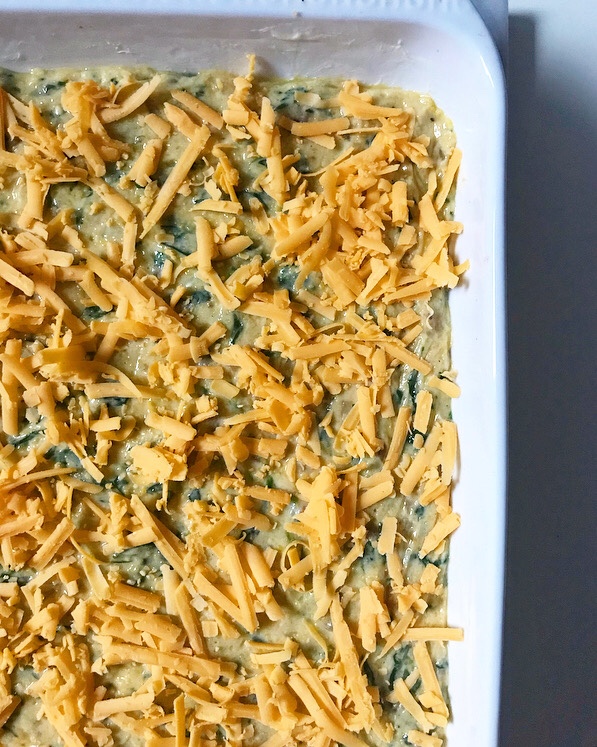
 This Polenta Breakfast Bake can be prepared morning-of, if you are an early bird, but I love that I can assemble it a day or two ahead and then just bake it for 25 minutes before serving. I have a hard time doing anything in the morning without the aid of coffee, but I can absolutely turn on the oven and bake a breakfast casserole for 25 minutes.
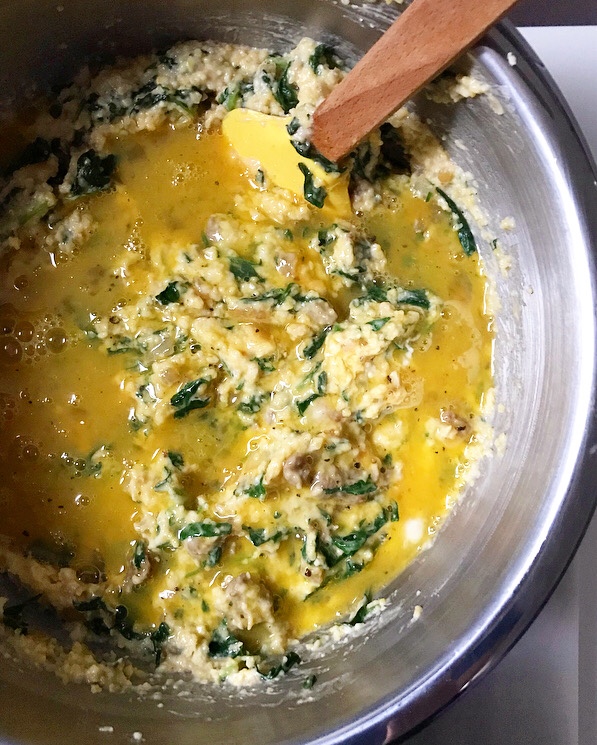
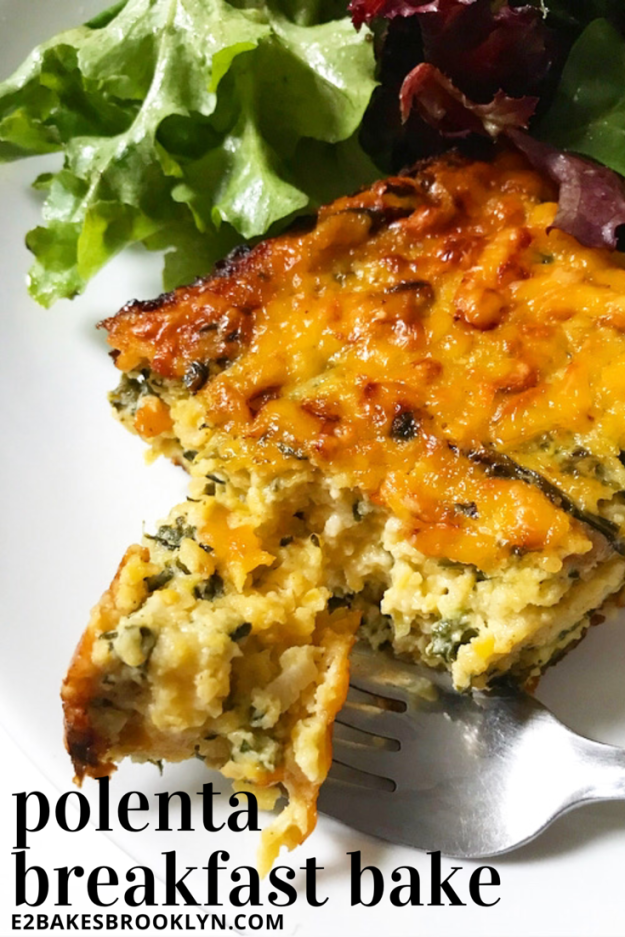
 Hot from the oven, this Polenta Breakfast Bake will be a little hard to slice cleanly, so feel free to scoop it instead. I was able to slice the casserole pictured after letting it cool for about half an hour, but I’d be happy to eat this stuff in any shape (or lack thereof). Leftovers keep very well in the refrigerator and will slice & reheat like a freaking dream.
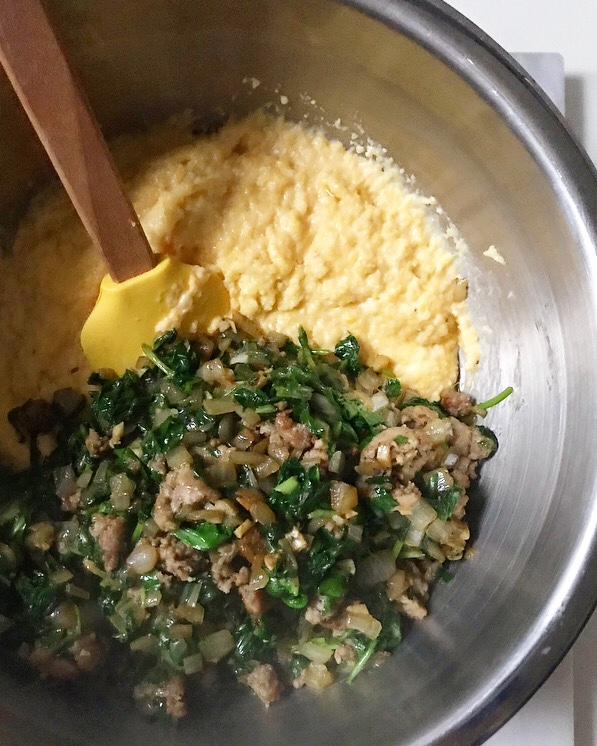
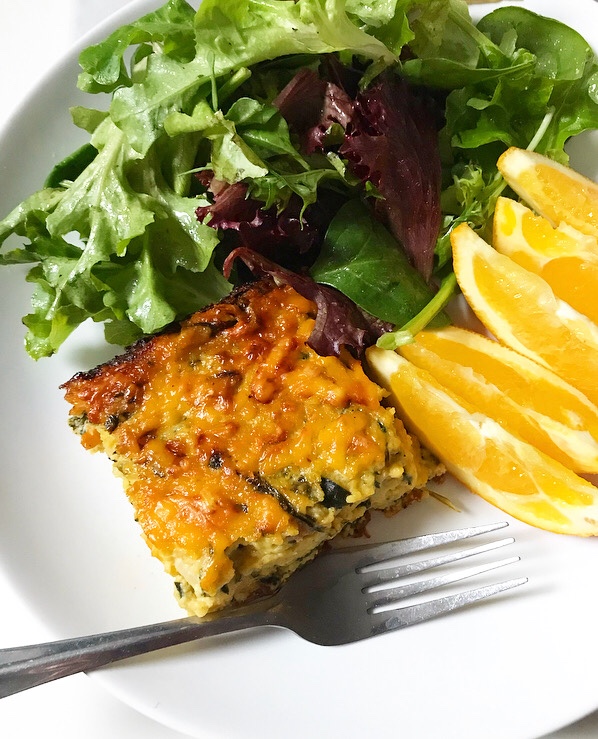 One last thing before I get to the recipe. Like all recipes on this site, I’ve made this Polenta Breakfast Bake to suit my own flavor preferences. I used breakfast sausage and cheddar cheese because those were prominent flavors in my mom’s recipe, but you can swap them for any meat and/or cheese you like in weights equal to those in the recipe. My only word of advice here is that if you choose to use bacon, remove it from the pan while you sauté the onion, garlic, and greens so that it doesn’t burn. Oh, and speaking of greens, feel free to leave ‘em out if you have picky eaters (or if breakfast vegetables just aren’t your thing).


 I have put a lot of
 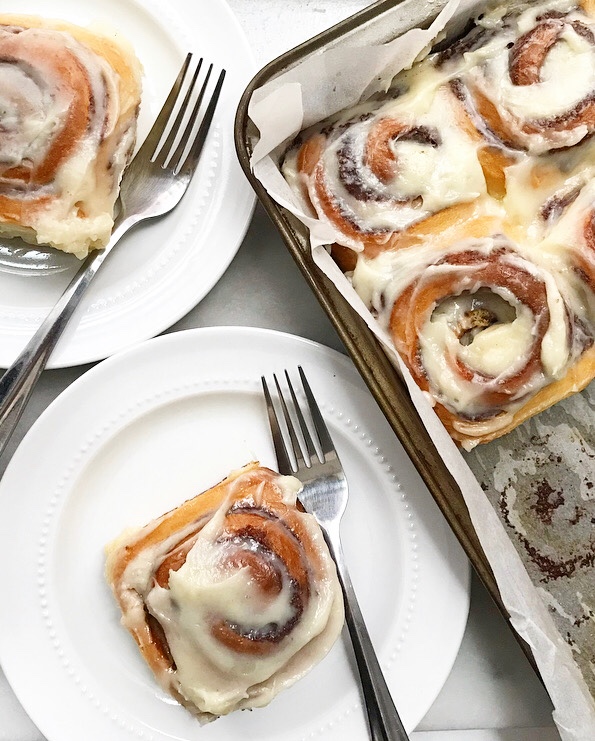 Now, I know there are a gazillion cinnamon roll recipes out there. You probably have one you love. Why take a chance and switch it up? What makes these cinnamon rolls special?
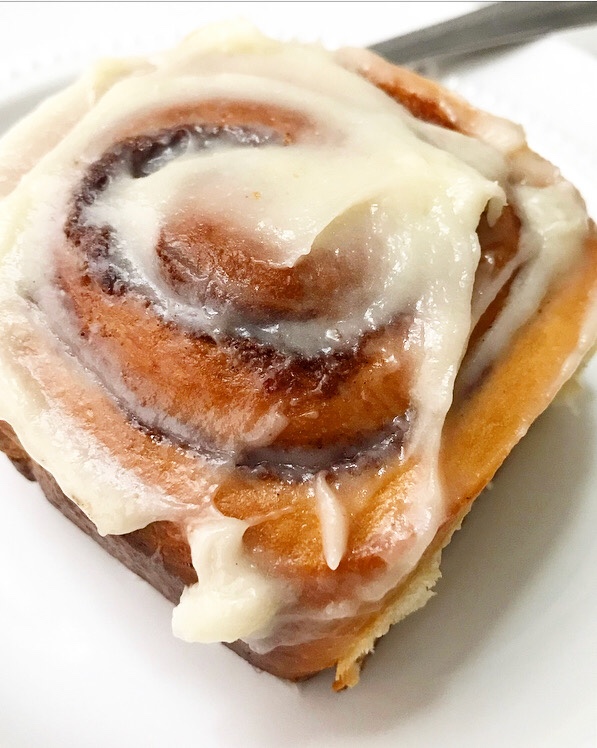 Well, I like to think *all* cinnamon rolls are special. I have never been disappointed to be offered a cinnamon roll in all my 33.5 years. Not once. Not even by the one I ate at a Roy Rogers in rural Connecticut at 8am that one time eleven years ago.
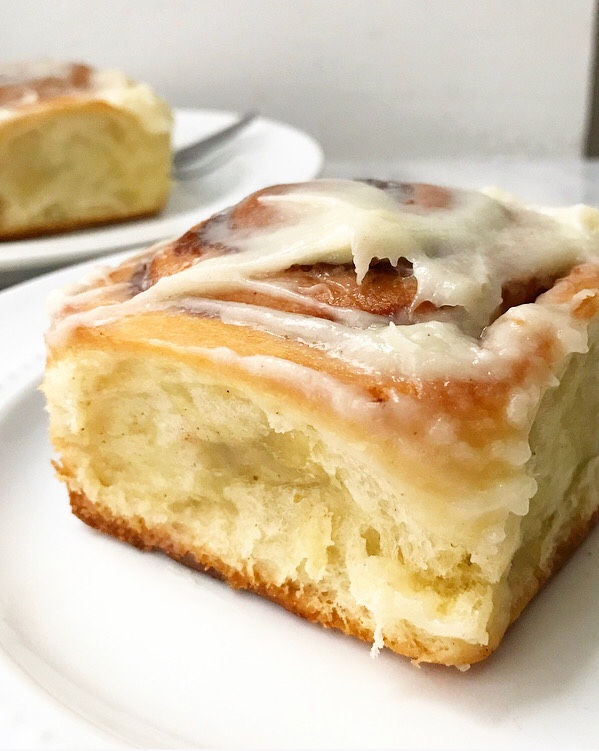 But, um, back to these cinnamon rolls, which are infinitely better than anything you could possibly find at a fast food restaurant in New England. They’re made with the same dough I use for my
 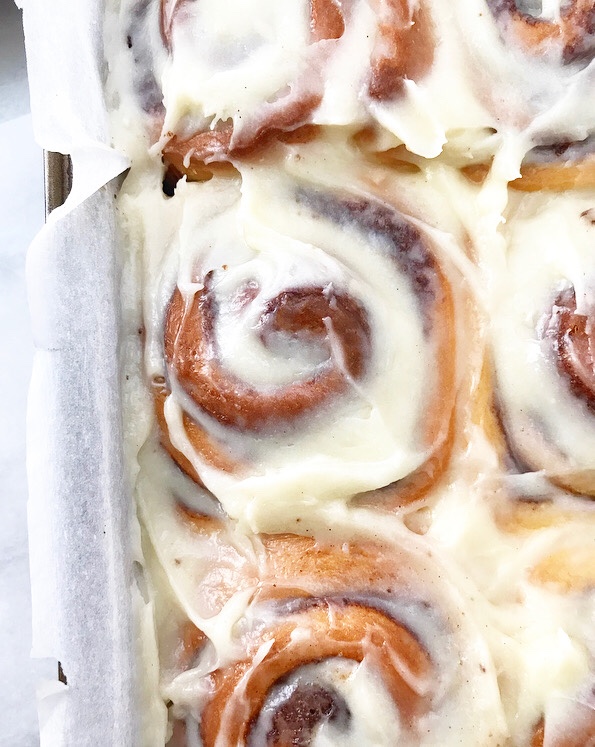 This dough works best with an overnight chill in the fridge. Immediately after mixing, it’s very soft and sticky—very frustrating to roll. After a chill however, the butter has set up enough that the dough rolls without sticking, making it ideal for slathering with brown sugar-cinnamon filling. This overnight method is also the ideal way to get scratch-made cinnamon rolls on the breakfast table without having to get up and start baking when it’s still dark outside. Sleep > baking.
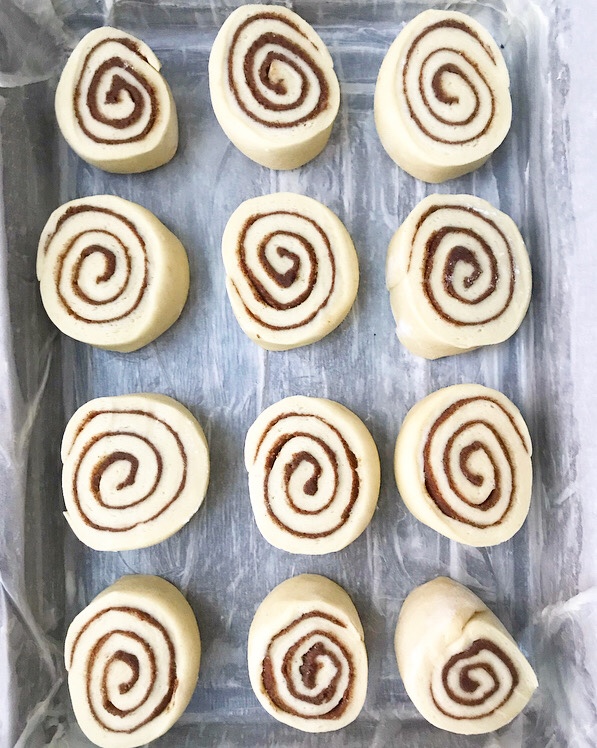 Once the dough has been filled, roll it into a cylinder and slice it into pieces.
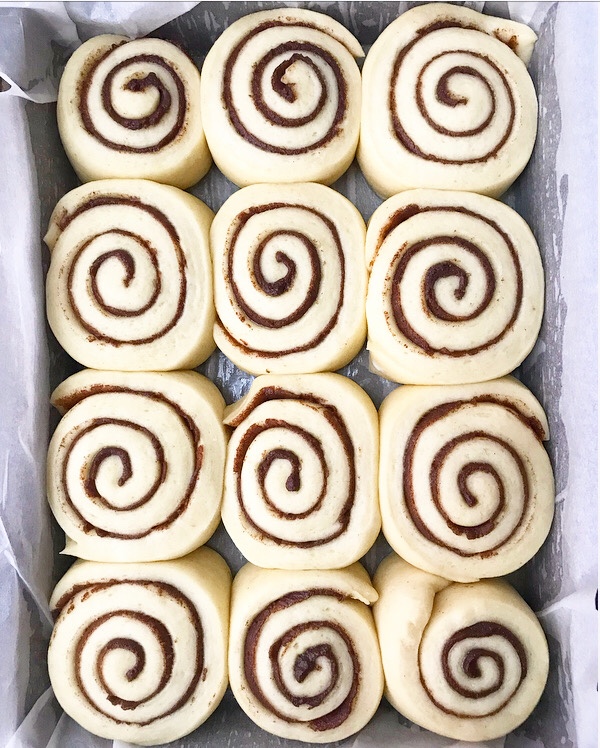
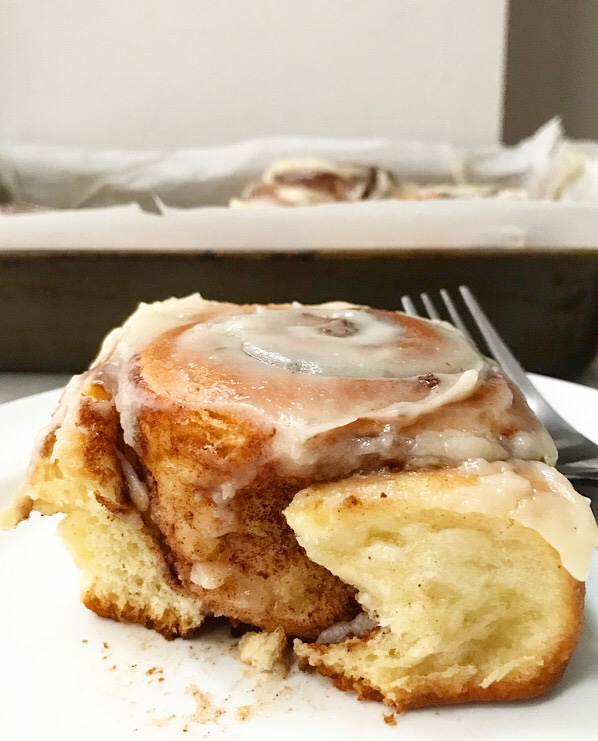
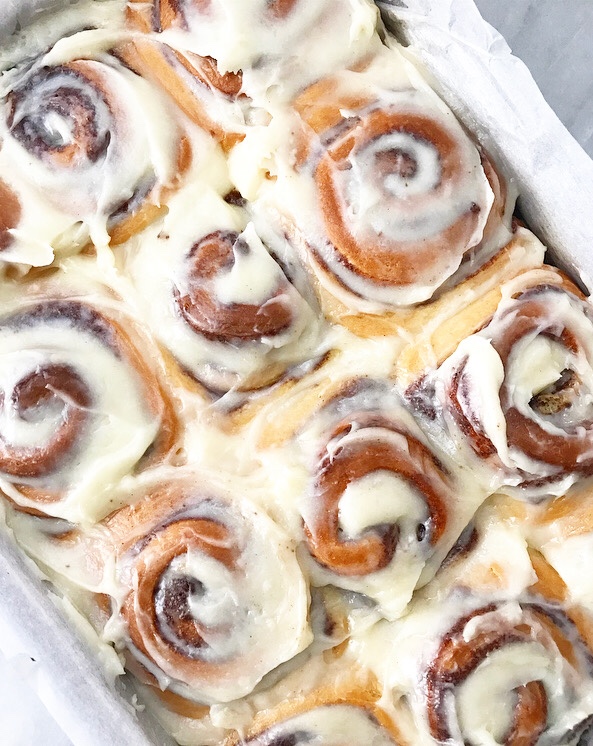
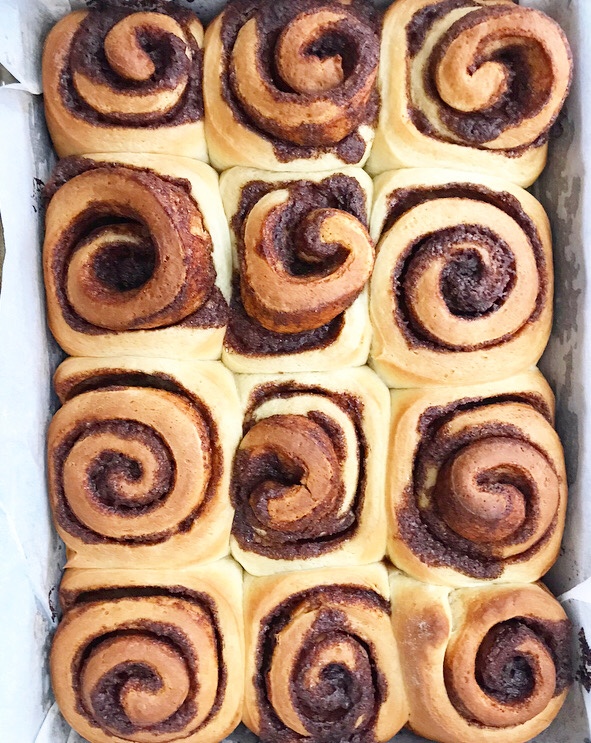 Let them rise and bake them until they’re brown.
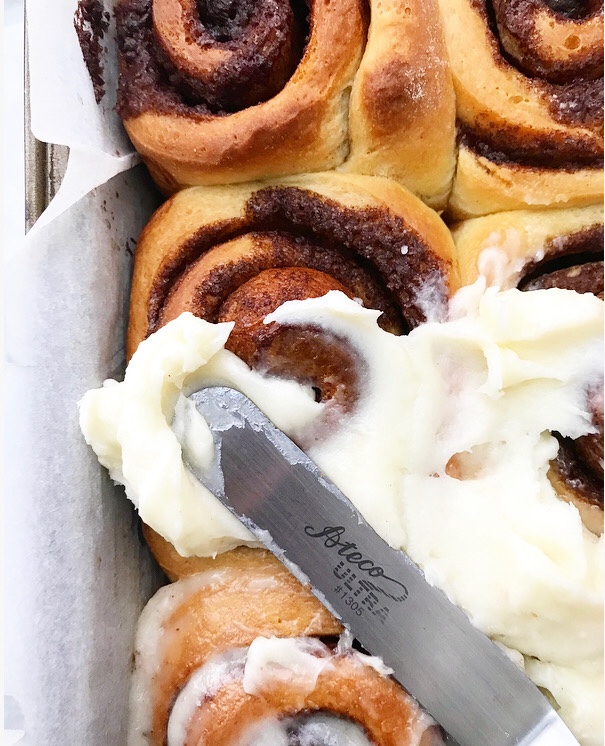 And then slather them with a thin coat of cream cheese frosting. Or double the recipe for a thick coat. Whatever floats your cinnamon roll boat. <—hey, that rhymes.
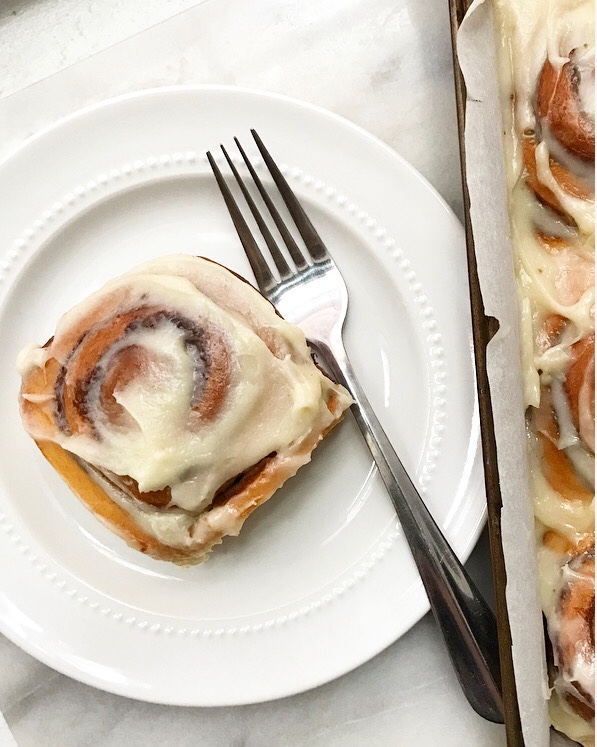 Anyway, you don’t need me to talk you into wanting fresh cinnamon rolls (unless you hate them like