Since the very beginning of this blog, I have sung the praises of my Cream Cheese Pie Dough. It’s easy to mix together (no guess work!), rolls without tearing, has a croissant-like flakiness, and is super delicious. I will stand by it forever and ever, amen.
So, if I love it sooo much—and I do—why on earth am I giving you another pie dough recipe? Because I don’t always have a brick of cream cheese sitting around when I’m in a pie-making mood. It’s that simple. That doesn’t mean I’m going to subject myself to subpar pie crust though. No way. Crisp, flaky, and buttery or bust! I’ll be the first to tell you that I’m not reinventing the wheel with this crust. There are a gazillion all-butter pie doughs out there and nearly all of them have similar proportions and instructions, which makes it all the more surprising that I had to test this recipe six times to get it exactly how I want it.
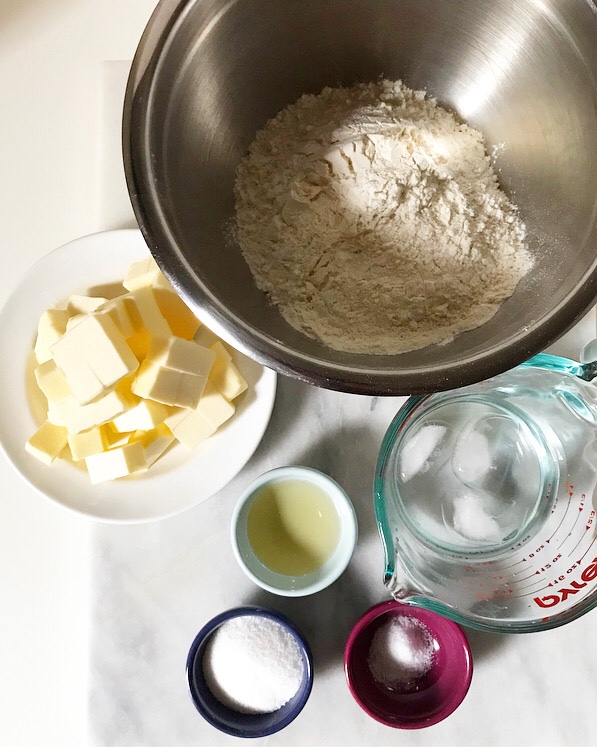 All-Butter Pie Dough requires just six ingredients. Six! You probably have all of them in your kitchen right now.
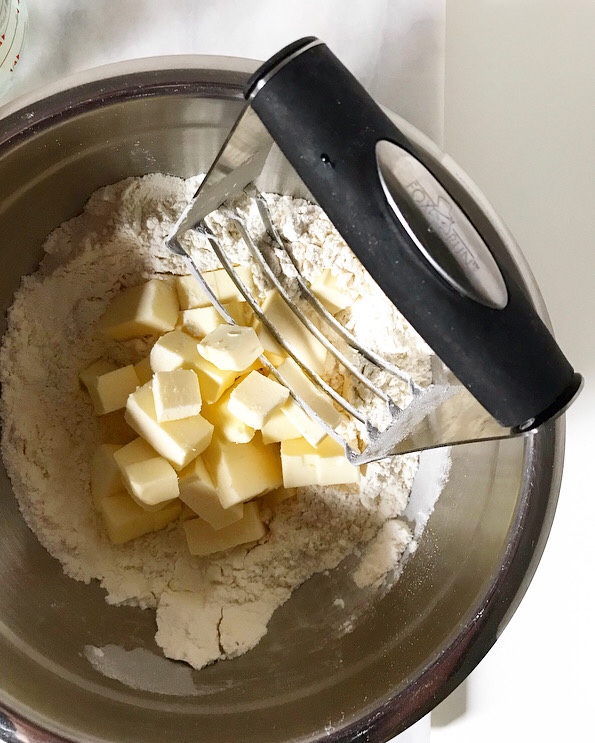
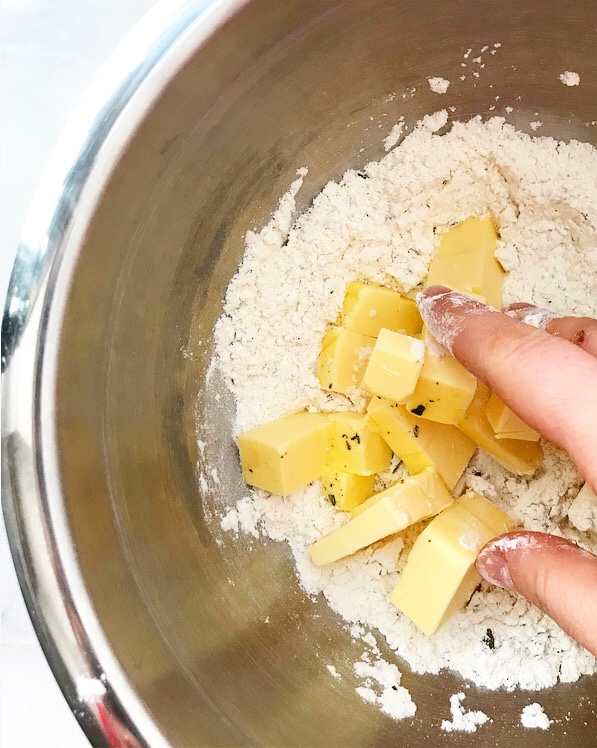
- Cold butter. Pockets of cold fat are the secret to a flaky crust. As they melt in the oven, their water content turns to steam and form the layers we all love so much. Some bakers use shortening or lard (or cream cheese!) as their fat of choice, but since this is All-Butter Pie Dough, we’re using all butter, duh. I like to cut mine into cubes ahead of time and then freeze it until I add it to the dry ingredients. It’ll get cut into the dough just until it’s the size of small peas. This means there will be visible chunks of butter in your pie dough at all stages, even when it’s rolled out. If at any point in the process your butter feels soft/warm/sticky/otherwise-not-cold, throw the dough back in the fridge. Unless you like tough crust, that is.
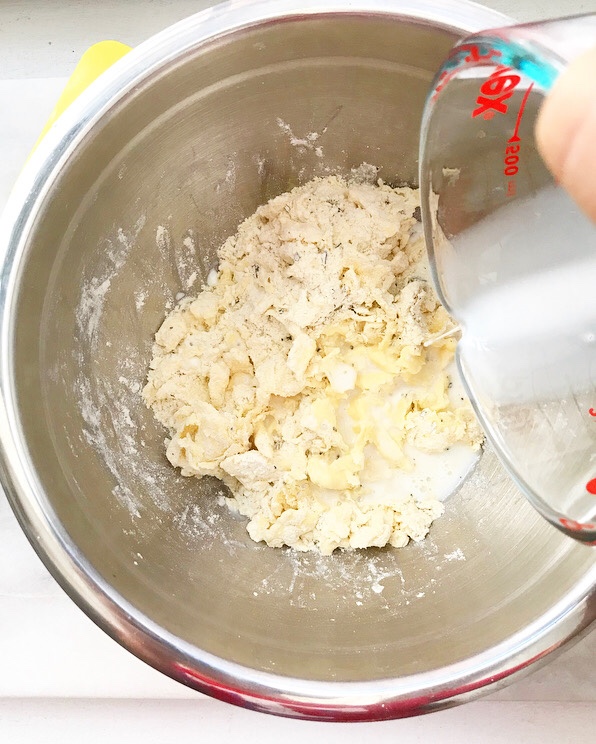
- Cold water. Cold. Cuh-old. Water is the binder in this pie dough recipe. It has to be freezing cold because if we add room temperature or—heaven forbid—warm water to the dough, we can kiss that cold butter and flaky crust goodbye. I like to measure out 2/3 cup of cold water and then add ice cubes to keep it that way. Also, don’t get heavy-handed—you probably won’t need all the water in your measuring cup. You want to add just enough for the dough to hold together. Any more than that and the gluten in the flour may become overdeveloped and yield a tough crust.

- Apple cider vinegar. This is the one “unusual” ingredient you’ll find in this recipe, but I’m far from the first baker to put vinegar in pie dough. It helps mitigate gluten development (buying you an extra stir or knead) to produce a more tender crust, the same way that adding buttermilk (also an acid) to cakes/biscuits/what-have-you helps make them tender.

- Sugar and salt. These add flavor and balance to our crust. Without them, why bother making pie dough at all?! You may be tempted to leave out the sugar, especially in savory applications, but I recommend keeping it. The small amount of sugar in this dough caramelizes during baking, helping to produce a golden brown crust.
- All-Purpose Flour. This is the structural foundation of pie dough (and sooo many other things). Make sure you measure it properly (spoon & level) so that you don’t use too much or too little.


See, six ingredients, each with a job of its own. You’re a bowl, a hand blender, and fifteen minutes away from having two disks of pie dough in your fridge. #score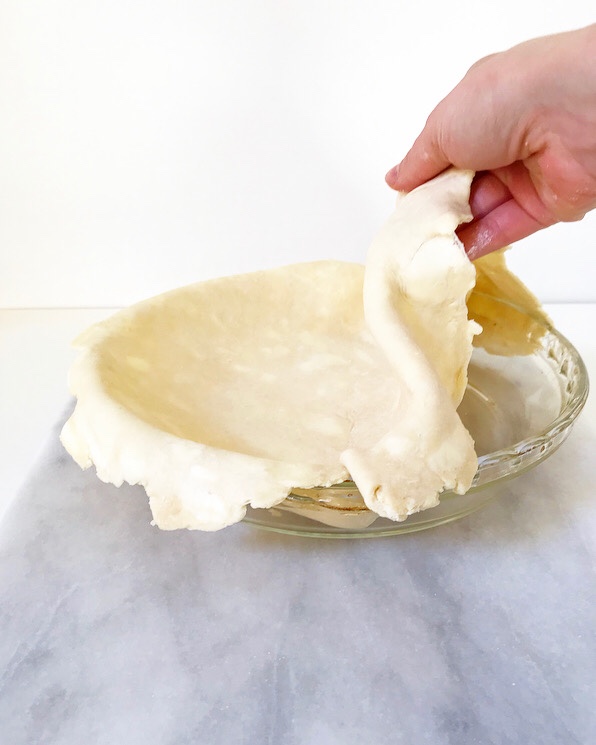
 If pie dough makes you jittery or this is your first year making it from scratch, never fear! All-Butter Pie Dough is very simple to make. Once you’ve made your first batch, you’ll wonder what you were ever afraid of…but just in case you need a little extra encouragement, here are some of my best pie dough tips.
- Make it by hand. There are now three pie dough recipes on this site, and not one of them is made in a food processor. I know it’s supposed to be faster and easier that way, but it also involves more clean up and requires you to give up control of the butter. It’s not always easy to get visible chunks of butter in a food processor, but it is when you are cutting it in by hand. Dough made by hand = visible butter = flaky crust!
- When in doubt, throw it in the fridge. This is the solution to almost all your pie crust problems. Butter seems sticky? Throw it in the fridge. Dough seems a little soft? Throw it in the fridge. Fitted the dough to the pie plate and filled it, but have some time before the oven will be warm? Throw it in the fridge. Worried about the crimp holding? Throw it it in the fridge. Say it with me: Throw. It. In. The. Fridge.

- Take your time. You can make pie dough three days before you make pie and keep it in the refrigerator—no need to do everything on the same day. You can even freeze this pie dough! Just triple-wrap in plastic and throw it in the freezer for up to six months. Let it thaw in the fridge overnight before rolling.
- Don’t fret if it’s not perfect. Pie takes time. Pie takes practice. I have made a lot of pies in the last six years and many of them have been hideous. Many, many. But you know what? Ugly pie is still pie. As one of my favorite bloggers, Julie Van Rosendaal, says “The best pie is the one on your table.”

Wooooow so many bullet points today. Pie, y’all! It’s happening. Look out Friday for my first pie recipe of the season. Or go into my Recipe Index and make yourself this tart Cranberry Crumb Pie. I know we still have 22 days til Thanksgiving, but I mean…it’s practice, right?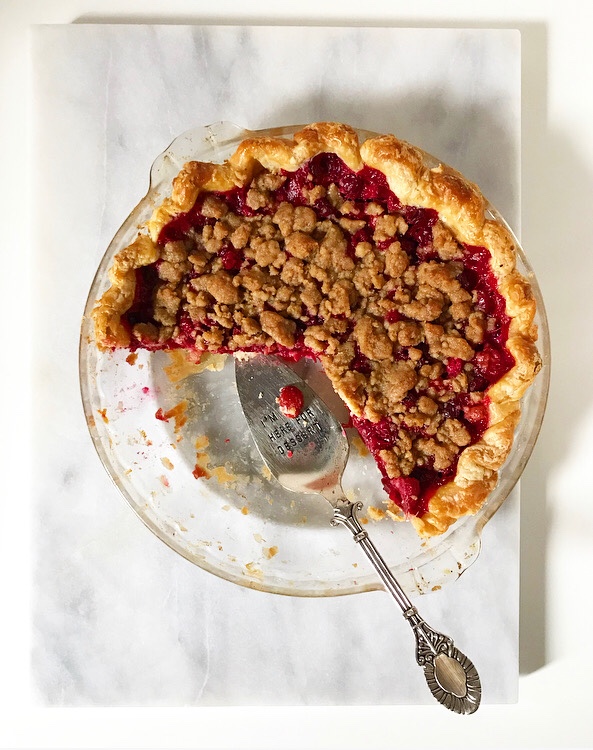
All-Butter Pie Dough
makes 2 crusts
1 cup (2 sticks) unsalted butter, very cold, cut into cubes
1 tablespoon apple cider vinegar
~2/3 cup water, very cold
ice cubes
2 1/2 cups all-purpose flour
2 tablespoons granulated sugar
1/2 teaspoon Kosher or sea salt
Cut butter into cubes. Put it on a plate and freeze it while you prepare the other ingredients.
Pour apple cider vinegar into a liquid measuring cup. Add cold water up to the 2/3 cup mark. Add a few ice cubes. Set aside.
In a large mixing bowl, whisk together flour, sugar, and salt. Add cold butter and use a pastry blender to cut it in until the largest pieces are the size of small peas.
Using a finger to block ice cubes, pour 1/2 cup water/vinegar mixture into the bowl. Use a silicone spatula or wooden spoon to stir just until everything is moistened. Add more liquid 1 tablespoon at a time until clumps begin to form and dough holds together well when pinched. You will likely have some liquid leftover.
Give dough a couple of quick kneads to help it come together. There may be some dry unincorporated bits at the bottom of the bowl—this is normal.
Divide dough into two equal pieces and fork into disks. Wrap in plastic wrap and refrigerate for at least 1 hour or up to 3 days.
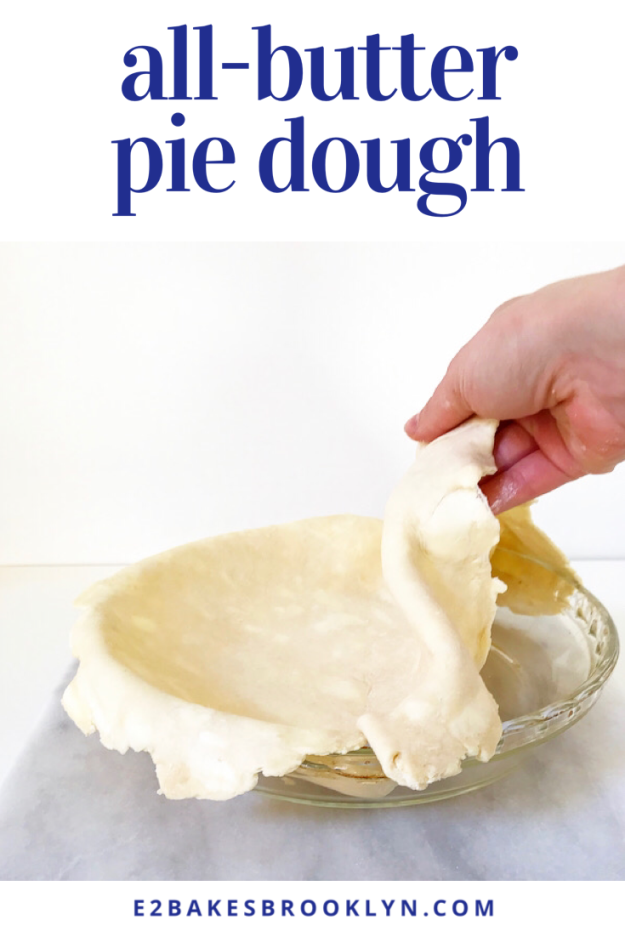
Flour a surface and a rolling pin. Unwrap one disk of dough. Use rolling pin to roll dough to 1/8-inch thickness (about 14 inches in diameter for a 9-inch pie plate). For easiest rolling, roll dough in one direction, turning it one quarter turn after each roll. Re-flour surface and rolling pin as needed.
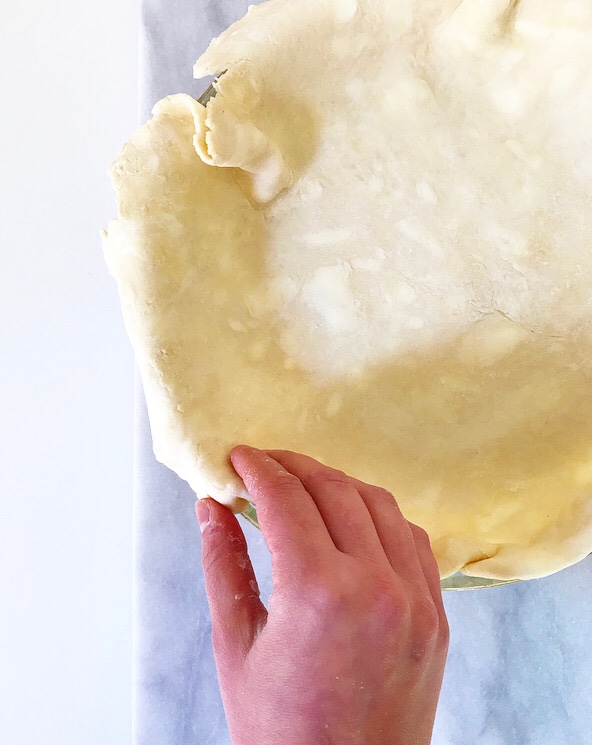
To transfer to a pie plate, carefully fold dough into quarters. Place point in the center of the pie plate and carefully unfold. Fit it to the pan, trim any excess overhang to 1-inch and crimp.
Proceed with your pie recipe as written.

 It’s almost time for pie. Almost.
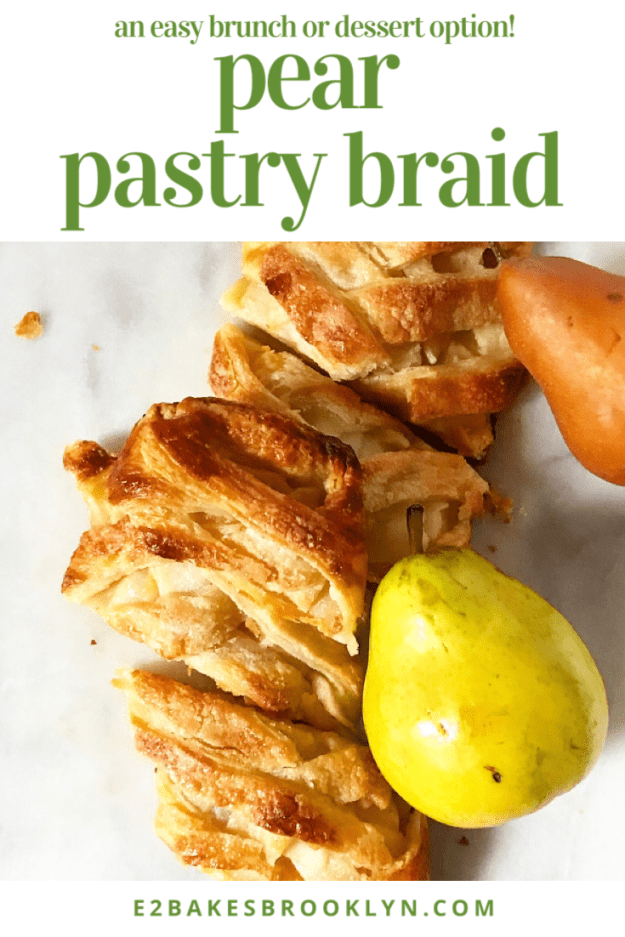
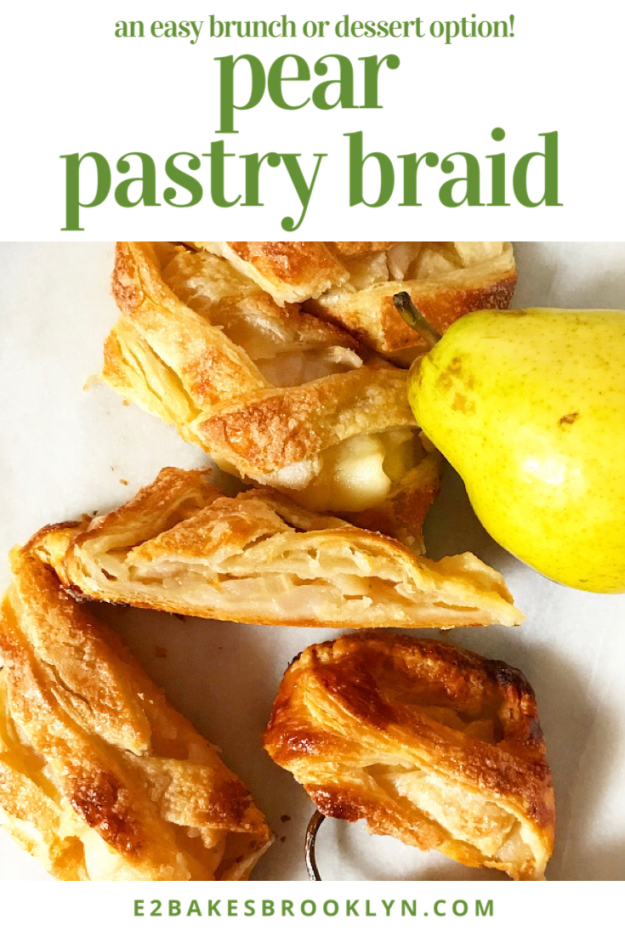
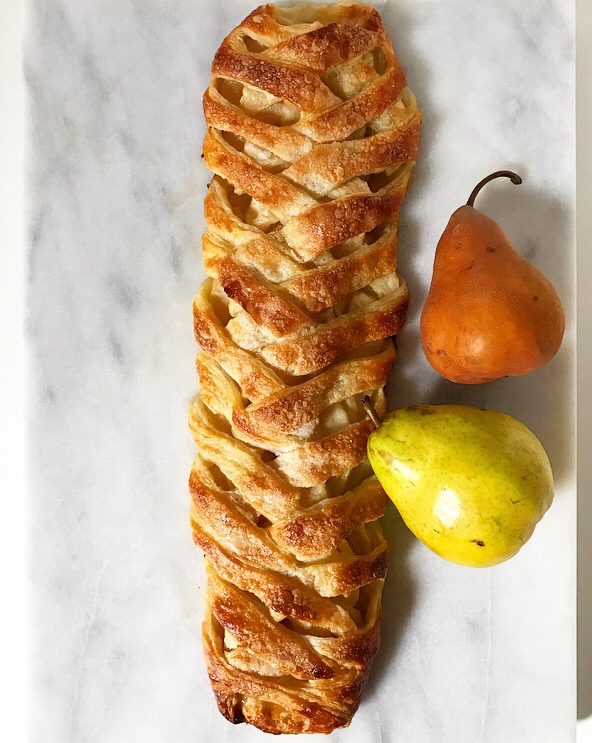 I mean, do you see this beautiful thing? Is it brunch food? Is it dessert? I don’t know. I don’t make the rules. I just make the pastry.
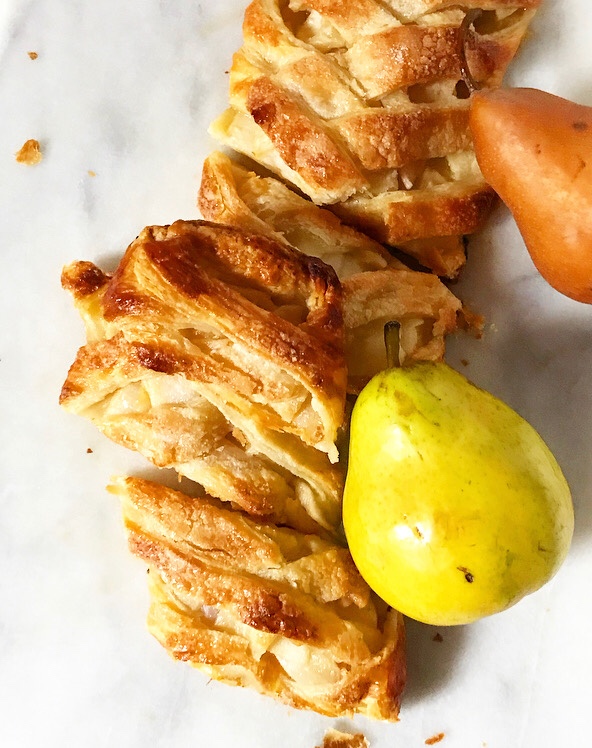
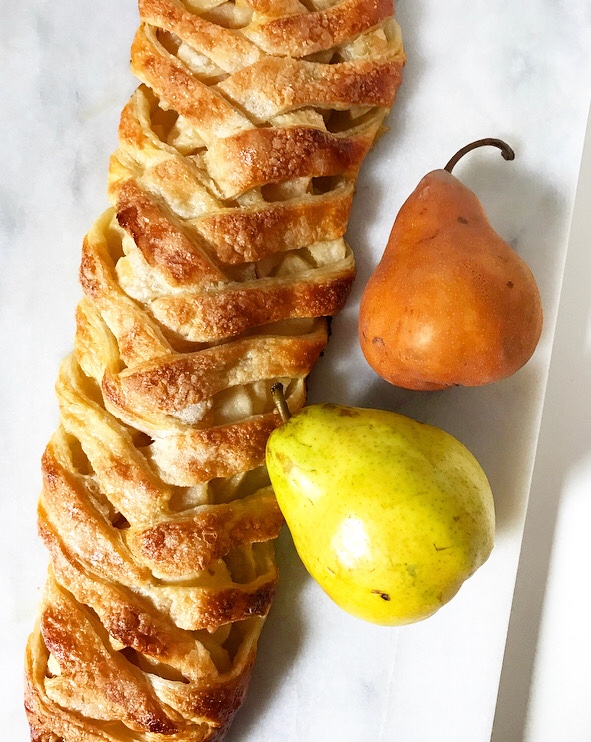 And oh, is this a good one. Pear Pastry Braid is super buttery and filled with tender pears that have been tossed with ginger, lemon, and a few tablespoons of sugar. Yum!
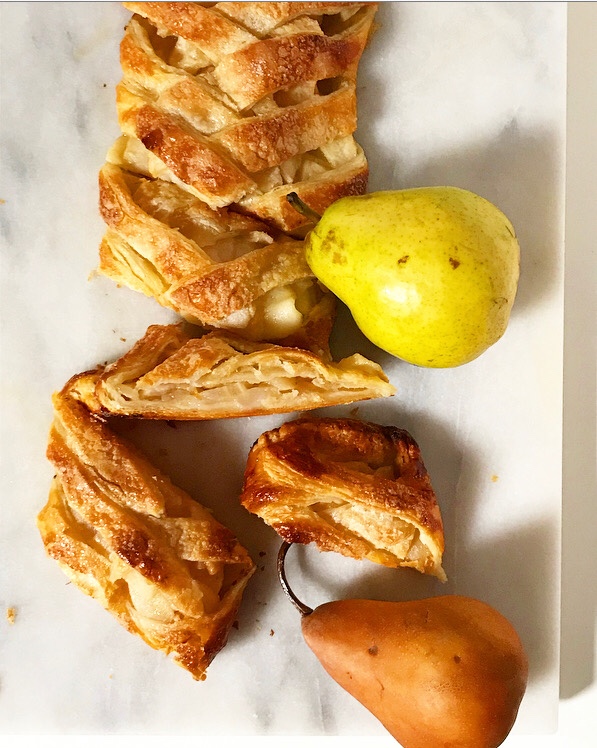 Don’t let these glamour shots deceive you–it’s surprisingly easy to make. Simply roll out a sheet of rough puff pastry (or the frozen thawed all-butter stuff), make a bunch of diagonal cuts down both long sides and fill the center with sliced pear filling.
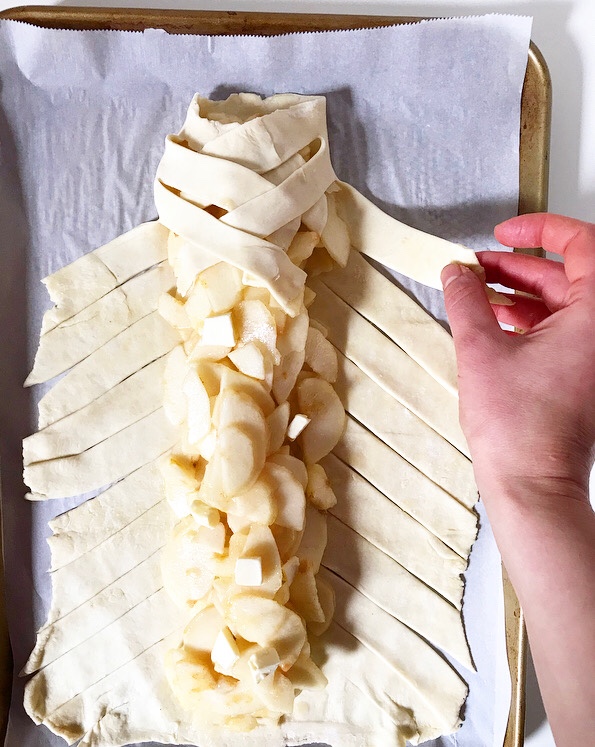
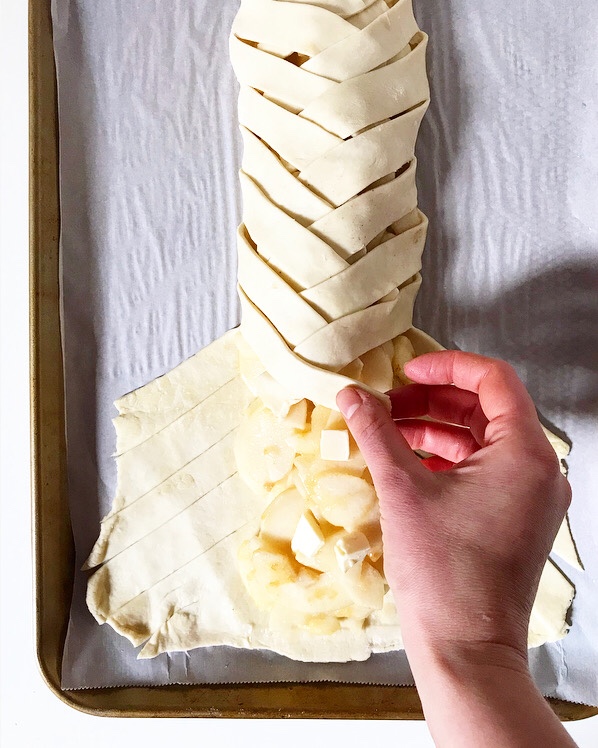 Alternating sides, carefully cover the filling with overlapping strips of dough, producing a braid-like appearance. Give it a brush of egg wash and a sprinkle of sugar, and then let it bake til golden.
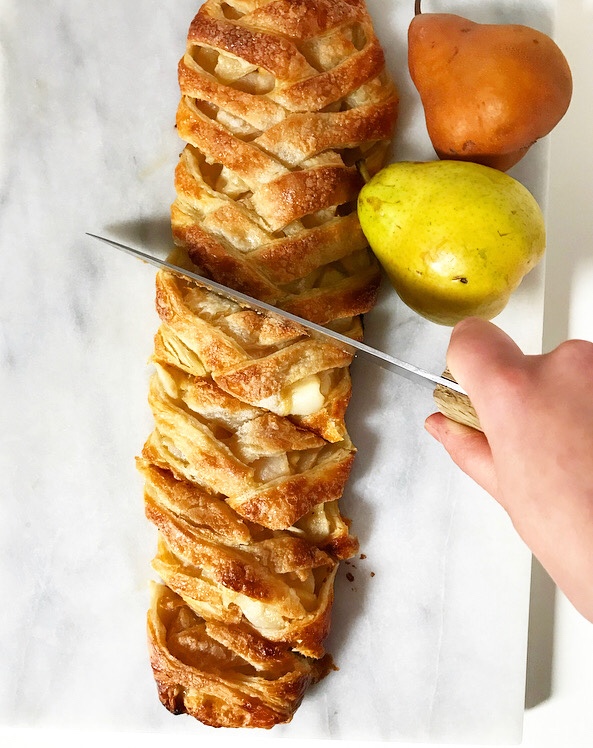 Sounds like a lot, but the time from when you start peeling pears to when you pull the finished pastry out of the oven is less than an hour. It can be sliced and served warm too, meaning that you don’t have to plan crazy far in advance (especially if you already have the pastry dough in the fridge). There’s so much planning around food this time of year that it’s kind of nice to have something you can make when the mood strikes or when someone says they’re going to pop by.
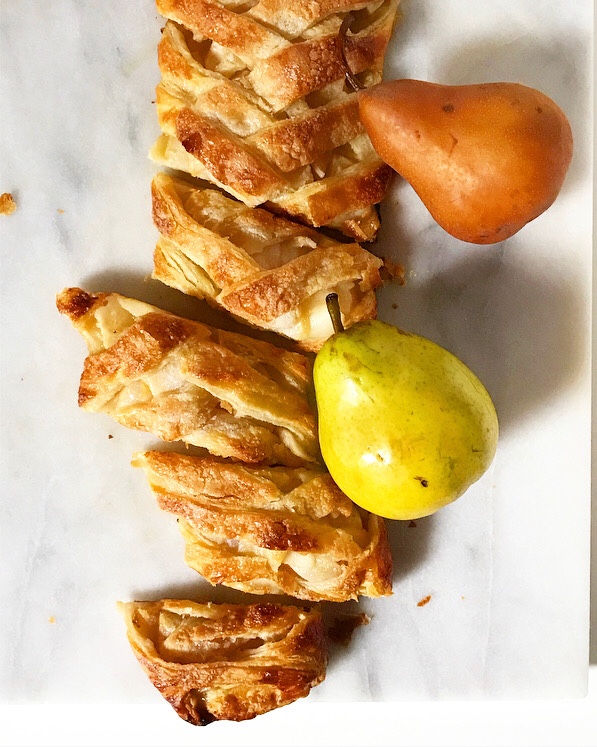 You know what else is nice? Eating a slice of sweet, flaky Pear Pastry Braid in your pajamas on a Saturday morning. Or a Saturday night. Or both.

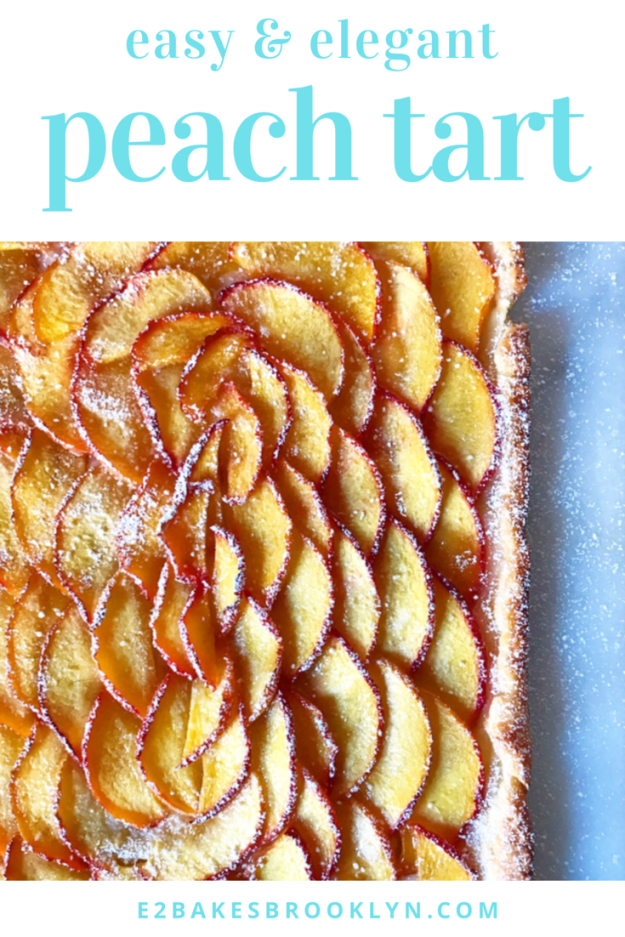
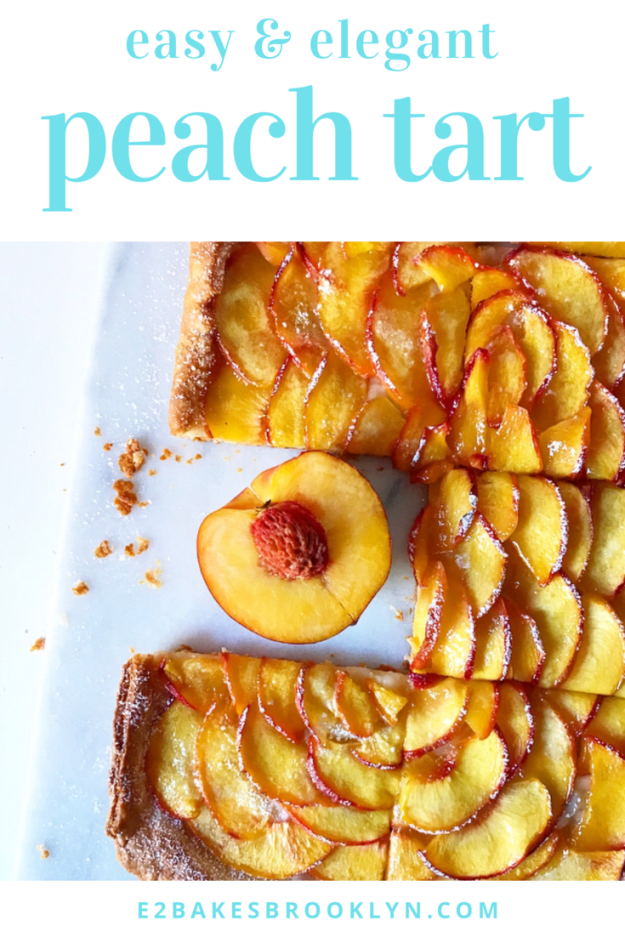
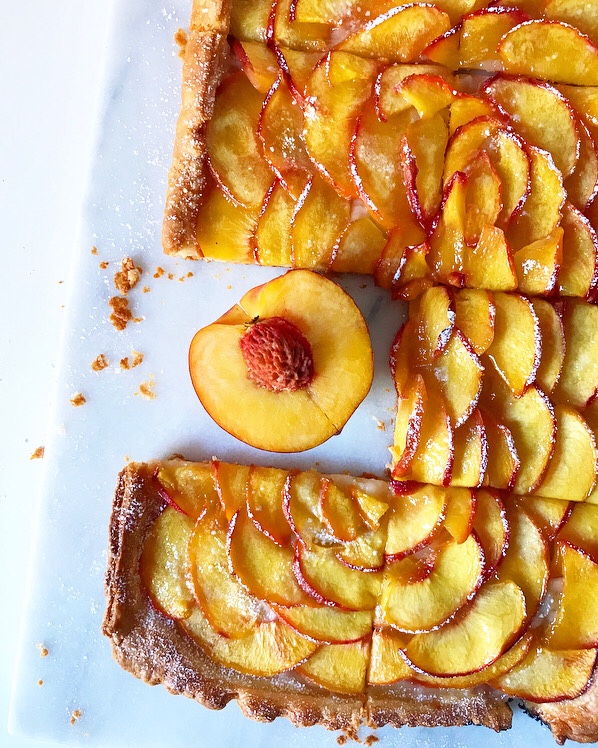 If you’re looking for an easy, elegant late-summer dessert, you’ve come to the right corner of the internet. This Peach Tart, y’all. I can’t get enough.
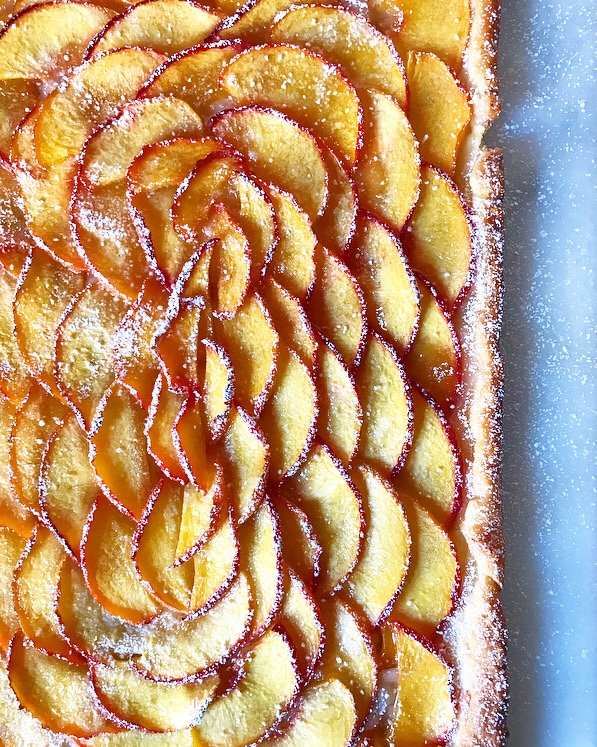 It’s as beautiful as it is delicious, and much easier than
 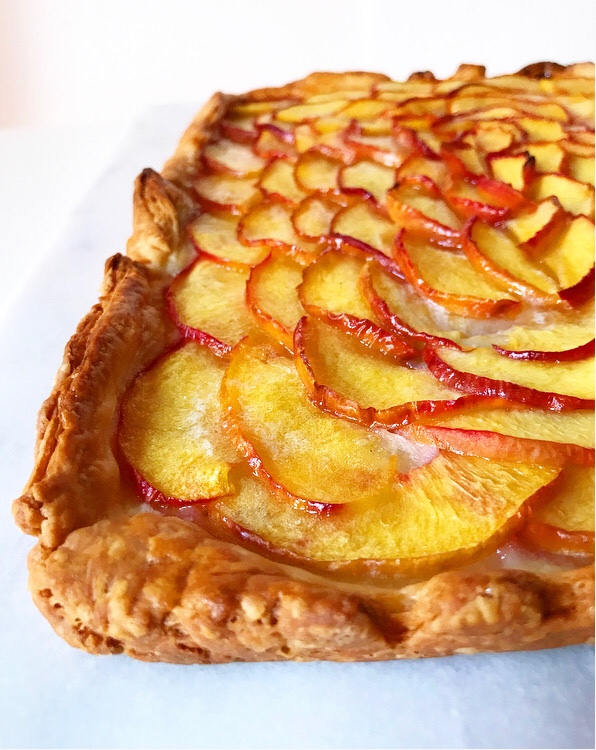 Where most
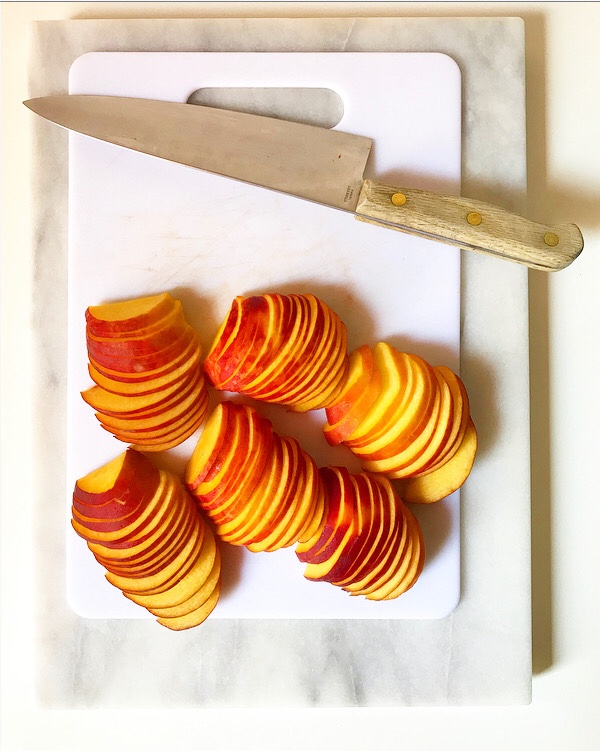

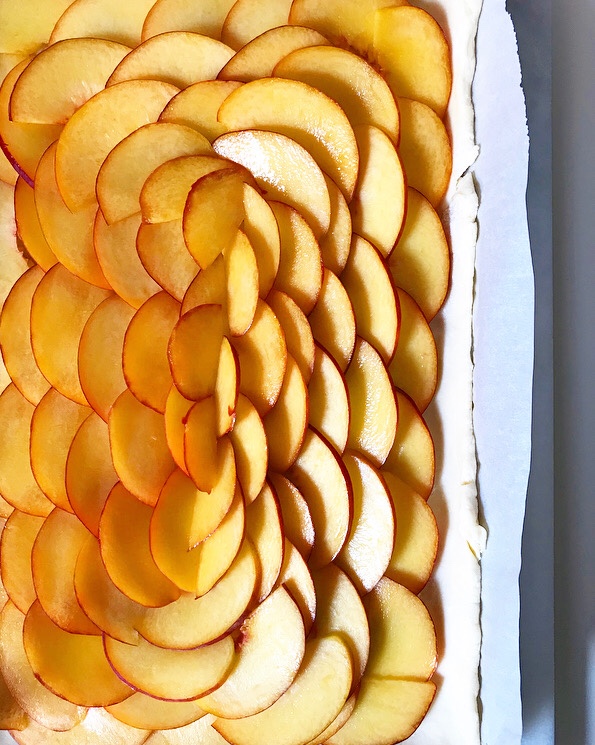

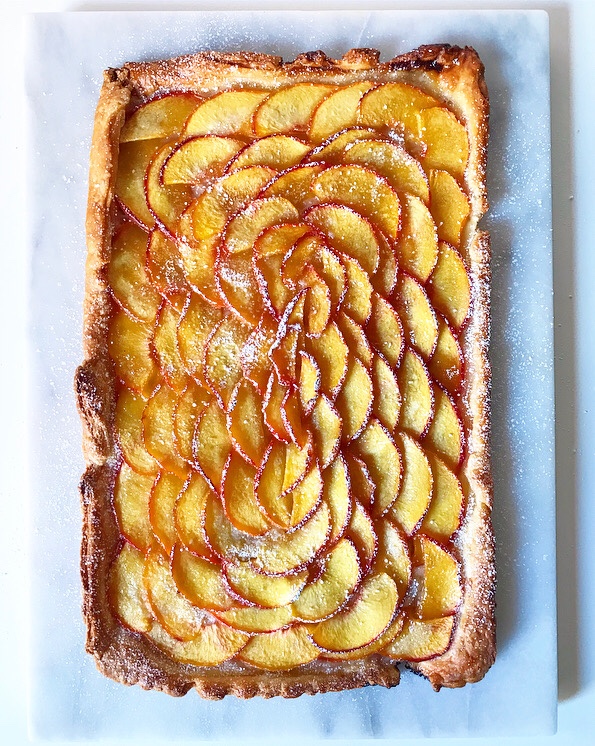 Fresh peaches are sliced thin and tossed with lemon juice before being arranged over pastry, then sprinkled with a tiny amount of sugar and dotted with butter before baking.
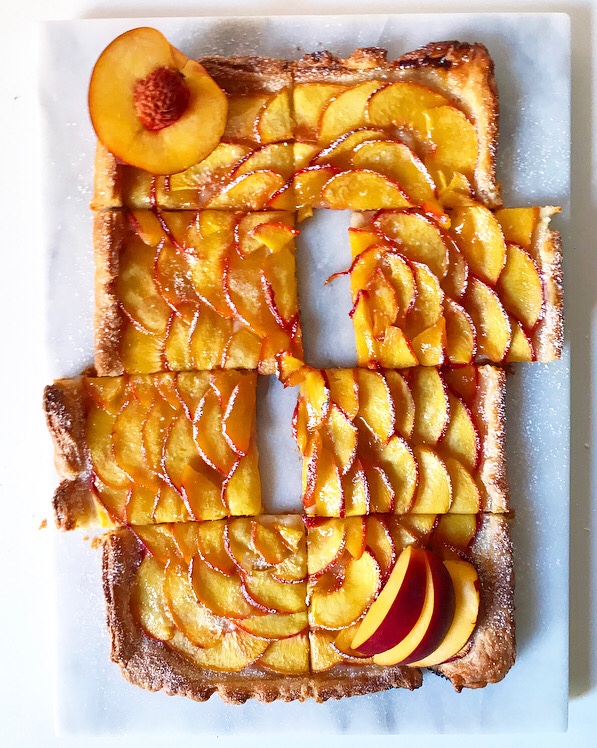 The result is this golden and gorgeous fruit-forward Peach Tart. There’s nothing to mask the flavor of the peaches because this time of year, when they’re at their peak, there’s no need.
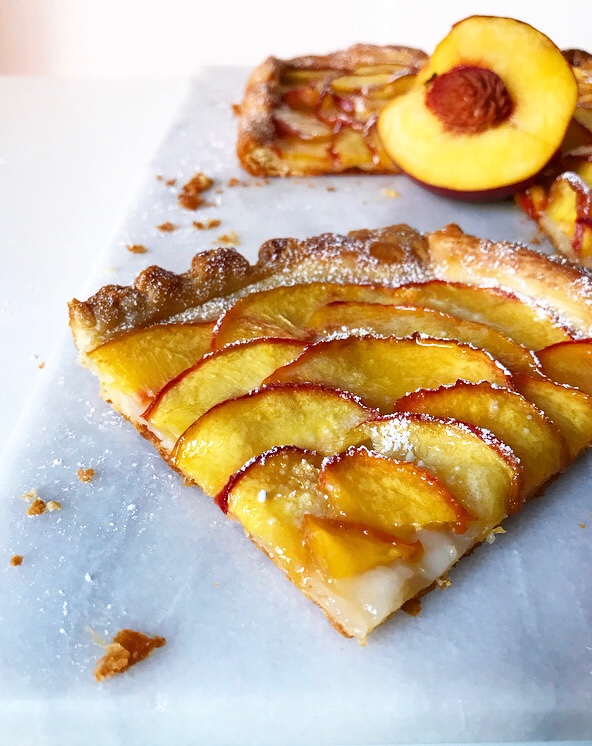
 If I could change one thing about myself, I think I’d like to be a morning person. I really like mornings (especially the lazy variety), but I have such difficulty getting myself out of bed that I rarely enjoy them. It’s a whole horrible, eight-alarm ordeal on weekdays and I almost always sleep past 11 on the weekends, so I’m either a bleary-eyed mess or out like a light for the start of most days. But, on extremely rare occasions, I wake up early of my own volition—usually with the aid of jackhammers outside my window or the sun shining in my eyes—and I get to enjoy the morning, starting with making myself a nice breakfast.
 Sometimes mixing flour, sugar, and butter is an act of self-care.
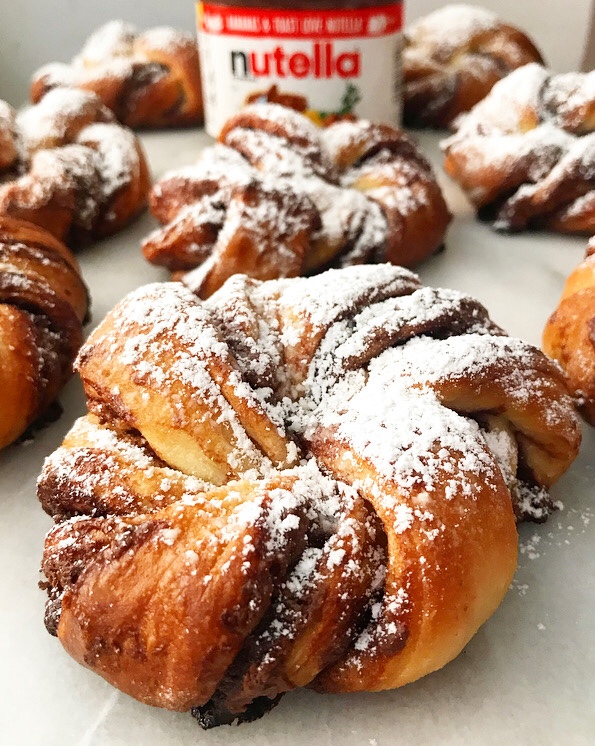
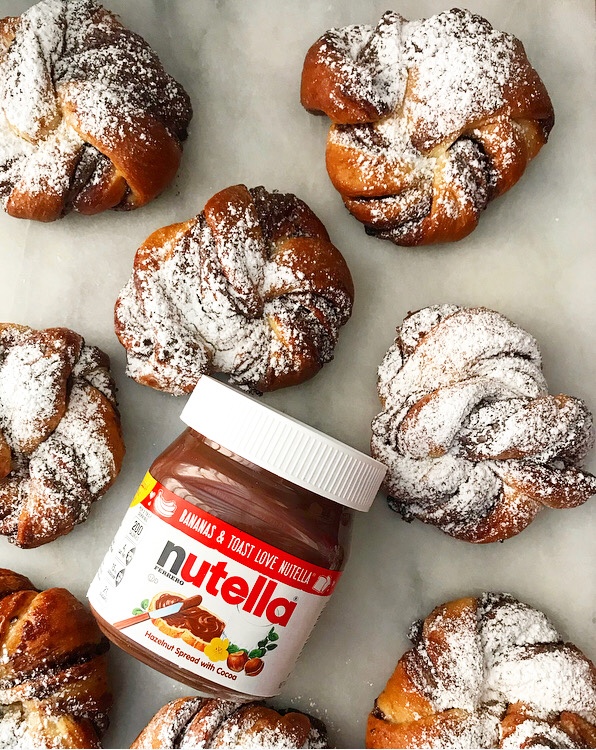
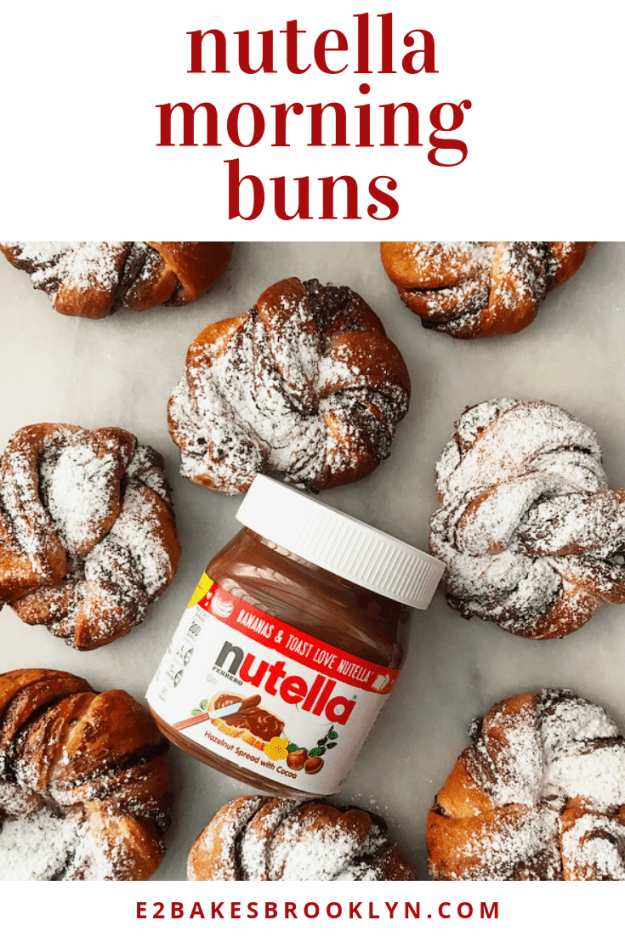
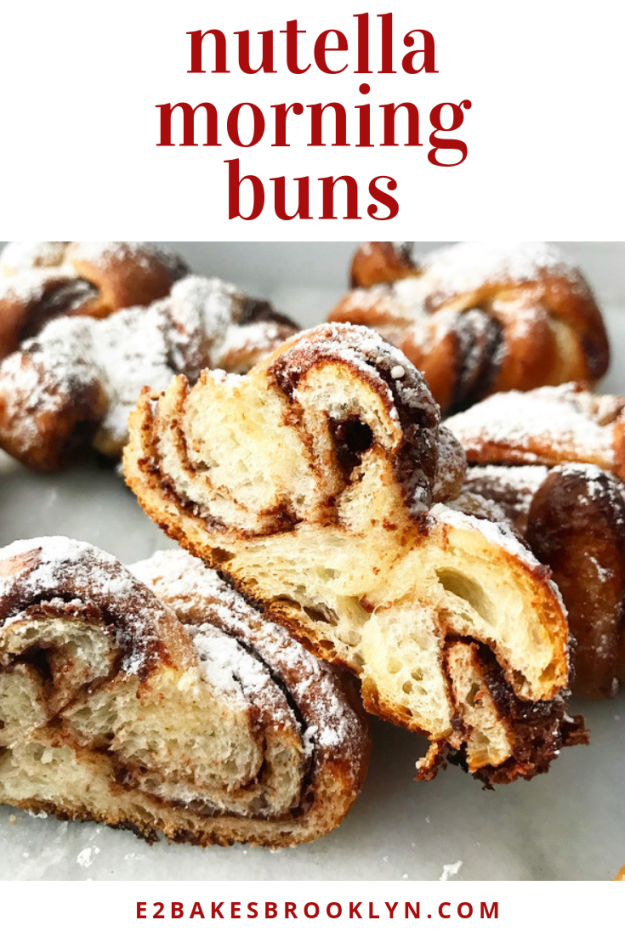
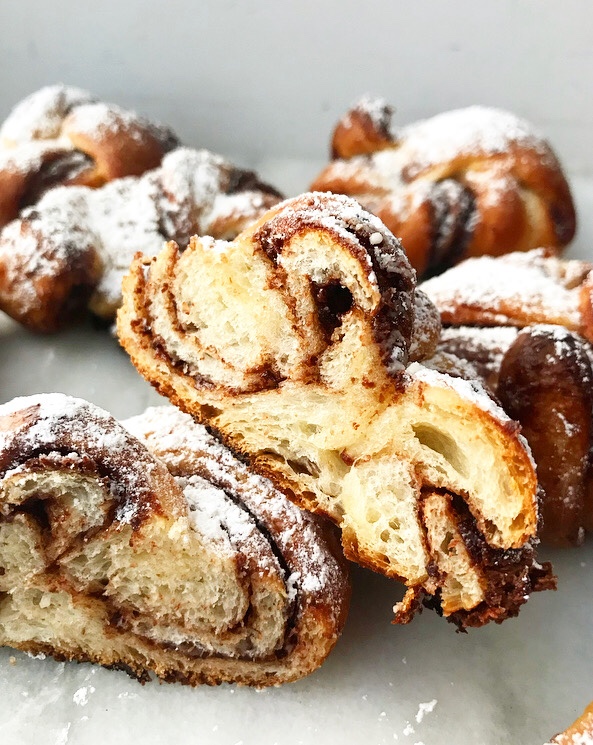 For something so rustic and beautiful, Nutella Morning Buns are surprisingly simple to make and come together in a pretty reasonable amount of time. It takes me about two hours to make a batch from the time I decide that a soft, warm bun full of chocolate-hazelnut spread might be nice to the time I dust them with confectioner’s sugar and dig in.
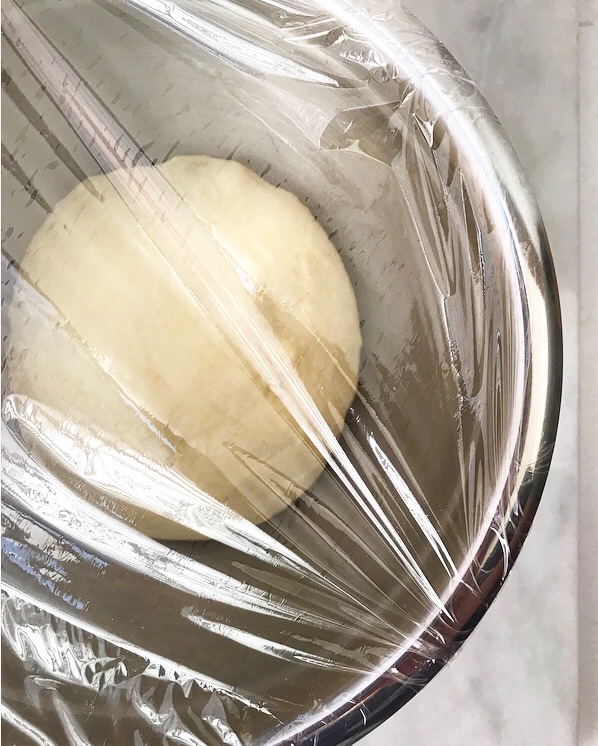
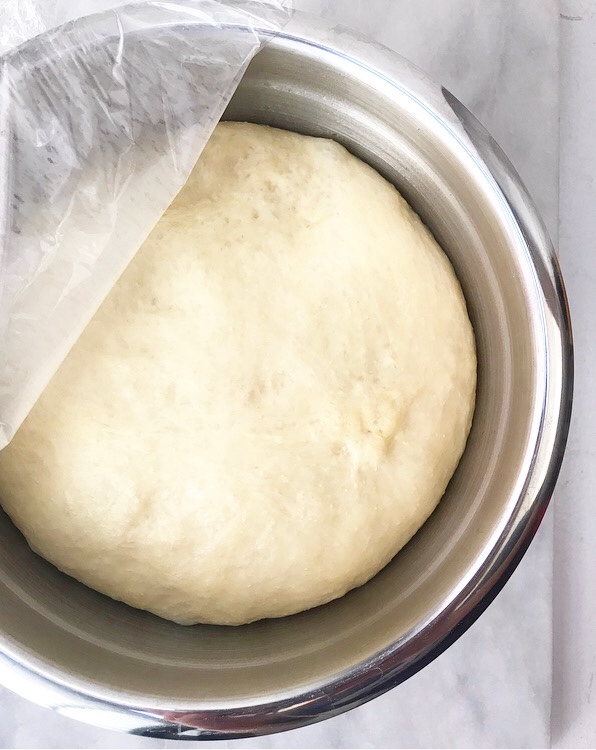 The dough is very straightforward. It’s got all the usual suspects: flour, a little sugar, butter, milk, and an egg. It requires yeast, of course, but I use the instant stuff here, which simplifies the already simple process, making these buns incredibly approachable.
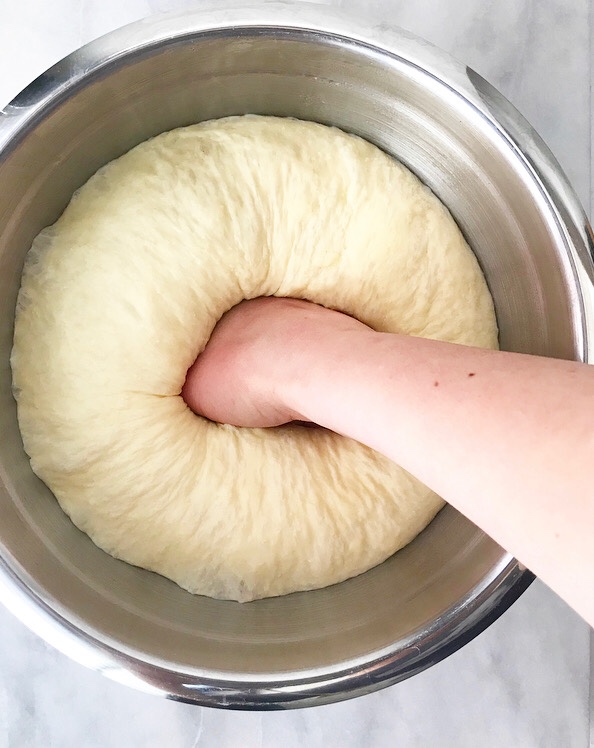 If there’s anything that’s intimidating about making Nutella Morning Buns, it’s probably shaping. Never fear though—it’s really simple and satisfying. Once your dough has risen for 40 minutes, punch it down and roll it into a large rectangle. Spread it with a thin layer of Nutella and then fold it like a letter, so that you have alternating layers of dough and filling. Use a sharp chef’s knife to trim off the ends and slice the rest into a dozen 8×1” strips.
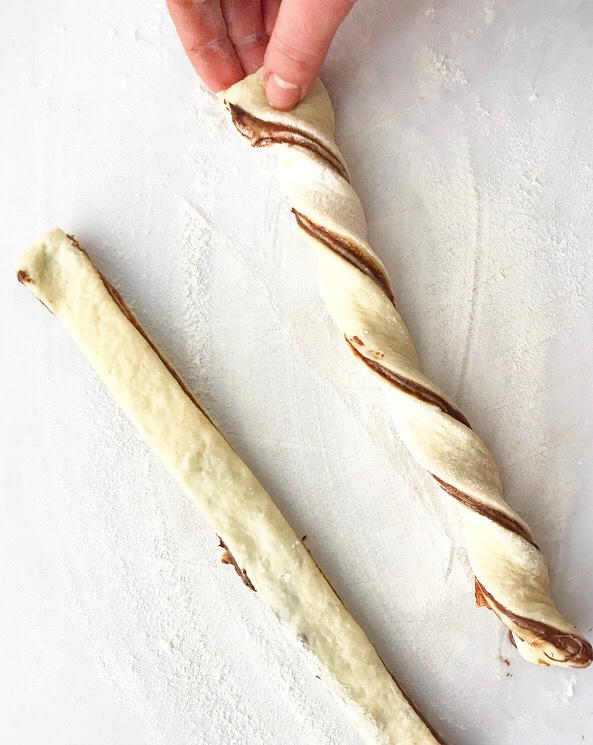
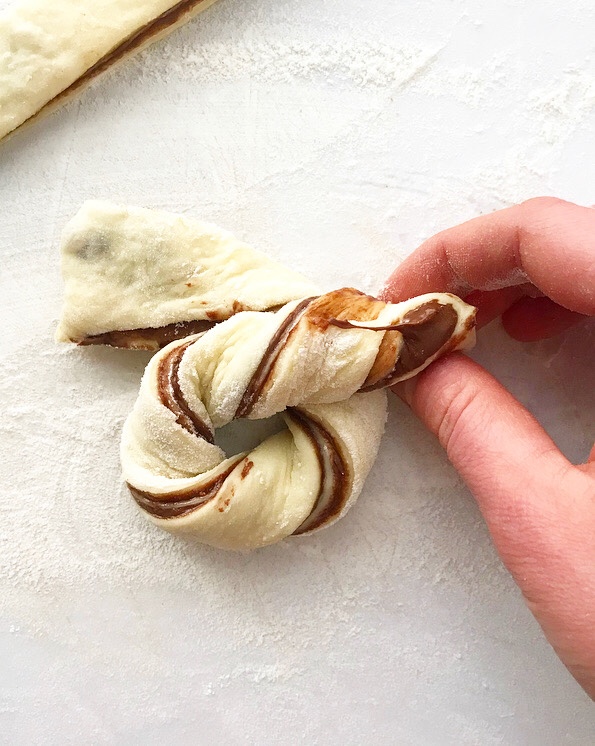
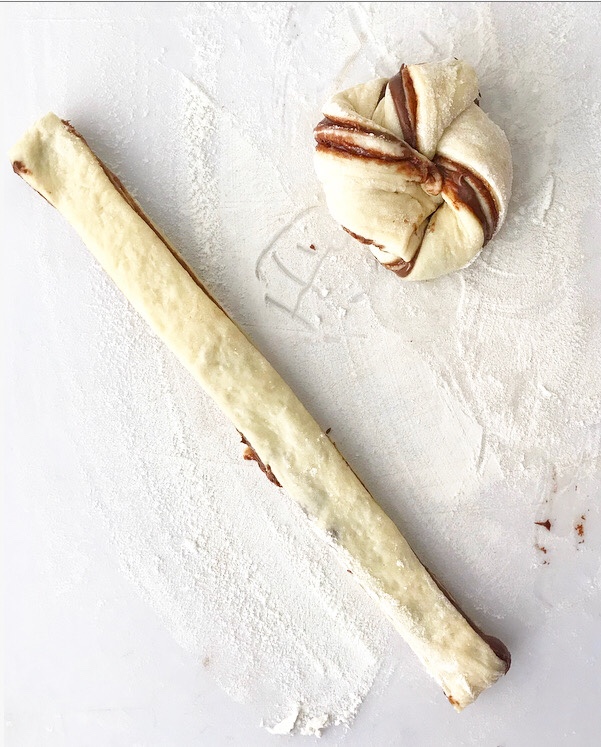
 Working with one strip at a time, twist it up. Then cross the two ends over each other and tuck them into the hole that forms in the center. BOOM! Dough shaped!
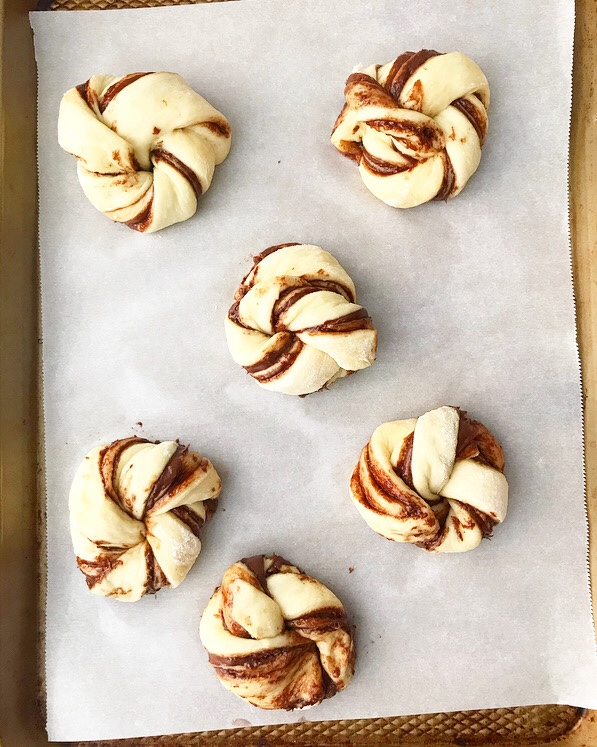
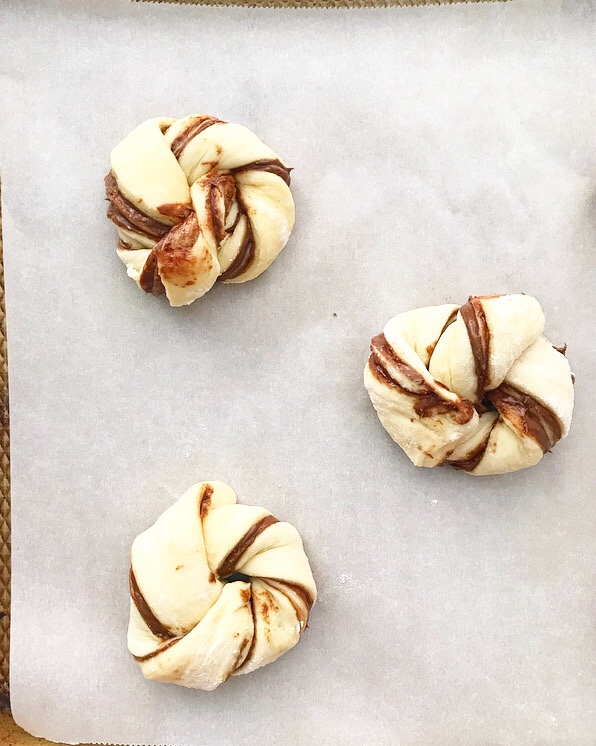
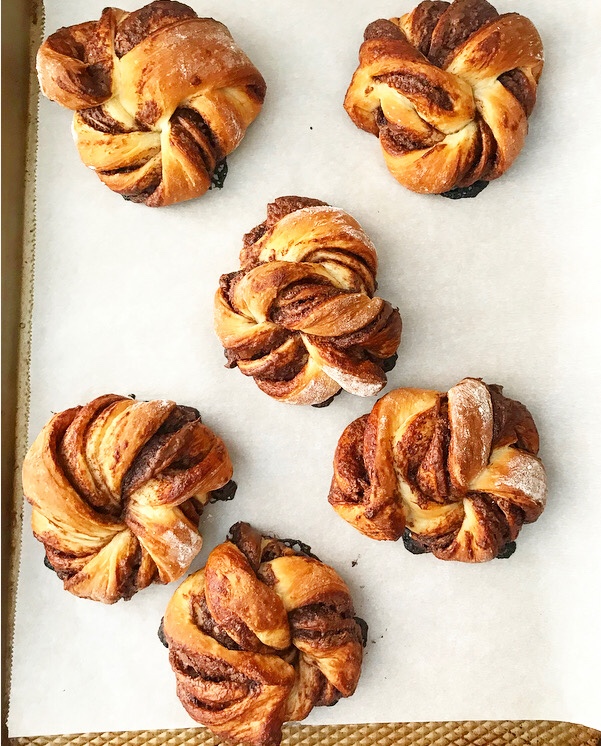 Repeat with the rest of your strips and then let them rise a little longer. If some ends come untucked, just nudge ‘em back with your fingers before baking. Or don’t. These are the sort of buns that can take all sorts of manipulation and still look gorgeous when all is said and done. And even if they don’t, a swipe of melted butter and a dusting of confectioner’s sugar can cure all manner of ugly pastry.
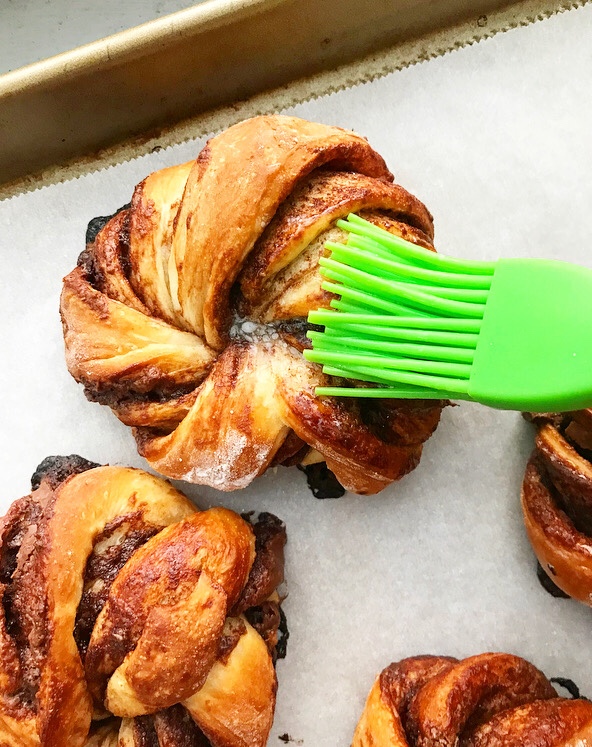
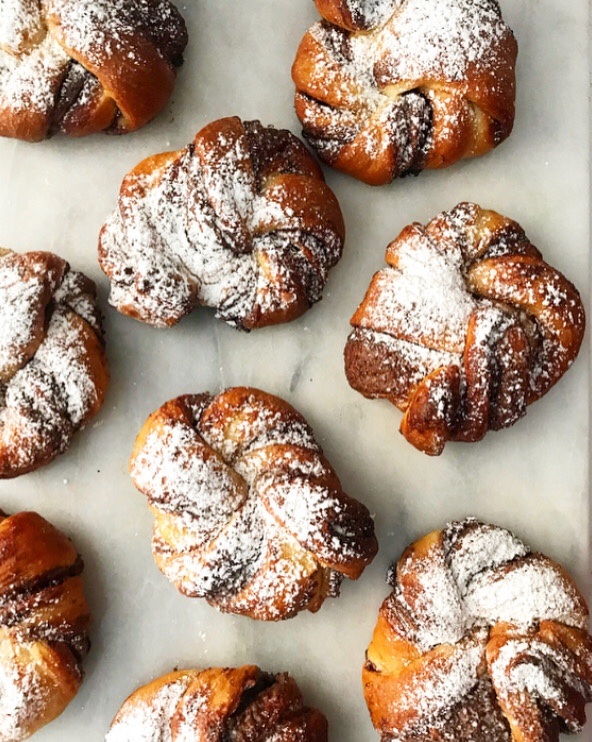 But is there such a thing as ugly pastry when Nutella is involved? I don’t think so. Or if there is, nobody who tried one of these buns during testing found the time to tell me. Oh, and all the test batches were gone (GONE!) within 45 minutes of coming out of the oven, so I’ll just let that speak for itself.
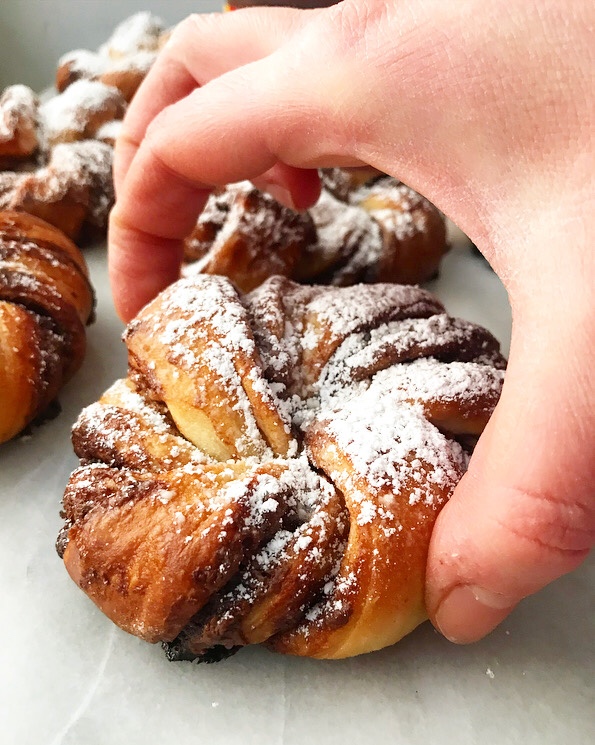 I’m pretty sure it’s impossible to have anything but a beautiful morning when these are around.
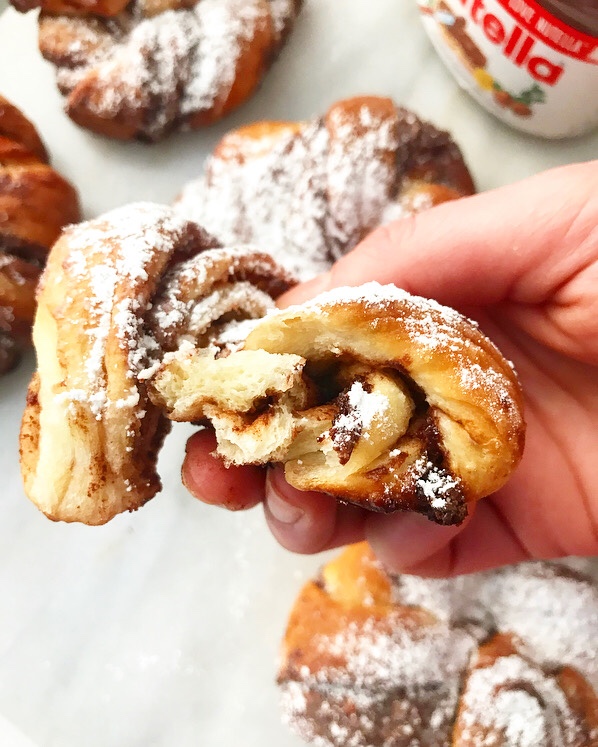

 Happy Halloween! If you’re looking for holiday-appropriate recipes, see
 There is going to be a lot of
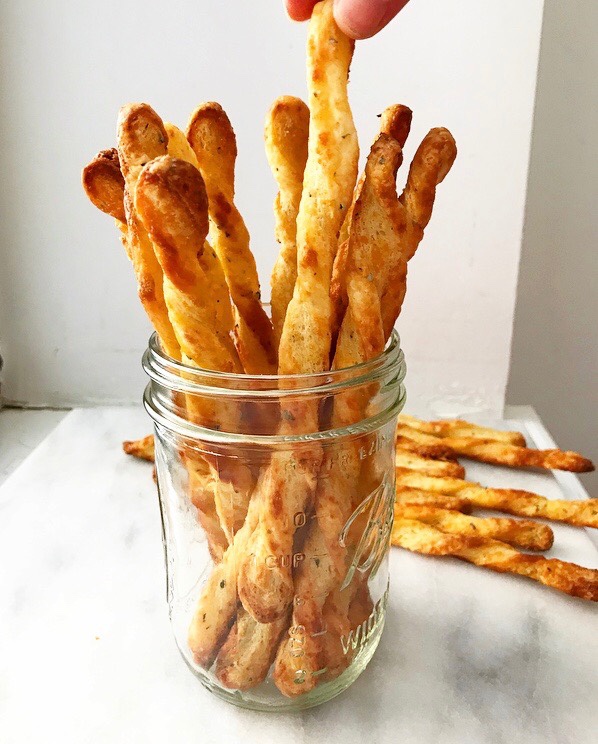
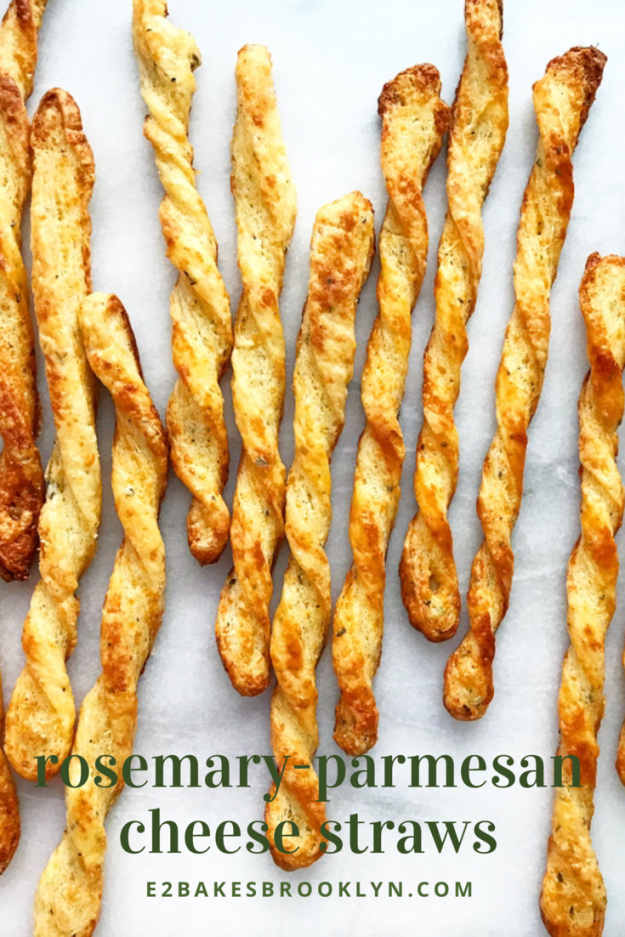
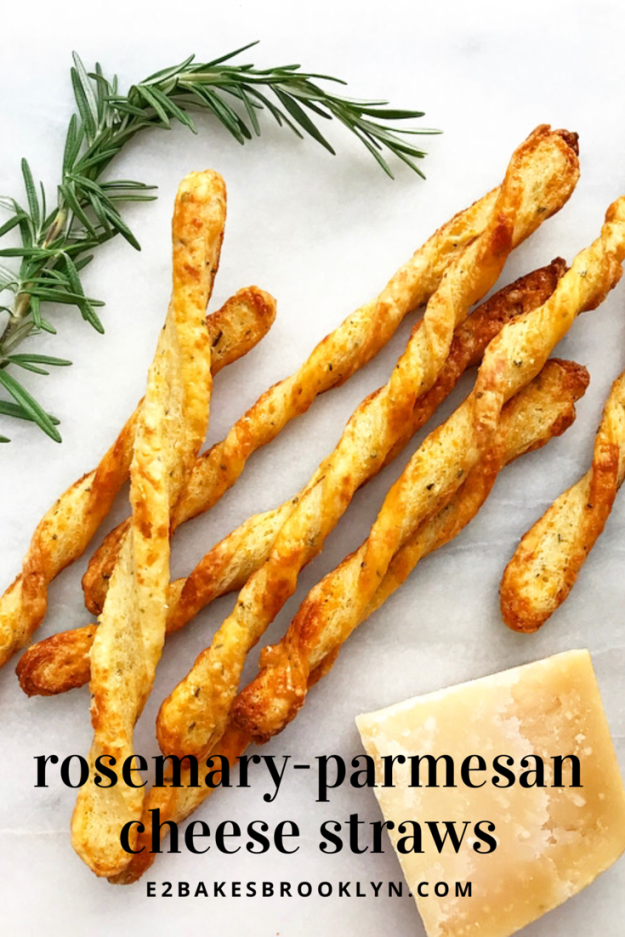
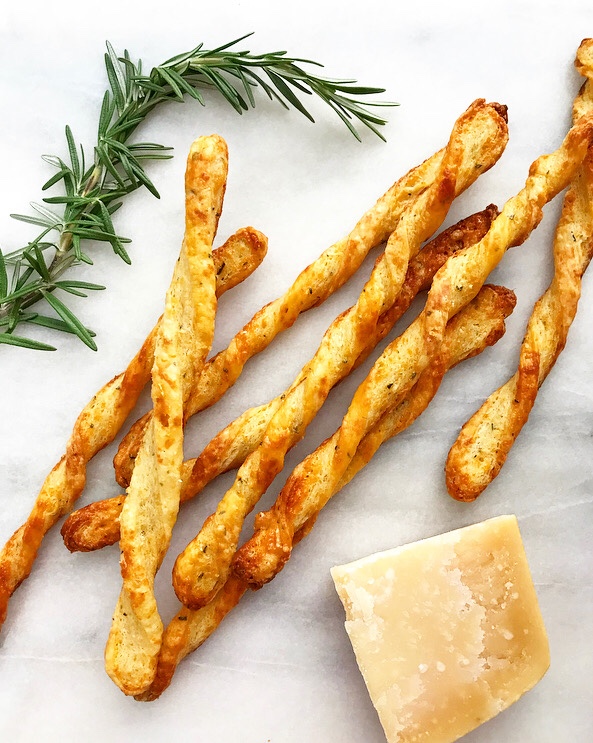
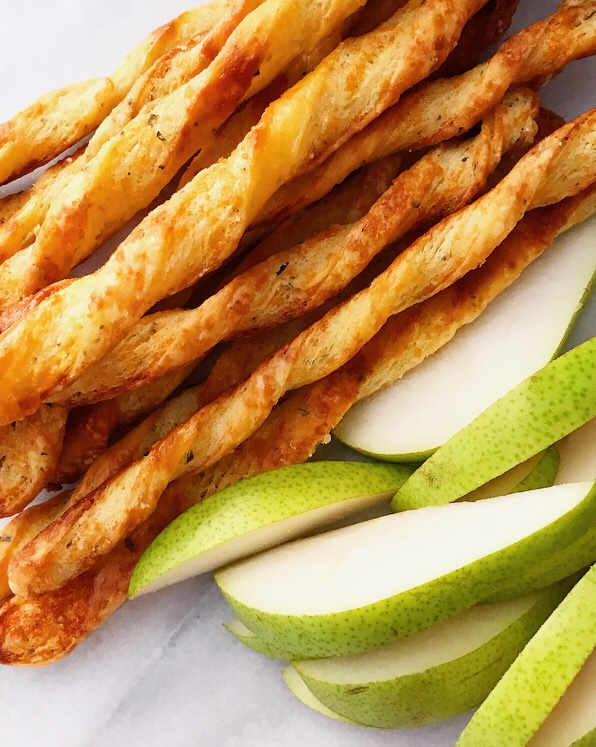
 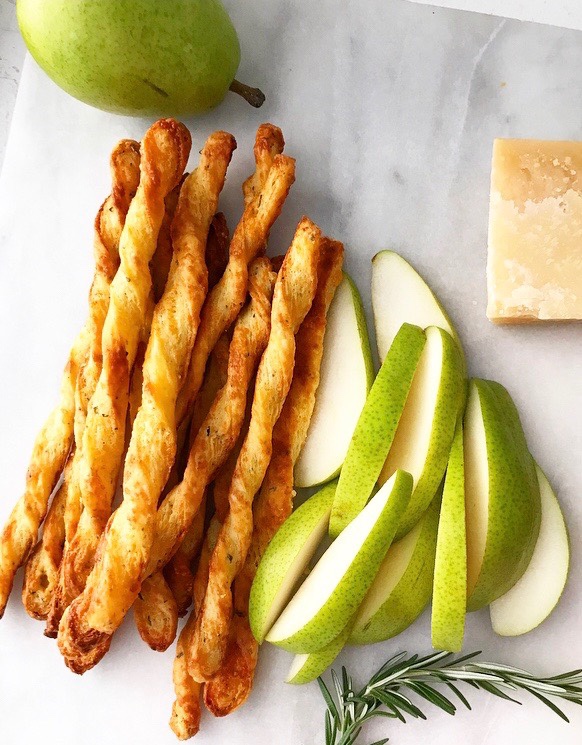 These golden, twisted beauties are perfect for any holiday cheese plate. They’re salty, flaky, cheesy, and have an aromatic hit of fresh rosemary—they’re perfect sidled up to a pile of sliced fresh pears.
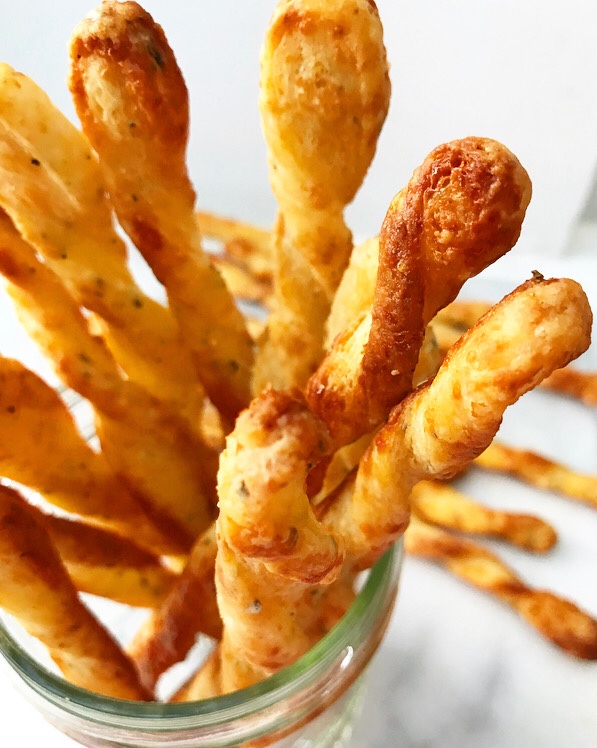 While these cheese straws look fancy, they are easy to make from scratch and require only eight ingredients. The base recipe is
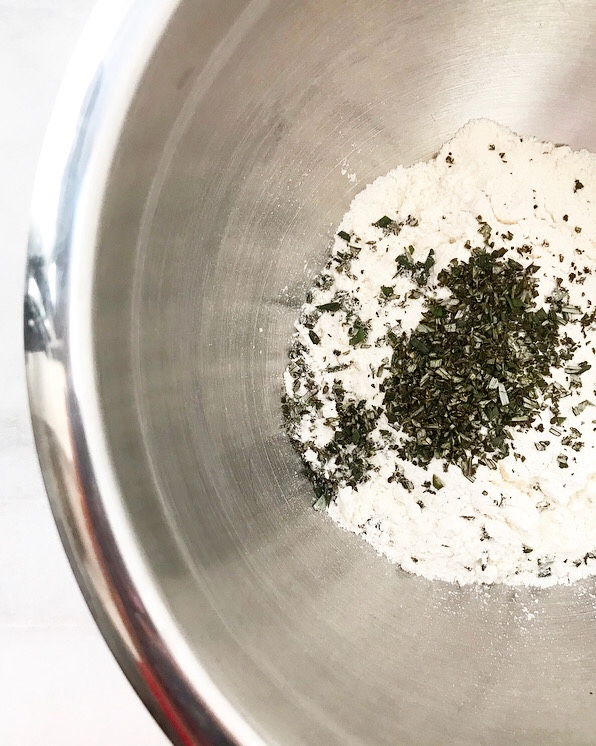
 Whenever possible, I like to use rough puff
 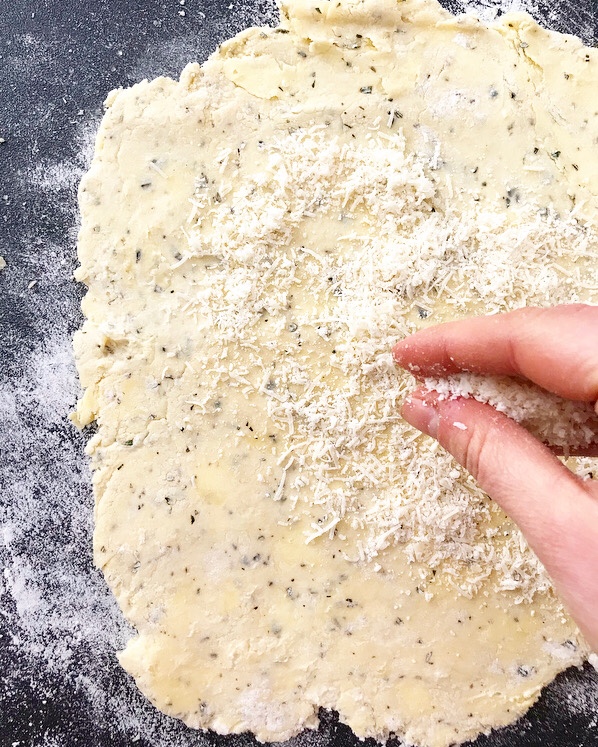 Once you have a dough, roll it into a sheet. Scatter fine, airy shreds of fresh Parmesan over the top and fold it all together like a letter. This will give you flaky layer of dough, along with almost impossibly thin layers of cheese. Flavor allllllll over the place!
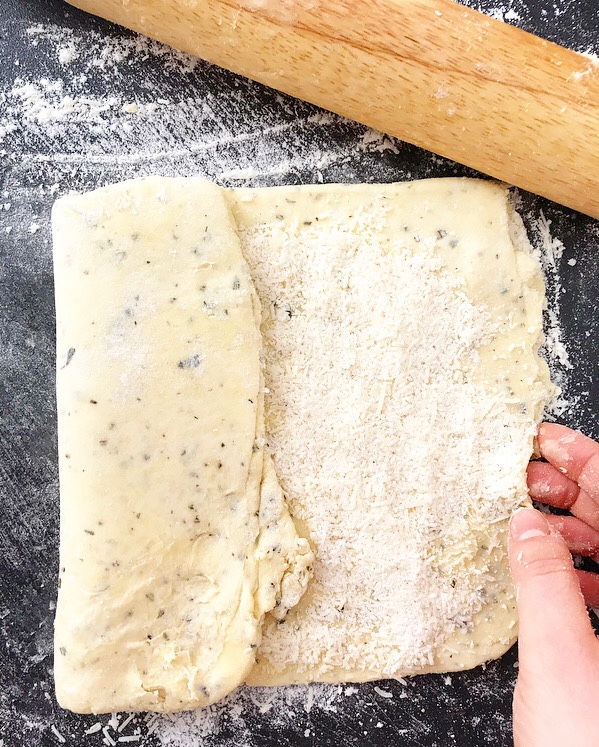
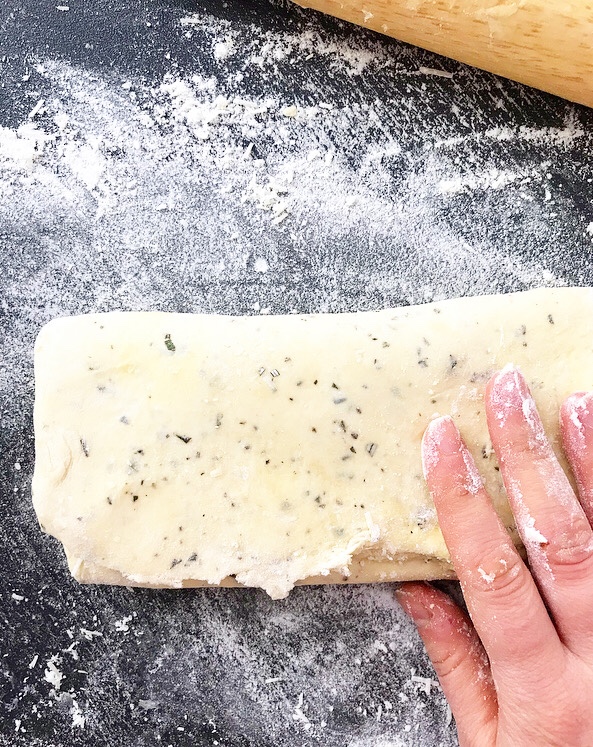 Repeat the folding process five more times and give it one extra, cheese-less fold to lock everything in—this is to ensure that there isn’t any exposed cheese left to burn during baking. Let the dough chill for an hour, or even a couple of days.
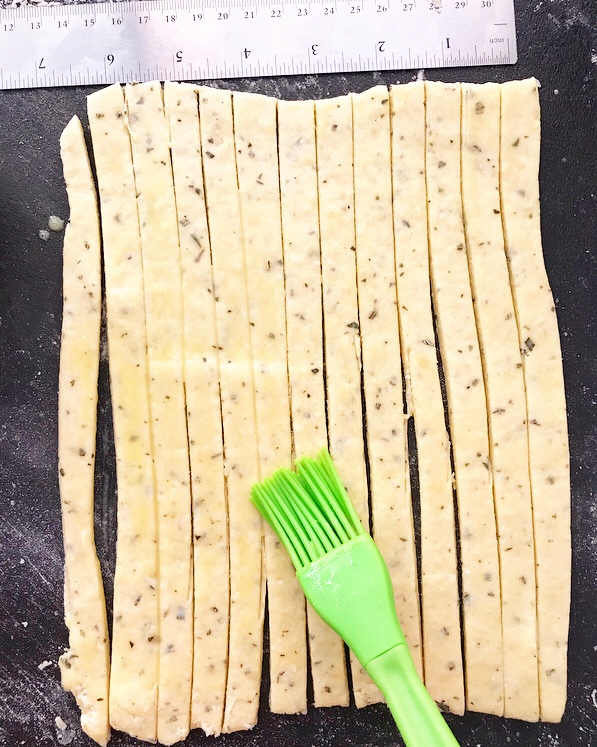
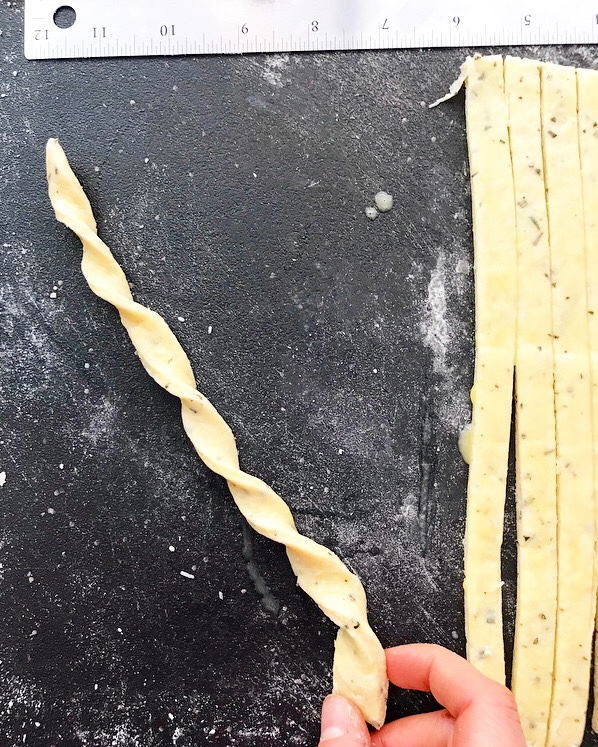 When you’re ready to bake, slice it into long, thin strips. Brush them with egg wash and give them a twist before laying them on parchment-lined baking sheets.
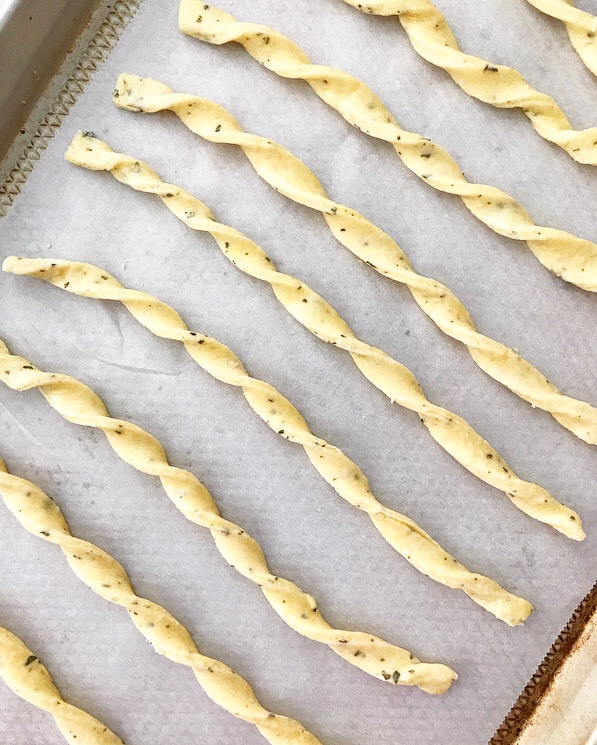 Bake the cheese straws for ten minutes before flipping them over and letting them go for another two minutes.
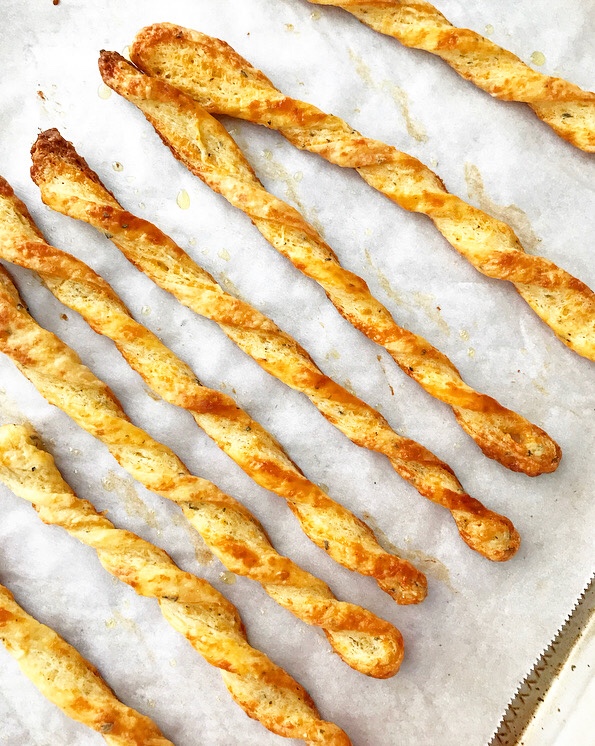 Aren’t they stunning?
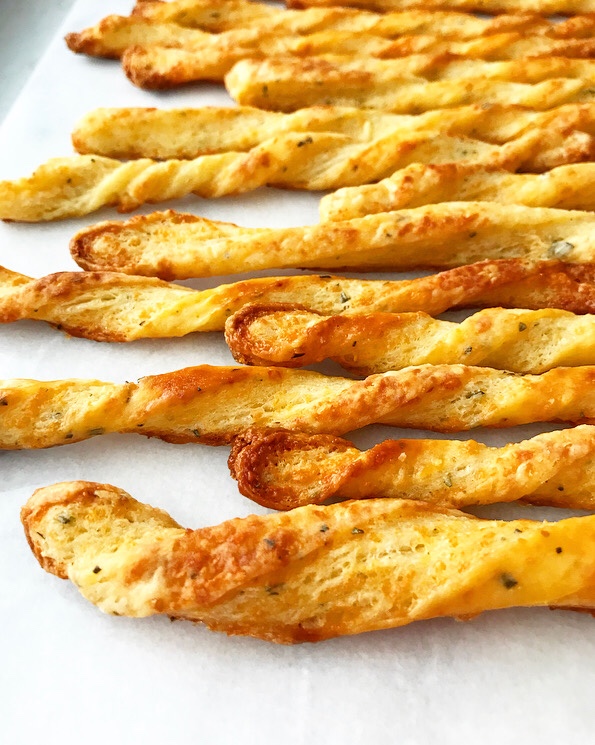 And talk about delicious—layer upon layer of rosemary-speckled pastry and Parmesan.
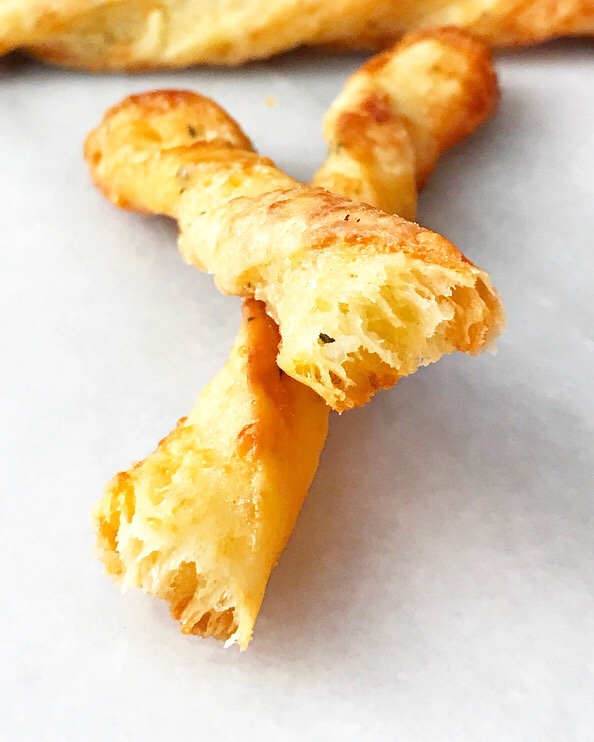 Yes.
Yes.