Vanilla Layer Cake

 This blog hit fifty posts last week which, considering that I only started blogging in October, is pretty crazy. Looking through my Recipe Index, I have a ton of cookie recipes, three pies, a bunch of different breakfast items and savory things, but only one measly cake recipe. Granted, it’s a Pumpkin Spice Latte Cupcake recipe that is really delicious, but how is it possibly the only one?!

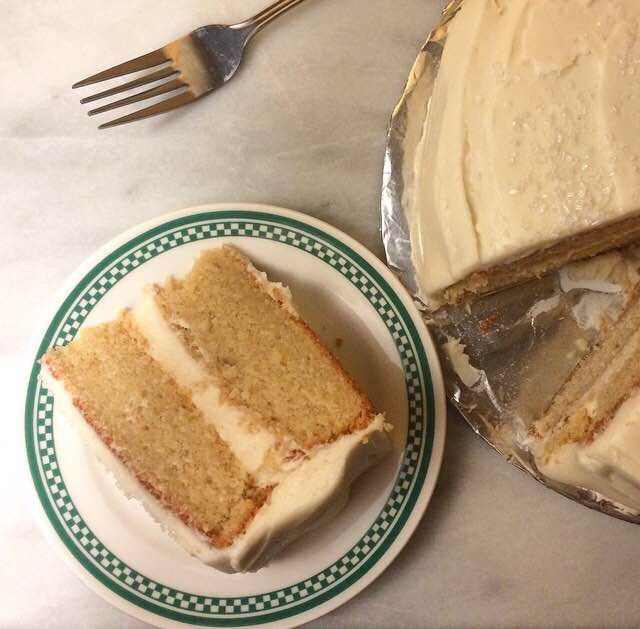
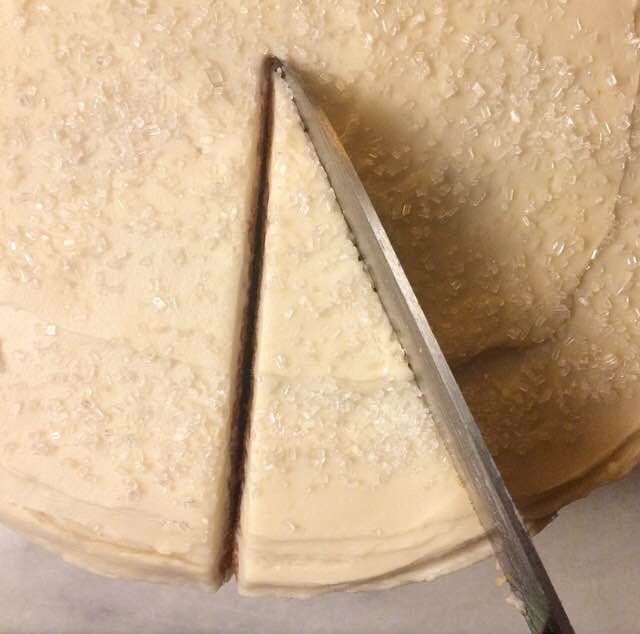
See, I make a lot of cake. Like, a minimum of five every month for the various birthdays and celebrations that all my friends (and their friends) have. I’ve made everything from chocolate biscuit cake to chocolate peanut butter cake to the vegan carrot cupcakes I baked last night. But the one that everyone really loves? The one that people get excited about when I walk in the room with a white cardboard cake box? It’s this Vanilla Layer Cake. 

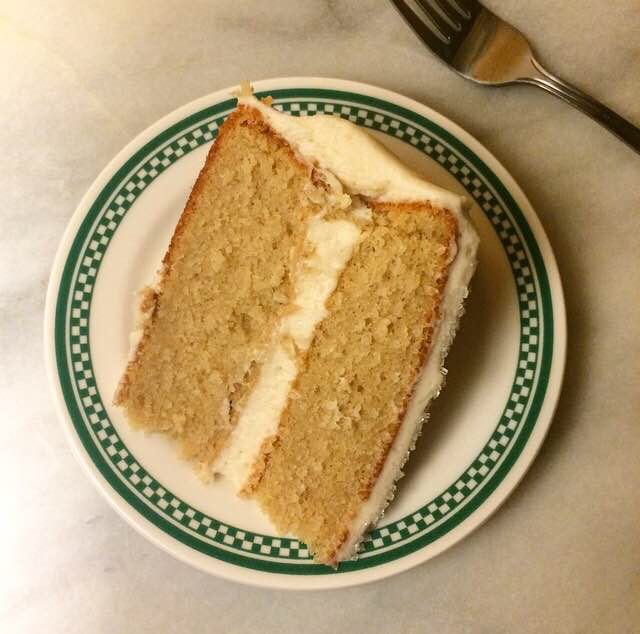
This cake has been through many iterations over the last two years as I learned more about baking chemistry and made adjustments. All of them were delicious, but this is the best by far. It’s moist and buttery, a little bit dense (but not pound cake-dense), and has a prominent vanilla flavor. 

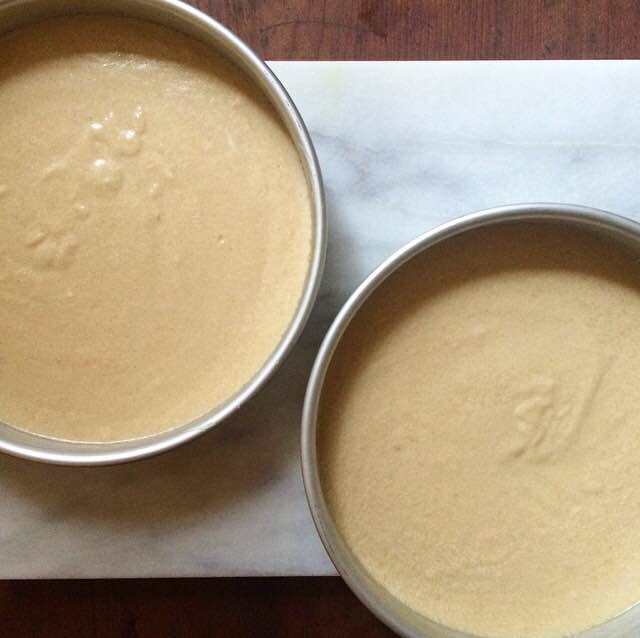
The cake is made with room temperature butter and eggs so that it stays extra rich. Buttermilk keeps everything moist. The dry ingredients involve a combination of all-purpose flour and cornstarch to mimic cake flour’s lightness and tenderness. Light brown sugar is used in addition to granulated sugar for a little extra moisture and complexity of flavor. And there is plenty of pure vanilla extract so that this cake is undoubtably vanilla. The batter is simple to put together, and will be thick and beautiful (or at least, I think it is). It’s divided into two pans and baked until a toothpick inserted in the middle comes out clean.
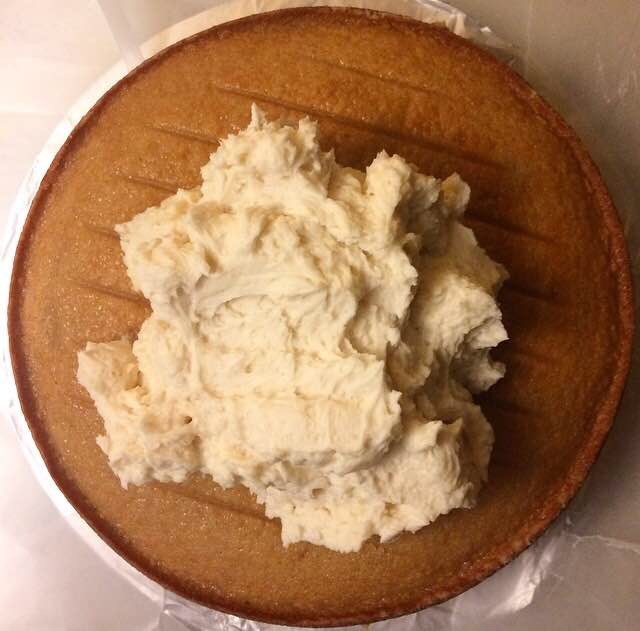
      The frosting is made while the cake layers are cooling. It’s a simple vanilla buttercream, and will come together in just a few minutes. Beat room temperature butter and confectioner’s sugar together until combined. Add in vanilla and salt, followed by a few tablespoons of heavy cream. You may use whole milk or half-and-half in place of the heavy cream, but the frosting won’t be nearly as rich and creamy. You see, the cream whips within the buttercream and makes it so light and fluffy, it’s ridiculous. Don’t skip it! Fill and frost the layers to your preference, and sit back while your friends and family ooh and ahh!

This Vanilla Layer Cake is anything but plain vanilla! Between the buttery, rich cake, and the fluffy, gorgeous frosting (not to mention the vanilla flavor!), it’s a total showstopper! 

 
Vanilla Layer Cake
makes 1 two-layer 9″ round cake*

To Grease the Pans:
2 tablespoons neutral-flavored oil
2 tablespoons all-purpose flour

Cake:
3 cups all-purpose flour*
1/3 cup cornstarch
1 teaspoon baking powder
1/2 teaspoon baking soda
1 teaspoon Kosher or sea salt
1 1/2 cups granulated sugar
1/2 cup light brown sugar
1 cup (2 sticks) unsalted butter, softened to room temperature
3 large eggs + 1 large egg yolk, room temperature
1 1/2 tablespoons pure vanilla extract
2 cups buttermilk*, room temperature

Frosting:
1 cup (2 sticks) unsalted butter, softened to room temperature
1 pound confectioner’s sugar
pinch of Kosher or sea salt
1 tablespoon pure vanilla extract
3-5 tablespoons heavy cream
sprinkles or decorative sugar, if desired

Preheat oven to 350F. In a small bowl, use a fork to whisk together greasing mixture ingredients. Use a pastry brush to paint mixture onto the entire insides of two 9-inch round cake pans. Set aside.

Make the cake batter. In a medium mixing bowl, whisk together flour, cornstarch, baking powder, baking soda, salt, granulated sugar, and light brown sugar. Set aside.

In a large mixing bowl, cream butter with an electric mixer until light and fluffy, about two minutes. Add eggs and egg yolk one at a time, beating completely after each addition. Beat in vanilla and buttermilk. Add dry ingredients in three installments, beating just until combined. Scrape down the bowl as necessary.

Divide batter evenly into prepared pans. Tap each full pan on the counter five times to release any large air bubbles. Bake cakes 32-37 minutes, rotating top to bottom and back to front at the halfway point. Cakes are done when a toothpick inserted in the centers comes out clean. Let cakes cool in pans for fifteen minutes. Run a small thin knife around the edges of the pans and invert the cakes onto cooling racks to cool completely.

Make the frosting. In a large mixing bowl, beat butter until light and fluffy, about two minutes. Beat in confectioner’s sugar in three installments, scraping down the bowl as necessary. Beat in salt, followed by vanilla. Add in heavy cream until desired consistency is reached.

Transfer one layer of the cake to a cake stand or plate. Frost and layer cooled cakes. Top with sprinkles or decorative sugar immediately after frosting, if desired.

Layer cake will keep covered at room temperature for up to three days, or in the refrigerator for up to a week.

Notes:

1. This recipe can also be made into 24 cupcakes. Skip the greasing, and instead line 24 muffin cups with cupcake liners. Fill each muffin cup 2/3-3/4 full. Bake for 16-18 minutes, or until a toothpick inserted in the middle comes out clean.
2. Cake flour may be substituted for the all-purpose flour and cornstarch. Just use 3 1/3 cup cake flour in place of the all-purpose flour and cornstarch.
3. If you don’t have buttermilk, put one tablespoon of white vinegar in the bottom of a liquid measuring cup, then pour milk up to the 2 cup mark. Stir and let sit for five minutes, until curdled. Use as instructed in the recipe. Do not use skim or fat free milk.

Oreo Peanut Butter

Is there possibly a better combination than Oreos and peanut butter? I had never heard of eating them together until I saw the Lindsay Lohan version of The Parent Trap. When one of her characters used Oreos to scoop peanut butter out of the jar, it blew. my. mind.

It makes sense. I mean, chocolate and peanut butter are BFFs. Exhibit A: Reese’s Peanut Butter Cups. But pairing not-too-sweet Oreo wafers, creamy filling, and the magic that is peanut butter? Does it get better than that?!

Well, yes. Yes it does. How about Oreos *in* peanut butter?!

!!!

 My Oreo Peanut Butter could not be easier to whip up. All you need are three ingredients: roasted salted peanuts, Double Stuf Oreos, and a tablespoon of coconut oil. Put all three in a food processor or high-powered blender, and blitz until smooth. That’s it! The combination of freshly-ground peanut butter and pulverized Oreos is to die for, and the coconut oil keeps everything smooth and spreadable.
The only drawback is that it’s not the most gorgeous color, but when there is peanut butter-Oreo magic going on, who cares?

Oreo Peanut Butter is fantastic on toast, spread on bananas, in milkshakes, or just on a spoon. My favorite thing to do with it is make Fluffernutter sandwiches. Who wouldn’t love Oreos, peanut butter, and Marshmallow Fluff?!

Bottom line: make this Oreo Peanut Butter. It doesn’t get any better.

Oreo Peanut Butter
makes about two cups

1 1/2 cups roasted salted peanuts
24 Double Stuf Oreos
1 tablespoon coconut oil, solid

Combine all ingredients in a food processor or high-powered blender. Process until smooth, scraping down the bowl as necessary. Store in an airtight container at room temperature for up to two weeks, or indefinitely in the refrigerator.

Oreo Peanut Butter

Glazed Cream Cheese Cake Doughnuts

 Nothing says love quite like doughnuts. When my sisters and I were little, my dad would very occasionally drive 45 seconds down the street to Dale’s Donuts #9 and have a dozen fresh doughnuts on the table before we ever got out of bed. He did it because he loved us…and maybe because he wanted a doughnut and knew we’d never stop complaining if we didn’t get some, too.

And doughnuts were pivotal in what remains one of the most important relationships in my life, the one with my little sister, Eliot (E3). We always loved each other, but like many siblings, we didn’t really get along for the first sixteen years or so. When I was a senior in high school, she was a freshman, so I drove us both to school everyday. And what did we do with our newfound freedom? Get doughnuts for breakfast, of course! Our little fifteen minute drives were spent chatting about the perfection that is John Cusack and eating chocolate sprinkle twists. We became best friends that year. I know the doughnuts weren’t the reason for it, but they sure didn’t hurt 😜

One of the only things I miss about Texas food (apart from Tex-Mex and great barbecue), is Dale’s Donuts #9. I’ve tried to find a good doughnut shop over the last eight years in NYC, but have been mostly unlucky. The Doughnut Plant is too flashy for me. I don’t need my doughnuts to be gourmet. I really love the 7th Avenue Donut Diner in Park Slope (get the Toasted Coconut Doughnut!), but it’s too far from home to be a viable option. There’s always Dunkin’ Donuts, but their doughnuts just aren’t great. They work in a pinch (and there have been many pinches), but they leave me underwhelmed. So what’s a woman to do? Make them at home! 

You might think I’m insane, but trust me, making your own doughnuts is worth it, if only to say “Hey! I made these doughnuts!” to everyone you meet. The doughnuts I’ve been making lately are cake doughnuts, so they take 90 minutes start-to-finish, instead of the 3+ hours that the yeast-raised variety can take. Yes, you can have shop-quality doughnuts on your table in less than two hours! 

And oh, are they ever good. These cake doughnuts are made with cream cheese, which keeps them extra soft. Sour cream is traditional, but cream cheese is just…cream cheese! It makes these doughnuts so light (something difficult to achieve with fried dough), but still rich enough to taste like the real deal. The dough also has a few tablespoons of softened butter and two eggs plus a yolk, just to keep everything really moist and fluffy.

These doughnuts are made with a combination of flour and cornstarch. As I’ve mentioned so many times, cornstarch lightens flour in cakes and cookies, and it does the same thing here. I made one batch with all all-purpose flour, and they were fine, but too dry and crumbly for me to want to make them again. The cornstarch is the “secret” ingredient in this recipe 😊 Also, add a dash of nutmeg. It’s traditional in doughnuts, and adds a little depth without being front-and-center. And of course, since these are cake doughnuts, they are leavened with baking powder instead of yeast, which makes them come together fairly quickly and easily. 

  Once your dough is made, let it rest at room temperature for 30 minutes. The rest allows for the dry ingredients to become fully saturated and for the proteins in the flour to develop properly. Once half an hour is up, flour a surface and roll out the dough, then use graduated cookie cutters (or a doughnut cutter, if you have one) to cut out doughnuts. I used a set of circles (the larger being 2 inches), and also some cute hearts for Valentine’s Day 💗  

Fry the doughnuts in batches of three or four. These cook in 350F oil, and only take 1-2 minutes per side. Once they start to puff and turn golden, they need to be flipped. They will darken a bit more as they cool. 

 
Once your doughnuts are cooked, whisk up the glaze. Confectioner’s sugar, corn syrup, vanilla, salt, and hot tap water ensure that it will set just like the glazes at your favorite doughnut shop! If you are wary of corn syrup, I recommend Lyle’s Golden Syrup as a substitute. Just whisk all the ingredients until smooth. If you want a pink glaze, add a couple of drops of liquid red food coloring. Dip each doughnut individually with your finger or chopsticks before setting it back on the rack to set. If you want to add sprinkles, do it immediately after dipping. The glaze will set after 20 minutes, and then…breakfast time!

This recipe is long and detailed, but trust me when I say that you can make shop-quality doughnuts at home! Soft and cakey with crispy edges, they’re totally irresistible. 

So, this Valentine’s Day (or any day!), invite some of your nearest and dearest for coffee and Glazed Cream Cheese Cake Doughnuts. Have them bring the coffee–you’re frying homemade doughnuts. You’ve done enough.

It’s a great way to let people know you love them 💗🍩 

 Glazed Cream Cheese Cake Doughnuts
glaze barely adapted from Handle the Heat
makes about 21 2-inch doughnuts and doughnut holes

Doughnuts:
2 3/4 cups all-purpose flour
1/4 cup cornstarch
1/4 teaspoon ground nutmeg
1 tablespoon baking powder
1/2 teaspoon Kosher or sea salt
4 ounces full-fat cream cheese, softened to room temperature
3 tablespoons unsalted butter, softened to room temperature
2/3 cup granulated sugar
2 large eggs + 1 large egg yolk, room temperature
2 teaspoons pure vanilla extract
vegetable or canola oil, for frying

Glaze:
1 pound confectioner’s sugar
1/2 teaspoon Kosher or sea salt
2 teaspoons light corn syrup*
2 teaspoons pure vanilla extract
5-6 tablespoons hot tap water
2-3 drops liquid food coloring, if desired
sprinkles, if desired

Whisk together flour, cornstarch, nutmeg, baking powder, and salt in a large mixing bowl. Set aside.

In a separate large mixing bowl, use an electric mixer to beat cream cheese and butter together for two minutes, until very light and fluffy. Beat in sugar. Add eggs and egg yolk and beat the mixture for five minutes until the volume is increased, and the mixture is thick, frothy, and light yellow.* Beat in vanilla. Add flour mixture in two installments, stopping frequently to scrape the bowl. Gather dough into a ball and cover it with plastic wrap, leaving it to rest in the mixing bowl for 30 minutes at room temperature.

Line a baking sheet with parchment paper. Set two cooling racks over wax paper.

On a floured surface, use a rolling pin to roll dough to 1/2-inch thickness. Use a doughnut cutter or graduated cookie cutters to cut doughnuts. Re-roll as necessary. Lay cut doughnuts and doughnut holes on prepared baking sheet.

Pour vegetable oil in a large heavy pot, until it is about 1 1/2 inches deep. Heat oil until it reaches 350F. Add cut doughnuts in batches of three or four. Let fry until golden, about 1-2 minutes per side. Remove cooked doughnuts to prepared racks. Continue frying until all doughnuts have been cooked.

Make the glaze. In a large mixing bowl, whisk together confectioner’s sugar and salt. Add corn syrup, vanilla, hot water, and optional food coloring, and continue whisking until smooth. Dip doughnuts one at a time before placing back on the cooling racks. Add sprinkles immediately after dipping, if desired. Let glaze set for twenty minutes before enjoying. Doughnuts are best eaten the day they are made.

Notes:

1. Lyle’s Golden Syrup may be substituted.
2. Mixture may have a few small lumps.

Chocolate-Dipped Strawberry Cookies

 I am one of those people who loves Valentine’s Day. Yes, I know it’s more of a greeting card holiday than anything else, but I just don’t see anything wrong with setting aside one extra day to acknowledge all the love we have in our lives. I know we’re supposed to do that everyday, but it’s easy to get caught up in the hustle and bustle of real life and forget to be grateful.

It’s not just a day for couples. Romantic love is like nothing else and I’ve been fortunate to experience it, but the idea that it’s all that matters on Valentine’s Day (or any day) is just false. As far as I’m concerned, Valentine’s Day is about taking a little extra time to show love and gratitude to everyone you hold dear. My mom sends me a valentine every year (and is actually visiting over the holiday this year!), and my best pal, Tad, is always my valentine. And as a nanny, I have a bunch of little valentines, too. And since it’s impractical (and a little silly) to buy gifts for everyone I love, I think I’ll just hand out cookies instead.

No Valentine’s Day treat is more iconic than chocolate-dipped strawberries, but because fresh fruit coated in chocolate simply isn’t my thing, I’ve taken the simple combination and made it into these fabulous cookies. Since its February, strawberries aren’t in season. Even if they were, putting juicy fresh berries in cookie dough would result in cakey cookies, which are a travesty as far as I’m concerned. If I want something cakey, I’ll have a piece of cake! When it comes to cookies though, I want them to be soft and chewy. 

 So, how do we get tons of strawberry flavor into cookies without using fresh berries or artificially-flavored cake mix? With freeze-dried strawberries! You might recognize them as those crunchy berries in your breakfast cereal. They’re just fresh strawberries that have been completely dehydrated–no sweeteners or artificial stuff, just pure fresh strawberry flavor! I get mine at Trader Joe’s, but they can be found in most well-stocked grocery stores. Simply put them in a food processor or blender and blitz them into a fine powder. If you don’t have either kitchen appliance, place them in a gallon-size zip-top bag and use a rolling pin to crush them. Then, mix the gorgeous pink powder into a soft drop sugar cookie dough. Chill it for a little while and then bake for just a few minutes, until the cookies are just starting to turn golden. 

 For the chocolate dip, you’ll just need good-quality chocolate chips and the tiniest bit of coconut oil. I use Ghirardelli semisweet chocolate chips here because I find that they melt more smoothly than most other brands. The coconut oil helps to give the chocolate a little sheen, and also helps it firm up. Coconut oil naturally solidifies at temperatures below 76F, so once the chocolate dip on these cookies sets, it will stay that way until it’s time to eat them. I like to dip each cookie halfway, but think these would look gorgeous drizzled with chocolate, like on my Almond Joy Cookies {Grain-Free}. I like to top the still-wet chocolate dip with sprinkles…because sprinkles. Aren’t these little hearts adorable?

Chocolate-Dipped Strawberry Cookies would be wonderful for gifting or parties, and of course, keeping in the cookie jar to share with someone you love. And who doesn’t love cookies? I think they’re my valentine this year.

  
Chocolate-Dipped Strawberry Cookies
makes about 3.5 dozen cookies

Strawberry Cookies:
1 1.2-ounce package freeze-dried strawberries*
3 cups all purpose flour
1 tablespoon cornstarch
1 teaspoon baking powder
1 teaspoon cream of tartar
1/2 teaspoon baking soda
1 teaspoon Kosher or sea salt
1 cup unsalted butter, softened to room temperature
1 1/4 cup granulated sugar
1/4 cup light brown sugar, packed
2 large eggs, room temperature
2 teaspoons pure vanilla extract
3-5 drops liquid red food coloring, optional*

Chocolate Dip:
1 1/2 cups good-quality semisweet chocolate chips*
1/2 teaspoon coconut oil
sprinkles, optional

In a food processor or blender, process freeze-dried strawberries until they are a fine powder. Transfer the powder to a large mixing bowl. Add flour, cornstarch, baking powder, cream of tartar, baking soda, and salt, and whisk to combine. Set aside.

In a separate large mixing bowl, use an electric mixer to beat softened butter until light and fluffy. Beat in granulated and light brown sugars, followed by eggs, vanilla, and optional food coloring. Add dry ingredients in three installments, scraping the bowl as necessary. Cover dough with plastic wrap and chill for 90 minutes, or up to three days.

Preheat oven to 350F. Line two baking sheets with parchment paper.

Scoop dough by the tablespoon and roll into balls. Place dough balls at least two inches apart on prepared baking sheets. Bake for 8-10 minutes, until no longer wet-looking and starting to turn light golden. Let cool on baking sheets for five minutes before removing to a rack to cool completely.

Once all cookies have been baked and cooled, make the chocolate dip. In a double boiler or the microwave, melt chocolate chips and coconut oil together. Stir until smooth. Dip each cookie halfway into the mixture before placing back on the rack. Top with sprinkles, if desired. Chocolate dip will solidify after a few hours at room temperature, or after 30 minutes in the refrigerator.

Chocolate-Dipped Strawberry Cookies will keep covered at room temperature for up to a week.

Notes:

1. I use Trader Joe’s brand freeze-dried strawberries.
2. The cookies pictured have three drops liquid red food coloring.
3. I use Ghirardelli semisweet chocolate chips.

Salted Grapefruit Scones

Winter food can get dull. Don’t get me wrong, I love a good pot pie or stew, and lord knows I could eat my weight in mashed potatoes, but after a while, I just want to eat fresh produce that isn’t a) a root vegetable, or b) kale. I love them both, but being at least three months away from really great berries and five away from a tomato that is good enough to be eaten like an apple has got me in a winter produce funk.

This happens every year though, until that wonderful, shining moment when I remember winter citrus. It’s a welcome taste of sunshine in the midst of all the wind and snow. Meyer lemons and key limes and clementines are all in season, waiting to be made into cakes and pies, or even thrown into salads! But the thing that always gets me is the grapefruit. Being from Texas, I prefer Ruby Red, but those are hard to come by in New York City. White and pink are delicious and all, but Ruby Red is just a cut above. It’s a little sweeter than other varieties, but still bitter enough to taste like grapefruit. Imagine my surprise when, after years of not seeing one Ruby Red in New York, I saw a whole box at my local green grocer. And they were on sale! Without a second thought, I grabbed two, handed over some change and ran home to make these scones.

I love a good scone. Soft in the middle with crunchy edges, not too sweet, great with a huge cup of coffee or tea. But good scones are hard to come by at coffee shops–they can be dry and cakey throughout, with very little depth of flavor. They’re simply not worth the cash or the calories, as far as I’m concerned. But these scones? They’re soft and buttery, sweetened with just a bit of honey and sugar, dotted with juicy pieces of fresh grapefruit, and topped with sea salt both for crunch and because sea salt and grapefruit are divine together. It may sound a little odd, but the salt makes the sweetness of the grapefruit shine. It’s so, so good.

These scones are quick and easy to whip up, and take less than an hour start-to-finish. Mix together some half-and-half and honey, and put it in the fridge to chill while you prepare the other ingredients. Use your fingers to rub the zest of one grapefruit into two tablespoons of granulated sugar until it’s well-combined and a little pasty (it’s better than it sounds). Peel that zested grapefruit and segment it, trying to avoid as much of the pith, membrane, and seeds as possible. This will keep the grapefruit from making the scones too bitter. Don’t worry too much about having perfect segments–they’ll break apart anyway when they’re mixed into the dough.

In a large mixing bowl, whisk together flour, baking powder, salt, and the zest-sugar mixture. This may look a little clumpy because of the oils in the zest, but it’ll all even out with the other ingredients. Use a pastry blender or two forks to cut in one stick of cold butter until the largest pieces are the size of small peas. Then use a silicone spatula or wooden spoon to fold in the half-and-half mixture and the segmented grapefruit. The dough will be pretty wet, but should still have some body to it.

  Turn the dough out onto a very well-floured surface. Don’t skimp on the flour. If you do, you’ll have dough stuck to everything and probably start cursing my name, and that’s no good when there are awesome scones to be had! Flour your hands and pat the dough into a 1-inch thick disc. Use a sharp knife or bench scraper (my tool of choice) to cut the disc into eight wedges. Transfer the wedges to a parchment-lined baking sheet and bake at 425F for 18-20 minutes, until cooked-through and light golden. Then stir up a glaze with some confectioner’s sugar and the juice of a second grapefruit, drizzle it over the scones, and sprinkle with crunchy coarse sea salt! All you need is a hot cup of coffee or tea and some good company 😊

Break out of the heavy winter food rut with these Salted Grapefruit Scones! Sweet and salty, soft and buttery, they’re a wonderful way to start these cold, snowy days.

 Salted Grapefruit Scones
makes 8 scones

3/4 cup half-and-half + more for brushing, very cold
2 tablespoons honey
2 medium Ruby Red grapefruits**, divided
2 tablespoons granulated sugar
2 cups all-purpose flour
2 teaspoons baking powder
1/2 teaspoon Kosher or sea salt
1/2 cup (1 stick) unsalted butter, very cold, cut into pieces
3/4-1 cup confectioner’s sugar
coarse sea salt*, for sprinkling

Preheat oven to 425F. Line a baking sheet with parchment paper. Set a cooling rack over a piece of wax paper. Set aside.

Whisk together half-and-half and honey, and place it in the refrigerator to stay cold.

Zest one grapefruit. In a small bowl, rub together the zest and the granulated sugar. Set aside.

Peel the zested grapefruit, and segment it, removing as much of the pith and membranes as possible, as well as all of the seeds. Set aside.

In a large mixing bowl, whisk together flour, baking powder, salt, and zest-sugar mixture. Use a pastry blender or two forks to cut the butter into the flour mixture until the largest pieces are the size of small peas. Add in the half-and-half mixture and grapefruit segments and use a silicone spatula or wooden spoon to incorporate them into a wet dough, making sure to scrape the sides and bottom of the bowl. If the dough is too sticky to handle, add up to 2 tablespoons more flour.

Turn the dough out onto a very well floured surface and use floured hands to pat it into a 1-inch thick disc. Flour a sharp knife (not serrated) or bench scraper and use it to cut the dough into eight wedges. Remove wedges to prepared pan, and brush the tops with additional half-and-half. Bake for 18-20 minutes, until light golden. Let scones cool on the pan for five minutes before removing to the prepared rack.

Make the glaze. Slice the second grapefruit in half. Seed one half of the grapefruit and squeeze the juice into a small bowl. Pour confectioner’s sugar into a second small bowl and add two tablespoons of the fresh grapefruit juice. Whisk with a fork until no lumps remain, adding juice or confectioner’s sugar until the glaze is to the desired consistency. Use a fork or small squeeze bottle to drizzle the glaze over the scones. Sprinkle wet glaze with coarse sea salt. Enjoy!

Glaze will fully set after a couple of hours. Scones are best the day they are made, but may be kept in an airtight container at room temperature for up to 48 hours.

Notes:

1. My grapefruits were about the size of a large orange.
2. If you can’t find Ruby Red, white or pink grapefruits may be substituted.
3. I use Trader Joe’s Pyramid Salt.

Salted Grapefruit Scones