Puff Pancake {Dutch Baby}

 When I was growing up, breakfast was always a last thought. More often than not, my little sister and I would be stuffed into the back of a Ford Explorer with a cold un-toasted Brown Sugar-Cinnamon Pop Tart and an apple to inhale while my mom sped down I-30 to get us to school three minutes before classes started. My family and I…we’re just not punctual. We play with fire when it comes to scheduling, much to my dad’s chagrin. We all try really hard to be on time, but we really should invest in hats or t-shirts that say “Sorry I’m late.”

But back to breakfast. When Saturday mornings came around, things were different. E3 and I would wake late and park ourselves (and our trusty miniature schnauzer) in front of the TV, while Mom actually got to read the paper. At some point, she’d ask us what we wanted for breakfast, and the answer was almost always a Dutch Baby pancake, but we always called it a Puff. It’s a much better name, if you ask me. 

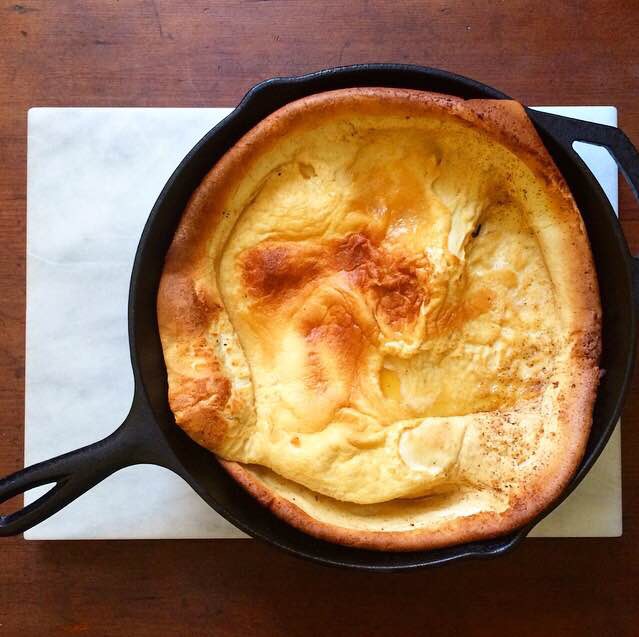
Puffs are oven pancakes made with a thin batter and no chemical leavening, very similar to a Yorkshire pudding. The batter is poured into a hot skillet or cast iron pan and then baked until the whole thing rises and puffs from the heat of the oven, hence the name. When it’s removed, it starts to deflate quickly, leaving a light, custard-like pancake in the shape of whatever dish it was baked in. Traditionally, they are served with confectioner’s sugar and a squeeze of lemon, but I prefer maple syrup 😊 

 
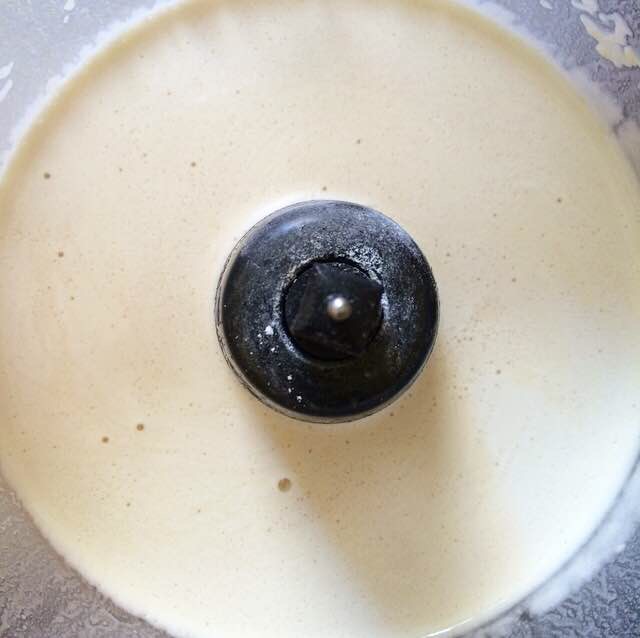
The batter takes almost no effort at all. Add some eggs, milk, vanilla, flour, sugar, and salt to the bowl of a food processor or high-powered blender, and blitz until no lumps remain. Then, let it sit at least five minutes so the flour starts to thicken things and the air bubbles dissipate. While it’s resting, melt butter in a heavy pan that’s been heating in a 400F oven. Once the butter is melted and the pan is coated, pour in the batter and put it in the oven. 

 This is important: do NOT open the oven door while the Puff is in the oven. Just don’t do it. That little blast of room temperature air will deflate your pancake and destroy the amazing texture. Instead, set a timer for 19 or 20 minutes and go play with your kids or read the paper or watch an episode of Arrested Development. Just before your timer is going to go off, put on your oven mits. Puffs brown quickly and dramatically (especially around the edges), so they need to be taken out of the oven exactly when the timer dings.

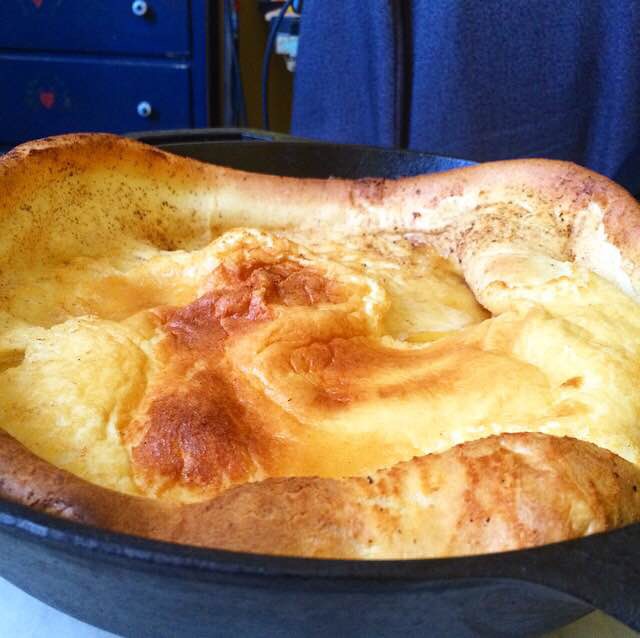
If you have children or breakfast guests, you might think about having them around (but standing at a safe distance from the oven) to see the big, puffy masterpiece come out of the oven. And it will be huge! Like a giant golden brown bubble! But it will also be fleeting. The puff will deflate completely in 90 seconds or less, leaving behind a pancake in the shape of the pan, with crisp-chewy brown edges and a soft, custardy center. Trust me, it’s amazing. 

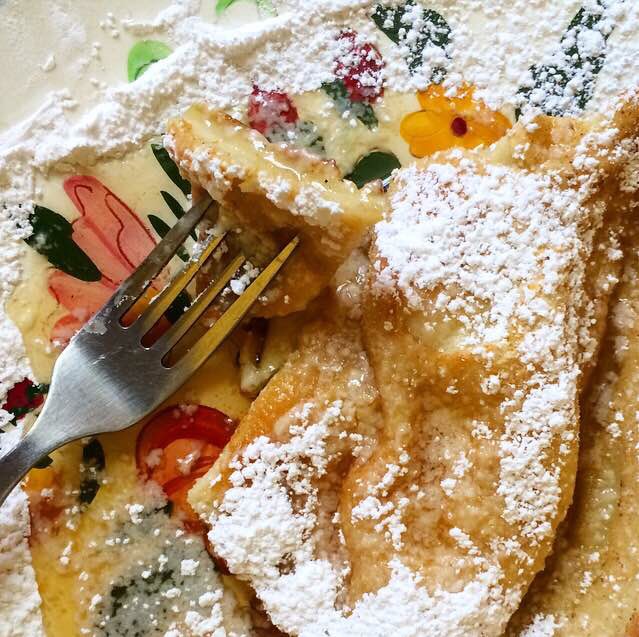
The puff will only need to rest for a couple of minutes before slicing. Make sure to have your oven mits handy as the pan will still be raging hot. I get four large or six medium servings out of a pancake this size. Top with whatever suits your fancy. If you want to be traditional, go with confectioner’s sugar and a squeeze of fresh lemon juice. If you’re like me, maple syrup and confectioner’s sugar with a dash of sea salt is the ticket. My mom says puffs are fantastic with yogurt and fruit, but I’ve never actually tried that. I think a drizzle of barely-warmed Nutella and some sliced strawberries would be amazing. However you go about it, this is guaranteed to be a good breakfast.

Puffs are, to this day, my weekend breakfast of choice. The recipe halves and quarters easily, so if you’re the only one home, you can make a personal-sized fancy breakfast, permitting of course that you have a 6-inch pan to make it in. (I’ve written instructions for adjusting the quantity in the note below.) A puff is a great option if you are having a small brunch at home or want to make an impressive breakfast for your valentine. If you observe Shrove Tuesday, a puff would be an out-of-the-ordinary way to celebrate at home, instead of traditional pancakes. But of course, it’s a fantastic breakfast any old Saturday.

Do something nice for yourself this weekend. 

 Puff Pancake {Dutch Baby}
makes 4-6 servings**

4 large eggs
1 cup milk (not skim or fat free)
2 teaspoons pure vanilla extract
1 cup all-purpose flour
3-4 tablespoons granulated sugar
1/2 teaspoon Kosher or sea salt
3 tablespoons butter (unsalted or salted)

Toppings:
confectioner’s sugar
lemon wedges
pure maple syrup
berries
yogurt

Place a large ovenproof cast iron or stainless steel pan in a cold oven. Preheat oven to 400F.

In the bowl of a food processor or high-powered blender*, combine eggs, milk, vanilla, flour, sugar, and salt. Process 30 seconds, or until no lumps remain. Let batter rest five minutes.

Once the oven has reached 400F, remove the hot pan. Add the butter and swirl to coat the pan; there will still be a bit of solid butter. Place pan back in the oven for one minute, until remaining butter has melted and started to bubble. Remove pan from the oven, and pour in batter. Bake 19-20 minutes, until puffed and golden. Do NOT open the oven door during baking.

Let pancake cool 2-5 minutes before slicing. Serve immediately with toppings of choice.

Notes:

1. If you’d like to make a personal-sized puff, use 1 large egg, 1/4 cup milk, 1/2 teaspoon vanilla, 1/4 cup all-purpose flour, 1 tablespoon granulated sugar, a small pinch of salt, and 1/2 tablespoon butter. I recommend using a 6-inch cast iron pan for this much batter. Follow all instructions as written, changing the baking time to 16 minutes.
2. If you’d like to make a 3-4 serving puff, use 3 large eggs, 3/4 cup milk, 1 1/2 teaspoons vanilla, 3/4 cup all-purpose flour, 2-3 tablespoons granulated sugar, 1/4 teaspoon salt, and 2 tablespoons butter. Follow all instructions as written, changing the baking time to 18-19 minutes.
3. If you do not have a food processor or blender, you may whisk all of the ingredients together and then push them through a wire mesh sieve to remove any lumps of flour. Let batter rest five minutes before proceeding as written.

Puff Pancake {Dutch Baby}

My Favorite Guacamole

 Does anything say game day more than chips and dip? Maybe like…wings, but for the purposes of this blog, let’s go with “no.” You simply can’t have game day without chips and dip! I mean, when it comes down to it, everybody’s mostly there for the food, am I right?!

I mentioned yesterday that football isn’t my thing, but that won’t discourage me from accepting an invitation for a Super Bowl party. Ohhhh no. I’ve got a strategy.

I’ll come over and make nice during the pre-game show, and then while everyone else is yelling at the TV about first downs and safeties, I’ll be in the back demolishing the guacamole I brought for “everyone.” And by “everyone,” I mean “you may all have two bites and the rest is for me, okay?” 

You see, I make ridiculous guacamole. There’s nothing fancy about it–it’s just some vegetables mashed together–but everywhere I take it, it becomes a hit. My friend, David, insists that I make the best guacamole in the world. I don’t know about the world, but how about the best in the four block span between our apartments?

Maybe just my block?

Just my building? Yeah, that sounds reasonable. Let’s go with that.

So, what makes this recipe such a crowd pleaser? It’s all made to taste. Since vegetables are seasonal, and this entire recipe relies on fresh vegetables, the stellar recipe I made in April can taste very blah come October. So taste, taste, taste. 

Start with ripe avocados. They should have a little give when you press the skin lightly with your fingers. If they are super squishy, back away–the insides are probably black and watery. Gross. So grab three ripe avocados. Pit them and scoop the flesh into a large bowl. Then dice half a small onion and add that too. You may use red or white here, but red tends to have a stronger flavor. If raw onion isn’t your favorite thing, go for the white variety. Me though? I like raw onion on everything.

Next, dice up a couple of fresh jalapeños. If you are sensitive to heat, remove the seeds and ribs with a spoon. Then, dice it up. Regardless of how spicy you like your guacamole, it’s a good idea to taste a tiny piece of the jalapeño before adding it to the bowl. If it’s crazy-burn-your-tongue-off hot, maybe only add one full pepper. If it’s mild, go ahead and add two. The batch pictured has two whole large jalapeños, one with seeds and ribs, one without. Oh, and a quick reminder to always wash your hands thoroughly after handling hot peppers. And for the love of everything, don’t touch your face! I made that mistake in 2011, and it took an hour to stop burning 😁

Don’t be like me. 

 Anyway, mince up some garlic and add it to the bowl. I like two whole cloves, but if you’re sensitive to raw garlic, only add one. Squeeze in the juice of a lime and sprinkle in 1/2 teaspoon salt. Then, grab a potato masher or a fork and mash the living daylights out of everything until it’s to your desired consistency. Fold in some chopped cilantro and taste and adjust. Need more heat? Add more jalapeño! Need more lime? Squeeze another one! Not salty enough? I usually end up adding an additional 1/4 teaspoon, keeping in mind that the chips are salty too. Then put it in a cute bowl and serve it with tortilla chips. 

I know many people like their guacamole with diced tomatoes. I do too, but the February tomatoes I saw at the market yesterday were just too sad to use. If you find some that look good, by all means, use them! I recommend using two or three medium tomatoes that have been seeded. Just dice them the same size as the onion and jalapeños.

So, this weekend, make this guacamole and bring it to your Super Bowl party. It may not be the best in the whole world, but it’ll be the best at your get-together 😊 

Need more game day food? Check out my Artichoke Dip, Restaurant-Style Salsa, and Double Chocolate Fritos Cookies!

Classic Guacamole
makes about four cups

3 large ripe avocados, peeled and pitted
1/2 small red or white onion, diced small
1-2 jalapeños, diced small (ribs and seeds removed, optional)
1-2 cloves garlic, minced
juice of 1 lime
1/2 teaspoon Kosher or sea salt, plus more to taste.
1/4-1/3 cup cilantro leaves, chopped
tortilla chips, for serving

In a large bowl, combine avocados, diced onion and jalapeño, minced garlic, lime juice, and salt. Use a potato masher or fork to thoroughly mash all ingredients together. Use a silicone spatula or wooden spoon to fold in cilantro. Transfer guacamole to a serving bowl, and serve immediately with tortilla chips. 

Double Chocolate Fritos Cookies

 I love being from Texas. I do. I love barbecue and big skies and Willie Nelson and Texas Rangers baseball. I would wear cowboy boots every single day if they weren’t so quickly destroyed by the streets of New York. May my busted Noconas rest peacefully in the back of the closet.

But the one thing that I’m really supposed to love almost as much as God and family? The one thing that Texans love so much that there’s an Emmy-winning TV series about it? Football? I can’t stand it. Total snoozefest for me. My parents and sister-in-law live for it, but I just can’t get into it. As such, I have no clue who is playing in the Super Bowl this Sunday, except that it’s not Tom Brady. Sorry, Boston friends 😭

But for everything I don’t understand about football, the one thing I love is the food. Platter after platter of salty, starchy, cheesy everything? Now that’s my kind of Sunday evening. But for all the wings and pizza and artichoke dip, I often find a distinct lack of dessert. Not that dessert is necessary after all that heavy food, but come on. The Super Bowl is supposed to be a celebration, right?! And celebrations demand dessert! Or at least they do in my kitchen. 

Enter these Double Chocolate Fritos Cookies. No, your eyes are not deceiving you. These cookies contain both chocolate and Fritos. If you’ve never tried chasing Fritos with chocolate chips, you are missing out. The salty, crunchy corn chips with sweet, melty chocolate are to. die. for. These cookies have a soft chocolate cookie base that has the taste and texture of fudgy brownies–make sure to try one warm from the oven! The cookie itself and the super melty chocolate chips…just do it. And the Fritos! They soften just slightly from the moisture in the cookie dough, but they retain a lot of crunch. They add so much chewy texture to these cookies! Their signature saltiness is somewhat masked by all the chocolate, but that’s easily remedied with a sprinkling of coarse sea salt. Yum.

This recipe is super simple to put together, and it makes a lot of cookies (four dozen). If that seems like too many for your get together, let me say this: they will get eaten. Trust me. After the smorgasbord of cheese that is game day food, these sweet, salty, crunchy, chewy chocolate cookies will be a welcome end to the party. No matter who gets the trophy on Sunday, these Double Chocolate Fritos Cookies will definitely be winners 😊 

 Double Chocolate Fritos Cookies
makes about four dozen cookies

1 1/2 cups all-purpose flour
3/4 cup natural unsweetened cocoa powder*
1 Tablespoon cornstarch
1 teaspoon baking soda
1/2 teaspoon Kosher or sea salt
1 cup (2 sticks) unsalted butter, softened to room temperature
3/4 cup dark brown sugar*, packed
1/2 cup granulated sugar
2 large eggs, room temperature
2 teaspoons pure vanilla extract
1 1/2 cups lightly crushed Fritos
1 cup semisweet chocolate chips
coarse sea salt, for sprinkling*

In a medium mixing bowl, whisk together flour, cocoa powder, cornstarch, baking soda, and salt. Set aside.

In a large mixing bowl, beat softened butter with an electric mixer until light and fluffy. Beat in granulated sugar and dark brown sugar. Beat in eggs followed by vanilla. Add dry ingredients in three installments, mixing after each addition. Fold in Fritos and semisweet chocolate chips. Cover dough with plastic wrap and chill for 90 minutes or up to three days.

Preheat oven to 350F. Line two baking sheets with parchment or silicone baking mats. Scoop dough by the tablespoon and roll into balls. Place dough balls at least two inches apart on prepared baking sheets. Sprinkle with coarse sea salt. Bake 8-9 minutes, or until the cookies look just slightly underdone. Let cookies cool on baking sheets for five minutes before transferring to a rack to cool completely.

Cookies will keep covered at room temperature for up to a week.


Notes:

1. Do not use Dutch process cocoa powder.
2. Light brown sugar may be substituted.
3. I use Trader Joe’s Pyramid Salt.

Whole Grain Cranberry-Orange Snack Bars

 
I spend my life rushing. Rushing to bake, rushing to nanny, rushing to deliver cakes. Like this week–I have had four separate celebration cake orders. It wouldn’t be much for a bakery, but I am just one woman with one small oven and the world’s tiniest fridge. So, I rush. And I don’t remember to eat. I am asked often how I maintain a healthy weight with all the baking, and the answer is that I don’t actually eat much of it. No, I don’t have great self-control. After three years of near-constant baking, I just see cake and pie and cookies as projects most of the time. I taste-test, to be sure, and I have had cookies for dinner more than a few times, but for the most part, when I bake something it’s either picked at for several days or given away.

All that said, I am often so scattered that I forget to eat until I am halfway to wherever I’m going. Most of the time, I stop into the nearest corner store to get Cheez-Its and a Diet Coke. It keeps me from passing out, but it’s not a healthy or sustainable way to eat. 

I’ve been making a few changes to my diet this month, as evidenced by all the whole grain and grain-free recipes I’ve been posting. Today is the final post of this healthier January, and so I am posting what has become my Cheez-Its alternative: Whole Grain Cranberry-Orange Snack Bars. They’re like a cross between blondies, muffins, and granola bars, made with whole wheat flour and oats, dotted with dried cranberries, and scented with orange zest. They’re soft, chewy, and not too sweet, with a flavor that is wholesome and delicious. They’re great for on-the-go, a sweet treat in school lunches, and after-school snacks. They also make a fantastic dessert with a little vanilla ice cream. 


Whole Grain Cranberry-Orange Snack Bars are quick and easy to put together. They start with creaming softened unsalted butter and orange sugar until it’s all light and fluffy. Orange sugar is easy to make–just add the zest of an orange to some brown sugar, and rub it together with your fingers like you would if you were trying to remove dried school glue. This brings out the oils in the orange zest and starts to melt the brown sugar. Once the butter and brown sugar are combined, beat in an egg, followed by some vanilla.
 Beat in a mixture of white whole wheat flour, nutmeg, baking powder, and salt, followed by a cup of old-fashioned oats. All that’s left to add are some dried cranberries that have been plumped in hot water. This little act of soaking the dried fruit ensures that the pieces are more juicy than waxy. Spread the batter into a parchment-lined pan and bake 20-25 minutes, until the bars are just done. Let them cool to room temperature and then hang out in the fridge for an hour or so. Refrigerating the bars helps them to slice cleanly.

These bars can be stored in an airtight container at room temperature for up to a week, or wrapped individually in plastic wrap so they’re easy to grab as you’re running out the door! Make a batch of Whole Grain Cranberry-Orange Snack Bars this weekend so you can enjoy them all week long 😊 

 Whole Grain Cranberry-Orange Snack Bars
makes one 8×8″ pan, about 16 bars

6 tablespoons water
3/4 cup dried cranberries
3/4 cup light brown sugar
1 tablespoon orange zest
1/2 cup unsalted butter, softened to room temperature
1 large egg, room temperature
1 teaspoon pure vanilla extract
1/2 cup white whole wheat flour*
1/4 teaspoon ground nutmeg
1/4 teaspoon baking powder
1/2 teaspoon Kosher or sea salt
1 cup old fashioned oats

Preheat the oven to 350F. Grease an 8×8″ pan and line it with parchment. Grease parchment. Set aside.

Heat water to a simmer, and pour it into a small bowl. Stir in dried cranberries. Set aside.

In a separate small bowl, rub orange zest into light brown sugar. Set aside.

In a medium bowl, together white whole wheat flour, nutmeg, baking powder, and salt. Set aside.

In a large mixing bowl, beat butter with an electric mixer until it’s fluffy and lighter in color. Beat in light brown sugar mixture, followed by the egg and vanilla. Beat in flour mixture until completely combined. Beat in oats.

Drain dried cranberries and fold them into the batter. Spread batter into prepared pan. Tap the full pan on the counter five times to release any air bubbles. Bake for 20-25 minutes, until a toothpick inserted in the middle comes out clean. Cool completely on a rack before refrigerating for at least one hour. Slice into bars.

Bars will keep covered at room temperature for up to one week.


Note:

Regular whole wheat flour may be substituted for white whole wheat flour.

Almond Joy Cookies {Grain-Free}

 Do you ever get sudden cravings for treats from your childhood? Once or twice a year, I’ll get a craving for Fruit Roll-Ups or Gushers or Dunkaroos (may they rest in peace) that I just can’t shake. I spend days agonizing over these junk foods I haven’t had since my mom was packing my school lunches, and then once I finally give in and eat a fruit snack or a tiny tub of frosting, it’s never as good as I want it to be. And the worst part is that I’ve wasted perfectly good calories on processed food, when they could have gone to something waaaaay better, like Cocoa Brownies or Dark Chocolate Pecan Butter.

Last week, I got a craving for Almond Joys seemingly out of nowhere. I spent far too many waking hours thinking about little pillows of coconut topped with whole almonds, all covered in dark chocolate. Never mind that I hadn’t had one since my grandmother passed in 2001. On Thursday, I walked into the deli on our block prepared to give in and buy what was sure to be a disappointing candy bar. The Almond Joy of my daydreams was sure to be full of sticky, mealy coconut, slightly-soft almonds, and cheap chocolate in reality. Just as I was preparing to fork over four quarters and what’s left of my dignity, I saw a jar of almond butter behind the counter. And because I have a perpetual case of baker’s brain, my mind immediately went into overdrive. I thought about the classic three-ingredient peanut butter cookie recipe, but made with almond butter. Dotted with coconut and covered in chocolate, they’d be like a grown-up Almond Joy in cookie form. And high in protein and grain-free, so I would feel less guilty about eating three in a row. I got to work, and let me tell you, these cookies are way better than any store-bought candy bar could ever hope to be. 

Almond Joy Cookies bear a lot of similarities to the Easy Nutella Cookies I posted earlier this month. They are both made primarily of nut butter, eggs, and sugar, and are totally grain-free (and therefore gluten-free). This recipe is super simple, but does require some precision in the mixing. As in every cookie recipe, each ingredient has a job. When the recipe has no grains, like this one, those ingredients have to be backed by some serious technique, or the results will send you running for that disappointing candy bar! Here are a few tips to make these cookies as awesome as possible.

Beat the bejeezus out of the egg. I mean, get your electric mixer out, crank it to high, and beat the egg for at least two minutes. The egg will serve to give our cookies structure. If the egg is simply scrambled, we’ll have flat cookies. So beat the egg until it is really, really, REALLY frothy and much lighter in color. This way, our cookies will be nice and puffy. Also, make sure your egg is room temperature, so it takes in air easily.

Use brown sugar, but not too much. Sugar may come in a dry bag, but it’s actually a liquid ingredient. It’s mixed into dough as crystals, but it starts melting on contact with fat and eggs, and fully caramelizes in the oven (which is why most cookies are golden brown). If there is too much sugar in a recipe, the cookies will spread like crazy because of the molten excess liquid. This recipe only calls for 2/3 cup light brown sugar, so our cookies will only spread a little. Don’t worry, they’ll still be sweet! Also, brown sugar keeps things extra moist thanks to the molasses. This will make our final results nice and chewy 😊 

Don’t use almond butter that separates. There are a million brands of almond butter on the shelves these days. You may have noticed that some of them have a layer of separated oil on top. Do not use any of those in these cookies, unless you are ready for a mess! I recommend creamy-style (like Trader Joe’s) or no-stir almond butter (like MaraNathra). Still give whatever you use a good stir, just to distribute all the fat evenly. The almond butter is the other half of the structural dream team. Along with the beaten egg, the almond butter will serve to keep these cookies from becoming flat, oily puddles of sadness. It also provides the flavor base, along with a touch of almond extract, some vanilla, and coconut. Your dough may still feel a little oily while you are rolling it. Don’t worry–just let the excess oil drain off a bit. Your finished cookies will not be greasy.

Baking powder is non-negotiable! Some of the three-ingredient peanut butter cookies out there don’t call for leavening. Peanut butter is pretty thick though, so they still get big and puffy. Almond butter, on the other hand, is thin, so we need a bit of baking powder to keep these cookies rising up instead of spreading out!

Whew!  


Once all your cookies are baked, melt some chocolate chips and coconut oil, and drizzle it over the cookies with a squeeze bottle or a fork. I like to drizzle twice because, hello, chocolate! I made these in two different sizes for no other reason than I felt like it 😊 I have included instructions for smaller cookies in the notes below. Now, go forth and resist the candy bar! Instead, make cookies that will live up to your childhood memories! 
 Almond Joy Cookies {Grain-Free}
makes 21 medium cookies*

1 large egg, room temperature
2/3 cup light brown sugar
1 teaspoon pure vanilla extract
1/4 teaspoon pure almond extract
1 cup creamy-style almond butter, measured in a dry measuring cup*
1/2 teaspoon Kosher or sea salt
1/4 teaspoon baking powder
3/4 cup sweetened flaked coconut
1 cup semisweet chocolate chips
1 teaspoon coconut oil

Preheat oven to 350F. Lay a cooling rack over a sheet of wax paper. Line two baking sheets with parchment or silicone baking mats. Set aside. 

In a large mixing bowl, use and electric mixer to beat the egg until very frothy and lighter in color, about two minutes. Add the light brown sugar, vanilla, and almond extracts, and beat for one minute. Add the almond butter, salt, and and baking powder, and mix until completely combined. Fold in coconut.

Scoop dough by the tablespoon* and roll into balls. The dough may feel oily. Set dough balls at least 1.5 inches apart on prepared pans. Bake for 9-10 minutes, until the cookies have puffed up a bit and no longer look shiny. If the cookies are too domed, tap the tops with the back of a spoon. Let cool on the pans for five minutes before removing to the prepared rack.

While cookies are cooling, melt chocolate chips and coconut oil together in a double-boiler or the microwave. Use a small squeeze bottle or a fork to drizzle cooled cookies with chocolate. Chocolate will set after several hours at room temperature, or within thirty minutes in the refrigerator.

Cookies keep covered at room temperature for up to a week.

Notes:

1. Alternatively, this recipe makes about five dozen very small cookies.
2. I used MaraNathra No-Stir Almond Butter. Do not use almond butter that separates.
3. If making very small cookies, scoop dough by the teaspoon. Bake for 7-8 minutes.