Tag Archives: cheesecake

Red Velvet Cheesecake Bars

Red Velvet Cheesecake BarsWhile I was in Texas this past December, I held a pop-up sale in my parents’ dining room. When I set the date and began to plan the thing, I had grand ideas about what I would have available. The list of ideas included grapefruit bars and pie and Texas-shaped ginger cookies, but when it came down to it, I threw all those ideas out the window and took it easy on myself. The preparation was still intense, but making drop cookies and bars was far simpler than what I had originally planned.

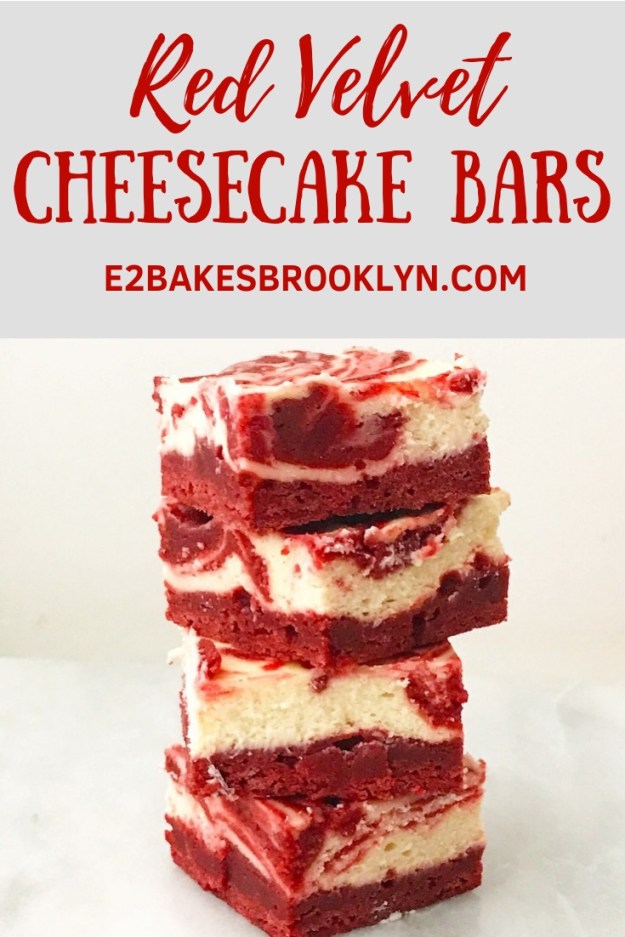
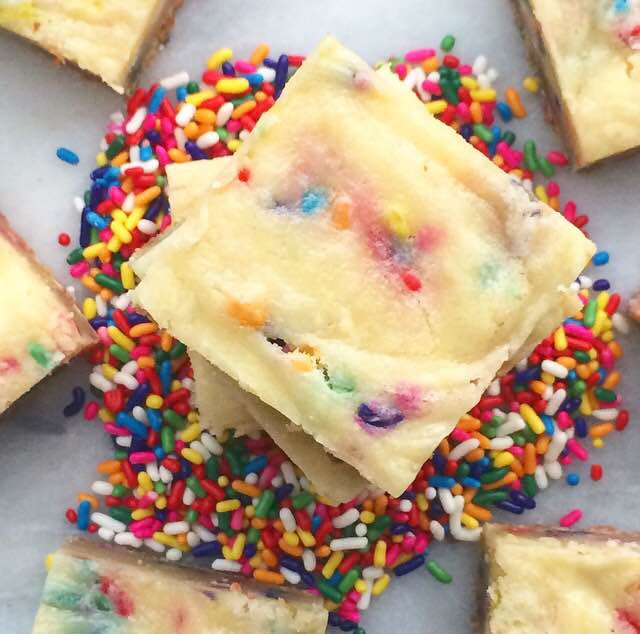
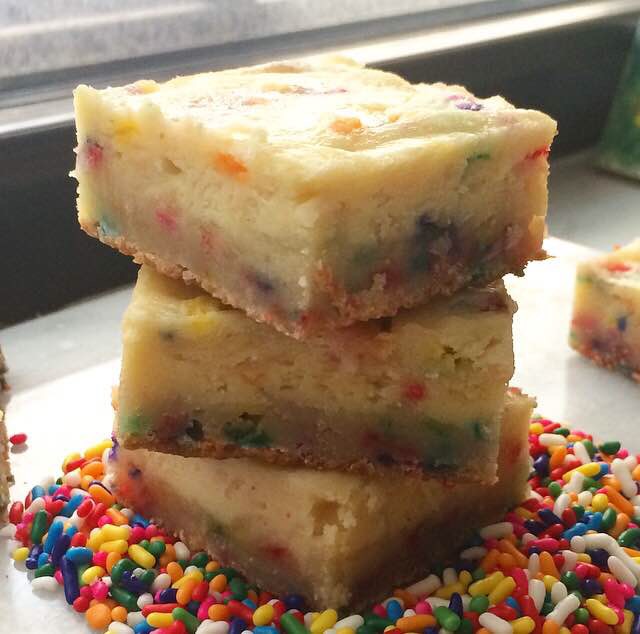
There were Peanut Butter Blossoms, Malted Whoppers Cookies, and Brown Butter Chocolate Chip Cookies, but the first things to go were these Red Velvet Cheesecake Bars. Between their eye-catching color, classic chocolate-meets-vanilla flavor, and the swirls of cheesecake, their quick disappearance is easy to understand.

Red Velvet Cheesecake BarsMaking Red Velvet Cheesecake Bars may sound daunting to some, but they were actually the easiest recipe I made. I mean, there’s no softening of butter, no chilling of dough, no waiting for chocolate to harden. Nope. These bars are ridiculously easy to make, and come together in just a few minutes.

The red velvet base is a play off of my favorite blondie recipe. You’ll notice a few changes from the norm here, most noticeably that they’re bright red, but food coloring isn’t the only thing these bars have in common with their namesake cake: natural unsweetened cocoa is subbed for part of the usual all-purpose flour and a touch of vinegar gives the base that signature red velvet tang.

Red Velvet Cheesecake Bars
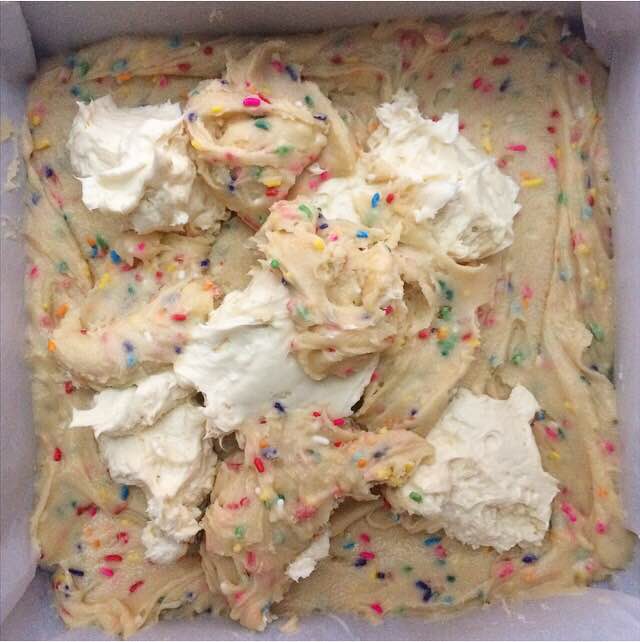
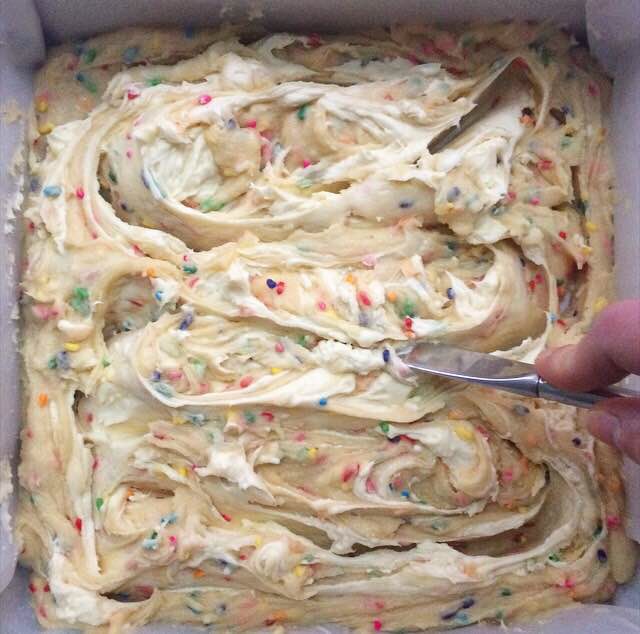
The batter comes together with just a whisk and a bowl, but you will need your mixer for the cheesecake. It’s the real star of the show here. I mean, red velvet is great and all, but I am all about that cheesecake layer. There’s nothing new here–cream cheese, sugar, eggs, and vanilla are beaten together before being swirled into the red velvet batter. Everything goes into the oven for about half an hour before taking a seemingly endless four hour chill. For all the ease of preparation here, there is a lot of patience required. I promise it’ll all be worth it once you bite into one of these bars.

Red Velvet Cheesecake Bars
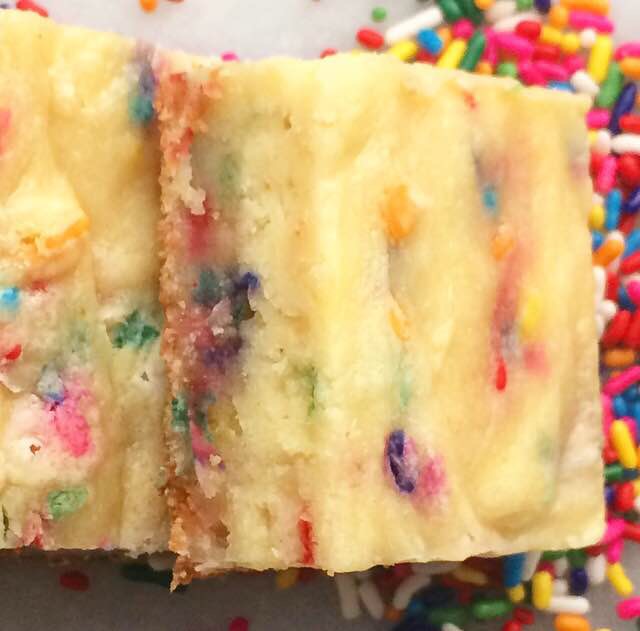
Look at that! There’s almost as much cheesecake as there is red velvet! Make a batch this weekend, or use a heart cookie cutter and make them part of your Valentine’s Day ❤ Red Velvet Cheesecake Bars

Red Velvet Cheesecake Bars
makes 24-32 bars

Cheesecake:
16 ounces (2 bricks) full-fat brick-style cream cheese, room temperature
1/3 cup granulated sugar
2 large eggs
2 teaspoons pure vanilla extract

Red Velvet Base:
1 3/4 cups all-purpose flour
1/4 cup natural unsweetened cocoa powder (not Dutch process)
1 teaspoon Kosher or sea salt
1 cup unsalted butter, melted
2 cups granulated sugar
3 large eggs, room temperature
1 1/2 teaspoons white vinegar
2 teaspoons pure vanilla extract
1 tablespoon liquid red food coloring

Place oven racks in the top and bottom positions. Preheat oven to 350F. Line a 9×13-inch pan with foil and grease with butter. Set aside.

Make cheesecake. In a medium mixing bowl, use an electric mixer to beat cream cheese until fluffy. Mix in sugar. Add eggs one at a time, beating until combined. Mix in vanilla. Set aside.

Make the red velvet. In a small bowl, whisk together flour, cocoa powder, and salt. Set aside. In a large mixing bowl, whisk together melted butter and sugar. Add eggs one at a time, whisking completely after each addition. Whisk in white vinegar, vanilla, and food coloring. Use a silicone spatula to fold in flour mixture. Reserve 2/3 cup of the batter before spreading the rest in the prepared pan.

Pour cheesecake mixture over the red velvet batter. Drop spoonfuls of the reserved red velvet over the top and swirl in with a small, thin knife. Tap full pan on the counter five times to release any air bubbles. Tightly cover the pan with foil. Bake on the top rack of the oven for 15 minutes. Remove top foil and place pan on the bottom rack to bake for 15-20 more minutes. Bars are done when the cheesecake layer barely jiggles when the pan is jostled.

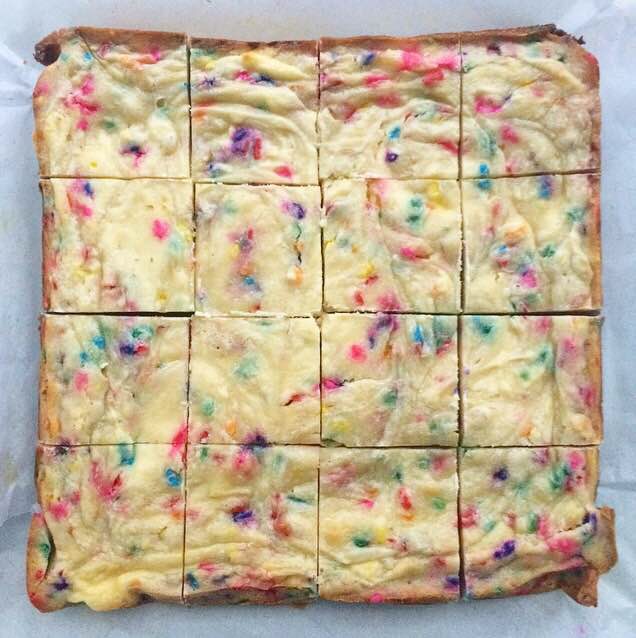
Allow bars to cool in the pan on a rack until they reach room temperature. Refrigerate for four hours, until cold. Place bars on a cutting board and remove foil. Use a large chef’s knife to slice them into bars (or a cookie cutter for fun shapes). Serve.

Red Velvet Cheesecake Bars will keep in an airtight container in the refrigerator for up to five days.

Red Velvet Cheesecake Bars

Advertisement

Peachy Paleo Cheesecake {Vegan & Grain-Free}

Peachy Paleo Cheesecake {Vegan & Grain-Free}A few weeks ago, my boss asked me to cater a small engagement dinner for two of her friends. Normally, my job consists of grocery shopping and making dinner for her, her husband, and twin teenage boys, but every once in a while, she’ll ask me to pull out the big guns and cater a party. This wasn’t my first rodeo (I cater frequently for different people and organizations around Brooklyn), but this party had me a little nervous.

You see, the grooms-to-be are paleo. As in, they don’t eat grains, legumes, sugar, or dairy, among other things. I am used to having specific guidelines when I cook for others, but they’re usually something akin to “cut the salt” or “no nightshades,” not “cut out four food groups.”

Peachy Paleo Cheesecake {Vegan & Grain-Free}I spent the days leading up to the party scouring the Internet for dinner party-worthy paleo recipes. I was apprehensive about choosing any of them–I am not paleo and don’t know many people who ascribe to that lifestyle, so I really felt like I was walking in blind. After much agonizing and many frantic late-night emails to my boss, I settled on this paleo Shrimp & Grits recipe (which is fantastic, by the way). One thing I didn’t have to worry about was dessert. I had seen a paleo cheesecake on Brown Eyed Baker several months before, and knew it would be perfect topped with ripe peaches. It was such a huge hit with the guests of honor that I knew I had to put it on here.

Peachy Paleo Cheesecake {Vegan & Grain-Free}This Peachy Paleo Cheesecake is vegan, grain-free, and refined sugar-free, but is definitely still dessert. It’s sweet and creamy, with a nutty cinnamon-spiced date crust, and a topping of sliced late-summer peaches and a drizzle of maple syrup. It may not be anything like traditional cheesecake, but it is really delicious.

Peachy Paleo Cheesecake {Vegan & Grain-Free}Let’s talk ingredients. As you may have gathered, this cheesecake contains no actual cheese. Here, the smooth and creamy filling comes from a combination of coconut cream, coconut oil, and cashews that have been soaked in water. When those three ingredients are combined in a food processor with some Grade B maple syrup, lemon juice, vanilla extract, and a touch of salt, the result is ultra-velvety, coconut-scented magic.

Peachy Paleo Cheesecake {Vegan & Grain-Free}The filling gets poured over a simple three-ingredient crust. To make the crust, combine 13 dates, a cup of almonds, and four tablespoons of cinnamon* in the bowl of your food processor. Whirl everything until the almonds are completely broken down, and the mixture holds together when you pinch it between your fingers. Then press it into an even layer on the bottom of a springform pan and top it with the filling.

*Yes, I said four tablespoons of cinnamon. When I first made this recipe, I thought that had to be a typo, but it’s not. I promise that this crust is not overly-spiced.

Peachy Paleo Cheesecake {Vegan & Grain-Free}This cheesecake requires a long chill: eight hours in the refrigerator. It will seem absolutely endless. Lucky for you, I am the queen of impatience when it comes to waiting for my desserts to set up, so I found a little shortcut. The cake pictured was frozen for two hours after assembly, and looked and acted just like the paleo cheesecakes I’ve chilled in the refrigerator. Once your cheesecake is nice and cold, top it with sliced peaches (or any fruit you like) and drizzle it with a little more maple syrup!

This Peachy Paleo Cheesecake is delightfully smooth and creamy, with a crumbly crust and delicious fresh peaches. It’s absolutely delicious and guaranteed to be a hit with your paleo and non-paleo friends alike! Peaches will only be in season for a few more weeks, but I already have plans to try this recipe with sliced pears over the coming months.

Peachy Paleo Cheesecake {Vegan & Grain-Free}Let me know if you try this or any of my other recipes! I’m on Facebook, Instagram, Pinterest, and Twitter @e2bakesbrooklyn 💗

Peachy Paleo Cheesecake {Vegan & Grain-Free}
adapted from Brown Eyed Baker
makes one 9-inch round cheesecake

Crust:
13 Medjool dates, pitted
1 cup raw almonds
4 tablespoons ground cinnamon

Filling:
2/3 cup raw cashews
1 14 ounce can coconut cream* (not cream of coconut)
1/3 cup Grade B maple syrup (or raw honey)
juice of 2 lemons
1 tablespoon pure vanilla extract
1/4 teaspoon Kosher or sea salt
2/3 cup coconut oil, melted and cooled

Topping:
2 large peaches, thinly sliced
Grade B maple syrup (or raw honey), for drizzling

Place cashews in a small Tupperware. Cover with water. Refrigerate for 4-12 hours.

Place coconut cream in the refrigerator for 4-12 hours.

Lightly grease a 9-inch springform pan with coconut oil.

Make the crust. Combine dates, almonds, and cinnamon in the bowl of a food processor, and process until the almonds are broken down (about 15-20 seconds). Mixture will look dry, but should hold together when pinched. Pour crust mixture into prepared pan, and press it to the edges to form an even layer. Set aside.

Wash and dry the food processor, or wipe it out very well with a paper towel.

Make the filling. Drain cashews and place them in the food processor. Open coconut cream. Scoop the chilled cream from the top of the can, and discard the water accumulated in the bottom. Add coconut cream, maple syrup, lemon juice, vanilla, and salt to the food processor. Process until the mixture is completely smooth. With the food processor running, drizzle coconut oil through the feed tube. Continue processing until everything is fully combined.

Pour filling mixture over crust. Refrigerate for 8 hours (or freeze for 2 hours). Release the cheesecake from the springform pan, and allow it to sit at room temperature for 10 minutes. Top with sliced peaches and a drizzle of maple syrup, and serve immediately.

Leftovers will keep covered in the refrigerator for up to two days.

Note:

If you cannot find coconut cream, use two 13.5-ounce cans of full-fat coconut milk. Chill them and scoop off the coconut cream, as written in the recipe.

Peachy Paleo Cheesecake {Vegan & Grain-Free}

Funfetti Cheesecake Platinum Blondies

 How have I made it this far without posting any kind of cheesecake recipe? I love cheesecake. Smooth, rich, creamy, decadent–it’s everything I love in a dessert. And it gets brownie points for being the Golden Girls’ treat of choice. If it’s good enough for Blanche, Dorothy, Rose, and Sophia, it’s good enough for me.

But for all the things I love about cheesecake, it’s speed of preparation is not one of them. If you’re making a cheesecake today, you’re not going to get to enjoy it until tomorrow. Many recipes require a 24 hour chill after baking and cooling at room temperature. Who really has time for that when it’s not for a special occasion? Definitely not me. But I also refuse to live without cheesecake. My solution? Swirl it into some blondie batter, bake it up, chill, and commence eating in hours, not days. 

I also refuse to live without sprinkles, so today I’m bringing you Funfetti Cheesecake Platinum Blondies. The blondie base is similar to the one I used here, and it can take almost anything I throw at it. Most blondie recipes contain brown sugar, but I use all granulated here–the resulting lighter color is what makes these “platinum.” If you’d like to stick to traditional blondies, you may use all light brown sugar here, but I think Funfetti desserts are best with all granulated. It makes the vanilla flavor shine, and the lighter color means the rainbow sprinkles really pop!

Let’s get to the most important part: the cheesecake. It’s so good here. The creamy, tangy cheesecake is the perfect counter to the sweet, chewy, sugar cookie-like blondie base. The mixture is super simple to make, too. Beat a brick of full-fat cream cheese with an egg yolk and a teaspoon of vanilla. When it’s fluffy, add in two tablespoons of sugar. If you taste this by itself, it won’t seem sweet enough, but trust me–the tanginess will be divine when baked into the sweet blondie batter. 

 Once you’ve made the batter and the cheesecake mixture, it’s time to assemble. Set aside 2/3 cup of the blondie batter, and spread the rest into the bottom of a 9×9″ pan. Drop the cheesecake mixture and reserved batter by the spoonful over the top of the batter in the pan. Use a knife to swirl it all together. I swirled mine a lot (some might say too much). If you want more pronounced swirls, just go back and forth with the knife a few times. Tap the pan on the counter to make sure everything is evenly distributed before baking at 350F for 25-30 minutes. I tented mine with foil after ten minutes to keep everything from browning too quickly. 


Once the blondies just barely (and I do mean barely) jiggle in the center when the pan is jostled, they’re done. Let them cool on a rack for an hour before chilling for three hours. Yes, three hours seems like eternity, but it’s nothing compared to the 24 hours you’d wait for a traditional cheesecake! Once everything is good and cold, slice it into bars and serve. 

The Funfetti blondie base and cheesecake are a match made in dessert heaven! These bars are sweet, chewy, dense, creamy, tangy, and full of vanilla flavor. Oh, and look how colorful they are! I mean, who can resist a dessert studded with sprinkles and filled with cheesecake? Not many people I know, that’s for sure. 

Do you love sprinkles as much as I do? Check out these Funfetti Sandwich Cookies and Funfetti Cookie Dough Truffles!

Funfetti Cheesecake Platinum Blondies
makes one 9×9″ pan,* about 12-16 bars

Cheesecake:
8 ounces brick-style full-fat cream cheese, softened to room temperature
2 tablespoons granulated sugar
1 large egg yolk, room temperature
1 teaspoon pure vanilla extract

Blondies:
3/4 cup (1 1/2 sticks) unsalted butter, melted and cooled slightly
1 1/2 cups granulated sugar
2 large eggs, room temperature
1 tablespoon pure vanilla extract
1/8 teaspoon imitation butter extract (optional)
1 1/2 cups all purpose flour
1/2 teaspoon Kosher or sea salt
1/2 cup rainbow sprinkles (jimmies)*

Preheat oven to 350F. Grease a 9-inch square pan and line with parchment, leaving overhang for bar-removal. Set aside.

Make the cheesecake. In a medium-large mixing bowl, use an electric mixer to beat cream cheese until light and fluffy, about two minutes. Add sugar, and beat to combine. Mix in egg yolk and vanilla. Set aside.

Make the blondie base. In a large mixing bowl, whisk together melted butter and sugar. Mix in eggs, vanilla, and imitation butter extract. Whisk in flour and salt. Use a silicone spatula or wooden spoon to fold in jimmies. Set aside 2/3 cup batter.

Spread the remaining blondie batter in prepared pan. Drop in cheesecake mixture and leftover batter by the spoonful. Use a knife to swirl it all together. Bake 25-30 minutes, tenting with foil if anything starts browning too quickly. Blondies are done when the middle jiggles just barely when the pan is jostled. Let pan cool on a rack at room temperature for one hour. Refrigerate pan for three hours, until cold. Slice into squares and serve.

Funfetti Cheesecake Platinum Blondies will keep covered in the refrigerator for up to five days.

Notes:

1. An 8×8″ square pan may be used here, but it may affect the bake time.
2. Jimmies are the cylindrical sprinkles, and they are ideal for this recipe. Do not use non-pareils (the little ball-shaped sprinkles)–they will bleed their color and give you an unappetizing purplish batter. Have more questions about sprinkles? I go into more detail here.

Overnight Raspberry Cheesecake-Stuffed French Toast Bake

There are two kinds of people in the world: those who love leftovers, and those who hate them.

I am the former, though I haven’t always been. I was raised by someone who will eat cold anything out of a Tupperware while checking phone messages, and that grosses me out completely. I am wary of leftover spaghetti to this day. But I love leftovers that can be repurposed: roast chicken or vegetables, a spare slice of cooked bacon, some extra marinara. I can use those to make soup or quiche or lasagna! It’s like hitting the kitchen lottery.

Imagine my surprise when I was gifted two artisan loaves of bread last week, one challah, one a rustic country bread. They were given to me at a ritual Friday night dinner by my friend, Phil, who, ironically, doesn’t eat gluten. He had stopped at a nearby bakery and coffee shop to get a little pick-me-up on the way to dinner. They were about to close for the night and were trying to get rid of any loaves they hadn’t sold that day. Being the great friend he is, he grabbed two and gave them to me 😊

By the time I got home from dinner Friday night, I had already decided to make some baked french toast. It’s a simple, sweet brunch dish that’s absolutely perfect for a crowd. Instead of flipping individual pieces, all the bread is placed in a baking dish and soaked with custard for several hours. All that’s left to do is bake it up, slice, and serve with maple syrup. And while that is great by itself, why not turn up the flavor a little by stuffing it all with a cheesecake filling and raspberries?!

If you’ve ever made baked french toast, you know that day-old bread is the way to go. Since it’s all dried out, it soaks up a ton of custard, and after a good half-day or so, bakes up to be absolutely divine.

This recipe requires one whole loaf of day-old challah. Italian or French bread would work, too; use something that has a tight structure and isn’t too crusty. Don’t go for regular sliced bread though–it will get too soft and goopy from soaking. Slice the bread in 3/4″ slices, and lay half of them in a buttered baking dish. Fill in any gaps by cutting other slices into smaller pieces and squishing them into the empty spaces. The bottom of the dish doesn’t have to be completely covered, but you shouldn’t have any large gaps. Cover that layer of bread with a simple custard mixture of eggs, whole milk, vanilla, granulated and brown sugars, cinnamon, and salt.

 Then comes the best part: the cheesecake filling and raspberries! To make the cheesecake mixture, cream an 8-ounce brick of softened cream cheese with an egg yolk. Mix in a little confectioner’s sugar and vanilla, and you’re ready to spread! Spoon the filling over the top of the soaking bread, and use a silicone spatula or offset knife to spread it all the way to the edges of the dish. Top that with a cup of raspberries–fresh or frozen work just fine. Then top the filling with another layer of bread slices and the rest of the custard. Wrap the pan tightly with plastic wrap and foil, pressing down to encourage the bread to soak up the custard.

Then just stick the pan in the refrigerator for 8-24 hours. The longer it sits, the better it gets. The french toast pictured was refrigerated for 20 hours, and was super smooth and rich 😊 Assemble it the night before you want to serve it, and it’ll be ready to go by morning!

 
 When it’s time to bake, take the pan out of the fridge to warm up a bit. While the oven is preheating, make a quick streusel. Mix together some flour, brown sugar, cinnamon, and salt, and then use a pastry blender or two forks to cut in four tablespoons of cold butter. Sprinkle the streusel over the top of the bread, and put it all in the oven for 30-35 minutes, until it starts to puff and is golden brown. Let it sit ten minutes before serving with maple syrup, a dusting of confectioner’s sugar, and more raspberries!

This Overnight Raspberry Cheesecake-Stuffed French Toast Bake is a divine sweet brunch. The streusel gets golden and crunchy, the french toast itself is super rich and soft, and the center is bursting with raspberries and cheesecake! The tang of the cream cheese and the tartness of the berries contrasts beautifully with the creamy, cinnamon-scented layers of french toast. And best of all, it’s easy! Make this baked french toast for your next big weekend brunch!

 Overnight Raspberry Cheesecake-Stuffed French Toast Bake
makes one 9×9″ pan, 9-12 servings

Cheesecake Filling:
8-ounces full-fat brick-style cream cheese
1 large egg yolk, room temperature
1/4 cup confectioner’s sugar
2 teaspoons pure vanilla extract

French Toast:
butter, for greasing the pan
4 large eggs, room temperature
1 1/2 cups whole milk
1 teaspoon pure vanilla extract
6 tablespoons granulated sugar
2 tablespoons light brown sugar, packed
3/4 teaspoon ground cinnamon
1/2 teaspoon Kosher or sea salt
1 loaf day-old challah, French, or Italian bread, sliced in 3/4″-1″ slices
1 cup fresh or frozen raspberries

Streusel:
1/2 cup all-purpose flour
1/4 cup light or dark brown sugar
1/2 teaspoon ground cinnamon
pinch of Kosher or sea salt
4 tablespoons unsalted butter, very cold

For Serving:
maple syrup
confectioner’s sugar
raspberries

Make the cheesecake filling. In a medium mixing bowl, use an electric mixer to beat cream cheese until fluffy, about one minute. Beat in egg yolk, followed by confectioner’s sugar and vanilla. Set aside.

Grease a 9×9″ inch pan with butter. Set aside.

Make the custard. In a small mixing bowl, whisk the eggs until combined and a bit frothy. Whisk in milk, followed by vanilla. Stir in sugars until well-distributed. Whisk in cinnamon and salt. Set aside.

Place slices of bread in the bottom of the prepared pan. Fill in any gaps by using small pieces. Pour half the custard mixture over the slices, coaxing it with a spoon so there aren’t any large dry spots. Drop spoonfuls of the cheesecake filling over the soaking bread. Spread it to the edges of the pan, covering the bread completely. Scatter raspberries over the cheesecake layer. Top with the rest of the sliced bread, and fill in the gaps accordingly. Pour the remainder of the custard mixture over the top layer of bread, using a spoon to make sure everything is saturated. Press plastic wrap onto the top layer of bread, followed by a layer of aluminum foil. Set an empty pan of the same size (or slightly smaller) on top of the foil. Press down lightly. Place filled, covered pan (with the second pan on top), in the refrigerator for 8-24 hours to chill.

Preheat the oven to 350F. Remove the pan from the refrigerator, and uncover it.

Make the streusel. Stir together the flour, brown sugar, cinnamon, and salt. Use a pastry blender, two forks, or clean, cool fingertips to cut the cold butter into the flour mixture, until the largest pieces are the size of small peas. Scatter the streusel over the top of the French toast. Bake for 30-35 minutes, until golden and starting to puff up.

Let cool for ten minutes before slicing and serving with maple syrup, confectioner’s sugar, and additional raspberries, if desired.

Overnight Cheesecake-Stuffed Raspberry French Toast Bake