Tag Archives: easy baking

White Chocolate Cranberry Pistachio Shortbread Wedges

White Chocolate Cranberry Pistachio Shortbread Wedges​

Hi there! I am sorry I left you hanging for a few weeks there—COVID finally got me—but I am very happy to be back with a new recipe in time for the Sweetest Season Cookie Exchange. This event, which I am participating in for the fifth year, is a food blogger-lead fundraiser and awareness campaign for Cookies for Kids’ Cancer. This organization is a 501(c)3 non-profit with the express mission to raise funds for innovative pediatric cancer treatments and research through bake sales and cookie swaps. Supporters (“Good Cookies”) can do this throughout the year, but I am delighted to lend support as part of my holiday giving especially right now when OXO is matching donations up to $100,000! If you’d like to learn more and/or make a charitable donation to Cookies for Kids’ Cancer, click here. For White Chocolate Cranberry Pistachio Shortbread Wedges, keep scrolling!

White Chocolate Cranberry Pistachio Shortbread Wedges​

I would like to give a high five to whichever person decided white chocolate, dried cranberries, and pistachios is a Christmas combination. I don’t believe it was a part of any holiday parties or cookie exchanges I took part in while growing up, but I am all for it now. Aside from just being festive—love that red, green and white—it’s delicious, and a welcome departure from the chocolate, peppermint, and spice-heavy fare that seems to be available 24/7 in December. Not that I’m complaining.

White Chocolate Cranberry Pistachio Shortbread Wedges​

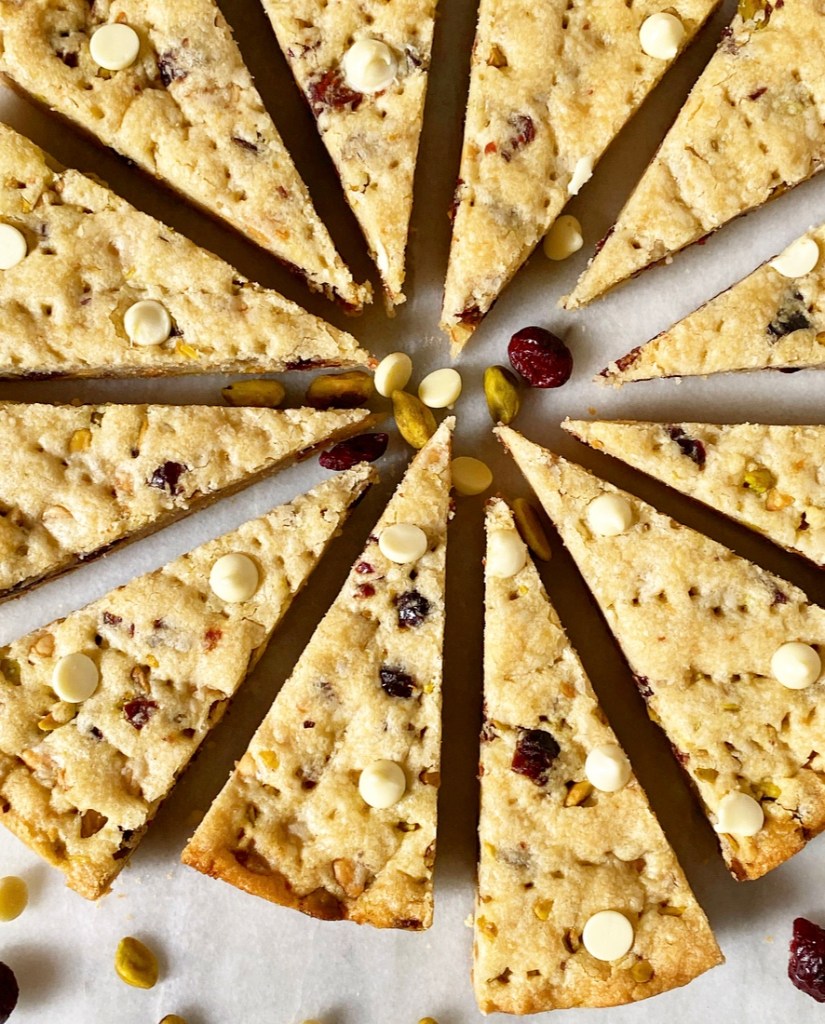
Today’s White Chocolate Cranberry Pistachio Shortbread Wedges are the perfect vehicle for showcasing this new holiday classic combination. They’re simple to make, require just a few ingredients, and are incredibly cute—things cut in wedges automatically have Christmas tree vibes, you know?

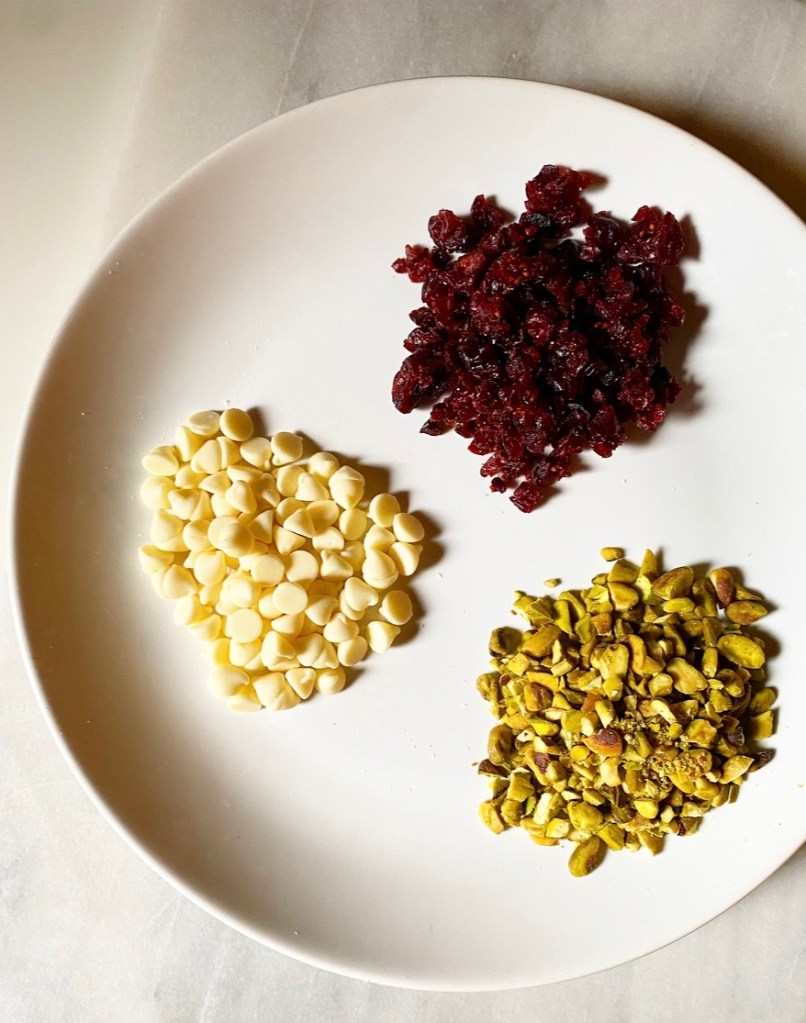
These buttery shortbread treats come together just as simply as the classic cookies. The dough is mixed in one bowl in just a few minutes. It’s got all the usual shortbread suspects (granulated sugar, softened butter, all-purpose flour), plus confectioner’s sugar, vanilla and salt for smooth texture, flavor and balance. Oh, and white chocolate chips, chopped dried cranberries and pistachios for pizzazz!

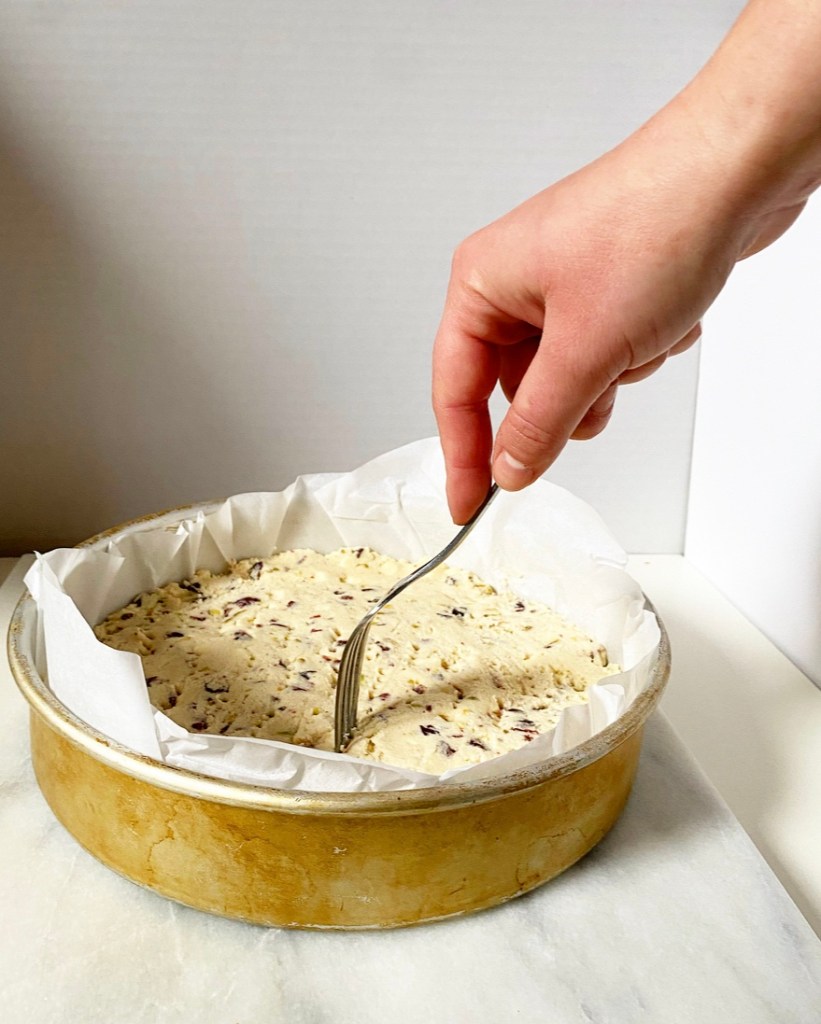
Once mixed, the dough is spread into a cake pan lined with an extra-large piece of parchment. It’s docked (vented) with a fork all over before baking for about 40 minutes, until just turning golden at the edges. Fifteen minutes later, that extra-large parchment is used to lift the whole disk of shortbread onto a cutting board and slice it into wedges while it’s still warm. I love those clean edges.

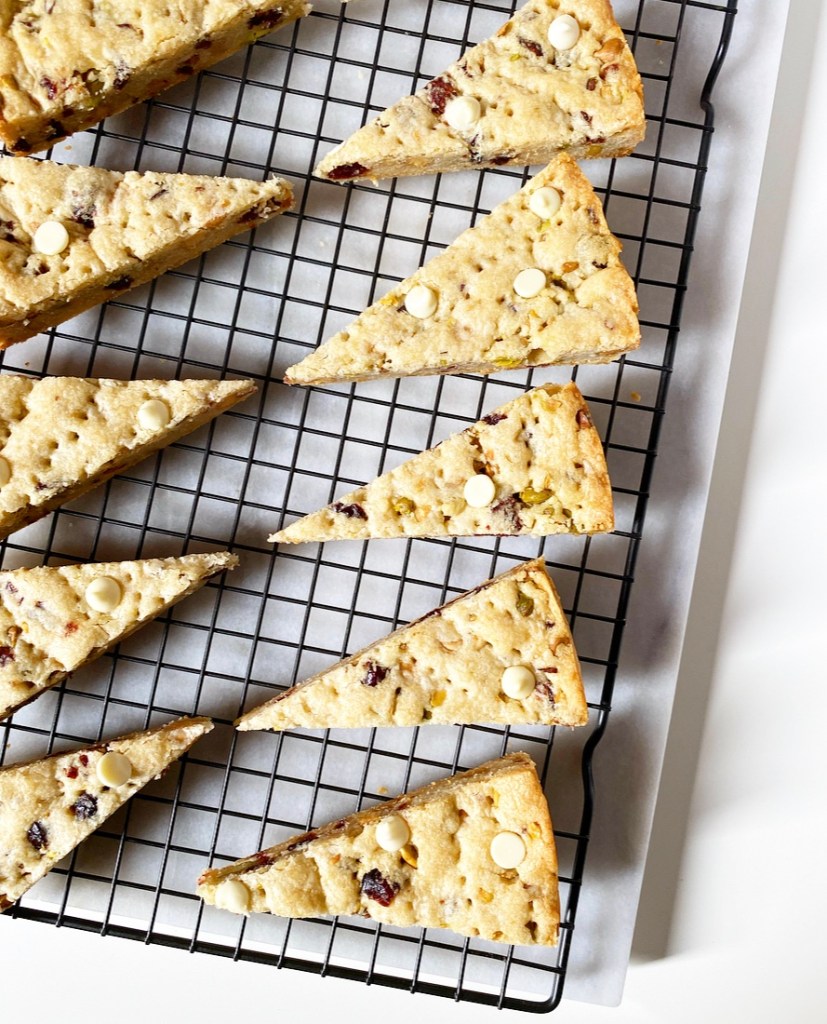
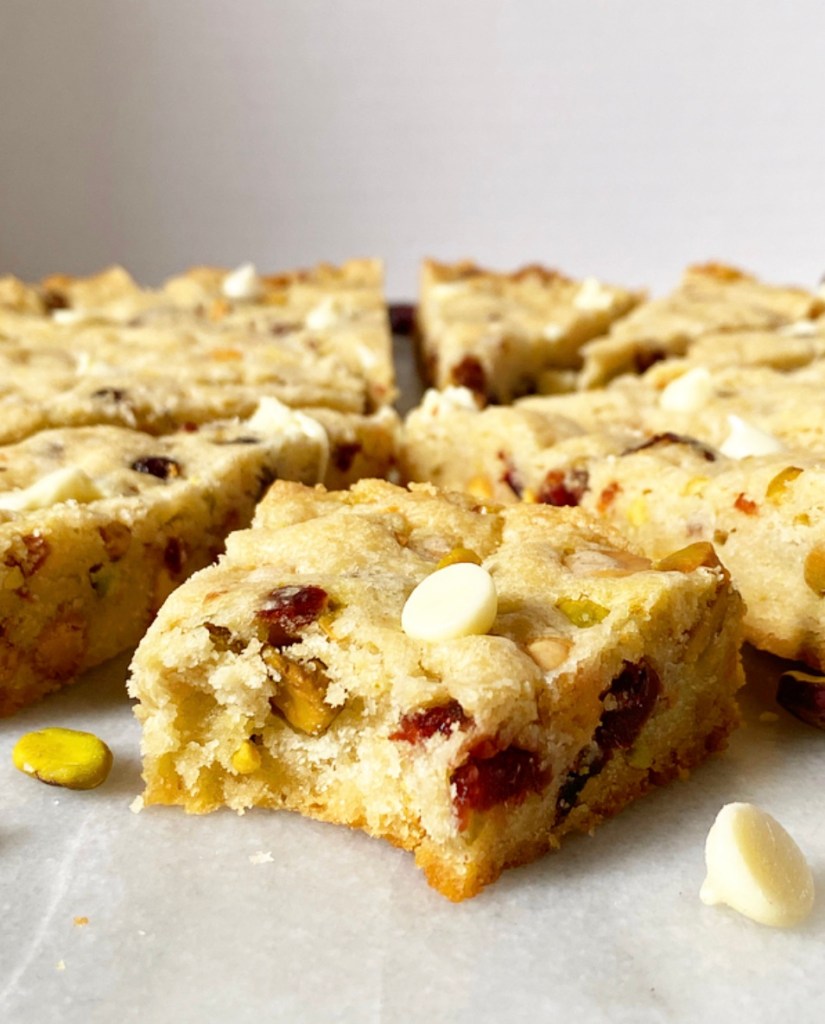
These shortbread wedges are thick and substantial, with a slight softness to their crunch, and plenty of color and flavor from the mix-ins. My favorite bites are the ones with white chocolate—it caramelizes in the oven and is outrageously good. I like to dot a few extra white chocolate chips on top after baking for diversity of flavor (and obvious cuteness). And the chewy cranberries and crunchy pistachios? So good!

White Chocolate Cranberry Pistachio Shortbread Wedges​

White Chocolate Cranberry Pistachio Shortbread Wedges are perfect for any upcoming party or cookie giving (eating?) occasion. They’re as satisfying to make as they are to eat, and the dough is a perfect blank slate for any festive mix-in your holiday heart desires. What would you put in shortbread wedges? Let me know in the comments!

White Chocolate Cranberry Pistachio Shortbread Wedges​
White Chocolate Cranberry Pistachio Shortbread Wedges
makes 12-16 wedges

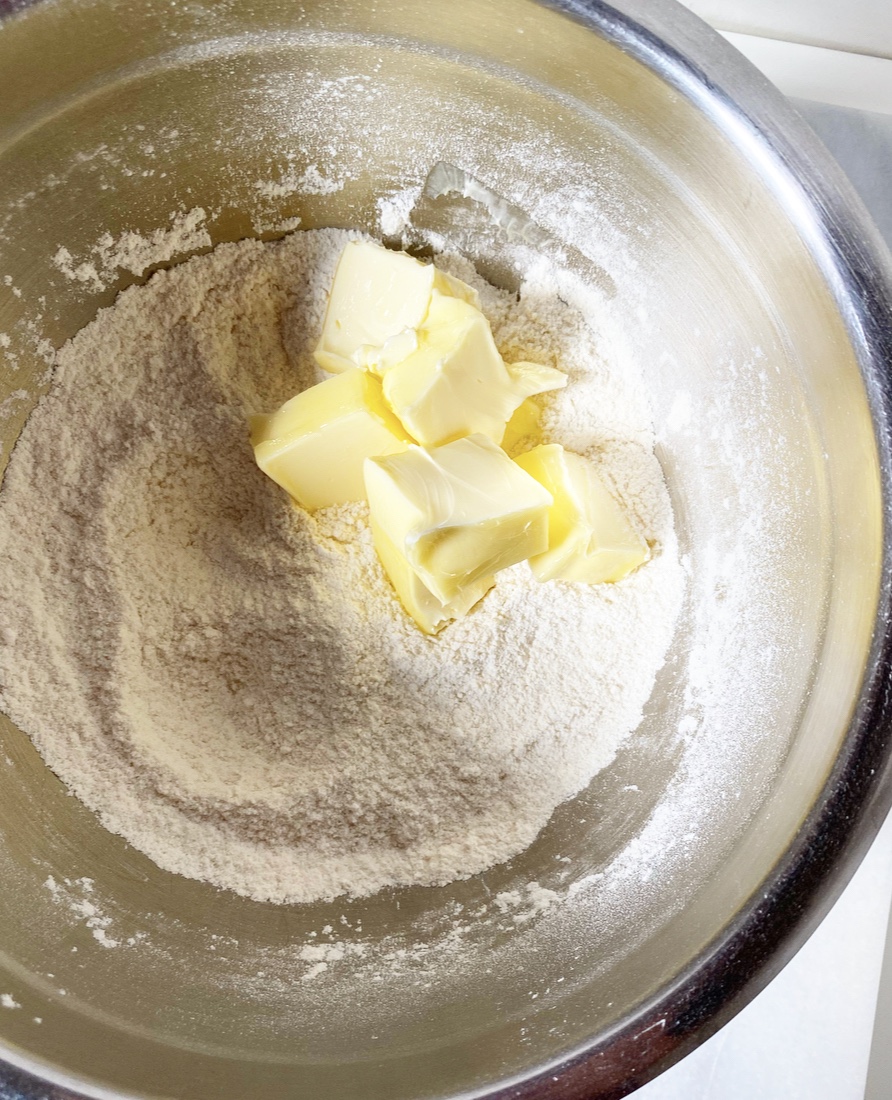
3/4 cup unsalted butter, softened to room temperature
1/3 cup granulated sugar
1/3 cup confectioners sugar
2 teaspoons pure vanilla extract
1 3/4 cups all-purpose flour
1/2 teaspoon Kosher or sea salt
1/3 cup dried cranberries, finely chopped
1/3 cup pistachio meats, finely chopped
1/3 cup white chocolate chips, plus more for garnish

Preheat oven to 325F. Cut a large (12-14 inch) circle of parchment paper. Grease a 9-inch cake pan with butter. Line the pan with parchment circle, leaving the overhang for ease of removal. Grease again. Set aside.

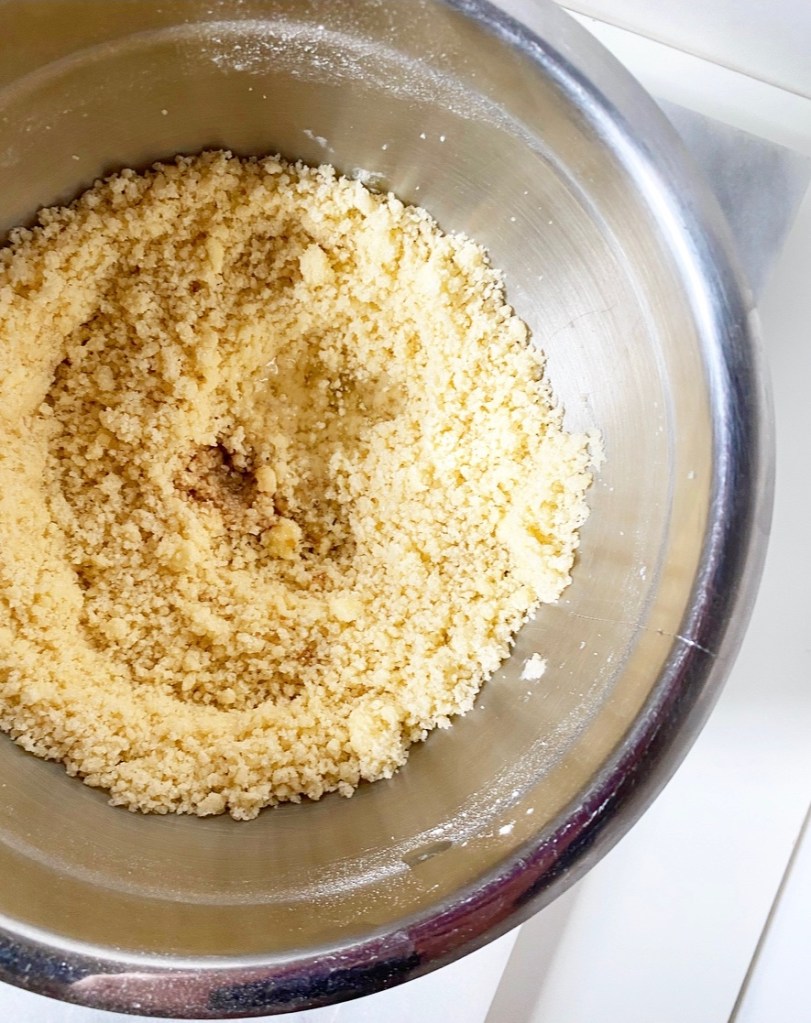
Place softened butter in a large mixing bowl. Use an electric mixer to beat until light and fluffy, about 2 minutes. Add granulated and confectioners sugars and vanilla, and beat until incorporated. Beat in half of flour and salt, followed by remaining flour. Add chopped dried cranberries, pistachio meats, and white chocolate chips.

Transfer dough to prepared pan and press into an even layer. Use the tines of a fork to dock the entire surface of the dough. If you hit a big piece of pistachio (or whatever), simply pull it off the fork and press it back into place.

Bake shortbread 38-40 minutes, until golden at the edges and set on top. Dot with additional white chocolate chips, if desired.

Let shortbread cool in the pan on a rack for 15 minutes. Then use the overhang to remove the still-warm shortbread to a cutting board. Use a large sharp chef’s knife to cut into 12 large or 16 smaller wedges. Gently transfer wedges back to the rack and let cool completely. Serve.

Leftover shortbread will keep covered at room temperature for a few days.

Apple Cinnamon Upside-Down Cake {Seven Year Anniversary}

In years past, I might have gone with a flashier recipe to celebrate seven years of this blog, but this year I’m keeping it low key and doing what comes naturally. I’m just glad to be here.

Apple Cinnamon Upside-Down Cake​

I’ve been open about needing a break this past summer. Though the baking never stopped, I’m very much getting back into the swing of posting. I am currently writing to you on a Friday afternoon from the New York City subway—it’s not the first time and certainly not the last. E2 Bakes has always been a little bit of a patchwork. A little time here, a little time there. Late nights, early mornings, set baking hours with a little wiggle room, writing content on public transit between appointments—it all makes this place function.

Of all of that, the baking and recipe testing is obviously the most important. I need to spend time making the things that I want to make not just because it’s enjoyable for me, but because those things are just better. See exhibits A, B & C of many (many, many). I am not one of those who thinks being “made with love” is crucial for success (I have made plenty of delicious things while absolutely furious), but it sure doesn’t hurt.

Apple Cinnamon Upside-Down Cake​

This Apple Cinnamon Upside-Down Cake was made with joy, on the fly, in pajamas, on a Monday morning in my kitchen. I didn’t shop for any specific ingredients or make a plan; I just saw what I had (a fridge drawer full of apples) and went from there. It was, to be frank, my ideal baking situation.

Apple Cinnamon Upside-Down Cake​

The cake itself is the slightest variation on the summery Peach Upside-Down Cake I made in 2020, but updated for fall with a little more comforting spice. It’s a simple torte batter poured over a mix of brown sugar, butter, and sliced apples that bakes up to tender butterscotch-edged perfection.

There are certainly prettier ways to arrange your apples for this cake, and I know that the finished product could benefit from a drizzle of caramel and a scoop of ice cream, but I like it like this. Thrown together for the fun of it, photographed without a plan, eaten warm before noon on a weekday. It feels authentic, which is exactly how I hope this space comes across.

Apple Cinnamon Upside-Down Cake​

Thank you for being here and for supporting this little project of mine for so long. It means the world. I hope we bake together for many years to come.

Happy birthday, E2 Bakes.

Apple Cinnamon Upside-Down Cake​
Apple Cinnamon Upside-Down Cake
makes 1 9-inch round cake

For the apples:
2 large baking apples (I used Granny Smith & Pink Lady)
1/4 cup unsalted butter
2/3 cup light or dark brown sugar, packed
pinch of Kosher or sea salt

Batter:
1 cup all-purpose flour
1 teaspoon ground cinnamon
1 teaspoon baking powder
1/4 teaspoon Kosher or sea salt
1/2 cup unsalted butter, softened to room temperature
1/2 cup granulated sugar
1/2 cup light brown sugar, packed
2 large eggs, room temperature
1 1/2 teaspoons pure vanilla extract

For serving (optional):
vanilla ice cream

Preheat oven to 350F. Heavily grease a 9-inch round cake pan. Set aside.

Slice apples in 1/4-inch slices. No need to peel. Discard cores.

In a small saucepan, combine butter and dark brown sugar. Place over medium-low heat and stir constantly until butter and sugar are melted and fully homogeneous, 3-5 minutes. Remove pan from heat. Pour mixture into a 9-inch round cake pan, using a silicone spatula to spread it over the entire bottom of the pan.

Top the brown sugar mixture with single layer of sliced apples, slightly overlapping them for the prettiest effect, in any design you like. Set aside.

In a small-medium bowl, whisk together flour, cinnamon, baking powder, and salt. Set aside.

In a large mixing bowl, use an electric mixer to cream butter until very light and fluffy (about 2 minutes). Beat in granulated sugar and light brown sugars. Mix in eggs one at a time, followed by vanilla extract. With the mixer on low, mix in dry ingredients. Batter will be thick.

Drop batter in spoonfuls over the peaches. Use an offset icing knife or the back of a spoon to spread it in an even layer. Tap the pan on the counter 5 times to release any large air bubbles. Bake 40-45 minutes, or until a toothpick inserted near the center comes out clean or with only a few moist crumbs (not wet batter).

Let cake cool in the pan on a rack for 15 minutes before running a small, thin knife around the edge a couple of times. Place a cake stand or large serving plate upside down over the top of the pan. Holding on to the plate and pan with oven mitts, quickly invert them so that the plate is right-side-up and the pan is now upside-down. Tap the top of the pan a time or two to help the cake release. Lift off the empty pan. If any fruit sticks to the pan, just nudge it back onto the cake with your fingers or a spoon.

Serve cake warm, room temperature, or cold, with ice cream, if desired.

Cake is best the day it's baked, but will keep in the refrigerator for up to three days.

Crispy, Crunchy Sprinkle Sugar Cookies

How has it been more than six months since I posted a rainbow sprinkle recipe?! I hardly know who I am anymore!

Just kidding. I know exactly who I am: a woman with a drawer in her kitchen that is only for sprinkles. I’ve got my priorities in order.

Crispy, Crunchy Sprinkle Sugar Cookies​

Today’s sprinkly recipe? Crispy, Crunchy Sprinkle Sugar Cookies! They’re a take on my go-to crunchy cookie formula, this time scented with vanilla and bursting with colorful sprinkles inside and out. Though I was once a soft-cookie-only person, I can’t help but love these crispy, colorful cookies!

Crispy, Crunchy Sprinkle Sugar Cookies are super easy to make, but the method is a little different from most drop cookie recipes. Instead of being creamed with the sugar, the butter is added to all the dry ingredients—a method called reverse creaming—and the dough is bound with a spoonful of light corn syrup rather than an egg. Together, these things keep the gluten from developing and the moisture level low, resulting in crunchy cookies. The lack of chill and longer bake time help too, and they also mean that these cookies can be made in under an hour start-to-finish. Score!

Crispy, Crunchy Sprinkle Sugar Cookies

Crispy, Crunchy Sprinkle Sugar Cookies are just what they sound like: crispy, crunchy, and chock full of sprinkles! In addition to providing tons of color, the sprinkle coating adds even more crunch—so good. That said, if you’re not ready to come over to the crispy side just yet, I’ve got your back. You can never have too many sprinkle cookie recipes, you know?

Crispy, Crunchy Sprinkle Sugar Cookies
makes 22 cookies

1 cup + 2 tablespoons all-purpose flour
2/3 cup granulated sugar
1/2 teaspoon baking powder
1/2 teaspoon baking soda
1/2 teaspoon Kosher or sea salt
1/2 cup (1 stick) unsalted butter, softened to room temperature
1 tablespoon light corn syrup (or golden syrup or mild honey)
2 teaspoons pure vanilla extract
1/3 cup rainbow sprinkles (jimmies, not nonpareils)

For coating:
1/3 cup rainbow sprinkles (jimmies or nonpareils)

Arrange oven racks in central positions. Preheat the oven to 350F. Line two rimmed baking sheets with parchment paper. Set aside.

In a medium mixing bowl, whisk together flour, granulated sugar, baking powder, baking soda and salt.

Cut softened butter into 8 pieces and add them to the mixing bowl. Starting at low speed and increasing as ingredients become incorporated, use an electric mixer to mix the butter into the flour/sugar mixture until powdery and wet-sandy. You may need to stop a time or two to break up larger pieces of butter.

Add corn syrup and vanilla and mix to combine. Dough will look crumbly, but should hold together well when pinched.

Add the sprinkles to the dough and mix them in with a silicone spatula (or wooden spoon) until evenly distributed and the dough is a cohesive unit.

Pour sprinkles for coating into a shallow bowl.

Scoop the dough by the tablespoon and roll into balls. Roll each ball around in the bowl of sprinkles until completely coated. Place dough balls 2-3 inches apart on prepared pans (I fit 12 on each half-sheet pan). Bake for 9 minutes, then rotate the pans top-to-bottom and front-to-back. Bake another 7-8 minutes, until a bit puffy and turning golden at the edges.

Let cookies cool for 7 minutes on the pans. Remove to a rack to cool completely. Serve.

Leftover cookies will keep in an airtight container at room temperature for up to a week. Depending on your area’s weather, they may soften a bit over time.

Blueberry Sour Cream Scones

Blueberry Sour Cream Scones​

If you’re on the hunt for impossibly tender scones, look no further. Beneath these nubbly exteriors lie the softest, most buttery interiors. The secret? A hefty spoonful of sour cream.

Blueberry Sour Cream Scones​

Oh, yes. Where most scones are bound with heavy cream, half & half or just plain ol’ milk, these get their delicate decadence from thick, rich sour cream. Between its texture and natural acidity, its scone game simply cannot be beat.

For those concerned that sour cream’s tanginess might overwhelm the other flavors, rest assured that it does not. The acidity is neutralized with a bit of baking soda, ensuring that the end results have a smooth, buttery flavor to accompany their perfect texture.

You can bake this scone base by its lonesome, of course, but blueberries are at their best right now, so we’re tipping a full cup into the mix today. Blueberry Sour Cream Scones? Sign. me. up.

Blueberry Sour Cream Scones start just how any other scone recipe might—cutting butter into dry ingredients—but where the next step is usually to add heavy cream or half & half, these are bound with an egg and 1/2 cup of sour cream. The dough may simultaneously seem both too wet and too dry during mixing (weird and true), but it will come together. Once mixed, it’s filled with blueberries, formed into a disk and sliced into wedges before baking.

These scones bake up craggy and golden with juicy burst blueberries throughout. You may serve them as soon as you can handle them, but you can also wait a few more minutes and give them a drizzle with a quick blueberry glaze. You know, if you’re the kind of person who needs your Blueberry Sour Cream Scones to have a vibrant purple drizzle…which I very much am.

Blueberry Sour Cream Scones​
Blueberry Sour Cream Scones
makes 8 scones

1 large egg, cold
1/2 cup full-fat sour cream, very cold
1 teaspoon pure vanilla extract
1/3 cup light brown sugar, packed
2 cups all-purpose flour
2 teaspoons baking powder
1/2 teaspoon baking soda
1/2 teaspoon Kosher or sea salt
1/2 cup (1 stick) unsalted butter, very cold, cut into cubes
1 cup fresh blueberries
2 tablespoons milk of choice, heavy cream, or half & half

Glaze:
1 tablespoon pulverized freeze dried blueberries (about 2 heaping tablespoons whole)
1/2 cup confectioner’s sugar
pinch of Kosher or sea salt
3-4 teaspoons milk of choice

Make the scones. Place an oven rack in the center position. Preheat oven to 400F. Line a baking sheet with parchment. Set aside.

In a liquid measuring cup, use a fork to whisk together cold egg, sour cream, and vanilla. Refrigerate.

In a large mixing bowl, whisk together flour, light brown sugar, baking powder, baking soda, and salt. Add cold butter. Use a pastry blender or clean fingertips to cut the butter into the flour until the largest pieces are the size of small peas. Stir in sour cream mixture. Add blueberries and fold them in as gently as you can. Some will break; that’s just the nature of this.

Turn dough out onto a floured surface. Pat it to 1-inch thick circle. Use a large, sharp chef’s knife to slice circle into 8 wedges. Place scones at least 2 inches apart on prepared pan. Brush with milk, cream, or half-and-half. Bake 21-23 minutes, until puffed and golden.

Meanwhile, set a cooling rack over a piece of parchment paper. Let scones cool on the pan on a rack for a few minutes, before removing to the prepared rack.

When scones are cool enough to handle but still a little warm, make the icing. In a small mixing bowl, whisk together pulverized freeze dried blueberries, confectioners sugar, salt and 3 teaspoons milk. Add more milk by the 1/2 teaspoon until icing is thick, but pourable. Pour or drizzle icing over the scones as desired. Icing will set quickly, and eventually harden completely after a few hours.

Scones are best the day they are made, but will keep in an airtight container at room temperature for up to 2 days.

Coconut Biscoff Magic Bars

When I don’t know what to make, I make magic bars. I have all sorts of recipes for them on this site—vanilla malt, peanut butter-Oreo, and s’mores are some of my favorites. As long as I have sweetened condensed milk in my pantry, nothing is safe from being turned into a magic bar.

Coconut Biscoff Magic Bars

These layered bars are so easy to make and so good. I mean, how could a buttery crumb crust topped with chewy, caramelly filling possibly be bad?! There is barely any mixing involved; the majority of the ingredients are layered or scattered into the pan. Their titular “magic” comes from the way their sweetened condensed milk-based filling seems to assemble itself in the oven.

Coconut Biscoff Magic Bars

Today’s variation involves sweet, chewy coconut, smooth white chocolate, and buttery spice from Biscoff cookies. These are a little unusual, but definitely still magical. Coconut Biscoff Magic Bars are super simple to make, containing just seven ingredients and taking under an hour to prepare. Simply mix together the Biscoff cookie crumb crust, bake it for a few minutes, then layer the filling ingredients on top and bake again. Make sure to let these bars cool completely so that the caramelized sweetened condensed milk will set up properly—we love clean slices!

Coconut Biscoff Magic Bars

Now you might be wondering “why these flavors?” Well, as I alluded to above, magic bars are a great way to bake with the odds and ends in your pantry. I opened mine one day and saw the dregs of some coconut, the last of a bag of white chocolate chips, and a sleeve of Biscoff cookies—simple as that. The light spice of the Biscoff and the oven-toasted coconut compliment each other incredibly well, and the white chocolate and sweetened condensed milk add richness and texture.

If you’re not already sold, you’ll have to trust me that these bars are much more than the sum of their seven parts. Or, you know, you can dig into your own cabinets and make a weird and wonderful magic bar recipe of your own.

Coconut Biscoff Magic Bars
makes 1 8- or 9-inch pan, about 12-16 bars

26 Biscoff cookies, divided
1/4 cup light brown sugar, packed
pinch of Kosher or sea salt
5 tablespoons unsalted butter, melted
1 14-ounce can sweetened condensed milk
1 1/4 cup sweetened flaked coconut
1/2 cup white chocolate chips + more for topping
6 Biscoff cookies, broken into pieces

Preheat oven to 350F. Heavily grease a 9-inch square pan and line with parchment paper, leaving overhang on two sides. Grease again. Set aside.

Place 20 Biscoff cookies the bowl of a food processor and process until pulverized. Add brown sugar and melted butter. Pulse until combined. Alternatively, cookies may be crushed in a bag and crust ingredients may be mixed in a bowl.

Transfer crust mixture to the prepared pan. Press into an even layer. Bake for five minutes, until set. Set crust aside to cool for 10 minutes.

Drizzle sweetened condensed milk over crust. Use a silicone spatula or the back of a spoon to carefully spread into an even layer. Scatter coconut over the top, followed by white chocolate chips.

Break remaining 6 Biscoff cookies into pieces and scatter over the top. Use the palms of your hands to lightly press the toppings into the sweetened condensed milk. Bake for 30-32 minutes, tenting pan with foil if anything becomes too dark. Bars are done when the center jiggles just slightly when the pan is jostled. The bars will set as they cool. Top with more white chocolate chips if desired.

Let bars cool completely in the pan on a rack. Use overhang to remove bars from the pan to a cutting board. Peel off foil. Slice with a lightly-greased knife and serve.

Leftovers will keep in an airtight container at room temperature for up to 4 days, or in the refrigerator for up to a week.