 I have been asked many times over the last several summers for my favorite cobbler recipe. Every time, I have referred these inquiries elsewhere—usually to Deb—because the truth is that…I don’t like cobbler. It sounds so baby-ish to say it that way, that I just don’t like an entire category of food regardless of flavor or nuance or anything else. But I just don’t like it.
Or, as you may have gathered from the title of today’s recipe, I just didn’t like it.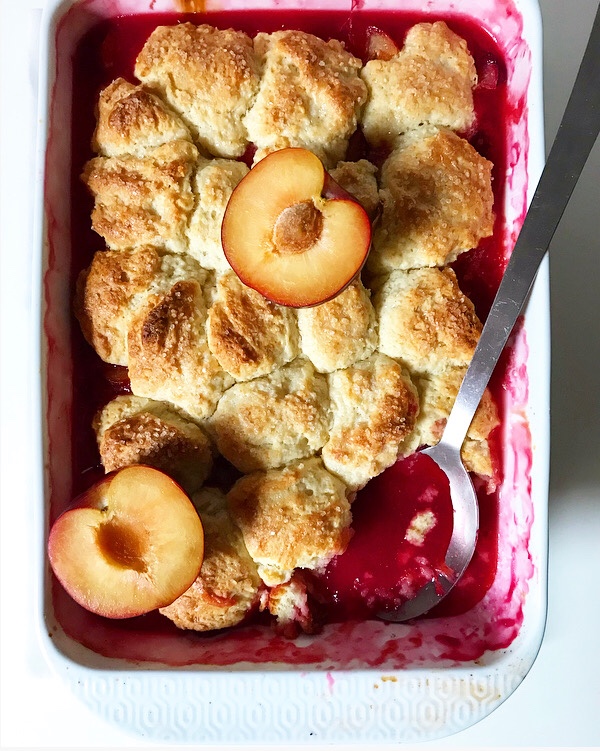 But that was before I started a blog and spent time trying to bake with all types of seasonal produce, even stone fruit, which I previously thought should never be warmed. Pre-2015 Liz would never, ever have eaten Plum Cake or Peach Tart and definitely would have passed on Peach Pie, and she would have looked on in horror as 2019 Liz ate apricot jam on an English muffin while in Maine a few weeks ago. But the truth is that having this blog has brought me around to all these things and more, and that’s how we got to this momentous day, on which I have prepared, eaten and enjoyed a cobbler.
*bows awkwardly*
*and metaphorically*
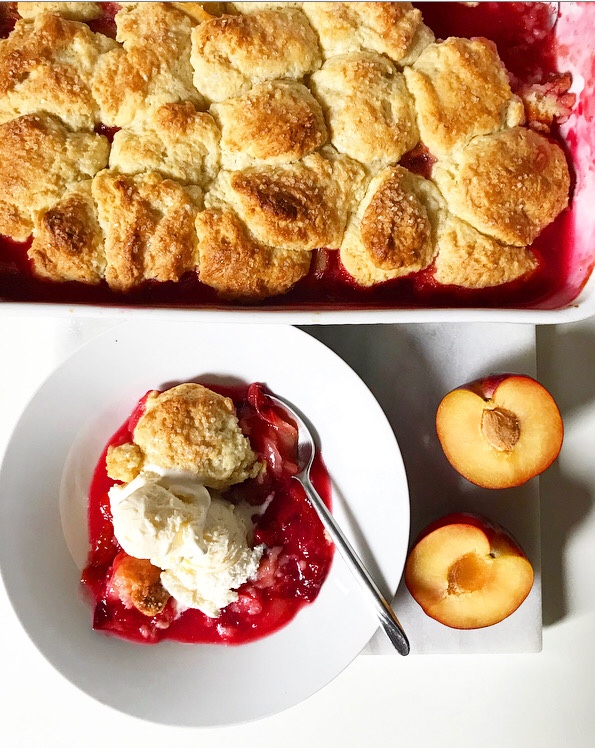
Um, sorry. Got a little carried away there.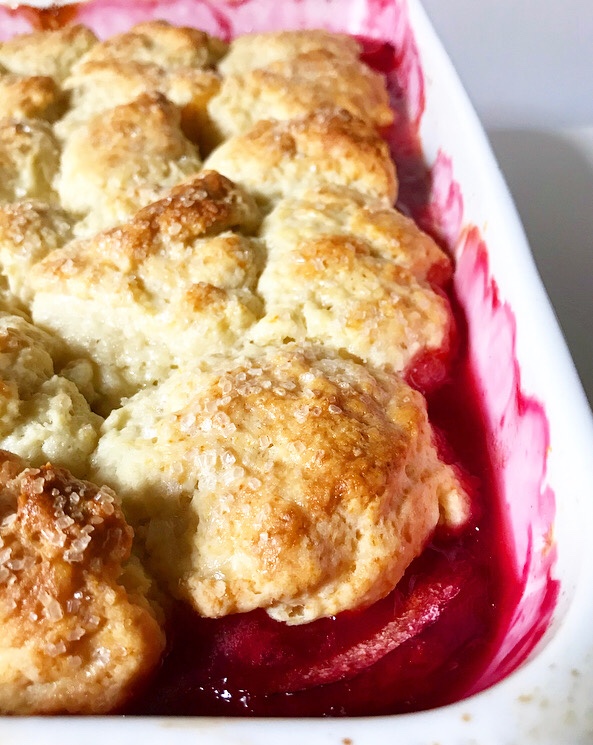 In retrospect, I’m not sure why I ever turned my nose up at this particular category of dessert—I mean, what could be bad about fluffy biscuits baked over seasonal fruit and served with ice cream?! Too many textures, maybe? I don’t know. Perhaps I’ll figure it out one day. For now, I know that I’m a cobbler convert, thanks in no small part to the glut of fabulous plums at my local green market and a drive to bake even when my un-air-conditioned kitchen is already 85 degrees.
 Trust me, though. This Plum Cobbler is worth heating up the house. It may very well make a believer of even the staunchest of the anti-cooked-stone-fruit contingent.
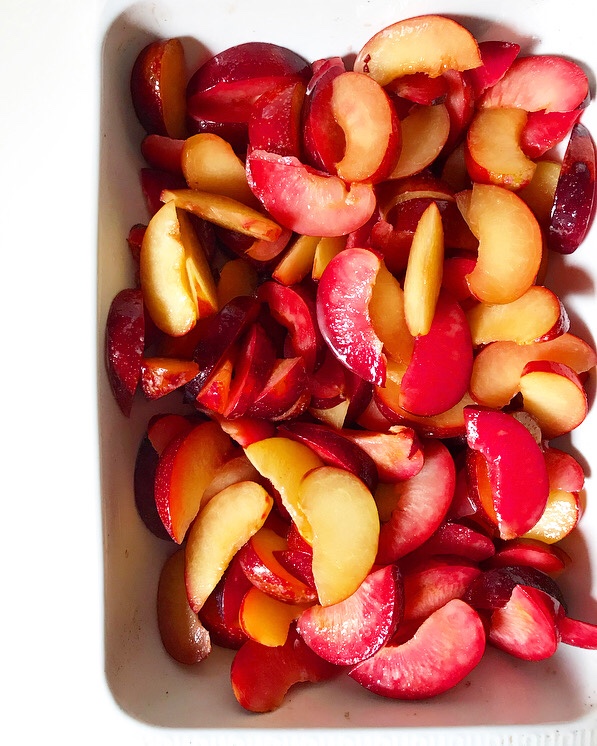 The filling is made of sliced fresh plums (I used a mix of red and black), sugar, lemon juice and ground ginger for depth, and a touch of cornstarch. It’s piled into a baking dish and dotted with butter.
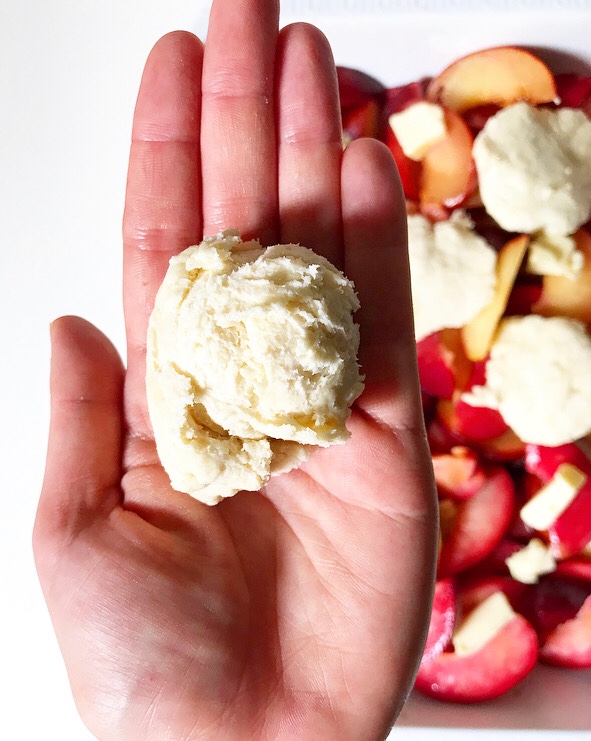
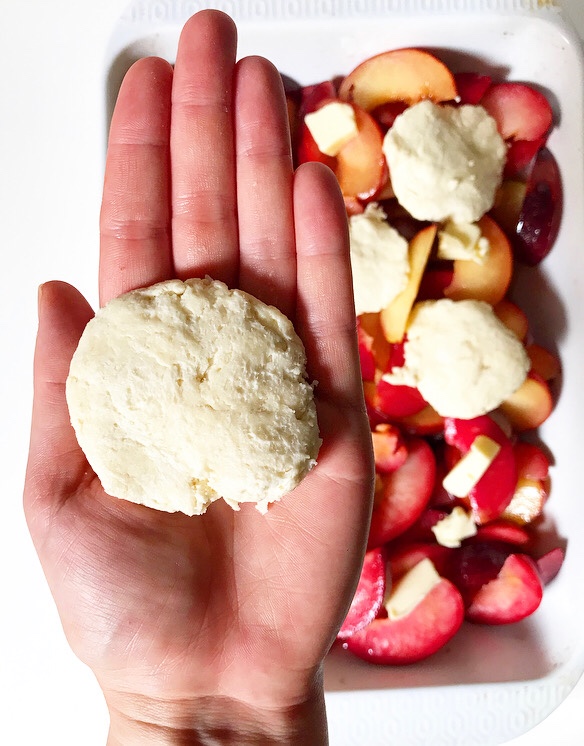 Next up is the topping, which is simply my Cream Biscuit recipe with an additional tablespoon of sugar. Instead of rolling and cutting the biscuit dough as I usually would, I prefer to scoop the dough in small increments and then flatten them with my hands.
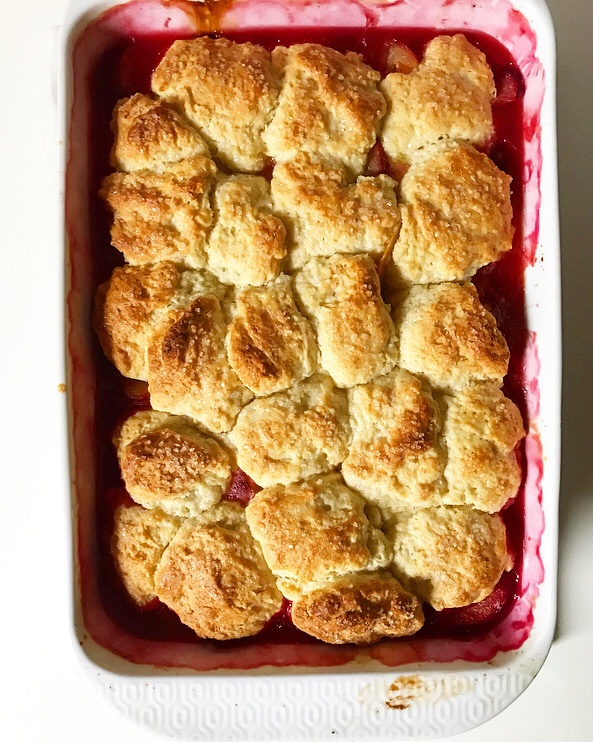 The flattened pieces are then arranged in a cobblestone pattern—this is where the name cobbler comes from. After brushing the dough with cream and sprinkling on some coarse sugar, everything is baked for 45 minutes, or until the biscuits are golden and the filling is bubbling.
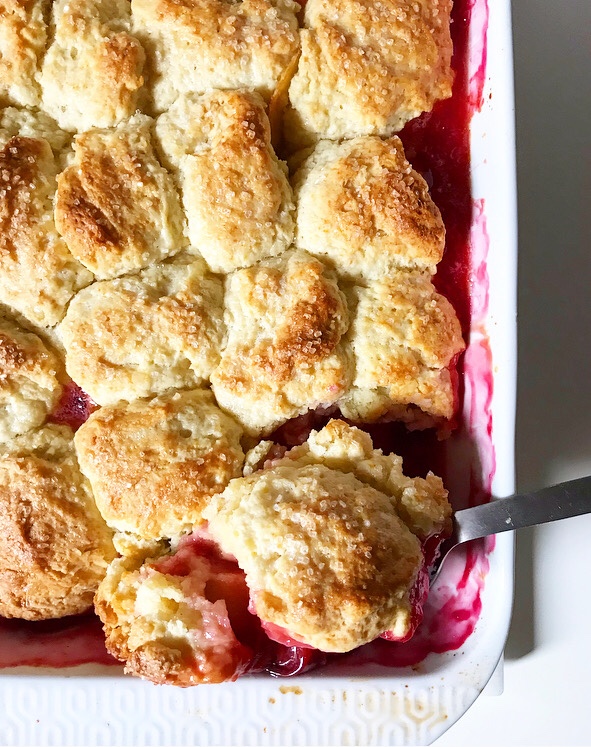
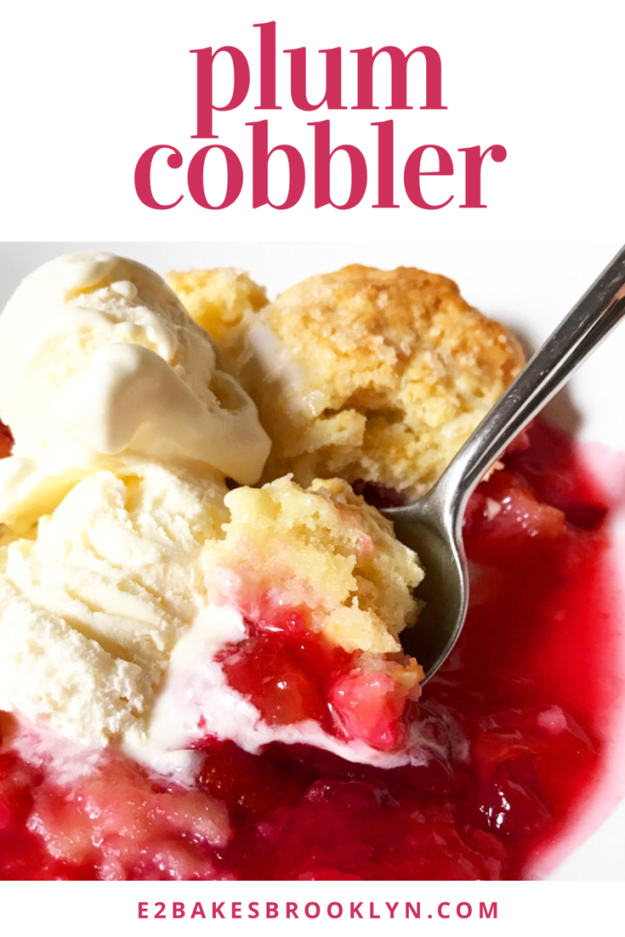
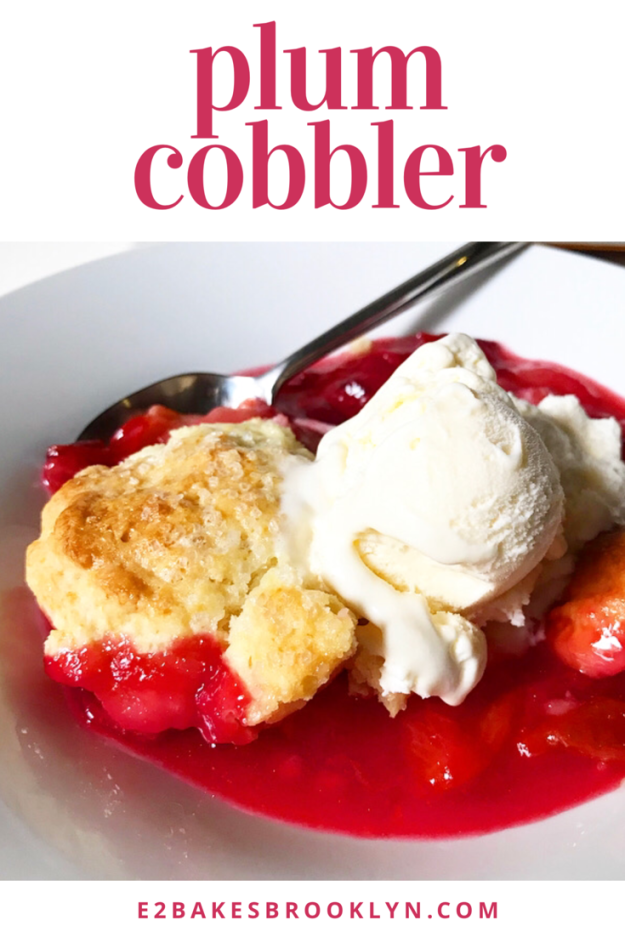
 Maybe my favorite thing about cobbler (and crisps and crumbles) is that it’s best hot from the oven. I like to let mine cool ten minutes, just until the filling stops bubbling, before spooning it into shallow bowls and finishing it off with vanilla ice cream.
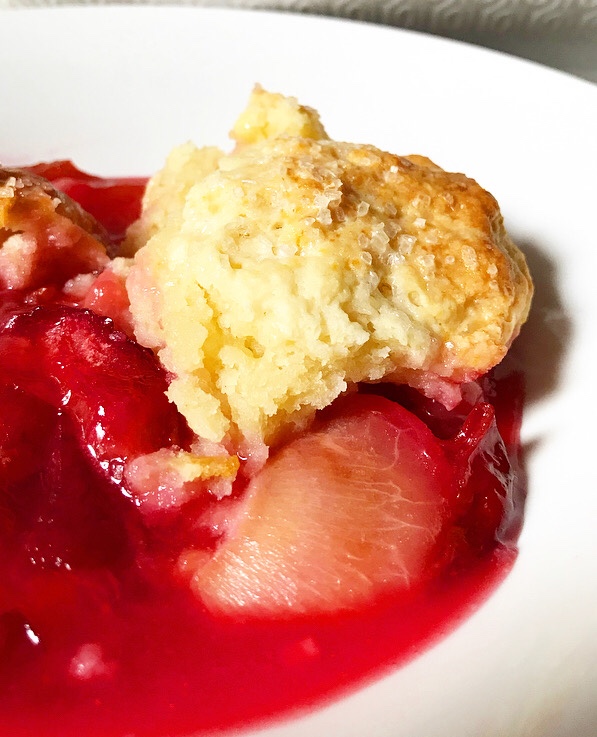
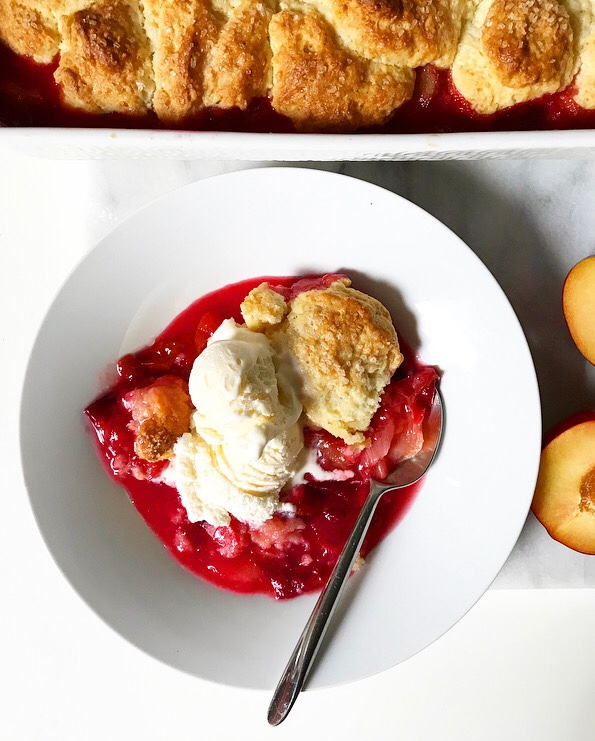 Plum Cobbler is tart and sweet and a bit on the syrupy side, the perfect contrast to the fluffy biscuit topping. And that’s to say nothing of the outstanding vibrant color of the filling or the way slow-melting ice cream rounds out this bowl of late summer goodness. It’s damn near impossible to resist.
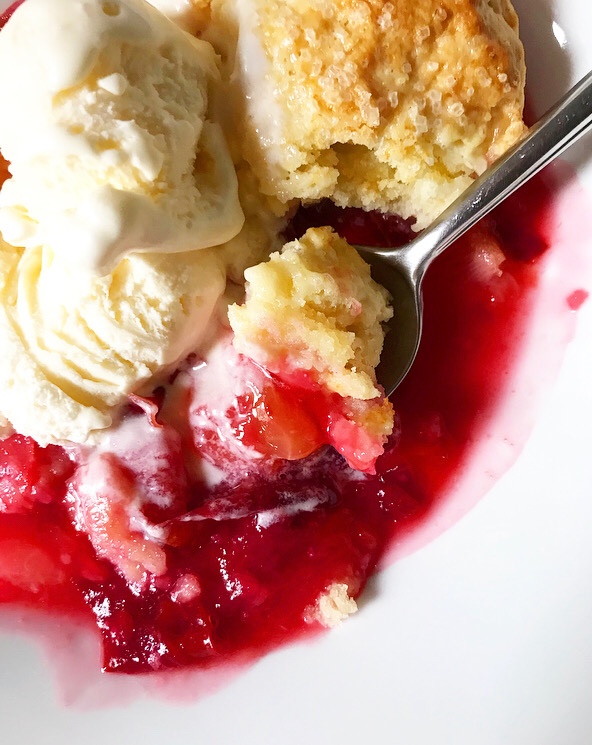
Plum Cobbler
makes one 9×13-inch dish, about 12-16 servings
Plum Filling:
4 pounds plums (about 10-12 plums; I used a mix of red & black)
1/2-2/3 cup granulated sugar
1 teaspoon ground ginger
2 tablespoons cornstarch
pinch of Kosher or sea salt
1 tablespoon fresh lemon juice
2 tablespoons butter, cut into small pieces
Cream Biscuit Topping:
3 cups all-purpose flour
3 tablespoons granulated sugar
1 tablespoon baking powder
1/2 teaspoon Kosher or sea salt
2 cups (1 pint) cold heavy cream + more for brushing
1 tablespoon coarse sugar (optional)
For serving:
vanilla ice cream
Place an oven rack in the center position. Preheat oven to 350F. Grease a 9×13-inch casserole dish. Set aside.
Use a large sharp chef’s knife to pit and slice plums into wedges (I got about 12 wedges per plum). Place plum pieces in a large mixing bowl. Fold in sugar, ground ginger, cornstarch, salt, and lemon juice. Transfer filling to prepared baking dish and dot with butter.
Make the cream biscuit topping. In a medium mixing bowl, stir together flour, sugar, baking powder, and salt. Pour in heavy cream and fold into a sticky dough.
Scoop biscuit dough in ~2 tablespoon increments, flatten them with you hands, and arrange them in a cobblestone pattern over the filling. Brush the biscuit topping with more cream and sprinkle with coarse sugar, if using. Bake cobbler 45-50 minutes, or until golden on top with bubbling filling.
Let cobbler cool 5-10 minutes before serving with vanilla ice cream. Cobbler is best the day it’s made, but leftovers may be tightly covered and kept at room temperature for up to 2 days or in the refrigerator for up to 4. Reheat before serving.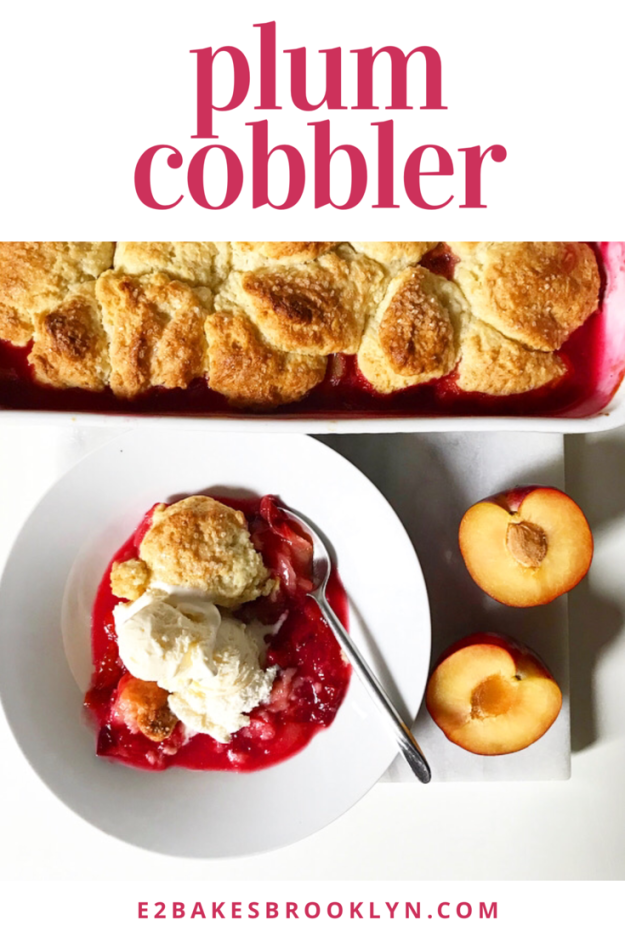
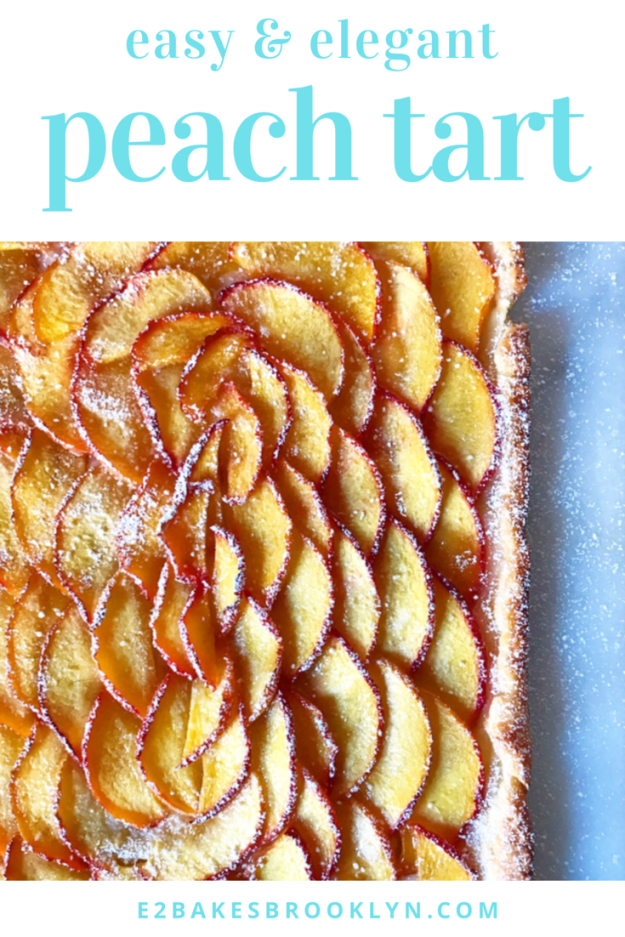
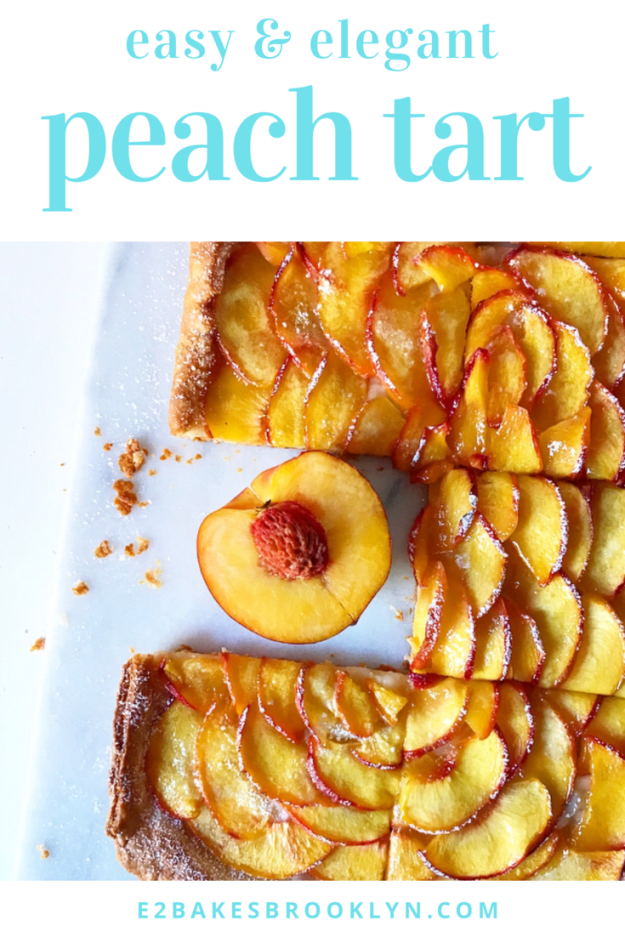
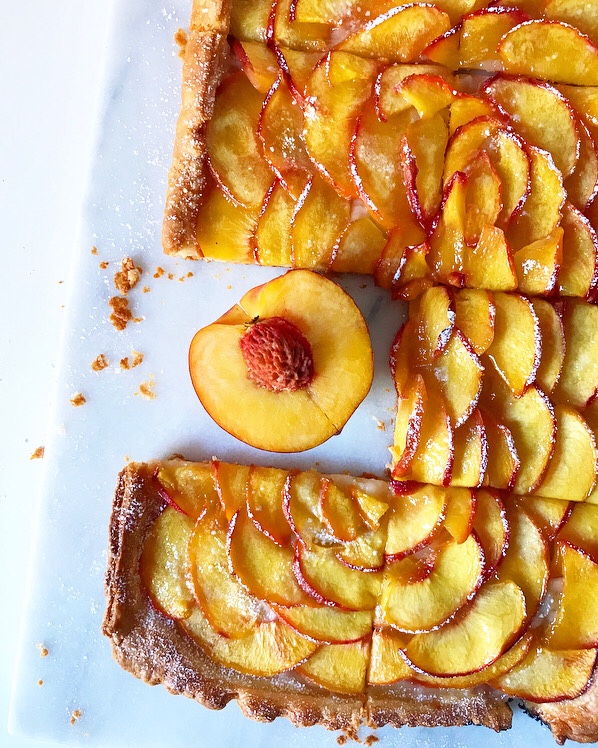 If you’re looking for an easy, elegant late-summer dessert, you’ve come to the right corner of the internet. This Peach Tart, y’all. I can’t get enough.
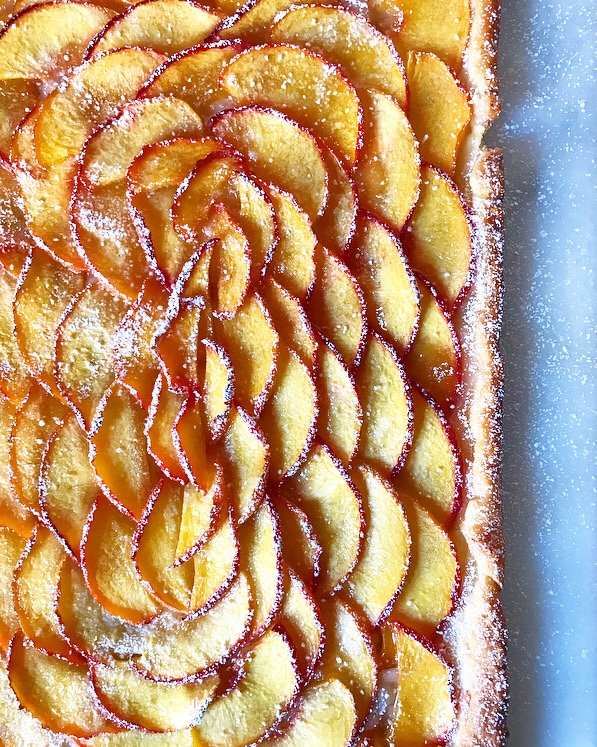 It’s as beautiful as it is delicious, and much easier than
 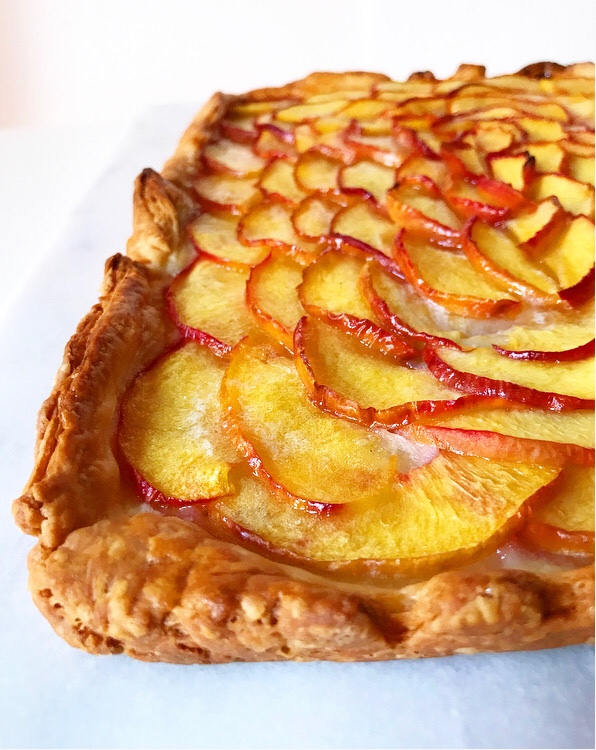 Where most
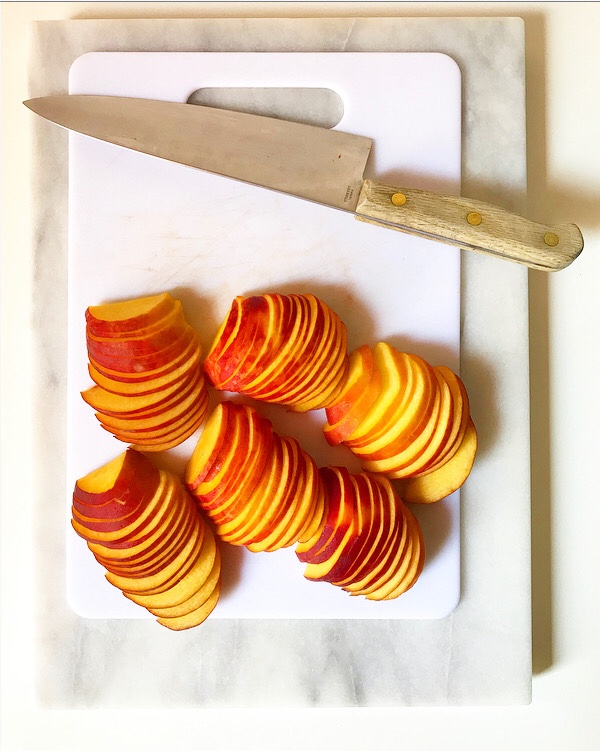

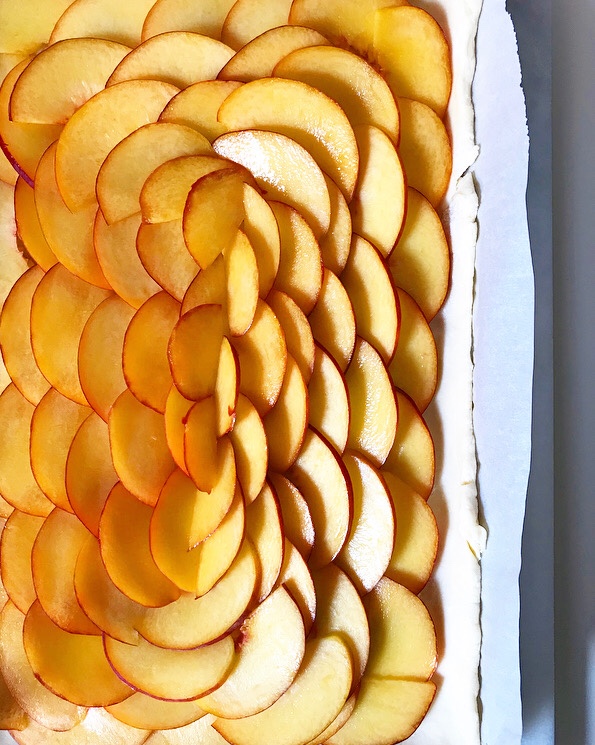

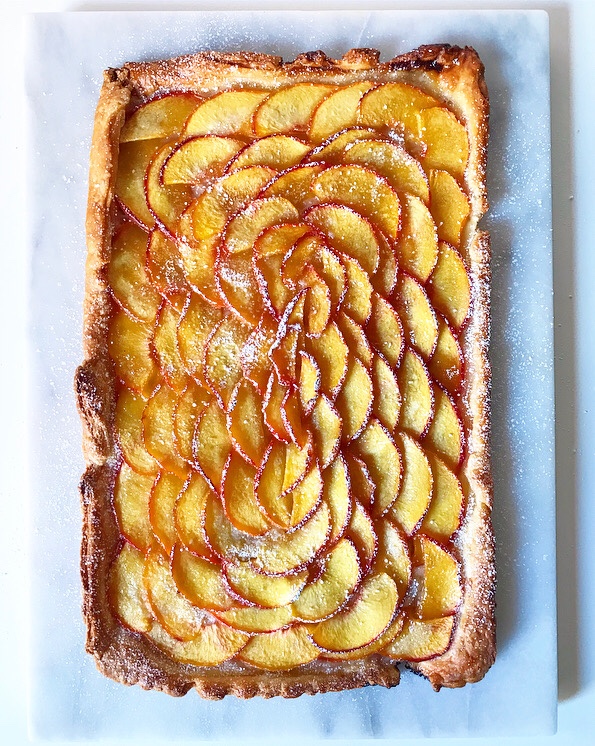 Fresh peaches are sliced thin and tossed with lemon juice before being arranged over pastry, then sprinkled with a tiny amount of sugar and dotted with butter before baking.
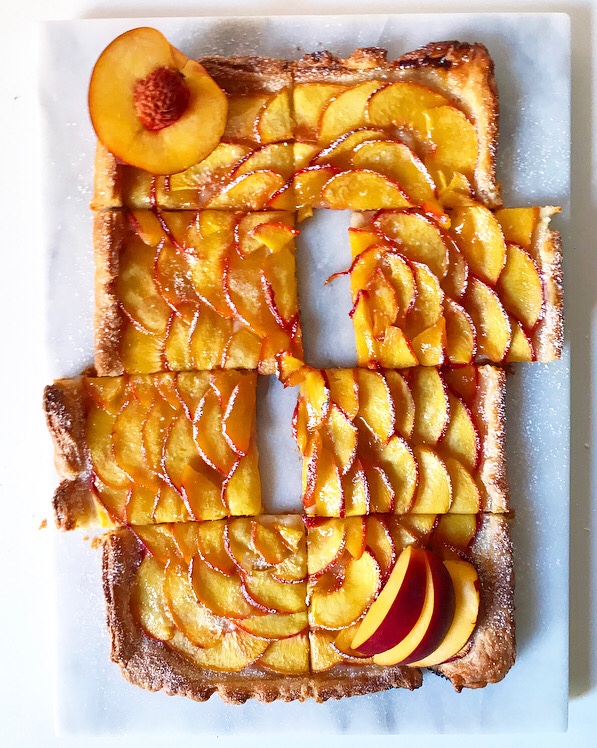 The result is this golden and gorgeous fruit-forward Peach Tart. There’s nothing to mask the flavor of the peaches because this time of year, when they’re at their peak, there’s no need.
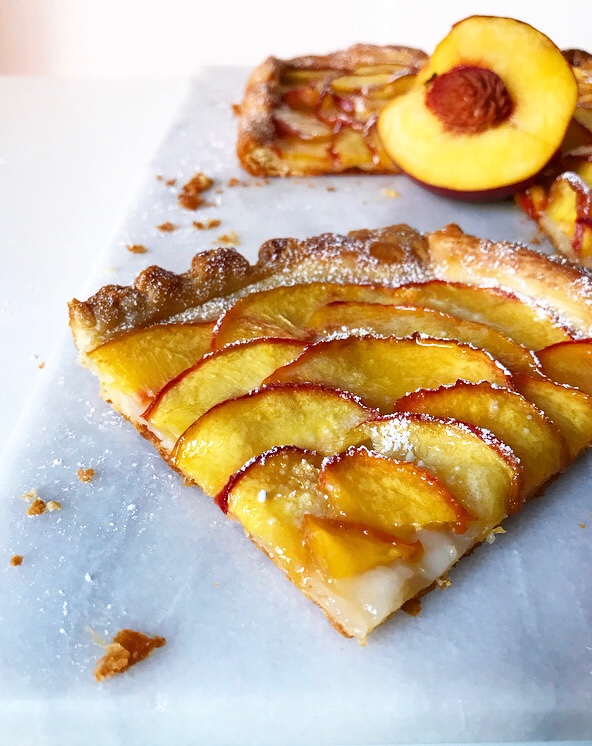
 This is the last
 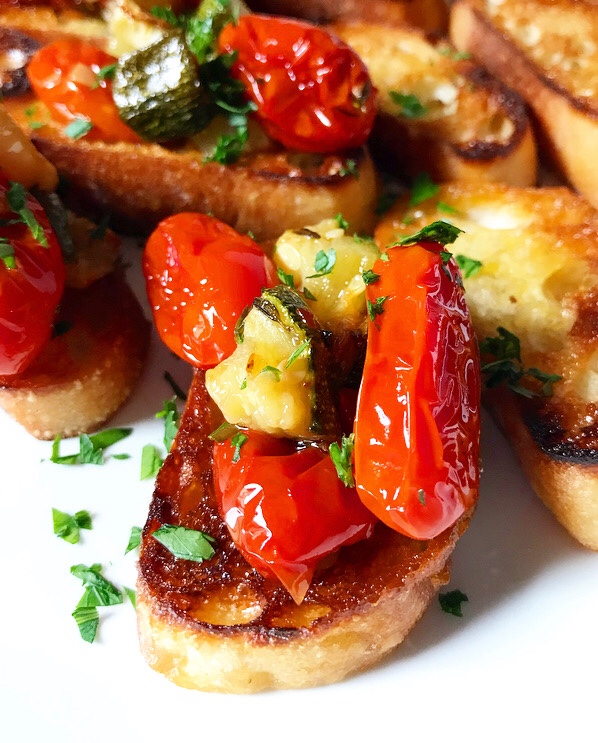 Unlike the
 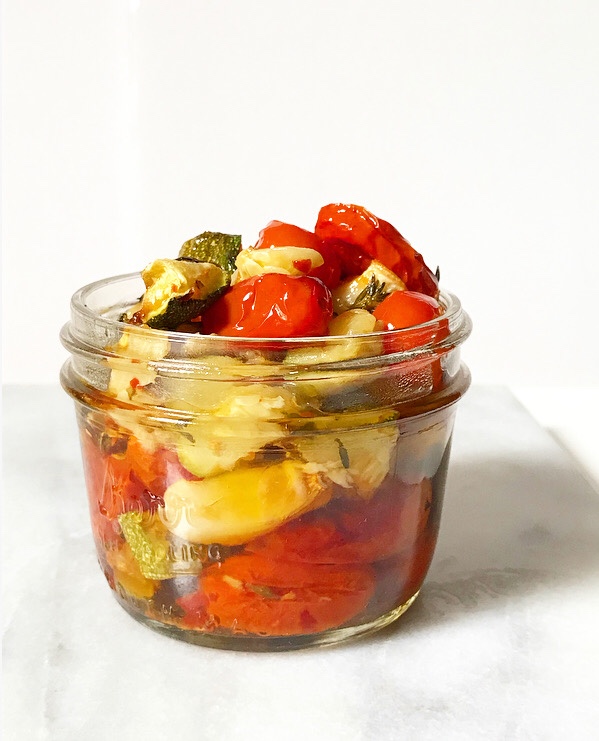 Now, you’ve almost certainly heard of confit, most likely in association with duck. The word itself comes from the
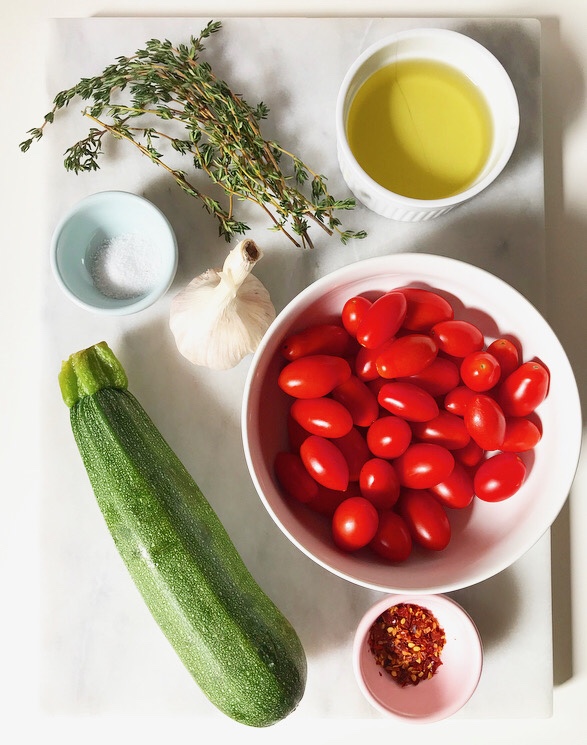
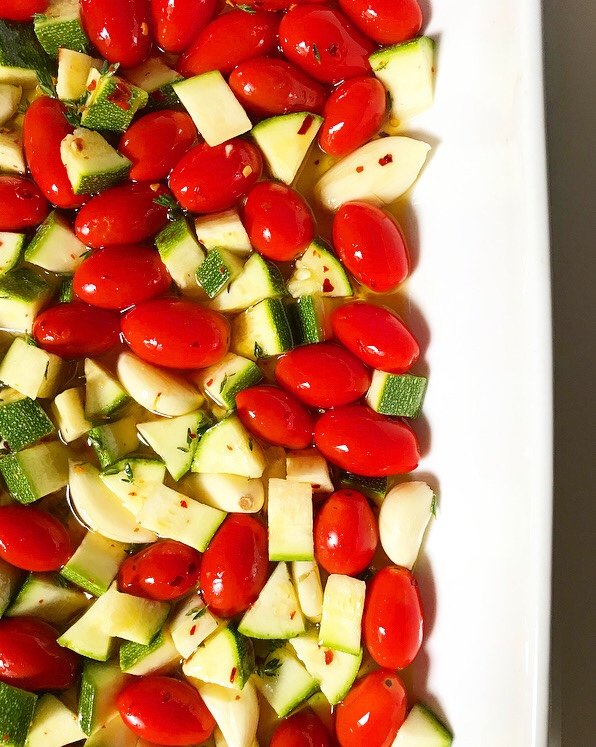
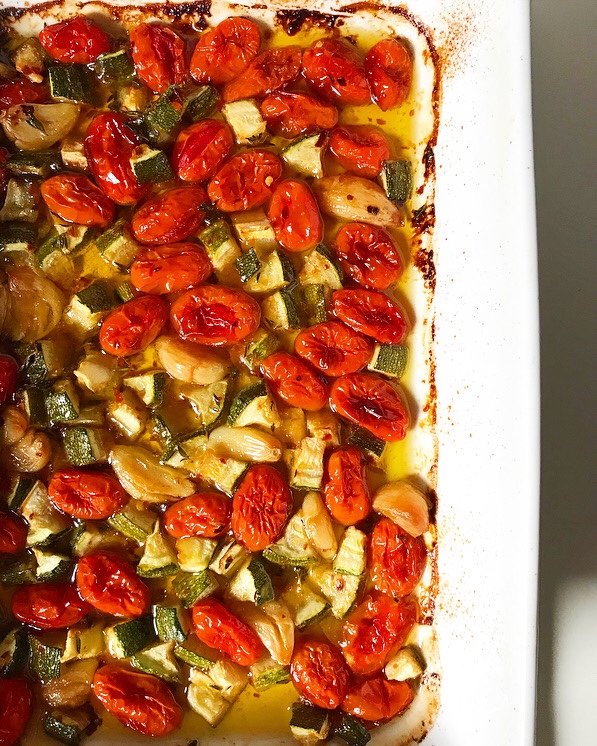 Making this confit couldn’t be simpler. Start by tipping a pint of grape tomatoes, some diced zucchini and an entire head’s-worth of garlic cloves into a casserole dish. Season them with thyme, red pepper flakes and salt. Stir in 3/4 cup of olive oil and slow-roast until it’s all soft, caramelized, and fragrant. That’s it.
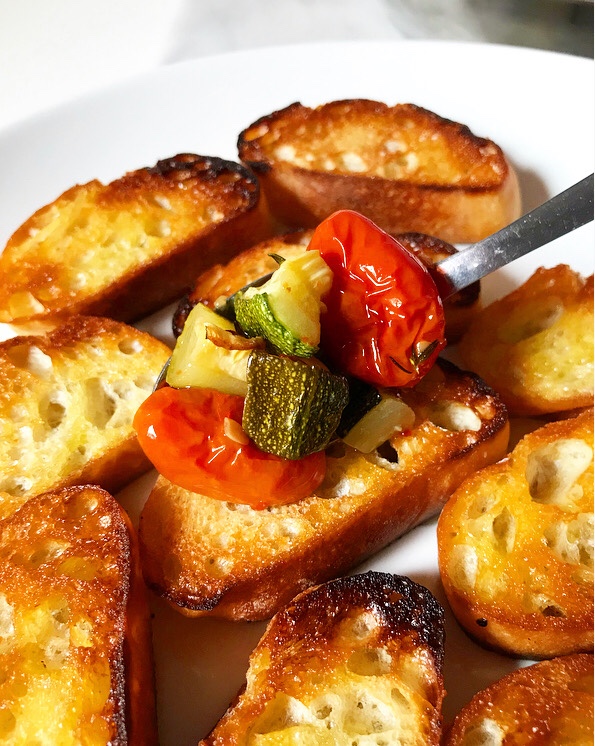 The sky’s the limit on applications. Tomato & Zucchini Confit can be stirred into pasta , grains or beans for a quick meal, or used to garnish chicken or fish. For this post, I just spooned it onto some baguette slices that were toasted in olive oil and called it crostini. Really, put this on anything that could use a touch of herby, savory, garlicky tomato & zucchini. (I think you’ll find that that’s most things.)
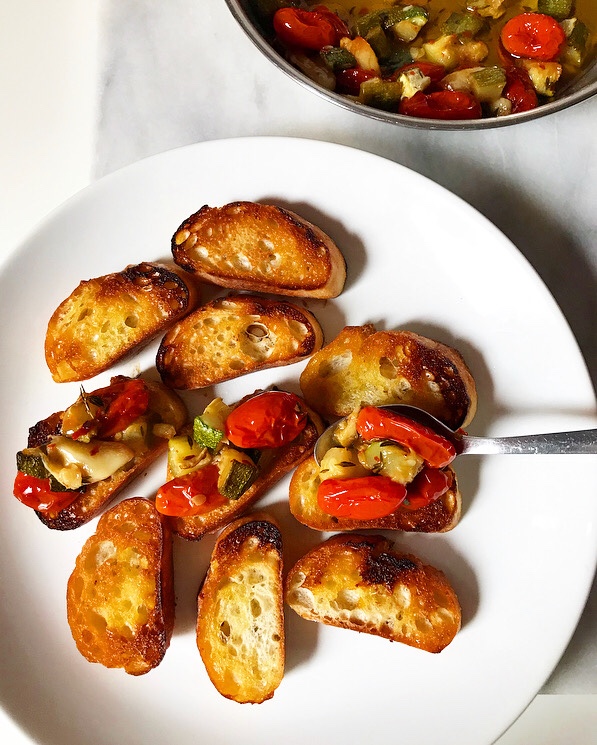 I’ve written this recipe so that the oven is at 300F and the confit cooks for about an hour, but you can go even lower and slower (think 250F for 2 or even 3 hours) for greater depth of flavor. I think it’s pretty wonderful as is though.
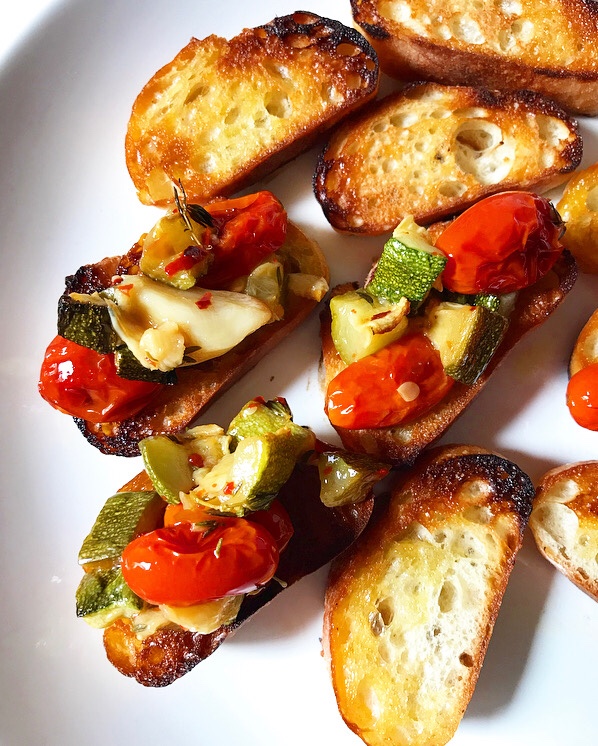 Tomato & Zucchini Confit is great the day it’s made, but since it’s a preserve, one batch can last a while. Once it has cooled, just pile it into a jar, top it off with olive oil so that none of the tomato, zucchini or garlic is exposed, and store it in the fridge. When you’re ready to serve it, bring the confit back to room temperature. When you’ve had your fill, top the leftovers with more oil and refrigerate the jar again for up to two weeks. If you’re anything like me though, it won’t be around longer than a few days.
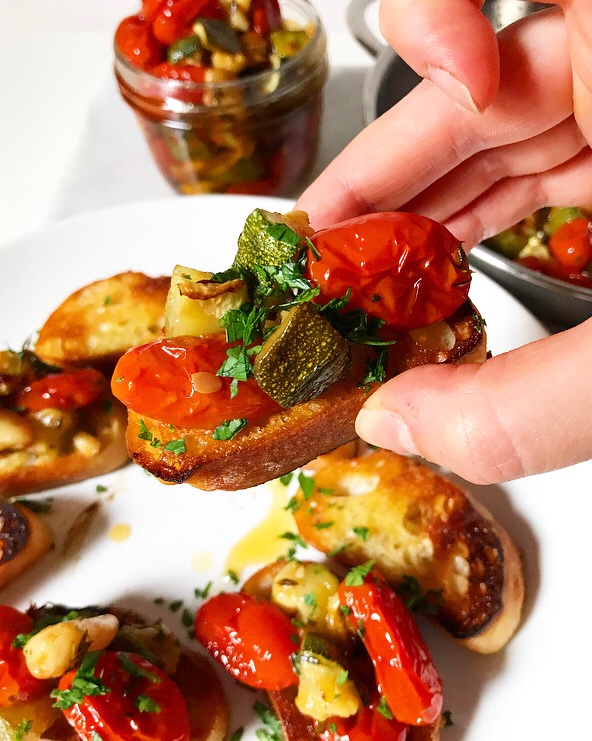


 Hi there! Long time, no blog.
 That doesn’t mean I didn’t cook though. Vacationing on a remote island means spending time in the kitchen is a necessity, and for me,
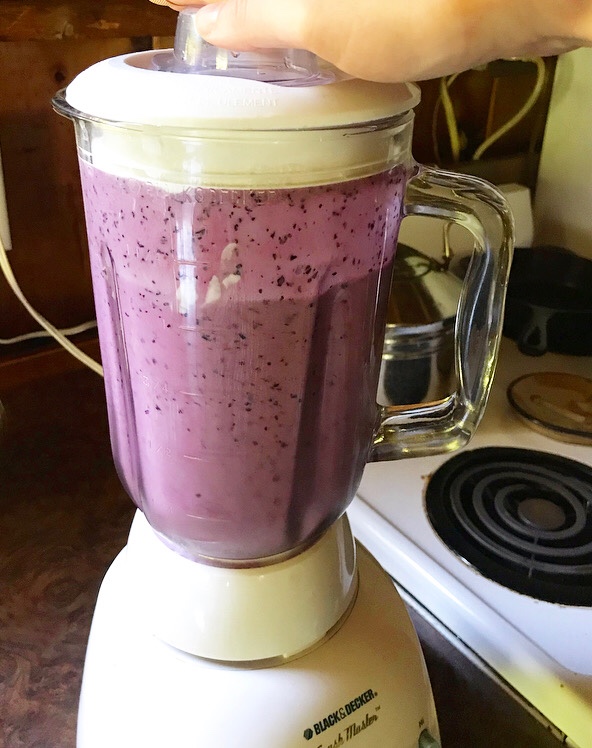
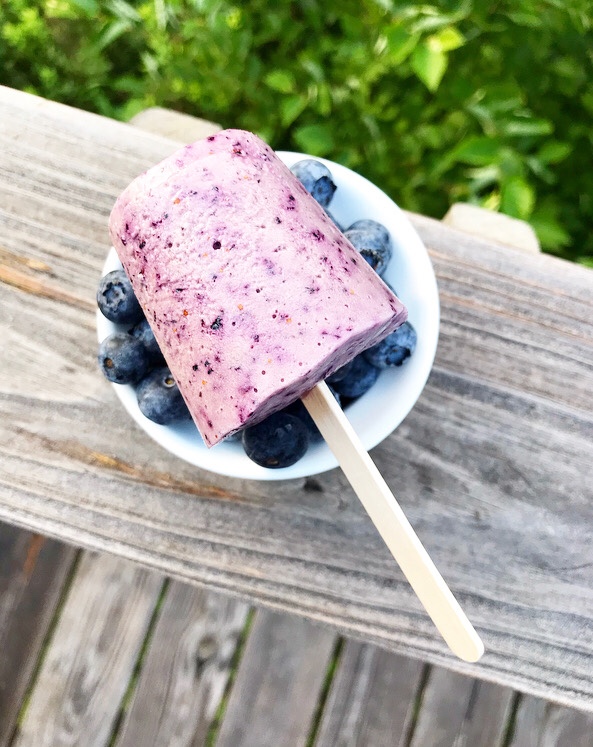
 This time around, we already had blueberries (because Maine), maple syrup (because waffles), and vanilla (because I’m a baker) on the list, and I had packed a blender (because
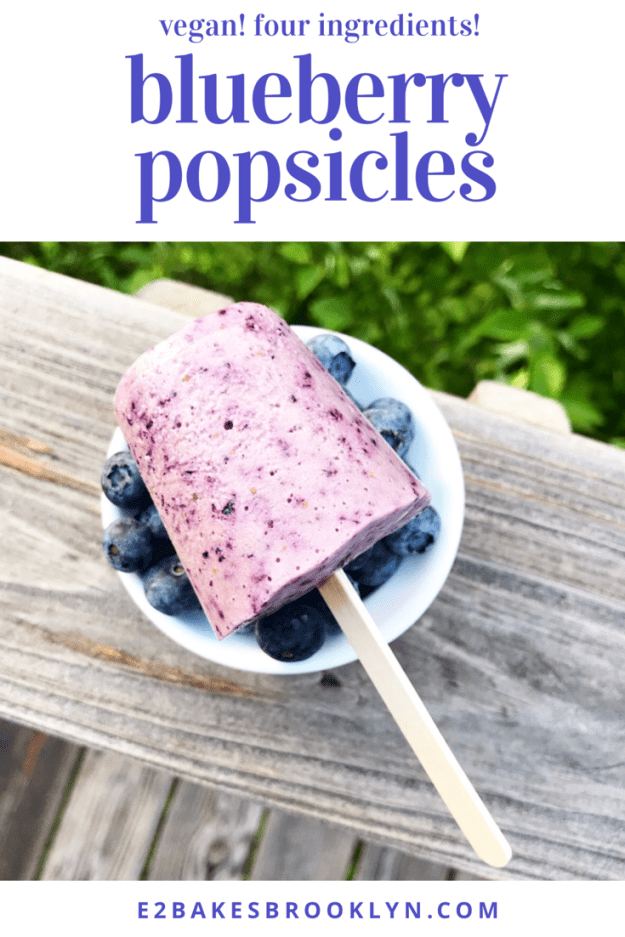
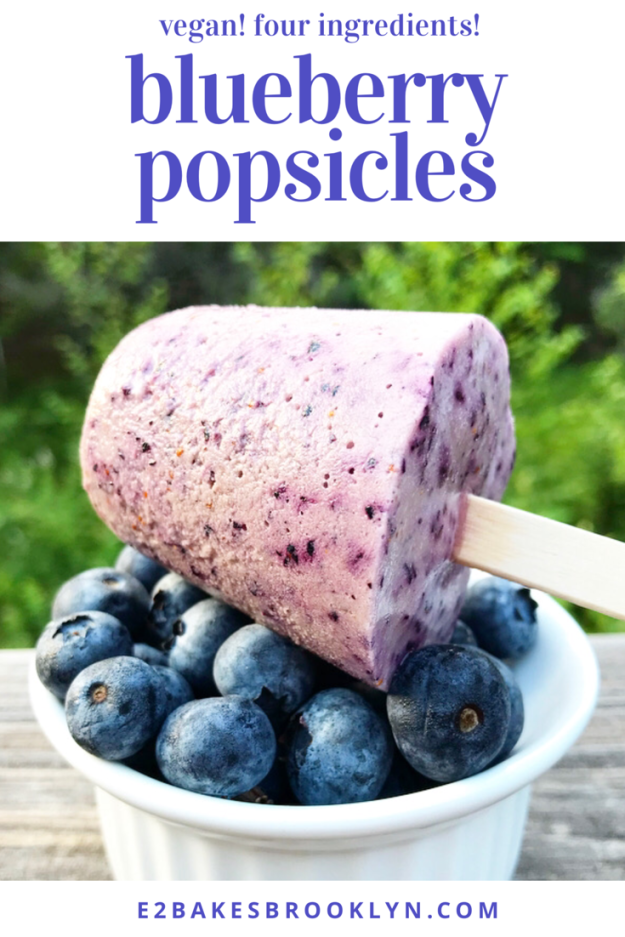
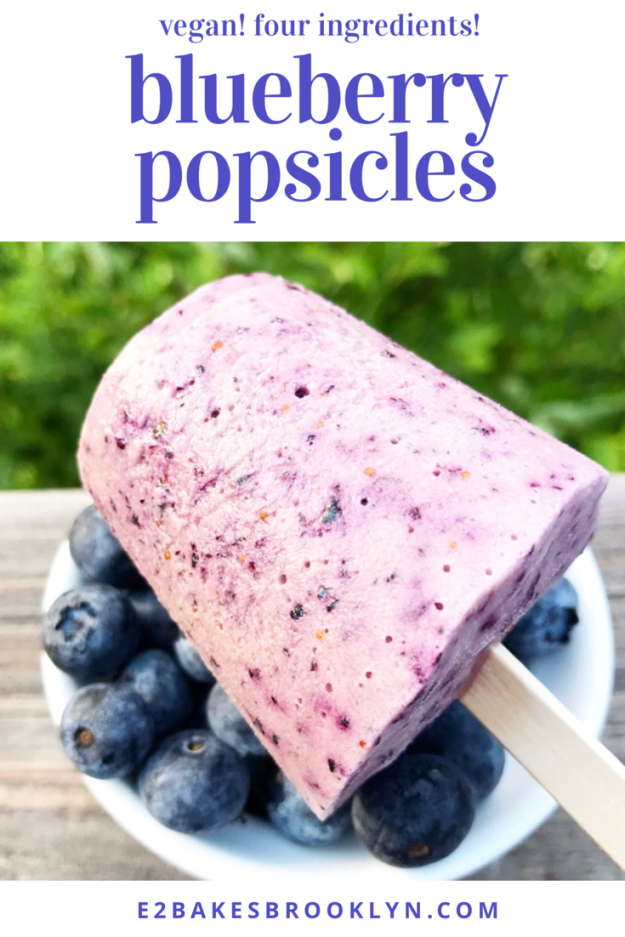
 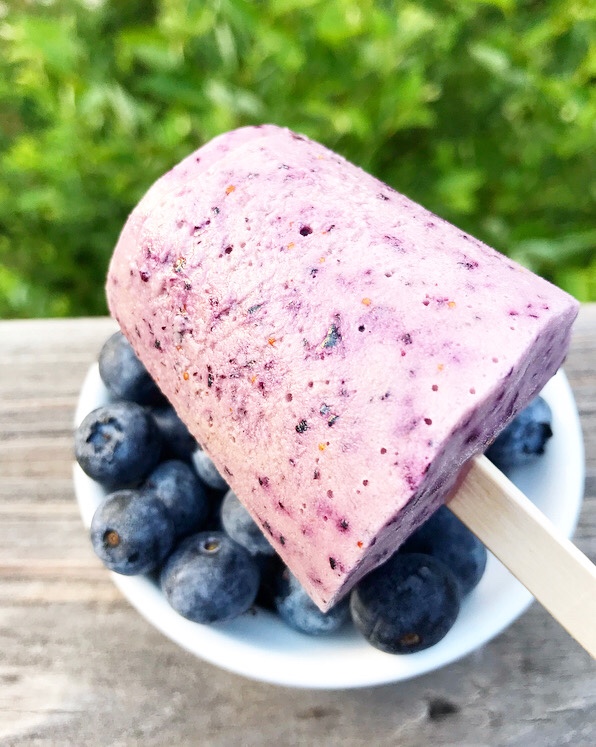 These are the perfect easy summer dessert! They require the bare minimum of effort and ingredients, but deliver big-time on icy texture and creamy blueberry flavor. Oh, and they’re vegan, so your gluten-free vegan co-traveler can enjoy them too.
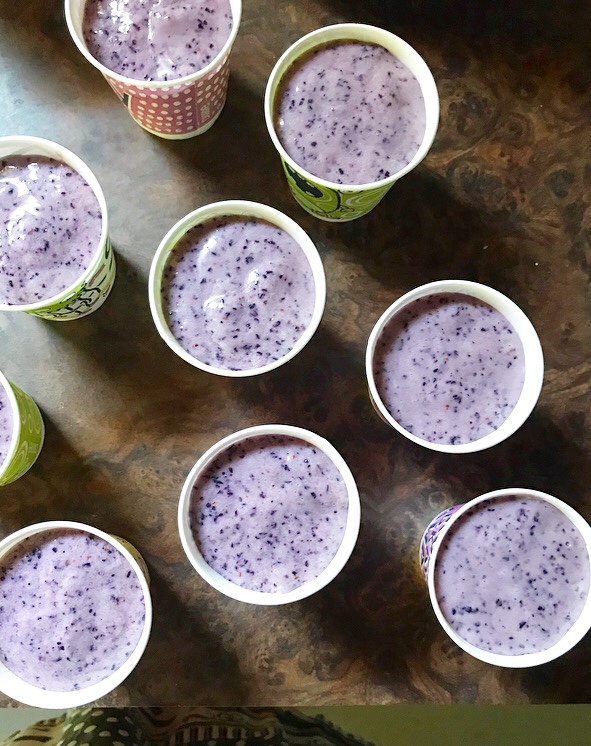
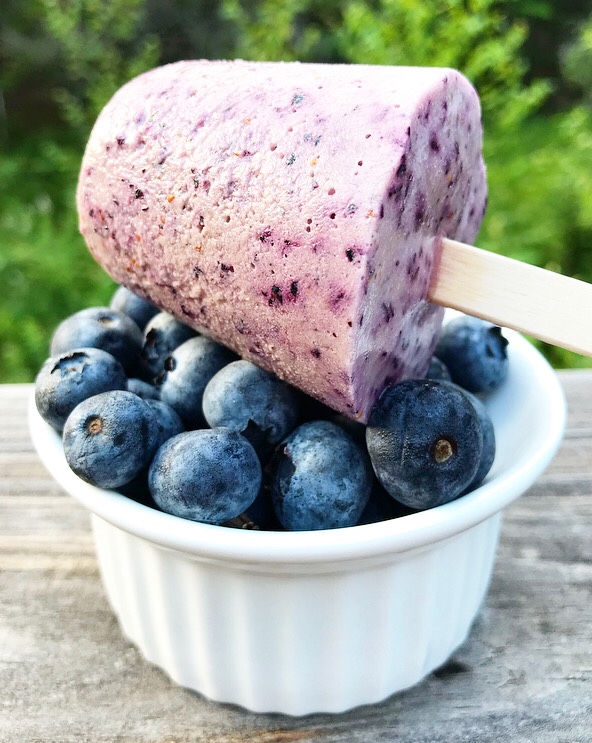 There are four steps to making Blueberry Popsicles:
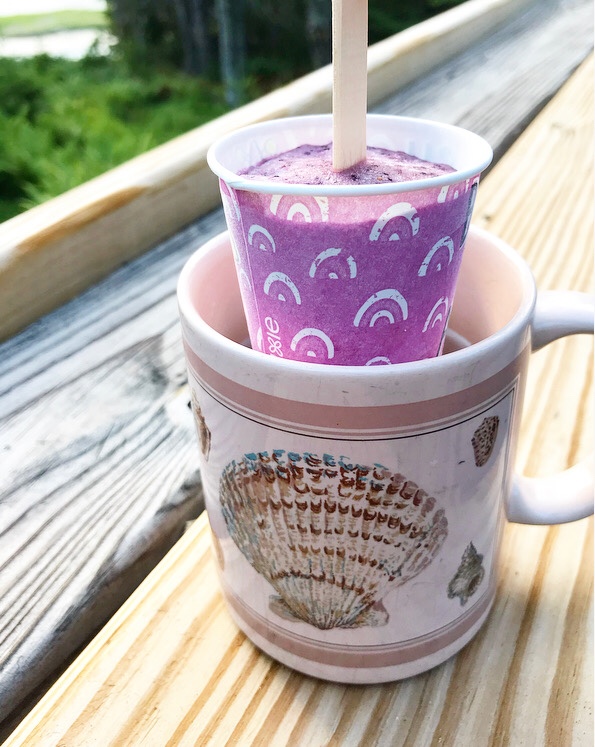
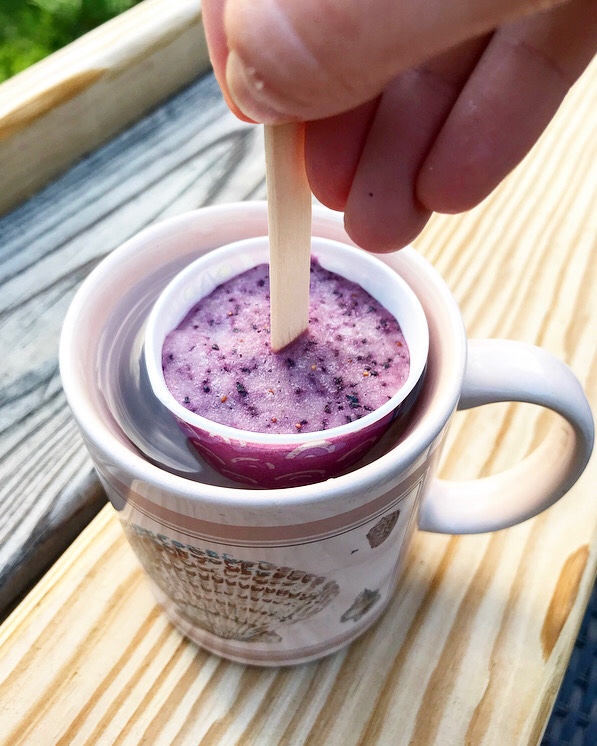 All that’s left to do is unmold and enjoy them on a patio in
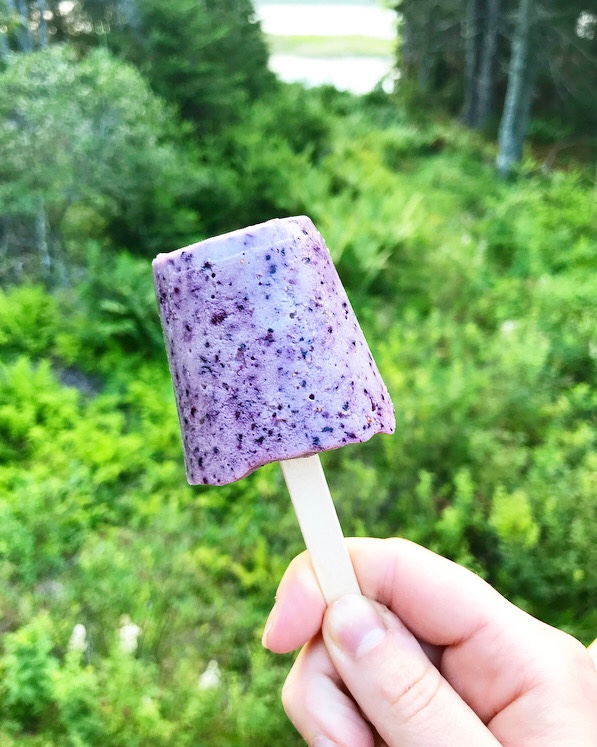
 Hello from

 I am only doing things that I want to do this week, which have thus far included thrifting, reading an actual book, re-seasoning our cottage’s abused cast iron, going to another island to see whale bones, and eating waffles twice because my friend/co-traveler/fellow Swan’s Island enthusiast, VJ, thought to bring her waffle iron and has been kind enough to let me mess with it.
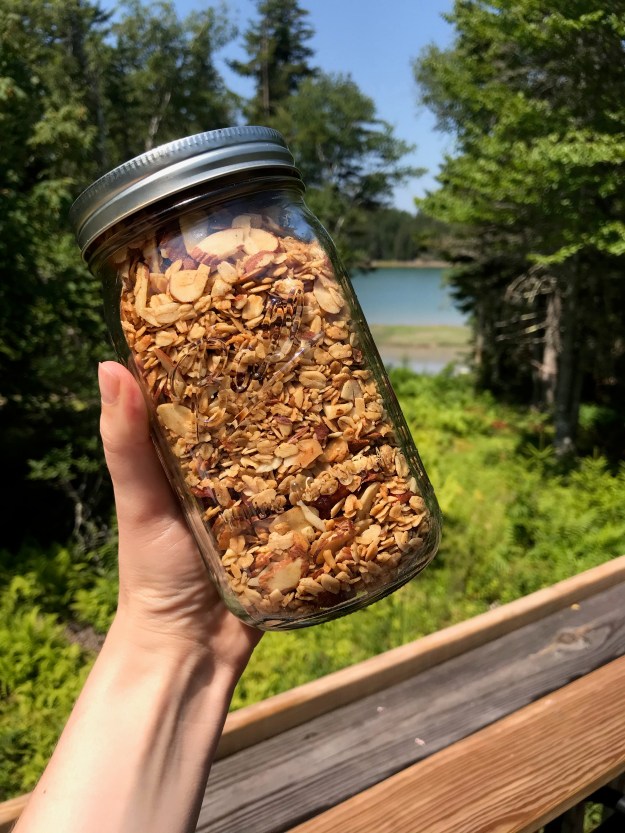
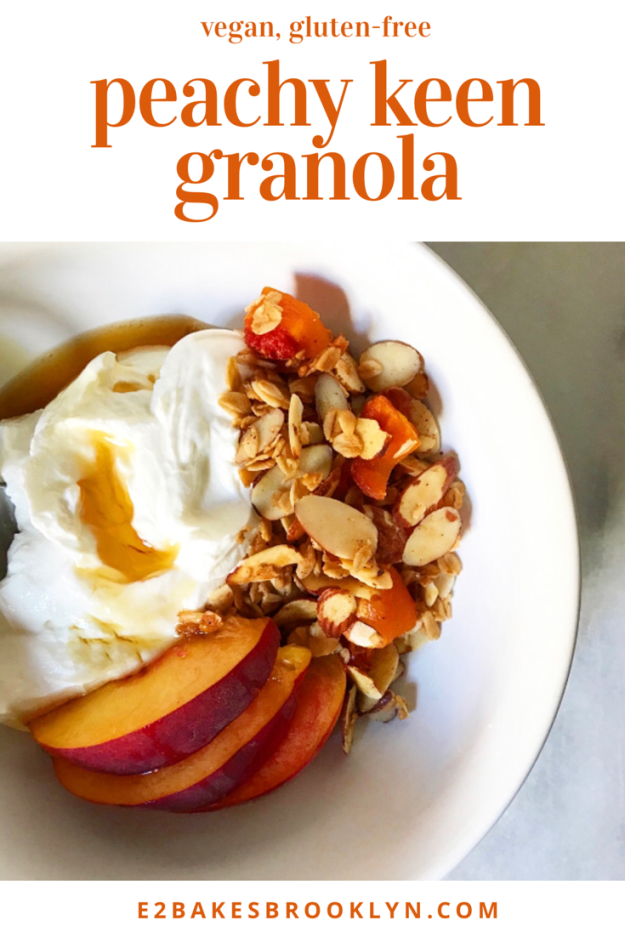
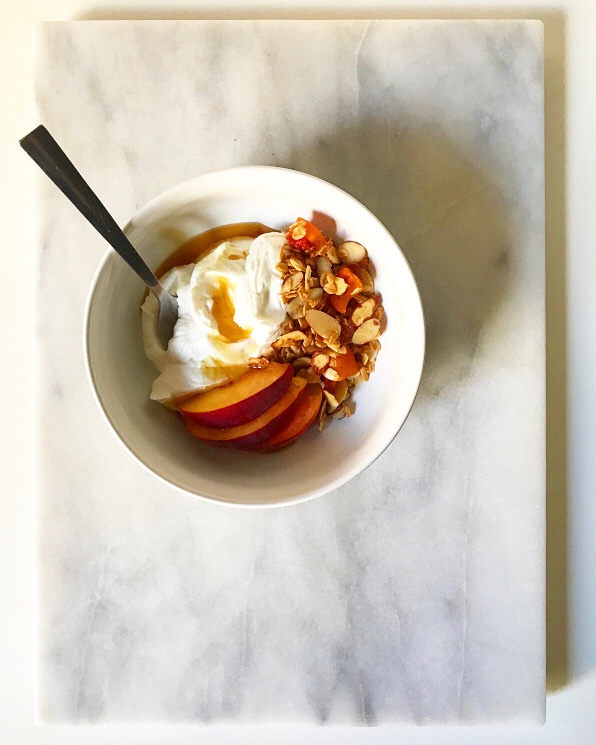
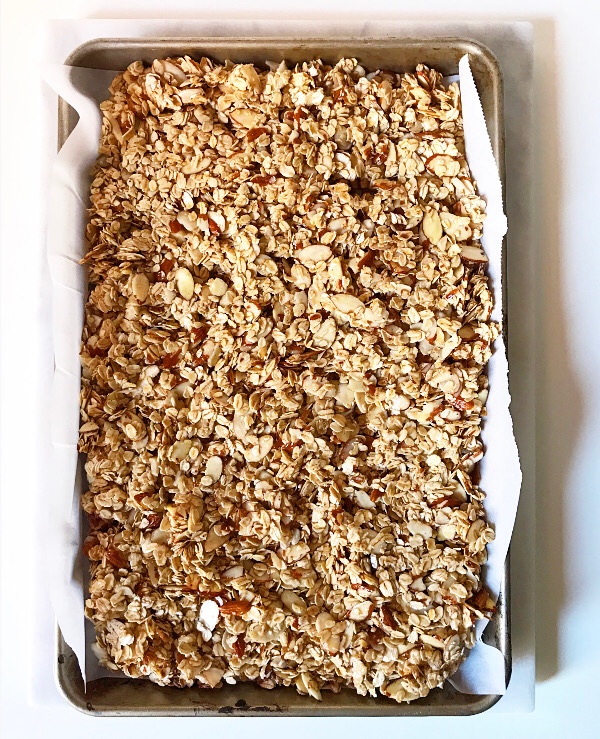
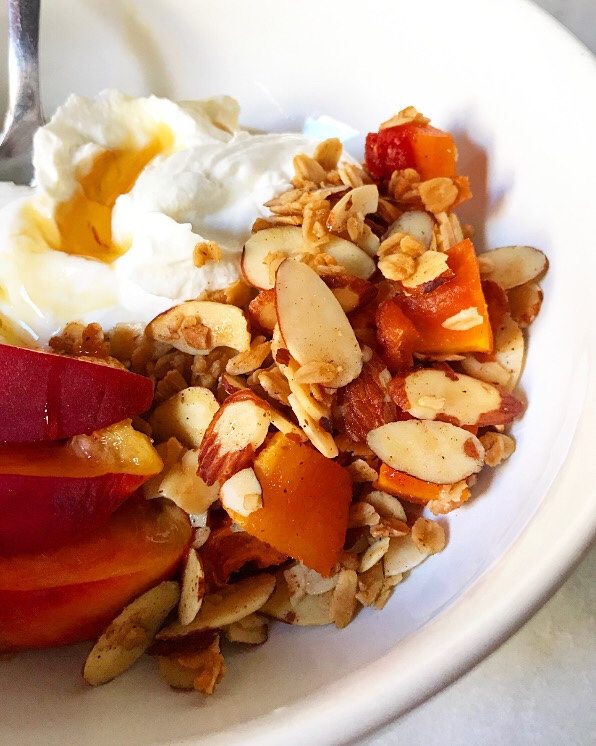 I, however, am the Granola Queen. In an effort over the last few years to create a breakfast item that we could both enjoy, I’ve created three granola recipes in anticipation of our trips to Maine. They’re all vegan and gluten-free (aka
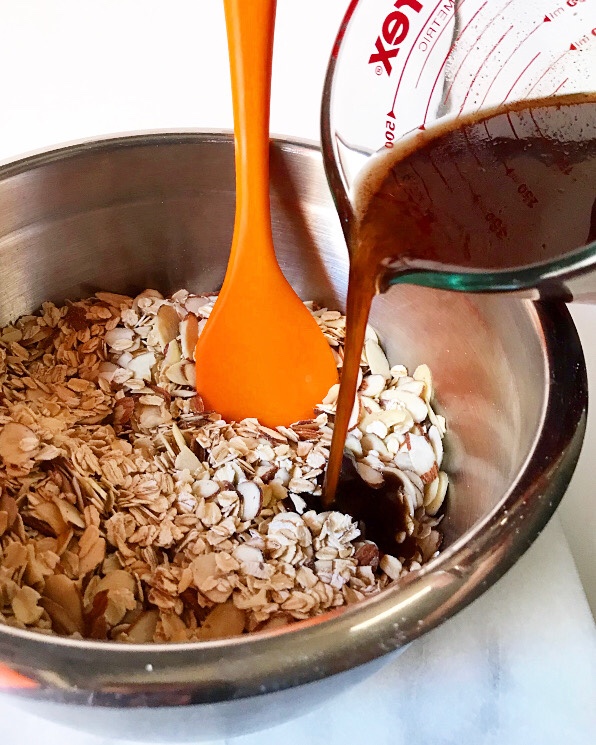
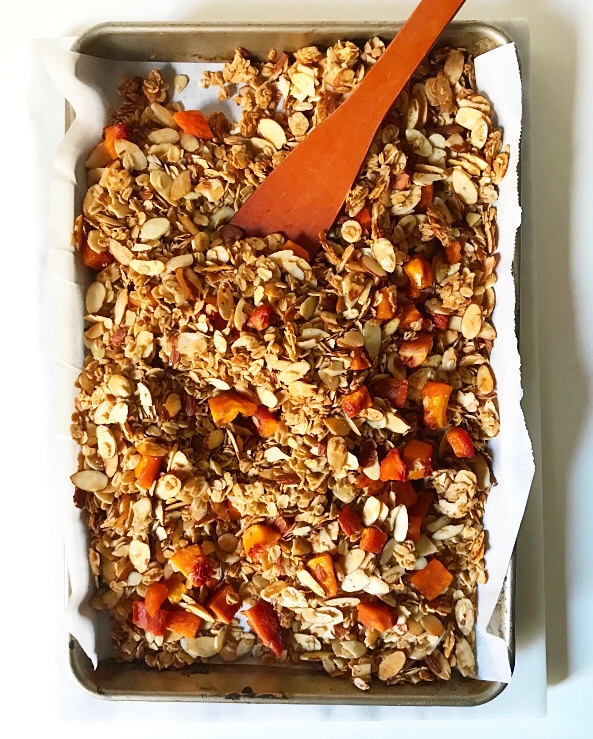 I will not apologize for the cutesy name, or this granola for that matter. It’s my first new variation in
 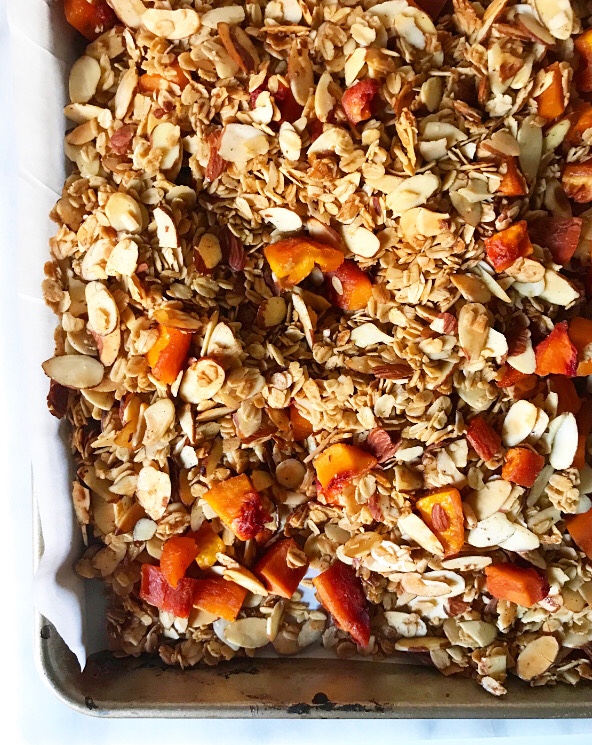 Made with dried peaches, almond extract and pie spices in addition to the usual oats, nuts, maple syrup and olive oil, this is the stuff my summer breakfast dreams are made of.
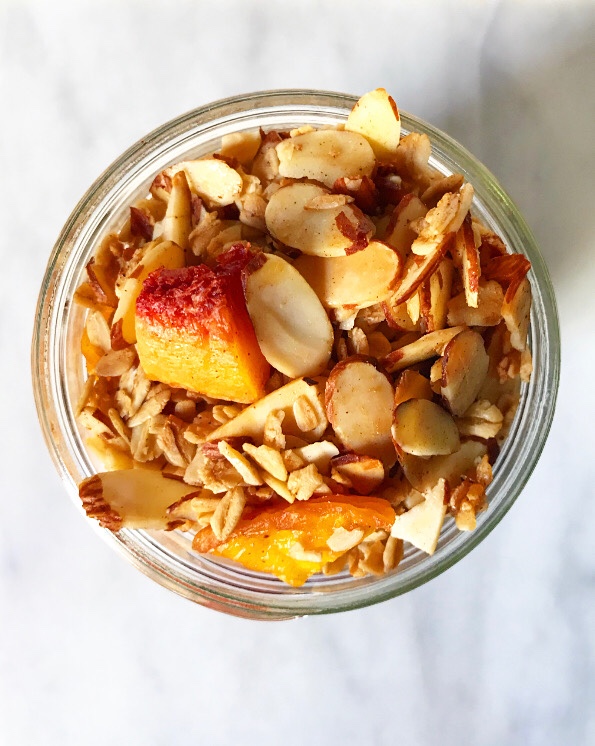 That goes double when eaten in my own personal paradise. Peachy keen, indeed.