Tag Archives: Valentine’s Day

Chocolate Cut-Out Cookies

Chocolate Cut-Out Cookies
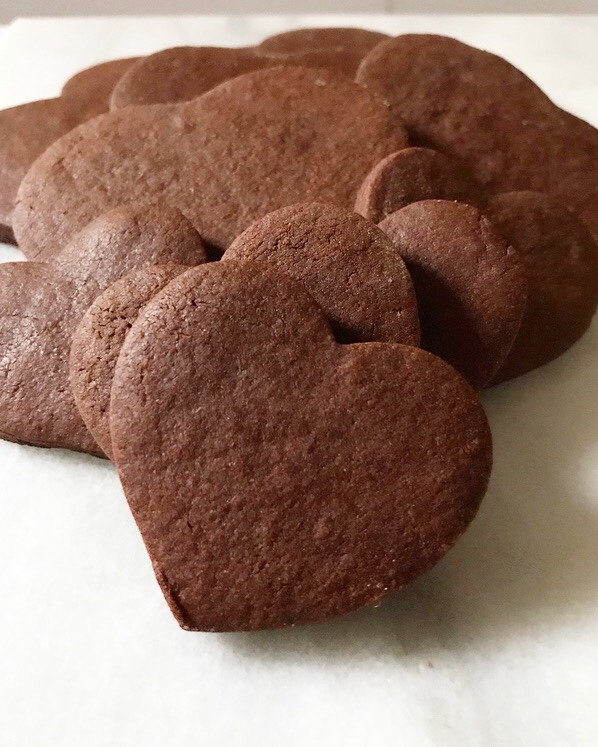
I’m not sure exactly how I’ve allowed 3+ years to go by without giving you my recipe for Chocolate Cut-Out Cookies, but I’m happy to be rectifying that travesty today.Chocolate Cut-Out CookiesI mean, how dare I deprive you of this dead-easy recipe for these deeply chocolaty, shockingly tender blank-slate cookies for 362 posts! How. Dare. I.Chocolate Cut-Out CookiesYou may think I’m being dramatic—they’re cookies, not rocket science—but these are really delicious. Like more chocolaty than any plain, no-frills cookie really ought to be.Chocolate Cut-Out CookiesChocolate Cut-Out Cookies
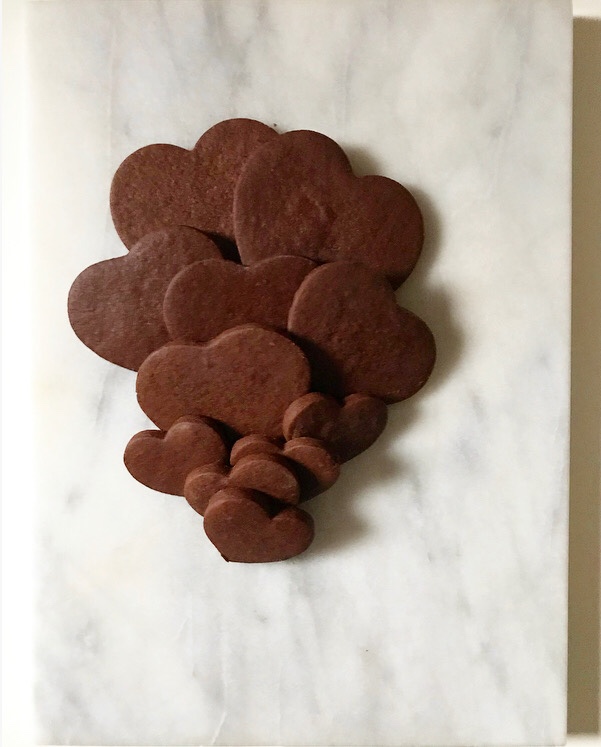
So rich and buttery and utterly decadent that you’d be more than happy to eat them by their lonesome…Chocolate Cut-Out Cookies
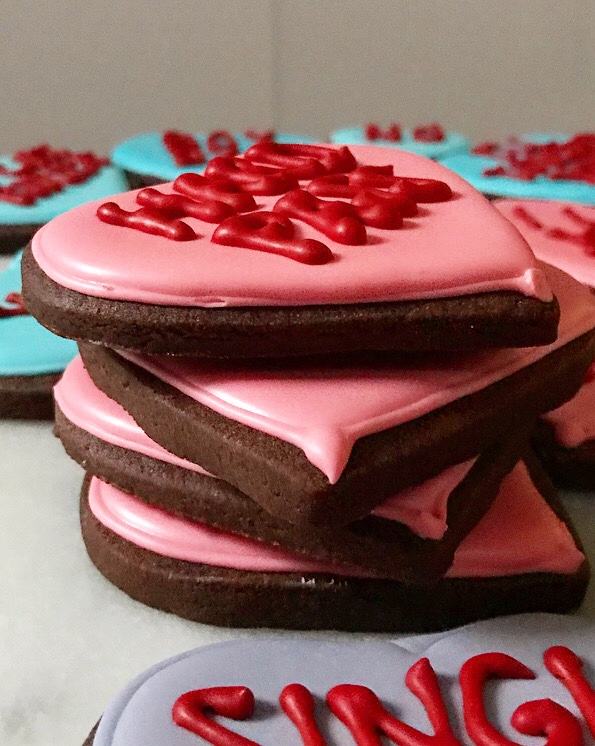
…but then you’d be missing out on the cheeriness that comes with a layer of my go-to Quick-Dry Royal Icing.Chocolate Cut-Out CookiesOr perhaps you, like me, prefer your cookies and icing with a little light-hearted snark. I’m not one of those people that hates Valentine’s Day—far from it—but I do prefer a more tongue-in-cheek approach over the traditional syrupy-sweet message.Chocolate Cut-Out Cookies
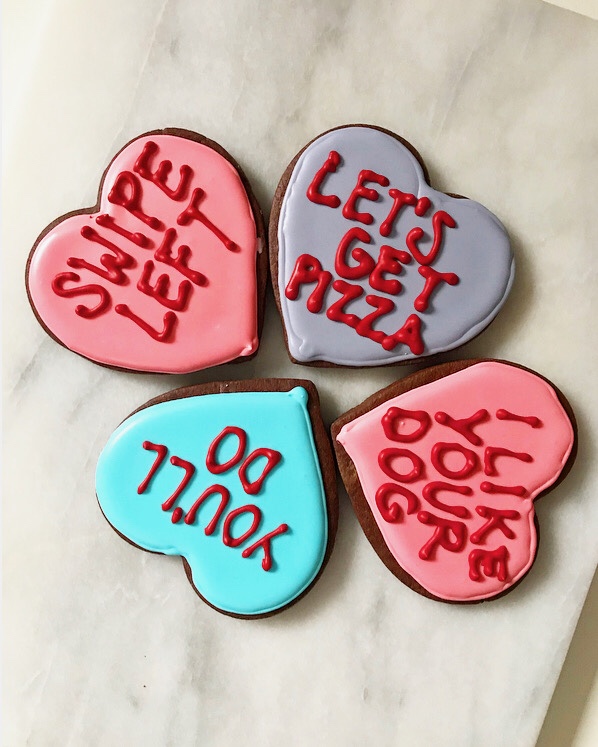
Perhaps I’ve had my heart broken one too many times. Or maybe I just know exactly what I want: a man who will tolerate me for all my weirdness and vast amount of baking equipment.Chocolate Cut-Out CookiesYes. That and a pile of cookies.Chocolate Cut-Out Cookies

Chocolate Cut-Out Cookies
makes about 2 dozen 3-inch cookies

2 1/2 cups all-purpose flour
3/4 cup unsweetened cocoa powder (I use Dutch process)
1 1/2 teaspoons baking powder
1/2 teaspoon Kosher or sea salt
1 cup (2 sticks) unsalted butter, softened to room temperature
1/2 cup granulated sugar
1/2 cup light brown sugar, packed
1 large egg, room temperature
2 teaspoons pure vanilla extract
Quick-Dry Royal Icing, for decorating (recipe below)

Special Equipment:
rolling pin
graduated cookie cutters

In a large mixing bowl, whisk together flour, cocoa powder, baking powder, and salt. Set aside.

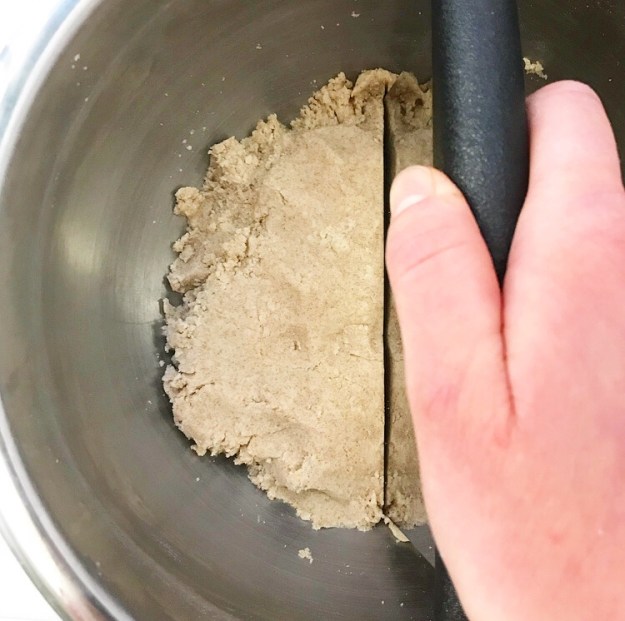
In a separate large mixing bowl, use an electric mixer to beat butter until light and fluffy, about 2 minutes. Mix in granulated and light brown sugars, followed by the egg and vanilla extract. Add dry ingredients in 3 installments, combining completely after each. Dough may seem a bit crumbly, but will hold together well when pinched. Divide dough into quarters and wrap each in plastic wrap. Chill for at least 3 hours, or up to 3 days.

Preheat oven to 350F. Line two baking sheets with parchment. Set aside.

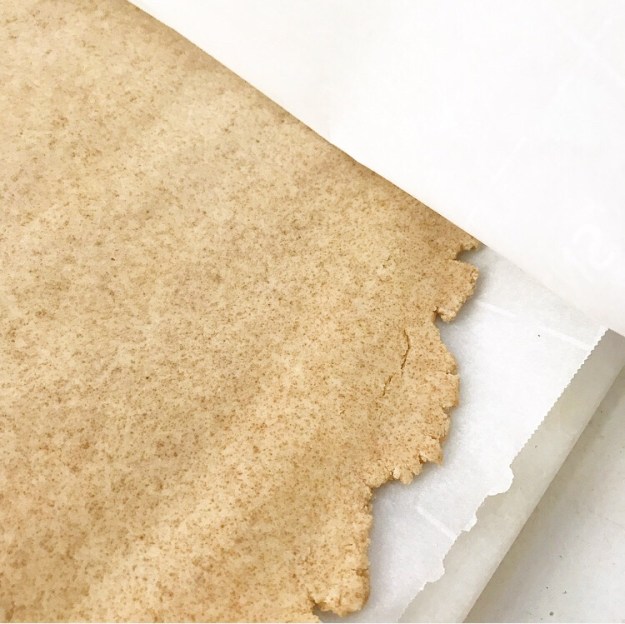
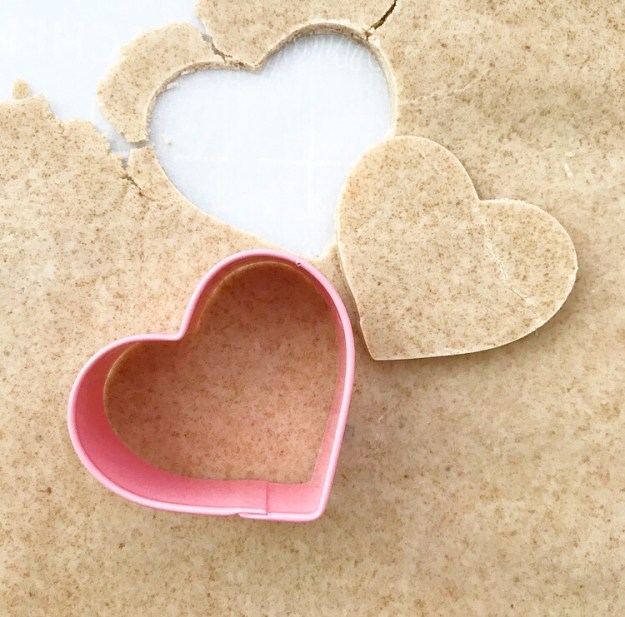
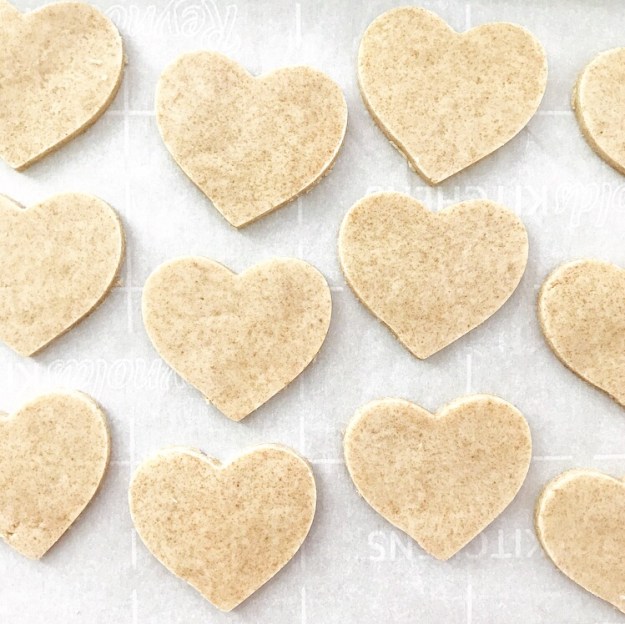
Lightly flour a surface and a rolling pin. Take one quarter of chilled dough at a time, roll it to 1/4-inch thickness, and cut with cookie cutters. Place cut cookies at least 1 inch apart on prepared baking sheets. Bake cookies 10-12 minutes, until soft but no longer raw-looking. Let cookies cool on the pans for 10 minutes before carefully removing to a rack to cool completely. Repeat rolling, cutting, and baking with any remaining dough.

Decorate cookies with Quick-Dry Royal Icing and allow to dry.

Cookies will keep in an airtight container at room temperature for at least a week.

Quick-Dry Royal Icing
recipe barely adapted from SugarDeaux

3 tablespoons meringue powder
5 ounces warm water
3/4 teaspoon cream of tartar
2 teaspoons pure vanilla extract
1/4 teaspoon pure almond extract (optional)
2 pounds confectioner’s sugar, divided
1 tablespoon corn syrup
water

Special Equipment:
small bowls
gel food coloring
piping bags (or plastic sandwich bags)
small round piping tips and couplers
squeeze bottles
toothpicks
sprinkles

In a large mixing bowl, combine meringue powder and warm water. Beat with an electric mixer on medium-high speed until doubled in size, about 1 minute. Mix in cream of tartar, vanilla, and almond extract. With the mixer running on low, add 1 pound of confectioner’s sugar. Mix in corn syrup. Add the remaining pound of confectioner’s sugar. Scrape down the bowl before beating on medium-low for an additional 30 seconds.

Divide icing among small bowls. Press plastic wrap to the surface of all exposed icing.

Make outline icing. Working with one bowl of icing at a time, add water 1/2 teaspoon at a time until icing dribbled into the bowl forms a ribbon that fades within a few seconds. Stir in gel food coloring until the desired color is reached. Place 1/4 cup of icing into a piping bag with a tip. Alternatively, load icing into a plastic sandwich bag and snip a very tiny corner. Outline all cookies. Set aside to dry while you prepare fill icing.

Add water by the 1/2 teaspoon until the ribbon of icing fades into the bowls within 2 seconds. Load icing into squeeze bottles. Working with one cookie at a time, fill icing into outlined sections. Use toothpicks to coax fill icing evenly to the outlines.

Decorate with more icing or sprinkles, as desired. Let cookies dry uncovered at room temperature for 4-6 hours. For 3D decorations, use outline icing to decorate dried cookies and allow to sit uncovered for another 3-4 hours.

Iced cookies will keep in an airtight container at room temperature for several days.Chocolate Cut-Out CookiesChocolate Cut-Out Cookies

Advertisement

Chocolate-Dipped Brown Butter Shortbread

Chocolate-Dipped Brown Butter ShortbreadAs with everything else in life, patience is a huge part of being a food blogger. For instance, I first made a version of these cookies for an order last April and knew immediately that I wanted to put them on the blog…but who eats shortbread in April?

Chocolate-Dipped Brown Butter ShortbreadI’m sure someone does, but most everybody I know reserves it for Christmas, so I waited. And then December came and went, and nary a shortbread made an appearance on this blog. I suppose I could have held out for the end of the year, but instead I’m making shortbread for Valentine’s Day and you should too.
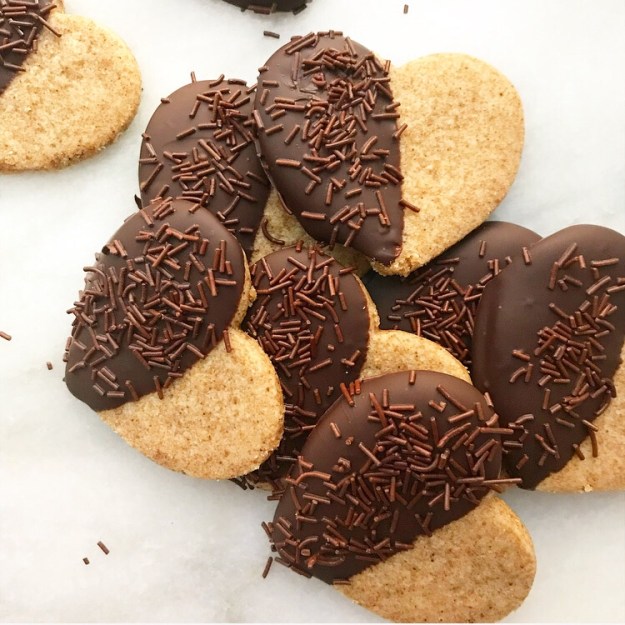
Chocolate-Dipped Brown Butter ShortbreadChocolate-Dipped Brown Butter ShortbreadI mean, all shortbread is good—it’s basically a vehicle for eating copious amounts of butter and sugar in polite company. But this isn’t just any shortbread.

Chocolate-Dipped Brown Butter ShortbreadChocolate-Dipped Brown Butter ShortbreadChocolate-Dipped Brown Butter ShortbreadChocolate-Dipped Brown Butter ShortbreadThis version is made with brown butter. It’s one of my very favorite ingredients (see here, here, and here), producing baked goods with a nutty aroma and incomparable depth of flavor.

Chocolate-Dipped Brown Butter ShortbreadChocolate-Dipped Brown Butter ShortbreadChocolate-Dipped Brown Butter ShortbreadChocolate-Dipped Brown Butter ShortbreadChocolate-Dipped Brown Butter Shortbread
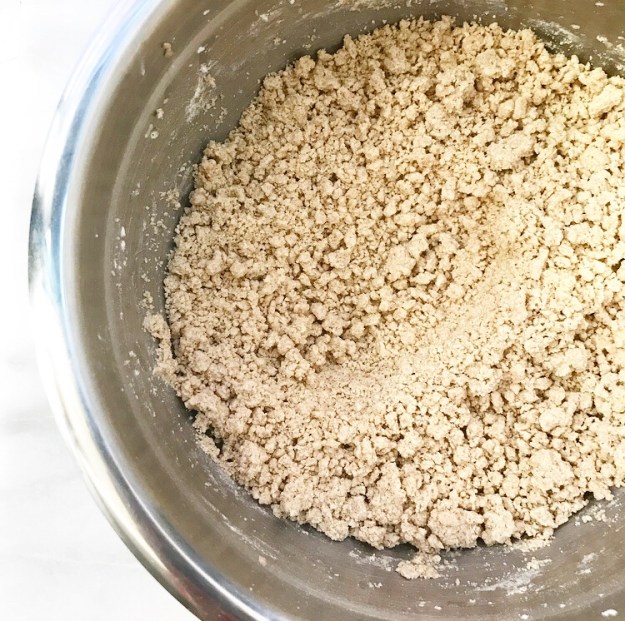
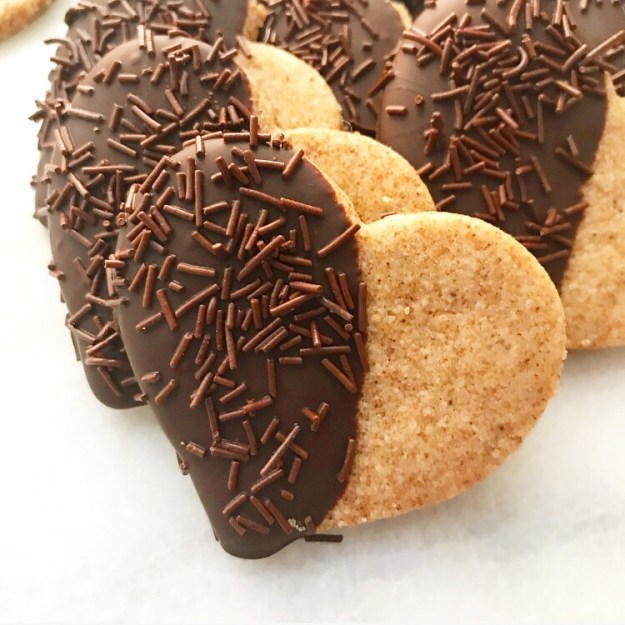
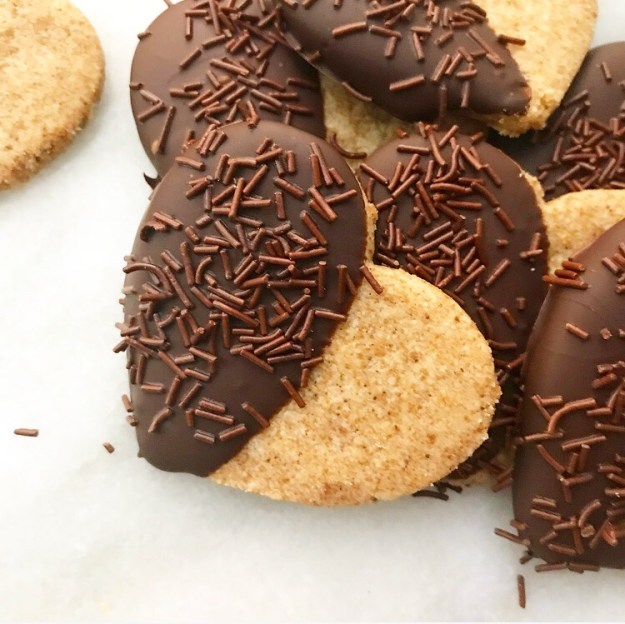
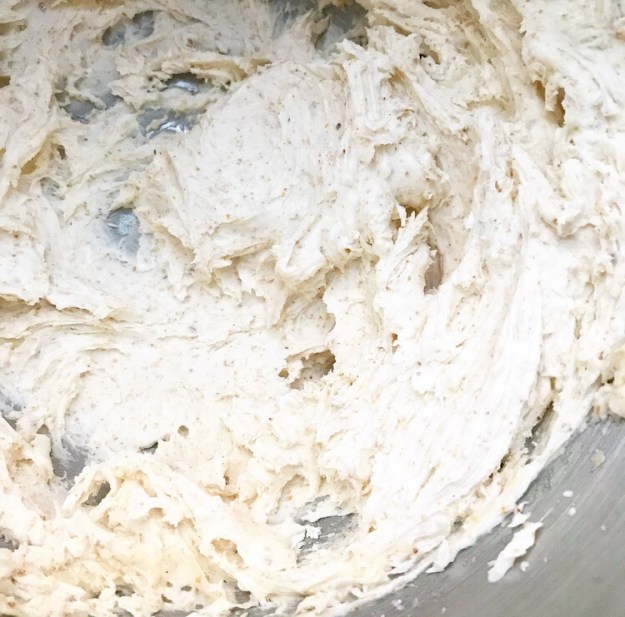
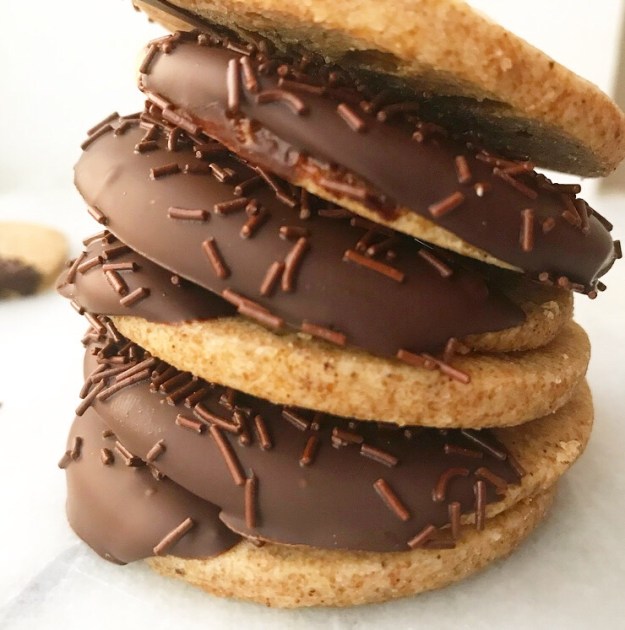
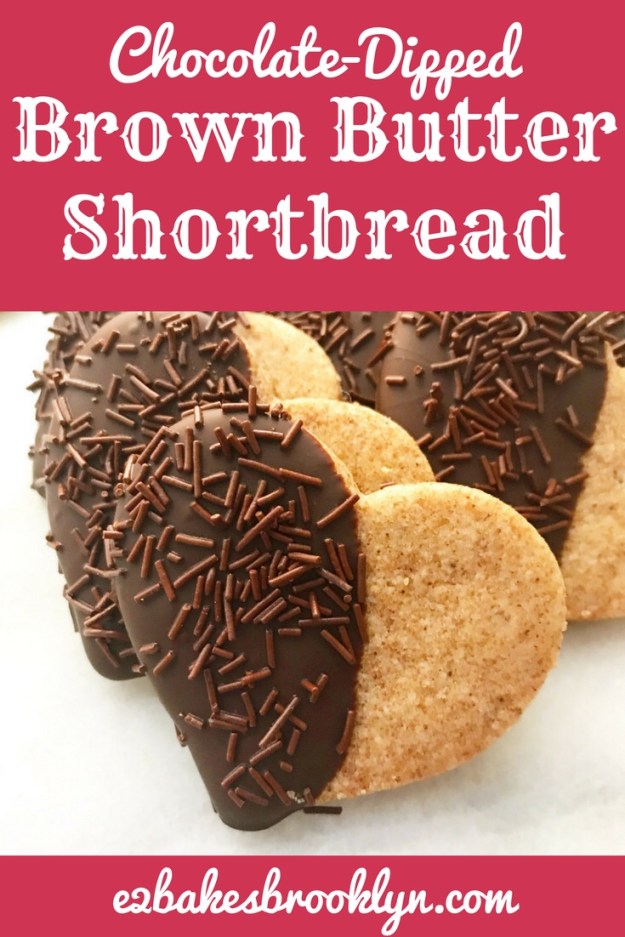
Brown butter is good in basically everything, but it really shines in these simple six-ingredient cookies. See those dark specks? Those are browned milk solids—tiny bits of flavor alllllll over the place, y’all!

Chocolate-Dipped Brown Butter ShortbreadChocolate-Dipped Brown Butter Shortbread
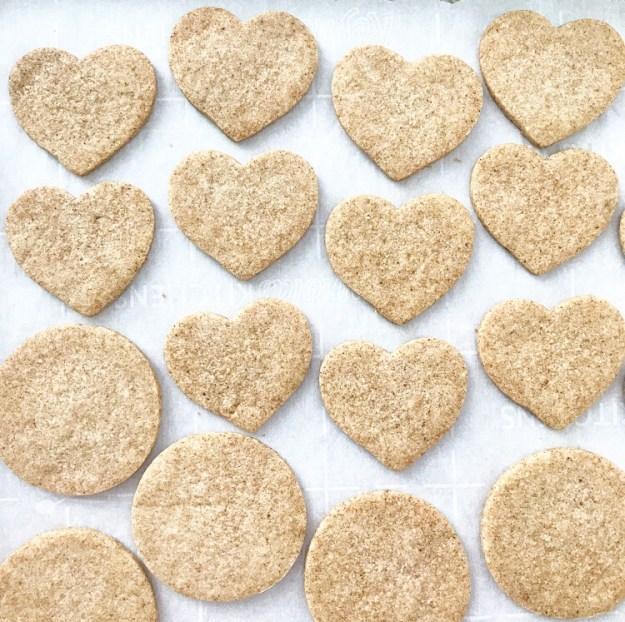
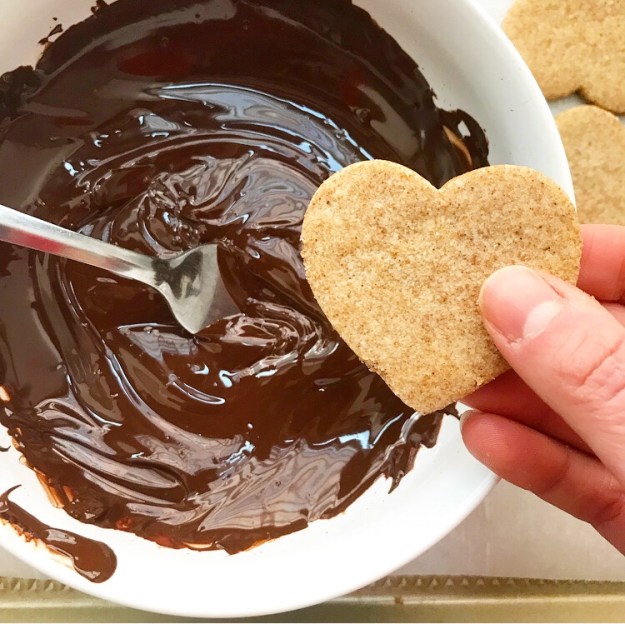
And then, as if things could possibly get better, the baked shortbread are dipped in melted dark chocolate.

Chocolate-Dipped Brown Butter Shortbread
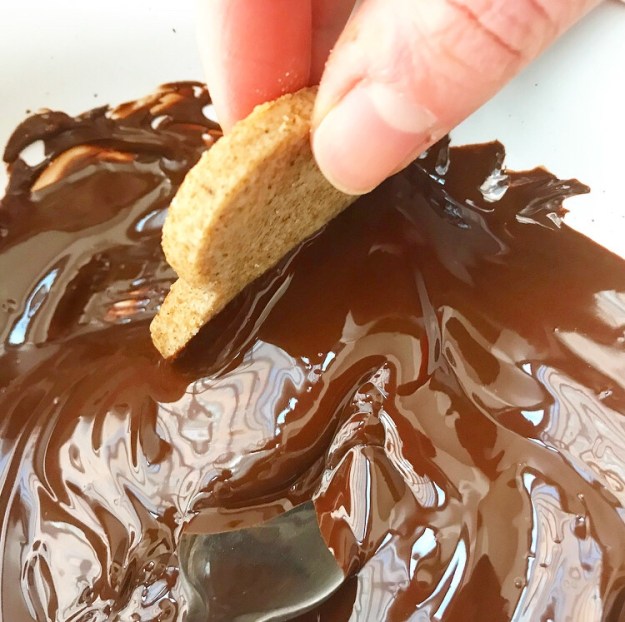
Tender, buttery, melt-in-your-mouth brown butter shortbread dipped. in. chocolate.
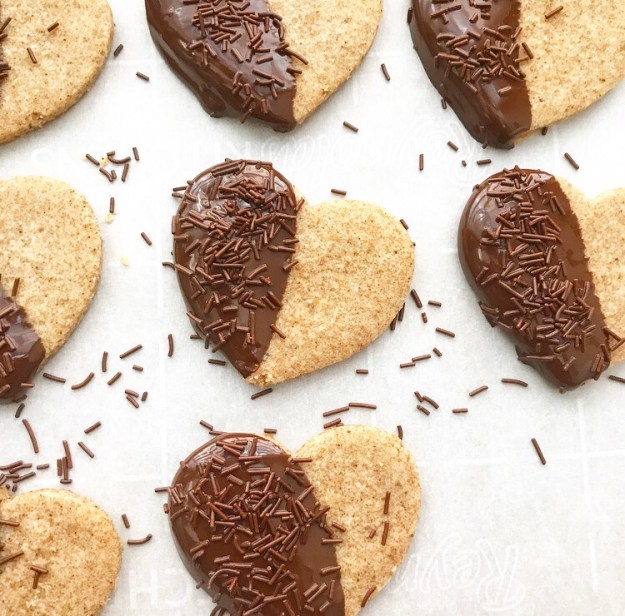
Chocolate-Dipped Brown Butter ShortbreadOh my word.

Chocolate-Dipped Brown Butter Shortbread
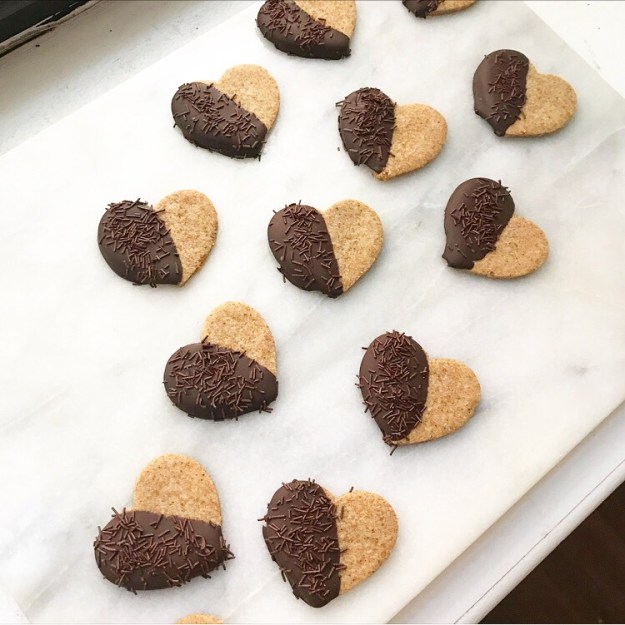
You could certainly leave the chocolate half plain, but I am not the sort of baker who leaves things plain. I used my fanciest chocolate sprinkles here (they’re called hagelslag—try ‘em on buttered toast). Coarse salt works too, if you didn’t run out over Christmas and then totally forget to replenish your stash for two months. I wouldn’t know anything about that though. Nope.Chocolate-Dipped Brown Butter Shortbread

Chocolate-Dipped Brown Butter Shortbread
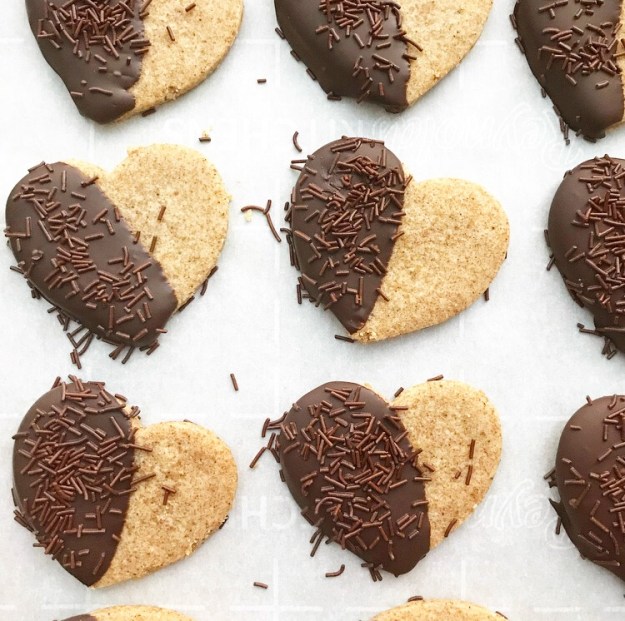
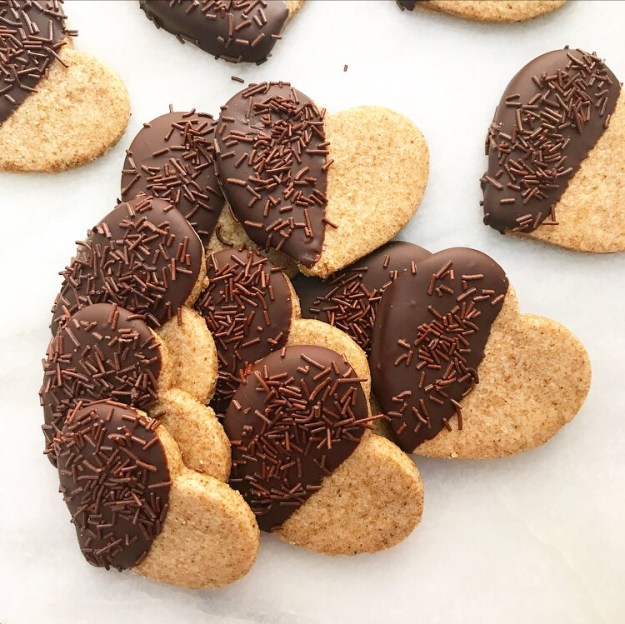
There’s something luxurious about the name of this recipe, and they certainly look fancy, but I assure you that these Chocolate-Dipped Brown Butter Shortbread are as easy as they are delicious. I made them five times this week (and in multiple shapes!), so I know.

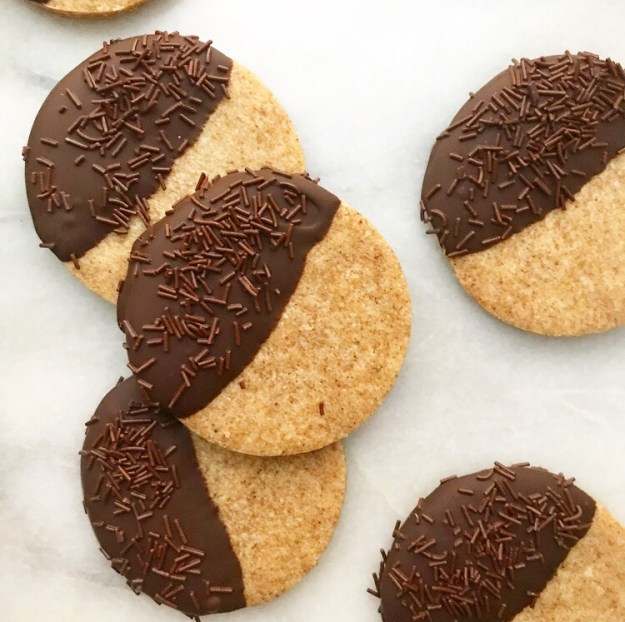
Another thing I know? If someone presented me with a batch of these, I’d definitely feel loved.Chocolate-Dipped Brown Butter Shortbread

Chocolate-Dipped Brown Butter Shortbread
makes about 36 2-inch cookies

1 cup unsalted butter, cut into cubes
6 tablespoons dark brown sugar, packed
4 tablespoons confectioners sugar
1/2 teaspoon pure vanilla extract
1/4 teaspoon Kosher or sea salt
2 1/4 cups all-purpose flour

Chocolate Dip:
8 ounces pure dark chocolate, chopped
chocolate sprinkles (hagelslag) or coarse salt, for garnish (optional)

Brown the butter. Place butter in a light-colored saucepan over medium heat. Let butter melt. Butter will bubble and crackle as the water content evaporates. Swirl the pan frequently for 5-7 minutes, keeping an eye on the color. When the solids are turning brown and the butter is nutty and fragrant, remove the pot from the heat and immediately pour the brown butter into a small bowl. Let it cool a bit before refrigerating until solid (a few hours or overnight). When you are ready to bake, soften the solid brown butter to room temperature

Place softened brown butter in a medium-large mixing bowl and use an electric mixer to beat it until light and fluffy, about 1-2 minutes. Add dark brown and confectioners sugars and mix until fluffy. Mix in vanilla and salt. With the mixer on low, beat in flour. Dough will be crumbly looking, but should hold together very well when pinched. Divide dough in two parts.

Working with one half at a time, sandwich dough between two pieces of parchment paper and roll until 1/4-inch thick. Transfer to the freezer (on a baking sheet, if desired) for 15 minutes. Repeat with remaining dough. It is okay to stack the sheets of dough in the freezer.

While the dough is freezing, place racks in the center positions. Preheat the oven to 300F. Line two baking sheets with parchment.

Remove one sheet of dough from the freezer. Peel on of the pieces of parchment off. Use a lightly floured 2-inch cookie cutter to cut cookies. Place them close together on prepared pans. Repeat with remaining dough. Scraps can be re-rolled, frozen, and cut.

Bake cookies for 21-23 minutes, or until no longer shiny. Let cool on the pans for 7 minutes. Use a thin spatula (not your fingers!) to remove cookies to cooling racks to cool completely.

Line two baking sheets with parchment.

Melt chocolate in a double boiler or the microwave (30 second increments, stirring in between). Dip each cookie halfway and place on prepared pans. Scatter sprinkles or coarse salt over the top. Repeat with remaining cookies. Chocolate will set after a couple of hours at room temperature, or a few minutes in the freezer.

Shortbread will keep in an airtight container at room temperature for several days.

Chocolate-Dipped Brown Butter Shortbread

Strawberry Sugar Cookie Squares

Strawberry Sugar Cookie Squares
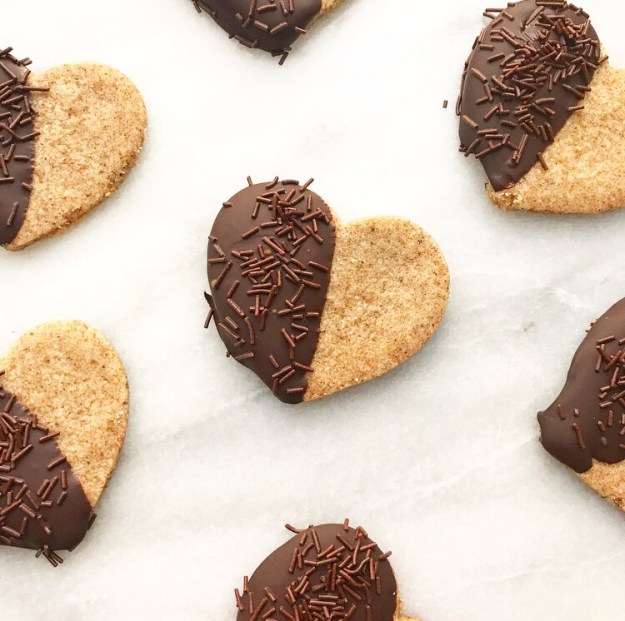
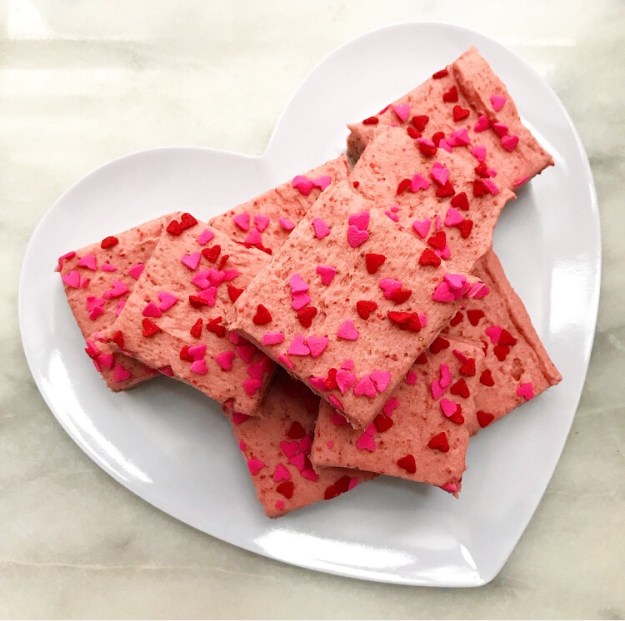
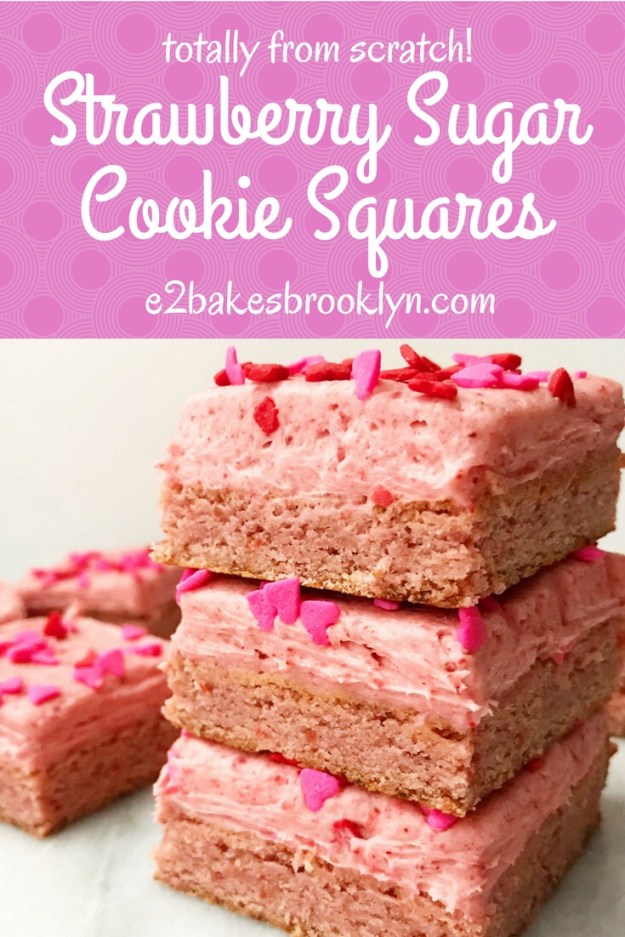
Does anyone else think it’s weird that strawberries are considered Valentine’s Day-appropriate? I mean, I get that they’re an aphrodisiac and that their red color goes with the whole lovey-dovey puffy heart aesthetic of the holiday, but strawberries aren’t in season in February.

Strawberry Sugar Cookie Squares
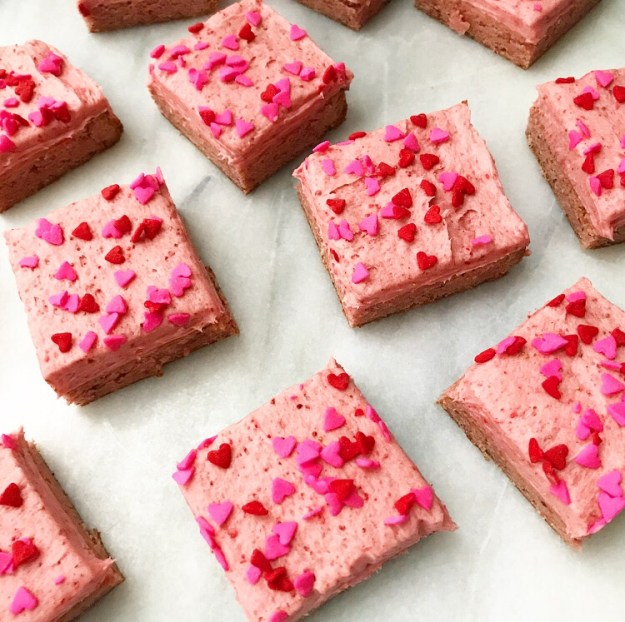
Before I go any further: yes, I know that we live in a time where fresh strawberries are available year-round. I saw huge displays of them at Trader Joe’s yesterday. Available or not though, the fact remains that a mid-winter strawberry will never be as good as one you have in June. Period. End of story.

Strawberry Sugar Cookie Squares
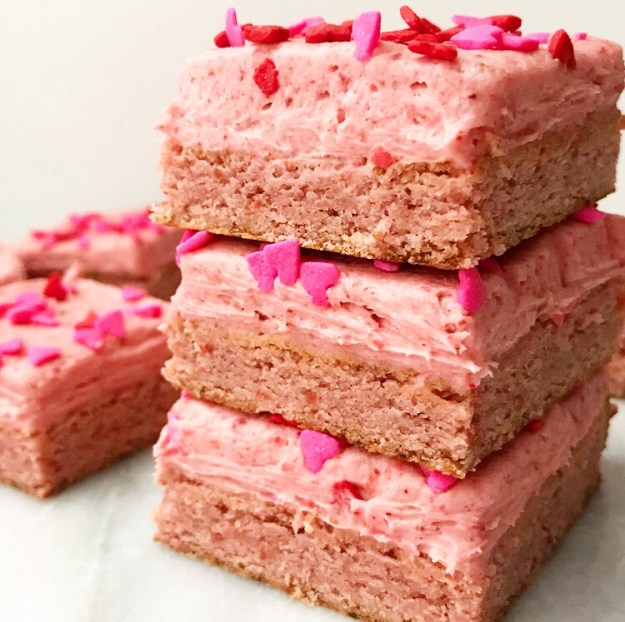
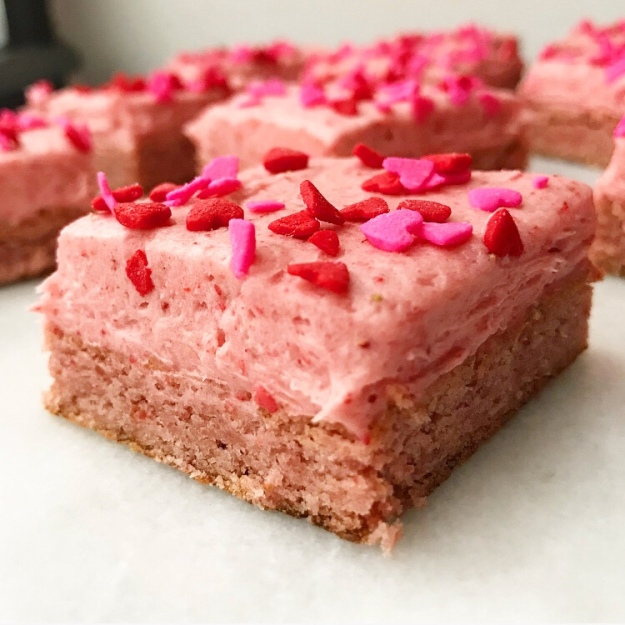
All that said, today I’m bringing you some Strawberry Sugar Cookie Squares. They may not be seasonal, but they are pink, fabulous, easy, and totally perfect for Valentine’s Day.

Strawberry Sugar Cookie SquaresStrawberry Sugar Cookie SquaresStrawberry Sugar Cookie Squares
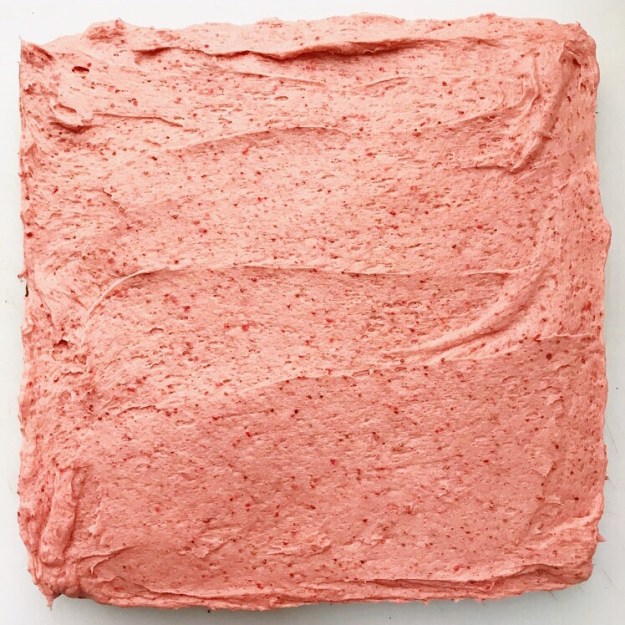
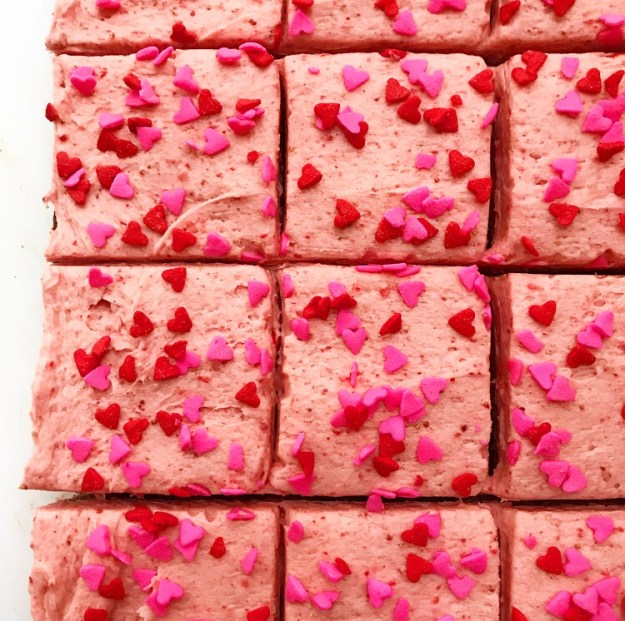
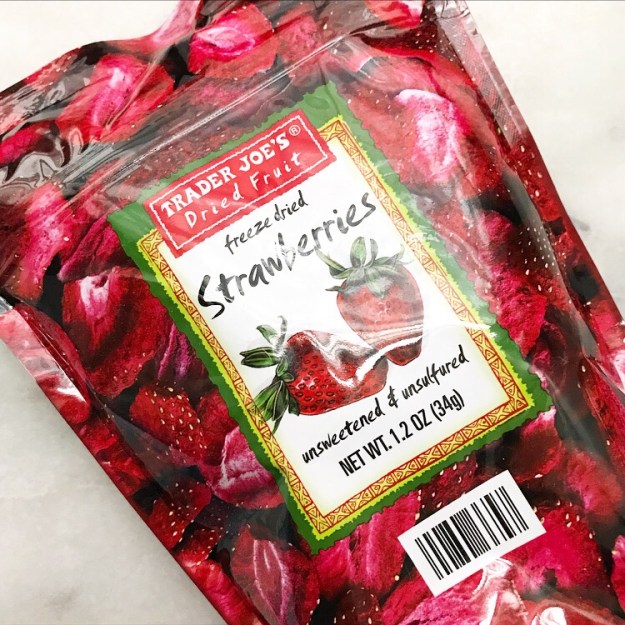
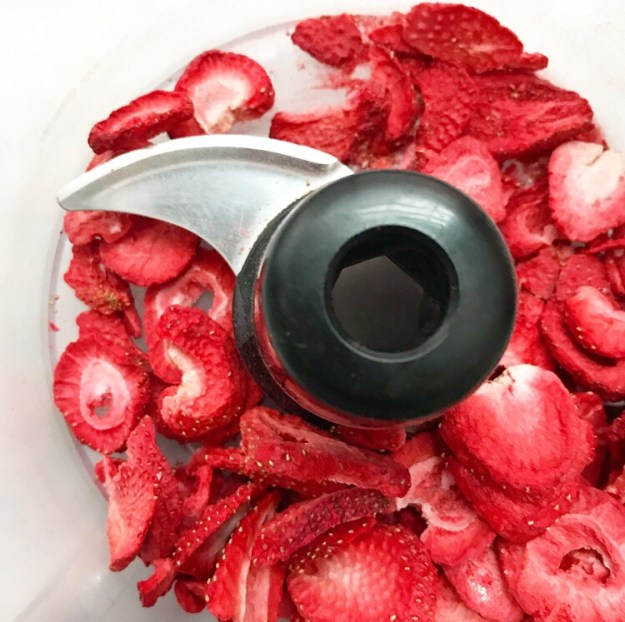
The strawberry flavor in these sweet squares comes from freeze dried strawberries. Their concentrated flavor, lack of moisture, year-round availability, and consistent quality make them perfect for all sorts of baked goods, especially cookies and bars. Here they’re pulverized in a food processor until they’re nothing but powder and then whipped into sugar cookie dough and a batch of fluffy buttercream.

Strawberry Sugar Cookie SquaresStrawberry Sugar Cookie SquaresStrawberry Sugar Cookie SquaresStrawberry Sugar Cookie SquaresStrawberry Sugar Cookie SquaresStrawberry Sugar Cookie Squares
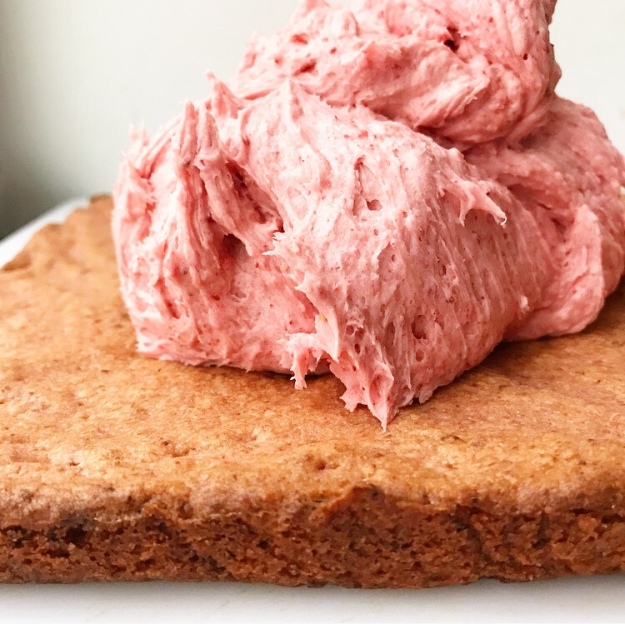
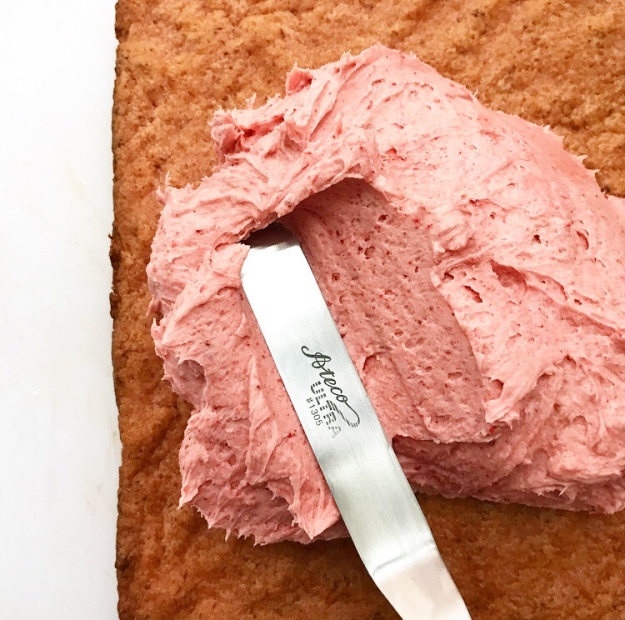
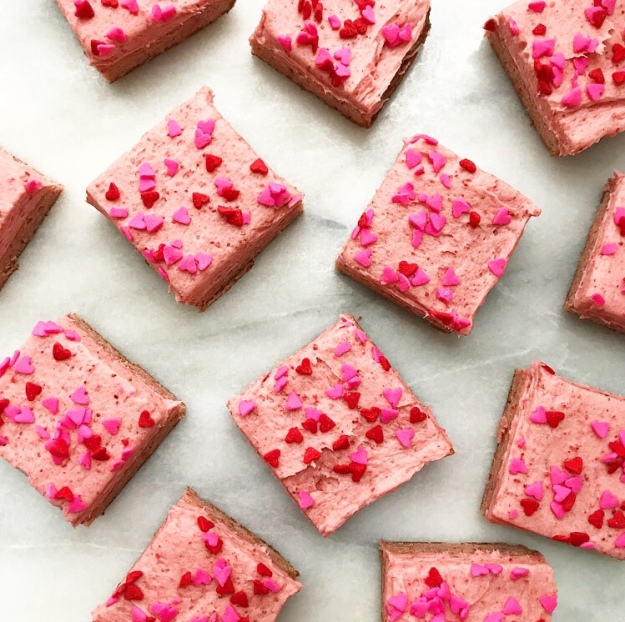
These squares must be baked to be believed—if you’re into strawberry desserts, this recipe is absolutely for you. The strawberry flavor is decidedly real, unlike anything you’ll find in a boxed mix.

Strawberry Sugar Cookie Squares
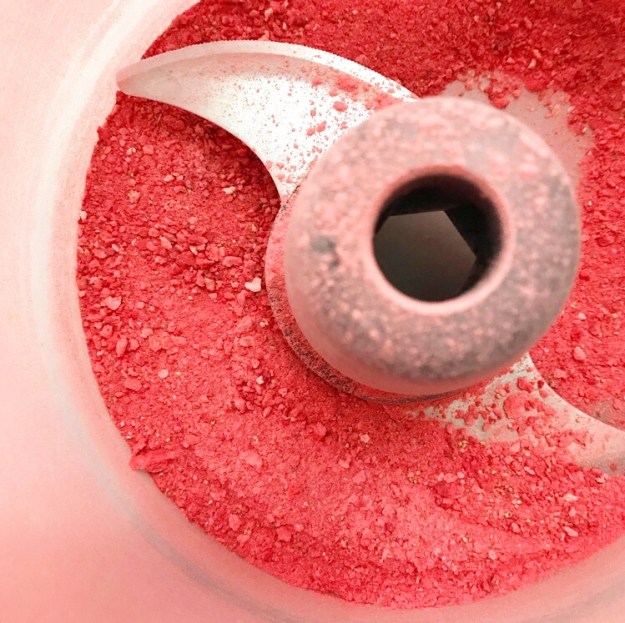
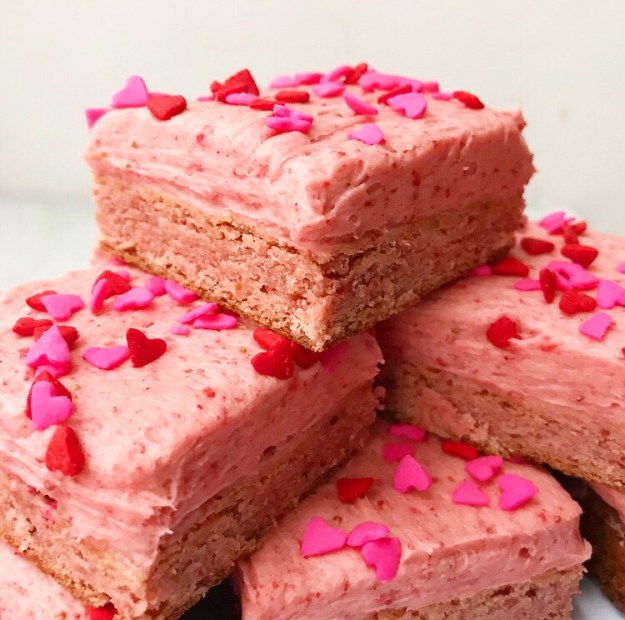
Oh, did I mention that there’s no food coloring in these bars? That happy pink color is all from the pulverized strawberries 🙂

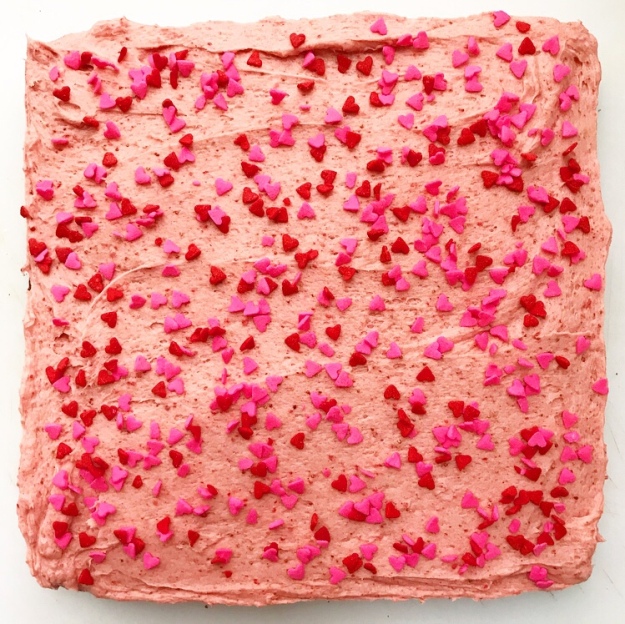
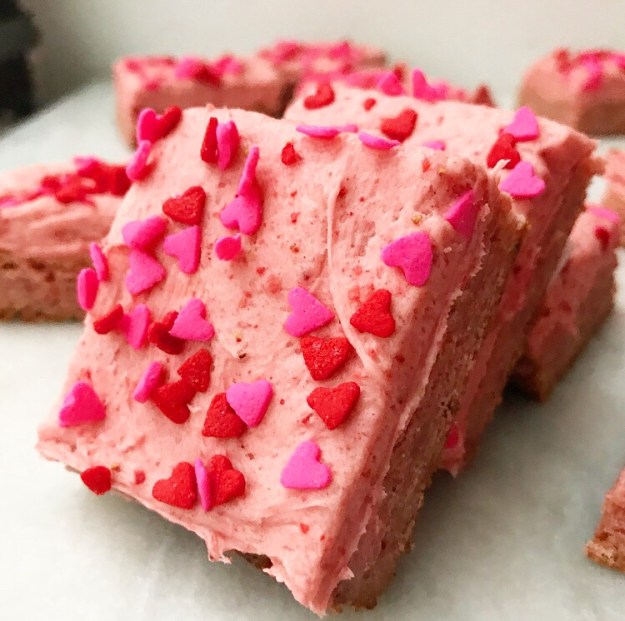
Well, I suppose there is food coloring in the sprinkles, but they’re just so cute! Feel free to leave them off though if sprinkles aren’t your thing.Strawberry Sugar Cookie Squares

(They are definitely my thing. They are basically my favorite thing.)

Strawberry Sugar Cookie Squares
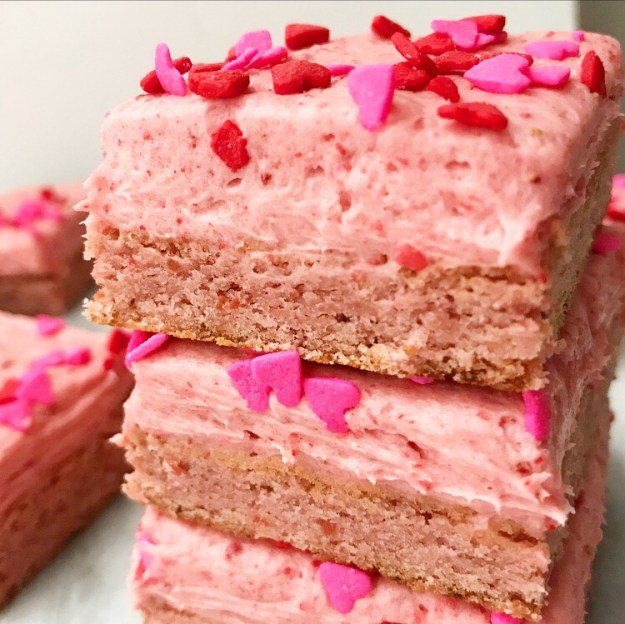
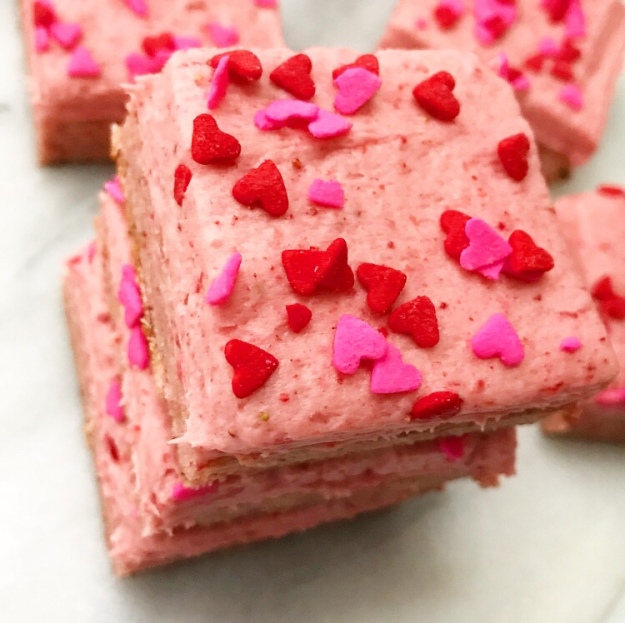
Make these Strawberry Sugar Cookie Squares for someone you love ❤Strawberry Sugar Cookie Squares

Strawberry Sugar Cookie Squares
makes one 9-inch pan, about 9-16 bars

Cookie Layer:
1 1.2-ounce package freeze dried strawberries
1/2 cup (1 stick) unsalted butter, softened to room temperature
3/4 cup granulated sugar
1 large egg + 1 large egg yolk, room temperature
2 teaspoons pure vanilla extract
1 1/3 cups all-purpose flour
1 tablespoon cornstarch
1/2 teaspoon baking powder
1/4 teaspoon Kosher or sea salt

Frosting:
1 1.2-ounce package freeze dried strawberries
1/2 cup (1 stick) unsalted butter, softened to room temperature
2 cups confectioners sugar
pinch of Kosher or sea salt
2 teaspoons pure vanilla extract
5-6 tablespoons heavy cream
sprinkles, for decorating (optional)

Preheat oven to 350F. Line a 9-inch square pan with foil and grease lightly. Set aside.

Make the cookie layer. Place freeze dried strawberries in a food processor and process until they are powder, about 30 seconds. Set aside.

In a medium-large mixing bowl, beat butter with an electric mixer until fluffy, about 2 minutes. Beat in sugar, followed by egg, yolk, and vanilla. Add strawberry powder, flour, cornstarch, baking powder, and salt, and mix until combined. Dough will be thick.

Press dough into prepared pan with a silicone spatula or lightly-oiled hands. Bake 20-22 minutes, or until no longer wet-looking. A toothpick inserted in the center should come out clean. Let cookie layer cool completely in the pan on a rack.

Make the frosting. Place freeze dried strawberries in a food processor and process until they are powder, about 30 seconds.

In a medium-large mixing bowl, use an electric mixer to beat butter until light and fluffy, about 2 minutes. With the mixer on low, beat in confectioner’s sugar, strawberry powder, and salt. Mixture may be alarmingly crumbly—this is normal. Add vanilla and 5 tablespoons of heavy cream. Beat until very fluffy, about 2 minutes. If desired, mix in another tablespoon of heavy cream until the proper consistency is reached.

Remove foil from the cookie layer and place on a cutting board. Spread a thick layer of frosting over the cookie later. Top with sprinkles, if desired. Let sit at room temperature for minutes, or until frosting crusts a bit.

Use a large, sharp chef’s knife, slice into squares. Wipe knife clean between cuts.

Serve squares. Leftovers will keep in an airtight container at room temperature for up to two days or in the refrigerator for up to five.

Strawberry Sugar Cookie Squares

Red Velvet Cheesecake Bars

Red Velvet Cheesecake BarsWhile I was in Texas this past December, I held a pop-up sale in my parents’ dining room. When I set the date and began to plan the thing, I had grand ideas about what I would have available. The list of ideas included grapefruit bars and pie and Texas-shaped ginger cookies, but when it came down to it, I threw all those ideas out the window and took it easy on myself. The preparation was still intense, but making drop cookies and bars was far simpler than what I had originally planned.

There were Peanut Butter Blossoms, Malted Whoppers Cookies, and Brown Butter Chocolate Chip Cookies, but the first things to go were these Red Velvet Cheesecake Bars. Between their eye-catching color, classic chocolate-meets-vanilla flavor, and the swirls of cheesecake, their quick disappearance is easy to understand.

Red Velvet Cheesecake BarsMaking Red Velvet Cheesecake Bars may sound daunting to some, but they were actually the easiest recipe I made. I mean, there’s no softening of butter, no chilling of dough, no waiting for chocolate to harden. Nope. These bars are ridiculously easy to make, and come together in just a few minutes.

The red velvet base is a play off of my favorite blondie recipe. You’ll notice a few changes from the norm here, most noticeably that they’re bright red, but food coloring isn’t the only thing these bars have in common with their namesake cake: natural unsweetened cocoa is subbed for part of the usual all-purpose flour and a touch of vinegar gives the base that signature red velvet tang.

Red Velvet Cheesecake BarsThe batter comes together with just a whisk and a bowl, but you will need your mixer for the cheesecake. It’s the real star of the show here. I mean, red velvet is great and all, but I am all about that cheesecake layer. There’s nothing new here–cream cheese, sugar, eggs, and vanilla are beaten together before being swirled into the red velvet batter. Everything goes into the oven for about half an hour before taking a seemingly endless four hour chill. For all the ease of preparation here, there is a lot of patience required. I promise it’ll all be worth it once you bite into one of these bars.

Red Velvet Cheesecake BarsLook at that! There’s almost as much cheesecake as there is red velvet! Make a batch this weekend, or use a heart cookie cutter and make them part of your Valentine’s Day ❤ Red Velvet Cheesecake Bars

Red Velvet Cheesecake Bars
makes 24-32 bars

Cheesecake:
16 ounces (2 bricks) full-fat brick-style cream cheese, room temperature
1/3 cup granulated sugar
2 large eggs
2 teaspoons pure vanilla extract

Red Velvet Base:
1 3/4 cups all-purpose flour
1/4 cup natural unsweetened cocoa powder (not Dutch process)
1 teaspoon Kosher or sea salt
1 cup unsalted butter, melted
2 cups granulated sugar
3 large eggs, room temperature
1 1/2 teaspoons white vinegar
2 teaspoons pure vanilla extract
1 tablespoon liquid red food coloring

Place oven racks in the top and bottom positions. Preheat oven to 350F. Line a 9×13-inch pan with foil and grease with butter. Set aside.

Make cheesecake. In a medium mixing bowl, use an electric mixer to beat cream cheese until fluffy. Mix in sugar. Add eggs one at a time, beating until combined. Mix in vanilla. Set aside.

Make the red velvet. In a small bowl, whisk together flour, cocoa powder, and salt. Set aside. In a large mixing bowl, whisk together melted butter and sugar. Add eggs one at a time, whisking completely after each addition. Whisk in white vinegar, vanilla, and food coloring. Use a silicone spatula to fold in flour mixture. Reserve 2/3 cup of the batter before spreading the rest in the prepared pan.

Pour cheesecake mixture over the red velvet batter. Drop spoonfuls of the reserved red velvet over the top and swirl in with a small, thin knife. Tap full pan on the counter five times to release any air bubbles. Tightly cover the pan with foil. Bake on the top rack of the oven for 15 minutes. Remove top foil and place pan on the bottom rack to bake for 15-20 more minutes. Bars are done when the cheesecake layer barely jiggles when the pan is jostled.

Allow bars to cool in the pan on a rack until they reach room temperature. Refrigerate for four hours, until cold. Place bars on a cutting board and remove foil. Use a large chef’s knife to slice them into bars (or a cookie cutter for fun shapes). Serve.

Red Velvet Cheesecake Bars will keep in an airtight container in the refrigerator for up to five days.

Red Velvet Cheesecake Bars

Brownie Truffles

Brownie TrufflesAre you on Pinterest? I’ve had an account since it started up a few years ago. I think this was during the height of the mason jar trend. If it could be baked, layered, or served in a mason jar, it made my recipe board. Never mind that I didn’t bake or own mason jars at the time. I just liked all those pretty things lined up next to each other on my computer screen.

Flash forward a few years to the creation of this blog. I went to create a Pinterest business account and took a scroll through my old, long-dormant page. To my utter shock, I hadn’t made any of those recipes, and most of them didn’t interest me anymore. Now that I’ve been running the E2 Bakes account for a year or so, I’ve made a point of only pinning things that actually inspire me. For this blogger, that means things made from scratch with real ingredients (or things I can easily convert to be made with real ingredients). There’s nothing wrong with using boxed cake mix. It’s just not my style.

Brownie TrufflesThis past weekend, I was scrolling through for Valentine’s Day fodder when I came across these Peanut Butter Brownie Truffles from Sincerely Jean. Brownie. Truffles. Brownies coated in chocolate. Does a better treat exist?!

In an effort to actually use my Pinterest for its intended purpose, I got to work making my own version of those truffles. Instead of boxed brownies, I use a double batch of my go-to Cocoa Brownies and leave out the peanut butter. I love peanut butter, but if I’m going to eat chocolate, I want it to be all chocolate.

Brownie TrufflesBrownie TrufflesBrownie TrufflesOnce the brownies are baked and cooled, the truffles come together in about an hour. Slice off the crunchy edges of your brownies and save them for a snack. Crumble the soft middle section with a couple of forks and then roll all that brownie goodness into balls. Freeze them for 15 minutes or so, and then dip them in a mixture of melted milk chocolate, coconut oil, and corn syrup. You could serve them unadorned, but I have a stash of chocolate sprinkles that were calling my name. Freeze everything for 15 more minutes and voilà! Brownie Truffles.

I have big plans to make a batch of these treats for my friends next week. Is there a better way to tell someone you love and appreciate them?! 

Brownie TrufflesLooking for more Valentine’s Day Treats? Check out these Chocolate-Dipped Strawberry Cookies and Glazed Cream Cheese Cake Doughnuts.

Brownie Truffles
inspired by Sincerely Jean
makes about 6 dozen truffles*

Brownies:*
1 1/4 cups (2 1/2 sticks) unsalted butter
1 1/2 cups granulated sugar
1 cup light brown sugar
1 3/4 cups cocoa powder (natural or Dutch process)
4 large eggs, cold
2 teaspoons pure vanilla extract
1 cup all-purpose flour
1 teaspoon Kosher or sea salt

Coating:
16 ounces milk chocolate,* chopped
1 teaspoon coconut oil
2 teaspoon corn syrup
sprinkles, for topping

Preheat oven to 325F. Butter the inside of a rimmed quarter sheet pan or 9×13-inch pan. Line the bottom with parchment and butter again. Set aside.

Melt butter in a saucepan or the microwave. Stir butter, sugars, and cocoa together in a large mixing bowl. Let mixture cool for a couple of minutes. Add the eggs one-by-one, mixing until they are completely incorporated. Stir in vanilla extract. Fold in flour and salt just until combined.

Pour batter into prepared pan. Tap the full pan on the counter a couple of times to release any air bubbles. Bake for 30-35 minutes, or until a toothpick inserted in the middle comes out with only a few moist crumbs. Let the brownies cool completely in the pan on a rack.

Line a separate quarter sheet pan with parchment. Set aside.

Lift brownies out of the pan and onto a cutting board. Slice off all edges–they aren’t good for crumbling. Use two forks to crumble brownies.

Scoop crumbled brownies by the tablespoon, press them together to hold their shape, and roll into balls. Place on prepared sheet pan. Freeze for 15 minutes.

Place chopped milk chocolate in a microwave-safe bowl. Microwave for 1 minute. Stir with a fork. Add coconut oil. Continue to microwave in 30 second increments, stirring in between, until smooth. Stir in corn syrup.

To dip, drop one brownie ball into the melted chocolate. Use a fork to coat brownie in chocolate. Drain briefly by scraping the tines of the fork on the edge of the bowl. Use the fork to gently lay the truffle on the prepared pan. Immediately top with sprinkles. Reheat chocolate in 15 second increments if it becomes too stiff. Continue this process until all truffles are coated.

Freeze truffles for 15 minutes before serving.

Truffles will keep in an airtight container in the refrigerator for up to a week.

Notes:

  1. This recipe halves easily.
  2. Feel free to use your favorite brownie mix. Prepare them according to package directions (not the cake-style) and let cool to room temperature before proceeding.
  3. I like milk chocolate here, but feel free to use dark. I nearly always use Trader Joe’s Pound Plus bars. I do not recommend using chocolate chips.

Brownie Truffles