Tag Archives: Vanilla

Vanilla Bean Ricotta Cake

 Everyone has their go-to dessert–that thing they make when a friend has a baby or they’re asked to bring dessert for a dinner party. For my mom, it’s angel food cake with fresh blueberries and whipped cream. For my grandmother, Mame, it was a cherry-pineapple dump cake, which she called “Simply Delicious,” because who wants to eat something called dump cake?! 

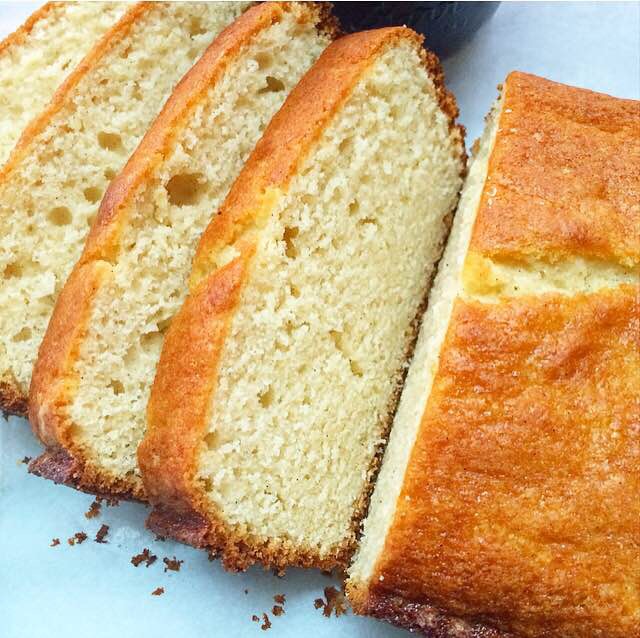
My go-to? This Vanilla Bean Ricotta Cake. Now, the words “vanilla bean” and “ricotta” make it sound fancy, but it’s not–it’s basically pound cake. There’s no frosting or layering because this cake simply doesn’t need that kind of adornment. It’s easy to put together and bakes up super dense and moist, with tons of vanilla bean flavor.

For those of you who aren’t much for ricotta in other applications, you should know that I’m not either. Ricotta cheese doesn’t belong in my lasagna, on my toast, or anywhere else…except this cake. The milky flavor and grainy texture that turn me off in savory foods are what make this cake so insanely moist and delicious. The cheese melds so well into the simple batter, it’ll turn even the staunchest of ricotta-haters. If you really don’t want to use the stuff, you may substitute an equal volume of full-fat sour cream.
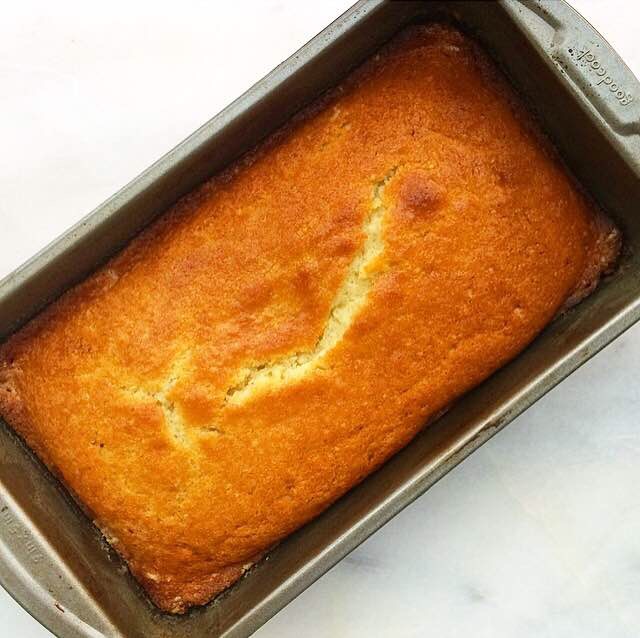
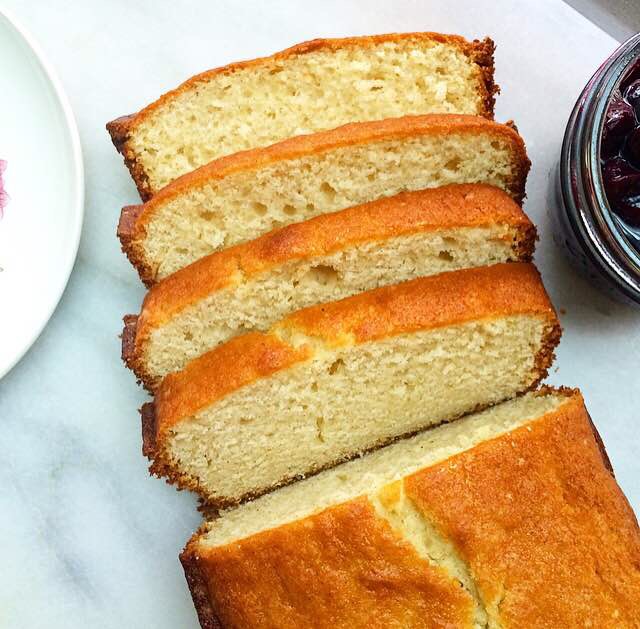
 This recipe makes a small loaf cake. It will not rise above the top of the pan. But what it lacks in size, it makes up for in versatility. Vanilla Bean Ricotta Cake is buttery and moist with a distinct vanilla flavor. It’s the kind of cake that’s fantastic by itself with a cup of coffee or tea, but it is a wonderful base for pretty much any toppings you can think of! Mix up a quick vanilla glaze (like the one used here) and drizzle it over the top of the cooled cake before slicing. Top slices with fresh strawberries and whipped cream for a sort of makeshift strawberry shortcake. Use it in trifles or ice cream cakes. Seriously, this cake is good with just about anything. 

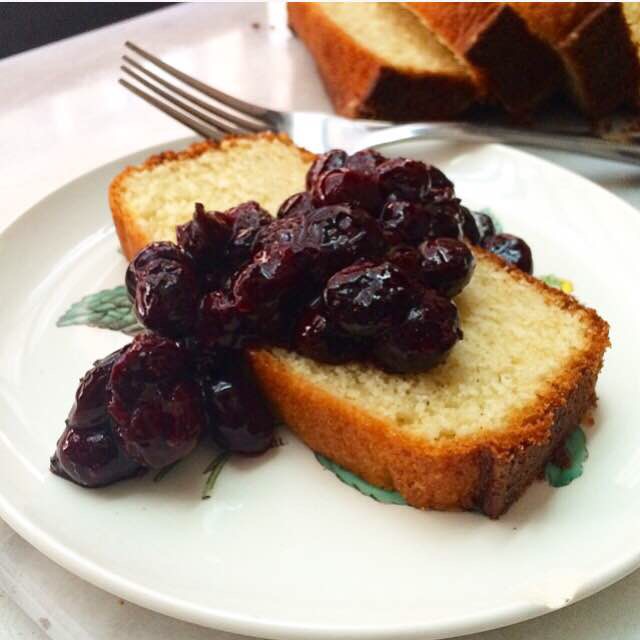
This weekend, I’m going to serve Vanilla Bean Ricotta Cake with Blueberry Compote. I just love the look of the berries on the sliced cake, and the blueberry-lemon flavor goes so well with the vanilla bean! Make it this Memorial Day Weekend and enjoy it with your family and friends. Maybe it’ll become your go-to dessert, too 😊 

 Vanilla Bean Ricotta Cake
makes one 9×5″ loaf, about 8-12 servings

For the pan:
1 tablespoon all-purpose flour
1 tablespoon neutral-flavored oil (I like canola)

Cake:
1 1/3 cups all purpose flour
2 tablespoons cornstarch
1 teaspoon baking powder
1/4 teaspoon baking soda
1/2 teaspoon Kosher or sea salt
1/2 cup (1 stick) unsalted butter, softened to room temperature
3/4 cup granulated sugar
2 large eggs, room temperature
2 teaspoons vanilla bean paste**
4 ounces (1/2 cup) full-fat ricotta cheese, room temperature

Preheat oven to 350F. Grease the pan. Mix together flour and neutral-flavored oil. Use a pastry brush to paint mixture over the entire inside of the pan. Pour out any excess. Set aside.

Make the batter. In a small-medium mixing bowl, whisk together flour, cornstarch, baking powder, baking soda, and salt. Set aside.

In a large mixing bowl, use an electric mixer to beat butter until light and fluffy. Beat in sugar. Add eggs one at a time, mixing after each addition. Beat in vanilla bean paste, followed by ricotta. Add dry ingredients in two installments, combining completely after each addition.

Spread batter evenly into prepared pan. Tap full pan on the counter five times to release any air bubbles. Bake 35-40 minutes, tenting with foil if it starts to brown too quickly. Cake is done when it’s golden brown and a toothpick inserted in the center comes out clean, or with only a few moist crumbs.

Let cake cool in the pan for ten minutes. Run a small, thin knife around the edge of the pan to release the cake. Invert it onto a cooling rack, and then revert. Let cool completely.

Cake will keep at room temperature for up to three days, and in the refrigerator for up to five.

Notes:


1. I use Nielsen-Massey Vanilla Bean Paste.
2. If you don’t have or don’t want to use vanilla bean paste, you may use an equal volume of pure vanilla extract, or the scraped seeds of one vanilla bean + 1 teaspoon of pure vanilla extract.  

Vanilla Bean Sandwich Cookies

 Confession: I’m a vanilla person. Given the choice, I will pick vanilla over chocolate every single time. It’s not that I don’t like chocolate, it’s that I enjoy vanilla just the tiniest bit more. If you think I’ve gone and lost my mind, know that I come by it honestly.

So many people rag on vanilla, saying it’s boring. As far as I’m concerned though, when vanilla is done right, it’s anything but! In fact, my most popular cake order is this Vanilla Layer Cake. It has a little bit of a following! Oh, and these Vanilla Wafers are so good, you’ll never buy the boxed variety again. 

Long story short, I’m out to prove that vanilla is a powerhouse flavor. To make my point, I’m bringing you some fantastic sandwich cookies that are packed to the gills with vanilla bean flavor. Oh yes, these Vanilla Bean Sandwich Cookies are amazing! Soft, chewy vanilla bean cookies sandwiched together with the creamiest, dreamiest vanilla bean filling ever. There’s nothing plain about these little cookies! 

There’s nothing difficult about them either. The cookie dough is simple and straightforward–the hardest part is rolling 120 teaspoon-sized balls of cookie dough! And the filling is basically just a scaled down version of my go-to buttercream frosting. I use shortening in this recipe because I find it makes the filling reminiscent of Oreos, but you may substitute an equal volume of softened butter if you prefer. 

As easy as this recipe is though, there’s one thing that we need to talk about. This recipe contains one specialty ingredient: Nielsen-Massey Vanilla Bean Paste. You see, as much as I love vanilla, I can rarely bring myself to purchase whole vanilla beans. At $4 a pop, I just can’t justify the cost. Vanilla bean paste is my go-to for all recipes that demand the good stuff. It’s full of vanilla bean seeds and high-quality vanilla extract, and a $14 jar lasts forever. Trust me, nobody can tell that I didn’t throw $8 worth of vanilla beans into my recipes! See all those little black specks? If I didn’t tell you directly that I didn’t scrape those from whole vanilla beans, you’d never know the difference. But if you’re feeling fancy, feel free to use the real deal.

Whether you’re into vanilla or chocolate, you’ll love these Vanilla Bean Sandwich Cookies! They’re anything but plain 😊 

 Vanilla Bean Sandwich Cookies
makes about five dozen sandwich cookies

Cookies:
2 1/2 cups all-purpose flour
1 tablespoon cornstarch
1 teaspoon baking powder
1/4 teaspoon baking soda
1 teaspoon Kosher or sea salt
1 cup (2 sticks) unsalted butter, softened to room temperature
1 1/4 cup granulated sugar
1 large egg + 1 large egg yolk, room temperature
1 tablespoon vanilla bean paste*

Filling:
1/2 cup shortening*
2 1/4-2 1/2 cups confectioner’s sugar
pinch of Kosher or sea salt
3 tablespoons heavy cream
2 teaspoons vanilla bean paste*

Make the cookies. In a large mixing bowl, whisk together flour, cornstarch, baking powder, baking soda, and salt. Set aside.

In a separate large mixing bowl, use an electric mixer to beat butter until light and fluffy. Beat in sugar, followed by egg and yolk. Mix in vanilla bean paste. Add flour mixture in two installments, mixing to combine completely. Chill dough for 90 minutes in the refrigerator.*

Preheat oven to 350F. Line two baking sheets with parchment paper.

Scoop chilled dough by the teaspoon, and roll into balls. Set dough balls 1 1/2-inches apart on prepared pans. Bake 6-8 minutes, until no longer raw looking. Let cool on the pans for five minutes before removing to a rack to cool completely.

To make the filling, place the shortening in a large mixing bowl, and beat with a hand mixer on low speed. Once it’s smooth, add in 2 1/4 cups confectioner’s sugar and salt in two installments, until smooth. Beat in heavy cream and vanilla bean paste. If you’d like the filling to be thicker, add an additional 1/4 cup of confectioner’s sugar. If you would like to pipe the filling, place it in a plastic sandwich bag, and snip off a corner.

There are two options for filling:

1. To assemble a sandwich cookie by piping, apply filling by piping a circle in the middle of the underside of one cookie, leaving about 1/4″ around the edge. Top with a second plain cookie, with the underside filling-side-in. Repeat until all cookies have been used.

2. To assemble a sandwich cookie by spreading, use an offset frosting knife to spread 1/2-1 teaspoon on the underside of one cookie. Top with a second plain cookie, with the underside filling-side-in. Repeat until all cookies have been used.

Vanilla Bean Sandwich Cookies keep well in an airtight container at room temperature for up to a week.

Notes:

1. If you do not have or do not want to use vanilla bean paste, you may use the scraped seeds of half a vanilla bean plus two teaspoons of pure vanilla extract. Alternatively, you may use one tablespoon pure vanilla extract.
2. If you do not want to use shortening, you may substitute 1/2 cup (1 stick) room temperature unsalted butter.
3. If you do not have or do not want to use vanilla bean paste, you may use the scraped seeds of half a vanilla bean plus one teaspoon of pure vanilla extract. Alternatively, you may use two teaspoons pure vanilla extract.
4. I have sped up the chilling process by throwing the dough in the freezer for fifteen minutes. The dough may need to spend five minutes at room temperature before scooping.

No-Churn Banana Pudding Ice Cream

 Last week, I posted some seriously good homemade vanilla wafers. They’re an everyday kind of cookie that isn’t full of “stuff” and doesn’t involve a ton of work or even a chill, but always hit the spot. They’re absolute perfection by themselves with a big cup of tea (I’m currently obsessed with this one). 

But since I posted those sweet little wafers last week, I have been absolutely surrounded by baked goods–Winning Hearts and Minds Cake, Carrot Cake Blondies, a chocolate-peanut butter cake, some huge ice cream sandwiches at The Meatball Shop, yesterday’s Katharine Hepburn Brownies

Let’s just say that I have eaten a lot of sugar and the vanilla wafers have been unfairly neglected. Until now. 

Here, they are paired with their BFF, bananas, and folded into ultra-creamy no-churn vanilla ice cream. The wafers get soft like the cookie crumbles in classic cookies & cream ice cream. The ice cream is super smooth and creamy, thanks to the magic no-churn formula of sweetened condensed milk and freshly whipped cream. And all of it is perfumed with more vanilla and mashed ripe bananas. 

   It’s like the best banana pudding you’ve ever had. But scoopable. And if you want to pile it into a waffle cone and top it with a spoonful of lightly-sweetened whipped cream, well, you should. It would be amazing.

No-Churn Banana Pudding Ice Cream is perfect for any parties or cook-outs you have coming up this spring and summer! It would be adorable in ice cream sandwiches, or as an ice cream cake <—definitely doing that!

But, of course, it’s just as good in a bowl when you’re on the couch watching Netflix 😊

Looking for more no-churn ice cream? Check out my No-Churn Mint Chocolate Chip Cookie Dough Ice Cream!

No-Churn Banana Pudding Ice Cream
makes about 8 cups

1 14-ounce can sweetened condensed milk
1 tablespoon pure vanilla extract
2 cups heavy cream, cold
3 large ripe bananas, mashed
1 cup crushed vanilla wafers (homemade or store-bought)

In a large mixing bowl, stir together sweetened condensed milk and vanilla extract. Set aside.

In a separate large bowl, use an electric mixer (or a whisk) to whip heavy cream to stiff peaks. Fold whipped cream into sweetened condensed milk mixture just until combined. Fold in mashed bananas, followed by crushed vanilla wafers.

Transfer ice cream into a 9×5″ loaf pan, or other 8 cup vessel. Press plastic wrap onto the surface of the ice cream. Cover plastic wrap with aluminum foil. Freeze ice cream for 6 hours or overnight, until completely frozen. Scoop and enjoy!

Vanilla Wafers

 Vanilla WafersSometimes you just need something easy. Something that will satisfy your sweet tooth, but also doesn’t have 43 ingredients or involve a 90 minute chill. Something that turns out every single time without you having to think too hard. Something that will go well with Nutella or ice cream or pudding or coffee. Something that you can pull out of the cabinet when company shows up, and look like Ina freaking Garten because *of course* you have these on-hand all the time.

Well, this is that recipe. 

Vanilla WafersThese vanilla wafers are so quick and easy, and they are ten zillion times better than the boxed variety. And I should know–these were the first recipe I “mastered” almost three years ago. I made them over and over again for months! I can practically bake them in my sleep.

The dough comes together in ten minutes flat, and doesn’t involve any special ingredients. If you feel like you have no food in the house, you probably still have all the ingredients to make these wafers. These cookies came to mind last week because I had one egg, one stick of butter, and not much of anything else. Less than 90 minutes later, I had made the world’s simplest dough, rolled it, and baked 152 tiny little cookies. 

Vanilla Wafers The most work-heavy part is probably the rolling–scooping dough 1/2 teaspoon at a time can get a little tedious–but that really doesn’t take more than a few minutes. I use my half-sheet pans for making these, and that allows me to bake 54 on a single pan! If you place one on each rack, that means all the cookies will be done in two batches. Easy peasy. 

Vanilla WafersAnd oh, are they good. For someone who prefers soft and chewy cookies, I sure do love these crispy, crunchy wafers. They’re buttery and full of vanilla flavor, and there’s a divine caramel undertone thanks to the brown sugar.

I love to make these Vanilla Wafers into tiny ice cream sandwiches, dunk them in coffee and, obviously, throw them into banana pudding. But of course, they’re wonderful just on their own. 

Vanilla Wafers Vanilla Wafers
adapted from Serious Eats
makes about 13 dozen very small cookies

1 1/3 cup all purpose flour
1/2 teaspoon Kosher or sea salt
1/2 teaspoon baking powder
1/2 cup (1 stick) unsalted butter, softened to room temperature
3/4 cup granulated sugar
1/4 cup light brown sugar, packed*
1 large egg, room temperature
4 teaspoons pure vanilla extract

Preheat oven to 350F. Line two baking sheets with parchment or silicone baking mats. Set aside.

In a small mixing bowl, whisk together flour, salt, and baking powder. Set aside.

In a large mixing bowl, cream butter with an electric mixer until light and fluffy. Beat in granulated and light brown sugars, followed by egg and vanilla. Add dry ingredients in two installments, combining completely after each addition.

Scoop dough by the 1/2 teaspoon, roll into balls*, and set 1-inch apart on prepared baking pans. Bake 8-9 minutes, or until browned at the edges and no longer raw-looking. Let cool five minutes on the pans before removing to a rack to cool completely.

Vanilla Wafers will keep in an airtight container at room temperature for at least a week.

Notes:

1. If you do not have or do not want to use light brown sugar, granulated sugar may be substituted.
2. Dough should be sticky, but still rollable.

Vanilla WafersVanilla Wafers

No-Churn Mint Chocolate Chip Cookie Dough Ice Cream

 I know. I know! Who makes ice cream in February?!

But I have three very good reasons:

1. It’s been in the fifties and sixties multiple times since last weekend’s deep freeze. In NYC, that’s practically June.
2. Until last week, I hadn’t had a freezer bigger than a shoe box in three years. I had to have something to put in it!
3. I wanted ice cream. 

But what kind of ice cream? My two favorite flavors are Chocolate Chip Cookie Dough and Mint Chocolate Chip. I hadn’t been able to keep either at home for so long, making that decision just seemed impossible. 

But what about a combination of the two? A rich vanilla-mint ice cream stuffed to the gills with bits of edible mint chocolate chip cookie dough? And no-churn (because I don’t have an ice cream machine)? That would do the trick. And so, I got to work.

This ice cream is so easy, it’s stupid. Anybody could make it. The most difficult part is being patient for six hours while it sets in the freezer. The base is made entirely of sweetened condensed milk and heavy cream, a combination that sounds like it shouldn’t work at all, but it totally does. The sweetened condensed milk (you guessed it!) sweetens the base, and since it’s condensed, it keeps ice crystals from forming while the ice cream is freezing. It also adds a little richness. The heavy cream is whipped and then folded into the sweetened condensed milk. This makes everything super creamy and light-textured, and ensures that the ice cream is scoopable. Add a little vanilla and freeze it, and you have some fantastic homemade vanilla ice cream.  But we’re not after vanilla ice cream today. No, this is first-ice-cream-in-three-years ice cream. This is exciting ice cream!

 Okay, maybe I’m being a little over-enthusiastic.

In this recipe, the sweetened condensed milk is flavored with vanilla and just a bit of peppermint extract. The whipped cream is folded in, followed by 1/2 cup of miniature chocolate chips. Then comes the best part: little pieces of eggless edible cookie dough flavored with a bit more peppermint and filled with more miniature chocolate chips. I dyed mine green to go with the mint chocolate chip theme (and because I think it’s cute), but food coloring is optional. Freeze it in a loaf pan, and scoop away!

So, who cares if it’s February? And who needs an ice cream machine? With this No-Churn Mint Chocolate Chip Cookie Dough Ice Cream, the answer is “nobody.” 

 No-Churn Mint Chocolate Chip Cookie Dough Ice Cream
makes about 8 cups

Edible Cookie Dough:
1/2 cup unsalted butter, softened to room temperature
3/4 cup granulated sugar
2 tablespoons milk of choice
1/2 teaspoon pure vanilla extract
1/4 teaspoon peppermint extract*
3-5 drops liquid green food coloring, optional
1 1/4 cups all-purpose flour*
1/2 teaspoon Kosher or sea salt
1/2 cup miniature chocolate chips

Ice Cream:
1 14-ounce can sweetened condensed milk (not fat free)
1 teaspoon pure vanilla extract
1/4 teaspoon peppermint extract*
2 cups heavy cream, cold
1/2 cup miniature chocolate chips

Put a 9×5″ loaf pan* in the freezer to chill.

Make the edible cookie dough. In a medium mixing bowl, use an electric mixer to cream butter and granulated sugar together until light and fluffy. Add milk, vanilla and peppermint extracts, and food coloring, and beat together until completely combined. Add in flour and salt. Mix until combined, scraping down the bowl as necessary. Add mini chocolate chips and mix until well-dispersed. Cover with plastic wrap and chill for 30 minutes.

Line a pan with wax paper. Remove dough from refrigerator. Scoop dough by the 1/2 teaspoon and roll into balls. Place rolled dough into wax paper-lined pan. Dough balls may touch–this is okay. Once all dough has been scooped and rolled, place full pan in freezer for an additional 15-30 minutes.

Prepare the no-churn ice cream. Pour sweetened condensed milk into the bottom of a large mixing bowl. Whisk in vanilla and peppermint extracts. Set aside.

In a separate mixing bowl, beat cream with an electric mixer until it holds billowy peaks, about three minutes. Slowly fold whipped cream into sweetened condensed milk, being careful not to deflate it too much or overmix. Fold in miniature chocolate chips.

Remove the frozen loaf pan and the dough balls from the freezer. Spread half the sweetened condensed milk mixture in the loaf pan. Top with half the dough balls. Spread the second half of the sweetened condensed milk mixture on top, followed by the remaining dough balls. Use a table knife to stir the cookie dough balls around. Cover the pan with two layers of plastic wrap, pressing it onto the surface of the ice cream. Wrap covered pan with aluminum foil. Chill six hours or overnight before scooping.

No-Churn Mint Chocolate Chip Cookie Dough Ice Cream keeps well covered in the freezer for about two weeks.

Notes:

1. Make sure you are using peppermint extract. Mint extract is not the same thing.
2. If you have concerns about eating raw flour, I suggest microwaving the flour for one minute, then letting it come back to room temperature before mixing.
3. Do not be tempted to use more than 1/4 teaspoon of peppermint extract in the ice cream base (or the cookie dough for that matter). Peppermint extract is very potent, and can easily make things taste like toothpaste if too much is added.
4. If you’d rather not use your loaf pan for this recipe, you may use another container with an 8 cup capacity. I recommend a glass Tupperware.