Sausage & Mushroom Biscuit Stuffing

Sausage & Mushroom Biscuit StuffingThanksgiving, y’all. It’s happening in eight days. Are you ready? I know I am.

See, aside from taking a bus to Boston, there’s nothing I need to do. My parents are coming up to spend the holiday with my little sister and me, and we’ll be having the traditional turkey dinner at a restaurant in Brookline, Massachusetts. No muss, no fuss. All we need to do is dress nicely and show up. It’s pretty great, especially if the idea of making a huge dinner doesn’t appeal to you. But, as you may have gathered by my having a food blog, the marathon cooking very much appeals to me.

Sausage & Mushroom Biscuit StuffingFor years I’ve said that my idea of the perfect day is preparing a Thanksgiving dinner all by myself. I know–I’m insane. Hear me out though. I have been obsessively reading recipes for years and have catalogued an extensive collection of Thanksgiving recipes. Given the chance to host Thanksgiving, I know every detail from how I’d serve Artichoke Dip as an appetizer to how I’d dry brine the turkey to which of my mother’s sweet potato recipes I’d use and how many pies I’d make. And of course, I know what kind of stuffing I’d serve–one made with biscuits and studded with sausage and mushrooms. Since it doesn’t appear I’ll be preparing any large turkey dinners anytime soon, I went ahead and tried my ideal stuffing recipe on a rainy Tuesday afternoon. After eating four servings over the course of the day, I can safely say that the Sausage & Mushroom Biscuit Stuffing I’d been imagining for years is just as good as I had hoped. Crispy on top, moist in the middle, and made out of the perfect food (biscuits, duh), this is the stuffing of my dreams.

Sausage & Mushroom Biscuit StuffingSausage & Mushroom Biscuit Stuffing starts with a batch of cream biscuits. These biscuits require less work than their buttermilk-based counterparts and are just as delicious. They’re great with butter and jam or made into little sandwiches, but here they’re cut into small pieces after baking and left at room temperature until stale (12-48 hours). If you’re working on a tight deadline, I’ve written a shortcut for this step into the recipe.

Once the biscuit pieces are dried out, the stuffing assembly can begin. Brown some sausage. I like breakfast sausage because the sage flavor goes so well with other parts of the Thanksgiving meal, but use whichever variety you like.

Sausage & Mushroom Biscuit StuffingSauté some diced mushrooms, followed by onion and celery. Add the biscuits, sausage, and vegetables to a large mixing bowl. Toss in some herbs–parsley, sage, rosemary, and thyme (just as Simon & Garfunkel intended). Throw in a little salt and pepper and moisten everything with melted butter and chicken stock.

Pile it into a casserole dish (or your trusty cast iron skillet) and drizzle it with a bit more stock. Lay parchment and foil over the top to keep the stuffing moist, and bake for half an hour. Then remove the foil and parchment and bake for fifteen more minutes, just long enough for the top to get brown and crispy.

This stuffing, y’all. It’s freaking delicious. Deeply savory with tons of meaty sausage, earthy mushrooms, aromatics, herbs, and butter (always butter), it’ll be perfect alongside your turkey. The top is brown and crisp-crunchy, while the middle stays soft and moist. Oh my lord, is this good. Try it, and you will be wondering why we save this for one or two days per year. I know I am.Sausage & Mushroom Biscuit Stuffing

Sausage & Mushroom Biscuit Stuffing
biscuit recipe from Dinner with Julie
makes about 8-10 servings

Cream Biscuits:
3 cups all-purpose flour
2 tablespoons granulated sugar
1 tablespoon baking powder
pinch of Kosher or sea salt
2 cups heavy cream

Stuffing:
1 recipe cream biscuits (or other good biscuits), cut into 1-inch pieces (about 8 cups)
1 tablespoon olive oil
1 lb breakfast sausage, removed from casings
6 tablespoons butter, divided
8 ounces cremini or other mushrooms, diced
2 cups diced white onion (about one large onion)
2 cups diced celery (about 6-8 stalks)
1 tablespoon fresh thyme leaves, chopped
1 tablespoon fresh rosemary, chopped
1 tablespoon fresh sage, chopped
1/4 cup fresh Italian parsley, chopped
1/2-1 teaspoon Kosher or sea salt
1 teaspoon freshly-ground black pepper
3 cups low-sodium chicken stock, divided (I like Better than Bouillon)

Make the biscuits. Preheat oven to 400F. Grease a 9×13-inch baking dish. Set aside.

In a large mixing bowl, whisk together flour, sugar, baking powder, and salt. Use a silicone spatula or wooden spoon to stir in heavy cream. Knead a few times to incorporate any extra dry ingredients. Press biscuit dough into prepared pan and score with a sharp chef’s knife (I usually score 20 rectangular biscuits). Bake 15-20 minutes, or until cooked through and starting to turn golden. Let cool in the pan on a rack until the biscuits reach room temperature.

Use a sharp chef’s knife to cut the biscuits into 1-inch pieces. Place pieces in one layer on a baking sheet and leave uncovered for 12-48 hours, until stale. Alternatively, you may dry out the biscuit pieces by toasting them in a 350F oven for 30 minutes.

Make the stuffing. Preheat oven to 350F. Grease a large casserole or other ovenproof pan. Set aside.

Place stale biscuit pieces in a large mixing bowl.

Place olive oil in a large skillet over medium-high heat. Add sausage and cook until browned. Remove sausage to the mixing bowl that contains the biscuits.

Discard all but 1 tablespoon of sausage fat from the pan, and return to the heat. Add 2 tablespoons butter and melt. Sauté mushrooms 7-10 minutes, until cooked but not browned. Add them to the sausage and biscuit pieces.

Return pan to the heat and reduce heat to medium. Add celery and onion and sauté until translucent but not brown, about 10 minutes.

Add vegetables to the large mixing bowl, along with thyme, rosemary, sage, parsley, 1/2 teaspoon salt, and pepper. Toss all ingredients together. Pour in 2 cups of chicken stock and continue stirring until everything is moistened (there may be a bit of excess liquid–this is fine). Taste for salt and add 1/2 teaspoon more, if desired.

Press mixture into prepared casserole dish. Drizzle with an additional 1 cup chicken stock. Cover with a layer of parchment, followed by a layer of foil. Bake 30 minutes. Remove parchment and foil. Bake an additional 15 minutes until browned and crispy. Serve immediately.

Leftovers will keep in an airtight container in the refrigerator for a few days.

Cranberry Crumb Pie

Updated 11/06/2019 to add better photos and halve the crumb.Cranberry Crumb PieWhat a week. I had planned to post this recipe on Wednesday, but when I got home from catering an election party on Tuesday night, I knew I wasn’t going to get any work done until I knew who would become President-Elect. Since then, our country’s citizens have been more deeply divided than ever before (and we were already pretty divided). It’s tough to be an American this week. Regardless, we need to come together for change and for the future. I suggest we start with pie.Cranberry Crumb PieWhen I first came to New York nine years ago, I had a friend who loved pie. I mean LOVED it. At the time, I had never eaten a slice of pie that I considered revolutionary, so I asked him: why is pie so great? What he said has stuck with me since. Every time I make pie, I think of his words. He said that pie is a communal food; it brings people together. Pie is designed to be shared. While one certainly can eat a whole pie by their lonesome, it’s much more enjoyable to share it. I think the same goes for our nation.Cranberry Crumb PieIn a couple of weeks, Americans will celebrate Thanksgiving with their families and friends. Of course, just because you share DNA or a last name with someone doesn’t mean you have the same beliefs. There are some of us who dread these family holidays for fear of awkward political talk over turkey. I love my family, but I’d be lying if I said I didn’t have some of these fears, too. And while there’s little anyone can do to change someone else’s beliefs over the course of one holiday, there is one thing we can all enjoy together: Cranberry Crumb Pie.Cranberry Crumb PieCranberry Crumb Pie
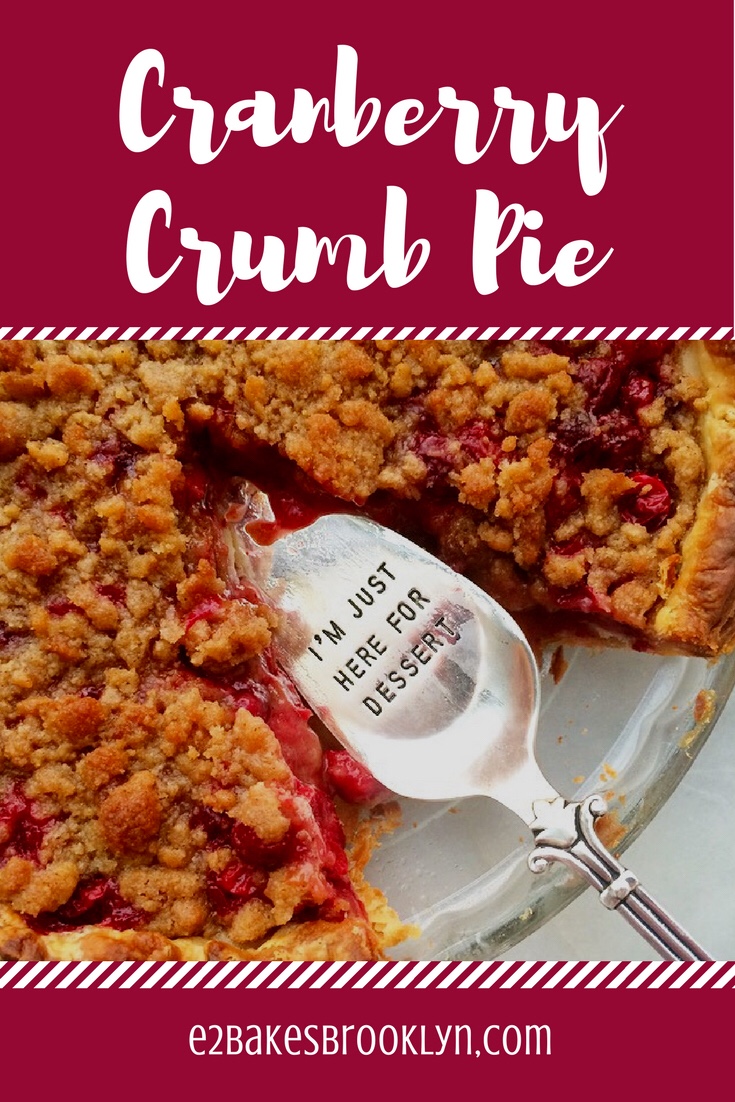
This pie has it all. Orange-scented cranberries with sweet, buttery cinnamon crumbs in my favorite Cream Cheese Pie Crust. If you love cranberries and the crumb on top of coffee cakes, this is the pie for you! Some don’t particularly care for the tartness of fresh cranberries, but here they are sweetened with sugar and spiced with cinnamon and nutmeg before being tossed with the zest and juice of an orange. They are still tart, to be sure, but the combination of sugar, spices, and citrus mellows them enough to be enjoyed on their own.Cranberry Crumb PieThe crumb is an old stand-by for American bakers. Melted butter is stirred into a combination of flour, brown sugar, cinnamon, salt, and vanilla until evenly combined. The cranberry filling is baked for 15 minutes before being topped with the crumb and going back into the oven. As the pie bakes, the cranberries burst and bubble around the crumb, spreading the buttery cinnamon flavor a bit, but also allowing those crumbs the get crisp-crunchy and super delicious. Soft, juicy cranberries and sweet, crispy crumbs? Yes, please!Cranberry Crumb PieNow, go forth and start to heal your community. Make a pie and have friends over (make one of them bring the vanilla ice cream). Be good to each other.Cranberry Crumb Pie
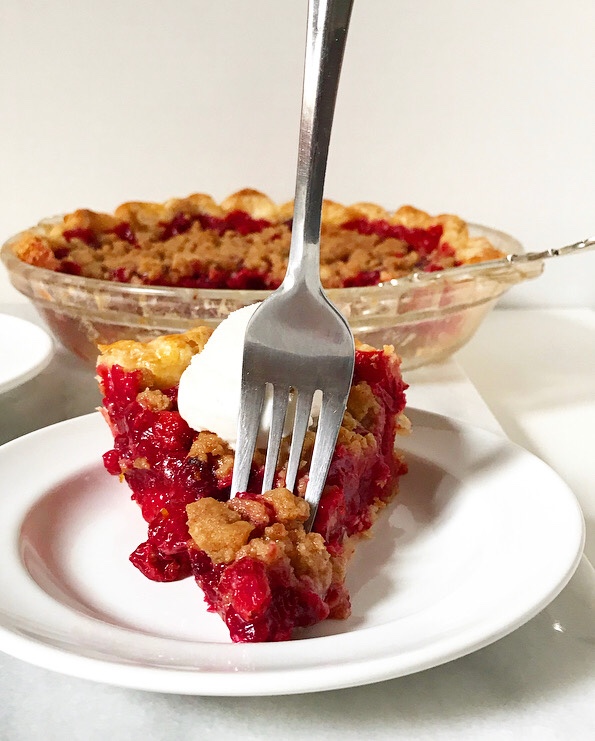
Looking for more pie? You’ve come to the right blog! Check out this Black Bottom Pear & Almond Pie, this light & fluffy Pumpkin Pie, this Cranberry Apple Pie, this Salted Butterscotch Pie, and this Maple Pecan Pie. One more pie recipe is coming your way next week!

Cranberry Crumb Pie
makes one 9-inch pie

Pie:
1/2 recipe Cream Cheese Pie Dough or other good crust
4 cups (about 15-16 ounces) fresh whole cranberries, rinsed and picked over
3/4 cup granulated sugar
1/4 teaspoon ground cinnamon
1/4 teaspoon ground nutmeg
3 tablespoons cornstarch (or arrowroot powder)
1/4 teaspoon Kosher or sea salt
zest of one medium orange
milk or cream, for brushing
vanilla ice cream, for serving

Crumb:
1/2 cup + 1 tablespoon all-purpose flour
7 tablespoons light brown sugar, packed
1/2 teaspoon ground cinnamon
pinch of Kosher or sea salt
1/4 cup unsalted butter, melted

Roll out the pie crust to 14-inch diameter. Fit it in a pie pan, trim the excess to 1/2-inch, and crimp as desired. Freeze 30 minutes.

Preheat the oven to 400F. Place racks in the top and bottom positions.

Place cranberries in a large mixing bowl. Use a silicone spatula or wooden spoon to fold in sugar, cinnamon, nutmeg, cornstarch, salt, and orange zest.

Place chilled pie crust on a baking sheet. Pour the cranberries into the pie crust. Brush exposed crust with milk. Place pie (on baking sheet) on the bottom rack of the oven. Bake 15 minutes.

Make crumb. Combine flour, brown sugar, cinnamon and salt in a small bowl, and whisk with a fork. Add melted butter and stir until large clumps form.

When the 15 minute bake time is up, remove pie from oven and top with crumb.

Return pie to oven and reduce temperature to 350F. Bake 30-40 minutes, tenting with foil (or using a pie protector) if anything gets too dark.

Let pie cool on a rack at least 4 hours, until room temperature. Slice and serve with vanilla ice cream, if desired.

Pie will keep covered at room temperature for up to three days, or in the refrigerator for up to five.Cranberry Crumb PieCranberry Crumb PieCranberry Crumb Pie

Lamb Ragù with Parmesan Polenta

Lamb Ragù with Parmesan PolentaIt’s Election Day! For many of us, it’s the most stressful day since…Election Day 2012??? One great thing is that this part will be over soon. But we still have to get through the day.

When things are stressful, we often find solace in comfort food. My go-to is Baked Macaroni & Cheese, but maybe not for long.

Lamb Ragù with Parmesan PolentaY’all, today’s recipe is a doozy: Lamb Ragù with Parmesan Polenta. Oh my lord, is this good. The ragù itself is rich and deeply meaty, made with a very inexpensive cut of lamb that is simmered in tomato sauce until it’s extra tender. And the polenta! Ohhhh, the polenta. It’s quick, easy, and super cheesy.*

*Hey, that rhymes! In other news, I’m also cheesy.

This Lamb Ragù comes together in about two hours, but there is some real technique behind it. It all starts with preparing the lamb. Lay the chops in an even layer on a baking sheet and sprinkle them with salt. Massage it in a bit before flipping the chops and repeating the sprinkling and massaging. Then let it sit for 15-20 minutes. This step allows the lamb to get a good base flavor before it ever hits the pan. It also negates the need for additional salt. Once time is up, rinse the lamb in cold water and blot it dry with paper towels.

Lamb Ragù with Parmesan PolentaAnd now, for the real action: the ragù. The basic rule of ragù is brown everything. Brown the crud out of it. This step is where all the flavor develops! When you go to sear the lamb, make sure it really gets seared–you want deep brown color. Sauté the vegetables for a good 20 minutes, scraping up all the fond (stuff in the bottom of the pan) and caramelizing the bits of onion. When you stir the tomato paste into the vegetables, let it cook until it begins to darken. Trust me, all of this will be worth it. You don’t want to burn anything, of course, but you want it brown.

Once the browning is done, toss in some thyme, crushed red pepper flake, and bay leaves. Add a 28-ounce can of whole peeled tomatoes that you have crushed by hand before stirring in a couple of tablespoons of balsamic vinegar and three cups of beef stock. Bring all of that to a boil, then reduce the heat, cover, and simmer for an hour. Prepare for your kitchen to smell amazing.

Once the lamb is nice and tender, remove it from the pot. It won’t fall apart with the slightest nudge of a fork, but the bones should be loose. Shred the meat with two forks or pull it apart with your fingers. Add it back to the pot and then simmer for a few more minutes.

Lamb Ragù with Parmesan PolentaWhile the ragù is simmering, make the Parmesan Polenta. I know polenta sounds fancy, but it is super easy and really inexpensive to make. If you have cornmeal and water, you can make polenta. All you need to do is bring the water to a boil and then slowly add the polenta (or cornmeal) while whisking constantly. Don’t add the polenta to the water all in one go–this will make everything lumpy and unappetizing. Add it slowly and just keep whisking until everything is nice and smooth. Remove the pot from the heat and whisk in a little butter and a lot of grated Parmesan. Divide it among bowls, and top it with that gorgeous ragù.

One more thing about the polenta. This recipe makes enough for eight people. Unless you are having a dinner party (or you have a huge family), you likely don’t need that much. Feel free to cut the recipe in half for four servings. Heck, I cut it down to a single serving all the time (see note below). The polenta is best when it’s made just before serving.

Y’all, Lamb Ragù with Parmesan Polenta is comfort food at its finest. This meal is a treat on any fall or winter night. It’s great for any old dinner, but also fancy enough for a dinner party. And it’s the perfect meal with which to distract yourself while you watch the returns come in tonight.Lamb Ragù with Parmesan Polenta

Now, enough about food. GO VOTE!

Lamb Ragù with Parmesan Polenta
makes 6-8 servings

For the Lamb:
1 1/2-2 lbs bone-in lamb shoulder chops
1 tablespoon Kosher or sea salt
1-2 tablespoons olive oil

For the Ragù:
3 medium carrots, cut into chunks
3 stalks celery, cut into chunks
1 medium white onion, cut into chunks
3-5 cloves garlic, minced
1/4 cup tomato paste
1 tablespoon fresh thyme leaves (or 1/2 teaspoon dried thyme)
1/4 teaspoon crushed red pepper flake
2 bay leaves
1 28 ounce can whole peeled tomatoes in purée, crushed by hand
2 tablespoons balsamic vinegar
3 cups low-sodium beef broth (I like Better than Bouillon)

For the Polenta:*
8 cups water
1 teaspoon Kosher or sea salt
2 cups cornmeal or polenta
4 tablespoons unsalted butter
1 1/2 cups Parmesan cheese, grated

For Serving:
chopped fresh parsley
Parmesan cheese

Use a paper towel to blot lamb dry. Lay chops in a single layer on a baking sheet. Sprinkle with half the salt and briefly massage. Flip chops and sprinkle with the rest of the salt. Allow to sit for 15-30 minutes. Rinse chops in cold water and blot dry with paper towels.

Heat olive oil in a large non-reactive pot over medium-high heat. Working in batches, sear lamb on all sides. Set aside on a plate and tent with foil. Turn heat down to medium.

Place carrots, celery, onion, and minced garlic in the bowl of a food processor. Pulse or process until all vegetables are in pieces smaller than 1/2 inch, but not puréed. Add vegetables to the pot and let cook, stirring frequently, until starting to caramelize–about 20 minutes. Stir in tomato paste and continue cooking 3-5 minutes, until it begins to darken.

Return lamb and any accumulated juices to the pot. Add thyme, red pepper flake, and bay leaves. Stir in tomatoes and purée, balsamic vinegar, and beef broth. Bring to a boil before reducing the heat to low. Cover pot and allow to simmer one hour, stirring occasionally.

Remove lamb from pot. Allow to cool a few minutes before shredding with two forks or clean hands. Discard bones.

Remove bay leaves from the pot. Stir in shredded lamb. Turn heat up to medium-low and allow ragù to cook uncovered for 15 minutes, stirring frequently. Remove from heat.

Make polenta. Bring water to a boil. Add salt. Whisking constantly, add cornmeal or polenta in a thin stream. Continue whisking for 2-3 minutes, until thick. Remove from heat. Whisk in butter and cheese. Divide polenta into bowls. Top with ragù. Sprinkle with fresh parsley or more cheese, if desired.

Note: Cut polenta recipe in half for four servings. To make polenta for one, use 1 cup of water, a pinch of salt, 1/4 cup polenta (or cornmeal), 1/2 tablespoon butter, and 3 tablespoons of grated Parmesan. The times and method are the same as written in the recipe.

Lamb Ragù with Parmesan Polenta

Salted Butterscotch Pie

Salted Butterscotch PieDid y’all watch the World Series? I did–I always do. I don’t care who’s playing (unless it’s the Texas Rangers), I just love baseball. Over the last month, I have watched nearly every single game that was broadcast. I’ve politely turned down invitations, ducked out early, and informed friends that I’d be back up for socializing just as soon as the World Champions were crowned. That’s not to say that I have been a hermit. My friend, Jody, and I have a running text chat for the duration of every postseason (check out his web comic here). And my pal, VJ, was brave enough to watch the last game of the NLDS with me. While I experienced the full range of human emotion over the first few innings, she said “Betsy,* watching you watch baseball is way more interesting than actual baseball.” Perhaps it’s a good thing that the postseason is over now 😬

*Yes, she calls me Betsy. Read the story on that here.

Salted Butterscotch PieI’ve been a little slow to blog these past few weeks, but can you blame me? The Chicago Cubs were playing. And they WON after 108 years! I couldn’t miss that.

Now that all the baseball is suddenly over, I’ve got a bit of a postseason hangover: I kind of don’t know what to do with myself if I’m not watching a high-stakes game! Rest assured, it’ll pass. I’ve got plenty to do to distract myself–Thanksgiving is coming up in a few weeks! Here on E2 Bakes, that means it’s pie season. I’ll be sharing three new pie recipes leading up to Turkey Day.

First up? This Salted Butterscotch Pie. You read that right. Salted. Butterscotch. Pie. YUM!

Salted Butterscotch PieThis pie, y’all. It’s going to be a new favorite. Not only is it bursting with the buttery brown sugar flavor of butterscotch–it’s quick and easy to assemble and slices like a dream! The crust is my go-to Cream Cheese Pie Dough. It’s my favorite pie dough ever: there’s no guess work with the liquid, it never tears, and it is seriously flaky and delicious. Try it sometime!

Anyway, roll out your crust, fit it in a pie plate, and crimp it. Then throw it in the freezer. Freezing the shaped dough will help keep your pie crust from shrinking while baking. Since this pie’s filling is just liquid (and liquid moves when heated), there’s not a whole lot keeping it in place. Don’t skip this step!

Salted Butterscotch PieThe butterscotch filling is super easy to make. It’s mostly just whisking. Start with two cups of dark brown sugar and a bunch of eggs. There are four eggs and two egg yolks in this pie. That may seem like a lot, but they are a powerhouse in this filling. The eggs, along with the brown sugar, provide the smooth texture as well as richness and structure!

Once the dark brown sugar and eggs are combined, mix in milk, apple cider vinegar, vanilla, and melted butter. Lastly comes a little flour to thicken the filling, some cinnamon and nutmeg for depth, and salt. The filling will be soupy going into the oven, but once it bakes, it will become dense and custardy.

Salted Butterscotch PieWhen the pie comes out of the oven, sprinkle it with finishing salt. I am partial to Trader Joe’s Cypriot Pyramid Salt because of the big crunchy flakes, but use whatever salt you like. Gray salt and Fleur de Sel are good choices, but if you have some specialty salt in the back of your spice cabinet, feel free to use that. As the pie cools, the salt will adhere itself to the top, adding a little salty punch to every sweet butterscotch bite.

And speaking of cooling, this Salted Butterscotch Pie doesn’t require a long rest between baking and eating. The pie pictured was sliced just one hour after baking! It’s super structurally sound at any temperature and can be served warm, room temperature, or cold. It’s the dream. And if you have vanilla ice cream to go with it, all the better.

Salted Butterscotch PieSalted Butterscotch PieLooking for more Thanksgiving pie inspiration? Check out this Black Bottom Pear & Almond Pie and this light and fluffy Pumpkin Pie!

Salted Butterscotch Pie
makes one 9-inch standard pie

1/2 recipe Cream Cheese Pie Dough or other good crust
2 cups dark brown sugar, packed
4 large eggs + 2 large egg yolks, room temperature
1/2 cup whole milk
1 tablespoon apple cider vinegar
2 teaspoons pure vanilla extract
4 tablespoons unsalted butter, melted and cooled slightly
2 tablespoons all-purpose flour
1/8 teaspoon ground cinnamon
1/8 teaspoon ground nutmeg
1/2 teaspoon Kosher or sea salt
1/2-1 teaspoon finishing salt, for topping
vanilla ice cream, for serving (optional)

Roll out pie crust to a 12-inch diameter and fit it in a 9-inch standard pie plate. Trim the excess to 1/2-inch and crimp as desired. Freeze prepared crust for 15 minutes while you make the filling.

Position oven racks to the top and bottom positions. Preheat oven to 350F. Place dark brown sugar in a large mixing bowl. Whisk in eggs and yolks one at a time until completely combined. Stir in milk, apple cider vinegar, and vanilla. While whisking constantly, drizzle in the melted butter until combined. Stir in flour, cinnamon, nutmeg, and salt. Let filling sit five minutes for any large bubbles to dissipate. Remove crust from the freezer and place it on a baking sheet. Pour filling into prepared crust (you may have a few tablespoons leftover).

Bake pie for 25 minutes on the bottom rack of the oven. Move pie to the top rack of the oven and tent loosely with foil. Bake 25-35 minutes, until filling is puffy. When the filling is done, it should jiggle just slightly when the pan is jostled and a toothpick inserted in the middle should come out clean. Once the filling deflates, sprinkle the pie with finishing salt. Let pie cool on a rack until it reaches room temperature. Serve in small slices with ice cream, if desired.

Pie will keep covered at room temperature for up to three days, or in the refrigerator for up to five.

Salted Butterscotch Pie

Pumpkin Scones

Pumpkin SconesI know, I know. More pumpkin. Some people love it, some hate it, and others, like me, are right in the middle. I definitely like pumpkin, but I do not need every single thing I eat in the autumn to be brimming with pumpkin pie spice. You wouldn’t know that based on the number of pumpkin recipes on this site, but it’s true.

These Pumpkin Scones though. Y’all, I could eat one of these everyday from now until Thanksgiving and not grow tired of them. They’re nubbly-edged, soft in the middles, and drizzled with a delectable pumpkin spice glaze. Oh my goodness.

Pumpkin SconesThe great thing about homemade scones is that they are ridiculously easy and very impressive. I’m telling you, when people come over and you offer them a warm homemade scone, they look at you like you’re Ina Garten. What they don’t know is that they took all of 35 minutes to make and almost no actual effort.

Pumpkin SconesPumpkin Scones come together just as easily as buttermilk biscuits. Mix together some dry ingredients and pie spices, cut in some cold butter, and stir in a mixture of milk and pumpkin purée. Turn your dough onto a floured surface, pat it into a disk, slice it into wedges, and bake for 18 minutes. Make a quick little glaze while the scones are cooling and drizzle it over the tops. That’s it!

If you’re looking for an easy Thanksgiving weekend breakfast, these Pumpkin Scones are just the ticket! But of course, they’re just as good any other fall morning 🍁🍂Pumpkin Scones

Pumpkin Scones
makes 8 scones

1/2 cup half-and-half + more for brushing, very cold
1/2 cup pure pumpkin purée
2 cups all-purpose flour
3 tablespoons granulated sugar
1 tablespoon pumpkin pie spice
1/2 teaspoon ground cinnamon
2 teaspoons baking powder
1/2 teaspoon Kosher or sea salt
1/2 cup unsalted butter, very cold, cubed

Glaze:
1 cup confectioner’s sugar
1/2 teaspoon pumpkin pie spice
pinch of Kosher or sea salt
1/2 teaspoon vanilla
2 tablespoons half-and-half

Move an oven rack to the center position. Preheat oven to 400F. Line a baking sheet with parchment or a silicone baking mat. Set aside.

Combine 1/2 cup half-and-half and pumpkin purée in a liquid measuring cup. Refrigerate until needed.

In a large mixing bowl, whisk together flour, sugar, pumpkin pie spice, cinnamon, baking powder, and salt. Use a pastry blender or two forks to cut cold butter into flour mixture until the largest pieces are the size of small peas. Pour in milk-pumpkin mixture and fold together with a wooden spoon until a shaggy dough forms.

Turn dough onto a floured surface. Pat into a 1-inch thick disc. Use a large, sharp knife (not serrated) to cut dough into 8 wedges. Transfer scones to prepared pan and brush with additional cream. Bake scones 16-18 minutes, until golden and cooked through. Let cool on the pan for 10 minutes.

Make the glaze. In a small bowl, use a fork to whisk together confectioner’s sugar, pumpkin pie spice, and salt. Whisk in vanilla and half-and-half. Drizzle glaze over the scones. Glaze will set after 20 minutes.

Scones are best the day they are made, but may be kept in an airtight container at room temperature for up to 48 hours.