Fudge-Stuffed Chocolate Chip Cookie Bars

Fudge-Stuffed Chocolate Chip Cookie Bars​

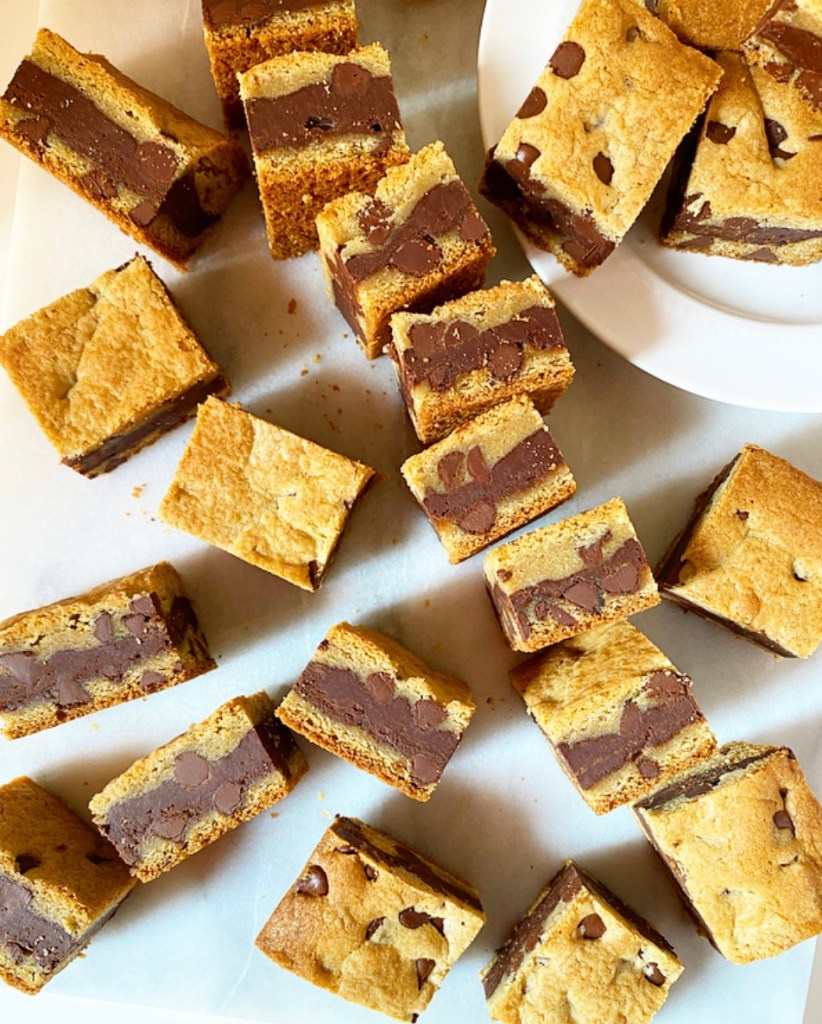
Nothing is better than homemade chocolate chip cookies, but these Fudge-Stuffed Chocolate Chip Cookie Bars might give them a run for their money. I mean, what’s not to love about two thin layers of chewy chocolate chip cookie sandwiched together with a layer of chocolate fudge?! It goes without saying that these are sublime.

Fudge-Stuffed Chocolate Chip Cookie Bars​

This recipe is remarkably easy to make (and even easier to eat). The chocolate chip cookie portion is simply my go-to cookie cake recipe. I made 1.5x the amount to fill a 9×13” pan and just used regular melted butter instead of browning it, but otherwise it’s the same one bowl, no-mixer recipe I’ve used for years.

The fudge is even easier than the cookie dough! Simply melt some dark chocolate in the microwave and then stir in a can of sweetened condensed milk. The mixture will be very thick and fudgy (because it’s fudge, duh). If you were to spread it in a square pan and let it cool, you could slice it into pieces and eat it as is, but today it’s going between two layers of cookie dough and being baked to chewy, chocolaty perfection.

Fudge-Stuffed Chocolate Chip Cookie Bars​

Fudge-Stuffed Chocolate Chip Cookie Bars only need 30 minutes in the oven—it’s the cooling step that takes a while! It will be worth it though because you’ll get chewy cookie, soft fudge and perfectly clean edges. Who can resist these layers?! Not me. That’s for damn sure.

Fudge-Stuffed Chocolate Chip Cookie Bars​
Fudge-Stuffed Chocolate Chip Cookie Bars
makes one 9x13-inch pan, 24-30 bars

Cookie Dough:
3 cups all-purpose flour
3 tablespoons cornstarch
1 1/2 teaspoon baking soda
1 teaspoon Kosher or sea salt
18 tablespoons (2 sticks + 2 tablespoons) unsalted butter, melted
1 1/2 cups light or dark brown sugar, packed
2 large eggs, room temperature
2 teaspoons pure vanilla extract
1 1/2 cup semisweet chocolate chips

Fudge:
12 ounces chopped dark chocolate
1 14-ounce can sweetened condensed milk

Preheat oven to 350F. Grease a 9x13-inch pan. Line with parchment, leaving overhang on the long sides for removal, and grease again. Set aside.

Make the cookie dough. In a medium mixing bowl, whisk together flour, cornstarch, baking soda, and salt. Set aside.

In a large mixing bowl, whisk together melted butter and brown sugar. Mix in eggs one at a time, followed by vanilla. Add dry ingredients in two installments, stirring to combine. Fold in chocolate chips.

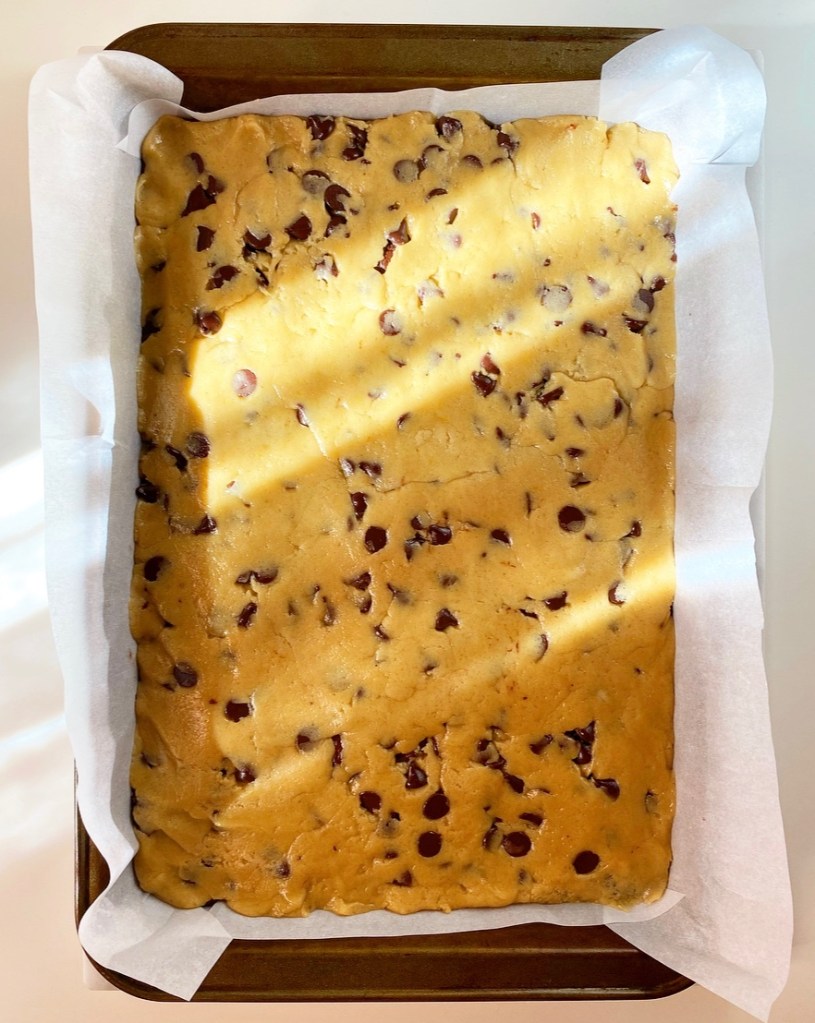
Transfer half the dough to prepared pan and spread/press into one even layer.

Make the fudge. Place dark chocolate in a microwave safe bowl. Microwave in 30 second increments, stirring between, until melted and smooth. Whisk in sweetened condensed milk. Mixture will be thick.

Use an offset icing spatula or the back of a spoon to spread fudge over the layer of cookie dough, making sure to go all the way to the edges. Use your hands to press the remaining dough into an even layer over the top of the fudge; this is easiest if you work with a little bit at a time and patch it together.

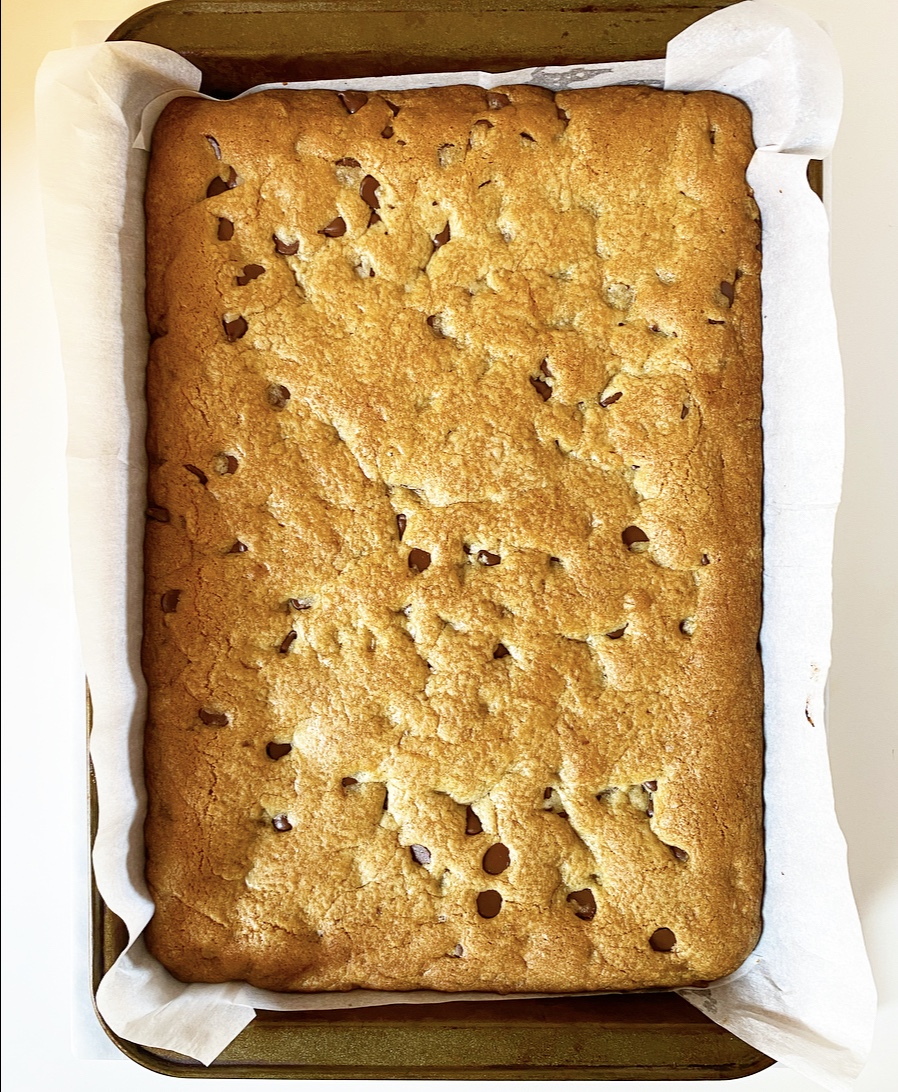
Bake 25-30 minutes, until the top no longer appears shiny.

Let cookie bars cool completely in the pan on a rack. Use the parchment overhang to remove to a cutting board. Discard parchment. Use a large sharp chef’s knife to slice bars. Serve.

Decorated cake will keep in an airtight container at room temperature for up to five days.

Soft Cheddar Cheese Bread

Soft Cheddar Cheese Bread

When I was twisting up Lemon Morning Buns a few weeks ago, it occurred to me that the same soft, stretchy, buttery dough would make spectacular cheese bread. Long story short, I was right.

Soft Cheddar Cheese Bread

This here loaf is as rich as any brioche, layered with extra sharp cheddar, twisted up like a babka and baked to burnished, glossy perfection. It’s cheesy and buttery, savory with a hint of sweetness, and best served in thick slices at literally any temperature.

Soft Cheddar Cheese Bread

Seriously. Served warm, the cheese is super melty. At room temperature, all the flavors are at their peak. Sliced cold out of the fridge, it’s reminiscent of leftover mac & cheese, one of my favorite things on earth. (I know I’m not the only one who likes cold mac & cheese!)

This cheese bread looks much more difficult to make than it actually is. It starts the same way as the Morning Buns: mixing, kneading, and letting the dough rise. After that, roll it out into a rectangle, cover it with cheese, and roll it back up cinnamon roll-style.

Here’s where we get a little wild. Slice your rolled up dough lengthwise so that you have two long pieces. Twist those together and put them in a loaf pan to rise again—don’t fret if it looks wonky. Once risen again, give the loaf a good brush of egg wash and bake til golden, pausing partway through to give it another swipe of egg for excellent sheen. I like to hit it with a little butter right out of the oven too, just for kicks.

Soft Cheddar Cheese Bread

As with most baked goods, the most difficult part of this recipe is letting it cool long enough so that you don’t destroy your fingers and the roof of your mouth with piping hot cheese bread. It’s almost a risk worth taking. Almost.

Soft Cheddar Cheese Bread
makes one loaf

Dough:
2 3/4-3 cups all-purpose flour
2 tablespoons granulated sugar
1 packet (2 1/4 teaspoons) instant yeast
1 teaspoon fine sea salt
3 tablespoons unsalted butter
1 cup whole milk
1 large egg, room temperature

Filling:
1 8-ounce brick sharp cheddar cheese, grated

Egg Wash:
1 large egg
1 teaspoon water

For Finishing:
2 tablespoons unsalted butter, melted

Make the dough. In a medium-large mixing bowl, whisk together 2 3/4 cups all-purpose flour, sugar, instant yeast, and salt. Set aside.

In a small saucepan over medium-low heat, melt butter and milk together until just warm to the touch, about 95-110 degrees.

Crack the egg into a small mixing bowl. Whisking constantly, add the butter/milk mixture in a thin stream until completely combined. Add mixture to the dry ingredients and fold together. A shaggy dough should form and be pulling away from the bowl. Gradually add flour in 2 tablespoon increments until the it pulls away a bit.

Turn dough onto a floured surface and knead 5-6 minutes, until smooth. Gather dough into a ball and place it in an oiled bowl, making sure to get a little oil on all sides. Stretch some plastic wrap over the top and allow dough to rise in a warm, draft-free environment for 45 minutes to 1 hour or until doubled in bulk.

In the meantime, heavily grease a 9x5-inch loaf pan with butter.

Shape the loaf. Flour a surface and a rolling pin. When the dough has risen, punch it down and turn it out onto the surface. Roll it out to an 11x14-inch rectangle (about 1/8-inch thick). Sprinkle the cheese over the entire surface of the dough, leaving 1/2-inch bare on all sides. Starting from a short edge (an 11 inch edge), tightly roll the dough into a cylinder and set it on the surface seam-side-down.

Slice the cylinder in half lengthwise. Place both halves next to each other, cut-sides-up. Carefully twist them together. Place twist in one of the prepared pan. Cover pan loosely with plastic wrap. Let loaf rise in a warm, draft-free place for 30-45 minutes, or until it peaks over the top of the pan. If you poke it with your finger, the dent should remain.

Meanwhile, set an oven rack in the central position. Preheat oven to 350F.

Make the egg wash. In a small bowl, use a fork to whisk together egg and water.

When loaf has risen, remove and discard the plastic wrap. Use a pastry brush to brush the entire top of the loaf with egg wash. Do not discard remaining egg wash.

Bake loaf for 25 minutes. Remove loaf from the oven and brush the top again with egg wash. Bake for another 20-25 minutes, tenting the loaf with foil if it is getting too dark. Test for doneness with a skewer—if it meets any resistance or comes out with dough on it, bake in five minute increments until neither of those things happens. To test for doneness with a thermometer, insert the end into center. If it reads at 190F or above, it’s done.

When the bread is done, brush the entire top with melted butter. Let cool in the pan for 15 minutes before turning it onto a rack to cool completely.

Slice bread thickly and enjoy warm, room temperature or cold. Cover and refrigerate any leftovers for up to a week.

Cookies & Cream Cookies

Cookies & Cream Cookies

Oreo turned 110 last week, but that’s not the reason I made these Cookies & Cream Cookies.

Cookies & Cream Cookies

No, I made them just because I like cookies & cream, and because I do my best to never be too far from a family size pack of Oreos. I’m not in the business of telling people how to live their lives, but I do endorse that as a lifestyle choice.

If you’re thinking “but why did you put Oreos in cookies when they are already cookies themselves?” Well, that is also a lifestyle choice that I endorse. Cookies in cookies is the kind of energy that I’m bringing in 2022.

Cookies & Cream Cookies

Cookies & Cream Cookies are so good, with irregular chunks of Oreo and white chocolate chips folded into my favorite soft sugar cookie dough. They bake up tall and thick, with tender centers and golden undersides. While the Oreos in these cookies won’t retain their crispness, their flavor and magnificent dark color are all over the place—they meld in here perfectly.

Cookies & Cream Cookies

If you’d like a crisper cookies & cream treat, check out these fabulous blondies. Or better yet, make time for the cookies and the blondies. Now that is my kind of lifestyle choice.

Cookies & Cream Cookies
Cookies & Cream Cookies 
makes about 2.5 dozen cookies

3 cups all-purpose flour
1 tablespoon cornstarch
1/2 teaspoon baking powder
1/2 teaspoon baking soda
1/2 teaspoon Kosher or sea salt
1 cup (2 sticks) unsalted butter, softened to room temperature
3/4 cup granulated sugar
1/2 cup light brown sugar, packed
2 large eggs, room temperature
2 teaspoons pure vanilla extract
16 Oreos (regular or DoubleStuf), cut into quarters
1/2 cup white chocolate chips + more for topping

In a medium mixing bowl, whisk together flour, cornstarch, baking powder, baking soda, and salt. Set aside.

In a large mixing bowl, use an electric mixer to cream butter until fluffy and lighter in color. Beat in granulated and light brown sugars. Mix in eggs one at a time, followed by vanilla. Add dry ingredients in two installments, beating until combined. Use a silicone spatula or wooden spoon to fold in chopped Oreos, followed by 1/2 cup white chocolate chips. Cover dough with plastic wrap and chill for at least 2 hours, or up to 3 days.

If chilled longer than a few hours, let dough sit at room temperature for 15-30 minutes for easier scooping.

Preheat oven to 350F. Line two baking sheets with parchment. Set aside.

Scoop chilled dough in 2 tablespoon increments, and roll into balls. Place dough balls at least two inches apart on prepared baking sheets. Bake cookies 10-11 minutes, until puffy. Once out of the oven, dot the tops with additional white chocolate chips, if desired.

Let cookies cool on baking sheets for five minutes before removing to a rack to cool completely. Repeat process with any remaining dough, letting the baking sheets come back to room temperature between batches.

Cookies will keep extremely well in an airtight container at room temperature for up to a week.

Lemon Morning Buns

Lemon Morning Buns

If you’re searching for a way to brighten up your weekend, look no further than these Lemon Morning Buns. They’re glossy, golden, gorgeous and swirled with fresh lemon flavor throughout.

Lemon Morning Buns

This is my third morning buns recipe, and there’s a reason I keep returning to them: I get a lot of bang for my baking buck. Though these twisty little guys look like they take some real skill, the truth is that if you can make cinnamon rolls and tie a knot, you can make morning buns.

I’ve posted detailed shaping tutorials previously and will link to them in the recipe below, but rest assured that these buns really are simple beginning to end. The entire recipe has just 8 ingredients with several being used in multiple places. The dough is enriched with butter, egg and whole milk, and is a pleasure to work with; it’s smooth and sticky and kneads like a dream. Let it rise for 45 minutes or so, then layer it with a lemon-sugar filling and twist it into knots. Let them rise a little more, then bake and brush with a lemon glaze, leaving them shiny and a little sticky. Oh, and bursting with buttery lemon flavor.

Lemon Morning Buns

These Lemon Morning Buns are a great way to put a little sunshine in your weekend. Between their fluffy texture and intense lemon flavor, they’re guaranteed to brighten your day.

Lemon Morning Buns
Lemon Morning Buns
makes 12 buns

Dough:
2 3/4-3 cups all-purpose flour
3 tablespoons granulated sugar
1 packet (2 1/4 teaspoons) instant yeast
1 teaspoon fine sea salt
3 tablespoons unsalted butter
1 cup whole milk
1 large egg, room temperature

Filling:
3 tablespoons granulated sugar
1 1/2 tablespoons fresh lemon zest
pinch of Kosher or sea salt
3 tablespoons unsalted butter, melted

Glaze:
1/3 cup fresh lemon juice (from about 1 1/2 medium lemons)
1/3 cup granulated sugar
1 tablespoon unsalted butter, cut into 4 pieces

Make the dough. In a medium-large mixing bowl, whisk together 2 3/4 cups all-purpose flour, sugar, instant yeast, and salt. Set aside.

In a small saucepan over medium-low heat, melt butter and milk together until just warm to the touch, about 95-110 degrees.

Crack the egg into a small mixing bowl. Whisking constantly, add the butter/milk mixture in a thin stream until completely combined. Add mixture to the dry ingredients and fold together. A shaggy dough should form and be pulling away from the bowl. Gradually add flour in 2 tablespoon increments until the it pulls away a bit.

Turn dough onto a floured surface and knead 5-6 minutes, until smooth. Gather dough into a ball and place it in an oiled bowl, making sure to get a little oil on all sides. Stretch some plastic wrap over the top and allow dough to rise in a warm, draft-free environment for 45 minutes to 1 hour or until doubled in bulk.

In the meantime, line two rimmed baking sheets with parchment. Set aside.

Make the filling. Combine sugar, lemon zest and salt in a small bowl. Rub together with your fingers to release the oils in the zest.

**Shaping photo tutorial here!**

Shape the buns. Return dough to floured surface. Flour a rolling pin and roll dough into an 18x12-inch rectangle. Brush dough with butter, leaving a 1/2-inch border on all sides.

Mentally divide the dough into thirds, like an unfolded letter. Place half the sugar mixture in the middle third of the dough—it’ll be a 12x6-inch section surrounded by two buttered sections of the same size.

Carefully grab one short side of the dough and fold it over the center, so that the dimensions are now 12x12-inches. Brush the top of the folded section with more butter and scatter on the remaining sugar mixture. Fold the other short side over the top so that the dimensions are 12x6-inches. Tap edges “closed” with your rolling pin.

Carefully lift and turn dough over so that the seam is against the floured surface. Roll the dough so that the dimensions are 14x8-inches.

Use a large, sharp chef’s knife to trim the short edges of the dough by about 1/2-inch. Slice dough into 12 strips. Working with one strip at a time, twist the ends until you have a loosely-twisted rope of dough. Carefully bring ends toward one another until they cross over one another and create a small hole. Tuck ends into that hole. Place shaped buns on prepared pans, leaving about 6 inches of space between (I put 6 on a half-sheet sized pan).

Cover pans loosely with parchment or a clean tea towel and let rise in a warm, draft-free environment for another 25-30 minutes. Remove parchment/tea towel. The buns will not seem to have changed drastically, but if you poke one with your finger, the indentation should remain. If any ends have come loose, just nudge them back into the centers.

Place oven racks in the center positions. Preheat oven to 375F. Bake buns for 9 minutes. Rotate pans top-to-bottom and front-to-back. Bake another 8-9 minutes, or until golden brown.

While Buns are baking, make the glaze. Combine lemon juice and sugar in a small saucepan over medium-low heat, stirring constantly until sugar dissolves (about 3-5 minutes). Remove from heat and stir in butter.

Brush warm buns with glaze. Let cool a few minutes before serving. Baked buns are best the day they are made, but will keep in an airtight container at room temperature for a day or so.

Banana Crumb Muffins

Internet, meet my freezer stash of bananas. Freezer stash of bananas, meet the internet.

Banana Crumb Muffins​

These brown bananas have been taking up space in my freezer since Christmas and it’s time to clear them out for…well, honestly, probably more brown bananas. The cycle continues, but that’s beside the point.

(The point is to bake good things with bananas, obviously.)

Banana Crumb Muffins

Of all the things you can make with sad bananas, none will ever beat banana bread/muffins. I’ve posted several recipes for both over the years, and while they all have their strengths, I think these are my best effort yet.

I’ve been making this particular recipe weekly for nearly a year now; the people I work for love banana muffins. I make them with bananas from their freezer stash, throwing them in the microwave for a minute or two while I prepare the other ingredients, then squeezing the fruit into a bowl and mashing it to smithereens.

I throw 1 1/2 cups of chocolate chips into the batter for work, but lately I am more interested in coffee cake-style crumb topping. I love its crispy texture and pop of buttery cinnamon flavor—it really takes these otherwise plain banana muffins to another level.

Banana Crumb Muffins are easy to make and really delicious. The batter is very straightforward—nothing out of the ordinary—and the crumb is just whisking some melted butter into flour, brown sugar, cinnamon and salt until, well, crumbly. Break it up with your fingers and distribute it over the muffin batter, then bake until brown and a little craggy.

Banana Crumb Muffins

As with most banana baked goods, these are good the day they’re made, but great with a little time. That said, good luck keeping them around for more than a day or two.

Banana Crumb Muffins
makes 14-16 muffins

Crumb:
2/3 cup all-purpose flour
1/3 cup light brown sugar, packed
1/2 teaspoon ground cinnamon
pinch of Kosher or sea salt
1/4 cup (1/2 stick) unsalted butter, melted

Muffin Batter:
2 cups all-purpose flour
1 cup light brown sugar, packed
1 1/2 teaspoons baking powder
1 teaspoon baking soda
1 1/2 teaspoon ground cinnamon
3/4 teaspoon Kosher or sea salt
2/3 cup buttermilk, room temperature
1/2 cup (1 stick) unsalted butter, melted
2 large eggs, room temperature
3 large very ripe bananas, mashed

Preheat oven to 425F. Grease or use muffin liners in 14-16 cups of a standard muffin tin. Fill the remaining cups 1/3-1/2 of the way with water (to keep the pan from warping in the oven). Set aside.

Make the crumb. In a small bowl, which together flour, brown sugar, cinnamon and salt. Add melted butter and whisk until everything is saturated. It should be the texture of damp sand, holding together when pinched. Set aside.

Make the muffin batter. In a small bowl, whisk together flour, brown sugar, baking powder, baking soda, cinnamon, and salt. Set aside.

In a large mixing bowl, whisk together melted butter and buttermilk, followed by eggs and mashed banana. Add dry ingredients. Use a silicone spatula or wooden spoon to fold ingredients together just until combined. Batter will be thick.

Divide batter among prepared muffin cups, filling nearly to the top. Tap full pans on the counter 5 times to release large air bubbles. Scatter crumb over the top of the filled cups and press down lightly with your fingers to adhere.

Bake 5 minutes. Reduce temperature to 375F and bake another 15-16 minutes, or until a toothpick inserted in the center comes out clean.

Let muffins cool in the pan for at least five minutes before removing to a rack to cool completely. Serve. Leftovers will keep covered at room temperature for a couple of days, but may be refrigerated for up to 5.