Category Archives: citrus

Key Lime Pie-vlova {Pavlova}

Key Lime Pie-vlova {Pavlova}​

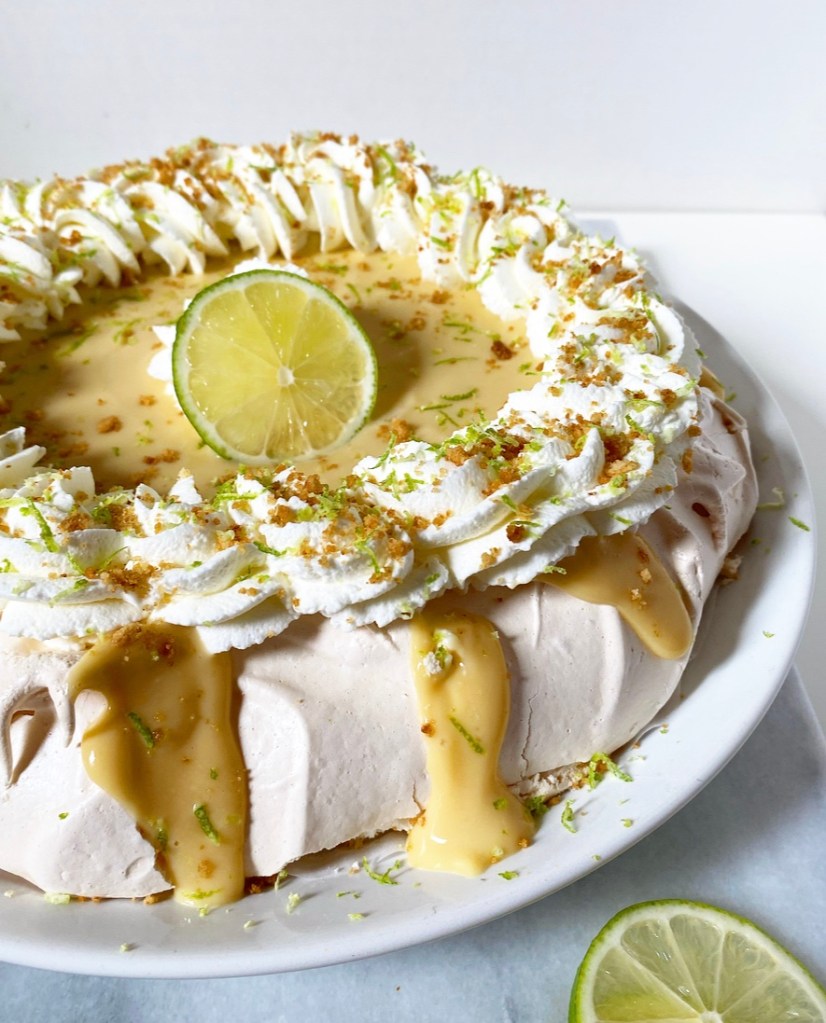
When I posted my Pavlova with Lemon Curd & Berries last year, I suggested a key lime pie variation. In the year that has followed, I haven’t been able to get that idea out of my head. So naturally, here we are.

Key Lime Pie-vlova {Pavlova}​

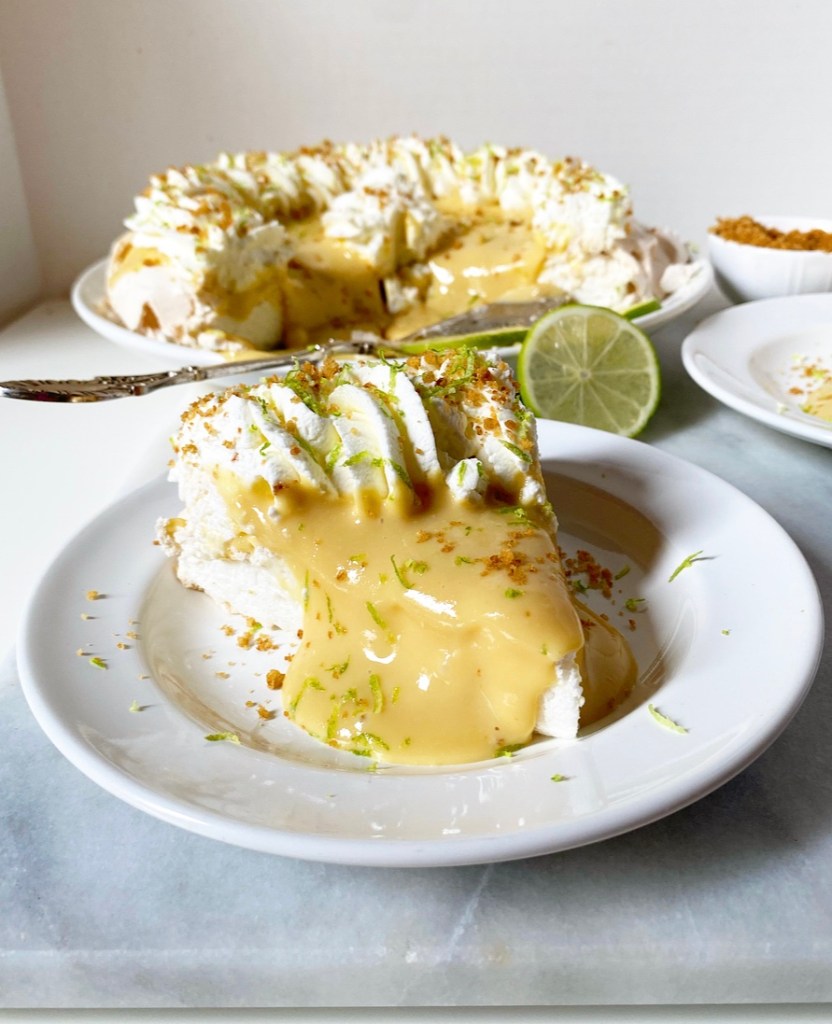
This is a summer dessert mash-up for the ages. We’re skipping the usual fresh fruit this time around, instead opting to top this pavlova with a sweet-tart key lime curd, whipped cream swirls, and a sprinkle of cinnamon-scented graham cracked crumbs! If this topping combo sounds rich, that’s because it is, but it also perfectly balances out the crisp edges and airy marshmallow center of this pavlova.

Key Lime Pie-vlova {Pavlova}​

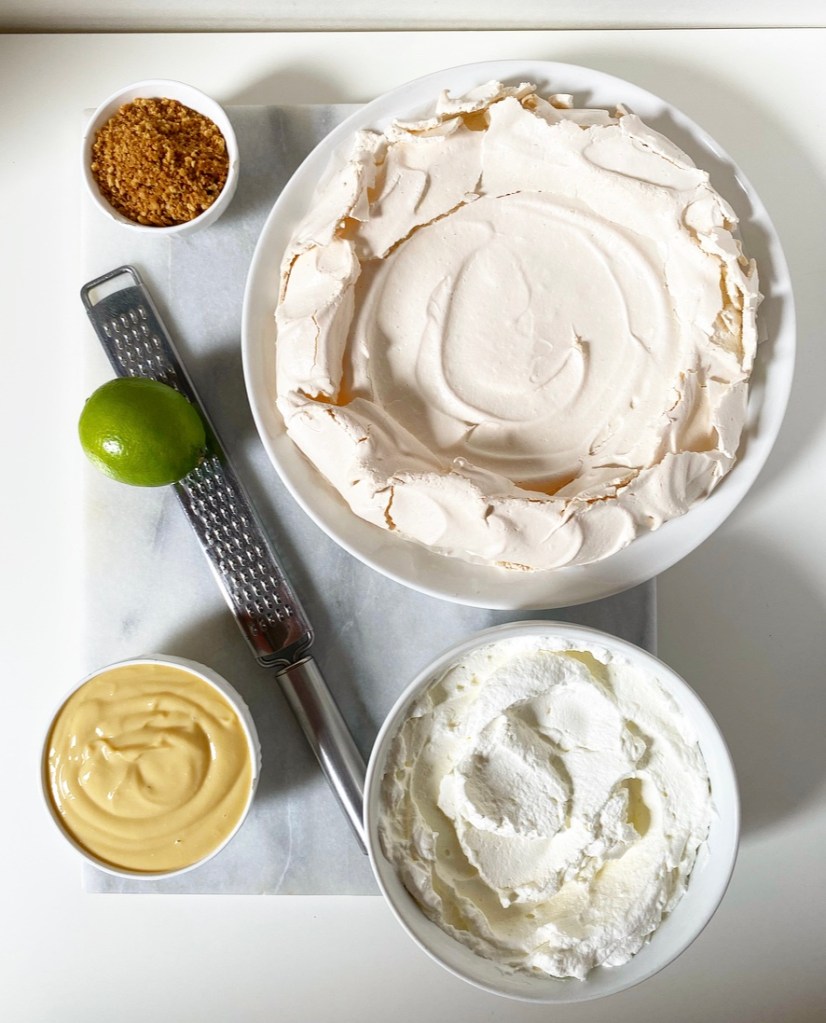
My favorite thing about making pavlova is that you can (and should) do it all in advance. The pavlova itself can be made up to three days ahead, and the key lime curd can sit in your fridge for a couple of days. If you can trust yourself around the graham cracker crumbs (I cannot), you can store them in your pantry for a day or two. Really, all you have to do day-of is whip the cream and assemble the thing, which only takes a few minutes.

Key Lime Pie-vlova {Pavlova}​

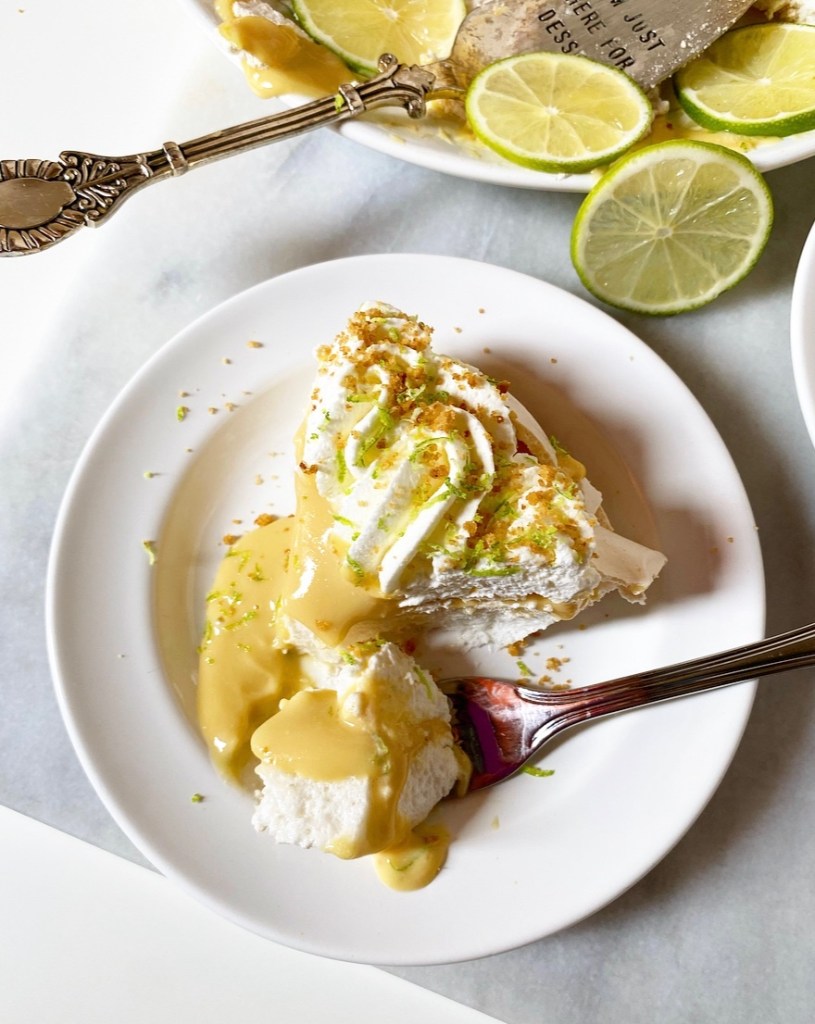
Be warned though that as soon as your Key Lime Pie-vlova is assembled, it’s the beginning of the end. This is not a dessert that can wait on you—this is a dig in immediately and don’t expect leftovers situation. Make no mistake, you are at the mercy of the pavlova, not the other way around.

That said, if you must be beholden to a dessert, let it be this one.

Key Lime Pie-vlova {Pavlova}​
Key Lime Pie-vlova {Pavlova}
makes one pavlova, about 8 servings

Pavlova:
1 cup granulated sugar
2 teaspoons cornstarch
1 teaspoon pure vanilla extract
1 teaspoon white or apple cider vinegar
4 large egg whites, room temperature
1/4 teaspoon Kosher or sea salt

Key Lime Curd:
2/3 cup key lime juice (fresh or bottled)
1 14-ounce can sweetened condensed milk
2 large egg yolks, room temperature

Graham Cracker Crumb Topping:
4 sheets graham crackers
3 tablespoons unsalted butter
1/4 cup light brown sugar, packed
1/8 teaspoon ground cinnamon
pinch of Kosher or sea salt

Whipped Cream:
1 cup heavy cream, very cold
2 tablespoons confectioner’s sugar

Garnish (optional):
lime slices
fresh berries
chocolate shavings

Make the pavlova. Preheat oven to 250F. Draw an 8-inch circle on a sheet of parchment big enough for a rimmed sheet pan. Turn the parchment over (so the drawn circle side is facing down) and place on the pan. Set aside.

In a small bowl, use a fork to whisk together sugar and cornstarch. Set aside.

In a separate very small bowl, combine vanilla and vinegar. Set aside.

Add egg whites and salt to a very clean, dry mixing bowl. Starting at the lowest setting and gradually ramping up to medium-high, use an electric mixer to beat egg whites until foamy (about 2-3 minutes). With the mixer running, add sugar-cornstarch mixture a tablespoon at a time until incorporated. Then add the vanilla-vinegar mixture. Turn the speed up to high and whip until stiff peaks form (about 5 minutes).

Turn the mixture (now a meringue) out onto the prepared baking sheet, using an offset spatula or the back of a spoon to gently spread it to the edges of the circle. Make it taller at the edges than the center so you have a logical place for the toppings.

Place pavlova in the oven and bake for 75 minutes (1:15) until puffed, glossy, and slightly cream-colored. Turn off the oven and wedge a wooden spoon in the door to keep it slightly ajar. Let the pavlova cool completely in the oven (a couple of hours or overnight).

If not using immediately, carefully remove the pavlova from the parchment and double wrap with plastic wrap. Keep at room temperature for up to 3 days.

While the pavlova is baking, make the Key Lime Curd. Fill a small pot with 1-2 inches of water. Set a heatproof bowl over the top, ensuring that the water does not touch the bottom of the bowl. Remove bowl and bring water to a simmer.

In the heatproof bowl, whisk together key lime juice, sweetened condensed milk, and egg yolks. Place bowl over simmering water, creating a double boiler. Let cook, stirring frequently, until slightly thickened (about 15 minutes). Remove from heat.

Place a fine mesh strainer over a heatproof bowl. Use a silicone spatula or wooden spoon to press curd through the strainer. Transfer curd to a heatproof container. Press a piece of plastic wrap to the surface. Let cool completely at room temperature. Refrigerate until you are assembling the pavlova, up to 2 days in advance.

Make the graham cracker crumb topping. Melt butter in a skillet over medium heat. Add crushed graham crackers, brown sugar, cinnamon, and salt. Cook, stirring very frequently, until fragrant (about 5-7 minutes).

Make whipped cream topping. In a medium-large mixing bowl, combine heavy cream and confectioner’s sugar. Use an electric mixer to whip cream until stiff peaks form. Load whipped cream into a piping bag fitted with a tip.

Assemble the pavlova immediately before serving. If wrapped, gently remove and discard plastic wrap. Place pavlova on a serving plate. Spread the top of the pavlova with about 1 cup key lime curd. Pipe whipped cream over the top as desired. Finish with graham cracked crumbs and garnish with lime slices, fresh fruit or chocolate shavings, if desired. Serve immediately.
Advertisement

Lemon Morning Buns

Lemon Morning Buns

If you’re searching for a way to brighten up your weekend, look no further than these Lemon Morning Buns. They’re glossy, golden, gorgeous and swirled with fresh lemon flavor throughout.

Lemon Morning Buns

This is my third morning buns recipe, and there’s a reason I keep returning to them: I get a lot of bang for my baking buck. Though these twisty little guys look like they take some real skill, the truth is that if you can make cinnamon rolls and tie a knot, you can make morning buns.

I’ve posted detailed shaping tutorials previously and will link to them in the recipe below, but rest assured that these buns really are simple beginning to end. The entire recipe has just 8 ingredients with several being used in multiple places. The dough is enriched with butter, egg and whole milk, and is a pleasure to work with; it’s smooth and sticky and kneads like a dream. Let it rise for 45 minutes or so, then layer it with a lemon-sugar filling and twist it into knots. Let them rise a little more, then bake and brush with a lemon glaze, leaving them shiny and a little sticky. Oh, and bursting with buttery lemon flavor.

Lemon Morning Buns

These Lemon Morning Buns are a great way to put a little sunshine in your weekend. Between their fluffy texture and intense lemon flavor, they’re guaranteed to brighten your day.

Lemon Morning Buns
Lemon Morning Buns
makes 12 buns

Dough:
2 3/4-3 cups all-purpose flour
3 tablespoons granulated sugar
1 packet (2 1/4 teaspoons) instant yeast
1 teaspoon fine sea salt
3 tablespoons unsalted butter
1 cup whole milk
1 large egg, room temperature

Filling:
3 tablespoons granulated sugar
1 1/2 tablespoons fresh lemon zest
pinch of Kosher or sea salt
3 tablespoons unsalted butter, melted

Glaze:
1/3 cup fresh lemon juice (from about 1 1/2 medium lemons)
1/3 cup granulated sugar
1 tablespoon unsalted butter, cut into 4 pieces

Make the dough. In a medium-large mixing bowl, whisk together 2 3/4 cups all-purpose flour, sugar, instant yeast, and salt. Set aside.

In a small saucepan over medium-low heat, melt butter and milk together until just warm to the touch, about 95-110 degrees.

Crack the egg into a small mixing bowl. Whisking constantly, add the butter/milk mixture in a thin stream until completely combined. Add mixture to the dry ingredients and fold together. A shaggy dough should form and be pulling away from the bowl. Gradually add flour in 2 tablespoon increments until the it pulls away a bit.

Turn dough onto a floured surface and knead 5-6 minutes, until smooth. Gather dough into a ball and place it in an oiled bowl, making sure to get a little oil on all sides. Stretch some plastic wrap over the top and allow dough to rise in a warm, draft-free environment for 45 minutes to 1 hour or until doubled in bulk.

In the meantime, line two rimmed baking sheets with parchment. Set aside.

Make the filling. Combine sugar, lemon zest and salt in a small bowl. Rub together with your fingers to release the oils in the zest.

**Shaping photo tutorial here!**

Shape the buns. Return dough to floured surface. Flour a rolling pin and roll dough into an 18x12-inch rectangle. Brush dough with butter, leaving a 1/2-inch border on all sides.

Mentally divide the dough into thirds, like an unfolded letter. Place half the sugar mixture in the middle third of the dough—it’ll be a 12x6-inch section surrounded by two buttered sections of the same size.

Carefully grab one short side of the dough and fold it over the center, so that the dimensions are now 12x12-inches. Brush the top of the folded section with more butter and scatter on the remaining sugar mixture. Fold the other short side over the top so that the dimensions are 12x6-inches. Tap edges “closed” with your rolling pin.

Carefully lift and turn dough over so that the seam is against the floured surface. Roll the dough so that the dimensions are 14x8-inches.

Use a large, sharp chef’s knife to trim the short edges of the dough by about 1/2-inch. Slice dough into 12 strips. Working with one strip at a time, twist the ends until you have a loosely-twisted rope of dough. Carefully bring ends toward one another until they cross over one another and create a small hole. Tuck ends into that hole. Place shaped buns on prepared pans, leaving about 6 inches of space between (I put 6 on a half-sheet sized pan).

Cover pans loosely with parchment or a clean tea towel and let rise in a warm, draft-free environment for another 25-30 minutes. Remove parchment/tea towel. The buns will not seem to have changed drastically, but if you poke one with your finger, the indentation should remain. If any ends have come loose, just nudge them back into the centers.

Place oven racks in the center positions. Preheat oven to 375F. Bake buns for 9 minutes. Rotate pans top-to-bottom and front-to-back. Bake another 8-9 minutes, or until golden brown.

While Buns are baking, make the glaze. Combine lemon juice and sugar in a small saucepan over medium-low heat, stirring constantly until sugar dissolves (about 3-5 minutes). Remove from heat and stir in butter.

Brush warm buns with glaze. Let cool a few minutes before serving. Baked buns are best the day they are made, but will keep in an airtight container at room temperature for a day or so.

Orange Cardamom Scones

Orange Cardamom Scones​

If you’ve never tried combining orange and cardamom, prepared to be wowed. Paired together in baked goods, they somehow walk the line between tea-like subtlety and stealing center stage, and are never, ever boring. In a season of pumpkin spices and apple ciders, this blend can sometimes get lost in the mix, but just like your favorite character actor, when it gets its moment, it’s all “pumpkin spice who?”

Orange Cardamom Scones​

Now, this is not the first time I’ve put Orange Cardamom on this site—far from it, in fact. If you’ve tried my tea cake, shortbread or morning buns, you know why I’m over here waxing poetic, but if you haven’t, I suggest you start simply by mixing some zest and spice into scones.

Orange Cardamom Scones​

Oh yes, these Orange Cardamom Scones may not look particularly exceptional, but they are. Tender, perfumed with citrus, and reminiscent of chai (that’s where you might recognize cardamom from!), they’re a perfect pastry for a weekend morning or lazy afternoon before it starts getting dark at 3pm and afternoons cease to exist.

Orange Cardamom Scones​

Scones themselves are pretty easy to make, and as they require cold butter, they’re a great way to practice some pie dough skills before all the holiday food-ing begins. But they’re also a great way to usher in some coziness as fall finally (finally) seems like it might be here to stay.

Orange Cardamom Scones​
Orange Cardamom Scones
makes 8 scones

Scones:
2/3 cup half-and-half, very cold + more for brushing
2 tablespoons maple syrup (or honey)
1 1/2 teaspoons pure vanilla extract
3 tablespoons granulated sugar
zest of 1 medium navel orange (about 1 1/2 tablespoons)
2 cups all-purpose flour
1 tablespoon baking powder
1 teaspoon ground cardamom
1/2 teaspoon Kosher or sea salt
1/2 cup (1 stick) unsalted butter, very cold, cut into cubes

Glaze:
2/3 cup confectioner’s sugar
pinch of Kosher or sea salt
1-1 1/2 tablespoons fresh orange juice (from about 1 medium navel orange)

Make the scones. Place an oven rack in the center position. Preheat oven to 400F. Line a baking sheet with parchment or a silicone baking mat. Set aside.

In a liquid measuring cup, use a fork to whisk together half-and-half, maple syrup, and vanilla. Refrigerate.

In a small bowl, use your fingertips to rub together orange zest and sugar until combined.

In a large mixing bowl, whisk together flour, baking powder, cardamom, salt, and orange sugar. Add cold butter. Use a pastry blender or clean fingertips to cut the butter into the flour until the largest pieces are the size of small peas. Stir in half-and-half mixture.

Turn dough out onto a floured surface. Pat it to 1-inch thick circle. Use a large, sharp chef’s knife to slice circle into 8 wedges. Place scones at least 2 inches apart on prepared pan. Brush with more half-and-half. Bake 16-18 minutes, until puffed and golden.

Meanwhile, set a cooling rack over a piece of parchment paper. Let scones cool on the pan on a rack for a few minutes, before removing to the prepared rack.

When scones are cool enough to handle but still a little warm, make the icing. In a small mixing bowl, whisk together confectioners sugar, salt and 1 tablespoon orange juice. Add more juice by the 1/2 teaspoon until icing is thick, but pourable. Pour or drizzle icing over the scones as desired. Icing will set quickly, and eventually harden completely after a few hours.

Scones are best the day they are made, but will keep in an airtight container at room temperature for up to 2 days.

Lemon Sugar Cookies

Lemon Sugar Cookies
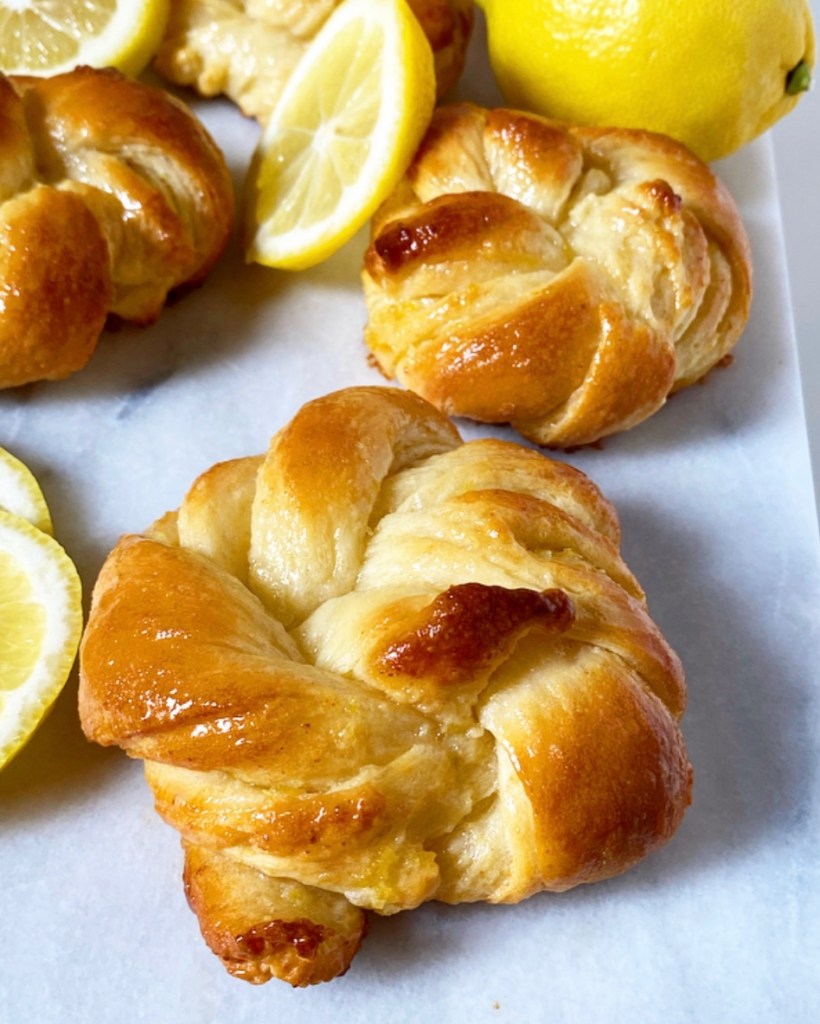
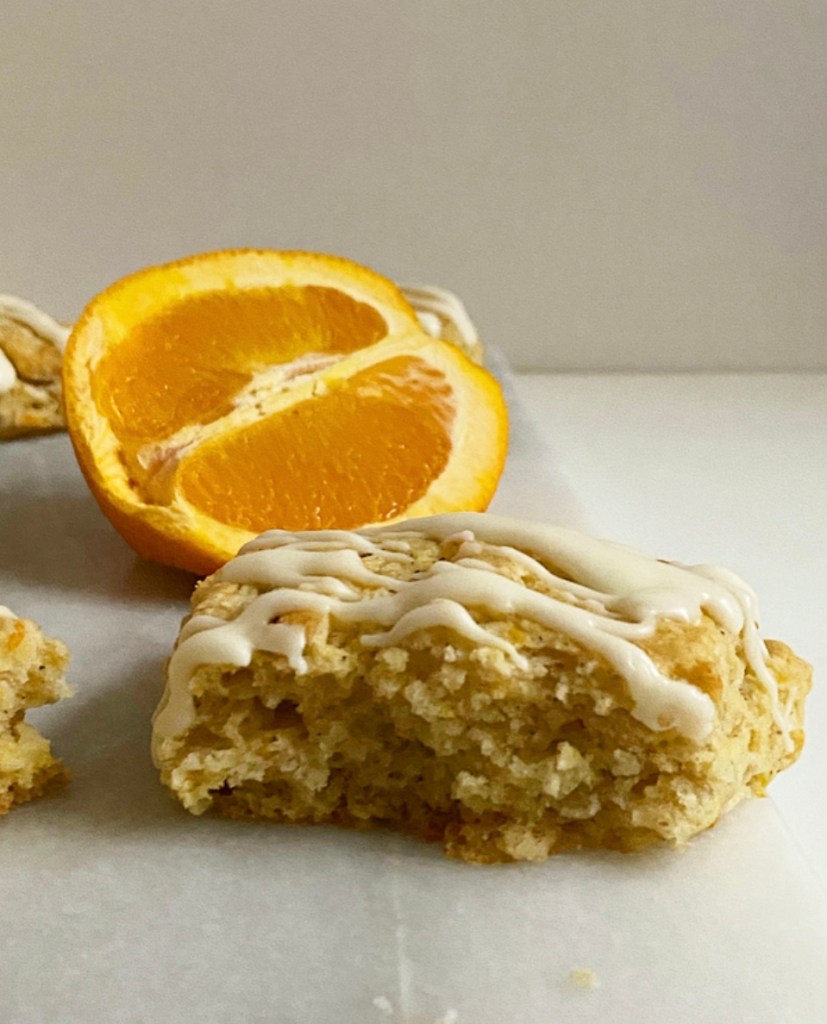
If you’re keeping track, this is my third lemon dessert in six weeks. What can I say? I’ve got a fridge full of lemons and I know how to use them.

Sunny Lemon Upside-Down Cake
Lemon Meringue Tart
Lemon Sugar Cookies ✅✅✅ Lemon Sugar Cookies
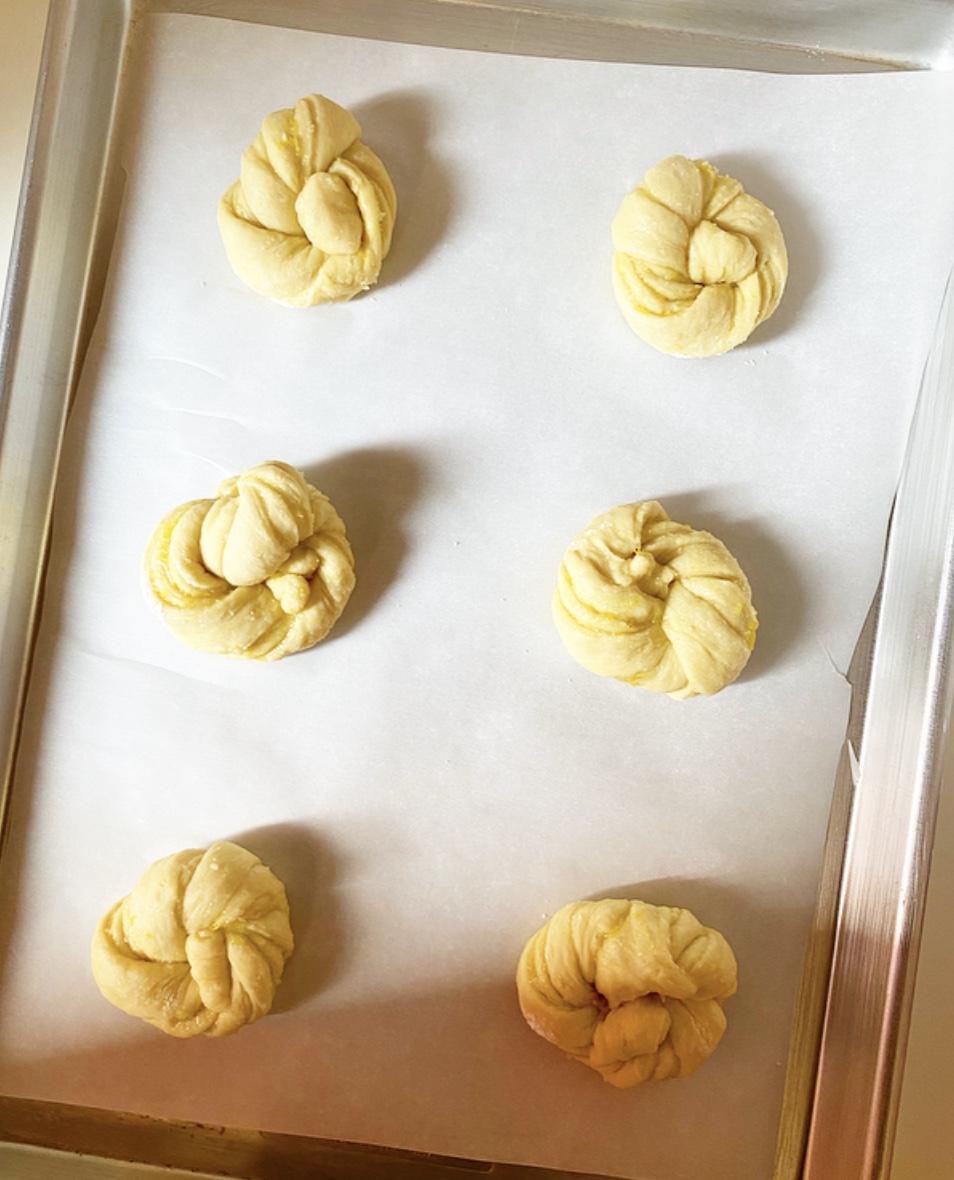
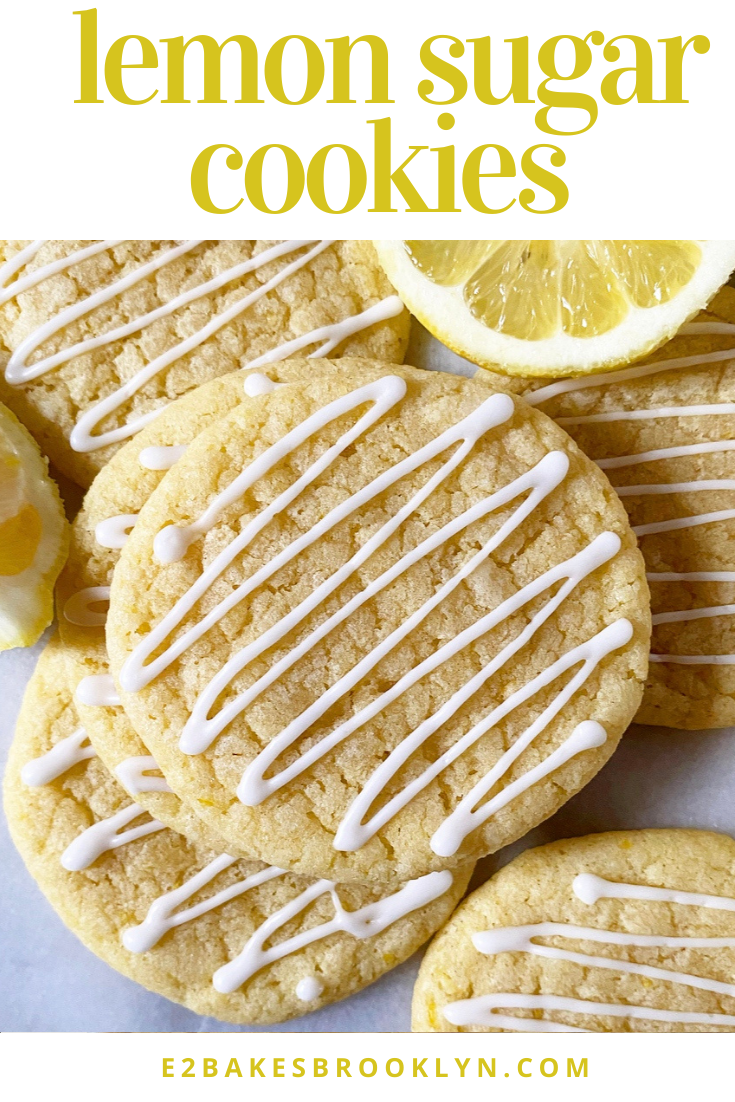
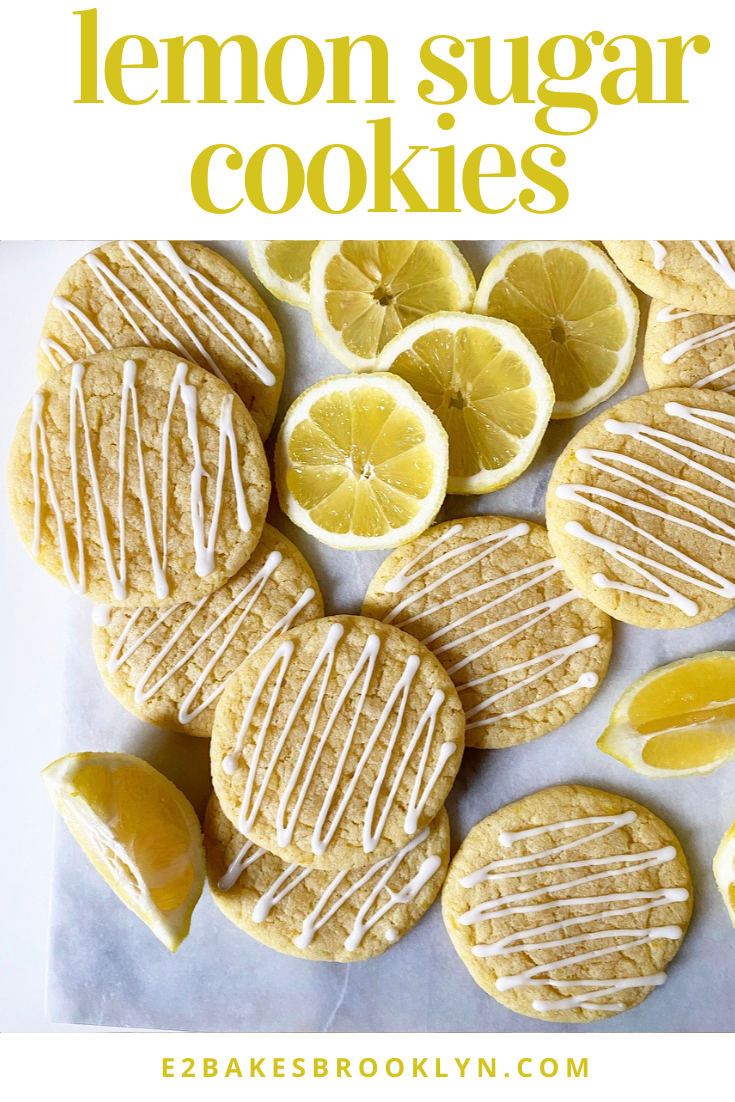
Y’all these Lemon Sugar Cookies are so good and so easy! The dough comes together in a pot on the stove just like my Maple Sugar Cookies—no need to dirty a mixing bowl! There’s no chill required for this recipe either, although there are a couple of ten minute rests for the flour to soak in all that buttery lemon goodness. Still, these are easy, easy, easy.Lemon Sugar Cookies
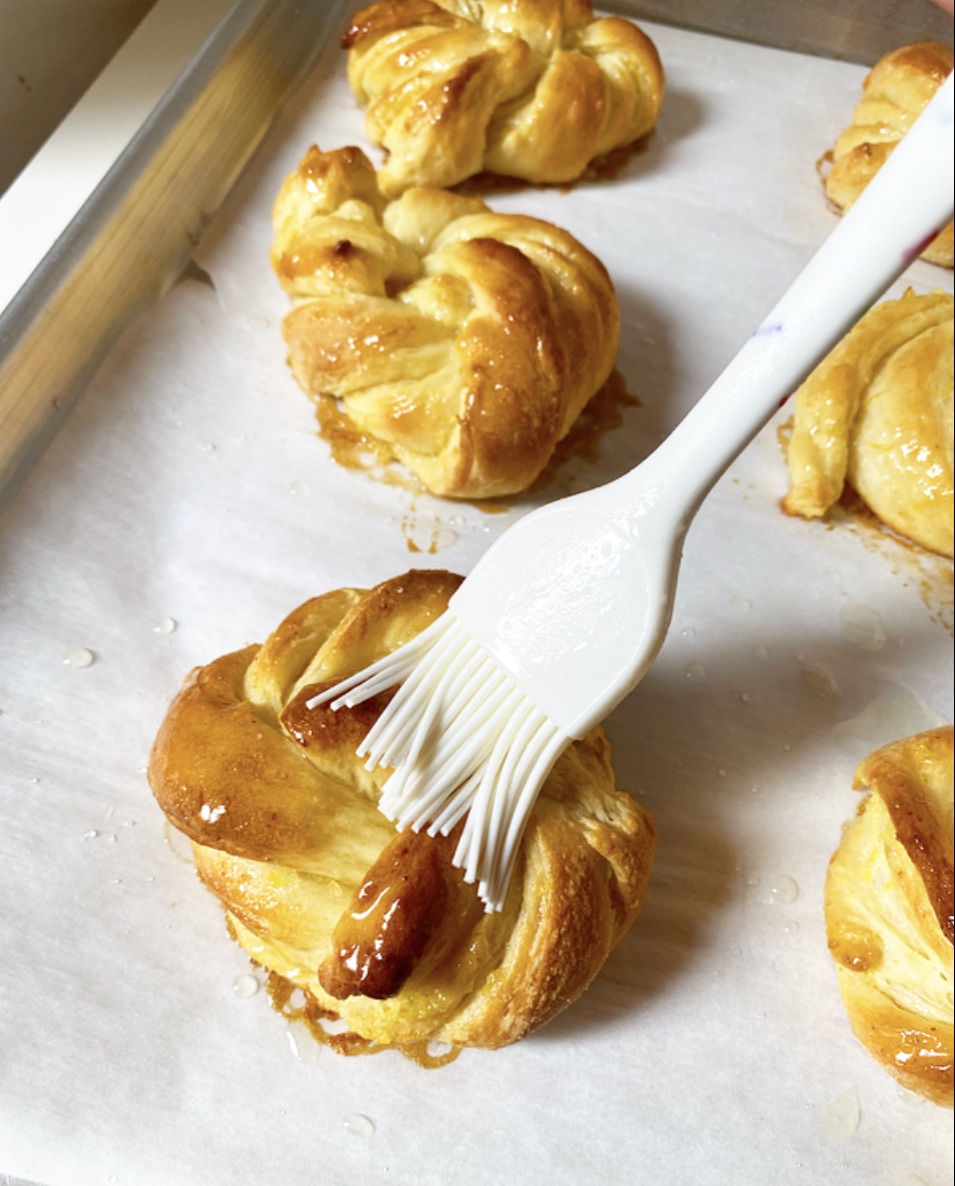
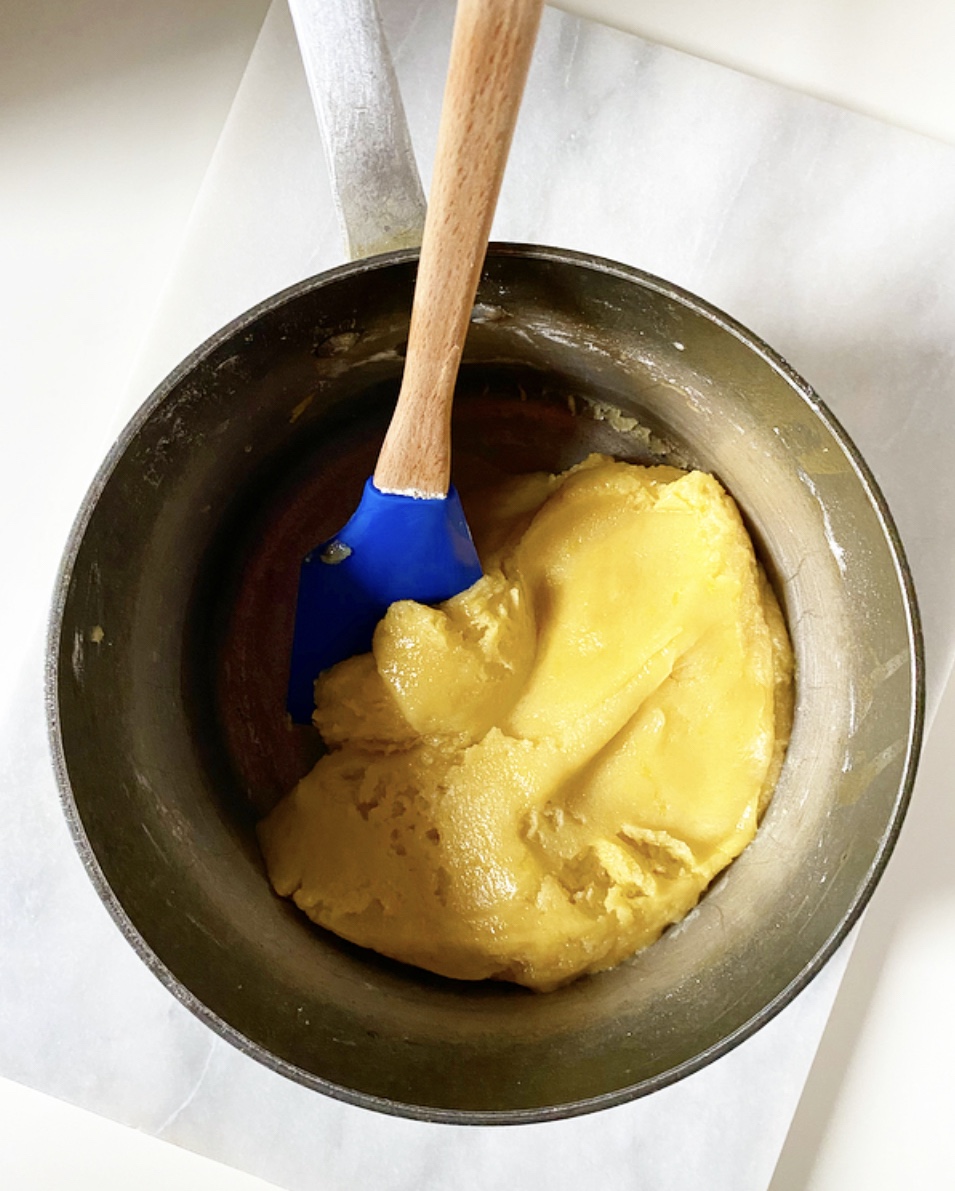
The ingredient list here is relatively short, but has one somewhat unusual addition: confectioner’s sugar. This super-smooth mix of sugar and cornstarch keeps these cookies soft, tender and just sweet enough. If you’ve tried my all-egg yolks chocolate chip cookies, you know what a game changer this is!

As for the lemon flavor, it comes from lemons (duh). The dough is flavored with only lemon zest, and the baked cookies finished off with a quick lemon glaze. The finished products are buttery and bright and pretty dang wonderful, but you can add 1/2 teaspoon of lemon extract if you’d like an extra lemony punch.Lemon Sugar Cookies
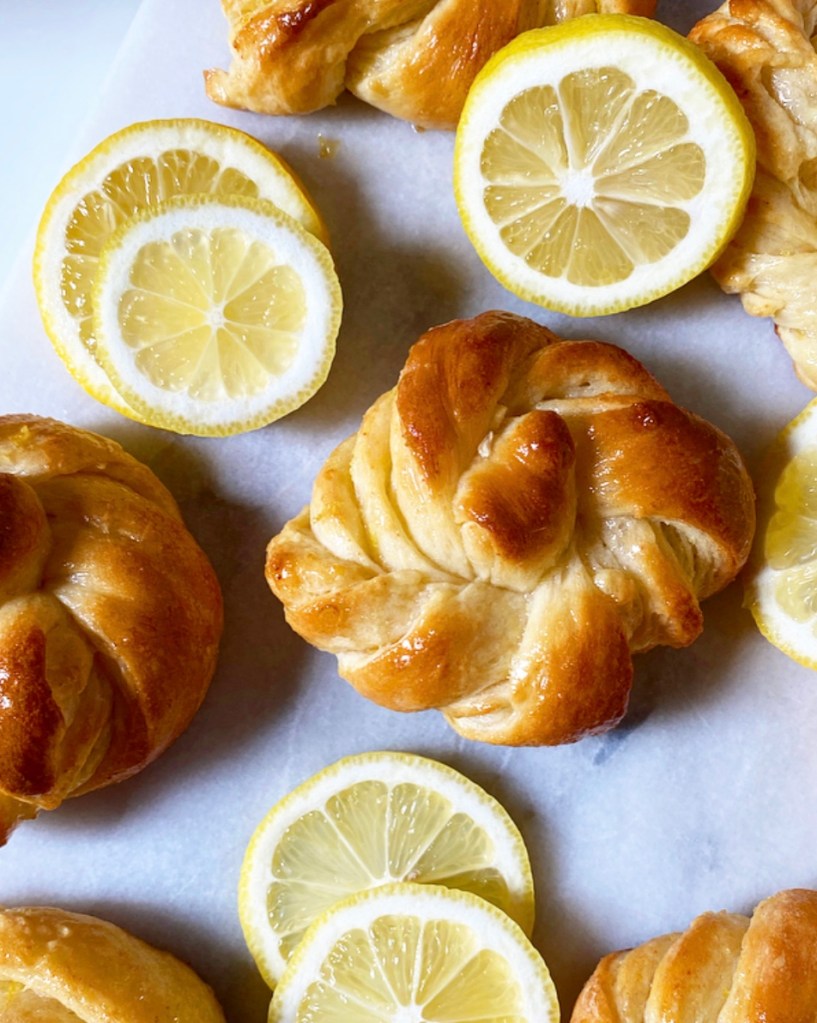
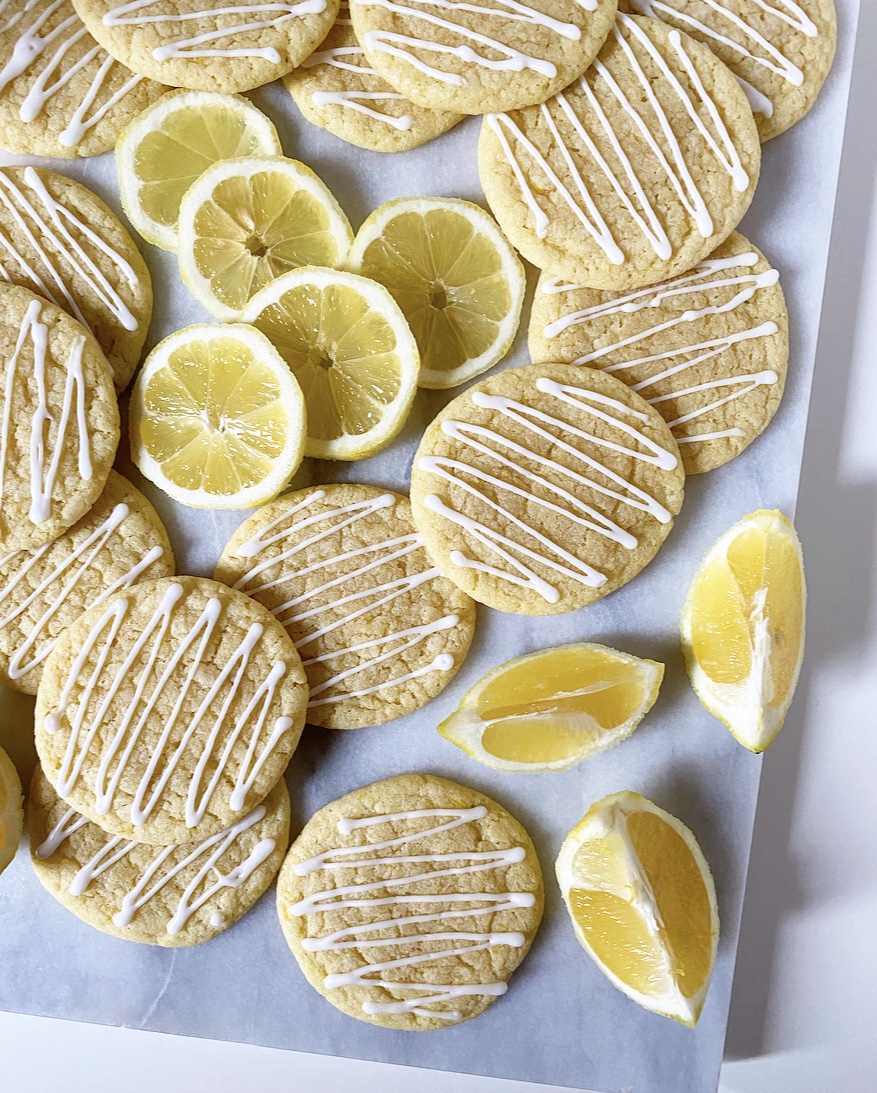
Pro Tip: wait a little bit to eat these. The difference in flavor between the time they are glazed and thirty minutes later is shocking to say the least. Somehow that half hour allows the lemon flavor to really shine through.Lemon Sugar Cookies
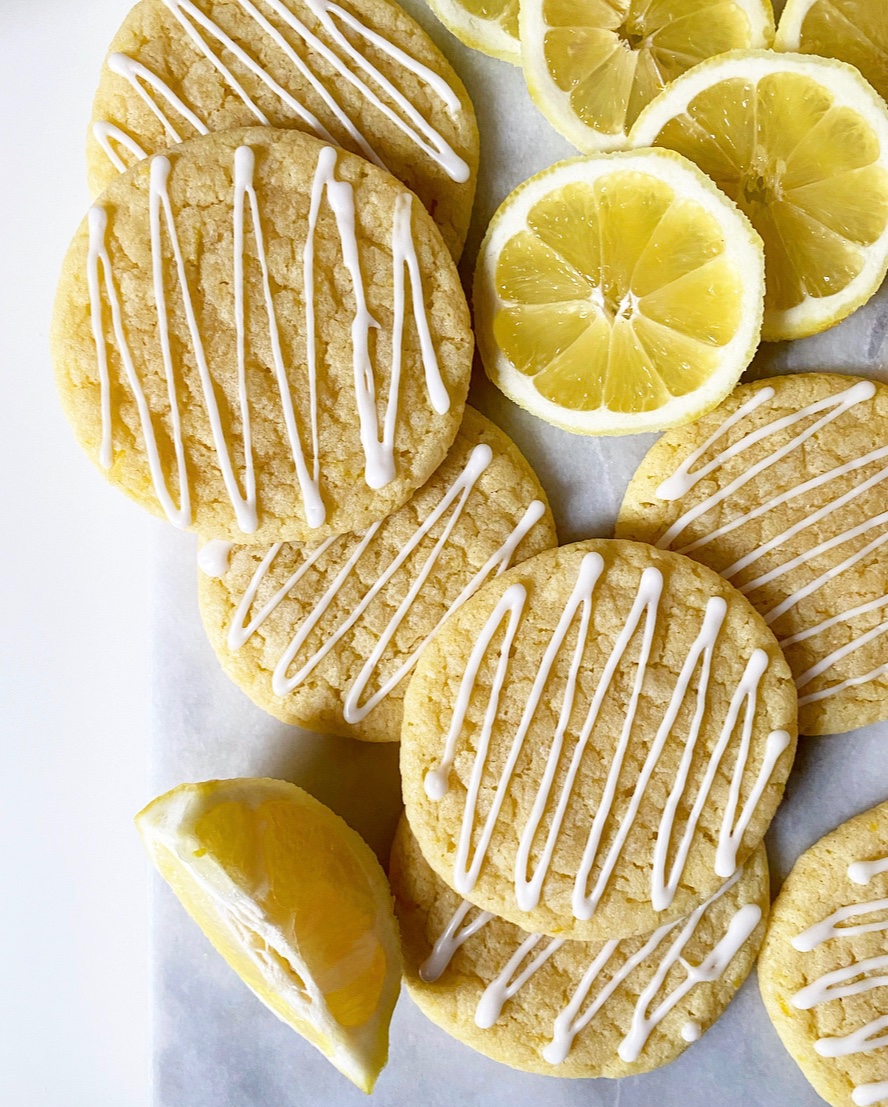
Lemon Sugar Cookies are crisp at the edges and chewy throughout, the way so many of the best cookies are. And make no mistake, these are the best cookies—the kind that are low maintenance and deliver big time. Take the time to make a batch this weekend. You’ll see.
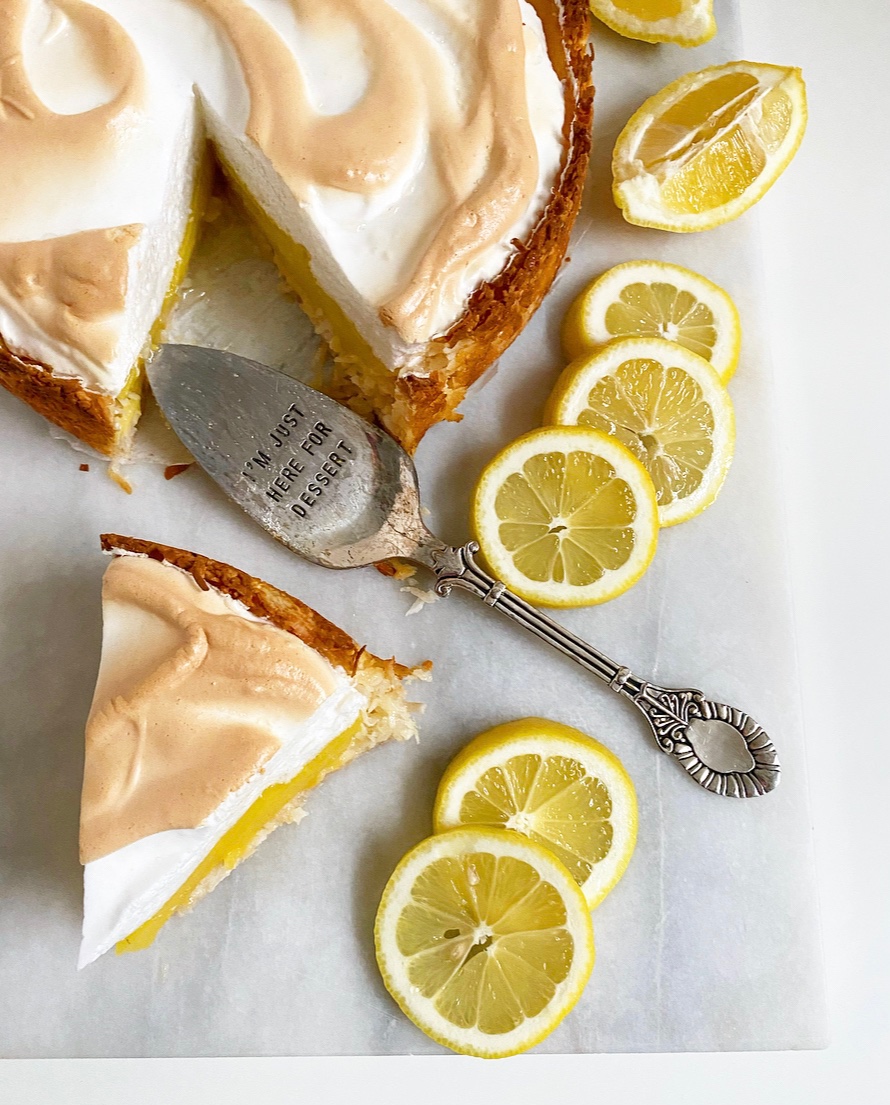
Lemon Sugar Cookies

Lemon Sugar Cookies
makes about 1.5 dozen cookies

3/4 cup (1 1/2 sticks) unsalted butter, cut into pieces
1 1/2 tablespoons fresh lemon zest (from about 1 medium-large lemon)
1 cup granulated sugar
1/3 cup confectioner’s sugar
1 large egg + 1 large egg yolk, room temperature
2 teaspoons pure vanilla extract
2 cups all-purpose flour
1/2 teaspoon baking powder
1/2 teaspoon baking soda
1/2 teaspoon Kosher or sea salt

Lemon Glaze:
2/3 cup confectioner’s sugar
pinch of Kosher or sea salt
5-6 teaspoons fresh lemon juice (from about 1/2 of a medium-large lemon)

Arrange your oven racks in central positions. Preheat oven to 350F. Line two rimmed sheet pans with parchment. Set aside.

Place butter in a medium pot (4 quart) over medium-low heat. Melt, then cool 10 minutes.

Combine the sugar and lemon zest in a small bowl and use your fingertips to rub them together. Whisk the mixture into the butter, followed by the confectioner’s sugar.

Add the egg and yolk to the pot and whisk to combine. Whisk in the vanilla, followed by flour, baking powder, baking soda and salt. Let dough sit for 10 minutes.

Scoop dough in 1 1/2 tablespoon increments (I use a medium cookie scoop). Roll into balls and place at least 2.5 inches apart on prepared pans. Bake cookies 10-11 minutes, or until puffed and no longer raw looking. Cookies will relax as they begin to cool.

Set a cooling rack over a pieces of wax paper or parchment.

Let cookies cool for 10 minutes on the pans before removing to a rack to cool completely.

Make the glaze. In a small bowl use a fork to whisk together confectioner’s sugar, salt and 5 teaspoons fresh lemon juice. Add more lemon juice by the 1/2 teaspoon, until desired consistency is reached.

Load glaze into a small piping bag and snip off the tiniest corner. The glaze will be dry to the touch within 20 minutes and harden after a few hours.

For best lemon flavor, let glazed cookies rest for at least 30 minutes before serving.

Cookies will keep in an airtight container at room temperature for up to 4 days.

Lemon Sugar CookiesLemon Sugar Cookies

Lemon Meringue Macaroon Tart

Lemon Meringue Macaroon TartI put a lemon meringue pie on here a few years back, and while it was good, it wasn’t great. I didn’t add enough sugar to the meringue, so it browned in a weird way, and I had a bit too much liquid in the filling. The good news is that baking is a journey, not a destination. I’ve gained experience and used it to make a truly killer lemon meringue pie filling. I’ve already updated the old pie recipe and will take new photos soon, but until then, let’s discuss this Lemon Meringue Macaroon Tart.Lemon Meringue Macaroon Tart
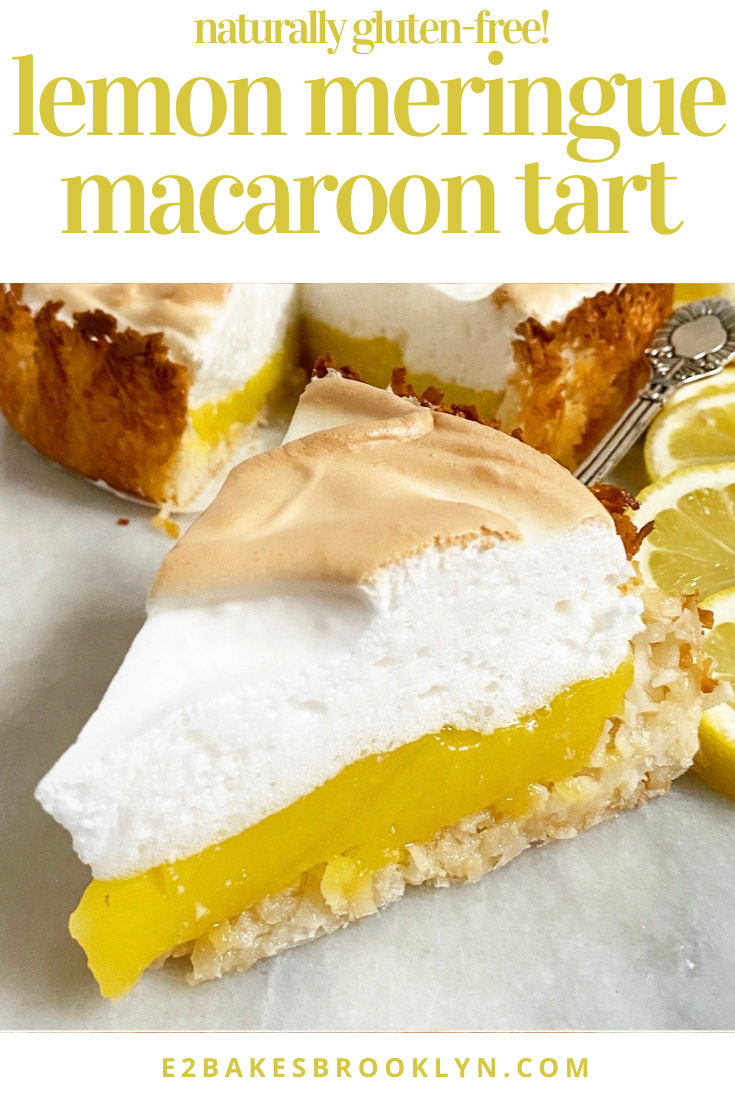
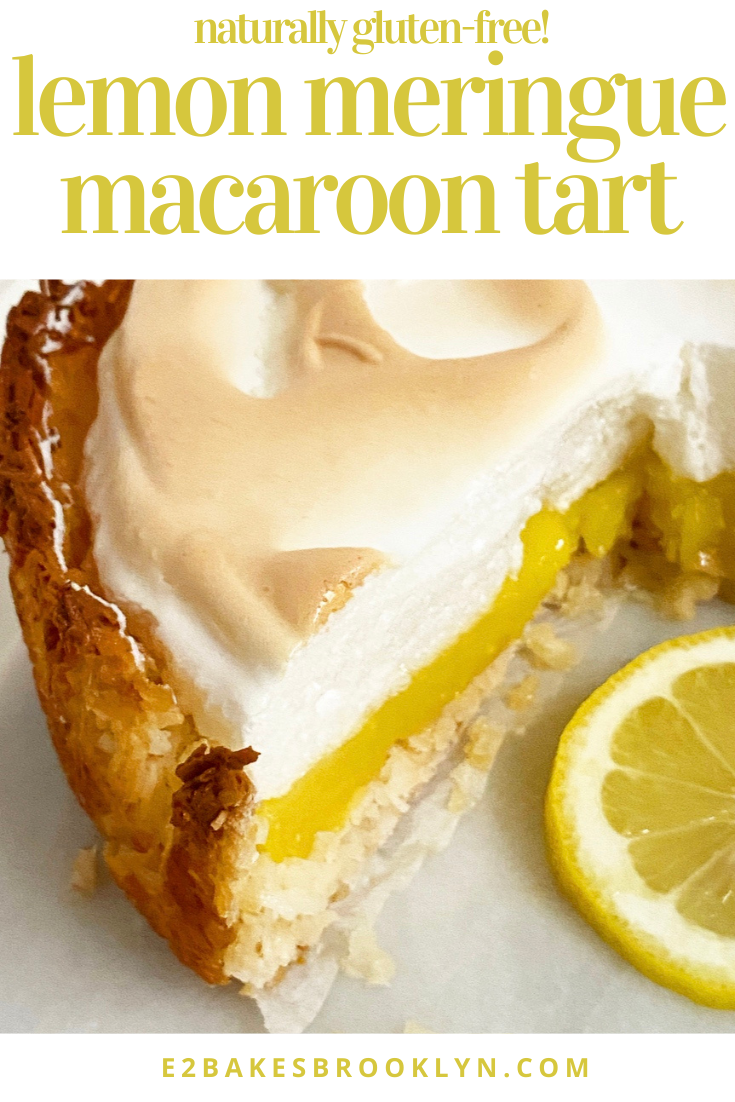
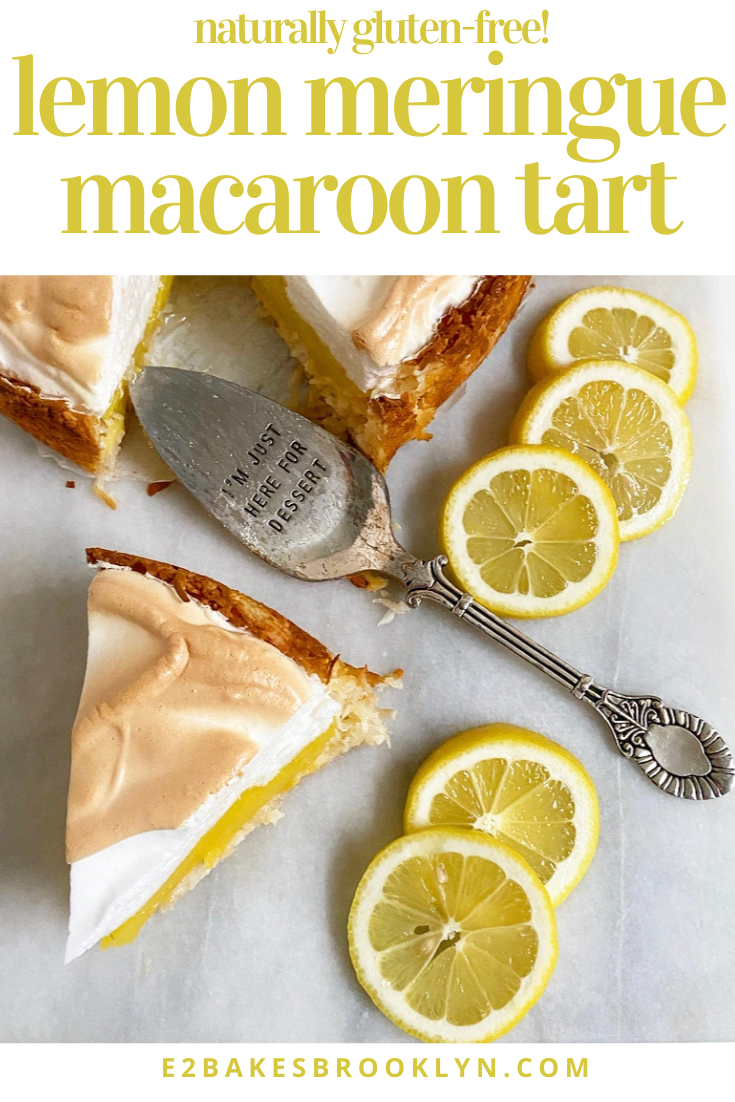
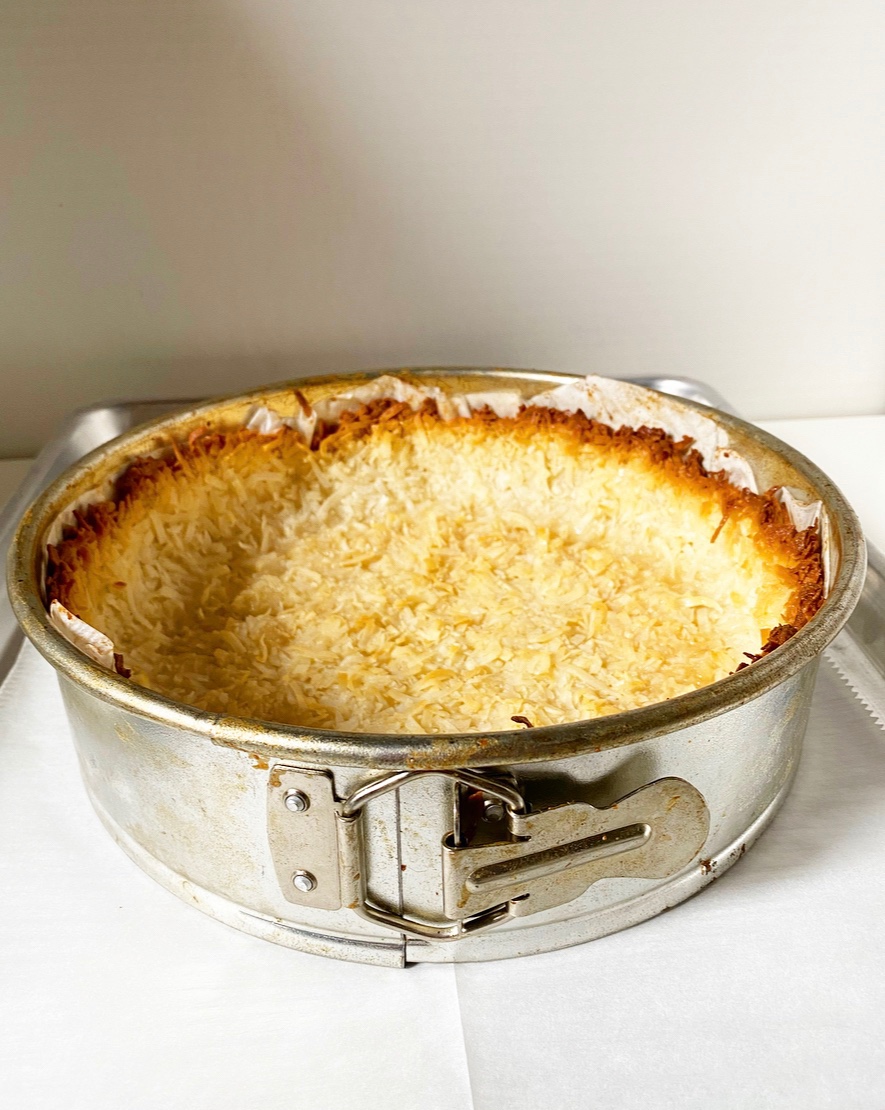
You read that right: Lemon Meringue Macaroon Tart. Like tangy lemon filling and airy meringue layered into a giant coconut macaroon crust. Oh y’all, this is something special.Lemon Meringue Macaroon TartLemon Meringue Macaroon TartLemon Meringue Macaroon Tart
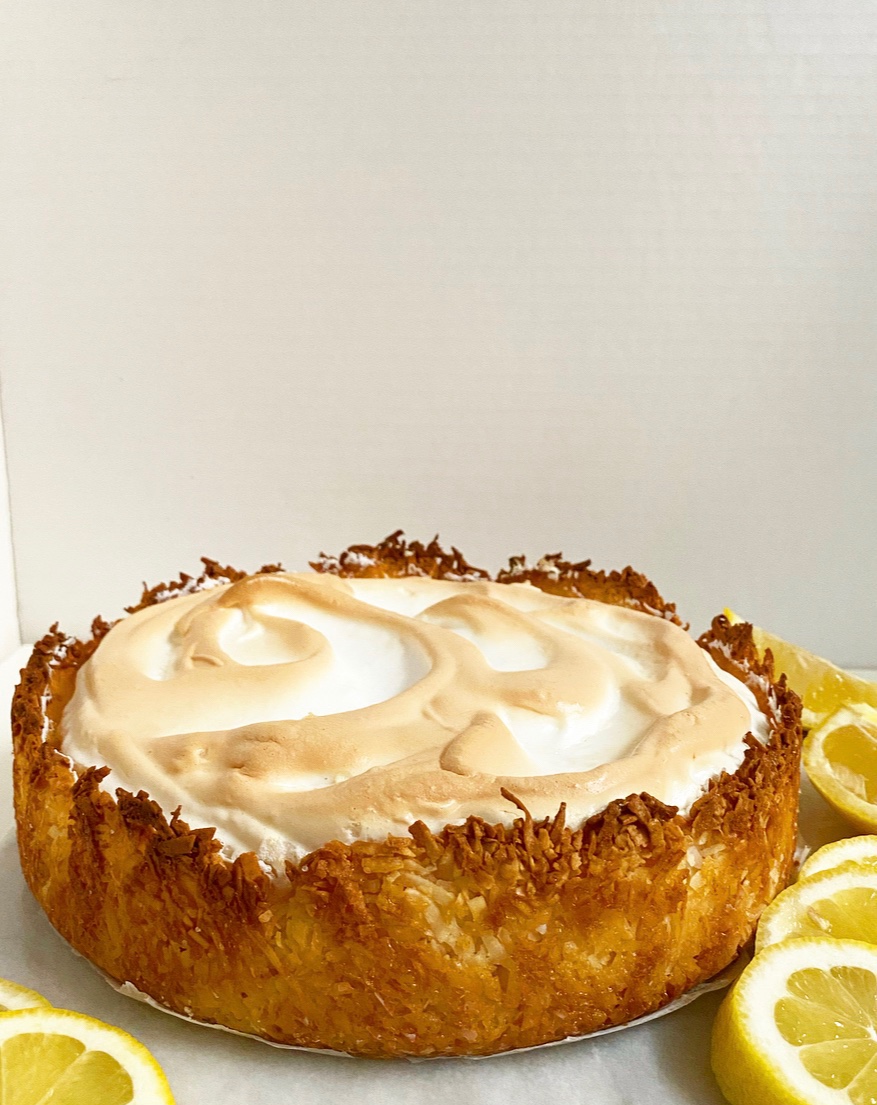
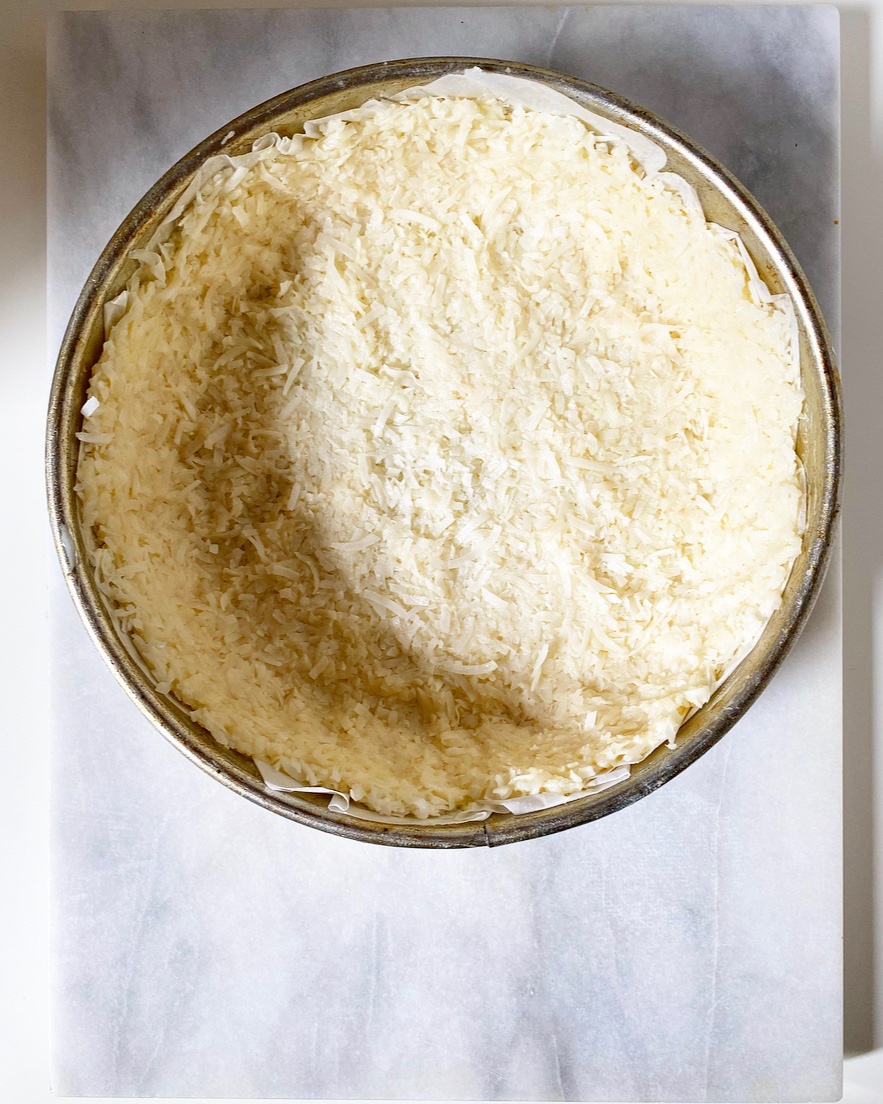
Let me get this out of the way: we are talking about macaroons (coconut) not macarons (delicate French almond cookies). Both are delicious, but today is all about this magical three-ingredient coconut crust.It’s made only of shredded coconut, sweetened condensed milk and salt, and resembles a coconut macaroon in both flavor and texture. It’s naturally grain-free and incredibly easy to make—just stir the ingredients together, press the mix into a heavily-buttered pan and bake until golden. Unlike traditional pie crusts (and very much like a macaroon) it will stay a bit soft, but will hold up with just about any filling you like. You know, like chocolate ganache…or lemon meringue.Lemon Meringue Macaroon Tart
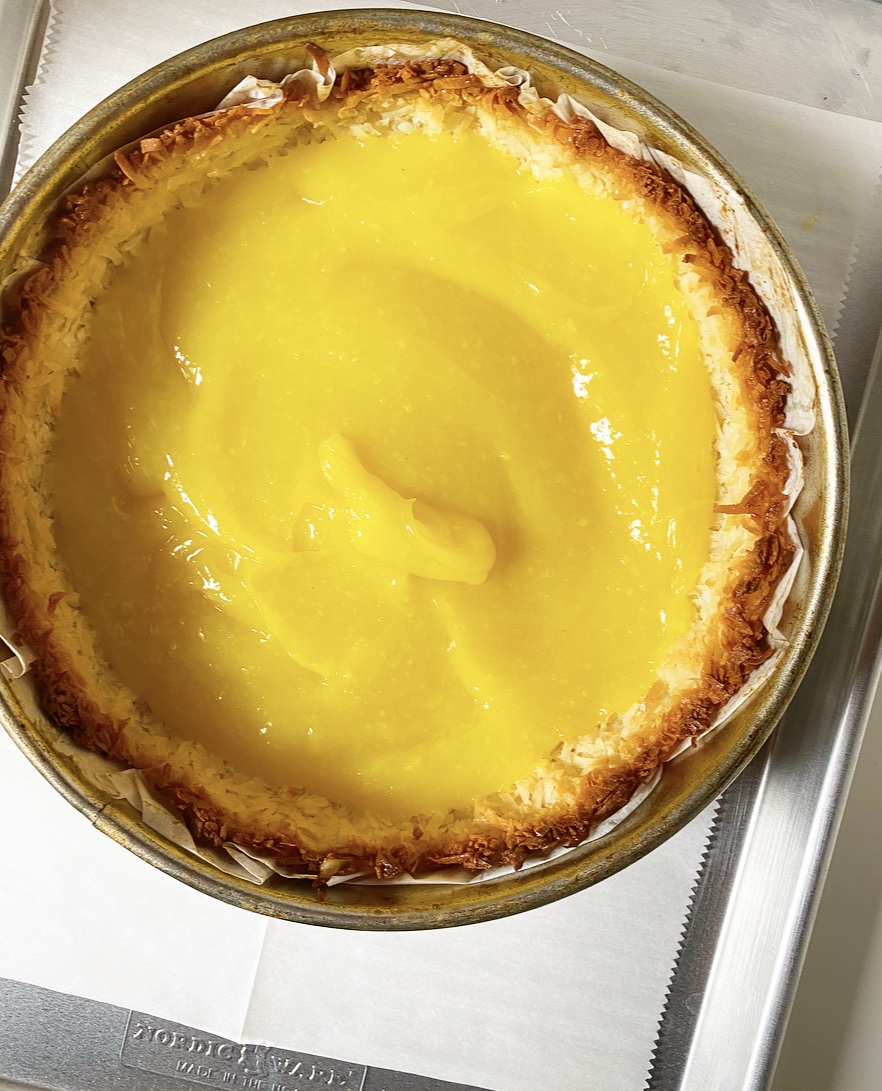
I know lemon meringue filling can be intimidating if you haven’t made it before, but I promise it’s not scary. I think it’s the color blocking that sends people running for the nearest bakery, but lemon meringue is just a marriage of two really simple recipes. The lemon portion is very similar to the grapefruit filling from the pie I posted last week. As with that recipe, if you can make pudding on the stovetop, you can make this. Heck, if you can use a whisk, you can make this. The most important thing to remember is to have all your ingredients prepared and within arm’s reach before you turn on the stove. This process goes quickly, but isn’t stressful at all if you have your ingredients ready. Just whisk, whisk, whisk and in mere moments, you’ll have made gorgeous, golden lemon filling.

As for meringue, it’s a snap to make. The key to success with meringue (and all whipped egg white things) is making sure your bowls and mixer attachments are very clean and dry before you begin; any errant drop of yolk, water or oil will keep your meringue from fluffing up properly. Just like with the lemon portion of this operation, preparation is everything. I go so far as to wipe my kitchen tools down with vinegar before whipping egg whites. Though that might seem like overkill, it’s worth it when you get billowy meringue every time!Lemon Meringue Macaroon TartLemon Meringue Macaroon Tart
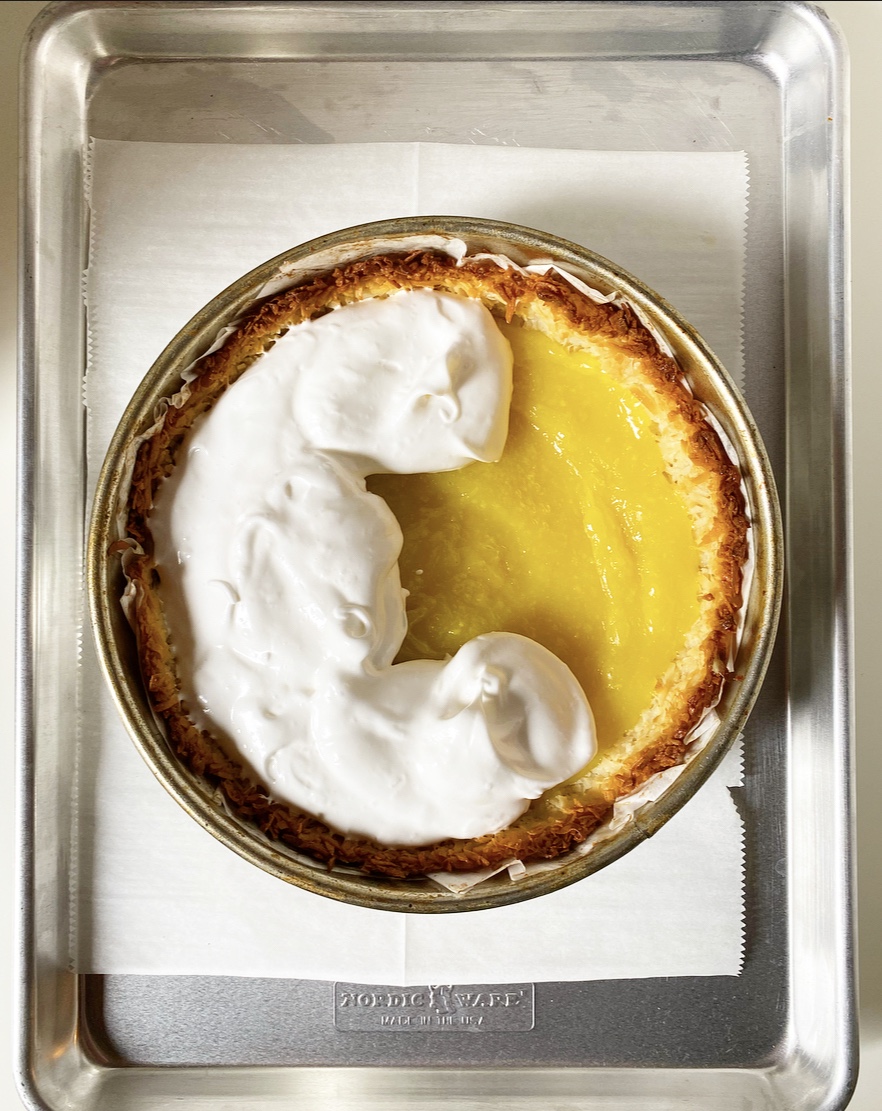
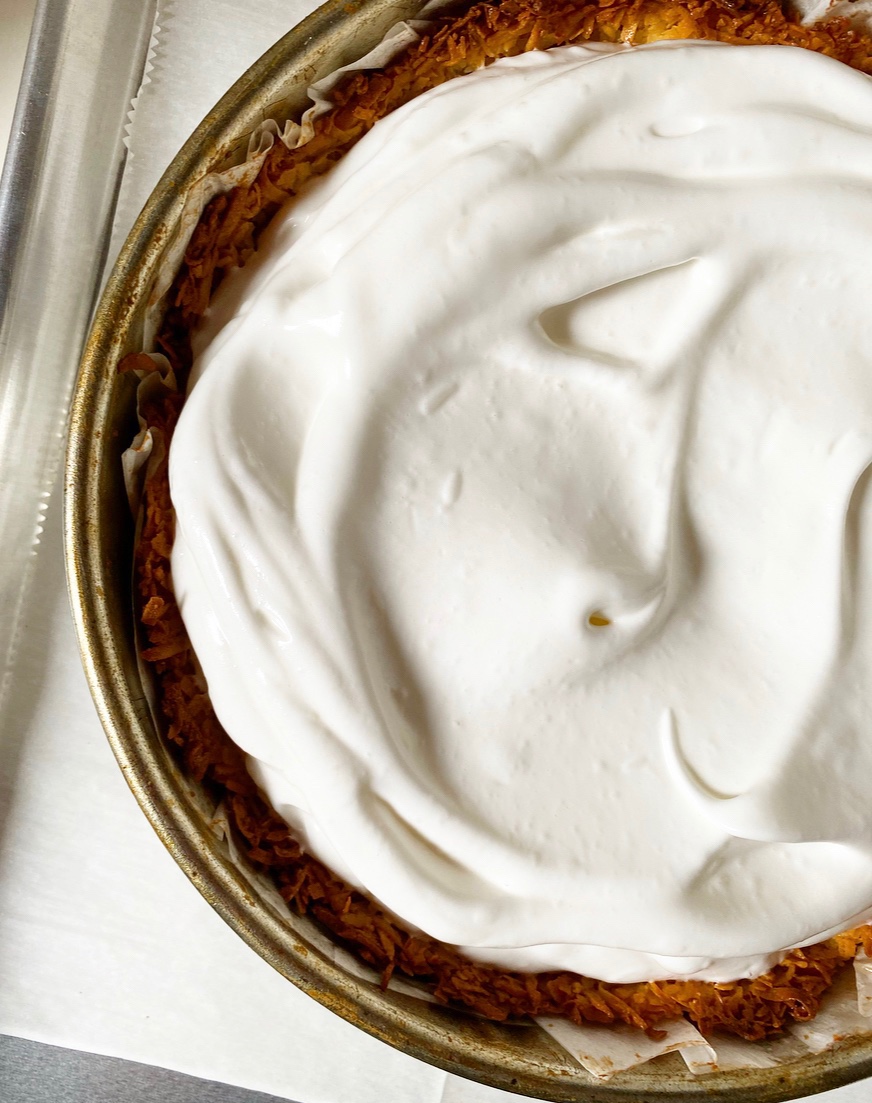
Regarding assembly, you’ll need to have your crust baked and cooled and the meringue whipped before you make the lemon filling. The reason for this is that the filling needs to be piping hot when it meets the meringue. By doing this, we are allowing the egg whites in the meringue to bake directly onto the entire surface of the filling, helping them to fuse together so they don’t slide apart during slicing. Once filled, the tart will need to bake for about 25 minutes, just until the meringue is beginning to turn golden.Lemon Meringue Macaroon Tart
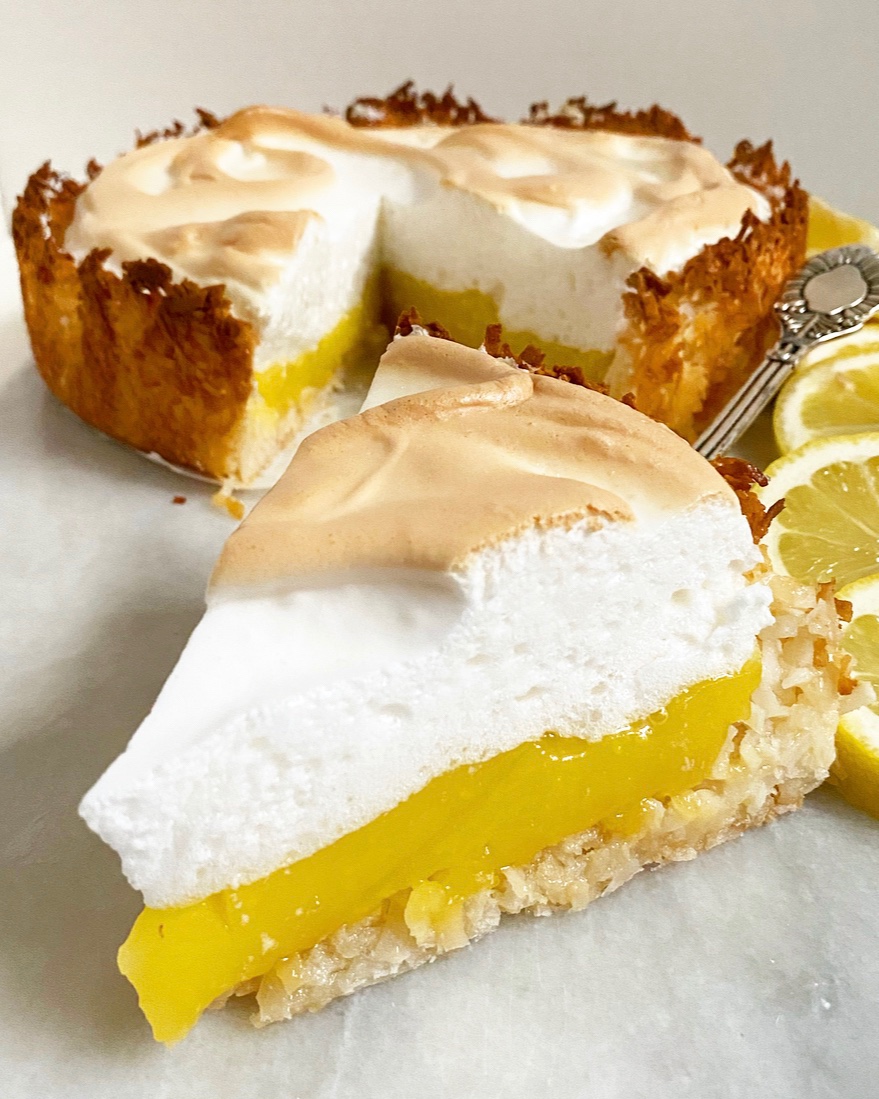
Some people like their lemon meringue desserts at room temperature, but I prefer mine cold. Also, I think it makes for more aesthetically pleasing slices. That color blocking though 😍 Lemon Meringue Macaroon TartOne persnickety thing about lemon meringue desserts? They need to be served the day they’re made. Meringue is a beautiful thing, but it is fleeting. If not served within hours of baking, it will begin to weep. Ew. Rest assured that even if you don’t have the time to bake and serve on the same day you can still get your lemon macaroon tart fix. The solution? Skip the meringue layer. You can cool the tart just after adding the lemon filling, then refrigerate until ready to serve.

Have a great weekend, y’all!Lemon Meringue Macaroon Tart

Lemon Meringue Macaroon Tart
makes one 9- or 10-inch tart

Macaroon Crust:
1 14 ounce package sweetened flaked coconut
2/3 cup sweetened condensed milk
1/4 teaspoon Kosher or sea salt

Meringue:
1/4 teaspoon cream of tartar
2/3 cup granulated sugar
1 tablespoon cornstarch
1/4 cup water
1/2 teaspoon pure vanilla extract
5 large egg whites, room temperature

Filling:
5 large egg yolks
2 tablespoons fresh lemon zest (about 1 medium lemon)
1 cup granulated sugar
1/4 cup cornstarch
1/4 teaspoon Kosher or sea salt
1 cup water
1/2 cup fresh lemon juice
2 tablespoons unsalted butter

Preheat oven to 350F. Heavily grease a 9- or 10- inch springform pan. Line the bottom with parchment and grease again.

Make the crust. Combine sweetened flaked coconut, sweetened condensed milk, and salt in a large mixing bowl. Use a silicone spatula or wooden spoon to fold together until combined. It will be thick.

Transfer mixture to prepared pan. Lightly grease your hands before pressing mixture onto the bottom and up the sides. Bake 25-30 minutes, or until edges are browned and center is turning pale golden. Remove to a rack and cool completely.

Make the meringue. In a small bowl, use a fork to combine cream of tartar and sugar. Set aside.

In a separate small bowl, use a fork to whisk together cornstarch, water, and vanilla. Microwave in 10 second increments, whisking with a fork in between, until mixture gels (about 30-35 seconds total).

Place egg whites in a large mixing bowl. Using an electric mixer, beat them on medium-high for 1-2 minutes, until frothy. Add sugar mixture one tablespoon at a time, beating until completely incorporated. Add cornstarch mixture one tablespoon at a time, until combined. Continue beating on medium speed until egg whites form stiff peaks. Set aside.

Make the filling. In a small mixing bowl, use a fork to beat egg yolks. Set aside.

In a large saucepan, use your fingers to rub lemon zest into sugar. Whisk together lemon sugar, cornstarch, and salt. Whisk in water. Heat over medium heat, stirring frequently, until the mixture reaches a simmer and thickens. Whisking constantly, pour 1/3 of the mixture into the egg yolks. Whisking constantly, add egg yolk mixture to the pan, followed by lemon juice. Whisk continue to whisk until mixture comes to a simmer for 1 additional minute. Remove from heat. Whisk in butter. Push filling through a sieve to remove lumps.

Pour hot filling into prepared crust. Drop spoonfuls of meringue over the top of the filling, making sure all edges are covered. Use the back of the spoon to spread it out. Bake 25-30 minutes, until meringue is lightly browned. Let pie cool completely on a rack. Chill uncovered for a couple of hours.

Before serving, carefully run a thin flexible knife between the crust and the pan a couple of times. Release the springform. Use a large, sharp chef’s knife to slice, wiping the blade clean between cuts. Serve immediately.

Lemon Meringue Macaroon Tart is best served the day it’s made. Meringue will weep over time.Lemon Meringue Macaroon TartLemon Meringue Macaroon TartLemon Meringue Macaroon Tart