Pumpkin Waffles

Do I have terrible time management skills? Yes.

Did I write this recipe and take these photos the week before Thanksgiving last year? Also yes.

Did I re-test with every intention of posting on September 21st this year? You bet.

Did I succeed? Well…it’s October 7th.

Luckily for us all, time management is not a major factor in making excellent Pumpkin Waffles. You don’t need to plan super far ahead; including mixing, resting, and waffling, you’ll need 45 minutes to an hour for the entire batch. All you need are some basic baking ingredients, a can of pumpkin, spice, and a little moxie.

Oh, and a waffle iron. That’s important.

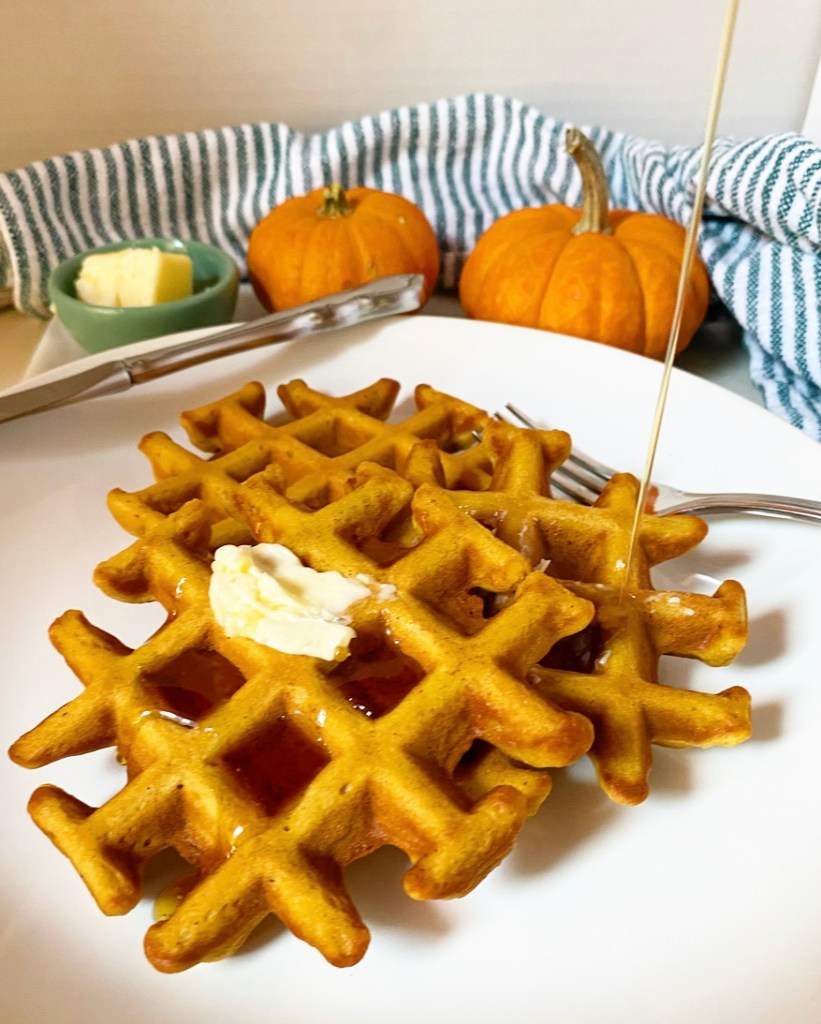
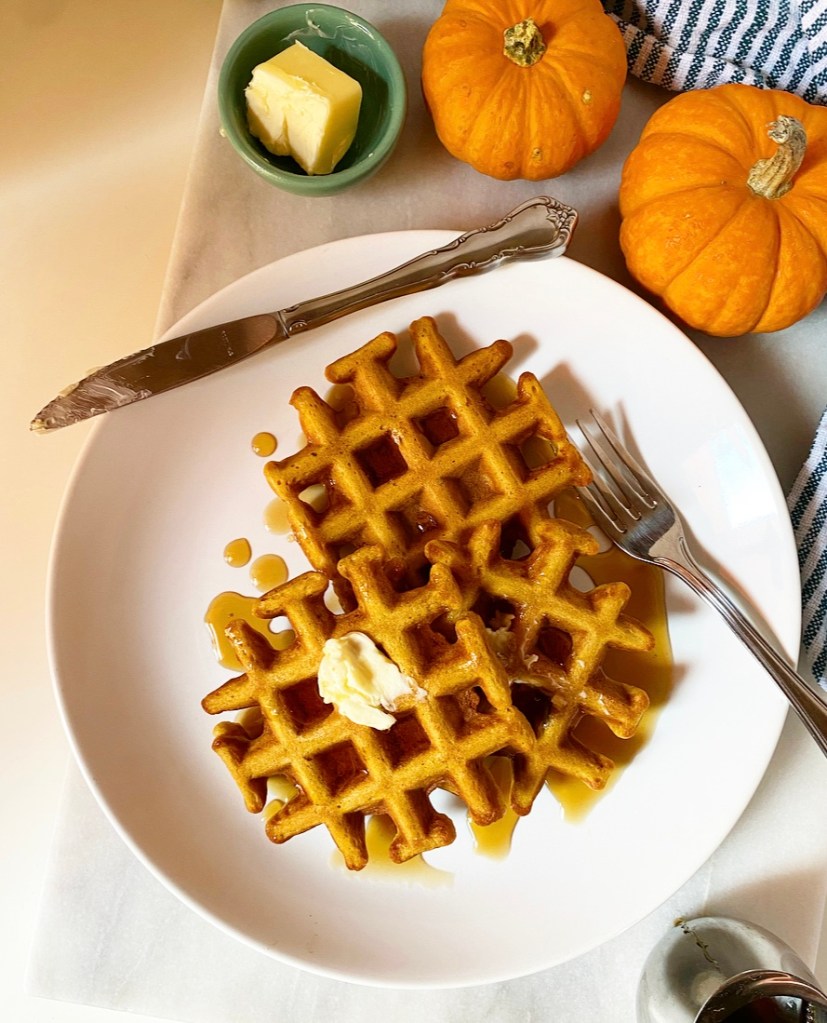
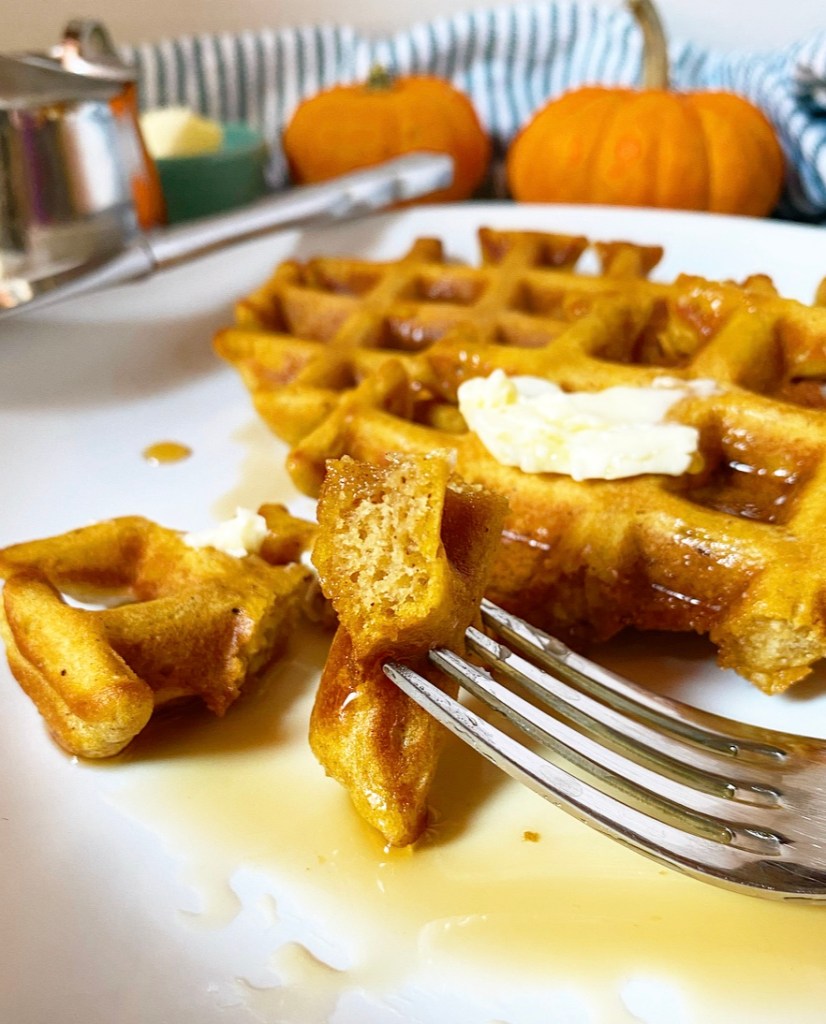
Pumpkin Waffles are the slightest seasonal riff on my Sour Cream Waffles. They’re super simple to mix up, and the results have fluffy centers, crispy edges, and lots of pumpkin spice flavor (you know, because of all the pumpkin and spice).

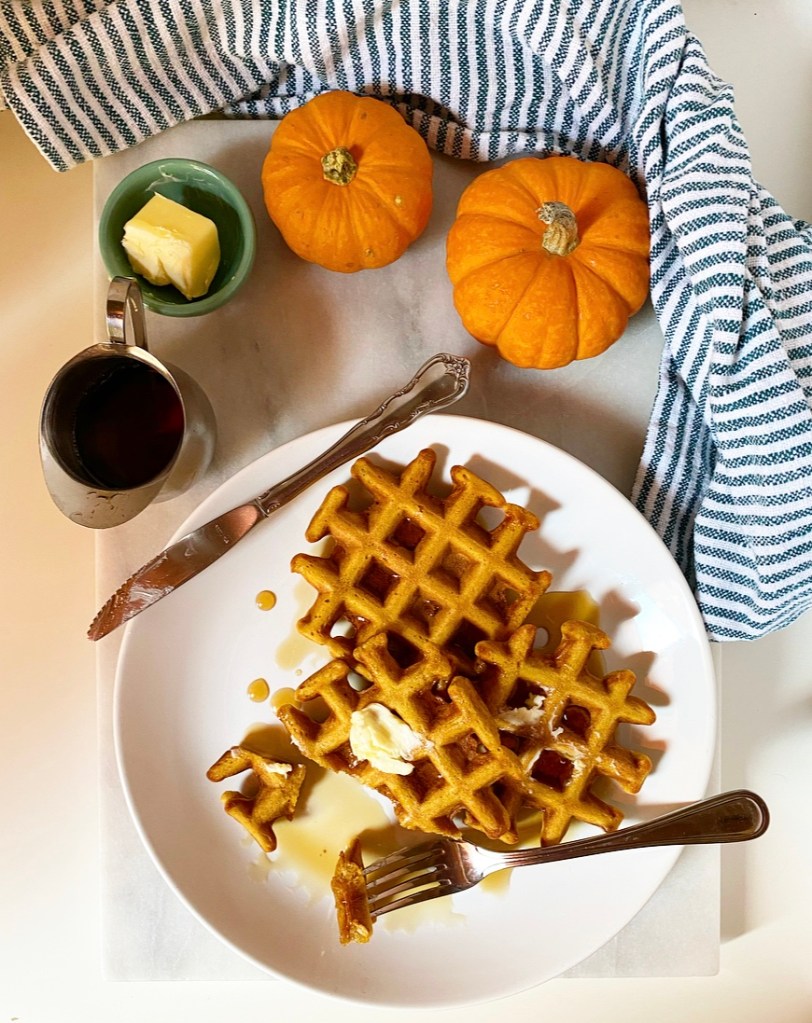
Topped with a pad of butter and drizzled—or drenched—with maple syrup, these are a perfect autumnal breakfast any ol’ time.

Pumpkin Waffles
makes about 8 4-inch waffles

1 1/3 cups all-purpose flour
1/3 cup cornstarch
2 tablespoons granulated sugar
2 teaspoons pumpkin pie spice
1 teaspoon baking powder
1/2 teaspoon baking soda
1/2 teaspoon Kosher or sea salt
1 cup whole milk, room temperature
1/3 cup pure pumpkin purée
1/3 cup full-fat sour cream
2 large egg whites, room temperature
6 tablespoons unsalted butter, melted
2 teaspoons pure vanilla extract

For the waffle iron:
cooking spray

For serving:
butter
warmed maple syrup
seasonal fruit

In a medium mixing bowl, whisk together all-purpose flour, cornstarch, sugar, pumpkin pie spice, baking powder, baking soda, and salt. Set aside.

In a large liquid measuring cup (or small mixing bowl), use a fork to whisk together whole milk, pumpkin purée, and sour cream. Whisk in egg whites, melted butter and vanilla.

Add liquid ingredients to dry in two installments, whisking until combined and mostly smooth (a couple of small lumps are okay). Let batter rest at room temperature for 15 minutes while the waffle iron is heating.

Preheat oven to 200F. Place a cooling rack over a rimmed baking sheet.

Grease waffle iron with cooking spray. Pour 1/3 cup of the waffle batter into each well of the iron and close the top. Let cook until steam dissipates and the waffles are turning golden, about 6 minutes.

Transfer cooked waffles to the prepared rack-over-pan and place in the oven to keep warm. Re-grease the waffle iron and cook remaining batter.

Serve waffles with butter, warmed maple syrup, and seasonal fruit, if desired. Enjoy immediately.

Leftovers may be layered with parchment, placed in a freezer bag, and frozen for up to 3 months. Reheat in the toaster.

Blueberry Ginger Ales

Blueberry Ginger Ales

Hello from the Shakespeare in the Park cancellation line in Central Park, where I am one of two hundred or so people hoping to keep the late summer gloom away with free world class theatre. I just got home from Maine a few days ago and am, in fact, wearing a dress last washed in a lobster pot in the backyard of our cottage and hung to dry on a line. Excuse me for waxing poetic, but if you’ve ever spent any time in Maine, you know these doldrums. Hell, if you’ve ever taken a vacation, you know.

Blueberry Ginger Ales

So what does this have to do with Blueberry Ginger Ales? Not a lot, I suppose. I started fooling around with this recipe mid-July in anticipation of our trip to Maine, but didn’t post it beforehand and now Maine has come and gone (though watch out for a mid-autumn sequel). I just wanted to make sure that you knew that you could make these seasonal homemade sodas before summer unofficially ends.

Blueberry Ginger Ales

As with many of the homemade beverages you’ll find on this site, this recipe takes only a few minutes of active work—in this case, making a syrup and straining it—but makes plenty to enjoy. Simply pour some syrup over ice, top with seltzer, stir, and sip.

With a balanced berry flavor and a good spicy punch of ginger, Blueberry Ginger Ales would be a perfect booze-free addition to any menu. From end-of-summer festivities to lazy weekend afternoons, you really can’t go wrong. I mean, I could certainly go for one in this cancellation line.

Blueberry Ginger Ales

Or at least I could have, because I ended up getting a ticket. Doldrums be gone.

Blueberry Ginger Ales
makes 8-12 small sodas

Blueberry Ginger Syrup:
1 5-7 inch piece fresh ginger (about 1/3 lb)
16 ounces (about 3 cups) fresh or frozen blueberries
1 1/2 cups granulated sugar
pinch of salt
1 cup water
1 tablespoon lemon juice

For Blueberry Ginger Ales:
1 batch blueberry ginger syrup
2 large bottles sparkling water

For Serving:
ice
fresh blueberries (optional)
straws (optional)

On a cutting board, scrape the edge of a spoon across the ginger to peel. Discard peelings. Slice ginger as thinly as possible—you should have about 1 cup slices.

Combine ginger, blueberries, sugar, salt, and water in a small pot. Bring to a simmer over medium-low and then let cook, stirring occasionally, for 15 minutes. It’s done when the berries have burst, sugar has dissolved, and the syrup coats the back of a spoon.

Remove from heat, mash berries a bit if needed (we want them all burst), and stir in lemon juice. Cool the syrup without straining. Once cool, strain ginger and blueberries out, pressing them to remove as much syrup as possible. Discard ginger and blueberries. You should have 1 1/2-2 cups syrup.

To make Blueberry Ginger Ales, add ice to your glasses. Pour about 3-4 tablespoons of syrup into each glass. Top with sparkling water, then stir to combine. Taste and adjust with more syrup or sparkling water as desired. Add a few blueberries for garnish, if desired. Pair with a cute straw and enjoy!

Leftover syrup will keep in an airtight container in the refrigerator for at least a week.

Blueberry Jam

Blueberry Jam

Every once in a while I mention that I spent a good amount of 2010 making jam, but I’ve never once put a recipe for it on here. Thing is, I don’t even like jam that much. But I do like making it, and I’m always surprised by how delicious it is, especially from scratch.

Blueberry Jam

I had a ton of blueberries on my hands and Maine on my mind a few weeks ago, and figured we could all use a little reminder that homemade jam is easier and more delicious than we all remember. There’s a reason people have been making it for centuries.

To make the best Blueberry Jam you’ll eat all year, all you really need are fresh ripe blueberries, sugar, salt, lemon juice, a pot, a warm jar, and about 30 minutes. Stir all the ingredients together in the pot and set it over medium heat. Before you know it, the mix will go from sugared fruit to boiling lava to gelling on a frozen plate (“the plate test”).

Blueberry Jam

Pour it into the warm glass jar (hot things need hot containers), twist the lid finger-tight and let it cool down before storing it in the refrigerator. If you’d like to make several jars or store at room temperature, I can point you to canning resources. That said, I enjoy jam-making far more than water-bath canning, so I like to make my preserves in small batches.

Blueberry Jam

Once your jam cools and settles, slather your dark purple blueberry jam on anything your late summer heart desires—I went for biscuits. Truly though, it will blow your mind on just about anything you put it on. Even if you don’t like jam that much.

Blueberry Jam
makes about 2 cups

3 cups fresh blueberries
1 cup granulated sugar
pinch of Kosher or sea salt
1 tablespoon fresh lemon juice

Place a small plate in the freezer.

Stir/toss all ingredients together in a medium heavy-bottomed pot. Heat over medium heat, stirring frequently, until it comes to a boil. Skim and discard any foam that accumulates on top.

The jam is near-ready when the fruit has softened and burst and the liquid appears to be thickening. To test for doneness, remove the frozen plate from the freezer and dribble a drop jam on it. If, after a few seconds, it wrinkles when nudged with your finger, it’s done. If not, return the plate to the freezer and perform the test after another minute or two of cooking. You can also use a candy thermometer; it’s done when it registers at 220F. When it’s done, remove the jam from the heat.

Use a jar funnel or a spoon to transfer the jam to a warm glass mason jar (I rinse a jar in HOT water as soon as I take the jam off the heat, then dry well). Do not, under any circumstances, put hot jam into a room temperature or cold jar—it can and will shatter. This is not the same as canning and is not meant for long term storage at room temperature.

Place a warm lid on top of the jar, then use the ring to tighten to finger tightness. Let jam cool to room temperature on the counter, then transfer the jar to the refrigerator.

Use jam as desired and store it in the refrigerator.

Three Ingredient Nutella Mousse

Hello from New York, where it is 5000% humidity. Thank whatever benevolent power is out there for air conditioning. I’m trying to keep my oven use to a minimum while we ride out another brutal summer (though I do have some baking on the docket), so I am leaning into no-bake recipes like this easy and divine Three Ingredient Nutella Mousse.

It’s airy and light, just sweet enough, and imbued with the perfect amount of chocolate hazelnut flavor. Truly, it’s little more than a Nutella whipped cream, but when something’s this good, the specificity of the name isn’t terribly important.

Three Ingredient Nutella Mousse​

This easy mousse comes together in under 15 minutes and after a two hour chill in the fridge (or up to three days, if you’re working ahead), it’s ready to be served. I like mine with a dollop of whipped cream and a drizzle of Nutella, but shaved chocolate, a few berries, or a chopped up chocolate hazelnut candy bar would be just as good.

Serve your Three Ingredient Nutella Mousse for dessert at a cookout or summer dinner party, or do as I do and eat it directly in front of your beloved air conditioning unit while running it full blast. It’s a delightful way to ride out the summer, if you ask me.

Three Ingredient Nutella Mousse​
Three Ingredient Nutella Mousse
makes 6 servings

1/3 cup Nutella
1 1/2 cups heavy cream, divided
pinch of Kosher or sea salt

Place Nutella in a medium-large mixing bowl.

Put 1/4 cup heavy cream in a microwave-safe bowl or liquid measuring cup. Please make sure the bowl has some extra room, as cream expands when it’s hot. Microwave cream 50-60 seconds, until bubbling. This step may also be done in a pot on the stove.

Immediately pour hot cream over the Nutella. Let sit 1 minute, then stir until completely combined and smooth. Let cool to room temperature (I like to put it in the refrigerator for a few minutes).

Once your Nutella combination is cool, pour the remaining 1 1/4 cups heavy cream to a separate medium mixing bowl. Add a pinch of salt. Use an electric mixer to whip cream until stiff peaks form.

Using a silicone spatula, stir 1/3 of the whipped cream into the Nutella combination until combined. Then add another 1/3 of the whipped cream to the Nutella combination and gently fold it in until combined. Fold in the remaining 1/3 of the whipped cream just until combined.

Divide the mixture among six small ramekins (these are 4 ounces). Cover with plastic wrap and chill for 2 hours or up to 3 days.

When ready to serve, remove and discard plastic wrap. Top with additional whipped cream and Nutella before serving.

Nutella Pretzel Blondies

When I don’t know what else to make, there are always blondies. I’ve had the recipe memorized for more than a decade, and they’re amenable to whatever odds and ends I have in my cabinets. As far as I’m concerned, they’re the ultimate catch-all baked good.

Blondies come together in one bowl—no mixer required—and bake up in less than half an hour. And despite the frequency with which I make them, they never ever get old. Oh lord, do I love a blondie.

This latest variation is salty and sweet, with pretzels folded into the brown sugar batter and gobs of Nutella spooned and swirled on top. A big pinch of flaky salt is optional, but highly recommended.

They may look a little sketchy when they go in the oven, but trust the process. Once sliced, you’ll be rewarded with a Nutella-swiped square of pretzel-studded blondie. And oh, what a reward.

Nutella Pretzel Blondies
makes one 8- or 9-inch pan, about 16 blondies

1/2 cup (1 stick) unsalted butter, melted and cooled slightly
1 cup light or dark brown sugar, packed
1 large egg, room temperature
1 1/2 teaspoons pure vanilla extract
3/4 cup all-purpose flour
pinch of Kosher or sea salt
1 1/2 cups pretzels, crushed + more for garnish
1/2 cup Nutella
flaky salt

Preheat the oven to 350F. Grease an 8-inch square baking dish and line it with parchment (or foil), leaving overhang on two sides for easy removal. Grease again. Set aside.

In a large mixing bowl, whisk together melted butter and brown sugar. Add egg and vanilla, followed by flour and salt. Fold in crushed pretzels. Batter will be very thick.

Spoon batter into prepared pan and smooth to the edges. Drop spoonfuls of Nutella over the top of the batter and use a butter knife to gently swirl it into the batter (it may look a little ugly—trust the process). Tap the full pan on the counter a time or two to help the Nutella settle a bit. Press a few whole pretzels into the top, if desired, and sprinkle with flaky salt.

Bake for 20-22 minutes, until the edges are turning golden. Let blondies cool in the pan on a rack until they reach room temperature. Run a small, thin knife around the edge of the pan, then use parchment to lift them onto a cutting board. Slice with a large, sharp chef’s knife, wiping the blade clean between cuts. Serve.

Blondies will keep in an airtight container at room temperature for up to 4 days. Layer with parchment paper to keep the Nutella from sticking to the other blondies.