I frequently joke that the Texas Rangers baseball team is partially responsible for my birth. It’s funny because it’s true.
 You see, my parents’ first date was to a Texas Rangers baseball game in May of 1981. When they entered the ballpark, my mom told my dad that she needed a program. He bought her one, assuming that she wanted a souvenir, but he realized he was wrong when she pulled out a pencil and began properly scoring the game on the grid in the middle. My dad had never met a woman who knew how to do that. Now, three daughters later, he knows four.
 My parents were married just under two years after that first game and have had season tickets for the Texas Rangers ever since. It will come as no surprise that they raised children who love baseball, too. All of us cheer for the Rangers with great enthusiasm, even when they are terrible, which has been a lot.
 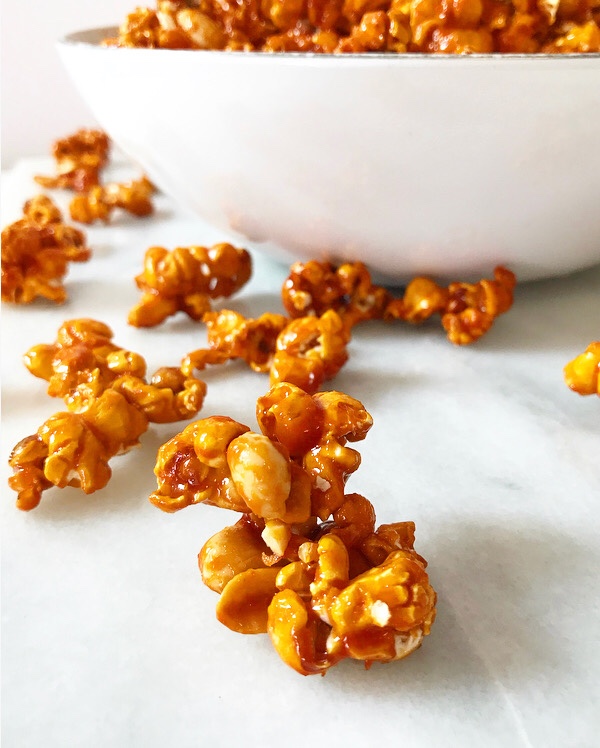 But. But! Tomorrow is Opening Day at Globe Life Park—the last at that ballpark—so we all have hope that the next 162 games will take our team somewhere great. The stats are not exactly in our favor, but it’s hard *not* to have hope on the day before the season starts. I will likely be singing a different tune when the playoffs begin at the end of September, but until then, I’m going to root-root-root for my home team. If they don’t win, it’s a shame 🎶
  I won’t ask you to buy me peanuts and Cracker Jack though, because Cracker Jack already has peanuts in it—why would I want more?—and because I’ve started making this Sriracha Cracker Jack, which is the perfect accompaniment for watching Texas Rangers games from the comfort of my Brooklyn bedroom.
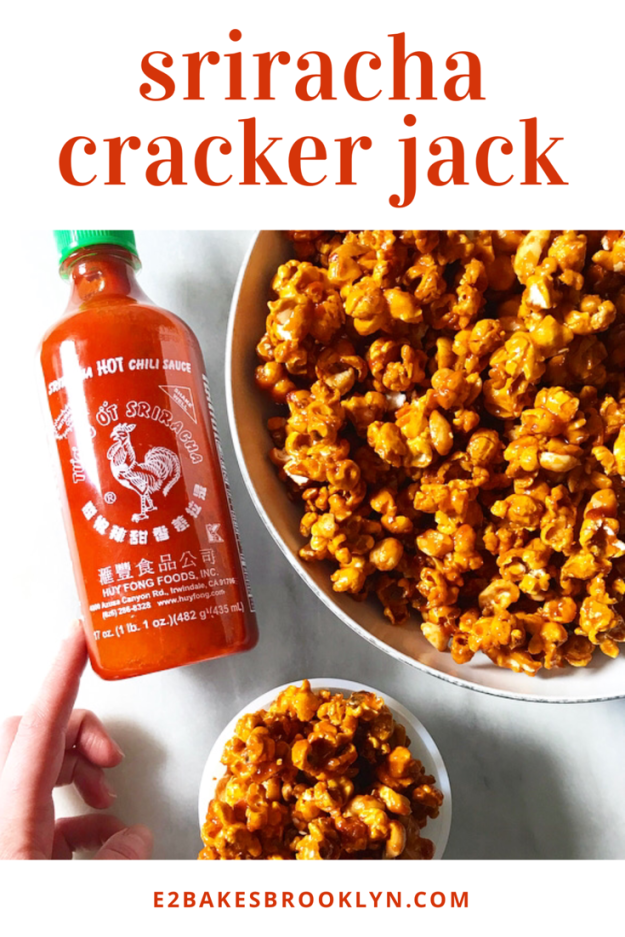
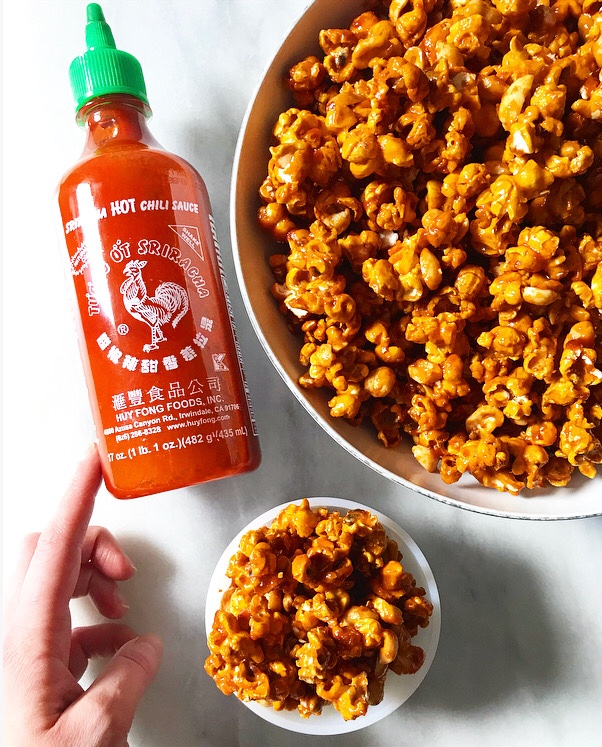 This stuff is so good, y’all. It’s the classic Cracker Jack combination of crispy popcorn and crunchy peanuts, but with a good dose of sriracha added to the traditional molasses caramel coating!


 I used my Salty Maple Caramel Corn recipe as a jumping-off point for this recipe, swapping the maple for honey and a touch of molasses, reducing the sweetener overall, and adding 1/4 cup of salty, spicy, garlicky sriracha to the mix. Yesssss.
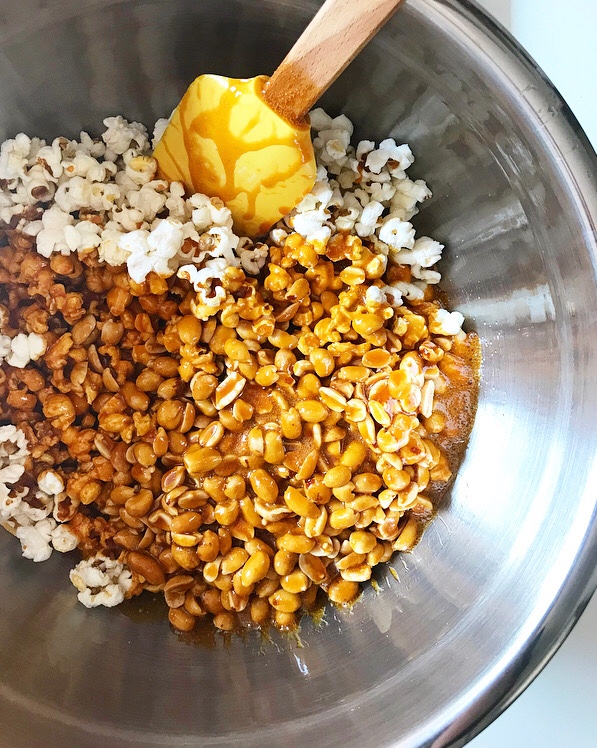


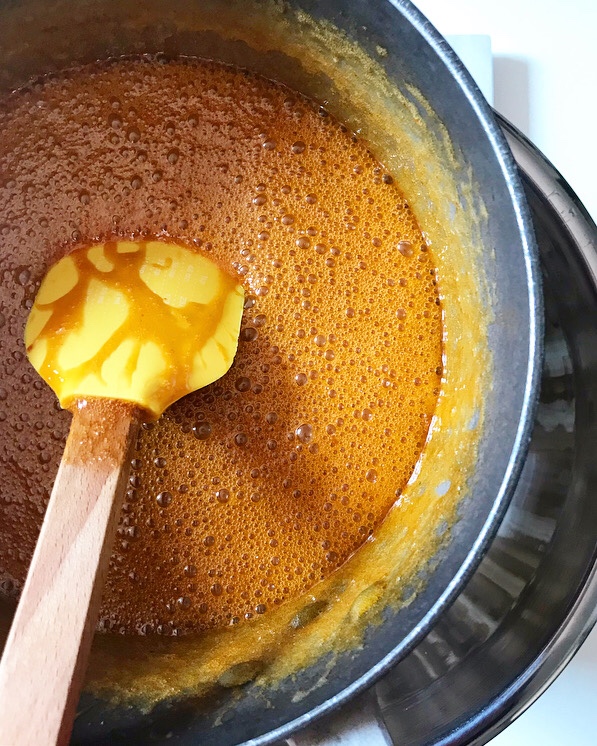
 The caramel comes together in five minutes before being tossed with freshly-popped popcorn and salted peanuts and baked at a low temperature for an hour. Once the Sriracha Cracker Jack has cooled, the coating will be glossy and glass-like—this makes for super satisfying munching.
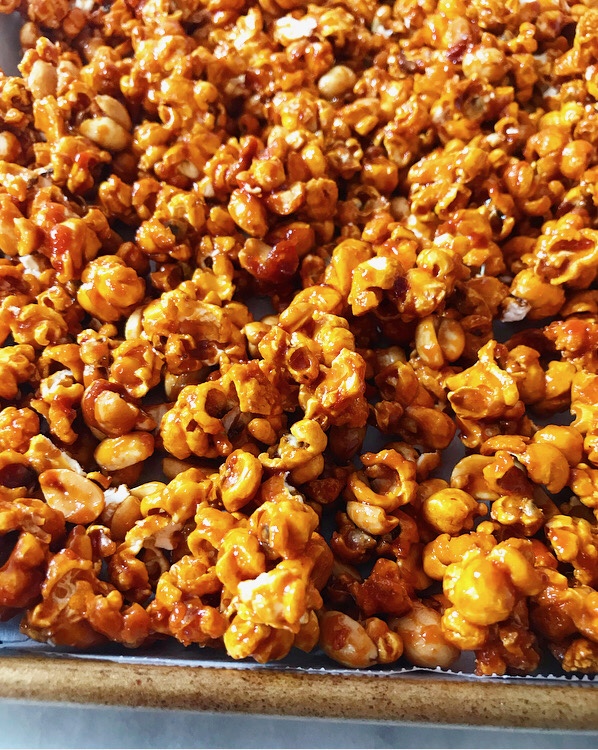 Sriracha Cracker Jack is crispy, crunchy, sweet, spicy, and a little savory—the best of all snack food worlds. It’s perfect for watching baseball, of course, but I think it’d be a great snack for parties and road trips, too.
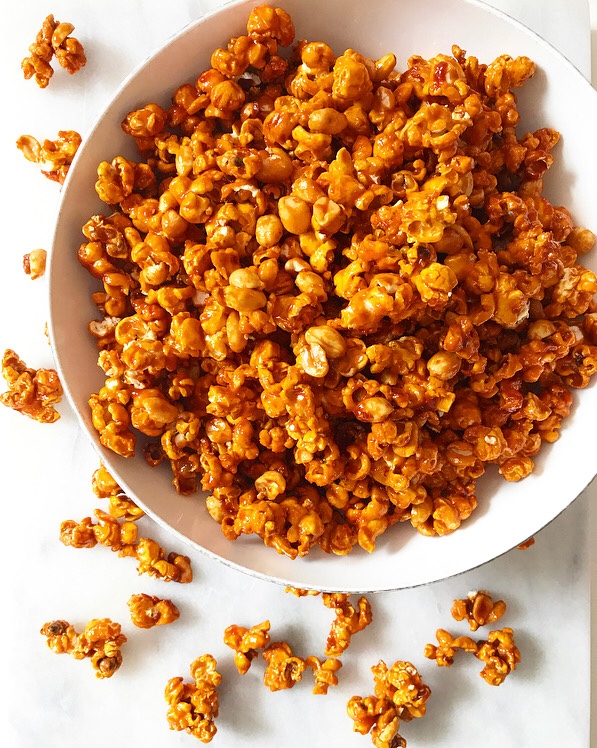 Really, anytime you choose to whip up a batch, it’s guaranteed to be a home run ⚾️
Sriracha Cracker Jack
makes 12 cups
1 tablespoon neutral-flavored oil
3/4 cup unpopped popcorn kernels
1 1/2 cups roasted salted peanuts
2/3 cup granulated sugar
2/3 cup mild honey
1 tablespoon molasses (not blackstrap)
3/4 teaspoon Kosher or sea salt
1/2 cup (1 stick) unsalted butter, sliced into 8 pieces
3 tablespoon water
1 teaspoon baking soda
1/4 cup sriracha hot chili sauce
Pour oil in a large heavy-bottomed pot. Add 4-5 popcorn kernels. Heat over medium heat until kernels begin to pop. Add remaining kernels and cover with lid, leaving it a little bit ajar. Jostle constantly while popcorn pops, until pops are 2-3 seconds apart. Do not burn.
Remove pot from heat and pour popcorn into a bowl. Measure popcorn to ensure there are 12 cups. Set aside excess or pop more, as needed to meet the 12-cup requirement for this recipe. Add peanuts to popcorn.
Preheat oven to 250F. Heavily grease two rimmed sheet pans, your largest mixing bowl, and 2 silicone spatulas with oil or non-stick spray. Put popped popcorn in the bowl. Set aside.
Without stirring or jostling, combine sugar, honey, molasses, salt, butter and water in a 4-quart pot. Bring to a boil over medium heat. Let boil 5 minutes. Do not stir. Remove from heat. Stir in baking soda; mixture will bubble up. Stir in sriracha.
Pour sriracha caramel over popcorn and use greased spatulas to toss together. Do not touch any coated pieces that fly out of the bowl—the molten sugar will burn you. Wait til they cool a bit before picking them up.
Divide coated popcorn/peanuts among sheet pans. Bake for 1 hour, stirring every 15 minutes.
Line a sheet pan or a surface with parchment. Pour baked Cracker Jack on top. Let cool to room temperature. Break up clumps. Serve.
Leftover Sriracha Cracker Jack will keep in a ziptop bag for a couple of weeks.
 When I moved in with my roommate, I thought it would be a short-term deal. We were friendly, but didn’t know each other particularly well, and I honestly didn’t think we’d get along in close quarters—the original plan was that I’d live here for six months or so while I recovered from the end of a relationship.
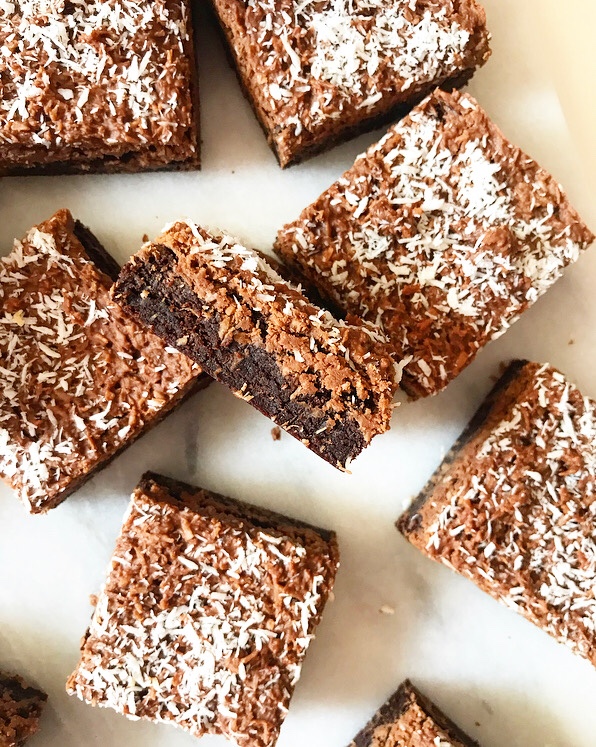 Flash forward three years and I’m still here, living with the same guy. Turns out that an obsessive baker who mostly wears pajamas and a neat freak can, in fact, live in peace. And make each other laugh really hard.
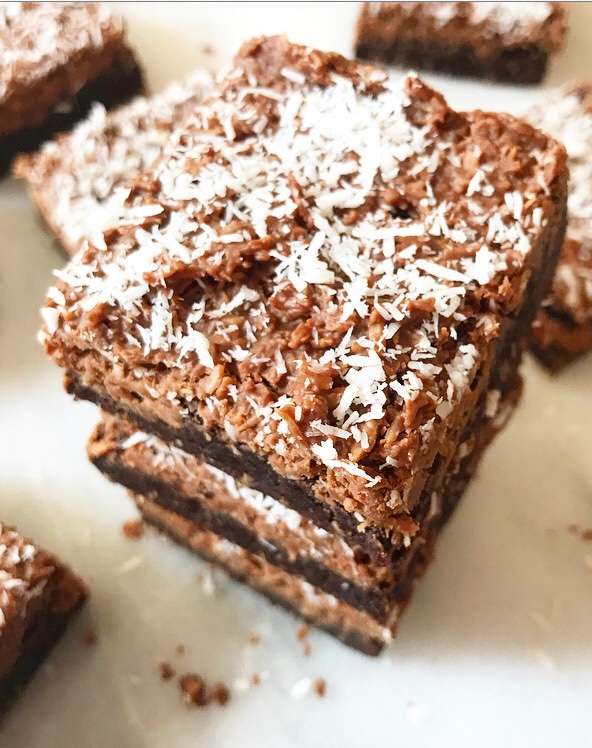 Before I get to the point and why this is relevant to Coconut Cluster Brownies, I have to say that this is not some sort of romantic announcement. Hahahahahaha absolutely not.
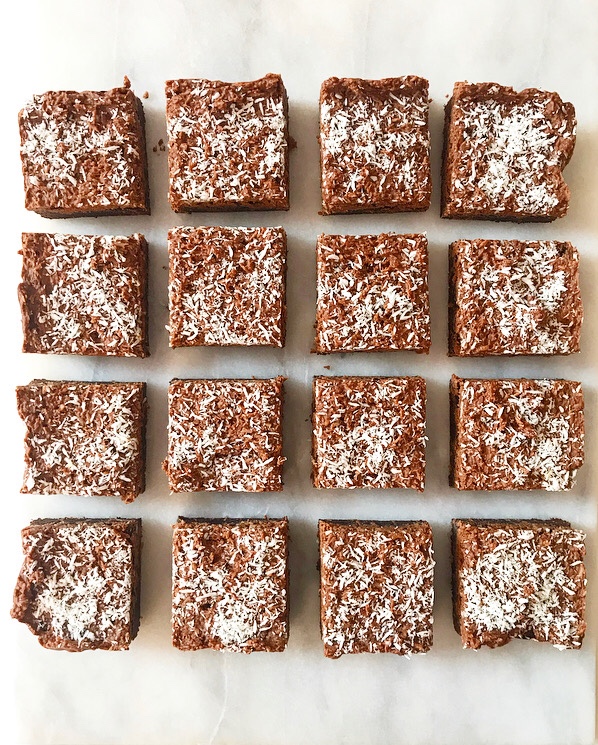 But let me confuse you further by telling you that he got me a box of chocolates for Valentine’s Day. It wasn’t a romantic gesture. We get each other things all the time—I sometimes make
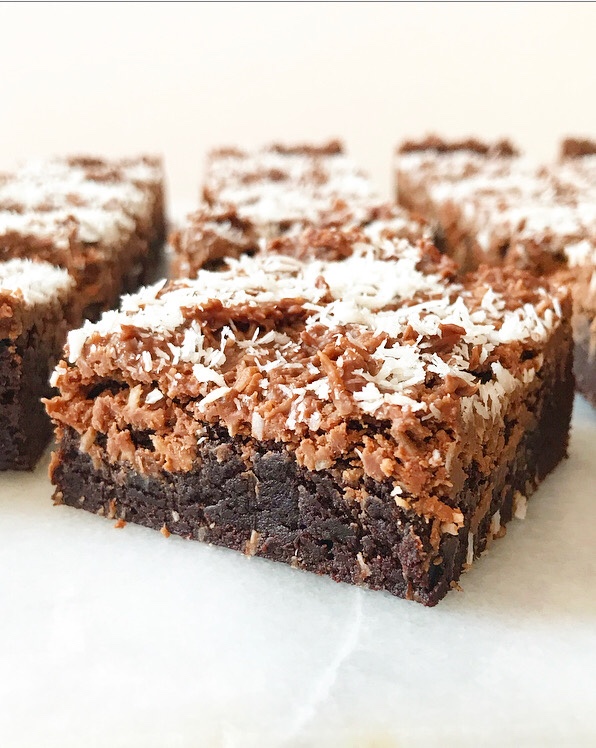
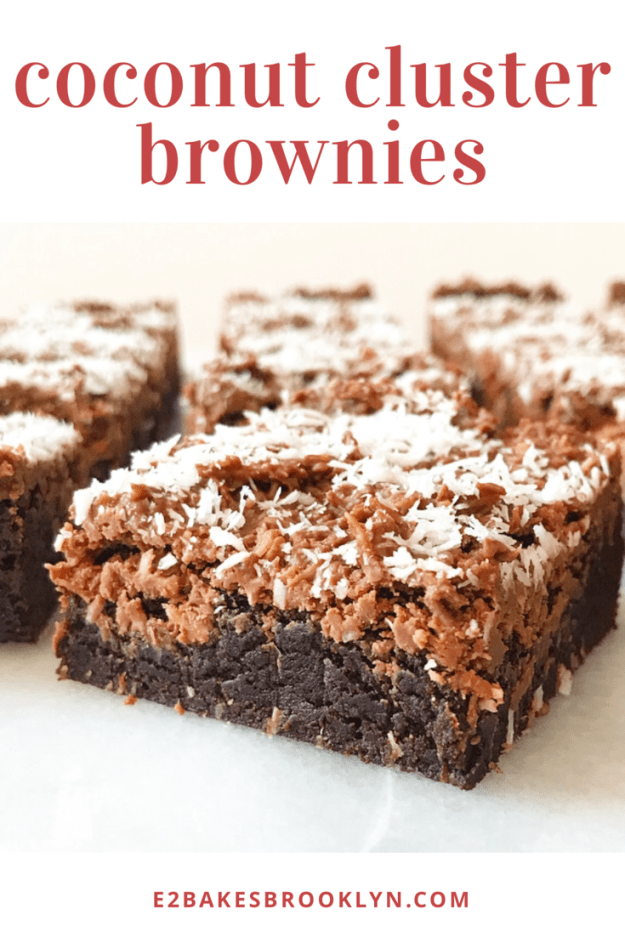
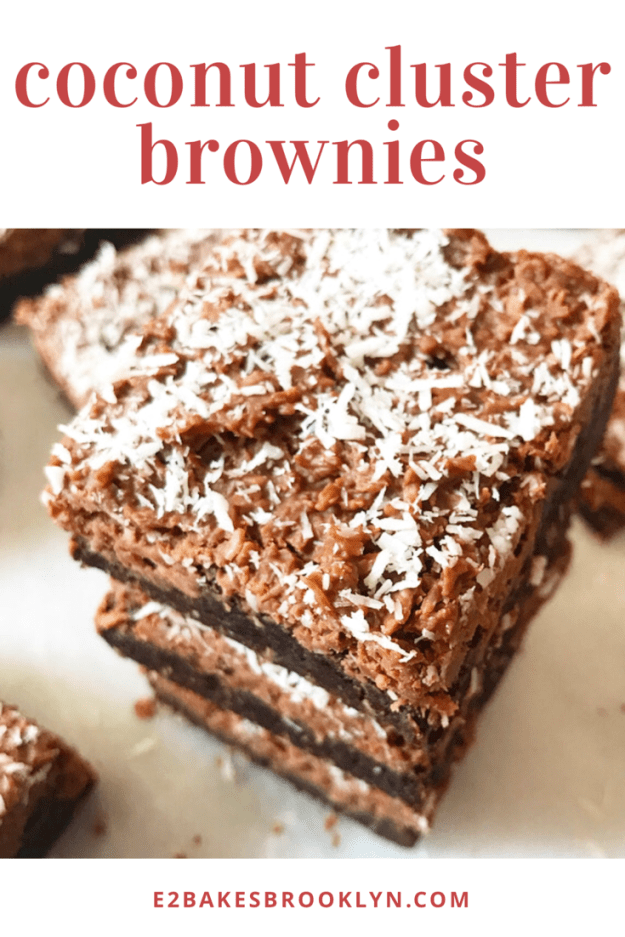
 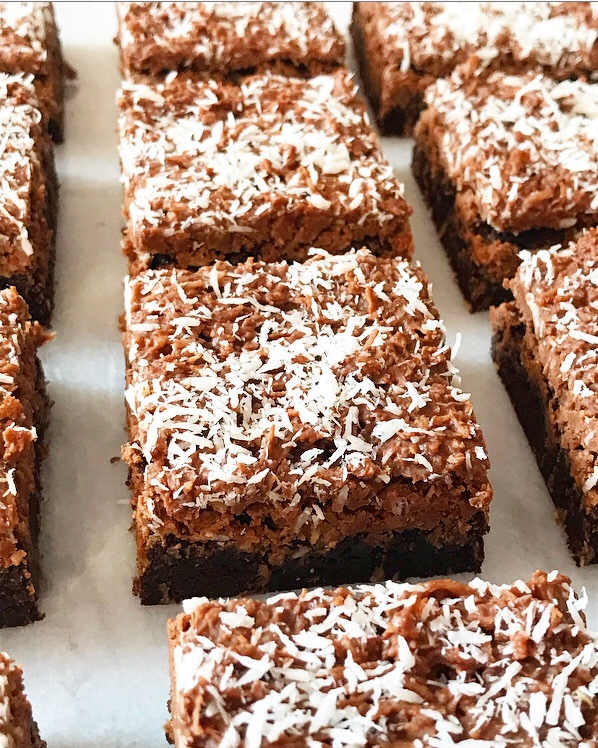 The small Whitman’s Sampler that I received only had a few pieces in it, and I immediately determined the order in which I would eat them, one at a time, over the next few days. The caramel went first, followed by the buttercream and the ganache. The last one, the candy that I was the least excited about, was the Coconut Cluster. It was shaped like a peanut butter cup, but instead of being a filling enrobed in chocolate, it was a block of milk chocolate speckled with bits of coconut. As I went to eat it so I could toss the heart-shaped box, I didn’t expect much, but then I popped it into my mouth and suddenly became obsessed with putting this rich, simple chocolate-coconut combination on a brownie. And so, a month later, I did.
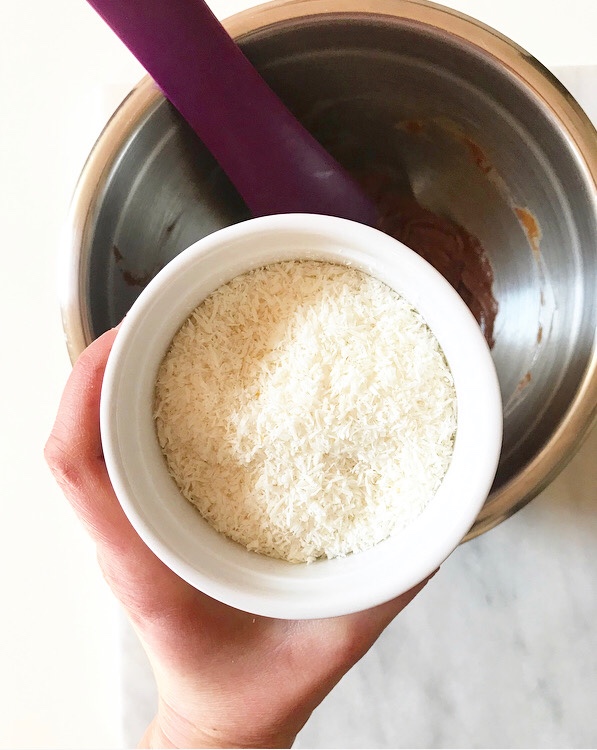
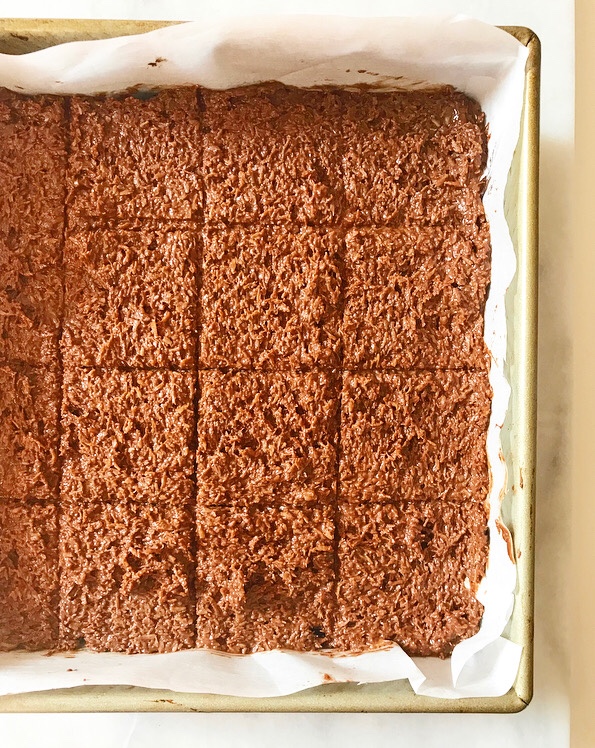
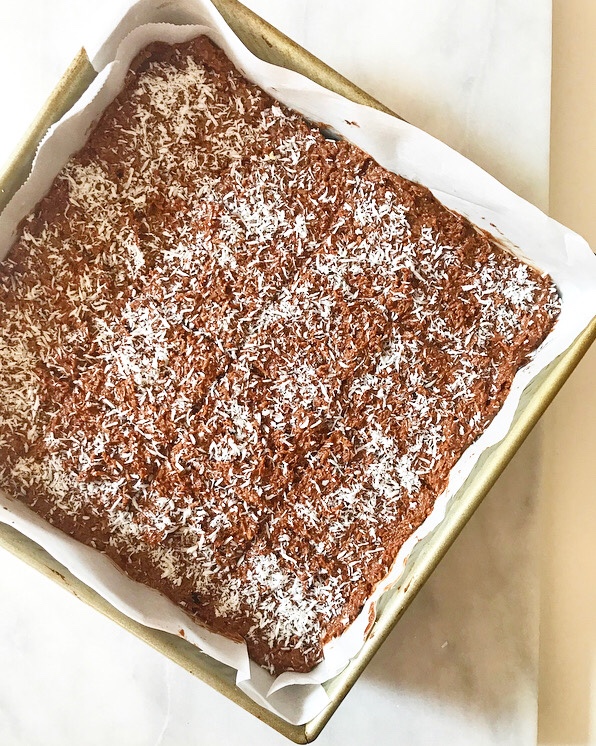 These Coconut Cluster Brownies are nothing more than my favorite
  If you love chocolate, coconut, and brownies like I do, you will want to hoard all of these for yourself…
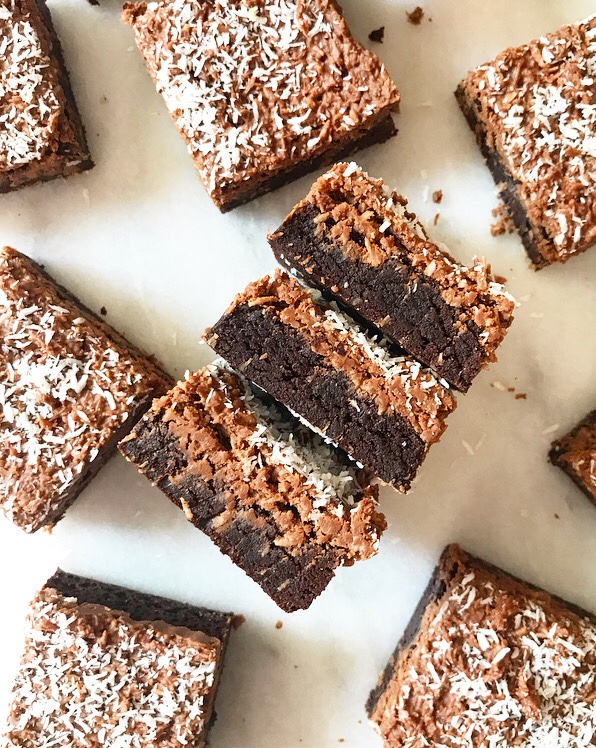 …but maybe set one or two or four aside for your friend who puts up with your late night baking and knows you well enough to know how you feel about sale-priced peanut butter and cheap chocolate. That’s a good sort of person to have around.
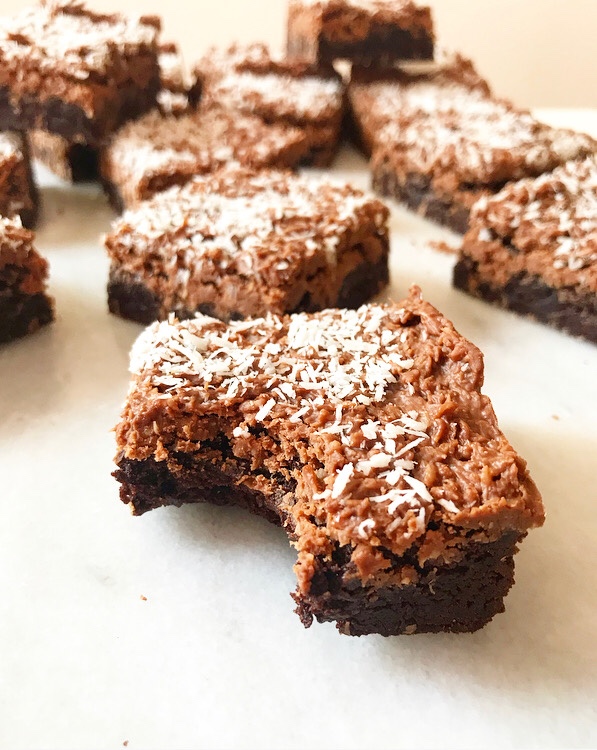
 There is a small town between Austin, Texas, and my hometown of Fort Worth that is called Hamilton. From the passenger seat of my parents’ SUV, it looks like any other small Texas town—there’s nothing remarkable about it from that particular vantage point, except that it is home to my family’s favorite pit stop,
 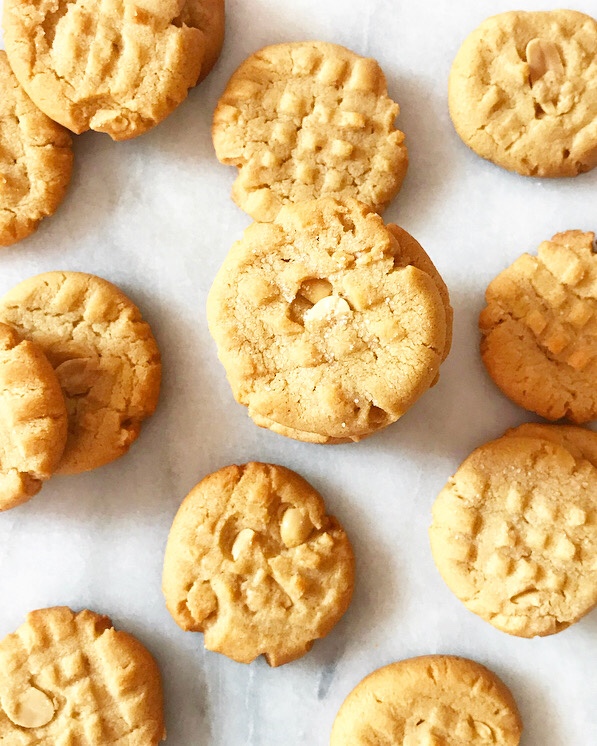 I should say that we have always called it The Flying Dutchman. I don’t know why—that’s just what we’ve always called it. I’d like to tell you that we will change our ways and call it Dutchman’s Hidden Valley from here on out, but we won’t so I won’t. A 35+ year family habit is not easily broken.
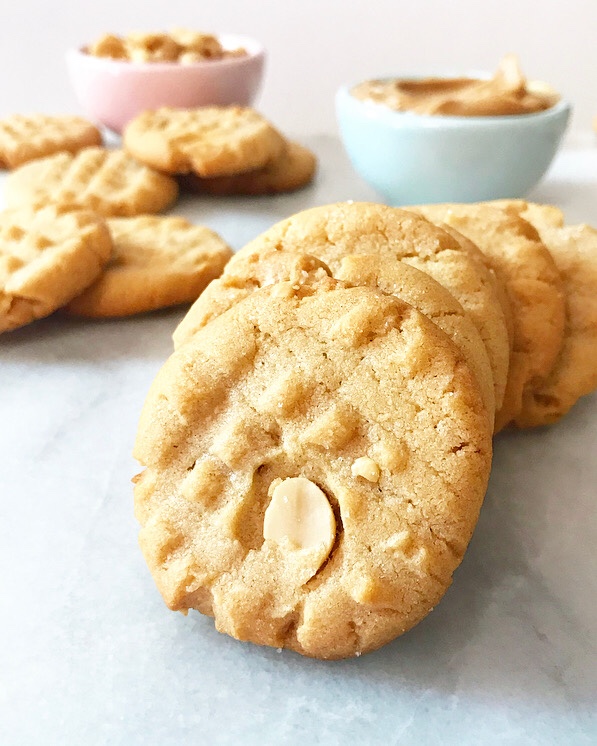 My dad began stopping at Dutchman’s Hidden Valley in the early 1980s on his way to visit my older sister down in Fredericksburg. He’d stretch his legs and grab a Bavarian ham sandwich before getting back on the road. When he met my mom, he introduced her to the store. Fast forward ten or so years, and she and my grandma began taking Eliot and me to Dutchman’s on our way to family reunions in Kerrville. And now, twenty years beyond that, my parents take the back route to visit my older sister again, this time in Austin. They say it’s because I-35 is a mess, which is true, but I think it’s actually so they can get a sandwich.
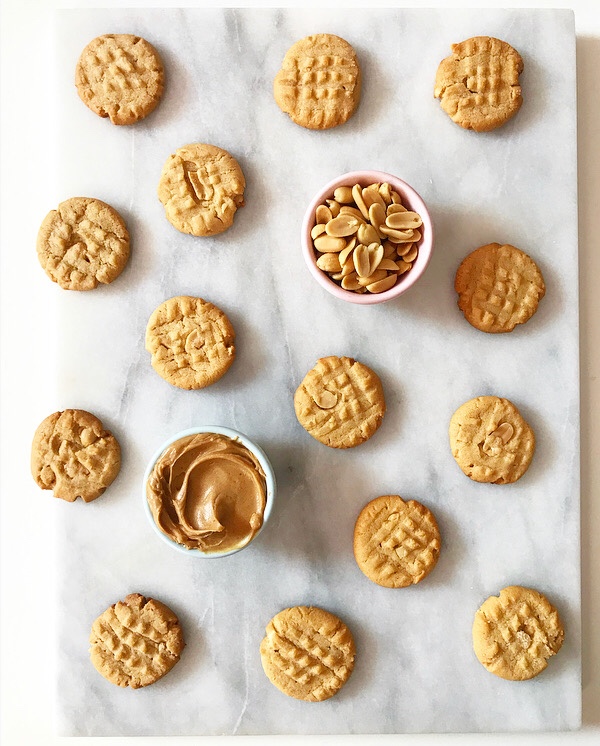 I haven’t lived in Texas or driven the back roads in a very long time now, but a couple of Christmases ago I had the pleasure of riding with my mom from my sister’s home in Austin to my parents’ in Fort Worth. We were listening to
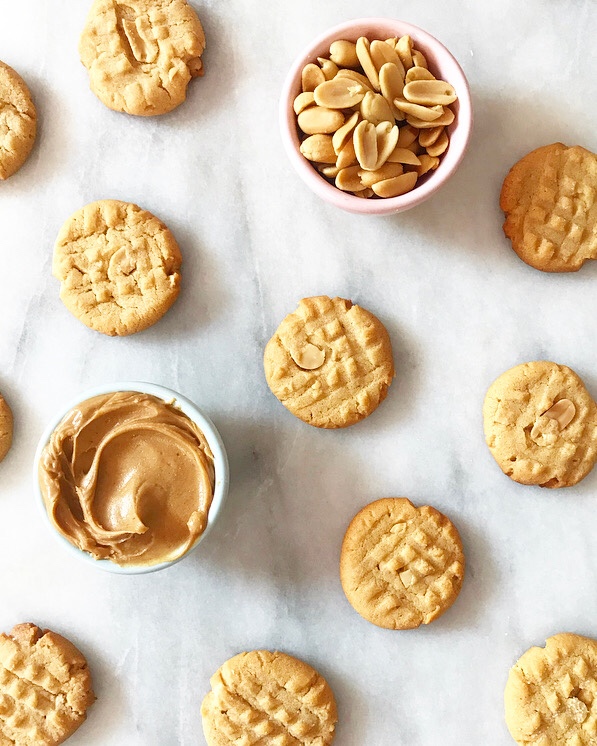
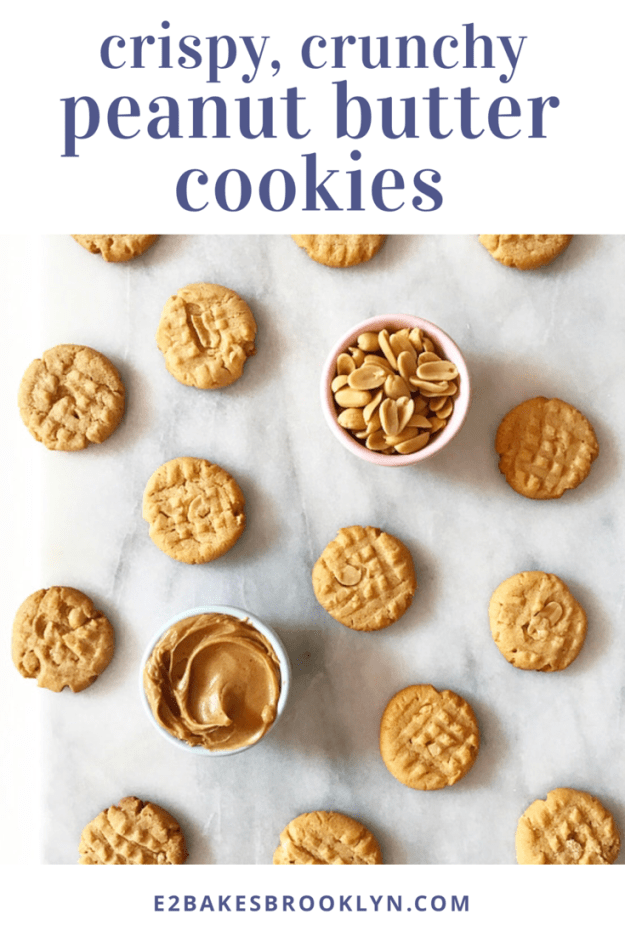
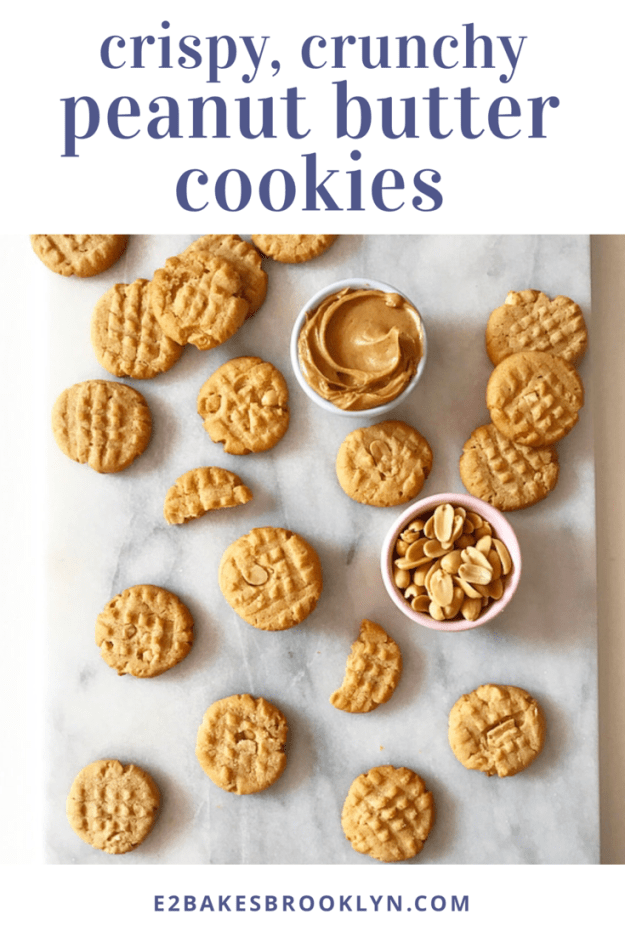
 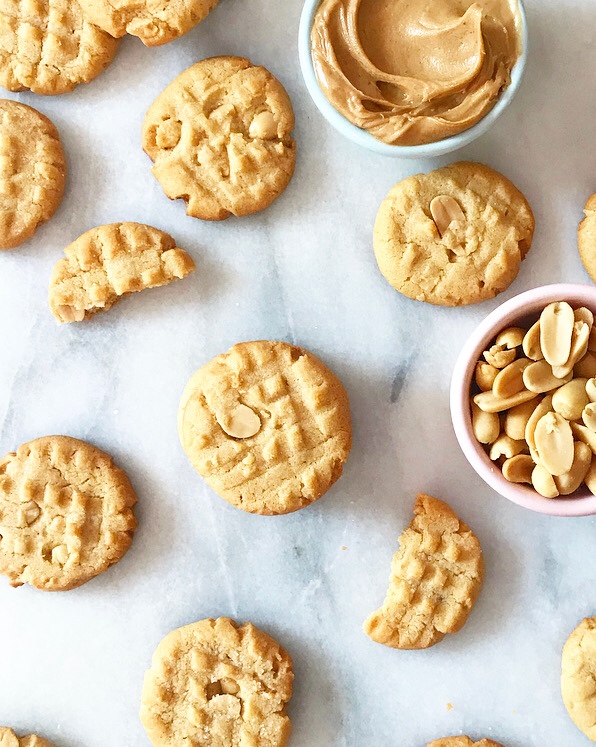 Crispy, crunchy and not-too-sweet, with an almost-savory peanut butter flavor, my mom and I talked about them all the way home. Dutchman’s peanut butter cookies are probably the best I’ve ever had in my life, and I have thought of them frequently and fondly for the last 15 months. I’m still kicking myself for not grabbing another on the way out the door—I think they were 60 cents each.
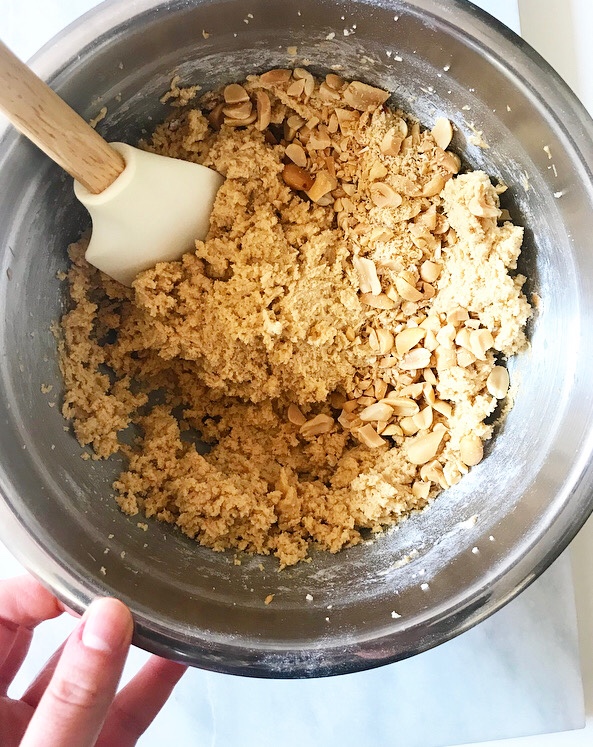
 Now, I am sure I will end up in Texas at some point this year, but I don’t know when, and I am highly unlikely to find myself passing through the sleepy metropolis of Hamilton. My trips are rarely more than a few days, so road trips to get Bavarian ham sandwiches and chips and my newfound-favorite peanut butter cookies are difficult to squeeze in.
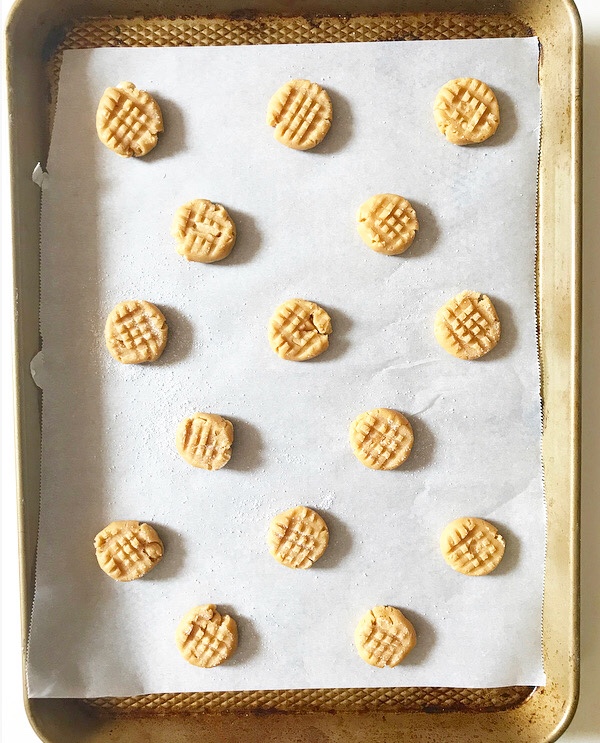
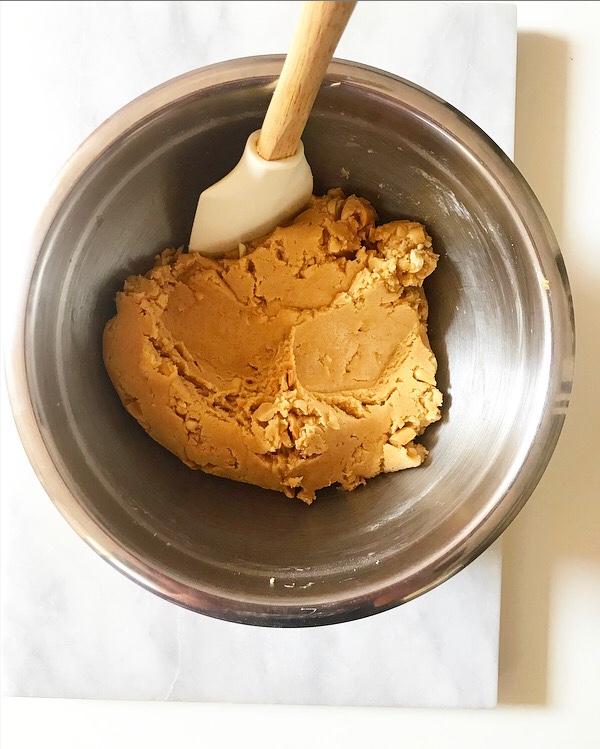
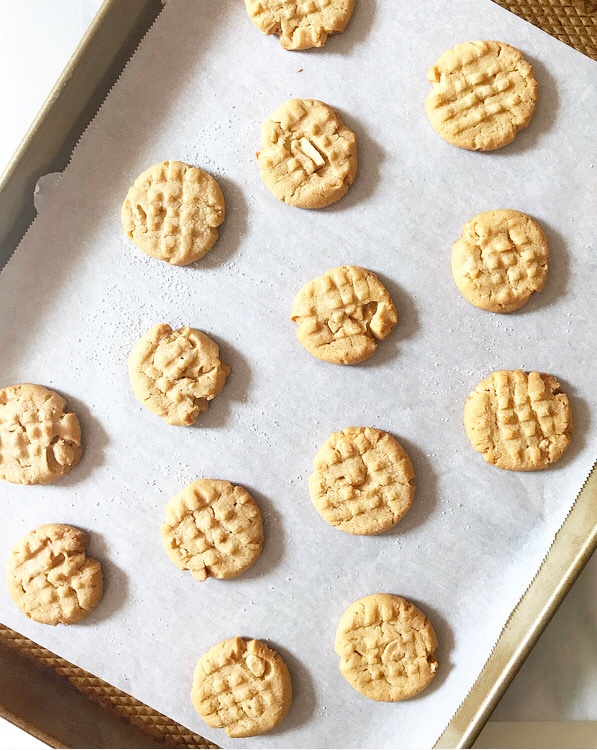 This is all a very long way of saying that I have done my best to recreate Dutchman’s peanut butter cookies in my New York kitchen. I’ve done a pretty good job, if I do say so myself 🙂
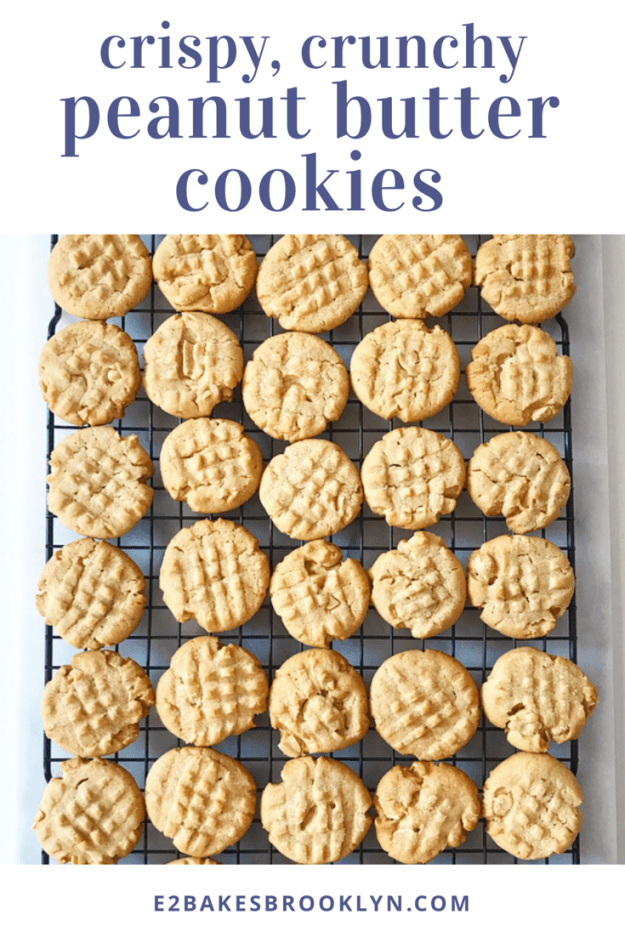
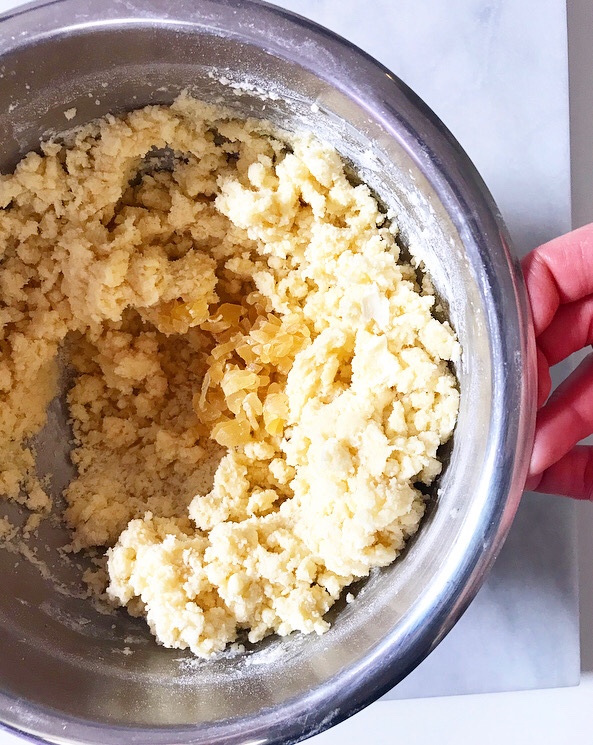
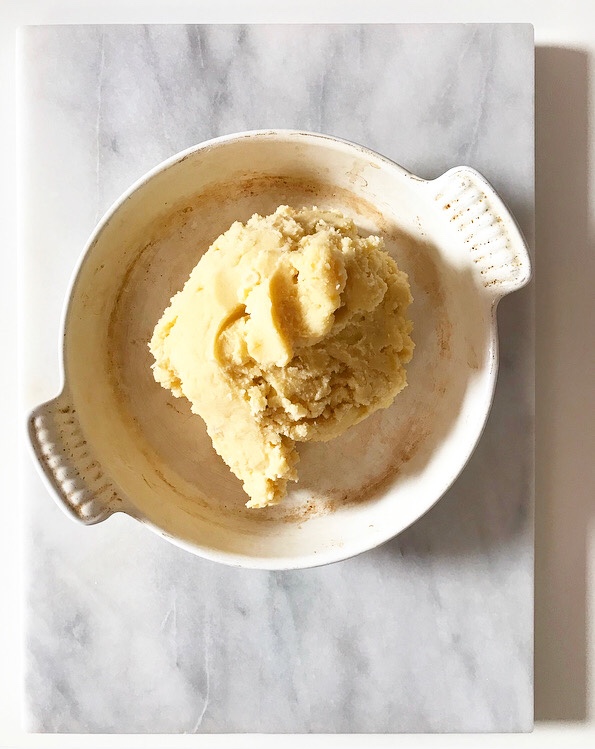
 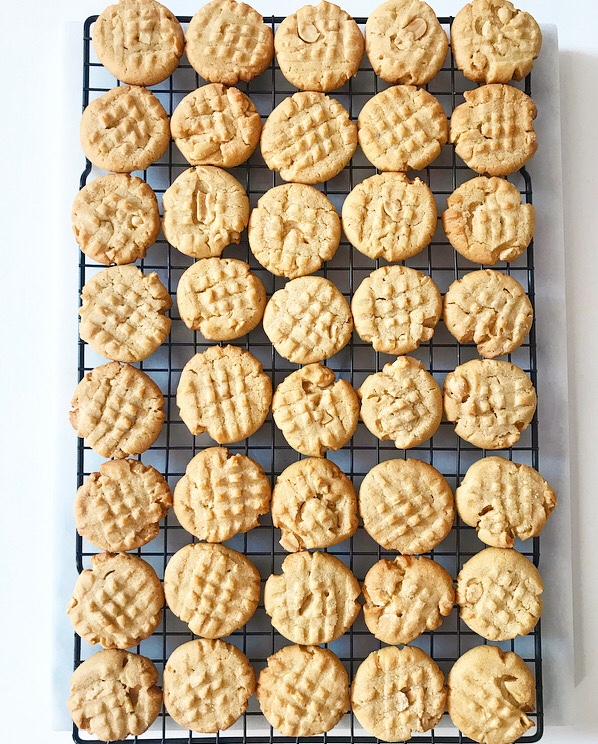 These Crispy, Crunchy Peanut Butter Cookies are crispy and crunchy (duh) and sort of sandy. They aren’t overly sweet—there’s barely 1/2 teaspoon of added sugar in each one—and while I believe Dutchman’s cookies’ savory edge may come from lard (rural Texas, y’all), mine comes from a smattering of roasted peanuts. If you want a sweeter cookie, you can swap all or part of the peanuts for chocolate chips, or leave the add-ins out entirely.
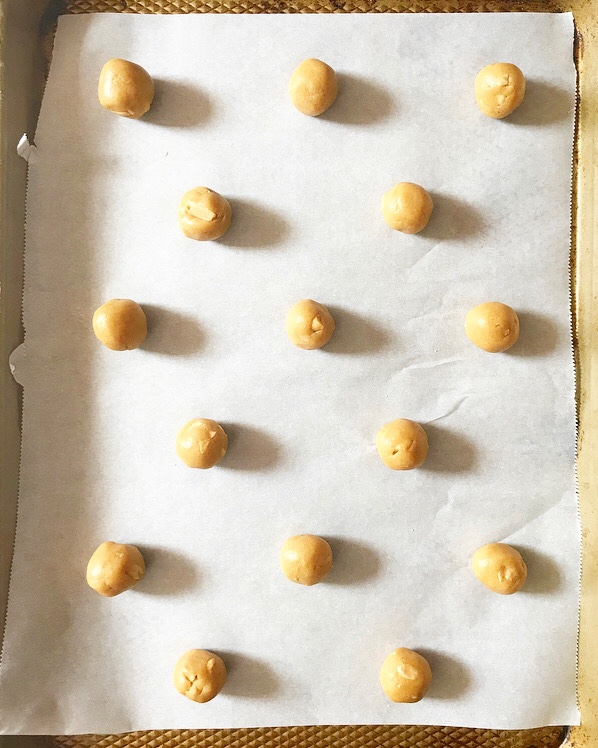
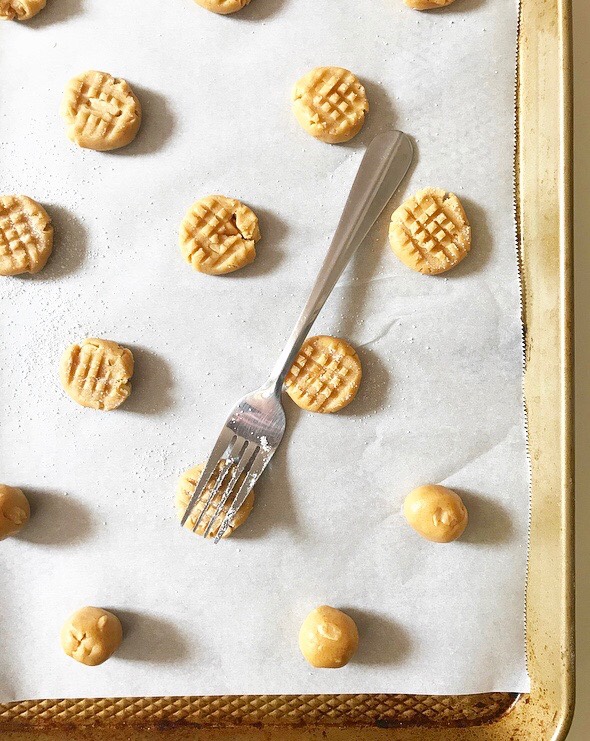
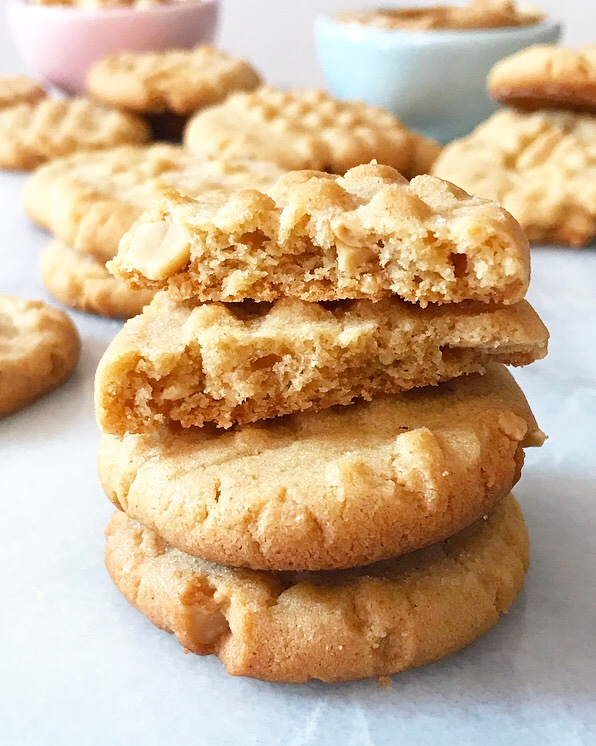 Hands-down, my favorite part of this recipe is that it doesn’t require a chill. The dough is sturdy and easy to roll from the get-go, so the time between the moment the peanut butter cookie craving strikes and when they are baked and ready is mercifully brief. Oh, and these cookies hold up well for at least ten days and develop deeper peanut butter flavor over time, so you can eat them frequently and think of them fondly and not have to worry about when you’ll have time to bake more, or when you can get to a roadside antique store & sandwich counter in Hamilton, Texas, to get your fix.
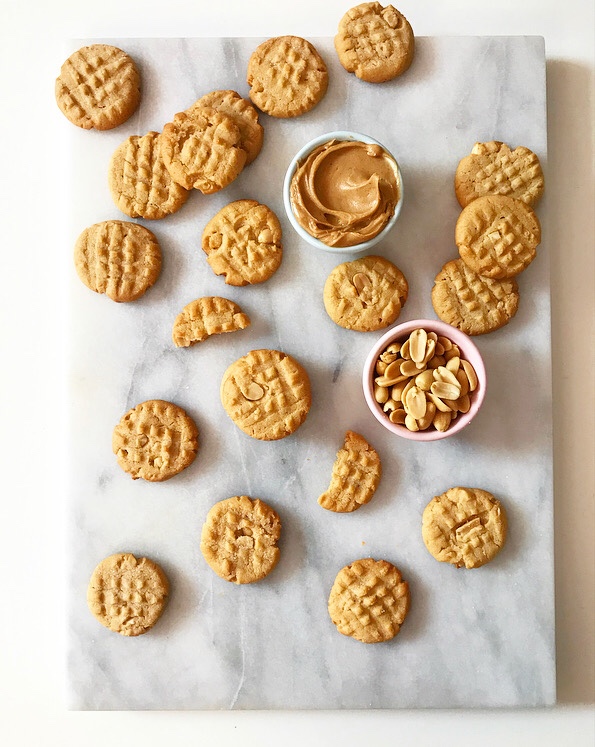
 Nobody throws a dinner party quite like my friend, David. He can make a multi-course meal for fifty without panicking for a second, and he’s been known to throw impromptu dinner & a movie nights for twenty without the slightest hesitation.
 Both the man and his food are sophisticated without being pretentious—think ham smoked on his roof, cold salmon with dill & yogurt, habanero cheese grits, herby roasted potatoes, tomato & avocado salad with pesto, and a recipe for brussels sprouts that haunts my dreams. And that’s to say nothing of the things he can do with a Costco croissant and a bulb of fennel! I could go on, but the bottom line is that David makes unfussy food that is outrageously delicious, and if you are ever so lucky as to be invited for dinner at his apartment, you must must must go. If not for the main menu or the love of his three-legged cat, go for the Boterkoek.
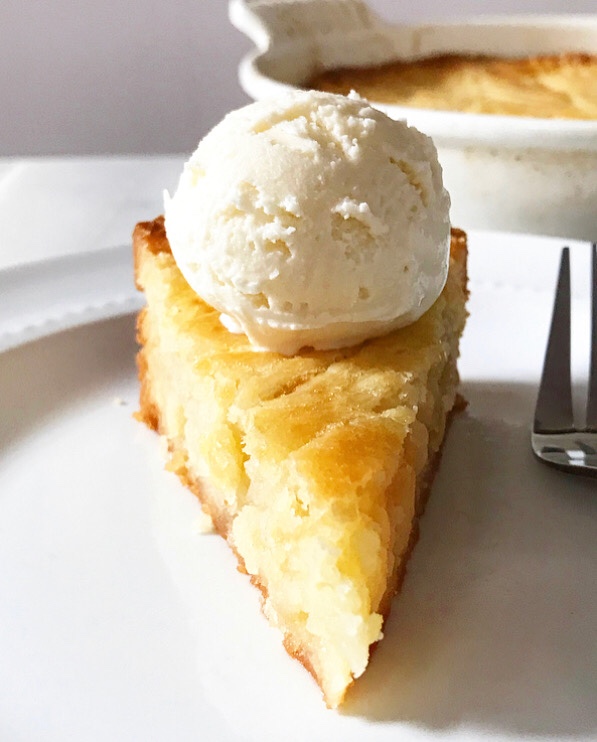
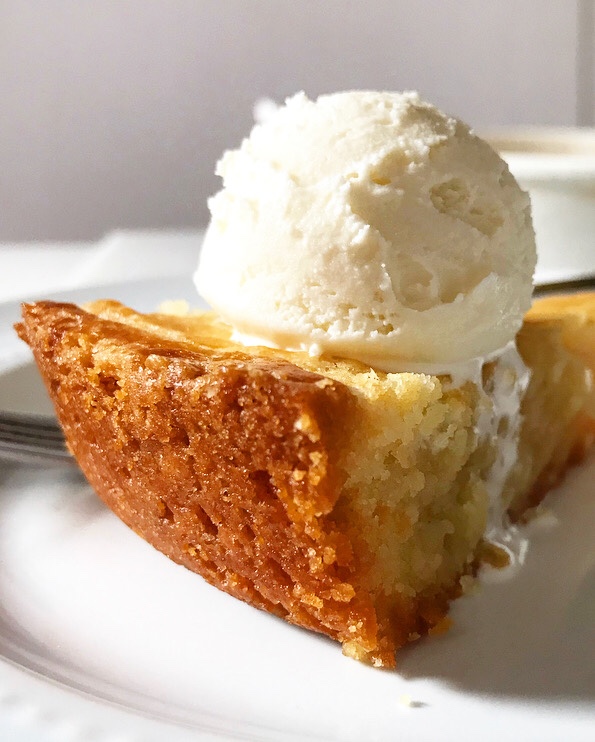 If you have never heard of Boterkoek (pronounced “bow-ter-kook”), it’s Dutch for “butter cake,” and it’s about to be your new favorite dessert for any and all occasions. David is of Dutch descent and makes it frequently (usually from Heleen A.M. Halverhout’s
 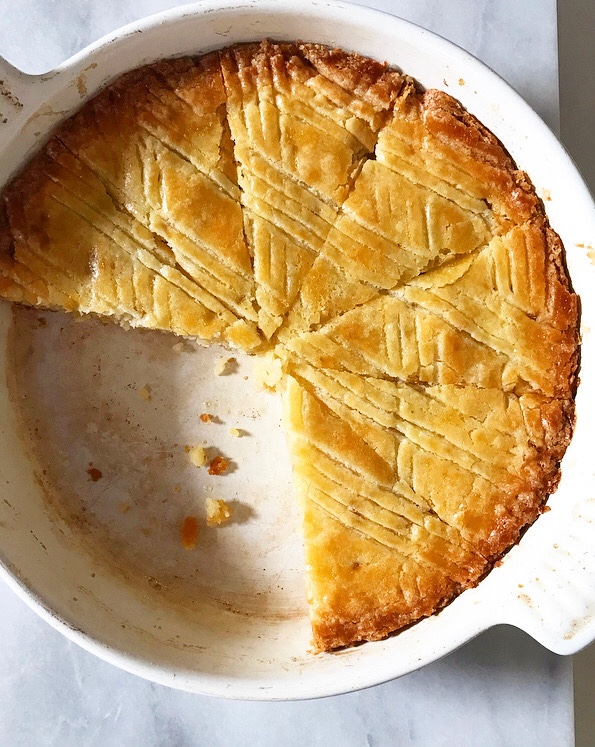 As its name states, this cake is ridiculously buttery. It’s also sweet, simple, and the sort of thing that works just as well for dinner with friends as it does for delivering to new parents or keeping around to pick on over the course of a lazy weekend.
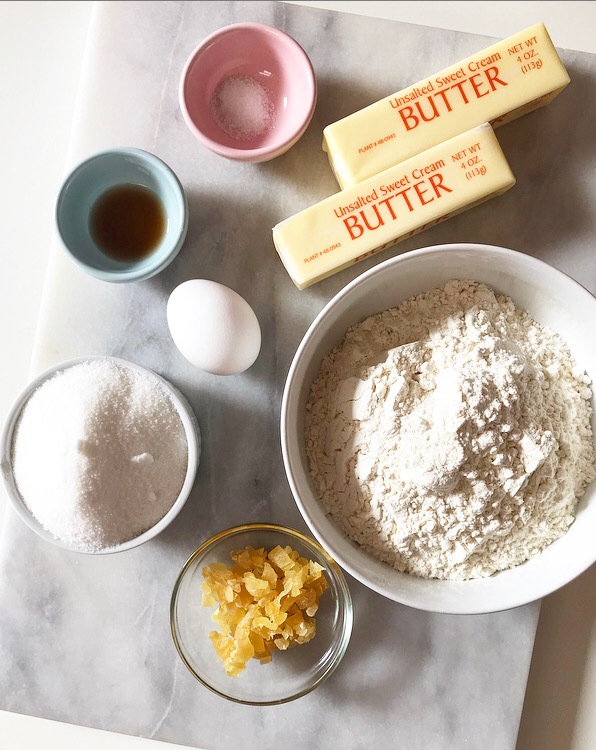
 Boterkoek is made from a dough rather than a batter. It includes softened butter (duh), sugar, an egg, flour, vanilla and almond extracts, and minced candied ginger. There’s no leavener, but the final product isn’t terribly dense. I attribute that to beating the softened butter until it’s good and fluffy.
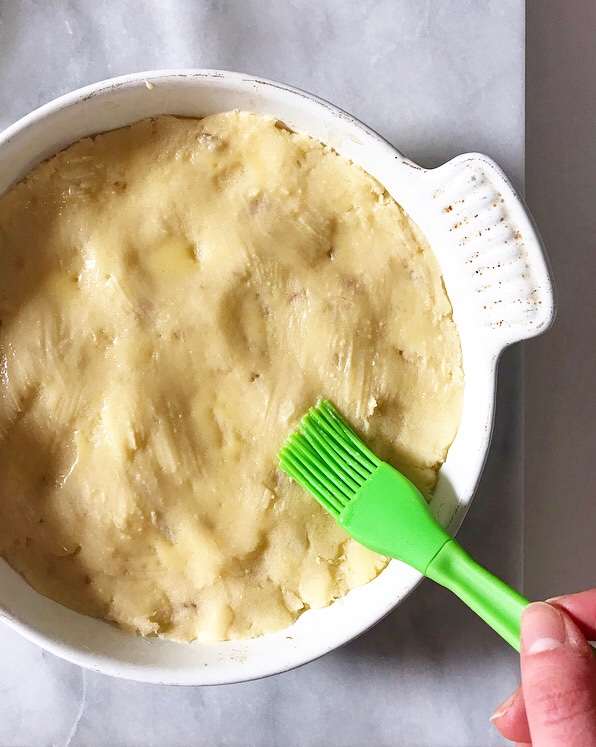
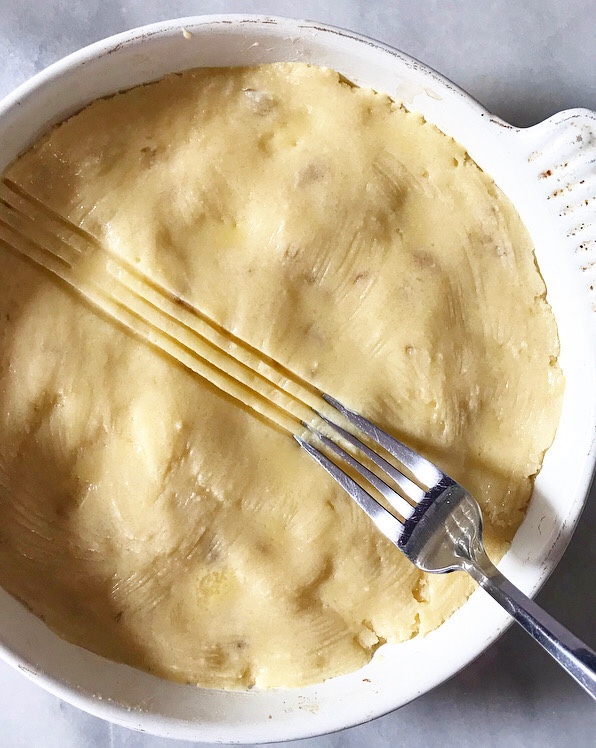
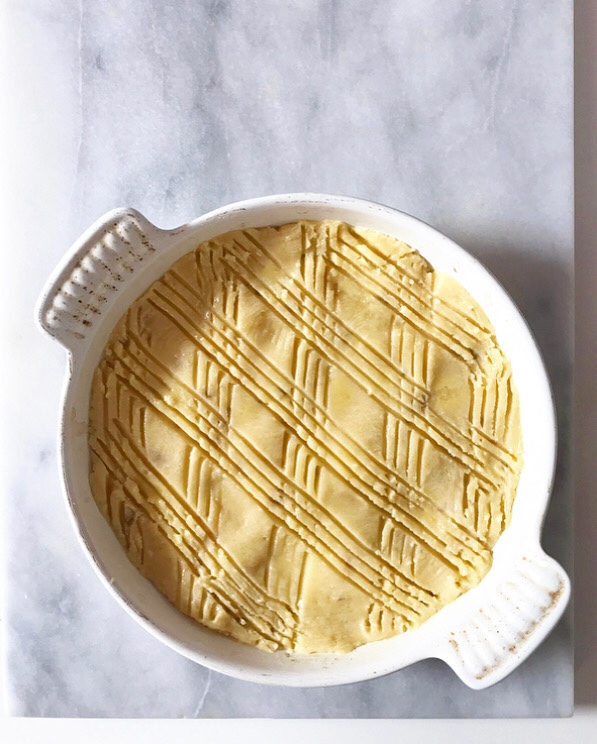
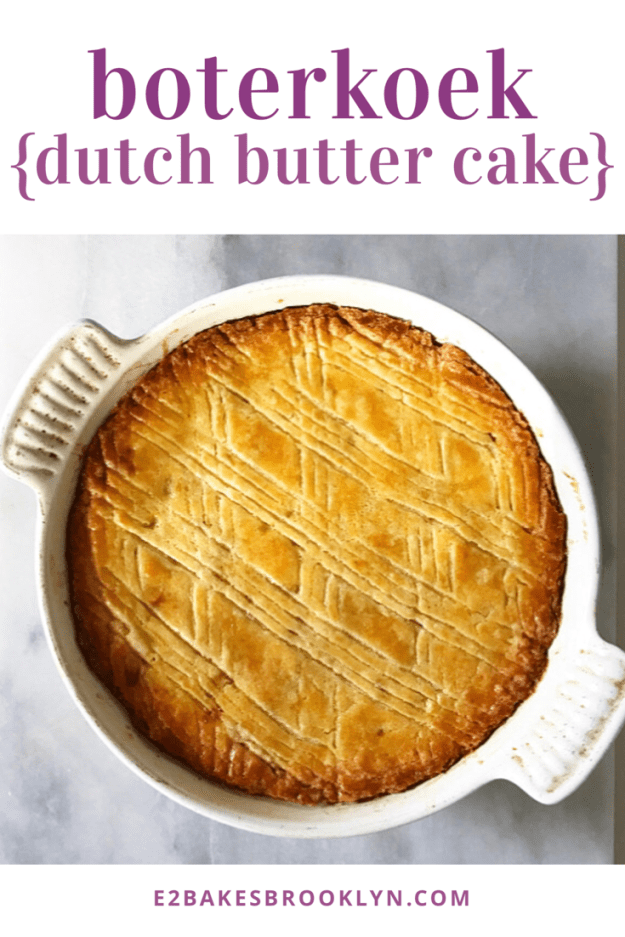
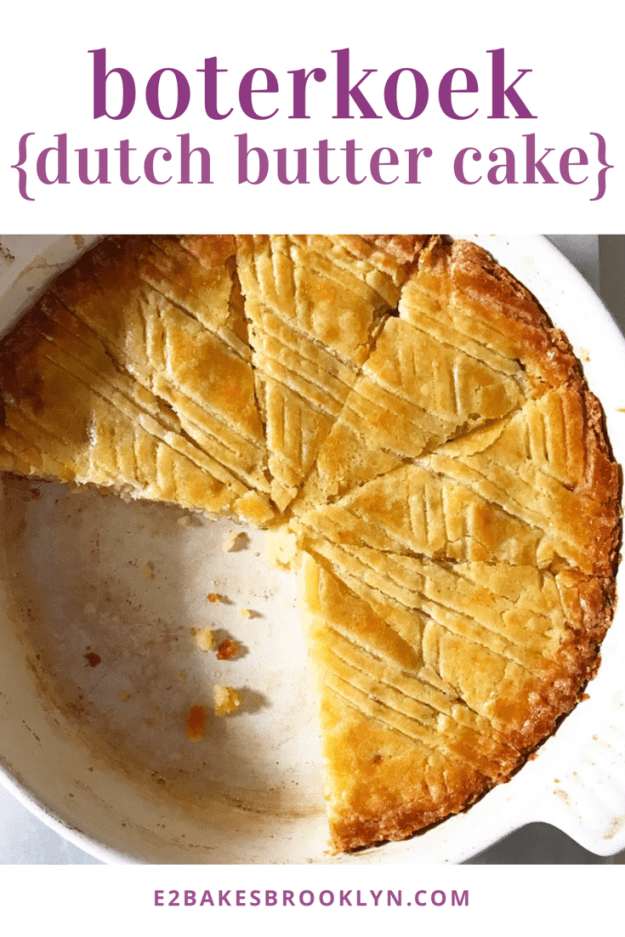
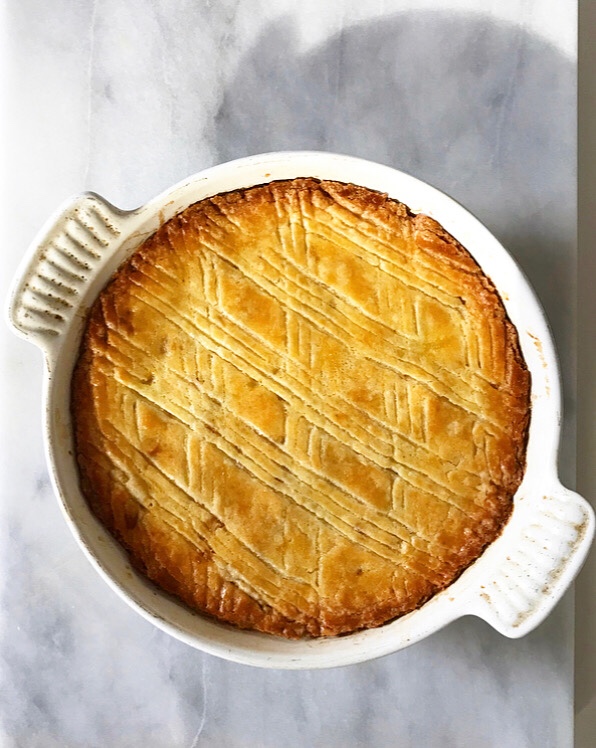 As with all of David’s go-to recipes, this one is decidedly unfussy. The most annoying part of making a Boterkoek is reserving a teaspoon of the beaten egg for brushing over the top of the cake. No bother, really. The thin layer of egg wash makes for a golden top, and a crosshatch pattern carved out with the tines of a fork gives way to crispy edges and a magazine-quality presentation.
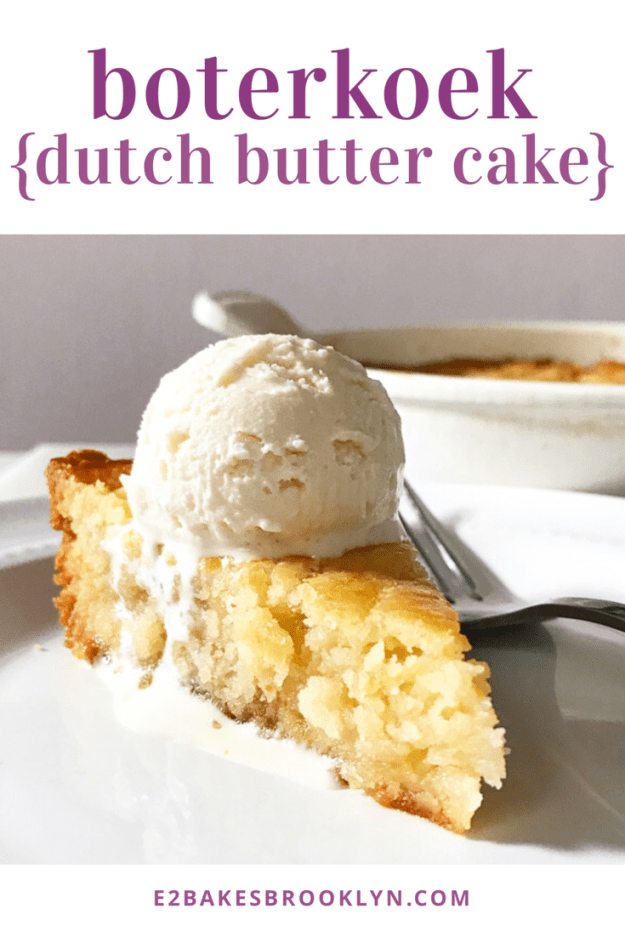
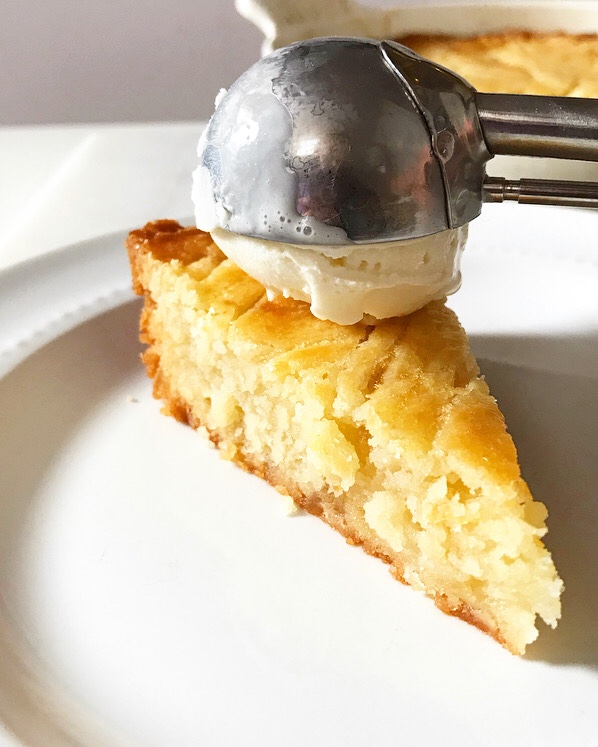 I haven’t even mentioned the flavor! Boterkoek is rich and buttery with a touch of almond flavor and a little sharpness from the candied ginger. The texture falls somewhere between a cake, shortbread and a blondie—it’s best eaten with a fork when it’s warm, but can be handheld when it’s room temperature.
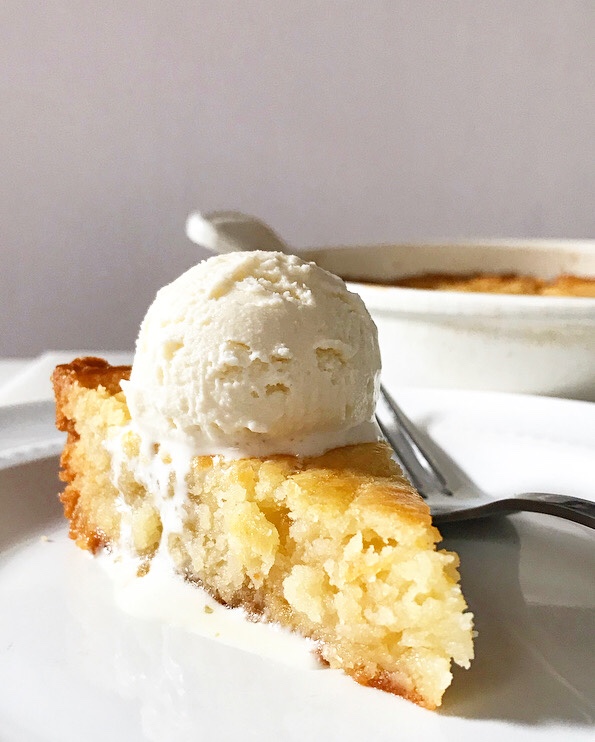 Boterkoek is what I like to call an everyday cake; it can be made easily with few ingredients, doesn’t require layering or frosting, and works for almost any casual occasion including, of course, a dinner party at David’s. Or, you know, watching Netflix in your oldest/best pajamas.
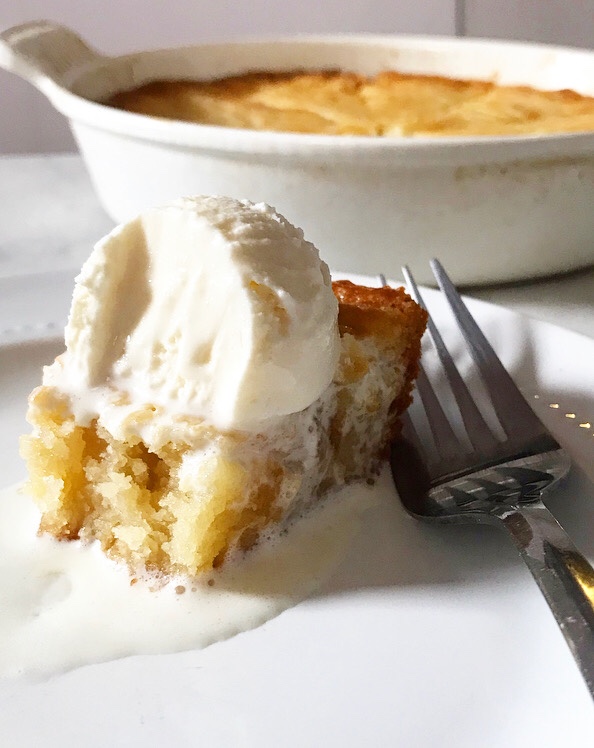 Either way, you shouldn’t skimp on the ice cream.
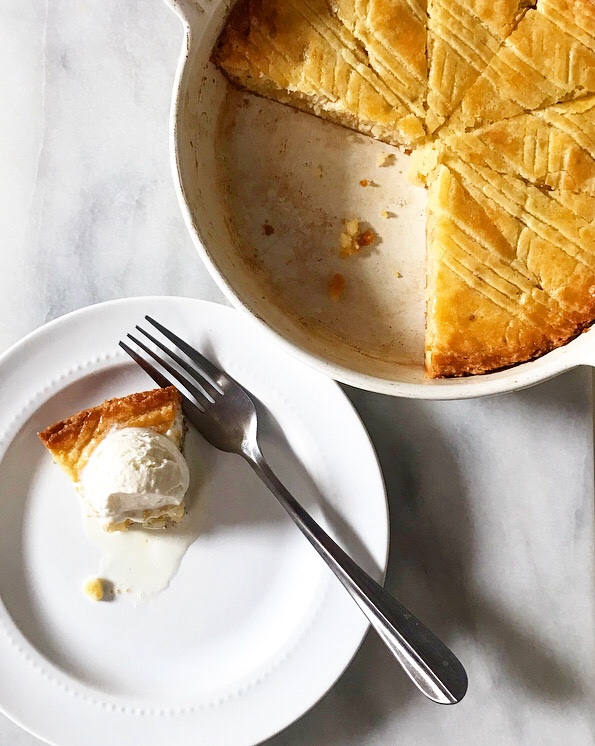
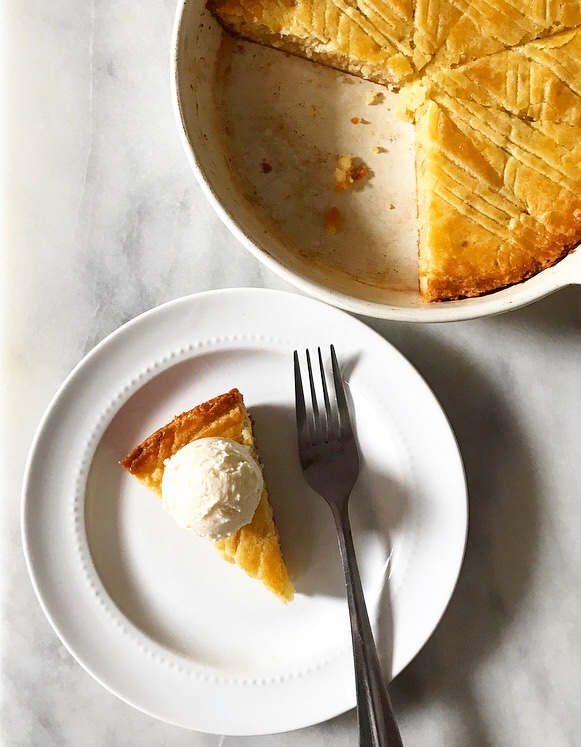
 I had big plans for Pi Day, the day on which we celebrate both pie and math, which falls on March 14th (aka 3.14, aka tomorrow). For months, my plan had been to make an Old-Fashioned Pineapple Pie, the sort of southern grandma food that makes my heart sing. I had read about this dessert sometime last year and decided that I would aim to have it perfected by today, but as usual, my plans never play out in the linear fashion that I’d prefer.
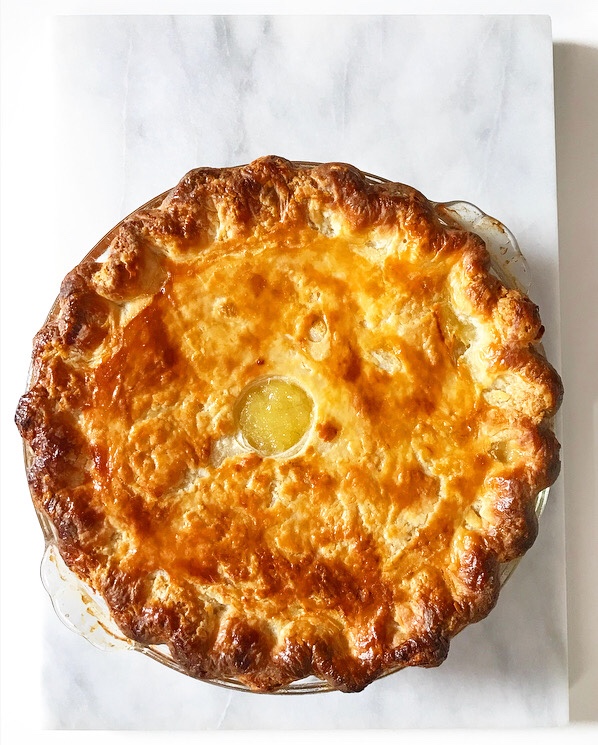 My attempt at Pineapple Pie was ostensibly fine. The crust was golden, the filling was set, the crimp was maybe my best ever, but when I went to try a slice, all I could think was how…soft…it was. The flavor was good and I suppose I’d prefer that it be soft over crunchy, but still. It was just so…soft.
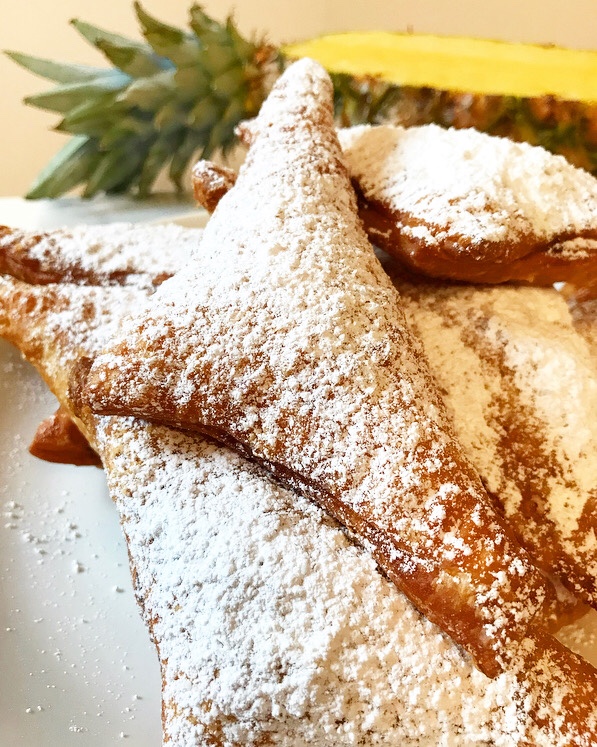 I was ready to go back to the drawing board, looking over my (long) list of recipe ideas when I noticed “fried pies” tacked onto my future-pie-inspo. That’s when it hit me: while I may not want an inch-thick layer of pineapple filling, a little bit folded into a crispy southern-style fried hand pie seemed like a very good idea.
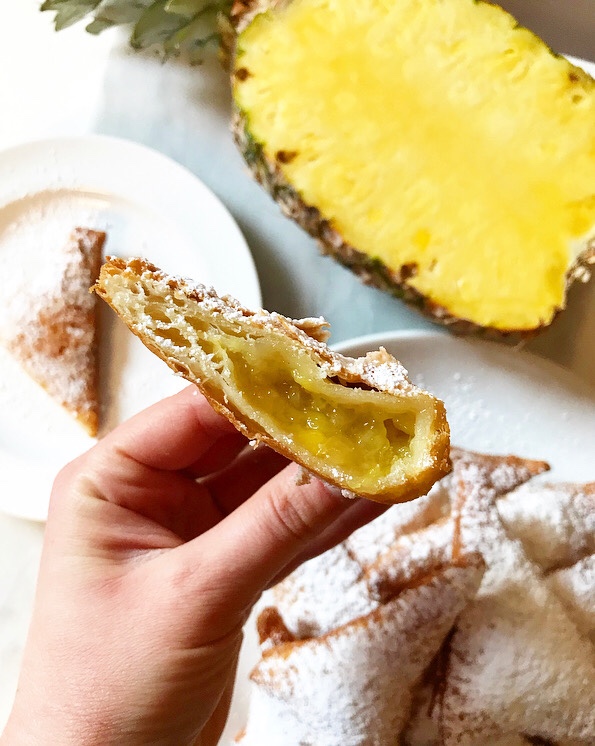
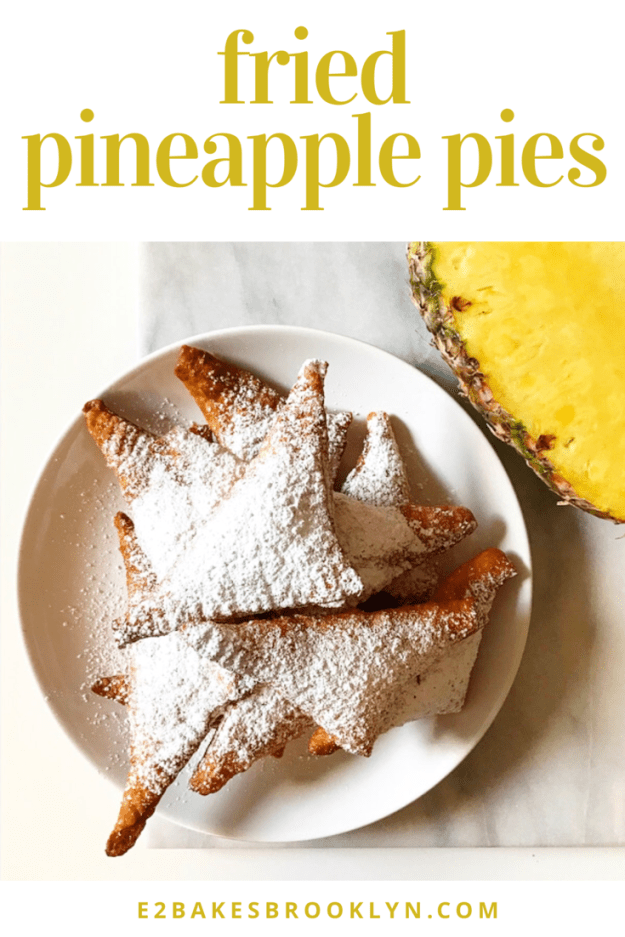
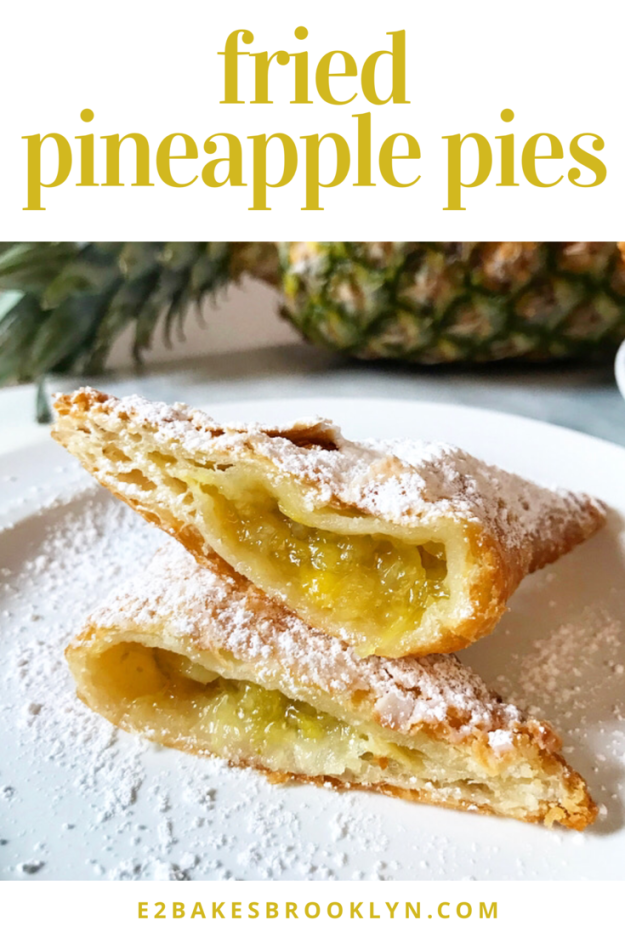
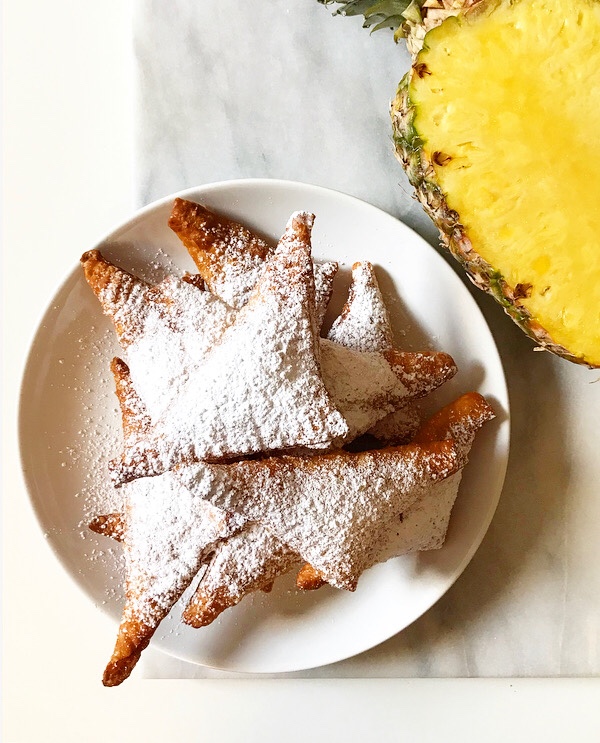
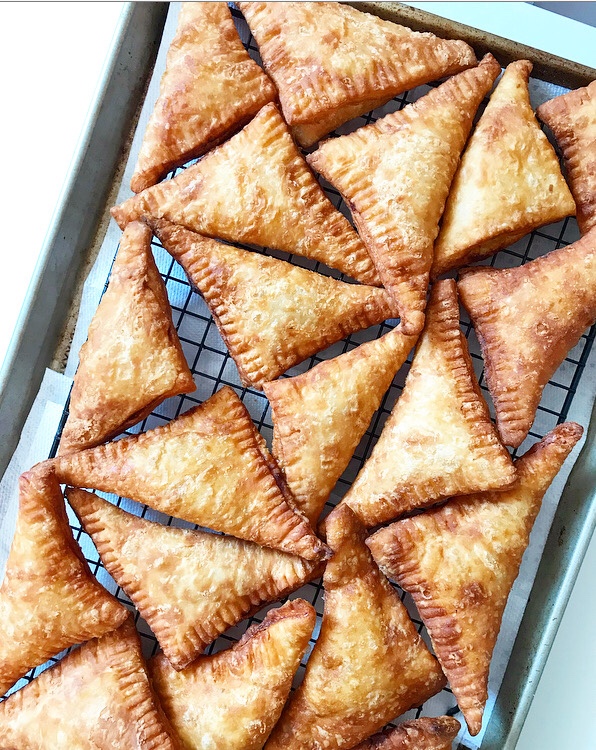
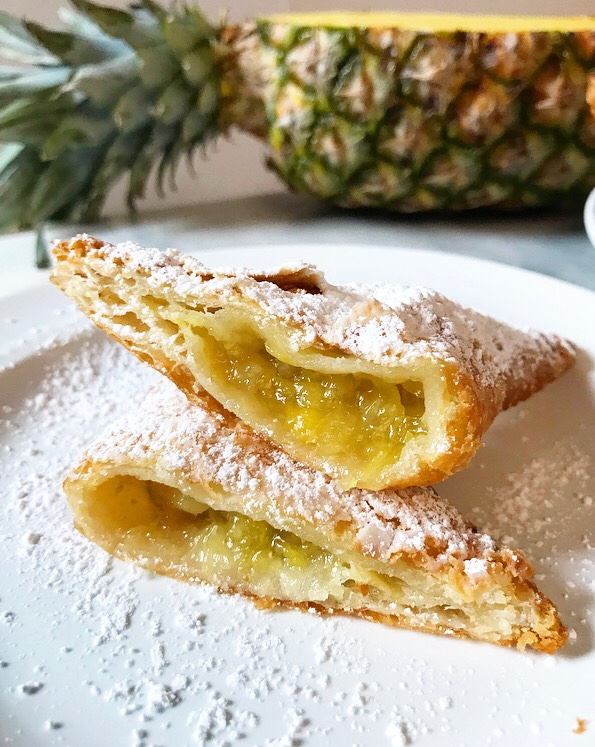 Now, having made these Fried Pineapple Pies twice, I can confirm that they are indeed a very good idea. A phenomenal idea, really. The combination of sweet, tangy, lime- and ginger-spiked pineapple filling and flaky fried crust is one of the best things to come out of my kitchen this year!
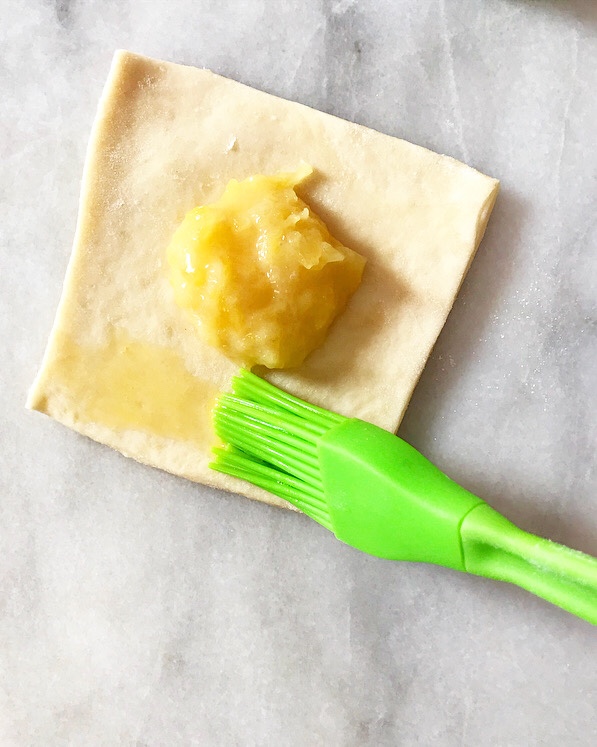
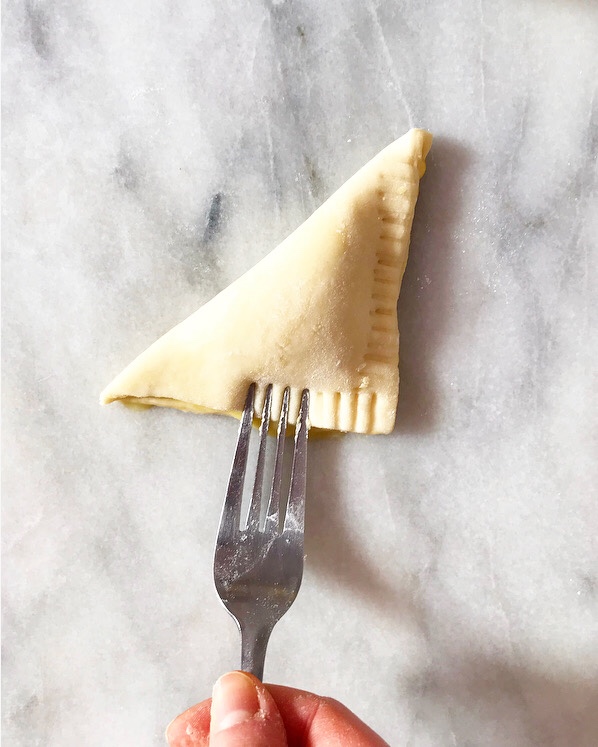
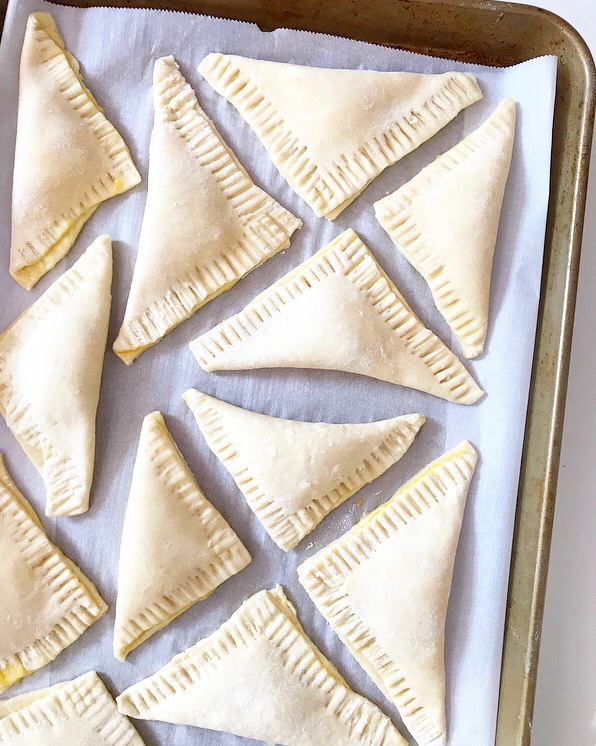
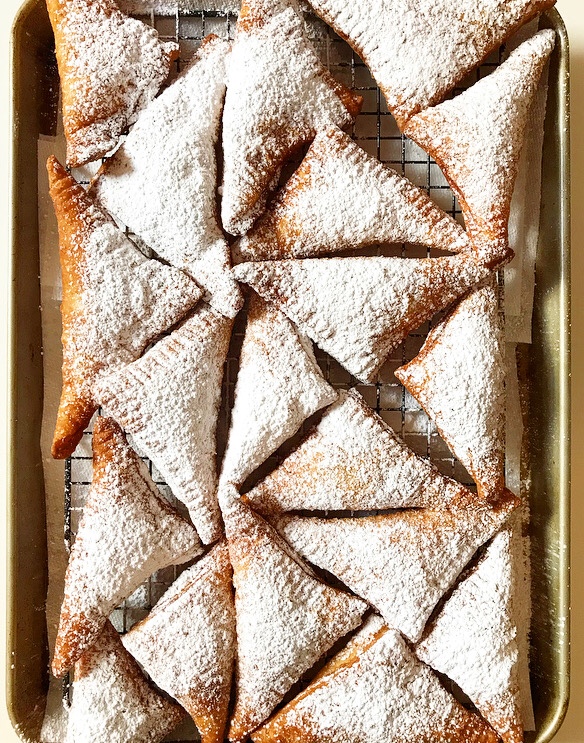
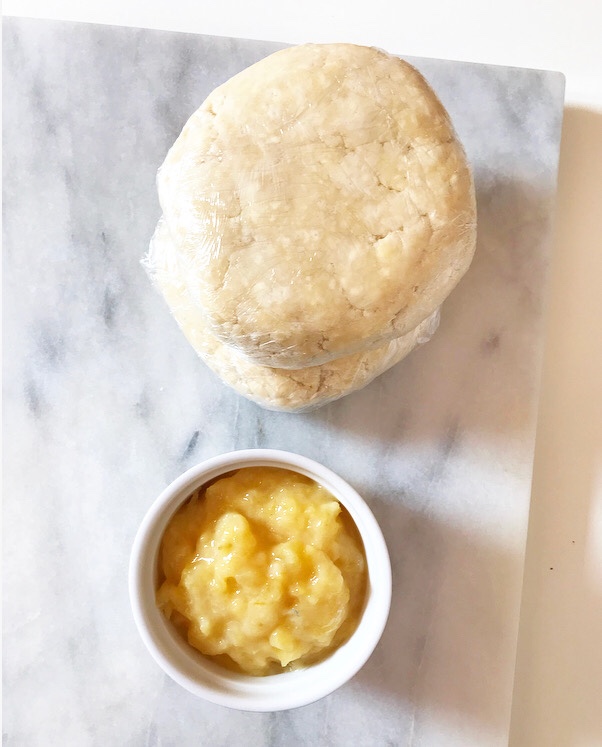 The crust and filling come together ahead of time—the filling in five minutes on the stovetop and the crust in the bowl of a food processor—and are then combined shortly before frying. Pineapple filling is doled out by the tablespoon before being folded into a triangle. The pies are sealed with egg and crimped with a fork before being lowered into a pot of 350F oil. Two or three minutes later, they are lifted out, golden and flaky and begging for a dusting of confectioner’s sugar before being eaten warm ❤
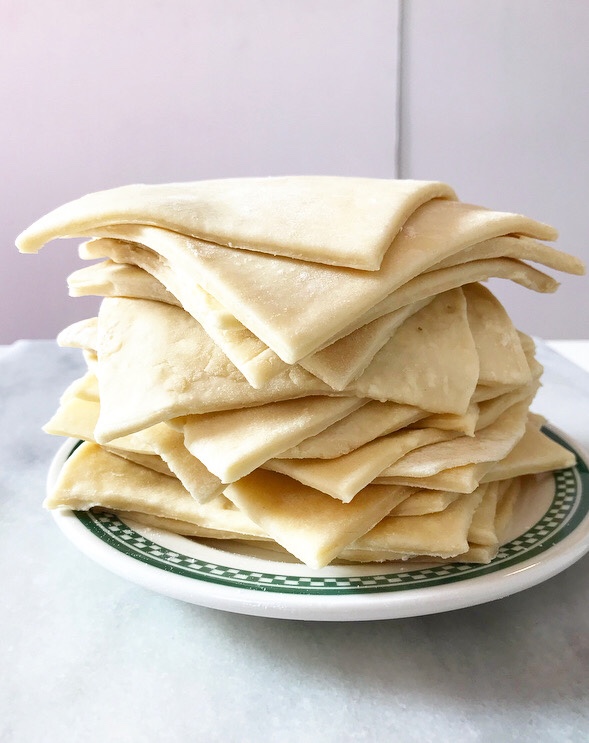

 A few things about the crust before I get to the recipe:
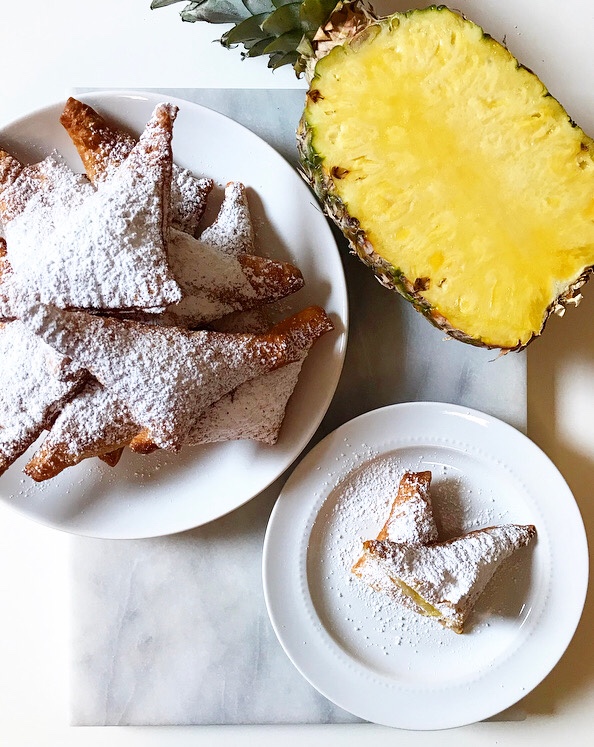 No need for words on the pineapple filling—it’s basically the same as the filling in my
 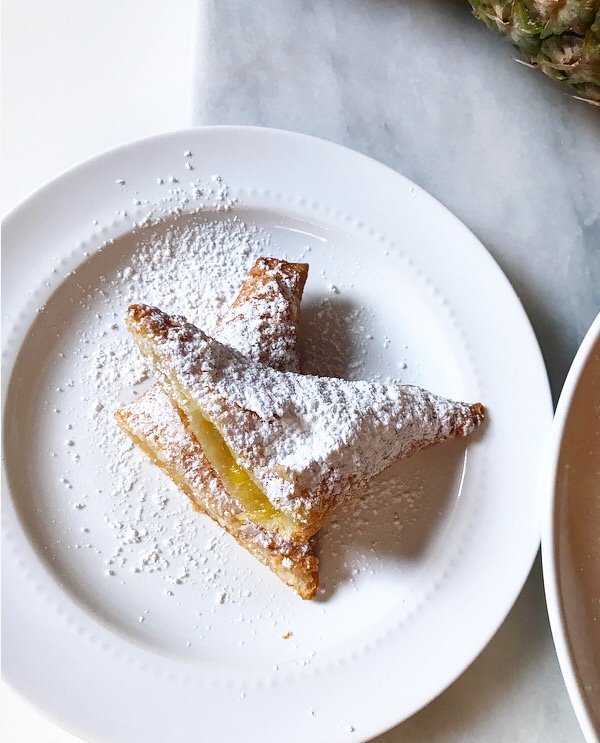 Well, I think that covers the pie portion of Pi Day. Maybe someday I’ll figure out how to properly celebrate the math…but probably not.