Happy Christmas week! Happy Solstice! Happy almost the end of 2020!
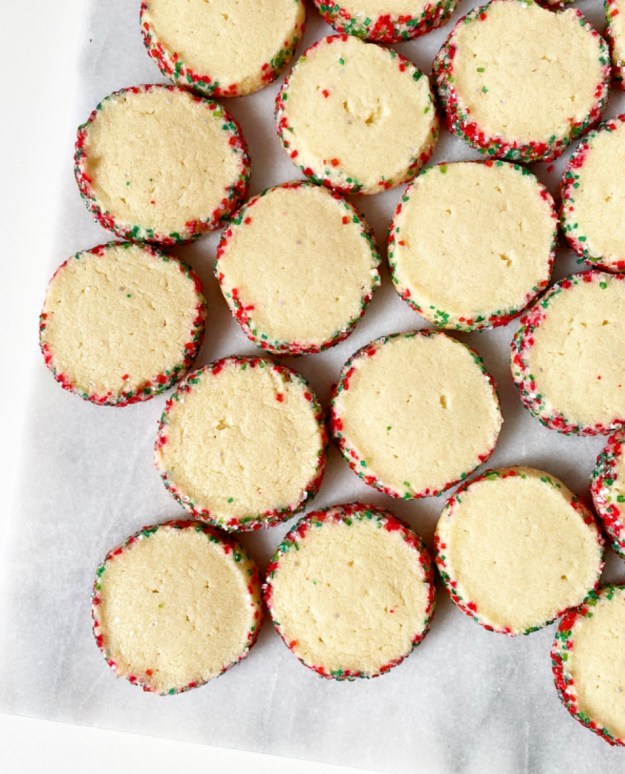 I’m coming at you on this winter Monday to give you one last cookie recipe before Christmas. Don’t worry, it’s super easy—just a slice & bake shortbread that’s been rolled in sparkling sugar so it looks *fancy.* And it is. But it’s also stupendously easy. I don’t know about you, but when it’s four days before Christmas, I only have time for things that are stupendously easy.
 This dough is super rich and buttery, and comes together in 15 minutes. Once mixed, divide it in two and shape each half into a log. Don’t worry about perfect round shaping—you can fix flaws after an hour-long chill. It’s much easier to form smooth shapes when the dough isn’t so pliable.
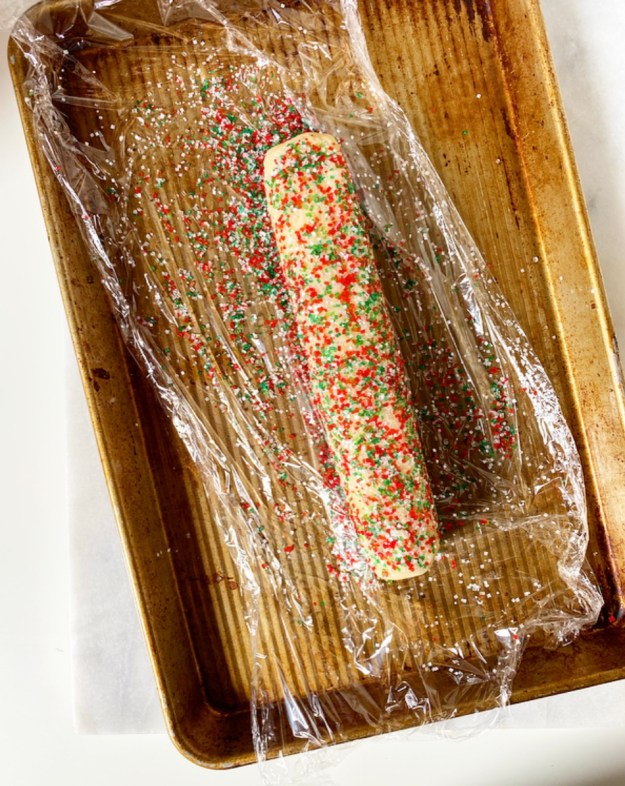 Next up, coat your shortbread in sparkling sugar! Working with one log at a time, give your shortbread a few rolls to even out any odd shaping. Then, roll them in a few tablespoons of festive sparkling sugar (this is the Mistletoe Blend from NY Cake Supply). I find it easiest to coat the shortbread by using my hands and a sheet of plastic wrap. Just do your best with this and don’t worry about perfection—these will all be a little different and they will all be gorgeous.
Don’t have sparkling sugar? Use sprinkles. I recommend using jimmies (the cylindrical kind) instead of non-pareils (the little balls), as those will bleed their colors.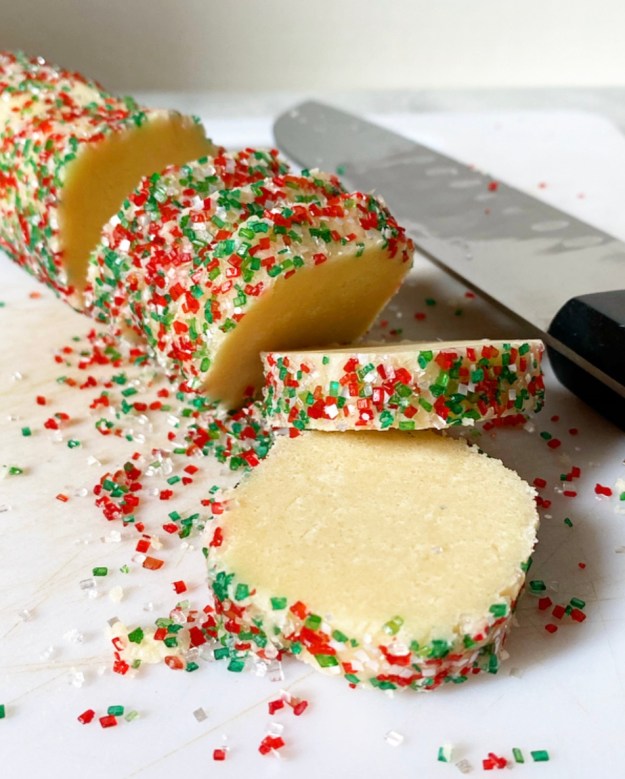 After coating, the shortbread will need another hour chill. I know—I know!—two chills are too many, but they are easily the most annoying part of this recipe. One upside, however, is that this means you can make the Sparkling Shortbread dough days in advance and then slice & bake when you have time.
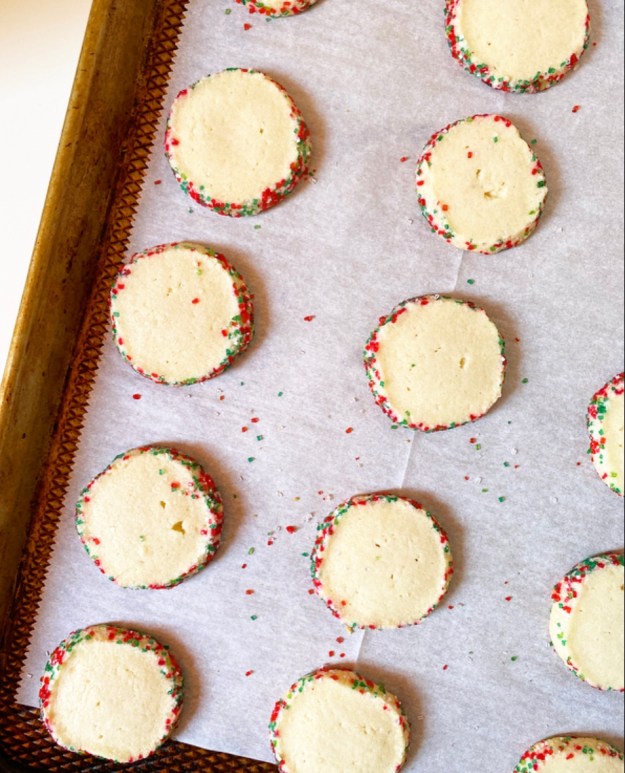 When it’s time to bake, slice the dough in 1/4-inch rounds and bake for 20 minutes at 300F, so they’re fully done but not brown. Despite not containing any leaveners, these cookies will puff and spread (but not too much).
 Once the shortbread are baked and cooled…well, that’s it! Time to eat. Sparkling Shortbread are crisp and buttery with a little extra crunch and zazz from their sugared edges. Truly, they’re so simple and stunning that I don’t know why you’d bother to make any other cookies this close to Christmas. Keep a few for yourself, drop a few off with a friend and leave a few for Santa. Everybody needs a little sparkle right now.
 There’s only one more E2 Bakes recipe left this year, and it’s coming up Wednesday! Any guesses???
Sparkling Shortbread
makes about 3 dozen cookies
1 cup (2 sticks) unsalted butter, softened to room temperature
1/3 cup granulated sugar
1/3 cup confectioner’s sugar
1/2 teaspoon pure vanilla extract
1/4 teaspoon Kosher or sea salt
2 cups all-purpose flour
For coating:
6-8 tablespoons (about 3 ounces) coarse sparkling/decorative sugar
Place softened butter in a medium-large mixing bowl and use an electric mixer to beat it until light and fluffy, about 1-2 minutes. Add dark brown and confectioners sugars and mix until fluffy. Mix in vanilla and salt. With the mixer on low, beat in flour. Dough will be crumbly looking, but should hold together very well when pinched.
Divide dough in two parts. Form each into a 9-inch log and wrap in plastic. Don’t worry if they aren’t perfectly round. Chill for 1 hour.
Line a small sheet pan or a surface with a sheet of plastic wrap and place 3-4 tablespoons of sparkling sugar on top. Unwrap one log of dough. Give it a few light rolls to form more of a round log shape. Place dough on top of sugar and use your hands and the plastic wrap to coat the log in sparkling sugar. Wrap in plastic and refrigerate for 1 hour or up to 3 days. Repeat this process with remaining log of dough and remaining sparkling sugar.
Place oven racks in central positions. Preheat oven to 300F. Line 2 rimmed sheet pans with parchment paper.
Unwrap one log of dough and place on a cutting board. Use a large, sharp chef’s knife to slice log into 1/4-inch rounds. Place at least 2 inches apart on prepared pans.
Bake cookies for 20-22 minutes, or until no longer shiny but not brown at all. Let cool on the pans for 10 minutes. Use a thin spatula (not your fingers!) to remove cookies to cooling racks to cool completely.
Serve. Leftovers will keep in an airtight container at room temperature for several days.


 A few years ago, I put out a call for holiday
 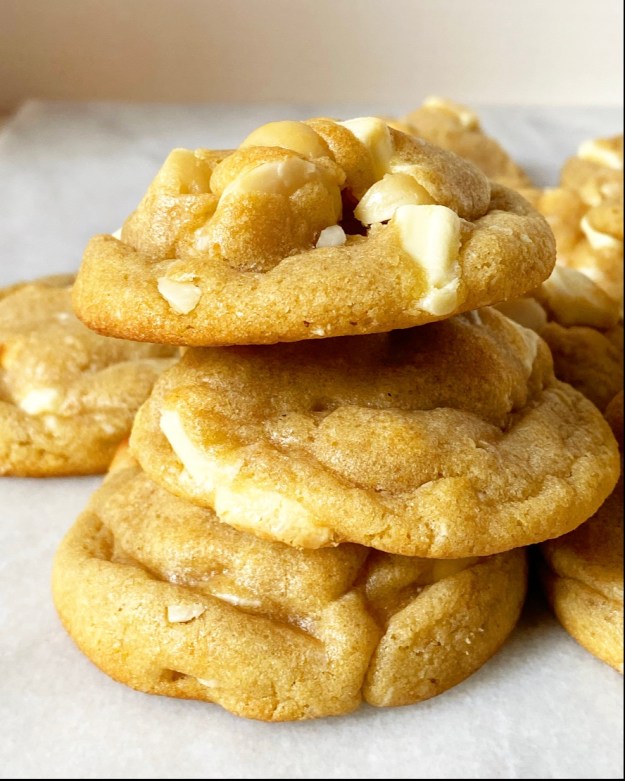 You might be thinking “are white chocolate macadamia nut cookies a holiday cookie?” To that I say…sure, why not?! If someone puts them out at the holidays, I think they’re a holiday cookie. Just because a recipe doesn’t match our own personal experience and nostalgia doesn’t mean it doesn’t align with someone else’s.
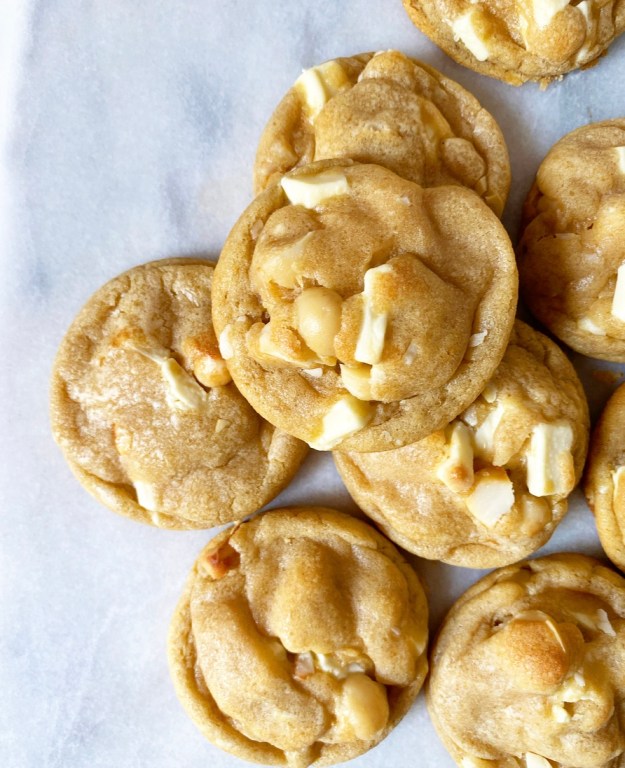
 So, here we are with my second holiday cookie of the season: Brown Butter White Chocolate Macadamia Nut Cookies. Yes, that name is seven words long but it is #worthit—brown butter takes this chewy, nutty classic cookie recipe from good to WOW! Like, why have we not been doing this all along?
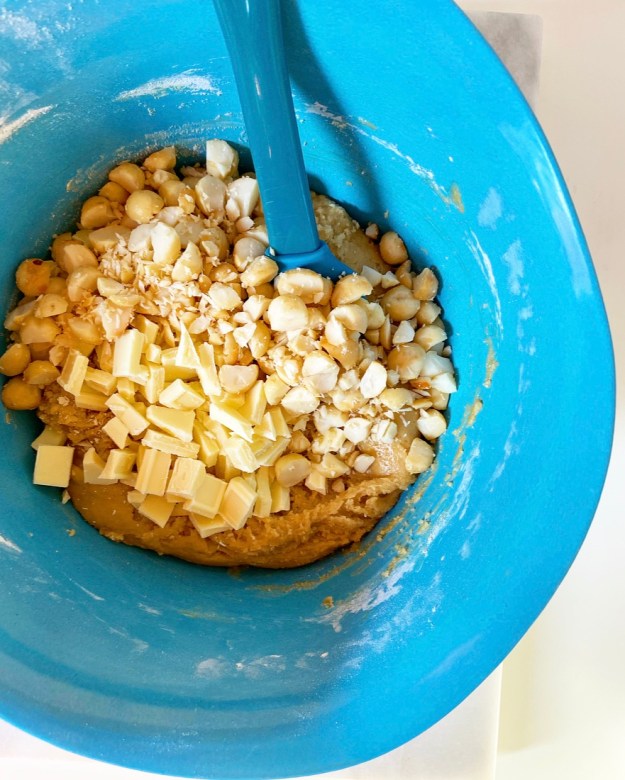 The cookie dough is straightforward and doesn’t require a mixer or anything fancy. I’ve made these with both white chocolate chips (about a cup) and chopped white chocolate, and prefer the chopped stuff every time. It has more cocoa butter, fewer stabilizers, and it just tastes better, period. As for the macadamia nuts, you can use roasted-salted or raw. I love control and have access to raw macadamias through
  And maybe, just maybe, share a few and spread a little holiday cheer.
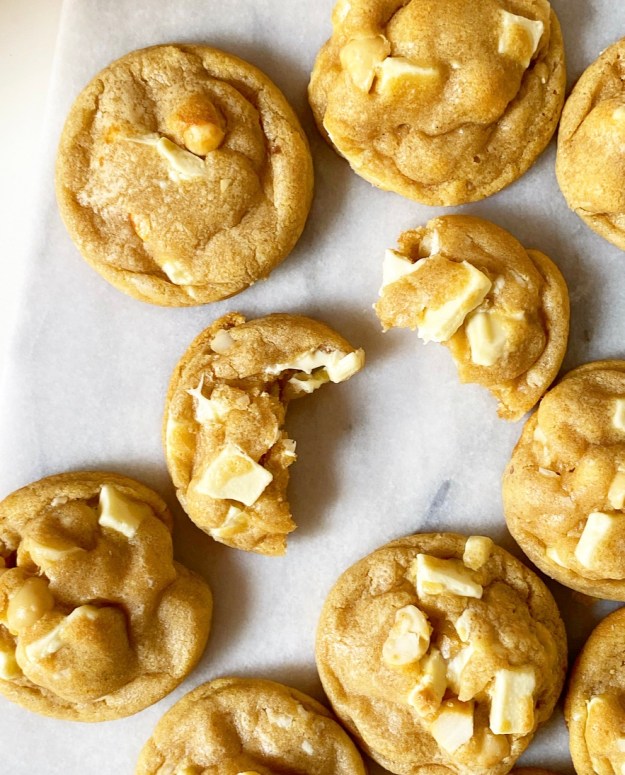


 I’ve been a bit lost trying to decide what to make for Christmas this year. In the past, I’ve really gone for it with elaborately
 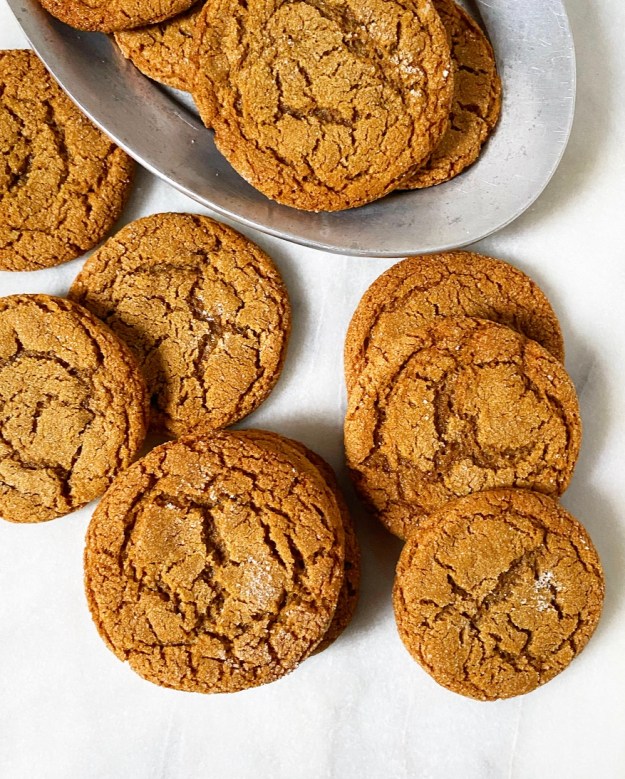 Anyway, this Christmas is going to be simpler around here. I’m not saying there won’t be sprinkles or a buttercream flourish—I’m still me, duh. It just may be a month of less…involved…holiday sweets.
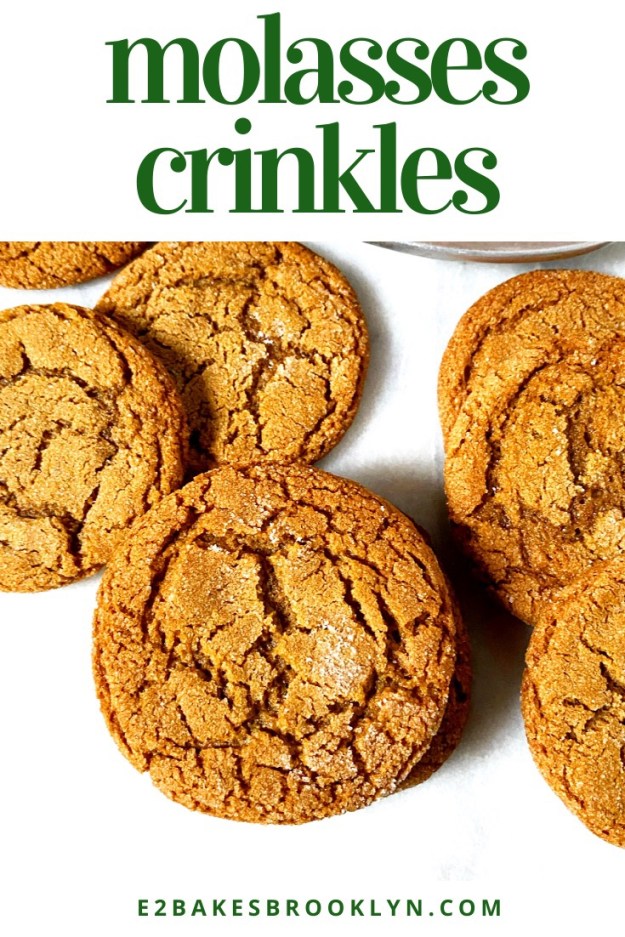
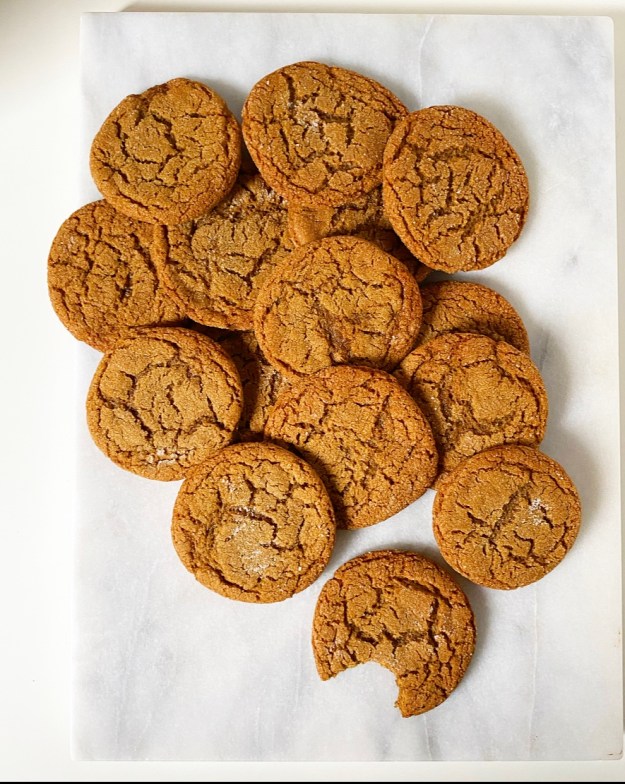 As far as the recipe goes, my path to chewy Molasses Crinkle glory is pretty straightforward. I used my
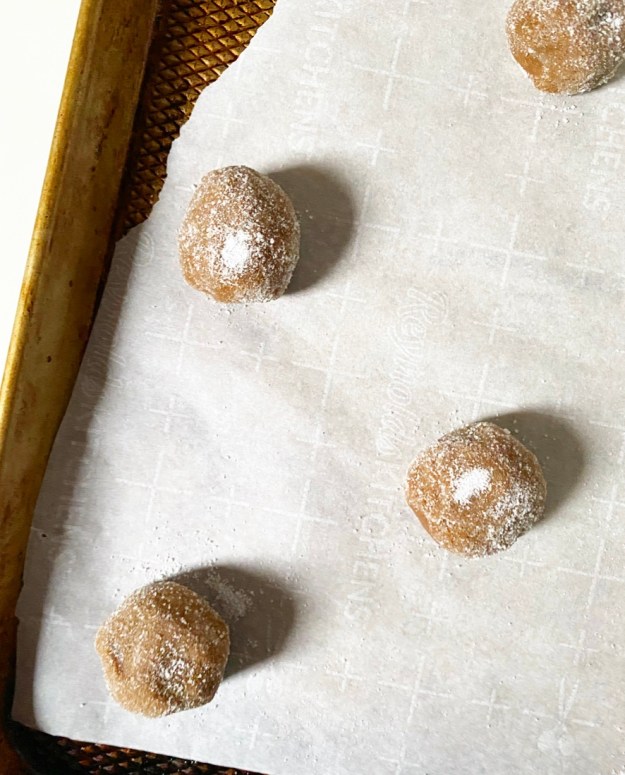
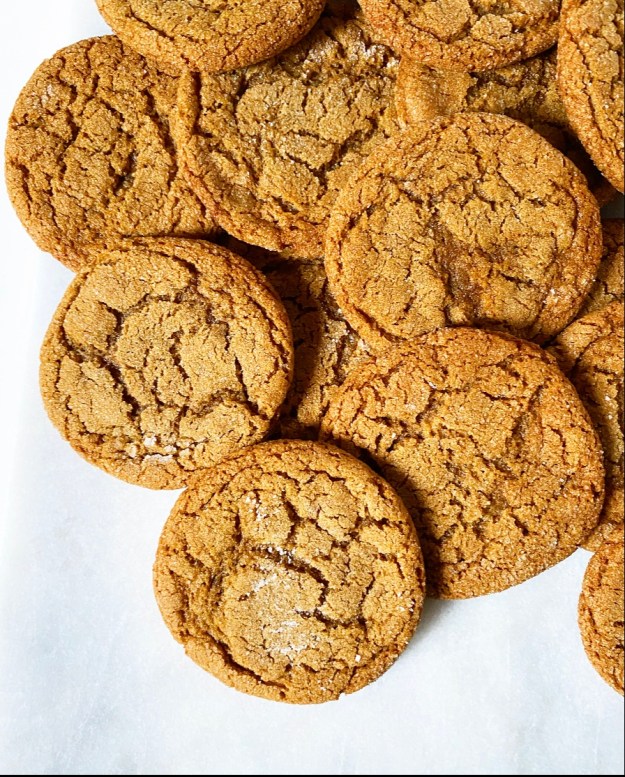
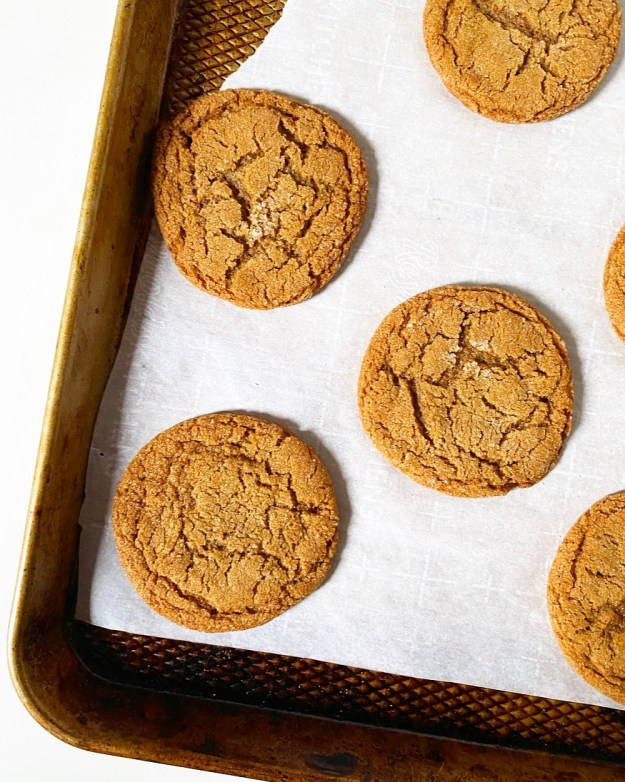 Mix your dough in a pot on the stove and let it relax at room temperature while your oven warms; this will give the gluten time to develop for extra-chewy results! Scoop the dough into balls and roll them in sugar (granulated or a mix of granulated and coarse) before baking for ten minutes. The big crinkles will begin to form during the last two or so minutes of baking, when the dough has spread pretty dramatically and puffs to the point that it breaks the sugar coating. Then, just when you remove the hot cookies from the oven, give the pan a good thwack on the counter and…bam. Crinkle city.
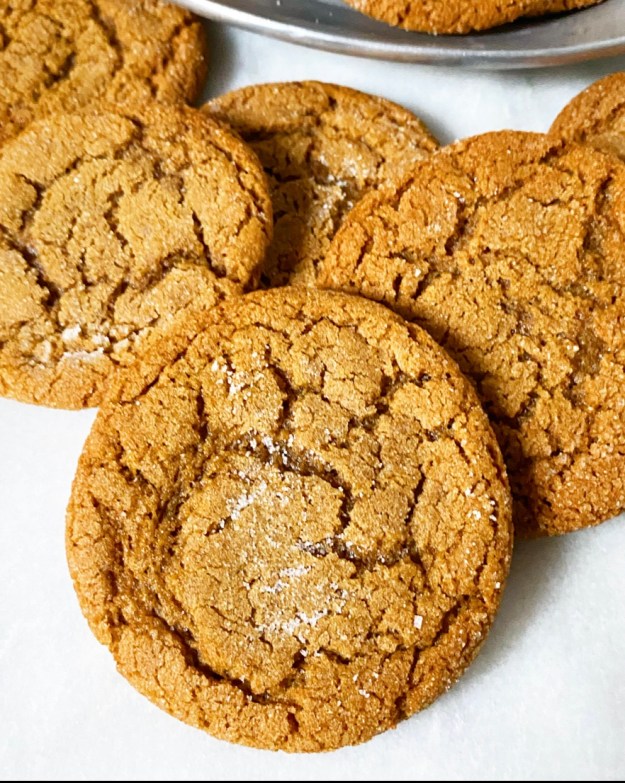 These cookies, y’all. They’re on the thin side, but have tons of surface area and chewy texture and crinkles and a crisp coating, and that’s to say nothing of the molasses and ginger and cinnamon! And make no mistake, these are molasses cookies. Sure, the ginger and cinnamon are quality background flavors, but sticky, bittersweet molasses? She’s the star of this show.
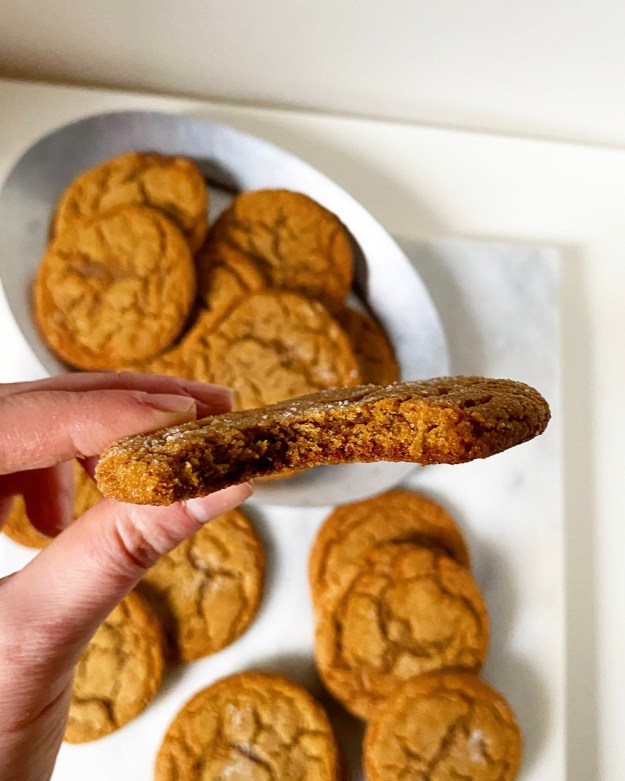 I’ve made three batches of Molasses Crinkles since Thanksgiving, and I’m here to tell you that they keep like a dang dream. Seriously. I keep thinking I’m going to reach into a bag to discover a bunch of molasses frisbees, but nope—chewy as ever.
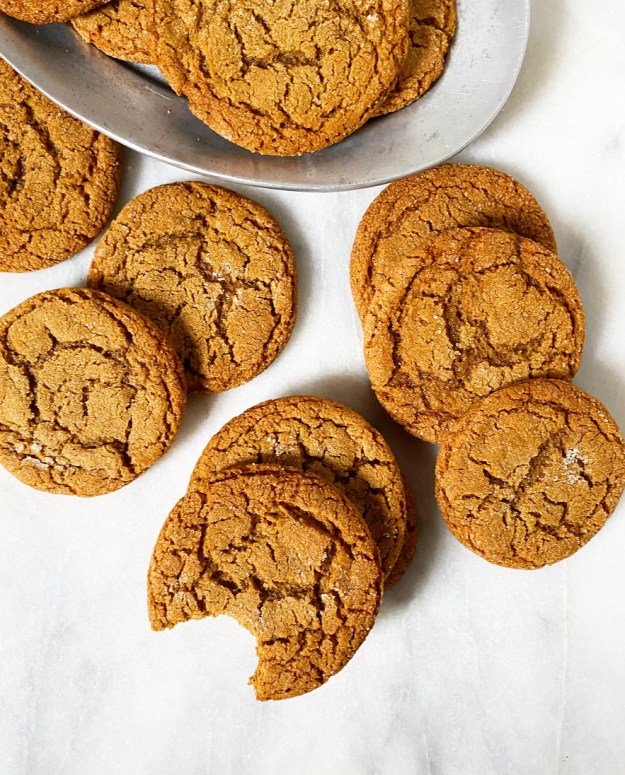

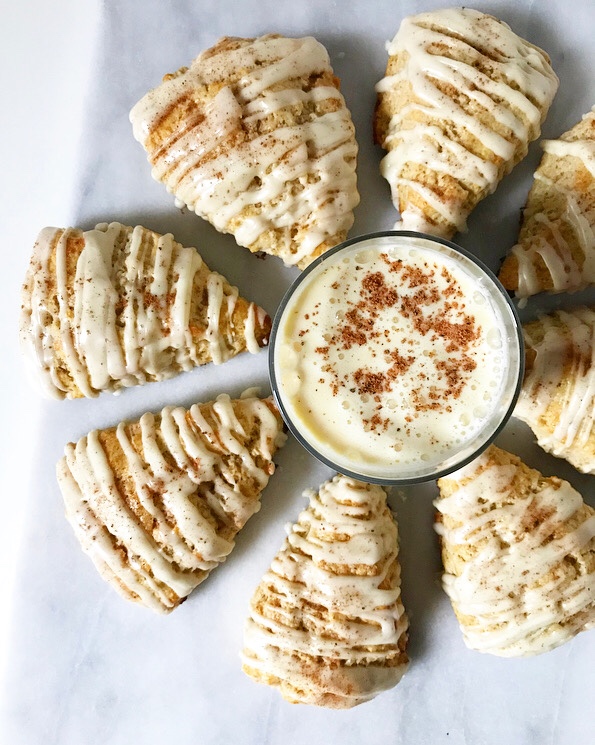 I had something a bit more complicated planned for today’s post, but due to circumstances beyond my control (number of hours in a day, number of days in a week), I had to take the easy way out.
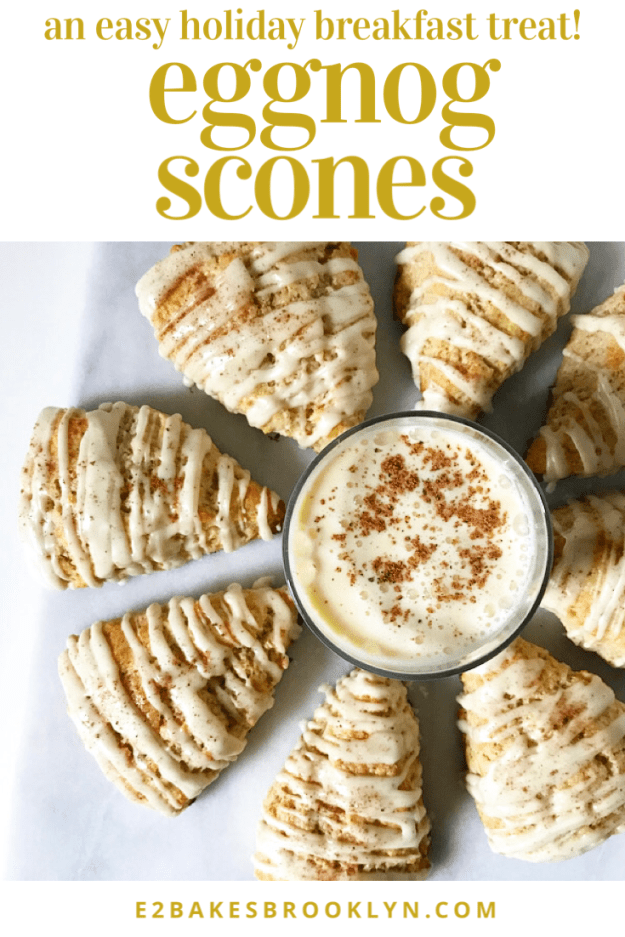
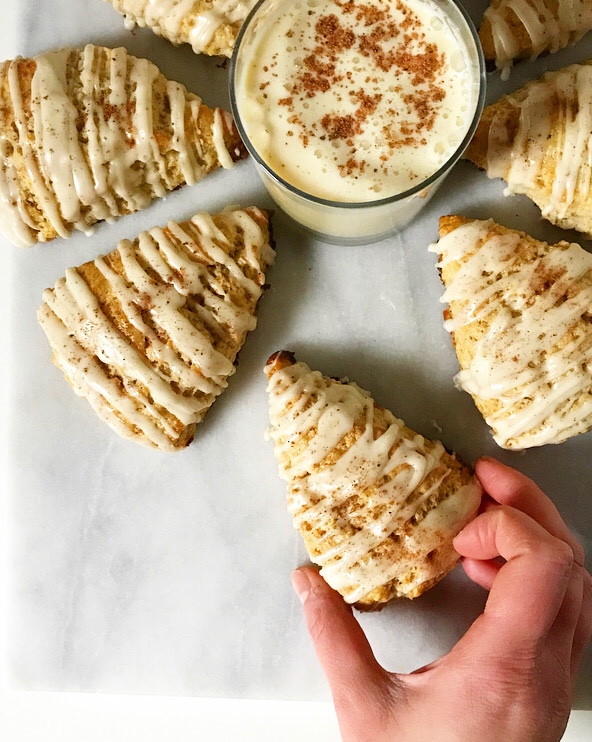 Lucky for all of us, the easy way out is through a warm batch of Eggnog Scones.
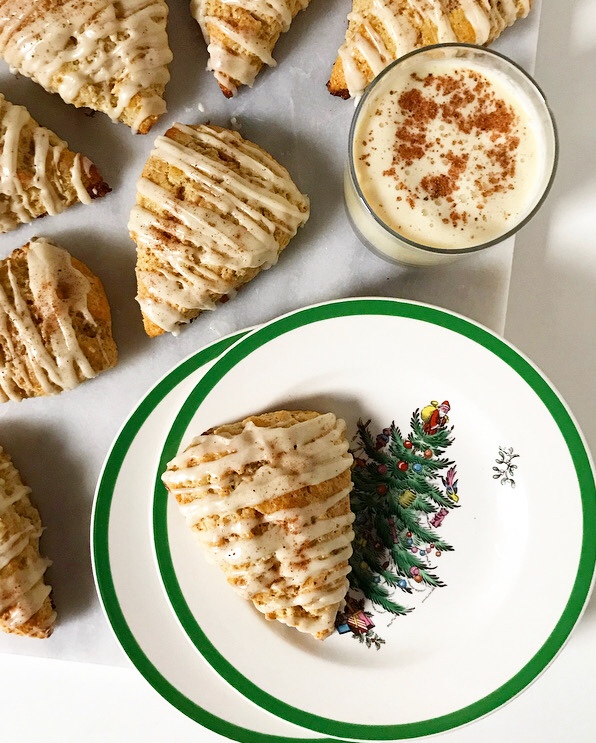 Y’all, these are goooood. We’re talking 8 springy, nubbly-edged breakfast treats made with eggnog and then topped with eggnog glaze—what’s not to love.?! I am not a fan of eggnog in its liquid state, but mix it into dough or whirl it into glaze and add warming spices, and I’m suddenly *very* interested.
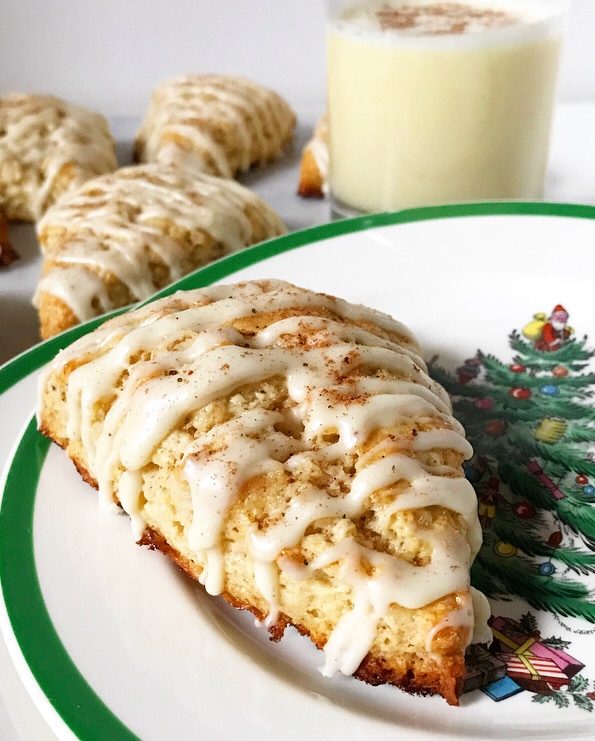 As with nearly all scones, these are a breeze to make. The dough comes together in ten minutes and bakes in fifteen. The glaze is technically optional, but it’s a snap to whisk up while the scones are cooling, and it’s delicious, of course. Creamy and lightly spiced, it’s the perfect accompaniment to the not-too-sweet scones. And that’s to say nothing of how satisfying it is to drizzle over the tops!
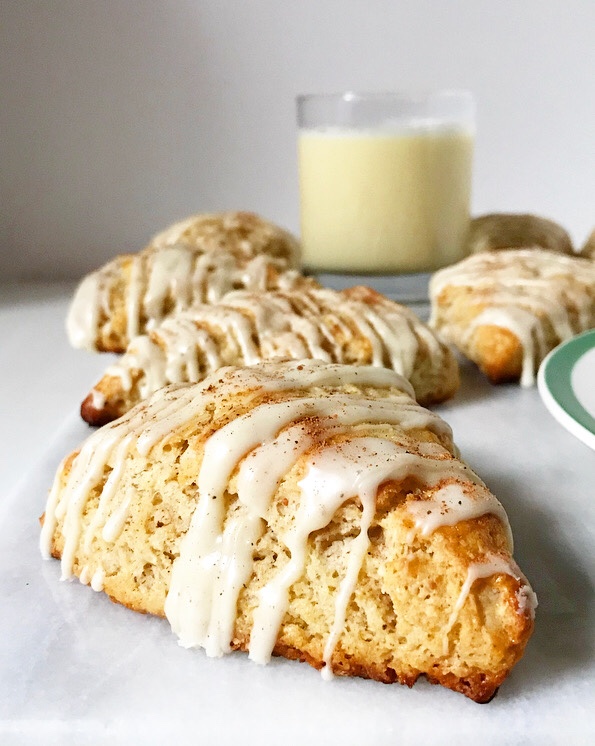 Speaking of satisfying, eating one…or one and a half…or two…of these with a big cup of coffee is, like, the best way to start a holiday morning. I’ve been so busy since I returned home from Thanksgiving that I keep forgetting that Christmas is almost here. When I’m eating an Eggnog Scone though, the holiday cheer is real. Real delicious, that is.
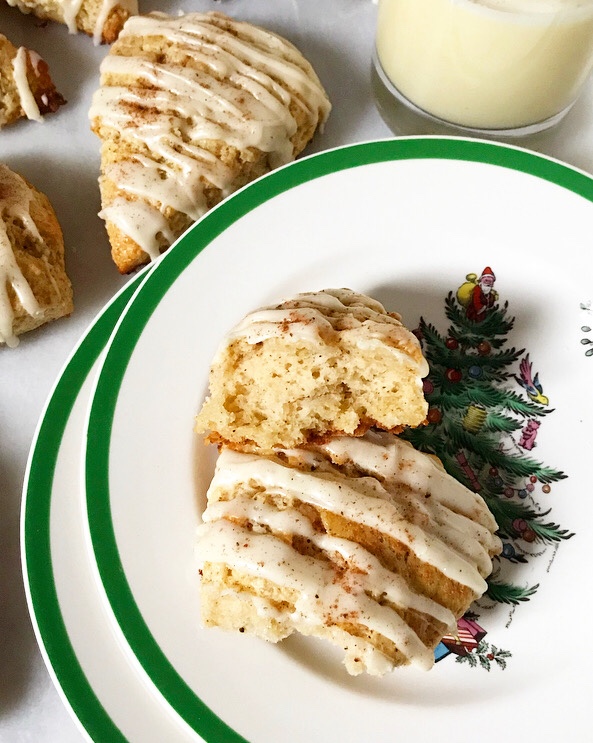

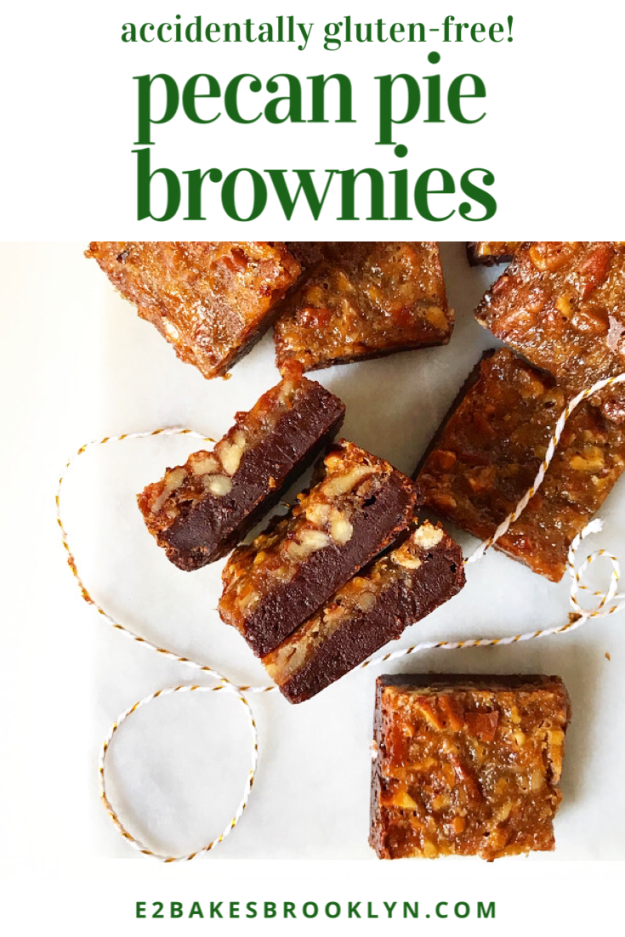
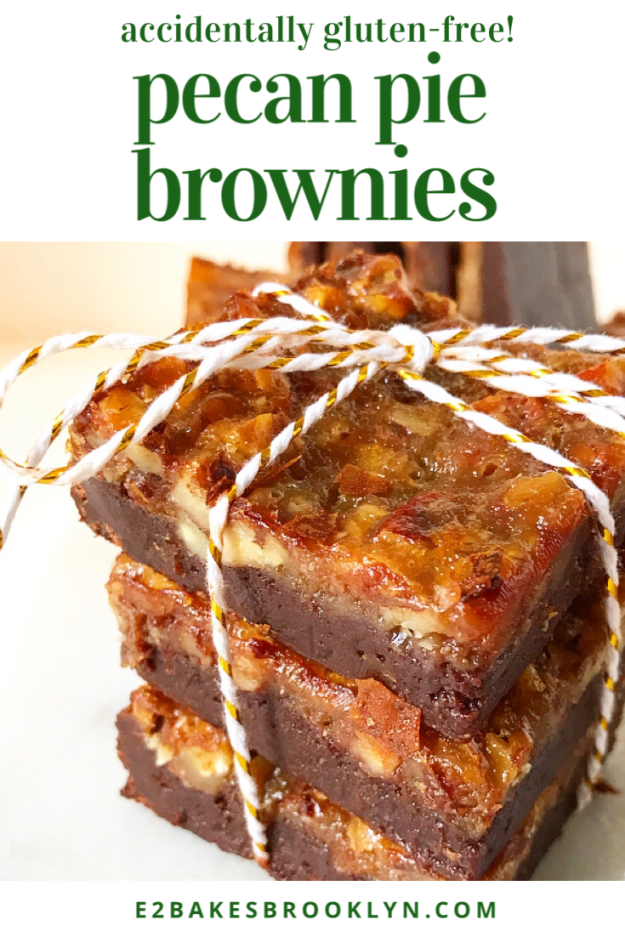
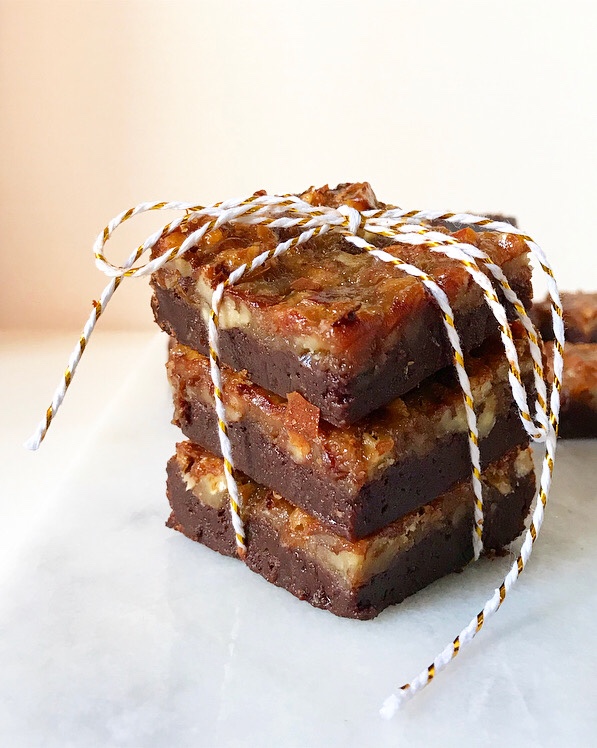 It’s Christmastime, y’all. I’ve got visions of sugarplums dancing in my head. And by sugarplums, I mostly mean these Pecan Pie Brownies.
 Just imagine a pan of rich, chocolaty
  During testing, I tried three different methods of adhering the pecan filling to the top of the brownies. The best, by far, is giving the filling a quick (3-5 minute) pre-cook on the stovetop to jumpstart the thickening. It’s very easy, but does require a sieve. Please don’t let that stop you though—I loathe sieving things, but this is pretty painless, and it beats the hell out of slicing up your brownies only to find scrambled egg bits or a thin layer of pecanless goo underneath. *shudder*
 Once you’ve done the 15 seconds of sieving, you get to stir in toasted pecans and spoon it over some soft-set brownies and bake until…divine. Yes—that’s the only word for these. Chewy, fudgy, nutty and sticky-sweet without being cloying; let’s just say these are difficult to resist. I brought a box on my family vacation to
  As if these need more endorsement, Pecan Pie Brownies also happen to be gluten-free. There are no unusual flours or gums here—this recipe simply doesn’t require gluten-containing ingredients. Inclusive holiday treats for the win!
 Pecan Pie Brownies would be wonderful as part of a cookie tin or holiday party spread, or for enjoying during a cozy Christmas movie night at home. I’m sure they’d work well left as a treat for Santa, too! I will say that, as a childless adult, they really hit the spot when eaten in PJs while watching The Crown and counting down the days until you head home for the holidays. You know, in case you were wondering.