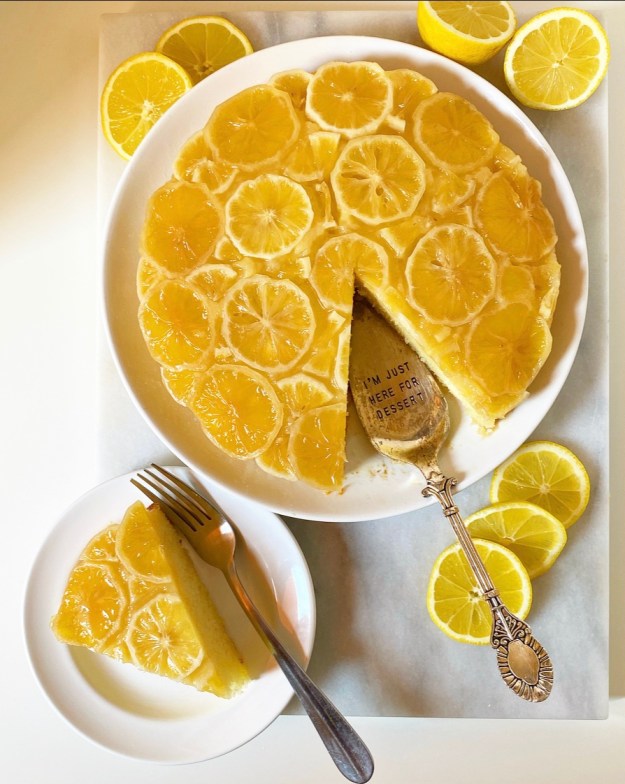
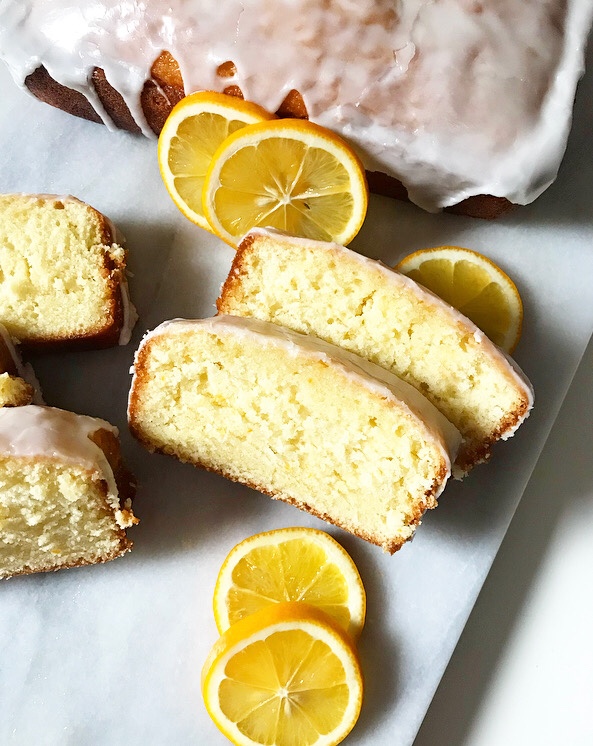
 If you love a real mouth-puckering punch of lemon, this Sunny Lemon Upside-Down Cake is for you. We’re talking buttery lemon cake topped with a sticky mosaic of sliced lemons—all the lemon flavor you could ever want. It’s sunny and happy-looking enough to drive any late-winter blues away, at least for the two minutes it takes to eat a slice!
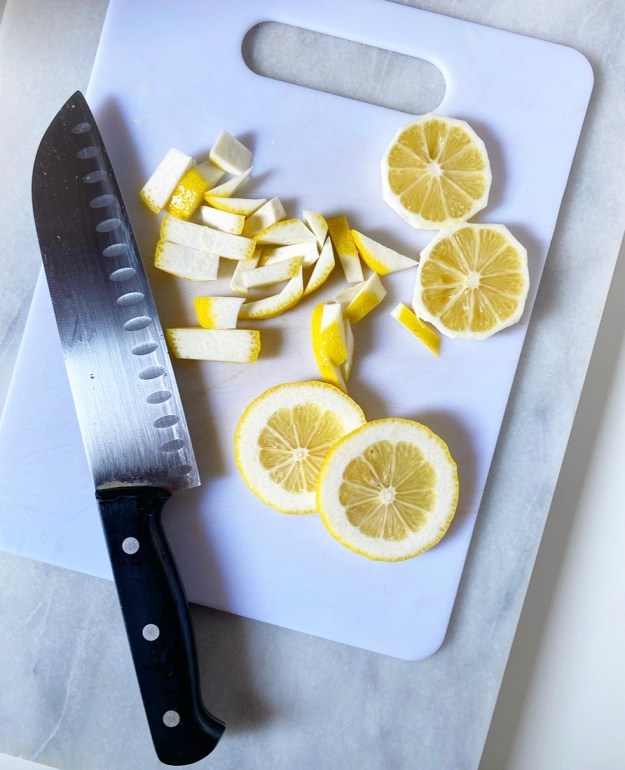 Upside-down cakes are very simple to make and this one is no different, although it does take some time. The lemons have to be sliced, seeded and trimmed of excess rind, lest your cake become incredibly bitter. If you happen to find thin-skinned lemons (Meyer lemons!), you can skip trimming off that outer layer, but I wouldn’t chance it otherwise. Heads up that while I find this process enjoyable, it almost always takes a half hour from beginning to end. Plan ahead.
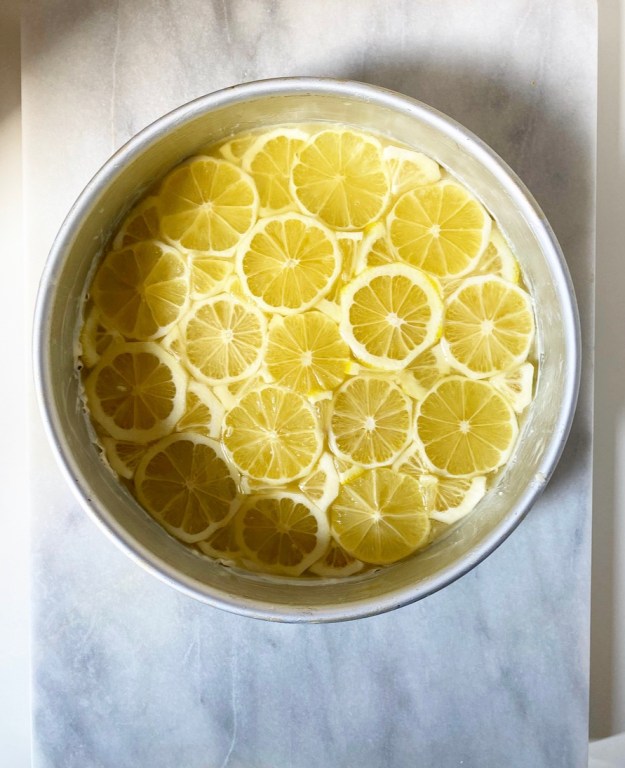 All my previous upside-down cakes have been made by tiling the fruit over a pool of butter and brown sugar that have been melted together, but that combination doesn’t work terribly well here if you’re hoping for your lemon slices to be tender and defined. I tried all sorts of adjustments to my usual topping before following the advice of Broma Bakery—arguably the queen of citrus upside-down cakes—and adding some water to form a syrup. This makes all the difference, keeping the lemon slices pretty, plump and tender, even after baking.
This syrup is made of sugar, honey, butter, salt and water that have been microwaved together. It’s divided so that there is a layer both under and over the lemons. The lemons themselves are tiled in whole at first, before being cut into tiny wedges to fill in gaps. The lemons will shrink while baking, so the only way to guarantee a beautiful upside-down cake is to leave as little space between pieces as possible. Once your lemon mosaic is assembled, bury it in thick lemon cake batter; this recipe is my go-to vanilla cake with some lemony flair. The cake will need nearly an hour to bake. Don’t be alarmed when when you pull it from the oven and it looks like a nightmare—there’s a reason this cake is served upside down!
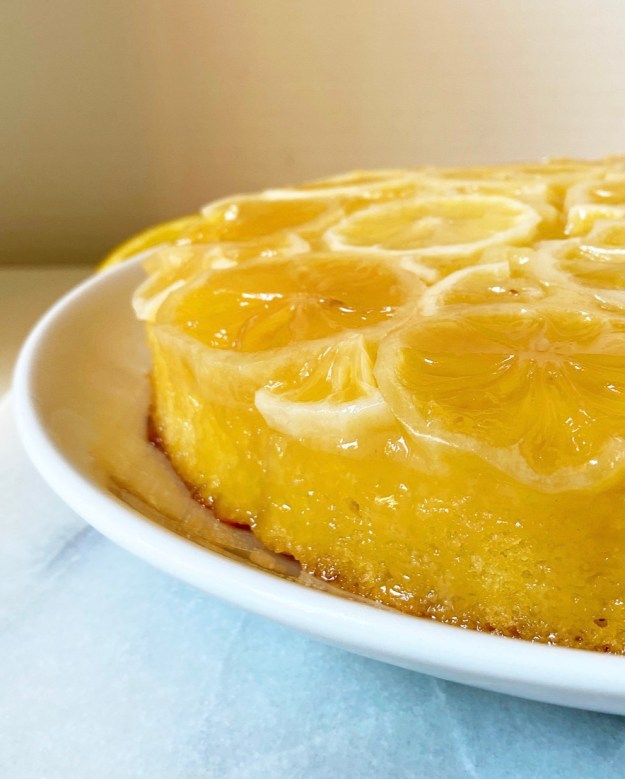 Another way this cake is different from my other upside-down cakes? It needs to cool for a long time in the pan. Between the juicy lemons and the syrupy topping, this cake needs to fully settle or it will look like a hot mess. For the best results, wait until the cake has cooled completely before inverting onto a plate. Your patience will be rewarded with a beautiful golden lemon top. All the peculiarities of assembly will have been worth it, I promise.
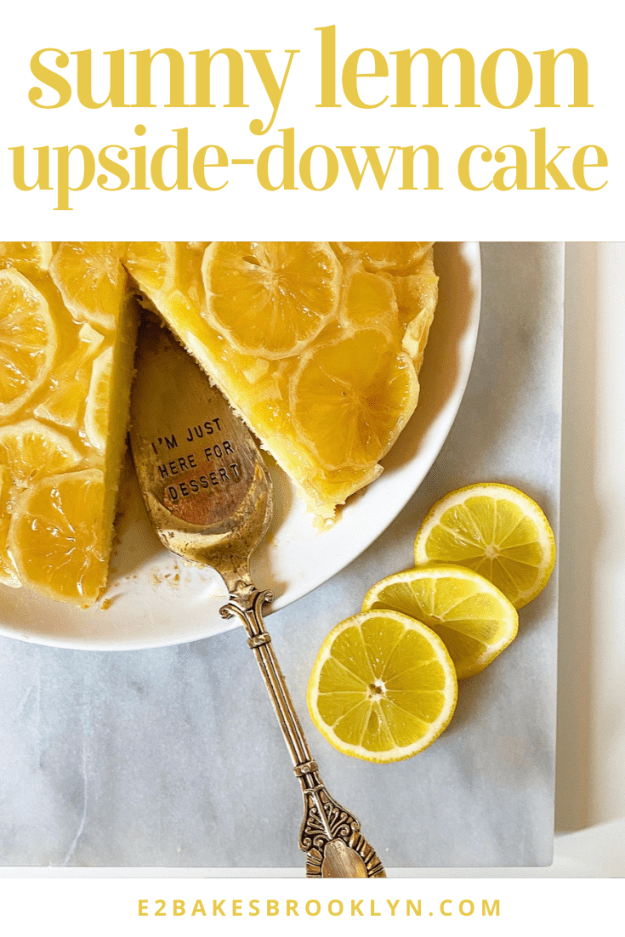
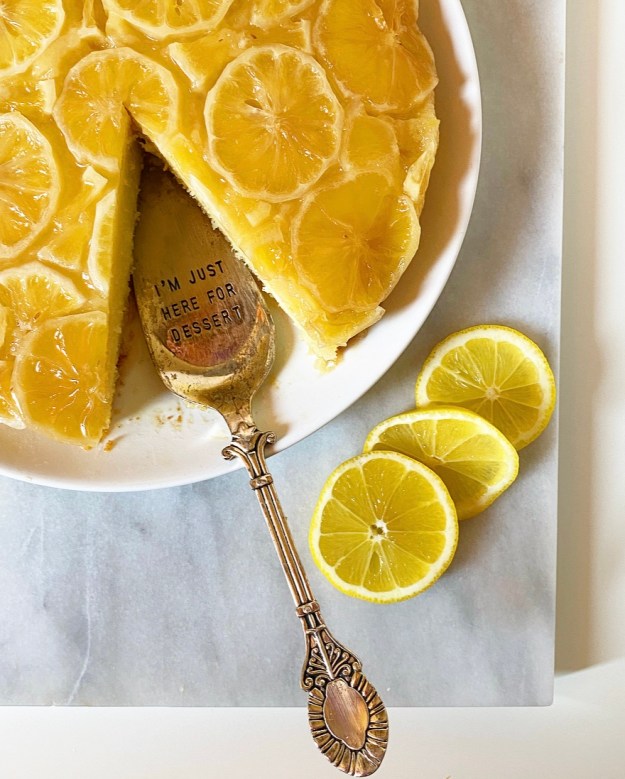 Once your cake is on a plate, all that’s left to do is slice through the top with a serrated knife, grab a fork and enjoy this dessert which, like it’s name suggests, both looks and tastes like a ray of sunshine. I, for one, can’t see or taste it without smiling.
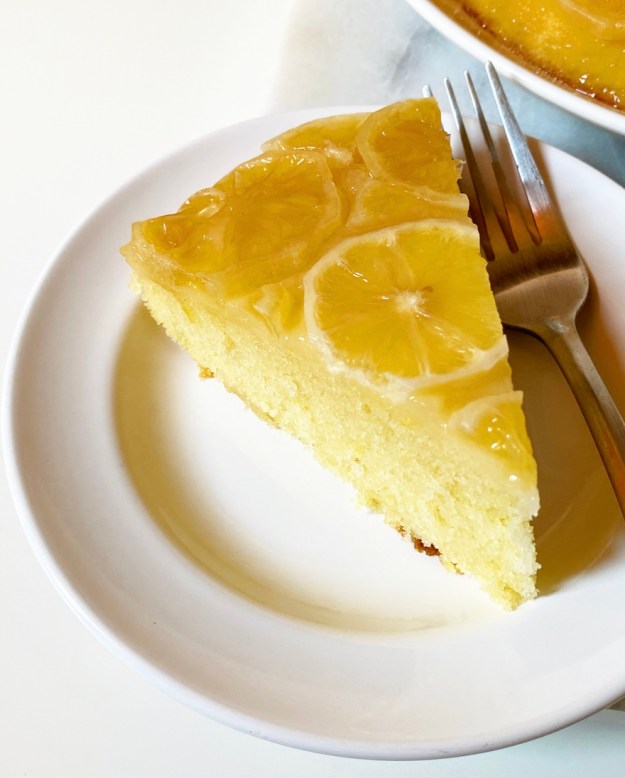
Sunny Lemon Upside-Down Cake
makes 1 9-inch round cake
Topping:
5-6 small/medium lemons
1/2 cup granulated sugar
1 tablespoon mild honey or maple syrup
pinch of Kosher or sea salt
1 tablespoon unsalted butter
1/4 cup water
Cake:
1 cup granulated sugar
1 tablespoons fresh lemon zest
1 tablespoon fresh lemon juice (from ~1/2 lemon)
~1 cup milk (not skim or fat free), room temperature
1 1/2 cups all-purpose flour
2 tablespoons cornstarch
1/2 teaspoon baking powder
1/4 teaspoon baking soda
1/2 teaspoon Kosher or sea salt
1/2 cup (1 stick) unsalted butter, softened to room temperature
2 large eggs, room temperature
2 teaspoons pure vanilla extract
For serving (optional):
vanilla ice cream
whipped cream
Preheat oven to 350F. Heavily grease a 9-inch round cake pan. Line with parchment and grease again. Set aside.
Make the topping. Wash and dry lemons. Zest 1 lemon, then set zest aside.
Slice lemons (including zested one) in 1/4-inch slices. Use a sharp knife to trim rind to no more than 1/4-inch. Remove seeds (they will become more pronounced during baking).
Combine sugar, honey, salt, butter and water in a microwave-safe bowl or liquid measuring cup. Stir together, then microwave 45 seconds. Stir again, just until sugar granules are dissolved. Pop back in the microwave for 15 seconds if necessary. This step may also be done in a small pot on the stove.
Pour half the liquid (~1/3 cup) in the prepared pan and swirl to coat. Arrange whole lemon slices tightly over the top. Cut some whole lemon slices into small wedges, then use them to fill in any gaps. There shouldn’t be much, if any, open space. Pour over the remainder of the liquid. Set aside.
Make the cake batter. Combine the sugar and lemon zest in a small bowl and use your fingertips to rub them together.
Pour lemon juice into a liquid measuring cup, then add milk up to the 1 cup mark. Stir together and set aside for at least 5 minutes, or until curdled.
In a small-medium mixing bowl, whisk together flour, cornstarch, baking powder, baking soda, and salt. Set aside.
In a large mixing bowl, beat butter with an electric mixer until light and fluffy, about 2 minutes. Beat in lemony sugar. Add eggs one at a time, mixing completely after each addition. Add vanilla. With the mixer on low, alternate adding dry ingredients and the milk mixture in two installments. Mix just until combined.
Pour batter over the arranged lemon slices, and spread with a silicone spatula to even out the top. Tap pan on the counter two or three times to release any large air bubbles. Bake 50-55 minutes, or until a toothpick inserted in the middle comes out clean.
Let cake cool completely in the pan on a rack. Run a small, thin knife around the edge of the pan a couple of times before inverting onto a cake stand or large serving plate. Peel off and discard parchment.
Serve cake with ice cream of whipped cream, if desired. Cake is best the day it’s baked, but wrapped leftovers will keep in the refrigerator for up to 3 days.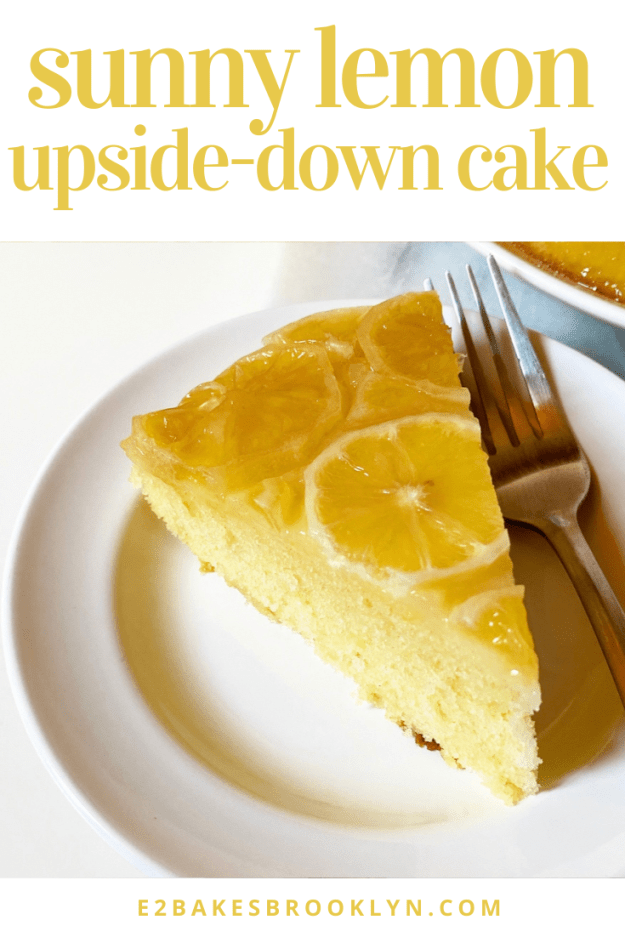
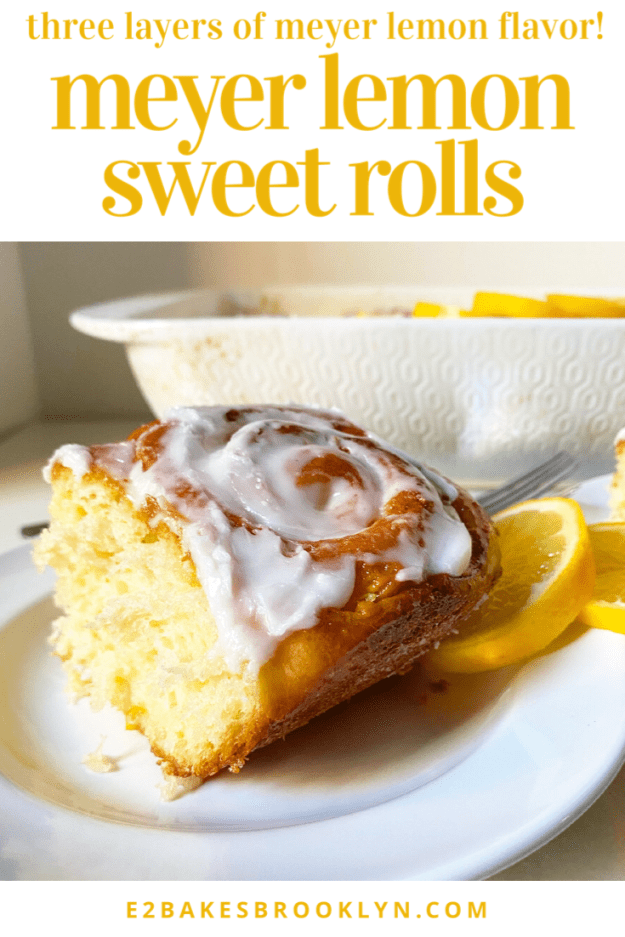
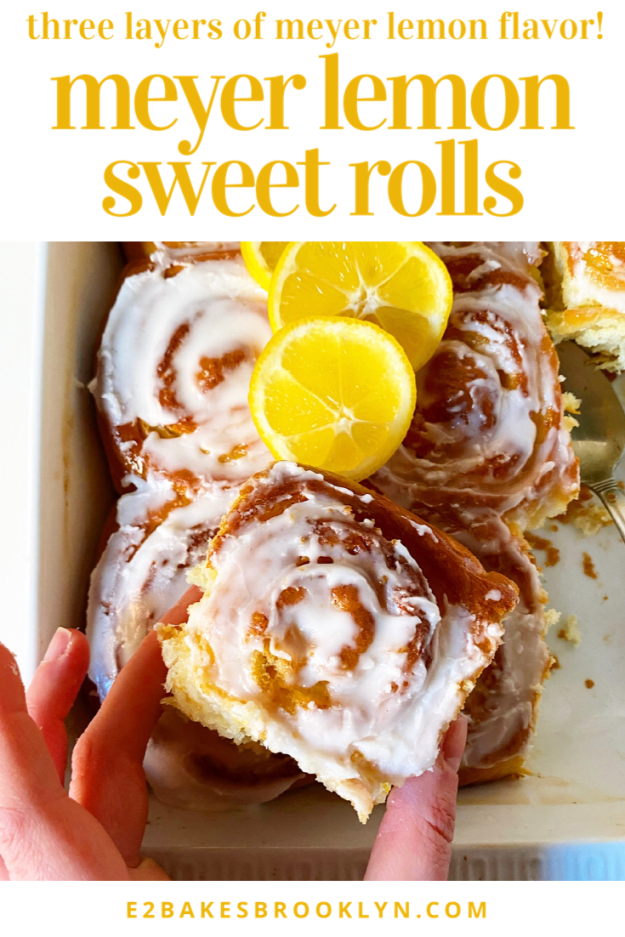
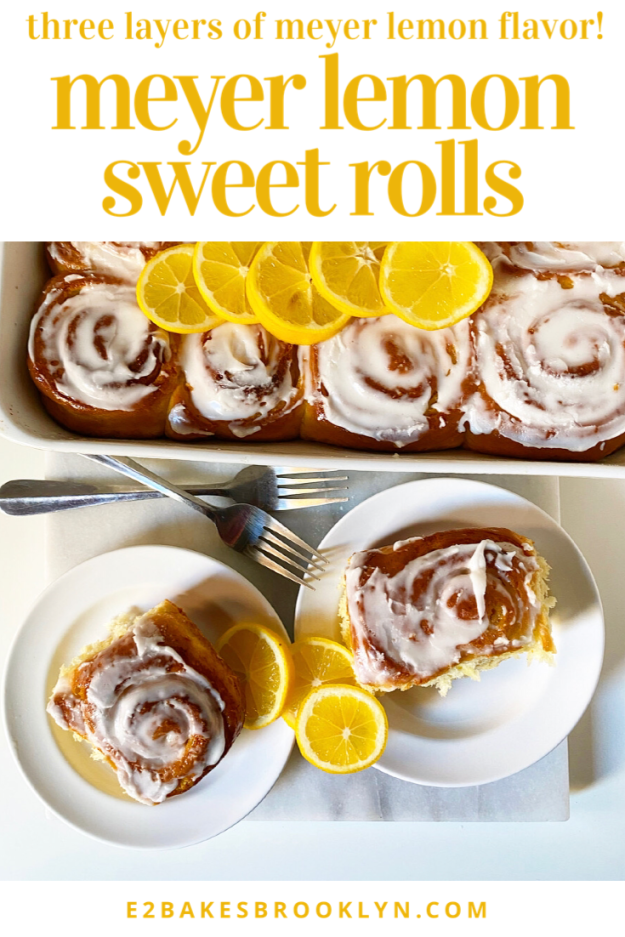
 Today is alllll about meyer lemons, y’all! As far as I’m concerned, they’re the queen of winter citrus. If you’ve never tried them, they’re what happens when you cross a mandarin orange with a lemon. This goes without saying, but they’re very, very good in
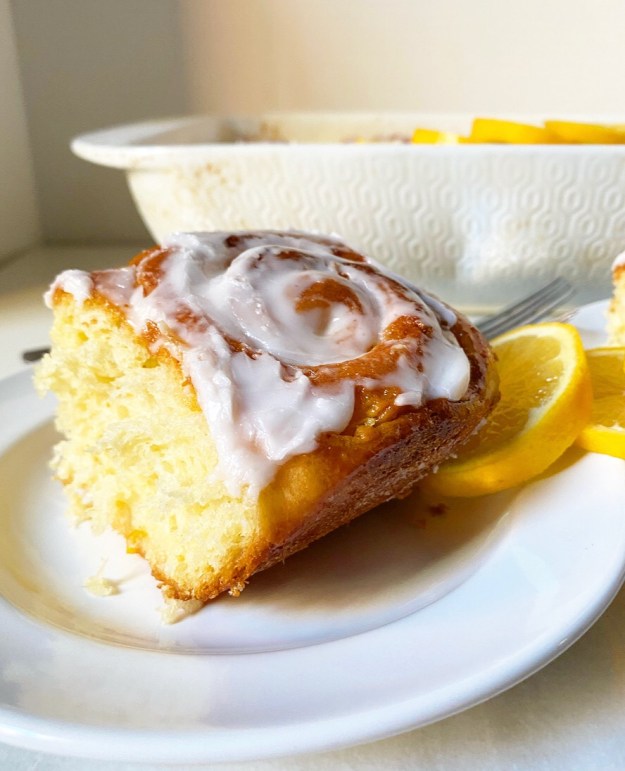
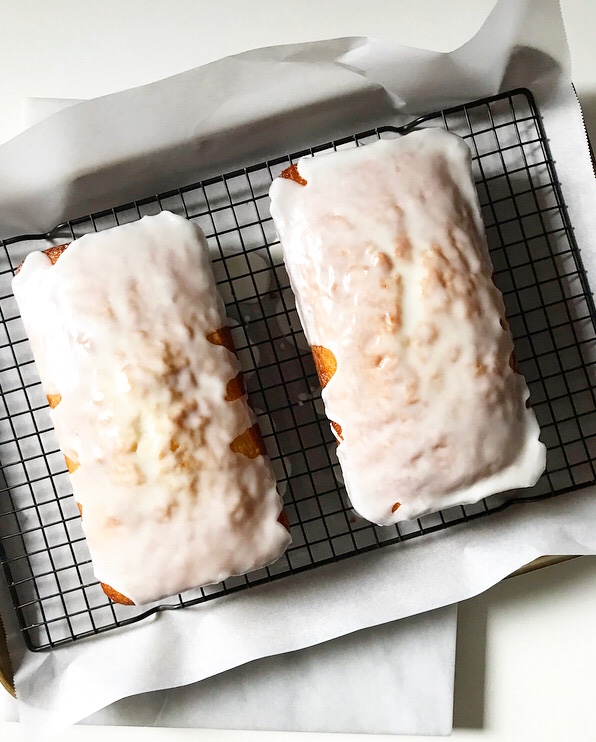
  These tall, fluffy rolls make excellent use of meyer lemon juice and zest. They’re bright and tangy and just a little bit sticky, but in the best sort of way.
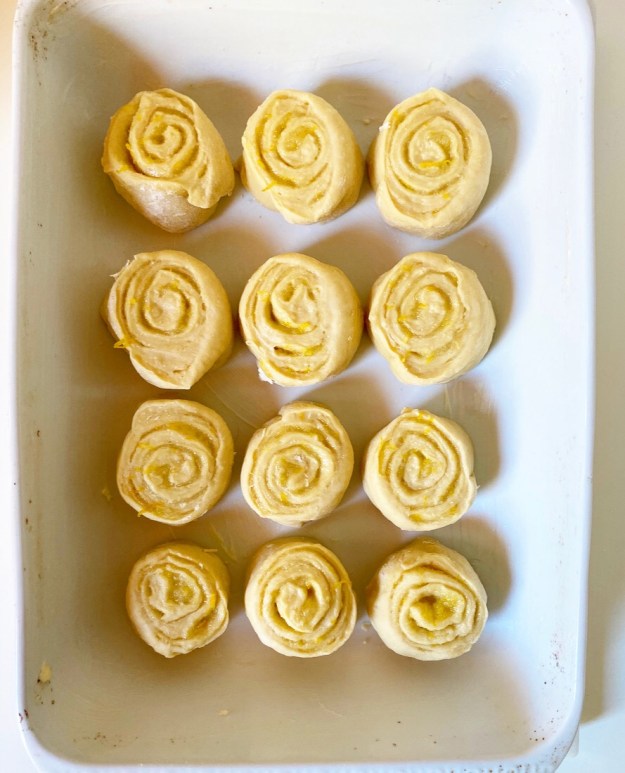
 These rolls get three doses of meyer lemon flavor. The first is in the filling, which is simply a paste made of meyer lemon zest, sugar, salt and melted butter. It’s spread onto the dough before it’s rolled up, sliced, risen and baked.
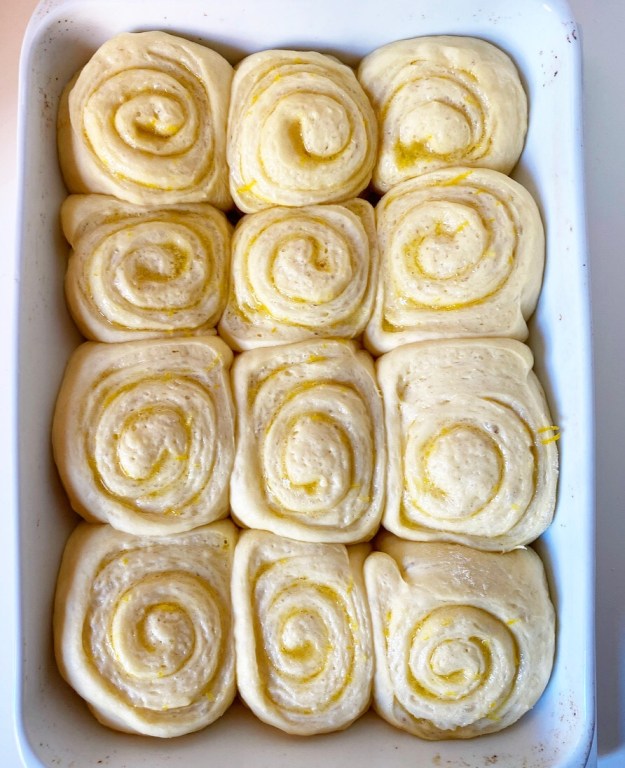
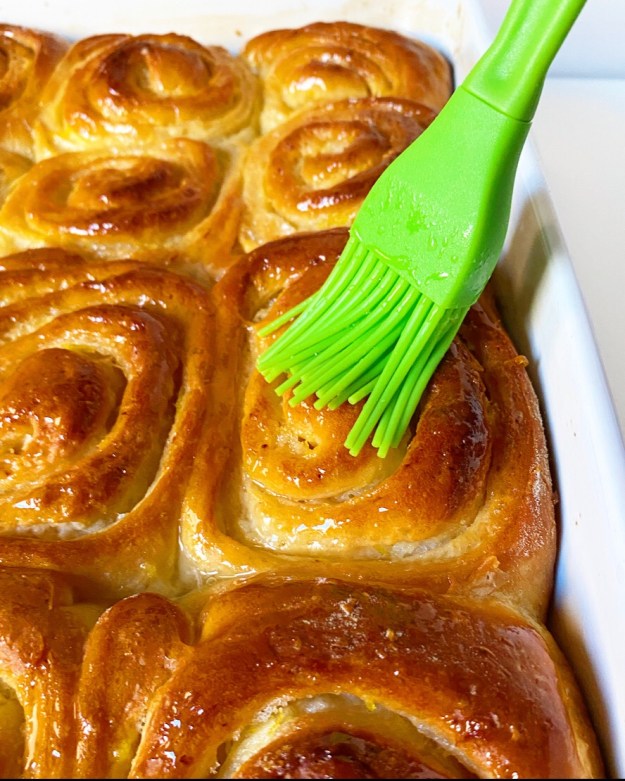 Next up: a glaze! I got the idea for painting on a glaze from last year’s
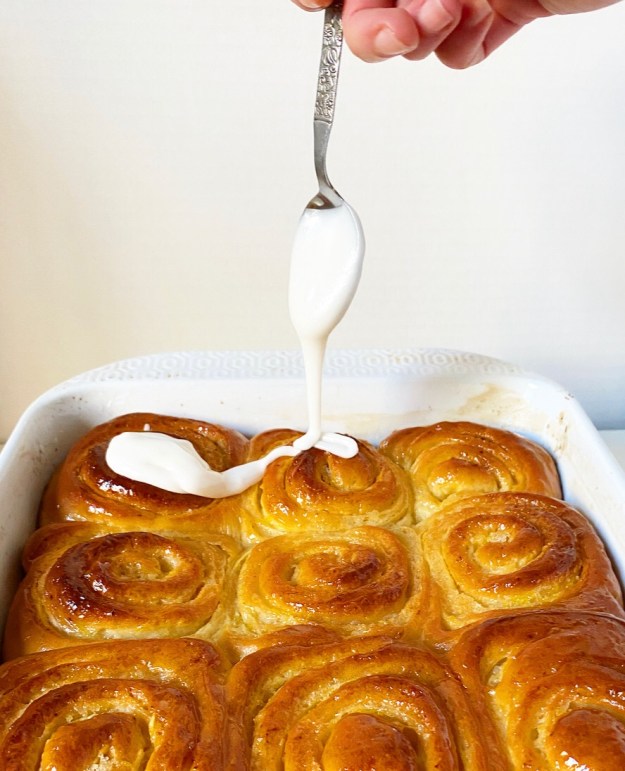
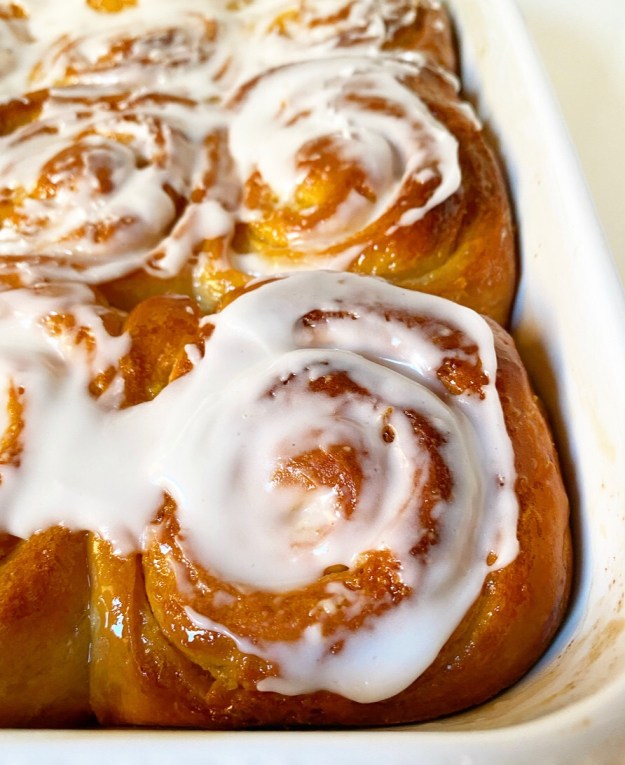 It’s all rounded out with a layer of meyer lemon icing. Ohhhh, the icing. It’s the crowning glory of this whole operation! To make it, just whisk a couple tablespoons of meyer lemon juice and a pinch of salt into a cup of confectioners sugar, and then spoon/pour/drizzle/spread it all over the tops of the rolls so that they’re absolutely impossible to resist.
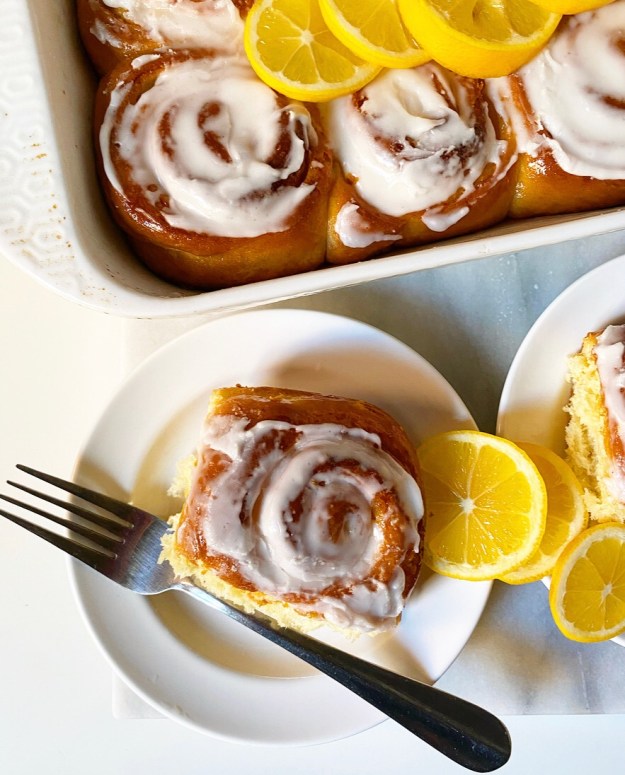 And then eat the dang rolls and bask in the sunshiny goodness that is the union of perfect winter citrus and fluffy pastry. Bask, I tell you.
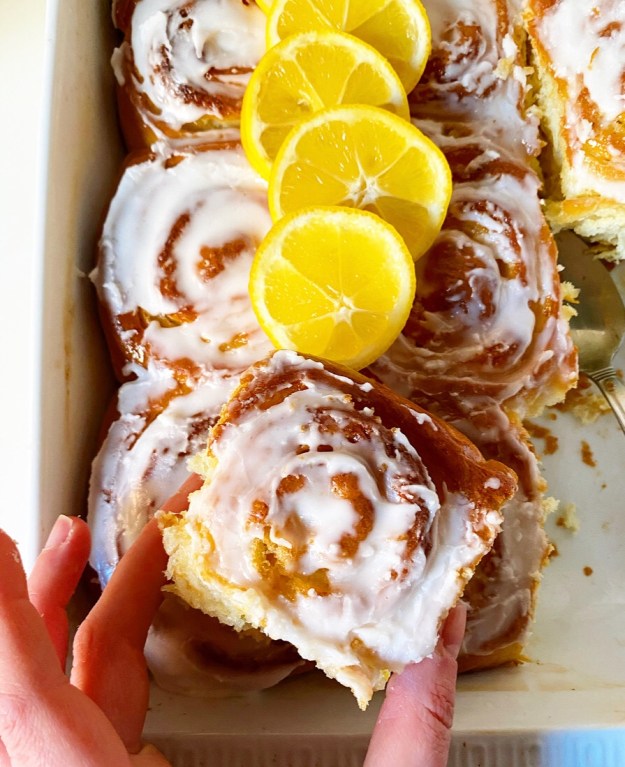
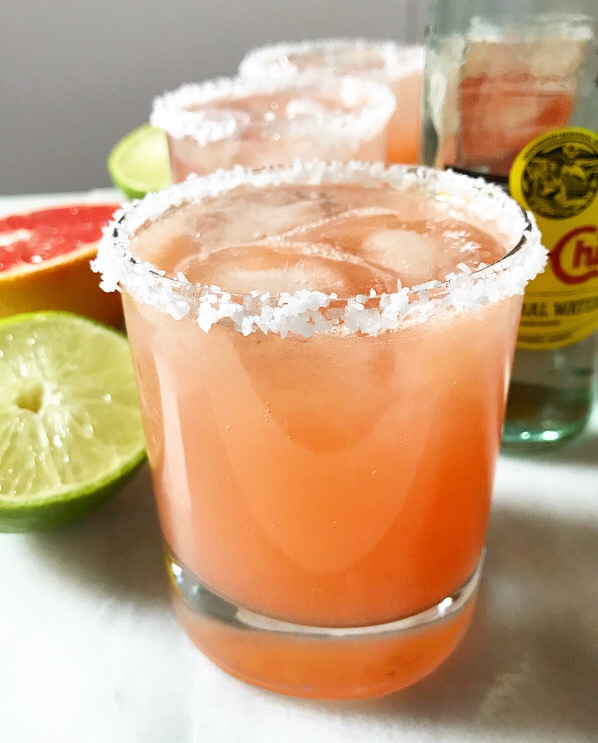 Your eyes are not deceiving you. I’m posting a cold beverage on a sub-30F day here in NYC. If you think I’ve lost my mind, you’re late to the party—I’ve been known to make
 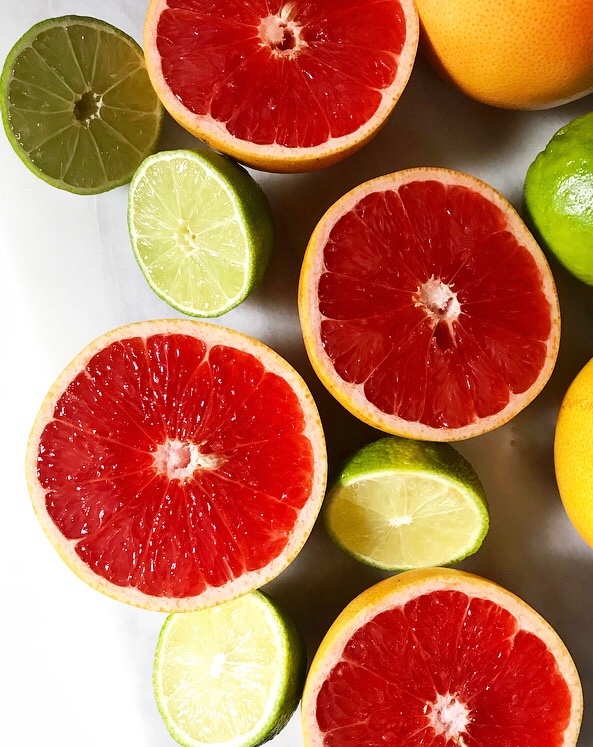 The truth is that a small miracle occurred a couple of weeks ago when I managed to find better-than-decent ruby red grapefruit for a third time this winter, something that’s virtually unheard of in New York. I’m lucky to find quality grapefruit once per year (see
 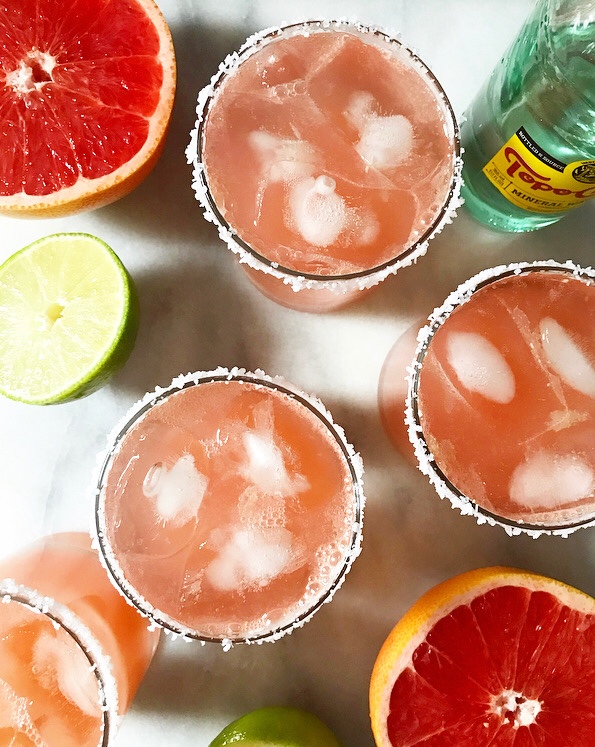 Sparkling Grapefruit-Lime Aguas Frescas are exactly what I want in these last weeks of winter. They’re a fruity, bright, seasonal, sippable reminder that there will soon be a day when I can leave my coat at home. If you’ve never heard of an agua fresca, it’s just a combination of fresh fruit, sugar, and water. I made a
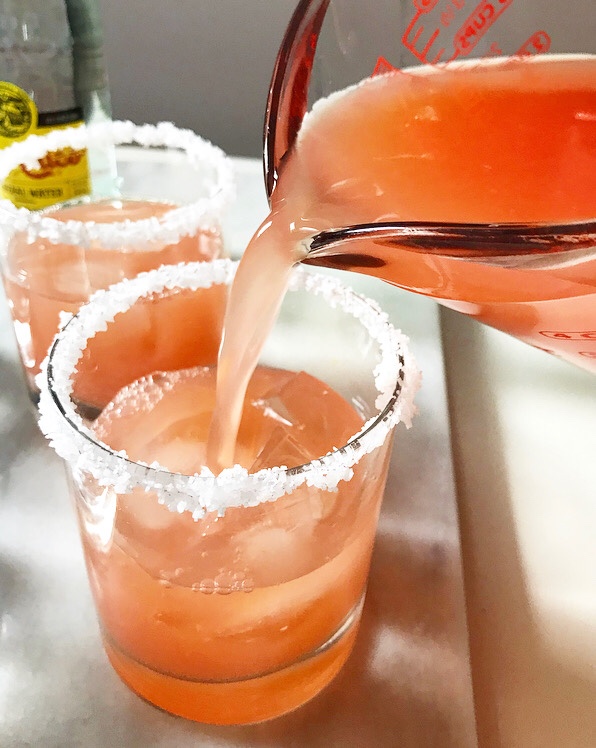
  As their name states, these aguas frescas are made with fresh-squeezed grapefruit and lime juices. They’re mixed together in a pitcher (or a big measuring cup, if you’re me) and sweetened to taste with a little simple syrup. I don’t care for super-sweet beverages in general, so I tend to limit the syrup to 1/3 cup for the entire batch, but feel free to sweeten to your heart’s content.
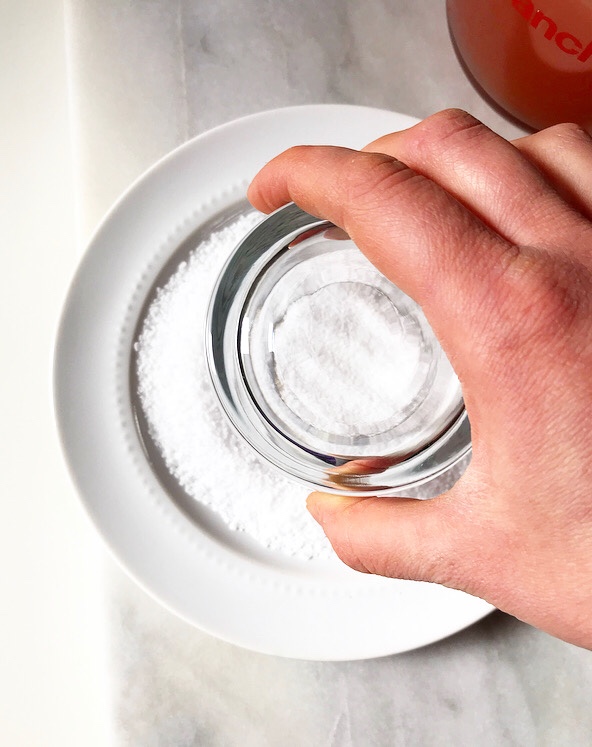
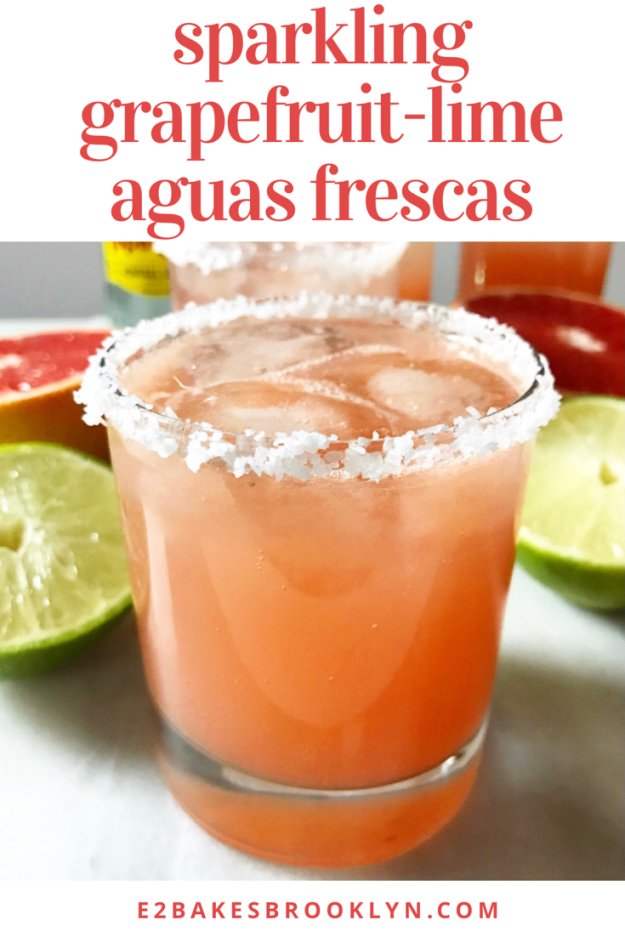
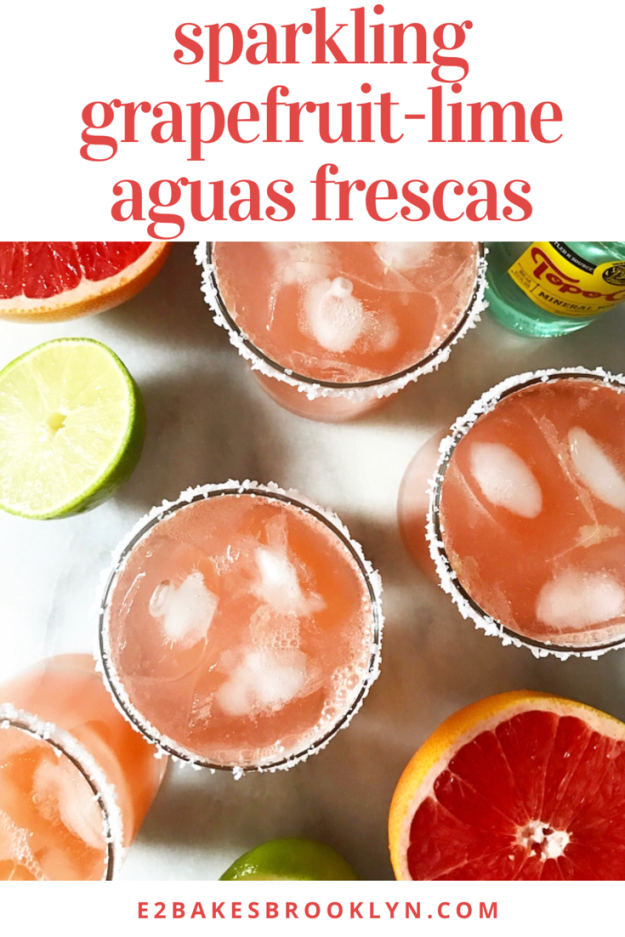
 You’ll also need simple syrup for salting the rims of your glasses. Salt is totally dreamy with both grapefruit and lime, so this is one lily worth gilding. Just dip the rim of each glass into a dish of simple syrup and then into salt. Voila! A salted rim 🙂 I used regular Kosher salt here, but anything slightly coarse will do.
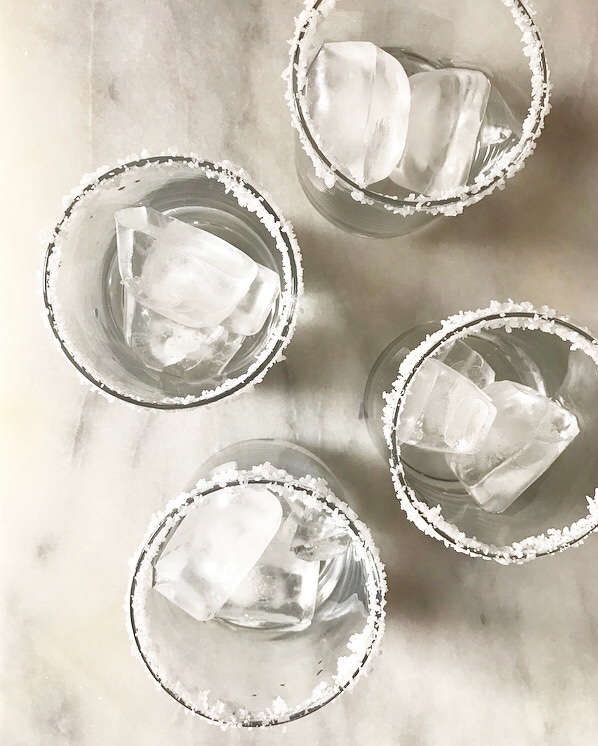
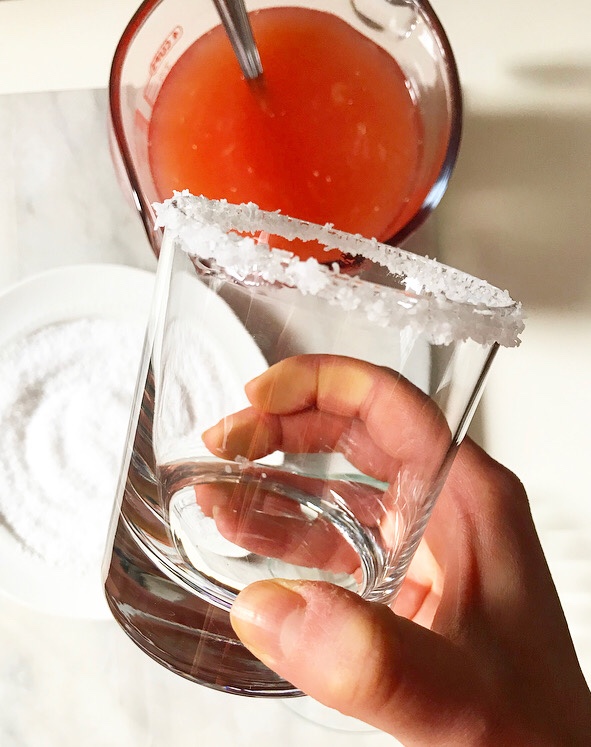
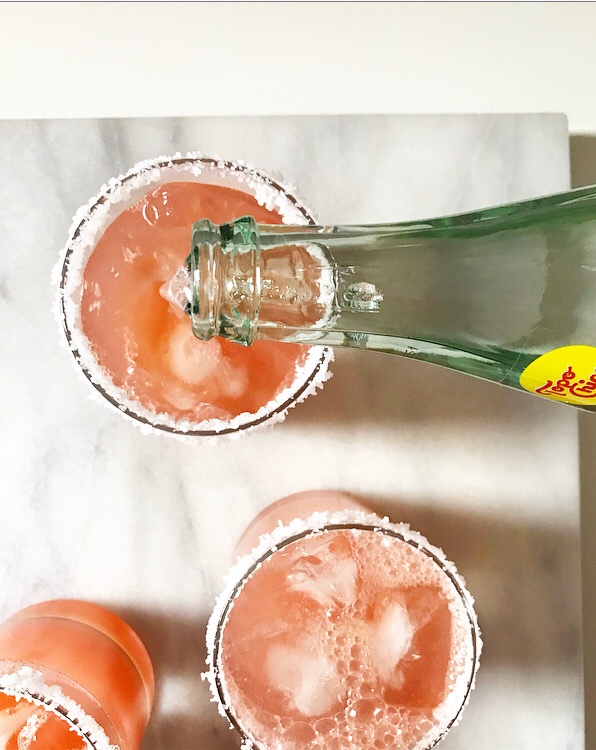 Add a few ice cubes to each of your salt-rimmed glasses and then fill them 3/4 full of the juice mixture. Most aguas frescas are blended with regular cold water, but I like to top these off with a little sparkling water. I use Topo Chico and love the subtle fizz it provides.
 Aren’t these fun?! I love their bright color and fresh, tangy flavor, and those salted rims, of course. They remind me a lot of a Salty Dog cocktail (aka grapefruit + vodka/white tequila + salt), but without the booze. I may or may not have taken to calling these Salty Schnauzers 🙂
 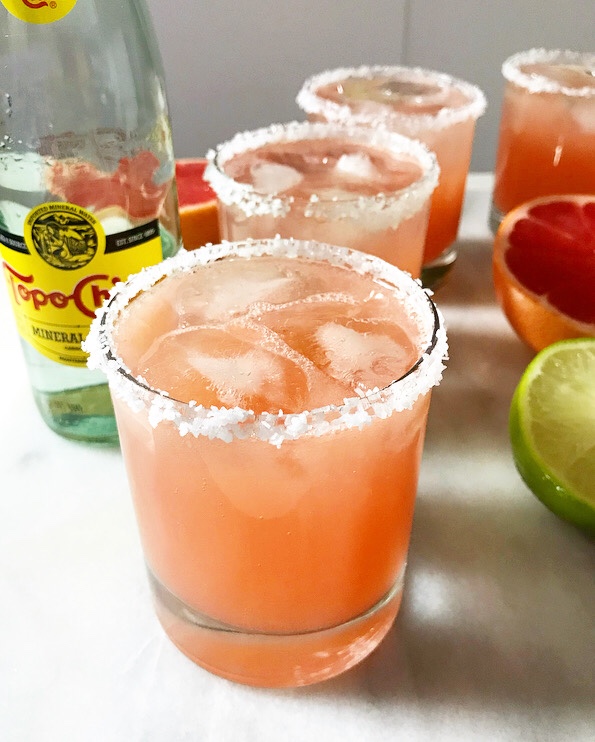 You may, of course, add liquor to the mix, but as someone who doesn’t drink anymore, I’m always thrilled when there’s an alcohol-free option that isn’t soda, juice, or plain seltzer. I may be sober, but that doesn’t mean I only drink boring drinks.
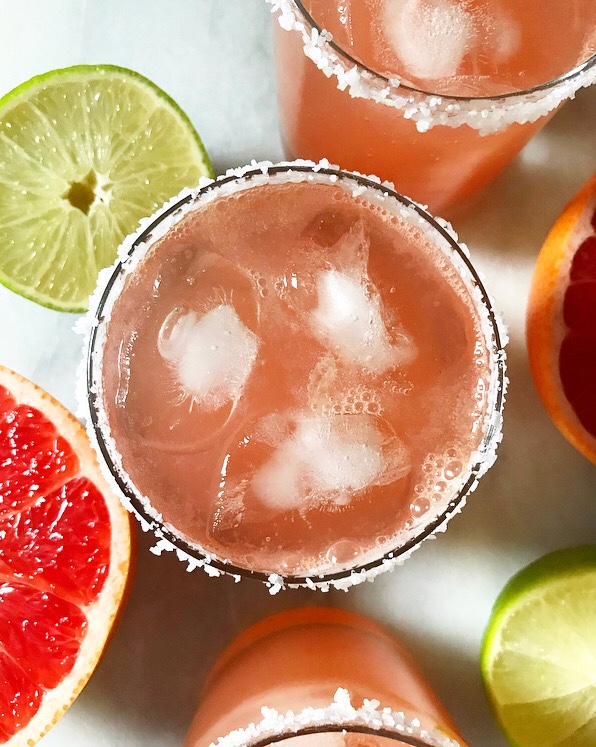 Nope. I don’t do boring.
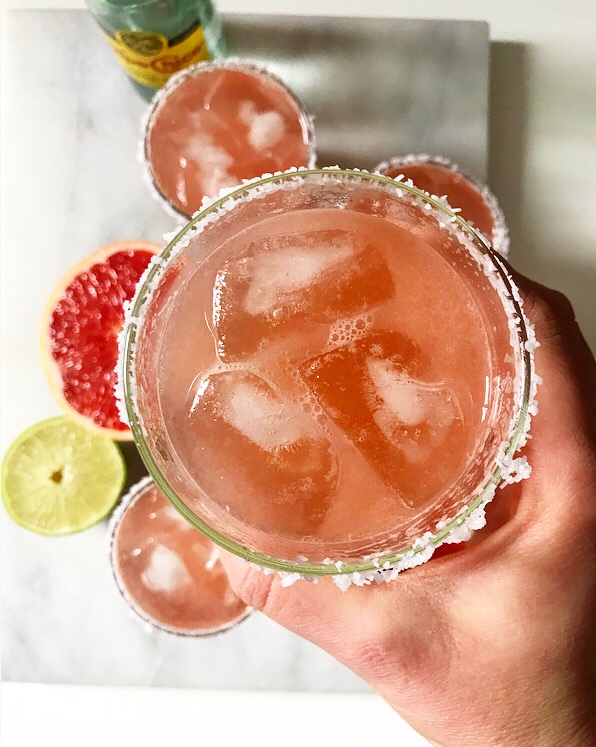
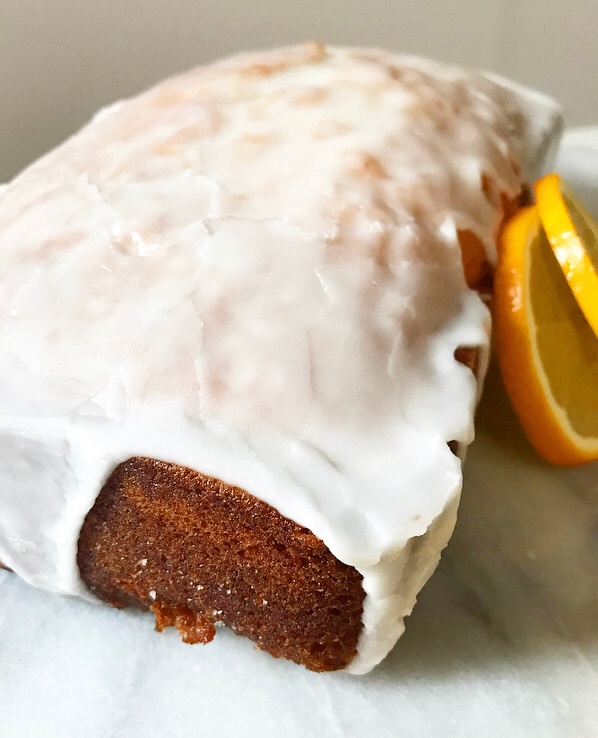
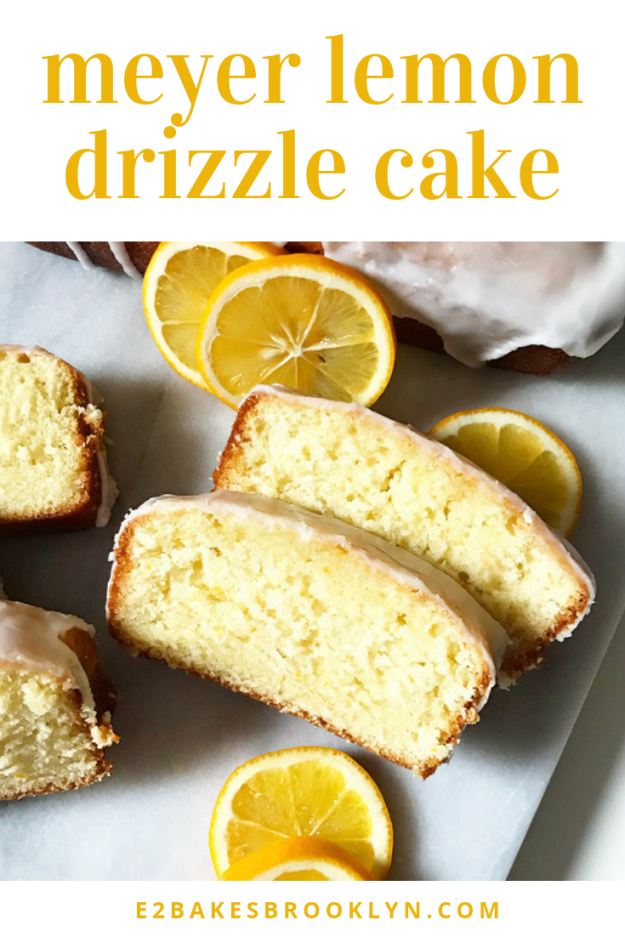
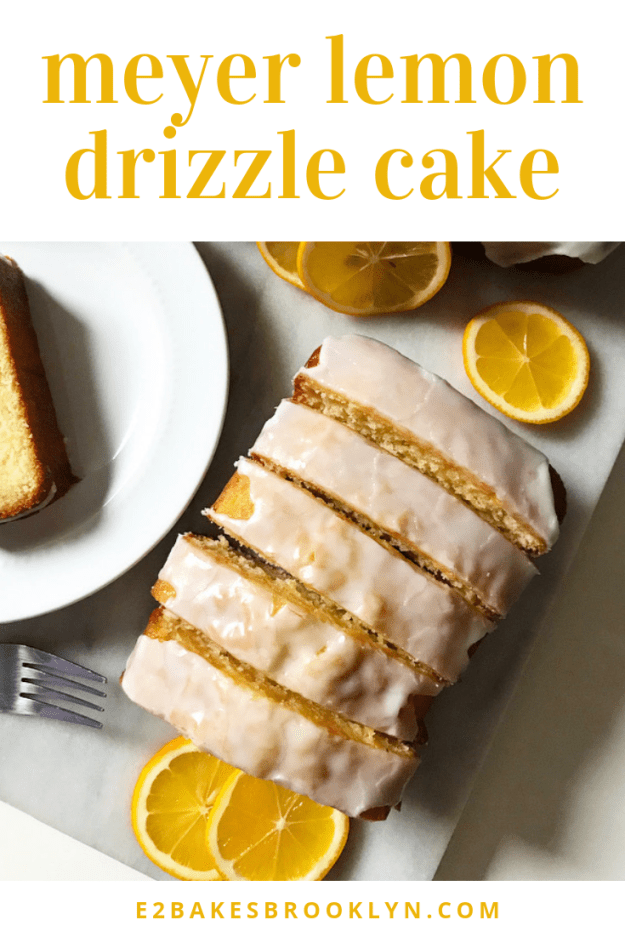
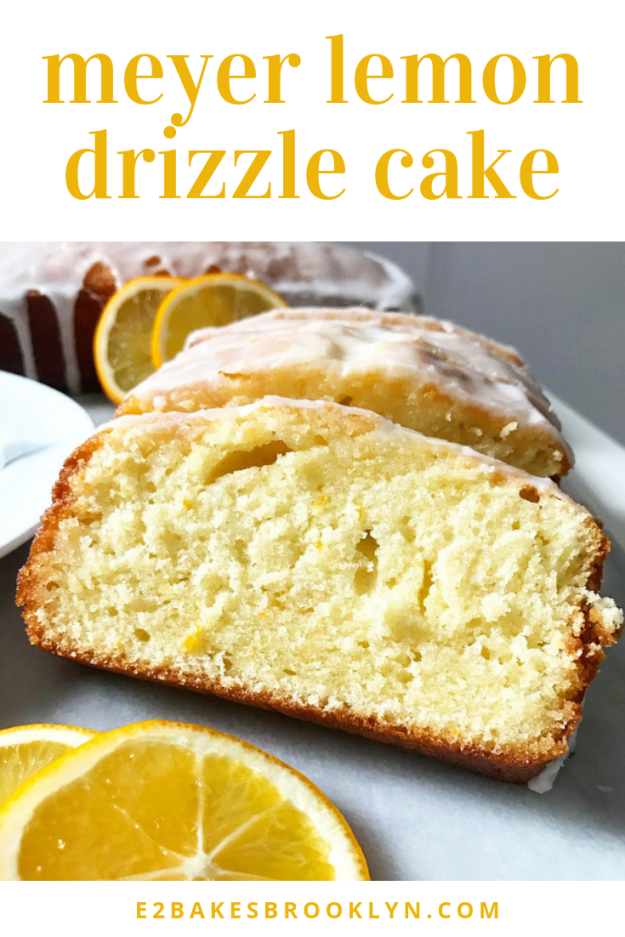
 I’ll never forget the first time I found meyer lemons in a regular grocery store. It was 2010, and I was doing a last-second rush for supplies before a blizzard. I have no idea what I shopped for that day (my then-oven ran at least 150F cool, so options were limited), but I remember seeing a display of meyer lemons and thinking they were so…exotic. I had heard of meyer lemons, of course, but never seen them in the wild (er, Cobble Hill grocery store). Out of curiosity, I put a couple in my cart. I couldn’t begin to tell you what I did with them, but that is the probably-tedious story of how I came to love meyer lemons.
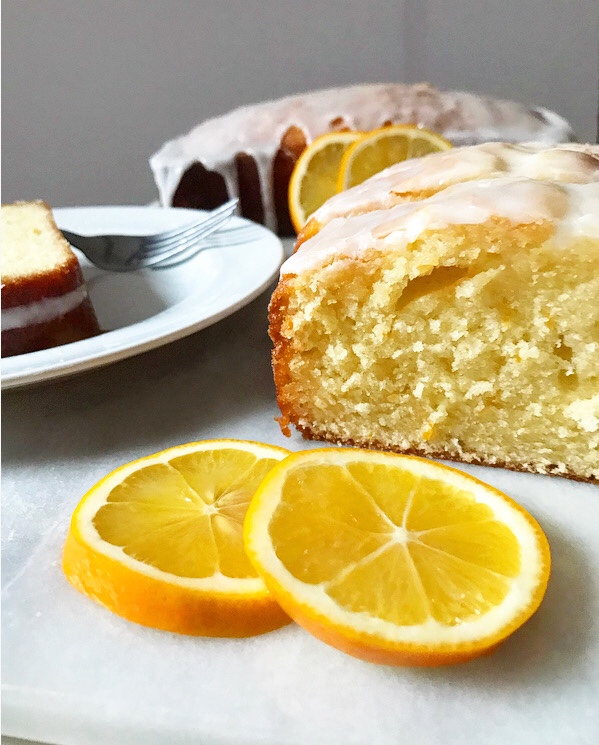 Fast forward nine years and I have used meyer lemons many, many times. I see them in every store this time of year, and while I no longer think of them as exotic, I always look forward to adding their orange-lemon flavor to my bakes. Imagine my surprise when I discovered that I only have one lone meyer lemon recipe in my
 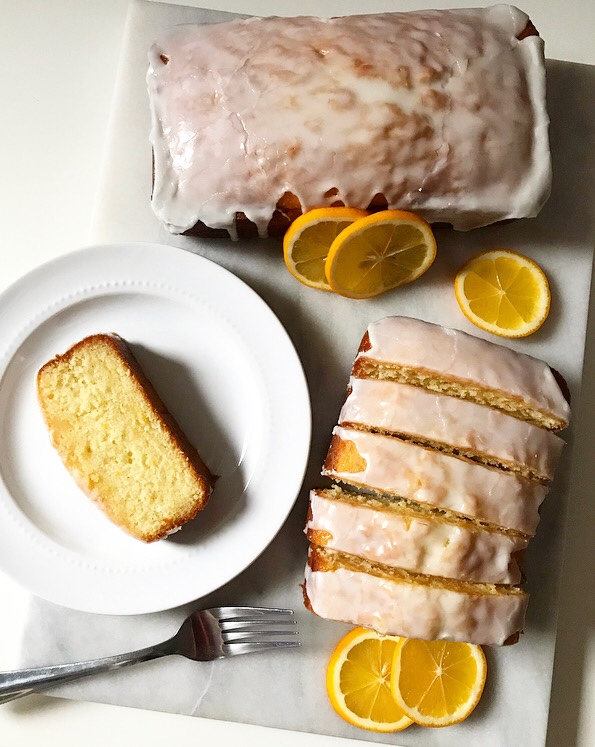 Well, consider that oversight rectified. Today’s Meyer Lemon Drizzle Cakes celebrate everything that is wonderful about this winter citrus. There’s meyer lemon zest in the batter, the cakes are soaked in a sticky meyer lemon syrup, and the cakes are topped with a thick meyer lemon icing drizzle. Yesssss.
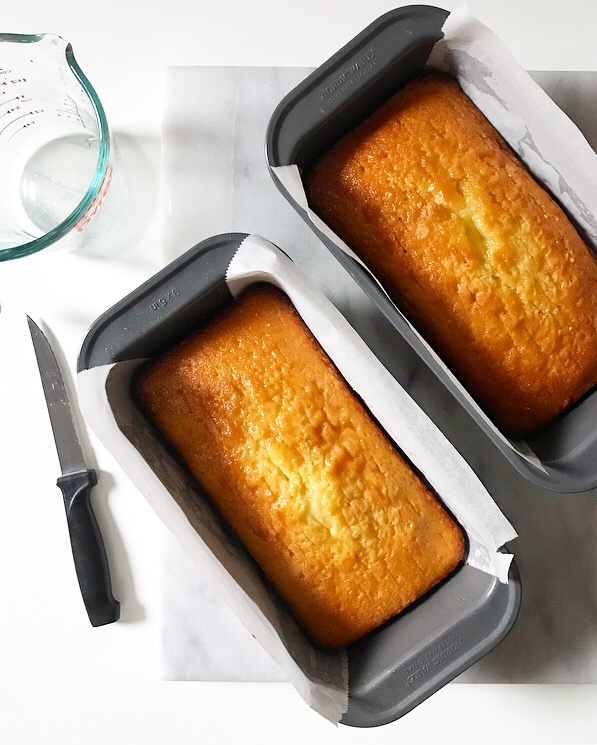
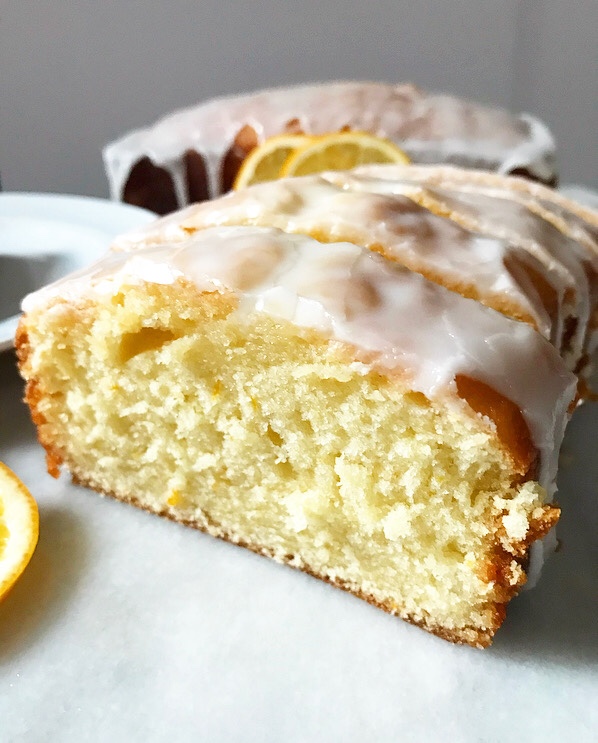 This recipe is based off the
 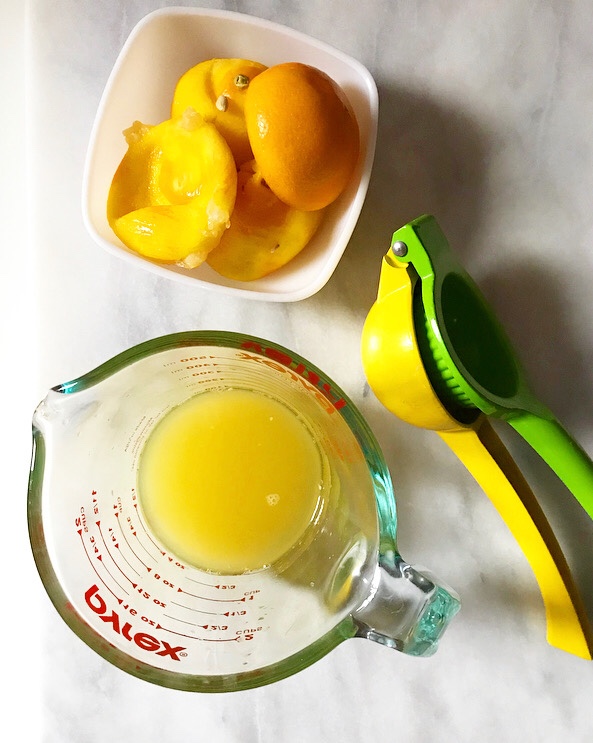 But before we get to icing, let’s talk syrup! After baking, these cakes are soaked with a meyer lemon simple syrup. To make it, just combine equal volumes of meyer lemon juice and granulated sugar over low heat, stirring just until the sugar dissolves. Easy.
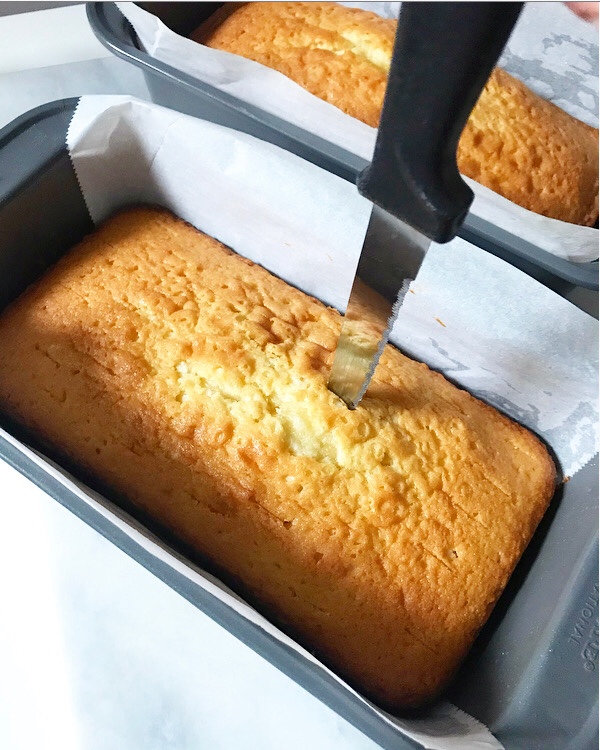
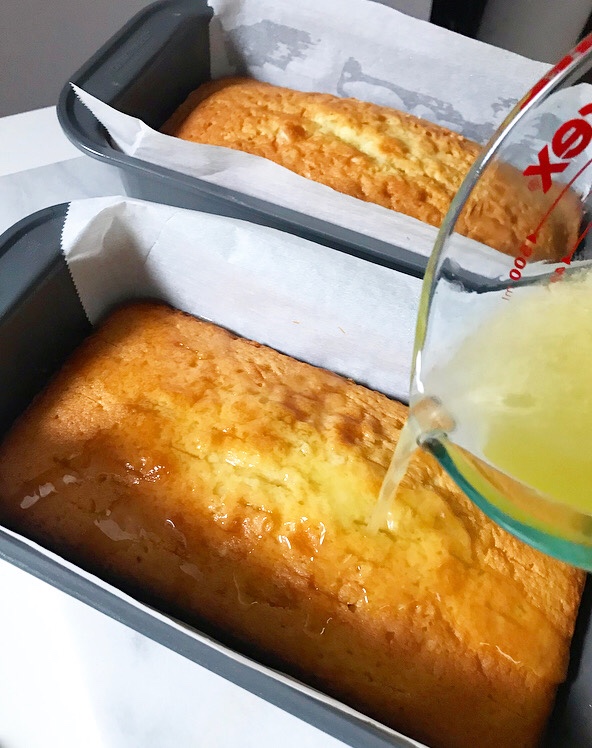
 While the cakes are still warm, poke ‘em full of holes. I like to use a thin, flexible knife to keep them inconspicuous, but a skewer will work. Whatever you use, poke it through to the bottom. Then pour over that syrup. You’ll think it’s too much, or that it’ll make your cakes soggy, but it won’t. It’ll just make them extra moist and dense and outrageously delicious. This is the good stuff.
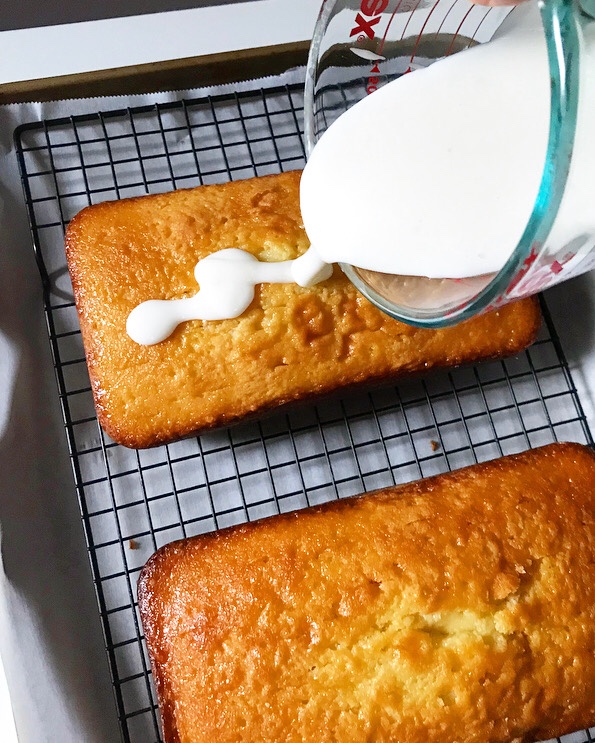
 Last but not least, let’s talk about the drizzle. It’s a just a simple icing—two ingredients, one bowl, no mixer—but it’s the crowning glory on these tea cakes. Once the soaked cakes are cool, set them on a cooling rack and pour the icing down the center. The cakes’ slight domes should help the icing to “spread” itself, but you can coax it with the back of a spoon, too. It’ll drip down the sides a bit, but should be thick enough that most of it stays on top. The icing will set quickly, which is a good thing because you’re going to want to dig right in.
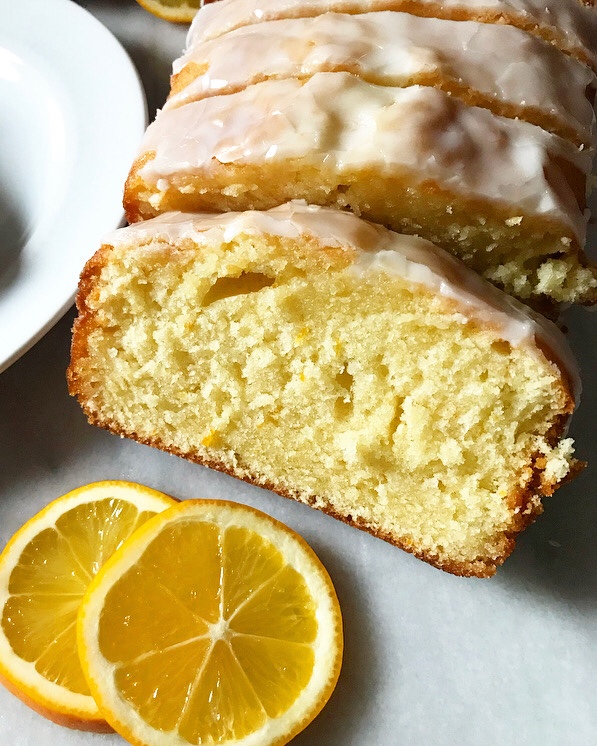 Meyer Lemon Drizzle Cake is good on the first day. Very good, even. But if you have the patience, you should wait a day or two to have a slice. The cakes become even more tender and the orange-lemon flavor intensifies over time, making those day-old slices absolutely heavenly.
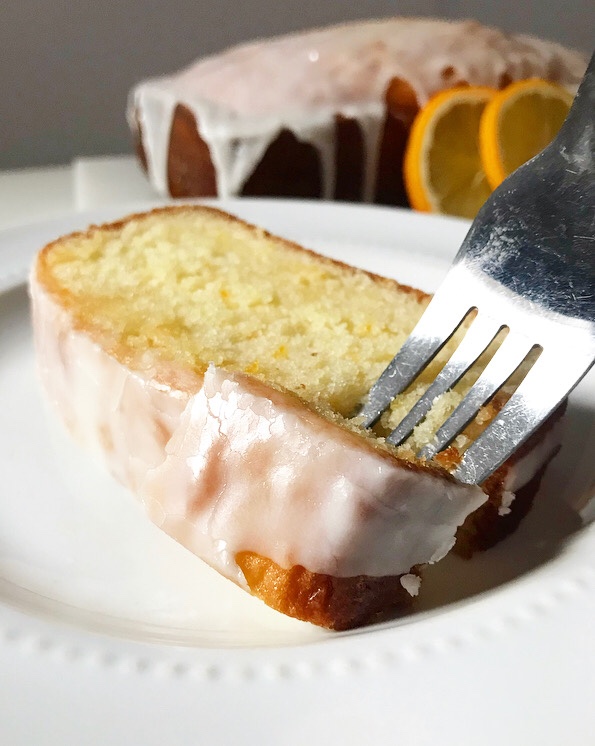 I, however, have no patience around Meyer Lemon Drizzle Cake.
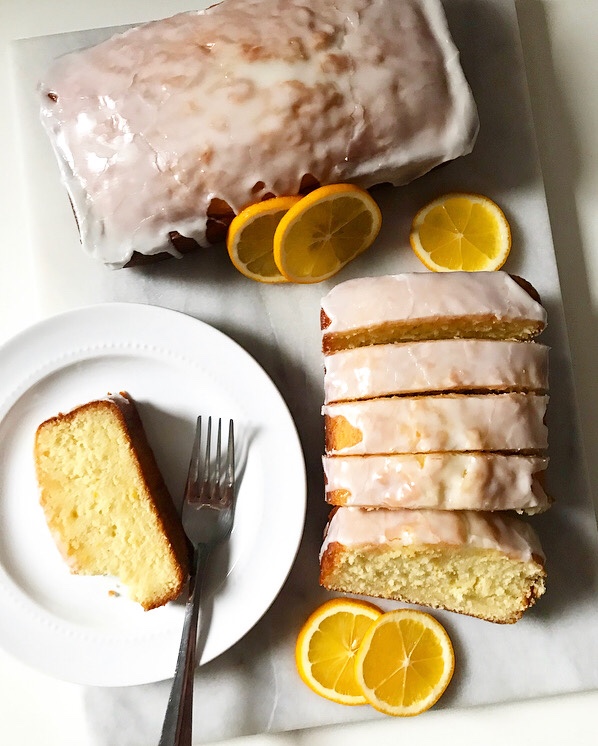
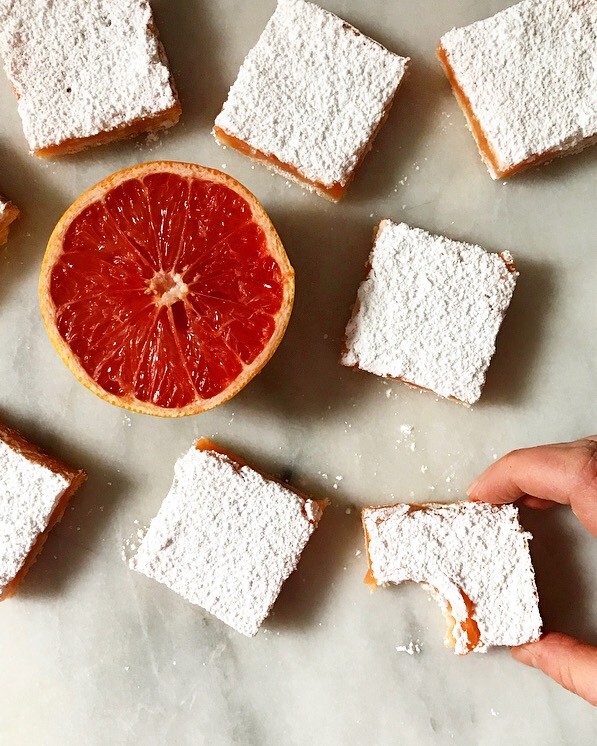
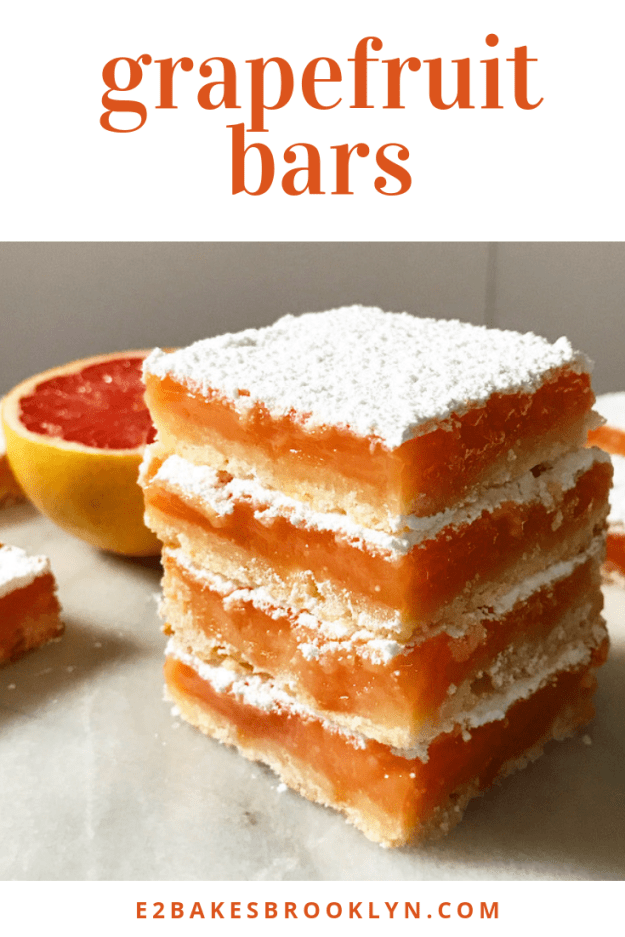
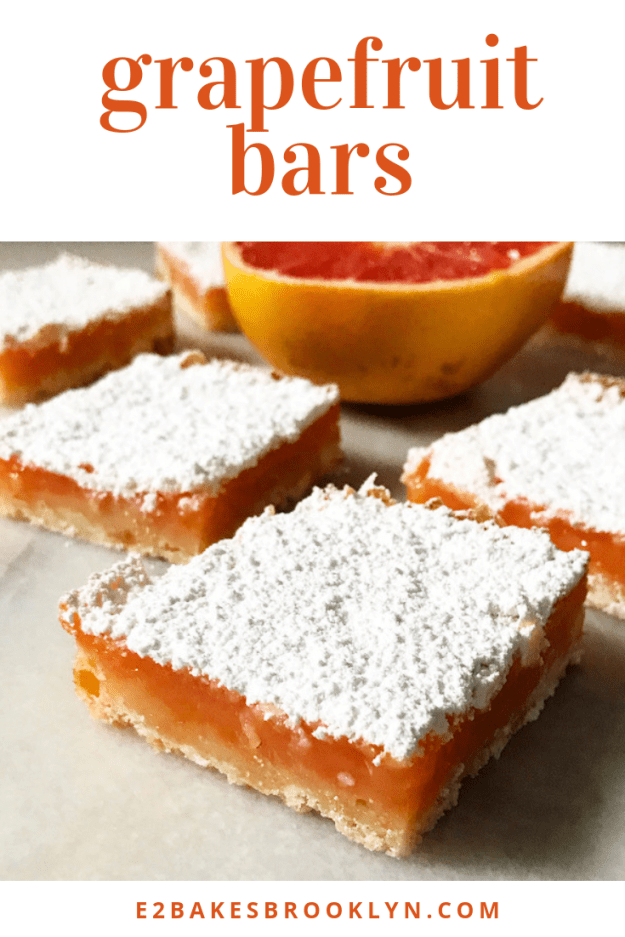
 Texans love a ruby red grapefruit, and while I have not been a resident of my home state for more than a decade, my mid-winter citrus needs are still very real. Unfortunately, the window for finding spectacular grapefruit in NYC is alarmingly short—just a few weeks!—and so I am compelled to take advantage. It’s my duty as a displaced Texan. Or something.
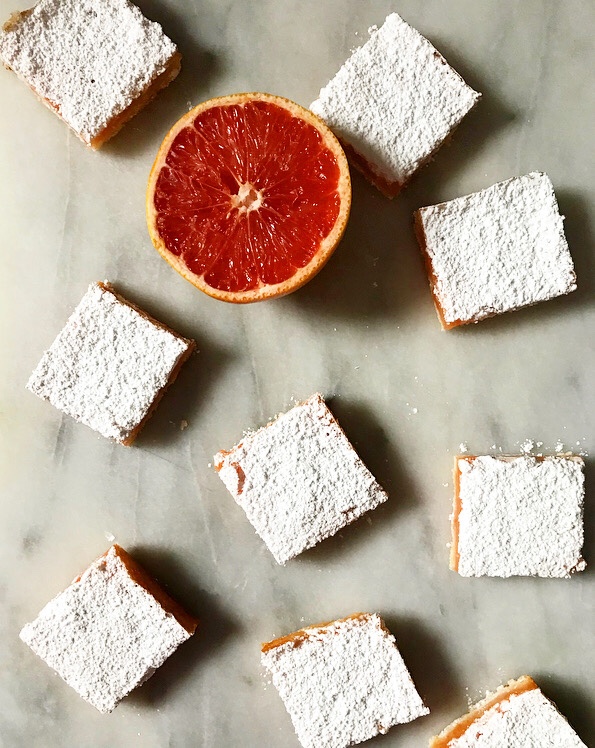 Grapefruit
 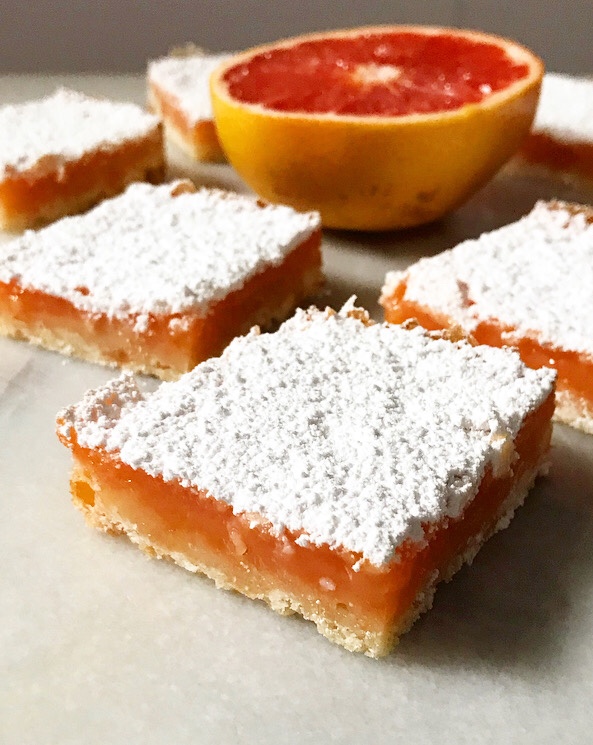 These beauts are a seasonal spin on their more traditional
 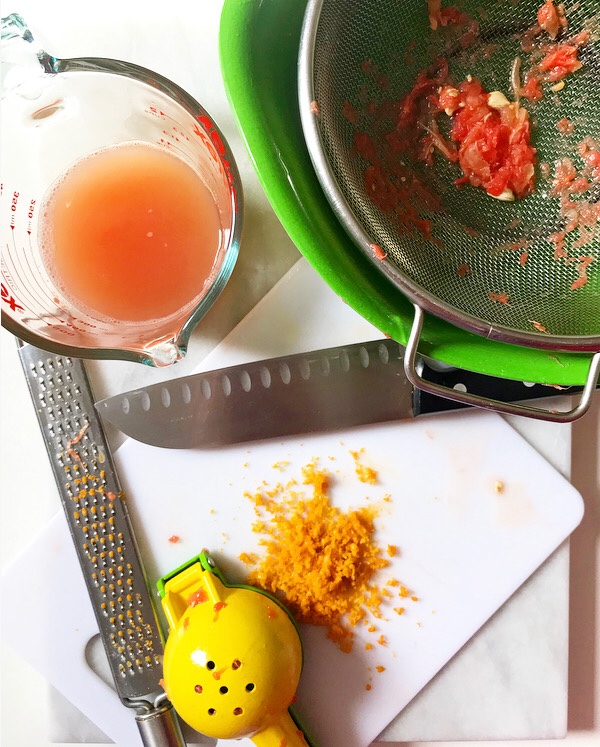 Now, if you’ve ever cooked with grapefruit, you might have noticed that it tends to lose its natural color and tartness as it is heated. I learned to mitigate this last year while testing Grapefruit
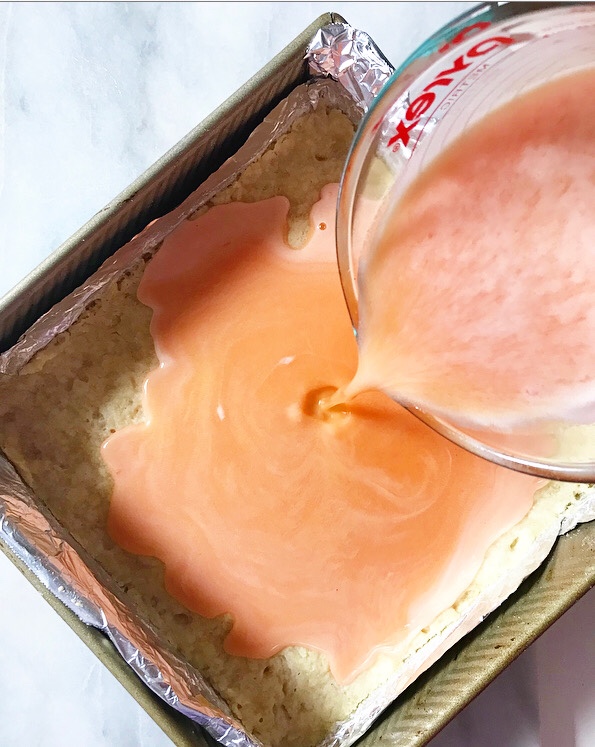
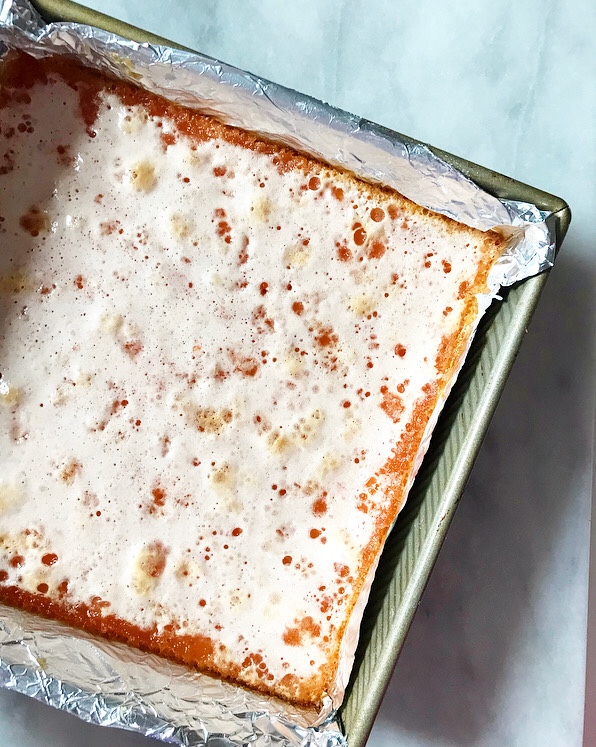
 Here, grapefruit flavor is added in two ways: first, by reducing a cup of fresh grapefruit juice by half, and then by rubbing zest into granulated sugar to release the citrusy oils. I also like to add a couple of tablespoons of lemon juice to ensure that the bars have a tart finish. The idea of omitting the lemon in favor of a “pure” grapefruit flavor is tempting, but I promise that leaving it out will leave you missing the acidic sharpness that makes these bars so singularly great.
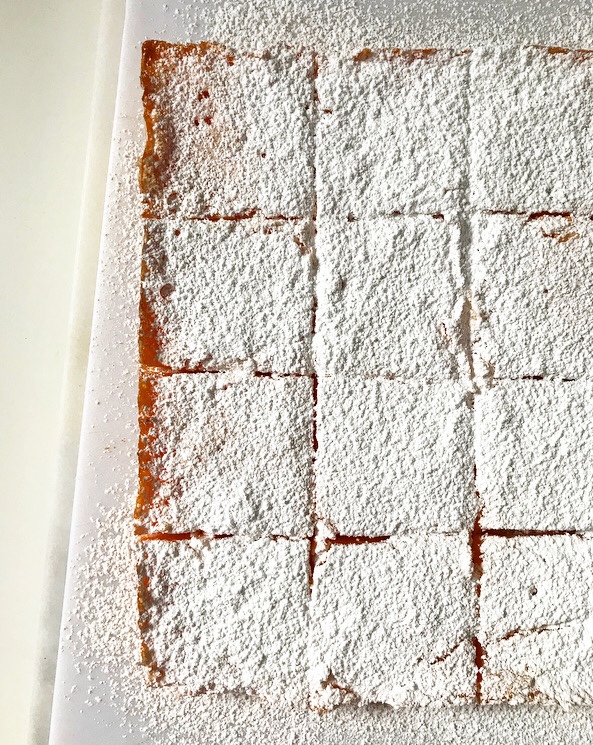
 The sweet-tart ruby red grapefruit flavor pairs perfectly with the lightly-squidgy texture of the filling—it’s the sort of thing I daydream about sinking my teeth into. Really. I have caught myself thinking about the feeling of taking the first bite into a Grapefruit Bar more than a few times since I finished testing these a couple of weeks ago. Is that not normal?
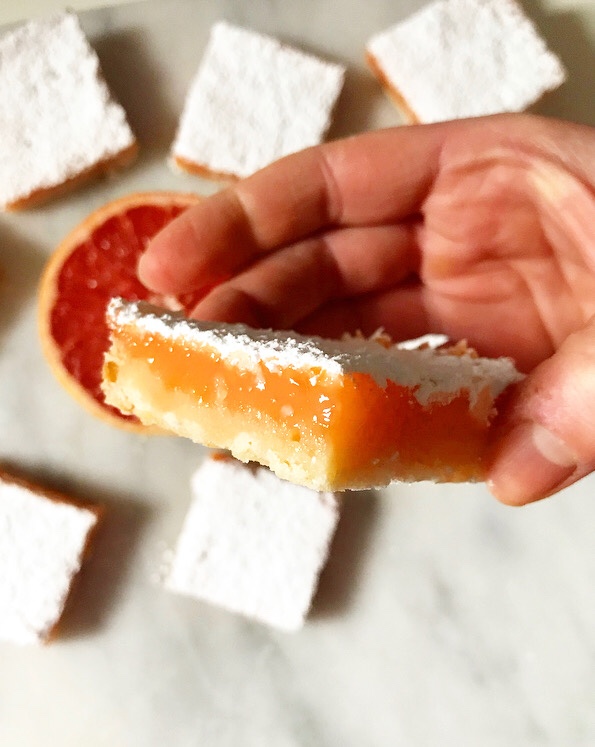 If not, I don’t want to be normal. Life’s too short not to daydream about the feeling of soft-set grapefruit filling and crisp, buttery shortbread between your teeth. It’s that sort of wholesomeness that makes this whole being a professional homebaker thing worthwhile.