Category Archives: Cakes & Cupcakes

King Cake

King CakeHave you ever been to New Orleans? I have a few times, including a three week stint of post-Hurricane Katrina relief work, but I’ve never been for Mardi Gras.

King CakeAs a college student in Texas, it occurred to me that it might be a fun thing to do once (I’m very into road trips), but then I remembered that I am a tried and true introvert and that spending a weekend in a loud, crowded city might be my idea of hell…

…so I moved to New York City instead. It never gets loud and crowded here 🙂

But back to Mardi Gras…

King CakeWhile I love the idea of a whole state with its own unique way of celebrating a holiday, my party days are well behind me and I don’t envision any circumstance in which I’ll ever find myself in Louisiana in early February. But I love King Cake. I mostly associate it with Epiphany (or Three Kings Day or Twelfth Night or January 6th, or whatever you call it), but I’m okay for breaking with personal traditions if it means I get to eat this:

King Cake
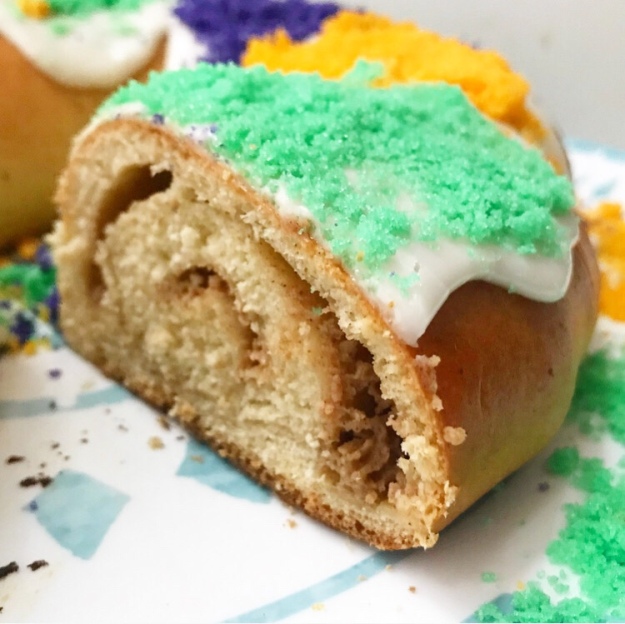
If you’ve somehow never had King Cake, you’re in for a treat. It’s a fluffy yeasted coffee cake served in Louisiana (and lots of other places) in the religious season between Christmas and Lent. To describe King Cake plainly, it’s sort of like cinnamon rolls that aren’t cut up. In fact, the dough I used here is just a variation on my favorite sweet roll recipe. It’s just a little richer and even more tender than that dough, and it’s flavored with cinnamon and nutmeg. Mmhmm.

King CakeFrom what I can tell from all my research, if you have a flavor preference, there is a King Cake recipe out there for you. The traditional filling is a mixture of butter and cinnamon-sugar (again, like cinnamon rolls), but I have seen pecan praline, strawberry, and cherry-almond variations. I have become entranced by the idea of cream cheese filling, so I did a little mash-up of my own: cinnamon cream cheese, y’all!

King Cake
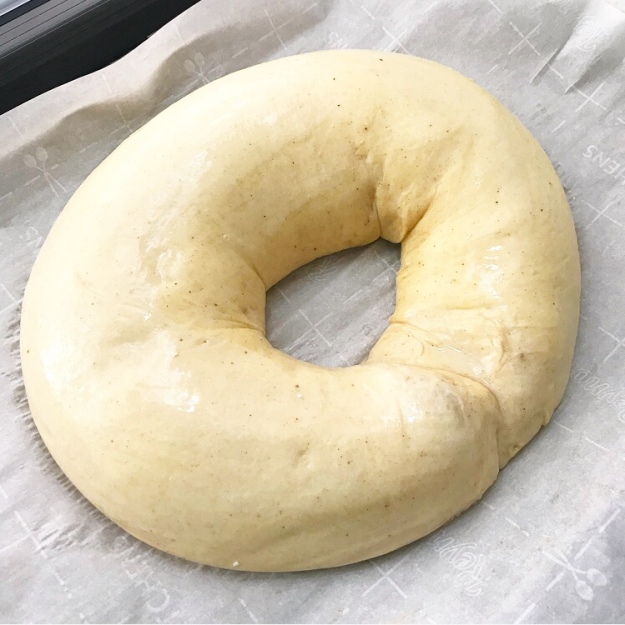
The filling is rolled up into the dough like it is in sweet rolls. The cylinder of dough is formed into a ring and set aside to rise for about an hour, until it doubles in size. Then it’s painted with an egg wash and baked until golden brown all over.

King CakeKing CakeKing Cake
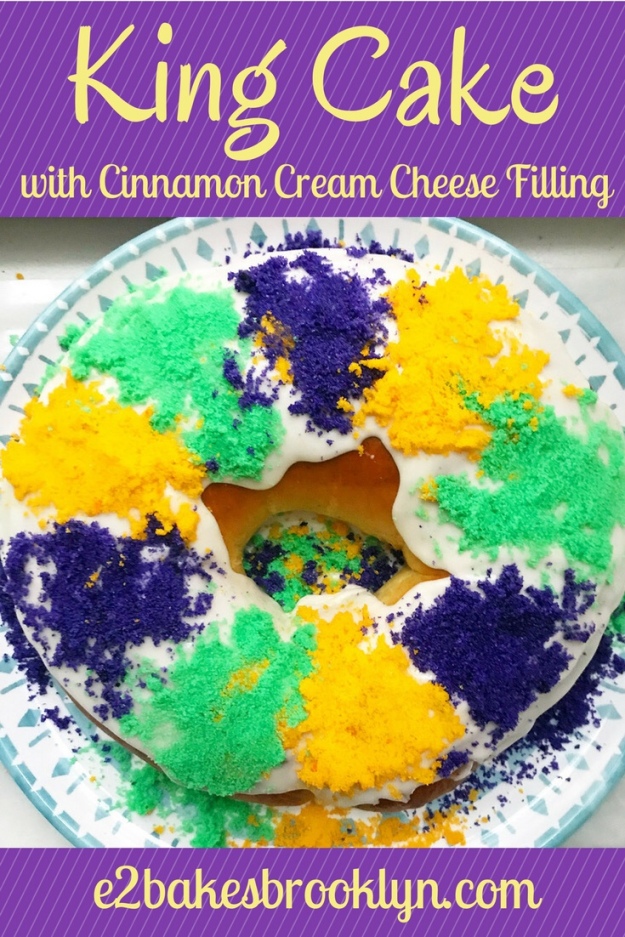
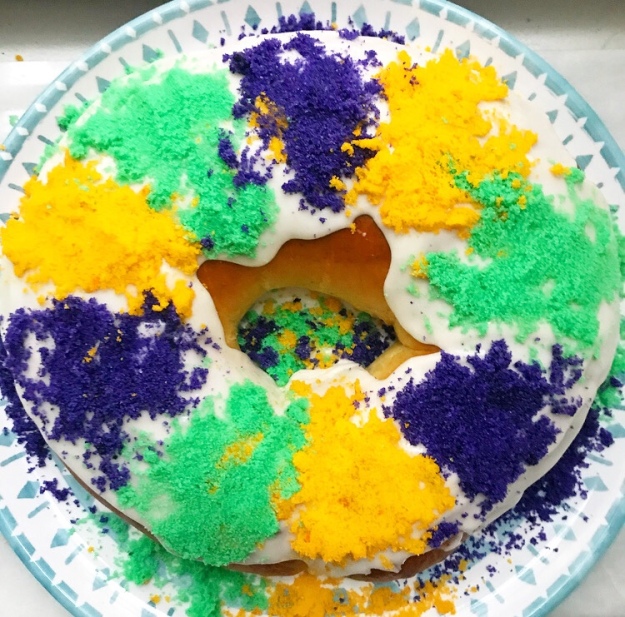
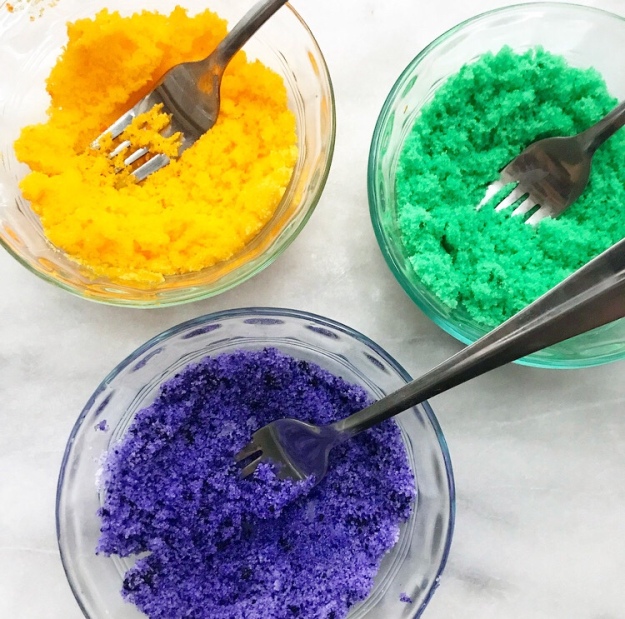
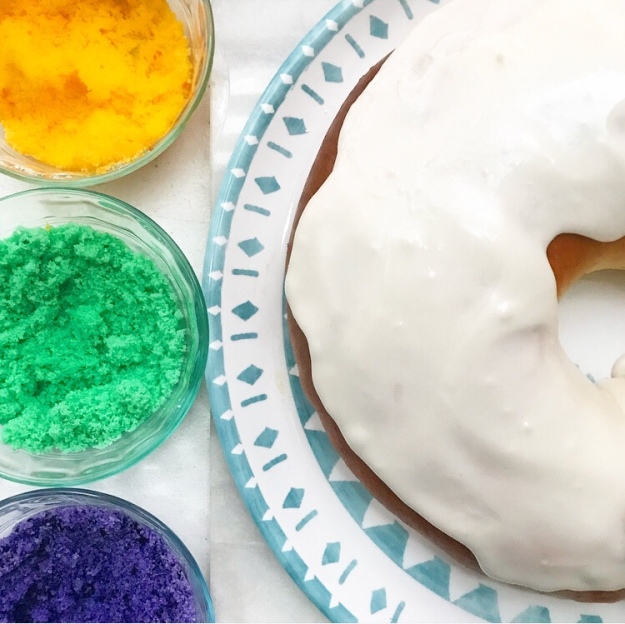
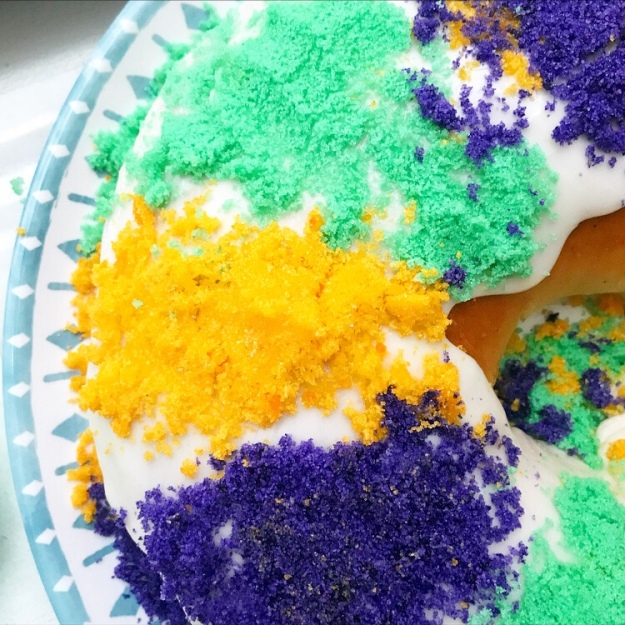
King Cakes are traditionally decorated with a thick white icing and yellow, green, and purple sugars (representing power, faith, and justice, respectively). I had a hard time tracking down sugars in the appropriate colors, so I just stirred a few drops of food coloring into 1/3 cup increments of granulated sugar.King CakeKing Cake

King CakeKing CakeKing Cake
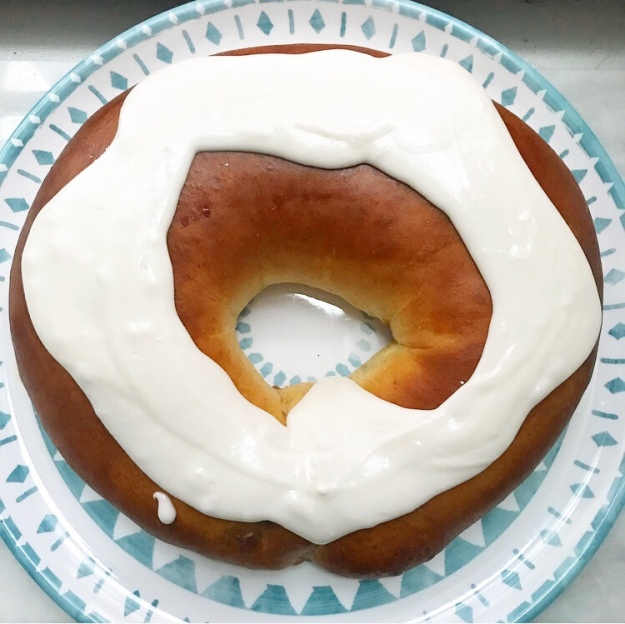
A tiny plastic baby doll is also traditionally inserted into the cake after baking. The person who receives the slice with the baby doll is king/queen for the day and is responsible for procuring next year’s cake. I didn’t put a doll in this cake because I simply don’t have it together enough to remember to order things in time for scheduled blog posts. But anyway…

King Cake
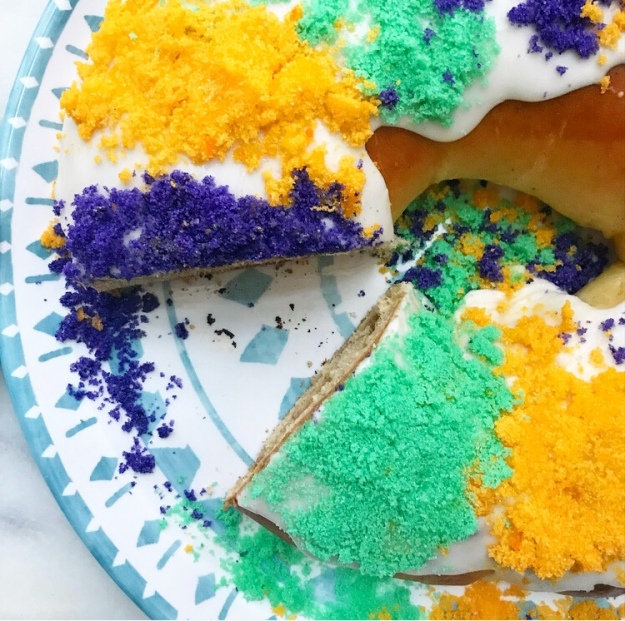
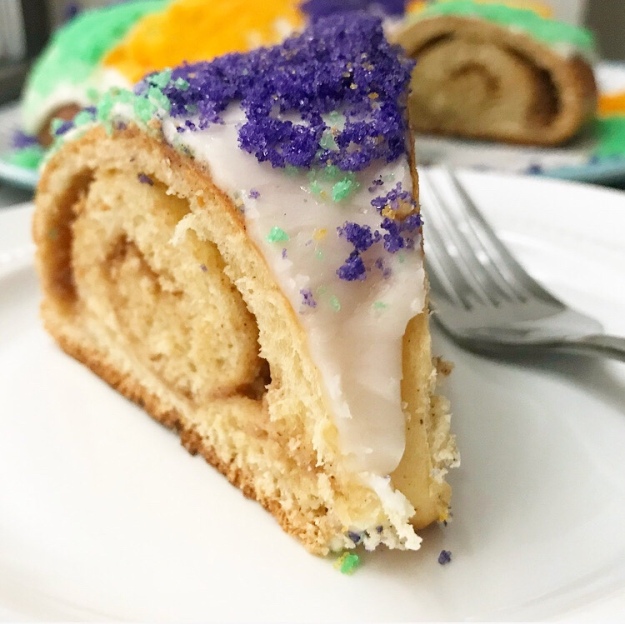
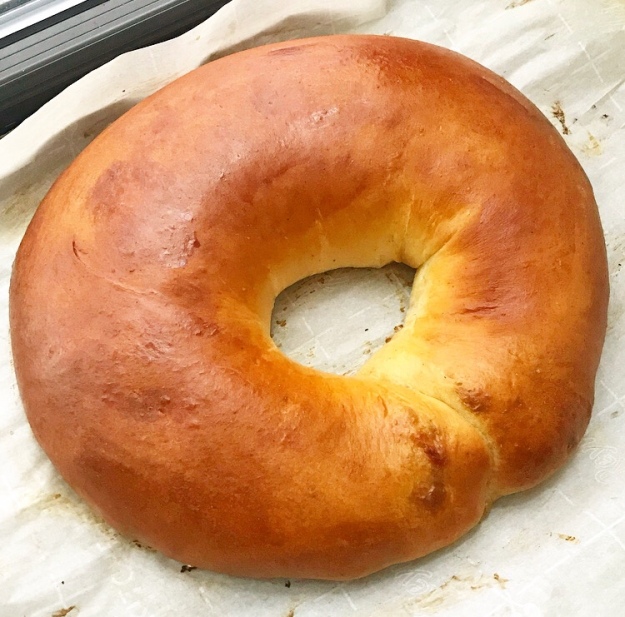
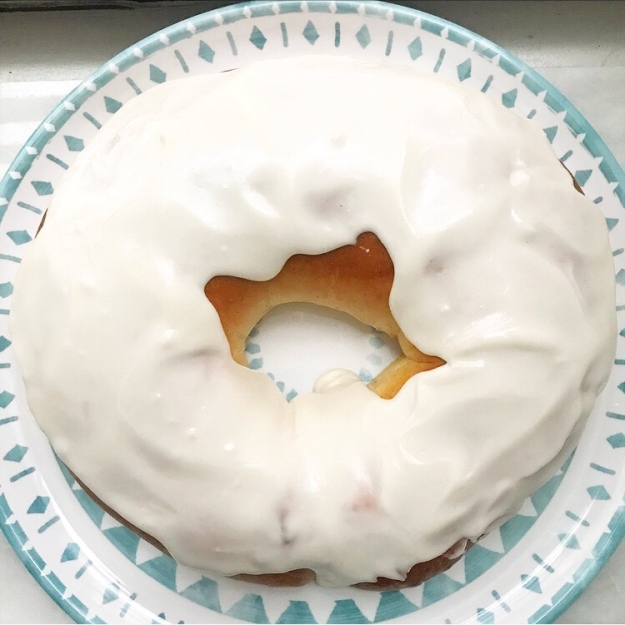
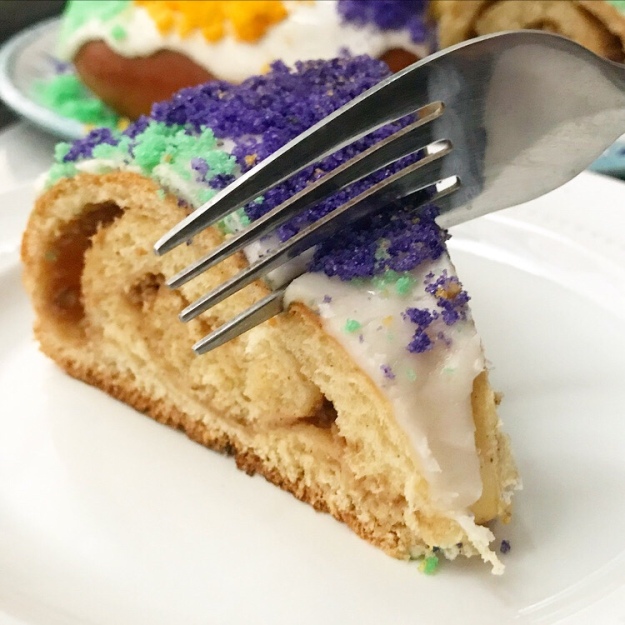
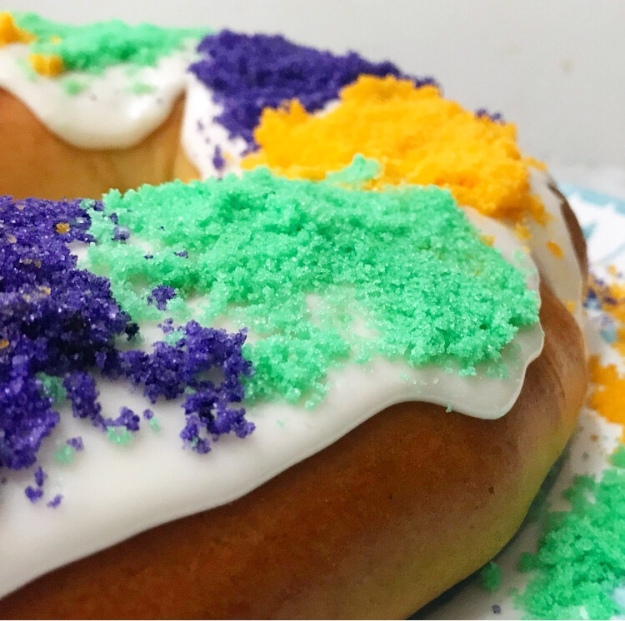
If you love the look of the golden cake, the white icing, and the sparkling, colorful sugars, just wait ‘til you slice it up.

King Cake
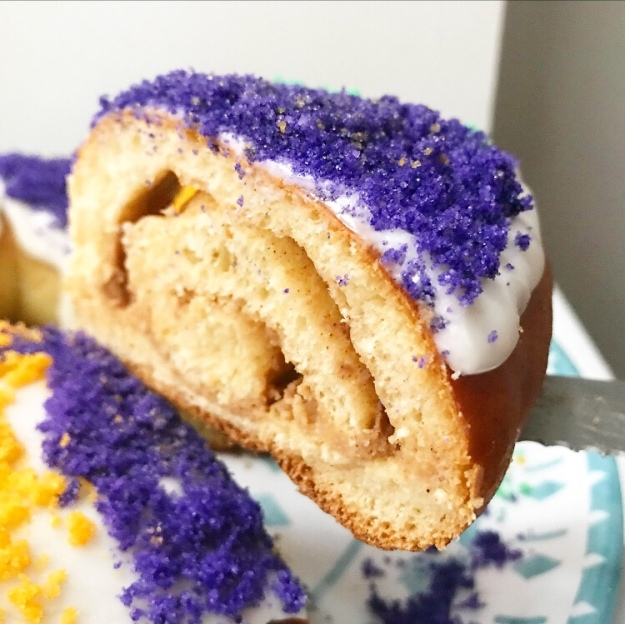
That swirl y’all! And the soft, fluffy interior! And the cinnamon in the cake and the filling! And the cream cheese! It’s a win all around 🙂

King CakeOne last thing: this recipe makes two King Cakes. Before you click away, never to return, here is a list of reasons to have two King Cakes.

  • It takes just as long to make one as it does to make two. Trust me on this.
  • It’s party food, so it’s good to have extra.
  • Need I say again that it bears a lot of similarities to cinnamon rolls? Best weekend breakfast ever!
  • You can freeze the second one. Do it after it’s baked/before it’s iced.
  • Or be the best friend/neighbor ever and give it away.
  • Or even put the spare in the break room at work.
  • Or call me and I will come help you eat it.

King Cake

King Cake
makes 2 cakes

Dough:
5 1/2-6 cups all-purpose flour, divided
1 teaspoon ground cinnamon
1/2 teaspoon ground nutmeg
1/3 cup granulated sugar
1 packet (2 1/4 teaspoons) instant yeast (I use Fleischmann’s Rapid Rise Yeast)
1 1/2 teaspoons Kosher or sea salt
1 1/2 cups buttermilk
6 tablespoons unsalted butter
3 large eggs + 2 large egg yolks, room temperature

Filling:
16 ounces (2 bricks) full-fat bricks-style cream cheese, cool room temperature
2/3 cup dark brown sugar, packed
2 teaspoons ground cinnamon
1 large egg, room temperature
1 tablespoon pure vanilla extract

Egg Wash:
1 large egg
1 teaspoon water

Icing & Garnish:
3 cups confectioners sugar
pinch of Kosher or sea salt
2 teaspoons pure vanilla extract
4-5 tablespoons milk
2 small plastic baby dolls
yellow, green, and purple sprinkles or sugars

In a large mixing bowl, whisk together 5 cups all-purpose flour, cinnamon, nutmeg, sugar, instant yeast, and salt. Set aside.

In a small saucepan, heat buttermilk and butter until hot to the touch, about 115F. Buttermilk may curdle—this is fine, if less than beautiful.

Places eggs and yolks in a small bowl and beat lightly with a fork.

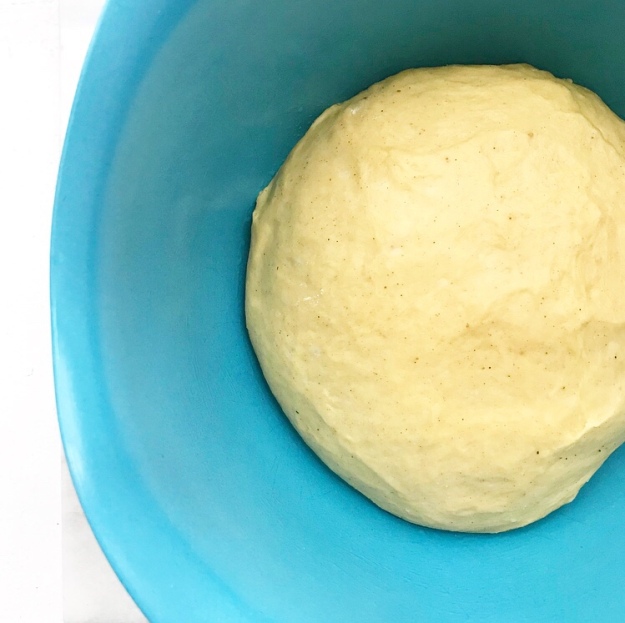
Use a silicone spatula or wooden spoon to fold warm buttermilk mixture into dry ingredients, followed by eggs. Add more all-purpose flour by the 1/4 cup until dough starts to pull away from the sides of the bowl. Knead the dough for 7 minutes on a floured surface before forming into a ball and placing in an oiled bowl. Cover with plastic wrap and let rest for 10 minutes.

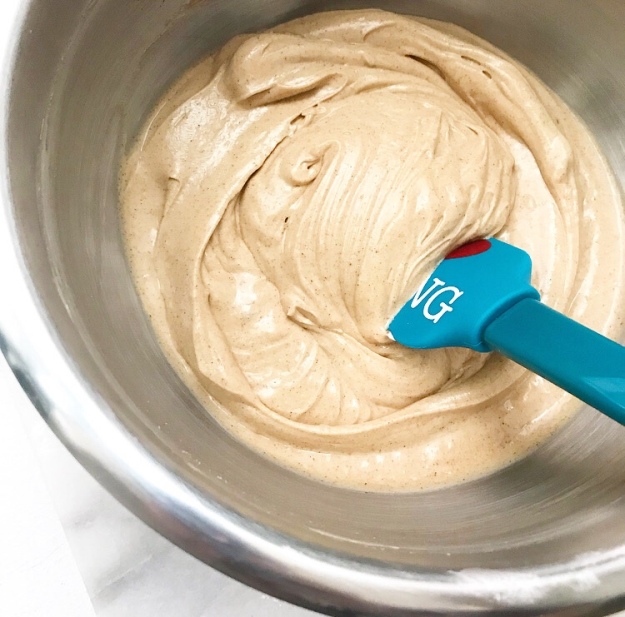
Make the filling. Use an electric mixer to beat cream cheese, dark brown sugar, and cinnamon until combined. Beat in egg and vanilla.

Line two half-sheet pans with parchment paper. Set aside.

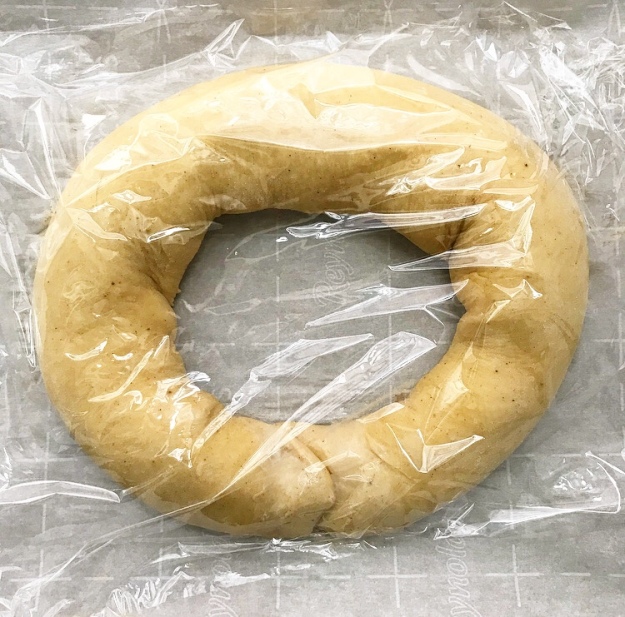
On a lightly floured surface, use a large sharp chef’s knife to cut dough into two pieces. Place one half back in the oiled bowl and cover again with plastic wrap. Roll the other half into a 10×28-inch rectangle. Spoon half the filling over the dough and use a silicone spatula or offset knife to spread mixture over the surface, leaving a 1/2-inch perimeter on all sides. Starting with the long edge furthest from your body, tightly roll filled dough toward you, smoothing any seams with your thumbs. A small amount of filling may squish out—just wipe it off and move on. Carefully lift the cylinder of dough onto one of the parchment-lined pans. Shape into a circle and tuck and seal ends together (a finger dipped in water may help with this). Loosely cover with plastic wrap and place in a warm draft-free environment for 60-90 minutes, until cake has doubled in size. Repeat process with remaining dough.

Place oven racks in the second-from-top and second-from-bottom positions. Preheat oven to 375F.

Once cakes have risen, make egg wash. In a small bowl, whisk together egg and water. Use a pastry brush to brush glaze all over the cakes, being careful not to tear the dough. Bake cakes for 12 minutes. Rotate pans top-to-bottom and front-to-back. Bake an additional 10-13 minutes or until cakes are golden brown all over and cooked through.

Let cakes cool completely on pans on racks.

Make icing. In a small bowl, use a fork to whisk together confectioners sugar and salt. Whisk in vanilla and milk. Icing should be very thick, but pourable.

Place cakes on serving dishes. Cut a small hole in the bottom of each and insert a small plastic baby doll.

Ice the cakes. Working with one cake at a time, pour half the icing onto the surface. Use an offset knife to coax icing over the top of the cake. Decorate with sprinkles or sugars as desired. Before decorating the second cake, give icing a stir—it may have thickened slightly. If necessary, add milk by the teaspoon until it returns to the desired consistency. Repeat icing and decorating process with the second cake. Icing should set after 20 minutes.

King Cakes are best the day they’re made, but will keep covered at room temperature for a day or two.

King Cake

Chocolate Mousse Cake

Chocolate Mousse Cake {Grain-Free}A friend of mine ordered a Chocolate Mousse Cake a couple of weeks ago. I had never made one, but said yes and then figured it out. I occasionally like to live on the edge.

Chocolate Mousse Cake {Grain-Free}As with most baking experiments, I anticipated that it’d either be terribly difficult/never to be made again, or I’d pick up a new skill. What I didn’t expect was how easy this cake would be.

I mean really, really easy.

Like so easy, you’re going to wonder why you haven’t been making this for years.

Chocolate Mousse Cake {Grain-Free}Chocolate Mousse Cake does take time–the cake base has to cool and there’s a long chill once the mousse layer is added–but none of the steps are difficult at all. And at the end, you have this three-layered beauty of a cake that’s airy on the top, rich on the bottom, and completely loaded with chocolate flavor. Oh. My. Goodness.

Chocolate Mousse Cake {Grain-Free}The base of this cake is my grain-free version of Molly Wizenberg’s Winning Hearts & Minds Cake. This seven-ingredient, no-mixer cake is delightfully easy and so delicious, it’s stupid. I have made it so many times that I have memorized the recipe–once I make it for someone, they request it over and over. I’ve yet to find anyone who doesn’t love it! It’s really hard to improve on this chocolate cake, but piling it high with chocolate mousse is a good start 😊

Chocolate Mousse Cake {Grain-Free}Chocolate Mousse Cake {Grain-Free}And speaking of chocolate mousse, this one is super simple to make. There’s no gelatin or egg whites here–this recipe is basically just chocolate, whipped cream, and a cocoa powder slurry. Just gently fold it all together and pile into the pan with the cake. Press some plastic wrap to the top and chill it until the mousse is firm.

Chocolate Mousse Cake {Grain-Free}Chocolate Mousse Cake {Grain-Free}Chocolate Mousse Cake {Grain-Free}When the mousse is ready, run a knife around the edge of the pan and release the springform. Whip some cream, pile it onto the mousse and spread it into an even layer. Smooth the edges, scatter some chocolate curls over the top, and try not to eat the whole thing. With dense cake, fluffy chocolate mousse, and whipped cream, it’s a real concern 🤣

Chocolate Mousse Cake {Grain-Free}Y’all. Y’all! Chocolate Mousse Cake is going to be my new go-to for all occasions. The ease-to-“OMG” ratio is off the charts! This cake is just as at home at a casual fall picnic as it is at a dinner party. And since it’s gluten-free, it might be one dessert that everyone at your Thanksgiving table can agree on.

Chocolate Mousse Cake {Grain-Free}Chocolate Mousse Cake: it brings people together.Chocolate Mousse Cake {Grain-Free}

Chocolate Mousse Cake {Grain-Free}
mousse adapted from Brown Eyed Baker
makes one 9-inch round cake

Cake:
7 ounces bittersweet chocolate, chopped
7 ounces unsalted European-style butter, cut into small pieces
1 1/3 cups granulated sugar
5 large eggs, room temperature
1/2 teaspoon pure vanilla extract
1 tablespoon cocoa powder (natural or Dutch process)
1/2 teaspoon Kosher or sea salt

Mousse:
7 ounces bittersweet chocolate, chopped
2 tablespoons cocoa powder (natural or Dutch process)
3 tablespoons hot tap water
1 1/2 cups heavy cream, cold
1 teaspoon pure vanilla extract
1 1/2 tablespoons confectioner’s sugar
pinch of Kosher or sea salt

Whipped Cream & Garnish:
1 1/2 cups heavy cream, cold
2 tablespoons confectioner’s sugar
chocolate curls, for garnish (optional)

READ THE ENTIRE RECIPE BEFORE PROCEEDING.

Preheat oven to 375F. Grease a 9-inch springform pan with butter. Line the bottom with parchment and grease again. Set aside.

In a double boiler or the microwave, melt dark chocolate and butter together, stirring occasionally, until smooth. Whisk in sugar. Allow to cool slightly.

Whisk in one egg at a time, combining completely after each addition. Stir in vanilla. Whisk in cocoa powder and salt, scraping down the bowl as necessary. Pour batter into prepared pan. Bake for 20-25 minutes, until the center jiggles just slightly when the pan is jostled. Let cool completely in the pan on a rack, about 90 minutes to 2 hours. Do not remove the springform. Cake may be made up to a day in advance.

Make the mousse. In a double boiler or the microwave, melt dark chocolate, stirring occasionally, until smooth. Let cool to room temperature.

In a small bowl, whisk together cocoa powder and hot tap water.

In a large mixing bowl, combine heavy cream, vanilla, confectioner’s sugar, and salt. Use an electric mixer to whip the mixture on low for 30 seconds before whipping on high for 1-2 minutes, or until stiff peaks form.

Transfer melted chocolate to a medium-large mixing bowl. Use a silicone spatula or wooden spoon to stir the cocoa powder mixture and 1/3 of the whipped cream into the chocolate. Gently fold the remaining whipped cream into the chocolate until no white streaks remain.

Pile the mousse on top of the cooled cake (still in the pan). Spread it into an even layer and tap the pan on the counter a few times to release any large air bubbles. Stick a layer of plastic wrap to the surface of the mousse. Refrigerate for at least 3 hours or overnight.

Remove cake from the refrigerator and let sit at room temperature for 30 minutes. Remove plastic wrap. Run a thin, flexible knife dipped in warm water around the edge of the pan before removing the springform.

Make the whipped cream. Combine heavy cream and confectioner’s sugar in a large mixing bowl. Use an electric mixer to whip the mixture on low for 30 seconds before whipping on high for 1-2 minutes, or until stiff peaks form.

Pile whipped cream onto the cake before spreading it into an even layer. Use a knife dipped in warm water to smooth the outer edge of the cake. Garnish with chocolate curls, if desired.

Serve cake immediately or refrigerate. For clean slices, dip the knife in warm water and wipe dry between cuts.

Chocolate Mousse Cake

Apple Cider Coffee Cake

Apple Cider Coffee CakeIt’s no secret that I don’t like Halloween. I’m ambivalent about wearing costumes and if I’m going to eat candy, I’d like for it to be full-sized.

Apple Cider Coffee CakeThat’s not to say I haven’t participated in the festivities as an adult. Just last year, my friend, VJ, showed up at my apartment with a panda costume. She was dressed as a unicorn. On our way to a party, we somehow got on the one car of the R train where literally nobody else was in costume. “So a panda and a unicorn get on the subway…”

Halloween We went outside like this.

Long story short, I’m skipping the Halloween treats this year. If you aren’t, I recommend these, these, and these (please forgive the terrible photos on that last link).

Apple Cider Coffee CakeInstead, I’m putting my energy toward dreaming up and making excellent “company” breakfasts, i.e. the sort of dessert-masquerading-as-breakfast that is socially accepted when you have a house full of guests in November and December. Cinnamon rolls are a common choice for such occasions, but I recommend you save those for another day and make this Apple Cider Coffee Cake instead. It’s faster, doesn’t involve fiddling with yeast, and has two layers of that crunchy crumb that everyone loves.

Apple Cider Coffee CakeThe base of this coffee cake is basically a souped up muffin batter. I started with my Orange Pecan Muffin recipe and then made a few changes. I swapped the oil for butter, the yogurt for sour cream, and the milk for an apple cider reduction. Oh, and I threw in some pie spices and chunks of tart apple. Flavor all over the place, y’all.

Apple Cider Coffee CakeLet’s talk about that apple cider reduction. It’s an easy way to get big flavor! This is the base of flavor in this recipe, so make sure to use quality apple cider–the refrigerated stuff, not the shelf-stable variety. Pour two cups of it into a saucepan, bring it to a simmer over medium-high heat, and let it go. This will take 20-30 minutes; I recommend checking the amount every ten minutes. Once it’s at 2/3 cup, let it cool to room temperature so it doesn’t melt your butter or scramble the egg. This is a very hands-off task, but if it seems like a little too much, you can do this step a day in advance and then refrigerate the reduction until you’re ready to use it.

Apple Cider Coffee CakeApple Cider Coffee CakeEnough about batter though. Coffee cake crumb topping is where it’s at! It’s crispy, crunchy cinnamon-brown sugar magic–the perfect foil for that rich, appley cake. The crumb recipe I use here is the same one from my Cranberry Crumb Pie. It comes together super quickly and easily and…well, I’m totally crazy about it.

Apple Cider Coffee CakeTo assemble the cake, butter a springform pan and line it with parchment. If you don’t have a springform, you may bake this cake in a deep (!) 9-inch cake pan. Dividing it into two loaf pans may work too, but I haven’t tried it. Let me know if you do!

Apple Cider Coffee CakeLayer the ingredients into the pan, starting with half the batter. Top it with half of the crumb. Then more batter, then more crumb. Bake it for nearly an hour, until the top is nice and golden.

Apple Cider Coffee CakeLet the cake cool completely in the pan before releasing the springform and dusting it with confectioner’s sugar.

Apple Cider Coffee CakeInvite a friend or two over, put on a pot of coffee, and slice up the cake!

Apple Cider Coffee CakeYou are going to love the combination of rich, buttery apple cider cake and the almost meltingly-soft chunks of apple, not to mention the craggy crumb 😍 I’ve made two of these this week and I know there will be many more before 2017 is over.

Can’t. Get. Enough.Apple Cider Coffee Cake

Apple Cider Coffee Cake
makes one 9-inch round cake

Batter:
2 cups apple cider
2 cups all-purpose flour
1/2 cup granulated sugar
1/4 cup light brown sugar, packed
1 1/2 teaspoons ground cinnamon
1/4 teaspoon ground allspice
1/4 teaspoon ground nutmeg
1 1/2 teaspoons baking powder
1/4 teaspoon baking soda
1/2 teaspoon Kosher or sea salt
1/2 cup (1 stick) unsalted butter, softened to room temperature
1 large egg, room temperature
3/4 cup full-fat sour cream
1 teaspoon pure vanilla extract
1 large tart baking apple, peeled &1/2-inch diced (I used Granny Smith)

Crumb:
1 cup + 2 tablespoons all-purpose flour
3/4 cup + 2 tablespoons light brown sugar, packed
1 teaspoon ground cinnamon
pinch of Kosher or sea salt
1 teaspoon pure vanilla extract
1/2 cup (1 stick) unsalted butter, cold, cut into cubes

Garnish:
1-2 tablespoons confectioner’s sugar

Pour apple cider into a small saucepan. Heat over medium-high heat for 20-30 minutes, until reduced to 2/3 cup. Set aside to cool to room temperature.

Make the crumb. In a large mixing bowl, whisk together flour, light brown sugar, cinnamon, and salt. Pour in vanilla. Add butter. Use your hands (or a pastry blender) to work butter into dry ingredients until a clumpy but homogenous mixture forms. Set aside.

Preheat oven to 350F. Grease a 9-inch springform pan with butter. Line with parchment. Grease parchment with butter. Set aside.

In a medium mixing bowl, whisk together flour, granulated sugar, light brown sugar, cinnamon, allspice, nutmeg, baking powder, baking soda, and salt. Set aside.

In a large mixing bowl, use an electric mixer to beat butter until fluffy. Mix in egg, apple cider reduction and sour cream; mixture may be a bit lumpy. Add dry ingredients in two installments, mixing just until combined. Use a silicone spatula or wooden spoon to fold in apple pieces.

Pour half the batter into the prepared pan and spread it evenly. Top with half the crumb. Pour in the remaining batter and sprinkle with the last of the crumb. Place full pan on a baking sheet and bake 50-60 minutes, until a toothpick inserted in the center comes out clean.

Let cool completely in the pan on a rack. Run a thin, flexible knife around the edge of the pan before releasing the springform. If you’d like, invert the cake and remove the parchment before placing on a serving platter. Sift confectioner’s sugar over the top. Serve.

Leftover cake will keep well at room temperature for up to two days, or in the refrigerator for up to five.

Apple Cider Coffee Cake

Flourless Chocolate Hazelnut Cake

Flourless Chocolate Hazelnut CakeI spent this past weekend celebrating my little sister, Eliot’s 30th birthday. We ate breakfast tacos and went to our first game at Fenway Park and laughed til we cried at least once. We also put on one hell of a birthday party in her Cambridge, MA, apartment, complete with lots of friends, a batch of salsa, and two of these Flourless Chocolate Hazelnut Cakes.

Flourless Chocolate Hazelnut CakeEliot didn’t specifically ask for this cake. When we started talking about her birthday a few weeks ago, she said she’d be perfectly happy with Fluffernutter Sandwich Cookies or the Winning Hearts & Minds Cake we both love so much. After her summer in India, she’s discovered that maybe wheat isn’t for her, so her main request was that whatever I made be gluten-free. That was easy enough–I am all about flourless cakes. And chocolate and hazelnut is her favorite sweet flavor combination, so here we are.

Flourless Chocolate Hazelnut CakeY’all, this Flourless Chocolate Hazelnut Cake is like a combination between a fudgy brownie and a jar of Nutella. Chocolate hazelnut overload! It’s very simple to put together and only has six ingredients: bittersweet chocolate, hazelnuts, eggs, butter, sugar, and salt. Yep, that’s all it takes to make this cake, but as with most recipes that have minimal ingredients, each one must be handled with care.

Flourless Chocolate Hazelnut CakeThe chocolate has to be melted and cooled to room temperature.

Flourless Chocolate Hazelnut CakeFlourless Chocolate Hazelnut CakeThe hazelnuts have to be toasted before having their skins removed and being blitzed into a fine meal.

Flourless Chocolate Hazelnut CakeFlourless Chocolate Hazelnut CakeFlourless Chocolate Hazelnut CakeFlourless Chocolate Hazelnut CakeFlourless Chocolate Hazelnut CakeThe eggs need to be separated and the whites have to be whipped to stiff peaks.

Flourless Chocolate Hazelnut CakeYes, all of that must be done before the batter can be put together. None of those steps are difficult or time-consuming, but they are completely necessary–no shortcuts here!

Flourless Chocolate Hazelnut CakeTo make the batter, cream the butter and sugar together. Beat in the egg yolks and hazelnut meal before adding the chocolate. Stir 1/4 of the whipped egg whites into the batter before carefully folding in the rest 1/4 at a time. Pour it all into a buttered, parchment-lined cake pan and bake it just until a tester comes out clean.

Flourless Chocolate Hazelnut CakeInvert it onto a foil-lined plate.

Flourless Chocolate Hazelnut CakeRevert it onto a serving dish (or your favorite cake stand).

Flourless Chocolate Hazelnut CakeFlourless Chocolate Hazelnut CakeEliot wanted her cake served with a dusting of confectioners sugar, but I prefer it with a puddle of ganache and some more toasted, skinned hazelnuts.

Flourless Chocolate Hazelnut CakeFlourless Chocolate Hazelnut CakeSlice it up and try not to eat the whole thing.

Flourless Chocolate Hazelnut CakeThis Flourless Chocolate Hazelnut Cake is truly phenomenal. Chocolaty, hazelnutty (it’s a word today, okay?!), rich, but not too heavy–basically everything you want in a decadent dessert! Between testing, partying, and blogging, I’ve made five of these in the past week, and I am still having a hard time not sneaking bites and evening out edges.

Flourless Chocolate Hazelnut CakeBasically, what I’m saying is make this, and/or come take cake #5 away from me 🙂🙃

Flourless Chocolate Hazelnut CakeHappy birthday, Smel!

Flourless Chocolate Hazelnut Cake
makes one 9-inch cake

6 ounces bittersweet chocolate, chopped (I use Trader Joe’s Pound Plus Dark Chocolate)
6 ounces (1 heaping cup) whole raw hazelnuts 
6 large eggs, separated, room temperature
1/4 teaspoon Kosher or sea salt
6 ounces (1 1/2 sticks) unsalted butter, softened to room temperature 
1 cup granulated sugar

Garnish:
3 ounces (heaping 1/2 cup) whole raw hazelnuts
7 tablespoons heavy cream
5 ounces bittersweet chocolate, chopped

In a double boiler or the microwave, melt bittersweet chocolate. Set aside to cool to room temperature.

Preheat oven to 350F. Grease a 9-inch round cake pan with butter. Line the bottom with parchment and butter again. Set aside.

Place hazelnuts on a dry, rimmed sheet pan. Toast in the oven for 5-7 minutes, or until fragrant. Immediately transfer hazelnuts to a clean, dry, textured hand towel. Fold towel around the hazelnuts and then rub the towel with the palm of your hand. This will allow the hazelnut skins to loosen. This step does not have to be done perfectly.

Transfer hazelnuts to the bowl of a food processor. Pulse until a fine meal forms. Set aside.

Place egg whites and salt in a very clean, dry large mixing bowl. Use a very clean, dry electric mixer on medium-high speed to beat egg whites until stiff peaks form. Set aside.

In a separate large mixing bowl, use an electric mixer to beat butter until fluffy, about 1 minute. Add sugar and beat until combined. Add egg yolks three at a time, mixing to combine. Add hazelnut meal in two installments, followed by room-temperature melted chocolate.

Use a silicone spatula to add 1/4 of the whipped egg whites to the batter, stirring as much as necessary to get them to incorporate.

Continue adding the whipped egg whites in 1/4 increments, gently folding them into the batter.
Transfer batter to prepared pan. Bake 23-27 minutes, or until a toothpick inserted in the center comes out clean. Top may still be a bit jiggly, but it will set as the cake cools. Let cake cool completely in the pan on a rack.

Release the cake. Line a dinner plate with foil. Dip a small knife in warm water and slowly run it around the edge of the pan, dipping again as necessary, to loosen the cake. Place the dinner plate, foil-side down, on top of the cake pan. Holding on to both the pan and the plate, quickly flip them over. Remove the pan and the parchment. Gently place a serving plate, top-side down, onto the bottom of the cake. Holding tightly to both plates (but not so much as to crush the cake), quickly revert. Remove the foil-lined dinner plate.

Prepare the garnish. Place hazelnuts on a dry, rimmed sheet pan. Toast in the oven for 5-7 minutes, or until fragrant. Immediately transfer hazelnuts to a clean, dry, textured hand towel. Fold towel around the hazelnuts and then rub the towel with the palm of your hand. This will allow the hazelnut skins to loosen. Set aside to cool completely.

Warm cream in a small saucepan over medium-low heat, just until it simmers. Remove from heat and add chopped chocolate. Let sit undisturbed until chocolate looks soft. Stir with a fork until smooth. Spread or drizzle ganache over the cake. Dot with toasted hazelnuts, as desired.

Chocolate will set a bit after 20 minutes. Cake will keep covered at room temperature for up to two days, or in the refrigerator for up to three.

Flourless Chocolate Hazelnut Cake

Pumpkin Bundt Cake

Pumpkin Bundt CakeI have loved baking with berries and stone fruit all summer, but I’d be lying if I said I’m not excited to do some fall baking. For the past couple of weeks I’ve been daydreaming about apples and pears, cranberries and warming spices, and of course, pumpkin. I’ve already gone through five cans of the stuff while testing upcoming recipes! If you love pumpkin, you’ve come to the right place.

Pumpkin Bundt CakeThis first recipe of fall is a great one, if I do say so myself. This Pumpkin Bundt Cake is soft, sweet, and full of that seasonal flavor we all love. It’s made with an entire 15-ounce can of pumpkin purée and a hefty dose of pumpkin pie spice.

Pumpkin Bundt CakePumpkin Bundt CakePumpkin by itself has a very subtle flavor, so quality pumpkin pie spice is imperative for quality baked goods. While there are many great store-bought versions, I prefer to make my own Pumpkin Pie Spice blend. It’s a combination of seven warming spices including all of the ones you’d expect (think cinnamon and nutmeg) and a couple of surprises (think cardamom). It has a depth that I haven’t found in even the highest quality packaged versions. I swear by this particular blend, but feel free to use any Pumpkin Pie Spice you like.

Pumpkin Bundt CakeEnough about spices though. Pumpkin Bundt Cake is a breeze to make. The simple no-mixer-required batter comes together in just a few minutes. In addition to the pumpkin purée and pie spice, it contains oil, light brown and granulated sugars, four eggs, and all the other usual suspects.

Pumpkin Bundt CakePumpkin Bundt CakeOnce the beautiful orange batter is ready, pour it into a bundt pan that has been heavily greased and floured. While I usually rely on a paste of oil and flour to keep my cakes from sticking, that particular method does not work well with this recipe. Instead, I recommend heavily (and I mean heavily) greasing every nook and cranny of the pan with butter, or even shortening, and giving it a good dusting of flour. Pour the batter into the pan and bake it for forty minutes. Let the cake cool for a few minutes before running a knife along all of the edges and inverting it. There’s nothing quite like the relief that comes when a bundt cake comes out in one piece.

Pumpkin Bundt CakePumpkin Bundt CakeThe cake itself may be made up to a day in advance. To do this, let the cake cool to room temperature before carefully wrapping it in plastic and letting it sit overnight. The pumpkin spice flavor will actually deepen as the cake sits, making this a very appealing make-ahead dessert. If you don’t have that kind of time though, your cake will still be delicious on the day it’s baked.

Pumpkin Bundt CakePumpkin Bundt CakePumpkin Bundt CakePumpkin Bundt CakeBefore serving, glaze the cake. I prefer to use a vanilla glaze here, but feel free to add a pinch of cinnamon or pumpkin pie spice to jazz it up. To make the glaze, whisk together some confectioners sugar, salt, vanilla, and milk until thick, but still pourable. Carefully pour it over the top of the cake and then let gravity do its job. It will turn out rustic and beautiful every time 

Pumpkin Bundt CakePumpkin Bundt CakePumpkin Bundt CakeI love this cake so much, you guys. It has a moist crumb and a fairly light texture; it will stay soft for days! And the flavor is everything you want in a pumpkin baked good–there is just enough spice 😊 Like I said, I’m positively in love. 

Pumpkin Bundt CakeHappy fall, y’all 🍂🍁Pumpkin Bundt Cake

Pumpkin Bundt Cake
makes one 12 cup-capacity bundt pan

For the pan:
2 tablespoons softened butter or shortening
~1 tablespoon all-purpose flour

Cake:
2 1/4 cups all-purpose flour
2 teaspoons baking powder
1 teaspoon baking soda
1/2 teaspoon Kosher or sea salt
1 tablespoon Pumpkin Pie Spice
1 teaspoon ground cinnamon
4 large eggs, room temperature
1 cup light brown sugar, packed
2/3 cup granulated sugar
1 cup neutral-flavored oil (I like canola)
1 teaspoon pure vanilla extract
1 15 ounce can pure pumpkin purée (I like Libby’s and Trader Joe’s)

Glaze:
1 1/2 cups confectioners sugar
pinch of Kosher or sea salt
1 teaspoon pure vanilla extract
2 tablespoons milk

Preheat oven to 325F. Grease a 12 cup-capacity bundt pan heavily with butter or shortening and dust with flour. Set aside.

Make the cake. In a small mixing bowl, whisk together flour, baking powder, baking soda, salt, pumpkin pie spice, and cinnamon. Set aside.
In a large mixing bowl, whisk eggs until frothy (about 1 minute). Whisk in light brown and granulated sugars followed by oil, vanilla, and pumpkin purée. Add dry ingredients in two installments, mixing just until combined. Pour batter into prepared pan. Smooth out the batter with a spatula or wooden spoon. Tap the full pan on the counter 5-10 times to release air bubbles. Bake 40 minutes, or until a toothpick inserted in a few spots comes out with just a few moist crumbs.

Let cake cool in the pan for 15 minutes. Run a small, thin knife around the outer edges of the pan before inverting the cake onto a rack to cool completely.

Make the glaze. In a small bowl, use a fork to whisk together confectioners sugar and salt. Whisk in vanilla and milk. Glaze should be thick, but pourable.

Place the cake (still on the cooling rack) over a sheet of wax paper. Pour glaze over the top. Let sit for 20 minutes to set. Move cake to a serving plate before slicing and serving.

Pumpkin Bundt Cake