It has been documented on here that I fear making cheesecakes, but that’s not exactly true. I don’t fear cheesecake, I fear a leaking springform pan in a water bath (bain marie). Yes, I know you are supposed to wrap it in foil, but I’ve never seen anyone explain in exacting, painstaking, borderline-dull detail how you should do that so that there is absolutely no risk of leakage. And so, I have still (!!!) never made a traditional baked-in-a-springform cheesecake.
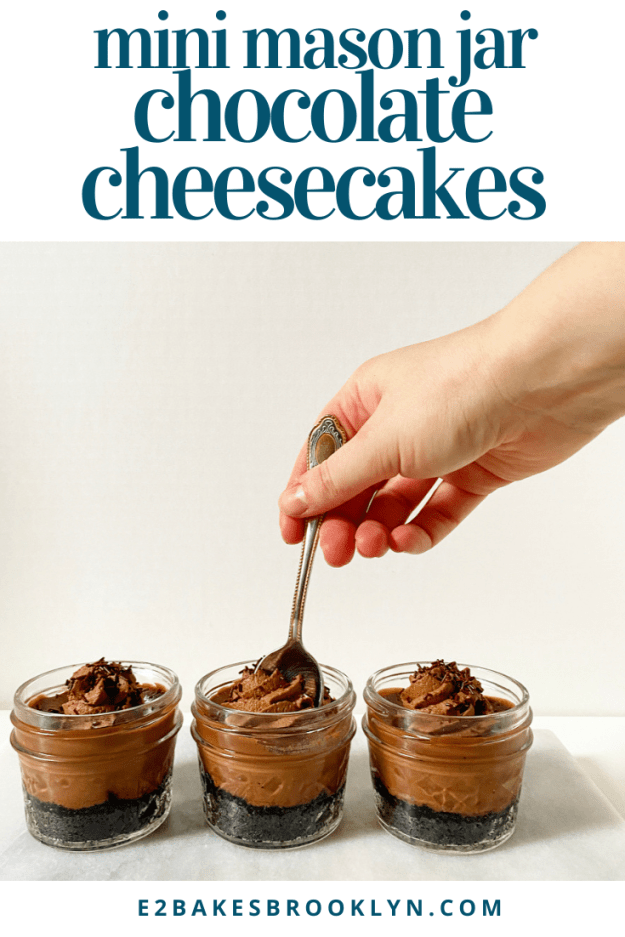
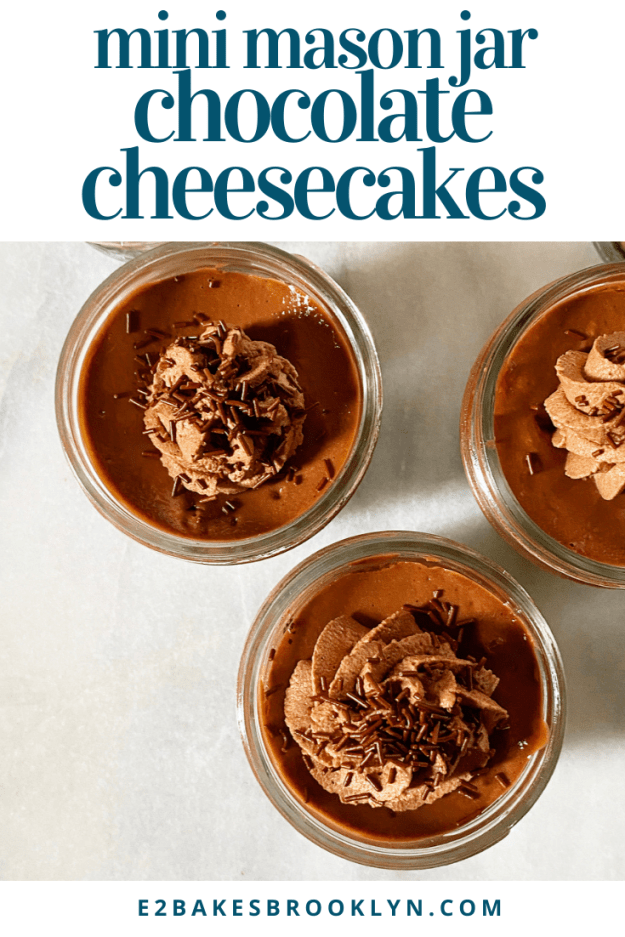
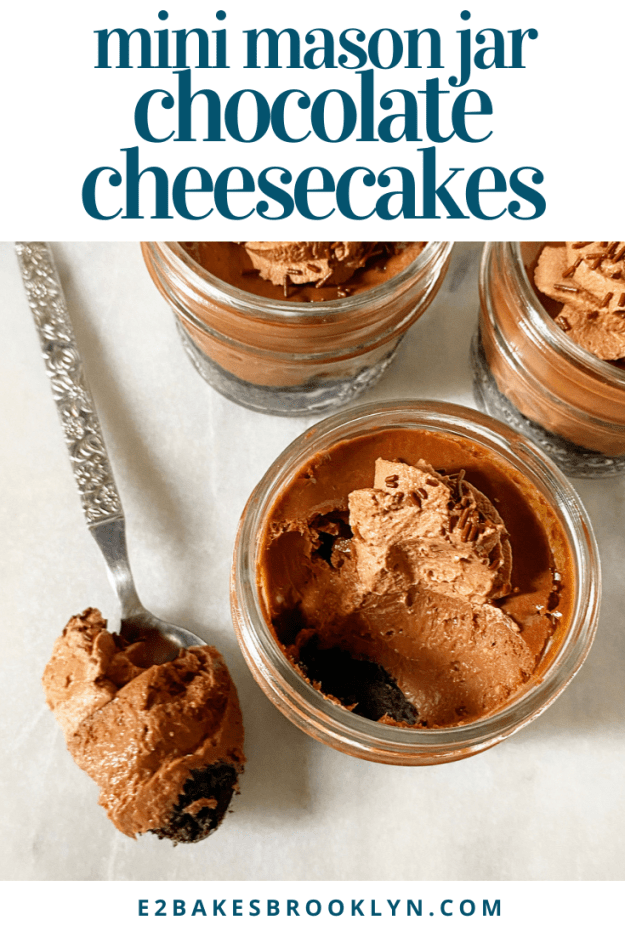
I have, however, made cheescake bars, cheesecake thumbprints, cheesecake brownies, cheesecake blondies, vegan cheesecakes, and now two different kinds of Mini Mason Jar Cheesecakes, because while I may not be super brave, I am nothing if not a problem solver. These Mini Mason Jar Chocolate Cheesecakes are SO good, y’all. So. Good. And they come in very cute, water tight, social distancing-approved serving vessels. Super rich, chocolaty filling, Oreo crust *and* no fiddling with a springform pan? Sign me up!
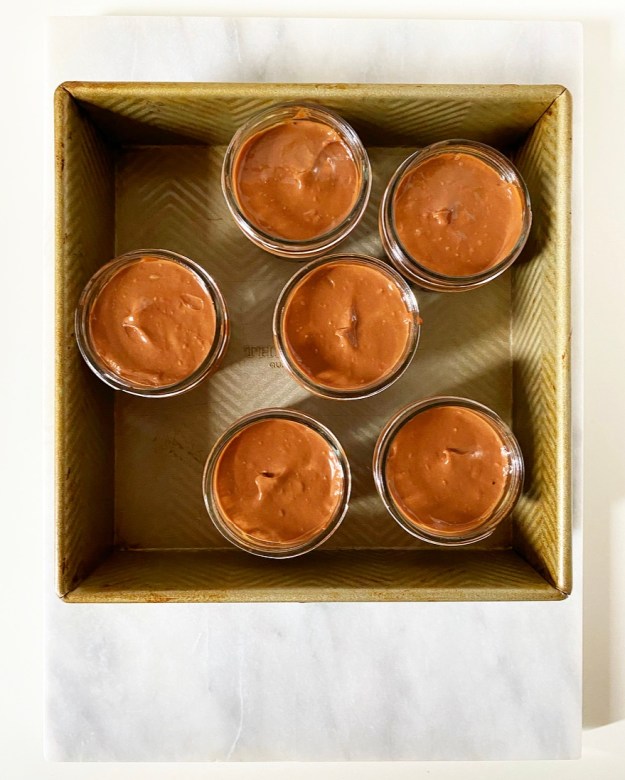
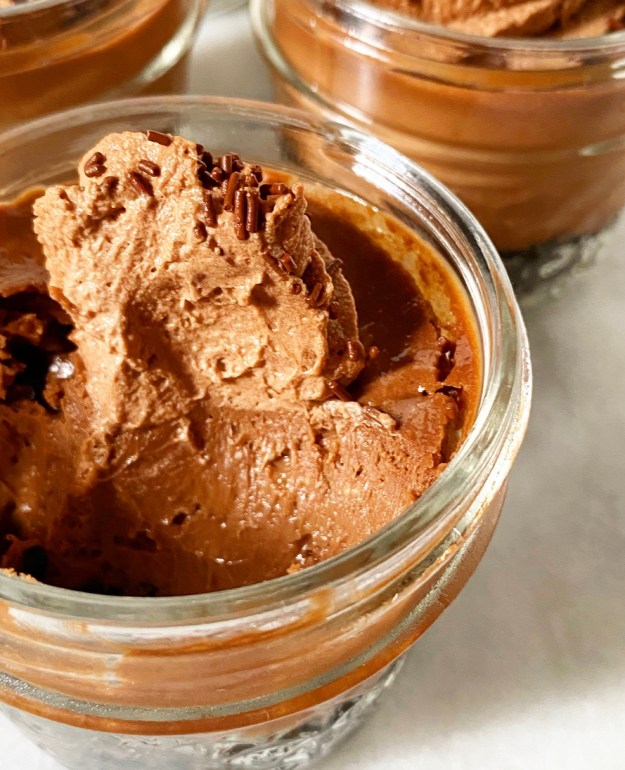 The crusts for these little cheesecakes are just Oreos and melted butter blitzed together in a food processor. Spoon a couple tablespoons into each of your mason jars and give them a few minutes in the oven before adding your filling.
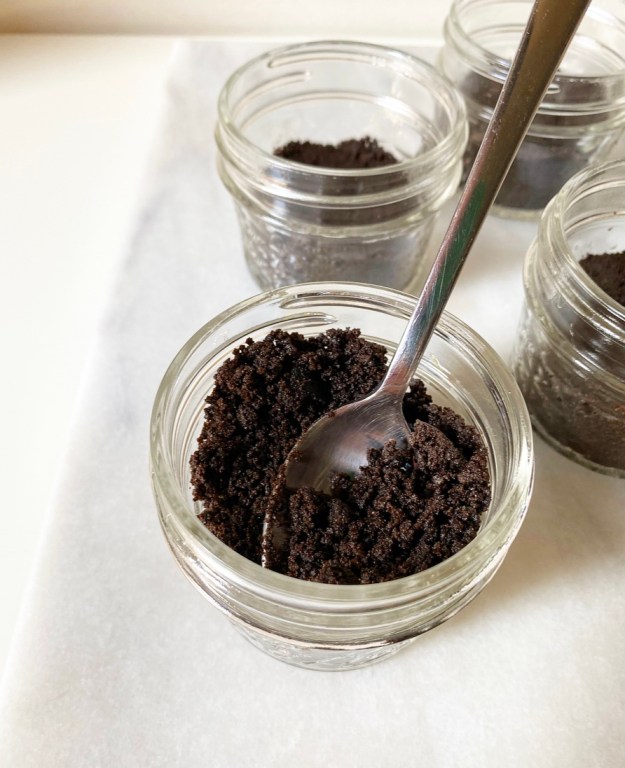 This chocolate cheesecake filling is super chocolaty from melted dark chocolate and cocoa powder, and has a little extra depth from light brown sugar (though granulated works too). The rest of the ingredients are standard cheesecake fare: cream cheese, sour cream, vanilla and an egg.
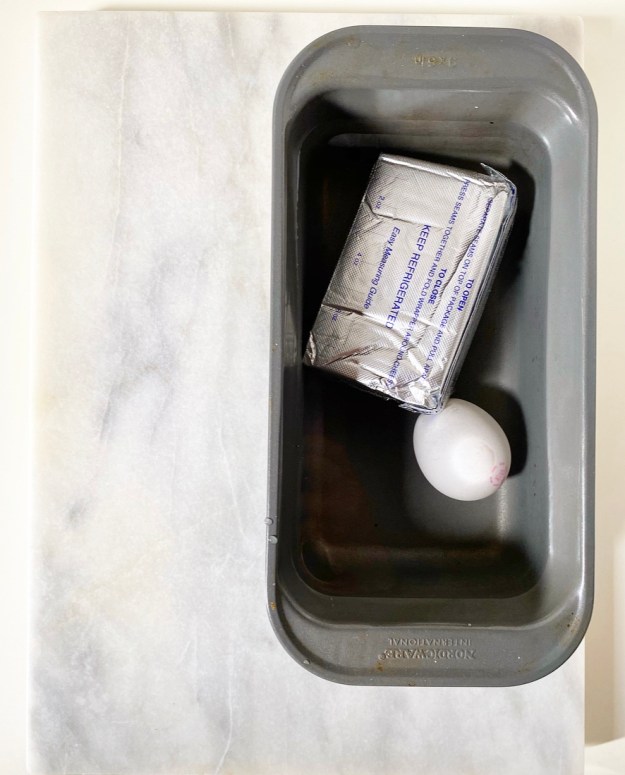 By far, the most important advice I can give you about making cheesecake is to make absolutely sure that your ingredients are at room temperature. If you’re more organized than I am, you can set your cream cheese out the night before. If you’re like me, just let it hang out (in its packaging) in a bowl of lukewarm tap water for 15 minutes. Throw your egg in there for maximum efficiency.
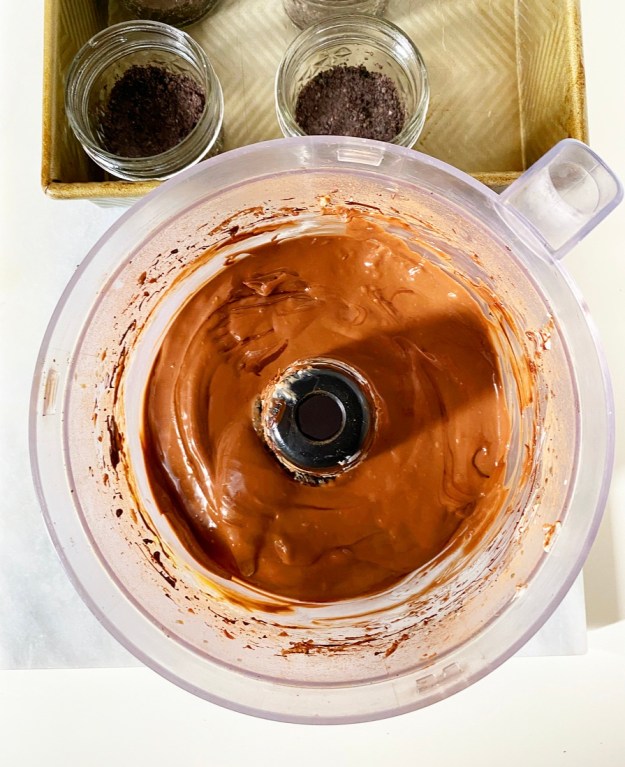
 You can make the filling in your food processor (just wipe it out) or use a mixer. Either way, make sure to give the bowl some taps on the counter and let it rest a few minutes to release any large air bubbles before baking. Then spoon it onto your crusts and bake for about 25 minutes. Let the baked cheesecakes hang out in their water bath for five more minutes before transferring them to a rack to cool completely. This brief step helps them transition from the hot oven to your cooler counters more seamlessly. Cheesecakes are divas, in case you couldn’t already tell.
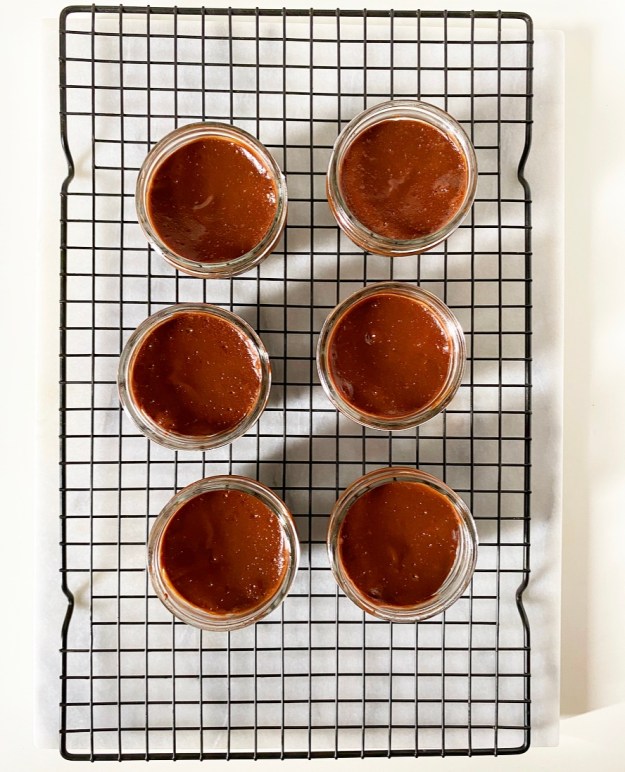 Once your chocolate cheesecakes hit room temperature, throw them in the fridge for a few hours to get nice and cold. This will seem endless, but will give you plenty of time to dream up toppings. I went for my new favorite Chocolate Whipped Cream and chocolate sprinkles, but you could do chocolate shell, chopped candy bars, fresh fruit or anything else your heart desires.
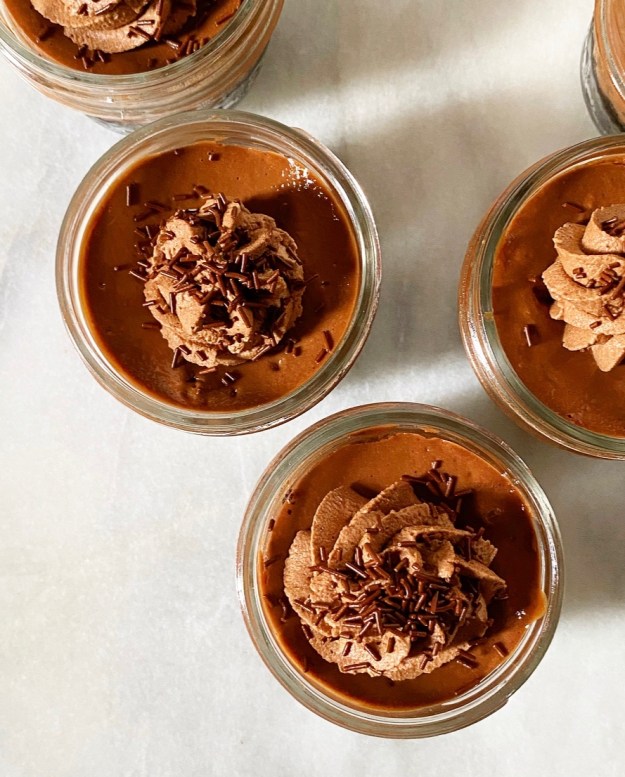 I won’t lie to you, Mini Mason Jar Chocolate Cheesecakes are a commitment, but take one bite and I promise you’ll agree that theyre entirely worth the effort. They’re super smooth and tangy with a big hit of chocolate, and that Oreo crust…well, I think we can all agree that Oreo crust should probably run for president.
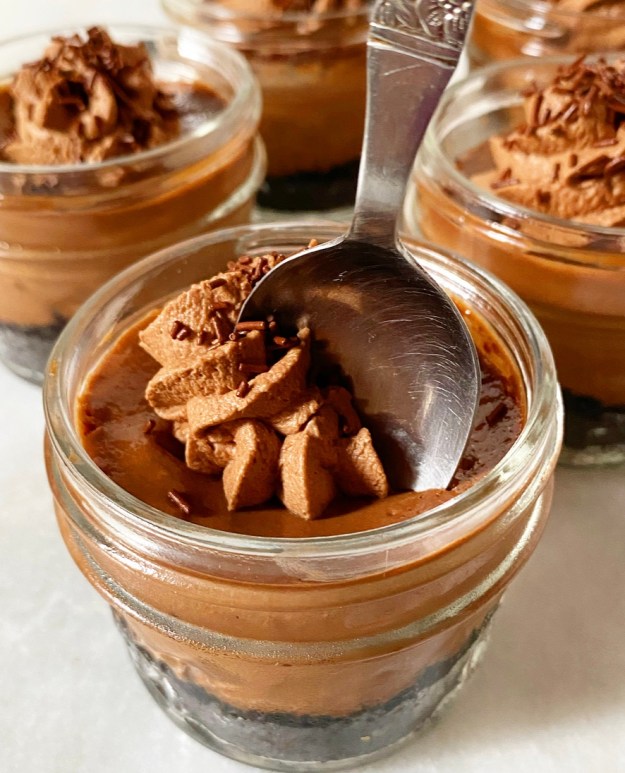 And on that note, enjoy this unofficial last weird weekend of this extremely weird summer. It’ll be two more weeks before I break out the pumpkin, and while that seems like eternity, I hope these chocolate cheesecakes soften the blow.
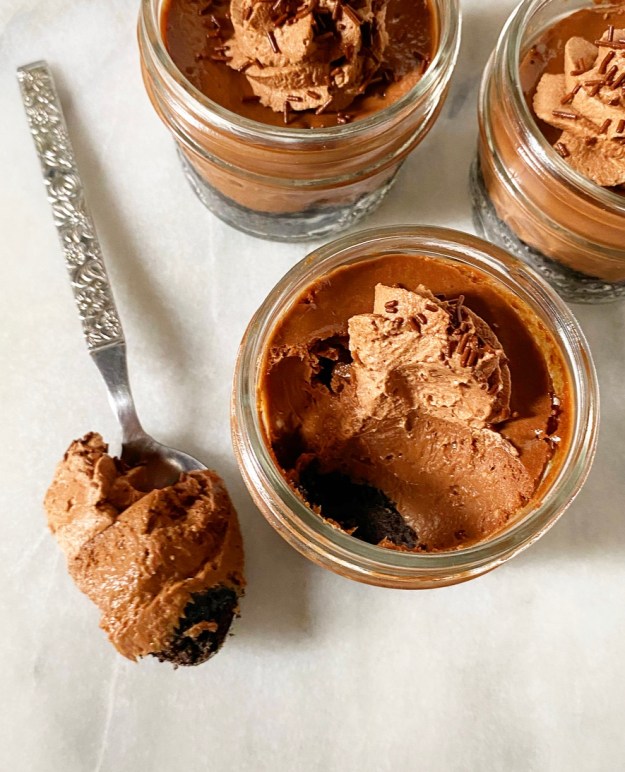
Mini Mason Jar Chocolate Cheesecakes
makes 6 small cheesecakes
Crust:
12 Oreos
2 tablespoon unsalted butter, melted
Cheesecake Filling:
1 8 ounce brick full-fat cream cheese, room temperature
1/4 cup light brown sugar, packed
1 1/2 teaspoons natural unsweetened cocoa powder
1/4 cup full-fat sour cream (or Greek yogurt), room temperature
1 teaspoon pure vanilla extract
2.5 ounces dark chocolate, melted and cooled
1 large egg, room temperature
For Garnish:
Chocolate Whipped Cream
chocolate sprinkles (hagelslag)
Homemade Chocolate Shell
Preheat oven to 325F. Grease 6 4-ounce mason jars.
Make the crust. Place Oreos and melted butter in the bowl of a food processor and process until the mixture resembles wet sand, scraping down the sides of the bowl as necessary.
Spoon 2 tablespoons of the crust mixture into eat prepared mason jar. Press down to form a crust. Place mason jar crusts in a high-rimmed dish. Bake crust for 10 minutes. Cool on a rack while you prepare the filling.
Make cheesecake filling. You have two options:
If using a food processor: Wipe out any errant crust pieces. Add cream cheese, brown sugar and cocoa powder to the bowl of the food processor and process until smooth, stopping and scraping down the sides as necessary. Add sour cream and vanilla and process until smooth. Whirl in melted chocolate. Add egg and process just until combined. Tap bowl on the counter 10 times and let batter rest 10 minutes.
If using a mixer: In a medium mixing bowl, use an electric mixer to beat cream cheese until fluffy. Mix in brown sugar and cocoa powder, followed by sour cream and vanilla, until mixture is smooth. Mix in chocolate. Add egg and mix just until combined. Tap bowl on the counter 10 times and let batter rest 10 minutes.
Once your batter is rested, divide the cheesecake mixture into the mason jars, about 1/4 cup each. Use the back of a spoon to lightly smooth out the tops, then tap each one on the counter a few times to release any air bubbles. Return jars to the high-rimmed pan, and place the pan on a counter near the oven.
Bring a small pot of water to a boil. Remove from heat. Carefully pour water into the baking pan until it is halfway up the sides of the cheesecakes. Do not get water in the mason jars. Carefully move pan into the oven. Bake 25 minutes, or until puffed and *barely* jiggly in the centers. Let cheesecakes stay in their water bath for 5 more minutes.
Use tongs to carefully remove mason jar cheesecakes to a rack. Do not get water in the mason jars.
Let cheesecakes cool completely on a rack; the centers will collapse a bit. Transfer to the refrigerator for at least 3 hours, or until thoroughly chilled. If not serving immediately, cover with plastic wrap. Garnish with chocolate whipped cream, chocolate sprinkles, homemade chocolate shell, or other desired topping before serving.
Store leftover cheesecakes in the refrigerator for up to 4 days. To freeze, press plastic wrap to the surfaces of the cheesecakes and screw on mason jar lids. Freeze for up to one month. Thaw in the refrigerator overnight or in a dish of lukewarm water at room temperature for an hour.
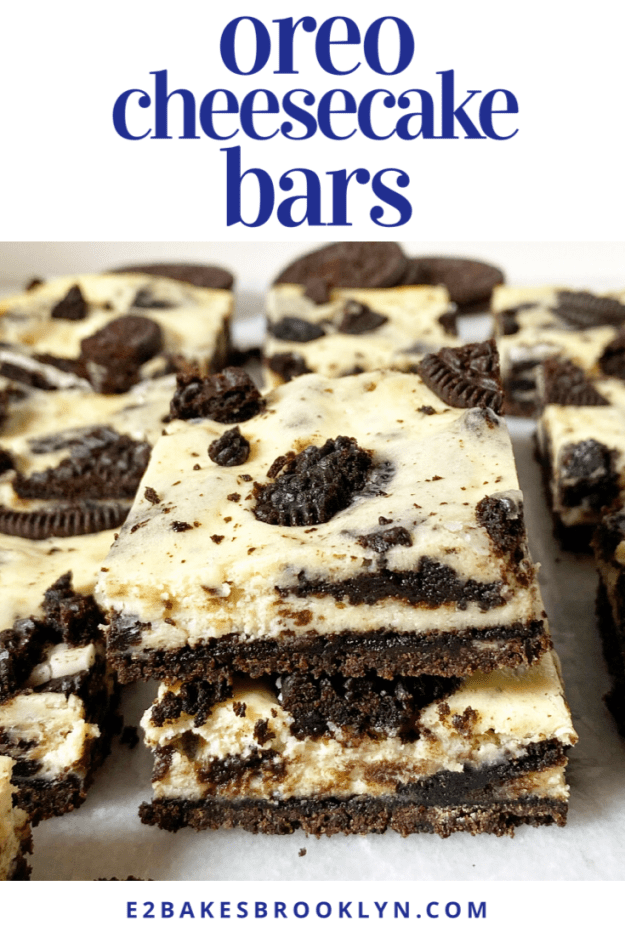
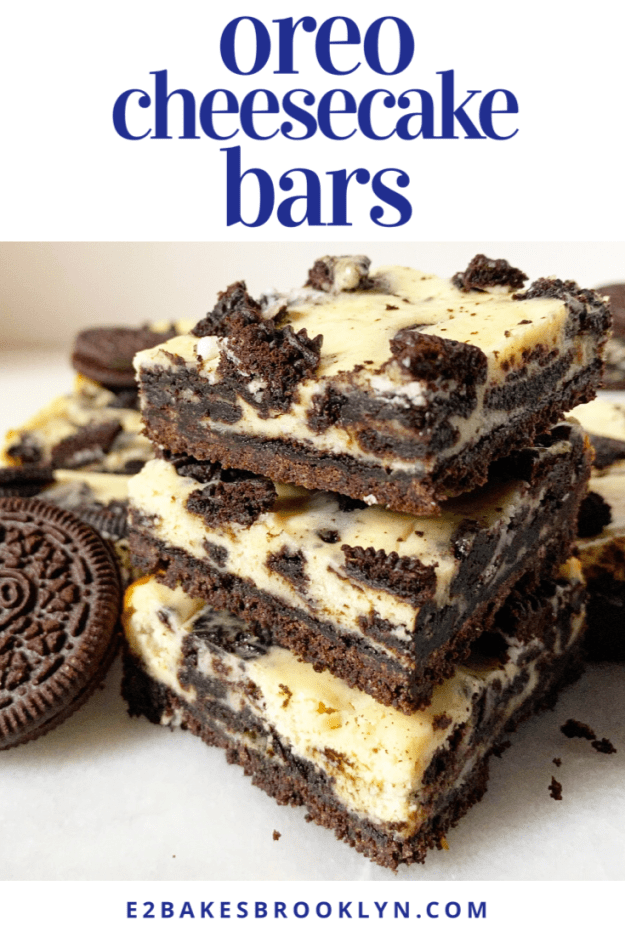
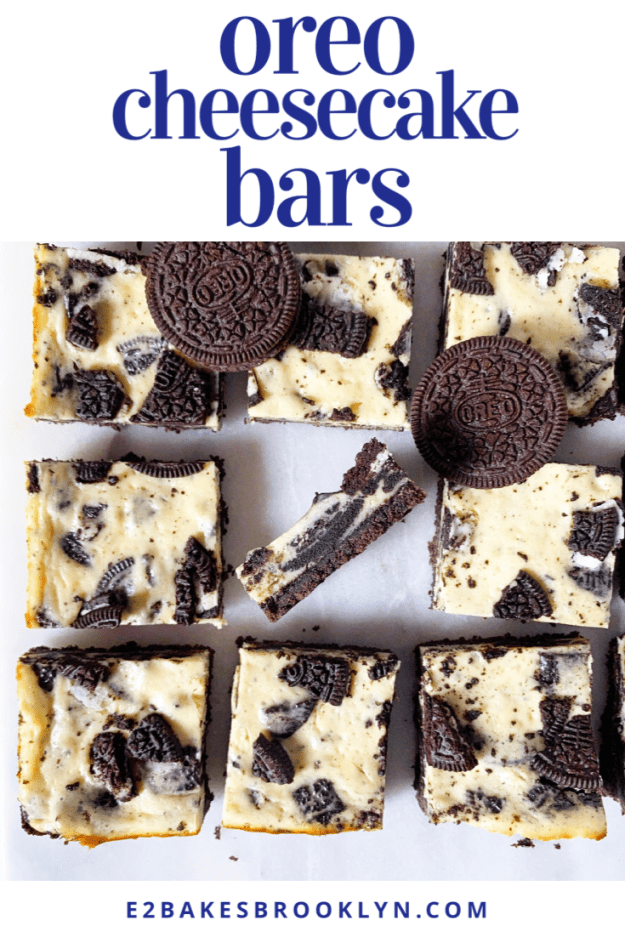
 After declaring that I was going to tackle my
 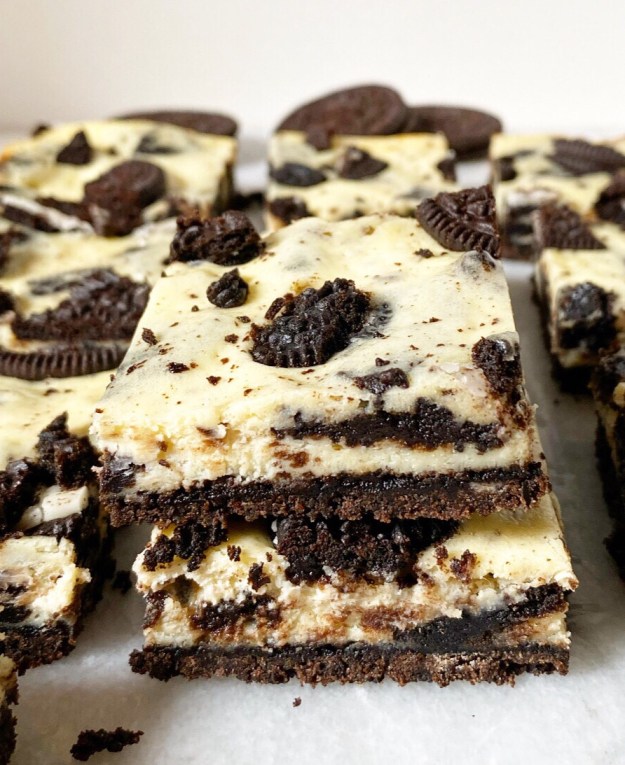 Not only are they freaking delicious—
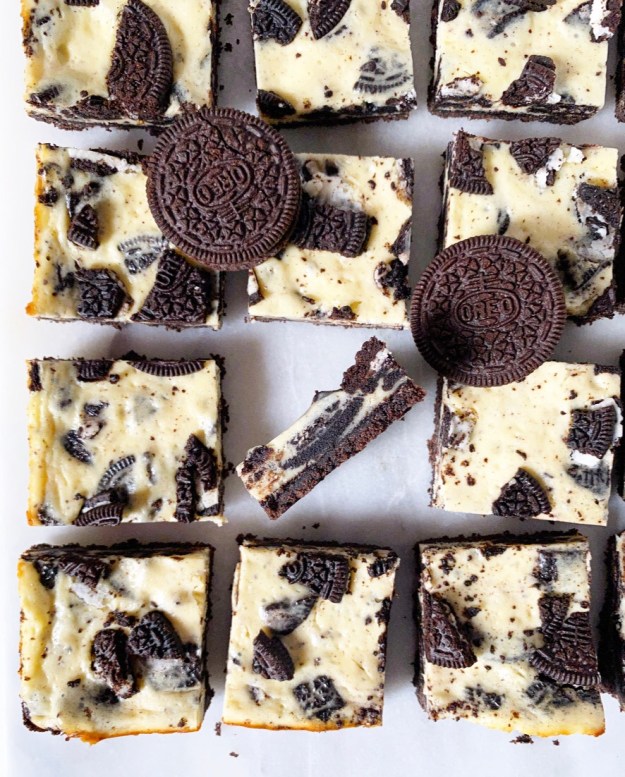
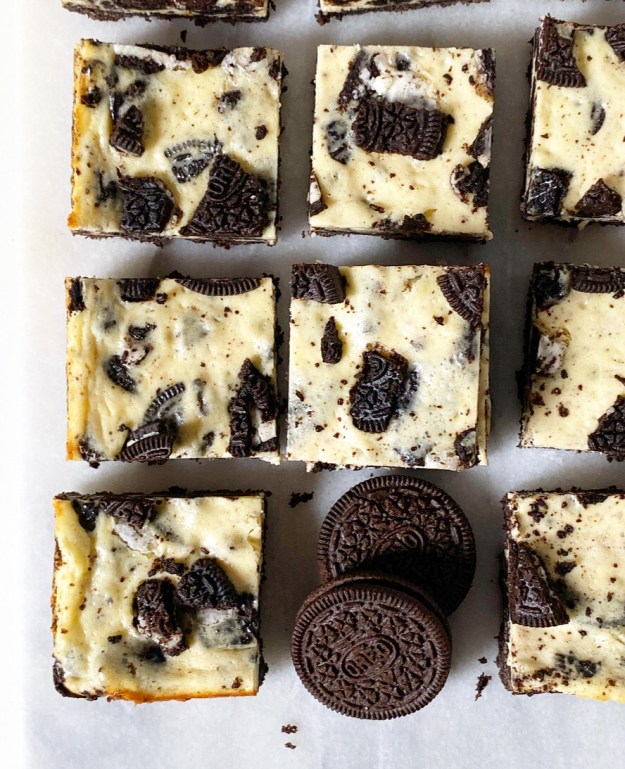 These are incredibly simple to make and they’re the perfect treat to have in the fridge all weekend. Crumbly Oreo crust and a thin layer of tangy cheesecake studded with more Oreos and you didn’t have to use a water bath? Is this real life?!
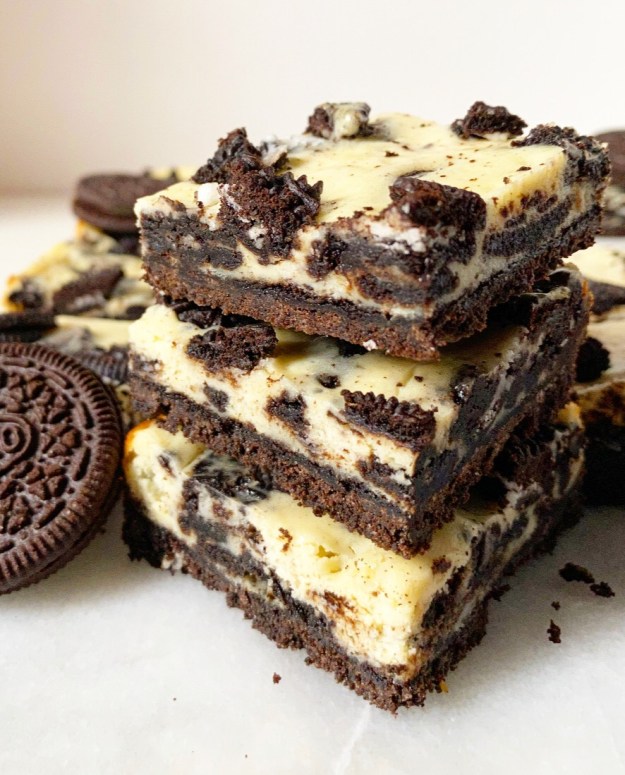
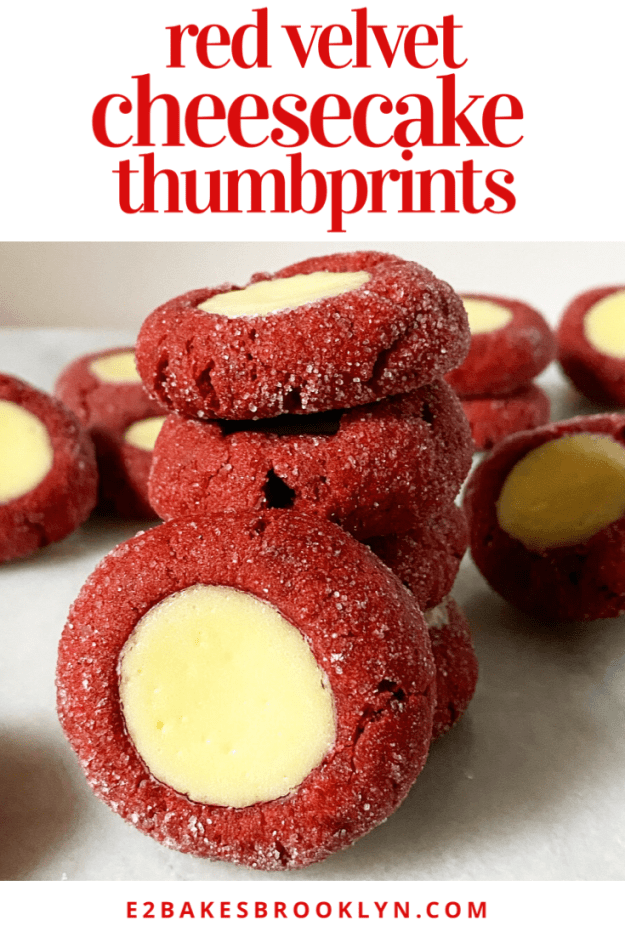
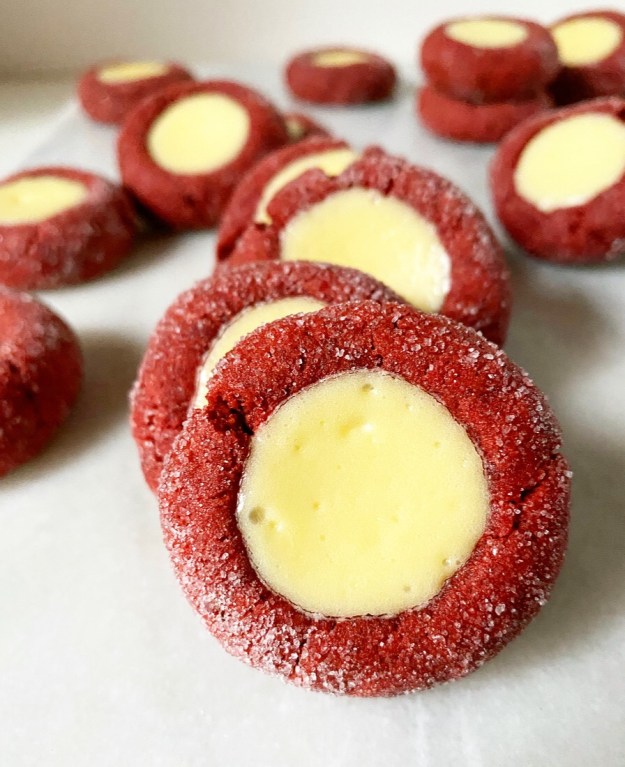 It’s a tradition of mine to make a red velvet treat for Oscar Night, which happens to be this Sunday. It’s sort of my “thing.”
 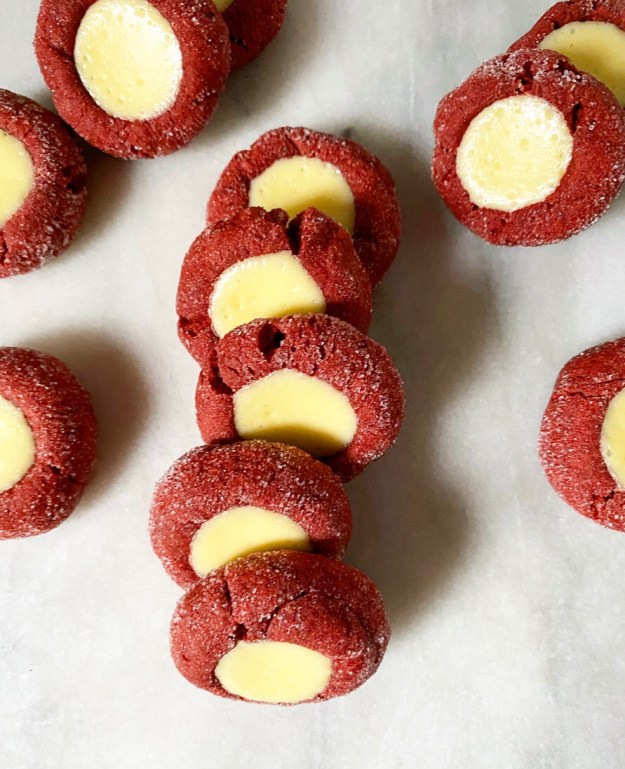 Yes, I know the Oscars are silly, but I, too, am silly. Also, I love a theme, especially when it means I get to watch 15 or 20 movies, cheer/curse/cry at my TV and eat red velvet baked goods. There was once a whole meal I made only for this occasion, but over the years it’s been reduced down to a “
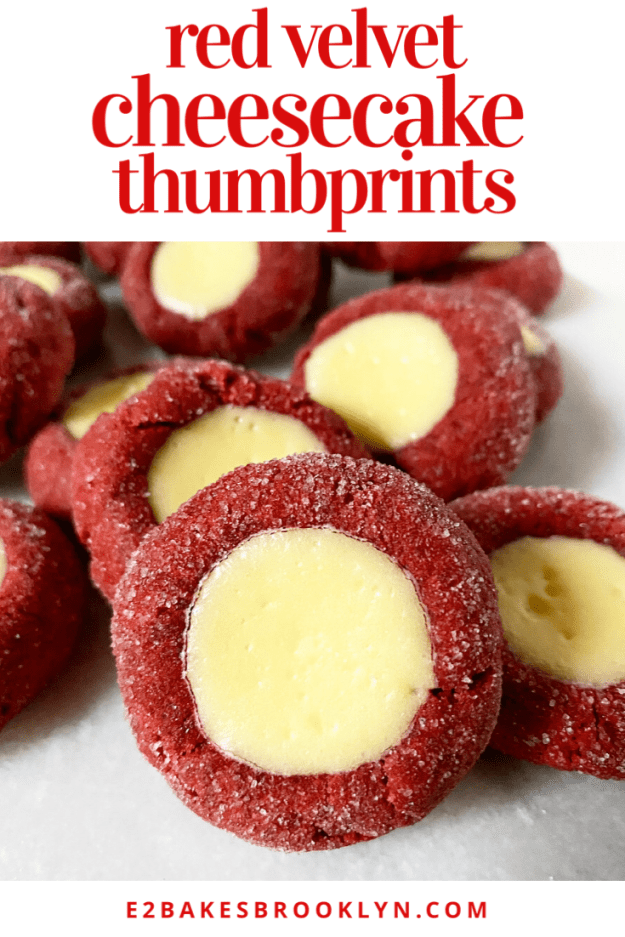
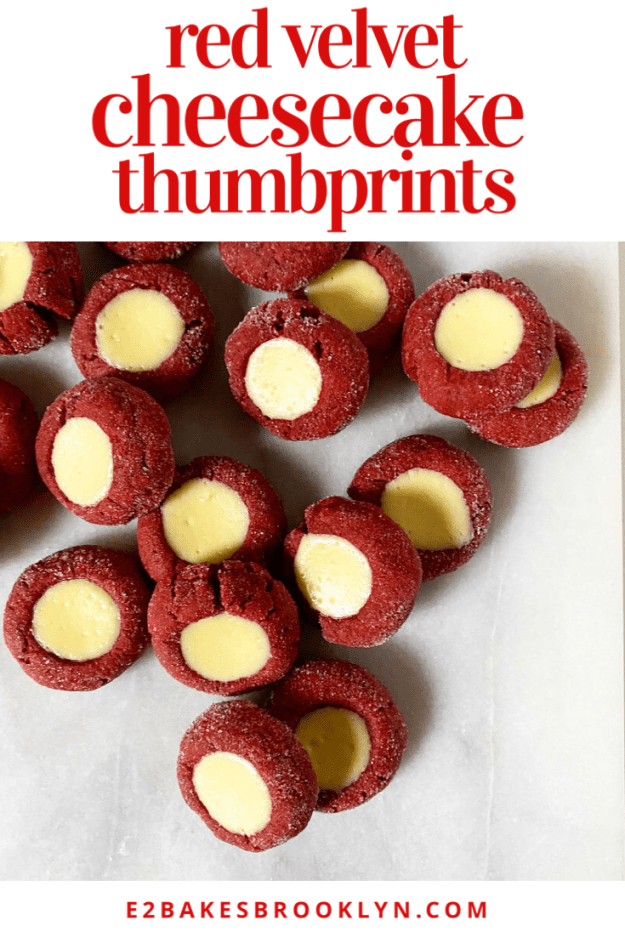
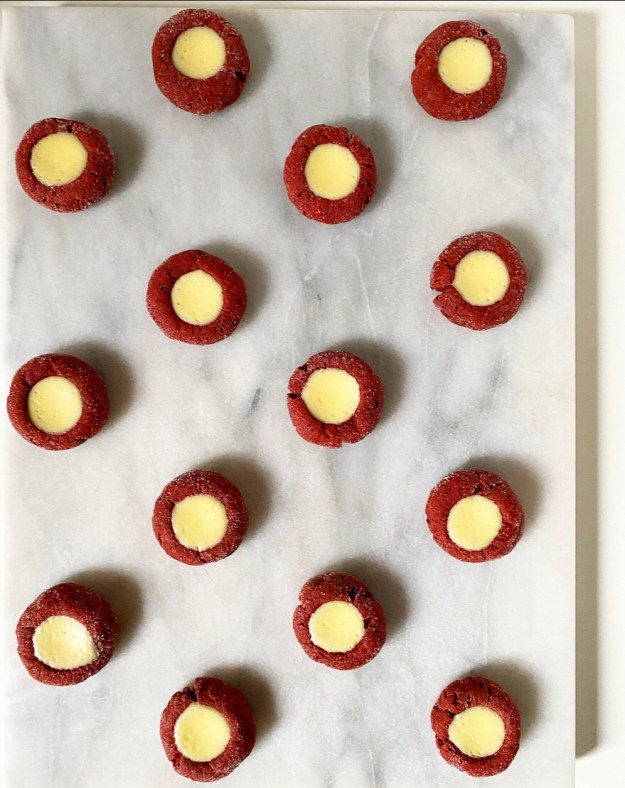 This year’s treat? Red Velvet Cheesecake Thumbprints. They’re exactly what they sound like—red velvet cookies with little wells of cheesecake baked into their centers—and they are also as delicious as you’d expect. Chocolate, vanilla and tangy cheesecake are a match made in heaven. And also my kitchen. And soon, yours.
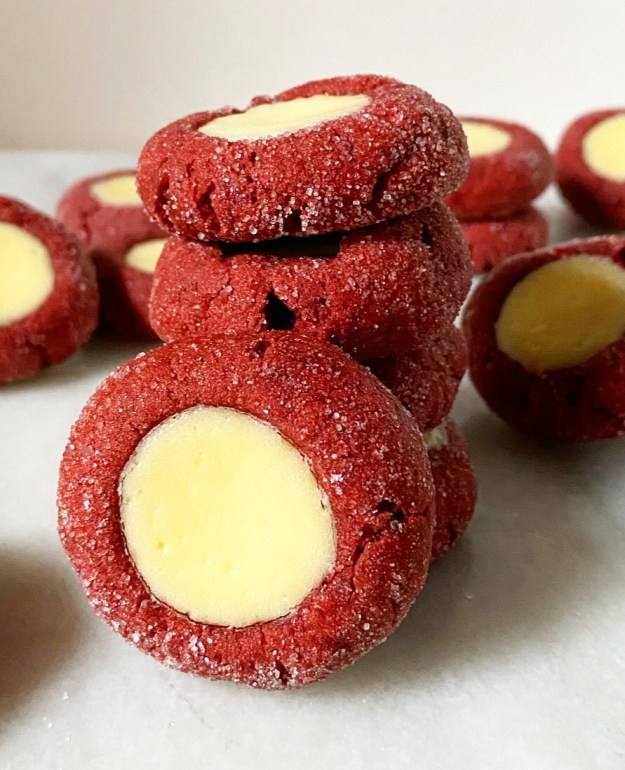 The base for these cookies is a slight variation on my
 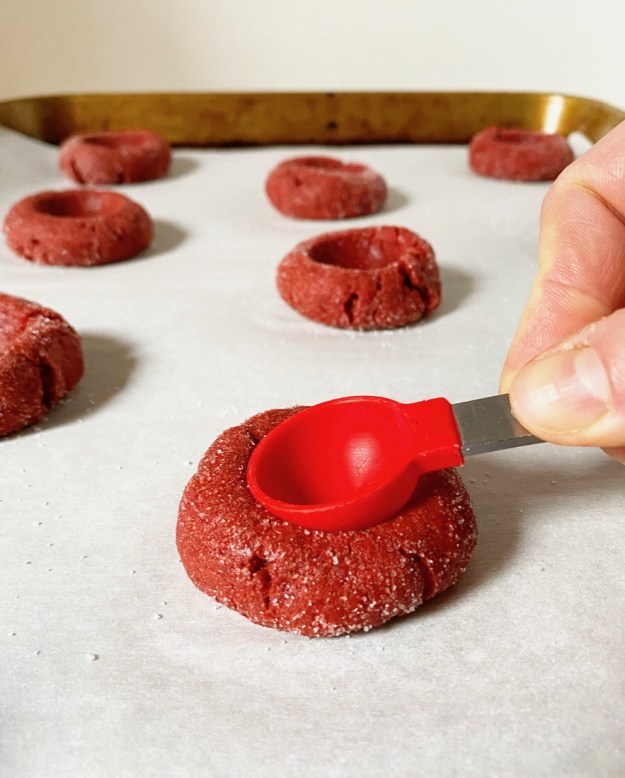 Next come the thumbprints or, if you want to keep things transparent, spoon-prints. Each sugar-crusted dough ball is indented with the back of a rounded 1/2 teaspoon measure. You could, of course, do this with your thumb, but a spoon is a more accurate (and less messy) tool for the job.
 The cookies are baked at a fairly low temperature (300F for ten minutes) before the thumbprints are deepened and widened with the back of a 1 teaspoon measure. Oh, and filled with cheesecake ♥️
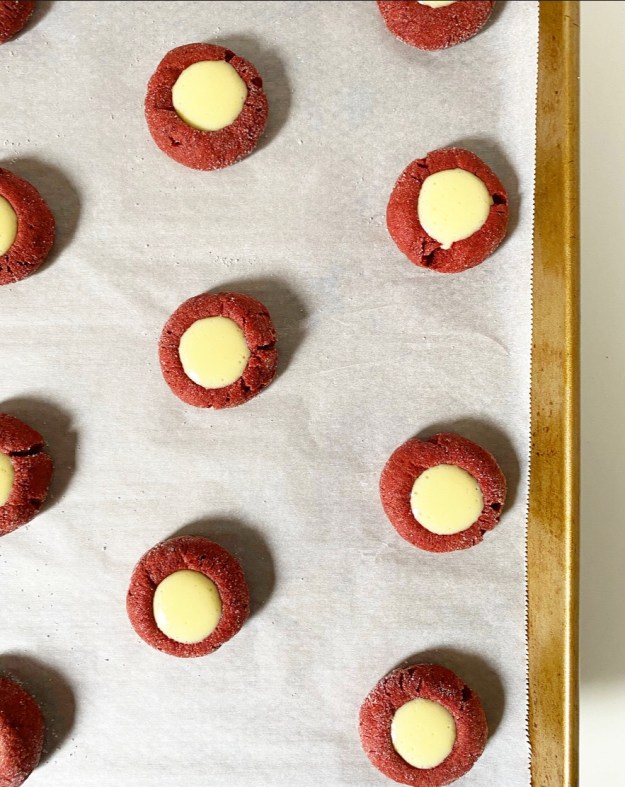 After ten more minutes in the oven, the cookies will be set and the cheesecake will be a little puffy. Let them cool to room temperature—the centers will deflate a bit—before chilling for at least 45 minutes. You want those little wells of cheesecake to be nice and cold when you’re snacking on them mid-Oscar broadcast.
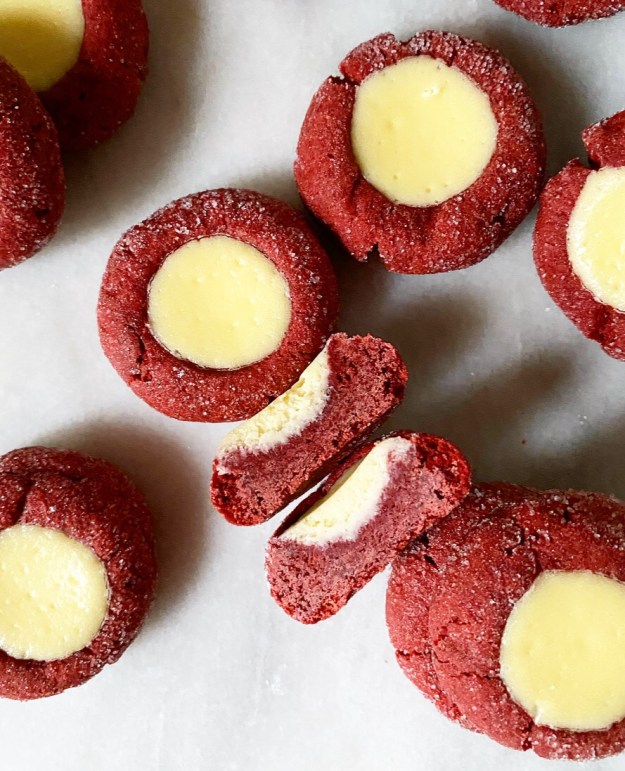 If you don’t have traditions and superstitions (and an
 Has anyone else’s week been five years long? Mine started with two babkas, three layer cakes and a Rosh Hashanah dinner, continued with some early morning construction in my apartment, and was followed up with a neck-ache and a midweek heatwave.
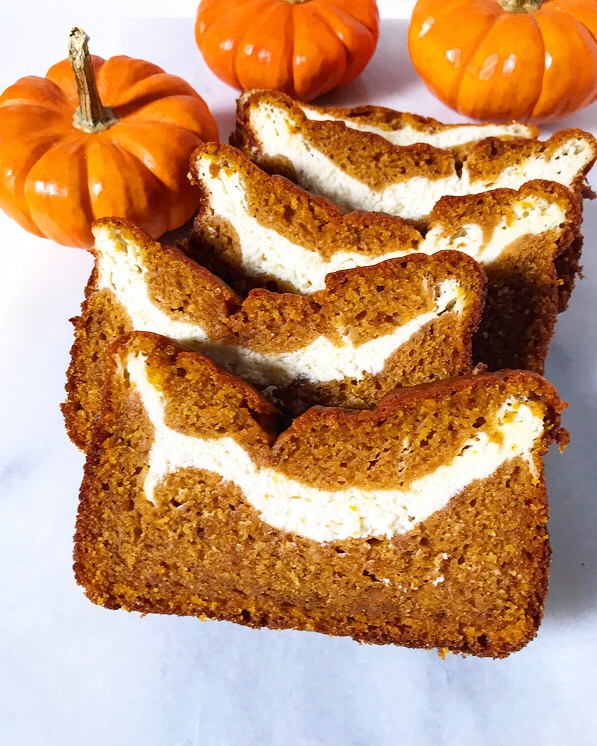
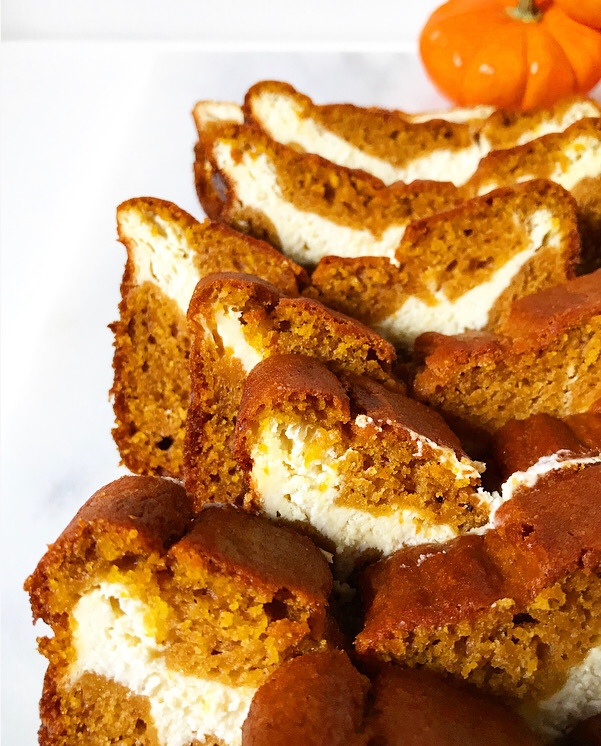 The good news is that NYC weather is finally starting to get with the autumnal program (I am so tired of summer clothes) and that my only plans for this weekend are to take my visiting godparents out for lunch and watch postseason baseball. Then two more work days before going on vacation next Wednesday—it can’t get here soon enough! But more on that later. For now, let’s talk about Cheesecake Swirled Pumpkin Bread.
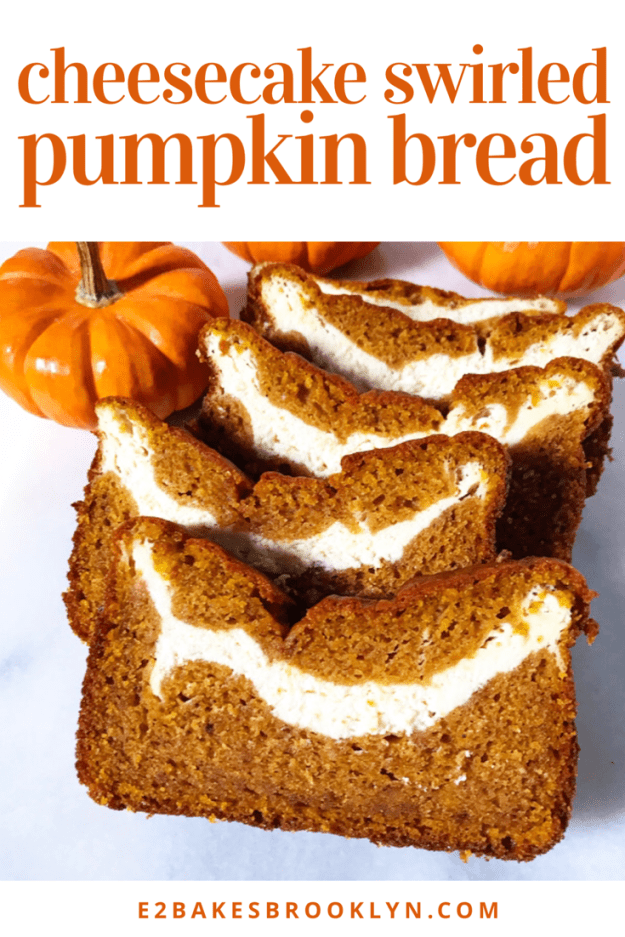
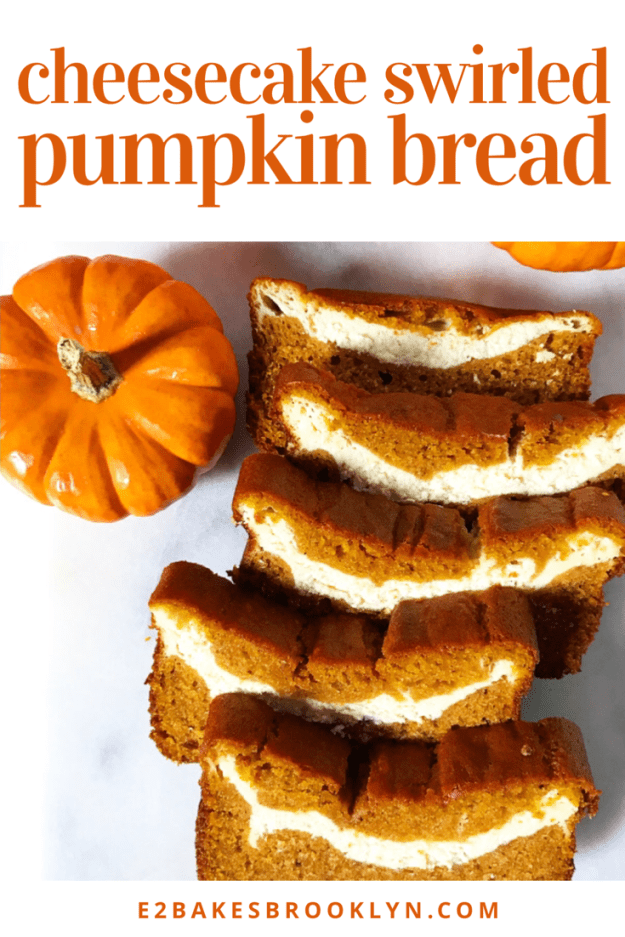
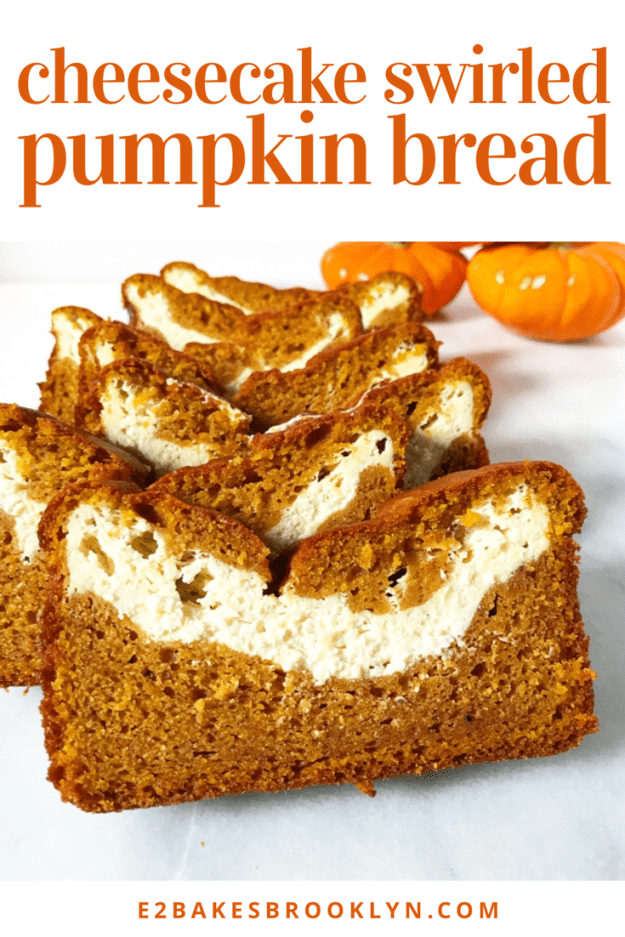
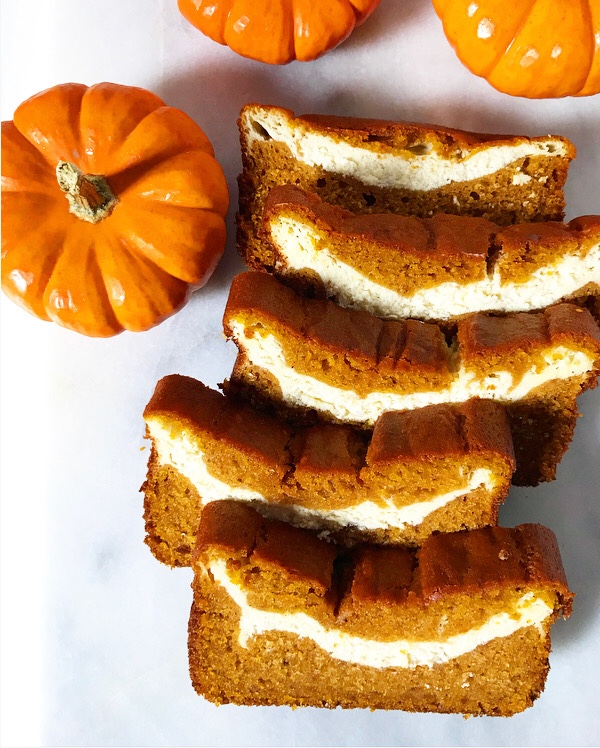 Cheesecake. Swirled. Pumpkin. Bread.
 Cheesecake Swirled Pumpkin Bread begins with a half-recipe of my
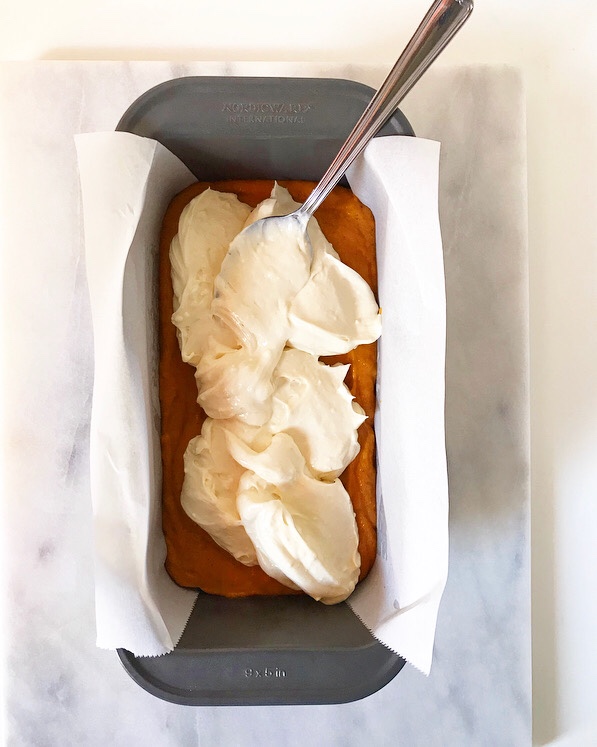

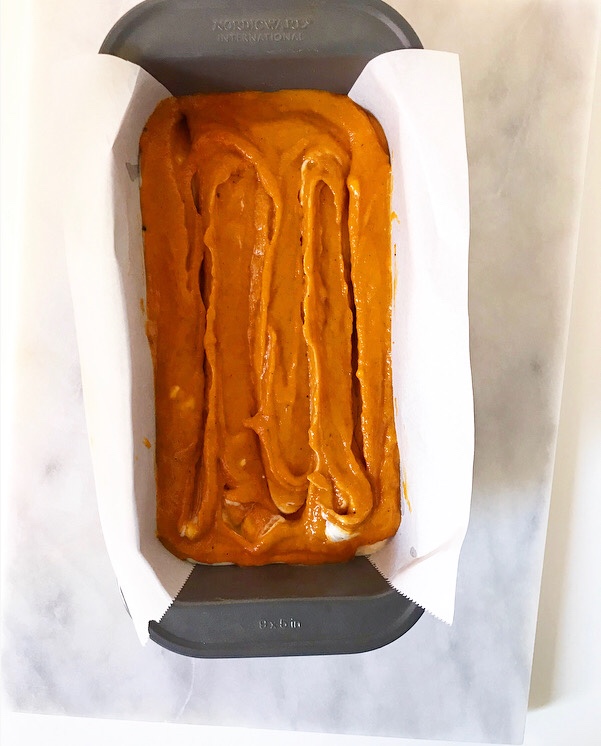
 To assemble, you’ll need the pumpkin batter and a small batch of cheesecake—don’t worry, they’re both easy to make. Set aside a cup of the pumpkin batter and put the rest in your loaf pan. Top it with the cheesecake, followed by the remaining batter. Swirl it all with a thin knife or skewer before baking for the better part of an hour. The bread will be puffed when it comes out of the oven, but sink a bit as it cools. This is just the cheesecake buckling a bit—not a bad thing.
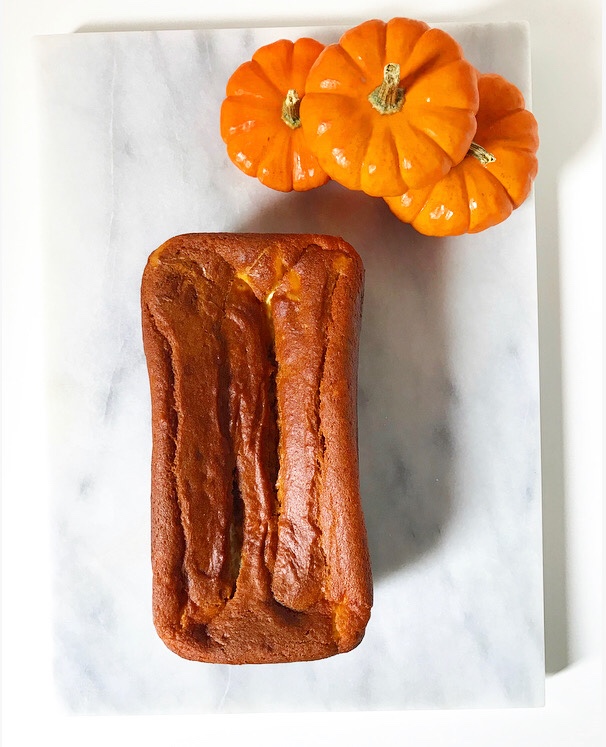
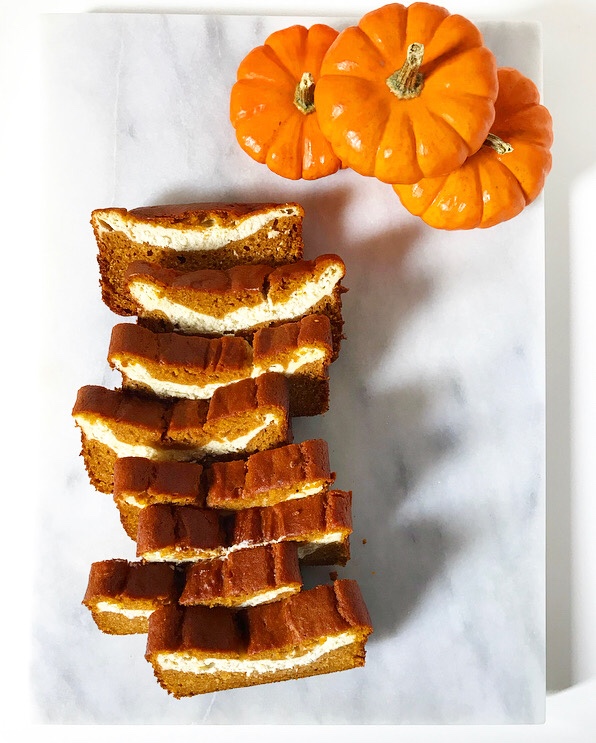 This bread needs to be cooled at room temperature and then chilled in the refrigerator, making it an ideal make-ahead treat. Don’t rush to serve this. Pumpkin is a flavor that blooms over time and nobody loves room temperature (or warm 😬) cheesecake. Good things come to those who wait.
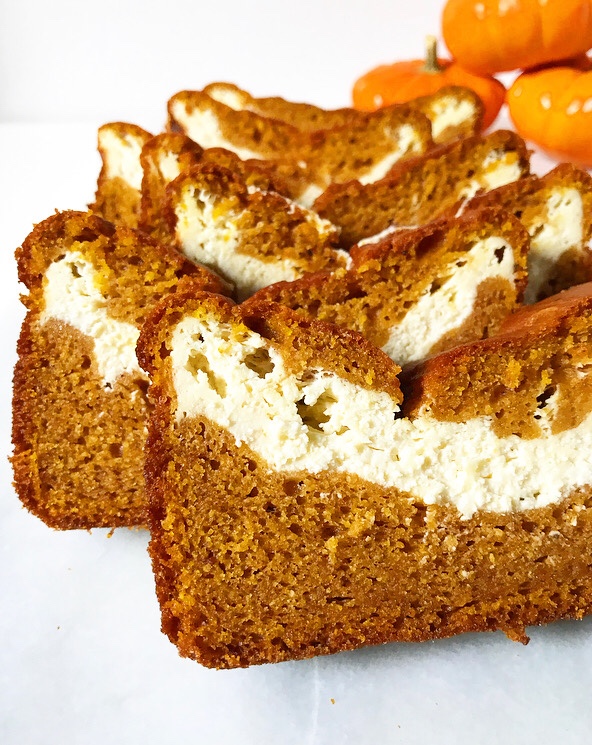
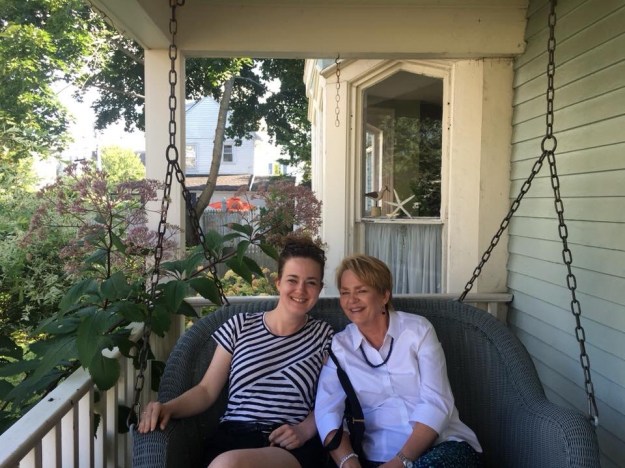
 Three years ago, I went home to Texas for three weeks over Christmas. I was there for the holidays and a family wedding a week into the new year, and I had determined that it was easier to spend an extended period in my home state than it was to fly back and forth. My little sister was home for her winter break too, so we had an odd period of time where our childhood living arrangements were real again, except that everyone had a driver’s license and their own bathroom this time.
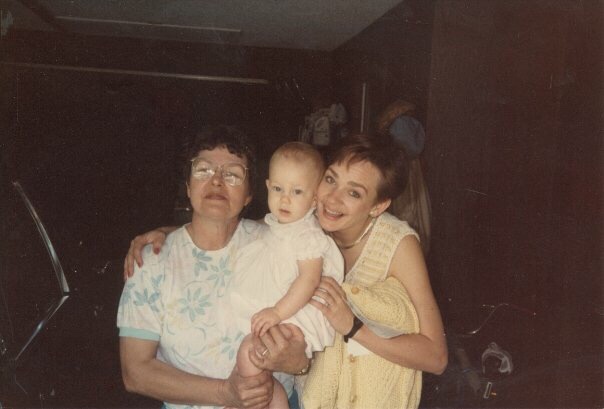
 But! But. I was going to make a cheesecake with my mom, even going so far as to have my older sister give her a Fat Daddio cheesecake pan for Christmas. I was going to do this thing. And then…I didn’t because we found 43 other ways to fill our time and there was the wedding and then it was time to go back to NYC.
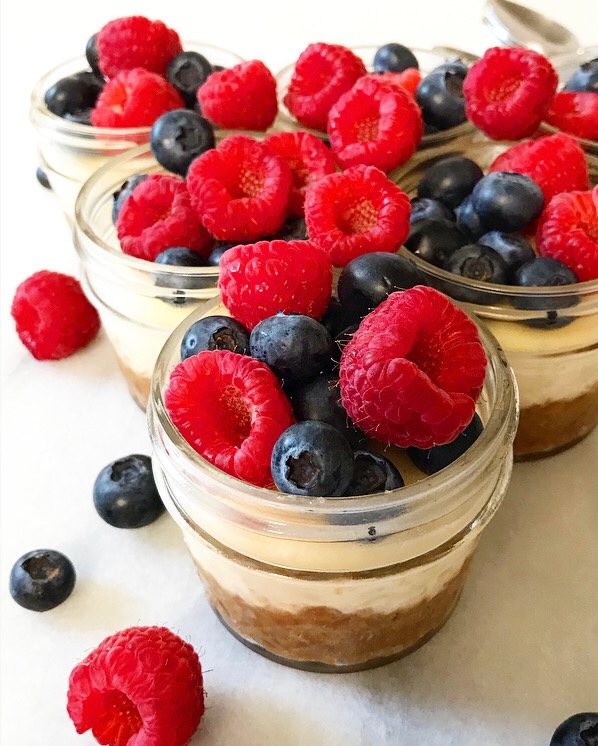 Now it’s Mother’s Day weekend three years later and I still owe my mom a cheesecake. I remain reticent about attempting a big one (yes, I know it’s silly) and I don’t know when I’ll be with her long enough to carve out the time, so I have made it easy on both of us and made miniature versions that don’t involve a foil-wrapped pan. Happy Mother’s Day, Mom! I made you six cheesecakes.
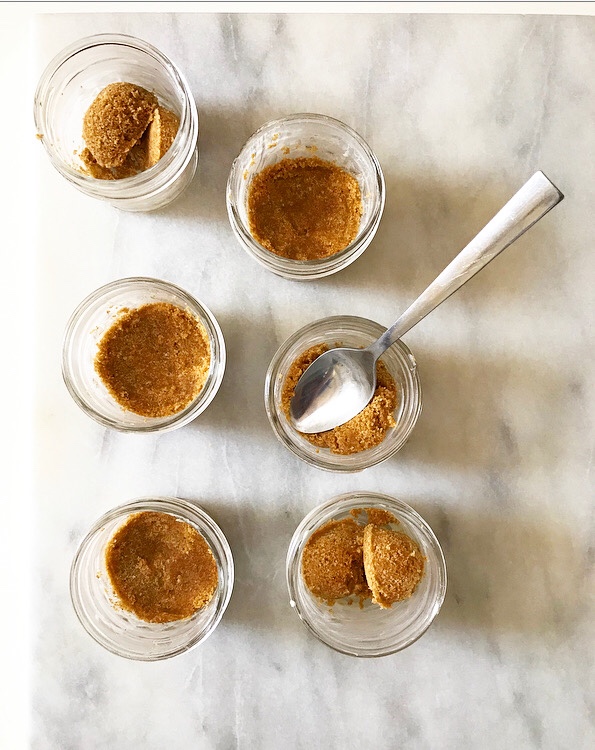
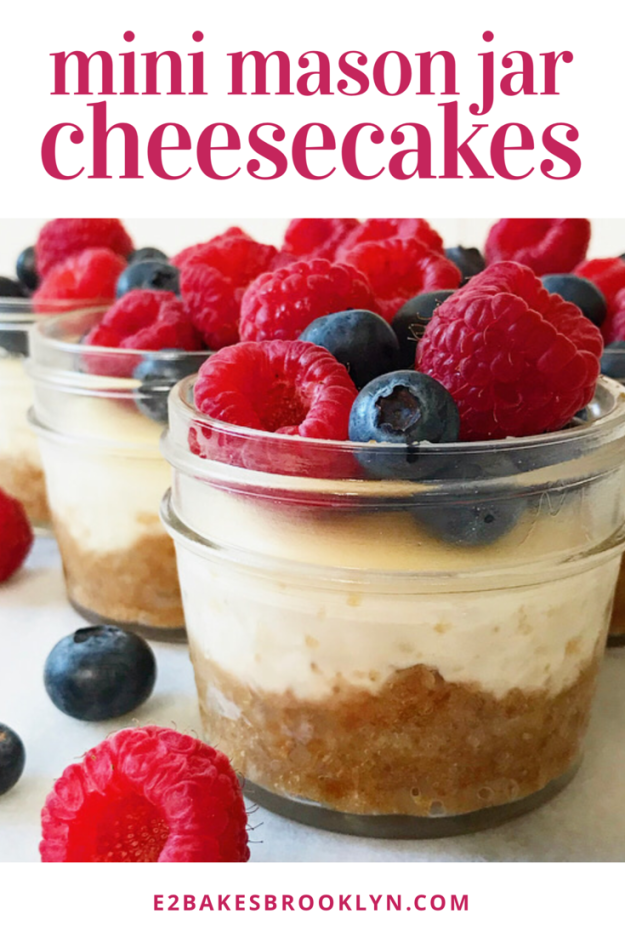
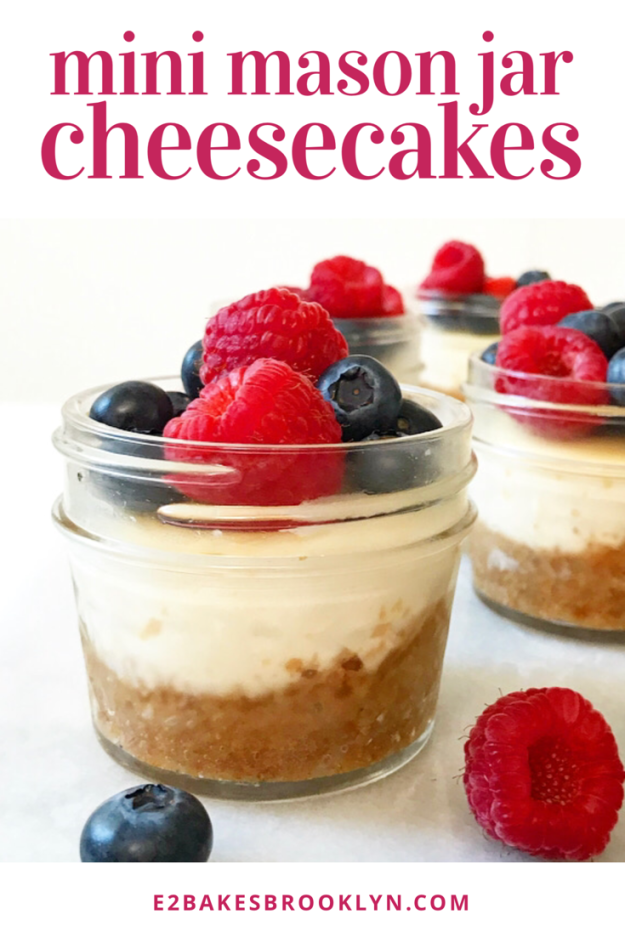
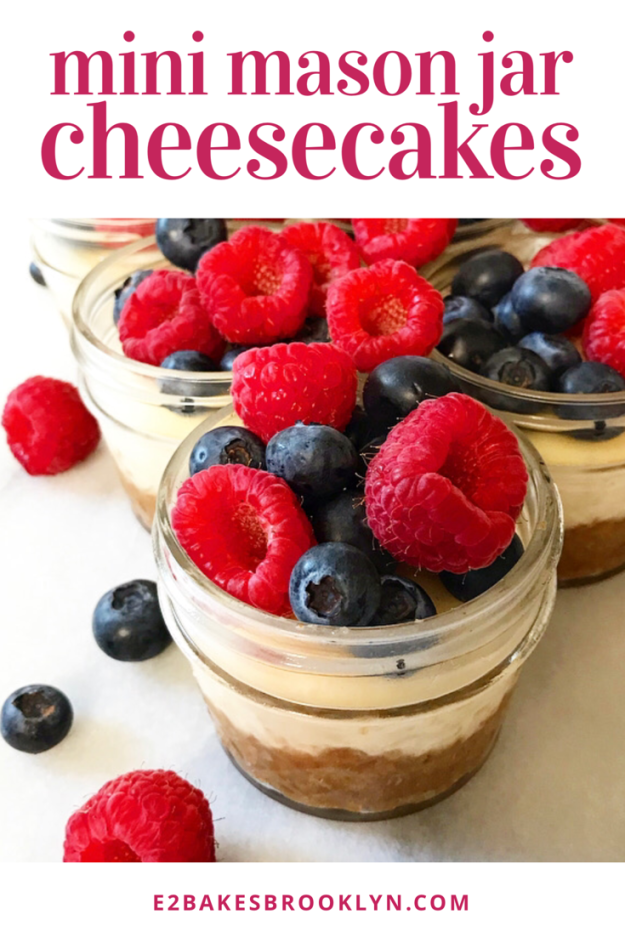
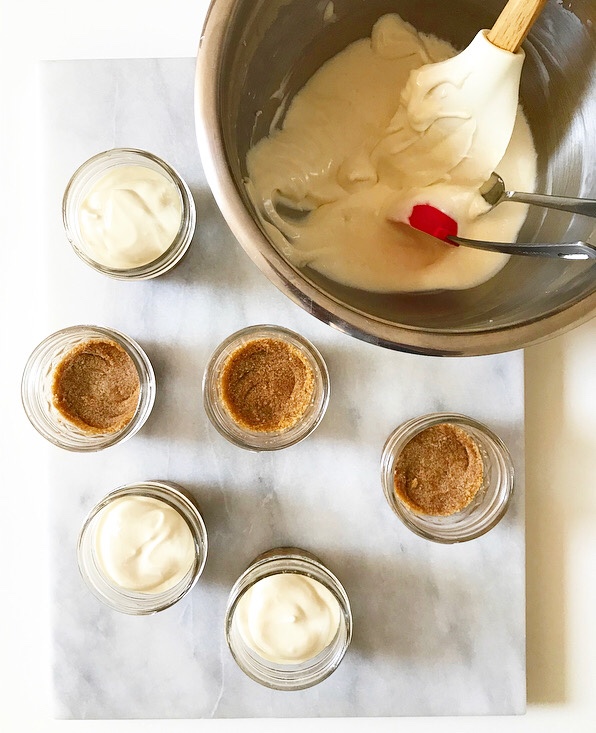 This small-batch recipe makes just enough to fill six 4-ounce mason jars, but you can easily scale it up depending on your needs. The cheesecake itself is remarkably easy to make—it has a total of nine ingredients and two major steps (both of which are easy), and most of the time commitment is spent waiting for things to cool.
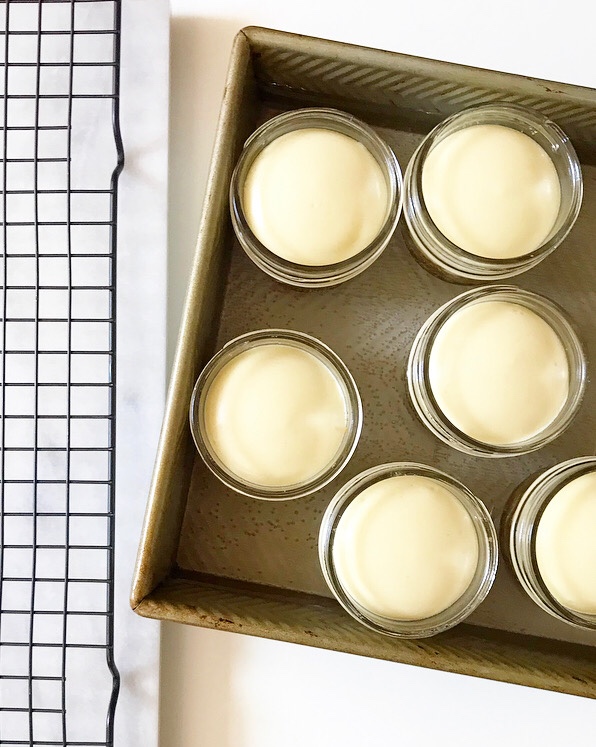
 As for the water bath (“bain-marie”) step that I fear so much, it’s a breeze. Mason jars are water-tight, so my fear of soggy cheesecake foiled-by-foil doesn’t apply here. These mini desserts bake up evenly and beautifully every time!
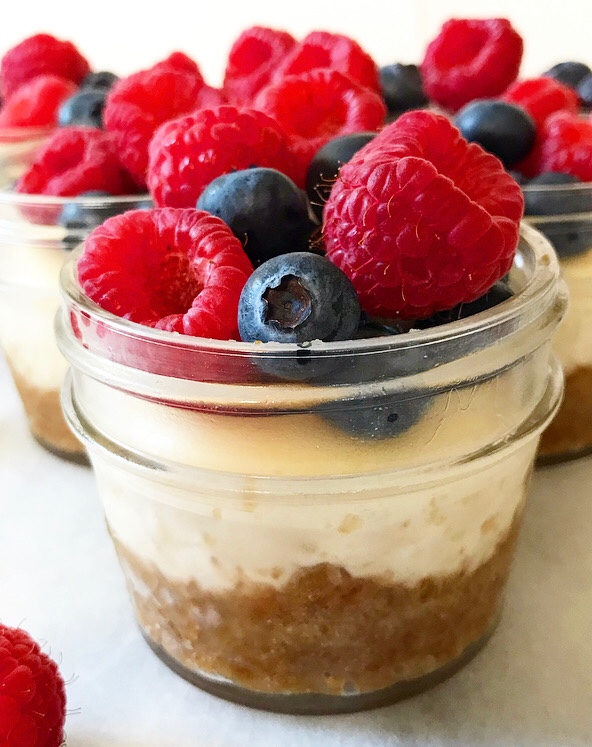
 They are delicious, too: rich, creamy and tangy with a brown sugary graham cracker crust. You can top them with anything you like:
 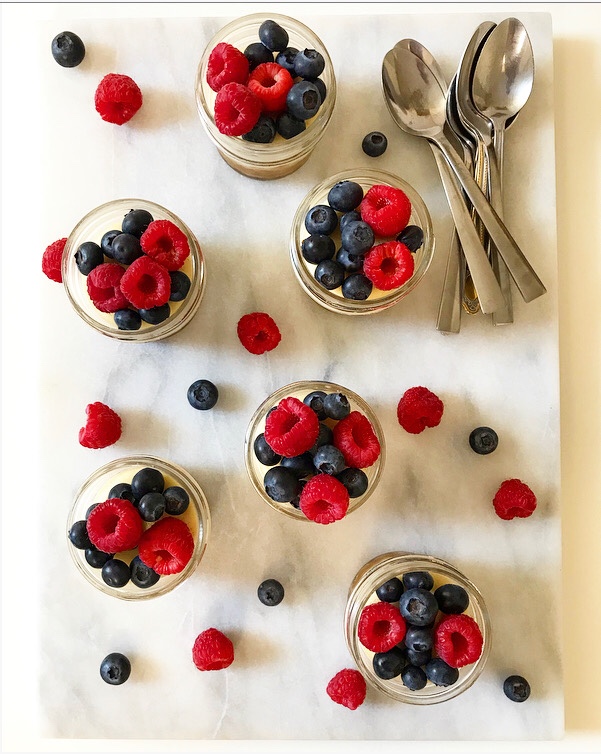 Aside from being cute, delicious, and portion-controlled, I love that these cheesecakes are portable. Just press a little plastic wrap to their surfaces after chilling, screw on the mason jar lids, and pack them into a cooler for premium picnicking. Pack the topping(s) separately and let everyone customize their own!
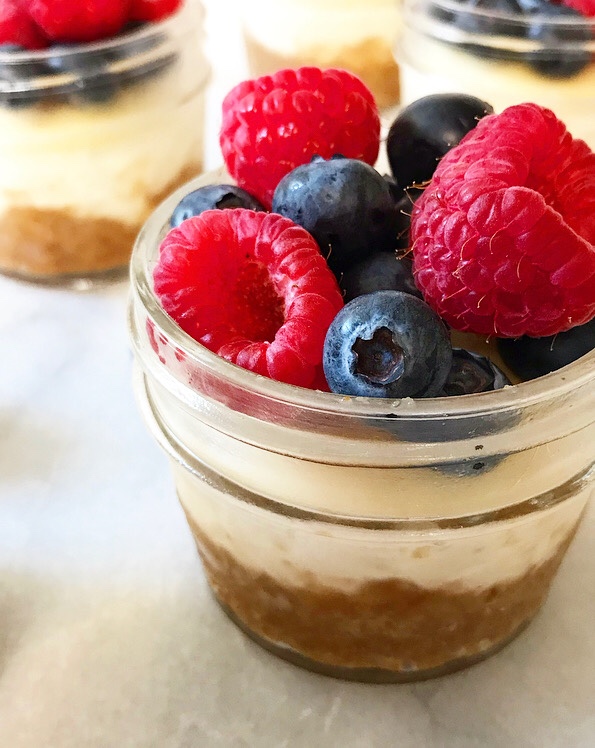 So, after 3.5 years of blogging, there is my first “traditional” cheesecake! Maybe I’ll be brave enough for the real deal before Labor Day. Got any leak-proofing tips for me? Leave them in the comments!
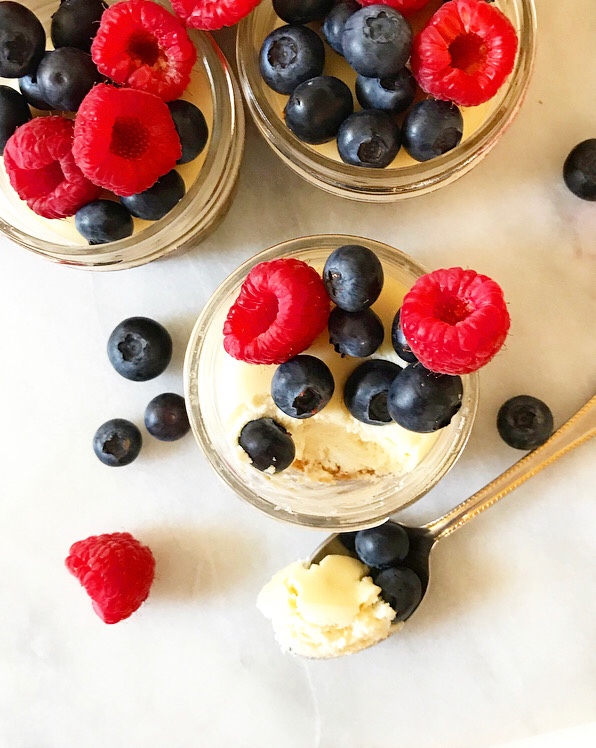 Happy Mother’s Day to all those celebrating, especially my cute mom ❤