Category Archives: Entertaining

Flourless Pumpkin Almond Cake

Flourless Pumpkin Almond Cake​

When I crack open a can of pumpkin purée, I want to make sure to use it all up instead of letting it get weird in the fridge. With the exception of the iconic pie, pumpkin recipes tend to call for just a small amount of the actual squash to achieve their texture and color, so there’s nearly always some leftover. And that, my internet friends, is how we’ve ended up with three pumpkin recipes in a row.

I mean, you can freeze leftover pumpkin purée, but wouldn’t you rather have a wedge of Flourless Pumpkin Almond Cake?!

Flourless Pumpkin Almond Cake​

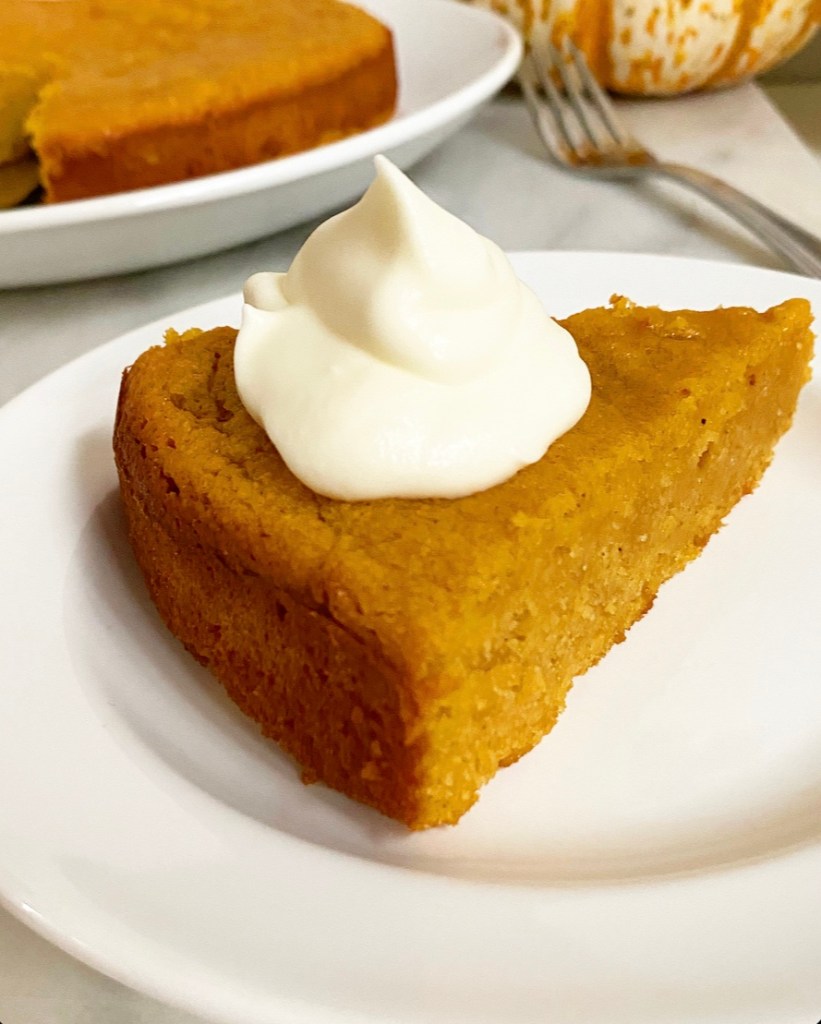
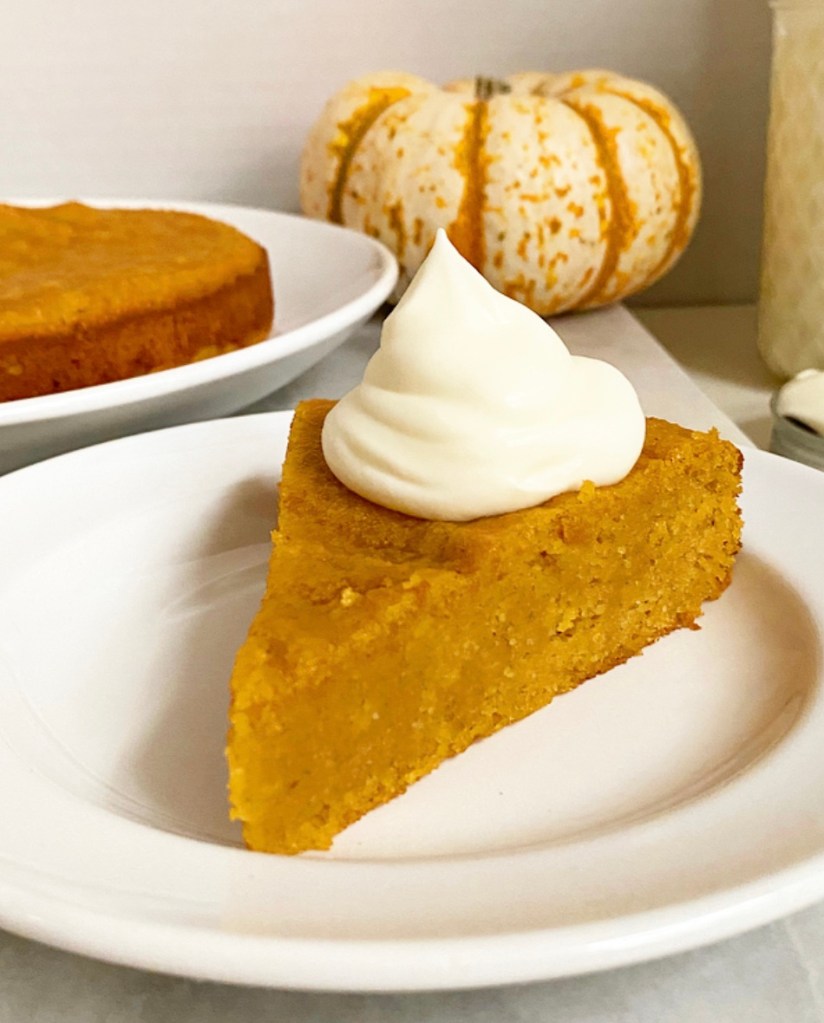
This simple cake is a seasonal spin on a classic Flourless Almond Cake. It begins with blanched almond flour, brown sugar and pumpkin spice, then gets some richness from egg yolks, pumpkin purée, and melted butter. The cake gets its moist, springy texture because it’s lifted with whipped egg whites (and the tiniest spoonful of baking powder for extra stability).

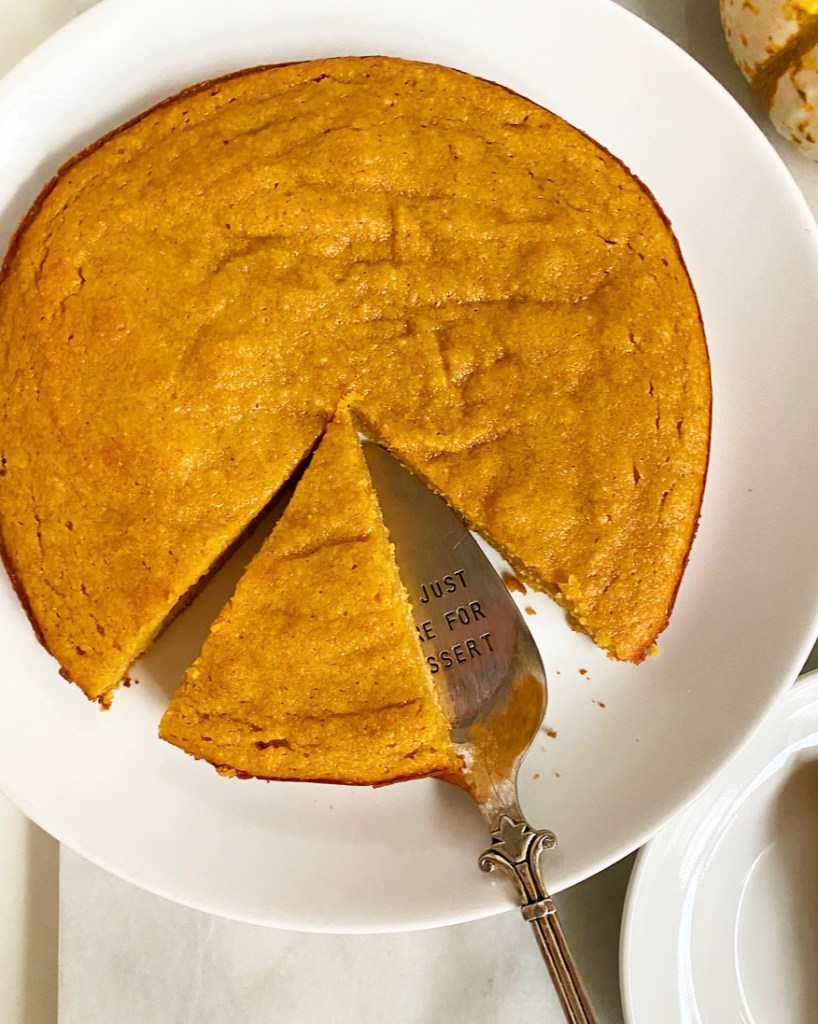
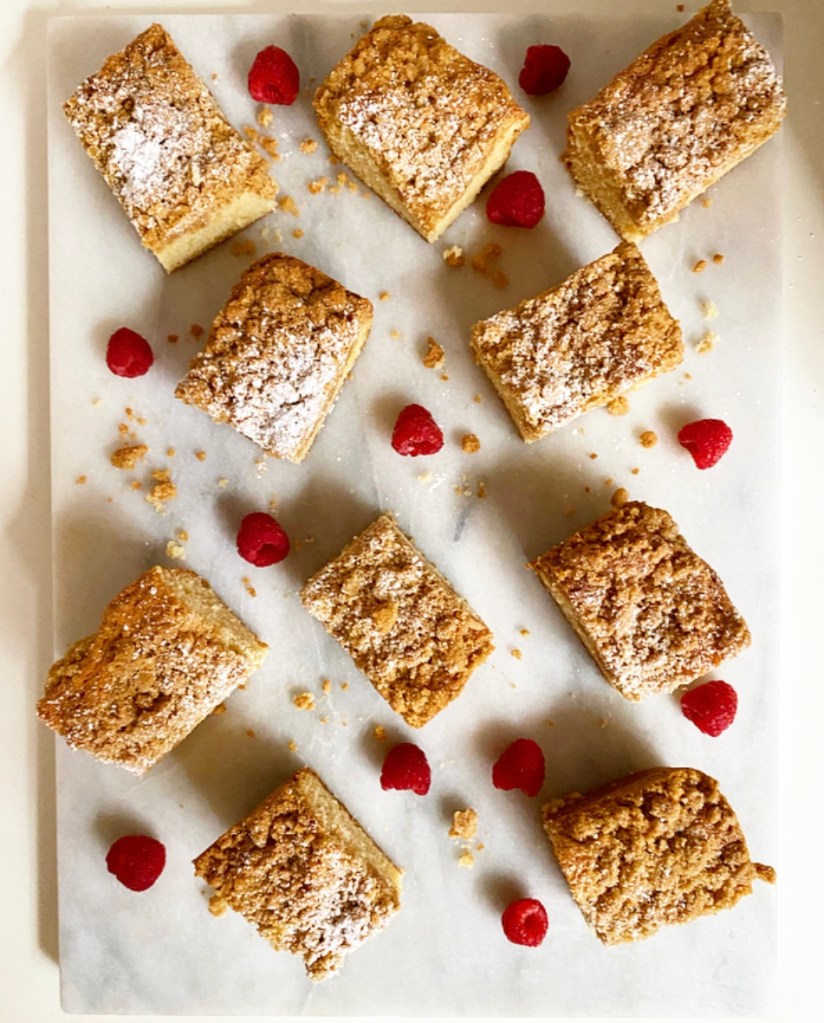
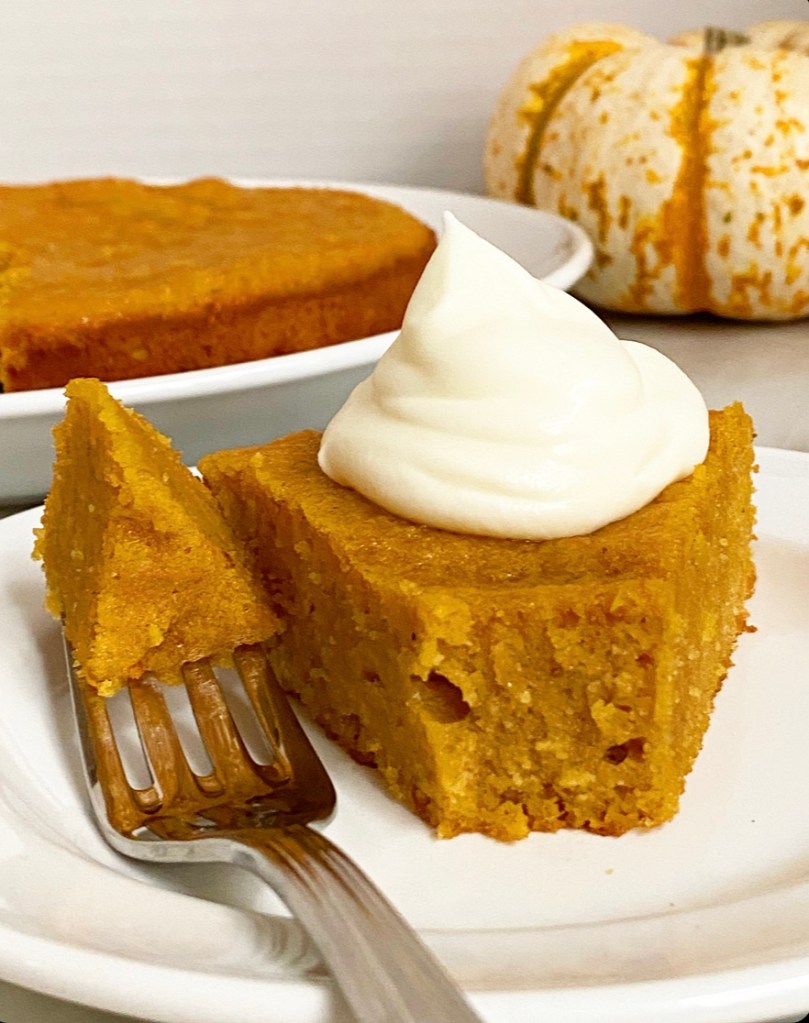
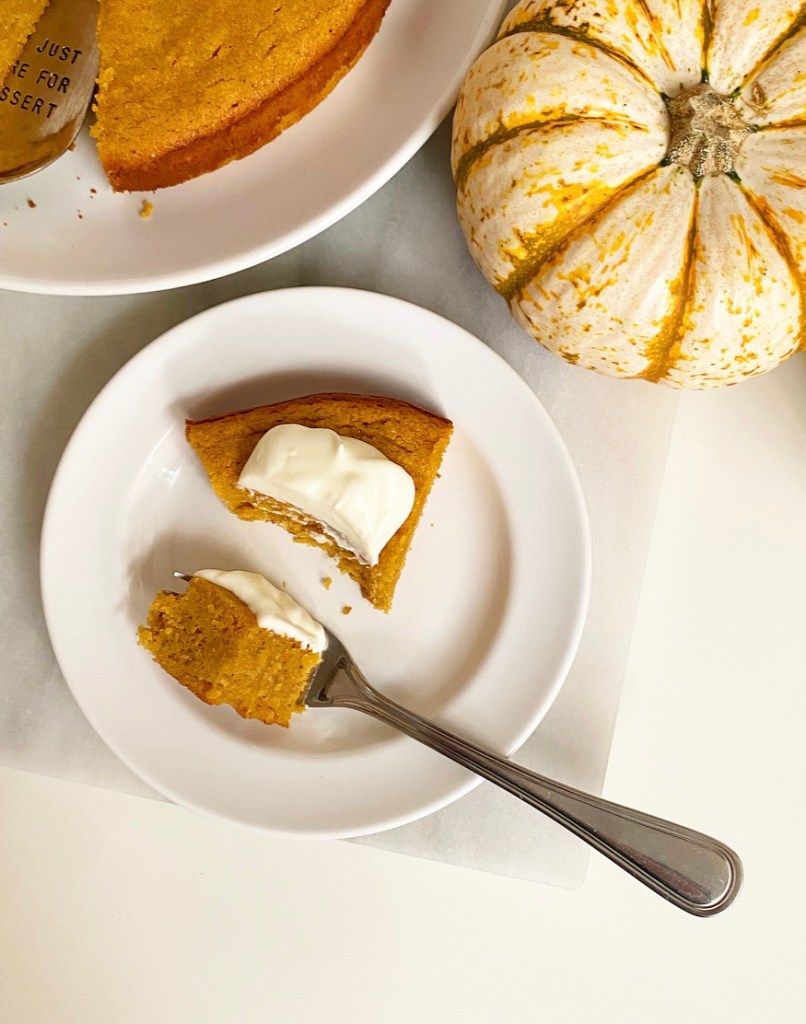
It bakes up thick and rustic, with a crumb that is somehow both airy and pleasantly damp (a weird but accurate descriptor). I find it to be somewhere between cake and a pumpkin pie filling, just without the crust. It’s a perfect non-pie dessert for Thanksgiving (or any fall occasion), and has the added benefit of being gluten- and grain-free. I will always love a dessert that can feed more of my people, especially if it involves copious amounts of fresh whipped cream.

Flourless Pumpkin Almond Cake​

On a separate note, I’m feeling a little more consistent in my baking and blogging as we get toward the holidays, so expect to see more of me. I’ve been sharing my daily baking adventures (the highs and the lows) over on my Instagram stories. I’ve been loving the feedback and learning what y’all want to see from me. It’s all fall Maine content for this weekend, but I’ll be back in the kitchen next week. Come follow along, if you like.

Flourless Pumpkin Almond Cake​
Flourless Pumpkin Almond Cake
makes 1 8-inch round cake, about 8-10 servings

4 large egg whites, room temperature
3 large egg yolks, room temperature
1/3 cup pure pumpkin purée
1/4 cup (1/2 stick) unsalted butter, melted
1 teaspoons pure vanilla extract
1 1/2 cups blanched almond flour (measured by spoon & level)
1/2 cup light brown sugar, packed
1 teaspoon pumpkin pie spice
1/4 teaspoon baking powder
1/4 teaspoon Kosher or sea salt

For serving:
whipped cream

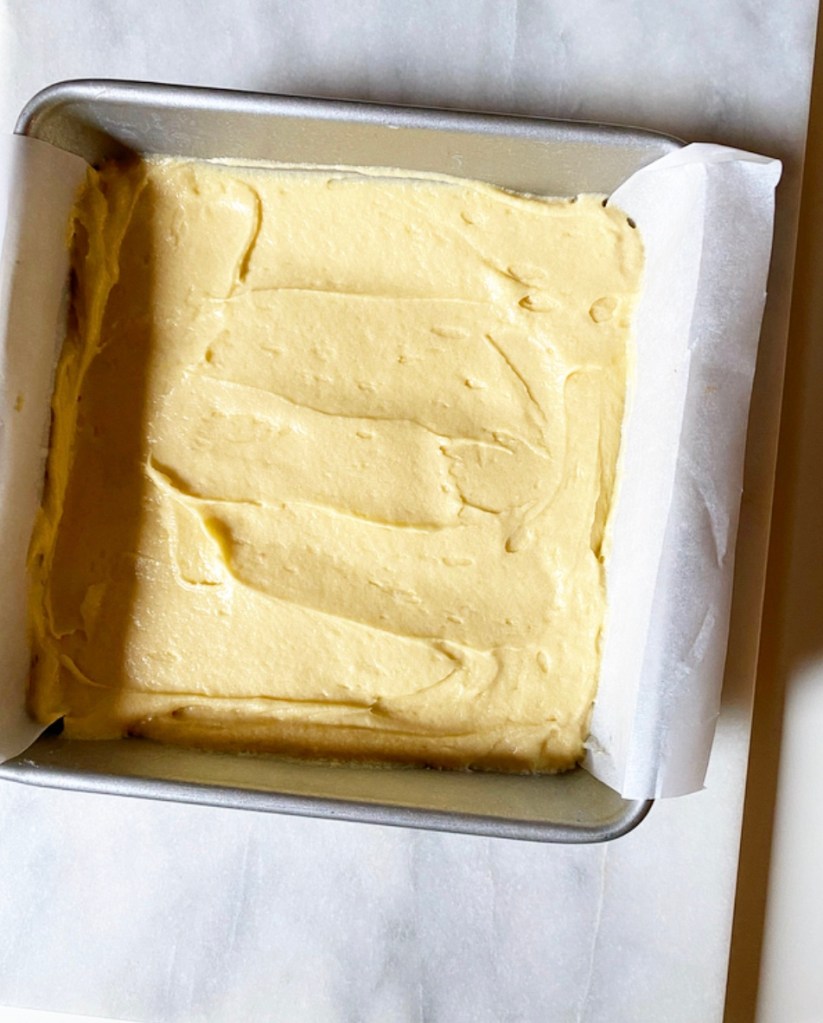
Preheat oven to 350F. Grease an 8-inch round pan. Line the bottom with parchment and grease again. Set aside.

Separate egg yolks from whites. Reserve 3 egg yolks for this recipe; set 1 egg yolk aside for a different use. Reserve all 4 whites in a very clean, dry bowl, for whipping.

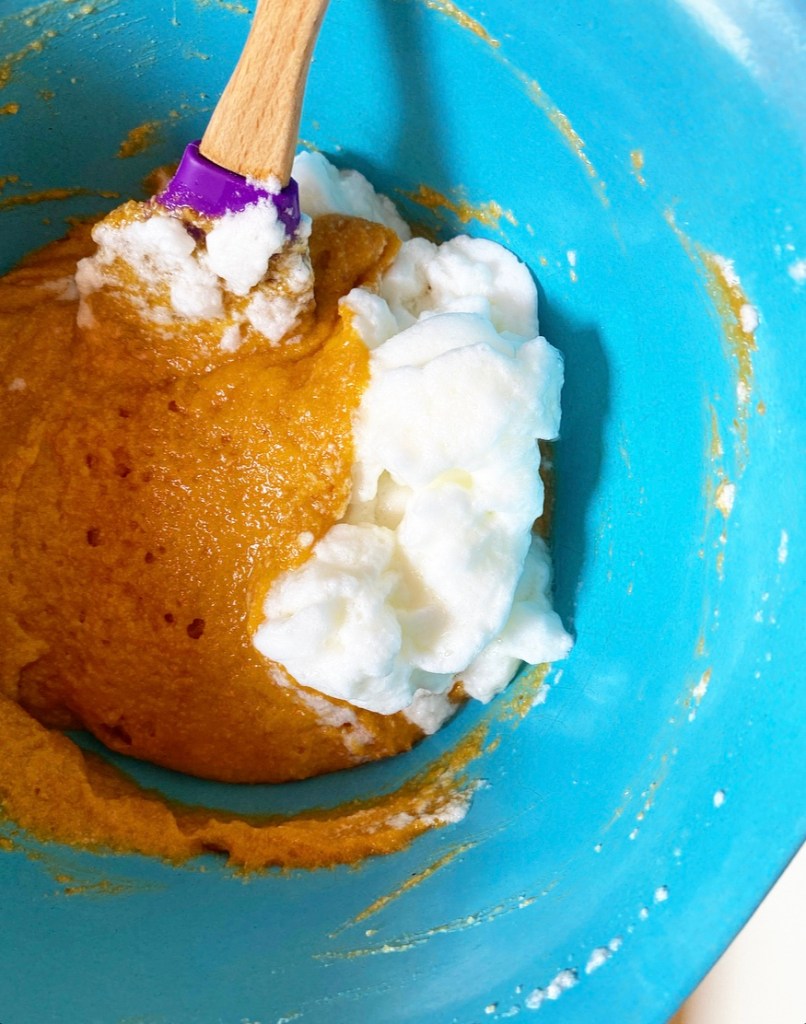
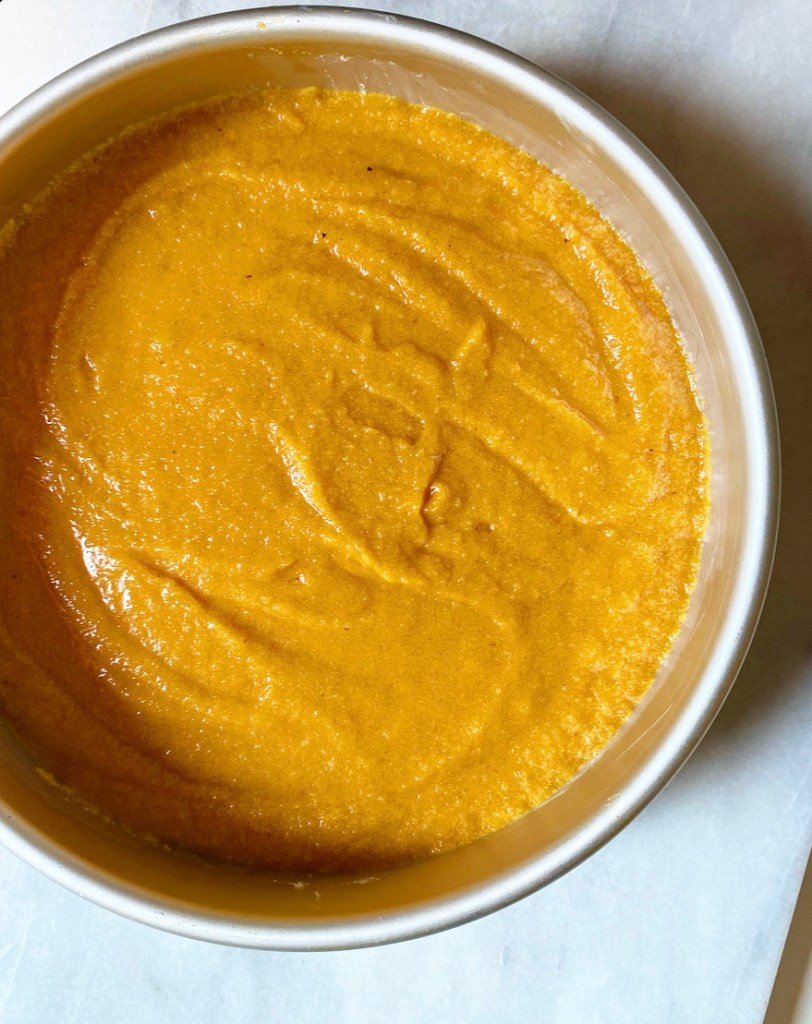
Combine almond flour, light brown sugar, pumpkin pie spice, baking powder, and salt in a large mixing bowl. Use an electric mixer on low speed to mix the ingredients together—this will take all of 15 seconds. Add 3 egg yolks, pumpkin purée, melted butter, and vanilla, then mix until combined. The mixture will be very thick.

Wash and dry mixer attachments, along with a medium mixing bowl. I also like to wipe down the equipment with vinegar, just to ensure that everything is completely clean before I add the egg whites. There is no way to salvage this recipe if the egg whites are contaminated with oil, yolk, or even water.

Transfer 4 egg whites to the very clean, dry medium mixing bowl. Use the very clean, dry electric mixer to whip them until stiff peaks form, about 2-3 minutes.

Stir 1/3 of the whipped egg whites into the almond mixture. Gently fold half the remaining egg whites into the mixture, followed by the other half.

Transfer batter to prepared pan. Scatter sliced almonds over the top. Bake for 28-30 minutes, or until firm in the center and not visibly damp.

Let cool in the pan for 30 minutes before running a thin, flexible knife around the edge of the cake. Invert cake onto a clean plate. Remove parchment. Revert onto a serving plate or cakestand. Let cool completely before slicing. Serve with whipped cream, if desired.

Leftover cake will keep covered at room temperature for up to two days or in the refrigerator for up to five. It tastes good on the first day, but the flavors deepen over time.

Pumpkin Waffles

Do I have terrible time management skills? Yes.

Did I write this recipe and take these photos the week before Thanksgiving last year? Also yes.

Did I re-test with every intention of posting on September 21st this year? You bet.

Did I succeed? Well…it’s October 7th.

Luckily for us all, time management is not a major factor in making excellent Pumpkin Waffles. You don’t need to plan super far ahead; including mixing, resting, and waffling, you’ll need 45 minutes to an hour for the entire batch. All you need are some basic baking ingredients, a can of pumpkin, spice, and a little moxie.

Oh, and a waffle iron. That’s important.

Pumpkin Waffles are the slightest seasonal riff on my Sour Cream Waffles. They’re super simple to mix up, and the results have fluffy centers, crispy edges, and lots of pumpkin spice flavor (you know, because of all the pumpkin and spice).

Topped with a pad of butter and drizzled—or drenched—with maple syrup, these are a perfect autumnal breakfast any ol’ time.

Pumpkin Waffles
makes about 8 4-inch waffles

1 1/3 cups all-purpose flour
1/3 cup cornstarch
2 tablespoons granulated sugar
2 teaspoons pumpkin pie spice
1 teaspoon baking powder
1/2 teaspoon baking soda
1/2 teaspoon Kosher or sea salt
1 cup whole milk, room temperature
1/3 cup pure pumpkin purée
1/3 cup full-fat sour cream
2 large egg whites, room temperature
6 tablespoons unsalted butter, melted
2 teaspoons pure vanilla extract

For the waffle iron:
cooking spray

For serving:
butter
warmed maple syrup
seasonal fruit

In a medium mixing bowl, whisk together all-purpose flour, cornstarch, sugar, pumpkin pie spice, baking powder, baking soda, and salt. Set aside.

In a large liquid measuring cup (or small mixing bowl), use a fork to whisk together whole milk, pumpkin purée, and sour cream. Whisk in egg whites, melted butter and vanilla.

Add liquid ingredients to dry in two installments, whisking until combined and mostly smooth (a couple of small lumps are okay). Let batter rest at room temperature for 15 minutes while the waffle iron is heating.

Preheat oven to 200F. Place a cooling rack over a rimmed baking sheet.

Grease waffle iron with cooking spray. Pour 1/3 cup of the waffle batter into each well of the iron and close the top. Let cook until steam dissipates and the waffles are turning golden, about 6 minutes.

Transfer cooked waffles to the prepared rack-over-pan and place in the oven to keep warm. Re-grease the waffle iron and cook remaining batter.

Serve waffles with butter, warmed maple syrup, and seasonal fruit, if desired. Enjoy immediately.

Leftovers may be layered with parchment, placed in a freezer bag, and frozen for up to 3 months. Reheat in the toaster.

Blueberry Ginger Ales

Blueberry Ginger Ales

Hello from the Shakespeare in the Park cancellation line in Central Park, where I am one of two hundred or so people hoping to keep the late summer gloom away with free world class theatre. I just got home from Maine a few days ago and am, in fact, wearing a dress last washed in a lobster pot in the backyard of our cottage and hung to dry on a line. Excuse me for waxing poetic, but if you’ve ever spent any time in Maine, you know these doldrums. Hell, if you’ve ever taken a vacation, you know.

Blueberry Ginger Ales

So what does this have to do with Blueberry Ginger Ales? Not a lot, I suppose. I started fooling around with this recipe mid-July in anticipation of our trip to Maine, but didn’t post it beforehand and now Maine has come and gone (though watch out for a mid-autumn sequel). I just wanted to make sure that you knew that you could make these seasonal homemade sodas before summer unofficially ends.

Blueberry Ginger Ales

As with many of the homemade beverages you’ll find on this site, this recipe takes only a few minutes of active work—in this case, making a syrup and straining it—but makes plenty to enjoy. Simply pour some syrup over ice, top with seltzer, stir, and sip.

With a balanced berry flavor and a good spicy punch of ginger, Blueberry Ginger Ales would be a perfect booze-free addition to any menu. From end-of-summer festivities to lazy weekend afternoons, you really can’t go wrong. I mean, I could certainly go for one in this cancellation line.

Blueberry Ginger Ales

Or at least I could have, because I ended up getting a ticket. Doldrums be gone.

Blueberry Ginger Ales
makes 8-12 small sodas

Blueberry Ginger Syrup:
1 5-7 inch piece fresh ginger (about 1/3 lb)
16 ounces (about 3 cups) fresh or frozen blueberries
1 1/2 cups granulated sugar
pinch of salt
1 cup water
1 tablespoon lemon juice

For Blueberry Ginger Ales:
1 batch blueberry ginger syrup
2 large bottles sparkling water

For Serving:
ice
fresh blueberries (optional)
straws (optional)

On a cutting board, scrape the edge of a spoon across the ginger to peel. Discard peelings. Slice ginger as thinly as possible—you should have about 1 cup slices.

Combine ginger, blueberries, sugar, salt, and water in a small pot. Bring to a simmer over medium-low and then let cook, stirring occasionally, for 15 minutes. It’s done when the berries have burst, sugar has dissolved, and the syrup coats the back of a spoon.

Remove from heat, mash berries a bit if needed (we want them all burst), and stir in lemon juice. Cool the syrup without straining. Once cool, strain ginger and blueberries out, pressing them to remove as much syrup as possible. Discard ginger and blueberries. You should have 1 1/2-2 cups syrup.

To make Blueberry Ginger Ales, add ice to your glasses. Pour about 3-4 tablespoons of syrup into each glass. Top with sparkling water, then stir to combine. Taste and adjust with more syrup or sparkling water as desired. Add a few blueberries for garnish, if desired. Pair with a cute straw and enjoy!

Leftover syrup will keep in an airtight container in the refrigerator for at least a week.

Sour Cream Crumb Cake

Remember when I went MIA last month? This is what I was doing. Making crumb cake after crumb cake, giving them away, picking them apart—I am patting myself on the back for only having to deposit two directly into the garbage.

Sour Cream Crumb Cake

I mean, how difficult could crumb cake be to make, you know? People have been making it forever. Slightly dense, buttery cake topped with a crunchy cinnamon crumb simply could not be that much of a challenge…right?

Wrong. So wrong. Seventeen dud crumb cakes wrong. I mean, they all tasted right (well, all but two), but they sunk in the center, too. Every single one. It didn’t matter what I did—adding eggs, changing the amounts of flour and sour cream, reducing the amount of crumb (heaven forbid!)—I could not get them to come out even.

But then. But. Then. I remembered that while baking powder helps cakes to puff, too much can cause them to collapse. I barely reduced the baking powder in my up-to-then best recipe and, well, here we are. Slightly dense, buttery cake topped with a crunchy cinnamon crumb, just like people have been making forever.

Sour Cream Crumb Cake
makes 1 8-inch pan, about 12 servings

Crumb:
1 cup all-purpose flour
1/2 cup light brown sugar, packed
3/4 teaspoon ground cinnamon
1/2 Kosher or sea salt
6 tablespoons unsalted butter, melted

Cake Batter:
1 1/3 cup all-purpose flour
3/4 teaspoon baking powder
1/4 teaspoon baking soda
1/2 teaspoon Kosher or sea salt
1/2 cup unsalted butter, softened to room temperature
1 cup granulated sugar
1 large egg, room temperature
1/4 cup full-fat sour cream
1 1/2 teaspoon pure vanilla extract
2 tablespoons milk of choice

For Garnish (optional):
confectioner’s sugar

Preheat oven to 350F. Grease an 8-inch square pan. Line with parchment, leaving overhang on two sides, then grease again. Set aside.

Make the crumb. In a small mixing bowl, use a fork to whisk together flour, light brown sugar, cinnamon, and salt. Add melted butter and stir together until everything is moistened and clumps form. Set aside.

Make the cake batter. In a small-medium mixing bowl, whisk together flour, baking powder, baking soda, and salt. Set aside.

In a large mixing bowl, use an electric mixer to cream butter until very light and fluffy (about 2 minutes). Beat in granulated sugar. Mix in egg, followed by sour cream. Add vanilla and milk. With the mixer on low, mix in dry ingredients in two installments. Batter will be thick.

Spread batter into the prepared pan. Scatter crumb evenly over the top and lightly press them into the batter. Bake 45-50 minutes, or until a toothpick inserted near the center comes out clean. Let cake cool completely in the pan on a rack.

Run a small, thin knife along the edges of the pan, then use the parchment overhang to lift the cake onto a cutting board. Dust with confectioners sugar, if desired. Slice into 12 pieces.

Serve cake room temperature or slightly warm. Leftovers may be kept covered at room temperature for a few days or in the refrigerator for up to a week.

Chocolate Chip Cake

Chocolate Chip Cake

This is just to say that if you have an inkling that you should throw a ton of mini chocolate chips into your yellow cake batter…well, you should follow that urge.

And if, once baked, you’d like to paint the cake layers with simple syrup and sandwich them with a trusty chocolate buttercream and some more mini chocolate chips (for texture & fun, duh), you should absolutely do that, too.

Chocolate Chip Cake

And if you feel like you want to frost the whole thing per usual layer cake practice, go right ahead. But if you want to leave it a little naked and rustic, you should—you guessed it—follow that instinct.

Chocolate Chip Cake

And if, at the end of this process, you’ve found that you’ve made a triple-decker Chocolate Chip Cake for no real reason, well, you’re not alone. I did, too.

Chocolate Chip Cake
Chocolate Chip Cake
makes one 3 layer 9-inch round cake

Cake:
2 1/2 cups all-purpose flour
1/4 cup cornstarch
1 1/2 cups granulated sugar
1/3 cup light brown sugar, packed
2 teaspoon baking powder
1/2 teaspoon baking soda
1/2 teaspoon Kosher or sea salt
1 cup mini chocolate chips
1 cup (2 sticks) unsalted butter, softened to room temperature, cut into pieces
3 large eggs + 2 large egg yolks, room temperature
1 tablespoon pure vanilla extract
1 cup whole milk
1/3 cup full-fat sour cream

Simple Syrup:
1/4 cup water
1/4 cup granulated sugar

Chocolate Frosting:
3 ounces dark chocolate
1 cup (2 sticks) unsalted butter, softened to room temperature
1 1/2 cups confectioner’s sugar
1/2 cup natural unsweetened cocoa powder
1/4-1/2 teaspoon Kosher or sea salt
1 1/2 teaspoons pure vanilla extract
2 tablespoons heavy cream

For Assembly & Garnish:
1/2-2/3 cup mini chocolate chips (or more, if desired), divided

Place an oven rack in the center position. Preheat oven to 350F.

Grease three 9-inch round cake pans. Line with parchment and grease again. Set aside.

Make the cake batter. Combine flour, cornstarch, granulated sugar, light brown sugar, baking powder, baking soda, and salt in a large mixing bowl. Whisk ingredients together (I like to do this by running my mixer on its lowest speed for about a minute). Add mini chocolate chips and mix to distribute.

Add butter to dry ingredients. Gradually turn the mixer from low up to medium, to mix in the butter until there are no large pieces and the texture is rubbly. This will take a few minutes.

With the mixer running, add eggs and yolks one at a time, followed by vanilla. Mix until combined.

In a measuring cup or small mixing bowl, use a fork to whisk together milk and sour cream. Running the mixer on medium, add the milk mixture in two installments and mix until combined. Scrape down the bowl well to ensure even mixing.

Divide batter evenly among prepared pans. Tap each full pan on the counter five times to release any large air bubbles. Bake layers on the center rack for 25-27 minutes, or until a toothpick inserted in the centers comes out clean. Let let layers cool in their pans for 15 minutes. Run a thin knife around the edges of the layer before turning out onto a rack to cool completely.

Make the simple syrup. Combine water and sugar in a small saucepan. Heat over medium heat, stirring occasionally, until sugar has dissolved (about 4-5 minutes). Remove from heat. Set aside.

Make the Chocolate Frosting. For a thicker coat or for piping, make 1.5x the recipe as written. Place chopped dark chocolate in a small microwave-safe bowl. Microwave in 15 second increments, stirring just until melted. Cool to room temperature (this can be done quickly by putting it into the fridge for 5-8 minutes, then whisking quickly with a fork).

In a large mixing bowl, use an electric mixer to beat butter until very light and fluffy (about 4-5 minutes). Beat in confectioner's sugar, followed by cocoa powder and salt, scraping down the bowl as necessary. Mix in melted chocolate, followed by vanilla and heavy cream. Beat on high for 1-2 minutes, until very fluffy.

Assemble the cake. Place the base layer on a serving plate. Paint the top with 1/3 of the simple syrup. Let soak in for a minute or two. Top the layer with a thin layer of frosting (about 1/3 of the batch), then top with 2 tablespoons of mini chocolate chips. Repeat this process with the remaining two layers. Frost the outside as desired, then decorate with more mini chocolate chips.

Layer cake will keep covered at room temperature for up to three days, or in the refrigerator for up to five.