Category Archives: layer cakes

Chocolate Chip Cake

Chocolate Chip Cake

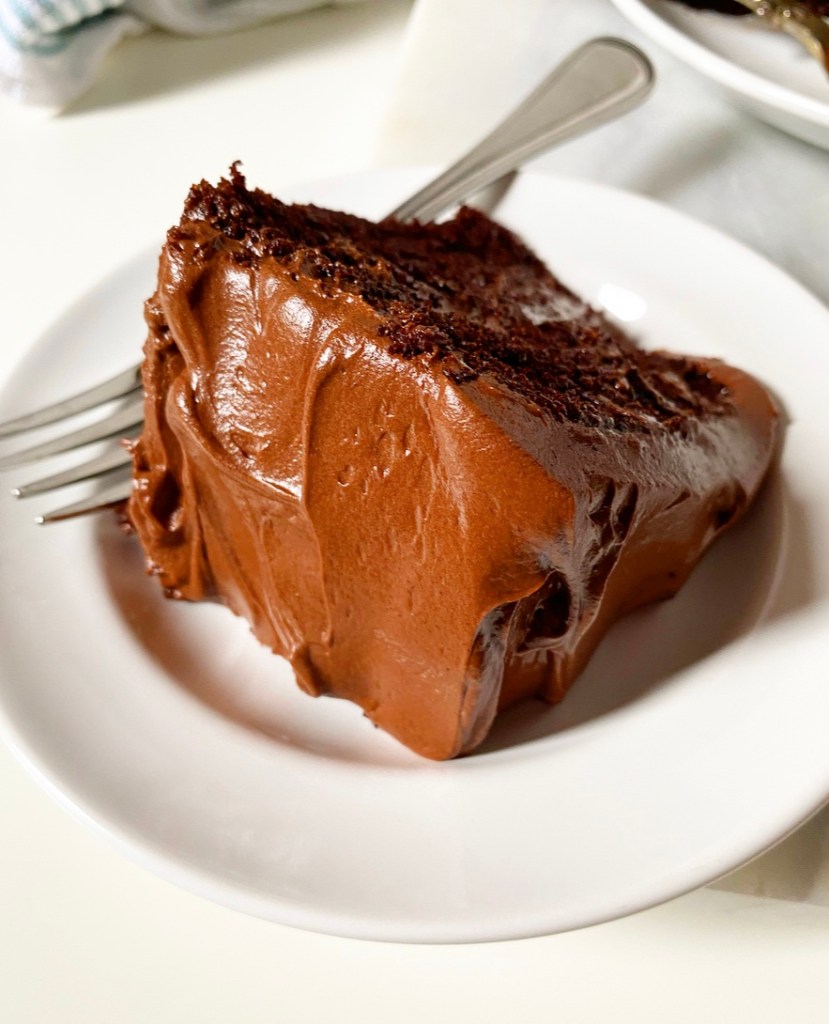
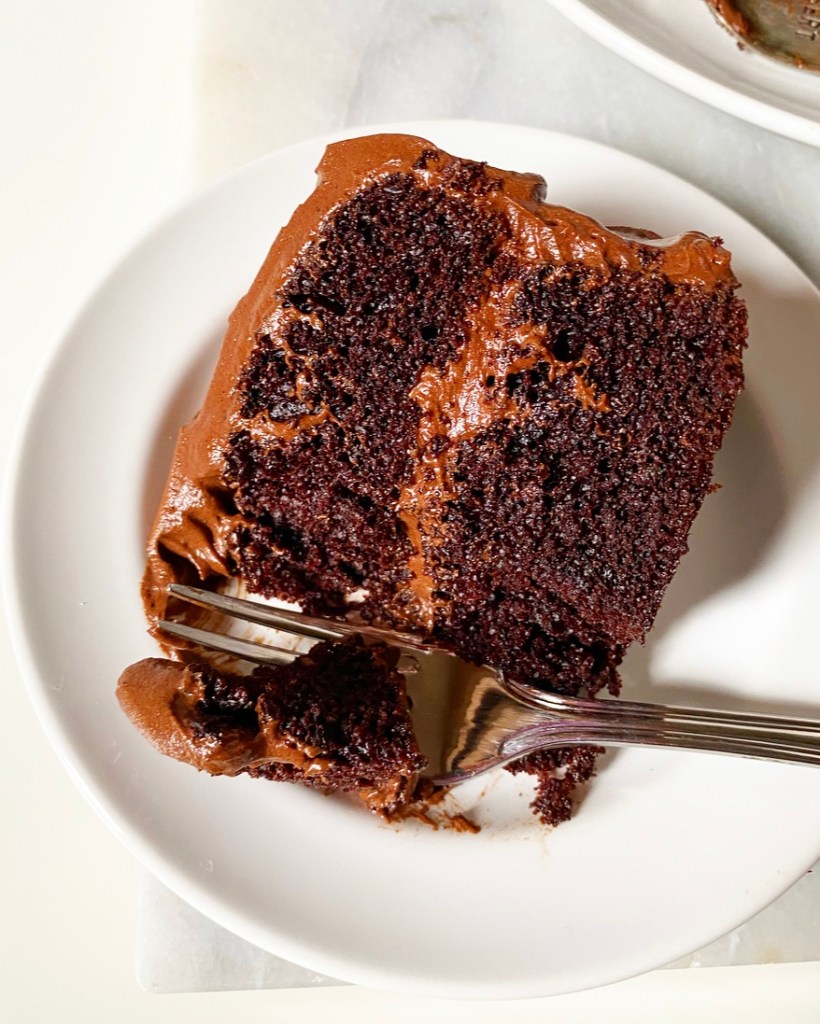
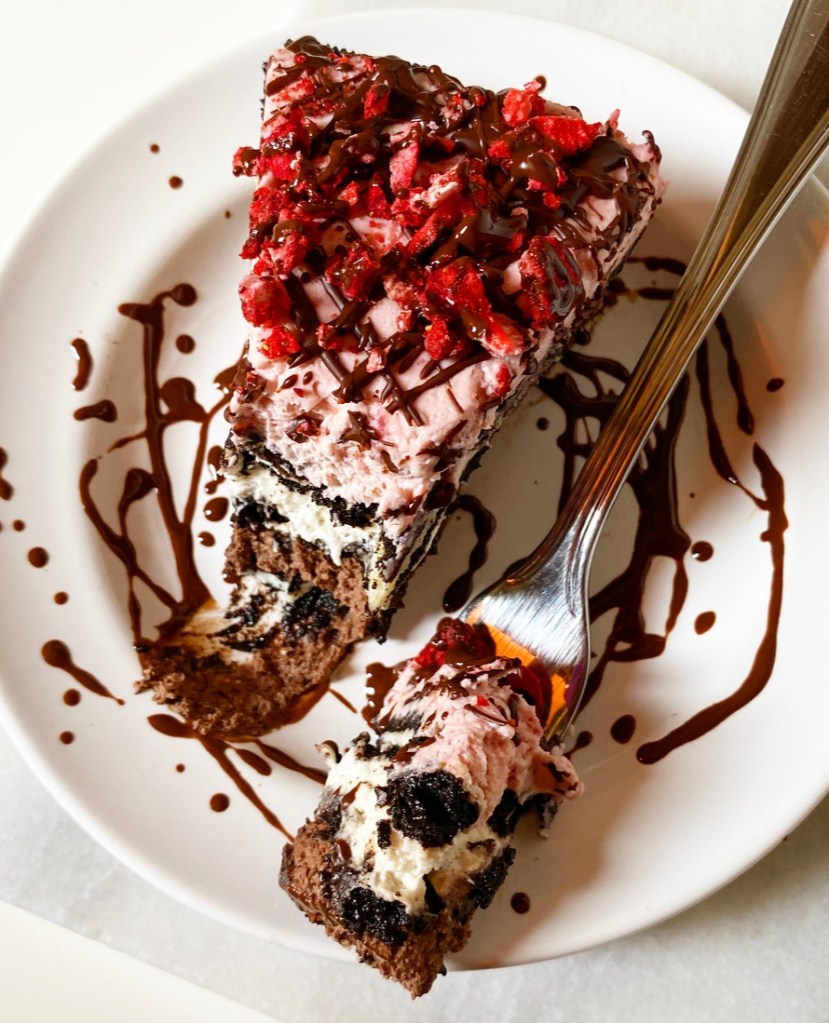
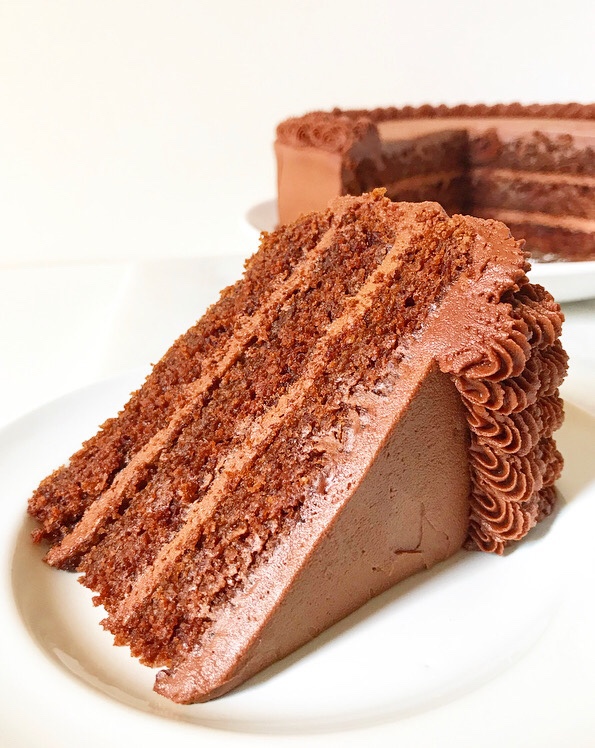
This is just to say that if you have an inkling that you should throw a ton of mini chocolate chips into your yellow cake batter…well, you should follow that urge.

And if, once baked, you’d like to paint the cake layers with simple syrup and sandwich them with a trusty chocolate buttercream and some more mini chocolate chips (for texture & fun, duh), you should absolutely do that, too.

Chocolate Chip Cake

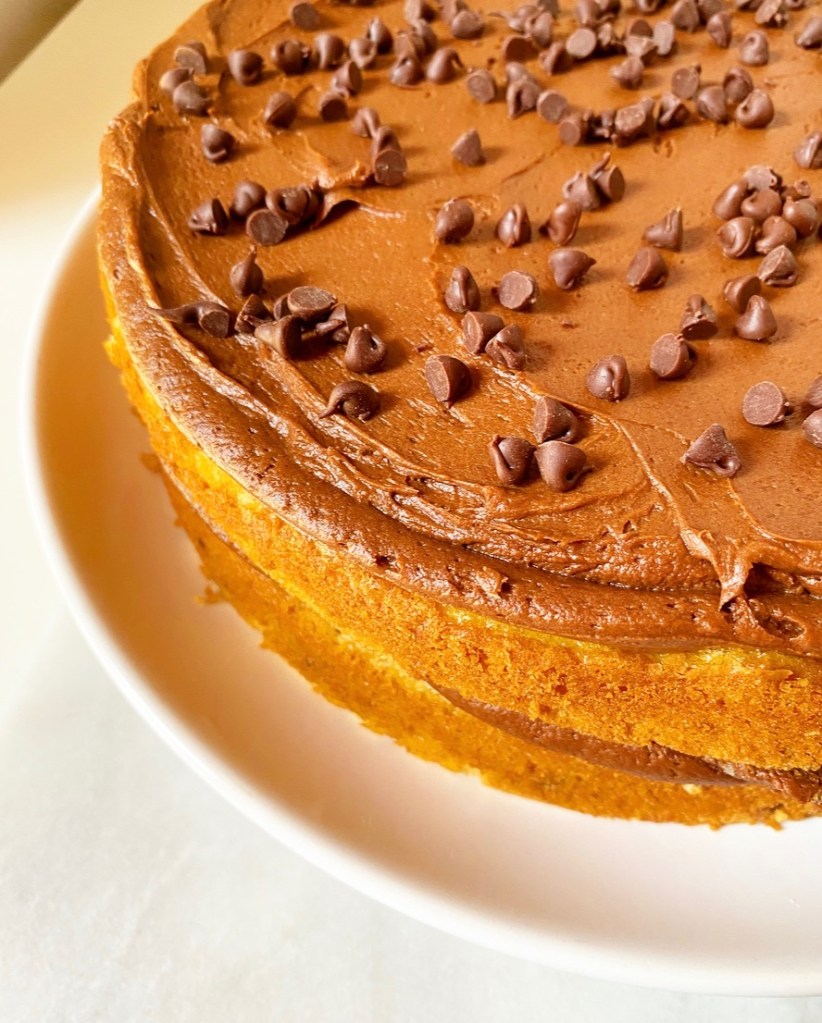
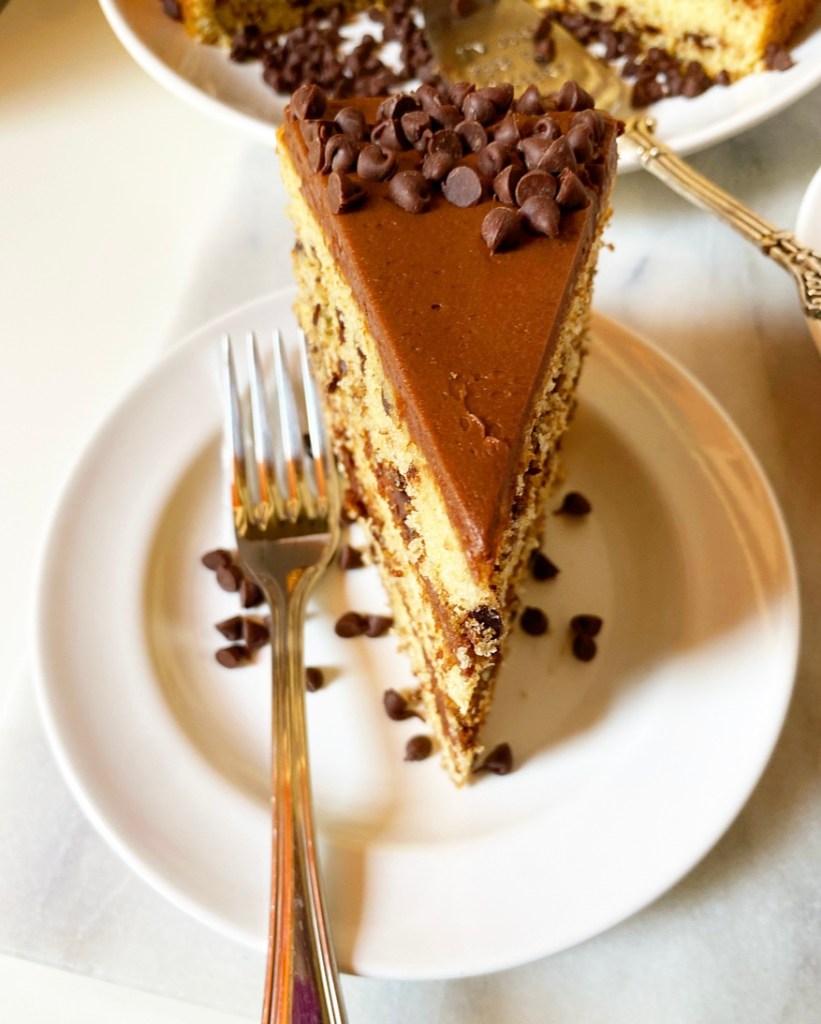
And if you feel like you want to frost the whole thing per usual layer cake practice, go right ahead. But if you want to leave it a little naked and rustic, you should—you guessed it—follow that instinct.

Chocolate Chip Cake

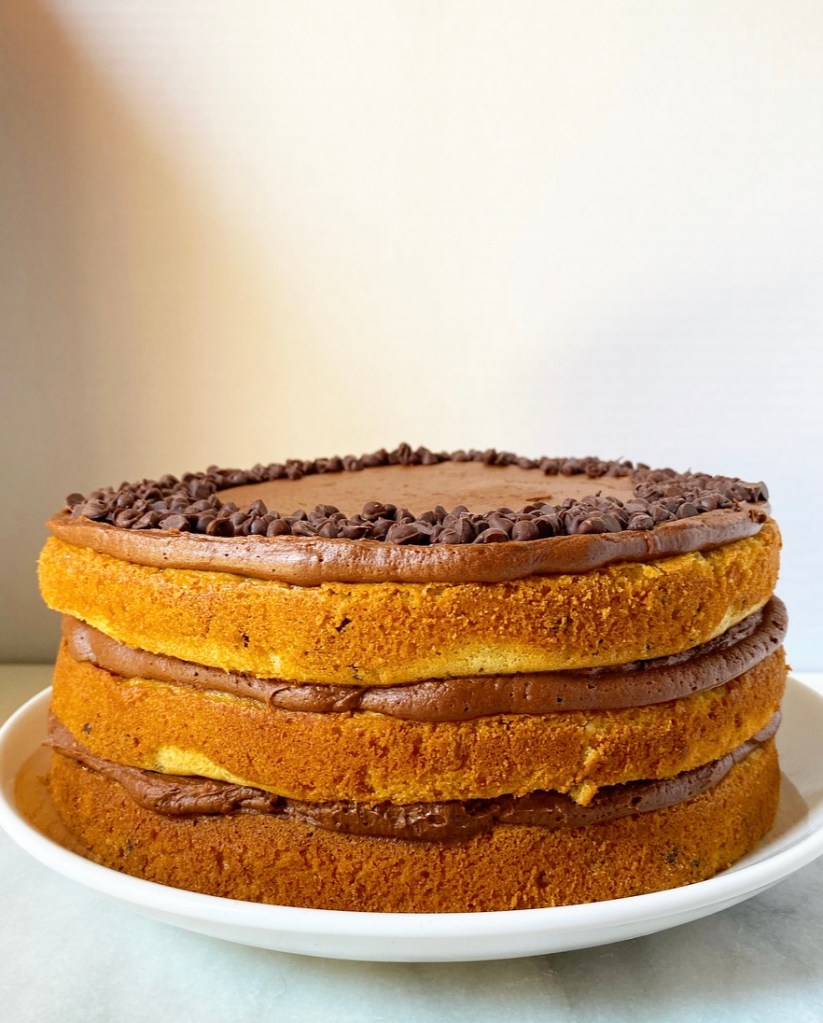
And if, at the end of this process, you’ve found that you’ve made a triple-decker Chocolate Chip Cake for no real reason, well, you’re not alone. I did, too.
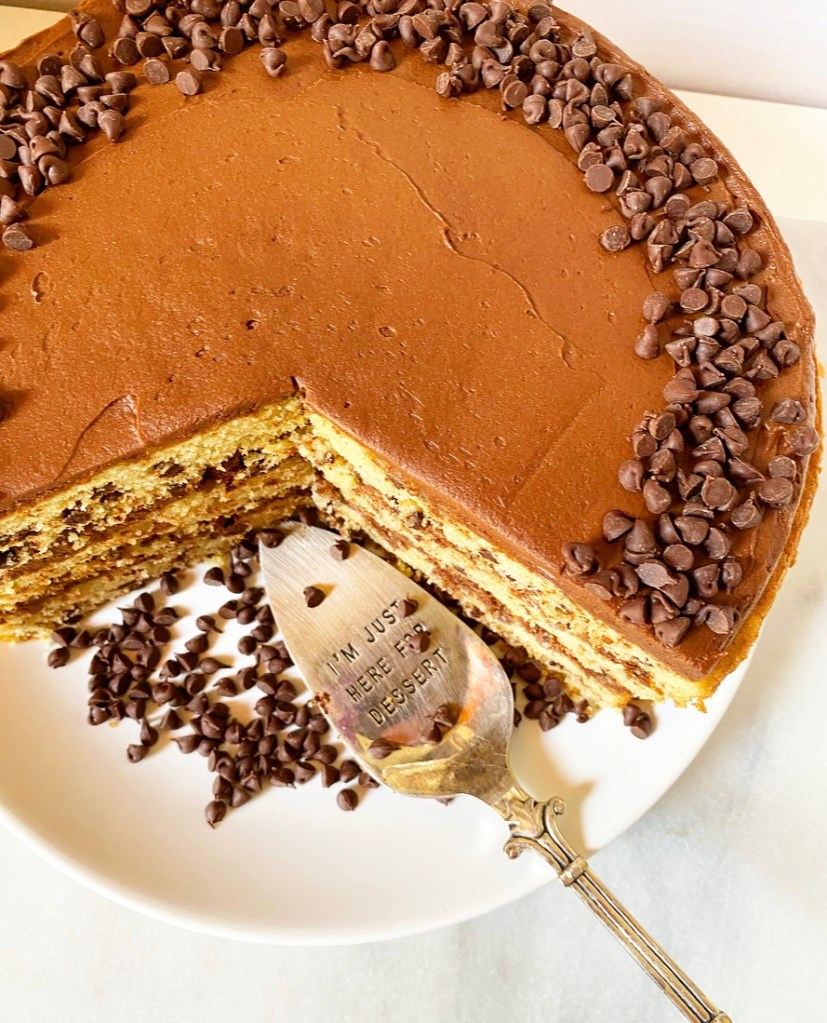
Chocolate Chip Cake
Chocolate Chip Cake
makes one 3 layer 9-inch round cake

Cake:
2 1/2 cups all-purpose flour
1/4 cup cornstarch
1 1/2 cups granulated sugar
1/3 cup light brown sugar, packed
2 teaspoon baking powder
1/2 teaspoon baking soda
1/2 teaspoon Kosher or sea salt
1 cup mini chocolate chips
1 cup (2 sticks) unsalted butter, softened to room temperature, cut into pieces
3 large eggs + 2 large egg yolks, room temperature
1 tablespoon pure vanilla extract
1 cup whole milk
1/3 cup full-fat sour cream

Simple Syrup:
1/4 cup water
1/4 cup granulated sugar

Chocolate Frosting:
3 ounces dark chocolate
1 cup (2 sticks) unsalted butter, softened to room temperature
1 1/2 cups confectioner’s sugar
1/2 cup natural unsweetened cocoa powder
1/4-1/2 teaspoon Kosher or sea salt
1 1/2 teaspoons pure vanilla extract
2 tablespoons heavy cream

For Assembly & Garnish:
1/2-2/3 cup mini chocolate chips (or more, if desired), divided

Place an oven rack in the center position. Preheat oven to 350F.

Grease three 9-inch round cake pans. Line with parchment and grease again. Set aside.

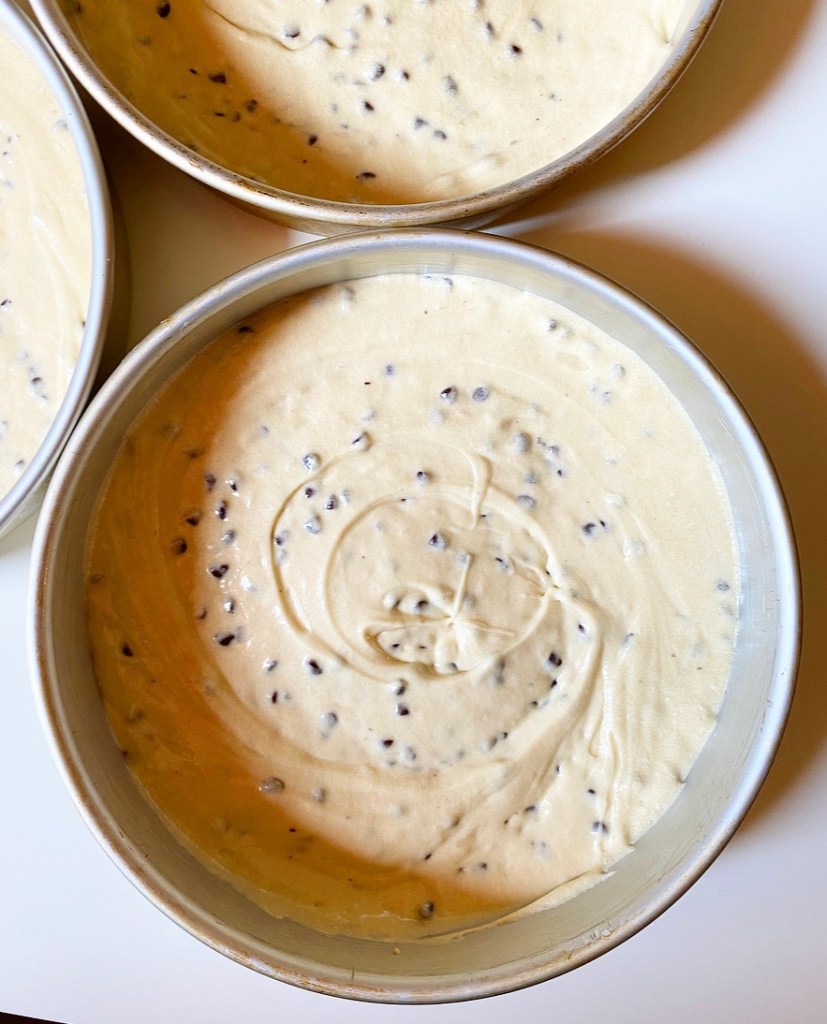
Make the cake batter. Combine flour, cornstarch, granulated sugar, light brown sugar, baking powder, baking soda, and salt in a large mixing bowl. Whisk ingredients together (I like to do this by running my mixer on its lowest speed for about a minute). Add mini chocolate chips and mix to distribute.

Add butter to dry ingredients. Gradually turn the mixer from low up to medium, to mix in the butter until there are no large pieces and the texture is rubbly. This will take a few minutes.

With the mixer running, add eggs and yolks one at a time, followed by vanilla. Mix until combined.

In a measuring cup or small mixing bowl, use a fork to whisk together milk and sour cream. Running the mixer on medium, add the milk mixture in two installments and mix until combined. Scrape down the bowl well to ensure even mixing.

Divide batter evenly among prepared pans. Tap each full pan on the counter five times to release any large air bubbles. Bake layers on the center rack for 25-27 minutes, or until a toothpick inserted in the centers comes out clean. Let let layers cool in their pans for 15 minutes. Run a thin knife around the edges of the layer before turning out onto a rack to cool completely.

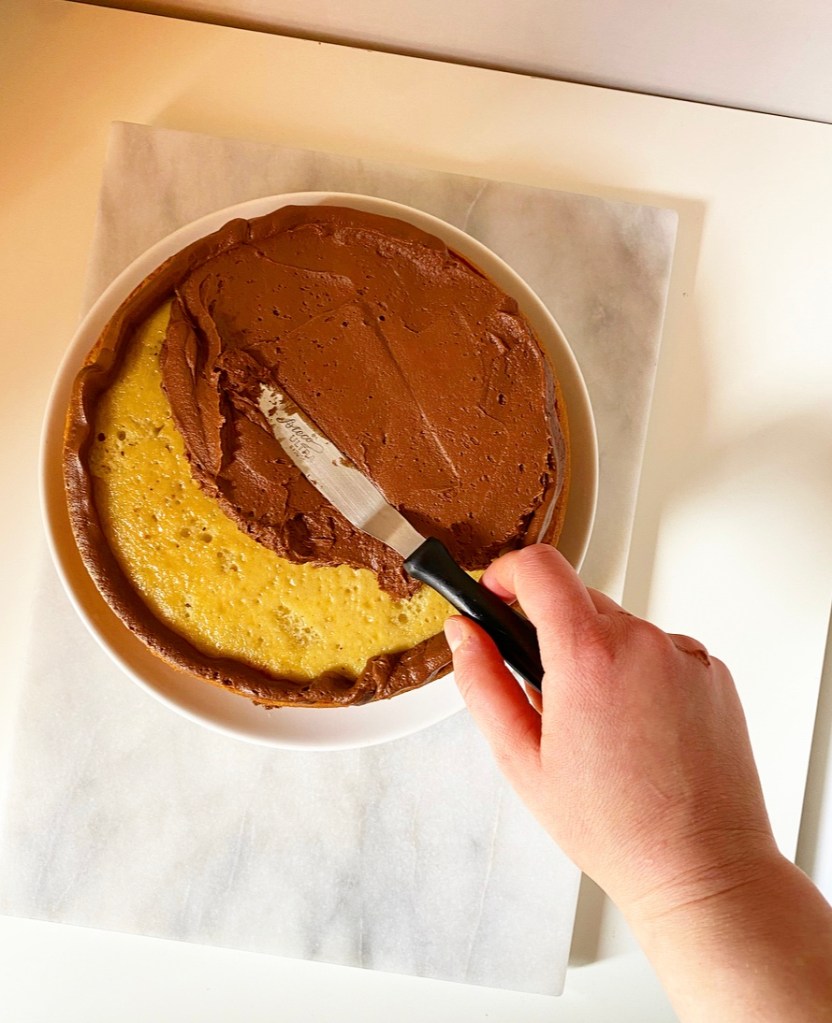
Make the simple syrup. Combine water and sugar in a small saucepan. Heat over medium heat, stirring occasionally, until sugar has dissolved (about 4-5 minutes). Remove from heat. Set aside.

Make the Chocolate Frosting. For a thicker coat or for piping, make 1.5x the recipe as written. Place chopped dark chocolate in a small microwave-safe bowl. Microwave in 15 second increments, stirring just until melted. Cool to room temperature (this can be done quickly by putting it into the fridge for 5-8 minutes, then whisking quickly with a fork).

In a large mixing bowl, use an electric mixer to beat butter until very light and fluffy (about 4-5 minutes). Beat in confectioner's sugar, followed by cocoa powder and salt, scraping down the bowl as necessary. Mix in melted chocolate, followed by vanilla and heavy cream. Beat on high for 1-2 minutes, until very fluffy.

Assemble the cake. Place the base layer on a serving plate. Paint the top with 1/3 of the simple syrup. Let soak in for a minute or two. Top the layer with a thin layer of frosting (about 1/3 of the batch), then top with 2 tablespoons of mini chocolate chips. Repeat this process with the remaining two layers. Frost the outside as desired, then decorate with more mini chocolate chips.

Layer cake will keep covered at room temperature for up to three days, or in the refrigerator for up to five.
Advertisement

Chocolate Cake with Chocolate Sour Cream Frosting (and a story about burnout)

Hi. Is anybody still here?

I’ve been a little MIA recently, owing mostly to the burnout I’ve been rocketing toward for the last year. It happened gradually—I went down to one post a week in February, quit posting to social media in June, didn’t do anything blog-related during my vacation in August, then took three more weeks away. I tried everything in my power not to disappear completely from this place, but nearly seven years into this endeavor, I was just…tired.

Chocolate Cake with Chocolate Sour Cream Frosting (and a story about burnout)​

Running this one-woman show isn’t easy. Between testing, photographing, writing, posting, and promoting, each post takes about twelve hours start-to-finish. I make income from this blog, but throwing all the daily tasks of running it on top of my day job, trying to have some semblance of a social life, and regularly scheduled introvert hours had me on the verge of a breakdown. So, I stepped away.

I didn’t stop baking though. In fact, I have baked more. I have baked, dare I say, *better.* With more passion, without any expectations. I made things I wanted to make, whether or not they were seasonally appropriate or trending.

Chocolate Cake with Chocolate Sour Cream Frosting

Take this Chocolate Cake with Chocolate Sour Cream Frosting, for instance. I wanted to make it for months, and finally did it once I took the pressure off myself. It’s old-fashioned and simple, made with my go-to chocolate cake recipe and finished with a silky, tangy chocolate frosting. It’s rich and chocolaty, unfussy and unpretentious, with a glossy finish usually reserved for the cover of Southern Living Magazine. In short, it’s everything I want in a chocolate cake. I’m just glad I finally took the time to make it. I hope you will, too.

I am a little hesitant to dive back in here, but I think I am ready to get back to blogging. I’ve missed it. Posts may be twice a week or may just be once depending on how the rest of my life is going. For now though, I am back and oh-so glad to be in this little corner of the internet.

Hello, out there.

Chocolate Cake with Chocolate Sour Cream Frosting
Chocolate Cake
makes two 9-inch round layers

Cake:
1 3/4 cups all purpose flour
3/4 cup natural unsweetened cocoa powder (not Dutch Process)
1 cup granulated sugar
3/4 cup light or dark brown sugar
1 tablespoon espresso granules (optional, but recommended)
1 teaspoon baking powder
2 teaspoons baking soda
1 teaspoon Kosher or sea salt
1/2 cup neutral-flavored oil (I use canola)
2 large eggs, room temperature
2 teaspoons pure vanilla extract
1 cup buttermilk (low fat is fine)
1 cup boiling water

For assembly:
1 recipe Chocolate Sour Cream Frosting (below)

Preheat the oven to 350F. Grease two 9-inch round cake pans. Line the bottoms with parchment and grease again. Set aside.

Make the cake batter. In a large mixing bowl, sift together flour, cocoa powder, granulated sugar, brown sugar, espresso granules (if using), baking powder, baking soda, and salt. Whisk to distribute ingredients evenly. Set aside.

In a separate medium-large mixing bowl, whisk together oil and eggs, followed by vanilla and buttermilk. Whisk half the egg mixture into the dry ingredients, just until combined. Add half the boiling water. Whisk in the remaining egg mixture followed by the remaining water. Batter will be thin.

Divide batter evenly between the pans. Tap full pans on the counter five times to release any air bubbles. Bake 25-27 minutes, or until a toothpick inserted in the middle comes out clean.

Let cakes cool in their pans for at least 30 minutes. Run a small, thin knife around the edges. Invert cakes onto cooling racks and discard parchment. Allow to cool to room temperature.

While layers are cooling, make the frosting (recipe below).

Assemble the cake. Place one layer on a cake plate. Top with about 3/4 cup frosting, then sandwich the other layer on top. Frost and decorate cake as desired.

Frosted cake will keep covered at room temperature for up to two days, and in the refrigerator for up to a week.


Chocolate Sour Cream Frosting
makes enough for two 9-inch round layers

2 1/2 cups confectioners sugar, sifted
3/4 cup natural unsweetened cocoa powder, sifted
pinch of Kosher or sea salt
1 cup (2 sticks) unsalted butter, softened to room temperature
2 teaspoons pure vanilla extract
6 tablespoons (heaping 1/3 cup) full-fat sour cream

In a medium mixing bowl, sift together confectioner’s sugar, cocoa powder, and salt. Whisk together to distribute evenly.

In a large mixing bowl, use an electric mixer to beat butter until light and fluffy (about 2 minutes). Beat in half the dry ingredients, scraping down the bowl as necessary. It may seem like too much, but it will incorporate. Mix in remaining dry ingredients. Add vanilla and sour cream, then beat on high for 2-3 minutes, until smooth and fluffy. Use to frost a 9-inch round layer cake (or whatever).

Neapolitan Icebox Cake

Neapolitan Icebox Cake​

Beautifully baked, elaborately frosted layer cakes are all fine and good, but have you ever skipped the oven entirely, stacked Oreos with three different flavors of whipped cream, let the whole thing set up in the fridge and called it a cake?

Neapolitan Icebox Cake​

Oh yes, Neapolitan Icebox Cake is where it’s at. This triple-layered, triple-flavored no-bake cake hits all the buttons you want in a summer dessert, including keeping the kitchen cool. Even mixing vanilla, chocolate, and strawberry whipped creams, it takes less than 45 minutes to assemble and slide into the fridge to set up.

There are two secrets to perfecting this icebox cake. The first is dipping each Oreo in milk before assembling the cake. This allows the cookies to soften all the way through by adding moisture to the creme centers. If you skip the dipping, you will still be able to slice the cake, but the areas near the Oreos’ creme filling will stay a bit tough instead of softening to a cake-like texture.

Neapolitan Icebox Cake​

As with all icebox cakes, the second secret is time! Though it only takes minutes to assemble, this cake has to be refrigerated for at least 8 hours before serving. Luckily, we here at E2 Bakes love a make-ahead recipe almost as much as we love cake. And that’s really saying something because we love cake a lot.

Neapolitan Icebox Cake​
Neapolitan Icebox Cake
makes one cake ~9 inch cake

1 batch chocolate whipped cream (recipe below)
55-60 regular Oreos, divided (I used 57)
~1 cup milk
1 batch vanilla whipped cream (recipe below)
1 batch strawberry whipped cream

For garnish (optional):
Chocolate Shell
crushed freeze dried strawberries
crushed Oreos

Use an offset icing spatula to smear a thin layer of chocolate whipped cream onto a 11-12 inch round plate or platter.

Create the first Oreo layer. Take one Oreo, dunk it in milk, then place it in the center of the plate. Repeat this process, arranging the Oreos so that they are touching and make a vaguely circular shape (mine is technically a hexagon). I used 19 Oreos per layer.

Top the first layer with the chocolate whipped cream, spreading it all the way to the edges.

Repeat the Oreo dunking and arranging process. Top with the vanilla whipped cream. Repeat the Oreo dunking and arranging one more time, then top with the strawberry whipped cream.

Refrigerate the cake uncovered for 2 hours. Then, gently cover the cake with plastic wrap and let refrigerate for 6-20 more hours, until ready to serve.

About 30 minutes before serving, gently remove and discard the plastic wrap. Drizzle the cake with chocolate shell and other toppings, if desired. Refrigerate the cake for 10 more minutes to ensure a hard shell.

To serve, cut slices with a large, sharp chef’s knife, wiping it clean between cuts. Leftovers will keep covered in the refrigerator for up to 48 hours. The freeze dried strawberry garnish will soften over time.


Chocolate Whipped Cream

1 1/3 cup heavy cream, very cold
2 tablespoons natural unsweetened cocoa powder
1/3 cup confectioner’s sugar

In a medium-large mixing bowl, combine heavy cream, cocoa powder and confectioner’s sugar. Use an electric mixer to whip cream until stiff peaks form. Do not over whip (but if you do, just add a little more cream). Store in the refrigerator until needed for cake assembly.

Vanilla Whipped Cream

1 1/3 cup heavy cream
1 teaspoon pure vanilla extract
1/3 confectioner’s sugar

In a medium-large mixing bowl, combine heavy cream, vanilla, and confectioner’s sugar. Use an electric mixer to whip cream until stiff peaks form. Do not over whip (but if you do, just add a little more cream). Store in the refrigerator until needed for cake assembly.

Strawberry Whipped Cream

~2/3 cup freeze dried strawberries
1 1/3 cup heavy cream, very cold
1/2 teaspoon pure vanilla extract
1/4 cup confectioner’s sugar

Place freeze dried strawberries in a food processor and process until they are powder, about 45-60 seconds. Alternatively, place the berries in a sealed zip-top bag and crush well with a rolling pin or other heavy object.

In a medium-large mixing bowl, combine heavy cream, vanilla, confectioner’s sugar, and pulverized berries. Use an electric mixer to whip cream until stiff peaks form. Do not over whip (but if you do, just add a little more cream). Store in the refrigerator until needed for cake assembly.

Triple Raspberry Icebox Cake

Triple Raspberry Icebox Cake

I happily bake year-round, but I’ll be the first to tell you that my favorite kind of summer baking is no-baking. Like leaving the oven off. Like letting the fridge do all the work. Like not heating up my remarkably well-insulated New York City apartment on an already steamy day, and still having incredible dessert.

Today’s recipe is a variation on the queen of no-bake desserts: icebox cake! At its simplest, it’s just layering whipped cream and thin cookies (usually chocolate wafers or graham crackers) together and then letting the assemblage chill out in the fridge for a few hours. The cookies soften against the whipped cream and become cakelike—it’s very good.

Icebox cakes have been around for a good long time now, since the advent of the home refrigerator. In all those years—and in all the recipes I’ve tried—I’ve yet to find one that isn’t outstanding. Icebox cakes can be as easy or complicated as you want them to be. Low brow, high brow, whatever. The two ingredient classics are just as delicious as more intricate variations. I guess what I’m saying is that you should absolutely get on the icebox cake train if you haven’t already, and then, once you are a believer, twist up the original recipe and make it Triple Raspberry.

Triple Raspberry Icebox Cake

Oh yes, this cool & creamy pink icebox cake is loaded with raspberry flavor. From whole fresh raspberries to spoonfuls of raspberry jam to airy raspberry whipped cream, this cake is about as raspberry as it is possible to be!

All the ingredients are stacked in a loaf pan with plain honey graham crackers to divide the layers. After a long chill, the crackers are tender as can be, making for clean slices.

Triple Raspberry Icebox Cake

Can we discuss the cross-sections of fresh raspberries and ruby red streaks of jam? Because those…well, they’re my jam. I mean that in every sense of the word.

Triple Raspberry Icebox Cake

Like its predecessors, this cake is so much more than the sum of its parts. It’s about as easy as from-scratch summer desserts come, and about as raspberry-forward as it can be! It’s berry good, if I do say so myself.

Triple Raspberry Icebox Cake
makes one 9x5-inch cake, about 8-10 servings

Raspberry Whipped Cream:
6 tablespoons pulverized freeze dried raspberries
1/2 cup confectioner’s sugar
3 cups heavy cream, very cold

For Assembly:
10-12 whole graham crackers (4 sections per cracker), divided
1 6-ounce package fresh raspberries, divided
1/2 cup raspberry jam, divided

Decoration & Garnish:
1/2 cup raspberry jam, strained
2-3 teaspoons pulverized freeze dried raspberries
fresh raspberries

Lightly grease a 9x5-inch loaf pan. Line with parchment paper, leaving a little overhang on the long sides. Set aside.

Make the raspberry whipped cream. Place freeze dried berries in a food processor and process until they are powder, about 45-60 seconds. Alternatively, place the berries in a sealed zip-top bag and crush well with a rolling pin or other heavy object.

Measure out 2 tablespoons of pulverized berry powder, and reserve any remaining powder for another use.

In a medium-large mixing bowl, combine heavy cream, vanilla, confectioner’s sugar, and pulverized berries. Use an electric mixer to whip cream until stiff peaks form. Do not over whip (but if you do, just add a little more cream).

Gently spread 1/3 of the whipped cream in an even layer in the bottom of the prepared pan. Scatter 1/3 of the raspberries over the top and spoon 1/3 of the raspberry jam over, so that there are little globs everywhere. Tile a single layer of graham crackers over the top, breaking the crackers to fit, as needed. Press the graham crackers down *lightly* with your palm to adhere. Repeat layering step 2 more times.

Gentry cover the loaf pan in plastic wrap and refrigerate for at least 6 hours or overnight.

When you’re ready to serve, remove the pan from the refrigerator and discard the plastic wrap. Place a serving plate upside-down over the pan. Holding tightly to both the pan and the plate, flip them over so that the pan is now sitting upside-down on top of the plate. Gently lift the pan up to remove it. Gently peel off the parchment.

Decorate. Place jam in a small microwave-safe bowl and microwave for 15 seconds so it’s a bit loose. Push through a fine mesh strainer (set over a bowl) to remove seeds. Transfer warmed, seedless raspberry jam to a piping bag and snip the tiniest corner. Drizzle the cake with the jam as desired.

Dust cake with pulverized raspberry powder. Garnish with whole fresh raspberries. If not serving immediately, refrigerate.

Serve cake cold. Slice with a serrated knife, wiping it clean between cuts.

Friday Favorites: Birthday Cake

Friday Favorites: Birthday Cake​

My birthday is tomorrow, so let’s talk birthday cake! From elaborate layer cakes to ice cream cakes to marble cupcakes to cookie cakes, the cake you choose to have at your birthday celebration is highly personal. Some people have the same thing every year. Others, myself included, like to change it up. No matter which camp you fall into, I have loads of cake recipes for you in my archives. Here are some of my absolute favorites.

Friday Favorites: Birthday Cake​

Black Forest Cake {Schwarzvaldtårta}

While feeling homesick on my birthday last year, I decided to recreate a Swiss-style Black Forest Cake that is hugely popular in my hometown. You won’t find any cherries or chocolate cake here, just layers of airy almond dacquoise, whipped cream and dark chocolate. It also happens to be naturally gluten-free and so, so good. I’ll be having the real deal for my birthday this year (lucky me!), but this homemade version hits the spot if you’re not near Fort Worth, Texas.

Friday Favorites: Birthday Cake​

Mint Chocolate Chip Ice Cream Cake

Who doesn’t love ice cream cake? This one is simple as can be, starting with sandwiching mint chocolate chip ice cream with two layers of chocolate cake, then finishing it with whipped cream and anything else you like! Feel free to change up the ice cream flavor or just use this as a template and change the recipe completely. There is no wrong way to ice cream cake.

Friday Favorites: Birthday Cake​

Funfetti Cookie Cupcakes

When I was a kid, all the best birthday parties involved cookie cake. The same is true as an adult. I have Brown Butter Chocolate Chip, Chocolate M&Ms and Red Velvet Cookie Cakes in my archives, but this almost-36 year-old could really go for these colorful, miniature Funfetti Cookie Cupcakes right now!

Friday Favorites: Birthday Cake​

Red Velvet Marble Cupcakes

We all know a red velvet person. I usually save it for Oscar Night, but I think these Red Velvet Marble Cupcakes would fit the bill for birthdays too!

Friday Favorites: Birthday Cake​

Gluten-Free Vegan Chocolate Cake

This chocolate cake is a thing to behold. Made with all vegan, gluten-free ingredients and stacked tall with vegan chocolate buttercream, it might just surprise you and become a favorite.

Friday Favorites: Birthday Cake​

Yellow Cake with Chocolate Frosting

Something about Yellow Cake with Chocolate Frosting screams “birthday” to so many people. Mine is made with very good things like sour cream and brown sugar, mixed using the reverse creaming method, and finished with an irresistible chocolate frosting.

Friday Favorites: Birthday Cake​

How to Make Mini Layer Cakes

Not quite ready to start celebrating with larger groups yet? A mini layer cake might be the perfect solution! This tutorial has everything you need to make a birthday cake for 4-6 people.

Friday Favorites: Birthday Cake​

M&Ms Surprise Cake

This is the cake for that person in your life who’s a little extra. The one who likes all the bells and whistles and would enjoy slicing into a cake full of candy—this cake is for that person. Also? Hi, I’m that person.

Have you made these or any of my other chocolate chip treats? Let me know in the comments or on social media!

Friday Favorites: Birthday Cake​