Pineapple Salsa Fresca

Nine years ago today, I moved to New York. I was 22 years old, fresh out of college, and convinced that as soon as I got to my first Manhattan apartment, my life would really begin. I was starting film school, and my biggest dream was to be the first woman to win the Oscar for Best Director. Clearly, that did not happen (shout out to Kathryn Bigelow!), but a lot of other things did.

I’m pretty sure New York City is the only place in the world where people celebrate the anniversary of their moving date. It’s hard to live anywhere, but New York is a special case. The crowds, the noise, the cost of living, the constant need to compete professionally–nothing is easy here. In the last nine years, I have:

  • lived in eight apartments.
  • moved from Manhattan to Brooklyn. Then back to Manhattan. Then back to Brooklyn.
  • had twelve jobs in five different fields.
  • realized that I enjoy cooking far more than I ever enjoyed film production.
  • learned to bake in the tiniest kitchen ever.
  • abandoned my filmmaking dreams in the name of butter and sugar.
  • met some of the most incredible people on earth.
  • fallen in love. And fallen out of love.
  • had really high highs and horrifically low lows.
  • survived.

 The life I have is not what I envisioned nine years ago (or anything close to it), but today, I am living the life I want. I live in a beautiful apartment in a safe neighborhood with good people. I work as a personal chef for a very nice family. I have an unbelievable support system, without whom I’m not sure I would have accomplished anything. I have a lot of goodness, generosity, spontaneity, and love in my life. Every once in a while, I dream of moving somewhere else–Austin, Chicago, Maine–but then I realize that moving would mean leaving everything I’ve accomplished in New York, all the people I’ve met, and all of the opportunities I might have here in the future. And so, I stay. New York, I’m not done with you yet.

But as they say, “You can take the girl out of Texas, but you can’t take the Texas out of the girl.” As much as I couldn’t wait to move out of Fort Worth nine years ago, growing up in Texas has molded my identity in ways I will never be able to shake. My whole family lives there (until E3 moves to Boston next week!), as do most of my closest friends, so as much as I love New York, a lot of my heart is in the Lone Star State.

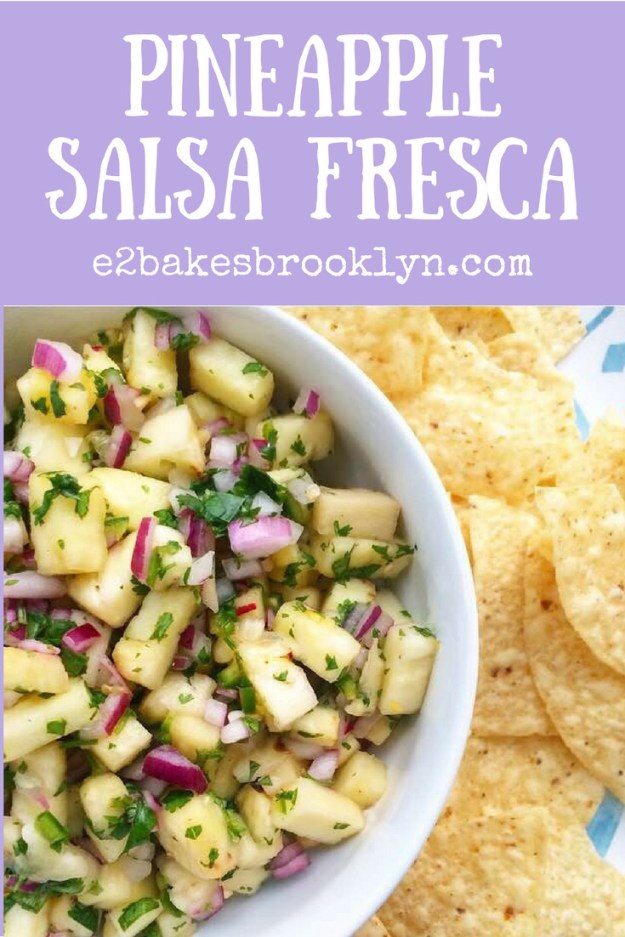
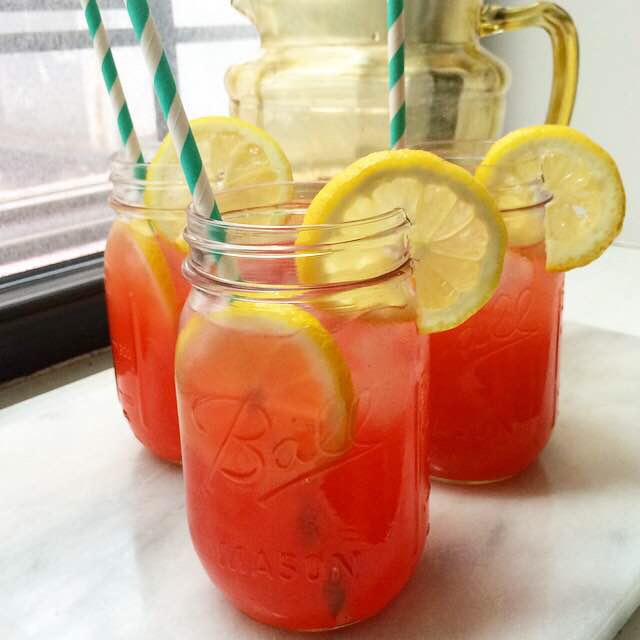
Another thing I’ll never be able to shake? My deep, abiding love of Tex-Mex. It’s one thing New York can’t ever seem to do right–I get my fix by making homemade versions of my favorite dishes. My recipe index already has my red and green salsas and my favorite guacamole, in addition to a fantastic posole and an easy southwestern chicken soup. I have big plans to put a couple of enchilada recipes on here when the weather cools down a little, but it’s hot today, so I’m keeping it simple with this Pineapple Salsa Fresca.

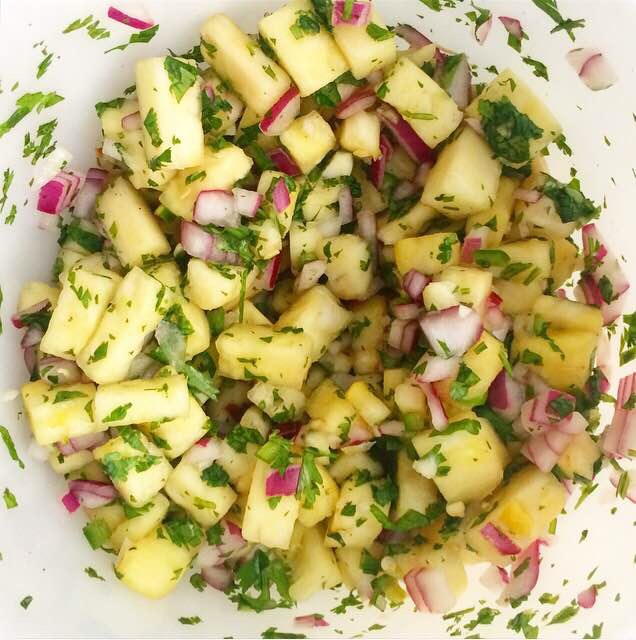
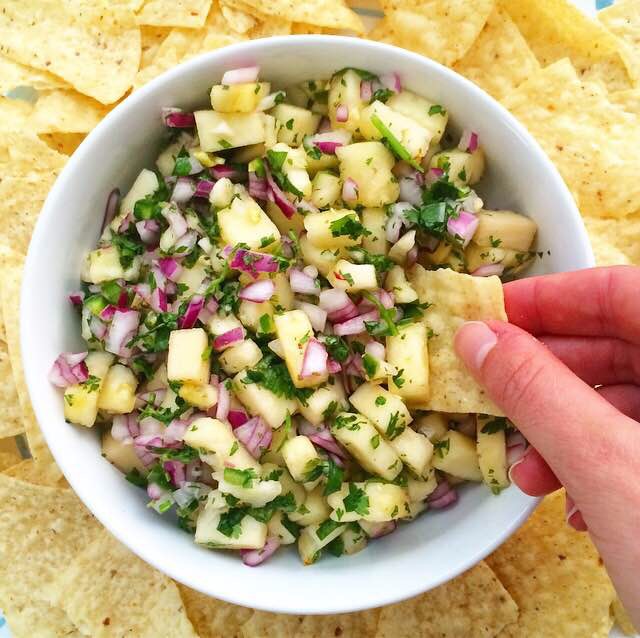
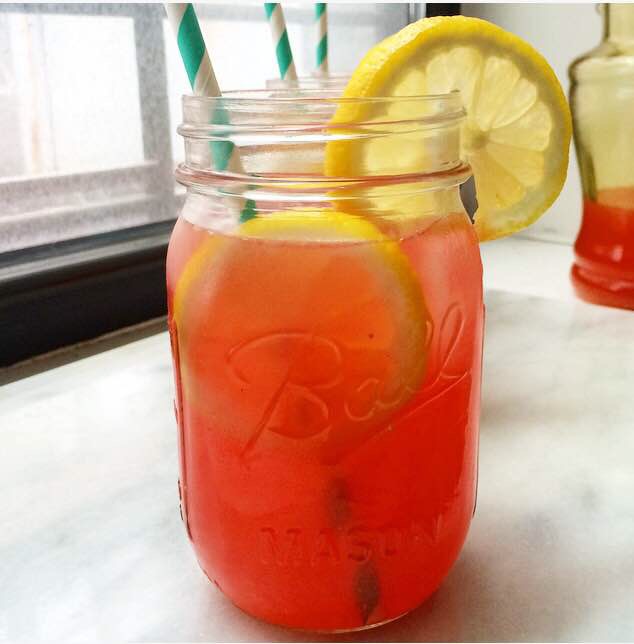
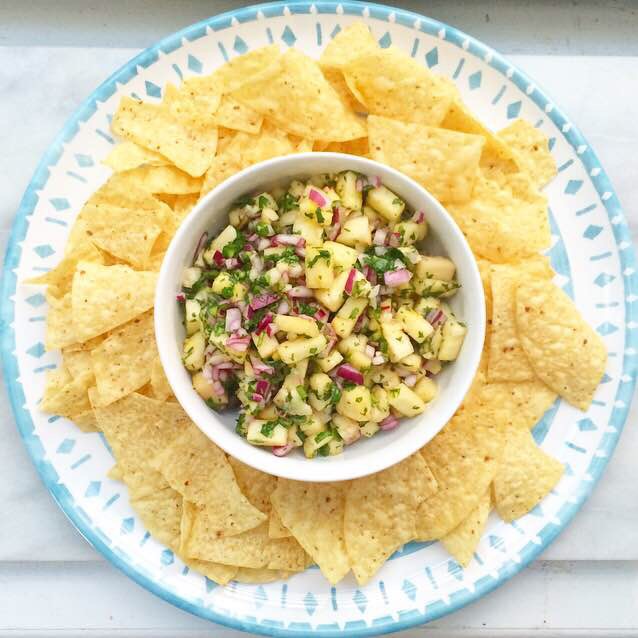
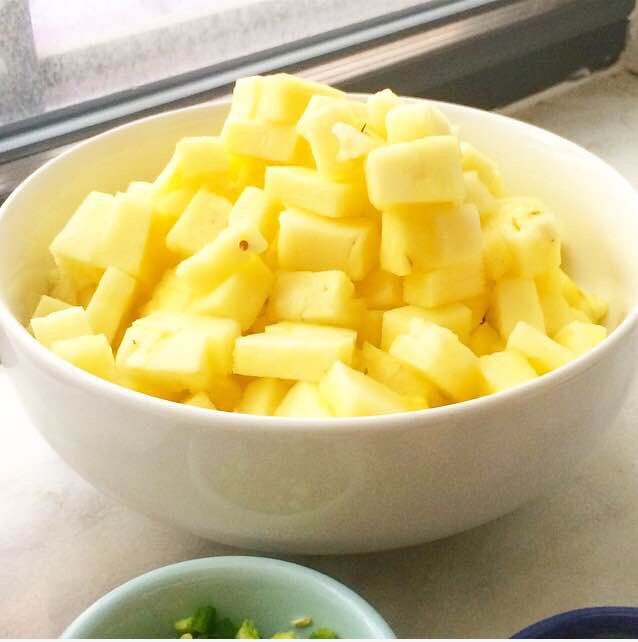
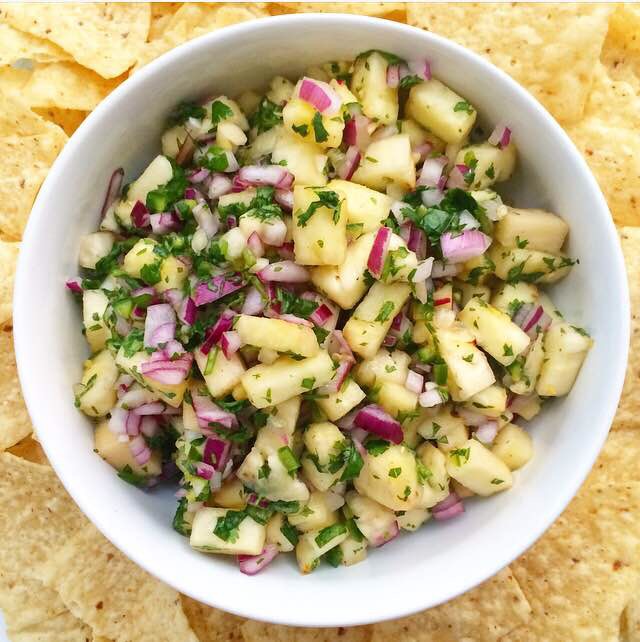
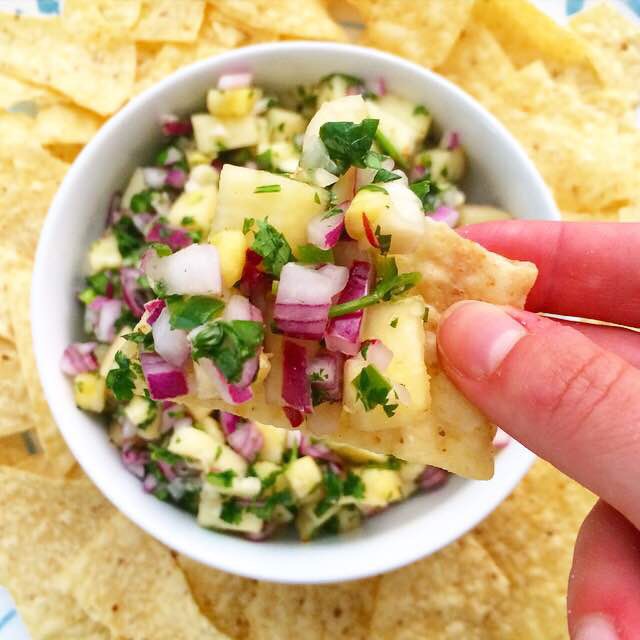
   This recipe is a sweeter, tangier twist on traditional pico de gallo. Fresh pineapple is used instead of tomatoes! Combined with red onion, a serrano pepper, a little garlic, chopped cilantro, lime juice, and salt, it’s a match made in heaven! Everything comes together on the cutting board in about ten minutes–no need for a food processor. Let it sit at room temperature for an hour to let the flavors meld a bit, and then dig in with your favorite tortilla chips!

Pineapple Salsa Fresca is a magical combination of flavors: sweet, tangy, spicy, and a little salty. The chunky, slightly crunchy texture is perfect with crispy tortilla chips! This salsa would also be great with grilled fish or shrimp. Oooh! Or pork tacos!

Yes. Even after nine years in New York, I’m definitely still Texan at heart.

 Pineapple Salsa Fresca
makes about 3 cups

3 cups fresh pineapple (about 1 pound), 1/2-inch dice
1/2 small red onion, 1/4-inch dice
1/2-1 serrano pepper,* minced, seeded (optional)
1 small clove of garlic, minced
1/2 cup chopped fresh cilantro leaves
juice of one lime
1/4 teaspoon Kosher or sea salt
tortilla chips, for serving

Combine pineapple, onion, serrano, garlic, cilantro, lime, and salt in a medium-large mixing bowl. Use a silicone spatula or wooden spoon to toss all ingredients together. Cover bowl with plastic wrap and let salsa sit at room temperature for one hour so the flavors can meld. Serve with tortilla chips.

Leftover salsa will keep covered in the refrigerator for up to two days.

Note:

Jalapeño may be used instead of serrano pepper. You may want two jalapeños, depending on your spice preferences.

Pineapple Salsa Fresca

Basil Pesto

When I was growing up, my parents insisted on family dinners nearly every night of the week, no matter how late E3 and I got finished with our extracurricular activities. As we got older, dance and piano practices went later and later, meaning dinner was often pushed to after 9pm, but as soon as everyone was home, we’d all sit down and catch up over a home-cooked meal. Those thirty minutes of family time every night are some of my favorite memories of my childhood, and not just because of all the joking that went on around our round kitchen table. My mom made dinner most nights. She is a good cook, although she doesn’t enjoy it the way I do. With rare exception, everything she put on the table was fantastic. Chicken divan, smothered pork chops, and corned beef were guaranteed hits with everyone, but my favorite was one of the few vegetarian meals she made: pasta with pesto, tomatoes and Parmesan. I just loved the combination of pasta, basil pesto, sweet tomatoes, and cheese. It wasn’t anything revolutionary, but it was delicious, and my mom made it often because she knew how I loved it.As I said, my mom is a good cook. But she isn’t always a scratch cook. She makes most things fresh, but when it comes to sauces, she usually goes for a jar. That pesto I loved so much is mass-produced. I continued to buy it into adulthood, not even imagining that I could make my own until I was well into my twenties. When I bought myself a food processor six years ago, pesto was one of the first things I made. I quickly ditched the storebought variety, and have been hooked on the homemade stuff ever since.Homemade Basil Pesto is delightfully quick and easy, and has a much brighter and more intense basil flavor than anything you’ll find in the grocery store. Start by putting two cups of fresh basil leaves, 1/3 cup each of pine nuts and Parmesan cheese, and two cloves of minced garlic into a food processor. You could certainly use whole garlic cloves, but I find that mincing them ahead of time guarantees that the final product won’t have any large pieces it it. I love pesto, but I don’t love biting into big chunks of raw garlic!While processing the basil, pine nuts, Parmesan, and garlic, stream in a combination of olive oil and lemon juice. The olive oil is what makes the pesto saucy and rich, and the lemon adds just a touch of brightness and acidity. As the liquid ingredients whirl with the basil, pine nuts, cheese, and garlic, a thick, bright green sauce will form. All that’s left to do is blitz in some salt and pepper!

Basil Pesto is great just about anywhere you can think to use it. Try it as a sauce for pizza, serve it over grilled chicken, spread it onto a halved loaf of bread and crisp it in the oven. Seriously, this stuff is good on everything. My favorite way to eat pesto is the same as it’s always been: tossed with pasta, topped with tomatoes, and sprinkled with Parmesan cheese.

Basil Pesto
makes about 1 cup

1/2 cup olive oil
juice of 1/2-1 medium lemon (to taste)
2 cups basil leaves, packed
2 cloves garlic, minced
1/3 cup pine nuts (or toasted walnuts or sunflower seeds)
1/3 cup freshly-grated Parmesan cheese
1/2 teaspoon sea salt
1/2 teaspoon fresh ground black pepper

For Pesto Pasta:
1 lb small pasta, cooked to al dente, drained
1/2 cup reserved pasta cooking liquid
1 pint grape tomatoes, sliced in half
freshly-grated Parmesan cheese (optional)

In a measuring cup, combine olive oil and juice of 1/2 lemon.

Combine basil, garlic, pine nuts, and Parmesan cheese in the bowl of a food processor or high-powered blender. While processing, stream olive oil-lemon mixture through the food processor’s feed tube. Process until a thick, bright green sauce forms. Add salt and pepper and process until well-distributed. Add more lemon juice, if desired. Store pesto in an airtight container in the refrigerator for up to a week.

To make pesto pasta, combine pasta and pesto in a large pot and fold them together with a large spoon. Add 2 tablespoons of the pasta cooking liquid and fold again. Add more cooking liquid by the tablespoon, until the desired consistency has been reached. Serve pasta in bowls. Top with halved grape tomatoes and additional Parmesan cheese, if desired.

Brown Butter Blondie Ice Cream Sandwiches

  I spent all day trying to come up with a fun way to introduce today’s recipe, but it doesn’t need any fanfare. I mean, how could I possibly go on and on about what I’ve been doing this week when we have Brown Butter Blondie Ice Cream Sandwiches to discuss?!

That’s right. Brown Butter. Blondie. Ice Cream. Sandwiches. 

Y’all. These are so good. I mean, how couldn’t they be? Ice cream sandwiched between two chocolate chip brown butter blondies? Sign me up!

This recipe is made with the same base I used for the Chocolate Chip-Pecan Brown Butter Blondies I made earlier this summer. I left out the pecans here, but that’s the only adjustment I made. I might also suggest using mini chocolate chips instead of the standard size, only because big chunks of frozen chocolate are a little hard to bite through. Not that I had any problem putting away two of these yesterday afternoon.

Anyway…for the ice cream sandwiches, you’ll need to make two batches of those chocolaty, brown-buttery blondies. Once they’re baked, stash them in the freezer for a half hour or so, until they’re a little cooler than room temperature. 

  Once your blondies are cool, scoop ice cream onto one batch and then use a spatula to smooth it into an even layer. Top the ice cream layer with the other batch of blondies, pressing down slightly to make sure everything is adhered together. Freeze the assembled ice cream sandwiches for at least two hours before slicing and serving.

These Brown Butter Blondie Ice Cream Sandwiches are my new favorite summer treat! The blondies are a little crunchy from being frozen, but still retain their signature chew. And the ice cream…I mean, hello. Ice cream and caramelly, chocolate chip-studded blondies are a match made in heaven. Sure, they’re a little messy to eat, but what good ice cream sandwich isn’t?! 

 Brown Butter Blondie Ice Cream Sandwiches
makes 16-25 ice cream sandwiches

1 cup unsalted butter
2 cups light or dark brown sugar, packed
2 large eggs, room temperature
1 tablespoon pure vanilla extract
2 cups all-purpose flour
1/2 teaspoon Kosher or sea salt
2 cups semisweet chocolate chips (or 1 2/3 cups mini chocolate chips)
2-3 cups (1-1 1/2 pints) ice cream of choice

Preheat the oven to 350F. Grease two 9-inch square baking dishes with butter. Line with parchment, leaving a little overhang for removal, and butter again. Set aside.

Brown the butter. Place butter in a light-colored saucepan over medium heat. Let butter melt. Butter will bubble and crackle as the water content evaporates. Swirl the pan frequently for 5-7 minutes, keeping an eye on the color. When the solids are turning brown and the butter is nutty and fragrant, remove the pot from the heat and immediately pour the brown butter into a large mixing bowl.

Add brown sugar to the brown butter and stir to combine (it will be thick and look like wet sand). Whisk in egg and vanilla. Use a silicone spatula to stir in flour and salt, scraping down the bowl as needed. Fold in chocolate chips.

Divide batter evenly among prepared pans and bake for 20-22 minutes, until a toothpick inserted in the center comes out mostly clean. Let blondies cool in the pan on a rack for 10 minutes before placing them in the freezer for 30 minutes, until cool. Thaw ice cream just so that its scoopable.

Remove one pan from the freezer. Leaving the blondies in the parchment-lined pan, drop ice cream in scoops over the top, and then use a spatula to smooth it into one even layer. Remove the other pan from the freezer. Use the parchment to lift the un-topped blondies from the pan. Remove parchment. Place Blondies over the ice cream layer. Press down slightly to make sure everything is adhered. Cover the pan in foil and freeze at least two hours.

When everything is frozen, remove pan from freezer. Remove foil, and use parchment to lift ice cream-filled blondies onto a cutting board. Use a sharp chef’s knife to remove any ice cream that may have squished out the sides. Slice into 16-25 sandwiches. Place ice cream sandwiches in an airtight container, using wax paper between layers to prevent sticking.

Ice cream sandwiches will keep in the freezer for up to three months.

Pink Lemonade

I think the world would be a much happier place if we all stopped for a lemonade break. I mean, think about it.

It’s ten thousand degrees outside. School is starting back up again soon. The holidays are not all that far away.

Yes, I’m thinking about the holidays nearly four months out. Aren’t you?! 😜

 So, how about instead of thinking about all the stuff we have to do, we pause for a glass of cold lemonade and forget everything for five minutes? Real lemonade, not the powdered stuff that you’ve had in your pantry for two years. Definitely not that. Instead, let’s have perfectly sweet-tart homemade lemonade. And let’s make it pink because it’s just more fun that way.

    Homemade Pink Lemonade takes a little more effort than stirring powder into water, but it is also a million times more delicious. You won’t find any food coloring in the list of ingredients either. Nope. The pink color comes from fresh raspberries!

The recipe starts with making a lemony raspberry syrup. Throw some fresh raspberries, a couple of tablespoons of lemon zest, sugar, and water into a small saucepan, and cook it just until the berries start to fall apart. Let it cool for 30 minutes while you juice a bunch of lemons. Then strain the syrup into a pitcher and stir in the lemon juice and some cold water. Serve it over ice with a few slices of lemon and cute straws, and then relax for five whole minutes. Trust me, your to-do list can wait that long.

 Pink Lemonade
makes about 2 quarts

Syrup:
1 1/4 cups granulated sugar
6 ounces fresh raspberries
2 tablespoons fresh lemon zest (about 2 large lemons)
3/4 cup water

For Assembly:
1 1/2 cups lemon juice (about 10 large lemons)
3 1/2-4 cups cold water
ice

For Garnish (optional):
1 large lemon, thinly sliced

Make the syrup. In a small saucepan, combine sugar, raspberries, lemon zest, and water. Cook over medium heat for 10-12 minutes, stirring occasionally, until berries are starting to fall apart. Let cool 30 minutes before pushing through a fine mesh sieve to remove seeds and pith.
Make the lemonade. In a large pitcher, combine syrup, lemon juice, and 3 1/2 cups cold water. Stir. Taste, and add 1/2 cup more cold water if it’s too tart.

Serve pink lemonade over ice. Garnish with lemon slices, if desired.

Pink Lemonade

Coconut Cupcakes

 I’m slowly but surely settling back into life in Brooklyn.

Last week, I basically felt like packing up and impulsively moving to Maine. You know, because living there would be just like being on vacation. #logic 

Arriving home to a heatwave, the end-of-the-month cake rush, and a week full of work at my day job (which I love, but work is work) was just enough to make me lose my pretty little mind.

Note to self: never go on vacation during the week preceding the craziest week of the month. Just don’t do it. 

 I worked through the weekend, but did pause Saturday night to have a mini-Maine reunion with VJ and Shira. I made tostadas and we ate all of the guacamole and loved on some cute cats. And on Sunday morning, I felt so. much. better. You know you have good friends when you can travel together for eight days, survive the hottest twelve hour drive in the history of twelve hour drives, and still want to hang out together. 

 I didn’t do much baking for myself or this blog last week (aside from this Chocolate Cream Pie), and honestly, I didn’t really want to. I love baking, but with the heatwave, a gazillion cakes, and work, all I really wanted to do was crank the AC up to high and take a nap. But I didn’t, and I survived it. All of the cakes turned out well, even though the frosting was a little soft from the heat. I made crowd favorites: vanilla, chocolate, and two carrot cakes, but my favorite was a coconut cake. Even in the midst of all the insanity last week, I made a mental note that that cake was blog-worthy. 

And so, here it is in cupcake form. Soft, buttery, coconut-scented cupcakes, brushed with a coconut simple syrup, topped with coconut buttercream, and rolled in sweetened shredded coconut. Yes, there are four doses of coconut–there’s no mistaking the flavor of these sweet little cupcakes!

I made these yesterday morning and ate two while chatting with my roommates in our finally-not-sweltering living room. One of them, who rarely tries any of the baked goods he is constantly surrounded by, told me that this was the best coconut cake he had ever eaten. I don’t know about “best ever,” but I do know that starting this week with Coconut Cupcakes is a sure sign that things are looking up. 

 Coconut Cupcakes
makes 16-18 cupcakes (or one 9-inch round cake*)

Cupcakes:
1 1/2 cups all-purpose flour
2 tablespoons cornstarch
1/2 teaspoon baking powder
1/4 teaspoon baking soda
1/2 teaspoon Kosher or sea salt
1/2 cup (1 stick) unsalted butter, softened to room temperature
1 cup granulated sugar
2 large eggs, room temperature
1 1/2 teaspoons pure vanilla extract
1 teaspoon coconut extract
1 cup buttermilk, room temperature

Coconut Simple Syrup:
1/4 cup granulated sugar
1/4 cup water
1/2 teaspoon coconut extract

Frosting:
1/2 cup (1 stick) unsalted butter, softened to room temperature
2 cups confectioner’s sugar
pinch of Kosher or sea salt
1 teaspoon pure vanilla extract
1/2 teaspoon coconut extract
1-2 tablespoons heavy cream
1-1 1/2 cups sweetened shredded coconut

Preheat the oven to 350F. Line a standard muffin tin with 12 cupcake liners. Set aside.

Make the cupcakes. In a medium mixing bowl, whisk together flour, cornstarch, baking powder, baking soda, and salt. Set aside.

In a large mixing bowl, use an electric mixer to beat butter until light and fluffy. Beat in sugar. Mix in eggs one at a time, followed by vanilla and coconut extracts, and buttermilk. Add dry ingredients in two installments, combining completely after each addition.

Fill prepared muffin cups 2/3-3/4 full. Tap pan on the counter five times to release any large air bubbles. Bake cupcakes 16-18 minutes, until a toothpick inserted in the centers of a few cupcakes comes out clean. Let cupcakes cool in the pan for five minutes before removing to a rack to cool completely. Repeat baking process with any remaining batter, making sure to fill any unused muffin cups 1/4 full with water to prevent the pan from warping.

Make the coconut simple syrup. Combine sugar and water in a small saucepan over medium heat. Cook, stirring occasionally, until sugar has dissolved and mixture begins to bubble at the edges. Remove pan from heat. Stir in coconut extract. Use a pastry brush to paint each cooled cupcake with the hot syrup.

Make the frosting. In a large mixing bowl, use an electric mixer to beat butter until light and fluffy. Mix in confectioner’s sugar and salt, followed by vanilla and coconut extracts. Add 1 tablespoon heavy cream and beat frosting for one minute, until fluffy. If a looser frosting is desired, add another tablespoon of heavy cream and beat for another minute. Use an offset knife to frost cupcakes.

Place sweetened shredded coconut in a small bowl. Dip the top of each frosted cupcake into coconut.

Serve cupcakes immediately, or keep in an airtight container at room temperature for up to two days. Cupcakes will keep in the refrigerator for up to five days.

Note:

This recipe may also be used to make a single-layer 9-inch round cake. Bake batter in a greased pan for 32-35 minutes, or until a toothpick inserted in the center comes out clean. Let the cake cool in the pan for 15 minutes before inverting onto a rack to cool completely. Brush with warm coconut simple syrup, and frost and decorate as desired.