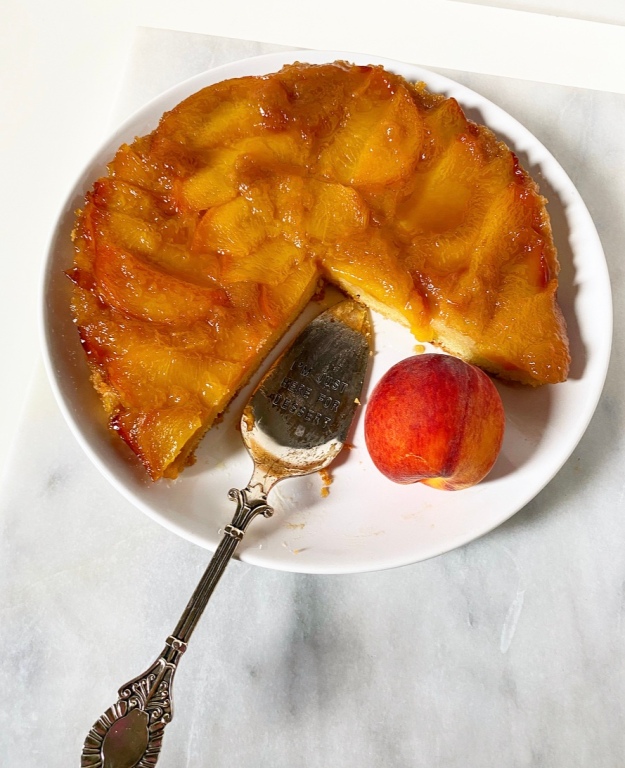
 I have a long history of hating cooked peaches—something about the texture—but I am coming around. I mean, peach is never going to be my first-choice flavor for anything, but I’ve embraced a peach tart, so maybe miracles do happen.
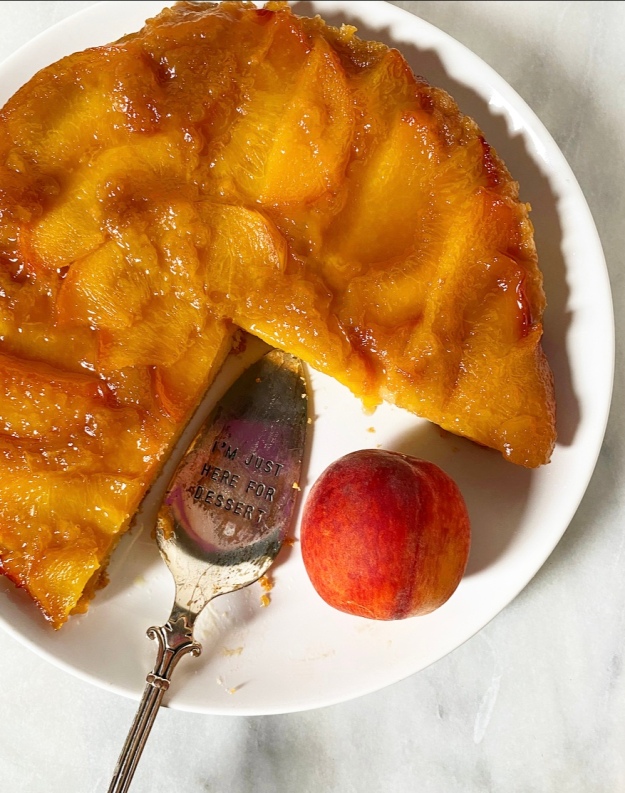
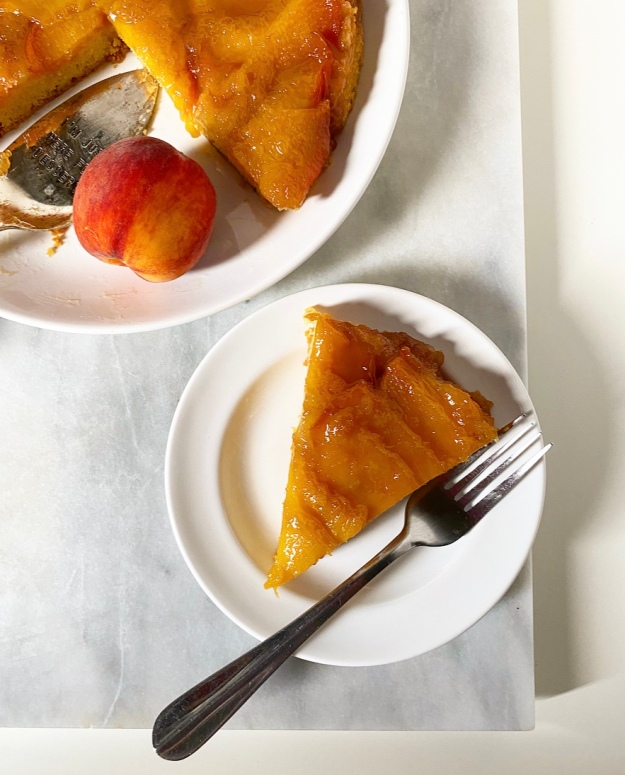 One peach dessert that I am crazy about? This Peach Upside-Down Cake. Not only is it very delicious and very peachy, but it couldn’t be easier to make.
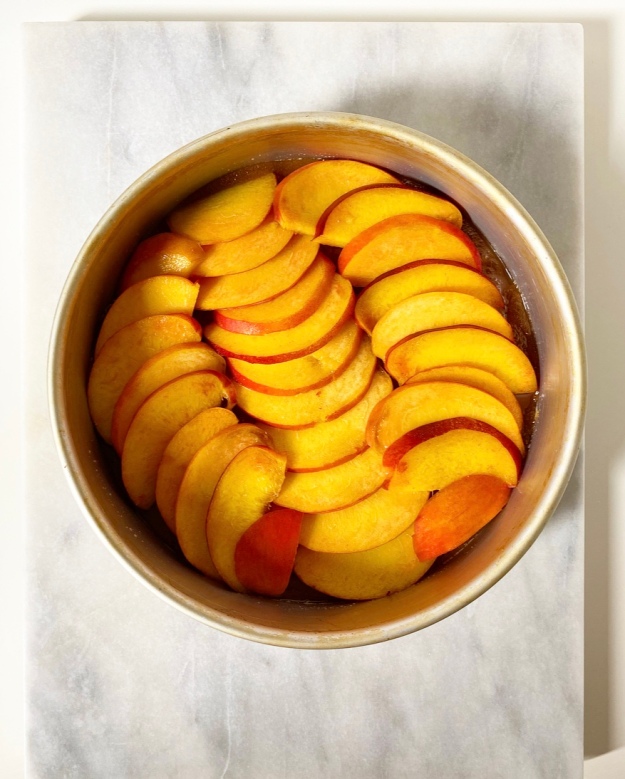 Melt some butter and brown sugar together and lay some thin slices of peach on top in any design you like. I overlapped mine slightly because I didn’t want much “plain” cake peeking through. There’s no need to get too fussy with it, as the peaches release quite a bit of liquid during baking and lose some definition.
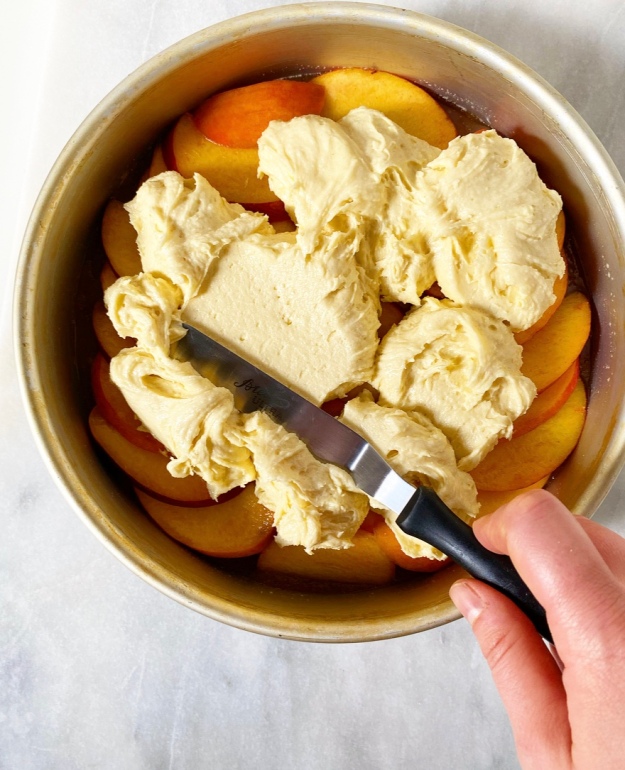 Next up, spoon some cake batter over the top of your peaches. I’ve used a brown sugary version of my vanilla layer cake batter in past upside-down cakes, but changed it up with a simple vanilla-almond torte batter this time and…well, I don’t think I’m ever going back. The batter is a snap to make, and produces a thin, buttery layer of cake that nestles perfectly into the peaches.
You’ll notice that I left pie spices out of this cake completely. I tried the tiniest pinches of cinnamon and nutmeg in both the topping and cake batter, but they overwhelmed the fresh peach flavor. No, thanks—peaches or bust! The only flavor I added to this dessert is the tiniest bit of almond extract in the cake batter. Rest assured, it only enhances the fruit, rather than detracting from it.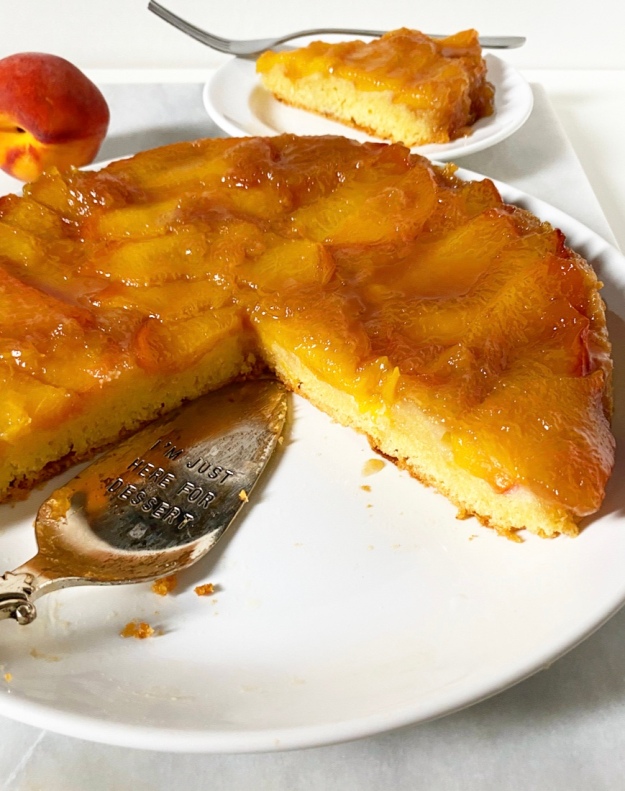
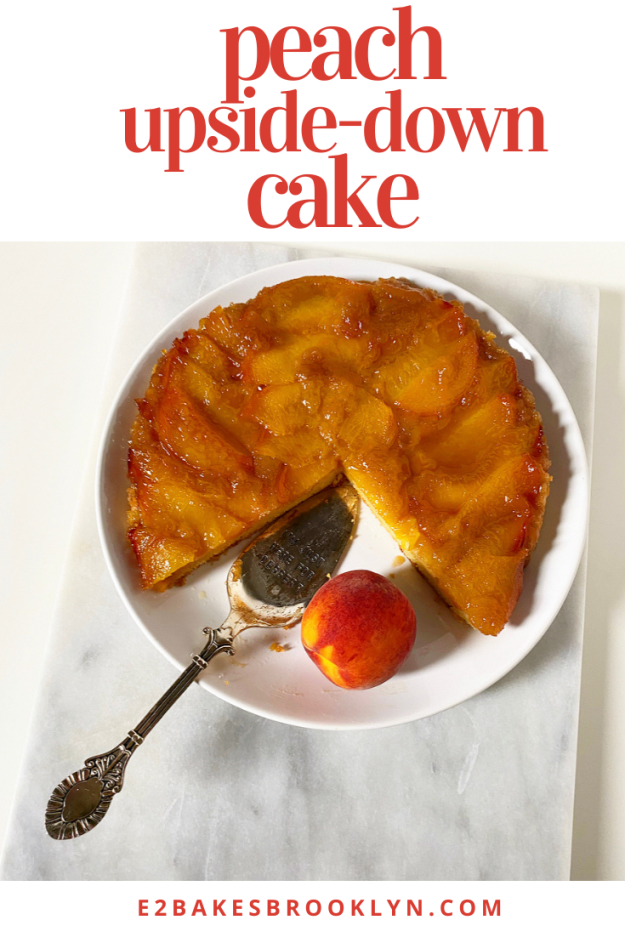
 This cake bakes up in about 50 minutes and only needs to rest for fifteen before it’s flipped onto a serving plate. Again, don’t worry if your peach slices aren’t perfectly defined—mine certainly weren’t but they were still gorgeous and dang delicious.
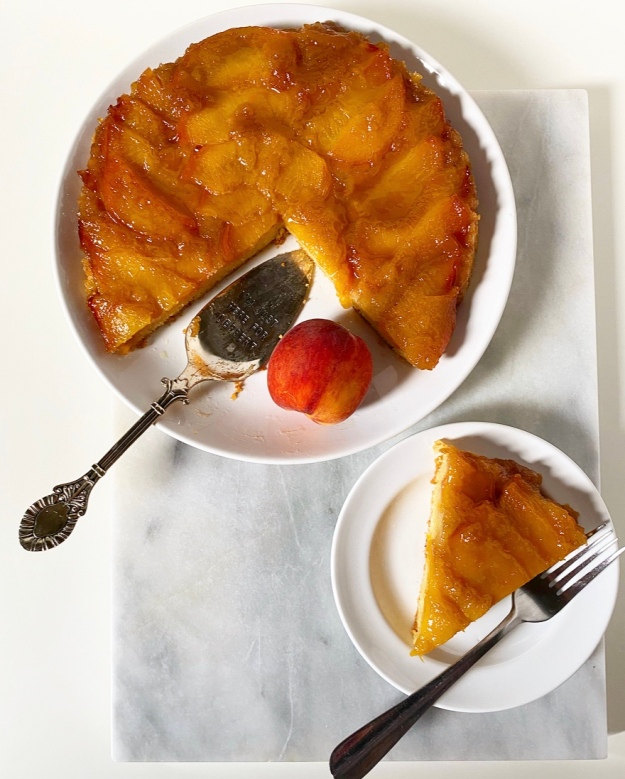 Once your cake is out of the pan, it’s up to you whether you want to enjoy it warm, room temperature or cold. I personally like a warm room temperature slice, so that the cake slices cleanly and the brown sugar topping is pleasantly gooey. Whatever you do though, don’t skip the ice cream or whipped cream. I mean, I forgot them here and everything was still good, but there’s something about cold creamy anything and peach cake that is simply not to be missed.
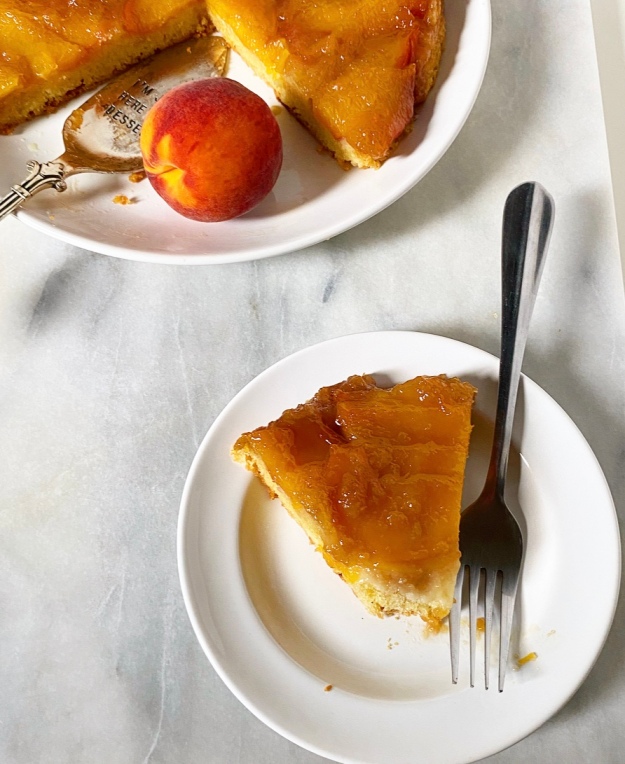
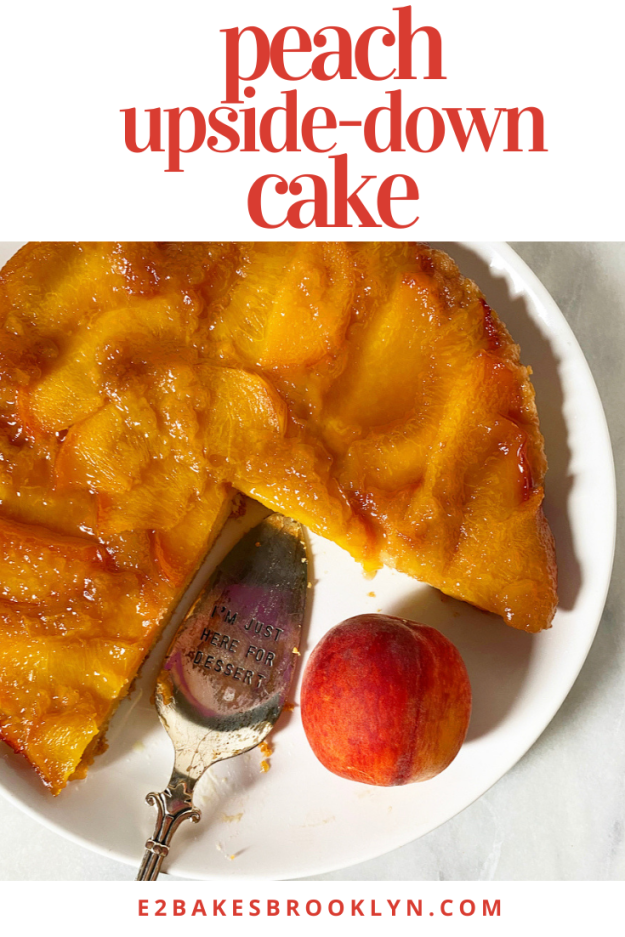
Peach Upside-Down Cake
makes 1 9-inch round cake
For the peaches:
3-4 large ripe peaches (or 5-6 medium peaches)
1/4 cup unsalted butter
2/3 cup light or dark brown sugar, packed
pinch of Kosher or sea salt
Batter:
1 cup all-purpose flour
1 teaspoon baking powder
1/4 teaspoon Kosher or sea salt
1/2 cup unsalted butter, softened to room temperature
1 cup granulated sugar
2 large eggs, room temperature
1 1/2 teaspoons pure vanilla extract
1/4 teaspoon pure almond extract
For serving (optional):
vanilla ice cream
whipped cream
Preheat oven to 350F. Heavily grease a 9-inch round cake pan. Set aside.
Slice peaches in 1/4-inch slices. No need to peel.
In a small saucepan, combine butter and dark brown sugar. Place over medium-low heat and stir constantly until butter and sugar are melted and fully homogeneous, 3-5 minutes. Remove pan from heat. Pour mixture into a 9-inch round cake pan, using a silicone spatula to spread it over the entire bottom of the pan.
Top the brown sugar mixture with single layer of sliced peaches, slightly overlapping them for the prettiest effect, in any design you like. Set aside.
In a small-medium bowl, whisk together flour, baking powder, and salt. Set aside.
In a large mixing bowl, use an electric mixer to cream butter until very light and fluffy (about 2 minutes). Beat in granulated sugar. Mix in eggs one at a time, followed by vanilla and almond extracts. With the mixer on low, mix in dry ingredients. Batter will be thick.
Drop batter in spoonfuls over the peaches. Use an offset icing knife or the back of a spoon to spread it in an even layer. Tap the pan on the counter 5 times to release any large air bubbles. Bake 45-55 minutes, or until a toothpick inserted in the center comes out clean.
Let cake cool in the pan on a rack for 15 minutes before running a small, thin knife around the edge a couple of times. Place a cake stand or large serving plate upside down over the top of the pan. Holding on to the plate and pan with oven mitts, quickly invert them so that the plate is right-side-up and the pan is now upside-down. Tap the top of the pan a time or two to help the cake release. Lift off the empty pan. If any fruit sticks to the pan, just nudge it back onto the cake with your fingers or a spoon.
Serve cake warm, room temperature, or cold, with ice cream or whipped cream, if desired.
Cake is best the day it’s baked, but will keep in the refrigerator for up to three days.
 Do you think Nancy Meyers knows how many lives she changed when she wrote peanut butter and Oreos into the 1998 remake of The Parent Trap? Mine, for one, and probably millions more. Certainly more than when she had Meryl Streep make croissants in It’s Complicated (and in an absurdly short period of time, I might add). Probably way less than when Steve Martin had a meltdown over the quantity disparity between packages of hot dogs and hot dog buns in Father of the Bride. That one still hasn’t been resolved.
 Anyway, since I started baking, I’ve thrown peanut butter and Oreos into many recipes because they just *work.* This salty, creamy, bittersweet combination is one of the easiest ways to take a dessert from fine to fabulous.
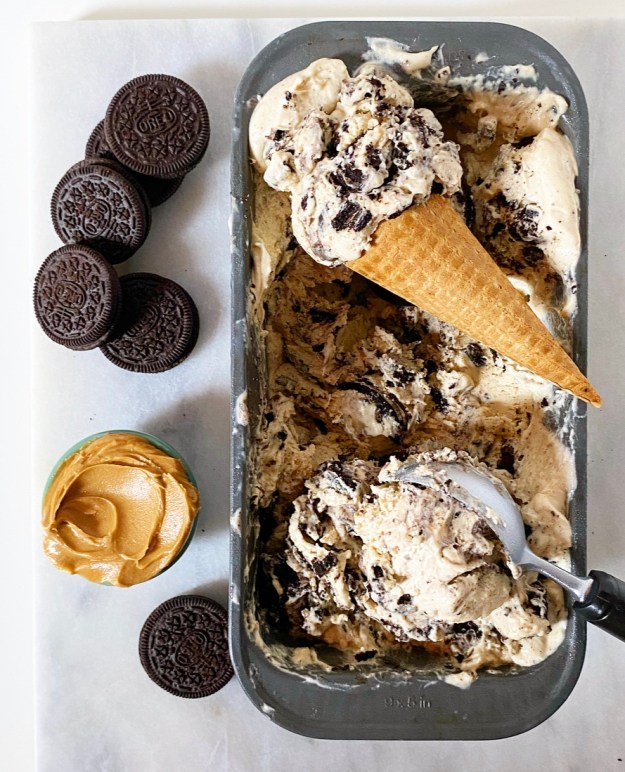
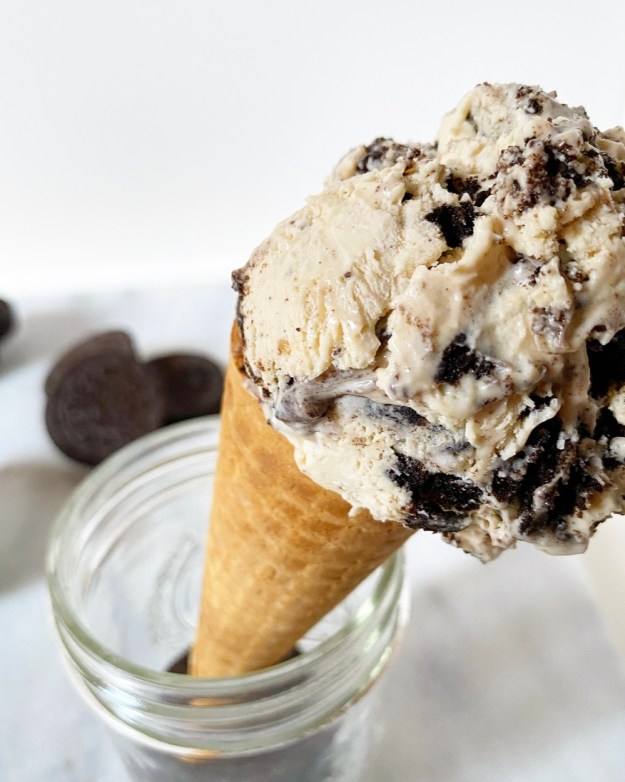 Today’s offering is one you probably saw coming from a mile away: No-Churn Peanut Butter Cookies & Cream Ice Cream! Of course—of course!—I was going to combine them in an ice cream someday. And by someday, I mean today, which just so happens to be National Ice Cream Day. I swear I didn’t plan it like that.
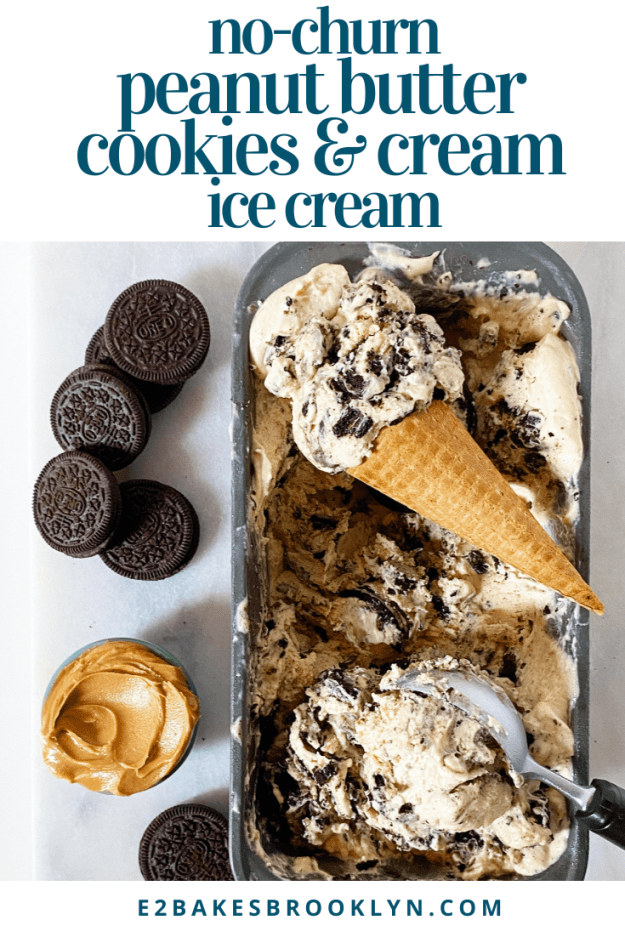
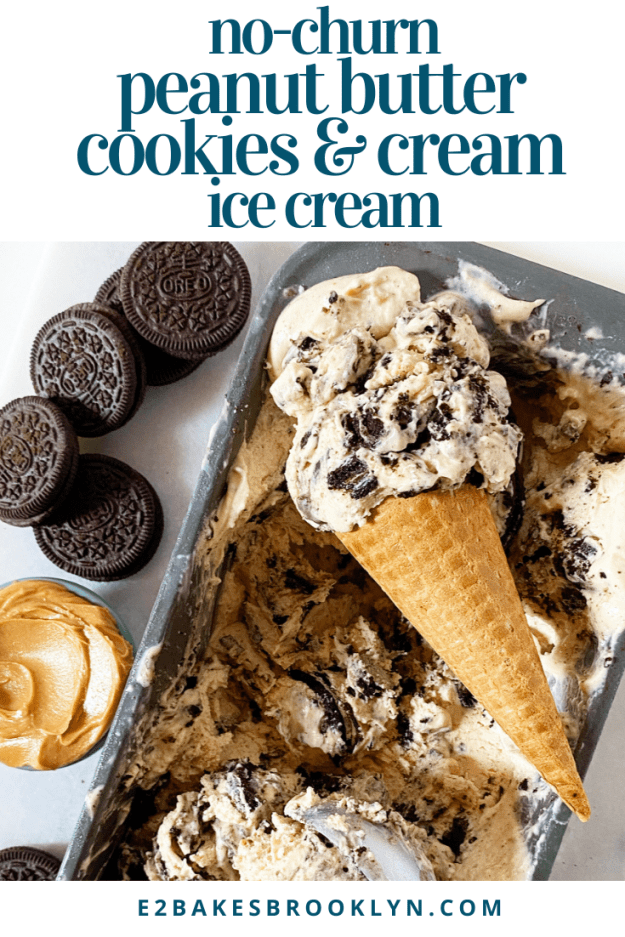
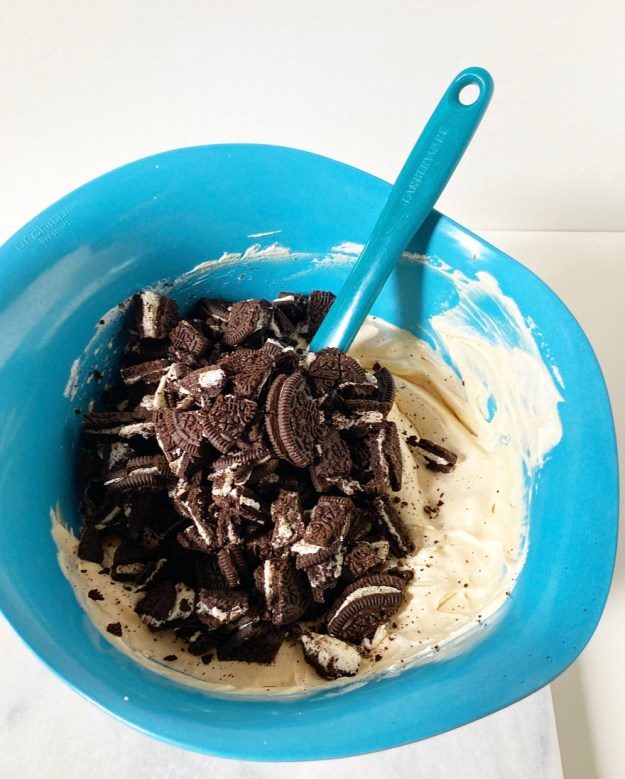 Oh yes, it’s the big chunks of Oreo cookie that are the real magic here. That’s one thing I have a lot of feelings about: big chunks of cookie instead of cookie crumbs in my cookies & cream. It’s not called crumbs & cream, am I right?!
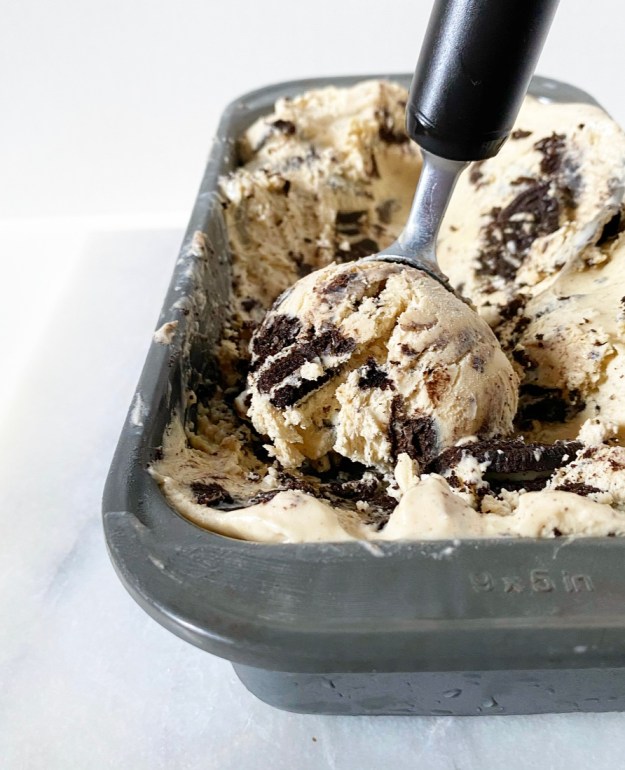 Actually, this whole situation is heaven. Cold, creamy, sweet & salty, Oreo-studded heaven piled in a cone.
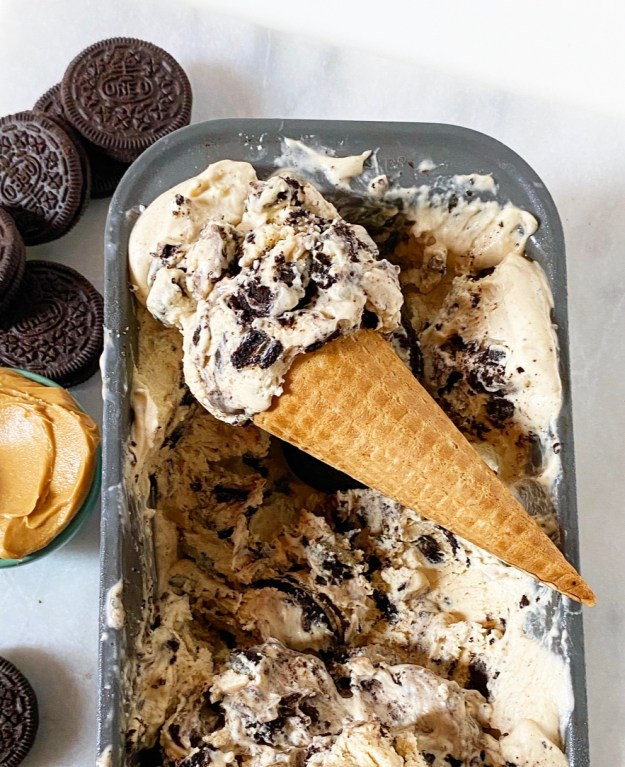

 I posted
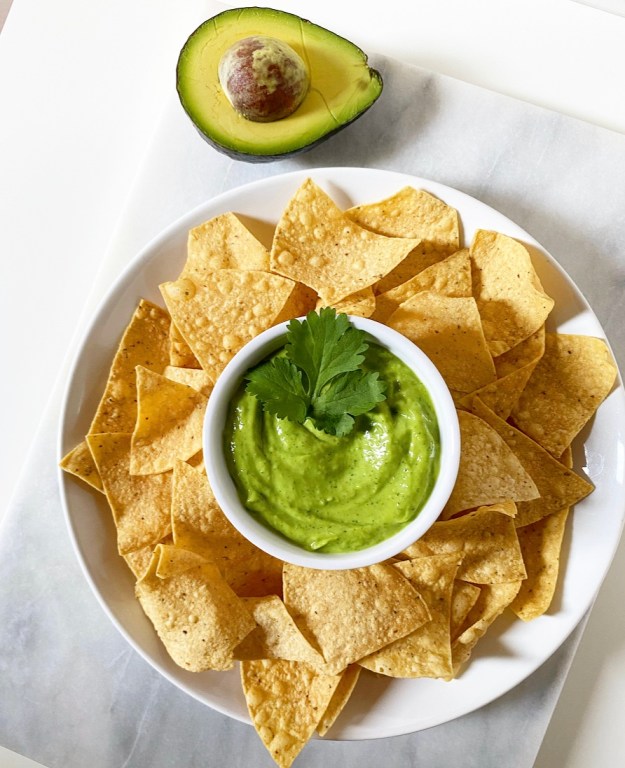
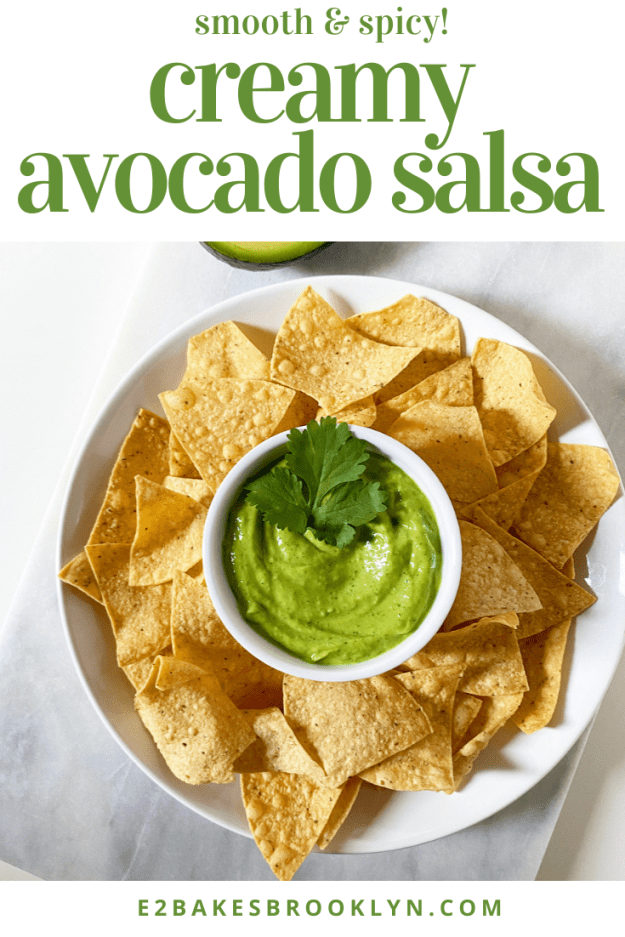
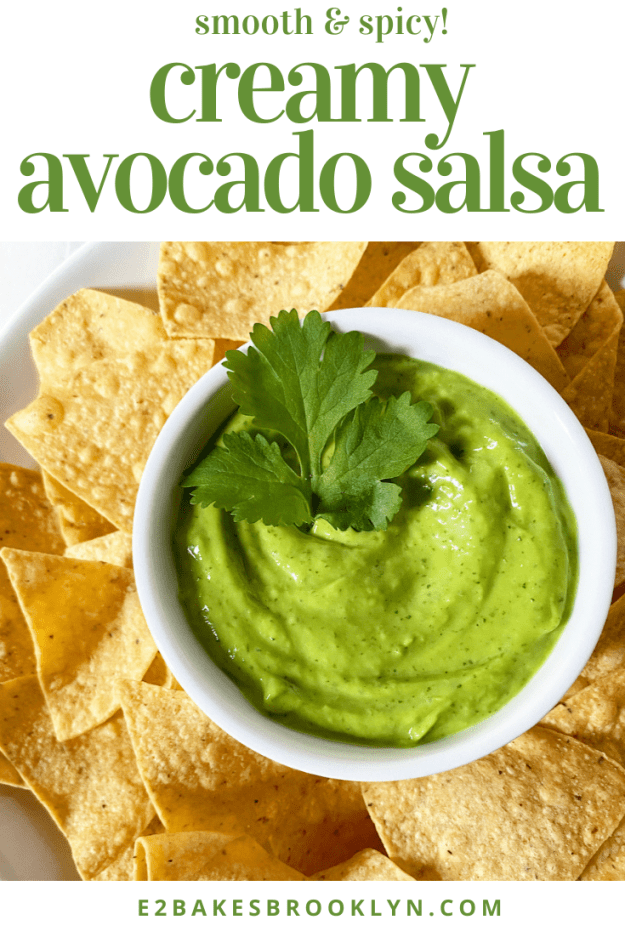
  Creamy Avocado Salsa is a relatively new addition to my repertoire. I began tinkering with it a couple of years ago in an effort to match one of the offerings at a local taqueria, and it’s been a favorite ever since. Creamy Avocado Salsa is creamy, refreshing and delicious–we’re talking all the flavors of guacamole with a smooth, dippable consistency. Yum! If you’re going to try one new salsa recipe this summer, let this be the one.
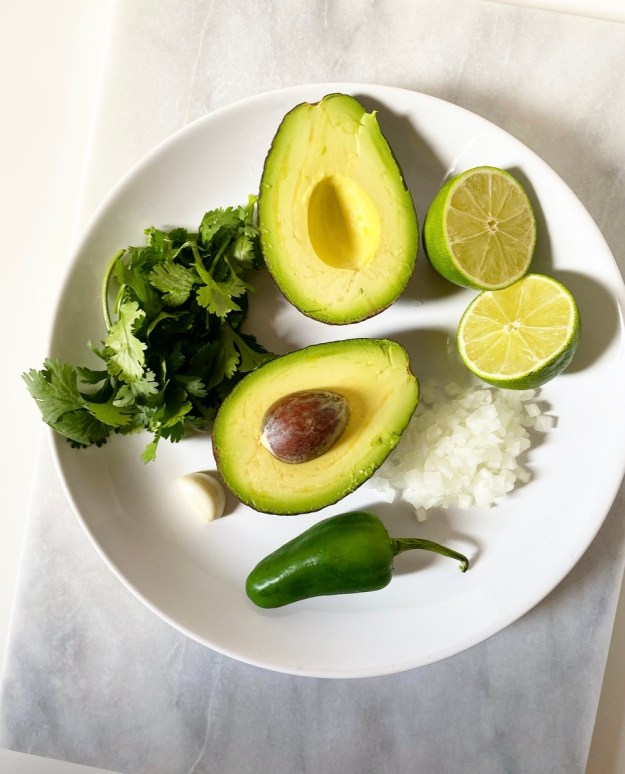 This recipe is a snap to make. Simply pile an avocado, a tiny bit of onion, some garlic, half a jalapeño, fresh cilantro and lime juice into a blender with some salt and cold water, and let it rip. After about a minute, you’ll have a super smooth, bright green salsa. It’s pairs well with tortilla chips, of course, but may I also recommend trying it with cheesy scrambled eggs or sautéed shrimp or with zucchini noodles? Because it’s good with all those things.
 As with all my salsas, guacamole and other dips, this one is made with my own flavor preferences in mind. I love it the way it is, but I recommend that you taste and adjust as you go, adding more salt, jalapeño or lime until it’s exactly how you like it. You’ll notice that there’s a lot of wiggle room in the amount of water you can use in the recipe. The pictured batch was made with a large avocado and seven tablespoons of water to achieve the texture of a thick, creamy dressing, but you may like yours thinner or thicker. Start with a little water and adjust as needed until it’s to your preference.
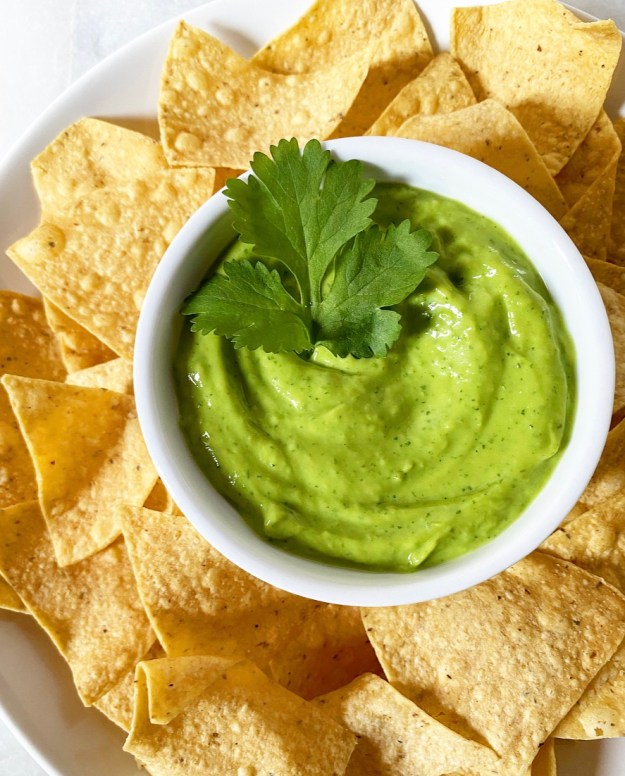 Creamy Avocado Salsa keeps shockingly well considering the usual trajectory of avocado-based treats. It’ll stay good in the fridge for a couple of days, but if you’re anything like me, it won’t last that long.

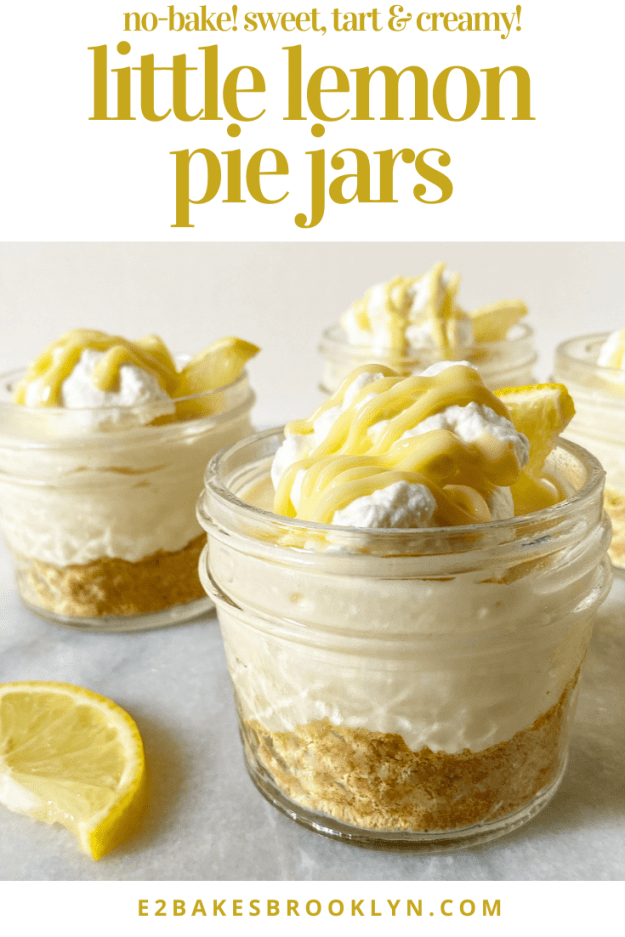
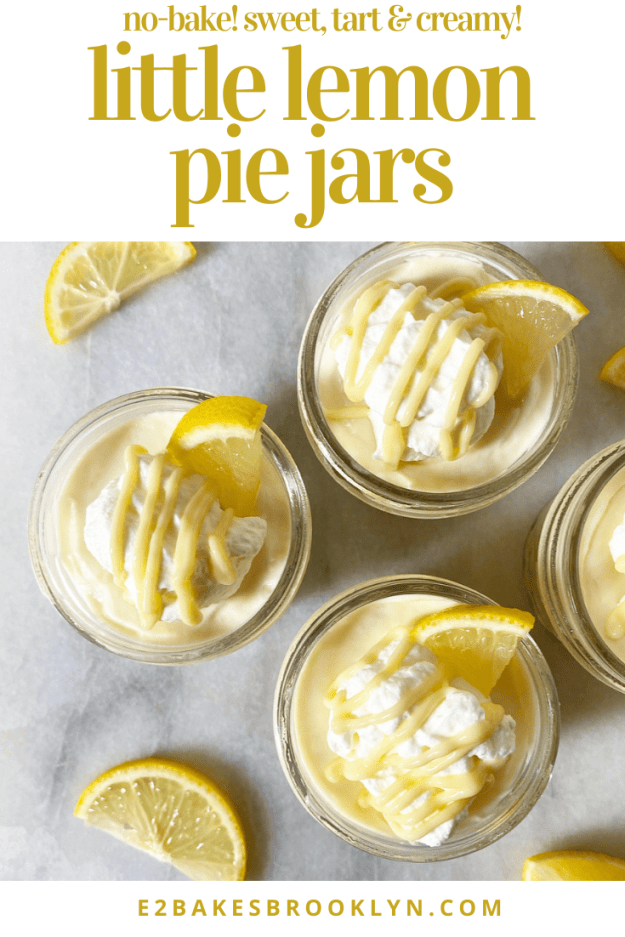
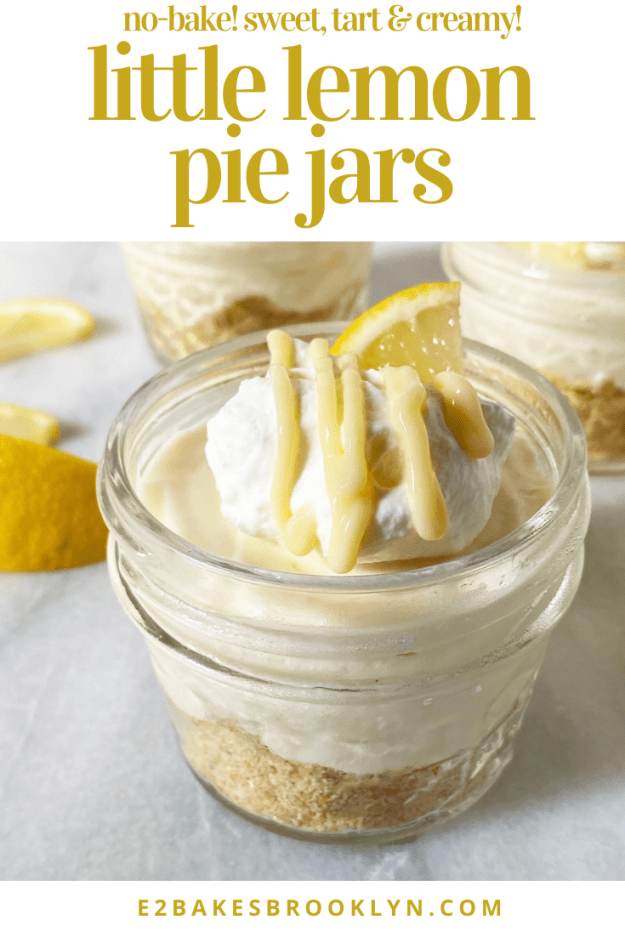
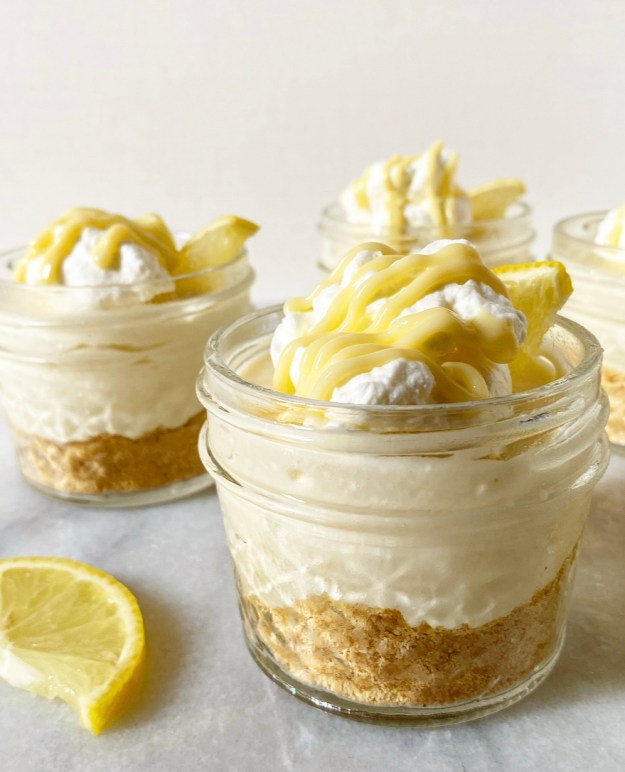 These Little Lemon Pie Jars are are the best no-bake dessert I’ve had in quite some time. They’re cold, creamy and tangy, but not overly rich, and their single-serve presentation makes them ideal for any socially-distanced gathering during these hotter months.
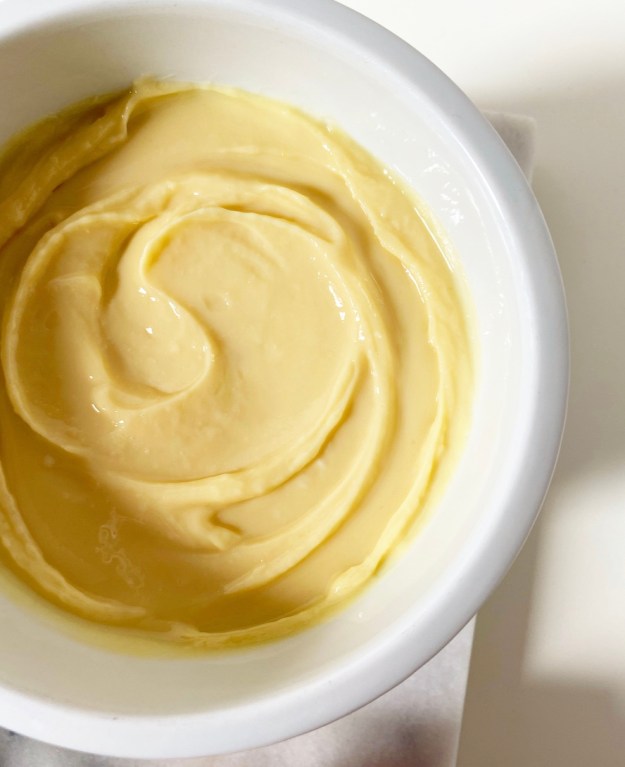
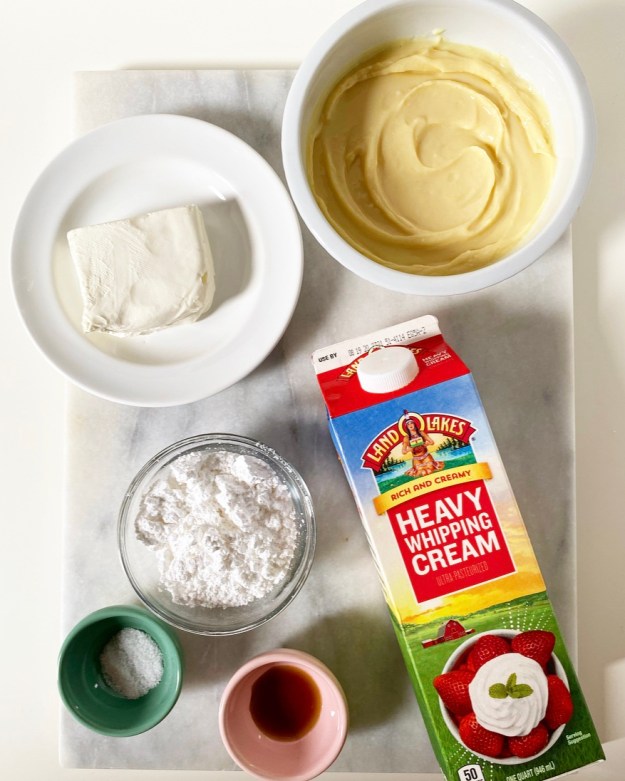
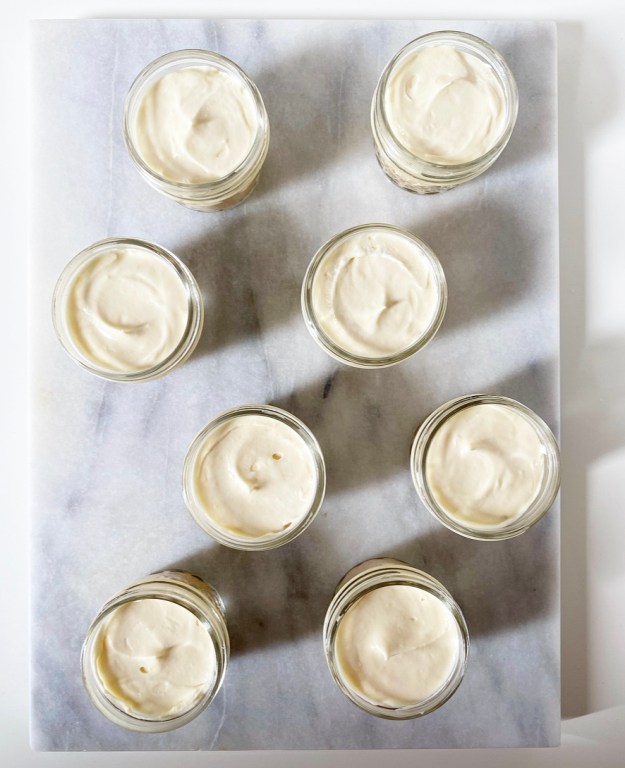 Little Lemon Pie Jars are incredibly simple to make. The lemon filling is made with a fluffy combination of cream cheese, confectioner’s sugar, whipped cream, and my favorite
 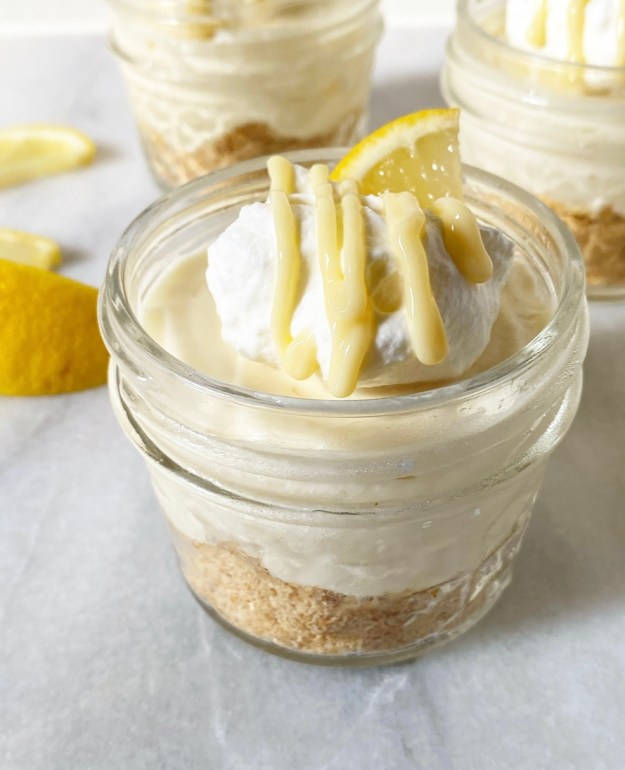 Once the curd is made and cooled, the filling takes all of ten minutes to mix and spoon over the crust. Oooh, this crust. While the lemon filling is plenty sweet and refreshing on its own, the crust provides textural contrast and cuts the richness.
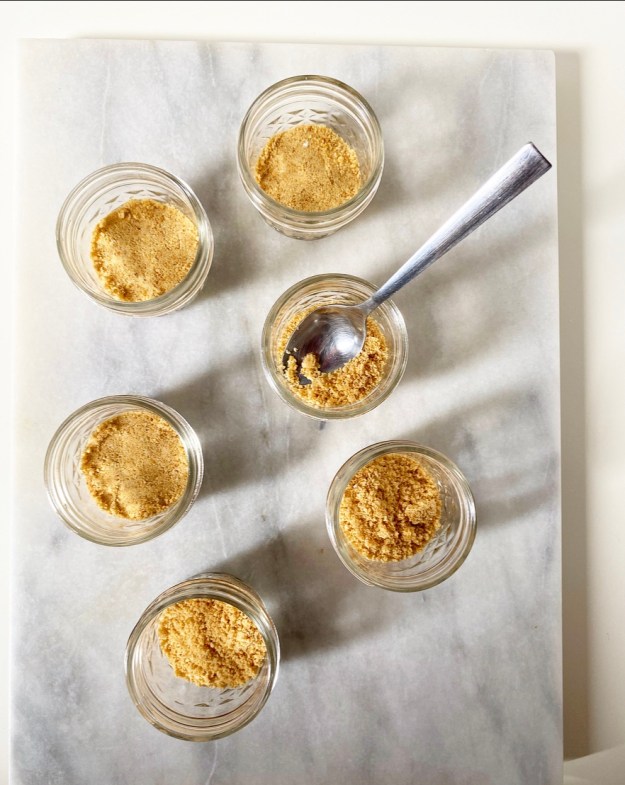
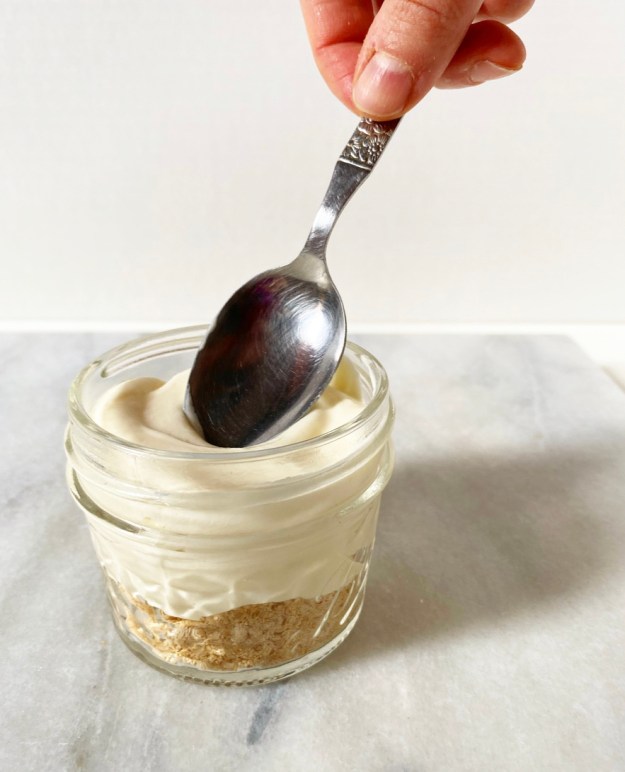
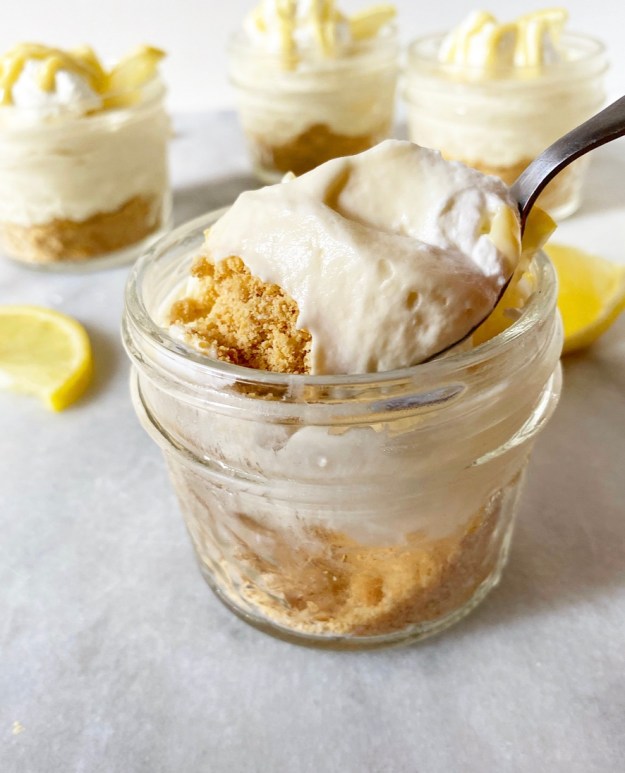 Simply mix up some graham cracker crumbs, confectioner’s sugar, a pinch of salt and melted butter until everything is lightly moistened, then press the mixture into the bottoms of eight small mason jars. It won’t set hard, instead staying a little on the crumbly side. Where this wouldn’t work particularly well for a traditional pie, it works like a dream here. I love that I can dig my spoon into the bottom of the jar and get a little crust in every bite.
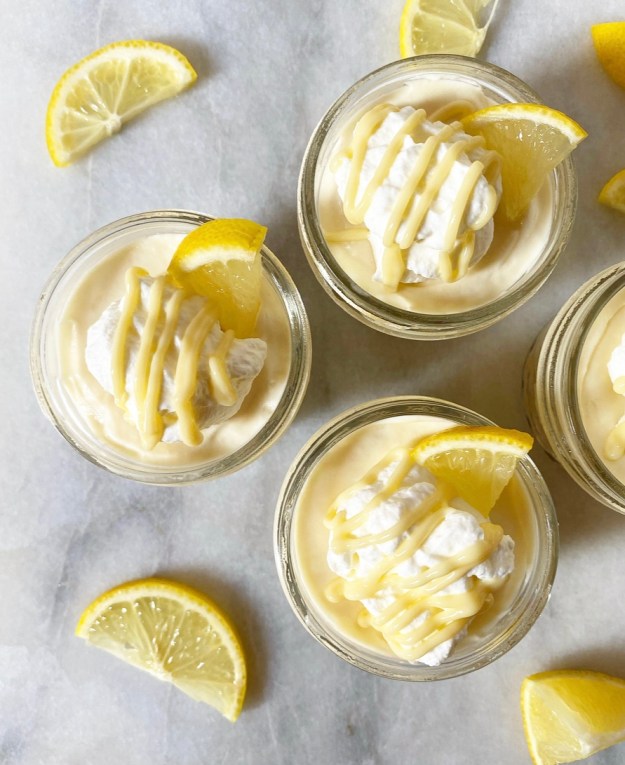 You can garnish these little pies however you like or not at all. I’ve been saying some version of this a lot lately, but it’s the truth: we’re in a pandemic and there are no dessert rules. I dressed these pictured pie jars up with whipped cream, teensy lemon wedges and extra drizzles of lemon curd for their glamour shots, but I ate the leftovers plain out of the fridge and they were just as delicious.
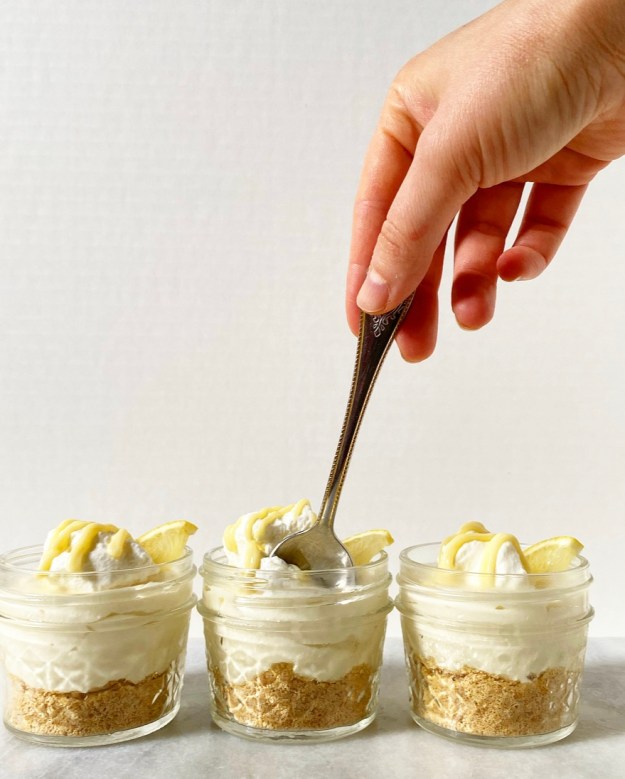
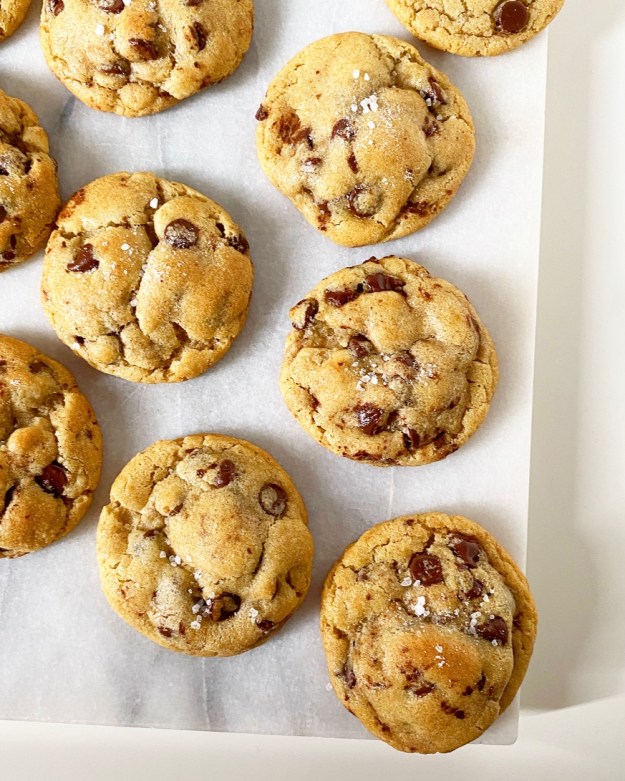
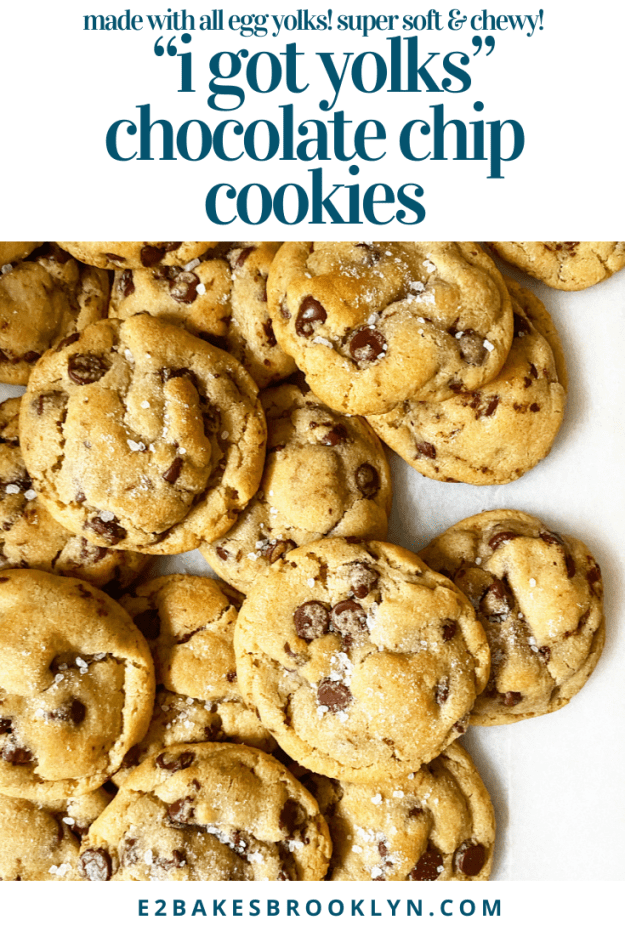
 You know how sometimes you test
  Well, here is something to do with them: “I Got Yolks” Chocolate Chip Cookies!
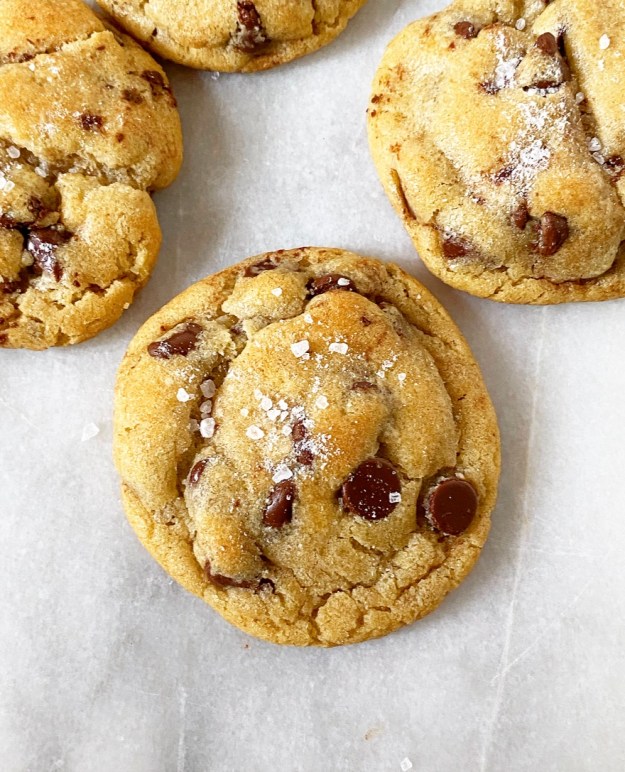 Anyway…this is a recipe born of necessity. Namely, the necessity to not waste good ingredients. Also, the necessity for something that can be eaten immediately or frozen for later or left on your friends’ front steps for a socially distanced surprise. Trust me, they’ll be beyond thrilled with a bag of these.
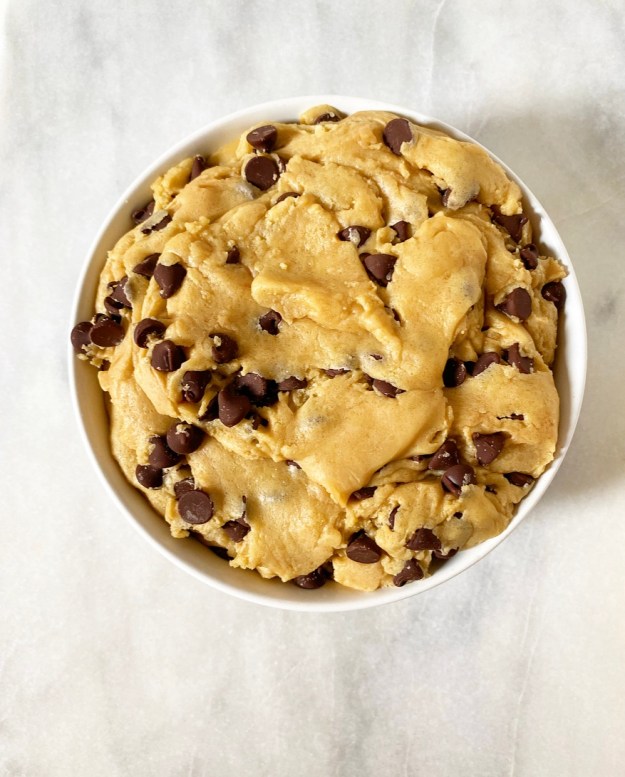
 “I Got Yolks” Chocolate Chip Cookies are, in a word, spectacular. They’re super rich and chewy from three large egg yolks, melted butter, and brown sugar, and incredibly tender thanks to the addition of confectioners sugar. I threw the confectioner’s sugar in the first batch on a whim just to see what would happen and, well, it won’t be the last time. The sweetness, structure and texture it provides are really something—like the
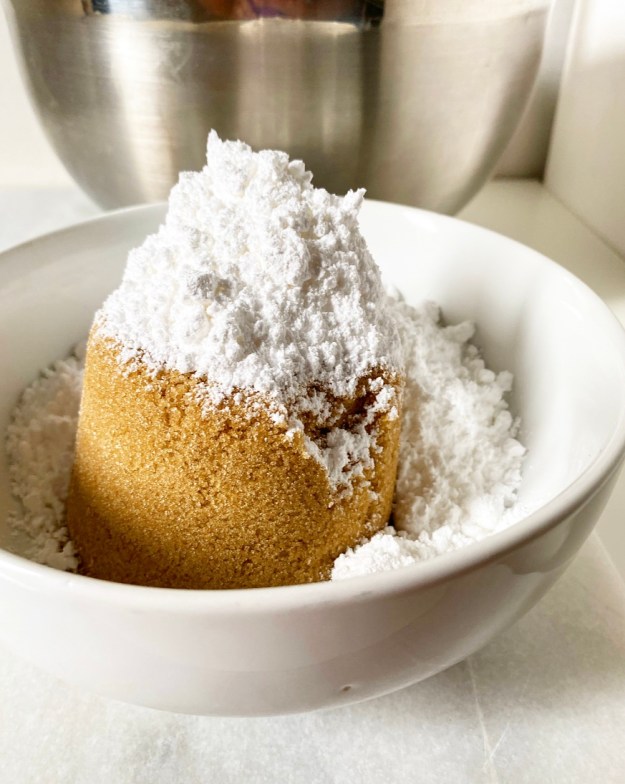
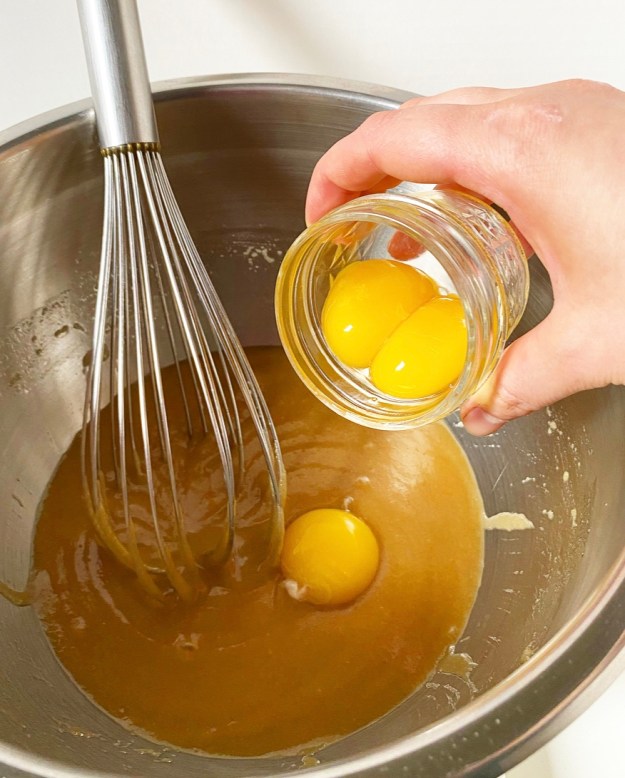
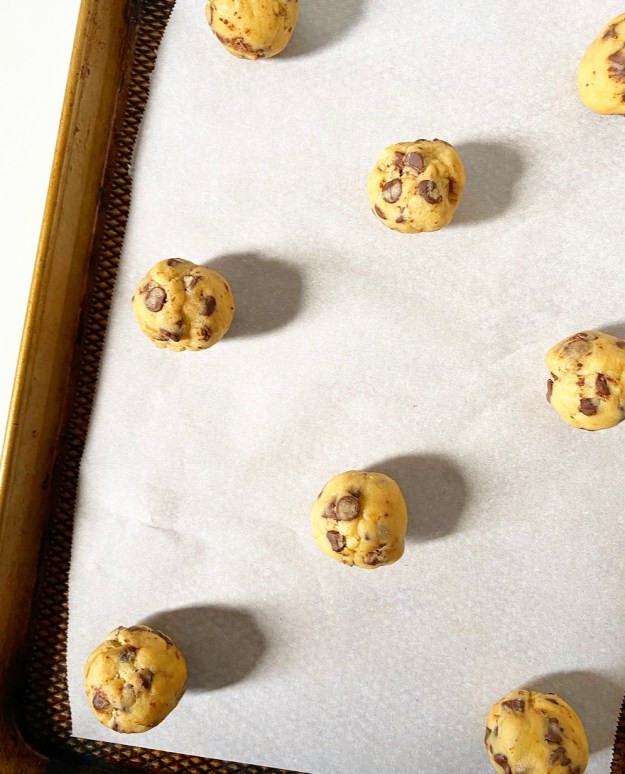
 The cookie dough comes together the same way most
 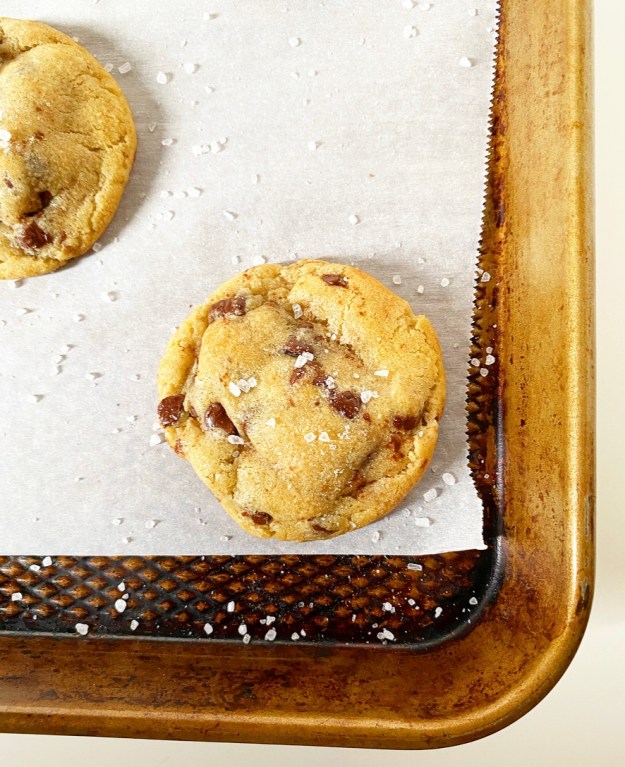 These are not only my current favorite way to use up egg yolks, but also my current favorite chocolate chip cookies. They are nice and thick, with crisp exteriors, soft centers, a rich caramel flavor and the perfect amount of chocolate chips. The confectioner’s sugar in the dough gives them an extra-smooth quality and has the added benefit of keeping them soft for days. That’s saying something—I’m a total diva about day-old cookies.
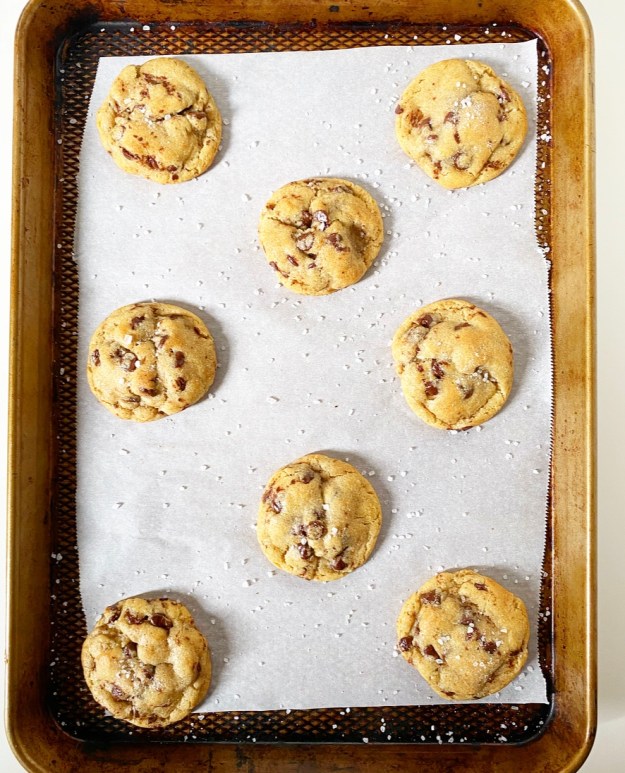
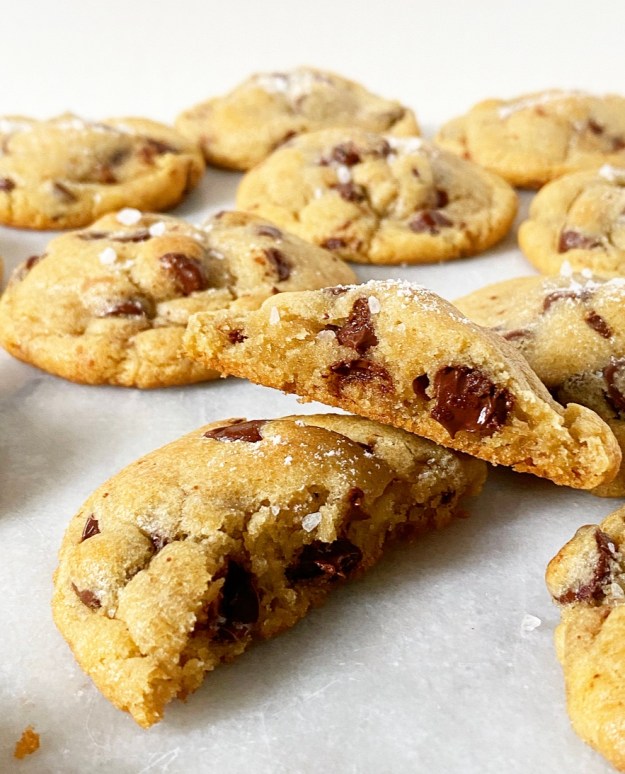 One more great thing about this recipe is that you can age the dough. I suppose you can age any cookie dough, actually, but I rarely have the fridge space. If you’ve never tried it, aging is as simple as keeping the dough in the fridge for up to a week before rolling and baking. By letting it sit for an extended period, you’re allowing the flavors to deepen in a really wonderful way. The exteriors get a light sheen after baking and the brown sugar flavor really sings. Try it. You’ll like it.