It has come to my attention that a gross oversight has occurred. Despite more than six years of blogging and 600 recipes, there are less than ten Nutella recipes on this site. I honestly don’t know how I let this happen, but rest assured I will be making up for it with plenty of new recipes featuring our favorite chocolate hazelnut spread coming your way soon. Until then though, here are my best Nutella bakes from my archives.
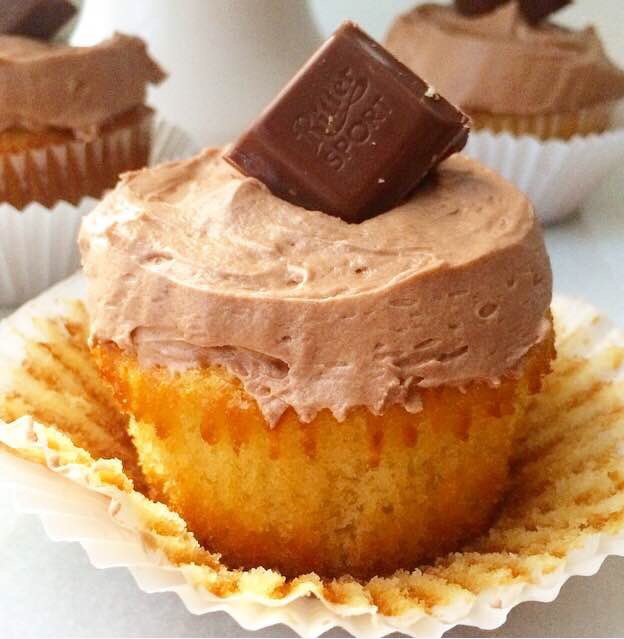
If there is one thing in the world more delicious than Nutella straight-up, it’s Nutella Buttercream. Everyone’s favorite chocolate hazelnut spread is whipped into an otherwise classic vanilla buttercream, then piled onto buttery yellow cupcakes.
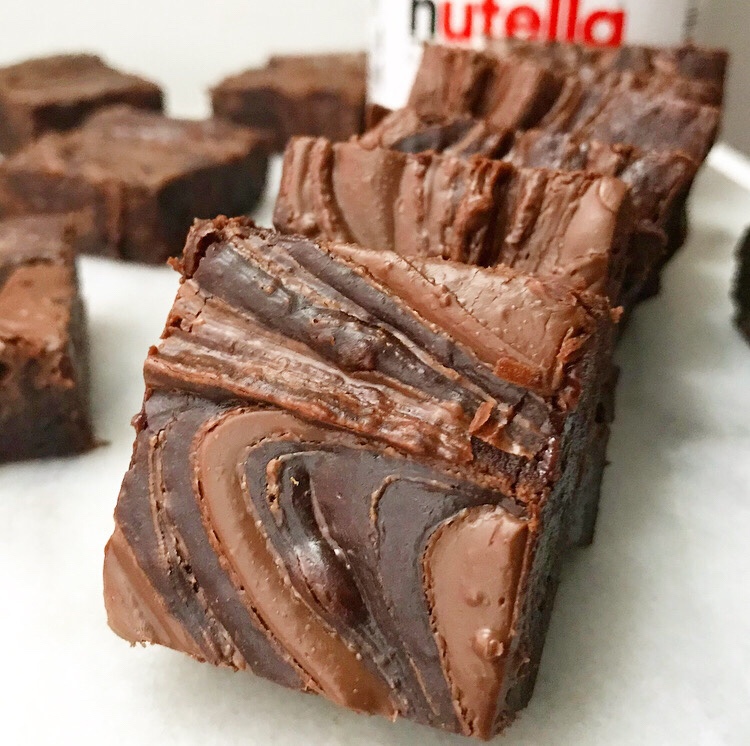
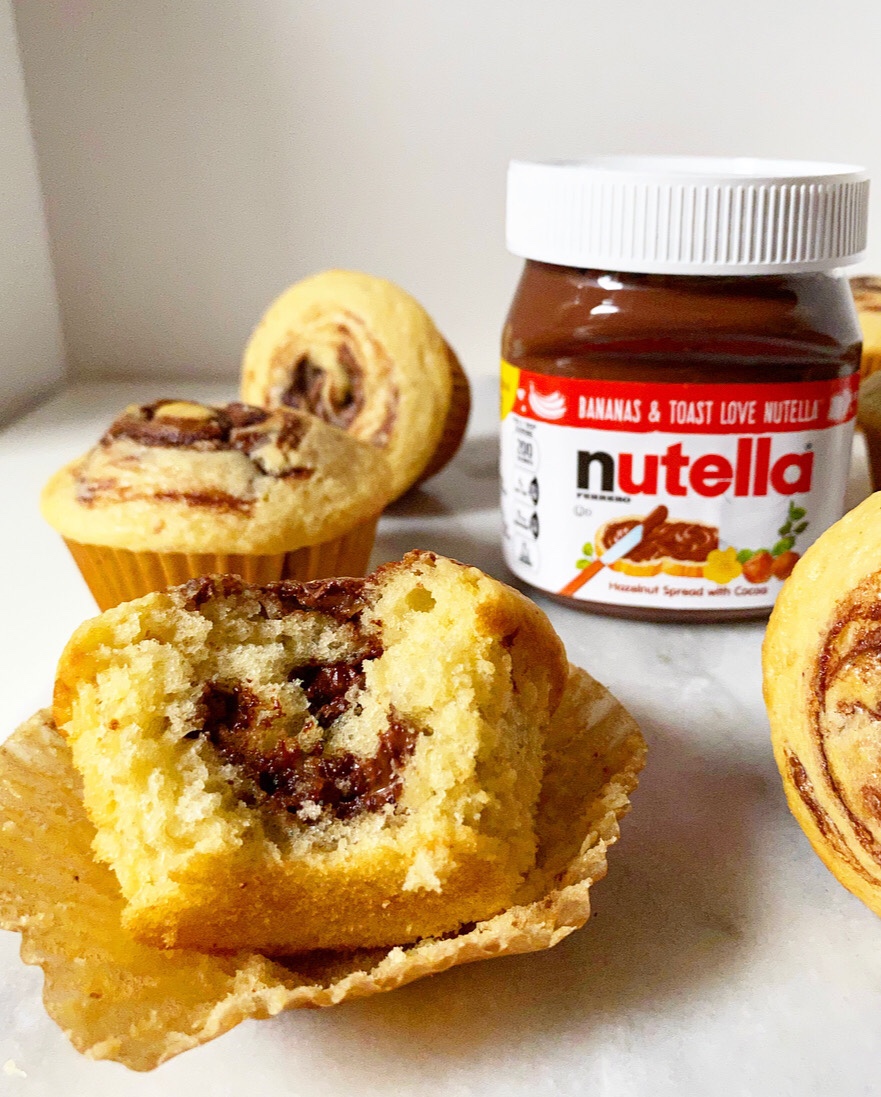
Want big Nutella flavor without having to reinvent the wheel? Swirl it into your favorite brownie recipe! I used my tried and true Cocoa Brownies here, and the chocolate hazelnut fudginess is out of this world!
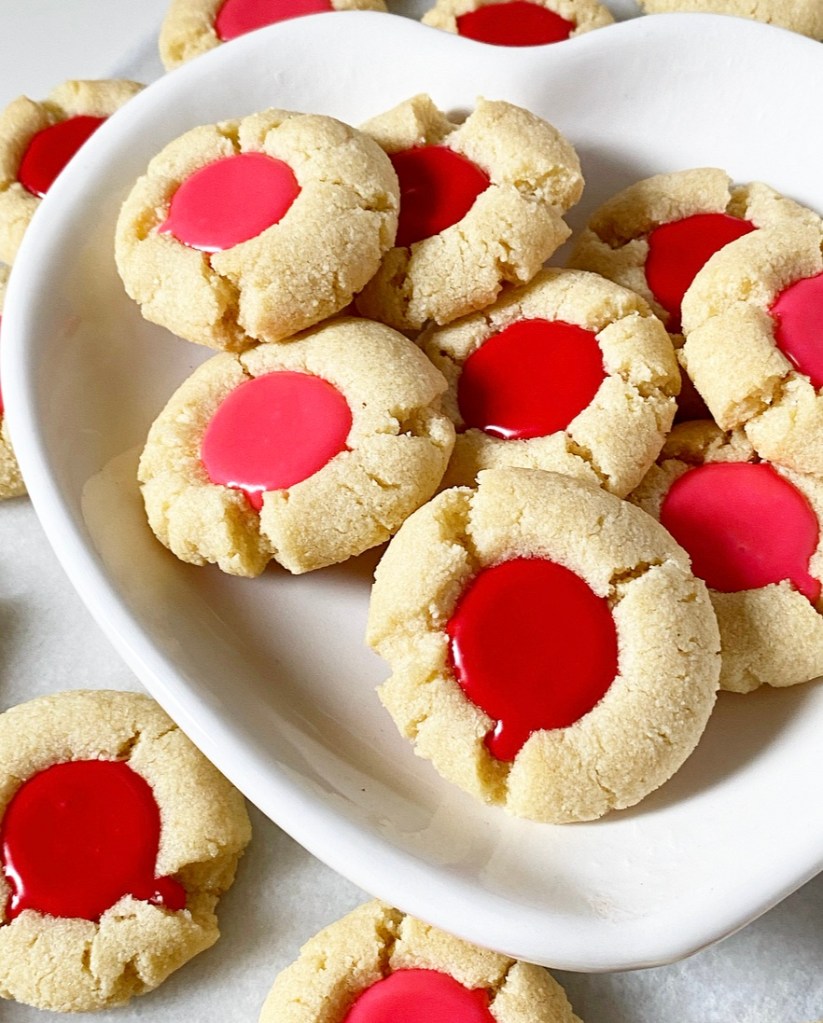
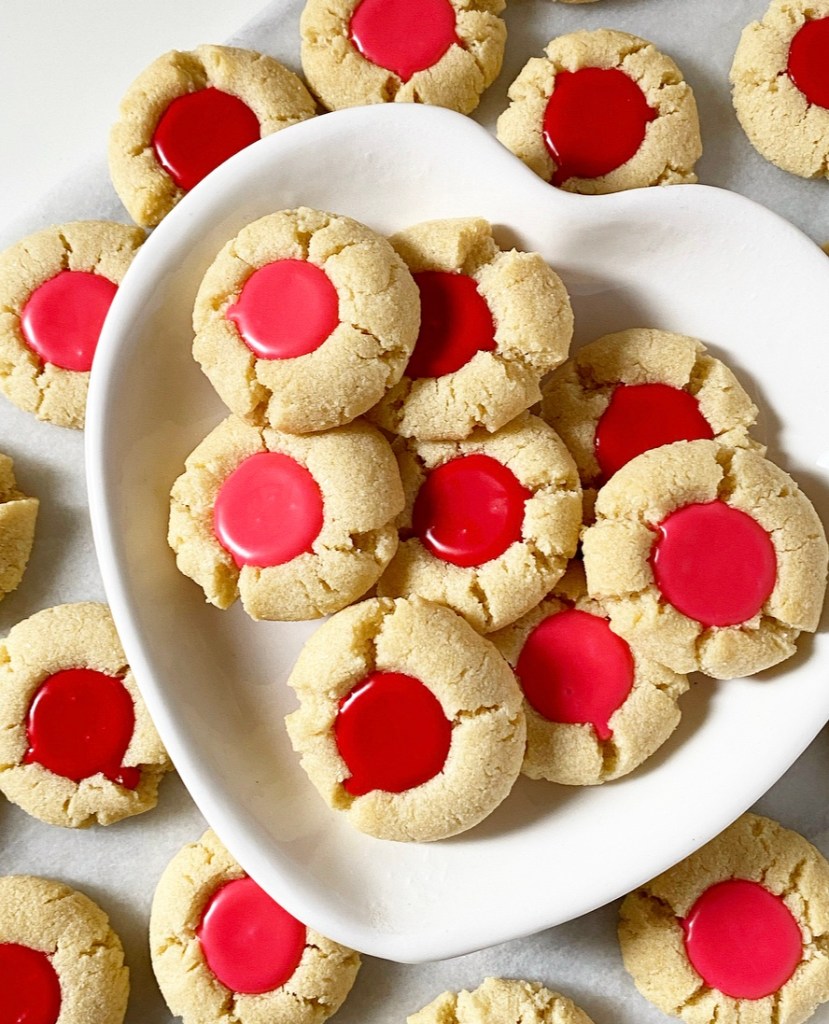
Have I made icing thumbprints on here before? Sure have! But I’ve never made them vegan and gluten-free, probably because I didn’t have a great vegan, gluten-free cookie base yet.
But, as you might have guessed, I do now. On my never-ending quest to feed all my various people, I spent a good chunk of the holiday season figuring out a dairy- and egg-free almond flour dough that works for a multitude of cookie applications. So far, I’ve made some stellar gingerbread and linzers that taste shockingly close to the real deal, and I’ve got all sorts of variations ready to be doled out as the need arises (as it has today).
While using this dough for a completely different cookie recipe last week, it occurred to me that I hadn’t checked to see if it would make good thumbprints. My traditional sugar cookie recipe thumbprints (using it as a verb) like a dream with a tiny adjustment, but would this one?
Well, yes. Yes, it would. It does! And with no adjustment at all, which is a dang delight. These cookies bake up somewhere between crisp and chewy and are sturdy enough to hold up against all that icing. What can I say? With a quality base recipe, I am unstoppable. Unstoppable and full of cookies.
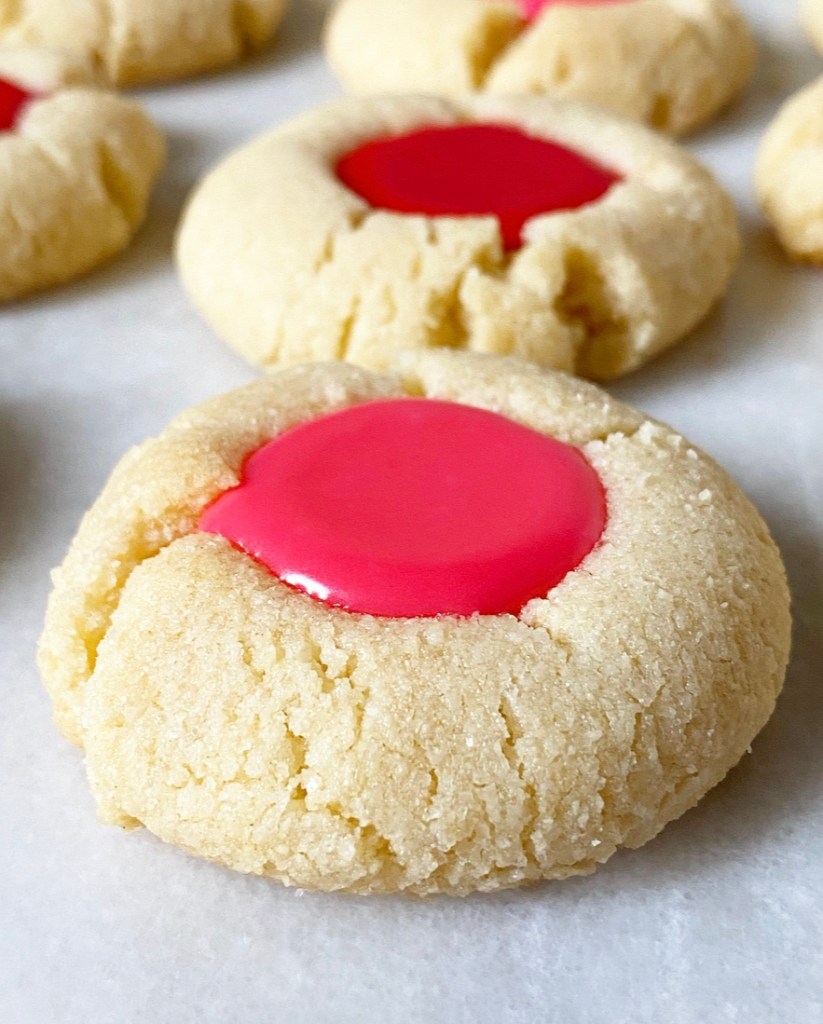
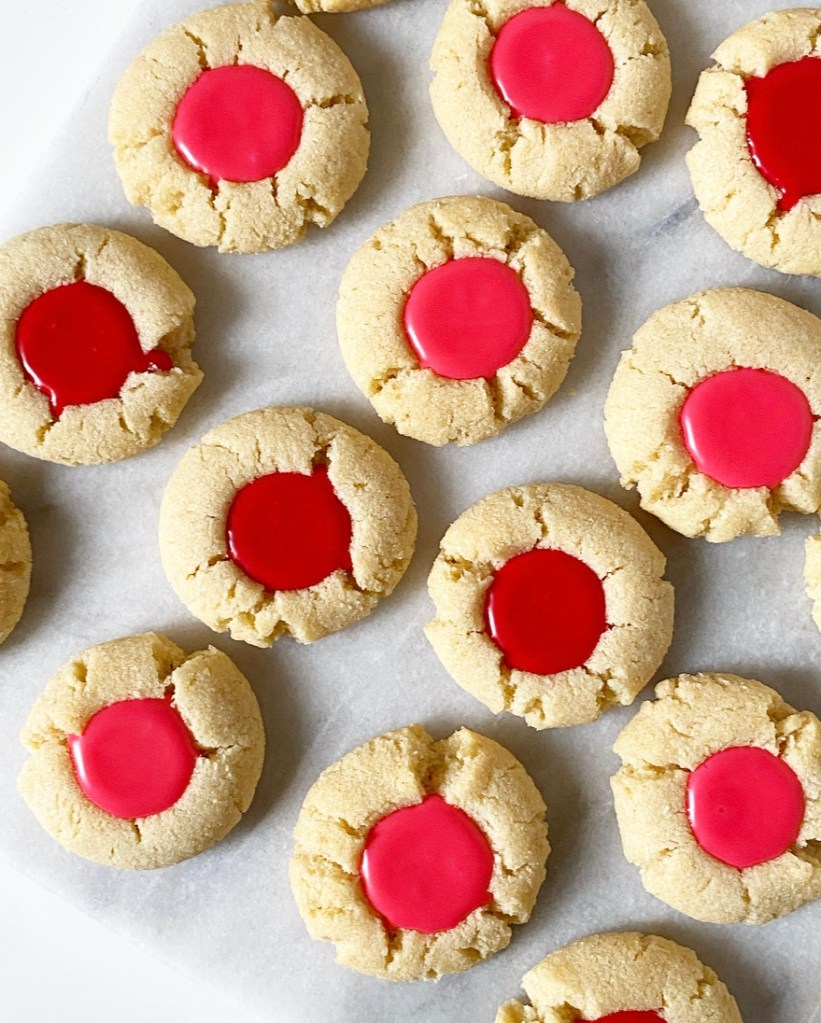
As for the filling, don’t you love these little wells of colorful icing? Say what you want about food coloring, but you can’t deny its cheer factor. With Valentine’s Day around the corner, I went with a vibrant pink and red motif for these, but do whatever makes you happy! I imagine that a display of these in team colors would make for a very festive Super Bowl dessert.
That said, if you’re making these for any occasion, please invite me.
Vegan, Gluten-Free Icing Thumbprints
makes about 2.5 dozen cookies

Cookie Dough:
3 cups blanched almond flour
1 teaspoon baking powder
1 teaspoon Kosher or sea salt
1/2 cup vegan butter, softened to room temperature
2/3 cup granulated sugar
1/3 cup confectioner’s sugar
2 tablespoons maple syrup or light corn syrup
2 teaspoons pure vanilla extract

Icing:
1 1/3 cups confectioner’s sugar, divided
pinch of salt
2 vegan gel or liquid food colorings of choice
2-3 tablespoons (6-9 teaspoons) unsweetened non-dairy milk, divided

In a medium mixing bowl, whisk together almond flour, baking powder, and salt. Set aside.

In a separate medium-large mixing bowl, use an electric mixer to beat vegan butter until fluffy (about 2 minutes). Add sugar and confectioner’s sugar and beat until fully combined (about 2 minutes). Beat in maple syrup and vanilla.

Add dry ingredients in two installments, mixing completely after each addition. Dough may look rubbly, but should hold together extremely well when pinched.

Divide dough in two. Form each half into a disk, then wrap with plastic wrap. Chill for 1 hour or up to 3 days.

Place oven racks in central positions. Preheat oven to 325F. Line two rimmed baking sheets with parchment.

Remove dough from the refrigerator. Scoop dough by the tablespoon and roll each int a ball. Place dough balls at least 2 inches apart on prepared pans. Use the back of a very small spoon (like a 1/2 teaspoon measuring spoon) to slowly press a well into each dough ball. They may crack a bit—just smooth them with your fingers. If dough gets too warm and sticky, freeze for 10 minutes.

Bake cookies 13-14 minutes. Cookies are done when puffed and no longer wet-looking. When you remove the cookies from the oven, press the back of the small spoon (I use 1 teaspoon measuring spoon) into the centers again.  Let cookies cool on the pans for 10 minutes before carefully removing to a rack to cool completely. Repeat rolling and baking process with all remaining dough, letting the cookie sheets come back to room temperature between batches.

Make the icing. Place 2/3 cup of confectioners sugar and tiny pinches of salt in each of two small bowls. Stir 1 tablespoon (3 teaspoons) of non-dairy milk into each bowl. Add desired food colorings to the separate bowls. Whisk each with a fork until combined. Add more milk by the 1/2 teaspoon until icings are very thick, but pourable.

Transfer icings to piping bags (or ziptop sandwich bags) twist them tight and snip off very small corners. Fill wells in cookies as desired.

You can serve the cookies almost immediately, but the icing won’t set to a non-drippy texture for a few hours. Cookies will keep in an airtight container at room temperature for a few days. Place parchment or wax paper between layers for easiest storage.
I am not a fan of strawberry desserts in February. They make exactly zero sense. We’ve got months before fresh berries are worth eating! That doesn’t seem to stop everyone from wanting them for Valentine’s Day though.
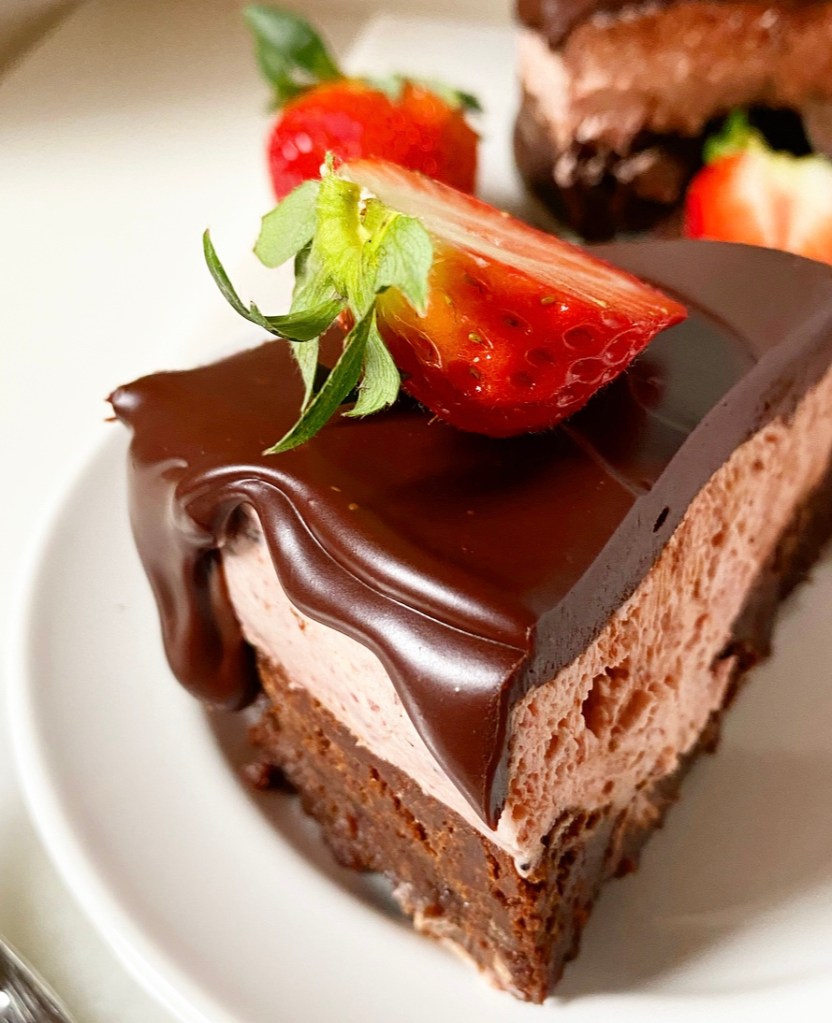
As a blogger, I can either resist or lean into situations like this. It’s safe to say that, in the case of this Chocolate-Covered Strawberry Mousse Cake, I’m leaning all the way in—all the way. With my favorite flourless chocolate cake base, a thick layer of strawberry mousse in the middle and a rich ganache topping, this is a Valentine’s Day dessert even I can’t resist!
This recipe looks fancy, but is actually very simple. The flourless chocolate cake base is a one-bowl whisk & bake situation that turns out fudgy and decadent every time. With a texture somewhere between an excellent brownie and the center of a chocolate truffle, this cake is fantastic all on its own, but today, it’s just the beginning.
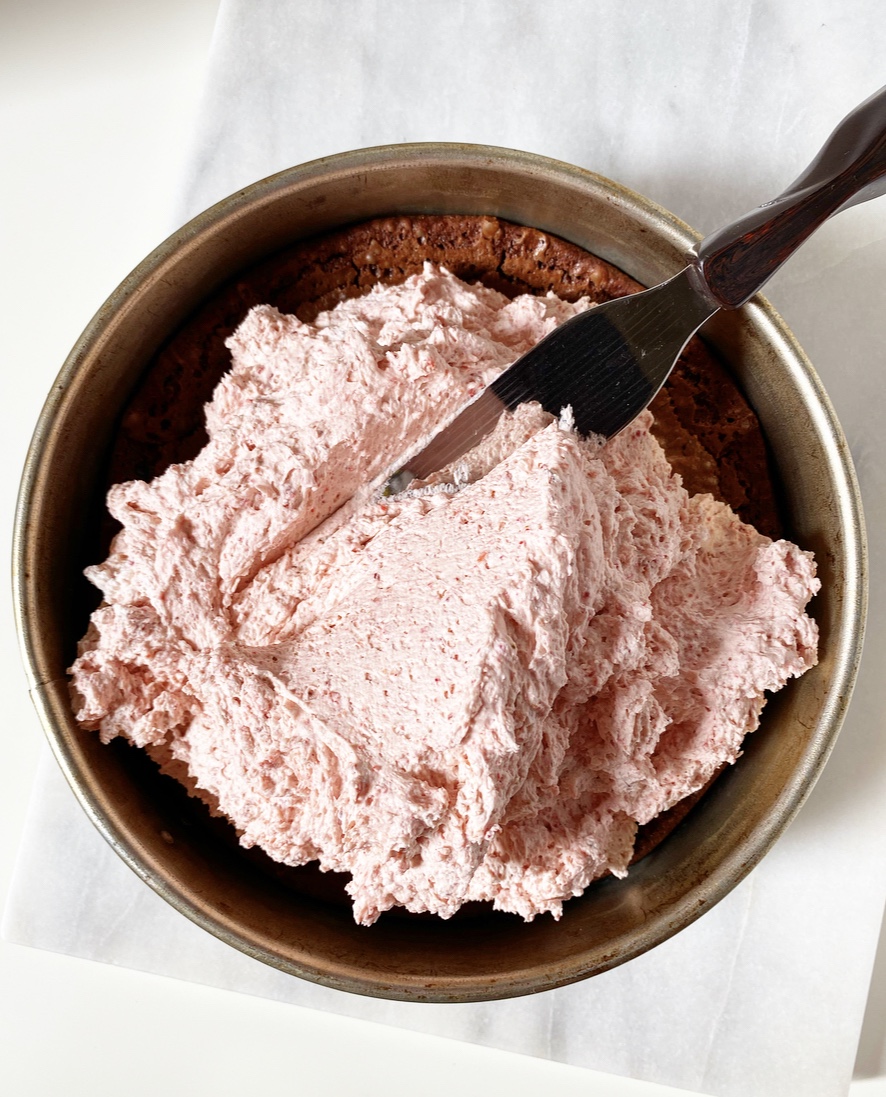
Next up: the strawberry mousse—the star of the show! It’s airy and creamy, but still stable enough to layer thanks to a tiny bit of cream cheese and a whole lot of pulverized freeze dried strawberries. Why freeze dried? Because unlike February strawberries, they have a super-concentrated flavor and are delicious year-round. I buy mine at Trader Joe’s and Target, but I am sure there are plenty of places to procure them online.
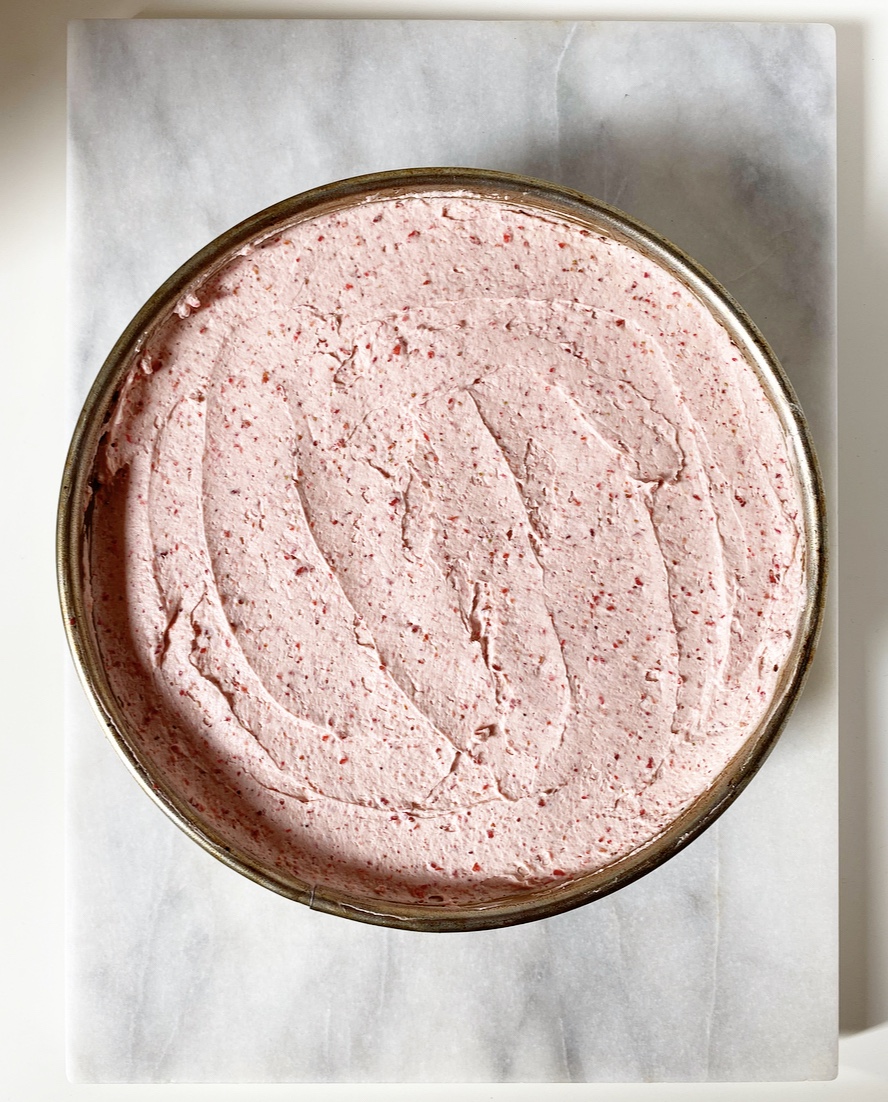
You’ll notice that I introduce heavy cream into the mousse in two phases. First, I add a cup of liquid cream to the strawberries and cream cheese to help them become one mass. Then, I whip two more cups of cream and gently fold them into the strawberry mixture until it’s mousse. This may seem like a lot of fuss, but it results in a super light texture, which is exactly what we want. Layer the mousse on top of the cake, smooth it to the edges of the pan, and refrigerate for a few hours to set.
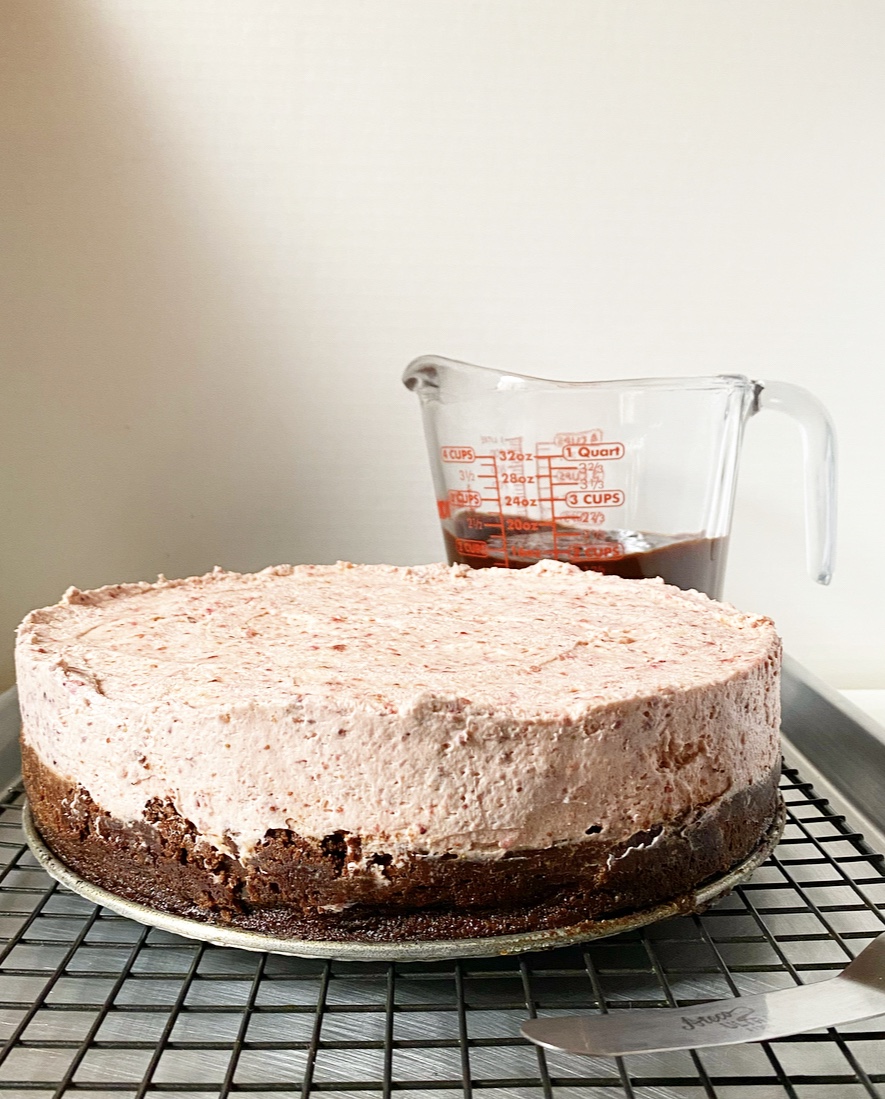
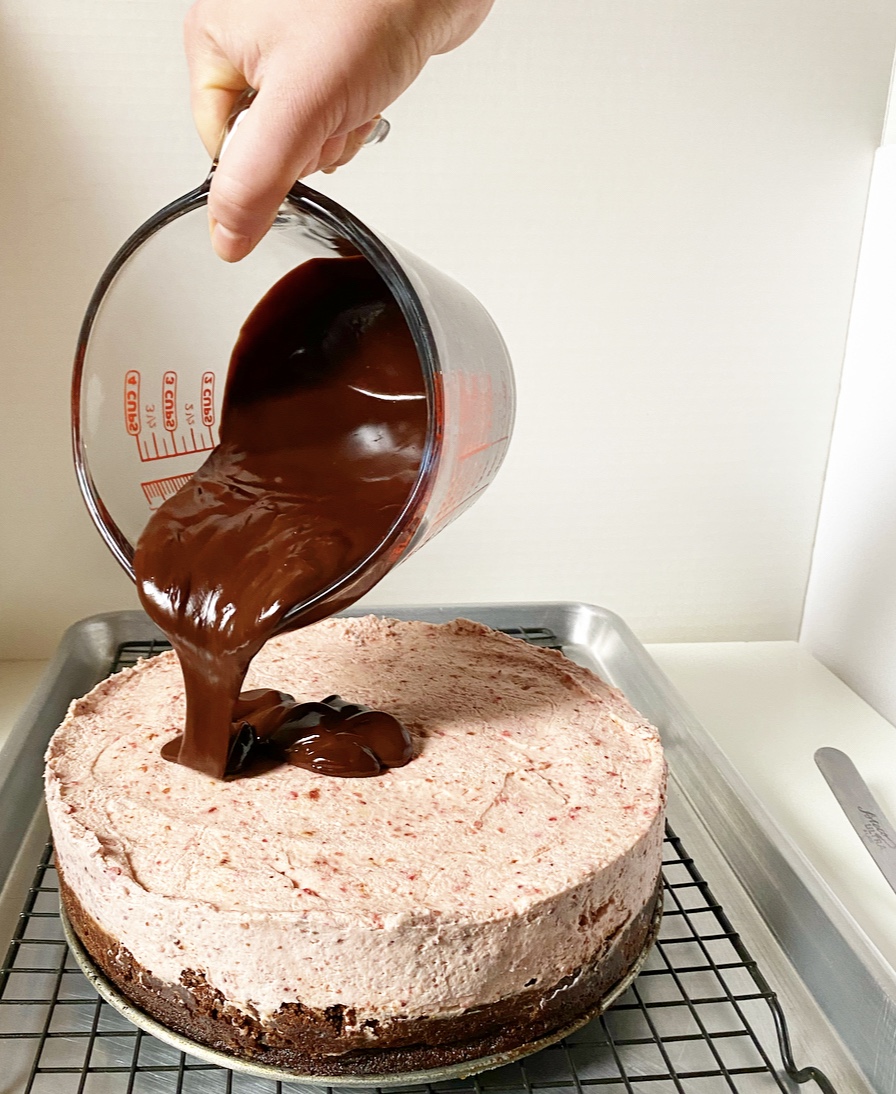
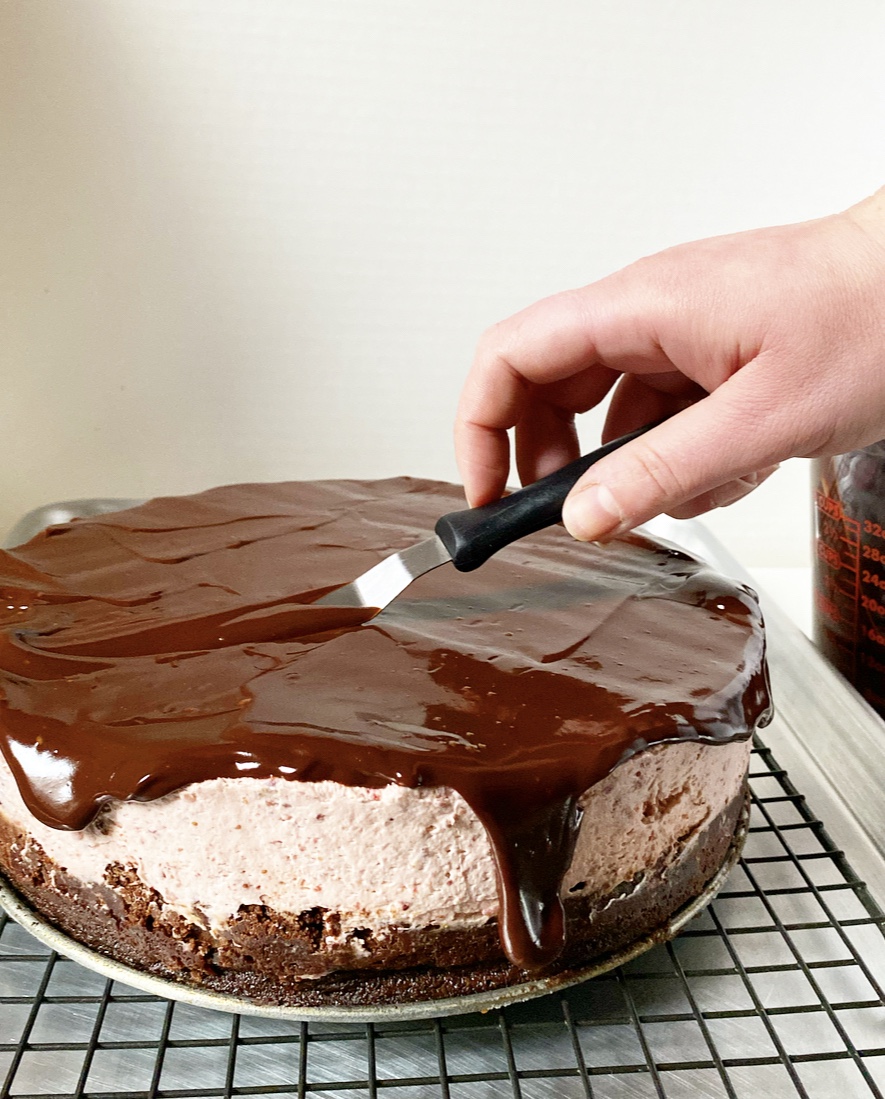
The last step in making Chocolate-Covered Strawberry Mousse Cake? Making the chocolate covering, of course! In this case, it’s just a soft ganache (mix of dark chocolate and heavy cream) that is poured over the mousse, then coaxed over the edges so that it drips down to the cake layer. I am sure there is some very fancy and precise way to do this, but I like it a little irregular.
Once fully assembled, the cake needs to be refrigerated just a little longer so that it slices well. I threw some styrofoam-flavored February strawberries on mine for flair, but feel free to decorate (or not) however you like. This thing is going to look gorgeous and taste like chocolate-strawberry magic no matter what.
Would you look at those layers? They’re a thing of beauty! And that’s to say nothing of the flavor, which is outstanding. The rich chocolate and creamy strawberry mousse balance each other perfectly, and are truly irresistible. And that’s coming from someone who doesn’t like fruit with chocolate anytime of year.
Yeah, I know. I’m no fun. But I’m leaning in.
Chocolate-Covered Strawberry Mousse Cake makes one 9-inch round cake
Cake: 7 ounces bittersweet chocolate, chopped 7 ounces unsalted European-style butter*, cut into small pieces 1 1/3 cups granulated sugar 5 large eggs, room temperature 1/2 teaspoon pure vanilla extract 1 tablespoon cocoa powder (natural or Dutch process) 1/2 teaspoon Kosher or sea salt
Ganache: 8 ounces dark chocolate, finely chopped 1 cup heavy cream
Garnish: fresh strawberries, if desired
READ THE ENTIRE RECIPE BEFORE PROCEEDING.
Make the cake. Preheat oven to 375F. Grease a 9-inch springform pan with butter. Set aside.
In a double boiler or the microwave, melt dark chocolate and butter together, stirring occasionally, until smooth. Whisk in sugar. Allow to cool slightly.
Whisk in one egg at a time, combining completely after each addition. Stir in vanilla. Whisk in cocoa powder and salt, scraping down the bowl as necessary. Pour batter into prepared pan. Bake for 20-25 minutes, until the center jiggles just slightly when the pan is jostled. Let cool completely in the pan on a rack, about 90 minutes to 2 hours. Do not remove the springform. Cake may be made up to a day in advance.
Make the mousse. In a medium mixing bowl, use an electric mixer to beat cream cheese until fluffy (1-2 minutes). Add pulverized strawberries, confectioner’s sugar and salt, and mix again. It will be very powdery. Add 1 cup heavy cream and mix on high until combined.
In a separate mixing bowl, use an electric mixer to whip 2 cups heavy cream on low for 30 seconds before whipping on high for 1-2 minutes, until stiff peaks form.
Stir 1/4 of the whipped cream into the strawberry mixture. Working with 1/4 at a time, gently fold remaining whipped cream into the strawberry mixture, until very fluffy with no white streaks remaining.
Pile the mousse on top of the cooled cake (still in the pan). Spread it into an even layer and tap the pan on the counter a few times to release any large air bubbles. Stick a layer of plastic wrap to the surface of the mousse. Refrigerate for at least 3 hours or overnight.
Remove cake from the refrigerator. Remove plastic wrap. Run a thin, flexible knife dipped in warm water around the edge of the pan before removing the springform. Smooth the sides of the released cake as needed. Refrigerate if not topping immediately.
Make the ganache. Place bittersweet chocolate in a small bowl. Pour heavy cream into a small saucepan over medium heat. When it just barely starts to boil, remove it from the heat and pour the cream over the chocolate. Once the chocolate looks soft (2-3 minutes), stir it together with a fork until you have a smooth chocolate sauce. Let cool 10 minutes.
Place a cooling rack over a rimmed sheet pan. Top with the cake. Gently pour ganache over the top of the cake, then use an offset icing spatula (or the back of a spoon) to coax the chocolate over the edges.
Lift the cake off the cooling rack and refrigerate for at least 1 hour before serving. Garnish with fresh strawberries, if desired. Serve cake.
For clean slices, dip the knife in warm water and wipe dry between cuts. Leftovers will keep for up to 4 days in the refrigerator, though fresh strawberries may degrade over time.
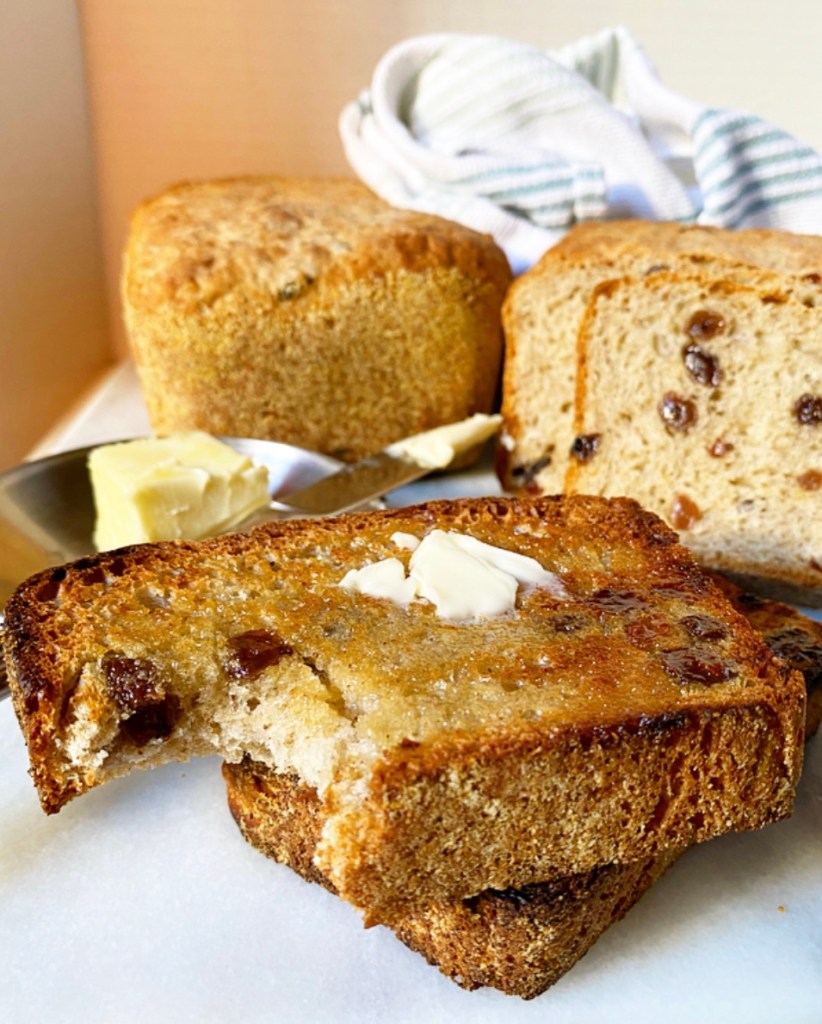
If you’ve never had English Muffin Bread, you’re in for a treat. It’s got all the craggy cornmeal-edged goodness of a quality English muffin, but baked into a loaf that you can slice as thick as you like and toast to golden perfection! It’s wildly easy to make—no proofing yeast or kneading, and only one rise *in the pan*—and it’s so good that I actually really love doing multiple tests on it. Don’t mind me over here packing my freezer with sliced English Muffin Bread. Nothing to see here!
My recipe for plain/classic English Muffin Bread can be found by clicking here. Please treat yourself to a loaf or two, heavily toasted with lots of butter, and then come back for this Cinnamon Raisin version.
Yep, that’s right. Cat’s out of the bag. I’m a raisin person! I like them in cookies, carrot cake, and a chicken stew my mom makes, among many other things (though never with or when I am expecting chocolate). I am sure this is a giant waving red flag for some of you, but we all have our flaws, and mine is that I enjoy the occasional raisin-speckled baked good. I like dried grapes and I like them in stuff and I’m not going to feel bad about it, okay? Okay.
If you are not a raisin person, I’ll get you with the next recipe, but this one’s for my fellow raisin enthusiasts and me. Because we know what’s good, and thickly-sliced, craggy, deeply toasted Cinnamon Raisin English Muffin Bread with butter is very good. It’s pretty outstanding with peanut butter, too, if that’s more your speed. I usually go with one slice each way—a single piece of toast is rarely enough.
My favorite part of this recipe? It takes exactly the same amount of time and effort as plain English Muffin Bread, which is to say…not very much. You’ll need all of 10 minutes to measure, stir together and divide the recipe into two loaves, an hour to rise over the top of the pan and 30 minutes to bake. The absolute most important part of this whole process is not slicing into the baked bread until it’s completely cool. Just don’t do it! The bread needs the cooling time to set its hole structure, and will be dense, gummy and otherwise weird if you slice it while it’s warm. Resist the intoxicating smells of fresh bread and cinnamon! It’s for your own good. Your breakfast’s, too.
Cinnamon Raisin English Muffin Bread makes 2 loaves
For the pans: 1 tablespoon unsalted butter 3-4 tablespoons cornmeal
For proofing: plastic wrap oil, butter or cooking spray
For serving: butter peanut butter
Grease 2 9x5-inch loaf pans with butter. Add cornmeal and rotate pans so that the entire insides are coated in a thin layer. Tap out and discard excess cornmeal.
In a medium-large mixing bowl, whisk together flour, sugar, cinnamon, baking soda, salt and instant yeast. Stir in raisins.
In a large liquid measuring cup (or other vessel) whisk together melted butter and warm water. It should be warm to the touch (90-110F) but not hot.
Whisk/stir wet ingredients into dry ingredients in two installments. Stir until a sticky, shaggy dough forms and flour is coated, then stir an additional 30 seconds to make sure things are saturated.
Grease your hands, then divide dough into prepared pans. Grease 2 pieces of plastic wrap. Lay them loosely over the top of each loaf pan.
Place pans in a warm, draft-free environment for 45-60 minutes, or until the dough has risen just above the tops of the pans. While dough is rising, preheat oven to 400F.
When dough is ready, gently peel off and discard plastic wrap. Dough may seem a bit wet and jiggly. Gently place pans in the oven and bake for 25-30 minutes, or until golden all over. The interior temperature should be at least 190F.
Immediately turn bread out onto a rack. Let cool completely so crumb structure can set. Do not slice into bread until it is completely cool.
Slice and toast before serving with butter, peanut butter, or your topping of choice. Leftovers will keep well-wrapped in the refrigerator for up to a week.
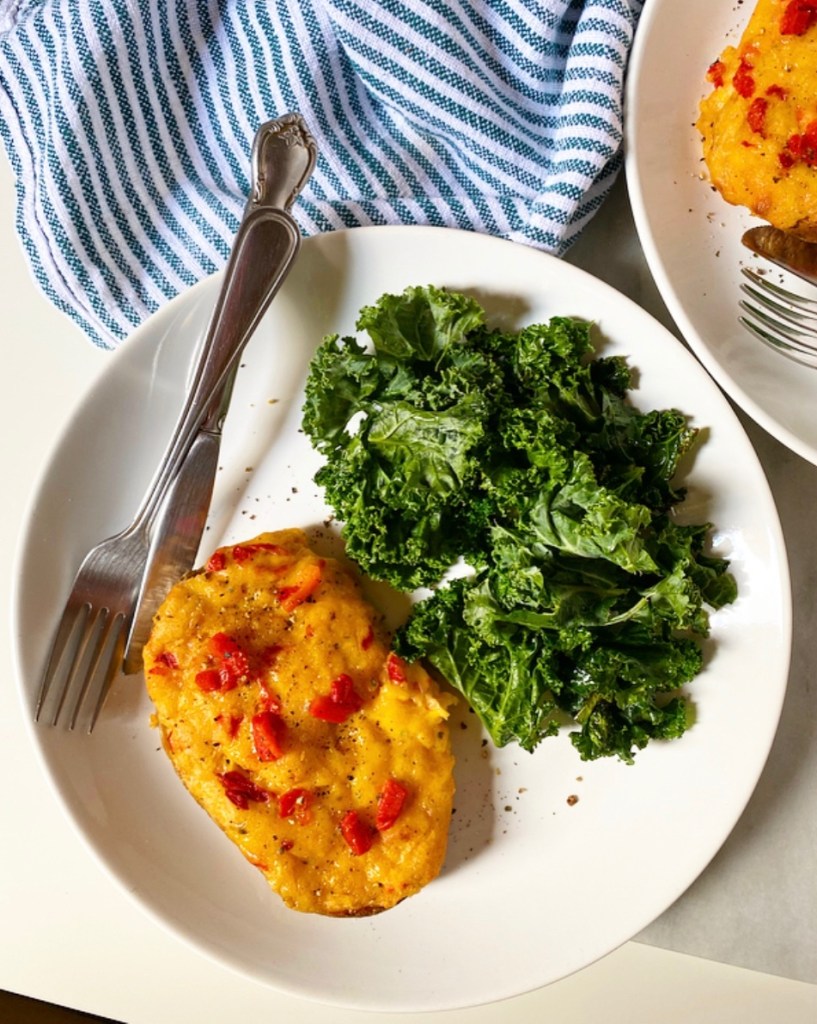
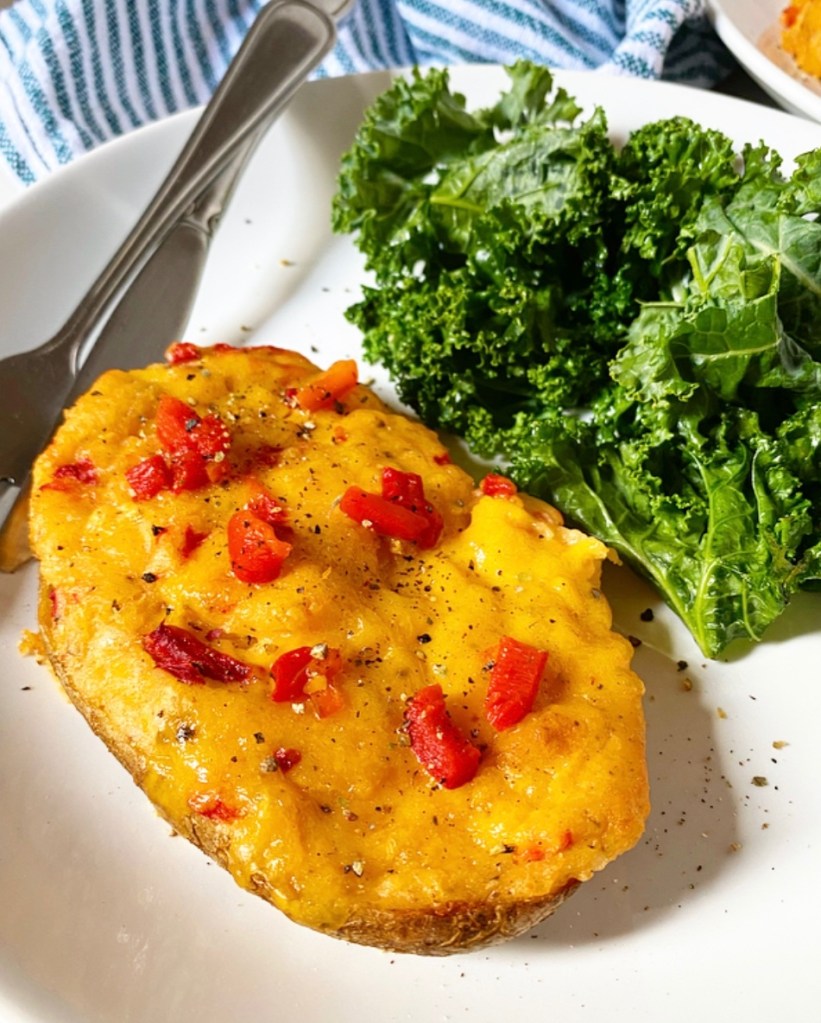
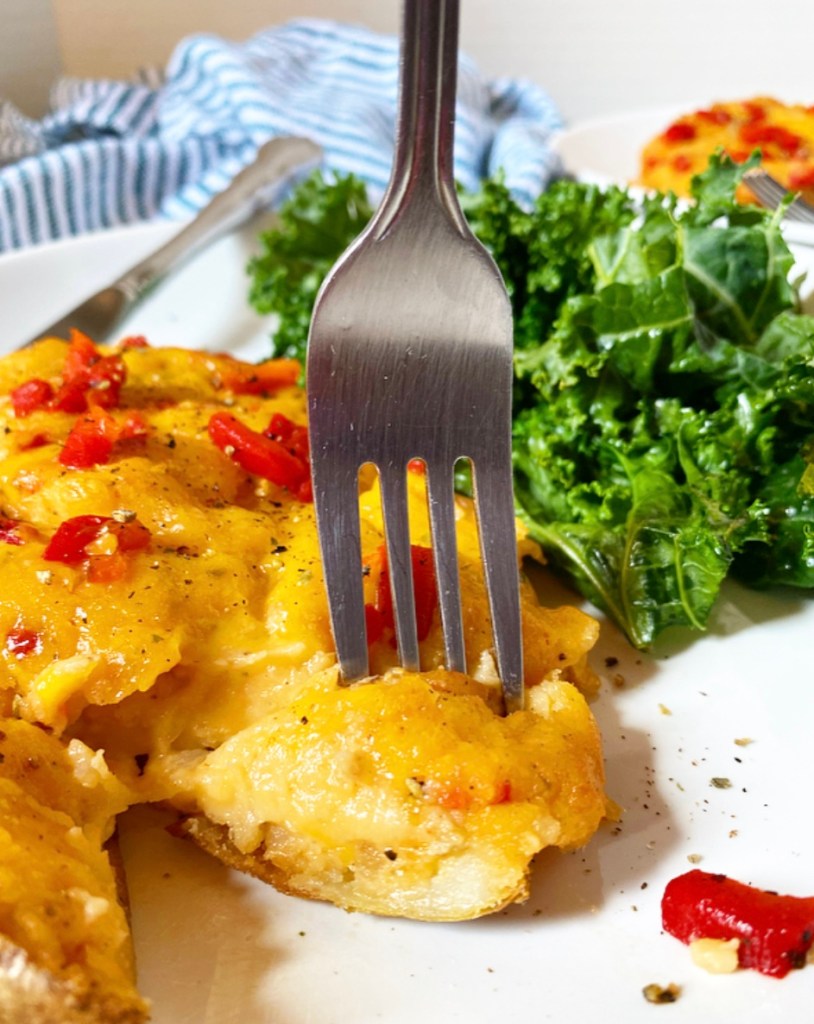
Carbs and cheese are the name of the game this week. Wednesday was all about French Onion Grilled Cheese, and today has Pimento Cheese Twice-Baked Potatoes written all over it.
This recipe is a comfort food mash-up for the ages. Tender, salt-rubbed baked potatoes overstuffed with a rich pimento cheese filling? Sign me up!
If you’re unfamiliar with pimento cheese, it’s a popular southern dip/condiment made of cheddar cheese, sweet pimento peppers, black pepper and mayonnaise. It doesn’t sound great when I lay it out like that, but when combined it’s salty, spicy, creamy, tangy, a little sweet—in short, it’s delightful. And that’s coming from someone who despises mayonnaise and is weird about creamy things, so do with that what you will.
Here, we’re ditching the controversial mayo in favor of potato-friendly cream cheese and butter, combining them with pimento cheese staples like extra sharp cheddar, jarred pimentos and a lot of black pepper. Scoop out the innards of some warm baked potatoes, mash in all those creamy, cheesy ingredients along with garlic and onion powders, load that glorious filling back into the empty potato skins and bake again. Top ‘em off with a little more cheese and maybe some more pimentos, if you’re feeling kicky, then serve them up with the sides of your choice and dig in!
Spicy, cheesy, and filling, Pimento Cheese Twice-Baked Potatoes make a great vegetarian main (or even a side, depending how hungry you are). They’re extra cheesy with plenty of spice from the pepper and some optional cayenne, and that classic pimento cheese tang from the chopped pimentos. In short, they’re what I’m craving as we head into a snowy weekend here in NYC, and that’s a good thing because I have a lot of leftovers.
Pimento Cheese Twice-Baked Potatoes makes 4 servings
2 medium-large russet potatoes 1 teaspoon olive oil 1 teaspoon Kosher salt (or to taste), divided 1 4-ounce jar pimentos 1 8 ounce brick extra sharp cheddar cheese, divided (I used Tillamook) 2 ounces (1/4 brick) full-fat cream cheese (or sour cream) 2 tablespoons unsalted butter 1/2 teaspoon garlic powder 1/2 teaspoon onion powder 1 teaspoon freshly-cracked black pepper (or to taste) 1/8 teaspoon cayenne pepper, optional
Preheat oven to 400F. Line a baking sheet with parchment paper.
Scrub and dry potatoes. Prick each several times with a fork. Massage 1/2 teaspoon olive oil and 1/4 teaspoon salt onto each whole potato. Place on prepared pan and bake about 1 hour, or until I small knife meets no resistance when inserted. Let potatoes cool 7-10 minutes, or until they can be handled.
While potatoes are baking, prepare the filling ingredients. Drain pimentos and blot as dry as possible on paper towels. Remove to a cutting board and dice into 1/4-inch pieces. Set aside.
Use the large hole side of a box grater to shred cheese. Set aside.
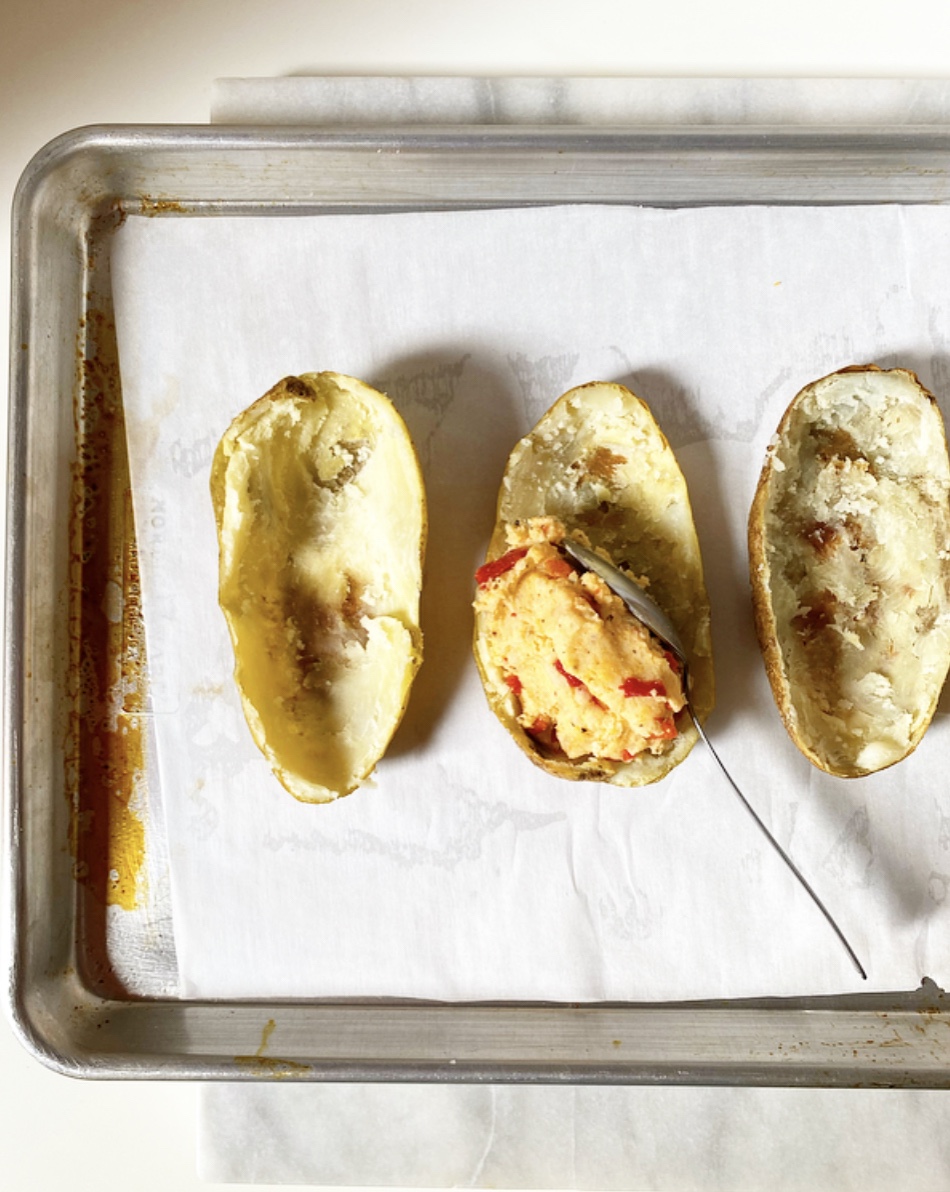
When you can handle the potatoes (they should still be very warm), remove them to a cutting board. Slice them in half lengthwise and use a spoon to scoop out the flesh, leaving behind the potato skin “boats.” Set the skins aside.
Make the filling. Place potato flesh in a medium mixing bowl. Use a potato masher (or two forks) to break up the large pieces. Add cream cheese, butter, 1/2 teaspoon salt, garlic powder, onion powder, black pepper, and optional cayenne and continue to mash just until combined. Do not over-mash. Use a silicone spatula or wooden spoon to fold in pimentos and 3/4 (6 ounces) of the shredded cheddar. Taste a small bite of filling and adjust seasoning as needed.
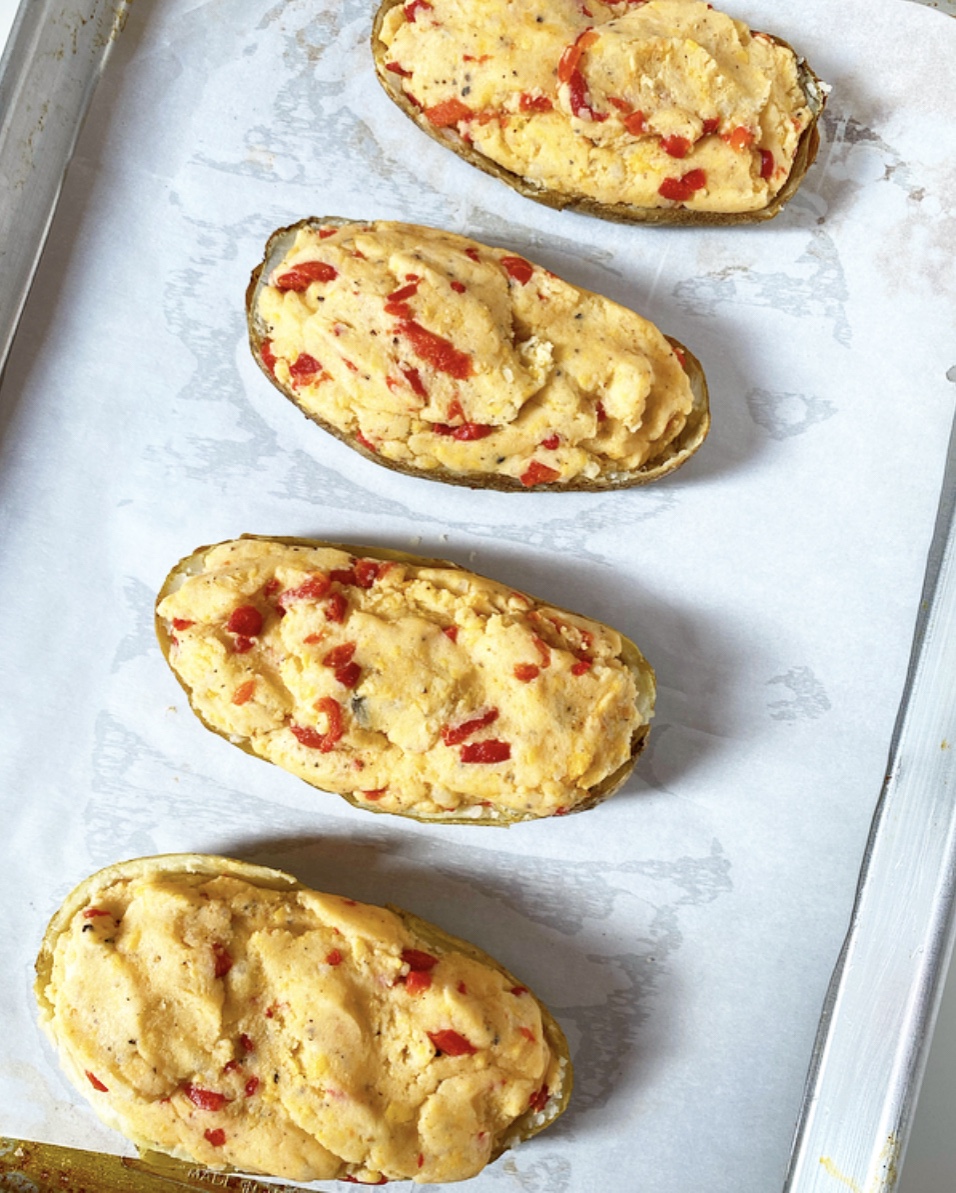
Place potato skins on a parchment-lined baking sheet. Divide filling mixture among skins (1/2-2/3 cup each); they will likely be heaping a bit. Bake uncovered for another 20-25 minutes at 400F, or until the filling is puffed in places. Top with remaining cheese and return to the oven for 3-5 minutes, just to melt. Add more pimentos if desired. Let potatoes cool a few minutes before serving.
Twice-Baked Potatoes are best eaten the day they are made, but leftovers can be reheated in the microwave, if desired. I’m sure they can also be reheated in a toaster oven or oven, although I have not tried it myself. Leftovers will keep covered in the refrigerator for up to 3 days.