Category Archives: weeknight meals

Lasagna a la Betsy

Lasagna a la Betsy​

Listen, I know that the internet is full of lasagna recipes. There’s everything from the jarred sauce and pre-shredded cheese kind to some that take three days and are lovingly layered with from-scratch bolognese, béchamel, and pasta made by hand. If you’re looking for a lasagna to suit your tastes, there’s a decent chance it’s out there…unless, of course, you were hoping to find mine.

I have been making lasagnas for people for years. Truthfully, if you ask nicely and pay for my ingredients, transportation, labor and time, I’ll come right to your house, tie on an apron, and fill your freezer with tightly-wrapped aluminum pans of layered bolognese, cheese, and pasta with an index card with baking instructions scotch taped on top. If, however, I’m out of your budget and you don’t want to have to interpret my handwriting, it’s your lucky day—Lasagna a la Betsy is finally on the blog.

Lasagna a la Betsy​

Now, what makes it “a la Betsy”? Well, half of everyone I know started calling me Betsy seven years ago, and while I introduce myself as “Liz” everywhere but Starbucks, I like that nickname whenever it suits me, which includes but isn’t limited to when I make lasagna. Also, this recipe is authentic to nothing—I am not trying to make this as lovingly as anyone’s Italian grandmother, I’m just trying to get dinner on the table today (and maybe sometime in a few weeks). But mostly, it’s a la Betsy because it’s what I like in my lasagna, and it’s made the way I like to make it. Period, end of story.

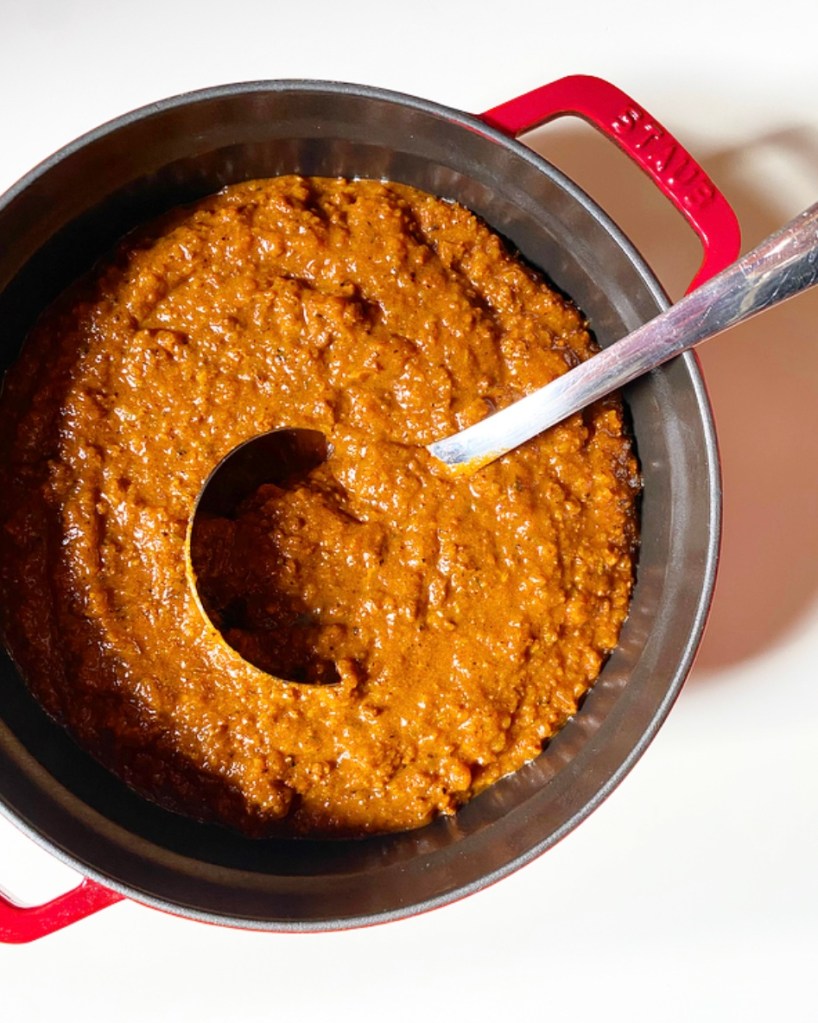
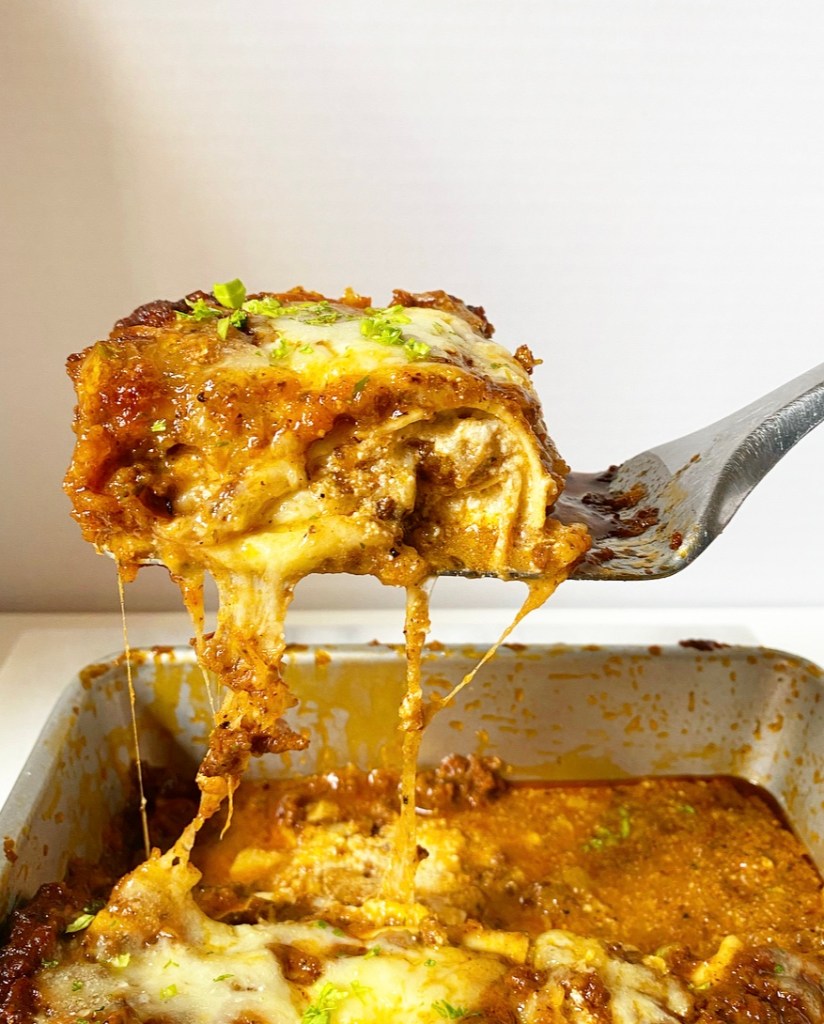
The “bones” of Lasagna a la Betsy are similar to many classic recipes. It starts with making my tried and true bolognese sauce from scratch. I usually do this a day ahead to split up the work, but it can be made the same day the lasagnas are assembled. It takes about three hours of browning and simmering beef, sausage, mushrooms and aromatics, but the results are meaty and rich and worth it all, I promise. Frankly, the sauce is the most time consuming part of this whole process; the rest is just layering. And oh, they are good layers.

You know the stuff: shredded mozzarella, spoonfuls of parmesan-spiked ricotta, the bolognese, some no-boil noodles… Yeah, I use the no-boil noodles—they’re one of the only convenience ingredients that I will swear by. I’ve used the boil-yourself kind and they are delicious, but they can be finicky and take a while. I like saving myself a little stress. I mean, I already made the sauce from scratch. That said, use whichever noodles work for you.

Lasagna a la Betsy​

My personal favorite part of my lasagna recipe? It makes two! Unless you have a huge family or are having a party, you probably don’t need a 9×13” pan of lasagna, but two 8” square pans? One for now and one for the freezer? Yeah, that’ll work. Future you is going to be so happy you planned ahead. Current me is already pretty jazzed about it.

To that end, I’ve included instructions for baking lasagnas right away, as well and freezing and baking from frozen. Whichever path you choose, you’re in for a treat. Hot homemade lasagna (a la Betsy or otherwise) is always a treat.

Lasagna a la Betsy
makes two 8-inch square lasagnas (each 4-6 servings)

1 recipe Bolognese Sauce (about 9-10 cups)
16 ounces whole milk ricotta cheese
1 large egg
2 tablespoons olive oil + more for drizzling
pinch of ground nutmeg
a few grinds freshly cracked black pepper
1/4 teaspoon Kosher or sea salt
1 1/4 cups grated parmesan cheese, divided
1 1/2 pounds (24 ounces) shredded mozzarella (fresh, low-moisture whole milk, or a mix)
12 no-boil lasagna noodles
chopped parsley, for garnish (optional)

Make the bolognese sauce. Remove from heat and let cool for at least an hour before assembling lasagnas. Alternatively, make the sauce the day before and let it chill in the refrigerator overnight. It can be used cold.

Preheat the oven to 375F. Grease 2 8-inch square baking dishes. If using aluminum pans or freezing the lasagnas, line them with parchment.

In a small mixing bowl, whisk together ricotta, egg, 2 tablespoons of olive oil, nutmeg, pepper, and salt. Stir in 1 cup grated parmesan. Set aside.

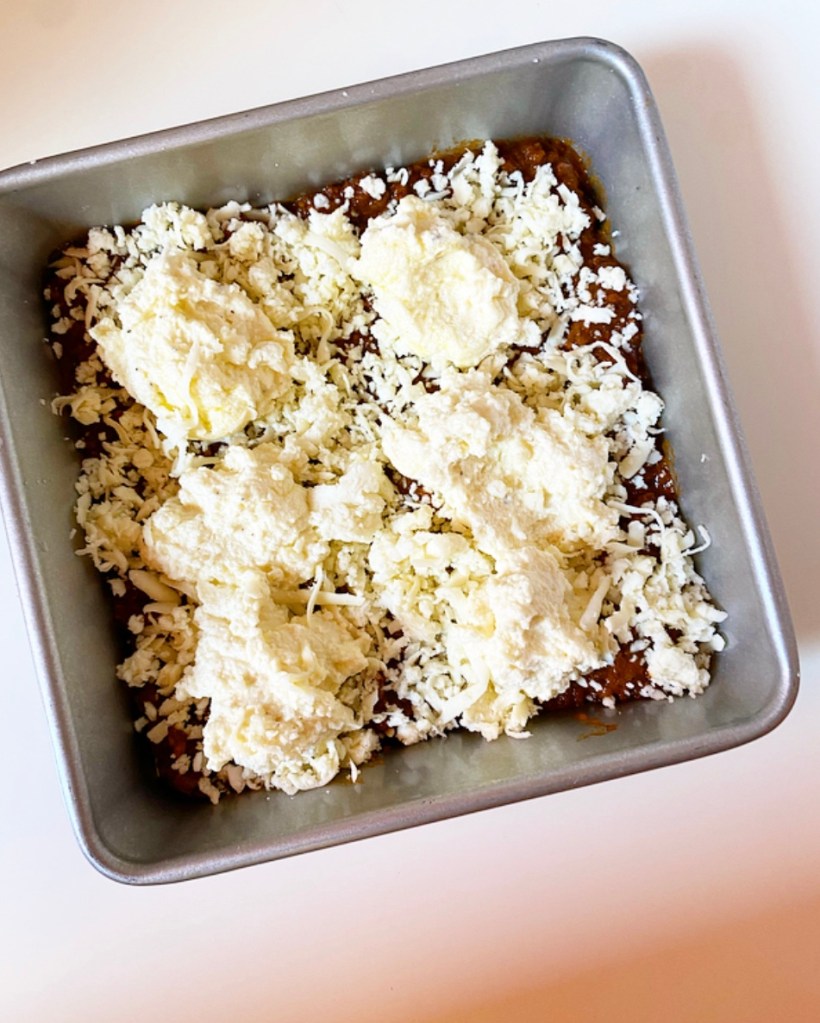
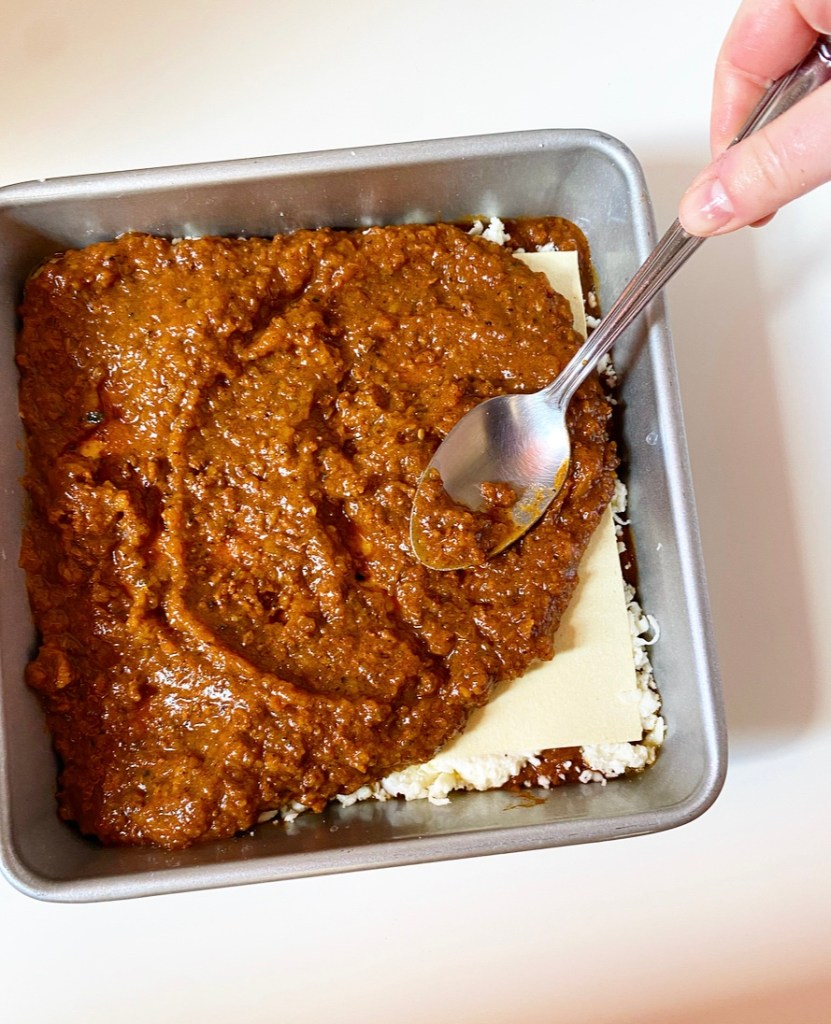
Assemble lasagnas. Spread 1/2 cup bolognese sauce in the bottom of one of the prepared pans. Top with 2 no-boil lasagna noodles (do not overlap them). Spread 1 cup of sauce over the top, then sprinkle on 1 cup of shredded mozzarella, and drop 1/4 of the ricotta mixture (about a heaping 1/3 cup) in spoonfuls over the top. Top with 2 more lasagna noodles, then another layer with 1 cup bolognese, 1 cup shredded mozzarella, and 1/4 of the ricotta mixture. Top with 2 more noodles, then 1 cup sauce. Sprinkle 1/2 cup shredded mozzarella over the top, followed by 2 tablespoons grated parmesan. Drizzle with a little olive oil.

Repeat layering process with remaining ingredients and prepare pan. Freeze any leftover bolognese (I usually have 1 1/2 cups leftover).

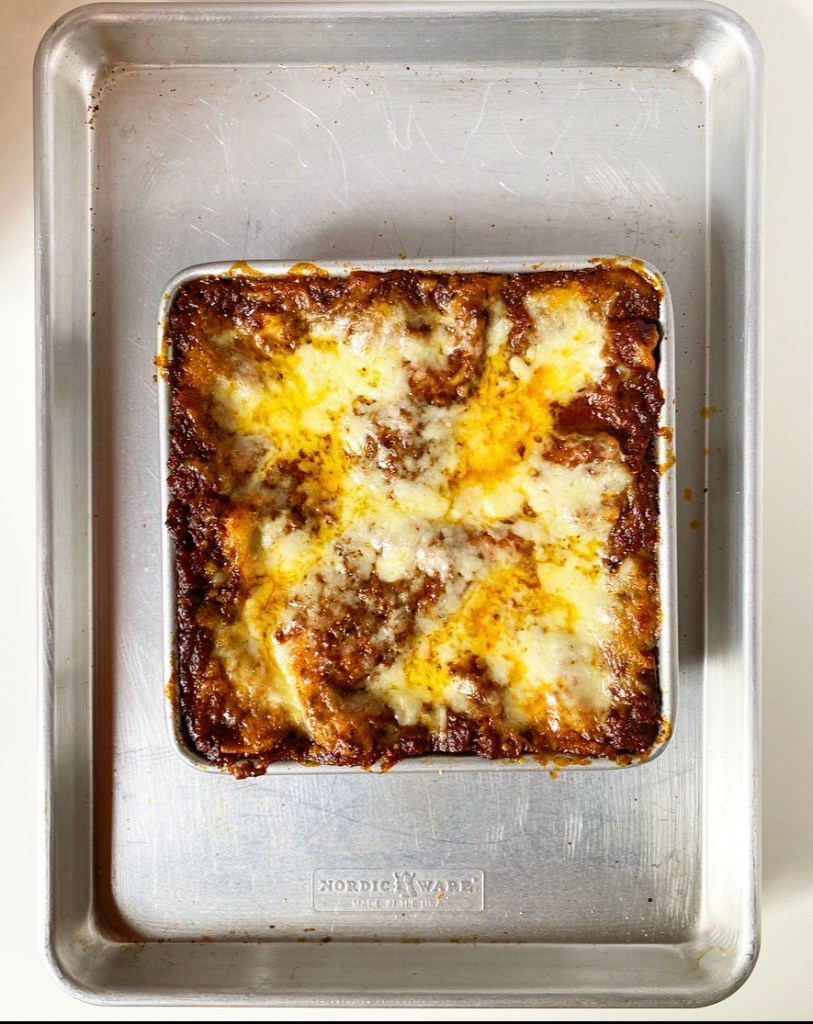
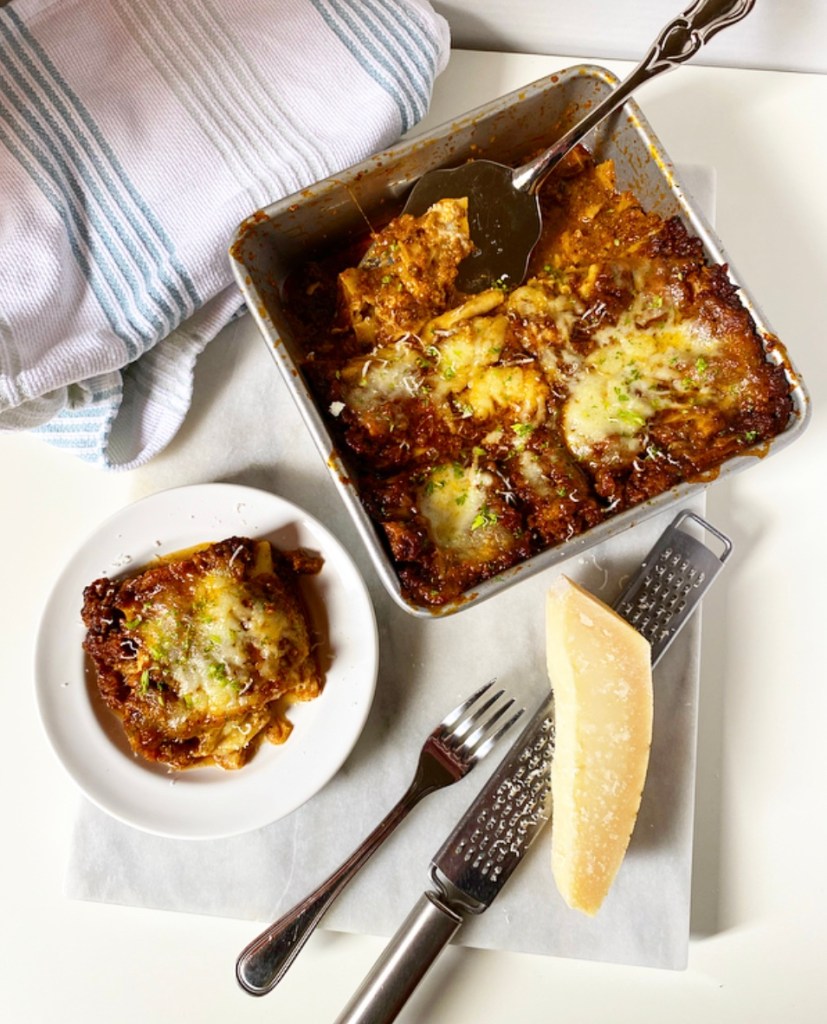
To bake lasagna immediately: cover with foil, making sure to tent it at the top so it doesn’t touch the cheese or sauce. Place the pan(s) on a sheet pan (to catch any mess). Bake 40 minutes. Remove foil and bake another 10-15 minutes, until browning in places and getting a little crispy at the edges. Let cool 15-30 minutes before slicing and serving. Garnish with parsley, if desired.

To freeze unbaked lasagna: cut a 7-inch square of parchment and lay it on the top of the lasagna. Triple-wrap the pan with plastic wrap. Wrap with foil. Freeze for up to one month.

To bake a lasagna from frozen: Preheat the oven to 350F. Remove frozen lasagna from the freezer. Remove and discard foil, plastic wrap, and parchment. Cover the pan with fresh foil, making sure to tent it at the top so it doesn’t touch the cheese or sauce. Place the pan(s) on a sheet pan (to catch any mess). Bake 75 minutes. Remove foil and bake another 10-15 minutes, until browning in places and getting a little crispy at the edges. Let cool 15-30 minutes before slicing and serving. Garnish with parsley, if desired.

Leftover lasagna will keep covered in the refrigerator for up to 5 days.
Advertisement

Pimento Cheese Twice-Baked Potatoes

Pimento Cheese Twice-Baked Potatoes​

Carbs and cheese are the name of the game this week. Wednesday was all about French Onion Grilled Cheese, and today has Pimento Cheese Twice-Baked Potatoes written all over it.

This recipe is a comfort food mash-up for the ages. Tender, salt-rubbed baked potatoes overstuffed with a rich pimento cheese filling? Sign me up!

Pimento Cheese Twice-Baked Potatoes​

If you’re unfamiliar with pimento cheese, it’s a popular southern dip/condiment made of cheddar cheese, sweet pimento peppers, black pepper and mayonnaise. It doesn’t sound great when I lay it out like that, but when combined it’s salty, spicy, creamy, tangy, a little sweet—in short, it’s delightful. And that’s coming from someone who despises mayonnaise and is weird about creamy things, so do with that what you will.

Here, we’re ditching the controversial mayo in favor of potato-friendly cream cheese and butter, combining them with pimento cheese staples like extra sharp cheddar, jarred pimentos and a lot of black pepper. Scoop out the innards of some warm baked potatoes, mash in all those creamy, cheesy ingredients along with garlic and onion powders, load that glorious filling back into the empty potato skins and bake again. Top ‘em off with a little more cheese and maybe some more pimentos, if you’re feeling kicky, then serve them up with the sides of your choice and dig in!

Spicy, cheesy, and filling, Pimento Cheese Twice-Baked Potatoes make a great vegetarian main (or even a side, depending how hungry you are). They’re extra cheesy with plenty of spice from the pepper and some optional cayenne, and that classic pimento cheese tang from the chopped pimentos. In short, they’re what I’m craving as we head into a snowy weekend here in NYC, and that’s a good thing because I have a lot of leftovers.

Pimento Cheese Twice-Baked Potatoes​
Pimento Cheese Twice-Baked Potatoes
makes 4 servings

2 medium-large russet potatoes
1 teaspoon olive oil
1 teaspoon Kosher salt (or to taste), divided
1 4-ounce jar pimentos
1 8 ounce brick extra sharp cheddar cheese, divided (I used Tillamook)
2 ounces (1/4 brick) full-fat cream cheese (or sour cream)
2 tablespoons unsalted butter
1/2 teaspoon garlic powder
1/2 teaspoon onion powder
1 teaspoon freshly-cracked black pepper (or to taste)
1/8 teaspoon cayenne pepper, optional

Preheat oven to 400F. Line a baking sheet with parchment paper.

Scrub and dry potatoes. Prick each several times with a fork. Massage 1/2 teaspoon olive oil and 1/4 teaspoon salt onto each whole potato. Place on prepared pan and bake about 1 hour, or until I small knife meets no resistance when inserted. Let potatoes cool 7-10 minutes, or until they can be handled.

While potatoes are baking, prepare the filling ingredients. Drain pimentos and blot as dry as possible on paper towels. Remove to a cutting board and dice into 1/4-inch pieces. Set aside.

Use the large hole side of a box grater to shred cheese. Set aside.

When you can handle the potatoes (they should still be very warm), remove them to a cutting board. Slice them in half lengthwise and use a spoon to scoop out the flesh, leaving behind the potato skin “boats.” Set the skins aside.

Make the filling. Place potato flesh in a medium mixing bowl. Use a potato masher (or two forks) to break up the large pieces. Add cream cheese, butter, 1/2 teaspoon salt, garlic powder, onion powder, black pepper, and optional cayenne and continue to mash just until combined. Do not over-mash. Use a silicone spatula or wooden spoon to fold in pimentos and 3/4 (6 ounces) of the shredded cheddar. Taste a small bite of filling and adjust seasoning as needed.

Place potato skins on a parchment-lined baking sheet. Divide filling mixture among skins (1/2-2/3 cup each); they will likely be heaping a bit. Bake uncovered for another 20-25 minutes at 400F, or until the filling is puffed in places. Top with remaining cheese and return to the oven for 3-5 minutes, just to melt. Add more pimentos if desired. Let potatoes cool a few minutes before serving.

Twice-Baked Potatoes are best eaten the day they are made, but leftovers can be reheated in the microwave, if desired. I’m sure they can also be reheated in a toaster oven or oven, although I have not tried it myself. Leftovers will keep covered in the refrigerator for up to 3 days.

Chicken & Dumplings

Chicken & Dumplings

It has been super cold in NYC these last several days—perfect weather for Chicken & Dumplings.

This is a bowl of pure comfort: creamy chicken stew with plenty of nourishing vegetables and fluffy, parsley-flecked dumplings. Yum! It’s the best kind of stick-to-your-ribs meal to have in your culinary arsenal during the winter, alongside its spiritual sibling, Chicken Pot Pie, of course.

Chicken & Dumplings

Chicken & Dumplings starts with a stew which, in this case, is nothing more than a slightly-enhanced chicken soup. To that end, I follow a similar method to my Sopa de Pollo recipe, cutting the vegetables into larger chunks and simmering them with bone-in skin-on chicken until cooked through. The chicken gets shredded and returned to the pot, and then it’s time to thicken the stew and simmer the dumplings.

Most chicken & dumplings recipes I have seen rely on a roux of flour and butter for thickening, but I decided to go with a slurry here because I am somewhat averse to creamy savory things and didn’t want to cook the milk in this recipe for very long (but very much wanted Chicken & Dumplings).

Like a roux, a slurry is a way of thickening a liquid by adding something starchy, usually cornstarch or flour. Where the roux involves cooking the starch with fat (like butter) at the beginning of the recipe before adding liquid, a slurry is a paste of starch and a small amount of liquid that is added at least part-way through through. Each has its strong points and I regularly use both methods, but since I based the recipe off Sopa de Pollo and am decidedly squicky about dairy, I went with a slurry here. A mixture of flour, milk and dijon mustard is added right before the dumplings go into the pot, adding flavor and a velvety, creamy texture to the broth.

But that’s enough about the stew—the dumplings are the stars of this show! They’re basically a biscuit dough that gets dropped into the pot, then covered and simmered in all that chicken-y goodness until fluffy and light and wonderful. Though they start as a sticky dough, they expand dramatically in the closed pot. Don’t be tempted to open it and check on them—you’ll release all the steam and end up with leaden results. Yuck. The dumplings only take fifteen or so minutes to cook up into buttery little pillows, so just trust the process. It will be worth the wait!

Once the dumplings are done, stir some frozen peas and parsley into the pot, set the table and serve yourself some Chicken & Dumplings! Between the creamy, vegetable-heavy chicken stew and fluffy dumplings, it’s easy to understand why this recipe is a cold weather comfort food classic.

Chicken & Dumplings
Chicken & Dumplings
makes 6-8 servings

3 lbs bone-in skin-on chicken pieces (I used a mix of white and dark)
1/2-1 teaspoon Kosher or sea salt + more to taste
1/2 teaspoon freshly cracked black pepper + more to taste
1 tablespoon olive oil
1 tablespoon butter
6 cups chicken stock (I use Better Than Bouillon)
4 medium carrots, peeled & trimmed, cut into 2-inch pieces
4 stalks celery, cleaned & trimmed, cut into 2-inch pieces
1 medium or 2 small turnips, peeled, cut into 1-inch chunks
1 large white or Spanish onion, large-diced
5 cloves fresh garlic, minced
1 bay leaf
1 tablespoon fresh thyme leaves (or 1 teaspoon dried thyme)
1/4 cup all-purpose flour
1/4 cup whole milk (or half-and-half or heavy cream)
2 teaspoons Dijon mustard
1 cup frozen peas
2 tablespoons chopped fresh parsley

Dumplings:
2 cups all-purpose flour
1 tablespoon baking powder
3/4 teaspoon Kosher or sea salt
1/4 cup chopped fresh parsley
3 tablespoons unsalted butter, cut into pieces
1 cup whole milk

Use paper towels to pat chicken dry, then season with salt and pepper to taste.

Add oil and butter to a large heavy-bottomed pot over medium-high heat. Add chicken and brown on all sides, about 5-7 minutes per side. Add chicken stock and bring to a boil. Add carrots, turnip, onion, garlic, bay leaf and thyme. Once the stock returns to a boil, reduce it to a simmer and let cook for 30 minutes.

Meanwhile, prepare the ingredients for the dumplings. Whisk together flour, baking powder, salt and parsley. Combine butter and milk in a microwave-safe liquid measuring cup, then microwave in 30 second increments, stirring between, until butter is melted (90 seconds in my microwave). Set wet and dry aside.

Once the soup has simmered 30 minutes, turn it down to the lowest heat. Use tongs to fish out the chicken and remove it to a heatproof plate. Fish out and discard bay leaf.

When the chicken has cooled enough that you can handle it, remove and discard skin and bones. Shred or slice chicken into bite-sized pieces, then return it to the soup.

Make a slurry to thicken the stew. In a small bowl, use a fork to whisk together flour, mustard and milk until smooth (or very close to smooth). Stir the mixture into the soup and return it to a simmer over medium-low. Taste for seasoning and adjust as necessary.

Mix the dumplings. Stir wet ingredients into dry just until combined. The dough will be sticky and shaggy; don’t overmix. Use a medium cookie scoop or a pair of spoons to scoop dough into 1 1/2 tablespoon dumplings and drop them in a single layer on the surface of the soup. Put the lid on the pan and keep covered for 15-18 minutes. Do not peek until 15 minutes have passed. Remove one dumpling, and slice it open to determine if it is done to your liking. If not, return the lid to the pot for another 3 minutes.

When dumplings are done, remove the pot from the heat. Gently stir in peas and parsley. Let sit 5-10 minutes before serving with additional parsley if desired.

Leftover chicken and dumplings will keep in an airtight container in the refrigerator for up to four days. Reheat in the microwave or on the stove.

Lentil Chili

Lentil​ Chili

Being from Texas, I was raised to believe that beans have no place in chili, but that is not something I ascribe to as an adult. For one thing, I don’t want to make both a main and a vegetable side dish if I don’t have to, and for another, I happen to like beans in chili. So there.

Lentil​ Chili

Now, I do have a go-to beanless meat-based chili recipe on here, but as of today, I have two vegan variations. What can I say? I like vegetables.

The secrets to great vegetable-based chili are the same as anything else: heat, seasoning and time. The ingredients are added with intention:

First the onion, then the garlic. Caramelize the tomato paste a bit, then stir in the spices, a splash of soy sauce for depth, and most of a pound of lentils. Simmer everything in vegetable stock until the lentils are tender, then scoop some out, purée and add it back for texture. Taste for seasoning and, well, that’s it. As far as chili goes, this is simplicity itself.

Lentil​ Chili

Lentil Chili is good right out of the pot, but give it a few hours (or days) in the fridge and it’s truly spectacular. Rich and hearty and meaty in a way that you wouldn’t expect from a meatless recipe. It’s particularly good after a long day, when reheated and topped with heaps of shredded cheddar, avocado, corn muffins, and anything else you like. Because, make no mistake, cooking at home is almost entirely about making what you like.

Chili “rules” be damned. This is comfort in a bowl.

Lentil​ Chili
Lentil Chili
makes about 6 servings

1 1/2 tablespoons canola oil
1 medium Spanish onion, diced small
5 cloves garlic, minced
1/4 cup tomato paste
1 tablespoon chili powder
2 teaspoons ground cumin
1/2 teaspoon dried oregano
1/2 teaspoon natural unsweetened cocoa powder
1/4 teaspoon ground cayenne pepper
2 cups dried green lentils, rinsed and picked over
7 cups vegetable stock
2 tablespoons soy sauce or tamari

Heat oil in a heavy-bottomed 4-6 quart pot over medium heat. Add diced onion and sauté until it begins to take on color, about 10 minutes. Add garlic and cook until fragrant, about 1 minute. Add tomato paste and cook, stirring frequently, until it begins to take on color (about 7-10 minutes). Stir in chili powder, cumin, oregano, cocoa and cayenne, followed by lentils. Stir in soy sauce and vegetable stock. Bring to a boil, reduce to a simmer and let cook uncovered for 30 minutes or until lentils are tender.

Turn heat to low. Remove 2 cups of cooked lentils to a heatproof bowl. Let cool 5-10 minutes before pureeing with an immersion blender, regular blender or food processor. Return purée to the pot. Stir and taste for seasoning. Adjust as needed.

Lentil Chili will taste good immediately after it is made, but is best after a few hours or a day in the refrigerator. Serve it up with cheese, avocado, scallions and/or any other toppings of choice.

Leftovers will keep in an airtight container in the refrigerator for up to 5 days.

Friday Favorites: Easiest Weeknight Meals

Friday Favorites: Easiest Weeknight Meals

After baking my tail off for the final two months of the calendar year, I make a point of changing things up around here every January, leaning into more everyday foods and savory fare. I began this month with my tried and true formula for Crispy Chickpeas, and will be bringing you plenty of dinners and snacky things until February. There may be a cookie recipe in there too—I make and break the rules around here.

While weeknight meals aren’t my usual content, a person cannot live on cookies alone. Believe me, I have tried. As we settle into whatever fresh hell 2022 has for us, I’ve compiled a list of my favorite meals that can be made with minimal time and energy, but with plenty of delicious pay-off. Some are classics and some are masquerading as classy, but they’re all wonderful. These are my Easiest Weeknight Meals!

Friday Favorites: Easiest Weeknight Meals​

Everyday Cassoulet

When people ask me for quick, easy, crowd-pleasing dinner ideas “Everyday Cassoulet” are always the first two words out of my mouth. A quick take on a slow-cooked French classic, this dish could not be easier—it’s just an assemblage of sausages, cherry tomatoes, white beans and aromatics that are roasted to comforting perfection. You can also make it vegan with meatless sausages or a couple of pounds of fresh mushrooms—love that versatility. Serve this up with a salad, a hunk of crusty bread or all by its lonesome. There’s no wrong way to Everyday Cassoulet.

Friday Favorites: Easiest Weeknight Meals​

Sopa de Pollo

This Mexican recipe is my absolute favorite chicken soup. It’s easy to make, with minimal knife work and no searing steps, and it simmers up in under an hour! Feel free to swap in your favorite vegetables to suit your particular tastes, but whatever you do, don’t skip the mint. It makes the whole thing.

How to Make Eggs 5 Ways

Eggs?! On a list of weeknight dinners?! Hell yes—breakfast for dinner rules. I work evenings, so when I finally get home and make dinner for myself, it’s frequently some form of eggs with whatever I have in my fridge. They’re a cheap, delicious protein and nearly everyone has a preparation that they love. In the linked post, I go into detail about how to scramble, hard-boil, soft-boil, poach and fry eggs, so you can make them however you like. Get crackin’! (Pun absolutely intended.)

Friday Favorites: Easiest Weeknight Meals​

Baked Shrimp with Lemon & Garlic

Baked Shrimp with Lemon & Garlic sounds fancy, but it’s dead easy and so good. I make it extra easy (and cut the cost!) by using raw frozen shrimp. The rest of the ingredients are kitchen staples, making this an absolute snap to make. While I’m recommending you make it for weeknights here, it’s also perfect for company.

Friday Favorites: Easiest Weeknight Meals​

Spicy Turkey Tacos

I have made this recipe approximately 250 times over the last six years and it has never once disappointed. I mean, who doesn’t love tacos? This recipe for easy homemade taco seasoning and saucy, spicy turkey tacos is a staple in my personal chef and home-cooking repertoire. It takes half an hour start to finish and makes amazing leftovers.

Friday Favorites: Easiest Weeknight Meals​

15 Minute Stovetop Mac & Cheese

I started making this mac & cheese while I was acting as craft services on student film sets approximately 147 years ago (2009). I learned how to make it on a sketchy hot plate that I bought at the K-Mart in Penn Station, but it works just as well in my home kitchen ☺️ Made with minimal ingredients, effort and time, this is my go-to recipe for creamy, comforting macaroni & cheese in minutes. Oh, and pro-tip: if you can’t get your hands on cream cheese right now, a scoop of full-fat sour cream works just as well.

Friday Favorites: Easiest Weeknight Meals​

Grilled Cheese & Tomato Soup

I used to be shocked at the number of people I know that don’t know how to make a grilled cheese sandwich, but then I realized that maybe nobody ever taught them how to make one. If you are one of those people, this post is for you. Learn how to make classic grilled cheese low-and-slow, step-by-step, and pair it with a simple homemade tomato soup for maximum comfort and nostalgia. Once you’ve perfected the original, get fancy with my Awards Season favorite Pesto Mozzarella Grilled Cheese—yum!

Friday Favorites: Easiest Weeknight Meals

What’s your favorite easy weeknight meal? Let me know in the comments or on social media!