Orange Pecan Muffins

image

When I was in the sixth grade, my dad got very interested in genealogy. He would spend any spare time at the downtown branch of the Fort Worth Public Library looking through microfiche. It was usually Saturday morning, and as E3 and I were under twelve, we were dragged along. We spent most of the time looking at websites that were blocked by our AOL Kids accounts and generally making the librarians crazy. The best part, hands down, was breakfast. There was a little bakery caddy-corner to the library that we’d go to–just us, my dad, and the Wall Street Journal. They had little cartons of Tropicana orange juice and these unbelievable orange pecan muffins. Soft and sweet, nutty and not too orangey, perfectly golden brown, and standard-size, so I could have two. This was nearly twenty years ago, and that bakery has since closed following a tornado that tore through downtown Fort Worth in 2000. But I still remember those muffins.

image

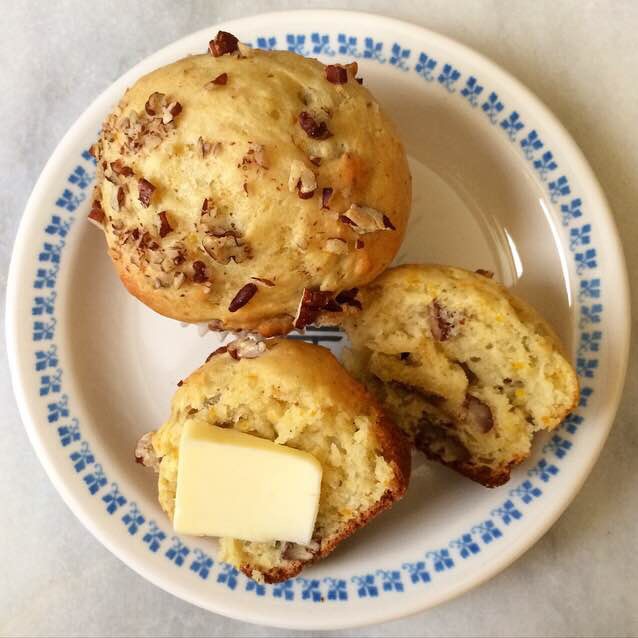
Whenever I’m in a coffee shop, I check to see if they have orange pecan muffins, but they never, ever do. While Texans put pecans in everything, New Yorkers choose walnuts. I know it’s just a geographic thing, but it still makes no sense to me. Why on earth would you choose walnuts when you could have pecans?!

…but anyway, back to the muffins.

image

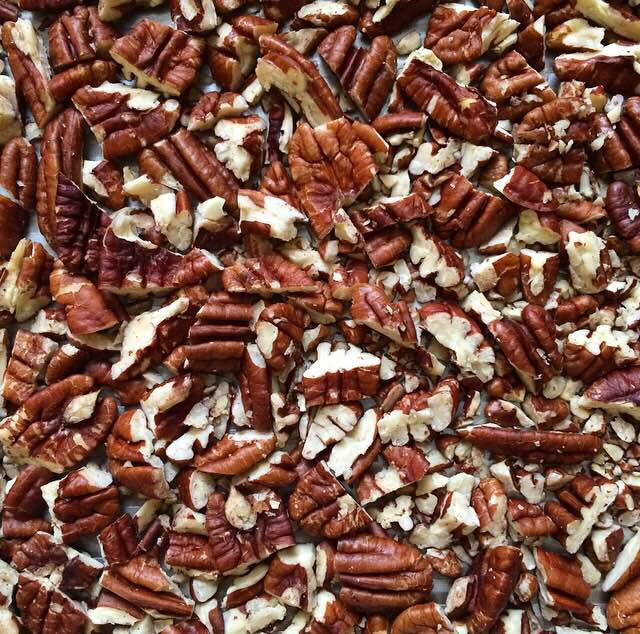
They start with toasting pecans. In Brooklyn, you simply can’t buy toasted pecans–believe me, I’ve tried. Homemade are better anyway. So, we throw a cup of pecan pieces on a baking sheet and let them toast just until they become fragrant, about five minutes. Watch them very carefully–nuts burn with no warning, and burnt pecans are decidedly not delicious.

image

image

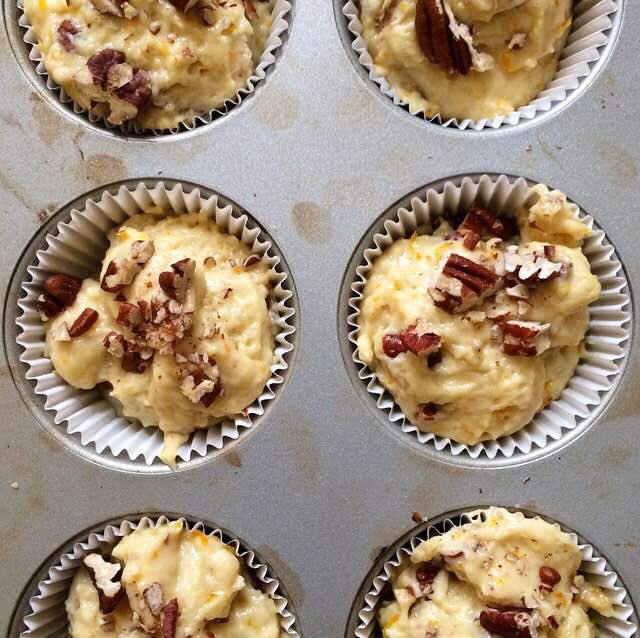
While those are cooling, make the orange muffin batter. We get orange flavor in there in two ways. First, we rub orange zest into granulated and light brown sugars. Rub the sugar and zest together like you’re trying to remove dried Elmer’s glue from your fingers. This releases the orange oil into the sugar. Once it all looks well-mixed and smells like heaven, add in flour, nutmeg, leaveners, and salt. Then squeeze in the juice of that orange you just zested, along with some yogurt, milk, a little oil, and an egg. Don’t stir the batter too much–if the gluten in the flour is overdeveloped, you’ll get tough muffins. And that would be a travesty. This is not the place to use an electric mixer. Use a whisk and a silicone spatula so you can really feel the batter coming together. It shouldn’t take more than 25 strokes to combine all the wet and dry ingredients. The batter will be extremely thick. Gently fold in the toasted pecans and divide your muffin batter into the twelve cups of a standard muffin tin (I use a cookie scoop). I like to sprinkle a few extra pecan pieces on top, purely for aesthetics. Once all the muffin cups are full, tap the whole pan on the counter five times. This is to release any big air bubbles and to help the batter spread.

image

image

These muffins start baking for five minutes at 400F and finish for 14-18 minutes at 350F. The initial 400F blast of heat allows these muffins to rise high–these dome like a dream. We turn down the heat so that the outsides turn golden (but don’t burn) and the insides cook through and stay soft and tender. If we kept the oven at 400F, our final product would be burnt and tough on the outside, and potentially raw on the inside. Yuck. When these are removed from the oven, they should be tall, puffy, and so, so soft. Once they cool for a few minutes, the warm muffins will be perfect for slathering with cold salted butter. These are best the day they’re made, but cooled muffins will keep covered at room temperature for up to three days.

Orange Pecan Muffins are perfect for breakfasts, brunches, and snacks over the upcoming holidays. Just set a basket of them on the table with a pot of coffee and some fruit–you won’t have any complaints.

Looking for more breakfast items for the holidays? Check out my Apple Pie Cinnamon Rolls!

image

Orange Pecan Muffins
makes 12 muffins

1 cup pecan pieces
1/2 cup granulated sugar
1/4 cup light brown sugar
zest of one large orange (about 2 tablespoons)
2 cups all purpose flour*
1/4 teaspoon ground nutmeg
1 1/2 teaspoons baking powder
1/4 teaspoon baking soda
1 teaspoon Kosher or sea salt
3/4 cup plain yogurt*
1/4 cup milk*
1/4 cup fresh orange juice (about one large orange-worth)
1/4 cup neutral-flavored oil*
1 large egg, room temperature

Preheat oven to 400F.

Spread pecans on a rimmed baking sheet. Toast in the oven for five minutes, just until fragrant. Let pecans cool while you prepare the muffin batter.

Grease a 12-cup standard muffin tin, or line with cupcake liners. Set aside.

In a large mixing bowl, combine granulated sugar, light brown sugar, and orange zest. With your fingers, rub the orange zest into the sugars until it is evenly dispersed and fragrant. Whisk in flour, nutmeg, baking powder, baking soda, and salt. Set aside.

In a separate bowl, combine yogurt, milk, fresh orange juice, and oil. Whisk in egg. Add dry ingredients in three installments, scraping down the bowl as you go. Do not overmix. Fold in toasted pecan pieces.

Divide batter among muffin cups. Bake for five minutes at 400F, then turn the oven temperature down to 350F and bake for an additional 14-18 minutes.

Remove from the oven and let cool in the pan for at least five minutes before removing to a rack to cool completely. Serve immediately, or keep covered at room temperature for up to three days.

Notes:

  1. One cup of the flour may be replaced with whole wheat flour. Do not use whole wheat flour for all of it, or you risk dry, heavy muffins.
  2. I use 2% Greek yogurt. I do not recommend fat-free yogurt. Vanilla yogurt may also be used.
  3. I use whole milk. Any low fat cow’s milk or plant-based milk will work. Do not use fat-free or skim milk.
  4. I use canola oil, but vegetable or melted coconut oils would work here.

Pumpkin Oatmeal Creme Pies

imageRemember Little Debbie Oatmeal Creme Pies? I had totally forgotten about them until a few weeks ago. I had just finished a nine hour day nannying…a day when I had forgotten to eat. It doesn’t happen often, but when it does, it’s bad. I’ll eat anything that’s not nailed down. As I neared the subway, I realized that I was not going to make it home in one piece if I didn’t eat something immediately. I swung into the nearest bodega thinking I’d grab a Kind Bar, but they didn’t have any. I went for Cheez-Its, but they didn’t have those either. And that’s when I saw it: the familiar cellophane wrapper with two suuuuuper soft cookies sandwiched with marshmallow filling and a hefty dose of nostalgia. I gave the cashier a handful of change and promptly demolished that cookie. Once I had my brain functioning again, I got to thinking about Little Debbie Oatmeal Creme Pies. They are so soft that they can practically be rolled into a ball, there are no discernible oats, and they have an ingredient list that I would find horrifying on an occasion when I don’t feel like I’m about to pass out. I could do better. And as the weather was starting to turn cooler, I decided that I could make them pumpkin. And tiny. Little food just tastes better.

image

When writing and testing this recipe, I tried to stay true to the Little Debbie classic. I wanted them to feel and taste authentic…but better, and with pumpkin spice. I didn’t want to take two Quaker Oatmeal Cookies, sandwich them with vanilla buttercream, and call them Oatmeal Creme Pies. Nope. I wanted for these cookies to be soft, sweet, not too oatey, chock-full of marshmallow–I wanted them to be nostalgia-inducing. But also pumpkin, because pumpkin. So I got to work.

Texture is key. These cookies have to be extra soft and puffy. Enter dark brown sugar and a bit of cornstarch. Egg yolks for richness. Pumpkin purée in place of egg whites (if we added both, these cookies would be cakey, and you know how I feel about cakey cookies 😭). Cinnamon and a hefty amount of my trusty pumpkin pie spice round out the pumpkin flavor. Yum.

Let’s talk about oats. I’ve never noticed any in Little Debbie’s cookies, which is probably why they are so incredibly soft. I thought about using oat flour to match their version, but instead went with quick oats. You can buy them in the store, but I just blitzed two cups of old-fashioned oats in the food processor until there were no visible whole oats. This gives our version a tiny bit of chew, but still keeps them feeling authentic. It’s an update worth making.

image

image

The filling is made with marshmallow fluff, confectioner’s sugar, vanilla, and one very controversial ingredient. I’m kind of afraid to even talk about it because, well…it’s shortening. And it seems like today everybody hates shortening. And I understand! Hydrogenated oils are horrible for us! But if you want to keep the filling close to the original, shortening is a necessary evil. I use Spectrum brand, which I find at Whole Foods. I’m pretty sure an equal volume of room temperature butter would work in its place, but I haven’t actually attempted it. If you do, let me know in the comments! The filling is sticky (but not too sticky), and keeps these cookies soft and delicious for days. If you make a batch on Sunday, you’ll be able to tuck them in lunches all week long.

Now that I’ve mentioned shortening, is there anyone still reading this?! Maybe not, but if you are, make plans to make these this weekend and then send Little Debbie packing. These Pumpkin Oatmeal Creme Pies are so, so good. You’ll never go back.

image

Pumpkin Oatmeal Creme Pies
makes about five dozen sandwich cookies

Cookies:
1 1/2 cups all-purpose flour
1 Tablespoon cornstarch
1 teaspoon baking soda
1 teaspoon Kosher or sea salt
1 cup (2 sticks) unsalted butter, softened to room temperature
1 cup dark brown sugar, packed
1/4 cup granulated sugar
1/2 teaspoon ground cinnamon
2 teaspoons pumpkin pie spice
4 tablespoons pure pumpkin purée
2 large egg yolks, room temperature
1 1/2 teaspoons real vanilla extract
1 1/4 cups quick oats*

Filling:
7oz marshmallow fluff (about 1 1/2 cups)
1/2 cup shortening, room temperature*
1 cup confectioner’s sugar
1/2 teaspoon Kosher or sea salt
1 teaspoon real vanilla extract
2 teaspoons hot water (from the tap is fine)

In a small mixing bowl, whisk together flour, cornstarch, baking soda, and salt. Set aside.

In a large mixing bowl, cream butter with an electric mixer until light and fluffy, about one minute. Beat in cinnamon and pumpkin pie spice until evenly dispersed. Add in dark brown and granulated sugars, and mix to combine. Beat in pumpkin purée, followed by the egg yolks and vanilla extract. With the mixer on low, add the flour mixture in three installments, until completely combined. Mix in quick oats. Cover dough with plastic wrap and refrigerate for at least one hour, or up to three days.

Preheat oven to 350F. Line two sheet pans with parchment paper.

Scoop cookie dough in one teaspoon increments. Roll into balls and set them two inches apart on prepared pans. Bake for 6-8 minutes, until the tops of the cookies no longer look wet. Let cool on the pans for five minutes before removing to a rack to cool completely. Repeat rolling and baking until you have used all the dough.

To make the filling, cream the marshmallow fluff and shortening with an electric mixer until light and fluffy. Beat in confectioner’s sugar and salt. Add in vanilla and hot water and mix on high until the filling is very fluffy. There are two options from here:

  1. To assemble a sandwich cookie by piping, apply filling by pipe a circle in the middle of the underside of one cookie, leaving about 1/4″ around the edge.
  2. Top with a second plain cookie, with the underside filling-side-in. Repeat until all cookies have been used. To assemble a sandwich cookie by spreading, use an offset frosting knife to spread 1/2-1 teaspoon on the underside of one cookie. Top with a second plain cookie, with the underside filling-side-in. Repeat until all cookies have been used.

Cookies will keep very well covered at room temperature for up to a week.

Notes:

  1. If you don’t have quick oats, you may blitz two cups of old fashioned oats in the food processor until there are no whole oats visible. Steel cut oats will not work in this recipe.
  2. If you don’t want to use shortening, you may use 1/2 cup of room temperature butter.

Black Bottom Pear & Almond Pie

Black Bottom Pear & Almond PieOn our anniversary last year, Henry and I went to al di la, an absolute treasure of a restaurant in Park Slope, Brooklyn…with my parents. They were visiting and wanted to take us out to celebrate, and who were we to turn down a (very) nice free meal? At the end of a dinner that I’m still thinking about almost a year later, we decided to split a dessert. This is a big deal. You see, Henry’s not much for sweets. I make dozens of cookies every week (not to mention all the cakes and pies and cinnamon rolls), and he politely turns down almost all of them. He digs gingersnaps and chocolate cake without frosting, but that’s pretty much it. So when he wanted to split a dessert at this restaurant, I leapt at the opportunity. Seeing as he is pickier about sweets than I am (I just had a cookie and called it breakfast), I let him choose. And he went for the one thing on the menu that didn’t look wonderful to me: an almond cake with pears and bittersweet chocolate. You see, for me, fruit and chocolate don’t really go together. I mean, if you give me a piece of chocolate cake with raspberry filling, I’m not going to turn it down. (As a rule, I don’t turn cake down.) But it’s not my favorite. So when this cake showed up at the table, I expected to take two bites, say how good it was, and be finished with it. That’s where I was wrong. This cake was dense and rustic, with a good almond flavor, soft pieces of pear, and a magical layer of melted chocolate. I’m pretty sure I ate all of my half and most of Henry’s too. And here we are, two weeks away from our anniversary, and I’m still thinking about it…so I took that cake and made it pie.Black Bottom Pear & Almond PieThis pie, you guys. This pie. It’s got soft pears in an almond filling, all suspended over a puddle of chocolate ganache. And all of that is in a cream cheese pie crust because that’s how I roll. It’s elegant and seasonal. There’s fruit, there’s chocolate–it covers all the bases. I won’t lie to you, it takes time and there are many steps, but none of them are difficult. This pie is sooo worth the effort. Don’t let the length of the recipe scare you away. You can do this. Let’s get started.Black Bottom Pear & Almond PieWe start by poaching pears. If we put raw pears in the pie, the result could be…crunchy. And while crunchy pies can be amazing (pecan pie is my jam), fruit pies should have a softer filling. So, let’s poach. We need four firm pears, like Bosc, about seven ounces each. Leaving them whole, peel them and set them aside. Bring some water and sugar to a boil, stirring until the sugar dissolves. Squeeze in the juice of an orange (about 1/4 cup) and throw in the two halves of your squeezed orange. When the mixture comes to a boil, reduce the heat and drop in the pears. Simmer for 20 minutes, then let them cool to room temperature in the poaching liquid. You can do this up to 24 hours ahead, and then put the pears and liquid in the refrigerator until you are ready to assemble the pie. If you want to cut the poaching step altogether, you may use canned whole pears in juice.Black Bottom Pear & Almond PieThen, take one good pie crust (I like this Cream Cheese Pie Dough), roll it to a 12-inch diameter, fit it in a pie plate, and crimp the edges. Then, throw it in the fridge while you preheat the oven to 425F. This crust has to be partially blind-baked, or baked without filling, because the wet filling in this pie could give us a soggy crust otherwise. When the oven is preheated, take the pie crust out of the refrigerator and prick the bottom of the crust several times with a fork. This is called docking; it keeps the crust from puffing up by allowing trapped steam to escape. Then, line the crust with foil and fill it with pie weights or dried beans. Bake the crust for 17 minutes. Remove it from the oven and take out the foil and weights/beans. Bake the crust for an additional three minutes. Let the crust cool to room temperature while you prepare the ganache.Black Bottom Pear & Almond Pie
This part is easy. Chop four ounces of bittersweet chocolate and put them in a bowl. Heat 1/4 cup of heavy cream in a small saucepan over low heat. When it just barely comes to a boil, remove it from the heat and pour it over the chopped chocolate. Once the chocolate looks melty, stir it all together with a fork until you have a smooth, beautiful sauce. Let that cool a little bit while you make the frangipane.Black Bottom Pear & Almond Pie
Black Bottom Pear & Almond PieBlack Bottom Pear & Almond PieFrangipane (almond filling) sounds difficult, but it really couldn’t be simpler. Put blanched almonds and a little flour in a food processor, and blitz until it becomes a fine meal. Then, pulse in sugar and salt, followed by six tablespoons of butter. Once that all comes together, put in one egg and 1/2 teaspoon of pure almond extract. It’s ready when it vaguely resembles hummus. Do not over-process, or you’ll have almond butter. Delicious, but not what we need here.Black Bottom Pear & Almond Pie
Black Bottom Pear & Almond PieBlack Bottom Pear & Almond PieNow, to assemble. Spread your ganache in the room temperature pie crust. Let it chill in the fridge for five minutes, just to set. Then, spread half your frangipane over the ganache, and then top that with half your pears. Spread the pears with the second half of your frangipane, and then decorate the top with the second half of your pears. Brush the exposed pears with heavy cream and sprinkle them with sugar. Cover the exposed crust with a pie protector or foil; I use a 9″ hoop that I made out of foil, and it works like a charm. Place the pie in a 350F oven for 45-55 minutes, until cooked through and lightly browned. Let it cool for at least two hours before slicing and serving with lightly sweetened whipped cream and a dusting of confectioner’s sugar. If you want to make it ahead, the pie will keep covered at room temperature for two days or in the refrigerator for three.Black Bottom Pear & Almond PieNow, look how fancy you are with your fancy pie. You can throw the word “frangipane” around at your Thanksgiving dinner and be all sophisticated and stuff. And then you can eat two slices in a very unladylike fashion and tell everyone that there are no leftovers as you shove the last piece in the back of the fridge. You’ve earned that last piece. You are the pie queen/king. You nailed it.

Want more pie? Check out this light and fluffy Pumpkin Pie, and come back next week for one more pie recipe before Thanksgiving.Black Bottom Pear & Almond Pie

Black Bottom Pear & Almond Pie
heavily adapted from Pear and Almond Tart by Deb Perelman
makes one 9″ pie

Pears
4 cups water
1 cup granulated sugar
1 whole orange, washed
4 whole pears*, about 7 oz each, peeled

Crust
1/2 recipe Cream Cheese Pie Dough

Ganache
4 oz good quality bittersweet chocolate*
1/4 cup heavy cream

Frangipane (Almond Filling)
4 ounces whole blanched almonds*
1 tablespoon all purpose flour
pinch of Kosher or sea salt
6 tablespoons granulated sugar
6 tablespoons unsalted butter, cold-ish room temperature, cut into cubes
1 large egg
1/2 teaspoon pure almond extract

heavy cream, for brushing
1-2 tablespoons granulated sugar, for sprinkling

Start by poaching the pears. In a large pot, bring 4 cups of water to a boil. Slice the orange in half. Squeeze the juice into the water, then drop both halves of the orange into the pot. When the liquid comes to a boil, turn the heat to medium high. Drop in the pears and simmer, stirring occasionally, for 20 minutes. They should be tender, but not falling apart. Let the pears cool to room temperature in the poaching liquid.*

On a floured surface, roll out the pie crust to a 12-inch diameter. Fit into a 9-inch pie plate*, and trim the edges to 1/2-inch of overhang. Crimp the edges. Place crust in the refrigerator for at least 30 minutes.

Blind bake the crust. Preheat the oven to 425F. Remove chilled crust from the refrigerator. Prick the bottom of the crust several times with a fork. Line the inside of the crust with foil, and fill with pie weights or 1 lb of dried beans. Bake for 17 minutes. Remove the crust from the oven, and gently lift out the foil and weights/beans. Bake the crust for an additional three minutes. Let crust cool to room temperature.

Make the ganache. Chop 4 ounces of bittersweet chocolate and place in a small bowl. Place heavy cream in a small saucepan over medium heat. When it just barely starts to boil, remove it from the heat and pour the cream over the chocolate. Once the chocolate looks soft, stir it together with a fork until you have a smooth chocolate sauce. Let cool a bit while you prepare the frangipane.

In a food processor (or very good blender), grind blanched almonds and flour until the mixture is a fine meal. Pulse in salt and granulated sugar. Pulse in butter. Pour in egg and almond extract, and process until frangipane is a homogenous paste.

Prepare the pears. Discard the poaching liquid. Slice the pears in half and core them. Then cut each half into 1/4-inch slices width-wise.

Assemble the pie. Spread an even layer of chocolate ganache onto the bottom of the pie crust. Refrigerate five minutes to set. Spread half the frangipane over the ganache. Layer half the pears on top. Then, spread the pears with the rest of the frangipane. Decorate the top of the pie with the remainder of the pears. Brush the exposed pears with heavy cream and sprinkle with granulated sugar.

Preheat the oven to 350F. Cover the exposed crust with foil or a pie protector. Bake the pie for 45-55 minutes, or until the pears are light golden brown. Let the pie cool for at least two hours before slicing and serving with a sprinkling of confectioners sugar and sweetened whipped cream.

This pie keeps covered at room temperature for two days, or in the refrigerator* for three days.

Notes:

  1. I use Bosc pears. Anjou and Bartlett are also good choices. Make sure your pears are firm.
  2. I use Trader Joe’s Pound Plus Dark Chocolate.
  3. If you can’t find whole blanched almonds, an equal weight of slivered almonds (without skins) or almond flour will do.
  4. The pears may be prepared up to 24 hours in advance. Just let them cool to room temperature, discard the orange halves, and then refrigerate the pears in the poaching liquid until you are ready to use them.
  5. Use a standard pie plate, not deep dish.
  6. Let refrigerated pie sit at room temperature for 60-90 minutes before slicing.

Black Bottom Pear & Almond Pie

Vanilla-Almond Shortbread Cookies

image

My first blog post centered around my dad’s love of chocolate, particularly brownies. While my whole family loves it when he makes brownies, I neglected to mention one thing: my mom doesn’t like chocolate all that much. She can take it or leave it. She doesn’t hate it. She just doesn’t love it. My parents have been happily married for 32 years, raised three daughters and two miniature schnauzers, and this is probably the biggest thing they disagree on.

For years, my mom never mentioned this. I remember many birthdays where my little sister and I gave her boxes of Russell Stover Chocolate Covered Cherries, having zero idea that she didn’t love chocolate. A few years ago, she revealed the truth to me over a ritual ice cream lunch date: she’s a vanilla person. That’s not to say she’s boring. No, my mom is anything but boring. The woman is fearless. She’s the kind of person who isn’t afraid to travel around the country with sixty teenagers in tow. She’s the kind of person who, upon finding out that Justin Timberlake’s mom is her friend’s neighbor and JT himself is visiting, will scream “JUUUUUSTIIIIIN!” like a banshee in an effort to get his autograph for her diehard *NSYNC fan daughters. My mom works a full-time job, takes a two mile walk with the dog, makes dinner for my dad, and still takes the time to have an hour phone conversation with you about whether it’s appropriate to wear velveteen pants to a black tie event. She’s the kind of mom that your friends absolutely love, and the kind of mom that is friends with her adult children first and foremost. Bottom line: my mom straight-up rules. And today is her birthday, so let’s make her something vanilla.

image

image

I’ve been on a shortbread kick lately. As the weather is (sort of, not really) starting to turn cooler in New York, I have been drinking a lot of tea. Obviously that requires cookies. Really buttery, crunchy cookies. And, since we’re giving my mom a cookie shout-out, let’s make them vanilla-almond and slice-and-bake. I think she’d approve.

These vanilla-almond shortbread are a breeze to put together. We cream butter and sugar together before adding in vanilla bean paste and just a touch of almond extract. Then we mix in flour and salt, followed by sliced almonds. Next, we form the dough into two logs, wrap them in plastic wrap, and throw them in the fridge for a little bit. Then we just slice them and bake at 325F for 14-17 minutes. All that’s left to do is make a pot of tea and dunk away.

image

Vanilla-Almond Shortbread Cookies keep very well at room temperature for at least a week. This makes them perfect for your cookie jar, holiday gifting, or shipping a box to your mom since you can’t be there for her birthday this year.

Happy birthday, Mom. I love you more than chocolate.

image

Vanilla-Almond Shortbread Cookies
makes about five dozen

1 3/4 cups all purpose flour
1/2 teaspoon Kosher or sea salt
3/4 cup unsalted butter, softened to room temperature
1/2 cup granulated sugar
1 1/2 teaspoons vanilla bean paste*
1/4 teaspoon pure almond extract*
1/2 cup sliced almonds, optional

In a small bowl, whisk together flour and salt. Set aside.

In a large mixing bowl, cream butter with an electric mixer until light and fluffy, about two minutes. Add sugar and mix until it is completely combined with the butter. Add in the vanilla bean paste and almond extract, and combine. With the mixer running on low, add in flour mixture in two installments, mixing until it is just incorporated. Fold in sliced almonds. Dough will be crumbly, but should hold together when pinched.

Divide dough in half. Take one half and lay it on a piece of plastic wrap. Using the plastic wrap and clean hands, form the dough into a log. Wrap tightly in the plastic wrap. Repeat with the other half of the dough. Refrigerate wrapped dough for at least 45 minutes, or up to three days.

Preheat the oven to 325F. Line two cookie sheets with parchment paper, and set aside.

Unwrap one log of dough. Using a large, sharp chef’s knife, slice the dough in 1/4″ installments and lay them on the prepared pans at least one-inch apart. Bake for 14-17 minutes, until the tops no longer look doughy and the edges are starting to brown. Let cool on the pans for for 10 minutes before removing to a rack to cool completely.

These keep well in an airtight container at room temperature for at least a week.

Notes:

  1. If you do not have vanilla bean paste, or simply don’t want to use it, you may use the scraped seeds of one vanilla bean in addition to one teaspoon of vanilla extract. If you do not want to use vanilla bean at all, you may use two teaspoons of vanilla extract.
  2. If you would like a more pronounced almond flavor, you may use 1/2 teaspoon of almond extract. Be careful though–almond extract is very potent.

Red Velvet Cookies

image

I have a cookie commitment every Wednesday night. I can make whatever I want, as long as there are five dozen. Whatever I want! I usually just take recipes I am testing/experimenting with that week. Lately, it’s been a lot of shortbread and sandwich cookies. Sometimes it’s brownies (bar cookies are still cookies). Everyone is always very kind and interested to see what I’ve brought, with the exception of the time I brought a truly sad batch of chocolate roll-out cookies. You know they’re bad when there are still two dozen left the next week…oops. But back to the point. On very rare occasions, all the cookies disappear in twenty minutes, I get high fives left and right, and a slightly curmudgeonly friend of mine holds a half-eaten cookie in his hand and says “Liz. Liz! These are a home run.” Since these people eat my cookie experiments literally all the time, that says something. When I made these Red Velvet Cookies last spring, I had a home run kind of night.

image

imageimageRed Velvet is shrouded in mystery. Is it chocolate or vanilla? It’s both. Like a chocolate-vanilla swirl soft-serve cone, it’s the absolute best of both worlds. Why is it red? In the old days, it was because acid reacted with baking soda and cocoa powder, giving the finished product a reddish hue. (Devil’s Food cake has a similar backstory, except that it is decidedly chocolate.) These days, most bakers rely on red food coloring or beet juice to achieve a red final product. At the end of the day, there are only five requirements for something to be Red Velvet, and none of them are cream cheese frosting. I know. It’s a travesty! Red Velvet must have:

  1. Vanilla. In these cookies, we use 1 1/2 teaspoons for a pronounced vanilla flavor. It won’t get lost here.
  2. Natural Unsweetened Cocoa Powder. Some recipes use as little as a tablespoon, some use as much as 1/2 cup. I like to use 1/4 cup–just enough to say “there’s chocolate in here, but this is not a chocolate dessert.” Also, cocoa powder can really dry out baked goods. The smallish amount in this recipe makes sure that our final product is soft and chewy, rather than dry and crumbly. This (and pretty much any Red Velvet recipe) is not a good recipe for Dutch Process Cocoa, which will have a metallic-tasting result.
  3. Acid in the form of buttermilk and/or vinegar. In the case of these cookies, it’s powdered buttermilk. It reacts with both the baking soda and the cocoa powder to give these cookies a pleasant tang. The buttermilk powder will also give these cookies some additional tenderness, along with the acid in the brown sugar.
  4. A reddish color (duh). Here, we use one teaspoon of regular liquid red food coloring. I know that food coloring is terrible for us, but I don’t often have beet juice, and I kind of believe that dessert has some wiggle room. If you aren’t comfortable using food coloring, just leave it out. These will be delicious no matter their color.
  5. A velvety texture. That’s where the “Velvet” comes from. Now, cookies and velvety texture are not synonymous. Unless they’re cakey cookies, and I don’t see the point of eating cakey cookies when I could just have cake instead. For me, the velvet factor comes in the form of soft centers. Softness comes from the addition of cornstarch, which allows for tenderness here, just like it does in cake flour. Also, the cookies bake for just a few minutes–when they come out of the oven, the edges are chewy and the centers are soft and a little underbaked. Velvety, if you will.

Whew! That’s a lot of information for a Friday. All of that said, these are cookies. Making cookies should be fun. And these red, chocolate-vanilla cookies studded with white chocolate chips are really, really fun. Whether you’re making them for your family or as holiday gifts, they’re a total home run.

image

Red Velvet Cookies
makes about four dozen cookies

2 1/4 cups all purpose flour
1/4 cup natural unsweetened cocoa powder*
1/4 cup buttermilk powder
1/4 cup cornstarch
1 teaspoon baking soda
1 teaspoon Kosher or sea salt
1 cup (2 sticks) unsalted butter, melted and cooled slightly
3/4 cup light brown sugar*
1/2 cup granulated sugar
2 large eggs
1 1/2 teaspoons real vanilla extract
1 teaspoon liquid red food coloring*
1 1/4 cups white chocolate chips, plus optional extra for decorating*

In a medium mixing bowl, whisk together flour, cocoa powder, buttermilk powder, cornstarch, baking soda, and salt. Set aside.

In a large mixing bowl, whisk together melted butter, light brown sugar, and granulated sugar. One at a time, add in eggs, whisking until completely combined. Add in vanilla extract, followed by red food coloring. Add dry ingredients in two installments, stirring with a silicone spatula or wooden spoon until combined. Fold in 1 1/4 cups white chocolate chips. Cover dough with plastic wrap and chill for at least two hours, or up to three days.*

Preheat the oven to 350F. Line two baking sheets with parchment paper or silicone baking sheets. Scoop chilled dough in 1 tablespoon increments and roll into balls. Set dough balls at least two inches apart on the prepared baking sheets. Bake for 8-10 minutes, just until the tops are no longer raw-looking. Let the cookies sit on the baking sheets for 5-10 minutes before removing to a rack to cool completely. Repeat rolling, baking, and cooling until all cookie dough has been used.

Cookies will keep in an airtight container at room temperature for up to one week.

Notes:

  1. Do not use Dutch process cocoa here. Your cookies will have an unpleasant metallic flavor.
  2. Dark brown sugar may be substituted.
  3. If you are not comfortable using food coloring, just leave it out. The cookies will still taste great.
  4. I like to press a few extra white chocolate chips into the tops of the baked cookies, but this is purely for aesthetics.
  5. If the chilled dough is too difficult to scoop, let it sit on the counter for ten minutes before proceeding.