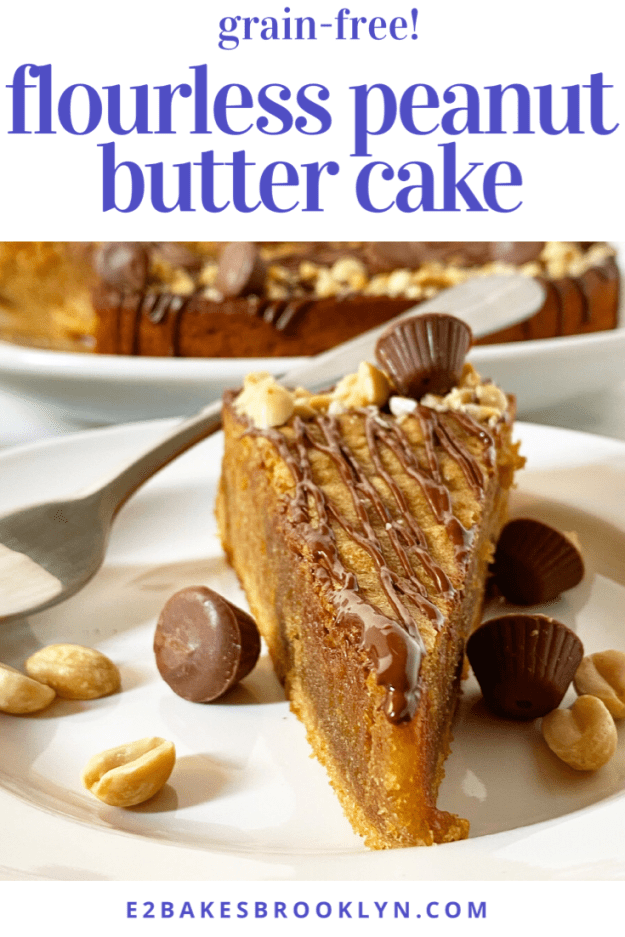
 If you are into rich, thick, salty-sweet, intensely peanut buttery peanut butter things…well, let me introduce you to your new favorite cake. This Flourless Peanut Butter Cake is the sort of thing that you can whip together for a casual night in (also known as every night right now) or dress it up for a birthday or dinner party (when dinner parties are a thing again).
 This recipe is a play on the three ingredient peanut butter cookies that have been around forever. If you haven’t made them this quarantine, the general gist is that you mix together 1 cup of creamy peanut butter, 1 cup of sugar (brown, granulated, or a mix) and an egg, scoop, roll and bake 10-ish minutes for some really excellent grain-free peanut butter cookies.
 This cake is almost exactly the same thing, except that I add a few more eggs, a pinch of salt and a little vanilla, and bake it all up in a cake pan. The result is a little chewy at the edges and tender in the center—think somewhere between Flourless Almond Cake and a cookie cake. Yum!
Lest I forget quarantine swaps…feel free to use all brown or all granulated sugar in the cake. You can leave out the vanilla too, if you’re out or running low.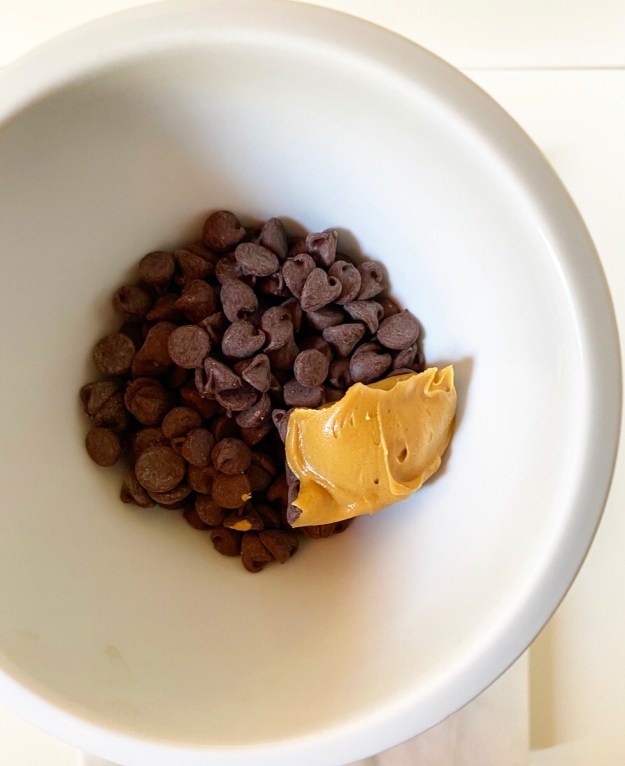
 After the cake has cooled, garnish all up to you. Leave it plain, dust with powdered sugar, serve with ice cream, make it into Peanut Butter Mousse Cake—whatever makes you happy.
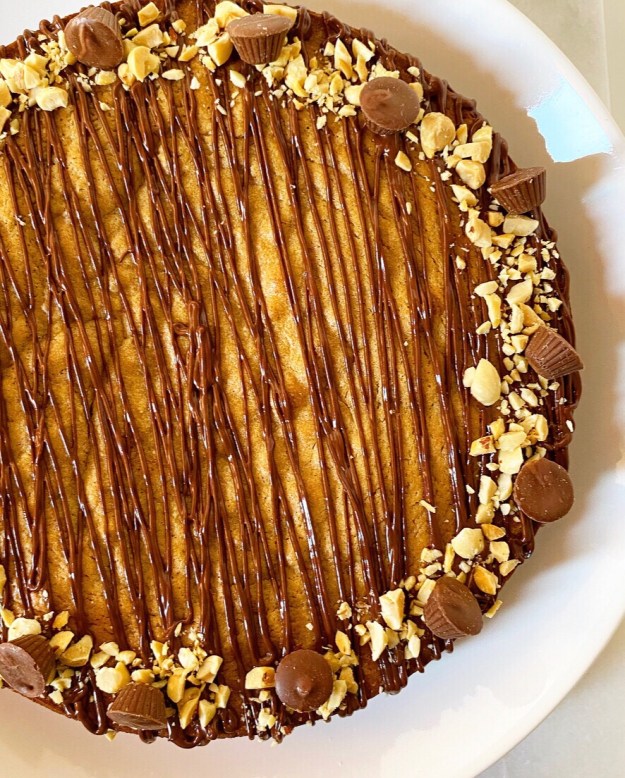
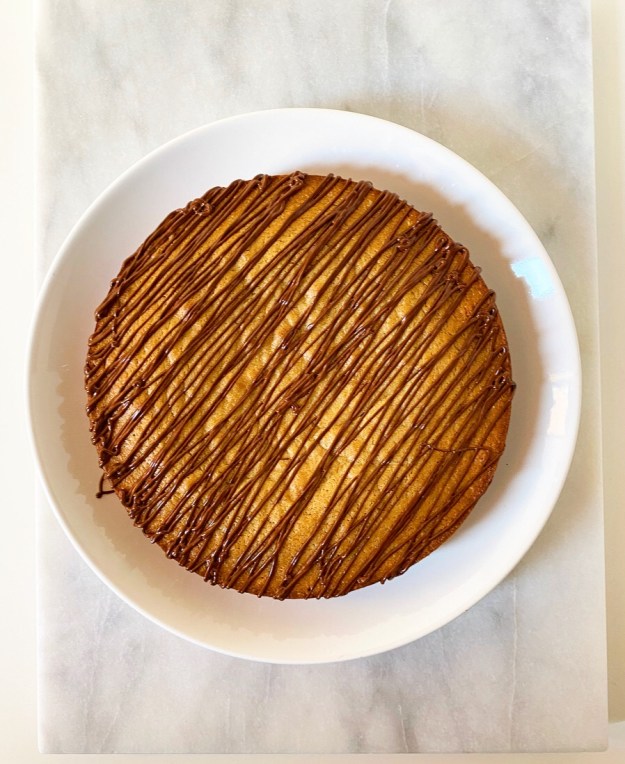
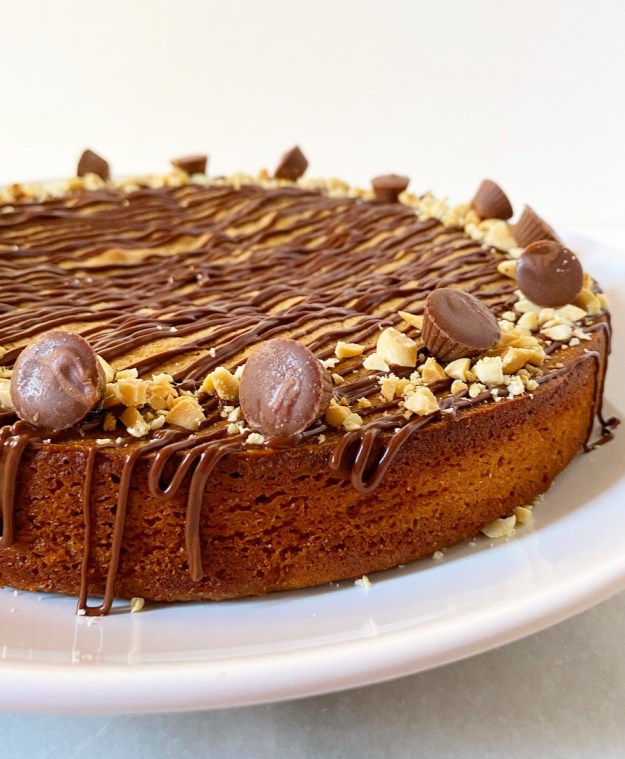 Today marks fifty days of lockdown in NYC, so I felt the need to jazz it up a little. I nuked chocolate chips and peanut butter until smooth, then loaded it into a bag, snipped a tiny corner and drizzled til I liked what I saw. The border is just chopped roasted peanuts and mini peanut butter cups from Trader Joe’s. I know it’s gilding the lily, but like…what else are we doing seven weeks in?

Flourless Peanut Butter Cake
makes one 8-inch round cake
1 cup creamy-style peanut butter (not natural-style)
1/2 cup granulated sugar
1/2 cup light or dark brown sugar, packed
pinch of Kosher or sea salt
2 teaspoons pure vanilla extract
4 large eggs, room temperature
Drizzle (optional):
1/2 cup semisweet chocolate chips
1 teaspoon creamy-style peanut butter
Garnish (optional):
chopped peanuts
miniature peanut butter cups
chopped peanut butter cups
Reese’s pieces
chocolate chips
dusting of confectioners sugar
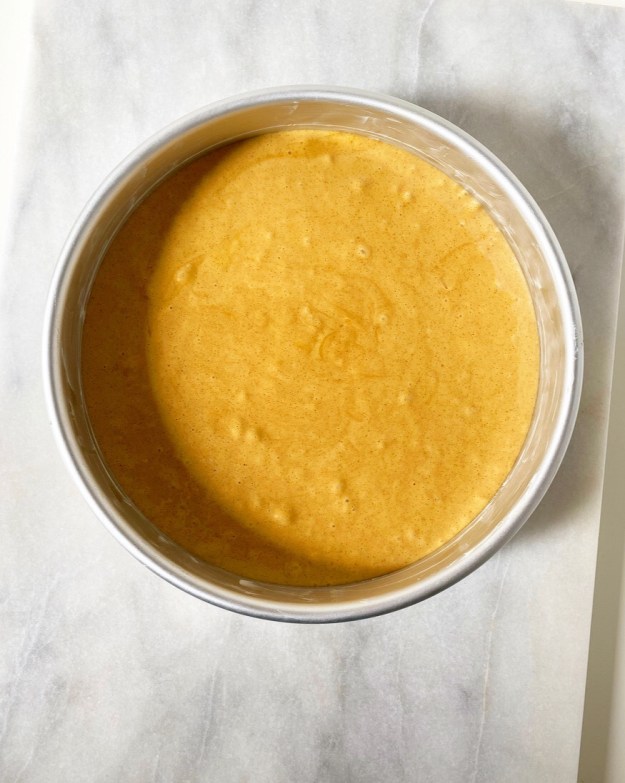
Place an oven rack in the center position. Preheat oven to 350F. Grease an 8-inch round cake pan and line with parchment. Grease again. Set aside.
In a medium mixing bowl, use an electric mixer to beat peanut butter, granulated and brown sugars until combined and a bit fluffy, about 2 minutes. Mix in salt and vanilla. Add eggs one at a time, mixing to combine after each addition. Beat on high for 30 seconds.
Transfer batter to prepared pan. Bake 27-30 minutes, or until a toothpick inserted in the center comes out clean or with only a few moist crumbs (not batter). Let cake cool 30 minutes in the pan on a rack. Cake will deflate a bit as it cools.
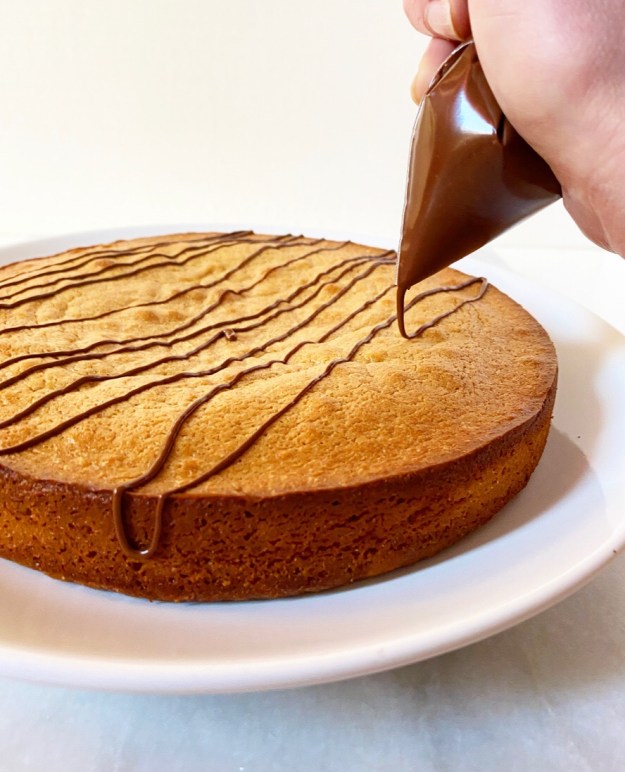
Run a thin knife around the edge of the pan and invert onto a plate (or rack). Peel off parchment. Place a serving plate upside-down onto the bottom the cake. Holding on tightly to both plates (but not so tightly as to crush the cake), flip the cake to be right side-up on the serving plate. Let cake cool completely.
Make the drizzle. Combine chocolate chips and peanut butter in a small microwave-safe bowl. Microwave in 15 second increments, stirring in between, until smooth. Load into a plastic sandwich bag, snip a tiny corner and drizzle onto the cake as desired. Alternatively, drizzle with a fork or use an offset icing knife (or the back of a spoon) to spread it onto the cake. This will likely be more than you need.
Garnish as desired. To set the drizzle, refrigerate the cake for 15 minutes.
Slice and serve. Leftover cake will keep covered at room temperature for up to four days, and in the refrigerator for a bit longer.

 Cake with frosting seems like it’s almost not allowed right now, but this is not just any cake and this is not just any day. Coronavirus be damned.
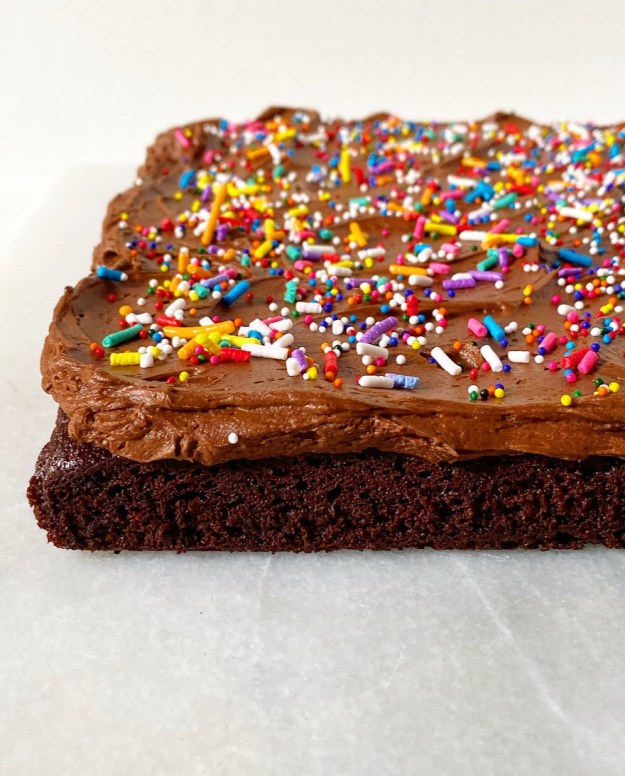 If you’re scratching your head wondering what today is…well, it’s Earth Day, and that is important. But there’s also something that I don’t talk about much on here because it seems mostly irrelevant to the daily operation of a food blog…but it’s actually completely relevant because there would be no E2 Bakes without it. Today marks seven years since I took a drink or a drug. Yep, I’m that sober home-baking food blogger that nobody warned you about.
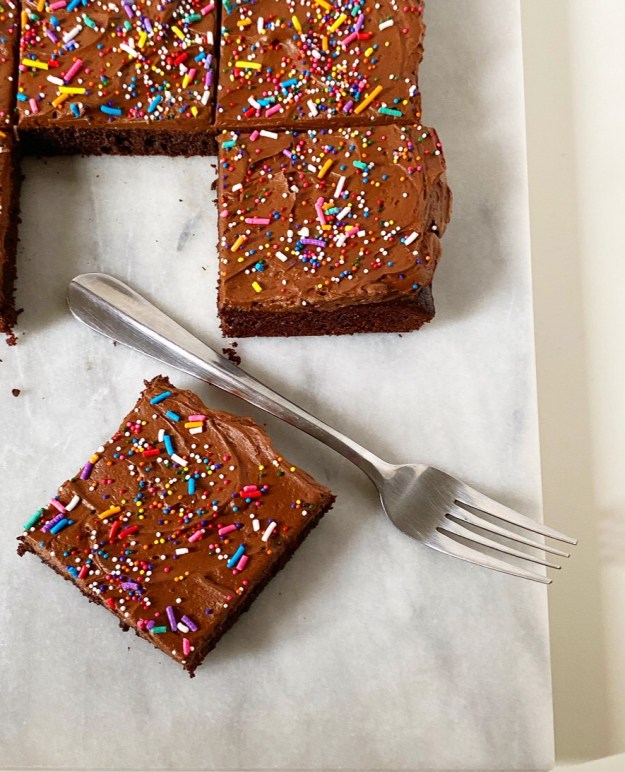 Quitting drinking and putting mind-altering substances in my body is the kindest thing I’ve ever done for myself and the people I love. I’ve gained so much more from that one decision (and many moments of grace and a lot of trudging) than I will ever be able to adequately express, least of all the ambition to run a baking blog. And, well, now you know why there is never liquor in my bakes or wine in my sauces–I can’t post something I can’t test.
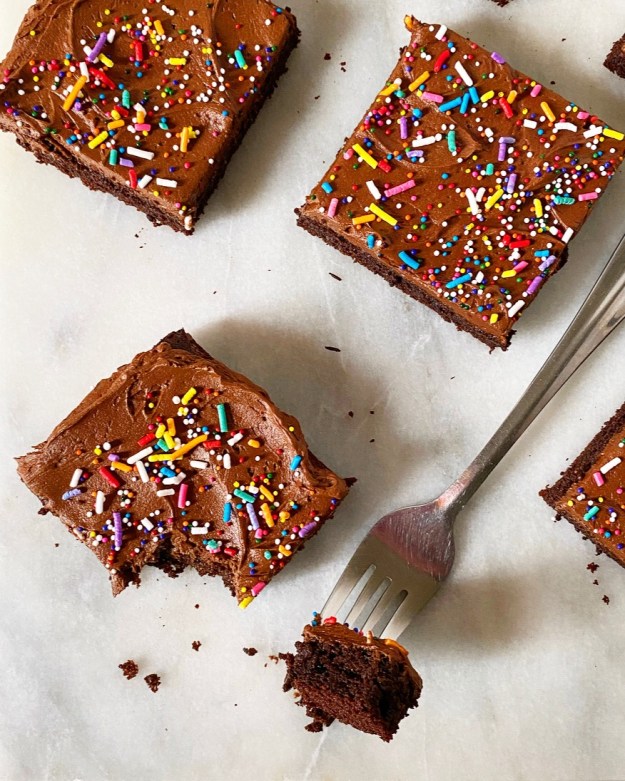
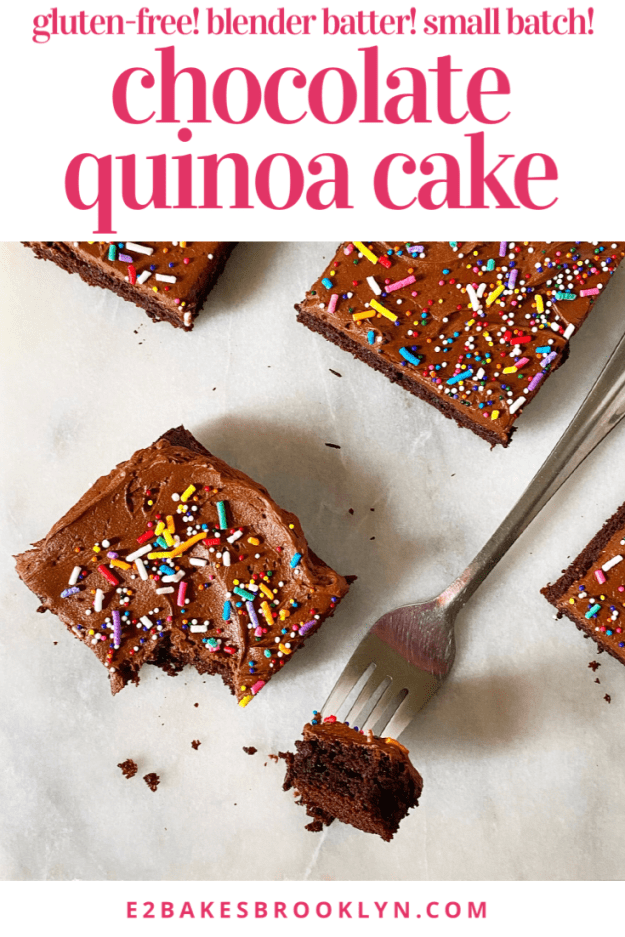
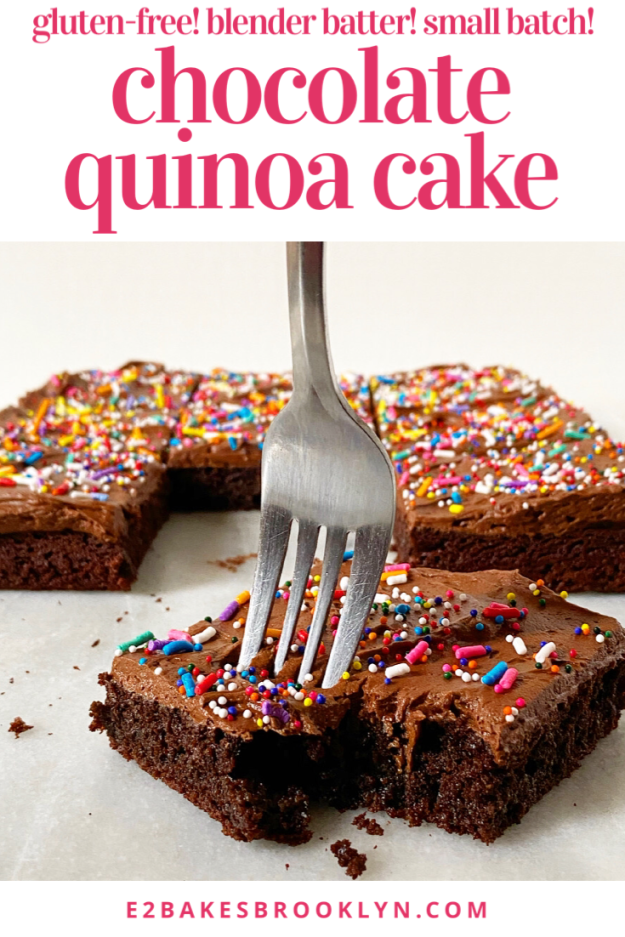
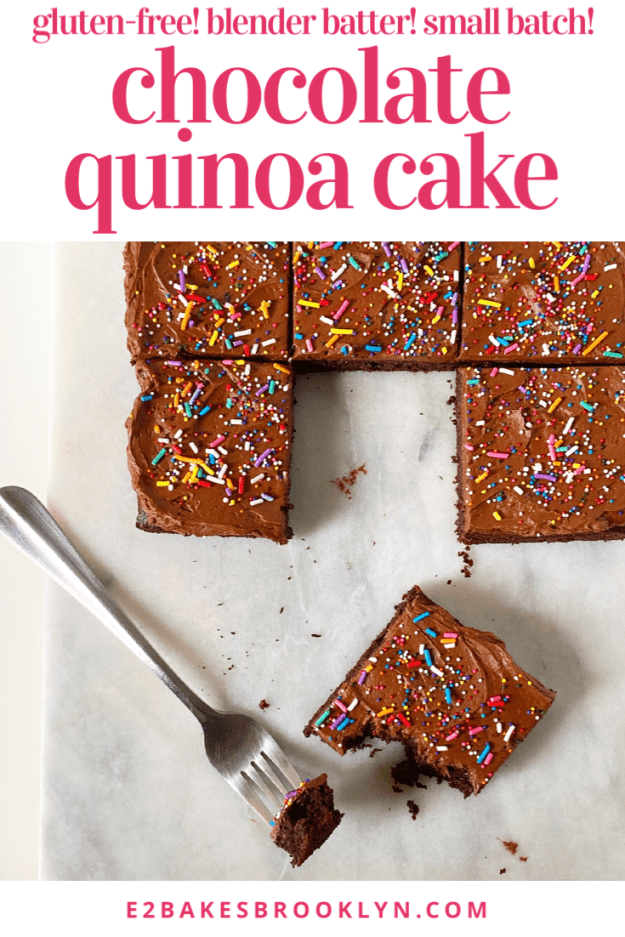
 Layer cakes are out for now and flour is difficult to find, but chocolate and frosting (and sprinkles!) are always welcome in my kitchen. Today’s cake is one of the best chocolate cakes I have ever had—so tender and chocolaty! If I weren’t telling you right now, I bet you’d never guess that it’s made with a cup of cooked quinoa instead of flour. For real.
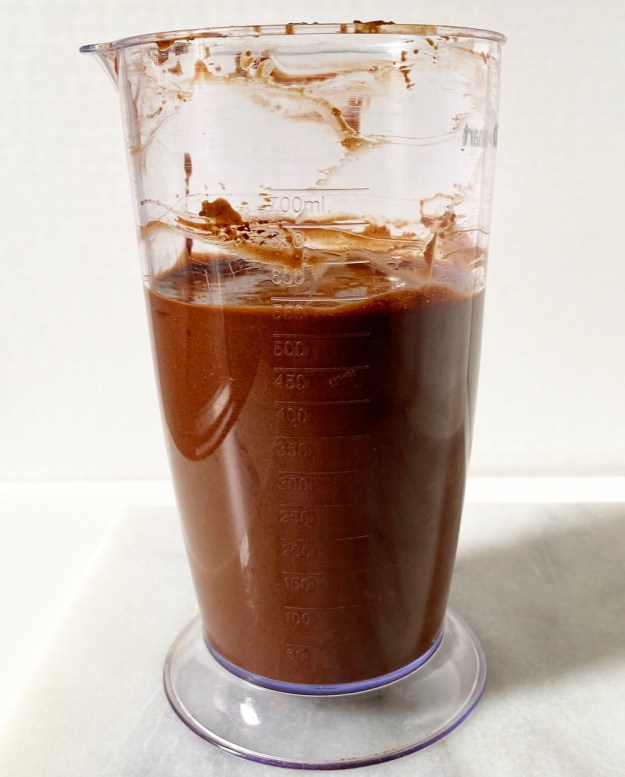
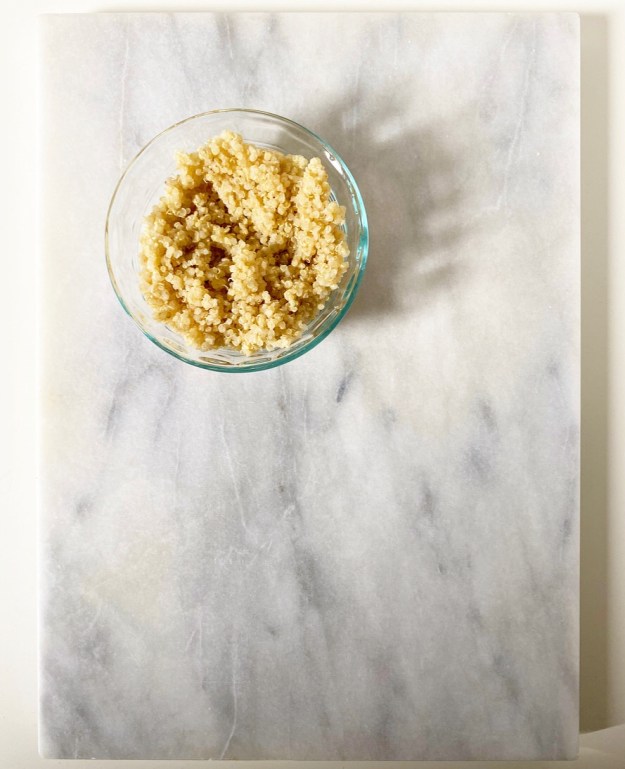 The batter—which includes cocoa powder, a hint of coffee, eggs and milk—is made in a blender to eliminate any whole pieces of quinoa. I wouldn’t recommend making most cake batters in a blender, but since this cake is naturally gluten-free, there’s no need to worry about overmixing or tough cake. Score!
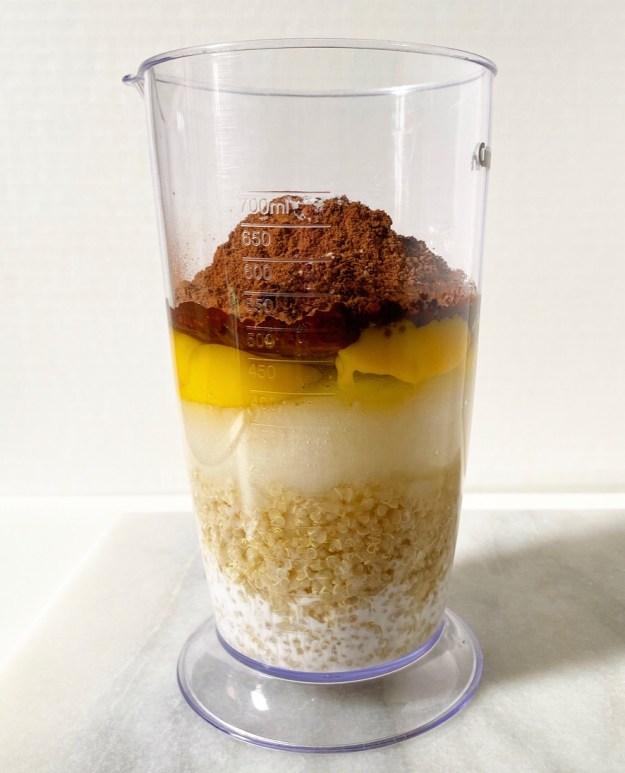
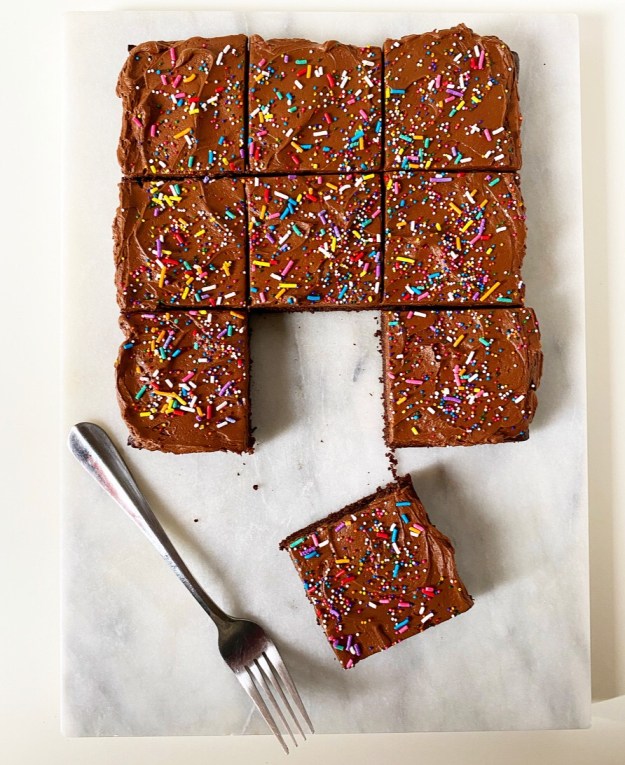
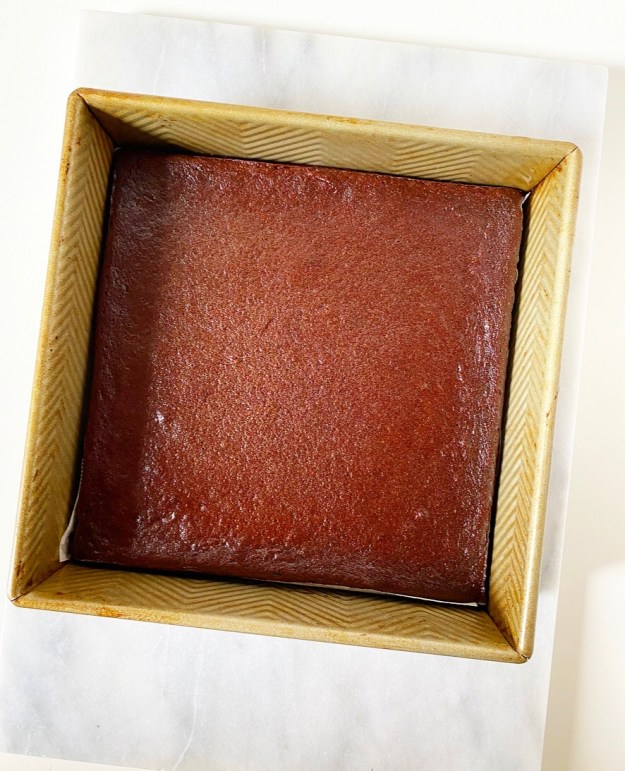 Chocolate Quinoa Cake bakes up in 30 minutes and is thin enough that it cools within an hour. I topped it off with a small batch of chocolate buttercream and dug into my stash of rainbow sprinkles for the occasion.
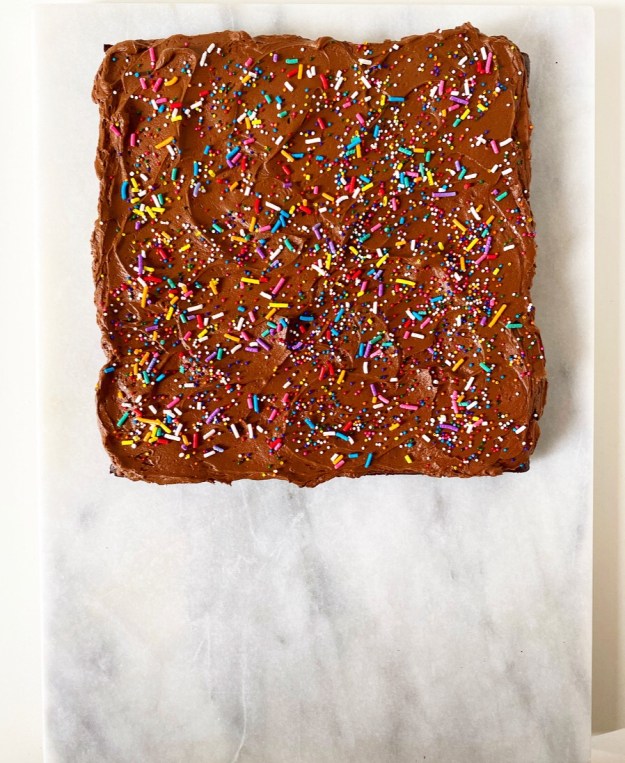 Oh yeah, that’s the stuff.
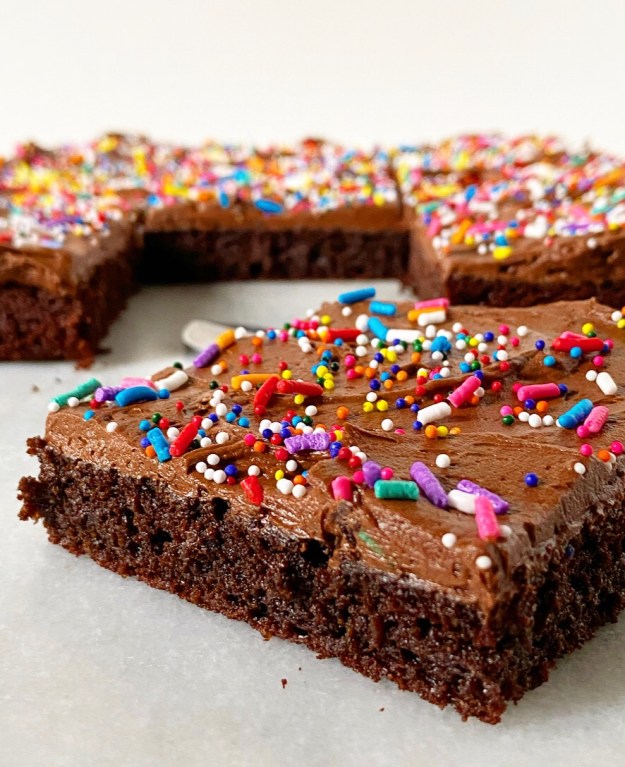 As for quarantine substitutions:
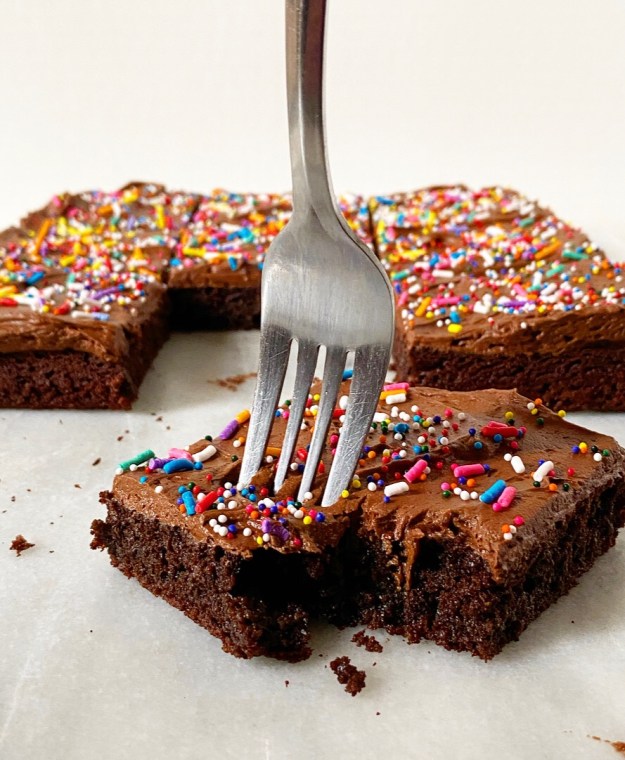 Whew! Okay. Now that you’re armed with everything you need to make a kickass gluten-free chocolate cake, go find something to celebrate. I promise you will.
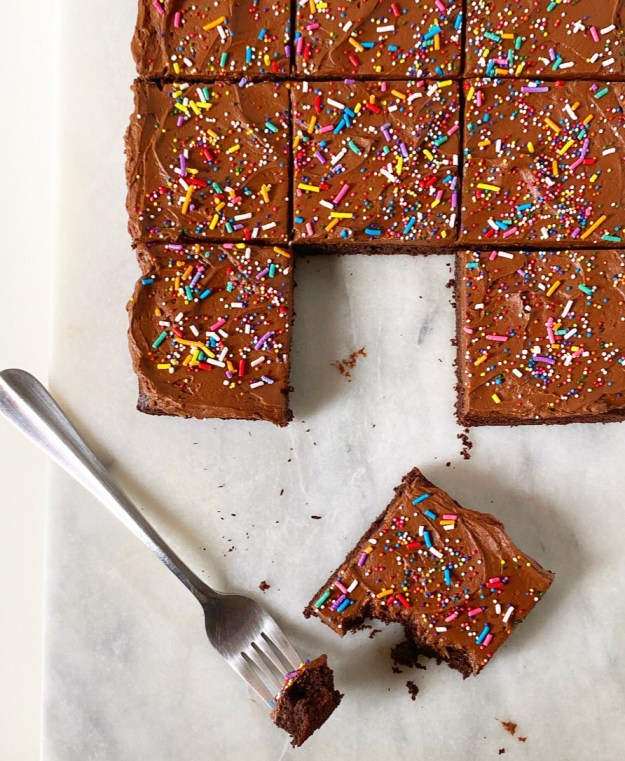
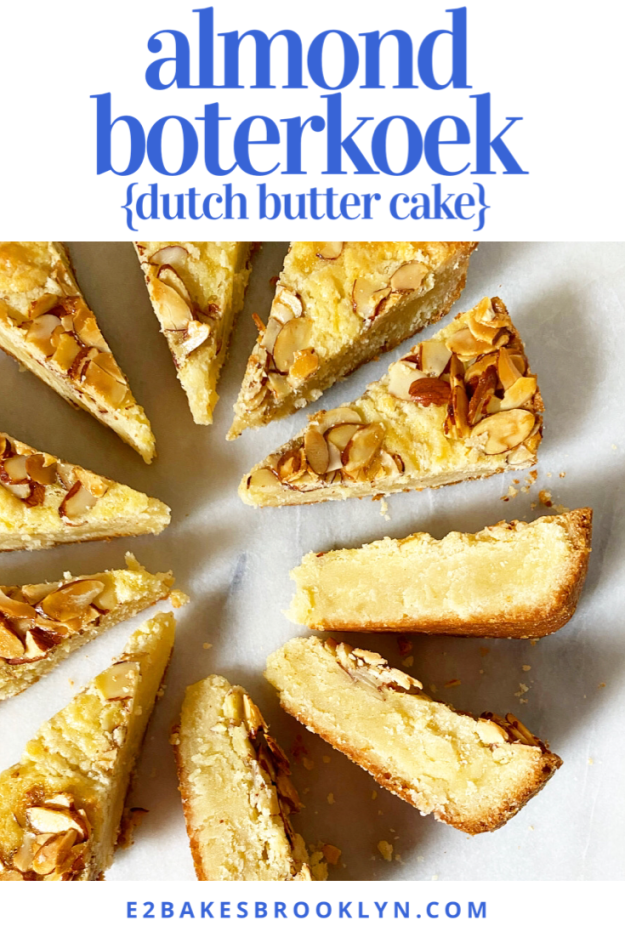
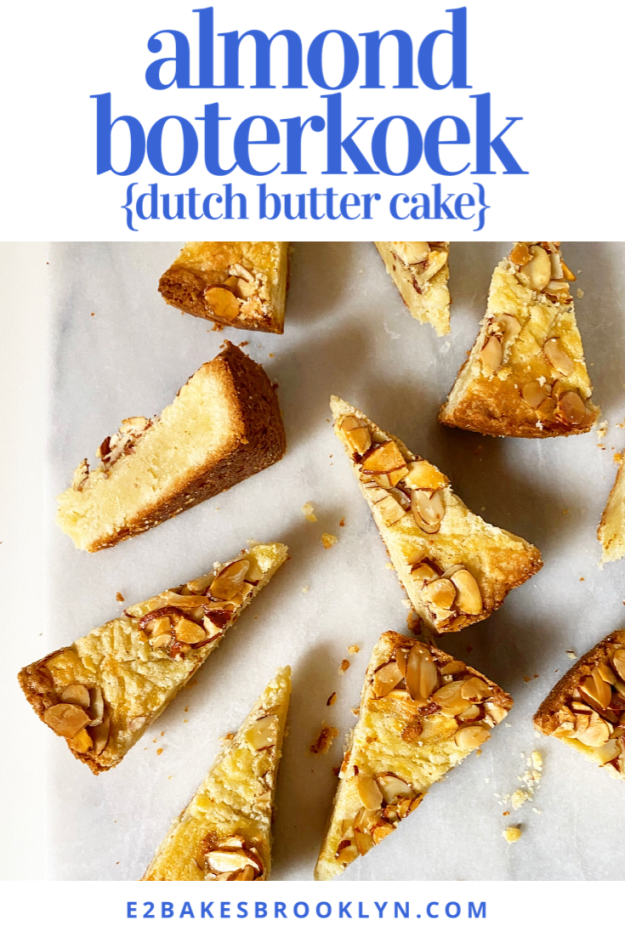
 I would have been content to make and eat only one
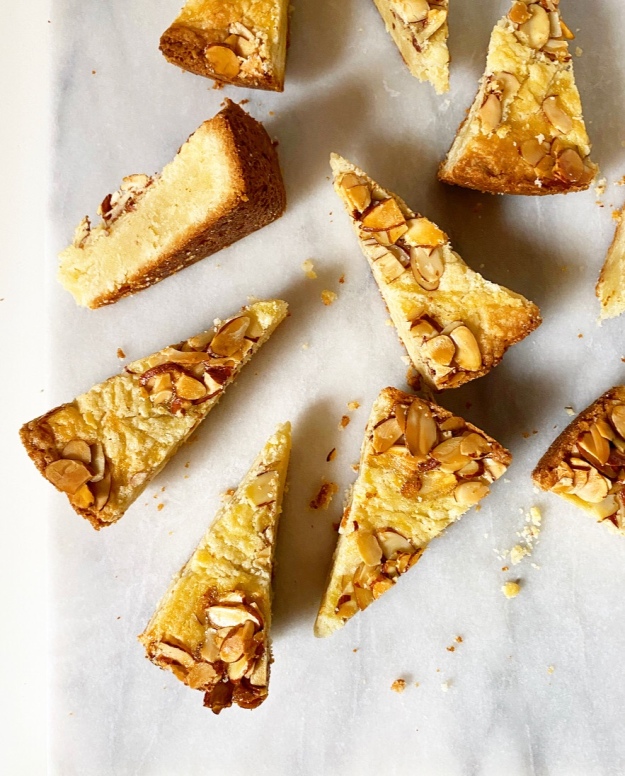
  I don’t make traditional New Year’s resolutions, but that night I absolutely resolved to make Almond Boterkoek happen on this blog. It took exactly eight weeks.
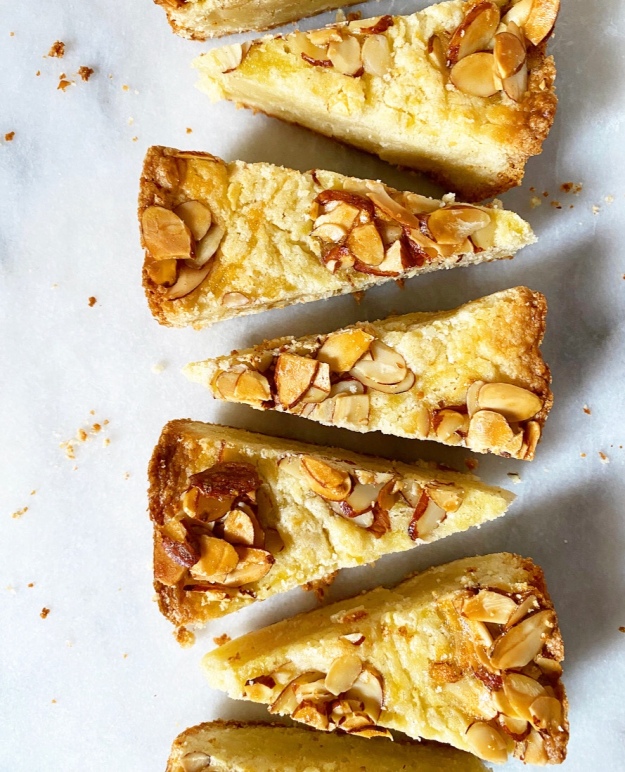 Anyway…David’s go-to Boterkoek (“bow-ter-kook”) already has a hint of almond to complement all the glorious butter, but this one…whoa. It’s super soft in the middle with crispy & buttery edges on the top and bottom, so it’s almost like biting into a piece of marzipan that is coated in a thin layer of butter cake.
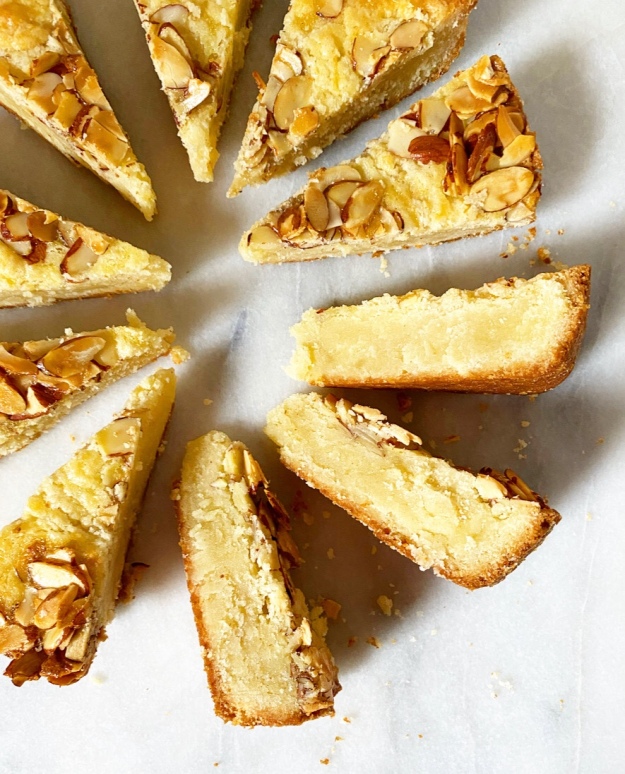 Does that make it sound gross? I promise it’s anything but.


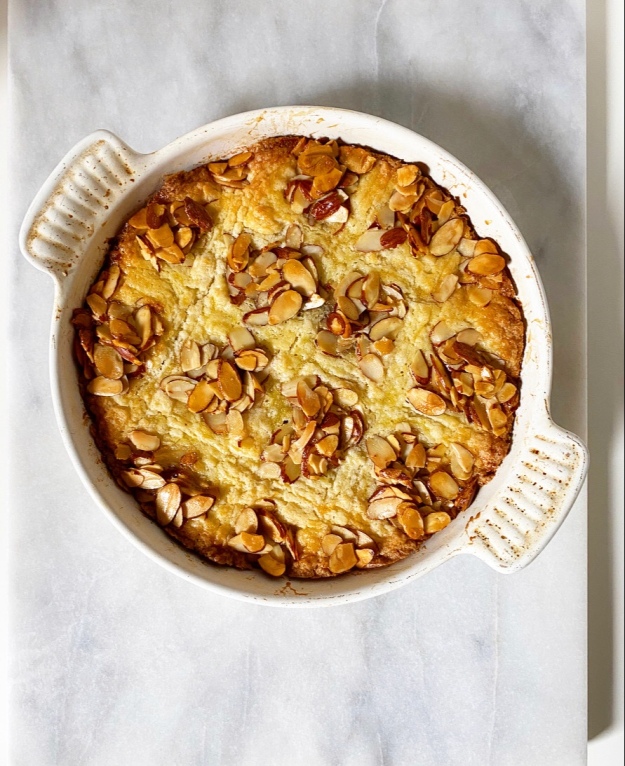 As with David’s O.G. Boterkoek, this one is no big deal to whip up. You will need to break out your mixer, but I promise that’s the fussiest part of the whole process. Well, except for the part where you have to remove a teaspoon of egg from a beaten egg, but that’s not too annoying. I even found time (30 whole seconds!) to make a crackly almond topping, which I used it to decorate the cake in a way that is much more flattering when it’s all sliced up.
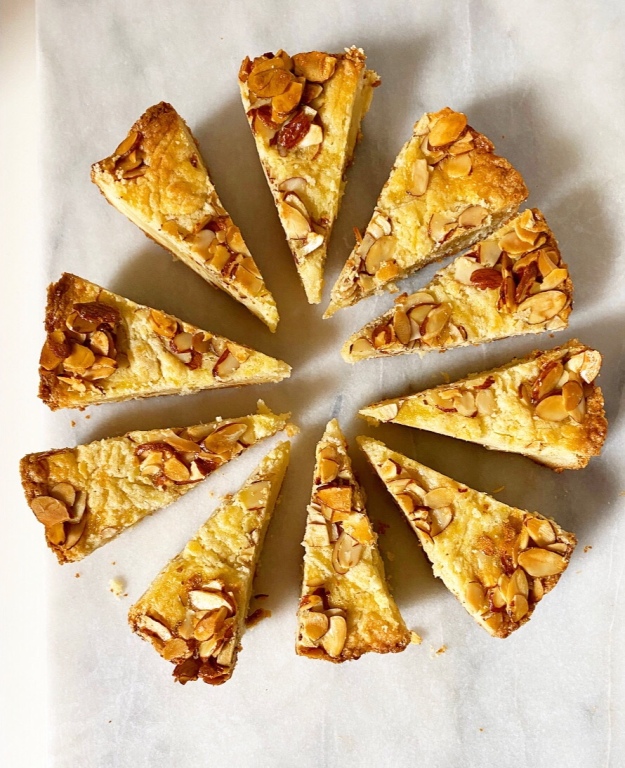
 Texture-wise, this dessert is fairly dense–more like a blondie than an American-style cake. This is because it contains no leaveners, therefore depending on the egg and the air that’s whipped into the butter for its minimal lift. If you want a cakier almond cake, try
  I, however, am more than content with a wedge of this buttery-edged, soft-centered almond cake (or whatever) anytime, anywhere, especially right-this-minute as I simultaneously write a blog post and watch Netflix. Yep.
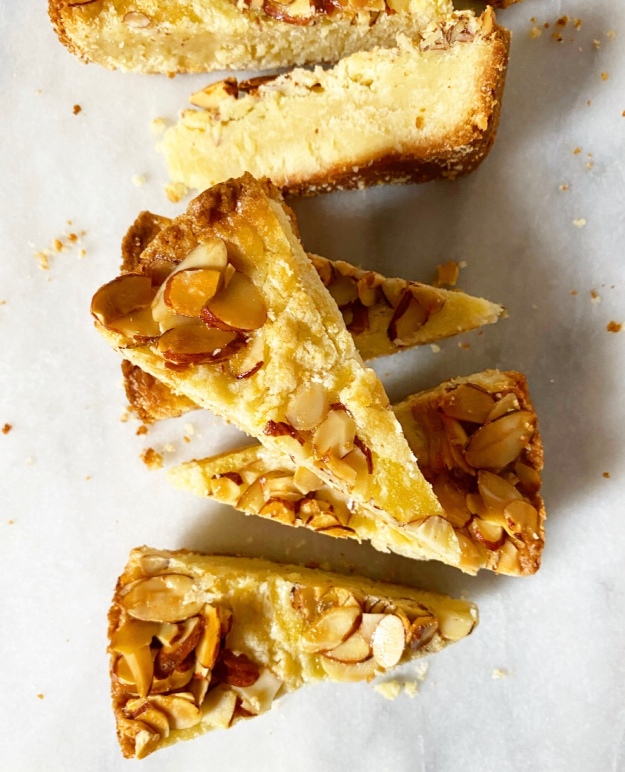

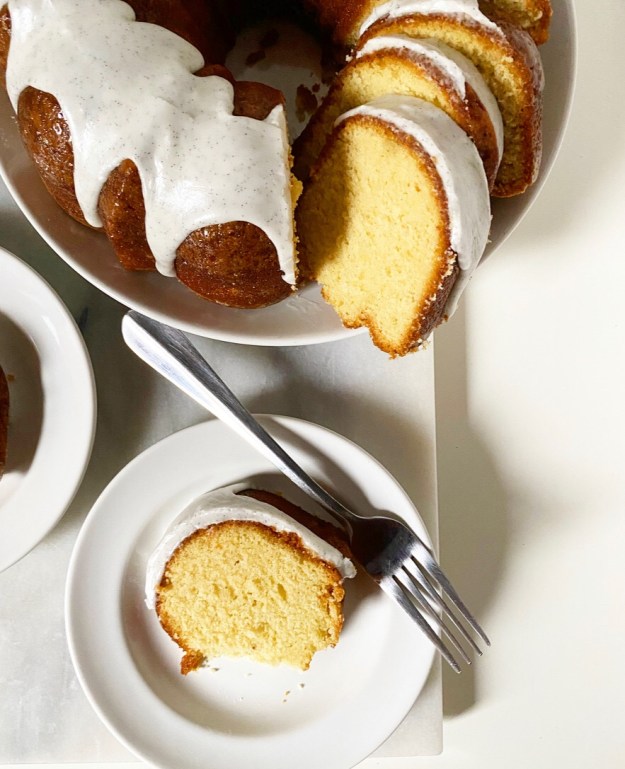 I try very hard to keep things simple around here. Recipes, techniques, flavors, everything. That doesn’t mean super easy or uncomplicated—just not over-complicated. No more steps or ingredients than absolutely necessary, you know?
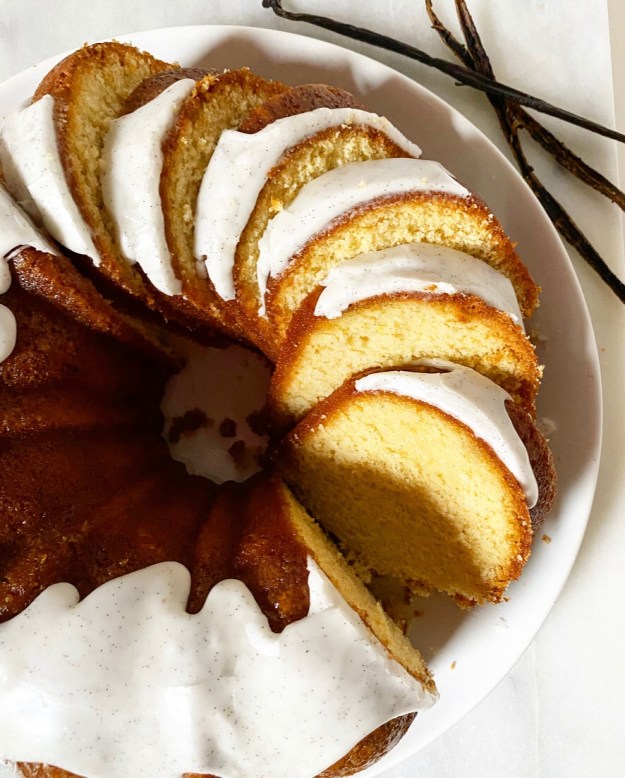 That said, sometimes a simple recipe like this Vanilla Bean Bundt requires several tries, each with a different technique or ingredient, all resulting in…excellent cakes. Really.
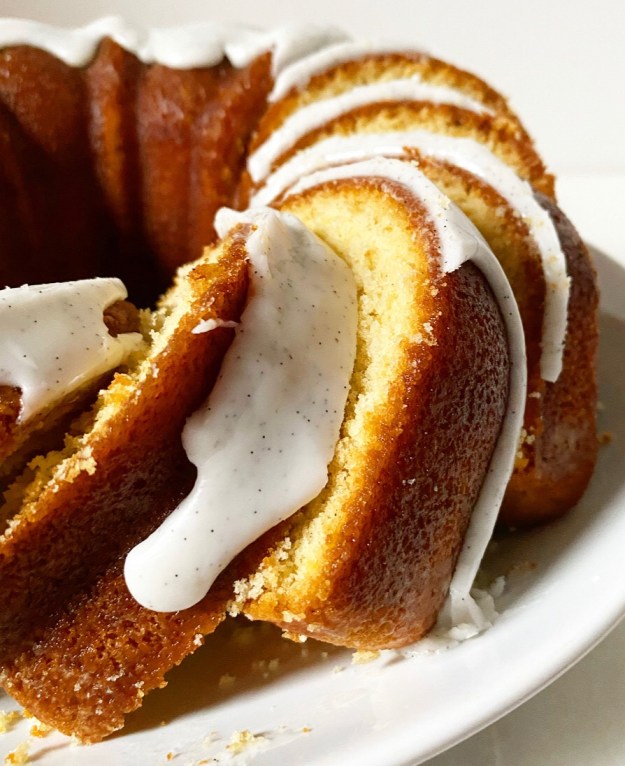 Each one began with the same basic recipe that I’ve used for my
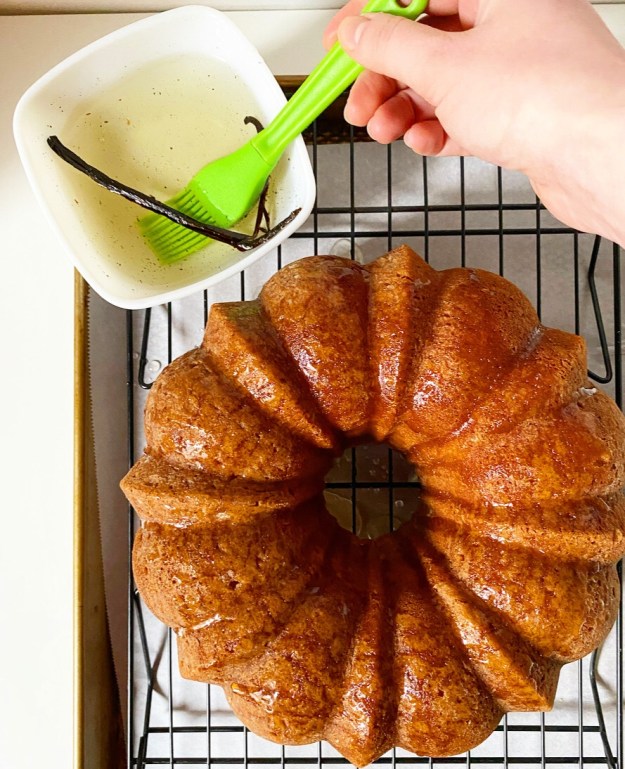
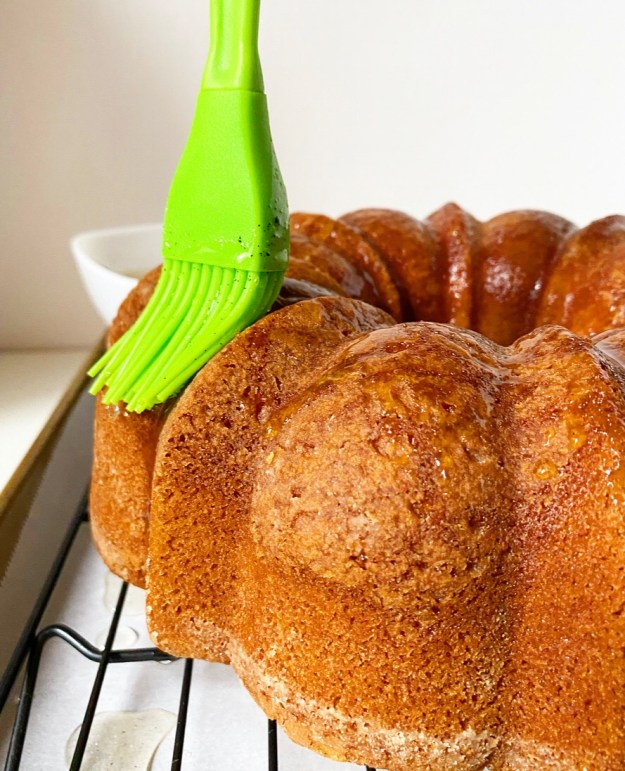
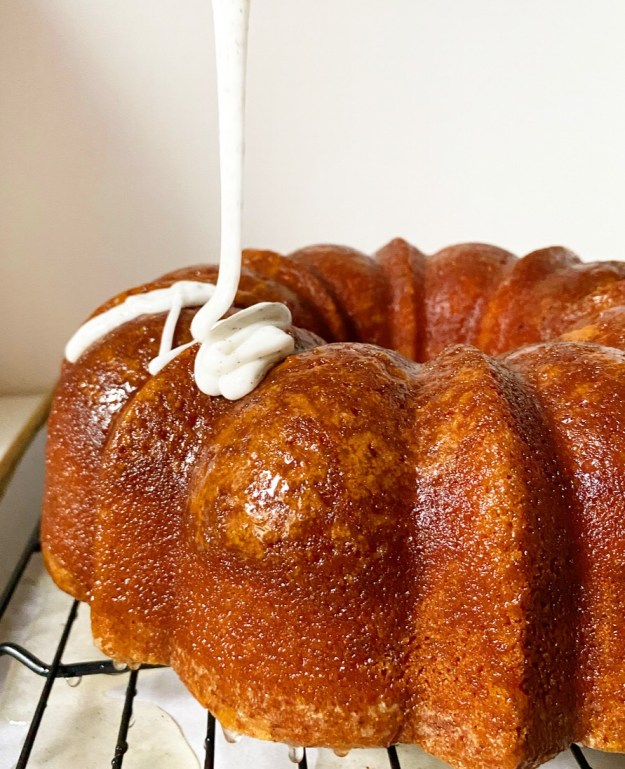
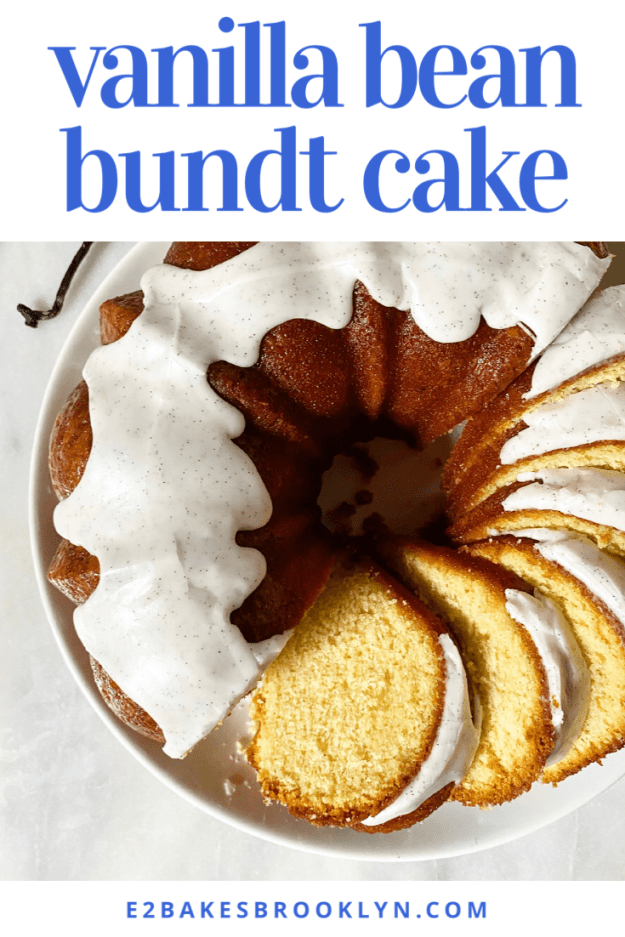
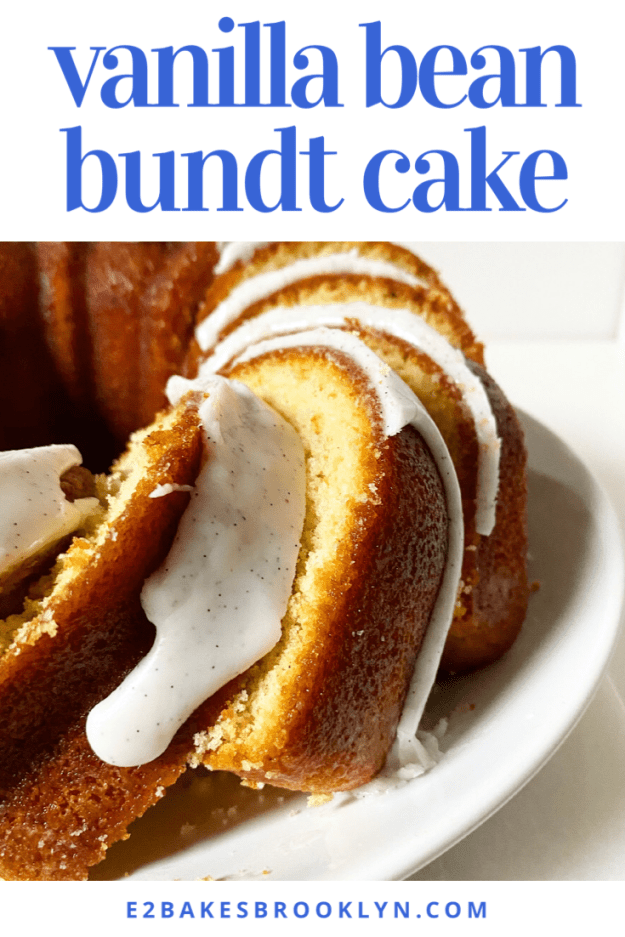
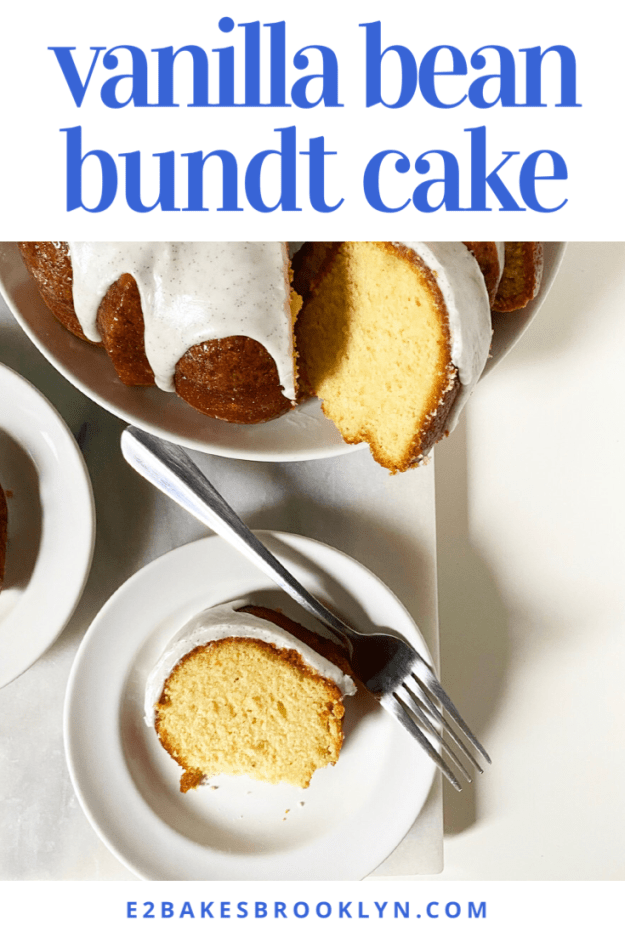
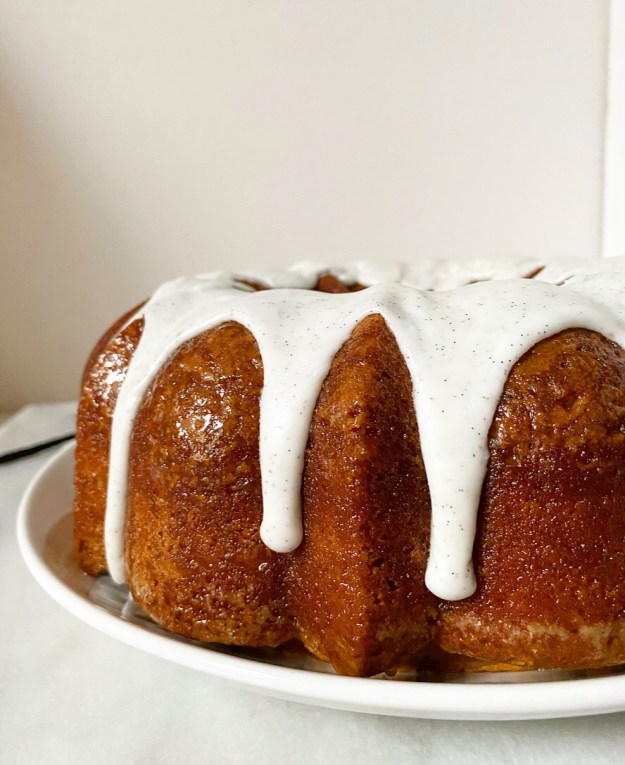 The cake I love the most is #1, so it’s the one I’ve posted below. The seeds of one vanilla bean are whirled into the batter, and the leftover pod is used to make a syrup that is brushed onto the baked cake before icing is poured over the top. The syrup is the element that makes all the difference here—it keeps the cake from being even the slightest bit crumbly, gives it a subtle glossiness, and makes it so that you can smell its dreamy vanilla aroma within a 6 foot radius. Yes, really!
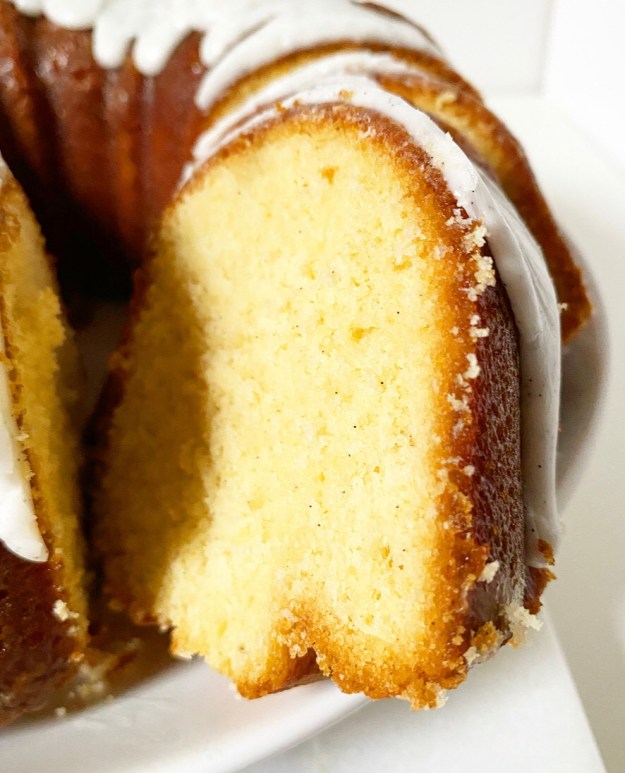 I also like that the pods in the recipe don’t go to waste. I’ve seen other bakers suggest using empty vanilla pods to make vanilla sugar, but how much vanilla sugar does anyone actually use? You could use them to make extract, I suppose, but that takes weeks or months. This way at least one of the pods is used directly in the cake. As for the second, let me know what you do with leftover vanilla pods. I’m interested!
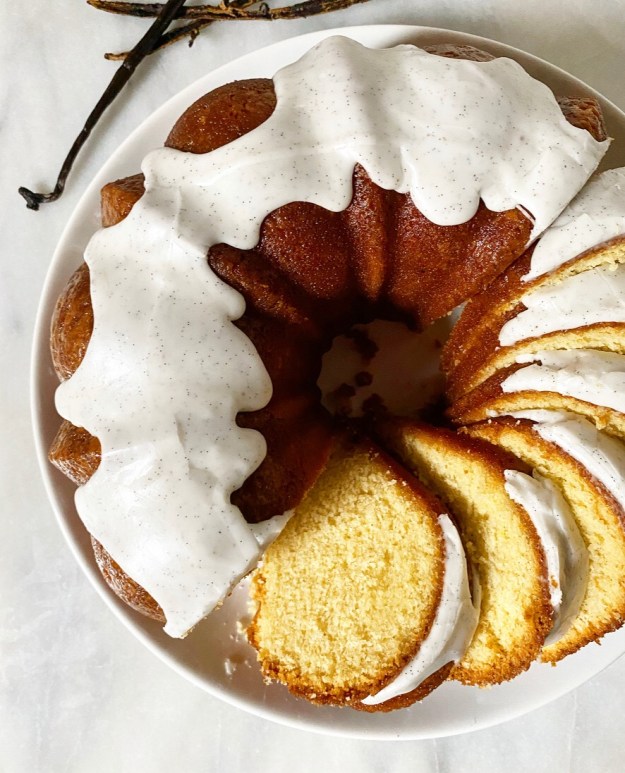 For those of you wondering about the cost of this whole operation, I won’t lie to you: vanilla bean anything is pricey. I buy my vanilla beans at Costco and Sahadi’s, and they run about $6 apiece. You could use two tablespoons of vanilla bean paste (1 per pod) instead, but the paste is about $35 upfront. A single jar contains enough to make this cake four times though, so it’s worth the investment. Oh, and this is a warning that the dark color of the vanilla bean paste will affect the aesthetic outcome of the cake, but only slightly. It will still be absurdly delicious, as all vanilla bean things are.
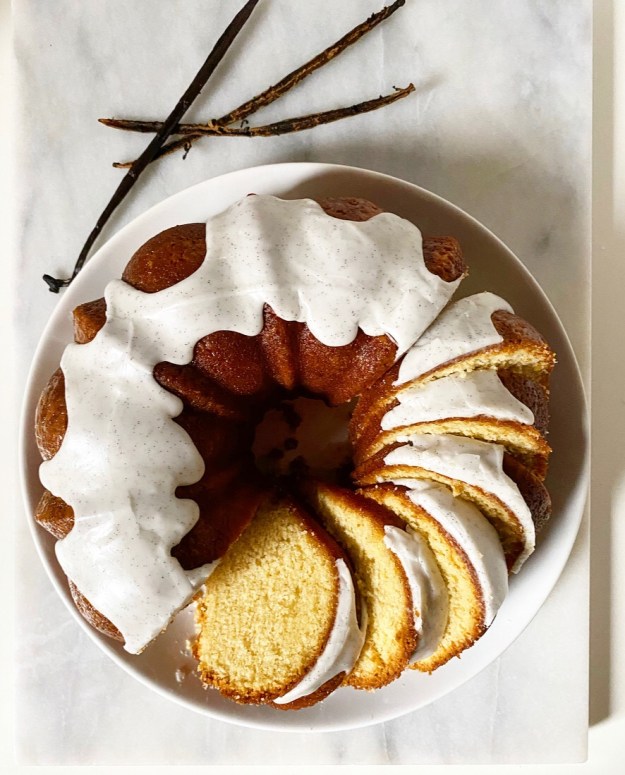 Keep it simple, y’all.
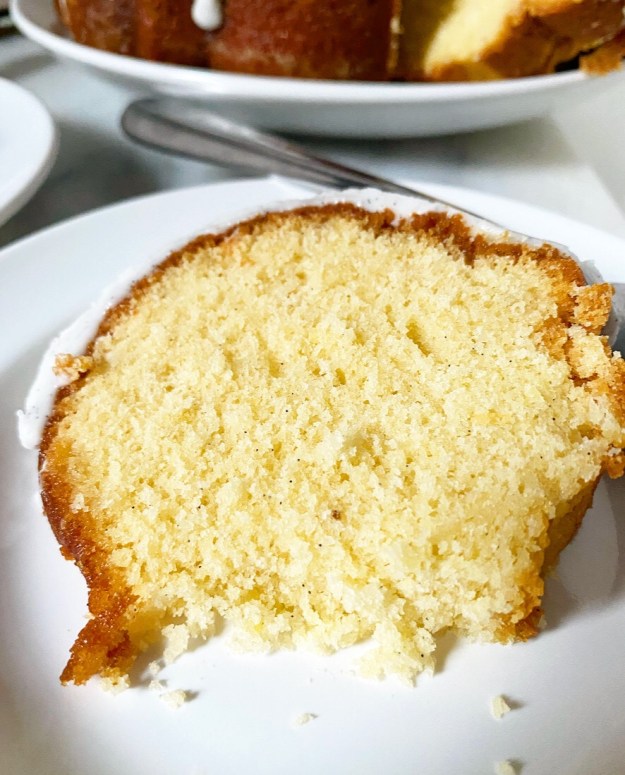
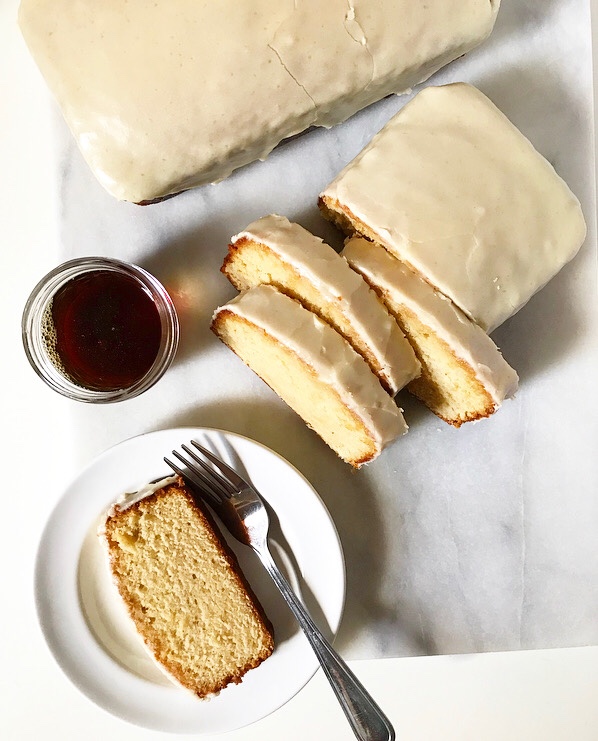 I feel like this fall is all about maple syrup. But based on
 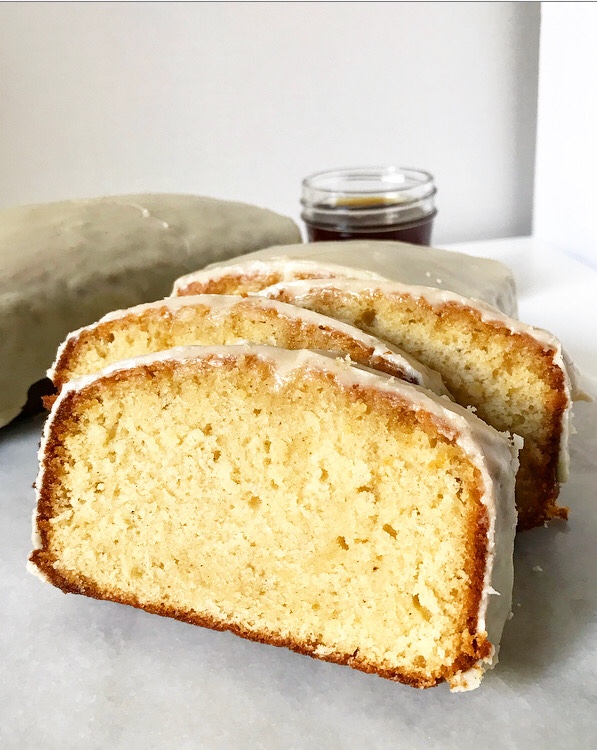 I mean, have you tried my
 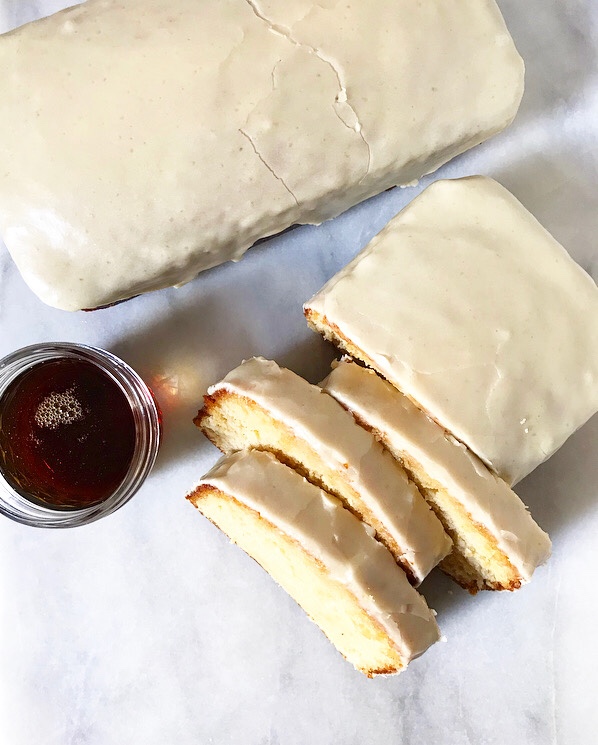 As you may have guessed, these are an autumnal take on classic
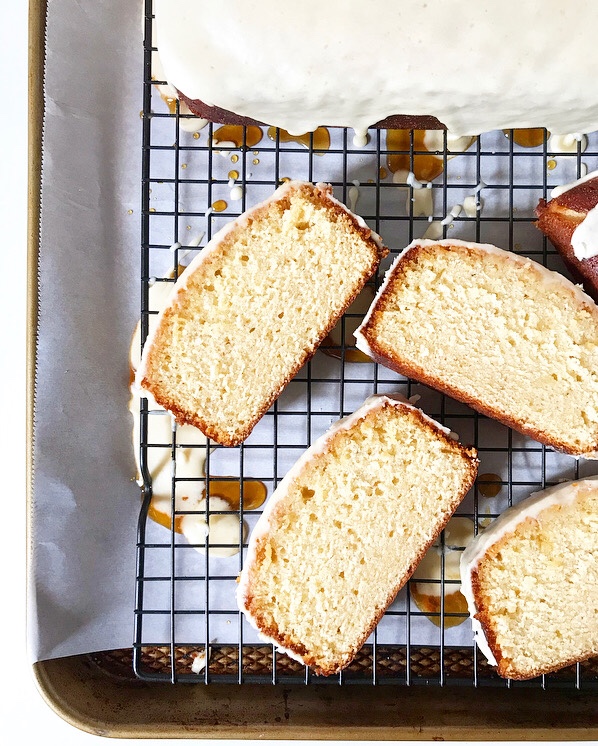
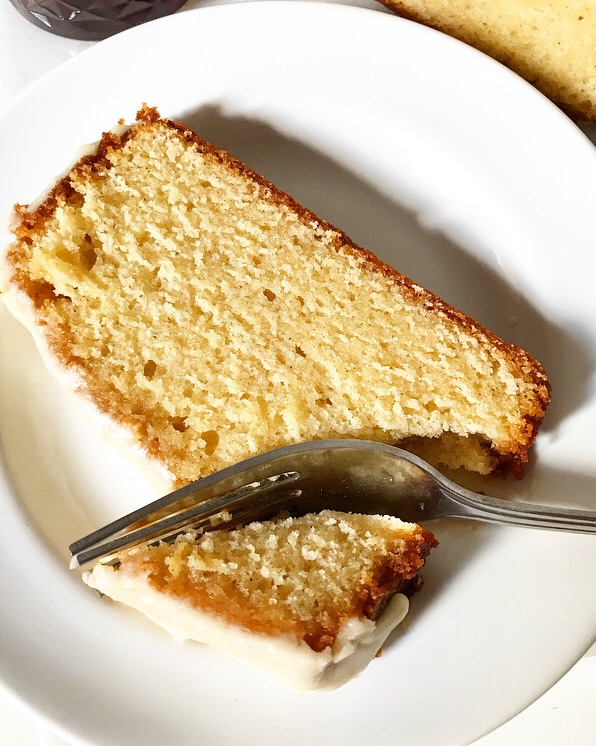
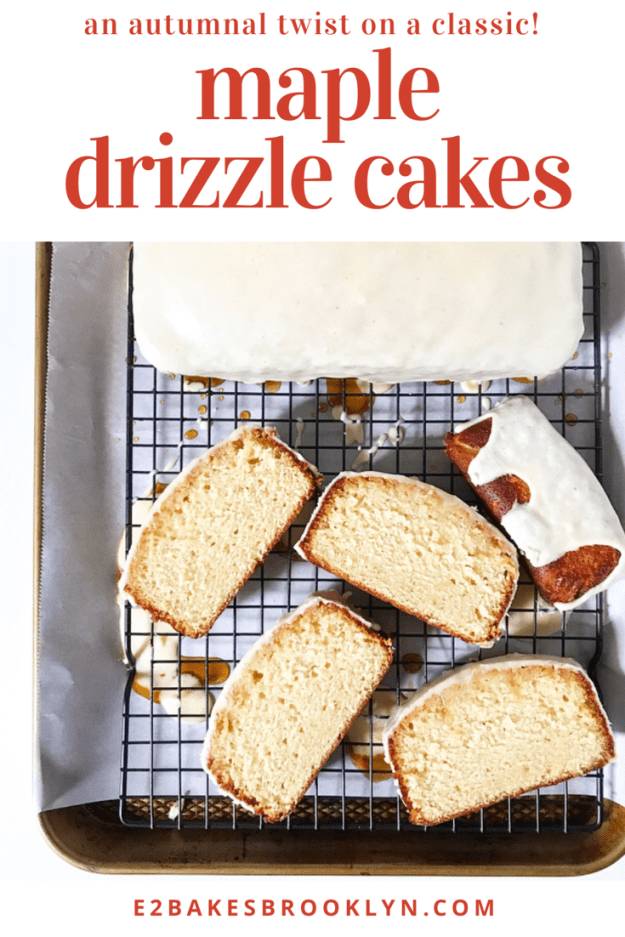
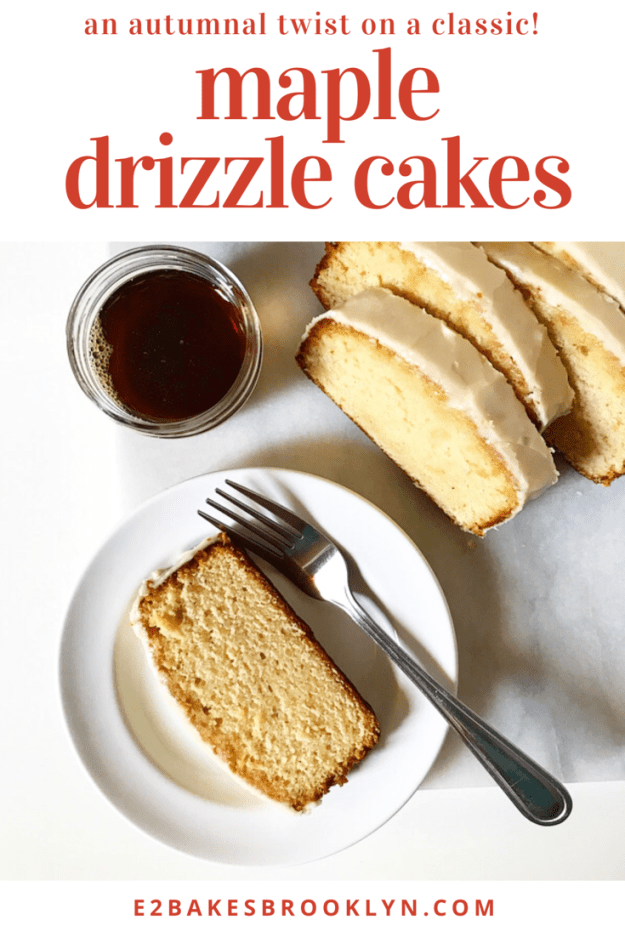
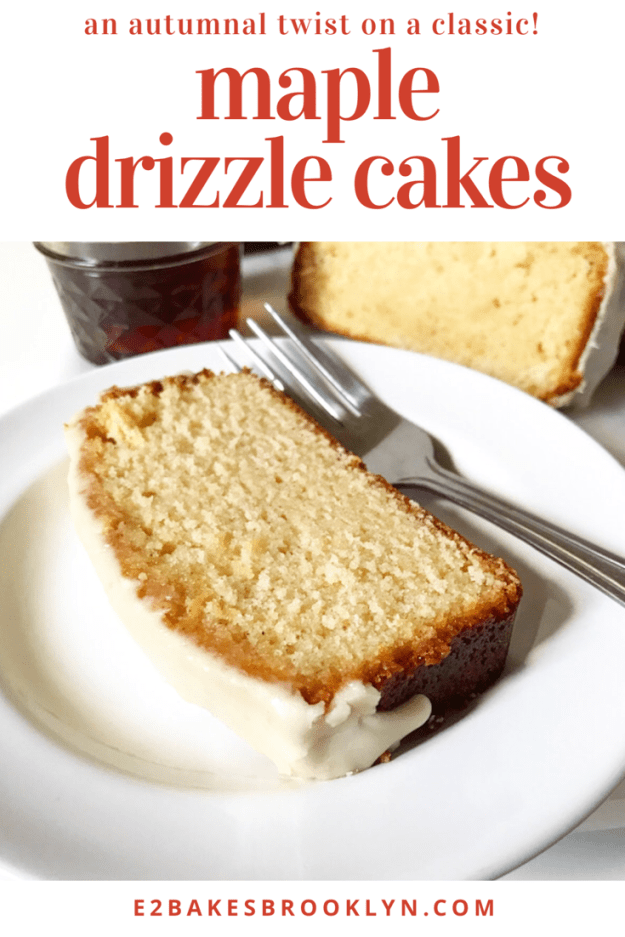
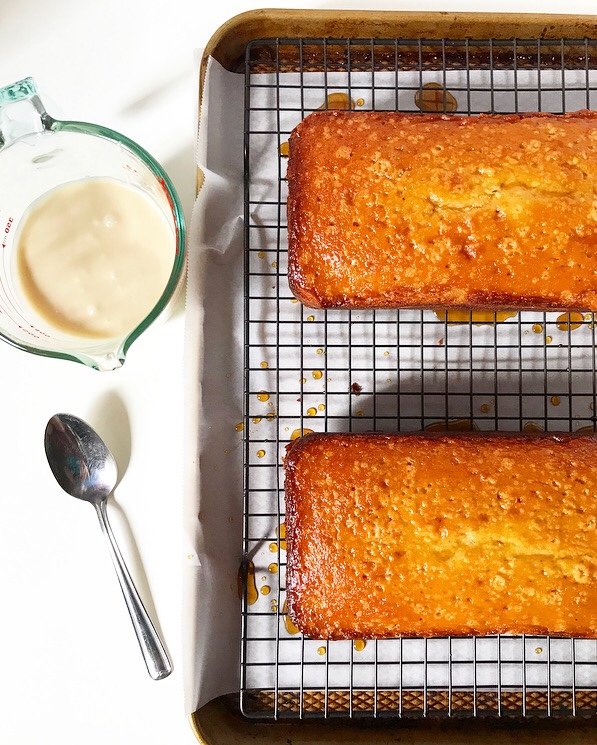 After baking, tiny holes are poked in the warm cakes and maple syrup is brushed over the tops and allowed to soak in. Alternatively, you can cool the cakes and then brush on warmed maple syrup. No matter which method you choose, this will add extra moisture and flavor, and make your cakes extra delicious.
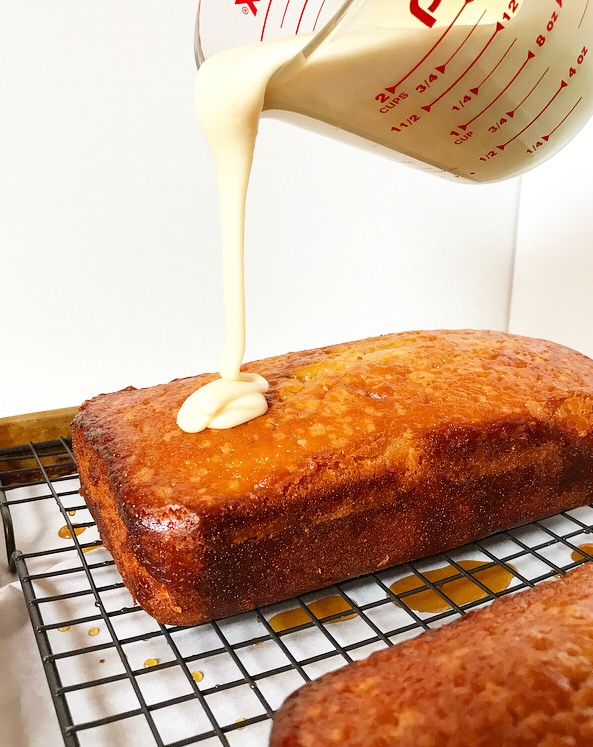
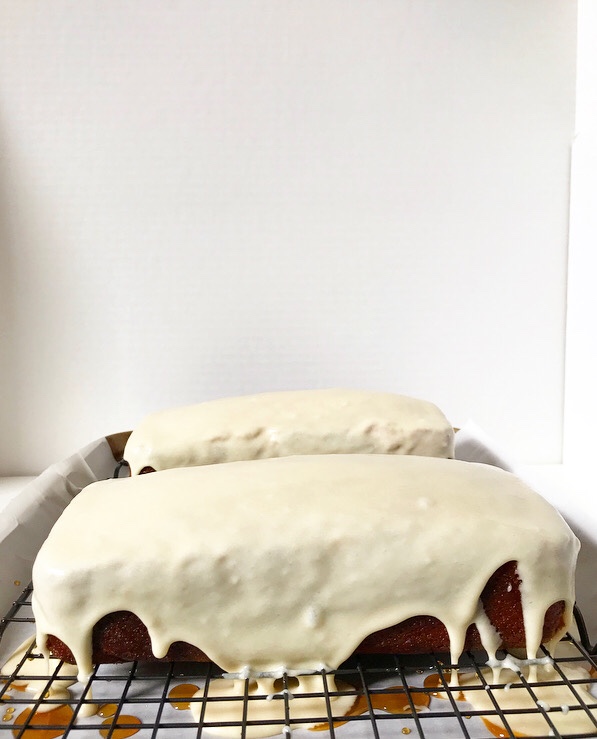 The icing is made primarily of maple syrup, confectioner’s sugar, melted butter and water. It goes on as a liquid, cascading down the sides of the cake before drying to a set finish. I like the icing recipe as written, but you could add another layer of flavor by browning the butter. You know, if you’re into things like that.
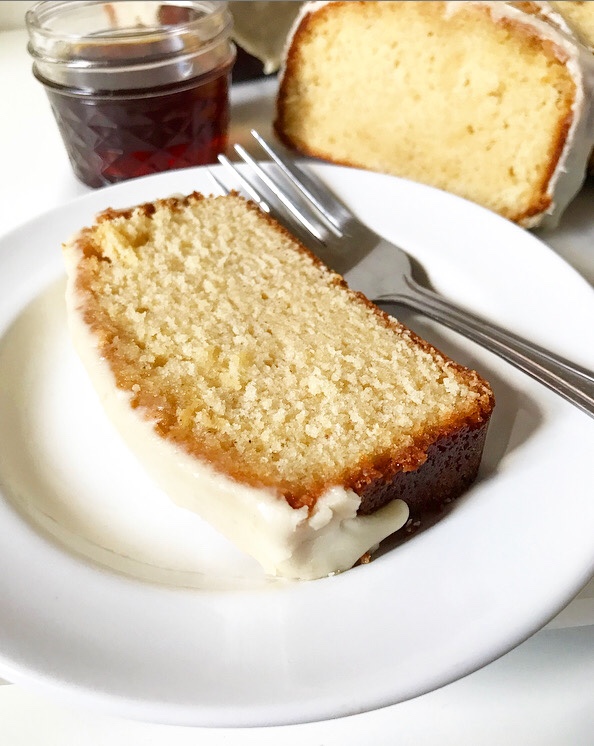 Maple Drizzle Cakes are great for any occasion. You could use them as hostess gifts, pack them carefully and mail them overnight to someone you love, leave one in the office break room, or even serve one as a non-pie Thanksgiving dessert (we all know a pie hater).