Tag Archives: fall baking

Salty Maple Brown Butter Blondies

Salty Maple Brown Butter ​Blondies

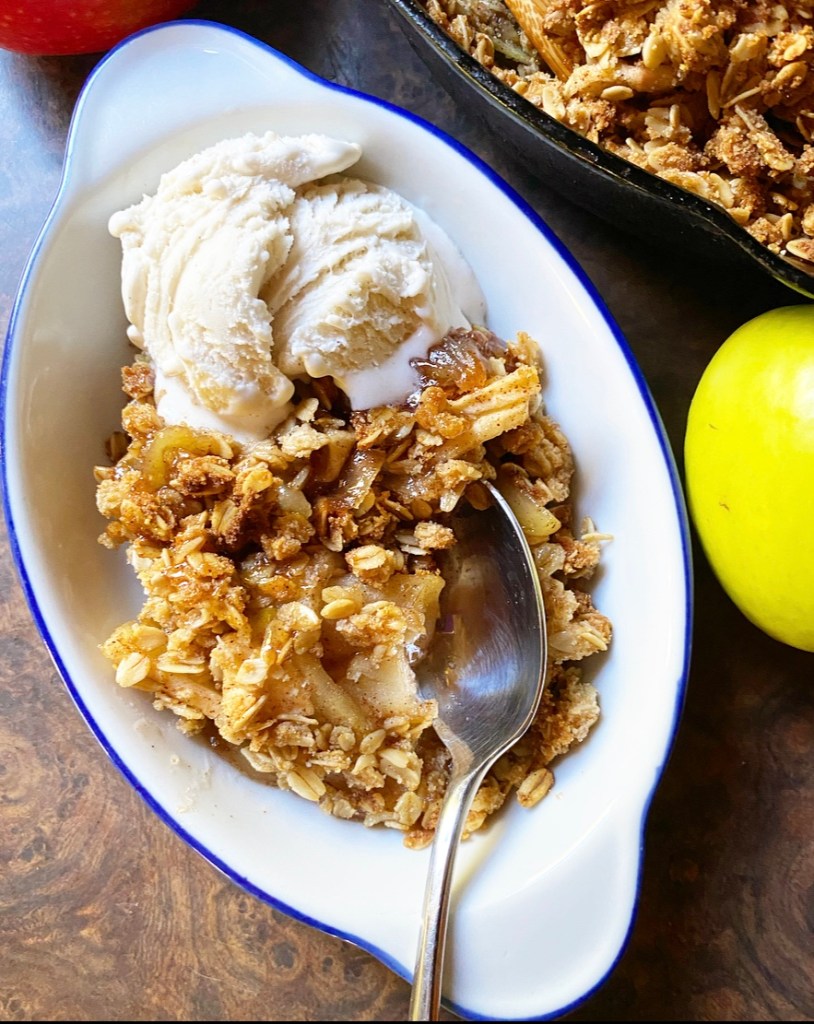
This time of year, everyone seems to lose their minds for pumpkin and apples. I admit I am guilty of this too, but I think maple is truly my favorite fall flavor.

Yes, I know maple syrup is made in the spring, but it tastes like fall. It just does. It’s the color of the best crunchy leaves and it tastes like nostalgia and Saturday mornings in early November. Please excuse my waxing poetic, but you know I’m right.

Salty Maple Brown Butter ​Blondies

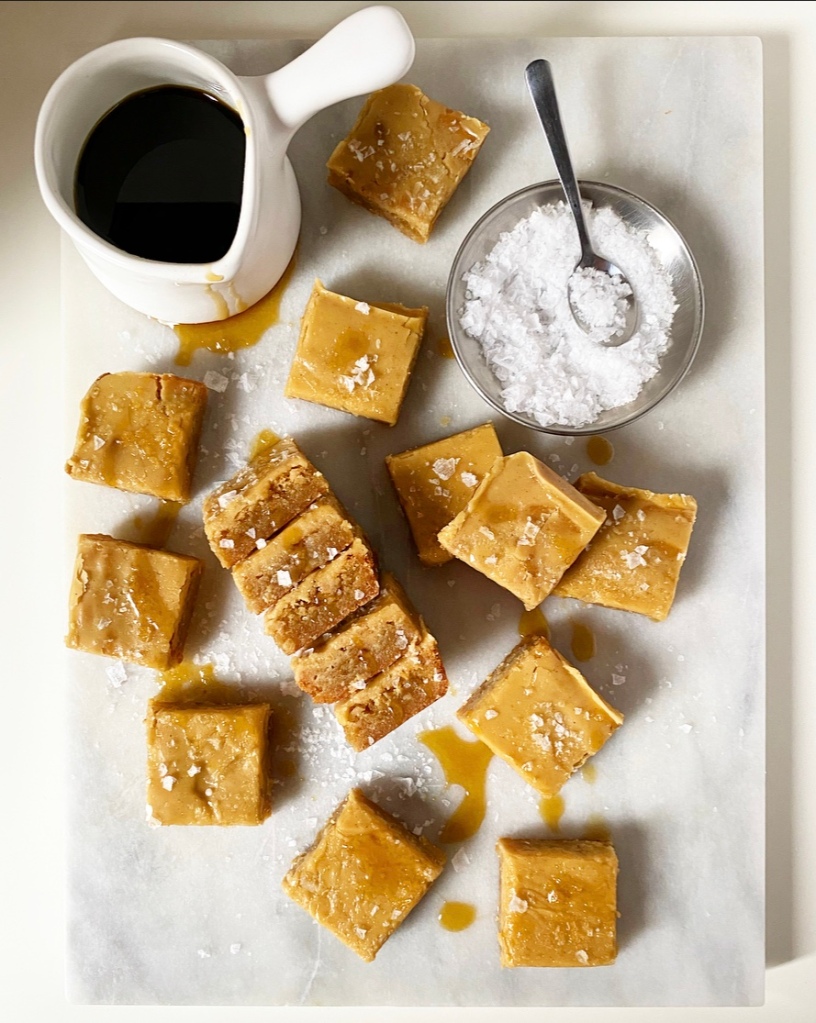
I’ve made tons of maple recipes over the years, including a layer cake, caramel corn, and some incredible sandwich cookies, but I never run out of new ideas for how to use it. Not gonna lie though, I think I’ve outdone myself with these Salty Maple Brown Butter Blondies.

You read that right. Salty. Maple. Brown Butter. Blondies. That’s like everything good in the world in one baked good.

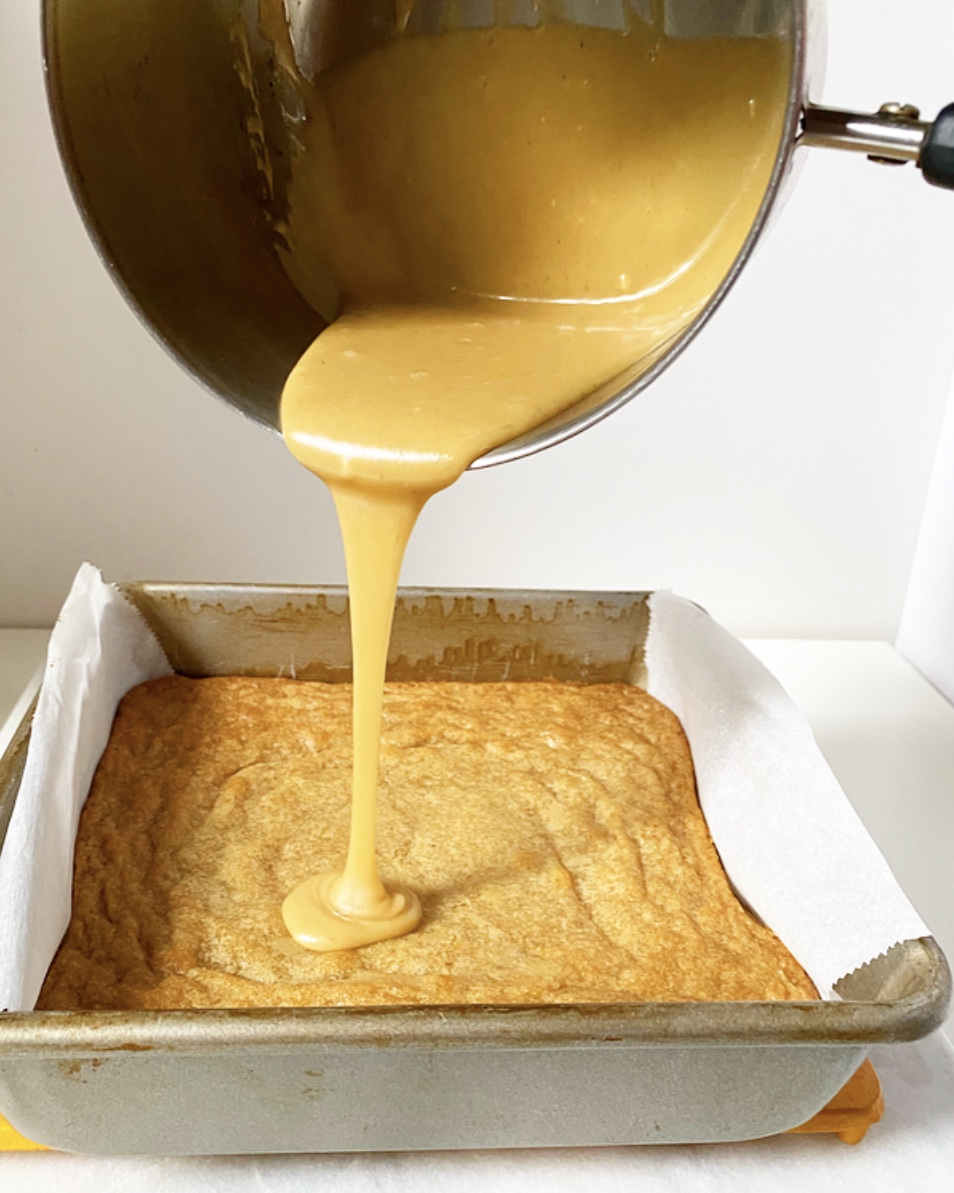
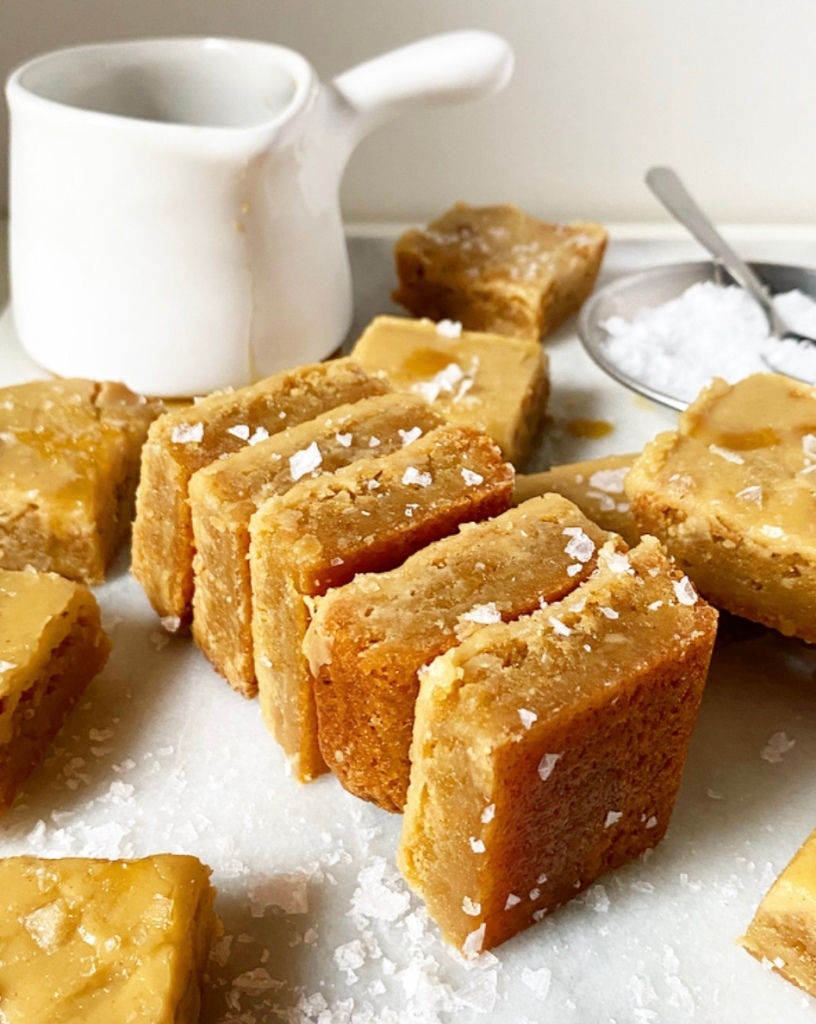
The blondies themselves are a classic recipe with a little less brown sugar and a whole lot of maple syrup. They bake up without fuss and would be great by their lonesome, but then you’d be foregoing the magic of the Salty Maple Brown Butter icing. It gets poured on the blondies warm and settles into a thick layer reminiscent of maple candy. But, you know, with brown butter and flaky finishing salt.

Salty Maple Brown Butter ​Blondies

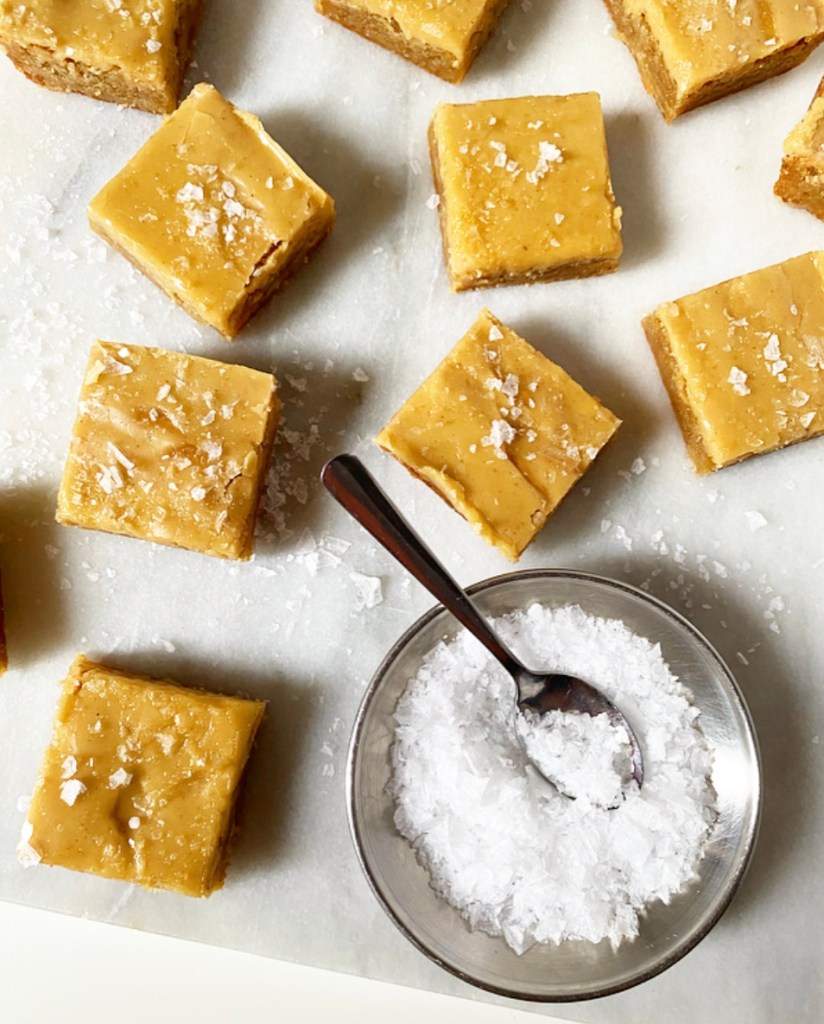
Salty Maple Brown Butter Blondies are sweet, salty, and very buttery, and have the textures of both a perfect chewy cookie and soft maple candy. Their maple flavor shines so brightly and just gets better and deeper as they age. Yes, I am telling you to take your time eating these, but I’ll be the first to admit that’s easier said than done.

Salty Maple Brown Butter ​Blondies
Salty Maple Brown Butter Blondies
makes one 8- or 9-inch square pan, about 16 blondies

Blondies:
1/2 cup (1 stick) unsalted butter
1/2 cup granulated sugar
1/2 cup light brown sugar, packed
1/4 cup pure maple syrup (I use Grade A Dark Color, Robust Taste)
1 large egg, room temperature
2 teaspoons pure vanilla extract
1 cup all-purpose flour
tiny pinch of ground nutmeg
1/2 teaspoon Kosher or sea salt

Salty Maple Brown Butter Icing:
2 tablespoons unsalted butter
3 tablespoons pure maple syrup
1/2 cup confectioner’s sugar
pinch of Kosher or sea salt

For Finishing:
coarse or flaky salt (I used Maldon)

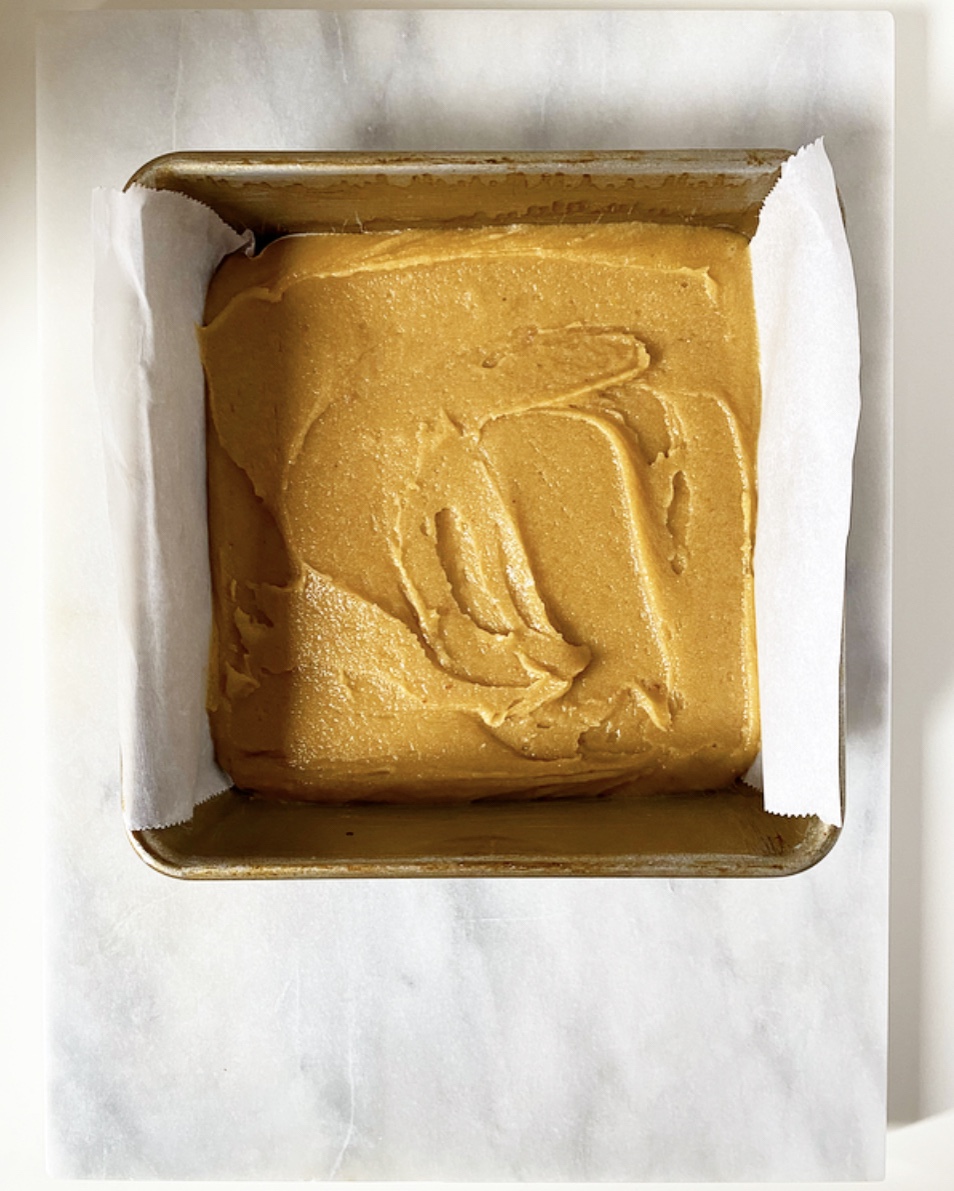
Preheat oven to 350F. Grease an 8- or 9-inch square pan and line with parchment, leaving overhang for bar-removal. Set aside while you make the blondie batter.

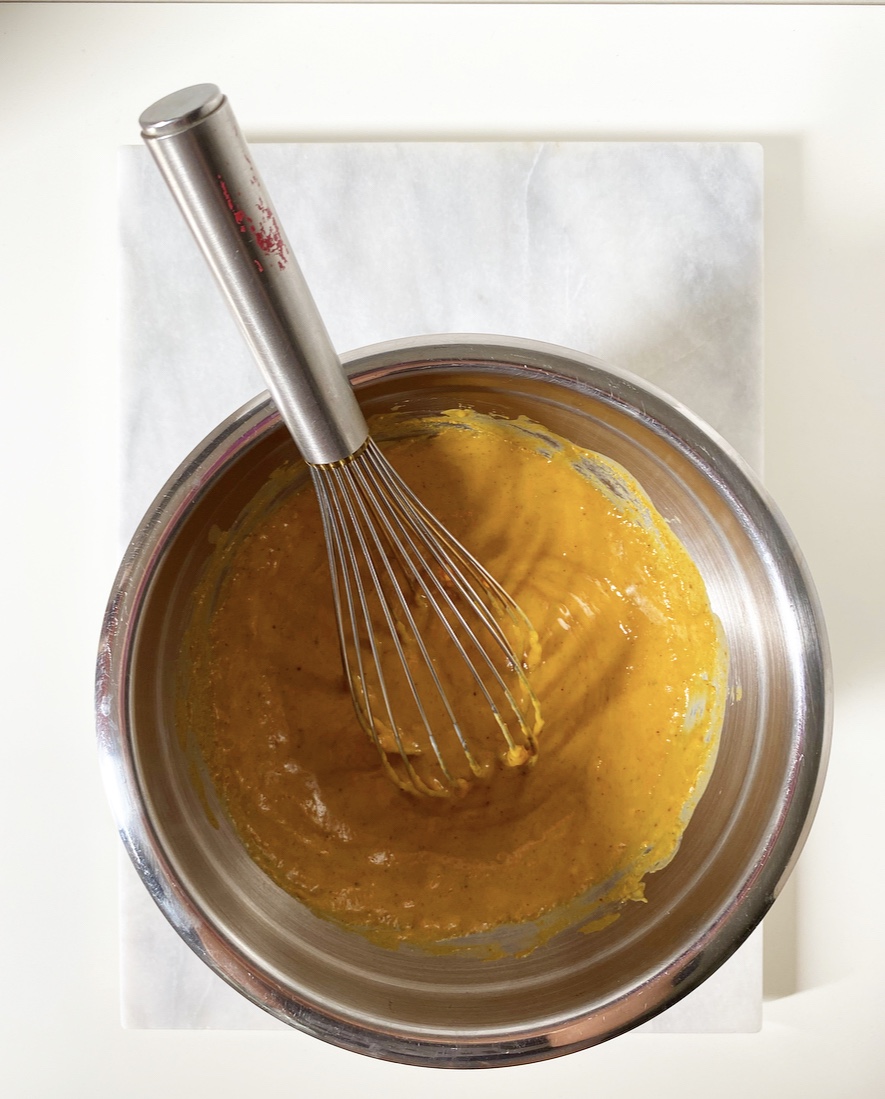
Brown the butter. Place butter in a light-colored saucepan over medium heat. Let butter melt. Butter will bubble and crackle as the water content evaporates. Swirl the pan frequently for 5-7 minutes, keeping an eye on the color. When the solids are turning brown and the butter is nutty and fragrant, remove the pot from the heat and immediately pour the brown butter into a medium-large mixing bowl.

Whisk granulated sugar, light brown sugar, and maple syrup into the brown butter. Mix in egg and vanilla, followed by flour, nutmeg and salt.

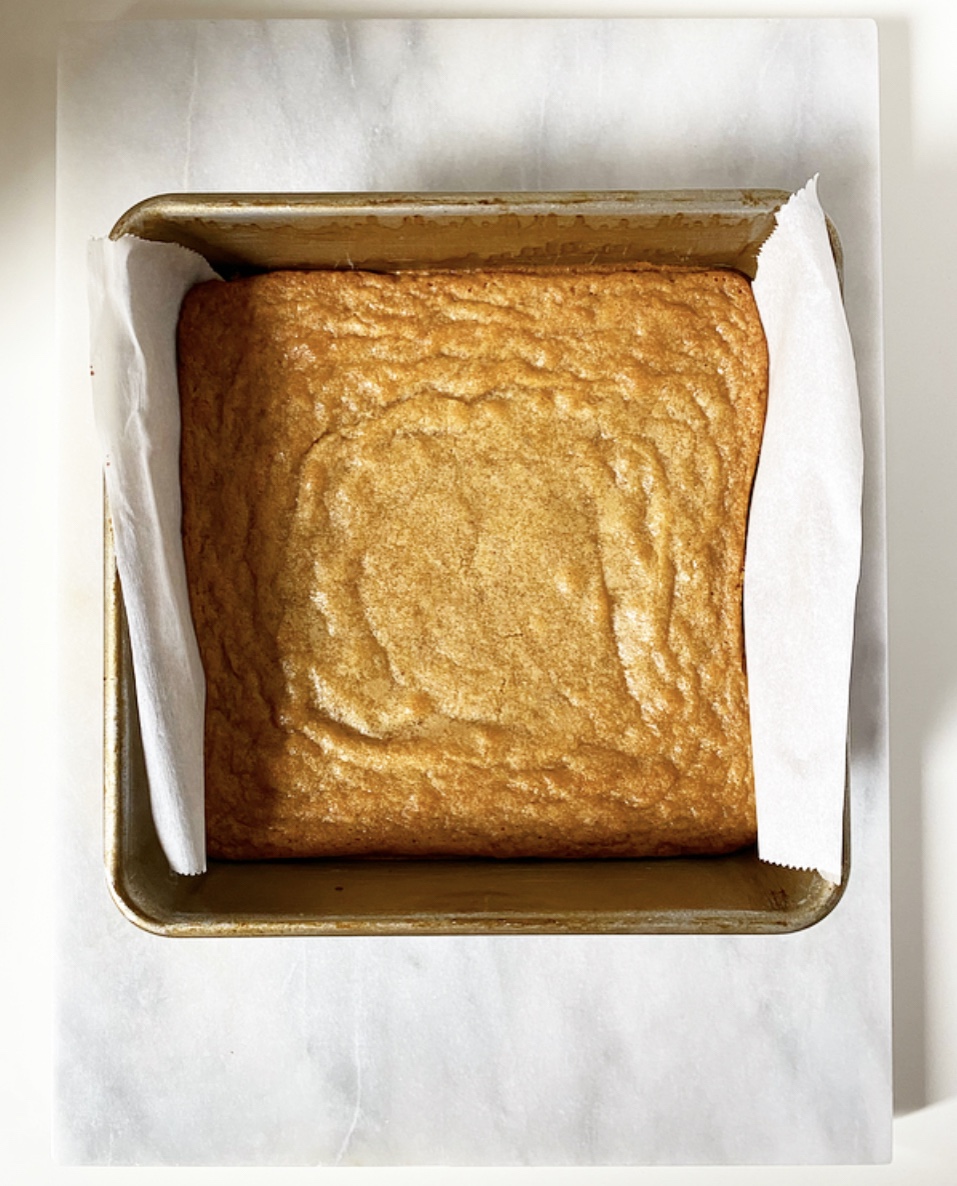
Spread the blondie batter in prepared pan. Bake 25-30 minutes, or until the top is golden and a toothpick inserted in the center comes out mostly clean (no raw batter). Let blondies cool 15 minutes in the pan on a rack.

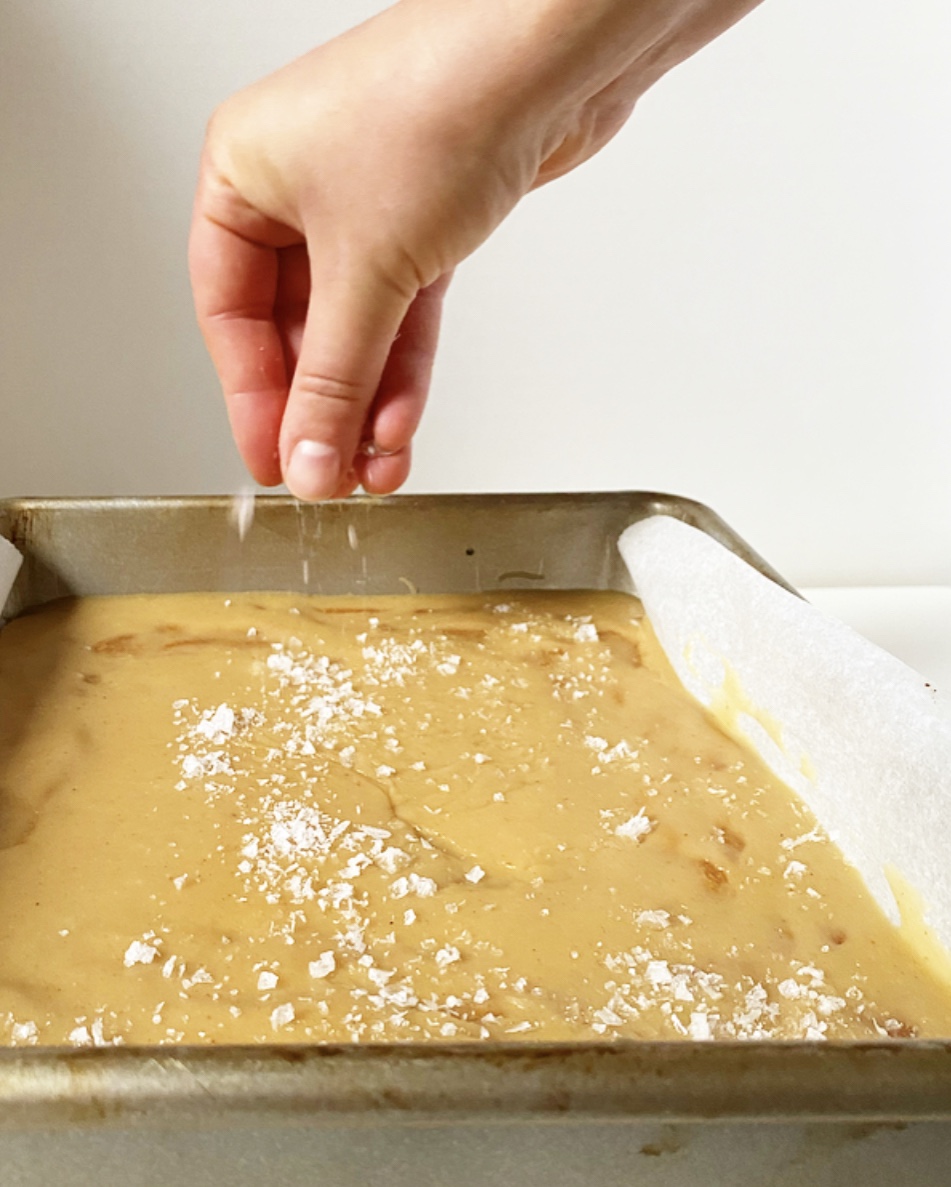
Meanwhile make the icing. Place butter in a light-colored saucepan over medium heat. Let butter melt. Butter will bubble and crackle as the water content evaporates. Swirl the pan frequently for 5-7 minutes, keeping an eye on the color. When the solids are turning brown and the butter is nutty and fragrant, remove the pot from the heat. Immediately whisk in maple syrup, followed by confectioner’s sugar and salt. Whisk until smooth.

Pour icing over the the blondies (still in the pan). Tilt the pan back and forth and coax with the back of a spoon so that the icing covers the blondies. Sprinkle with a generous pinch of flaky or coarse finishing salt. Let blondies continue to cool until room temperature.

Run a small, thin knife around the edge of the pan, then use parchment to lift them onto a cutting board. Slice with a large, sharp chef’s knife, wiping the blade clean between cuts. Serve.

Blondies will keep in an airtight container at room temperature for up to 4 days.
Advertisement

Vegan, Gluten-Free Apple Crisp

It may surprise you to learn that all our meals in Maine are vegan and gluten-free. While we don’t all subscribe to that diet year-round, keeping everything this way accommodates everyone (and keeps me from making multiple dinners). While those limitations may stymie some cooks, I do my best to lean all the way in, making sure that our baked goods and desserts fit the same parameters—it’s more fun to bake when everyone can enjoy the final product.

Vegan, Gluten-Free Apple Crisp​

Over the years, our Maine menus have included gluten-free graham crackers, baked oatmeal, blueberry popsicles, pumpkin oatmeal, peanut butter cookies, and a sheet cake. Knowing we’d be up there for the autumnal equinox this time around, this year’s major dessert offering was an easy and seasonal Vegan, Gluten-Free Apple Crisp.

Oh, y’all, I love crisps. They’re so easy and so satisfying—they hit all the same buttons as pie, but they’re a tiny fraction of the work. You can make them with pretty much any fruit, changing up the spices and such to suit whatever it is you have on hand, and—oh yeah—you can serve them warm from the oven without any concern for structural integrity. They’re not recipes for instant gratification, but when it comes to baking from scratch, they’re not far off!

This Vegan, Gluten-Free Apple Crisp has the same steps as the traditional variety: make the filling, make the topping, layer them, then bake ‘til bubbly and serve with vanilla ice cream. The only differences here are that the butter is vegan, the flour is made of almonds, and the ice cream is dairy-free. The crispy, nutty, oat-laden topping and the perfectly spiced apple filling you love are all still there, and they are spectacular. Especially when eaten with friends you love on an island off the coast of Maine.

Vegan, Gluten-Free Apple Crisp
makes one 9-10 inch dish, about 6 servings

Filling:
4-5 large apples, peeled & thinly sliced (5 cups slices)
2 teaspoons apple cider vinegar
1/2 cup granulated sugar
1 1/2 tablespoons cornstarch
1 teaspoon ground cinnamon
1/4 teaspoon ground nutmeg
1/4 teaspoon Kosher or sea salt

Crisp Topping:
1 cup rolled oats
1/2 cup almond flour
1/2 cup granulated sugar
1/2 teaspoon ground cinnamon
1/4 teaspoon ground nutmeg
1/2 teaspoon kosher or sea salt
1/2 cup vegan butter (or refined coconut oil), melted

For serving:
dairy-free vanilla ice cream (optional)

Preheat oven to 350F. Grease a 9-inch casserole dish or cast iron pan with vegan butter (or refined coconut oil). Set aside.

Make the filling. Place apple slices in a medium mixing bowl and toss with vinegar, sugar, cornstarch, cinnamon, nutmeg, and salt. Transfer to the prepared baking dish.

Make the crisp topping. In a medium mixing bowl (I just wipe out the one I used for the apples), whisk together oats, almond flour, sugar, cinnamon, nutmeg and salt. Add melted butter and stir until everything is saturated. It may seem sandy; this is okay. Scatter topping onto the apples.

Bake 28-30 minutes, until topping is browned and apples are tender. Let cool 10 minutes before serving in bowls with vanilla ice cream, if desired.

Cover and refrigerate any leftovers for up to 4 days. Reheat before serving.

Sparkly Applesauce Muffins

Sparkly Applesauce Muffins​

These Sparkly Applesauce Muffins are so easy and so good! They’re a perfect treat for transitioning from summer to fall, before everything is truly all pumpkin spice all the time…which will be next week on this website and also everywhere.

The batter is made with ingredients you likely already have at your disposal and comes together in a flash. Divide it into a muffin tin, filling each well up to the top, and then sprinkle on a thick (thick!) layer of sugar and pie spices before sliding them into the oven.

While baking, the muffins will dome dramatically. This is because of the baking powder and baking soda, of course, but also because the oven time begins with a blast of 425F heat that jumpstarts the rise. After five minutes, the temperature is reduced to 375F for the remaining time, yielding tender muffins with the most glorious sparkly, crackled tops!

Sparkly Applesauce Muffins​

Once the muffins are cool enough to handle, dig in! You’ll love the simple balance of pie spices and buttery apple flavor, and that’s to say nothing of the textures! The tops are crisp and crunchy, and the insides are sooo soft. Be forewarned that this perfect combination is fleeting, however, as the topping will start to melt in about a day. If you want to keep your applesauce muffins around for longer, bake them without the sugary flourish. There’s no need to miss out entirely though—you can still have the sparkling effect by painting the tops of the cooled muffins with butter and dipping them into the spiced sugar before serving.

Sparkly Applesauce Muffins​

I’m all about living in the solution, y’all! Especially when it means there’s a sparkling batch of applesauce muffins on my counter and yours.

Sparkly Applesauce Muffins​
Sparkly Applesauce Muffins
makes 12 muffins

Topping:
1/4 cup granulated sugar
1 teaspoons ground cinnamon
1/2 teaspoon ground nutmeg

Muffin Batter:
1 teaspoon apple cider vinegar or lemon juice
~2/3 cup milk of choice, room temperature
2 cups all-purpose flour
1 cup granulated sugar, packed
1 1/2 teaspoons baking powder
1 teaspoon baking soda
1 teaspoon ground cinnamon
1/2 teaspoon ground nutmeg
1/2 teaspoon Kosher or sea salt
2 large eggs, room temperature
1/2 cup (1 stick) unsalted butter, melted & cooled slightly
1 cup (8 ounces) unsweetened applesauce

Preheat oven to 425F. Use muffin liners to line 12 cups in a standard muffin pan (or grease them well). Set aside.

Make the topping. In a small bowl, use a fork to whisk together sugar, cinnamon and nutmeg. Set aside.

In a liquid measuring cup or small mixing bowl, use a fork to whisk together vinegar and milk. Set aside to rest for 5-10 minutes, until curdled.

In a medium mixing bowl, whisk together flour, sugar, baking powder, baking soda, cinnamon, nutmeg, and salt. Set aside.

Whisk eggs into milk mixture one at a time, followed by melted butter and applesauce. Add half the liquid to the dry ingredients. Use a silicone spatula or wooden spoon to stir ingredients together (15 strokes maximum). Add remaining liquid and stir to combine (15 strokes maximum). Batter will be thick.

Divide batter among prepared muffin cups, filling to the tops. Sprinkle a heaping teaspoon of the topping mixture onto each well of muffin batter. Tap full pan five times on the counter to release any air bubbles.

Bake muffins 5 minutes. Reduce temperature to 375F and bake another 15-16 minutes, or until a toothpick inserted in the center comes out clean.

Let muffins cool in the pans for 10 minutes before removing to a rack to cool completely. Serve immediately. Leftovers will keep covered at room temperature for up to a day. Sugar topping will degrade over time.

Pumpkin Spice Spread & Pumpkin Pie S’mores

Pumpkin Spice Spread & Pumpkin Pie S’mores
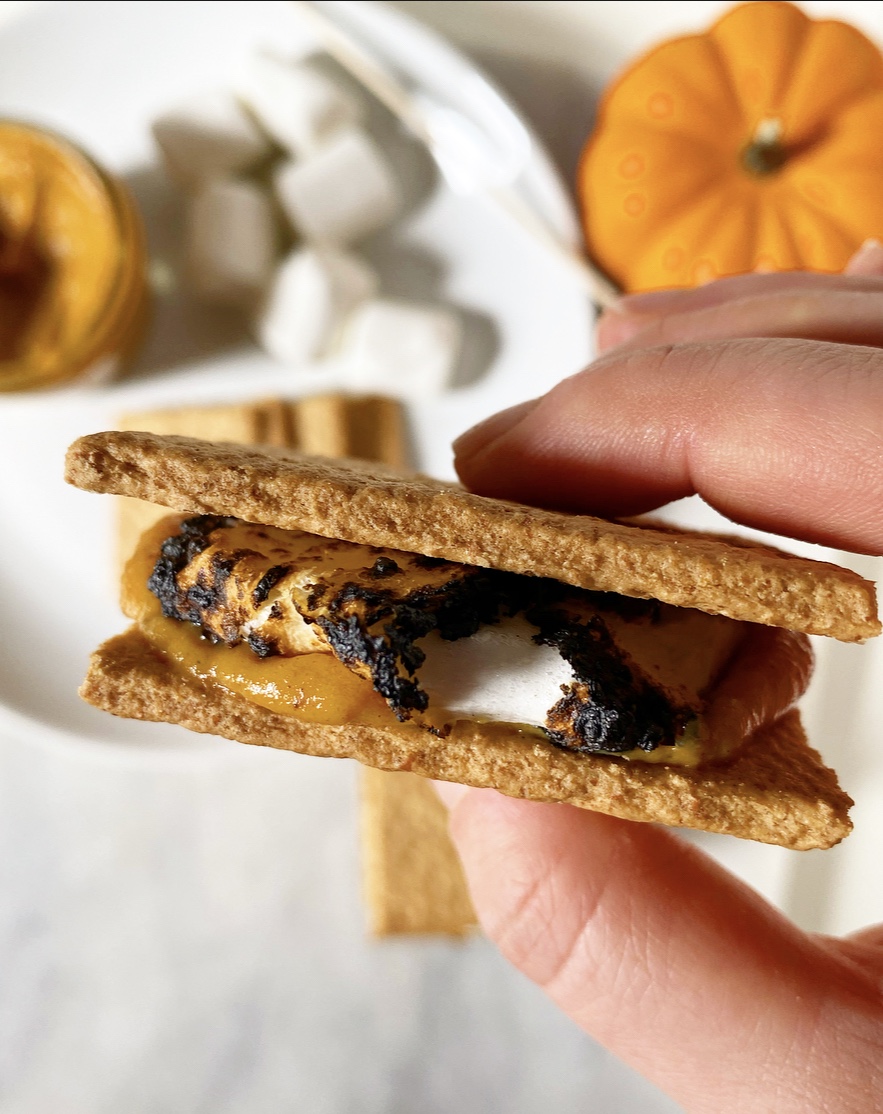
It’s fall, y’all! And not a minute too soon. I have been obsessed with these Pumpkin Pie S’mores for weeks and am so excited that I finally get to share them on here today!Pumpkin Spice Spread & Pumpkin Pie S’mores
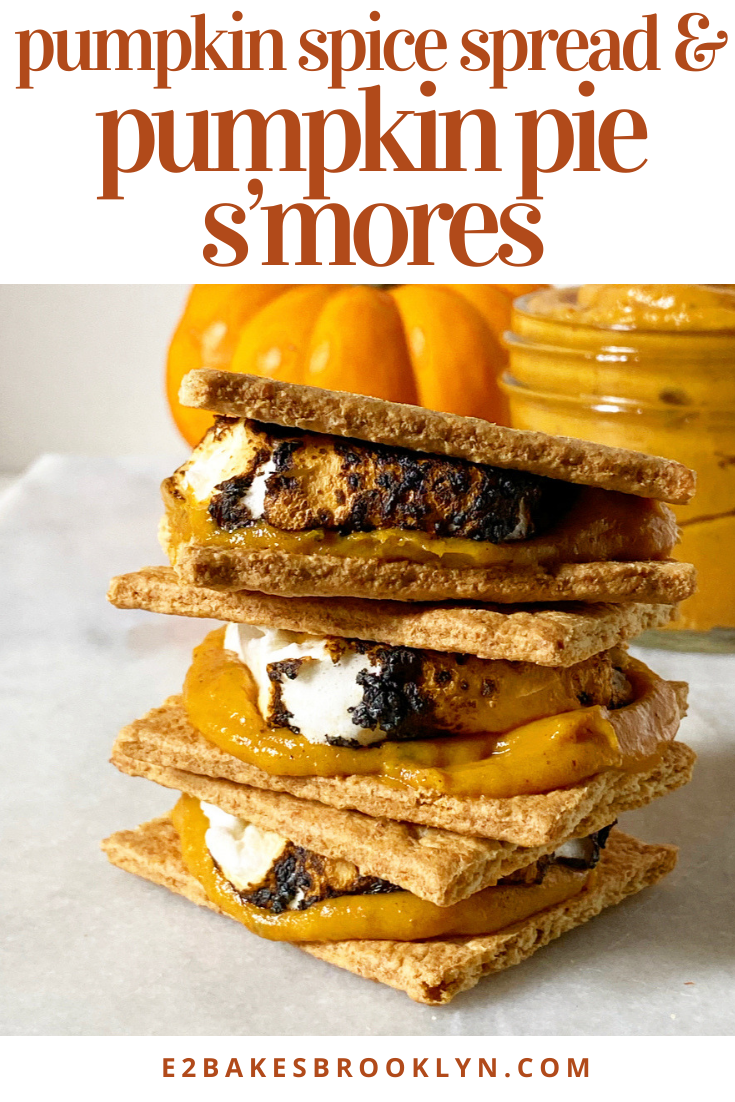
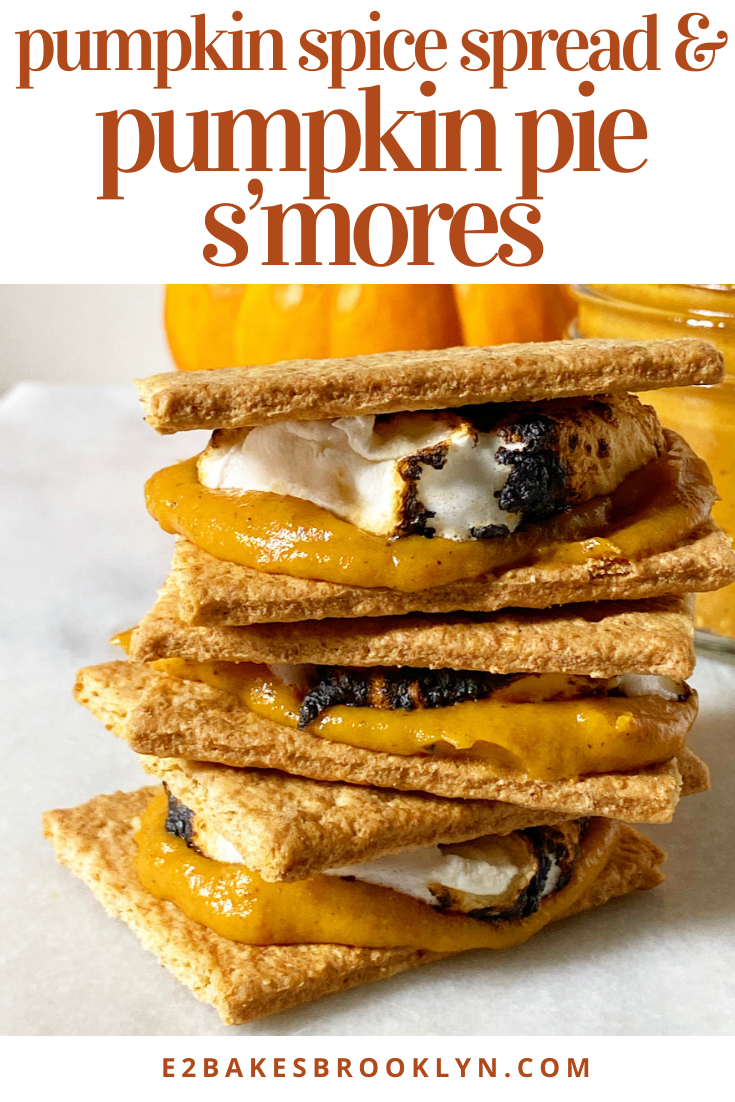
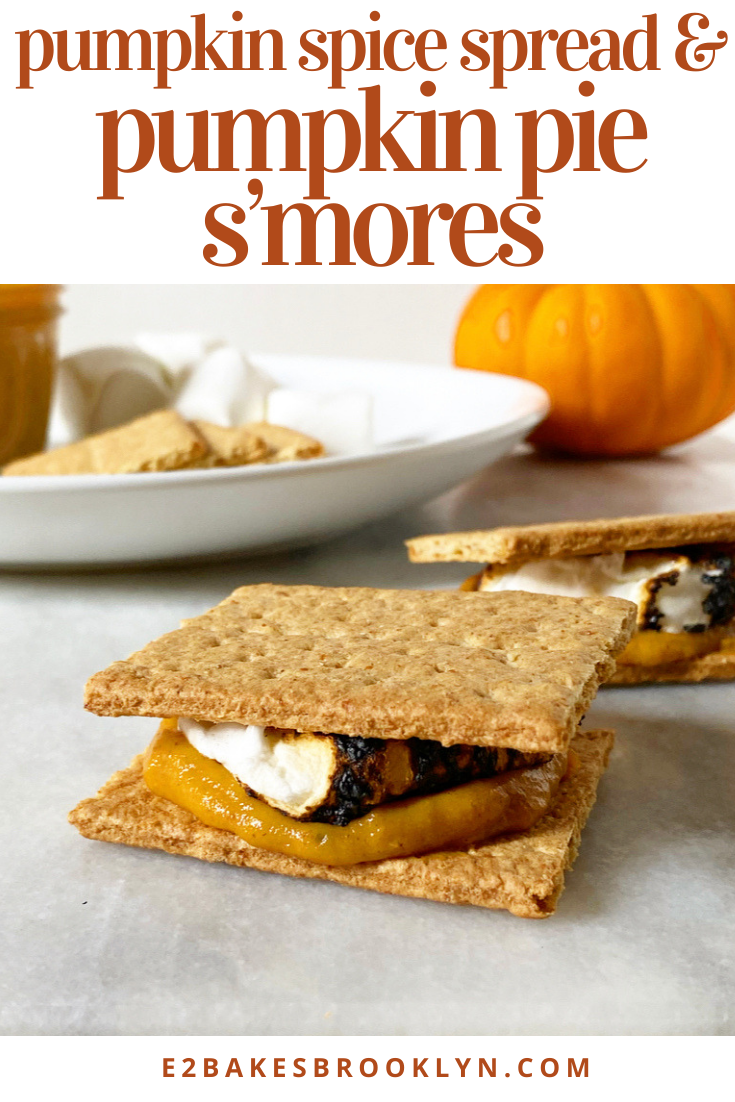
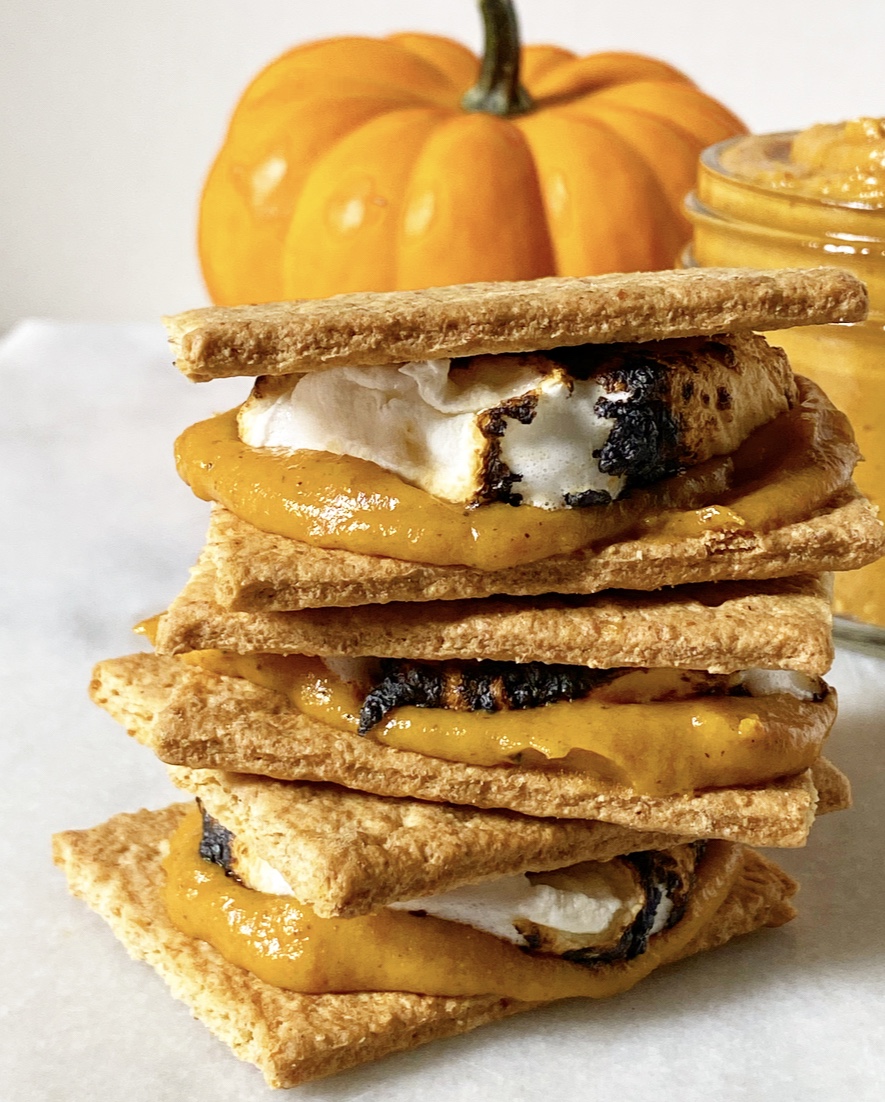
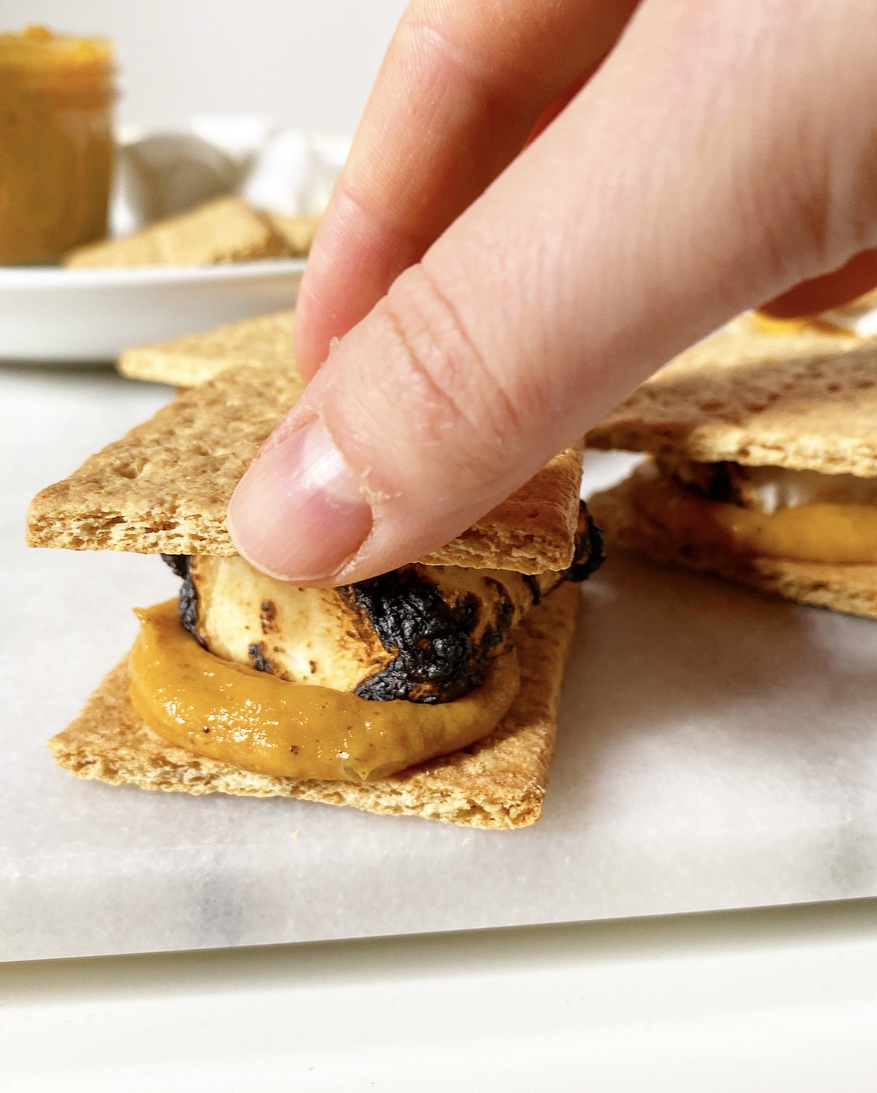
You read that right: Pumpkin Pie S’mores! As in graham cracker, toasted marshmallow and a little puddle of pumpkin pie all stacked together in one perfect bite. These are absolutely magical, if I do say so myself. And, I do, since I’ve been eating one around midnight pretty much everyday since Labor Day.Pumpkin Spice Spread & Pumpkin Pie S’mores
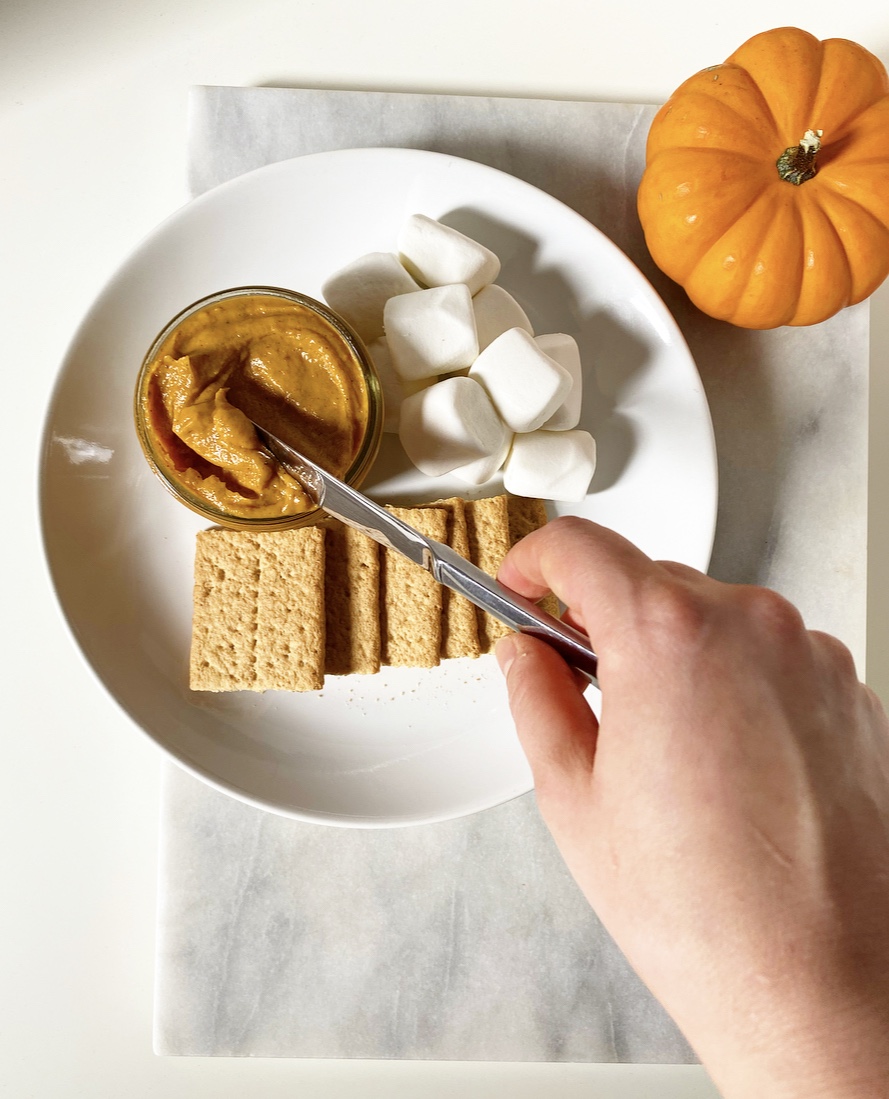
The key to this whole operation is a homemade Pumpkin Spice Spread. It’s basically a soft-set pumpkin pie filling that can be used anywhere you could use a little pumpkin spice flourish. Toast, biscuits, scones, cookies, swirled through no-churn ice cream, spread on a waffle, used as a fruit dip, or—you know it—stacked into seasonal s’mores! If you’re into pumpkin, this is a total game changer.Pumpkin Spice Spread & Pumpkin Pie S’moresPumpkin Spice Spread & Pumpkin Pie S’mores
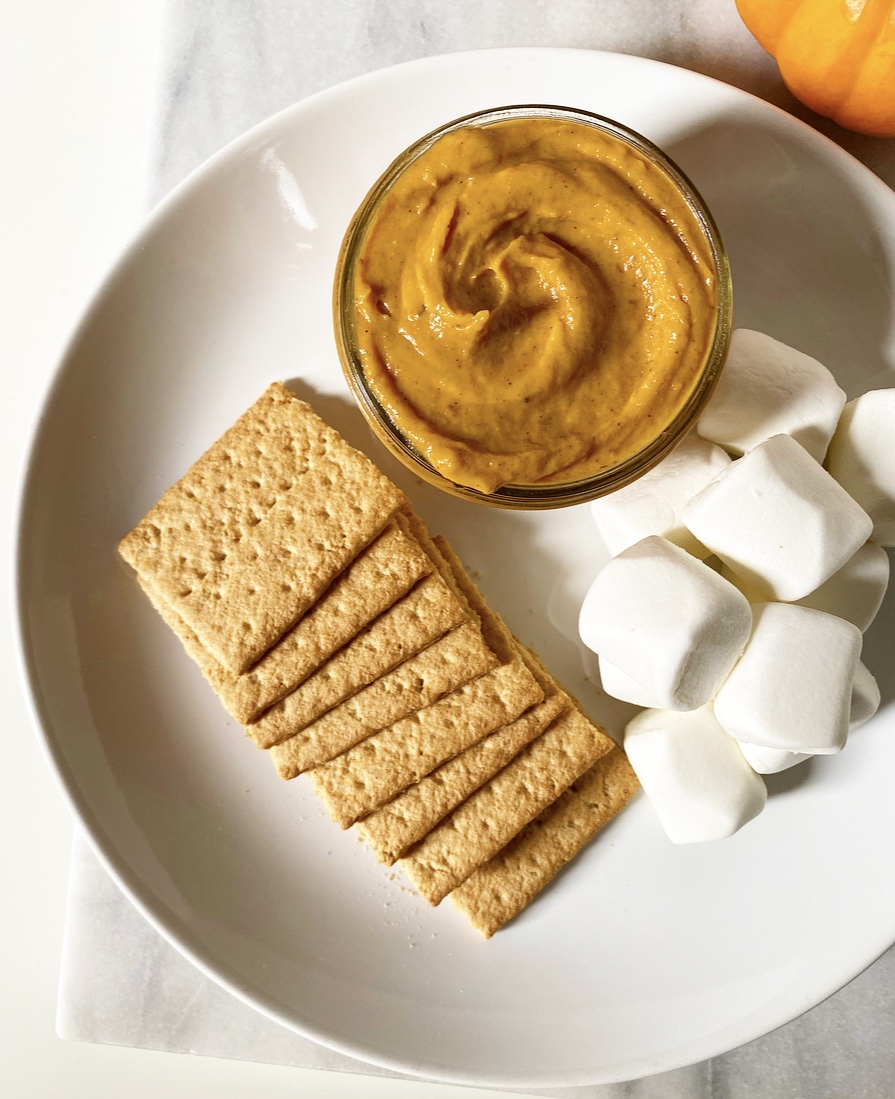
For those of you wondering if you can bypass the homemade spread by using pumpkin butter or mixing together some canned pumpkin, spices and brown sugar for your s’mores, the answer is “sure…but it won’t be the same.” While those options both work in a pinch, neither is as rich and decadent as Pumpkin Spice Spread. It’s made with sweetened condensed milk and has some body from egg yolks, so it’s every bit as luxurious as its pastry-wrapped counterpart and far more versatile. You’ll be seeing a lot of this stuff on here this season!Pumpkin Spice Spread & Pumpkin Pie S’moresPumpkin Spice Spread & Pumpkin Pie S’moresPumpkin Spice Spread & Pumpkin Pie S’moresPumpkin Spice Spread & Pumpkin Pie S’mores
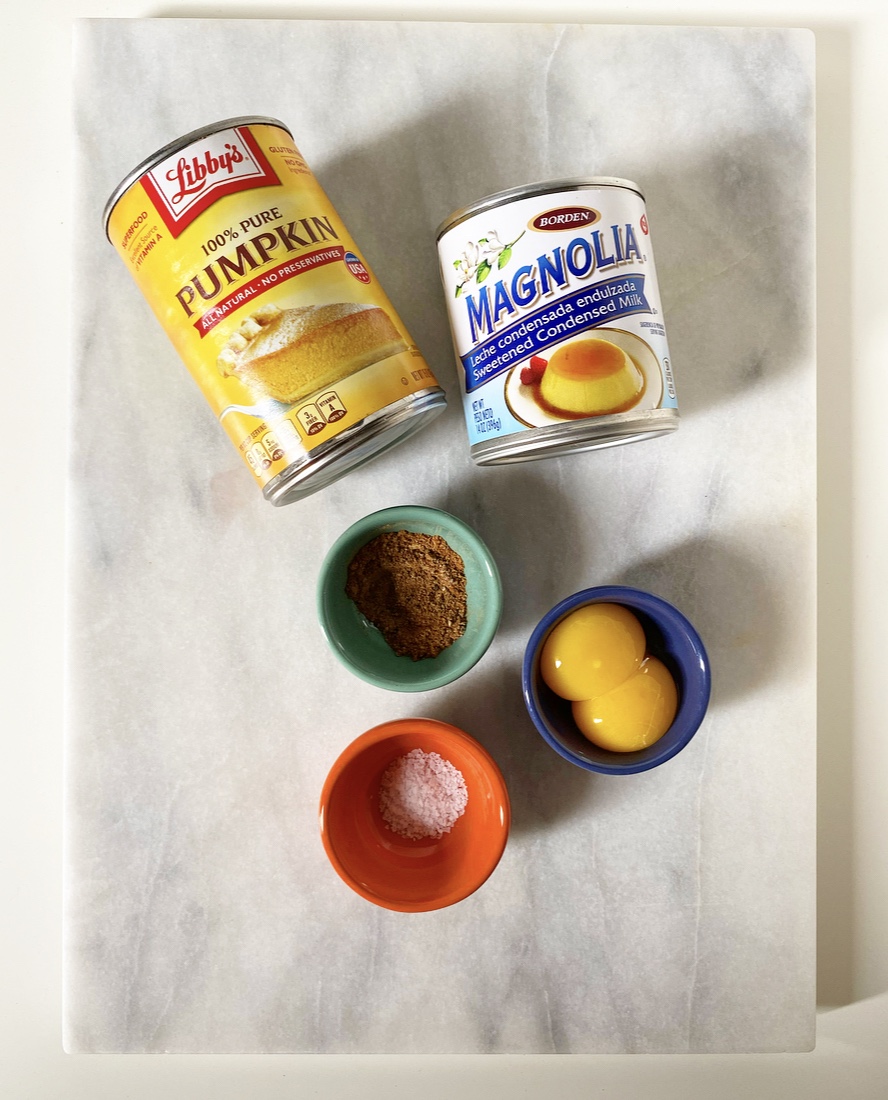
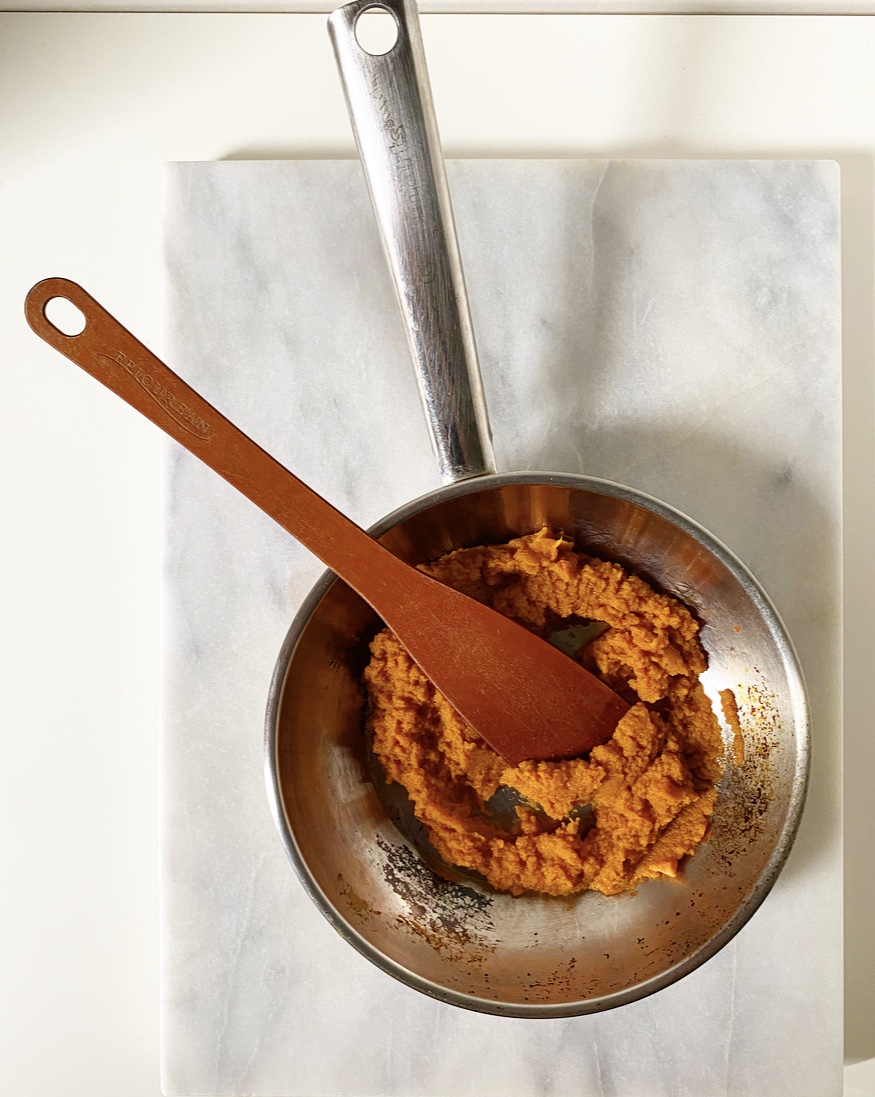
The whole Pumpkin Spice Spread process takes 25 minutes, fifteen of which are hands-off. The most “involved” step is caramelizing the pumpkin, and that’s no trouble at all. It’s literally pushing a cup of pumpkin purée around a dry sauté pan for ten minutes until some of its liquid evaporates and it darkens ever so slightly. This is to ensure that your Pumpkin Spice Spread is nice and thick and never one-note. If you’re pinched for time, you could probably get away without this step, but it really makes a difference in the end product.

The second and final step is to whisk the pumpkin together with the sweetened condensed milk, egg yolks, a spoonful of pumpkin pie spice and some salt. Set the whole bowl over simmering water for fifteen minutes, stirring when you remember, and…that’s it. I mean, you should definitely let it cool, but…that’s it.Pumpkin Spice Spread & Pumpkin Pie S’mores
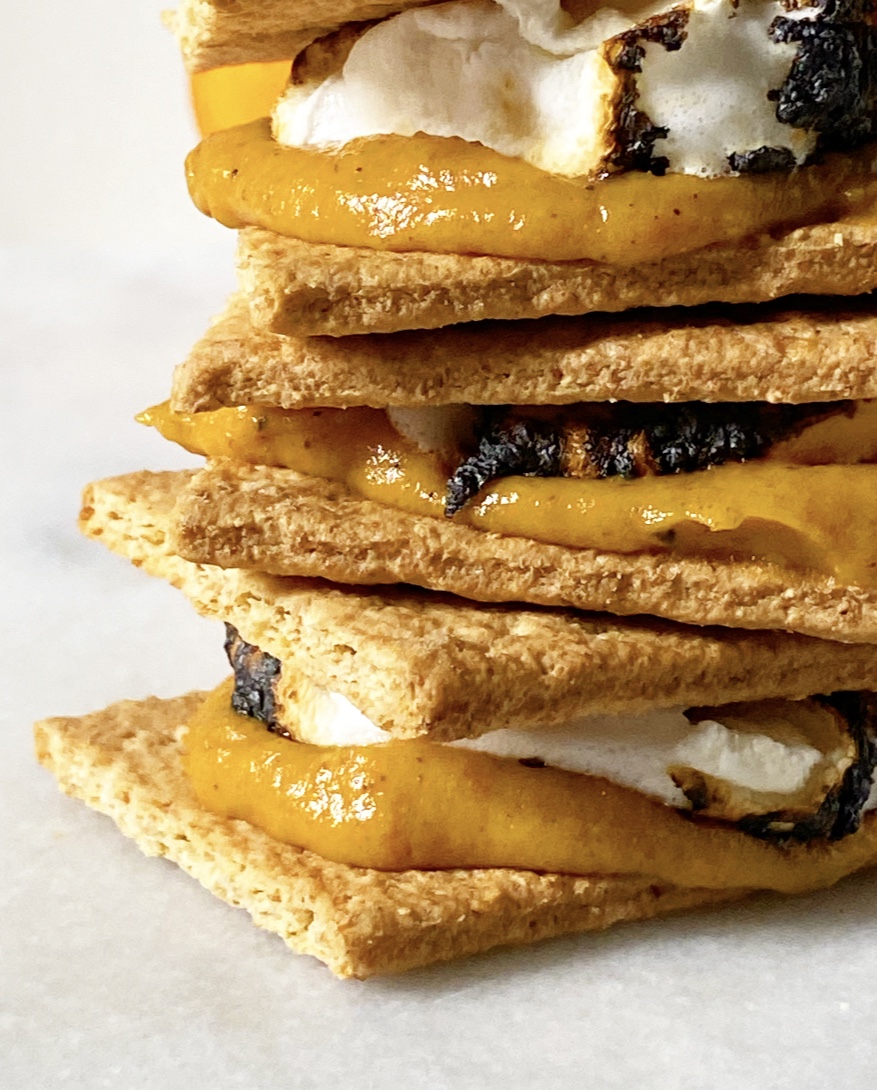
Well, except for the part where you dig it out of the fridge every night and sandwich some with graham crackers and a toasted marshmallow. Oh yeah, that’s it.Pumpkin Spice Spread & Pumpkin Pie S’mores

Pumpkin Spice Spread
makes about 2 cups

1 cup pure pumpkin purée (I use Libby’s)
1 14-ounce can sweetened condensed milk
2 large egg yolks
1 teaspoon pumpkin pie spice
pinch of Kosher or sea salt

Place pumpkin in a small sauté pan over medium-low heat. Cook, stirring frequently, for about 10 minutes, until slightly drier and a tiny bit darker in color. Remove from heat.

Fill a small pot with 1-2 inches of water. Set a heatproof bowl over the top, ensuring that the water does not touch the bottom of the bowl. Remove bowl and bring water to a simmer.

In the heatproof bowl, whisk together sweetened condensed milk, egg yolks, pumpkin pie spice and salt. Whisk in pumpkin purée. Place bowl over simmering water, creating a double boiler. Let cook, stirring frequently, until slightly thickened, about 15 minutes (it will thicken further as it cools). Remove from heat and let cool for 20 minute before transferring to a heatproof container. Press a piece of plastic wrap to the surface. Let cool completely at room temperature before storing in the refrigerator.

Pumpkin Pie S’mores
makes 4 s’mores

4 whole sheets honey graham crackers
2 tablespoons Pumpkin Spice Spread
4 large marshmallows

Carefully break each graham cracker sheet in half to produce 2 squares (8 squares total). Place bottom-side-up on a surface.

Top 4 of the graham squares with 1/2 tablespoon (1 1/2 teaspoons) each of the Pumpkin Spice Spread.

Toast the marshmallows. Place each marshmallow on a skewer. Turn a gas stove flame (or other heat source) to medium-low. Carefully toast marshmallow over the top before transferring it onto Pumpkin Spice Spread. Repeat with other marshmallows. Turn off stove. If you’d like to toast your marshmallows with another at-home method, see here.

Top marshmallows with the remaining graham squares, top-side-up. Serve immediately.Pumpkin Spice Spread & Pumpkin Pie S’moresPumpkin Spice Spread & Pumpkin Pie S’moresPumpkin Spice Spread & Pumpkin Pie S’mores

Friday Favorites: Maple Syrup

Hello from San Francisco! I’m visiting to celebrate my best friend, Tad’s 35th birthday (it’s today!) and do whatever people do in San Francisco. I’ve never been here before, so I’m excited to find out what that is. So far, it’s seeing Hamilton (again!) on tour and going to Sausalito.

What all this has to do with maple syrup and baking, I don’t know. What I do know is that I love to cook and bake with maple syrup, especially this time of year. It’s so delicate, but has incredible depth and versatility. I love it on pancakes and waffles, of course, but I’ve used it in everything from cookies to cake to nut butter to popcorn to pie! I’ve even got a new maple-centric recipe coming at you next week. But first, here are five of my favorite maple recipes from the archives.

Friday Favorites: Maple SyrupMaple Creme Sandwich Cookies

This is the first maple-based recipe ever to appear on this blog, and one of the first recipes to appear on this blog, period. I hated the photos, and so have sort of buried it in the archives…but no more! I re-baked the recipe this week, so now the photos reflect how delicious these chewy, creme-filled sandwich cookies actually are. Oh, they are goooood. I’ve had more than a few people claim these are the best cookies they’ve ever eaten. I don’t know about that, but I mean…they’re not not the best cookies I’ve ever eaten.

Friday Favorites: Maple SyrupMaple Layer Cake

I made this cake on a whim last fall and it’s still one of my favorite recipes on this site! It’s easy to see why. There’s plenty of pure maple syrup baked into and brushed onto the cake layers, and plenty more whipped into buttercream! This would make a great fall birthday cake or non-pie Thanksgiving dessert.

Friday Favorites: Maple SyrupMaple Pecan Pie

I made this pie nearly three years ago when this blog turned one! It’s got all the sweet, sticky, gooey nuttiness you want in a pecan pie, but it’s made with pure maple syrup instead of the usual dark corn syrup.

Friday Favorites: Maple SyrupMaple-Roasted Pecan Butter

If you’ve never made homemade pecan butter, go do it right now. Don’t forget to add a little maple syrup and spice and to spread it on every piece of bread and fruit in your house.

Friday Favorites: Maple SyrupSalty Maple Caramel Corn

Y’all, storebought caramel corn has nothing on this salty, maple-spiked homemade version. Not. A. Thing. Sweet & salty with a crisp, glass-like exterior—good luck not eating the entire batch yourself!Friday Favorites: Maple Syrup

Have you made these or any of my other maple treats? Let me know in the comments or on social media!