Category Archives: Entertaining

Baguette French Toast

Baguette French ToastThe great thing about classic dishes is that there are a million ways to make them. Take Chocolate Chip Cookies for instance: whether you like them soft and chewy, thin and crispy, with chocolate chips, with chocolate chunks, more brown sugar, more granulated sugar, etc., there’s a recipe out there to suit your preferences. The same rings true for just about any dish you can think of, really–no matter what you like, I guarantee there is someone else out there who feels the same way. While I like to think this blog is full of the “best” ways to make 200+ recipes, it’s really just a bunch of things made exactly the way I like them.

Baguette French ToastToday, let’s talk about French Toast, that classic dish made by dipping day-old bread in custard, frying it up, and serving it with maple syrup. The concept is simple, but there are endless ways to make it. Whether you like your French toast thin, thick, with just a whisper of custard, soaked with custard, fried, baked, stuffed, baked and stuffed, on the sweet side, with more of a savory note, or any other way, know that a recipe exists that suits your needs.

Baguette French ToastBaguette French ToastWhile I don’t think I’ve ever turned up my nose at any variety of French Toast, right now I’m into Baguette French Toast. My particular recipe was born of necessity on the last morning of my trip to Maine–we had two kinds of bread leftover, and I’ll be damned if I’m going to make this custard-dipped syrup-smothered dish with whole wheat sandwich bread. Thick-cut white bread or bust, am I right?!

Baguette French ToastBaguette French ToastMy Baguette French Toast (or Pain Perdu, if you’re feeling kicky) is made with thick slices of day-old baguette. You want each piece to be somewhere between 1- and 1 1/2-inches thick; I can get about 20 slices out of a baguette. The advantage to using thick slices of slightly-stale crusty bread is that they can soak up a lot of custard without getting mushy and weird. This French toast has all the fluffy texture your (or uh, my) little heart desires, but also stays fully intact.

Baguette French ToastLet’s talk about the custard. While the (very good) French toast of my childhood was soaked in just eggs and milk, as an adult, I like mine to have a little more panache. I add cinnamon, a bit of sugar, salt, and vanilla to my custard, and while none of the flavors are particularly strong, they all work to make this breakfast treat taste balanced and delicious.

Baguette French ToastA word on mixing. There is nothing I dislike more than finding unadulterated bits of egg yolk or white on my French toast. To keep this from happening, I like to mix the cinnamon, sugar, salt, and vanilla into the eggs before adding the milk. This ensures a smooth, homogeneous custard.

Baguette French ToastBaguette French ToastI soak the baguette slices in the custard for about two minutes per side before frying them in a combination of butter and oil. Yes, butter and oil. Why? Because I want the flavor of butter and the smoke point of canola oil. If I used only butter, I’d run the very real risk that it would burn, and if I used only oil, I’d miss out on flavor. By using a combination, I get plenty of flavor and crispy edges.

Baguette French ToastBaguette French ToastBaguette French ToastAs far as service goes, it’s up to you. I like the usual maple syrup, but I also heartily endorse sifting confectioners sugar over the top. Dot it all with fresh fruit, if you feel so inclined. However you choose to serve Baguette French Toast, know that you and your guests are in for a treat.Baguette French Toast

Baguette French Toast
makes 4-5 servings

1 day-old baguette* (about 11-13 ounces)
3 large eggs
1 teaspoon ground cinnamon
3 tablespoons granulated sugar
1/4 teaspoon Kosher or sea salt
2 teaspoons pure vanilla extract
2/3 cup whole milk
1-2 tablespoons butter, for cooking
1-2 tablespoons neutral-flavored oil, for cooking (I like canola)

For Serving:
seasonal fruit
pure maple syrup
confectioner’s sugar

Use a serrated knife to remove the very ends of the baguette. Slice into 1-1.5 inch slices (about 20 slices). Set aside.

Make the custard. In a small-medium mixing bowl, whisk together eggs and cinnamon until smooth. Whisk in sugar, salt, and vanilla, followed by whole milk. Pour mixture into a shallow dish.

Soak about 8-10 baguette slices in the custard for 2 minutes per side.

Heat 1 tablespoon each of butter and oil in a heavy-bottomed skillet over medium-high heat. Place baguette slices in the skillet. Let cook until a golden brown crust forms, about 2-3 minutes. Flip baguette slices and cook an additional 2-3 minutes. Remove French toast to a plate.

Repeat soaking and cooking processes until all slices of baguette have been used. Add more butter and oil to the pan, as necessary.

Divide French toast over 4-5 plates. Top with seasonal fruit, maple syrup, and confectioner’s sugar, as desired. Serve immediately.

Note:

Don’t have a baguette? Use 8 slices of thick-cut challah, brioche, or soft Italian bread instead.

Baguette French Toast

Lemon Meringue Pie

Updated 03/17/2021. I’ve made several adjustments to this recipe, including reducing the amount of water and upping the sugar in the meringue for a shinier, more structured finish. Baking is a journey! New photos forthcoming.Lemon Meringue PieFor the next three weeks, I feel like I should call this blog E2 Bakes Fort Worth. I’m in town for the holidays and a family event during the first week of January. Three weeks of family time may seem like an eternity to some, but I think it’ll go by in a flash. When my immediate family and I get together, we just *click.* Everything is more fun with my parents and sisters around. Oh, and I can’t forget about our trusty schnauzer.

We used to do the big family Christmas every year, but these days, we prefer a quieter holiday. We cook and decorate and play Dominoes–it doesn’t sound like much, but it’s the best.Lemon Meringue PieSince we aren’t expecting any company this year, we don’t have to make any specific holiday menu. The plan is to make a lamb pot pie, and I’m hoping to make pots de creme for dessert, but we’ll see. That’s the great thing about Christmas being “just us.” We can make those things…or not. There are no expectations beyond an ear-splitting rendition of “O Holy Night,” and my mom’s all-citrus fruit salad.

But there is something to be said for traditions. I do not come from a family of bakers, aside from my grandmother, Nonnie. She would have been 98 this past Sunday. Nonnie made the best Buttermilk Biscuits and chocolate cake I’ve ever had, but she had much more than those two items in her baking repertoire.

When we were young and she was in good health, she would come over on Christmas Day with boxes and boxes of homemade desserts. Many of them were made up on the fly, using up ingredients she found around her little house. There were strawberry cakes and chocolate cream pies, and I recall one Christmas where my mom allowed us to eat her apple cake for breakfast for days. No two years were exactly alike, save for one item: Lemon Meringue Pie. I don’t remember her ever making one for another occasion.Lemon Meringue PieLemon Meringue PieLemon Meringue PieWhile Lemon Meringue Pie may not say Christmas to you, it does to my family and me. The flaky crust, lemony base, and airy topping bring back memories of our childhoods. While I was baking this pie yesterday afternoon, my dad stopped in for a few minutes. Instead of remarking at the horrific mess the kitchen had become, he looked at me and said “This brings back memories of being in my mother’s kitchen.” That’s probably the highest compliment he could give me.

Lemon Meringue PieLooking for more holiday recipes? You’ve come to the right place! Check out my Five-Ingredient Salted Marzipan Truffles, Iced Sugar Cookies, Pear & Cranberry Torte, Eggnog Bundt Cake, Gingersnaps, Lindor Truffle Peanut Butter Blossoms, and Chai Shortbread Snowballs. For food gifting, try my Hot Chocolate Mix, Brownie Mix, or pair these Orange Cardamom Pistachio Shortbread with a box of tea.

Lemon Meringue Pie
makes one 9-inch pie

1/2 recipe Cream Cheese Pie Dough (or other good crust)

Meringue:
1/4 teaspoon cream of tartar
2/3 cup granulated sugar
1 tablespoon cornstarch
1/4 cup warm water
1/2 teaspoon pure vanilla extract
5 large egg whites, room temperature

Filling:
5 large egg yolks
1 tablespoon fresh lemon zest
1 cup granulated sugar
1/4 cup cornstarch
1/4 teaspoon Kosher or sea salt
1 cup water
1/2 cup fresh lemon juice
1/2 teaspoon pure vanilla extract
2 tablespoons unsalted butter

Preheat oven to 425F.

Roll pie crust to 12-inch diameter. Fit it in a standard pie plate, trim the overhang to 1-inch, and crimp. Line the inside of the unbaked pie crust with parchment (or non-heavy duty foil). Fill with pie weights (or dried beans). Bake for 15 minutes. Carefully lift out parchment and weights. Bake an additional 10-12 minutes. Set crust aside to cool. Reduce oven temperature to 350F.

Make the meringue. In a small bowl, use a fork to combine cream of tartar and sugar. Set aside.

In a separate small bowl, use a fork to whisk together cornstarch, water, and vanilla. Microwave in 10 second increments, whisking with a fork in between, until slightly thickened. Mixture may still be white in color.

Place egg whites in a large mixing bowl. Using an electric mixer, beat them on medium-high for 1-2 minutes, until frothy. Add sugar mixture one tablespoon at a time, beating until completely incorporated. Add cornstarch mixture one tablespoon at a time, until combined. Continue beating on medium speed until egg whites are glossy and form stiff peaks. Set aside.

Make the filling. In a small mixing bowl, use a fork to beat egg yolks. Set aside.

In a large saucepan, use your fingers to rub lemon zest into sugar until combined. Whisk in cornstarch and salt. Whisk in water. Heat over medium heat, stirring frequently, until the mixture reaches a simmer and thickens. Whisking constantly, pour 1/3 of the mixture into the egg yolks. Whisking constantly, add egg yolk mixture to the pan. Stir in lemon juice and vanilla. Let simmer for 1 additional minute. Remove from heat. Whisk in butter. Push filling through a sieve to remove any lumps.

Pour hot filling into prepared crust. Drop spoonfuls of meringue over the top of the filling, and use the back of the spoon to spread it out. Bake 20 minutes, until meringue is lightly browned. Let pie cool completely on a rack, then chill for 3 hours before slicing and serving.

Lemon Meringue Pie is best served the day it’s made.

Lemon Meringue Pie

M&Ms Sandwich Cookies

 If you haven’t noticed, I love sandwich cookies. This blog has existed for eight months, and I already have six sandwich cookie recipes in my recipe index. I mean, cookies and frosting together–does a more perfect dessert even exist?! 

Today’s sandwich cookies are my version of a favorite treat from my teenage years. Back then, I was on the high school dance team. Once classes were over for the day, I’d have thirty minutes to change and eat something before practice. Usually the whole team would go for some sort of fast food (ah, teenage metabolism), but occasionally, when everyone was attending tutorials or some other after-school program, I’d zip over to Ridgmar Mall, run to the cookie kiosk, and grab one or two (okay, okay, three!) miniature M&Ms sandwich cookies before driving back to school to dance off all the calories.

To this day, I get nostalgic for those soft cookies, M&Ms, and creamy vanilla filling. But I can’t remember the last time I was in a mall (one of the advantages of living in New York City). And as I always have fresh baked goods at home, I no longer stop for mass-produced treats. 

These days, if I want a few M&Ms Sandwich Cookies, I make them myself. They’re so much better than anything you could get at a mall. Soft, chewy cookies speckled with colorful milk chocolate M&Ms and sandwiched together with a smooth vanilla filling?! Yes. I’ll take three.

Most of my sandwich cookie recipes make five or six dozen very small cookies–far more than anyone really needs. This recipe makes a much more manageable two dozen sandwich cookies. If you’d like more, this recipe doubles very well.

Also, these cookies are slightly larger than my regular sandwich cookies. Where all of my other sandwich cookie recipes require you to scoop dough by the teaspoon, the cookies in this recipe are each made with 1/2 tablespoon (1 1/2 teaspoons) of dough. The larger scoops cut down on the time spent rolling dough and also allow for more M&Ms in every bite! 

I love working with M&Ms for holidays. There’s a perfect color combination for every occasion–red and green for Christmas, orange and black for Halloween, pastels for Easter. Since the Fourth of July is coming up next week, I went with the red, white, and blue variety for this batch! I think they’re pretty cute 😊 No matter which holiday you’re making these for (even if it’s just that it’s the end of a long week), I know these M&Ms Sandwich Cookies will be a hit!

 Want more M&Ms treats? Check out my M&Ms-Potato Chip Cookies!

M&Ms Sandwich Cookies
makes 2 dozen sandwich cookies

1 1/2 cups all-purpose flour
1 teaspoon cornstarch
1/2 teaspoon cream of tartar*
1/2 teaspoon baking powder
1/4 teaspoon baking soda
1/2 teaspoon Kosher or sea salt
1/2 cup (1 stick) unsalted butter, softened to room temperature
1/2 cup granulated sugar
1/4 cup light brown sugar
1 large egg, room temperature
1 teaspoon pure vanilla extract
1 cup M&Ms milk chocolate candies

Filling:
1/2 cup shortening (or room temperature unsalted butter)
2 1/2-3 cups confectioner’s sugar
pinch of Kosher or sea salt
2 teaspoons pure vanilla extract
1-2 tablespoons heavy cream

In a medium-large mixing bowl, whisk together flour, cornstarch, cream of tartar, baking powder, baking soda, and salt. Set aside.

In a large mixing bowl, use an electric mixer to beat butter until light and fluffy, about two minutes. Beat in granulated and light brown sugars, followed by egg and vanilla. Mix in dry ingredients in two installments, combining completely after each addition. With the mixer on low, add in M&Ms and mix for 10-15 seconds until they are evenly dispersed. Cover and chill dough for 90 minutes, or up to three days.

Preheat oven to 350F. Line two baking sheets with parchment.

Scoop chilled dough by the 1/2 tablespoon (1 1/2 teaspoons) and roll into balls. Set dough balls about two inches apart on prepared pans. Bake 7-8 minutes, until the tops are no longer shiny. Let cookies cool on pans for five minutes before removing to a rack to cool completely. Repeat with any remaining dough.

Make the filling. In a large mixing bowl, use an electric mixer to beat shortening (or butter) until fluffy. Beat in 2 1/2 cups confectioner’s sugar and salt. Mix in vanilla and 1 tablespoon heavy cream. If filling is too thin, add more confectioner’s sugar. If it’s too thin, add an extra tablespoon of heavy cream. If you would like to pipe the filling, spoon it into a piping bag and snip off a corner.

There are two options for filling:

1. To assemble a sandwich cookie by piping, apply filling by pipe a circle in the middle of the underside of one cookie, leaving about 1/4″ around the edge. Top with a second plain cookie, with the underside filling-side-in. Repeat until all cookies have been used.

2. To assemble a sandwich cookie by spreading, use an offset frosting knife to spread 1/2-1 teaspoon on the underside of one cookie. Top with a second plain cookie, with the underside filling-side-in. Repeat until all cookies have been used.

M&Ms Sandwich Cookies will keep in an airtight container at room temperature for up to a week.

Note:

There is no substitute for cream of tartar in this recipe.

Sweet Cherry Cheesecake Bars

 As far as summer fruit goes, I don’t think anything beats fresh cherries. Not even mango.

When cherries start showing up at the greenmarket, I get a flood of new ideas. Pairing them with rhubarb in pie, making syrup for homemade sodas, rolling them into sweet rolls. There are a million possibilities for every bag! Sometimes though, it’s fun to go with a classic like cherry cheesecake. But my kitchen is a sauna this time of year, and working with a water bath and a full springform pan sounds less than appealing. Plus, there’s the 24 hour chill–who has time for that?!

Enter these Sweet Cherry Cheesecake Bars: shortbread crust layered with tangy cheesecake and sweet cherry pie filling, topped with a simple almond streusel. They have all the flavor of the classic cheesecake, no water bath or seemingly-eternal wait required! They still take a little time (they have to chill, after all), but they are far less of a production than a traditional cheesecake–simple enough for a weekend treat, but perfect for parties, too! 

These bars have four layers, but none of them are difficult or time consuming to make. Start by making the shortbread crust. Mix together flour, sugar, and salt before cutting in a cold stick of butter. The mixture will be very dry and seem like it won’t bake up to much, but it will. Pour the mixture into a parchment-lined pan, spread it out to cover the entire bottom of the pan, and then press it down with your fingers until it is one even layer. It will still be powdery-looking, but it will pack down easily and hold together. Bake that for ten minutes–it won’t be fully cooked in that time, but this little step will prevent the crust from getting soggy from the cheesecake and cherry layers.

Once you put the shortbread crust in the oven, use the same bowl you used for the crust to make the streusel topping. No need to wash the bowl–the streusel has all the same ingredients as the crust, plus almonds. Mix together flour, sugar, salt, and sliced almonds, then cut in a stick of butter. Refrigerate the mixture to keep the butter cold while you prepare the cherries and cheesecake.

Remove the crust from the oven and set the pan on a rack to cool while you make the cherry layer. I basically use my favorite cherry pie filling recipe, but cut the quantity in half. Many cherry cheesecake recipes ask for canned cherry pie filling, but this is way better than anything you’ll find in the grocery store. Simply mix three cups of halved, pitted fresh sweet cherries with 1/2 cup of sugar, three tablespoons of cornstarch, a touch of nutmeg, and some salt. The cherries will release some liquid while you make the cheesecake layer.

The cheesecake comes together in less than five minutes. Beat some cream cheese with a bit of sugar. Mix in an egg, followed by a teaspoon of lemon juice and some vanilla. That’s it. It will be smooth, creamy, and absolutely gorgeous! 

By the time the cheesecake is ready, the shortbread crust should be at room temperature and ready for layering. Spread the cheesecake mixture over the crust, and tap the pan on the counter a few times to release any air bubbles. Scatter the cherries over the top of the cheesecake, leaving behind any liquid that has collected in the bottom of the bowl. Press down lightly to sort of nestle the cherries into the cheesecake. Remove the streusel from the refrigerator and sprinkle that over the cherries. Put the full pan in the oven to bake for about 45 minutes.

The last part is the most difficult by far. Let the full pan cool to room temperature, and then refrigerate it for at least four hours. Yes, it’s a long time, but you want that cheesecake layer to be nice and cold when you finally bite in! Room temperature cheesecake? No, thanks! I like to make these bars the night before I need them. That way, they’re thoroughly chilled when I get up, and all that’s left to do is slice them up and grab a fork! 

Look at all those gorgeous layers! The sweet cherries, tangy cheesecake, buttery shortbread crust, and crispy almond streusel are amazing together–the combination of cherries and cheesecake are a classic for a reason. These Sweet Cherry Cheesecake Bars are wonderful the way they are, but if you’re looking for a red, white, and blue dessert for Independence Day, you could swap fresh blueberries for one cup of the cherries. I don’t know about you, but watching fireworks while snacking on patriotic cheesecake bars is right up my alley. 

 Sweet Cherry Cheesecake Bars
makes one 8×8″ pan, about 9-16 bars

Shortbread Crust:
1 cup all-purpose flour
1/4 cup granulated sugar
pinch of Kosher or sea salt
1/2 cup (1 stick) unsalted butter, cold

Streusel:
1/2 cup all-purpose flour
1/4 cup granulated sugar
pinch of Kosher or sea salt
1/4 cup sliced almonds
1/4 cup unsalted butter, cold

Cherry Layer:
3 cups pitted, halved sweet cherries
1/2 cup granulated sugar
1/8 teaspoon ground nutmeg
3 tablespoons cornstarch
pinch of Kosher or sea salt

Cheesecake:
12 ounces (1 1/2 bricks) full-fat brick-style cream cheese
3 tablespoons granulated sugar
1 large egg, room temperature
1 teaspoon fresh lemon juice
2 teaspoons pure vanilla extract

Preheat oven to 375F. Grease a 9-inch square pan, line it with parchment, and grease again.

Make the shortbread crust. In a medium mixing bowl, whisk together flour, sugar, and salt. Use a pastry blender or two forks to cut butter into flour mixture until the largest pieces are the size of small peas. Mixture will be dry and crumbly with big pieces of butter, not a cohesive dough. Pour mixture into prepared pan and use clean dry fingers to press it into the pan. Bake ten minutes and then let cool completely.

While the crust is cooling, make the streusel. In a medium mixing bowl, whisk together flour, sugar, salt, and almonds. Use a pastry blender or two forks to cut butter into dry ingredients until the largest pieces are the size of small peas. Set in the refrigerator to chill.

Prepare the cherry layer. Place pitted, halved cherries in a large mixing bowl. Stir in sugar, nutmeg, cornstarch, and salt. Set aside.

Make the cheesecake. In a large mixing bowl, use an electric mixer to beat cream cheese until light and fluffy, about two minutes. Beat in sugar, followed by egg, lemon juice, and vanilla. Spread mixture over the cooled crust. Tap the full pan on the counter five times to release any air bubbles.

Scatter cherries on top of cheesecake layer, leaving any excess liquid in the bowl. Press down lightly to nestle the cherries into the cheesecake. Sprinkle chilled streusel mixture over the top of the cherries. Bake full pan at 375F for 40-45 minutes, tenting with foil at the 25 minute mark.

Let bars cool in the pan on a rack until they reach room temperature. Refrigerate the full pan for at least four hours. Use the parchment to lift the bars out of the pan and onto a cutting board. Use a chef’s knife to slice them.

Serve immediately, or keep the bars covered in the refrigerator for up to four days.

Mango Upside-Down Cake

I know I just posted a mango recipe yesterday, but the universe seriously wants me to eat all the mangoes right now. Trader Joe’s has mango everything (even Joe-Joe’s!) and my beloved green market is positively bursting at the seams with them! And when they’re two for $3, how can I resist?!

I’ve been eating them with strawberries and lime, blitzing them into smoothies, making salsa, throwing dried mango into my granola and eating it with the fresh stuff. If there’s a way to eat a mango, I am doing it. I’m like Bubba in Forrest Gump…but with mango.

I usually enjoy my mangoes raw, but today I’m switching it up a little bit with this Mango Upside-Down Cake! It’s a soft brown sugar cake topped with thinly sliced mango and a simple brown sugar caramel. It’s super easy and perfect for entertaining this summer.

Since this cake is served upside-down, the mangoes are baked underneath the cake batter. This recipe starts with melting butter and dark brown sugar together until the sugar is no longer grainy. Once this happens, take the mixture off the heat, stir in some salt, and spread it over the bottom of the pan. Top the mixture with an even layer of thinly-sliced mango, cutting small pieces to fill in any large gaps.

Next comes the cake batter, which is basically my Vanilla Layer Cake batter with more brown sugar and the tiniest bit less vanilla extract. It’s a moist, soft, slightly dense cake that pairs perfectly with the juicy mango and caramel. Bake it all together for about 35 minutes, or until the smell of brown butter and caramelized mango makes you totally insane!
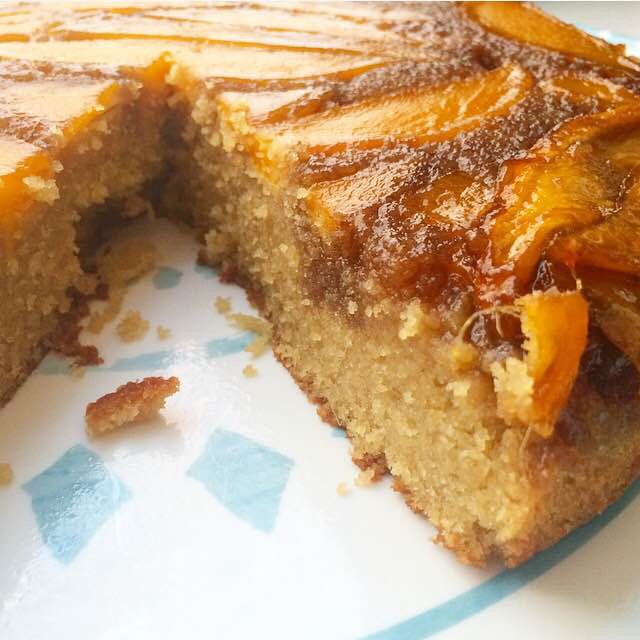
Let the cake cool in the pan for a few minutes before inverting it onto a cake stand or large serving plate. Don’t worry if a few pieces of mango stick to the pan–just use your fingers to nudge them back into place. Nobody will ever know it didn’t come out in one fell swoop.

 My favorite thing about this cake is that you don’t need to wait forever to serve it. There’s no worrying about melting buttercream or fretting over your piping skills. Nope. Mango Upside-Down Cake doesn’t require any decorating and can be served warm, room temperature, or cold! The cake pictured here was still slightly warm from the oven, and was amazing with a little scoop of coconut gelato.

Mango Upside-Down Cake is perfect for any occasion this summer, whether it’s Fourth of July, or that you came home from Trader Joe’s with eleven mangoes 😊

 Mango Upside-Down Cake
makes one 9-inch round cake

Mango Layer:
1/4 cup (1/2 stick) unsalted butter
2/3 cup dark brown sugar, packed
pinch of Kosher or sea salt
2 small (or 1 1/2 large) mangoes, thinly sliced

Cake:
1 1/2 cups all-purpose flour
2 tablespoons cornstarch
1/2 teaspoon baking powder
1/4 teaspoon baking soda
1/2 teaspoon Kosher or sea salt
1/2 cup (1 stick) unsalted butter, softened to room temperature
1/2 cup dark brown sugar
1/2 cup granulated sugar
2 large eggs, room temperature
2 teaspoons pure vanilla extract
1 cup buttermilk,* room temperature

For Serving:
Vanilla or Coconut Ice Cream

Preheat oven to 350F. Lightlu grease a 9-inch round cake pan with butter.

Make the mango layer. In a small saucepan, combine butter and dark brown sugar. Place over medium-low heat and stir constantly until butter and sugar are melted and no longer grainy, 3-5 minutes. Remove pan from heat and stir in salt. Pour mixture into prepared pan, using a silicone spatula to spread it over the entire bottom of the pan. Top the brown sugar mixture with one even layer of mango slices. Set aside.

Make the cake batter. In a small-medium mixing bowl, whisk together flour, cornstarch, baking powder, baking soda, and salt. Set aside.

In a large mixing bowl, beat butter with an electric mixer until light and fluffy, about 2 minutes. Beat in dark brown and granulated sugars. Add eggs one at a time, mixing completely after each addition. With the mixer on low, mix in vanilla and buttermilk. Add dry ingredients in two installments, scraping down the bowl as necessary.

Pour batter over mango layer, and spread with a silicone spatula to even out to top. Tap pan on the counter two or three times to release any large air bubbles. Bake 32-35 minutes, until a toothpick inserted in the middle comes out clean.

Let cake cool in the pan on a rack for 15 minutes. Run a small, thin knife around the edge of the pan a couple of times before inverting onto a cake stand or large serving plate mango layer-up.

Serve cake warm, room temperature, or cold.

Cake is best the day it’s baked, but will keep in the refrigerator for up to three days.

Note:

If you do not have buttermilk on hand, make your own! Pour one tablespoon of white vinegar or lemon juice in the bottom of a liquid measuring cup. Pour milk up to the 1 cup mark. Let sit five minutes before using as instructed in the recipe. I do not recommend using skim or fat free milk.

Mango Upside-Down Cake