Tag Archives: Fourth of July

Strawberry Rice Krispies Treats

Strawberry Rice Krispies Treats​

I’m on a bit of a freeze dried strawberry kick these days. While fresh are delicious and plentiful this time of year, they can be finicky in baking due to their high moisture content, so I tend to keep bags of freeze dried around no matter the season. Want a big burst of strawberry flavor in a cookie or cake or pastry without reformulating the recipe? Freeze dried strawberries to the rescue!

Strawberry Rice Krispies Treats​

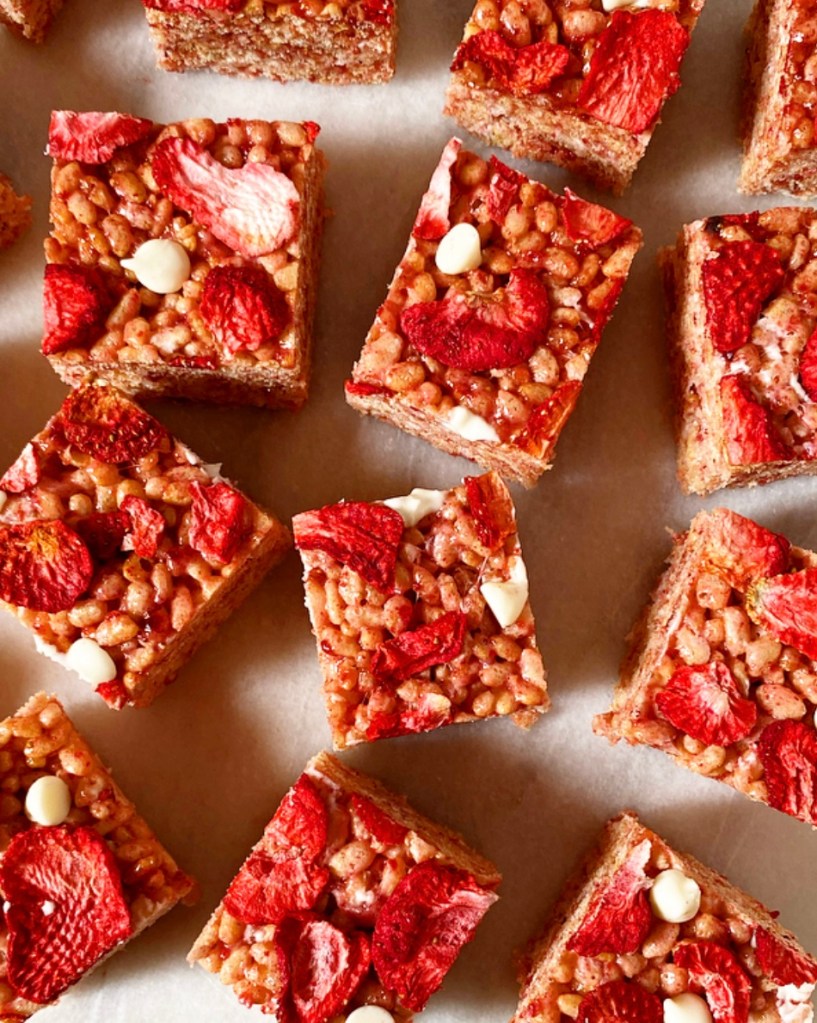
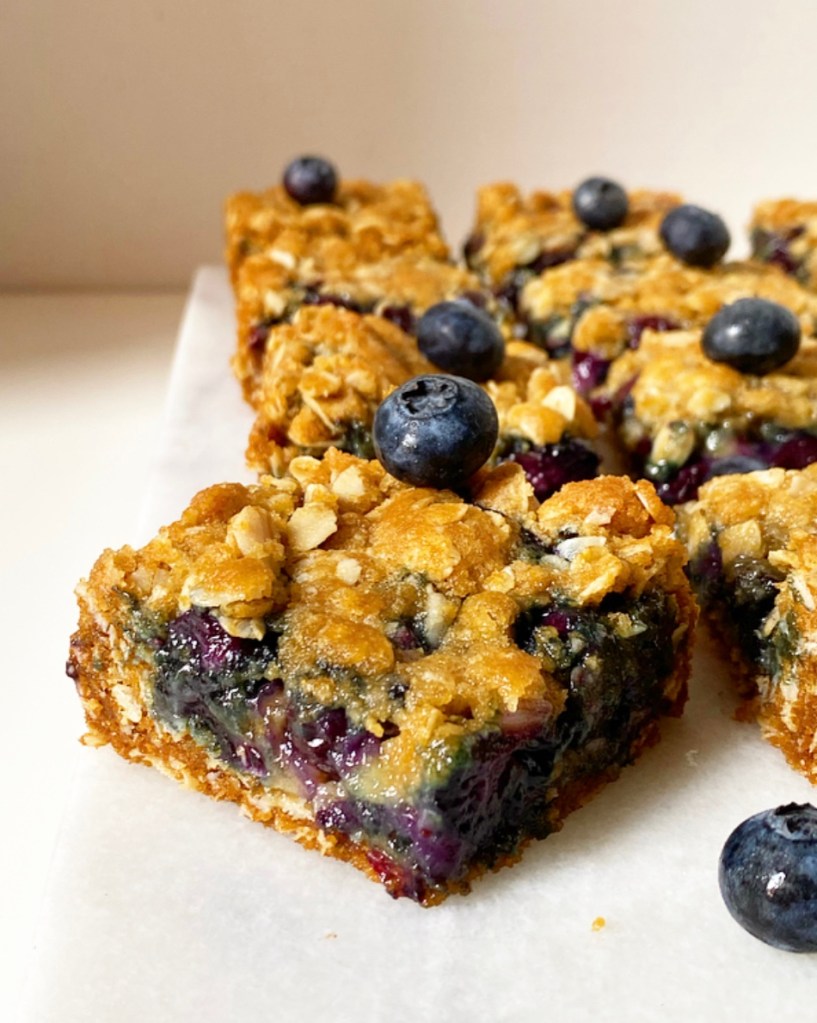
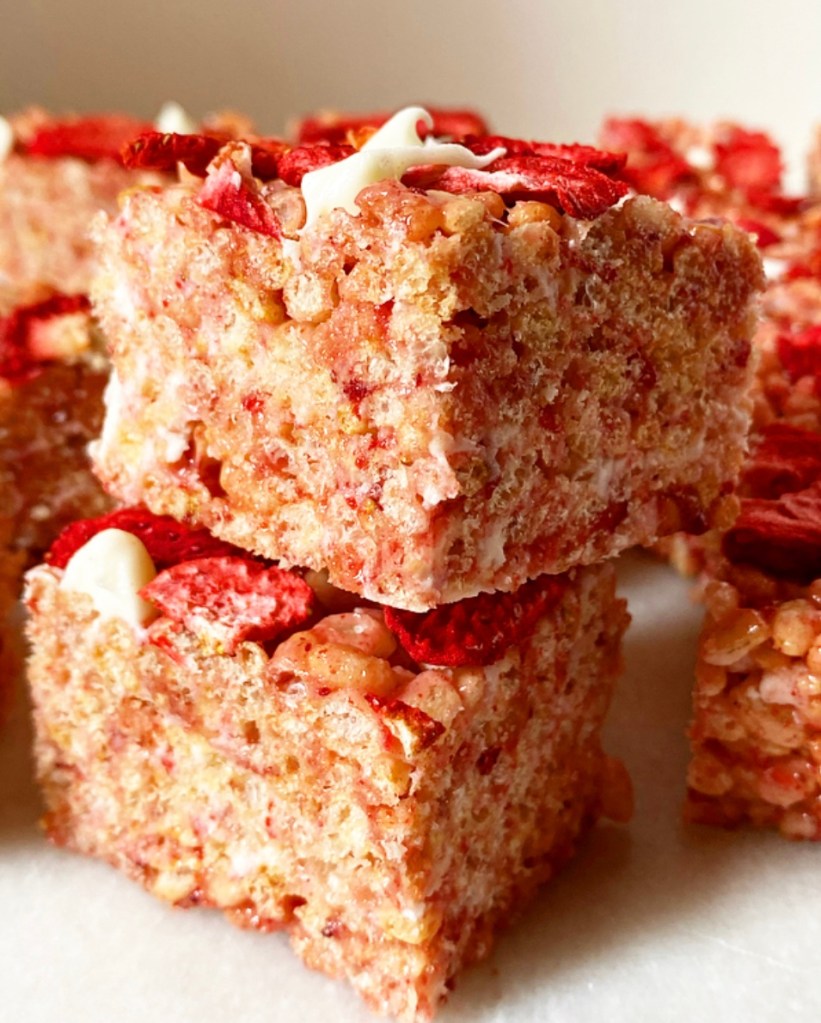
Now, we’re not actually baking today—just making a pan of Rice Krispies Treats—but freeze dried strawberries still give these sweets a huge punch of flavor. And that’s to say nothing of their berry pink color! Oh yes, these are about as strawberry as it gets.

Strawberry Rice Krispies Treats​

Strawberry Rice Krispies Treats are a snap (…crackle…pop?) to put together. Their ingredients list is short and sweet, as is the amount of time you’ll need to make them. Like the classic recipe, these treats come together in a single pot on the stove in less than ten minutes.

Start by melting some butter with some crushed freeze dried strawberries and salt. Add some marshmallows and let them melt before folding in the Rice Krispies cereal and a cup of white chocolate chips. The white chocolate will mostly melt, leaving the treats with a creamy texture…and the occasional pocket of white chocolate nestled in all that strawberry crunch.

Strawberry Rice Krispies Treats​

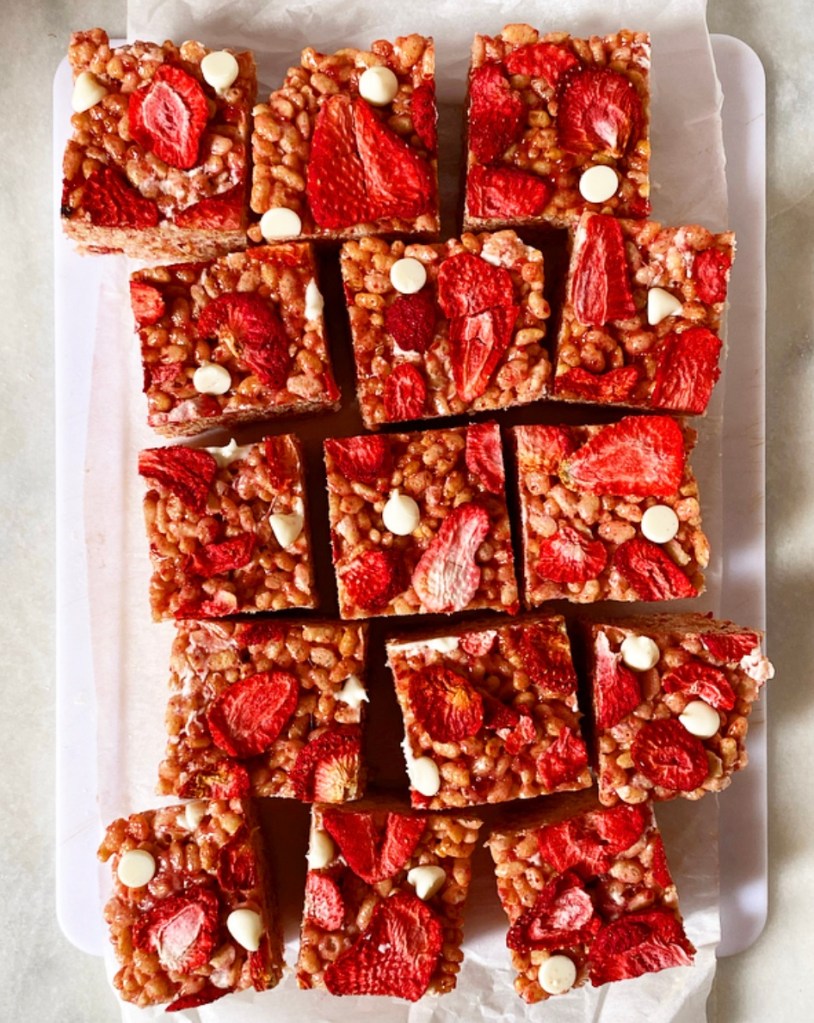
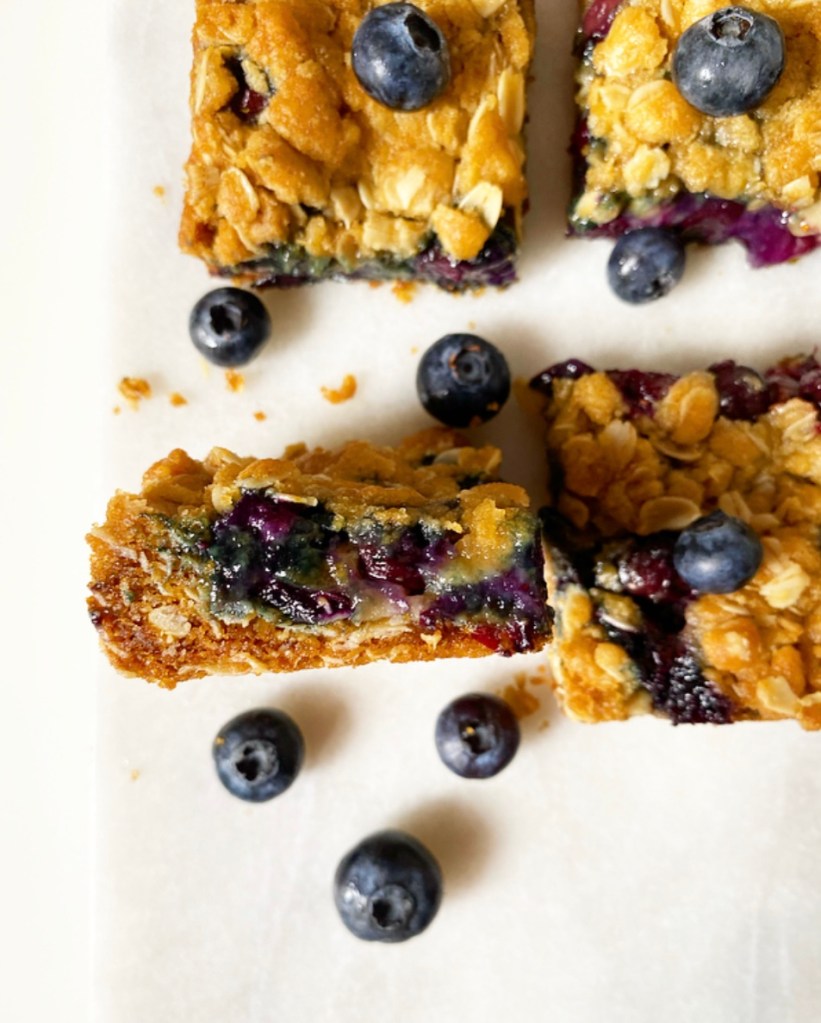
The most time consuming portion of this whole operation is waiting for the treats to cool enough to slice. I used an 8” square pan for thicker treats, so cooling takes a bit longer than it would if you went for a 9×13” pan. Whatever your preference, I highly encourage you to decorate the tops of your treats with more freeze dried strawberries and white chocolate chips—pretty food is just more fun to eat, ya know?!

Strawberry Rice Krispies Treats are perfect for picnics and cookouts, but quick and easy enough to whip up the minute a craving strikes. And, oh, the craving will strike.

Strawberry Rice Krispies Treats​
Strawberry Rice Krispies Treats
makes one 8- or 9-inch square pan, about 16 treats

6 tablespoons unsalted butter, cut into pieces
1 1.2 ounce bag freeze dried strawberries (~1 1/2 cups pieces), pulverized
pinch of Kosher or sea salt
1 10-ounce bag marshmallows (mini or regular)
5 cups Rice Krispies cereal
1 cup white chocolate chips

For garnish (optional):
1/2 cup freeze dried strawberry pieces, whole
white chocolate chips

This recipe makes thick Rice Krispies treats. For thin treats, use a 9x13-inch pan.

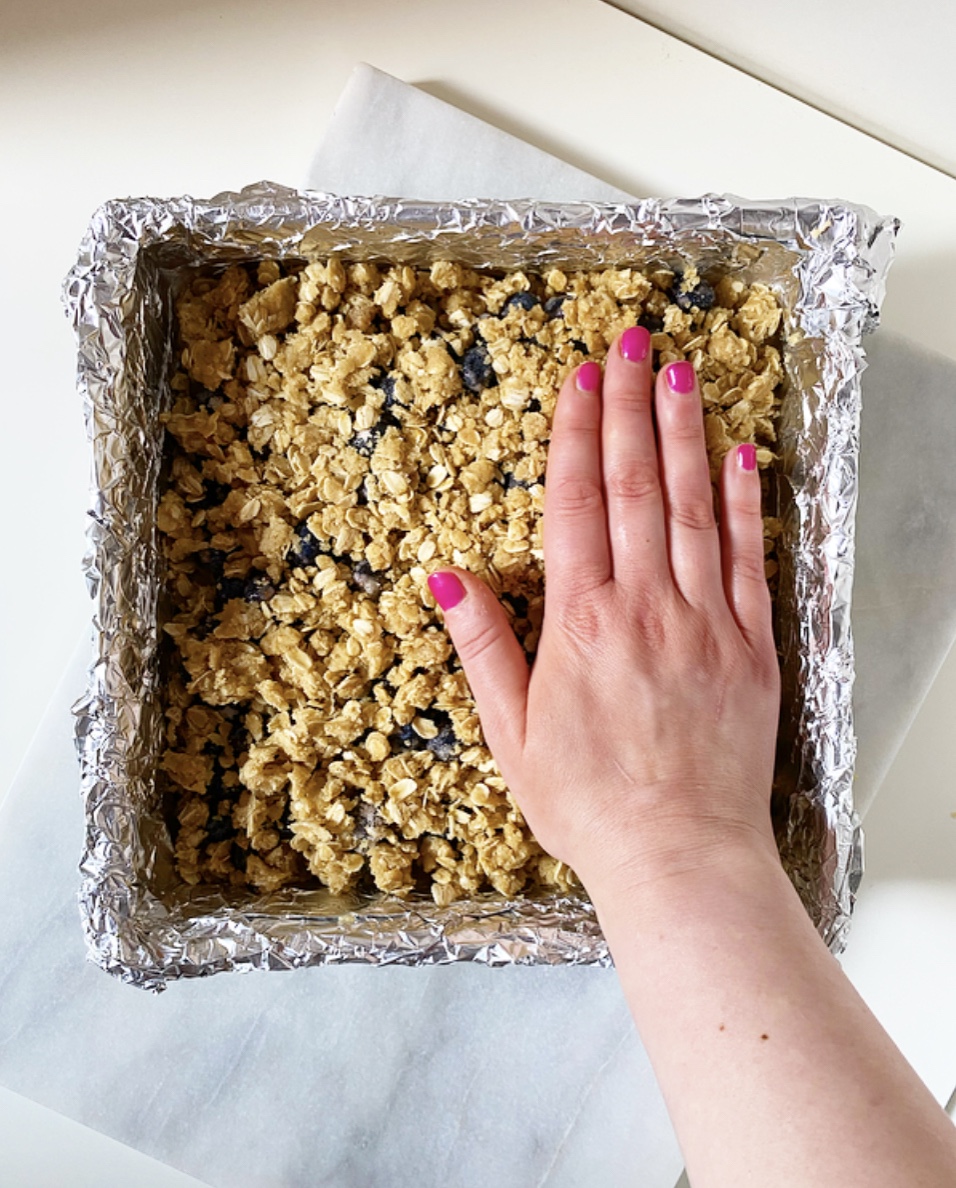
Heavily butter an 8-or 9-inch square pan. Line with parchment, leaving overhang on two sides for removal.

Place butter and pulverized freeze dried strawberries in a medium heavy-bottomed pot. Place pot over medium heat, stirring frequently until butter is melted and strawberries have soaked much of it up. Add mini marshmallows and salt, and stir constantly until melted. Remove pan from heat and stir in Rice Krispies cereal. Fold in white chocolate chips.

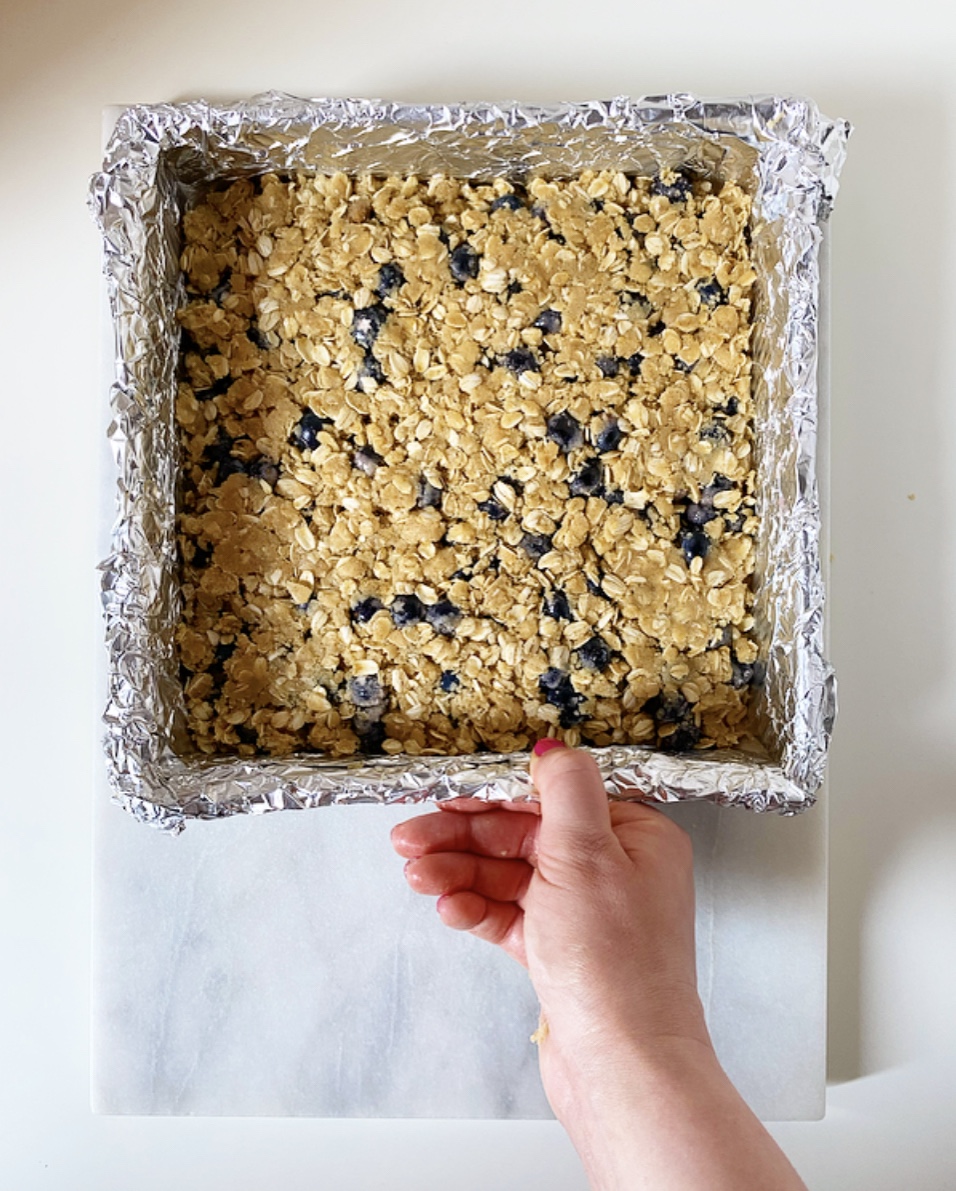
Transfer cereal to prepared pan. Use greased implements or hands (be careful—the mixture is hot!) to press the mixture into an even layer. Immediately garnish by pressing in freeze dried strawberries and/or scattering on white chocolate chips. Let cool completely.

When ready to serve, run a thin knife along the edges of the pan for easy release. Use the parchment overhang to lift the treats onto a cutting board and use a sharp knife to slice them into squares. Serve.

Leftovers will keep in an airtight container at room temperature for up to 5 days. Freeze dried strawberry garnish will soften over time, but not in an unpleasant way.
Advertisement

Tie-Dye Cupcakes

Tie-Dye Cupcakes

While all of us were inside last year, tie-dye made a huge comeback. It’s a fun and easy way to augment clothes, towels, bedsheets or anything else that will absorb color. Why not take that same bright & twisty aesthetic and apply it to dessert?! We’re talking colorful little cups of cake and clouds of vanilla buttercream with technicolor details. They’re fun and funky, and summery as all get-out!

You’ve seen these cupcakes on here before, but never like this. The base is my favorite vanilla sour cream cupcake batter which has been everything from yellow with Nutella Buttercream to spiked with honey and finished with candy corn to marbled with a streak of red velvet to dolled up for the Easter bunny. Today’s version might be my favorite variation of all. Tie-Dye Cupcakes are beautiful to look at and incredibly fun to make.

Start by mixing together the batter and dividing it into four bowls. Grab a few of your favorite shades of food coloring and dye each bowl of batter a different color. A word to the wise that gel food coloring makes for richer colors and doesn’t threaten to add too much liquid to your batter. That said, if liquid is what you have on hand, use it!

Once your batter is dyed, spoon the colors into your cupcake pans. There are no hard and fast rules on how to do this, except to get all the colors in each cup and only up to 2/3-3/4 full. I like to give mine a little swirl with a skewer before baking, but this is strictly optional. After you’ve got all your batters in your pans, bake your cupcakes and let them cool.

Tie-Dye Cupcakes

Next up: frosting! These swirly-twirly colorful plumes of buttercream may look intimidating, but they are just regular old vanilla buttercream with a little food coloring. Where most colorful frosting recipes ask you to whip the dye directly into the mix, I take a different approach here.

Before the buttercream is loaded into the piping bag, it’s rolled up in a piece of plastic wrap that has been painted with lines of gel food coloring, then formed into a log. I found it easiest to divide the frosting in half for this step. Once rolled, one end of the log is trimmed off before the whole kit and caboodle is placed in the piping bag and then…well, it’s piping business as usual. You know, except for the part where each cupcake looks different and the edges of the frosting are bright and beautiful!

Tie-Dye Cupcakes

It goes without saying that Tie-Dye Cupcakes are delicious, but let’s be real: these are all about aesthetics. They’re so fun—perfect for summer get-togethers, birthdays, or any occasion that could use a pop (or four) of color and a really spectacular bit of vanilla cake.

Tie-Dye Cupcakes
Tie-Dye Cupcakes
makes 12-14 cupcakes

Cupcakes:
1/2 cup milk, room temperature
1/2 cup sour cream, room temperature
1 1/2 cups all-purpose flour
2 tablespoons cornstarch
1/2 teaspoon baking powder
1/4 teaspoon baking soda
1/2 teaspoon Kosher or sea salt
1/2 cup (1 stick) unsalted butter, softened to room temperature
1 cup granulated sugar
2 large eggs, room temperature
2 teaspoons pure vanilla extract
4 food colorings of choice (I used gel)

Frosting:
3/4 cup (1 1/2 sticks) unsalted butter, softened to room temperature
2 1/2 cups confectioner’s sugar
pinch of Kosher or sea salt
1 1/2 teaspoons pure vanilla extract
3 tablespoons heavy cream
4 food colorings of choice (I used the same gels from the cake)

Special Equipment:
plastic wrap
food-safe paintbrushes
piping bag with a tip and coupler

Make the cupcakes. Preheat oven to 350F. Line a 12-cup standard muffin tin with cupcake liners. Set aside.

Combine milk and sour cream a liquid measuring cup, then use a fork to whisk them together. Set aside.

In a small-medium mixing bowl, whisk together flour, cornstarch, baking powder, baking soda, and salt. Set aside.

In a large mixing bowl, use an electric mixer to beat butter until light and fluffy. Beat in sugar. Add eggs one at a time, combining completely after each addition. Beat in vanilla. Mix in half the dry ingredients, followed by half the milk/sour cream. Add the remaining dry ingredients followed by the remaining milk/sour cream.

Divide batter into four small bowls (about 2/3-3/4 cup batter in each). Add a different food coloring to each one and stir with forks to distribute the color (I used 5 drops each pink, blue, green and yellow gel).

To achieve the tie-dye effect, spoon a heaping 1/2 tablespoon of each color into each liner, adjusting as needed, until each one is 2/3-3/4 full. Tap full pan on the counter five times before baking cupcakes for 18-19 minutes, until a toothpick inserted in the centers comes out clean. Let cupcakes cool in the pan for 10 minutes before removing to a rack to cool completely.

Make the frosting. In a large mixing bowl, use an electric mixer to beat butter until light and fluffy. Add confectioner’s sugar and salt in two installments, combining completely after each addition. Beat in vanilla & heavy cream until combined. Set aside.

Lay 2 14-16-inch long pieces of plastic wrap on a surface. On each one, use paintbrushes to paint parallel 6-inch stripes of each color of food coloring about 1/2-inch apart. The food coloring may bead on the surface of the plastic wrap—this is okay.

Top each set of stripes with half the frosting. Working with one assemblage of frosting/food coloring/ plastic wrap at a time, use the plastic wrap to roll and manipulate the frosting into a log shape with food coloring stripes going down all sides. Twist the ends of the plastic wrap so that the log looks like a piece of old-fashioned candy. Repeat this process with the other assemblage.

Working with one log of frosting at a time, trim one end and place the wrapped log trimmed-end-down in a piping bag fitted with a tip. Twist the piping bag closed and pipe frosting onto the cupcakes. Repeat trimming process with the second log of frosting when needed.

Serve cupcakes. Leftovers will keep covered at room temperature for 2 days or in the refrigerator for up to 4.
Tie-Dye Cupcakes
Tie-Dye Cupcakes

Blueberry Oat Squares

Blueberry Oat Squares​

Blueberry Pie is great and all, but so are quick, easy, berry-forward recipes that don’t require you to deal with cold butter in blazing summer heat.

Blueberry Oat Squares​

Y’all, I am all about these Blueberry Oat Squares right now. The edges are crisp and buttery with plenty of chewy oats, while the centers are bursting with juicy fresh blueberry filling. They’re super summery and delicious, and a snap to make!

One simple dough doubles as both crust and topping. Just stir six ingredients together in a bowl, then firmly press about half the resulting mixture into the bottom of a square pan. Top it with a layer of simply-spiced blueberry pie filling, then press on the remaining dough. You’ll probably have a few gaps in the topping, but that’s okay—that’s where the jammy filling will peek through. Love that visual and textural diversity.

Blueberry Oat Squares​

Once baked and cooled completely, Blueberry Oat Squares can be sliced and served at room temperature or cold. They’re easy to stack and transport, and don’t need to be chilled at all times—this is a perfect picnic dessert if I’ve ever seen one. If you want to get a little fancy, you could even serve them lightly warmed and topped with ice cream and fresh blueberries. But while, in most cases, I identify as “a little fancy,” I’m happy to keep things simple here. For now, at least.

Blueberry Oat Squares
makes one 8- or 9-inch pan, about 16 squares

Filling:
12 ounces fresh blueberries
1/3 cup granulated sugar
1 tablespoon cornstarch
1/4 teaspoon ground cinnamon
pinch of Kosher or sea salt
2 teaspoons fresh lemon juice (about 1/4 medium lemon)

Dough:
1 1/4 cup all-purpose flour
3/4 cup light brown sugar, packed
1 teaspoon baking soda
1/2 teaspoon Kosher or sea salt
1 1/2 cups old fashioned oats
3/4 cup (1 1/2 sticks) unsalted butter, melted & cooled slightly

Preheat oven to 350F. Line an 8- or 9-inch square pan with aluminum foil and grease with butter. Set aside.

Make the filling. Combine blueberries, sugar, cornstarch, cinnamon, salt and lemon juice in a medium mixing bowl. Use a silicone spatula or wooden spoon to fold them all together until combined. Set aside.

In a medium mixing bowl, whisk together flour, brown sugar, baking soda, salt, and oats. Use a silicone spatula or wooden spoon to fold in melted butter—mixture may be crumbly, but should hold together when pinched.

Firmly press half the dough (about 2 cups) into an even layer at the bottom of the prepared pan.

Give blueberry filling a stir, then scatter over packed dough (leaving behind any excess liquid), leaving a 1/2-inch border on all sides. Scatter remaining dough mixture over the top. Use the palms of your hands to gently pack it into a even layer, covering the jam.

Bake full pan for 25-27 minutes, or until golden and set on top. Let cool completely in the pan on a rack.

Slice bars with a sharp chef’s knife, wiping the blade clean between cuts. Do not try to slice bars until they are completely room temperature. Serve room temperature, cold, or warmed slightly with ice cream.

Bars will keep in an airtight container in the refrigerator for up to five days. Layer them with wax or parchment paper for best results.
Blueberry Oat Squares​

Blueberry Oat Squares

Blueberry Oat Squares​

Blueberry Pie is great and all, but so are quick, easy, berry-forward recipes that don’t require you to deal with cold butter in blazing summer heat.

Blueberry Oat Squares​

Y’all, I am all about these Blueberry Oat Squares right now. The edges are crisp and buttery with plenty of chewy oats, while the centers are bursting with juicy fresh blueberry filling. They’re super summery and delicious, and a snap to make!

One simple dough doubles as both crust and topping. Just stir six ingredients together in a bowl, then firmly press about half the resulting mixture into the bottom of a square pan. Top it with a layer of simply-spiced blueberry pie filling, then press on the remaining dough. You’ll probably have a few gaps in the topping, but that’s okay—that’s where the jammy filling will peek through. Love that visual and textural diversity.

Blueberry Oat Squares​

Once baked and cooled completely, Blueberry Oat Squares can be sliced and served at room temperature or cold. They’re easy to stack and transport, and don’t need to be chilled at all times—this is a perfect picnic dessert if I’ve ever seen one. If you want to get a little fancy, you could even serve them lightly warmed and topped with ice cream and fresh blueberries. But while, in most cases, I identify as “a little fancy,” I’m happy to keep things simple here. For now, at least.

Blueberry Oat Squares
makes one 8- or 9-inch pan, about 16 squares

Filling:
12 ounces fresh blueberries
1/3 cup granulated sugar
1 tablespoon cornstarch
1/4 teaspoon ground cinnamon
pinch of Kosher or sea salt
2 teaspoons fresh lemon juice (about 1/4 medium lemon)

Dough:
1 1/4 cup all-purpose flour
3/4 cup light brown sugar, packed
1 teaspoon baking soda
1/2 teaspoon Kosher or sea salt
1 1/2 cups old fashioned oats
3/4 cup (1 1/2 sticks) unsalted butter, melted & cooled slightly

Preheat oven to 350F. Line an 8- or 9-inch square pan with aluminum foil and grease with butter. Set aside.

Make the filling. Combine blueberries, sugar, cornstarch, cinnamon, salt and lemon juice in a medium mixing bowl. Use a silicone spatula or wooden spoon to fold them all together until combined. Set aside.

In a medium mixing bowl, whisk together flour, brown sugar, baking soda, salt, and oats. Use a silicone spatula or wooden spoon to fold in melted butter—mixture may be crumbly, but should hold together when pinched.

Firmly press half the dough (about 2 cups) into an even layer at the bottom of the prepared pan.

Give blueberry filling a stir, then scatter over packed dough (leaving behind any excess liquid), leaving a 1/2-inch border on all sides. Scatter remaining dough mixture over the top. Use the palms of your hands to gently pack it into a even layer, covering the jam.

Bake full pan for 25-27 minutes, or until golden and set on top. Let cool completely in the pan on a rack.

Slice bars with a sharp chef’s knife, wiping the blade clean between cuts. Do not try to slice bars until they are completely room temperature. Serve room temperature, cold, or warmed slightly with ice cream.

Bars will keep in an airtight container in the refrigerator for up to five days. Layer them with wax or parchment paper for best results.
Blueberry Oat Squares​

Snickerdoodle Squares

Snickerdoodle Squares

I try very hard to keep a baking schedule that allows me a full day off every week, but as with everything, there are exceptions. For example, a friend of mine had a fully-vaxxed get-together last weekend. You know I couldn’t show up empty-handed!

Snickerdoodle Squares

Enter these Snickerdoodle Squares, the perfect low-maintenance party treat. They have all the flavor and texture of classic, cinnamon-crusted Snickerdoodle cookies, but bake up in a square pan with limited fuss!

Snickerdoodle Squares

These soft, chewy squares are easy as can be, with slightly tangy sugar cookie centers and crisp cinnamon-sugar edges. The base is very similar to my favorite blondie recipe, with the biggest deviation being the additions of baking powder and cream of tartar for a more cookie-like texture. It’s an easy, no-mixer batter that requires few ingredients and almost no time to whip together.

Heads up: there is no substitute for cream of tartar—it is a classic snickerdoodle ingredient that gives these squares that signature tang. If you don’t have any on hand, you can leave it out without any major consequences, but the flavor will be a bit less snickerdoodly. Snickerdoodlesque?

Now onto the main event: the cinnamon sugar! You simply can’t have a snickerdoodle without cinnamon sugar—it’s basically the whole point. Here, it’s scattered in the bottom of the buttered pan before being topped with the batter and more cinnamon sugar. As the squares bake, the top layer expands and cracks with the batter, while the bottom layer melts and caramelizes. After the squares cool completely in their pan, that bottom layer will be extra-crispy, like a thin layer of cinnamon sugar glass against all that cookie square goodness! Textural diversity for the win.

Snickerdoodle Squares

Y’all, these Snickerdoodle Squares are as satisfying as they are simple. All the flavor and texture of a perfect, soft snickerdoodle and half the work! The combination of the crunchy, crystalline cinnamon sugar on the top, the crackling-crisp layer on the bottom, and the thick, chewy centers is irresistible. I, for one, will be hauling these to every picnic, party and anything else I’m invited to this summer, and I have an inkling you will be, too.

Snickerdoodle Squares
makes one 8- or 9-inch square pan, about 16 squares

Cinnamon Sugar:
3 tablespoons granulated sugar
1 1/2 teaspoons ground cinnamon

Batter:
1/2 cup unsalted butter, melted
3/4 cup granulated sugar
1/4 cup light brown sugar, packed
1 large egg, room temperature
1 teaspoon pure vanilla extract
1 cup all-purpose flour
1/2 teaspoon baking powder
1/4 teaspoon cream of tartar
1/2 teaspoon Kosher or sea salt

Preheat oven to 350F. Grease an 8- or 9-inch square pan well with butter. Line with parchment, leaving overhang on two sides for removal. Grease again.

Make cinnamon sugar. In a small bowl, use a fork to whisk together sugar and cinnamon.

Sprinkle 1 tablespoon of the cinnamon sugar in the bottom of the prepared pan. Tilt the pan around to coat the bottom. Set aside both the pan and the remaining cinnamon sugar.

Make the batter. In a medium mixing bowl, whisk together melted butter, granulated sugar and light brown sugar. Mix in the egg, followed by the vanilla. Add the flour, baking powder, cream of tartar and salt, and whisk just until combined.

Transfer batter to prepared pan. Use a silicone spatula or wooden spoon to gently spread it to the edges, covering the layer of cinnamon sugar. Sprinkle remaining cinnamon sugar over the top, taking care to get all the way to the edges. Tap full pan on the counter a couple of times to knock out any large air bubbles.

Bake squares for 20-22 minutes, or until a toothpick inserted in the center comes out clean or with only a few moist crumbs (not wet batter). Let squares cool completely in the pan on a rack.

Once cooled, use the parchment overhang to lift the bars onto a cutting board. Discard parchment. Slice into 16 squares with a large, sharp chef’s knife. Serve.

Leftovers will keep well covered at room temperature for up to four days.
Snickerdoodle Squares