When I don’t know what else to make, there are always blondies. I’ve had the recipe memorized for more than a decade, and they’re amenable to whatever odds and ends I have in my cabinets. As far as I’m concerned, they’re the ultimate catch-all baked good.
Blondies come together in one bowl—no mixer required—and bake up in less than half an hour. And despite the frequency with which I make them, they never ever get old. Oh lord, do I love a blondie.
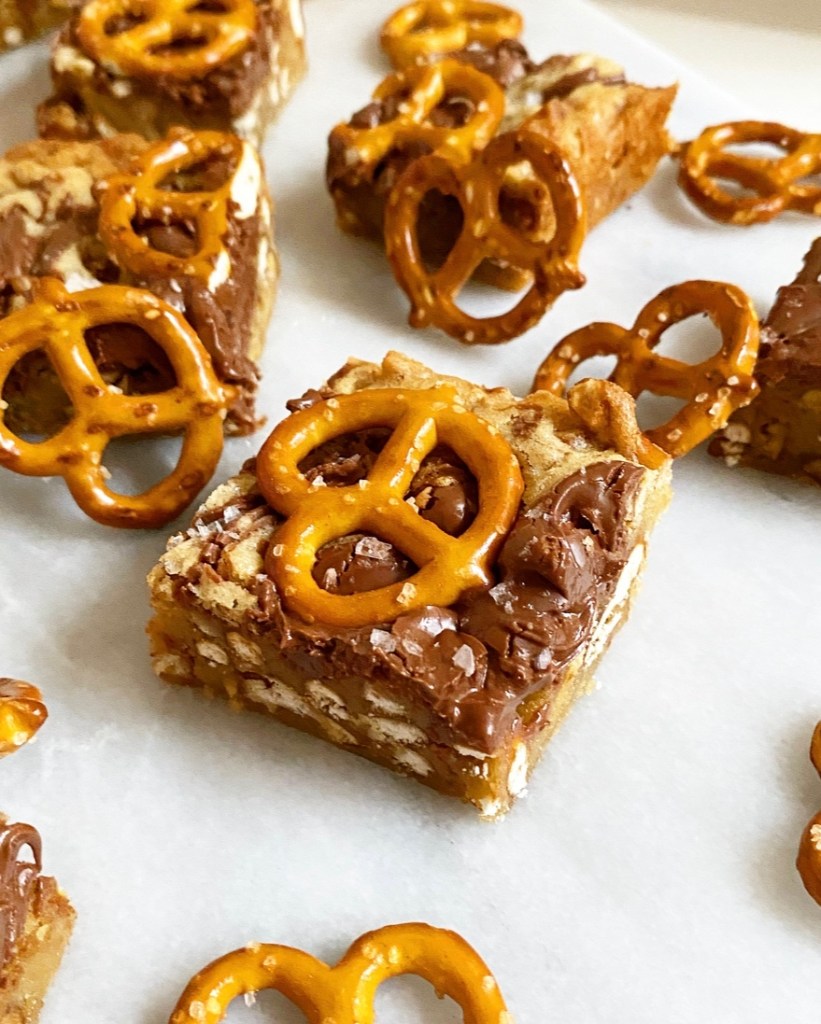
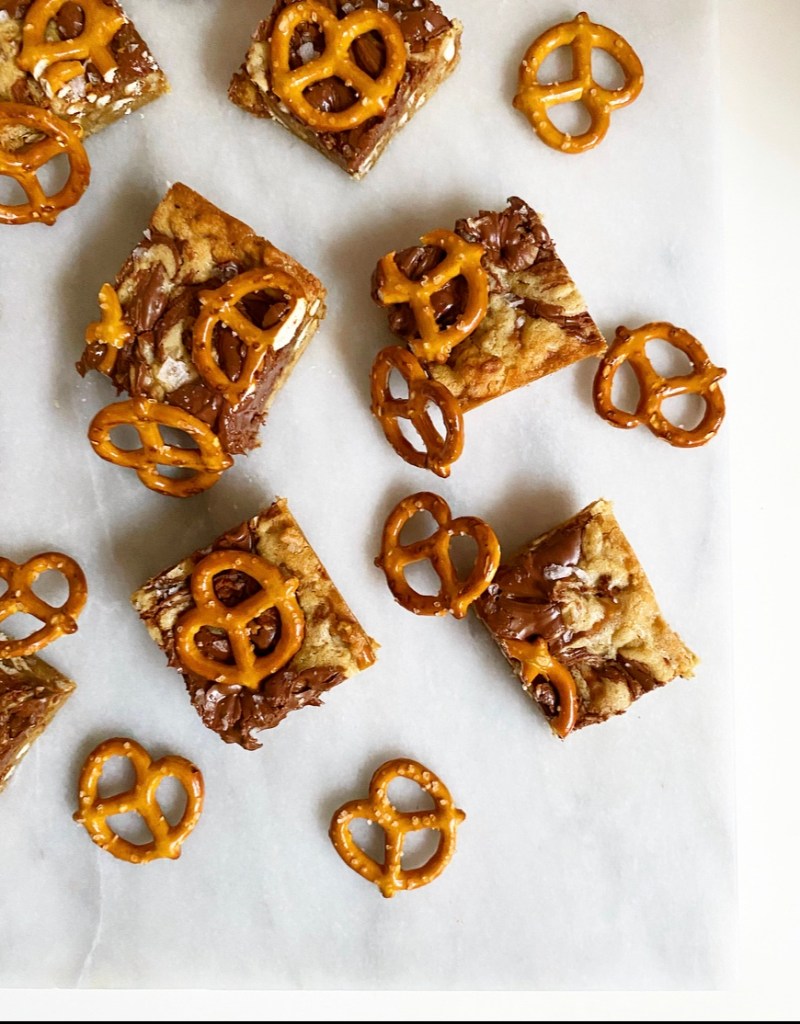
This latest variation is salty and sweet, with pretzels folded into the brown sugar batter and gobs of Nutella spooned and swirled on top. A big pinch of flaky salt is optional, but highly recommended.
They may look a little sketchy when they go in the oven, but trust the process. Once sliced, you’ll be rewarded with a Nutella-swiped square of pretzel-studded blondie. And oh, what a reward.
Nutella Pretzel Blondies
makes one 8- or 9-inch pan, about 16 blondies

1/2 cup (1 stick) unsalted butter, melted and cooled slightly
1 cup light or dark brown sugar, packed
1 large egg, room temperature
1 1/2 teaspoons pure vanilla extract
3/4 cup all-purpose flour
pinch of Kosher or sea salt
1 1/2 cups pretzels, crushed + more for garnish
1/2 cup Nutella
flaky salt

Preheat the oven to 350F. Grease an 8-inch square baking dish and line it with parchment (or foil), leaving overhang on two sides for easy removal. Grease again. Set aside.

In a large mixing bowl, whisk together melted butter and brown sugar. Add egg and vanilla, followed by flour and salt. Fold in crushed pretzels. Batter will be very thick.

Spoon batter into prepared pan and smooth to the edges. Drop spoonfuls of Nutella over the top of the batter and use a butter knife to gently swirl it into the batter (it may look a little ugly—trust the process). Tap the full pan on the counter a time or two to help the Nutella settle a bit. Press a few whole pretzels into the top, if desired, and sprinkle with flaky salt.

Bake for 20-22 minutes, until the edges are turning golden. Let blondies cool in the pan on a rack until they reach room temperature. Run a small, thin knife around the edge of the pan, then use parchment to lift them onto a cutting board. Slice with a large, sharp chef’s knife, wiping the blade clean between cuts. Serve.

Blondies will keep in an airtight container at room temperature for up to 4 days. Layer with parchment paper to keep the Nutella from sticking to the other blondies.
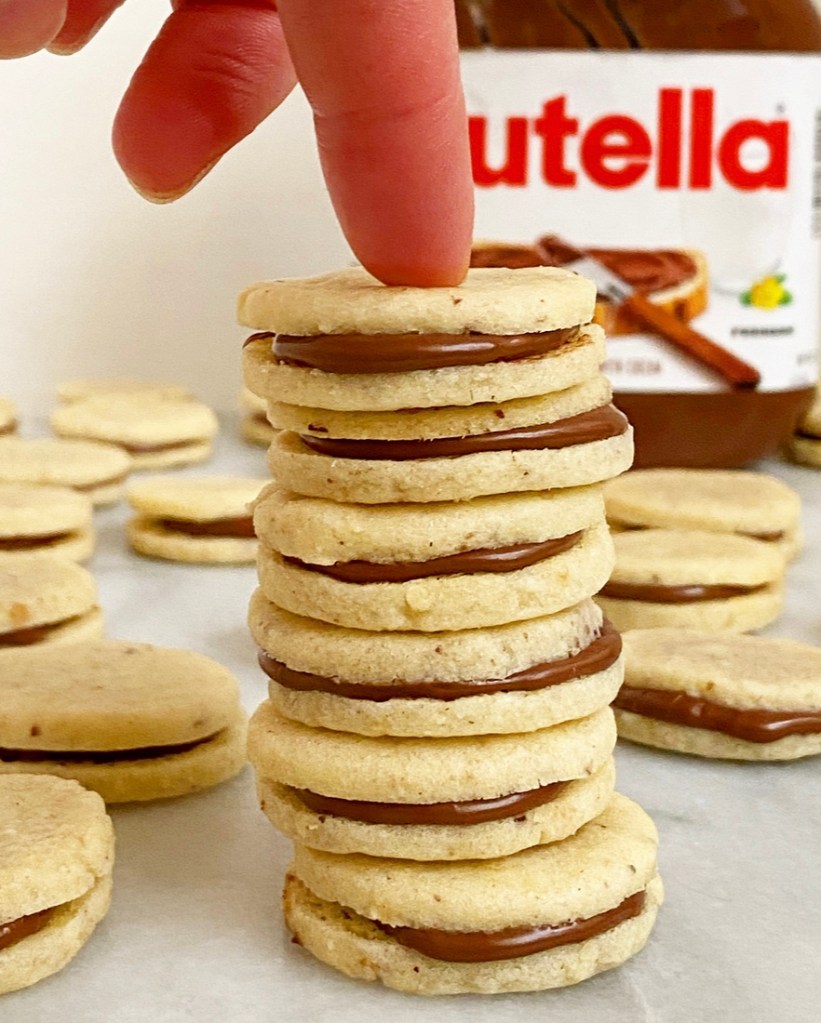
I promised you new Nutella recipes almost two months ago, and I am finally delivering in the form of the cutest, tiniest, most delicious Nutella Sandwich Cookies you ever did see.
Made with a buttery hazelnut sugar cookie dough and filled with a spoonful of Nutella, these are completely irresistible. Their texture isn’t crunchy or hard, so Nutella won’t squidge out the sides when you take a bite, but they are still sturdy enough to stack—it’s a little difficult to explain, but it’s so good.
I suppose the best endorsement I can give these Nutella Sandwich Cookies is that I have not shared even one with any of my friends or acquaintances, which is remarkable when you consider that the batch size falls around 8 dozen!
I’ll be the first to admit it: 8 dozen is a lot of cookies. But hear me out. Making sandwich cookies is a whole production, so you might as well make a ton at once to get your energy’s worth, right?! Also, they’re teeny tiny—1 1/2 inches in diameter, smaller than an Oreo. I can easily put away three or four at a time. If you’re still concerned, know that Nutella Sandwich Cookies keep for a while—longer than a week—so you don’t have to worry about them spoiling.
Honestly though, I don’t think you’ll have a whole lot of trouble putting these away. I mean, I’m over here by my lonesome and I’m managing just fine.
Nutella Sandwich Cookies
makes about 8 dozen small cookies

Cookie Dough:
2/3 cup whole raw hazelnuts
2 1/3 cups all-purpose flour
1 teaspoon baking powder
1/2 teaspoon Kosher or sea salt
1 cup granulated sugar
1 cup (2 sticks) unsalted butter, softened to room temperature
1 large egg, room temperature
1 teaspoon pure vanilla extract

For Assembly:
~1 cup Nutella

Preheat oven to 350F. Scatter hazelnuts on a dry rimmed sheet pan. Let toast for 5-7 minutes. Remove pan to a rack and turn off oven. Let hazelnuts cool to room temperature; no need to peel.

When hazelnuts are room temperature, add them to the bowl of a food processor. Pulse until a fine meal forms—do not over process or you’ll have hazelnut butter.

In a large mixing bowl, whisk together flour, hazelnut meal, baking powder, and salt. Set aside.

In a separate large mixing bowl, use an electric mixer to beat butter until light and fluffy, about 2 minutes. Mix in egg and vanilla. Add dry ingredients in 3 installments, combining completely after each. Divide dough into quarters, wrap each in plastic, and refrigerate for 3 hours or up to 3 days.

Preheat oven to 350F. Line two baking sheets with parchment. Set aside.

Lightly flour a surface and a rolling pin. Take one quarter of chilled dough at a time, roll it to 1/8-inch thickness. Cut cookies with a 1 1/2-inch round cookie cutter. Place cut cookies an 1 inch apart on prepared baking sheets. Bake cookies 6-7 minutes, until no longer raw-looking. Let cookies cool on the pans for five minutes before removing to a rack to cool completely. Repeat rolling, cutting, and baking with any remaining dough.

If not sandwiching immediately, store cookies in an airtight container for up to a couple of days.

To assemble sandwich cookies, place half the baked cookies on a surface bottom-side-up. Spoon or pipe about 1/2 teaspoon of Nutella on each cookie before gently topping with another cookie, bottom-side-down. Repeat until all cookies have been filled.

Cookies may be eaten immediately, but I like to let them sit in a single layer for a bit so that the cookies soften slightly against the Nutella; this way the cookie stays intact when you bite in.

Cookies will keep in an airtight container at room temperature for at least a week.
It has come to my attention that a gross oversight has occurred. Despite more than six years of blogging and 600 recipes, there are less than ten Nutella recipes on this site. I honestly don’t know how I let this happen, but rest assured I will be making up for it with plenty of new recipes featuring our favorite chocolate hazelnut spread coming your way soon. Until then though, here are my best Nutella bakes from my archives.
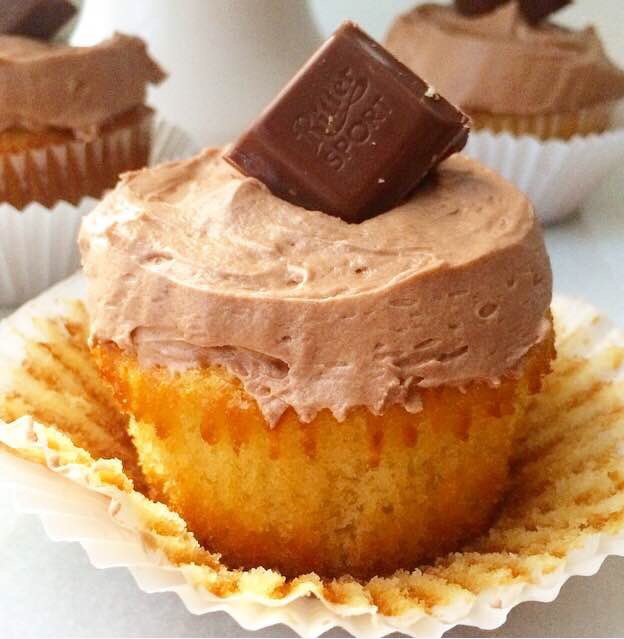
If there is one thing in the world more delicious than Nutella straight-up, it’s Nutella Buttercream. Everyone’s favorite chocolate hazelnut spread is whipped into an otherwise classic vanilla buttercream, then piled onto buttery yellow cupcakes.
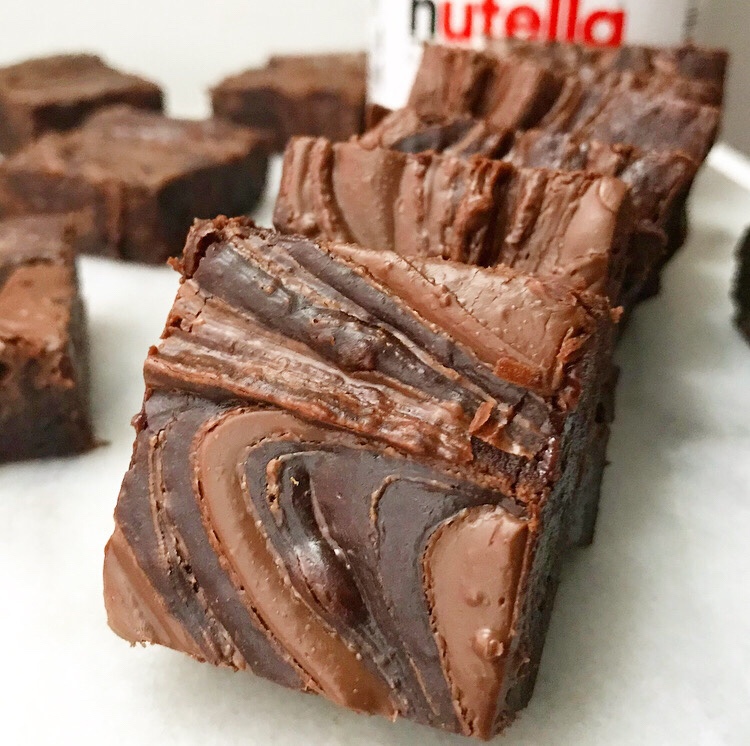
Want big Nutella flavor without having to reinvent the wheel? Swirl it into your favorite brownie recipe! I used my tried and true Cocoa Brownies here, and the chocolate hazelnut fudginess is out of this world!
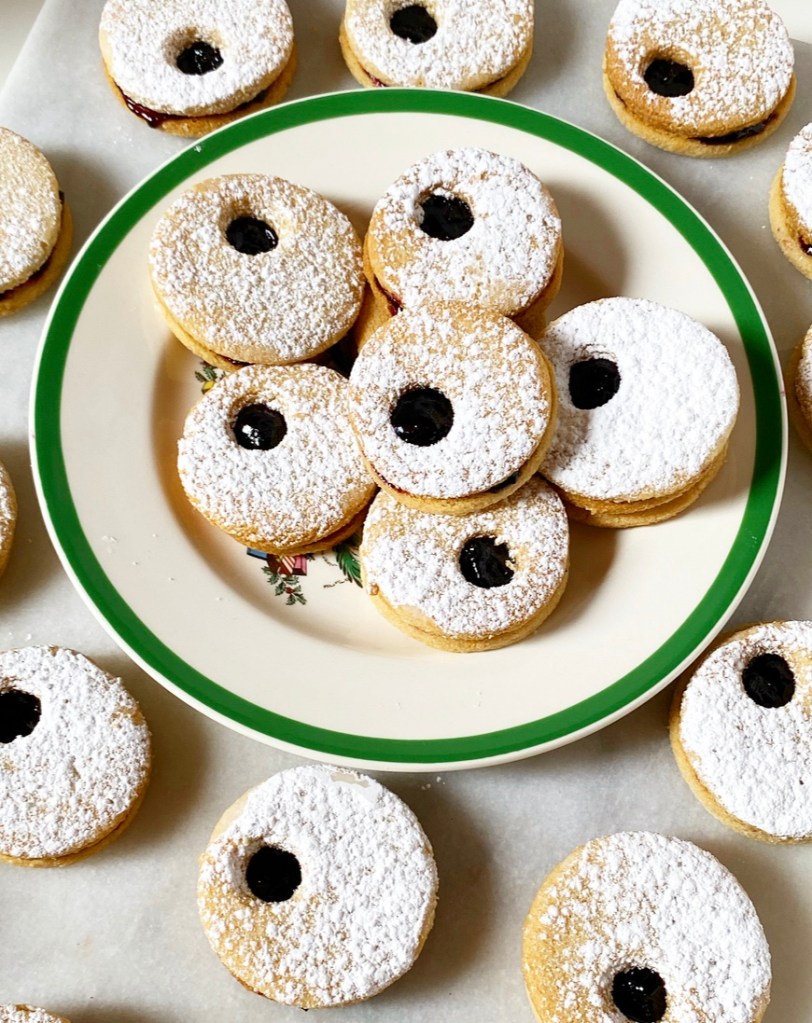
After nailing the perfect snappy texture in last week’s Vegan, Gluten-Free Gingerbread Cookies, I couldn’t resist taking that formula and making it into linzer cookies.
Traditional linzer cookies are made from a dough that isn’t much more than a sugar cookie with a smattering of ground nuts tossed in for depth and tenderness. My vegan, gluten-free cookie formula already gets all its structure from almonds, but I still found a way to make the final product uniquely linzery. Linzerian? Linzeresque? Anyway…
The gist is that I removed the dark molasses and spices from the dough, lightening the flavor profile with maple syrup and a small, but effective amount of toasted ground hazelnuts. If you can’t get your hands on hazelnuts, pecans will work just as well (plus you won’t have to peel them).
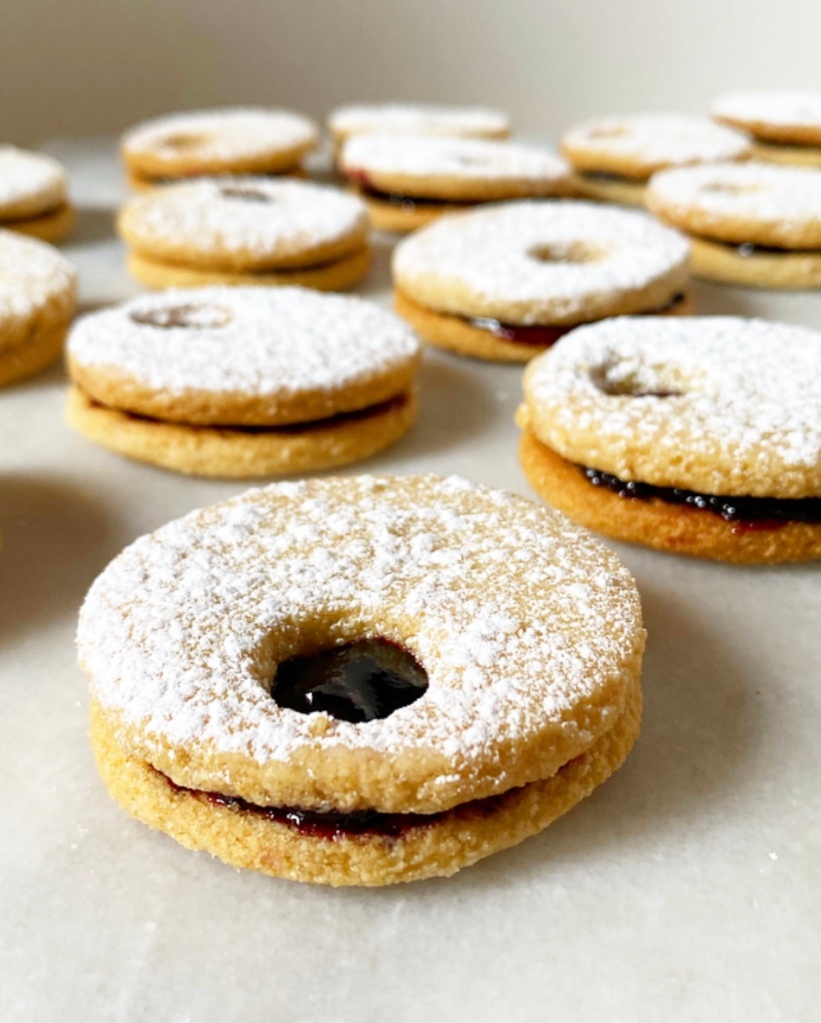
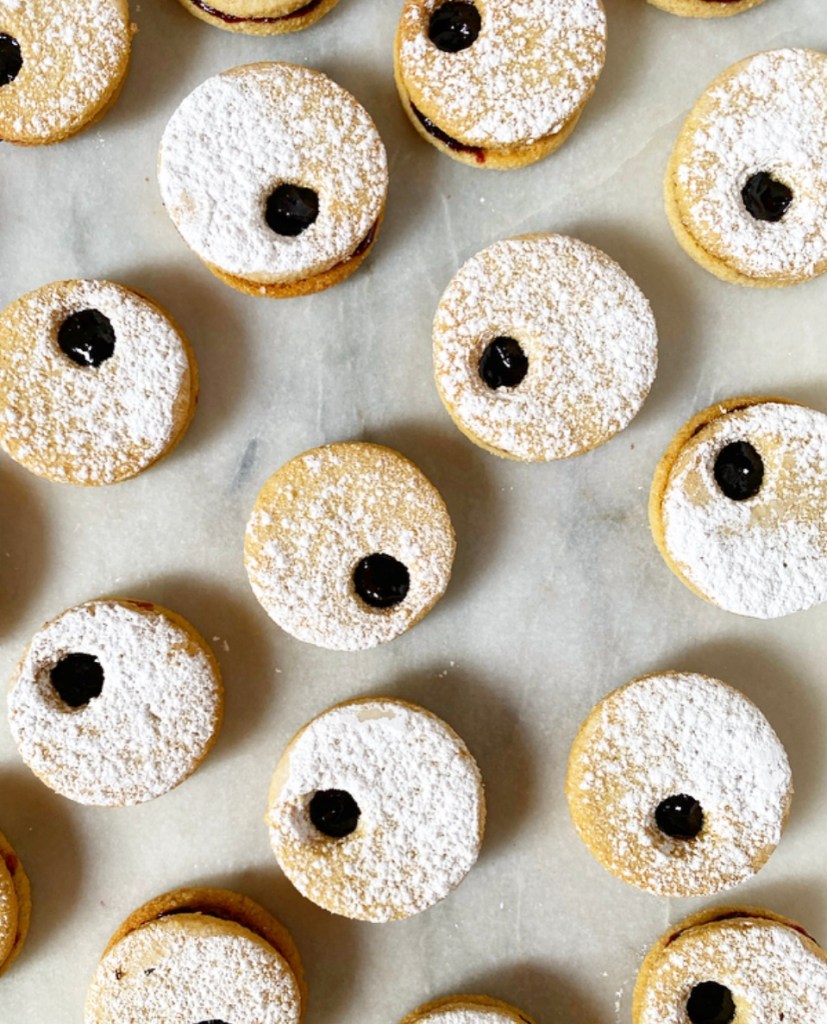
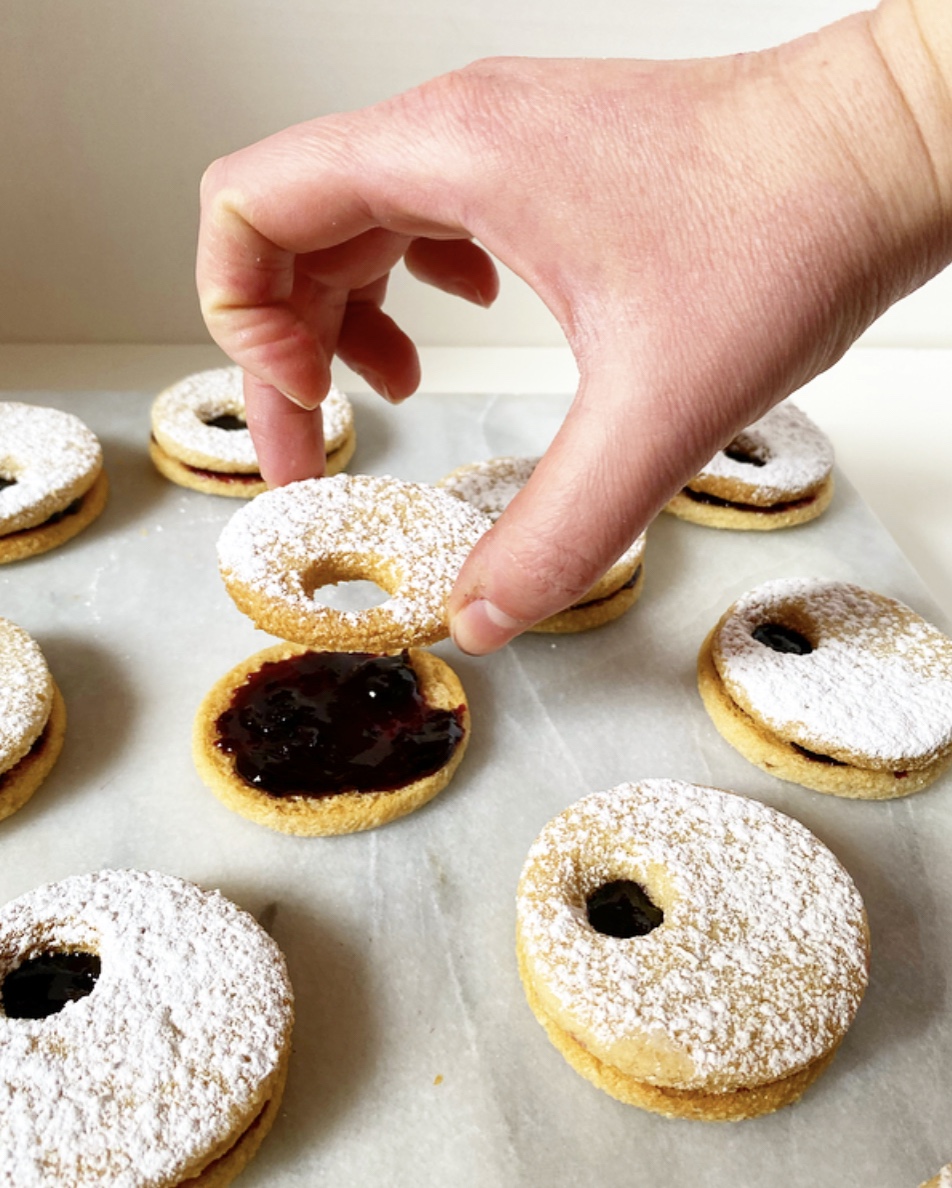
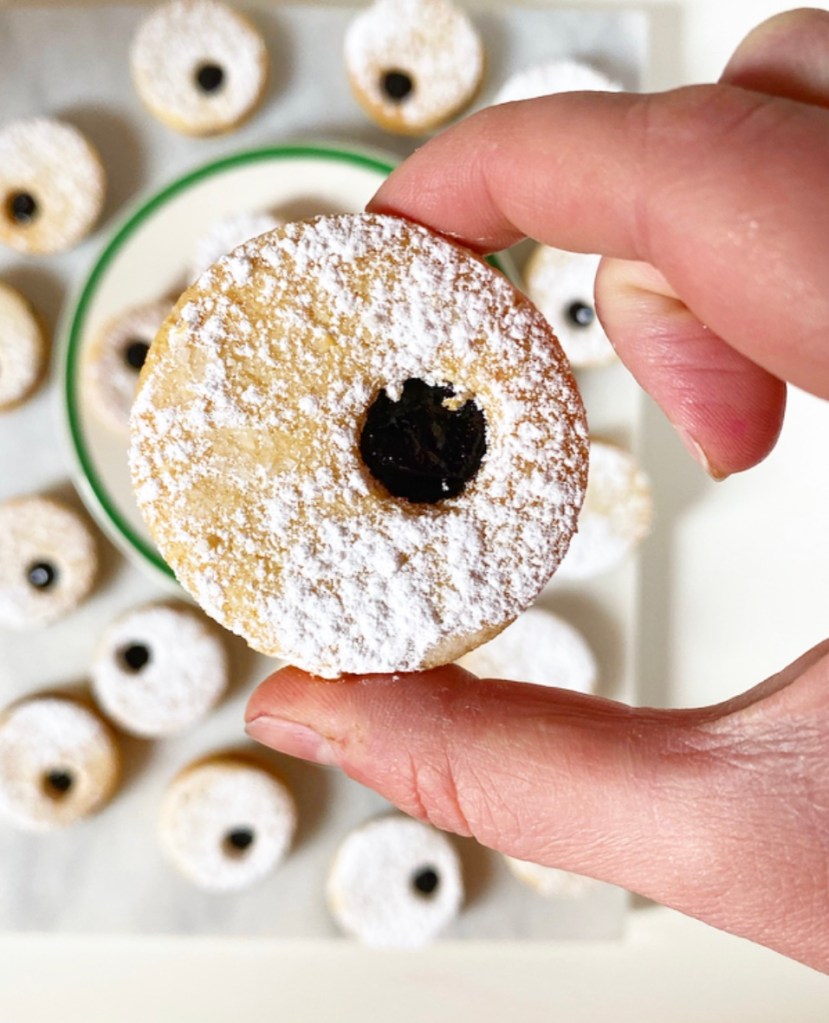
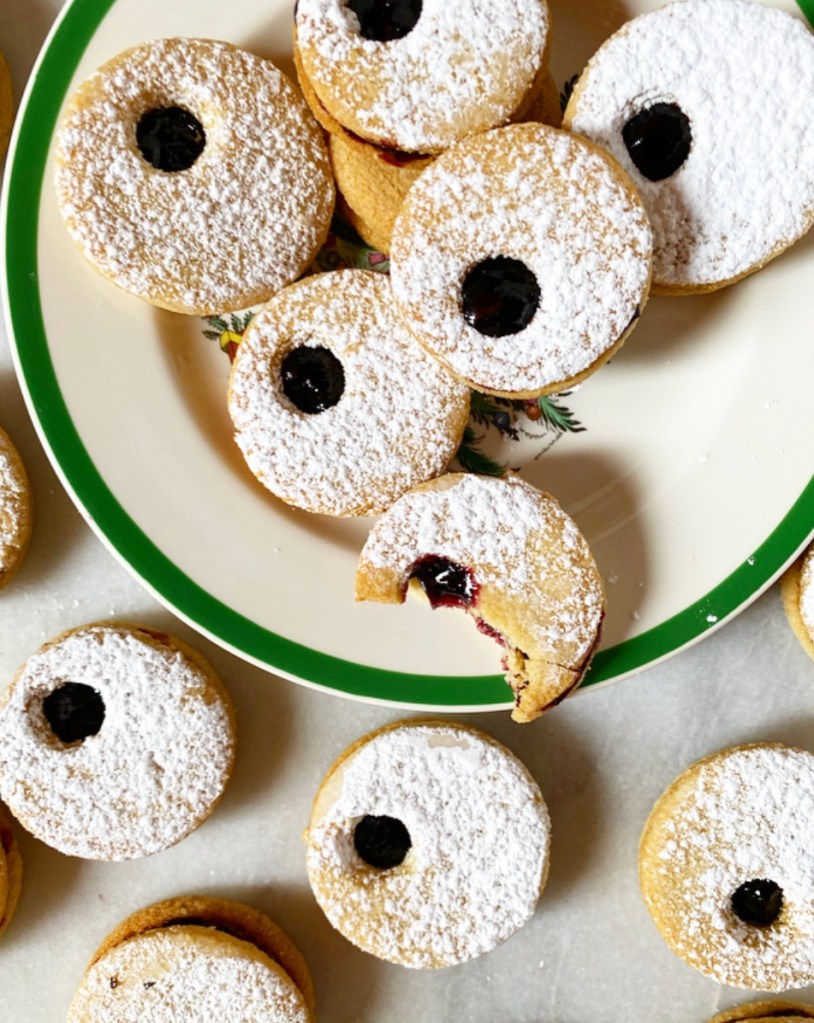
This dough requires a short chill before the usual rolling, cutting and baking. Don’t forget to stamp out a little window in half your cookies for that signature linzer cookie look!
As far as filling goes, you can use any spread you like, but jam is traditional. I’m not much of a jam person, but I had a jar of homemade blueberry jam from my friend Suzette up in Maine, so I used that. Raspberry and strawberry would give festive Christmas red vibes, but I think orange marmalade might be absolute magic paired with the nutty cookies. I’ll have to try that another day though—for now, I’m extremely into these blue-black little picture windows and the signature flavor of my favorite place.
Vegan, Gluten-Free Linzer Cookies are initially very crunchy, but soften a bit as they soak up some moisture from the jam. This is not a bad thing at all, as it makes them easier to eat without getting crumbs on your shirt. That’s very important if, like me, you plan to casually snag a cookie every time you walk by the plate from now until 2022.
Vegan, Gluten-Free Linzer Cookies
makes about 2.5 dozen sandwich cookies

1/2 cup whole hazelnuts (or pecans)
2 1/2 cups blanched almond flour
1 teaspoon baking powder
1 teaspoon Kosher or sea salt
1/2 cup vegan butter, softened to room temperature
2/3 cup granulated sugar
1/3 cup confectioner’s sugar
2 tablespoons maple syrup or light corn syrup
2 teaspoons pure vanilla extract

For assembly:
2 tablespoons confectioner’s sugar
~3/4 cup jam or spread of choice

Special equipment:
rolling pin
2-inch cookie cutter
smaller cookie cutter (I used the large end of a piping tip)

toast and peel the hazelnuts. Place hazelnuts in a dry skillet over medium heat. Stir frequently until fragrant, 7-10 minutes. Immediately transfer hazelnuts to a clean, dry hand towel. Fold towel around the hazelnuts and then rub the towel with the palm of your hand. This will allow the hazelnut skins to loosen. This step does not have to be done perfectly. (If you are using pecans, you do not need to peel them.)

Let hazelnuts cool completely. Transfer to a food processor and pulse until they are a fine meal. Do not over-process or you’ll have hazelnut butter (delicious, but not helpful here).

In a medium mixing bowl, whisk together ground hazelnuts, almond flour, baking powder, and salt. Set aside.

In a separate medium-large mixing bowl, use an electric mixer to beat vegan butter until fluffy (about 2 minutes). Add sugar and confectioner’s sugar and beat until fully combined (about 2 minutes). Beat in maple syrup and vanilla.

Add dry ingredients in two installments, mixing completely after each addition. Dough may look rubbly, but should hold together extremely well when pinched.

Divide dough in two. Form each half into a disk, then wrap with plastic wrap. Chill for 1 hour or up to 3 days.

Place oven racks in central positions. Preheat oven to 325F. Line two rimmed baking sheets with parchment.

Use confectioner’s sugar to dust a surface and rolling pin. Unwrap one disk of dough and place it on the surface. Use the rolling pin to roll it out to 1/8-inch thickness. A thin offset icing spatula or bench scraper (or similar) will make moving the dough much easier, as will adding more confectioner’s sugar to the surface and rolling pin.

Use a 2-inch rom d cookie cutter to cut cookies, then use the icing spatula to move them to the prepared pans, keeping them 1.5 inches apart. Use a smaller cutter (I used the wide end of a piping tip) to cut windows in half your cookies—these are the tops of your linzers. Bake cookies 12-14 minutes, rotating the pans top-to-bottom and front-to-back at the 7 minute mark.

Let cookies cool 10 minutes on their pans. Use a spatula to remove them to a cooling rack to cool completely.

Repeat rolling, cutting, and baking as needed, re-rolling scraps as needed. Let cookie sheets come to room temperature between batches.

Set a cooling rack over a piece of parchment. Once all cookies are baked and cooled, set the cookies with the centers cut out on a prepared rack. Sift confectioners sugar over the tops.

Spread each whole cookie with  jam (amount is based on your preference). Carefully sandwich cookies together. Serve.

Cookies will keep in an airtight container at room temperature for up to 3 days, or in the refrigerator for up to a week. Place wax paper between layers for best storage. Cookies will soften a bit over time.
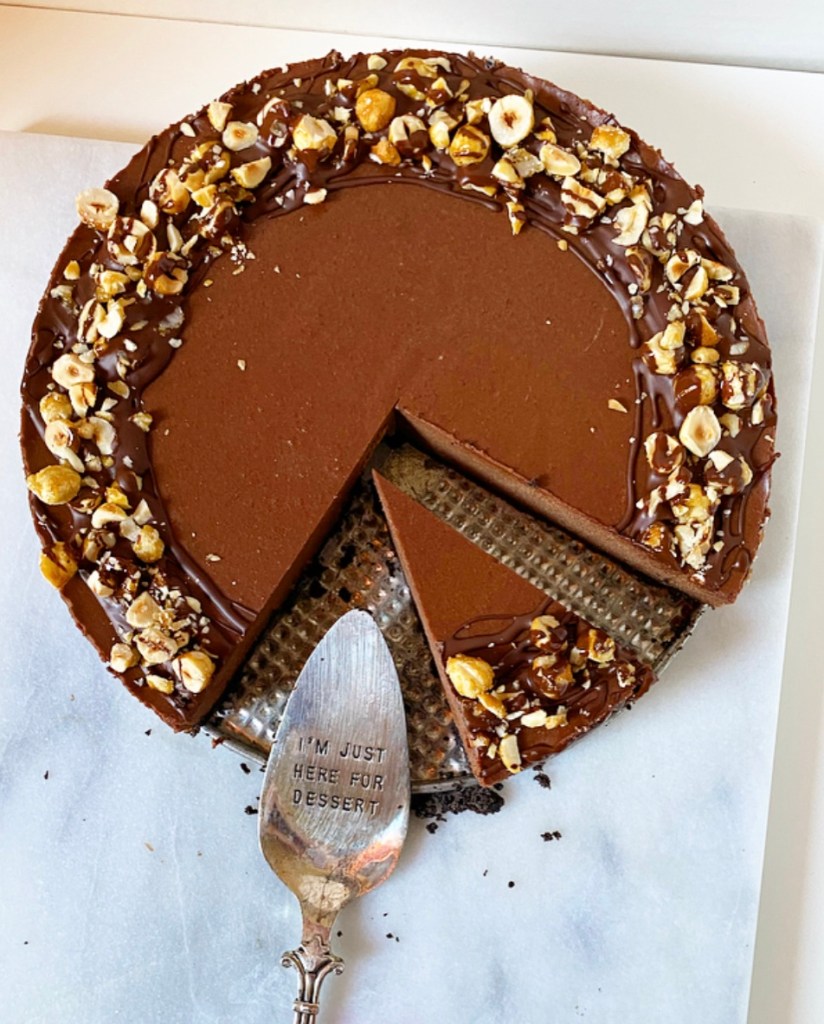
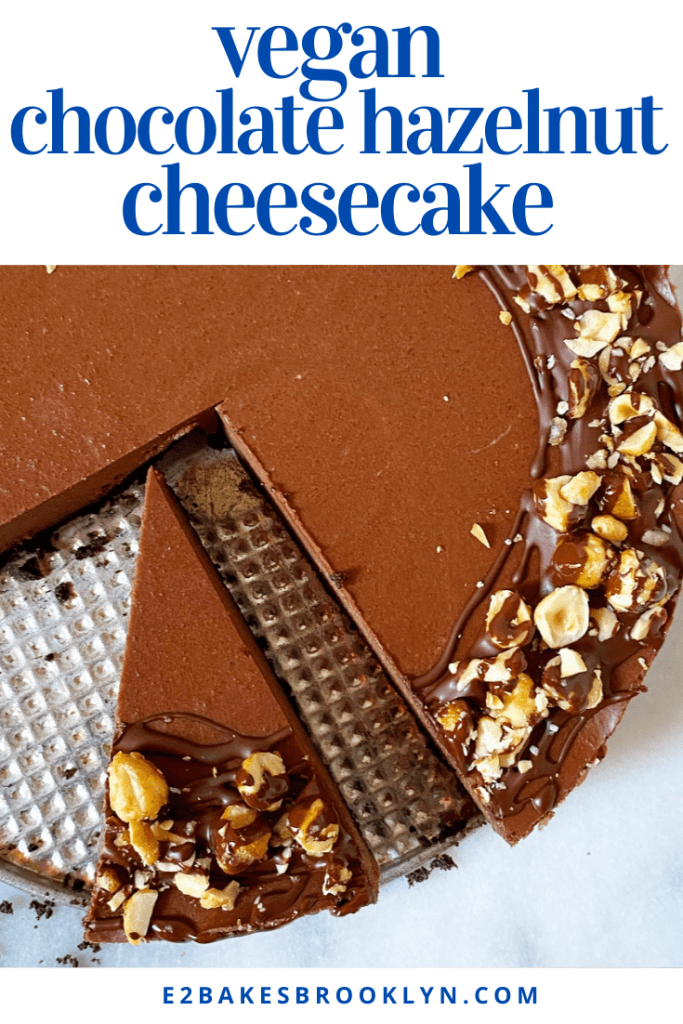
It is far too hot to bake today, but that’s okay because Vegan Chocolate Hazelnut Cheesecake requires no baking at all.
We’re talking all the rich, creamy, irresistible texture of a classic cheesecake with none of the dairy and exactly zero reasons to crank your oven. Oh, and more deep dark chocolate-hazelnut flavor than you can shake a stick at. (What does that even mean?)
This take on vegan cheesecake is made with toasted hazelnuts for flavor and raw cashews for creamy texture. They’re soaked together overnight for maximum tenderness, then combined in a blender with coconut cream, coconut oil, maple syrup, vanilla extract, salt, and—oh yeah—half a pound of melted dark chocolate. Put on the lid and then blitz-blitz-blitz until smooth.
This is the part where I get on my soapbox:
Please get yourself a good blender. You deserve a good blender. Good doesn’t necessarily mean expensive—it means a blender that actually blends things until smooth. Whether that’s a fifty year-old Oster (my parents’ amazing blender) or a Vitamix, a solid blender is crucial to vegan cheesecake success, and a million other things. I have a Ninja that I bought for $100 five years ago and it rules. Get a good blender!!!
*steps off soapbox*
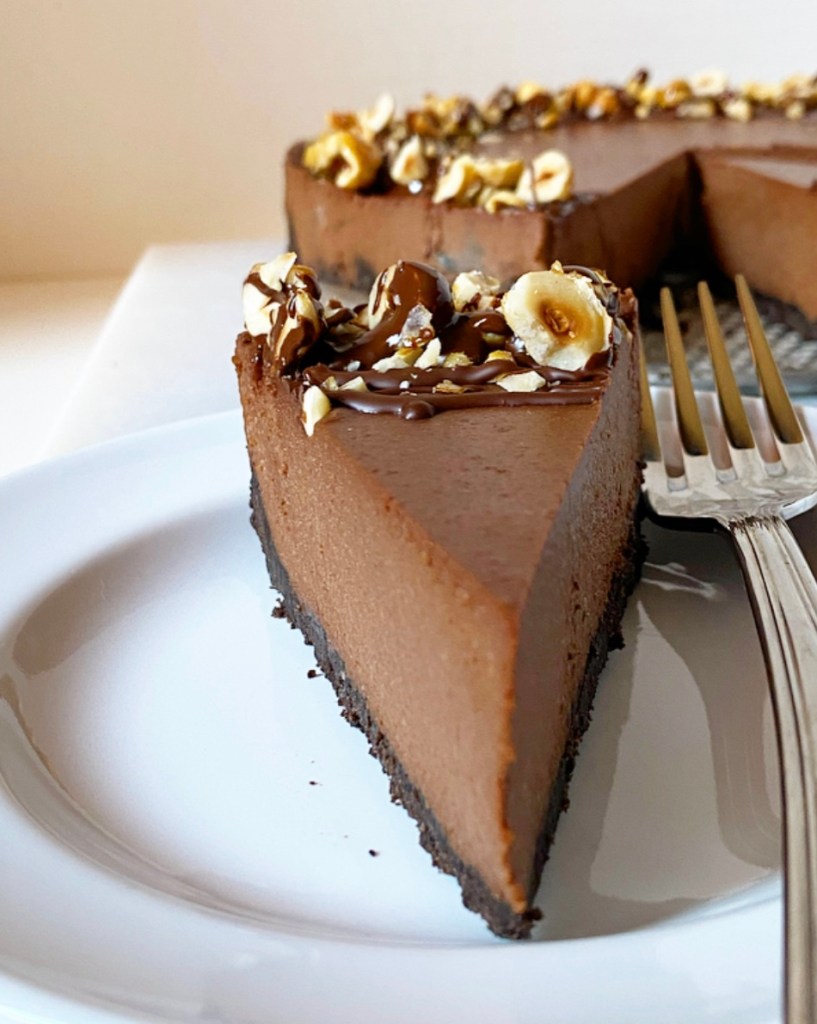
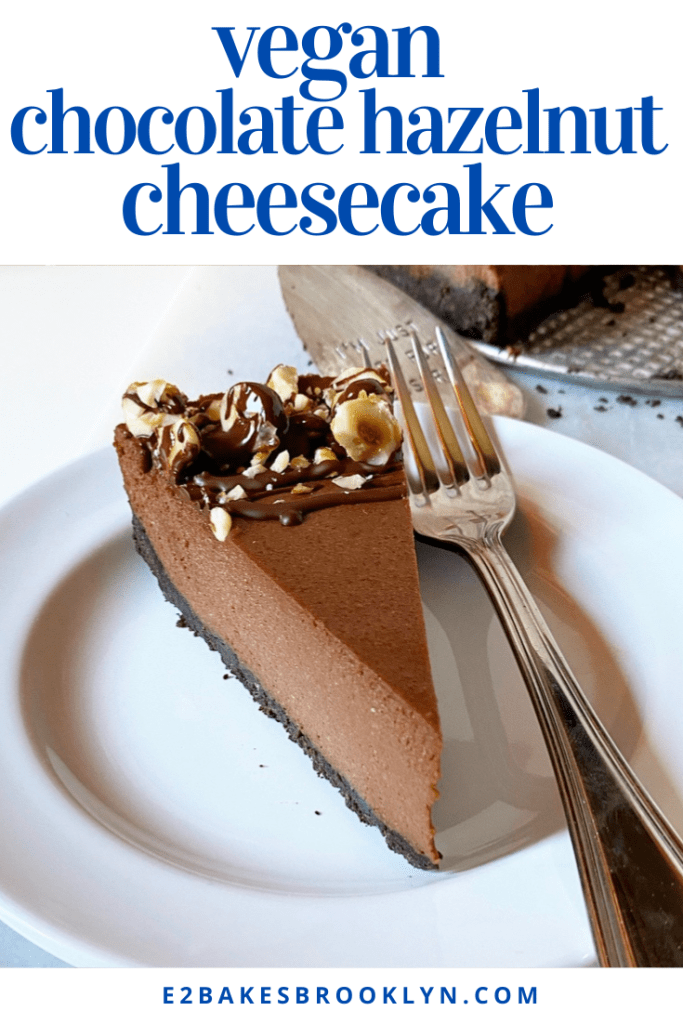
Ahem…the batter is then poured over an Oreo crust—yes, Oreos are vegan!—and chilled until firm. Then it’s released from the springform and finished off with some Homemade Chocolate Shell and easy candied hazelnuts before being sliced and served. You can use a plate and fork if you’re fancy (or taking pictures) or just eat ice cold slices with your fingers like a wild animal, as I did.
I’m pretty sure that’s what hot girl summer is all about.
Vegan Chocolate Hazelnut Cheesecake makes one 9-inch cheesecake
Filling: 1 cup whole raw hazelnuts 1 cup whole raw cashews 1 14-ounce can coconut cream (not cream of coconut) 4 tablespoons maple syrup 1 1/2 teaspoons pure vanilla extract 1/4 teaspoon Kosher or sea salt 6 tablespoons coconut oil (preferably refined), melted and cooled 8 ounces dark chocolate, melted
Crust: 24 Oreos (or other chocolate sandwich cookies) 5 tablespoons coconut oil or melted vegan butter
Candied Hazelnut Garnish: 1/3 cup whole raw hazelnuts 3 teaspoons granulated sugar Homemade Chocolate Shell
The night before you want to make the cheesecake, toast and peel the hazelnuts. Place hazelnuts in a dry skillet over medium heat. Stir frequently until fragrant, 7-10 minutes. Immediately transfer hazelnuts to a clean, dry hand towel. Fold towel around the hazelnuts and then rub the towel with the palm of your hand. This will allow the hazelnut skins to loosen. This step does not have to be done perfectly.
Place peeled hazelnuts in a 3-4 cup container that has a lid. Add cashews. Cover with water. Refrigerate for 4-12 hours.
Lightly grease a 9-inch springform pan with coconut oil.
Make the crust. Place Oreos in a high-powered blender and blitz until they are crumbs. Add coconut oil or melted vegan butter, and pulse until the mixture can be pinched together. Transfer crust mixture to prepared pan, and press it to the edges to form an even layer. Refrigerate for 15 minutes to set.
Very carefully wipe it out the blender with a paper towel.
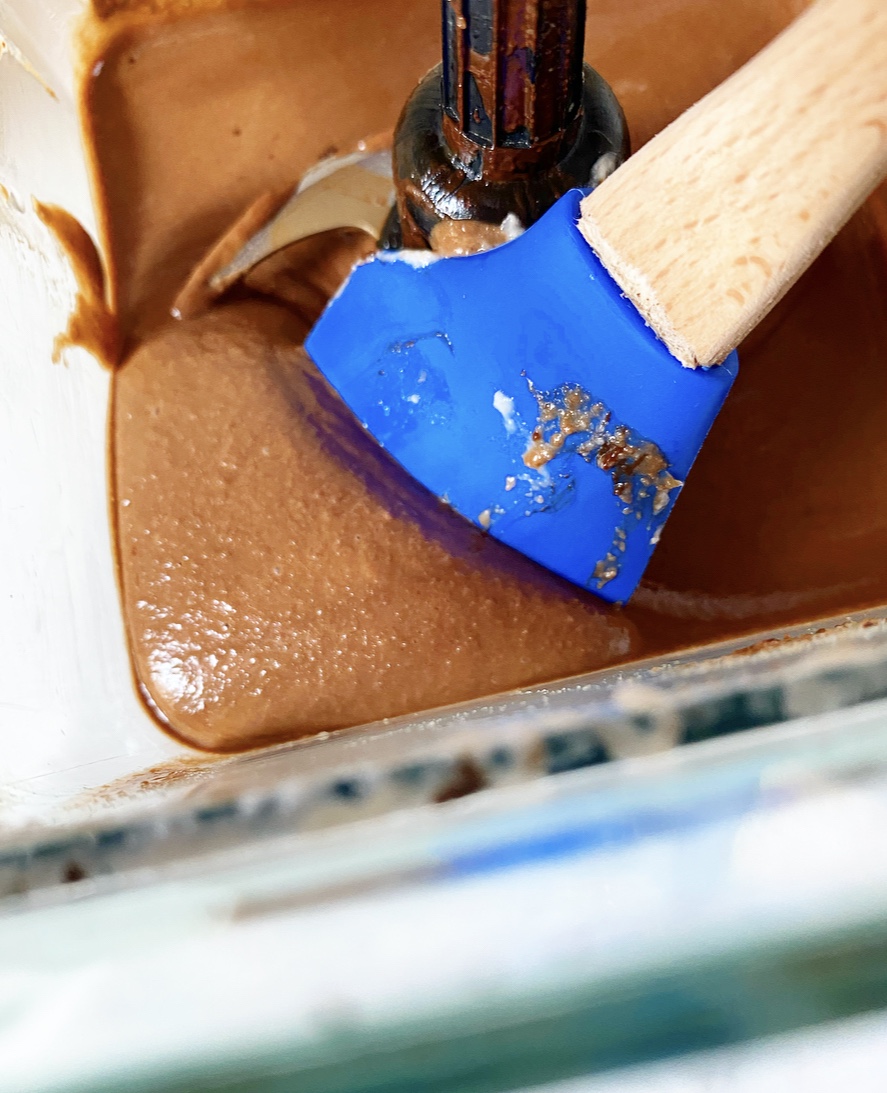
Make the filling. Drain soaked hazelnuts and cashews and place them in the blender. Add half of the coconut cream (~2/3 cup), maple syrup, vanilla, and salt. Process until the mixture is smooth. Add remaining coconut cream & coconut oil, followed by melted chocolate. Continue processing until everything is fully combined and smooth.
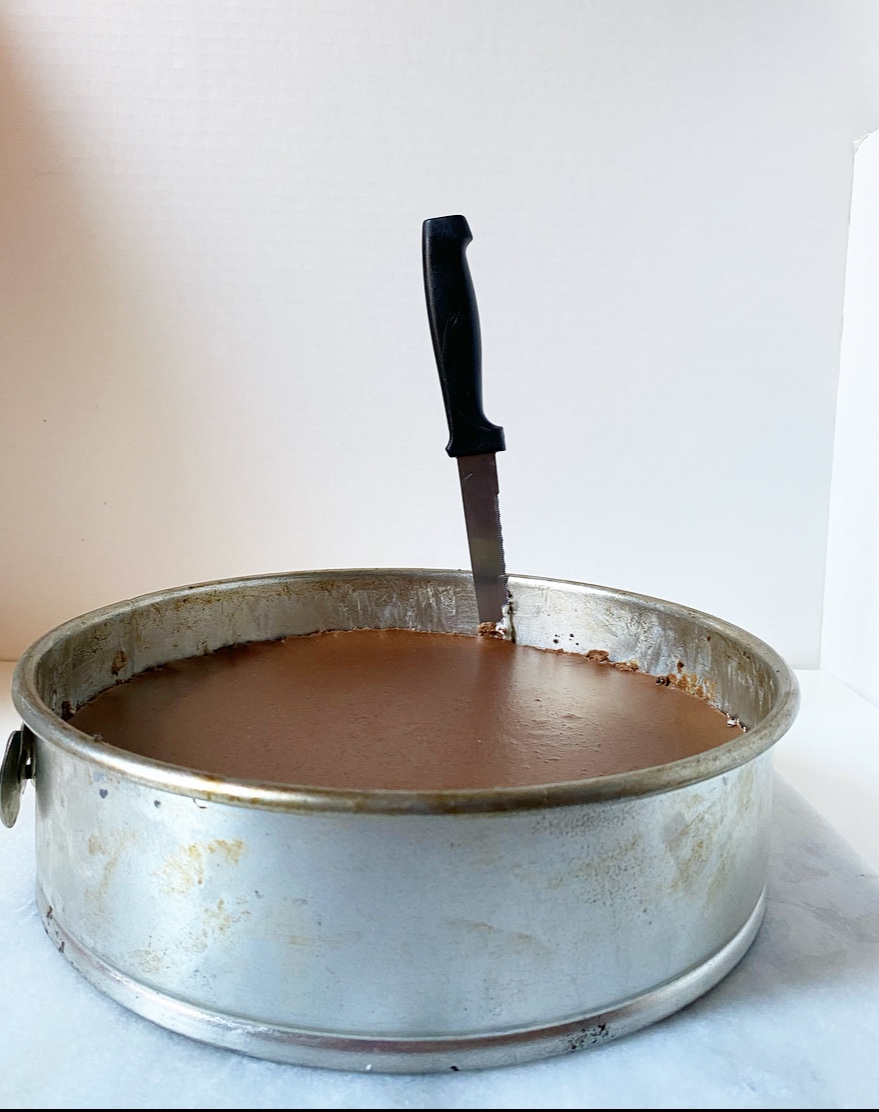
Pour filling mixture over crust and smooth with an offset spatula. Refrigerate for at least 3 hours (or freeze for 1 hour).
Make the candied hazelnut garnish. Line a plate with parchment and set aside. Place hazelnuts in a dry skillet over medium-low heat. Toast for 2-3 minutes, stirring frequently, until fragrant and shiny. Add sugar by the teaspoon, stirring until it dissolves (it may smoke up a bit). When all sugar has dissolved, remove hazelnuts to prepared plate. Let cool completely. Place on a cutting board and give them a rough chop with a large, sharp chef’s knife.
Run a thin, flexible knife around the edge of the pan. Release the cheesecake from the springform pan, and allow it to sit at room temperature for 10 minutes. Drizzle with chocolate shell, then immediately scatter on the candied hazelnuts. Slice with a large, sharp chef’s knife, wiping the blade clean between cuts. Serve.
Leftovers will keep covered in the refrigerator for a few days. Filling may slump slightly in very hot weather.