Category Archives: Holiday

Soft Sour Cream Sugar Cookie Bars

Soft Sour Cream Sugar Cookie Bars​

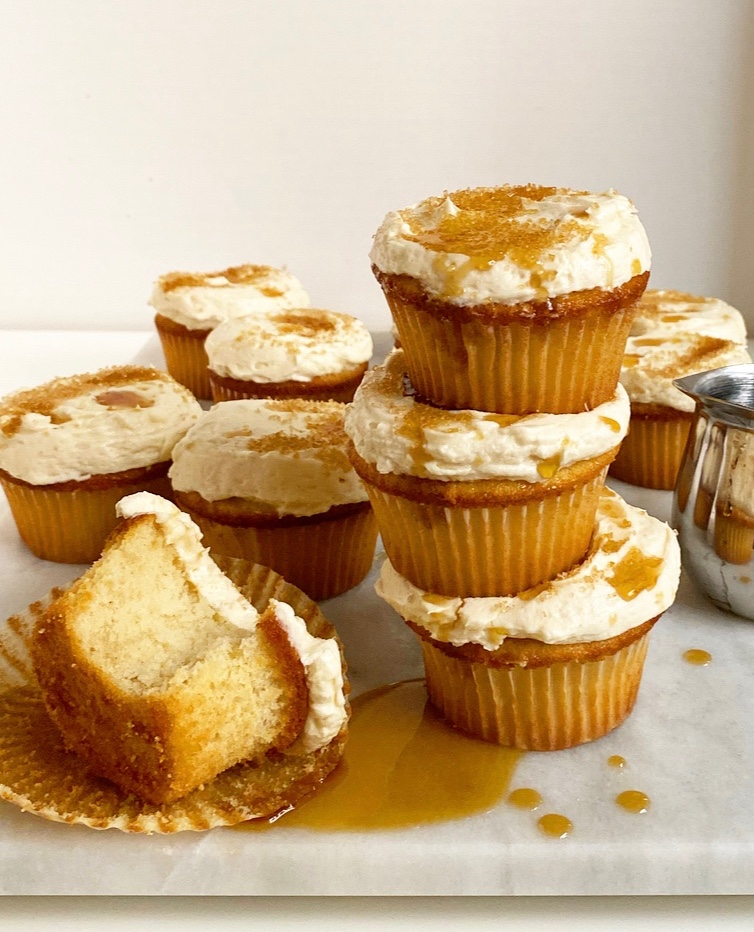
I’ve had these Soft Sour Cream Sugar Cookie Bars photos in my drafts for a long time—since September—waiting for the perfect time to post them. Fall was mostly spent getting back in the swing of things after my self-imposed break, and then there were the holidays, and then the post-holiday malaise. The Super Bowl or Valentine’s Day would have been a perfect time to post these, but I *just* posted those Vanilla Sour Cream Cupcakes and…

…well, there’s just never going to be a perfect time, is there? Or maybe anytime is a perfect time? I don’t know. This is confusing.

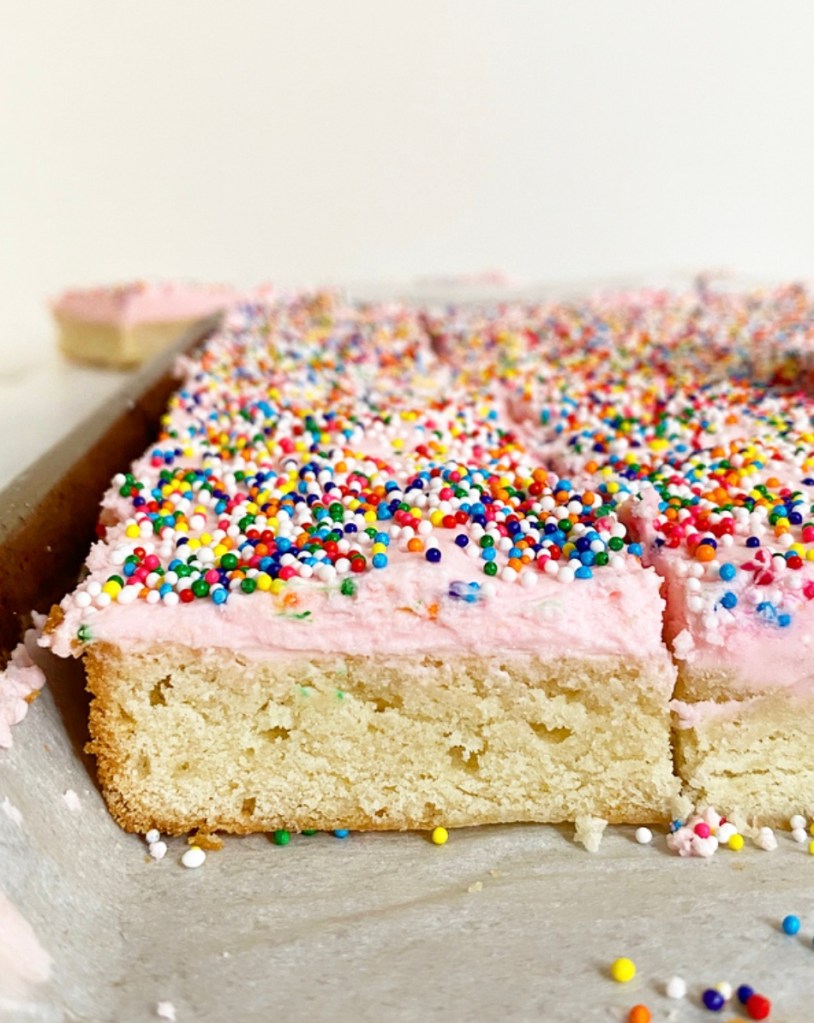
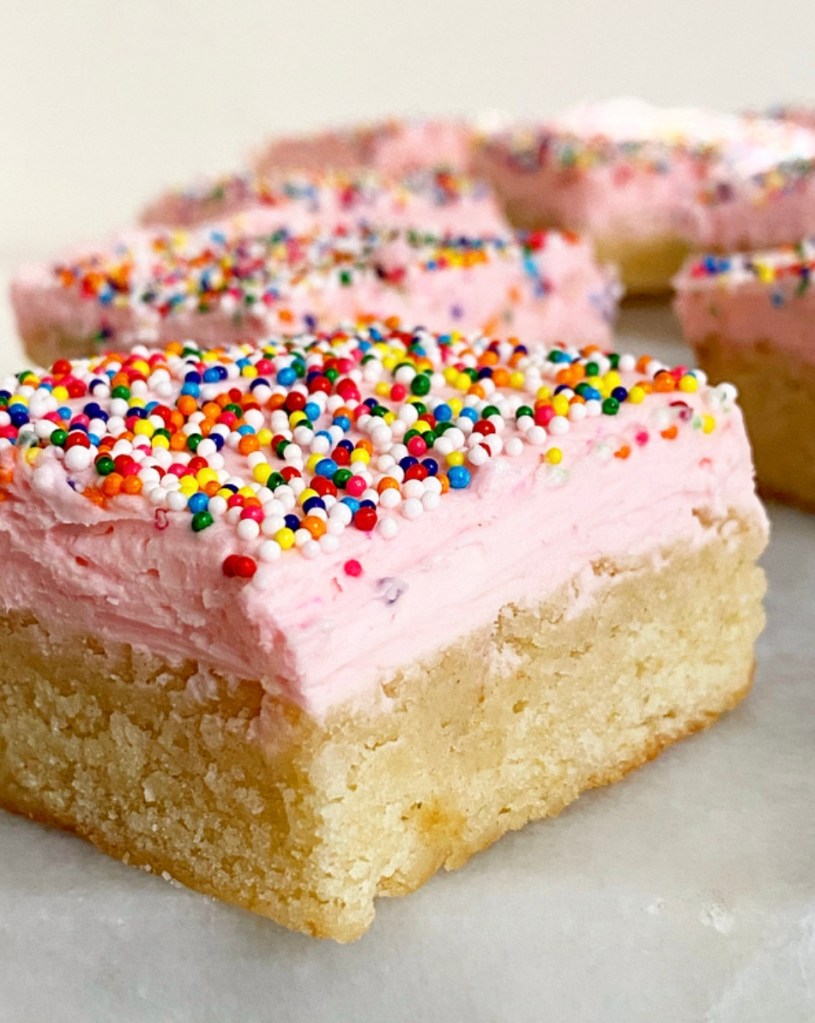
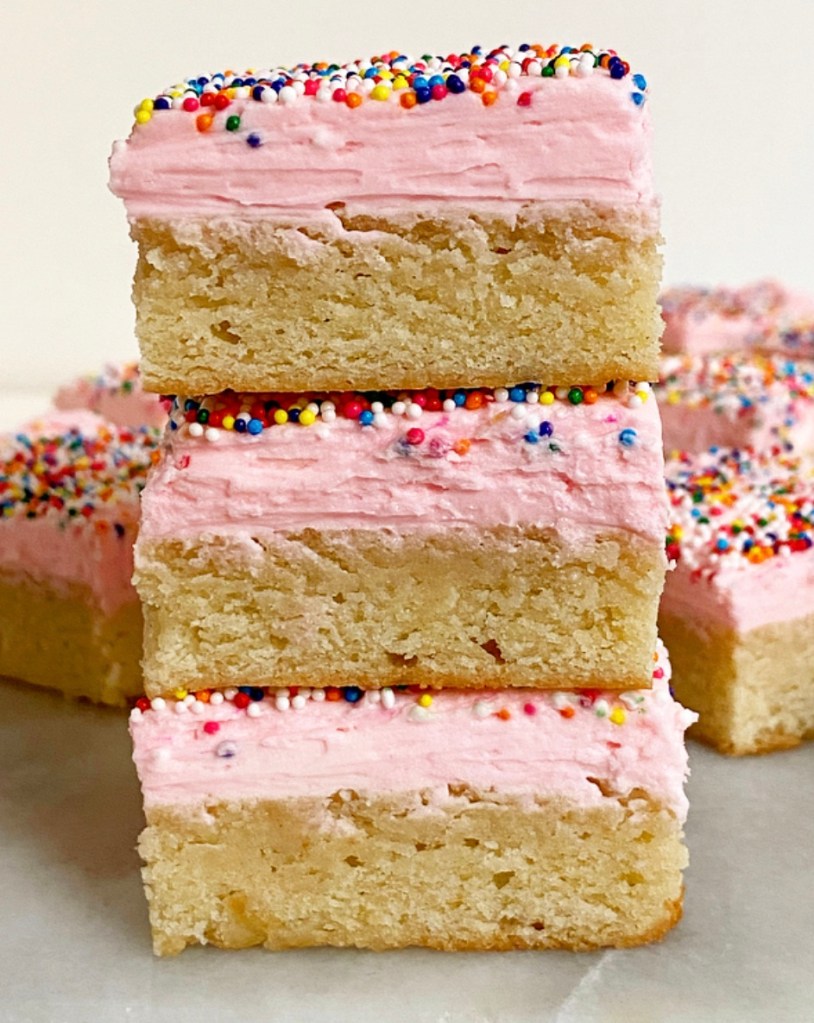
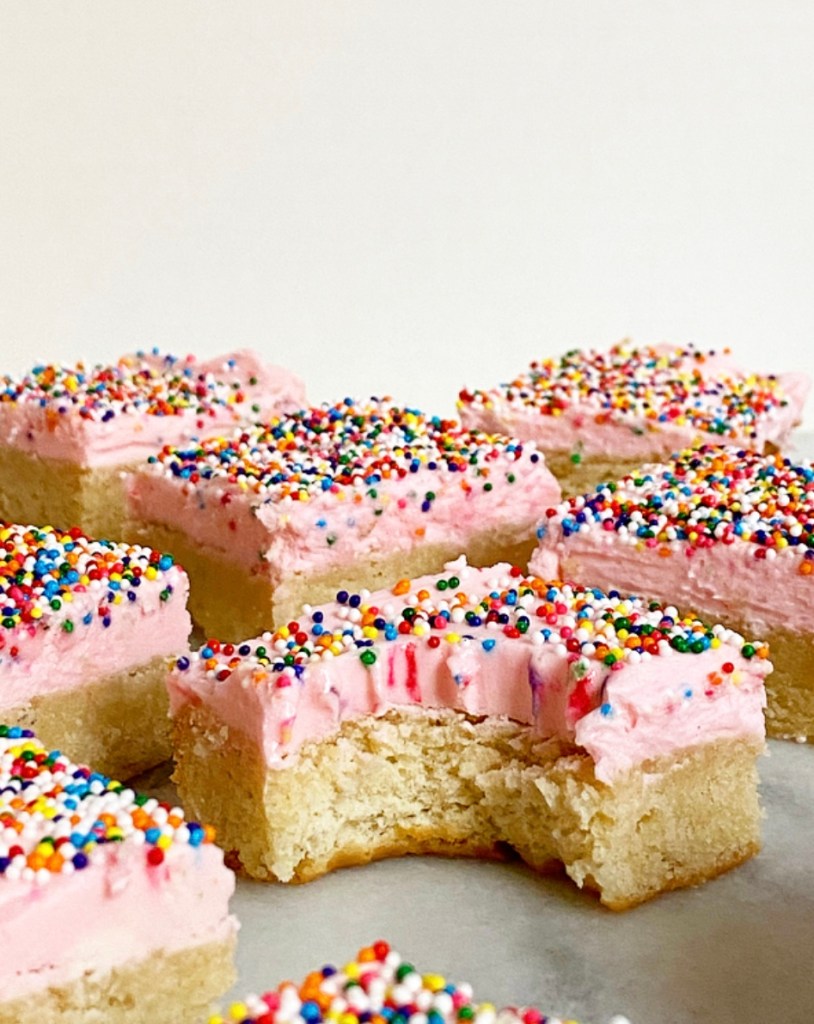
What I do know is that these Soft Sour Cream Sugar Cookie Bars are spectacular. They’re a riff on my Soft Sour Cream Sugar Cookies (which are a riff on Lofthouse Cookies), but they’re bars, ya know? The cookie layer is thick and a little cakey; perfect for pairing with a thick layer of Vanilla Sour Cream Frosting! I made mine pink because pink food just tastes better, as does anything with way too many sprinkles on top.

Soft Sour Cream Sugar Cookie Bars​

These are a great dessert for a multitude of occasions and non-occasions alike. Might I recommend this three day weekend in the middle of February? Seems like a perfect time to me.

Soft Sour Cream Sugar Cookie Bars​
Soft Sour Cream Sugar Cookie Bars
makes 1 9x13-inch pan (24 bars)

Dough:
2 1/3 cups all-purpose flour
1/2 cup confectioner’s sugar
1 teaspoon baking powder
1/8 teaspoon baking soda
1/2 teaspoon Kosher or sea salt
1 cup (2 sticks) unsalted butter, softened to room temperature
1 cup granulated sugar, packed
1 large egg, room temperature
1/3 cup sour cream (not fridge-cold)
2 teaspoons pure vanilla extract

For Decorating:
Vanilla Sour Cream Frosting (recipe below)
sprinkles of choice

Preheat oven to 350F. Grease a 9x13-inch pan (or quarter sheet pan) with butter. Line with parchment, leaving some overhang on the long sides, and butter again. Set aside

Make the dough. In a medium mixing bowl, whisk together flour, confectioner’s sugars, baking powder, baking soda and salt. Set aside.

In a medium-large mixing bowl, use an electric mixer to beat butter until light and fluffy, about 2 minutes. Beat in sugar until creamy. Mix in egg, followed by sour cream and vanilla. Add dry ingredients in 2 installments, beating until combined. Dough will be sticky.

Drop large spoonfuls of dough into the prepared pan, make sure to use it all. Use an offset icing spatula or the back of a spoon to spread dough in an even layer to the edges of the pan.

Transfer the pan to the oven and bake 23-25 minutes, until the edges are turning golden and the center has puffed. Let bars cool completely in the pan on a rack. Meanwhile, make the Vanilla Sour Cream Frosting (recipe below).

Once the bars are cool, run a thin flexible knife along all the edges to release them from the pan. Use the parchment overhang to transfer them to a cutting board or other surface. Drop spoonfuls of the frosting over the top of the bars. Use an offset icing spatula or the back of a spoon to spread it evenly to the edges. Finish with your sprinkles of choice.

For the cleanest slices, refrigerate the assembled bars for at least 20 minutes before slicing into 24 pieces with a large, sharp chef’s knife.

After they’ve crusted, leftovers may be layered with wax or parchment paper and kept in an airtight container. They will keep at room temperature for a couple of days or in the refrigerator for up to a week.

Vanilla Sour Cream Frosting

1 cup (2 sticks) unsalted butter, softened to room temperature
1 pound (3 3/4 cups) confectioner's sugar
pinch of Kosher or sea salt
2 teaspoons pure vanilla extract
4 tablespoons heavy cream
food coloring, if desired

In a large mixing bowl, use an electric mixer to beat butter until light and fluffy. Add confectioner’s sugar and salt in two installments, combining completely after each addition. Beat in vanilla, sour cream & food coloring (if using) nuntil combined.

Use buttercream to frost Soft Sour Cream Sugar Cookie Bars.

Peppermint Mocha Brownies

It’s a little late for a Christmas recipe, but frankly I can do whatever I want on this website. And what I want is a pan of Peppermint Mocha Brownies.

Peppermint Mocha Brownies

Made with my tried and true Cocoa Brownie base, these holiday treats come together super easily. Their already-deep chocolate flavor is punched up with semisweet chocolate chips, then accented with just enough peppermint extract and granulated espresso to evoke everyone’s holiday coffee shop fave.

Peppermint Mocha Brownies

But flavor’s only half of the equation here—Peppermint Mocha Brownies have to look the part, too! These are drizzled with a melted mix of chocolate chips and butter, and sprinkled with as much crushed candy cane as your heart desires. (My heart desires a lot.)

Peppermint Mocha Brownies

Peppermint Mocha Brownies are rich and satisfying; a little square goes a long way. I, however, have no self control and cut these on the larger side. I regret nothing.

Merry Christmas! Happy Holidays! Whatever and wherever you’re celebrating, I hope you’re safe, warm, and with people you love.

Peppermint Mocha Brownies
adapted from Alice Medrich's Cocoa Brownies
makes one 8- or 9-inch square pan

10 tablespoons unsalted butter, cut into small pieces
3/4 cup granulated sugar
1/2 cup light or dark brown sugar, packed
3/4 cup + 2 tablespoons cocoa powder (natural or dutch process)
2 large eggs, cold
1 teaspoon pure vanilla extract
1/2 teaspoon peppermint extract (not mint extract)
1/2 cup all-purpose flour
2 teaspoons granulated espresso or coffee
1/2 teaspoon Kosher or sea salt
1/2 cup semisweet chocolate chips

For Garnish:
3 tablespoons semisweet chocolate chips
1 tablespoon unsalted butter
crushed candy canes or starlight peppermints

Preheat oven to 325F. Butter the inside of an 8- or 9-inch square pan. Line the bottom with parchment and butter again. Set aside.

In a small pot over medium-low heat, melt butter, granulated and brown sugars, and cocoa powder together, stirring frequently, until a thick, grainy mixture forms. Remove from heat and let mixture cool 5-7 minutes.

Add vanilla, peppermint extract, and eggs to the pot, and stir/whisk to combine. Add flour, granulated espresso, and salt, and stir/whisk to combine. Fold in semisweet chocolate chips. Transfer batter to prepared pan and spread to the edges. Tap the full pan on the counter a couple of times to release any air bubbles. Top with pecans, if desired.

Bake brownies 25-30 minutes, or until a toothpick inserted in the center comes out with only a few moist crumbs (not wet batter). Let cool completely in the pan on a rack.

Garnish the brownies. Combine chocolate chips and butter in a small microwave-safe bowl. Microwave in 30 second increments, stirring in between, until smooth. Use a fork to drizzle over brownies. Sprinkle with crushed candy canes.

Refrigerate brownies for 15-20 minutes, until chocolate sets.

Slide a knife around the edges of the pan before using parchment overhang to lift brownies onto a cutting board. Use a large, sharp chef’s knife to slice brownies into 16 or 25 pieces. Serve.

Leftovers will keep in an airtight container at room temperature for up to 4 days or in the refrigerator for up to a week.

White Chocolate Cranberry Pistachio Shortbread Wedges

White Chocolate Cranberry Pistachio Shortbread Wedges​

Hi there! I am sorry I left you hanging for a few weeks there—COVID finally got me—but I am very happy to be back with a new recipe in time for the Sweetest Season Cookie Exchange. This event, which I am participating in for the fifth year, is a food blogger-lead fundraiser and awareness campaign for Cookies for Kids’ Cancer. This organization is a 501(c)3 non-profit with the express mission to raise funds for innovative pediatric cancer treatments and research through bake sales and cookie swaps. Supporters (“Good Cookies”) can do this throughout the year, but I am delighted to lend support as part of my holiday giving especially right now when OXO is matching donations up to $100,000! If you’d like to learn more and/or make a charitable donation to Cookies for Kids’ Cancer, click here. For White Chocolate Cranberry Pistachio Shortbread Wedges, keep scrolling!

White Chocolate Cranberry Pistachio Shortbread Wedges​

I would like to give a high five to whichever person decided white chocolate, dried cranberries, and pistachios is a Christmas combination. I don’t believe it was a part of any holiday parties or cookie exchanges I took part in while growing up, but I am all for it now. Aside from just being festive—love that red, green and white—it’s delicious, and a welcome departure from the chocolate, peppermint, and spice-heavy fare that seems to be available 24/7 in December. Not that I’m complaining.

White Chocolate Cranberry Pistachio Shortbread Wedges​

Today’s White Chocolate Cranberry Pistachio Shortbread Wedges are the perfect vehicle for showcasing this new holiday classic combination. They’re simple to make, require just a few ingredients, and are incredibly cute—things cut in wedges automatically have Christmas tree vibes, you know?

These buttery shortbread treats come together just as simply as the classic cookies. The dough is mixed in one bowl in just a few minutes. It’s got all the usual shortbread suspects (granulated sugar, softened butter, all-purpose flour), plus confectioner’s sugar, vanilla and salt for smooth texture, flavor and balance. Oh, and white chocolate chips, chopped dried cranberries and pistachios for pizzazz!

Once mixed, the dough is spread into a cake pan lined with an extra-large piece of parchment. It’s docked (vented) with a fork all over before baking for about 40 minutes, until just turning golden at the edges. Fifteen minutes later, that extra-large parchment is used to lift the whole disk of shortbread onto a cutting board and slice it into wedges while it’s still warm. I love those clean edges.

These shortbread wedges are thick and substantial, with a slight softness to their crunch, and plenty of color and flavor from the mix-ins. My favorite bites are the ones with white chocolate—it caramelizes in the oven and is outrageously good. I like to dot a few extra white chocolate chips on top after baking for diversity of flavor (and obvious cuteness). And the chewy cranberries and crunchy pistachios? So good!

White Chocolate Cranberry Pistachio Shortbread Wedges​

White Chocolate Cranberry Pistachio Shortbread Wedges are perfect for any upcoming party or cookie giving (eating?) occasion. They’re as satisfying to make as they are to eat, and the dough is a perfect blank slate for any festive mix-in your holiday heart desires. What would you put in shortbread wedges? Let me know in the comments!

White Chocolate Cranberry Pistachio Shortbread Wedges​
White Chocolate Cranberry Pistachio Shortbread Wedges
makes 12-16 wedges

3/4 cup unsalted butter, softened to room temperature
1/3 cup granulated sugar
1/3 cup confectioners sugar
2 teaspoons pure vanilla extract
1 3/4 cups all-purpose flour
1/2 teaspoon Kosher or sea salt
1/3 cup dried cranberries, finely chopped
1/3 cup pistachio meats, finely chopped
1/3 cup white chocolate chips, plus more for garnish

Preheat oven to 325F. Cut a large (12-14 inch) circle of parchment paper. Grease a 9-inch cake pan with butter. Line the pan with parchment circle, leaving the overhang for ease of removal. Grease again. Set aside.

Place softened butter in a large mixing bowl. Use an electric mixer to beat until light and fluffy, about 2 minutes. Add granulated and confectioners sugars and vanilla, and beat until incorporated. Beat in half of flour and salt, followed by remaining flour. Add chopped dried cranberries, pistachio meats, and white chocolate chips.

Transfer dough to prepared pan and press into an even layer. Use the tines of a fork to dock the entire surface of the dough. If you hit a big piece of pistachio (or whatever), simply pull it off the fork and press it back into place.

Bake shortbread 38-40 minutes, until golden at the edges and set on top. Dot with additional white chocolate chips, if desired.

Let shortbread cool in the pan on a rack for 15 minutes. Then use the overhang to remove the still-warm shortbread to a cutting board. Use a large sharp chef’s knife to cut into 12 large or 16 smaller wedges. Gently transfer wedges back to the rack and let cool completely. Serve.

Leftover shortbread will keep covered at room temperature for a few days.

Sweetened Condensed Milk Pumpkin Pie

If you’ve spent any amount of time in the recipe development corner of the internet, you know that there are as many different ways to make pumpkin pie as there are stars in the sky.

Sweetened Condensed Milk Pumpkin Pie

Okay, I may be exaggerating, but I’m not kidding when I say there are a *lot* of ways to make this classic Thanksgiving dessert. Until today, there were four on this site alone (1, 2, 3, 4), but now there are five. This one, made with one of my favorite ingredients, sweetened condensed milk, might just be my favorite. For now, at least.

Sweetened Condensed Milk Pumpkin Pie

You see, sweetened condensed milk can do it all. It sweetens, binds, and gives things and smooth, creamy texture. It carries the load in desserts from key lime pie to magic bars to no-churn ice cream. In short, it’s an incredible tool to have in your baking arsenal, especially if you’re in charge of making pie next week.

Sweetened condensed milk helps to sweeten and set this pumpkin pie filling, just like it does in my seasonal Pumpkin Spice Spread. It has the added benefit of cutting the list of ingredients a little shorter, too—a welcome shift anytime of year, but especially at the holidays.

Here, sweetened condensed milk is mixed with all the usual pumpkin pie suspects—a can of pumpkin purée, pumpkin pie spice, salt, eggs, and a touch of butter—and poured into a par-baked crust before baking. You’ll notice that the oven temperature goes from 350F to 425F and then back to 350F before this pie is done; it seems like a lot, but if followed, I can promise you flaky crust and a perfectly smooth set center.

I like to make Sweetened Condensed Milk Pumpkin Pie a day ahead because I prefer my custard pies cold. That’s not the case for everyone though, so feel free to serve it at room temperature. Whichever you choose, don’t forget the whipped cream.

Sweetened Condensed Milk Pumpkin Pie
makes 1 pie

For the crust:
1/2 recipe All Butter Pie Dough or other good single crust recipe
pie weights (or dedicated dried beans or rice) for blind baking

Filling:
2 cups pure pumpkin purée (1 15-ounce can)
2 1/2 teaspoons pumpkin pie spice
1/2 teaspoon Kosher or sea salt
2 large eggs, room temperature
1 14-ounce can sweetened condensed milk (not fat free)
2 tablespoons butter, melted

For serving:
whipped cream

On a floured surface, roll out pie dough to a 12" diameter. Fit into a deep 9-inch pie plate and trim the overhang to 1/2-inch. Crimp the edges and freeze for 30 minutes or refrigerate for an hour.

Place an oven rack in the lowest position. Preheat oven to 350F.

Remove pie crust from the freezer. Prick the bottom several times with the tines of a fork. Line frozen crust with a big piece of parchment. Fill the center with pie weights (or dried beans or rice).

Place the prepared pie crust on a rimmed baking sheet and bake for 20-25 minutes, or until pie crust has “set” and is starting to turn golden in places, but is far from done. Use parchment to lift out pie weights. Return crust to the oven for 10 minutes, then set aside.

In a large mixing bowl, mix together pumpkin purée, pumpkin pie spice and salt. Whisk in eggs one at a time, followed by sweetened condensed milk and melted butter. Pour pie filling into prepared crust.

Make the egg wash. In a small bowl, use a fork to whisk together egg and water. Brush over exposed crust.

Bake the pie for 15 minutes, then turn the oven temperature to 350F for an additional 45-50 minutes, covering the crust with foil if it starts to get too brown. The pie is ready when the filling no longer jiggles, or when a toothpick inserted in the middle comes out clean.

Let pie cool completely on a rack. Cover and chill, if desired. Serve at room temperature or chilled with whipped cream. Pie will keep covered at room temperature for up to two days or in the refrigerator for up to four days.

Maple Cupcakes

I know we’re past Halloween, but I’m not quite ready to dive into Thanksgiving food. Rest assured, I will be soon, but I need just one more minute to savor non-holiday food before we get to the pies and sides and then everything that Christmas requires. All of those things are wonderful, but let’s a moment for Maple Cupcakes first. I promise they deserve a second in the spotlight.

Maple Cupcakes

To me, Maple Cupcakes are the ideal treat to make the first weekend in November. Their hint of spice and natural colors make them seasonally appropriate, but they’re not associated with any holiday tradition I can think of. They’re just delicious—nothing more, nothing less.

Maple Cupcakes

Maple Cupcakes are a take on my reader favorite Maple Layer Cake. Like that dessert, they have maple syrup in a minimum of three elements; four, if you’re feeling kicky. Truly, these are a maple lover’s dream.

(It’s me. Hi. I’m the maple lover. It’s me.)

Maple Cupcakes

The cupcakes themselves are a lightly modified spin on my go-to vanilla recipe. They’re simple to make and the results are spectacular—soft and springy with the tiniest hint of spice to accent the maple. They bake up golden-edged and beautiful, with even surfaces perfect for brushing with more maple syrup and piling high with maple frosting. I like to finish them with coarse sugar, but an extra dab of maple syrup before serving is a nice touch, too.

In short, these are all maple all the time—it’s an approach I can get behind.

Maple Cupcakes
Maple Cupcakes
makes 14-16 cupcakes

Cupcake Batter:
1/2 cup milk, room temperature
1/2 cup sour cream, room temperature
1 1/2 cups all-purpose flour
2 tablespoons cornstarch
1/8 teaspoon ground cinnamon
1/8 teaspoon ground nutmeg
1/2 teaspoon baking powder
1/4 teaspoon baking soda
1/2 teaspoon Kosher or sea salt
1/2 cup (1 stick) unsalted butter, softened to room temperature
1 cup granulated sugar
1/4 cup pure maple syrup
2 large eggs, room temperature
2 teaspoons pure vanilla extract

Frosting:
1 1/2 cups (3 sticks) unsalted butter, softened to room temperature
4 cups confectioners sugar
1/2 teaspoon Kosher or sea salt
1 teaspoon pure vanilla extract
1/2 cup pure maple syrup
3 tablespoons heavy cream

For Assembly:
1/3 cup pure maple syrup
sparkling or coarse sugar (optional)

Make the cupcake batter. Preheat oven to 350F. Line a 12-cup standard muffin tin with cupcake liners. Set aside.

Combine milk and sour cream a liquid measuring cup, then use a fork to whisk them together. Set aside.

In a small-medium mixing bowl, whisk together flour, cornstarch, cinnamon, nutmeg, baking powder, baking soda, and salt. Set aside.

In a large mixing bowl, use an electric mixer to beat butter until light and fluffy. Beat in sugar, followed by maple syrup. Add eggs one at a time, combining completely after each addition. Beat in vanilla. Mix in half the dry ingredients, followed by half the milk/sour cream. Add the remaining dry ingredients followed by the remaining milk/sour cream.

Fill liners 2/3-3/4 full. Tap full pan on the counter five times before baking for 18-19 minutes, until a toothpick inserted in the centers comes out clean. Let cupcakes cool in the pan for 5-10 minutes before removing to a rack to cool completely.

Make the frosting. In a large mixing bowl, use an electric mixer to beat butter until light and fluffy, about two minutes. Beat in confectioner's sugar in two installments, scraping down the bowl as necessary. Beat in salt, followed by vanilla. Beat in maple syrup, followed by heavy cream.

To assemble, use a pastry brush to brush the top of each cooled cupcake with maple syrup. Let soak in for 1-2 minutes, just so there is no syrup standing on the surface of the cupcakes. Spread or pipe maple frosting on cooled cupcakes. Finish with coarse sugar. Add a few drops of maple syrup immediately before serving, if desired.

Leftover cupcakes will keep covered at room temperature for a few days or in the refrigerator for up to a week.