 I can hardly believe that Christmas is one week away. Thanksgiving was so late this year that I don’t feel like I’ve stopped to bask in the glow of Christmas lights at all, and I won’t have time to until I’m in Texas.
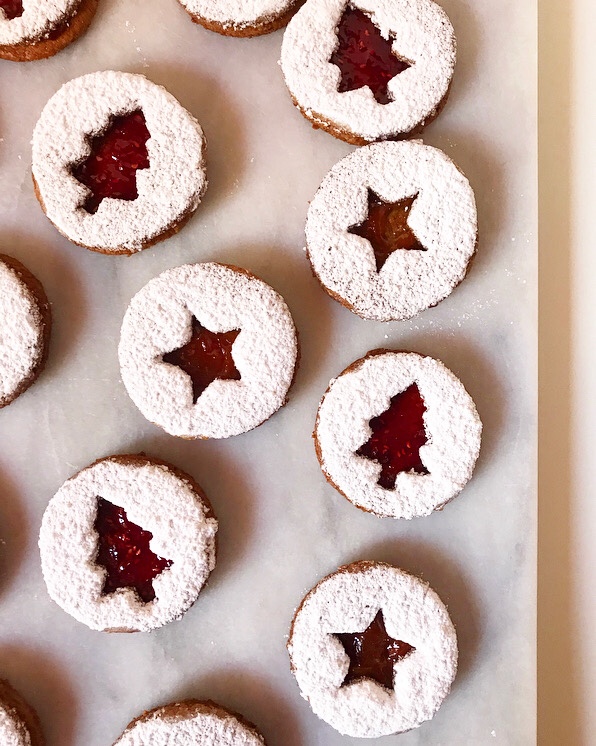 Don’t get me wrong, my apartment is decorated within an inch of fire code and I’ve been to see all the festive things. I’m just not quite in the spirit yet…except when I’m making cookies. Or showing up to places with cookies. Luckily for me, I do a lot of both of those things. Ain’t life grand?
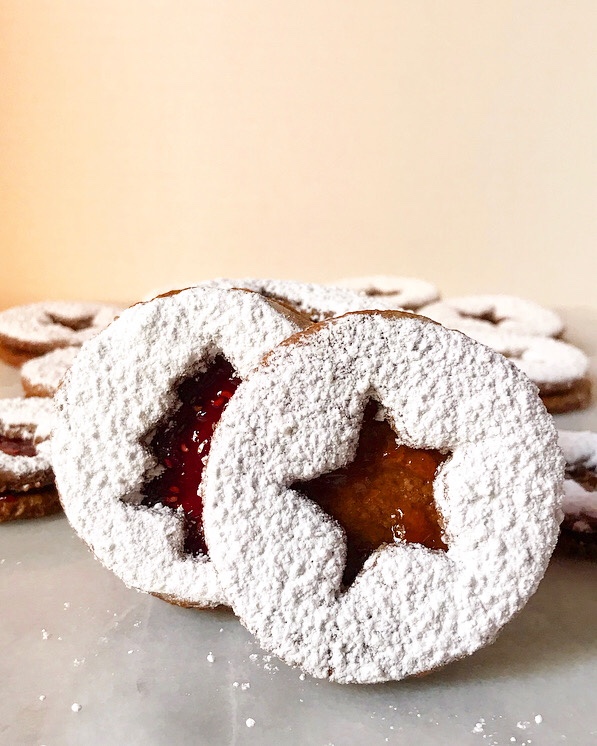
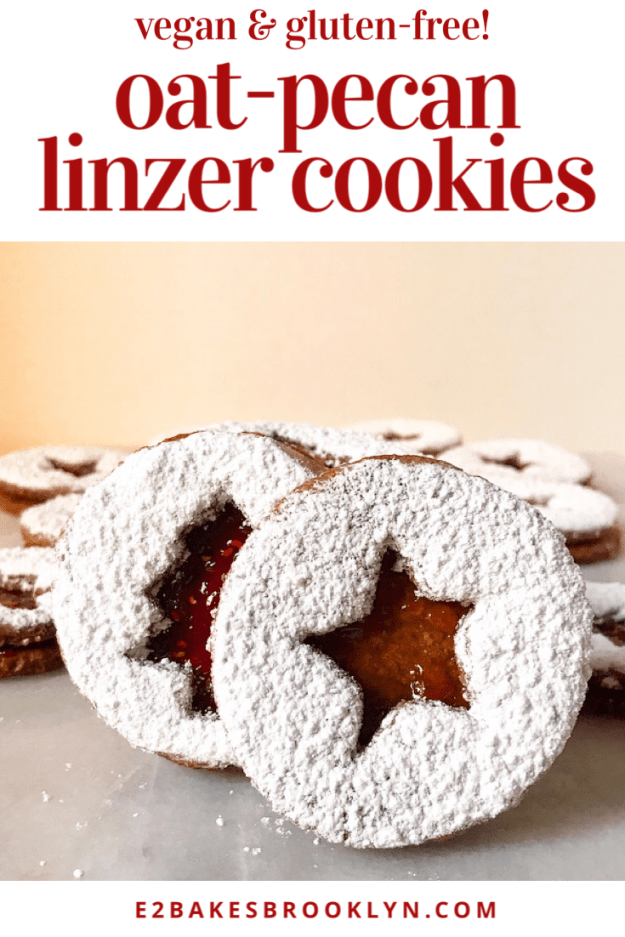
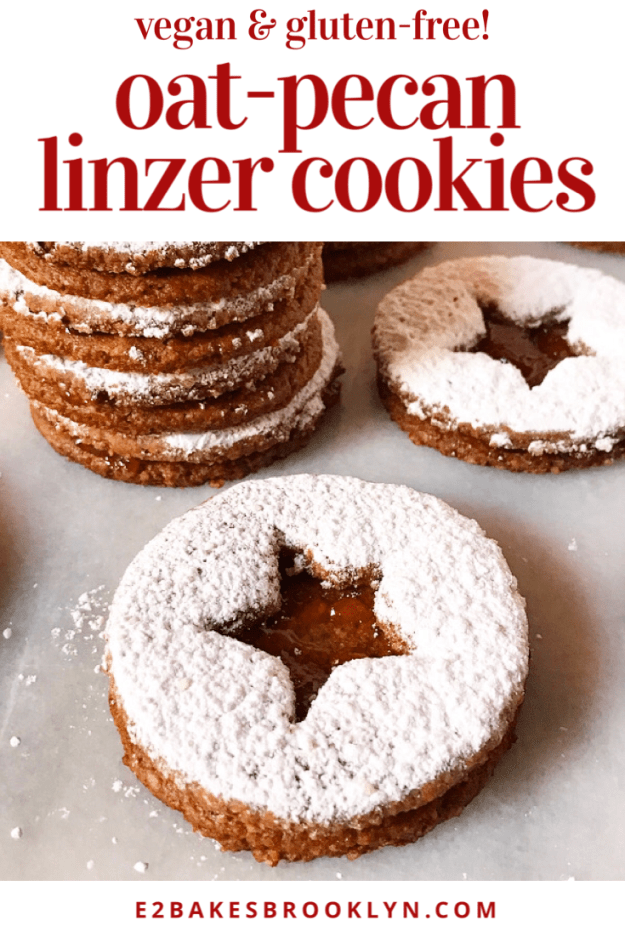
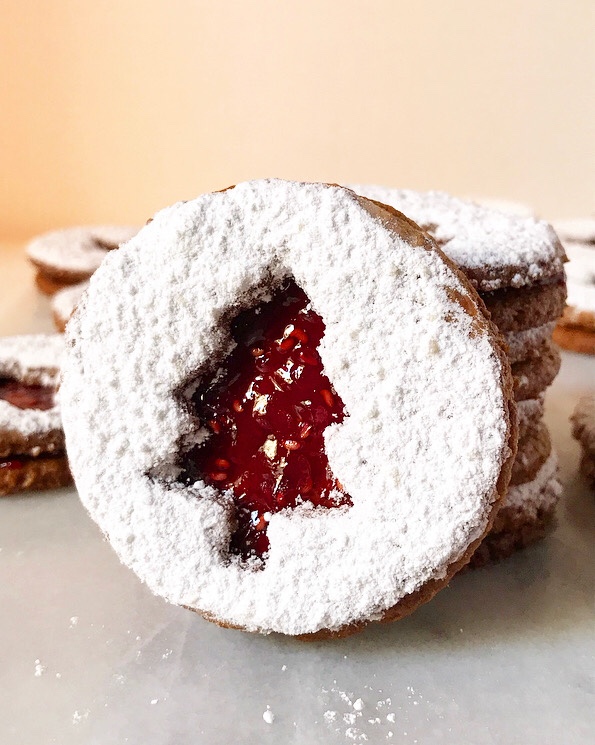 Today’s cookies, these Oat-Pecan Linzer beauts, are a crisp, nutty, whole grain take on a classic. They’re as delicious as they are visually stunning, and they have the added benefits of being both gluten-free and vegan, so you know the batch will disappear in no time.
 The Oat-Pecan Linzer Cookie dough is a variation on the Toasted Oat Graham Crackers I made last year, but with more spice and brown sugar, a touch of cornstarch for tenderness, and toasty pecans in place of some of the oats. The dough comes together in the food processor before being rolled out on parchment, chilled briefly, cut and baked.
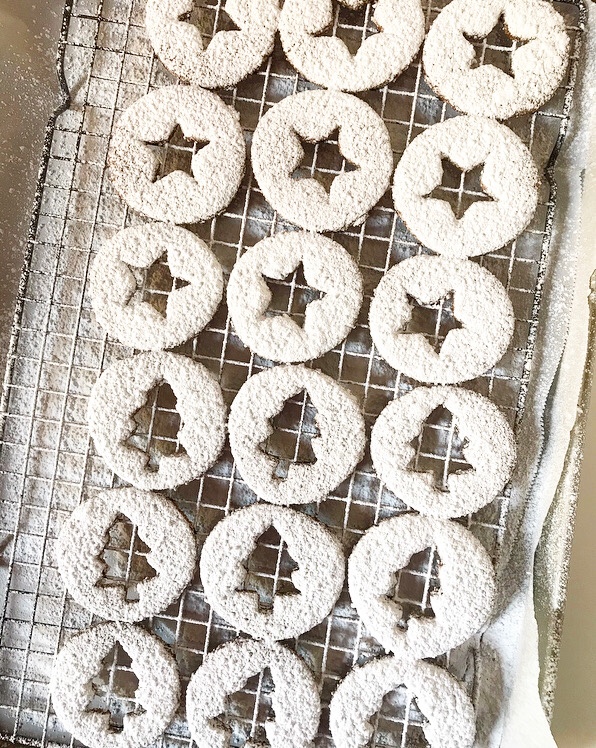
 The cut-out cookies are set over a rack and dusted with confectioner’s sugar, while the whole ones are spread with jam. You can glue your linzers together with any jam or spread you like. I used raspberry jam in the cookies with the tree cut-outs and apricot for the stars. Feel free to get creative with key lime or grapefruit curd or even a swipe of pineapple cake filling (but keep in mind that none of those are vegan).
 These linzers are everything I love in a holiday cookie: sweet, spiced, stunning and shareable. You *know* how much I love a cookie that accommodates multiple dietary needs! And guess what? I’ve got another coming at you Friday. ‘Tis the season.
Oat-Pecan Linzer Cookies
makes about 1.5 dozen sandwich cookies
Oat-Pecan Cookies:
2 cups old fashioned oats* (use certified gluten-free for gluten-free cookies)
3/4 cup raw pecan halves
2 tablespoons cornstarch
1/2 cup light brown sugar, packed
1 teaspoon ground ginger
1/2 teaspoon ground cinnamon
1/2 teaspoon baking soda
1/2 teaspoon fine sea salt
1/4 cup canola oil
4 tablespoons water
For Assembly:
1/3 cup confectioners sugar
1/2 cup jam (I used 1/4 cup each apricot & raspberry)
Special Equipment:
2 1/2 inch cookie cutter
smaller 1-1 1/2 inch cookie cutter(s)
Place oven racks in the top and bottom positions. Preheat oven to 325F.
Spread oats and pecans on a dry rimmed sheet pan. Place in oven and toast for 5-7 minutes, or until fragrant. Let cool for about 10 minutes.
Line two sheet pans with parchment. Set aside.
Transfer oats and pecans into the bowl of a food processor. Process for 1-1.5 minutes, or until there are no recognizable oats. Pulse in cornstarch, light brown sugar, ginger, cinnamon, baking soda, and salt. Add oil and water, and process until large clumps form.
Turn dough onto a large piece of parchment and lightly knead to form a ball. Lightly dust a rolling pin with cornstarch. Roll dough (still on parchment) to 1/8-inch thickness. Freeze sheets of dough (still on parchment) for 10 minutes, or refrigerate for 30.
Dip cookie cutters in cornstarch and shake off excess. Working with one sheet of dough at a time, use large cutter to cut circles. Carefully peel half of them from parchment and place 2 inches apart on prepared pans. Use smaller cutter(s) to cut centers out of remaining circles. Place cut out cookies on prepared pans. Re-roll scraps to use remaining dough.
Bake 10 minutes before rotating the pans top to bottom and front to back. Bake for an additional 10 minutes. Let cookies cool for 5 minutes before removing to a rack to cool completely. Cookies will initially be slightly soft, but will harden as they cool. Repeat rolling and baking with any remaining dough.
Set a cooling rack over a piece of parchment. Once all cookies are baked and cooled, set the cookies with the centers cut out on a prepared rack. Sift confectioners sugar over the tops.
Spread each whole cookie with ~1 teaspoon of jam (amount is based on your preference). Carefully sandwich cookies together. Serve.
Oat-Pecan Linzer Cookies will keep in an airtight container at room temperature for up to 3 days, or in the refrigerator for up to a week. Place wax paper between layers for best storage.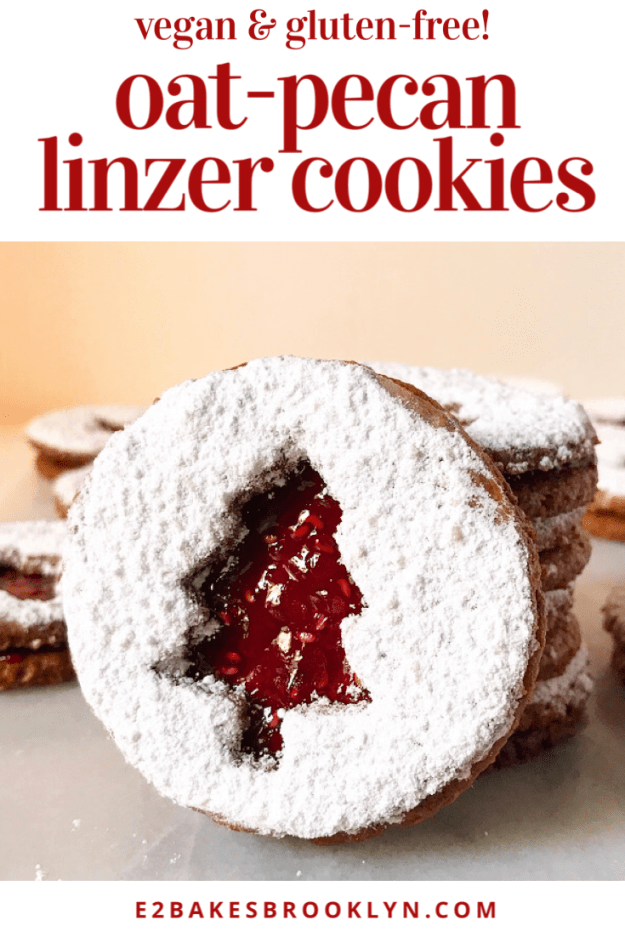
 I had something a bit more complicated planned for today’s post, but due to circumstances beyond my control (number of hours in a day, number of days in a week), I had to take the easy way out.
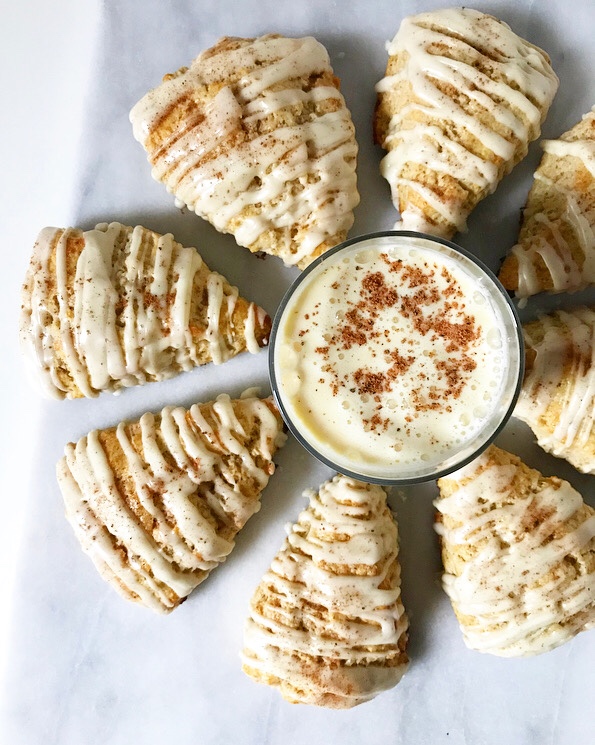
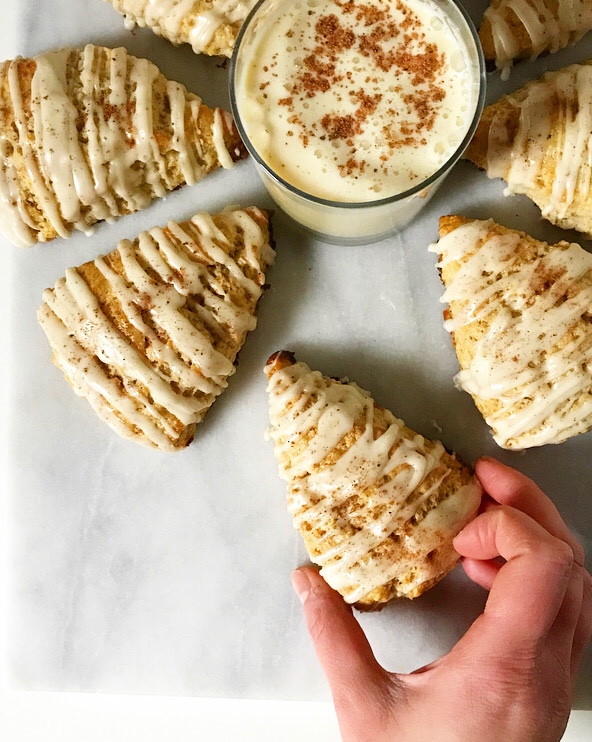 Lucky for all of us, the easy way out is through a warm batch of Eggnog Scones.
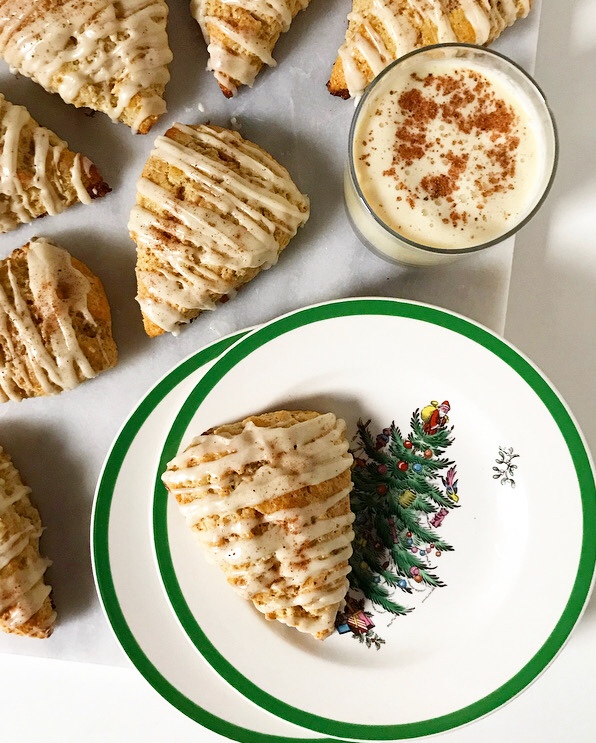 Y’all, these are goooood. We’re talking 8 springy, nubbly-edged breakfast treats made with eggnog and then topped with eggnog glaze—what’s not to love.?! I am not a fan of eggnog in its liquid state, but mix it into dough or whirl it into glaze and add warming spices, and I’m suddenly *very* interested.
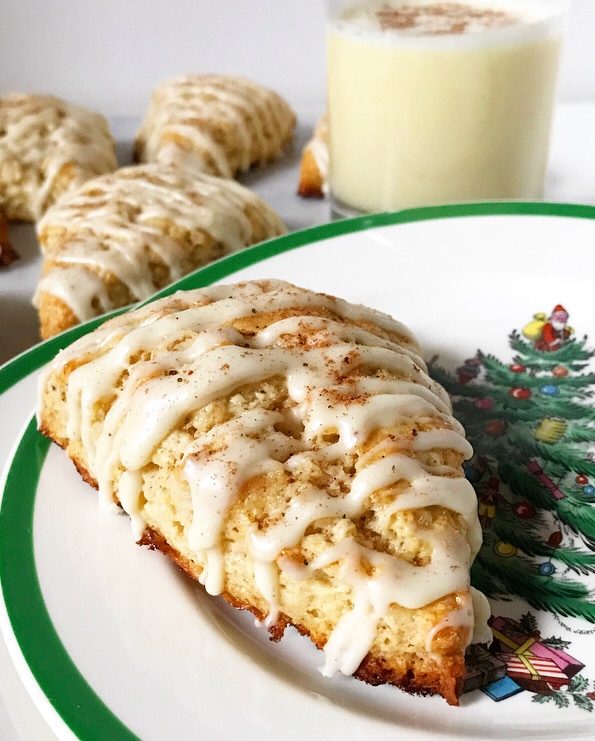 As with nearly all scones, these are a breeze to make. The dough comes together in ten minutes and bakes in fifteen. The glaze is technically optional, but it’s a snap to whisk up while the scones are cooling, and it’s delicious, of course. Creamy and lightly spiced, it’s the perfect accompaniment to the not-too-sweet scones. And that’s to say nothing of how satisfying it is to drizzle over the tops!
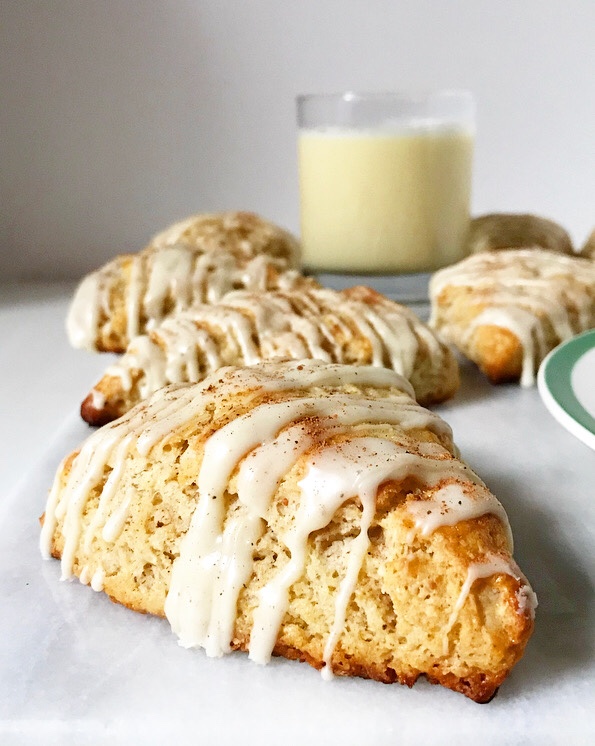 Speaking of satisfying, eating one…or one and a half…or two…of these with a big cup of coffee is, like, the best way to start a holiday morning. I’ve been so busy since I returned home from Thanksgiving that I keep forgetting that Christmas is almost here. When I’m eating an Eggnog Scone though, the holiday cheer is real. Real delicious, that is.
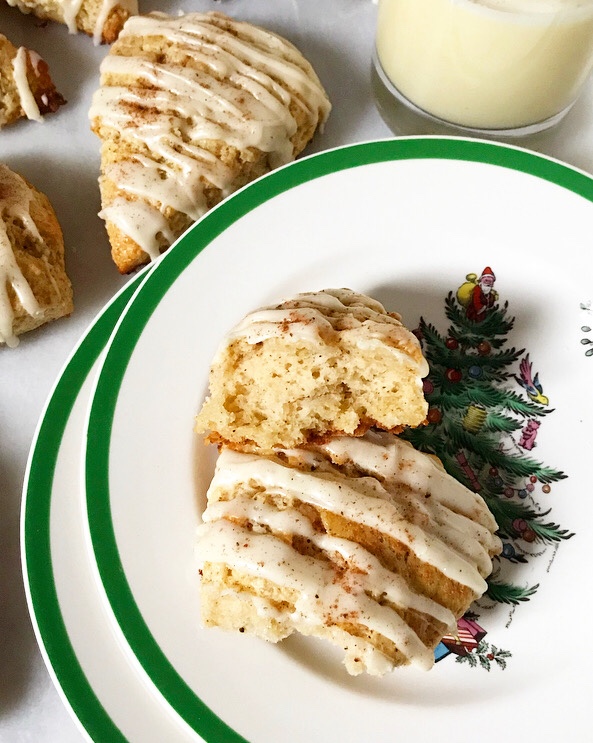


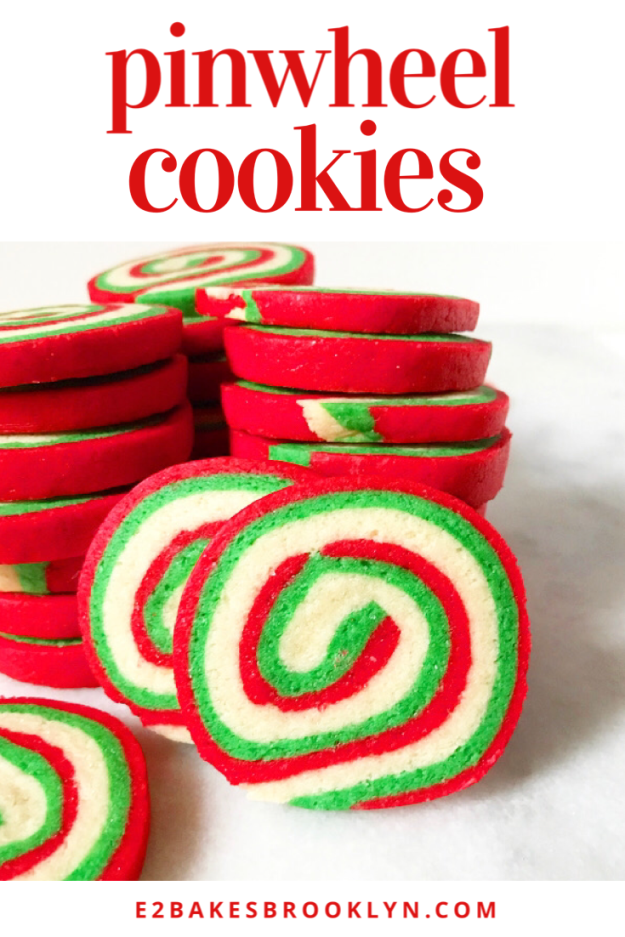
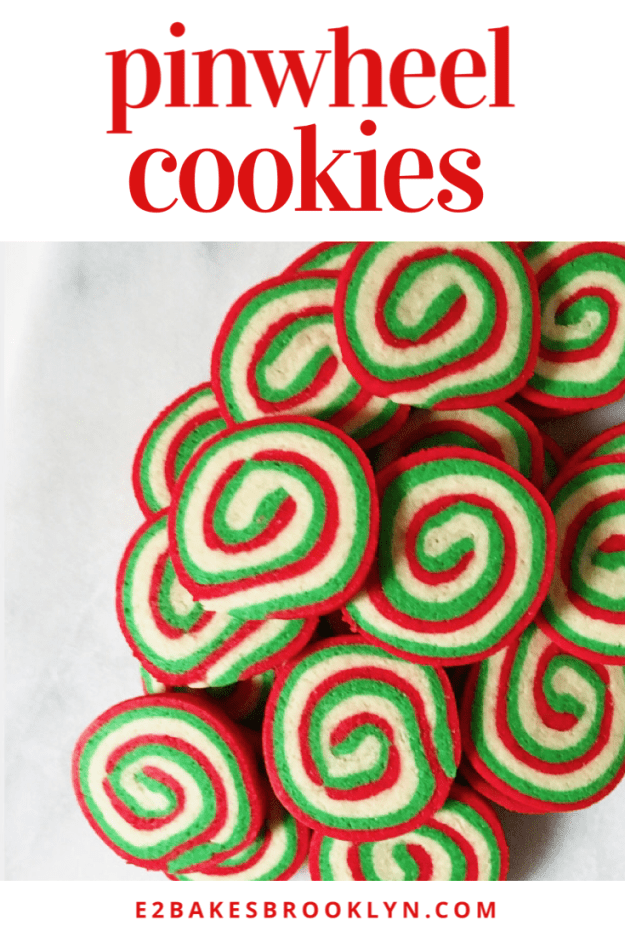
 I have had these Pinwheel Cookies on my “to bake” list for years, but every time the holidays have come around, I’ve said “next year.” But now, having gotten brave and made them four times without any real hitches, I can confidently say that the Pinwheel intimidation factor is entirely in the presentation. I mean, all those colors and the signature swirl and the abject cuteness—you can see why I was worried. What if mine were hideous?
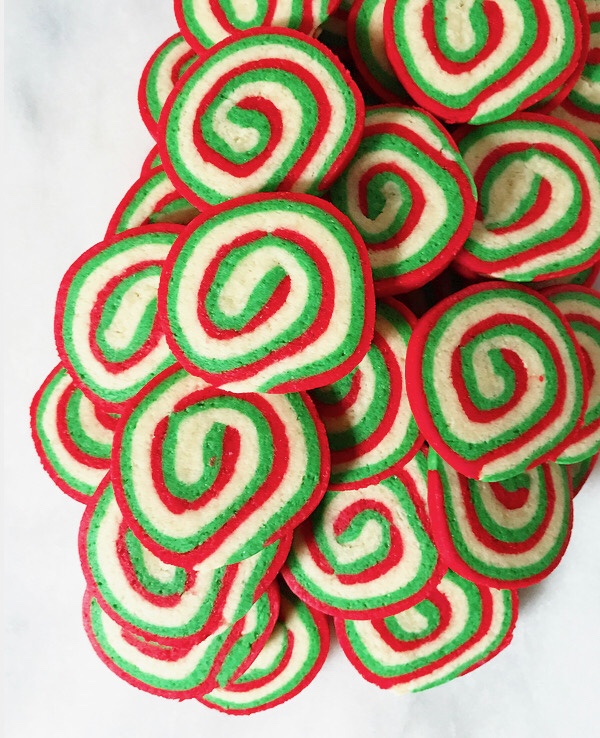 I was sure that I, with my fairly limited motor skills, would need months to figure out a method that worked for me. Turns out all I really needed were 48 hours and a little self-confidence. If I can make Pinwheel Cookies, so can you! I mean, even if you really screw them up (which you won’t!) they’re still going to be cookies, right?! Let me walk you through the process.
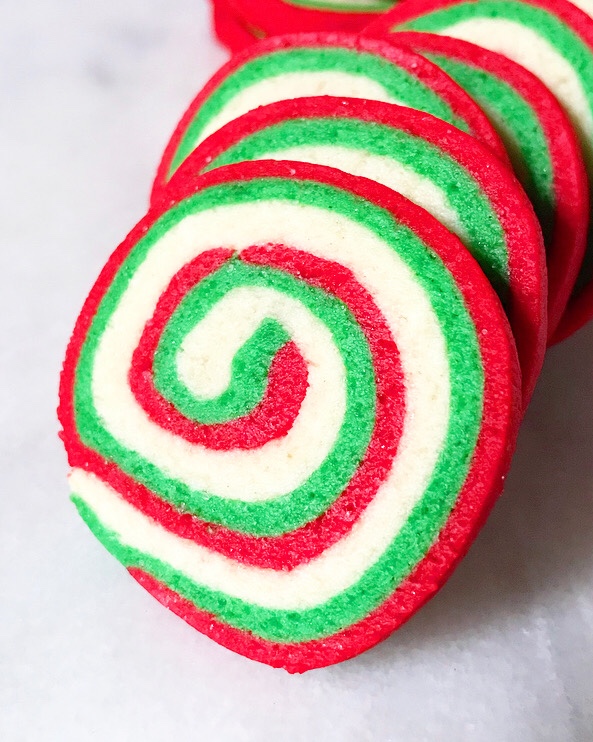 As I said, these are simpler to make than they look, but be sure you read through the recipe a couple of times before beginning. That’s Baking 101, but I know I’ve skipped it and found myself in a bind more than a few times. This recipe is not difficult, but it does have many steps, including two short chills and one long one. You want to know what’s coming before you start!
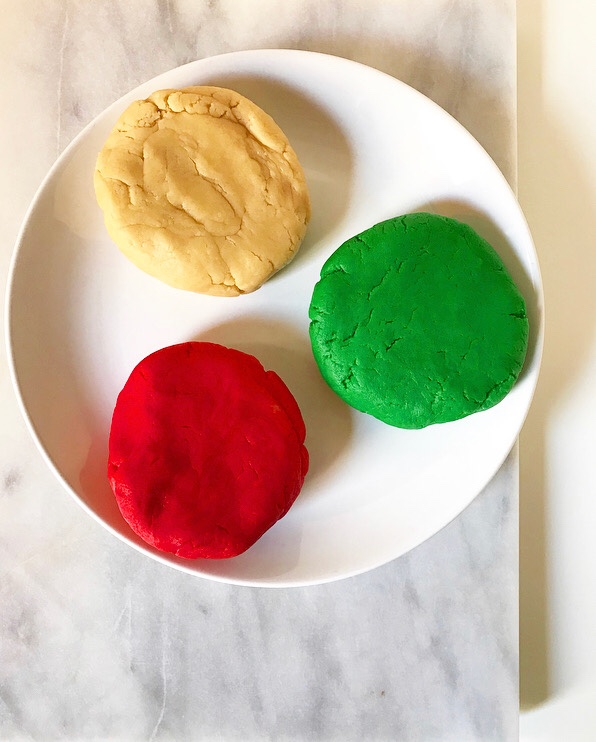 The dough I used here is my tried & true
  This part always stresses me out, but I promise it’s not a big deal. I’ve tried stacking the dough in frozen sheets, among other ways, but the best I’ve found is rolling them all on parchment, then stacking and peeling off the parchment. If your dough tears, simply press it back together with your fingers. Once all the colors are stacked, put the dough into the in the fridge for a few minutes before rolling it up into a cylinder.
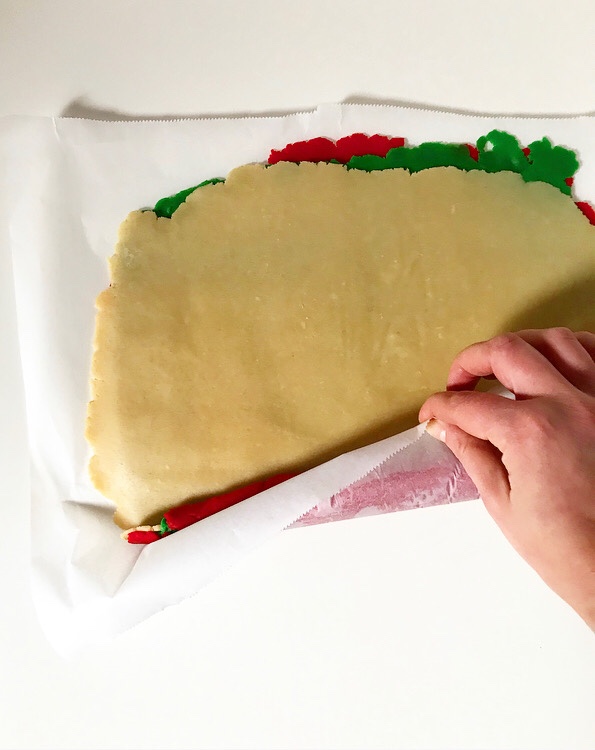
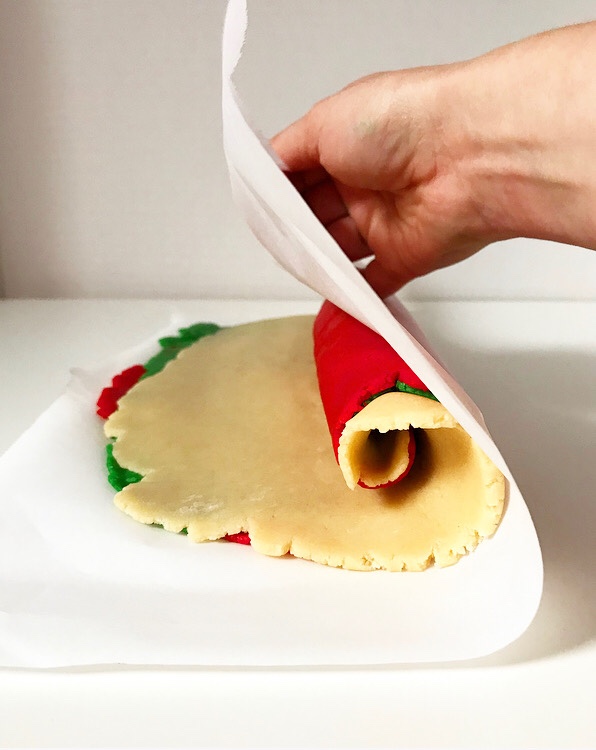 Some recipes will tell you to trim off the edges of the dough before rolling, but I’ve found that unnecessary. If it’s bothering you, though, go ahead and even out the long sides.
 Before I chill the dough, I like to smooth the cylinder, rolling it back and forth and stretching it out to 16 inches in length and 1 1/2 inches in diameter. This ensures that all the layers of the cylinder stick together in one cohesive piece and that all the cookies will be roughly the same size. Trim off the uneven ends, wrap the dough in plastic wrap and chill it for a good three hours. If you’re working ahead, you can triple-wrap it and put it in the freezer. Just thaw overnight before slicing.
 The great part about Pinwheel Cookies is that the hard part is done before the final chill. After that, all you’ll need to do is slice them into 1/4-inch thick pieces, arrange them on a sheet pan, and bake them for 8 minutes. Let them cool on a rack and then throw ‘em on a platter, in a tin or a cookie jar.
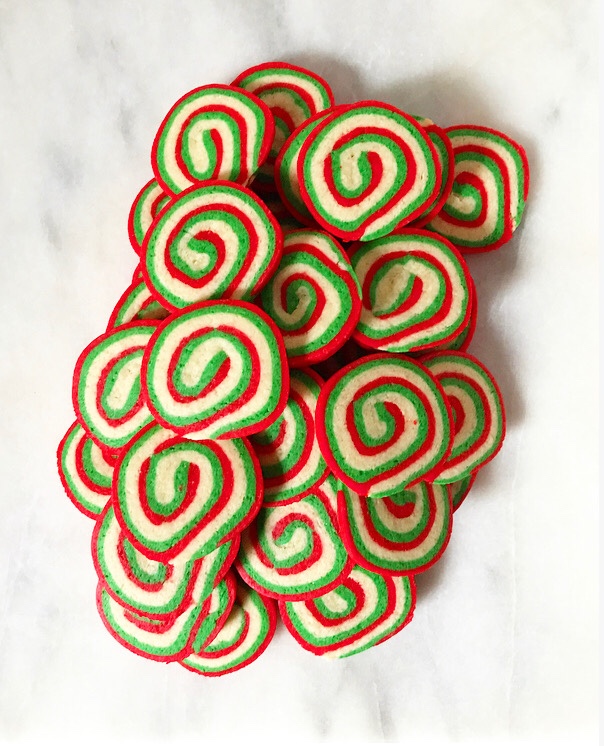 All that’s left to do is eat three and declare this the “Year of the Pinwheel.” Nobody else will have any idea WTF you’re talking about, but I do and I think you’re a holiday baking badass.
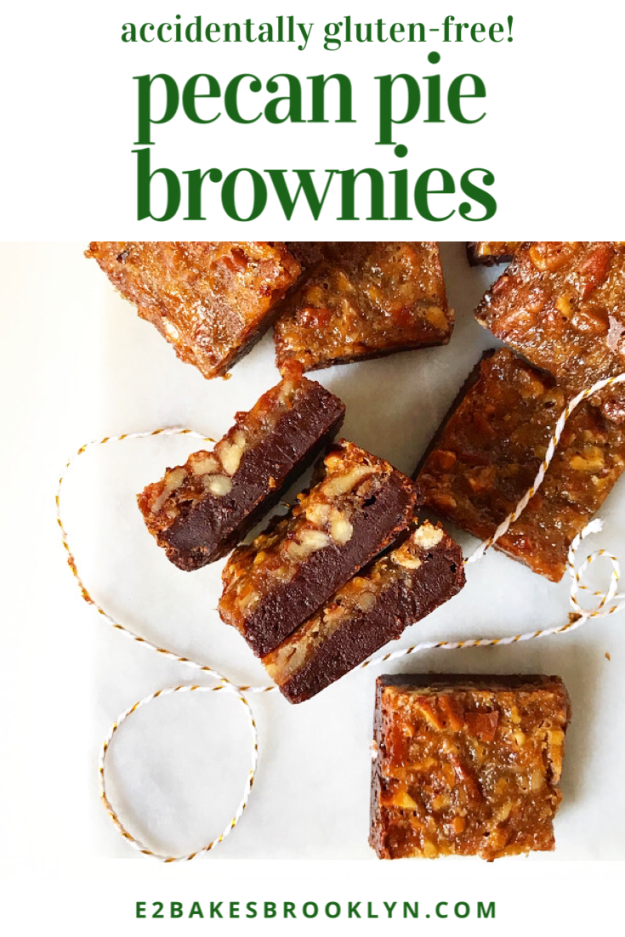
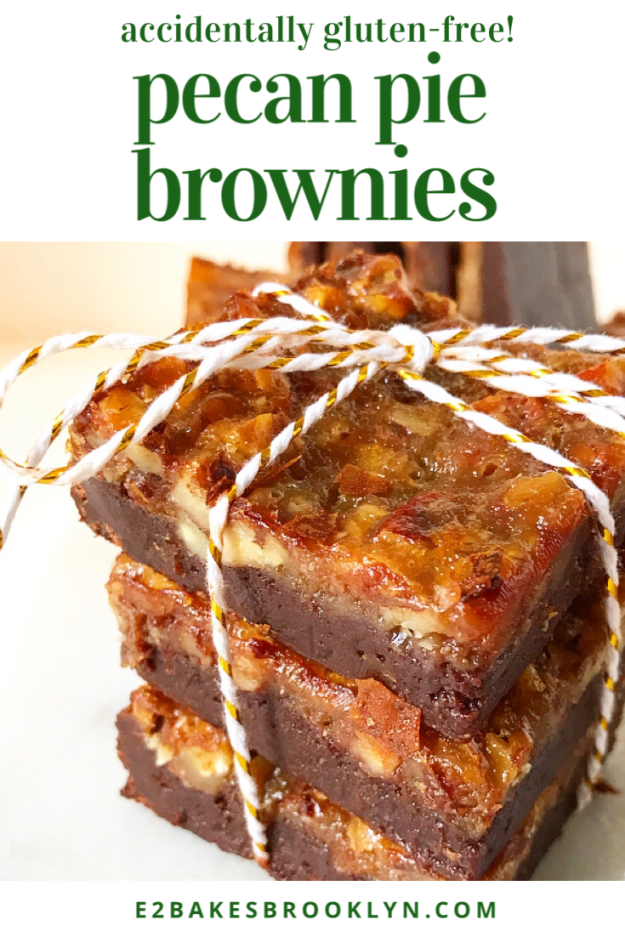
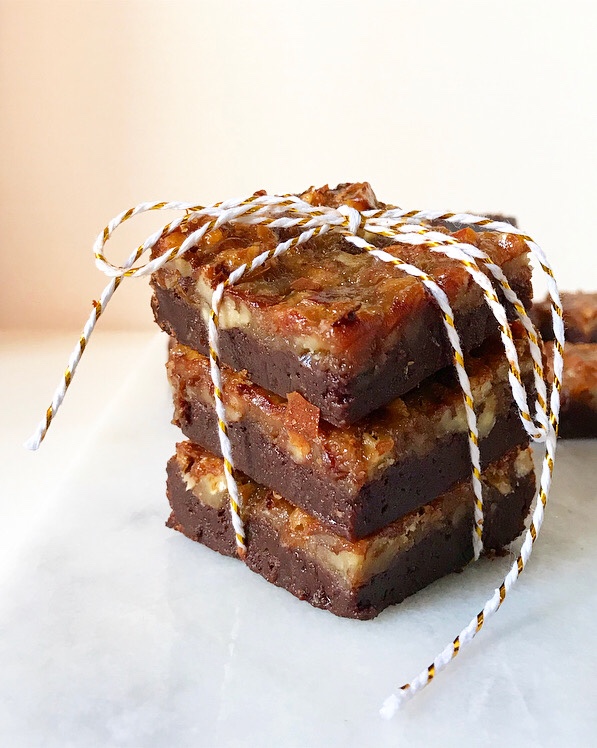 It’s Christmastime, y’all. I’ve got visions of sugarplums dancing in my head. And by sugarplums, I mostly mean these Pecan Pie Brownies.
 Just imagine a pan of rich, chocolaty
  During testing, I tried three different methods of adhering the pecan filling to the top of the brownies. The best, by far, is giving the filling a quick (3-5 minute) pre-cook on the stovetop to jumpstart the thickening. It’s very easy, but does require a sieve. Please don’t let that stop you though—I loathe sieving things, but this is pretty painless, and it beats the hell out of slicing up your brownies only to find scrambled egg bits or a thin layer of pecanless goo underneath. *shudder*
 Once you’ve done the 15 seconds of sieving, you get to stir in toasted pecans and spoon it over some soft-set brownies and bake until…divine. Yes—that’s the only word for these. Chewy, fudgy, nutty and sticky-sweet without being cloying; let’s just say these are difficult to resist. I brought a box on my family vacation to
  As if these need more endorsement, Pecan Pie Brownies also happen to be gluten-free. There are no unusual flours or gums here—this recipe simply doesn’t require gluten-containing ingredients. Inclusive holiday treats for the win!
 Pecan Pie Brownies would be wonderful as part of a cookie tin or holiday party spread, or for enjoying during a cozy Christmas movie night at home. I’m sure they’d work well left as a treat for Santa, too! I will say that, as a childless adult, they really hit the spot when eaten in PJs while watching The Crown and counting down the days until you head home for the holidays. You know, in case you were wondering.

 For the
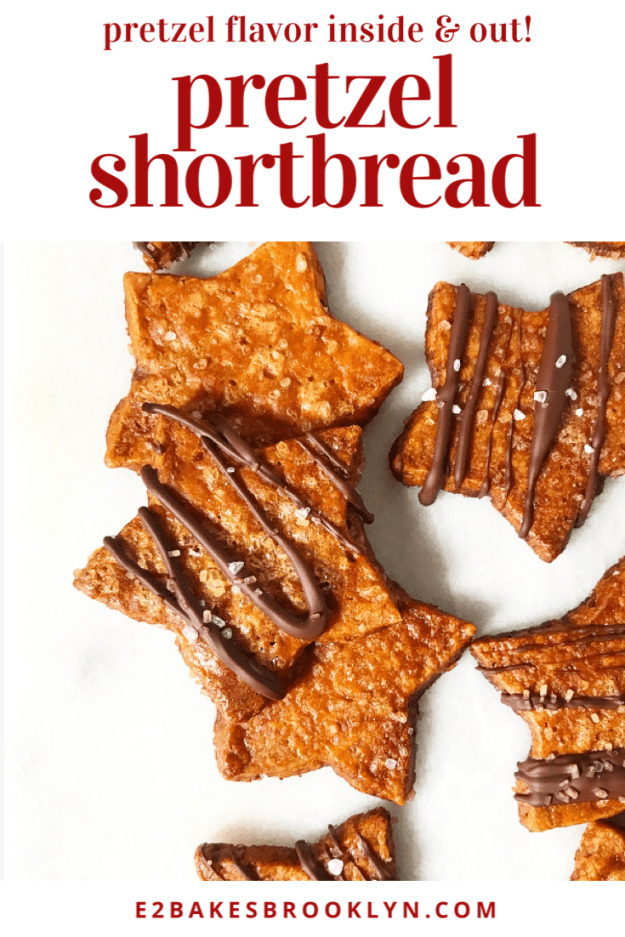
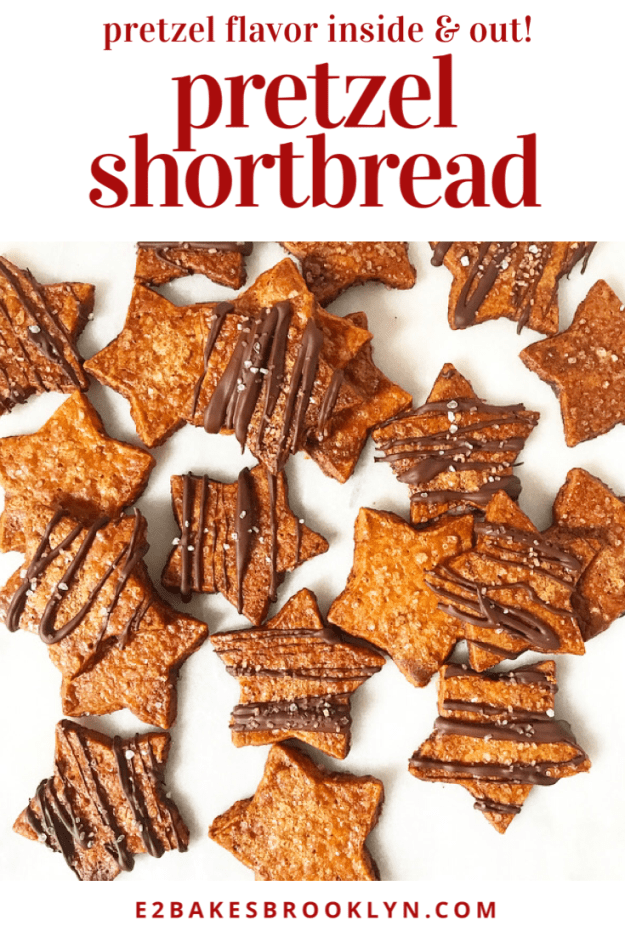
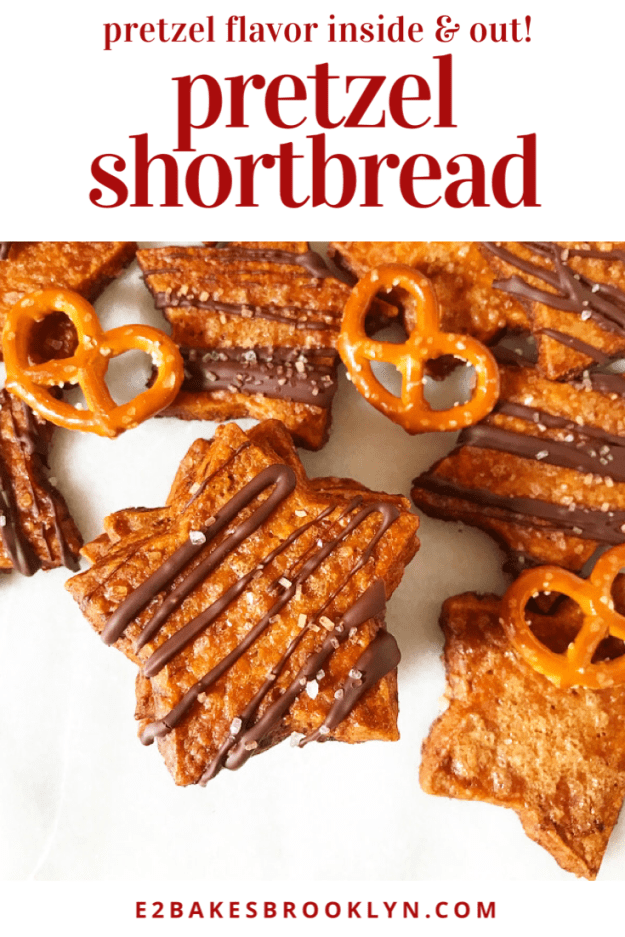
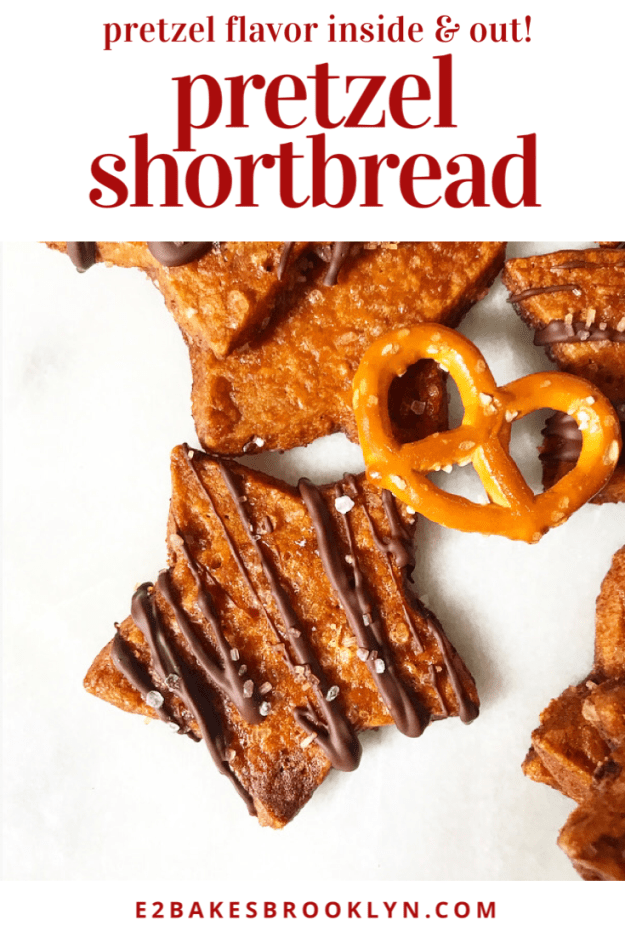
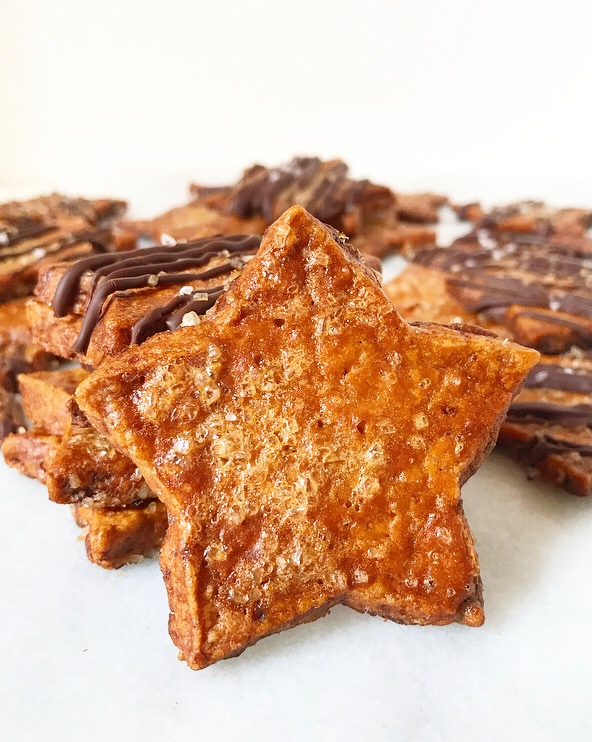
 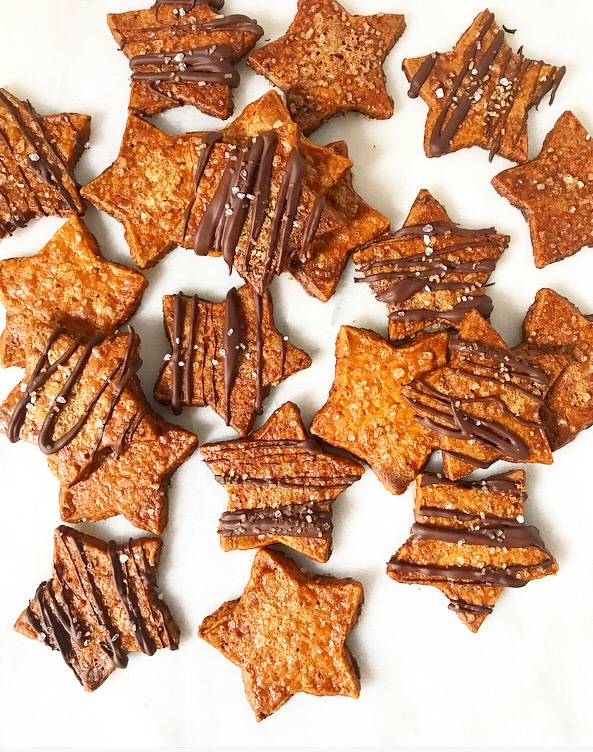 Let’s talk about Pretzel Shortbread. Salty, sweet, crisp, pretzely (inside & out!) cookies, with or without a drizzle of dark chocolate. Oh my lord, y’all. These are absurdly good.
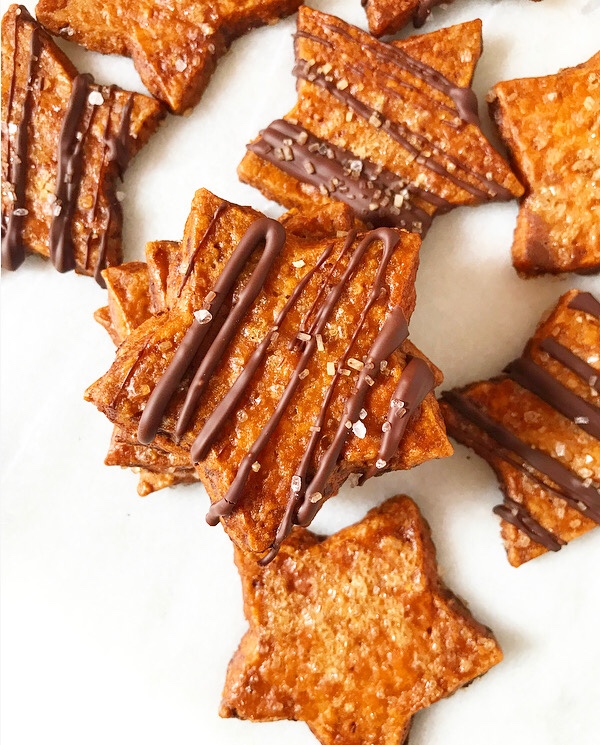
 Today’s cookies are inspired by Philadelphia-favorite
 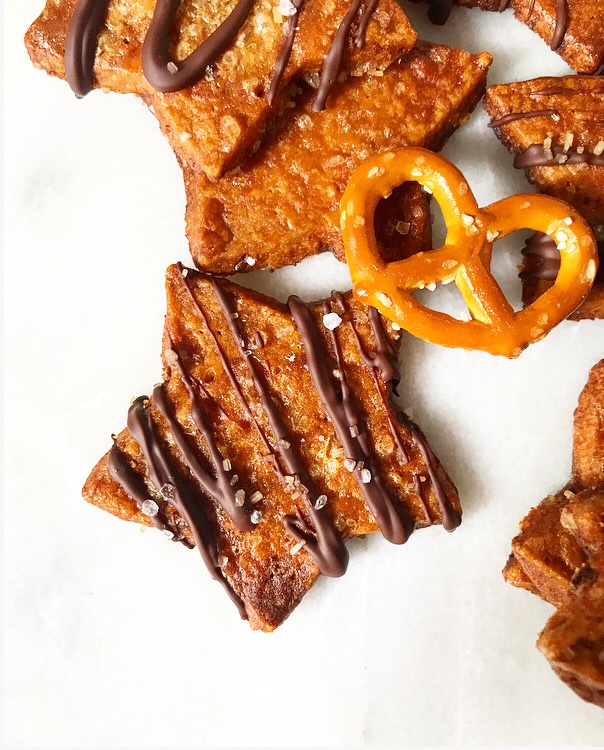 Instead of being a normal person and ordering from Lost Bread Co. online, I decided to figure out a version for the home baker…but without the lye because who keeps food-grade lye around?
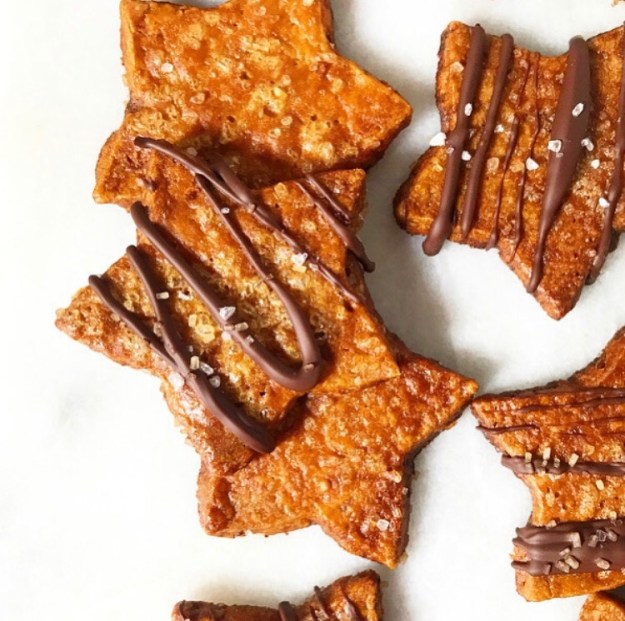
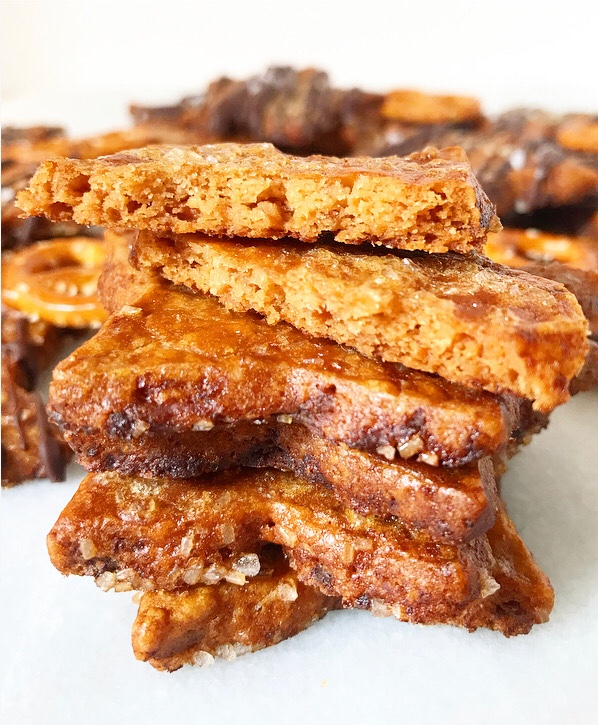 Taking a cue from Lost Bread Co., my Pretzel Shortbread dough is made with a mix of flour and ground pretzels, and sweetened with dark brown sugar and confectioner’s sugar for both flavor and texture. The rest of the ingredients are butter, vanilla, and salt. It’s all mixed together in the span of a few minutes, then rolled and cut into shapes. I went with stars because that’s what I like.
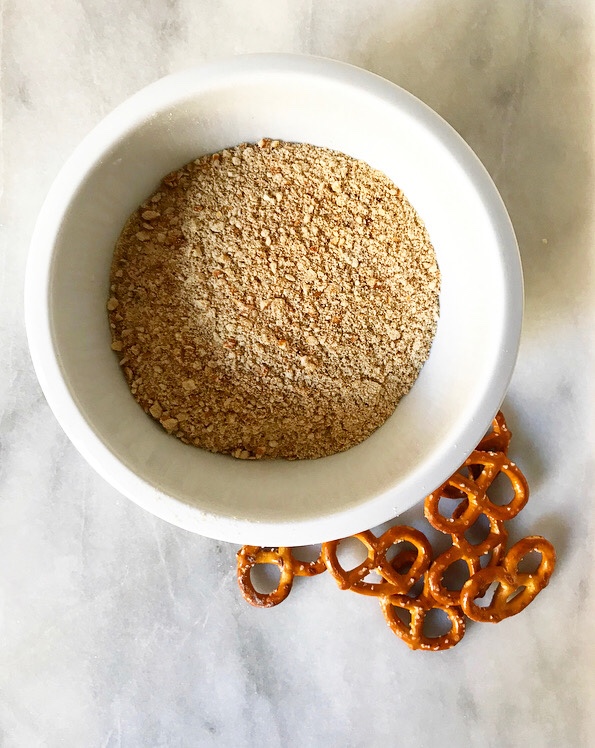

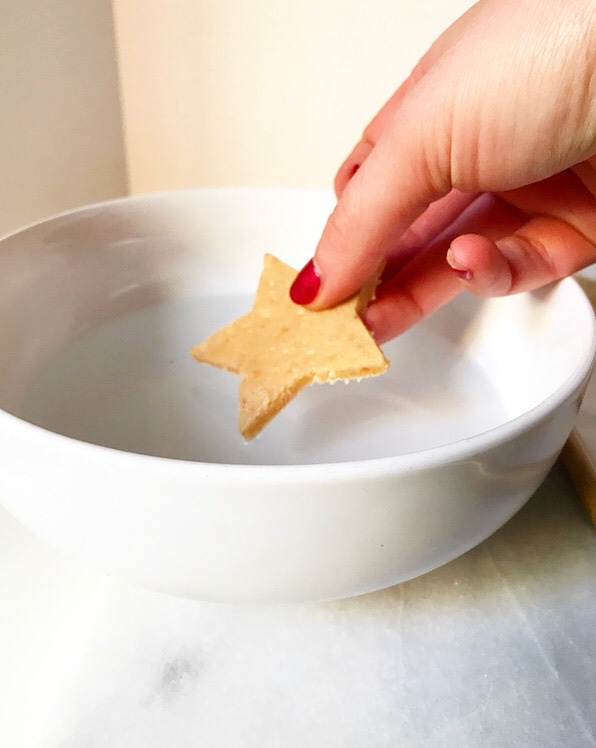 Next up: the pretzeling! After the cookies are rolled and cut (and also briefly frozen a couple of times), they are dipped in a warm mix of water and baking soda, or as I call it, “pretzel wash.” This is simply a small batch of the solution traditional soft pretzels are boiled in to achieve their signature golden finish. It’s literally just water and baking soda (no lye!), but it’s the thing that takes these cookies over the top!
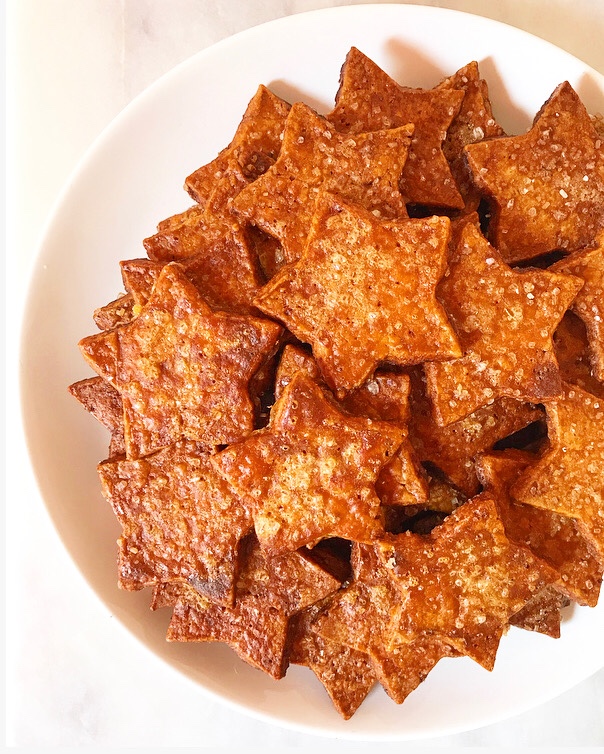 Instead of tossing the shortbread in boiling liquid, which would probably destroy them instantly, I let the pretzel wash cool until I can touch it, and then dip the frozen cookie dough stars into the mix. This is followed up by a swipe of egg wash and sprinkles of coarse salt and sugar before being baked to a brown, burnished, decidedly pretzelesque* finish.
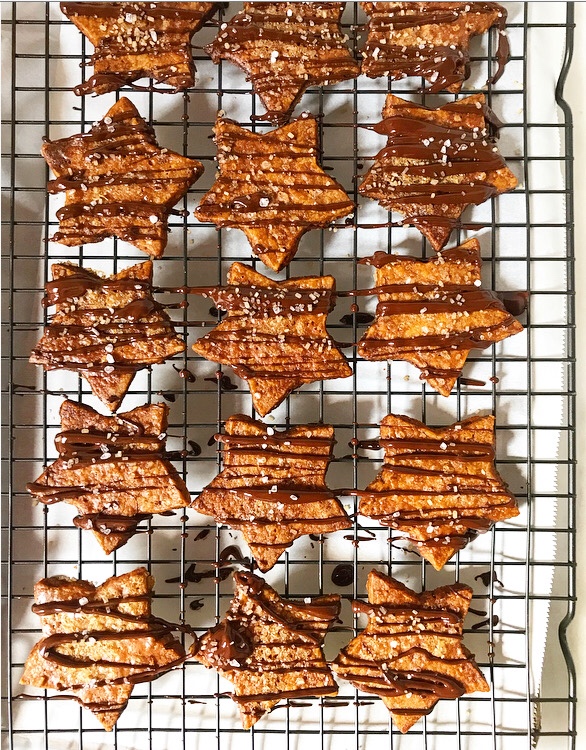 Finish the Pretzel Shortbread off with a drizzle of chocolate, or not. I did a little of each—I like to have options.
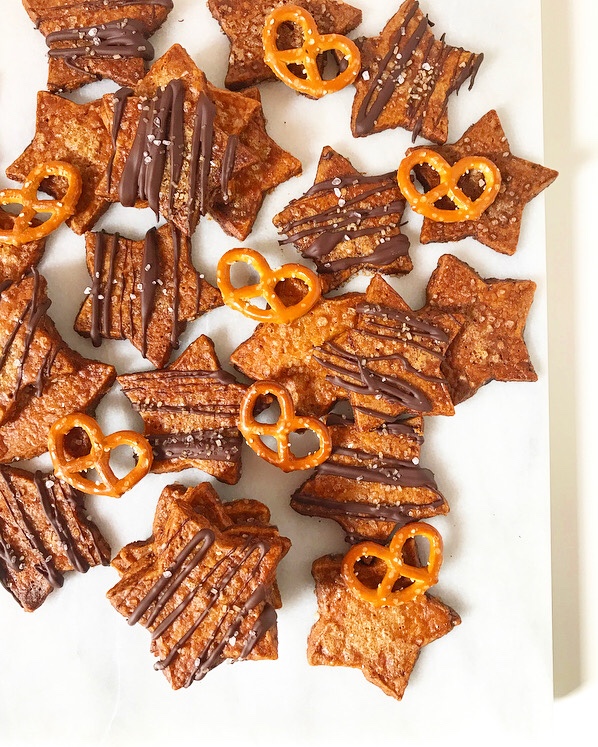 Salty, sweet, pretzeled inside-and-out, chocolaty, Christmasy, delicious options.