 Although I have never publicized it this way, I have privately referred to this time of my blogging year as “Savory January” for some time now. You see, every January since starting this site, I (mostly) switch focus from sweets to weeknight meals, sides and other savory pursuits. It’s not for weight loss, “cleansing” or any reason beyond keeping things interesting—I cook as much as I bake, and those recipes deserve their moment in the blogging sun, too. Is switching up my blog POV for one month a year weird? Sure. But I like variety, and also this is my website and I can do what I want.
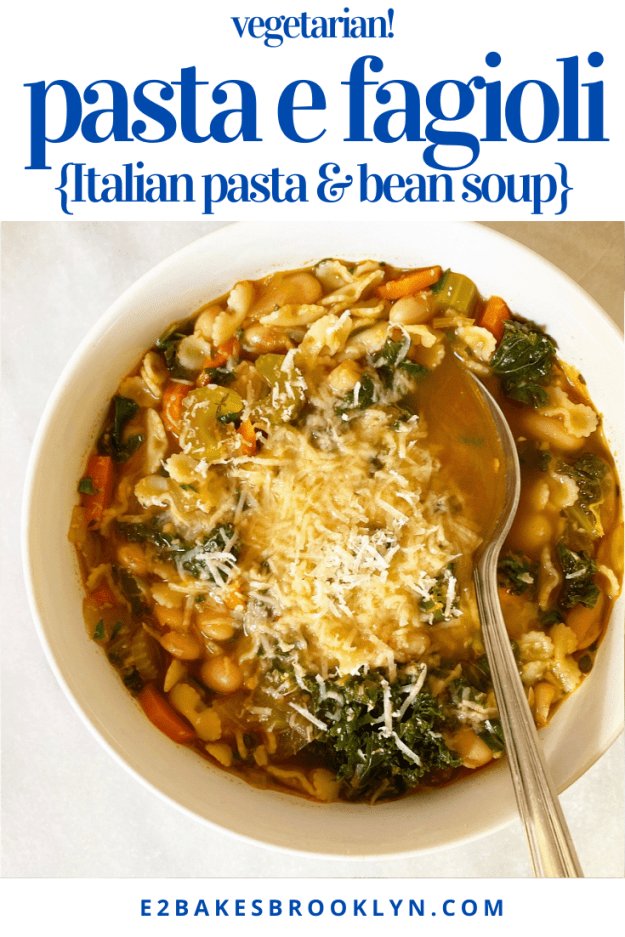
 Pasta e Fagioli has been one of my favorite recipes for years and years. At its most basic, it’s a vegetable soup with pasta and beans, but it’s so much more! It’s easy, it’s cheap, it’s hearty, and it’s dang delicious. Oh, and it’s vegetarian—vegan without the cheese, gluten-free depending what kind of pasta you use. Yesssss.
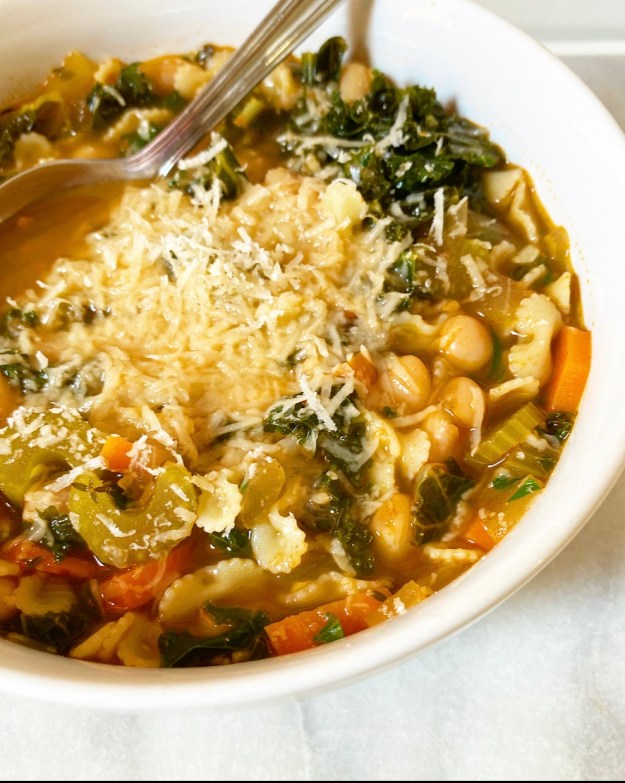 I made this Italian staple all the time when I first moved to NYC, but moved on to other things because that’s just how cooking goes for me. I make something regularly for a few weeks/months/years and then I completely forget about it for a few more weeks/months/years. In this case, I remembered Pasta e Fagioli on the last night of our Maine trip this past October. We had some produce to use up, and we had some tomato paste, beans (aka fagioli), pasta and cheese ends lingering…and well, when life gives you lemons, you know.
Long story short, I used up ingredients, was able to feed my people in under an hour start-to-finish and also became obsessed with Pasta e Fagioli again. We’ve been back in Brooklyn for three months and I’m still over here making this every couple of weeks. The heart wants what it wants.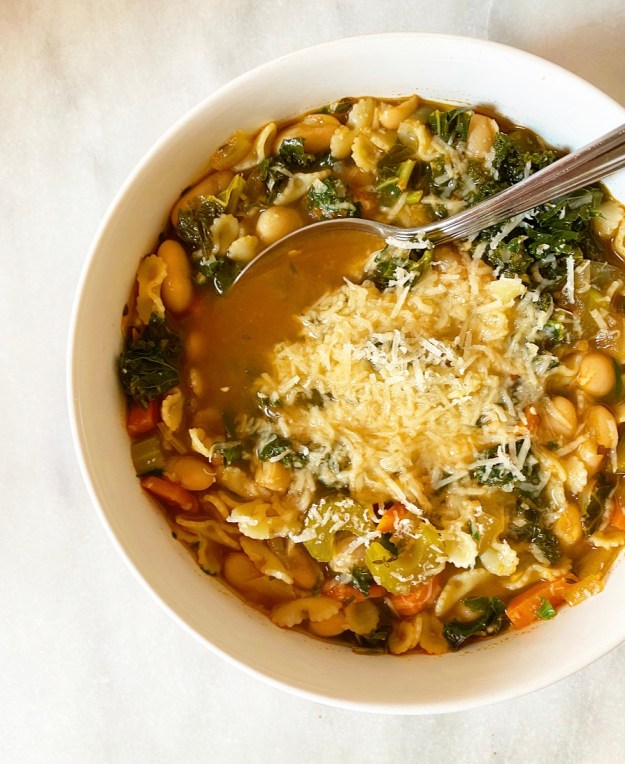 Making Pasta e Fagioli is super simple and you probably have most of the ingredients already. The method is nearly identical fo the way I make Sausage, White Bean & Kale Soup because why fix what isn’t broken?
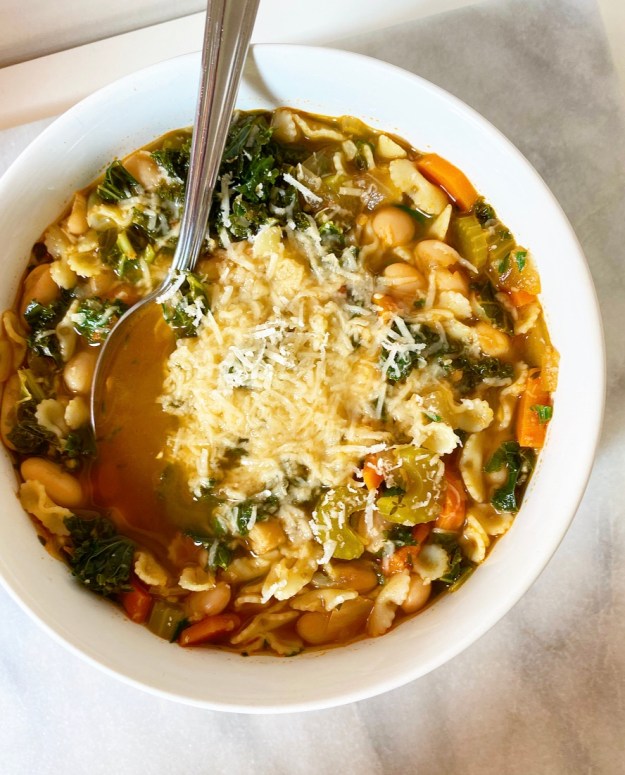
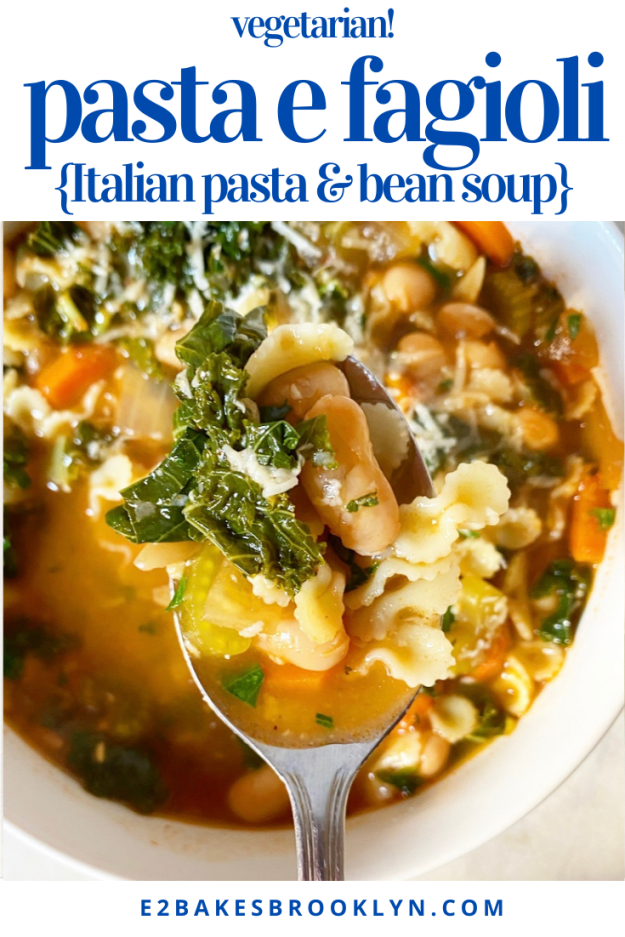
Start by cooking the mirepoix (French term for carrot, celery & onion) for about ten minutes. You’re not going to get any color on it, but this is where the flavor building begins. Add some garlic, and then coat it all in tomato paste and let it caramelize for a few minutes. Add some herbs (fresh or dried), vegetable stock and water, and let that all simmer for 20 minutes or so, until the vegetables are soft. Finish it all off with a couple of cans of white beans and a bunch of kale (or any hearty green) and let them warm through, then combine the soup with cooked pasta in individual soup bowls. All that’s left to do is grate some parm over the top and call it dinner.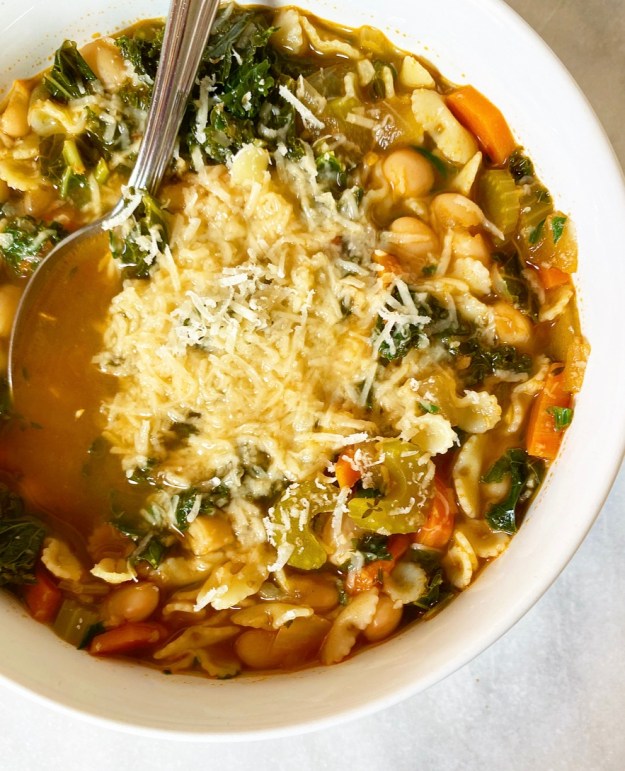 If you’re wondering why I cook the pasta separately from the rest of the soup, it’s because I’m a single lady who eats a lot of leftovers and hates mushy pasta. I do this with chicken noodle soup as well—by keeping the two components separate, the pasta doesn’t overcook or get waterlogged and sad. If you have a group to feed or will otherwise not have leftovers (or maybe like your pasta really soft?), feel free to toss it in the pot with the beans and kale.
Pasta e Fagioli takes less than an hour start-to-finish and keeps like a dream. I made a big pot on Sunday night and have been reheating it for quick dinners when I get home from work. Let me tell you, it’s taking the edge off the post-holiday blues.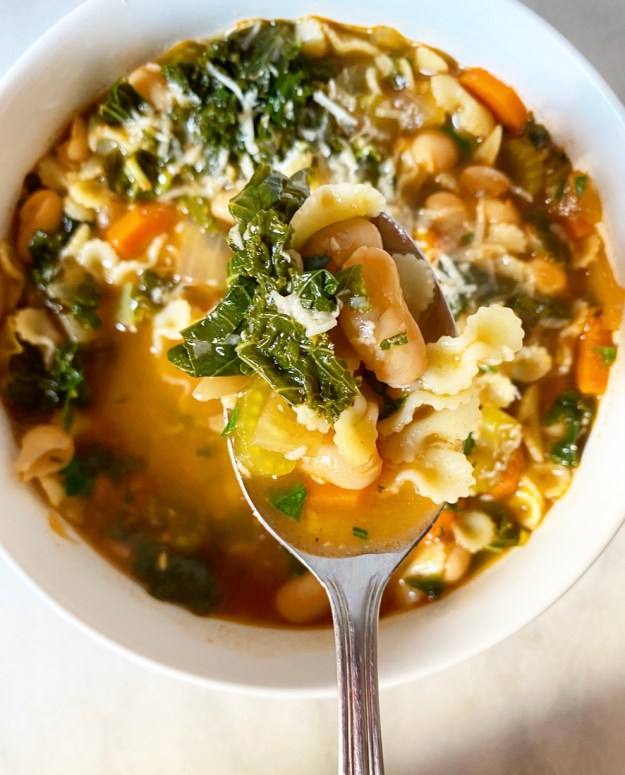
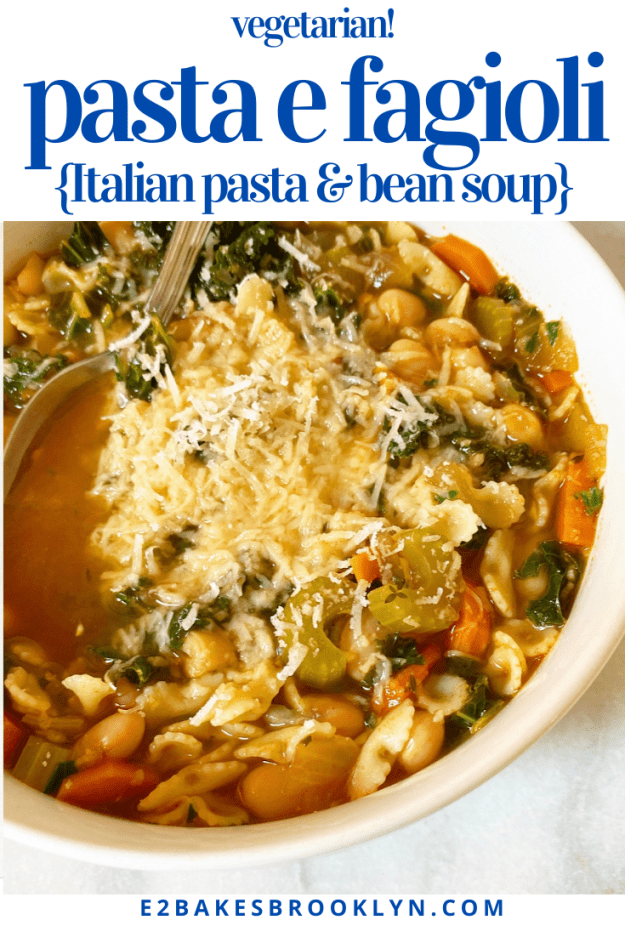
Pasta e Fagioli {Italian Pasta & Bean Soup}
makes 4-6 servings
For pasta:
water
Kosher or sea salt
splash of olive oil
1 1/2 cups small pasta (farfalline, ditalini, elbows)
Soup:
2 tablespoons olive oil
3 medium carrots, peeled, sliced into thin half-moons
3 ribs celery, trimmed, thinly sliced
1 medium-large yellow onion, diced small
1/2-1 teaspoon Kosher or sea salt, divided
6-8 cloves garlic, minced
1/4 cup tomato paste
1 tablespoon fresh thyme leaves (or 1/2 teaspoon dried)
1/4 teaspoon red pepper flakes (optional)
4 cups vegetable stock
4 cups water
2 bay leaves
1 bunch kale or chard, stemmed and chopped into bite-sized pieces
2 15-ounce cans cannelini or other white beans
1/4 cup chopped fresh parsley, plus more for topping
grated parmesan cheese, for topping (optional)
Fill a medium-sized heavy-bottomed pot 2/3 full with water. Bring to a boil. Salt well and add pasta, cooking according to the package directions. Drain pasta and return to the pot. Drizzle lightly with olive oil to keep it from sticking together whil you prepare the soup.
Heat olive oil in a stockpot over medium heat. Add carrots, celery, onion and a pinch of salt to the pot. Cook, stirring frequently, until starting to soften (about 10 minutes). Stir in garlic and cook until fragrant, about 1 minute. Add tomato paste and stir to coat. Let cook for 2-3 minutes, until tomato paste begins to darken. Add bay leaves, thyme, optional red pepper flakes, vegetable stock and water. Bring to a boil, reduce to a simmer, and let cook 20-25 minutes, or until vegetables are soft (but not mush).
Remove bay leaves. Add beans and kale and let cook 5-7 more minutes, until greens have wilted a bit. Stir in parsley. Taste for salt and adjust as needed.
For serving, place about 1/2 cup of cooked pasta in each bowl. Top with soup and stir together. Garnish with Parmesan, if desired.
Soup will keep in an airtight container in the refrigerator for several days.
 I’ve been meaning to put a Chicken Pot Pie on here for years, but inevitably I’d forget about it until the day before Thanksgiving (things to do with turkey leftovers!) or winter would slip away from me too quickly, and then it was summer, and who wants to make—let alone eat—a Chicken Pot Pie in July?
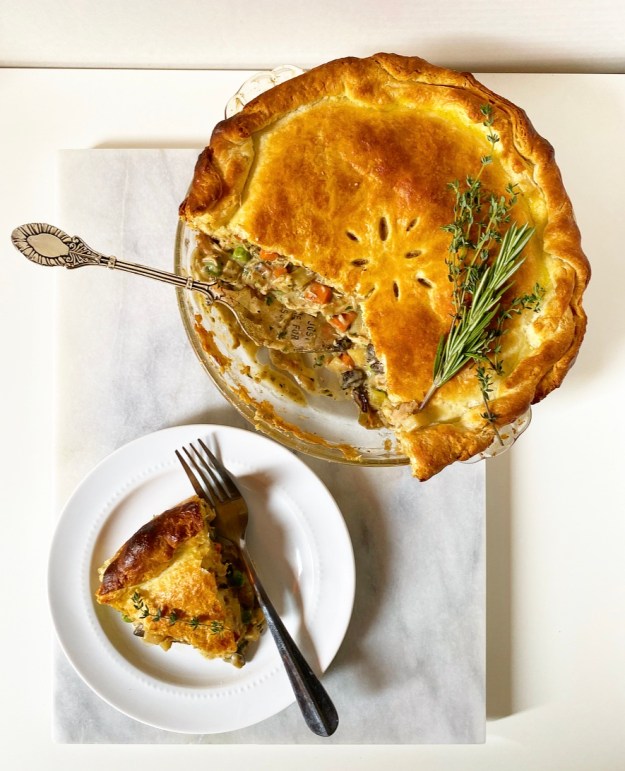
 Imagine my delight when the right timing and opportunity finally presented themselves a few weeks ago, when it seemed like every big-time food person in the world was making
 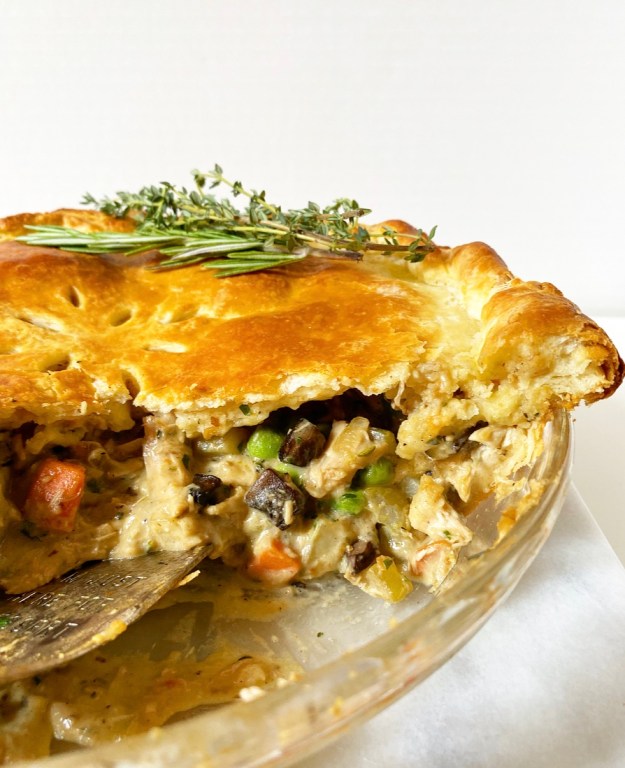 I started making pot pies
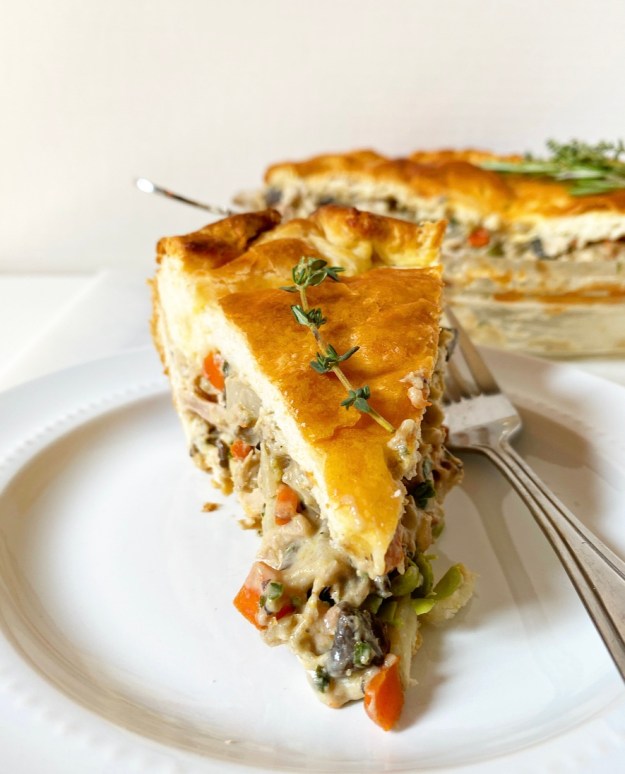
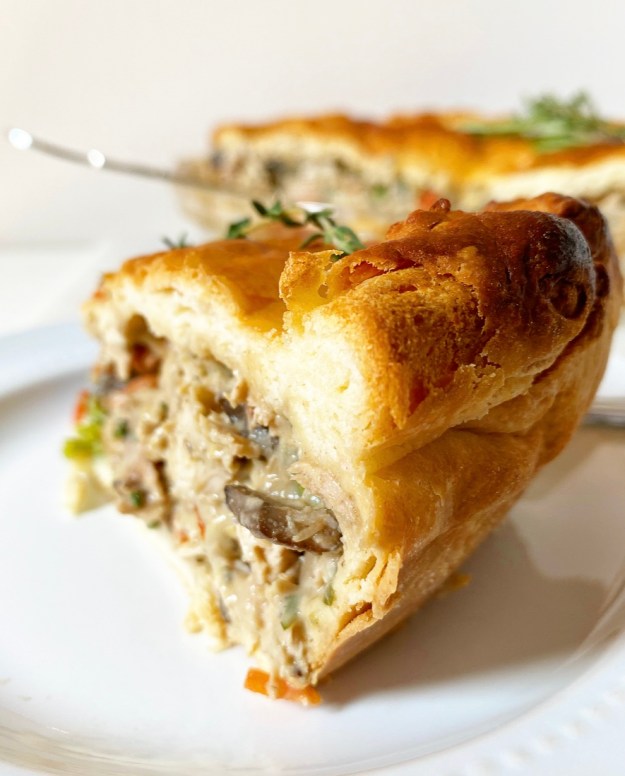
 I won’t lie to you, a from-scratch Chicken Pot Pie can take a bit of time to prepare. All of the filling ingredients have to be cooked before they can be put together. This includes the chicken; I made a
 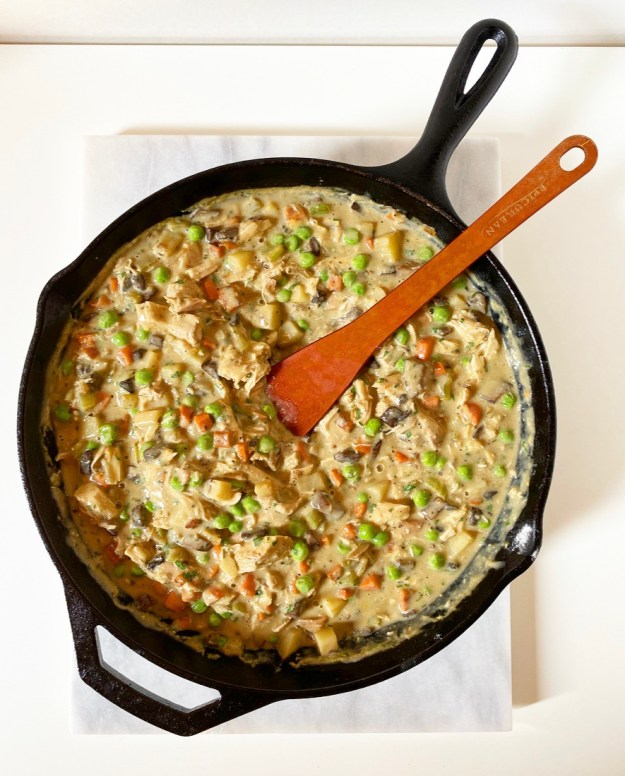 Once the various vegetables are cooked in butter until fork-tender, they all go in a big skillet together, and then you build the gravy on top of them. Stir in some flour (creating a sort of roux), then chicken stock, cream, dijon mustard, fresh herbs, salt and pepper. Simmer it all for ten minutes before removing the saucy, bubbling mix from the heat. Stir in your chicken and some frozen peas, then set your filling aside so you can roll out the buttermilk biscuit crust.
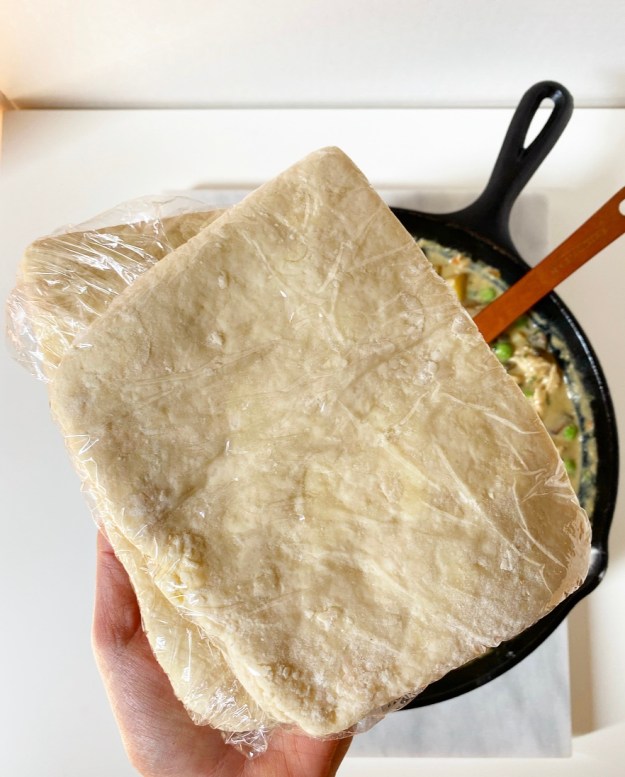
 Oh yes, back to the buttermilk biscuit crust! It’s tender and flaky, and you’re going to freaking flip over how easy it is to make. The dough comes together exactly as it does when you’re making traditional biscuits, except after all the folds and turns it’s split in half and chilled while you make the filling. At this point, when the filling is cooling a bit, the dough is rolled out and fitted to the pan just like any other pie crust. As biscuit dough is softer and contains half the butter of most pie doughs, I found this remarkably easy with which to work.
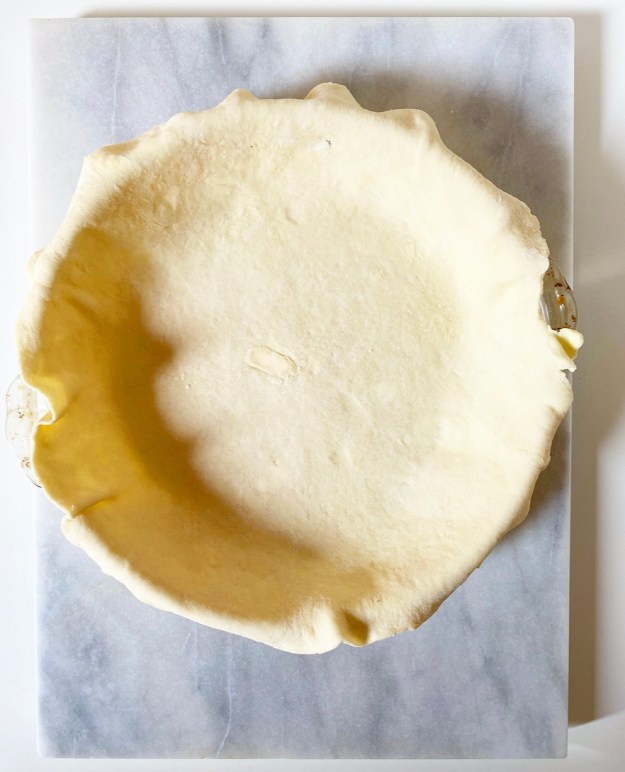
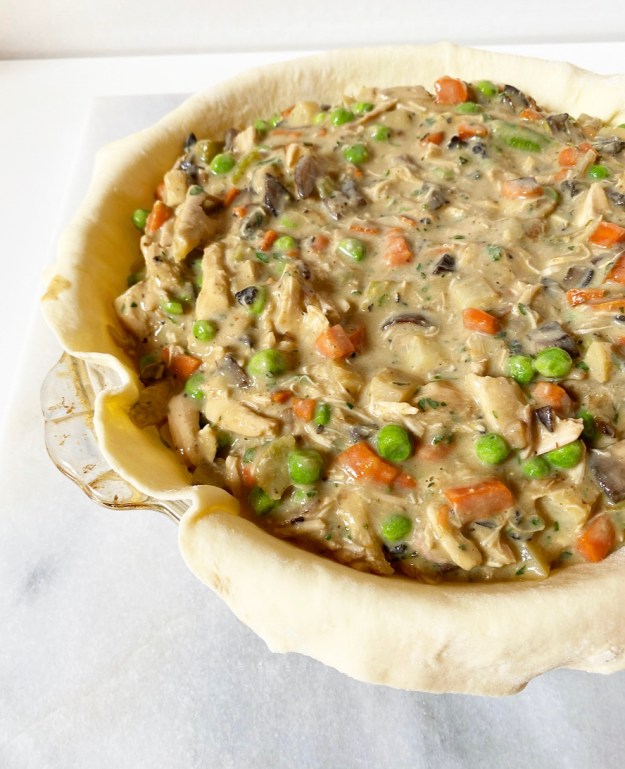 To finish off your Chicken Pot Pie, fill the bottom crust with your filling, then drape on the top crust, cut a few vents, paint the whole thing with egg wash, and bake it for about 30 minutes. Once your pie is burnished and bubbling, it’s time for dinner.
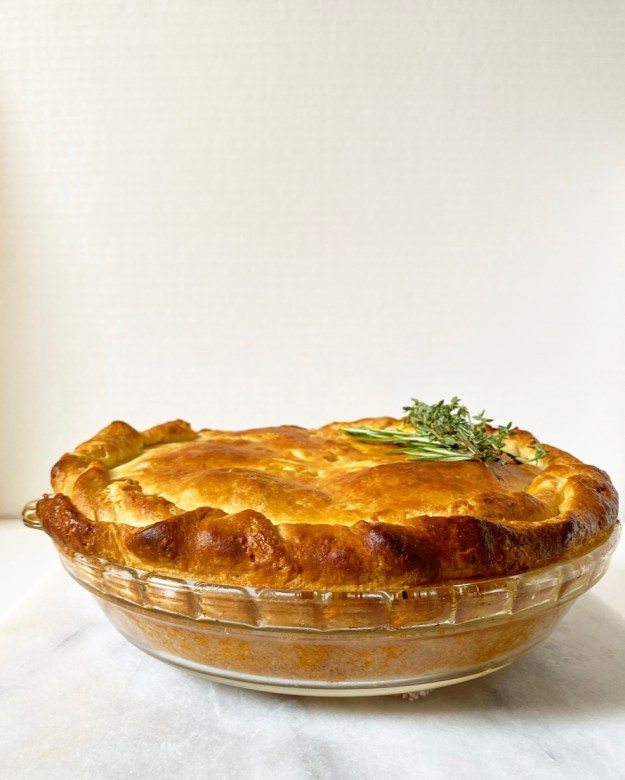 And oh, what a dinner it is. The filling is creamy and chickeny and rich, but never as heavy as I think it will be. The buttermilk biscuit crust is slightly puffed and perfectly browned, and retains distinct layers, just like it would in its traditional form.
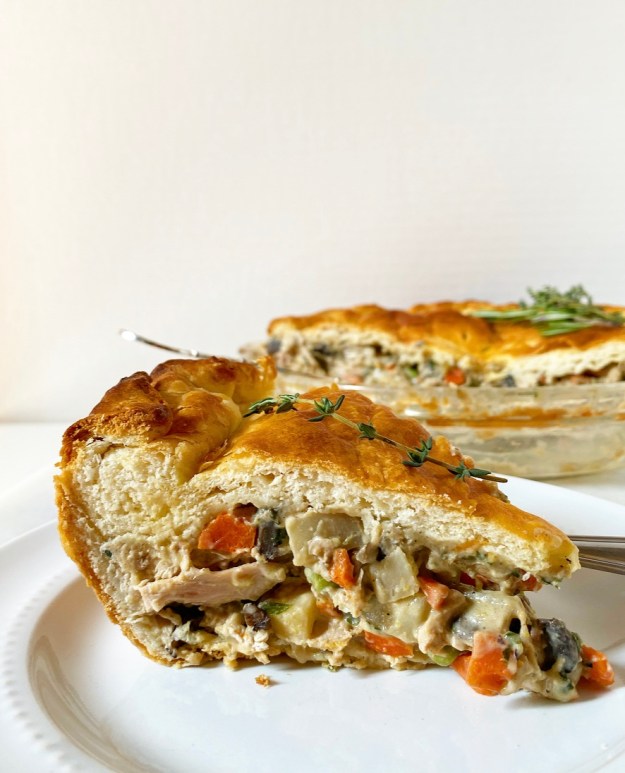 This is the best sort of Sunday dinner…or Monday through Thursday dinner if you, like me, have the enviable job of eating the whole thing yourself. Food blogger life isn’t always as glamorous as it seems, but I was happy to take this one for the team.
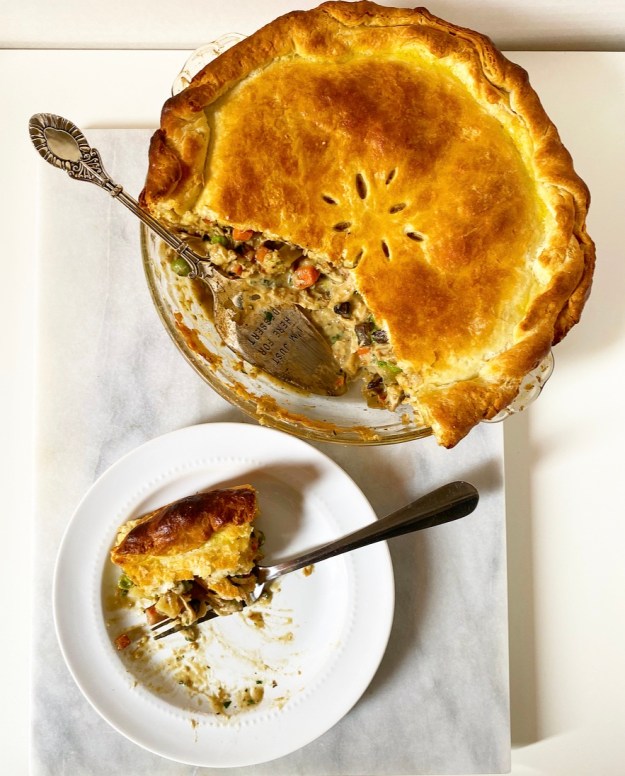

 Unsurprisingly, the way to my heart is through my stomach. I mean, I’m a food blogger–of course it is.
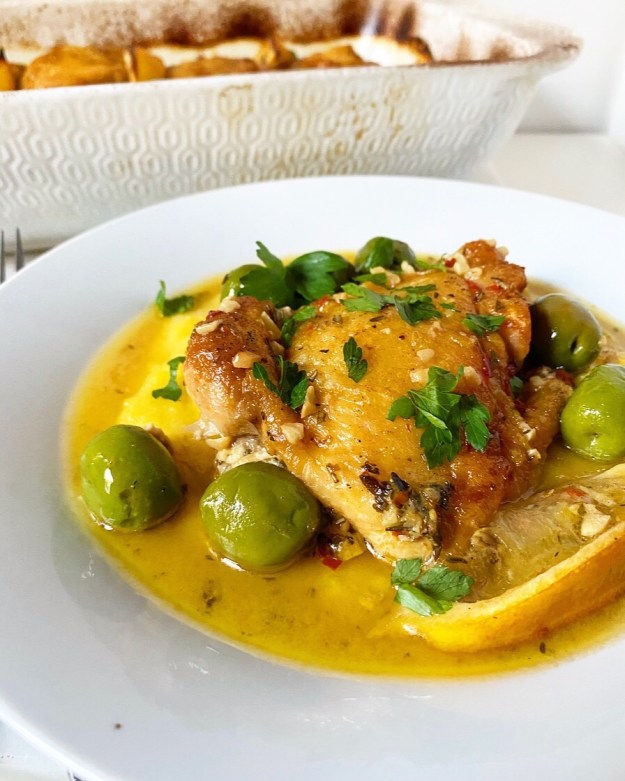
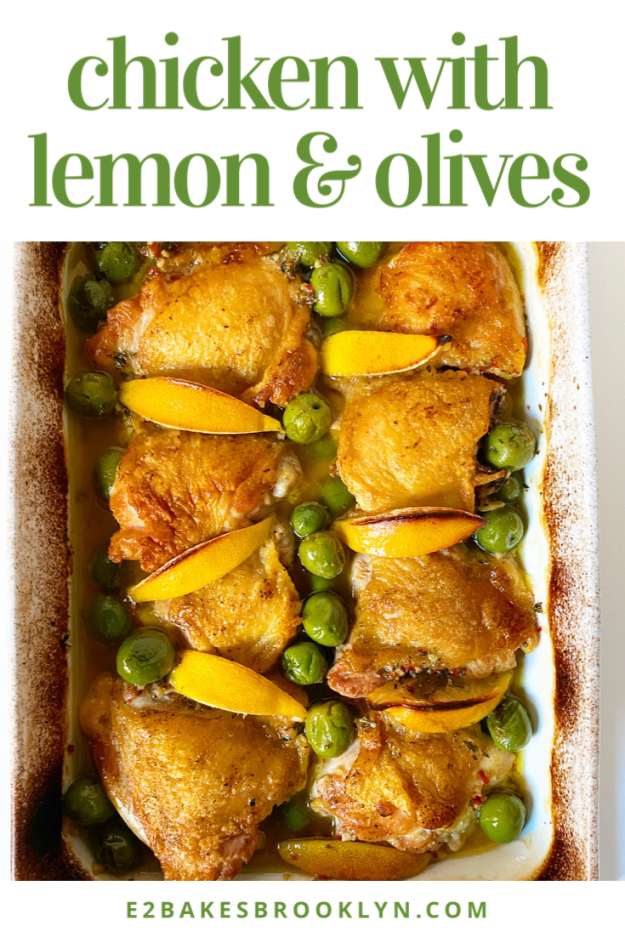
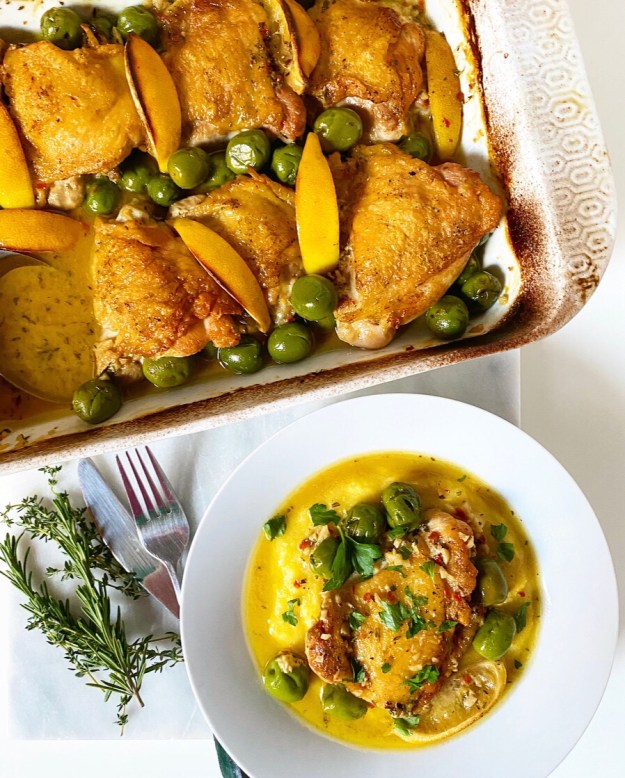 Today, we’re talking about Chicken with Lemon & Olives, which is a dream dinner for someone like me. It’s got crispy-skinned chicken thighs, briny roasted olives and a garlicky, herby, dijon-spiked lemon sauce, so…yeah, um, hi. Sign me up.

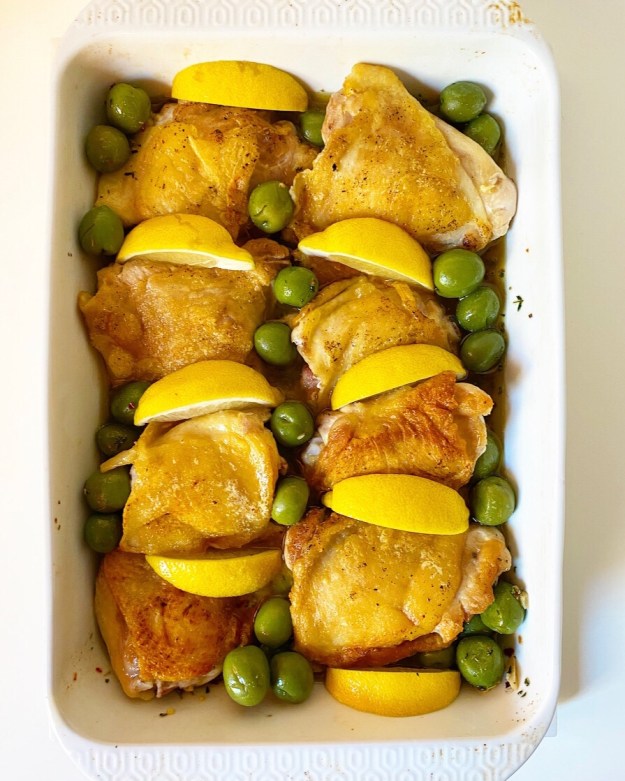 This dish, y’all. It’s so delicious. The sauce is tangy and acidic from the lemon and mustard, and rich (but not overly so) from the chicken and olive oil. And the olives—ohhhh, the olives. They’re cracked open before cooking so that all that tangy, schmaltzy sauce gets in there and gets a little briny and…well, it’s very good.
 Speaking of olives, I prefer to make this with castelveltranos because they’re my favorite. More of a kalamata person? Want to try a mix? Do what makes you happy. I used olives that still have their pits because, frankly, they always taste better. If you want to use pitted olives though, I won’t stop you. Just make sure to skip the step when you give them a thwack with the bottom of a cast iron skillet—nobody wants to clean that mess.
 I should note that the sauce stays on the thin side. If you’d like it to be thicker, you can reduce the amount of stock a bit when you pour it in, or remove the chicken, etc., and thicken it with a cornstarch slurry after roasting. Truly, the consistency of the sauce was the only thing I had reservations about during testing, but I like it as written. It nestles perfectly into a pile of
 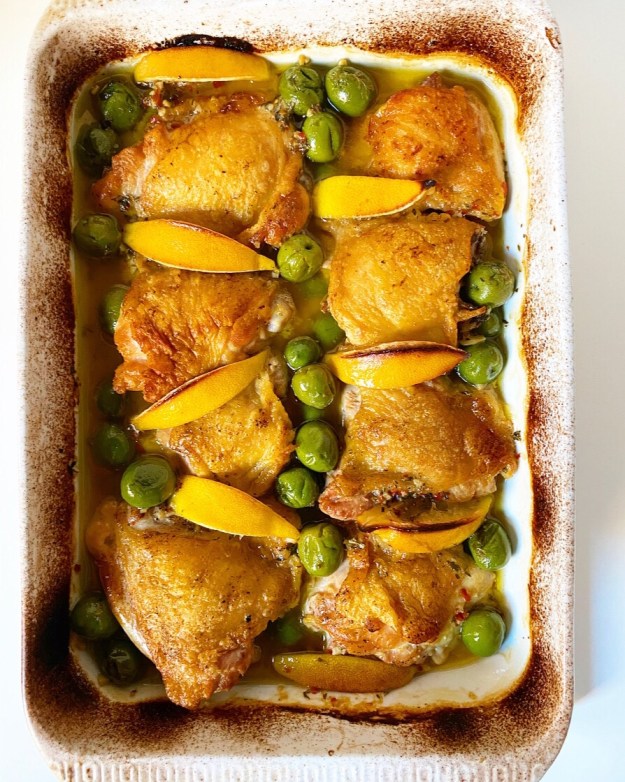 Can we discuss how absurdly beautiful this is? I love the golden chicken in contrast with the vibrant olives and roasted lemon wedges. This is definitely one of those mains that works as well for a
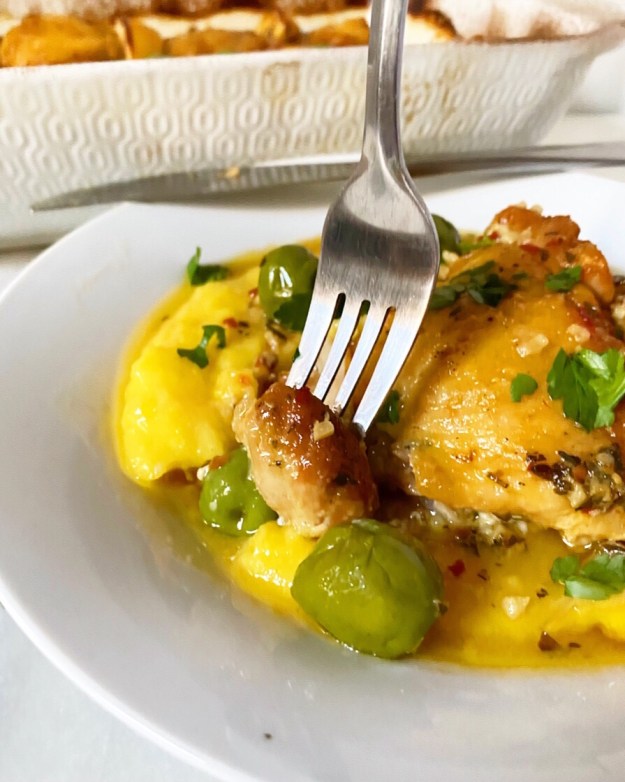


 Living far away from home means that when I get a call from friends or family, I “play the hits,” if you will. I tell them all about the big things going on in my life–a new apartment, the awesome kid I take care of, the brown and white spotted schnauzer I saw yesterday (I really love a schnauzer). But in all the fuss of sharing my life and hearing about theirs, I can let amazing things go by the wayside because they might seem mundane if the person on the other end of the phone call is not directly involved.
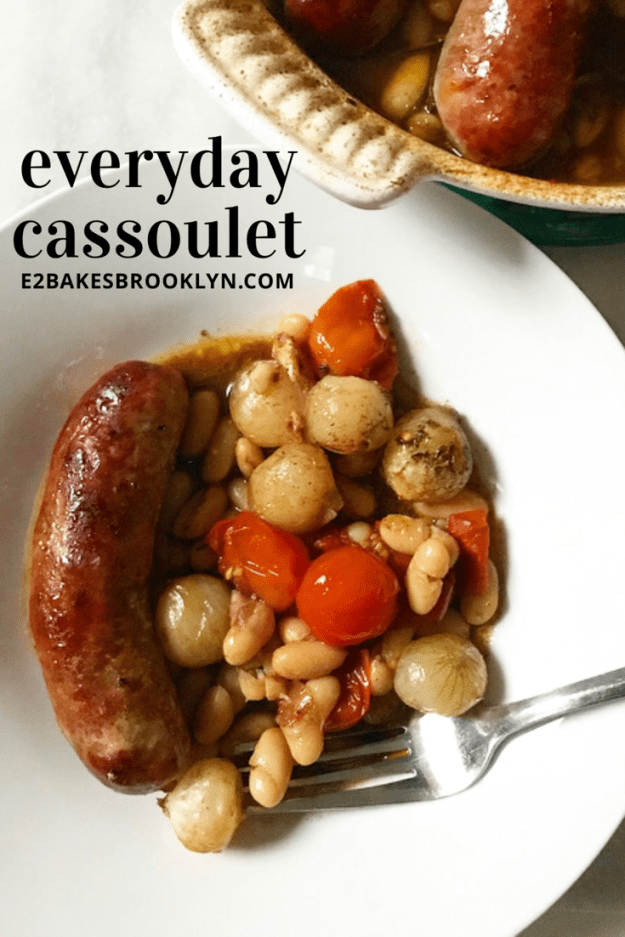
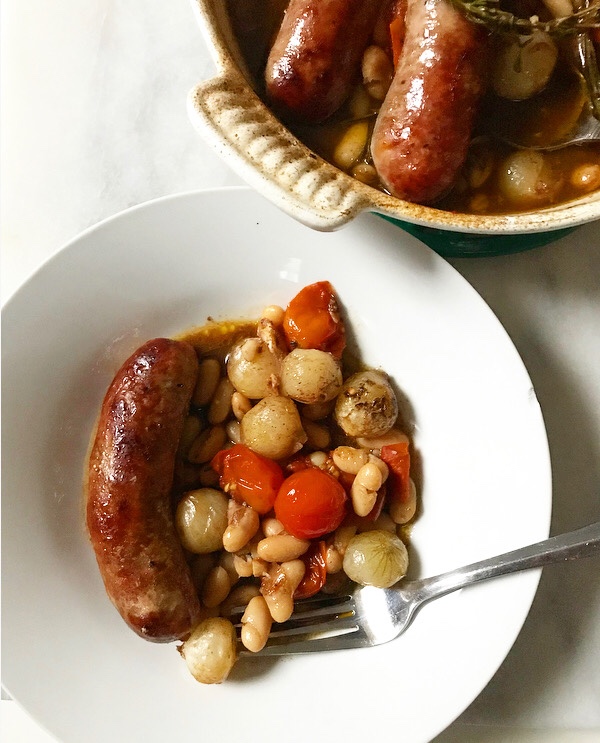
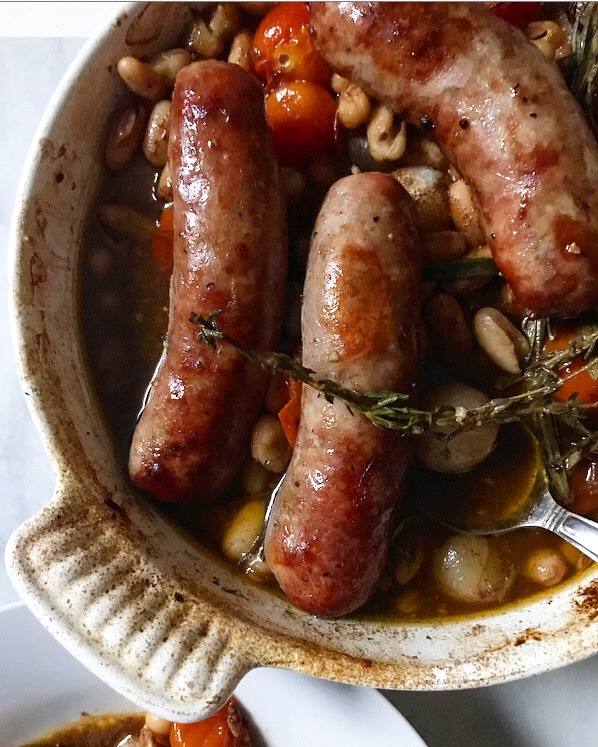 Take for example this Everyday Cassoulet. It’s rich and delicious and one of my favorite meals to make at home, but at the end of the day it’s *just* dinner. Everybody eats dinner. It’s not really a “call your mom down in Texas to tell her about it” kind of thing.
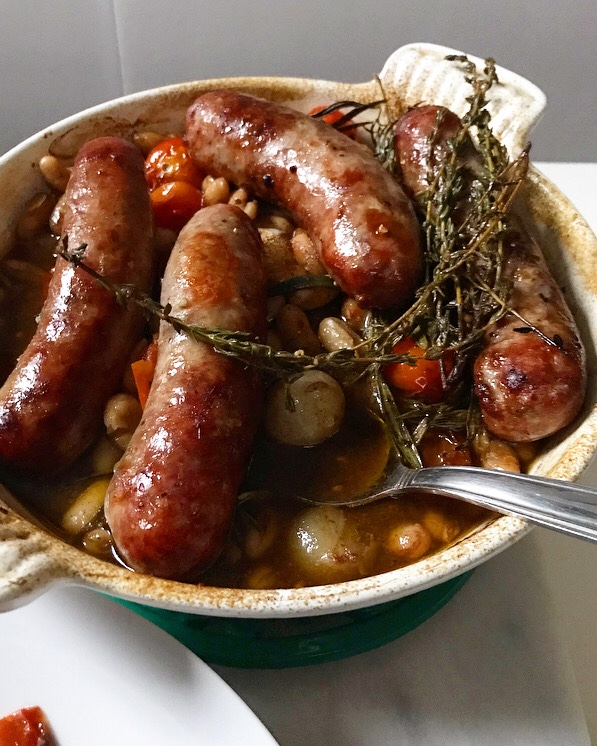 We all have our go-to meals though. My best friend, Emily, asked me a few months ago what I had been making for dinner lately, and this was the first thing I told her about. Mind you, I’ve been making this for five years. When I found the original recipe, I still lived in Manhattan! I was still working office jobs! The only thing I had ever baked from scratch were Ina Garten’s brownies! And while all of those things have changed, my go-to dinner has not.
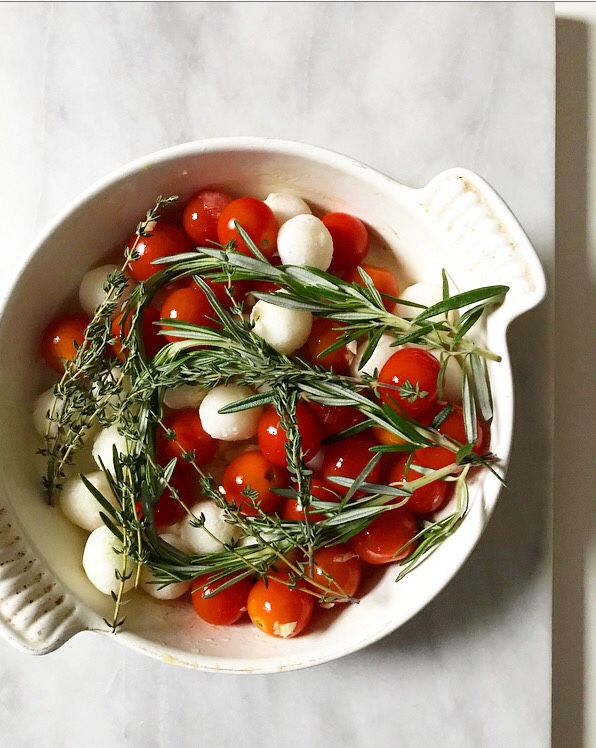
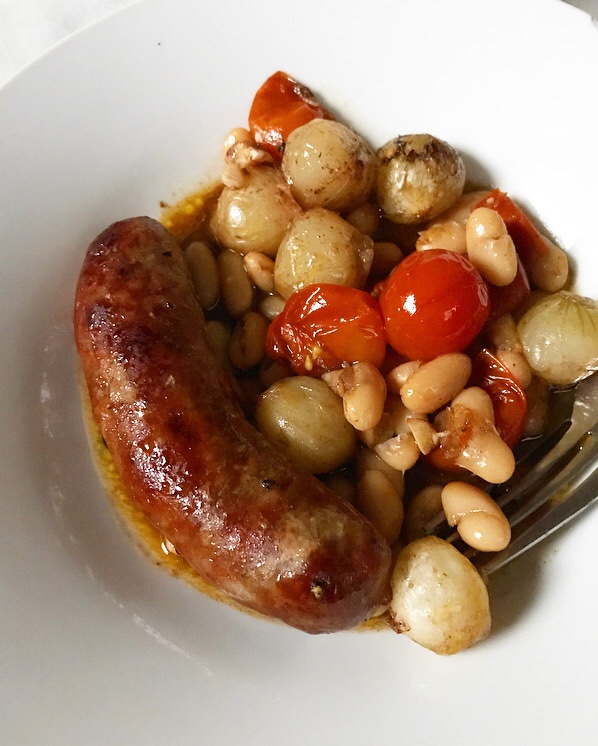
 Some of you may be wondering: what is cassoulet? It’s a slow-cooked meat and white bean stew from the south of France. Cassoulet is traditionally baked in a dish called a cassole. The fanciest versions contain things like goose, lamb, and duck confit. But this is a weeknight version of the classic French dish, so it’s been pared down. Don’t worry though, it’s still every bit as good and comforting as the real deal!
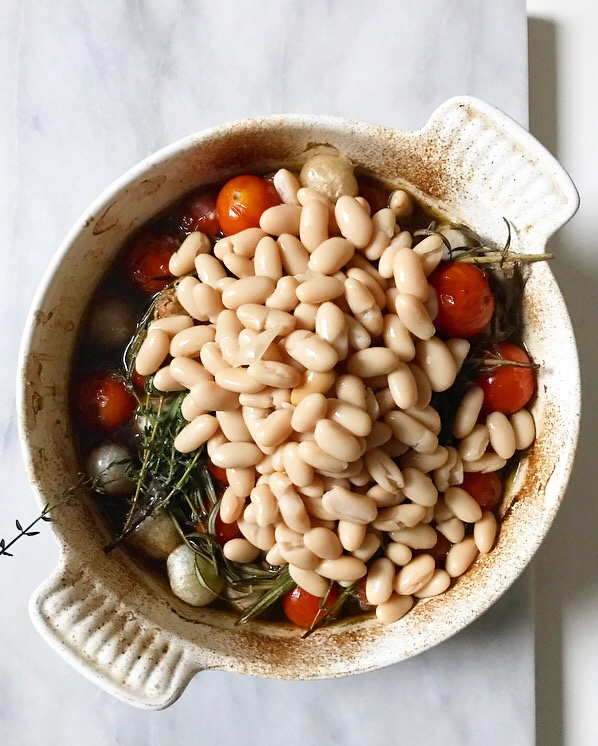
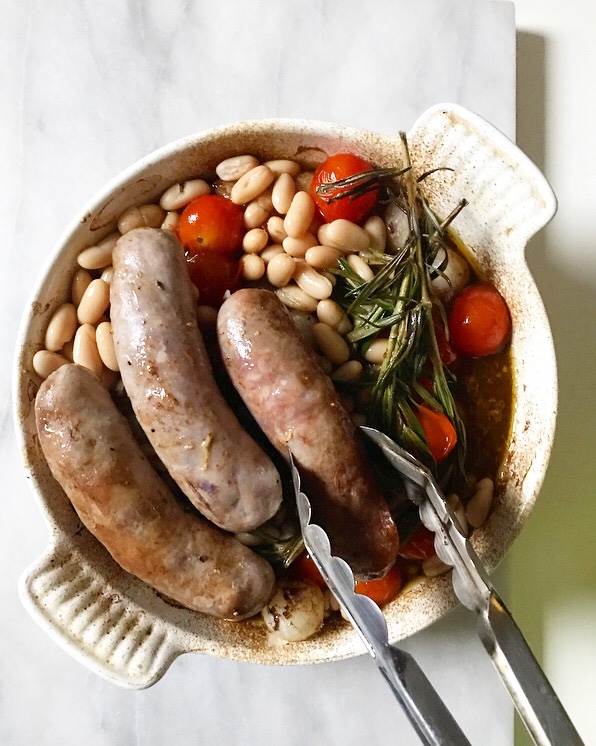 This Everyday Cassoulet is made with Italian sausages in place of any specialty meats. Traditional white beans are baked with grape or cherry tomatoes, pearl onions, crushed garlic, and fresh herbs. Nothing has to be sliced or diced–you only need a knife to crush the garlic! Everything is drizzled with a simple mixture of balsamic vinegar, olive oil, and Dijon mustard, and baked for an hour in a regular casserole pan–no need for specialty dishes here!
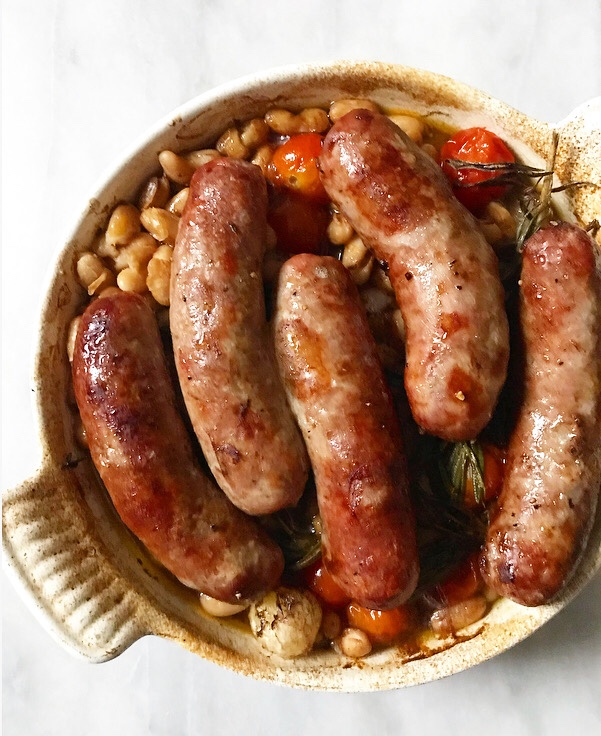 And oh my, is it delicious. The sausages get super crispy, and the tomatoes burst and create the most wonderful sauce with the balsamic mixture. The beans soak in all the flavors and get super tender. This is fantastic served with crusty bread. I forgot it when I took these photos, but trust me, you’ll need it.
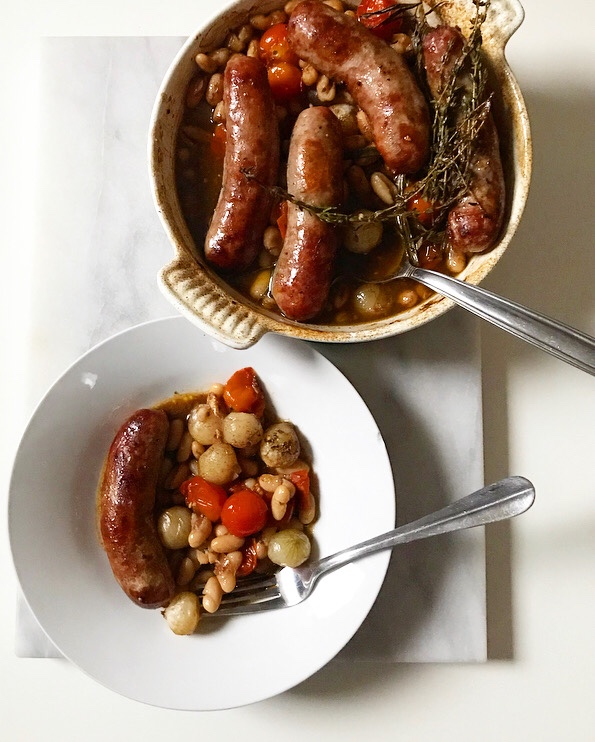 Put this Everyday Cassoulet on your list of weeknight dinners! It’s easy as can be, but sure doesn’t taste like it! Your family and friends will definitely ask for the recipe 🙂