 I try very hard to keep things simple around here. Recipes, techniques, flavors, everything. That doesn’t mean super easy or uncomplicated—just not over-complicated. No more steps or ingredients than absolutely necessary, you know?
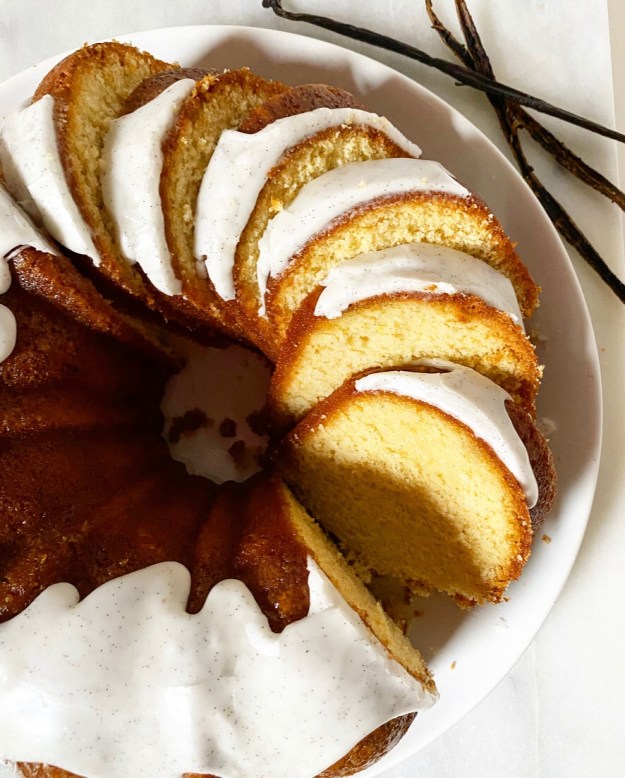 That said, sometimes a simple recipe like this Vanilla Bean Bundt requires several tries, each with a different technique or ingredient, all resulting in…excellent cakes. Really.
You know what’s not simple? Deciding which of those cakes to post.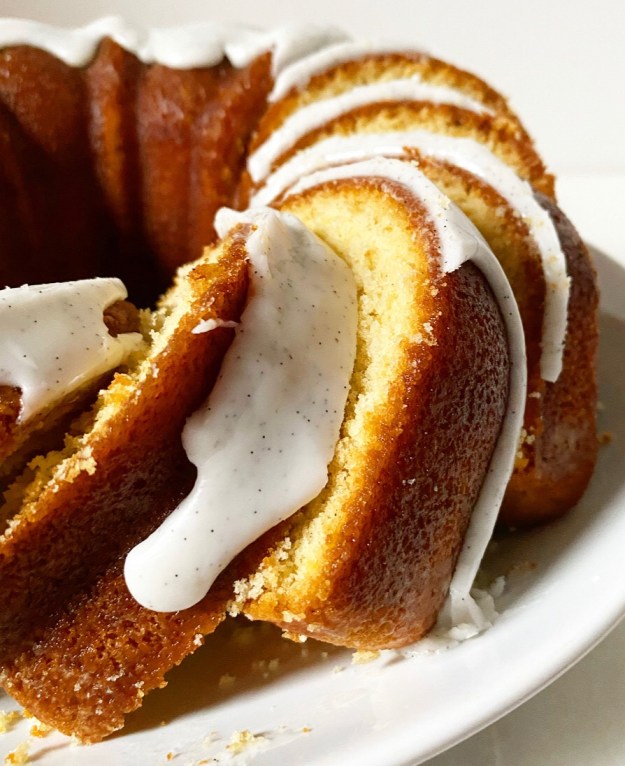 Each one began with the same basic recipe that I’ve used for my Orange Cardamom Cake, Meyer Lemon Drizzle Cakes, and Marble Bundt, but with vanilla bean, of course. My options were:
- a cake with one vanilla bean in the batter, one vanilla bean in the icing, and a vanilla syrup made from the empty pods painted on.
- a cake with two vanilla beans in the batter and one in the icing. No syrup.
- a cake and icing made with vanilla bean paste instead of the real deal. No syrup.
I cannot overstate how delicious all of them were—buttery and bursting with vanilla bean flavor! And those signature specks, of course.
If I felt like I could get away with posting three Vanilla Bean Bundt recipes, I would. Faced with making a decision however, I took into account the flavor, aesthetics, ease and cost of each one, and the winner just barely emerged.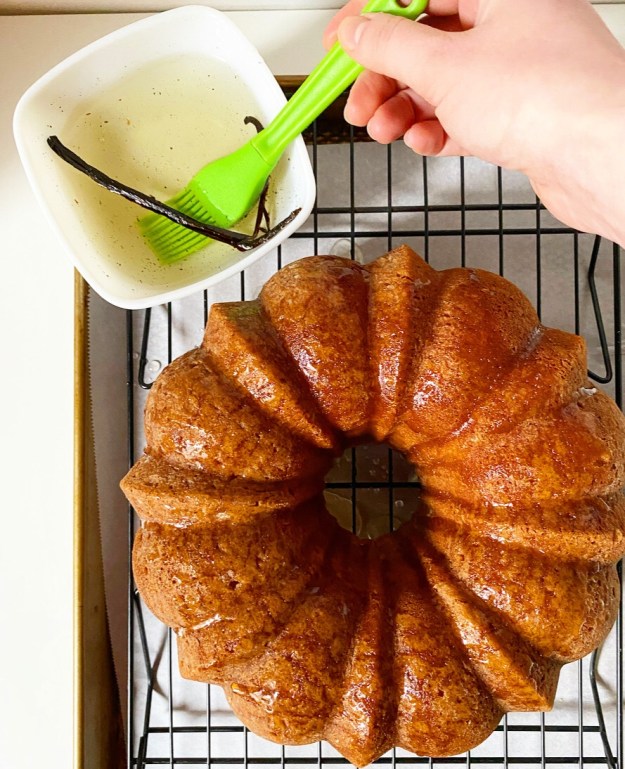
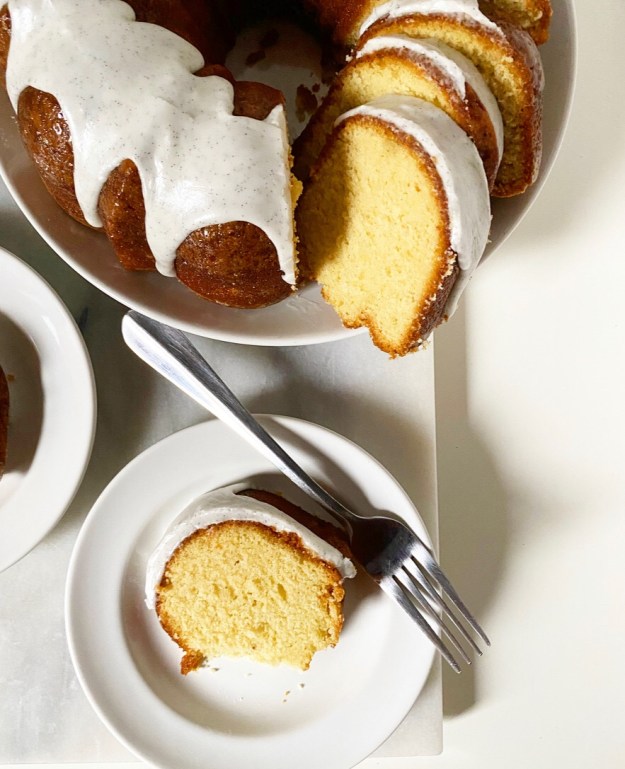
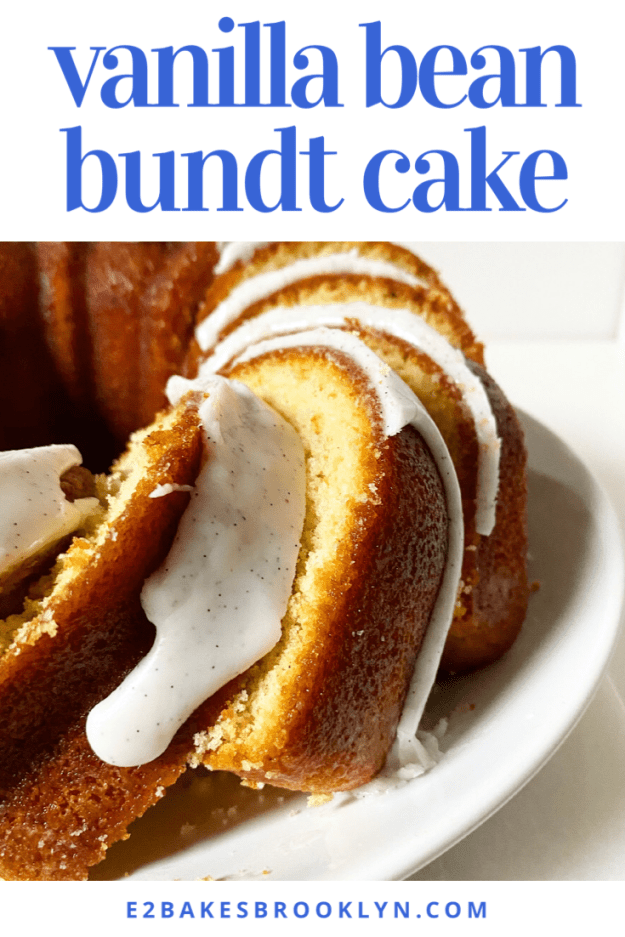
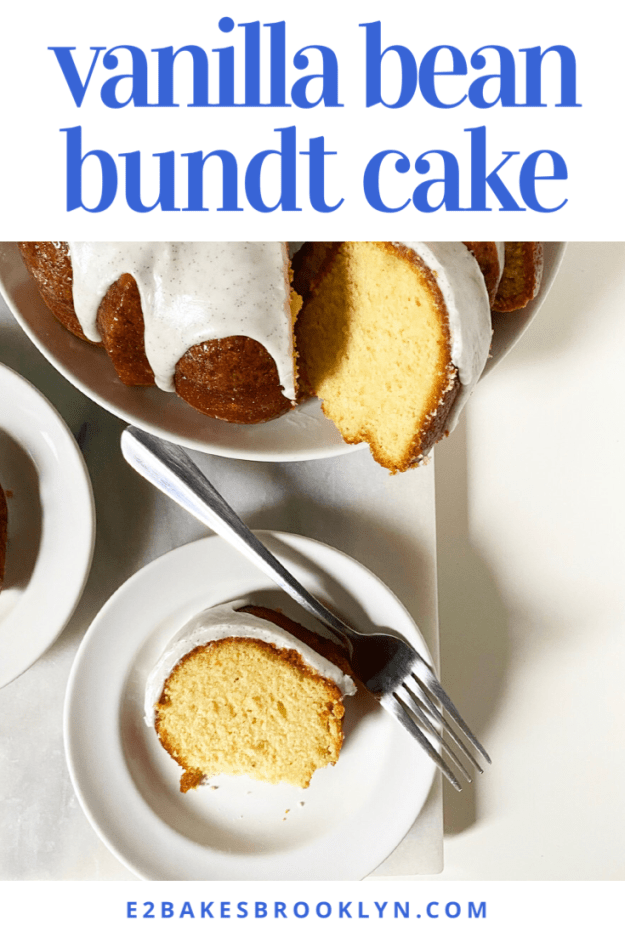
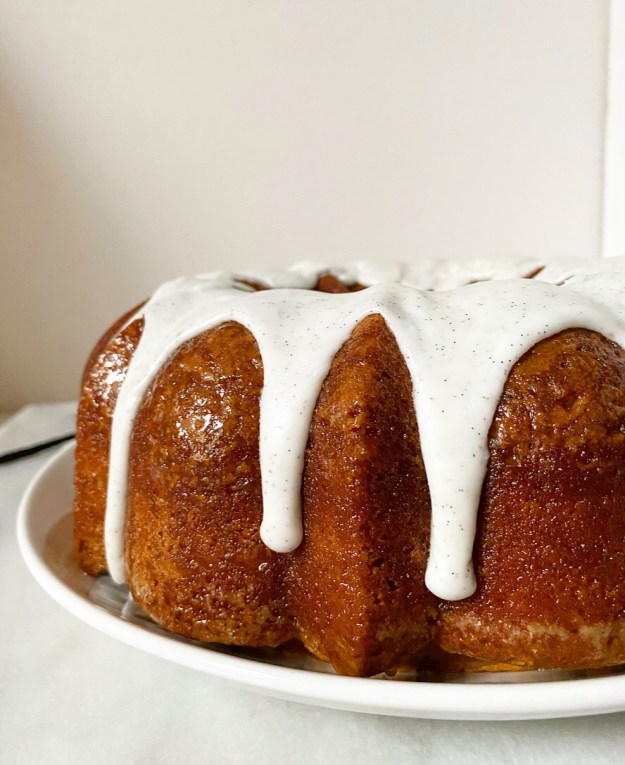 The cake I love the most is #1, so it’s the one I’ve posted below. The seeds of one vanilla bean are whirled into the batter, and the leftover pod is used to make a syrup that is brushed onto the baked cake before icing is poured over the top. The syrup is the element that makes all the difference here—it keeps the cake from being even the slightest bit crumbly, gives it a subtle glossiness, and makes it so that you can smell its dreamy vanilla aroma within a 6 foot radius. Yes, really!
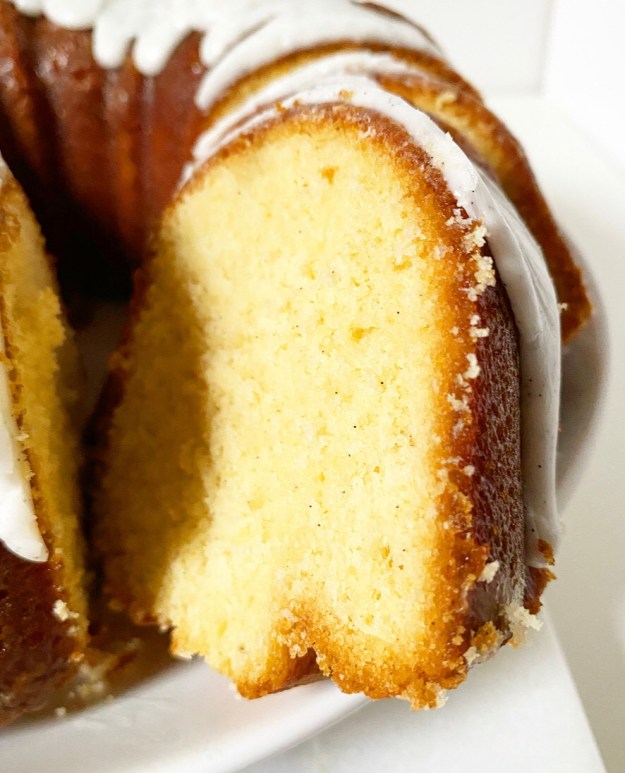 I also like that the pods in the recipe don’t go to waste. I’ve seen other bakers suggest using empty vanilla pods to make vanilla sugar, but how much vanilla sugar does anyone actually use? You could use them to make extract, I suppose, but that takes weeks or months. This way at least one of the pods is used directly in the cake. As for the second, let me know what you do with leftover vanilla pods. I’m interested!
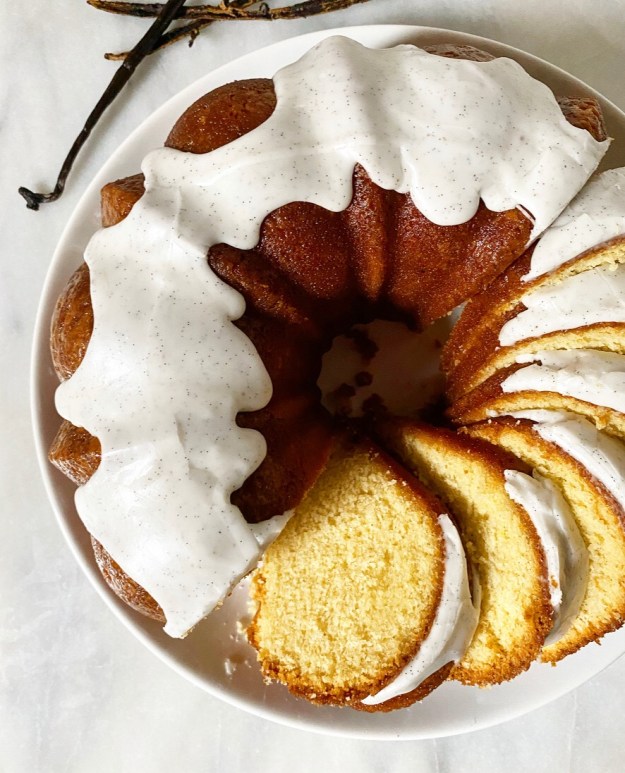 For those of you wondering about the cost of this whole operation, I won’t lie to you: vanilla bean anything is pricey. I buy my vanilla beans at Costco and Sahadi’s, and they run about $6 apiece. You could use two tablespoons of vanilla bean paste (1 per pod) instead, but the paste is about $35 upfront. A single jar contains enough to make this cake four times though, so it’s worth the investment. Oh, and this is a warning that the dark color of the vanilla bean paste will affect the aesthetic outcome of the cake, but only slightly. It will still be absurdly delicious, as all vanilla bean things are.
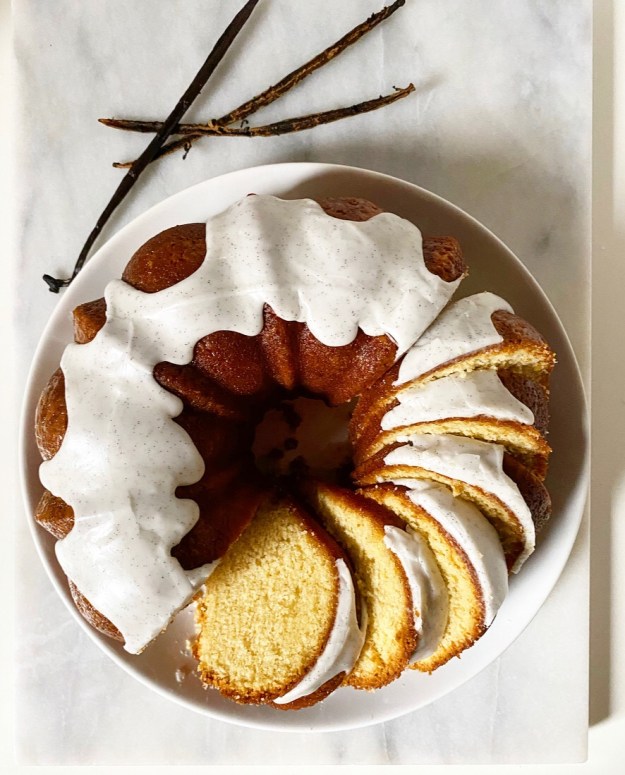 Keep it simple, y’all.
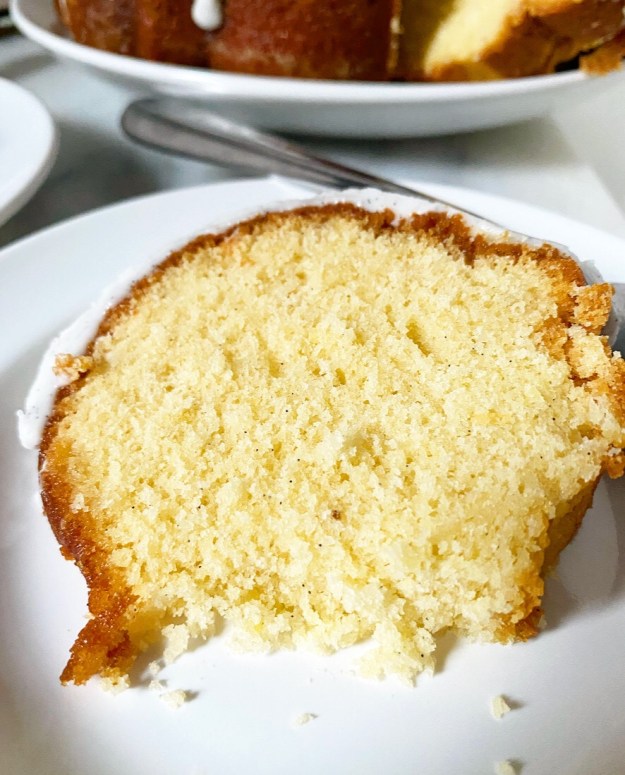
Vanilla Bean Bundt Cake
makes one 10-cup capacity bundt
Cake:
1 1/2 cups granulated sugar
1/2 cup light brown sugar, packed
scraped seeds of 1 vanilla bean
1 cup (2 sticks) unsalted butter, room temperature, cut into 16 pieces
4 large eggs, room temperature
2 teaspoons pure vanilla extract
3 cups all-purpose flour
2 teaspoons baking powder
1/2 teaspoon Kosher or sea salt
1 cup milk (preferably whole), room temperature
Simple Syrup:
1/3 cup water
2/3 cup granulated sugar
1 scraped/empty vanilla pod
Icing:
1 1/2 cups confectioner’s sugar
2 tablespoons whole milk
scraped seeds of 1 vanilla bean
pinch of Kosher or sea salt
Place an oven rack in the center position. Preheat oven to 325F. Heavily grease a bundt pan with softened butter (or shortening) and dust with flour. Set aside.
Make the cake. Combine all ingredients in a large mixing bowl. Use an electric mixer to mix on low for 30 seconds. Increase speed to medium and mix for 3 minutes. Batter will be thick.
Transfer batter to prepared pan and smooth the top with a silicone spatula or wooden spoon. Tap full pan on the counter five times to release any large air bubbles. Bake 65-75 minutes, or until a toothpick inserted in several places comes out clean.
Let cake cool in the pan for 15 minutes. Run a thin, flexible knife around all exposed edges. Invert cake onto a cooling rack and let cake cool completely. Cake may be made up to a day in advance; it will keep double-wrapped in plastic wrap.
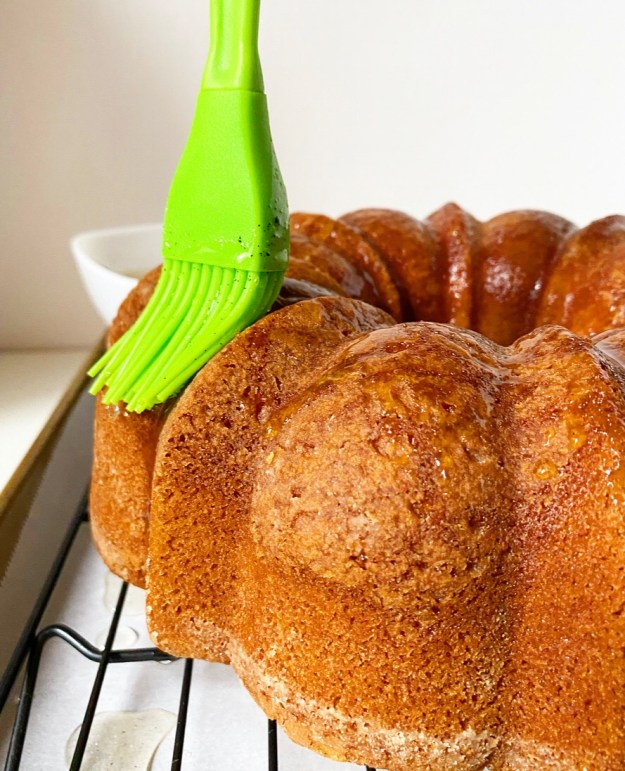
Set the cooled cake, still on the rack, over a rimmed baking sheet. Make the simple syrup. Combine water, sugar, and scraped vanilla pod in a small saucepan. Heat over medium heat, stirring occasionally, until sugar has dissolved. Remove from heat.
Use a pastry brush to paint syrup all over the cake. Continue brushing until you’ve used all the glaze. Some will run off onto the rimmed baking sheet—that is okay. Let cake sit for 30 minutes to absorb the syrup.
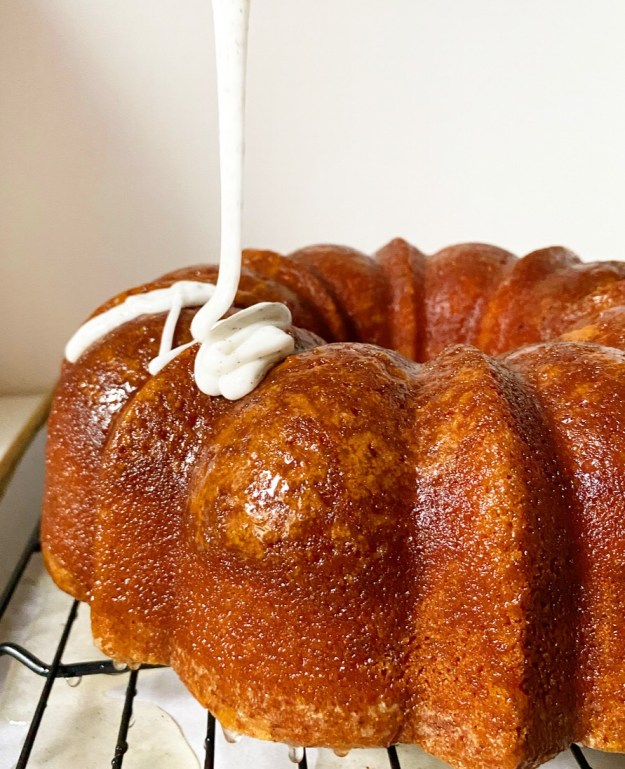
Make the icing. In a small bowl, use a fork to whisk together confectioners sugar, milk, vanilla seeds and salt. Mixture should be very thick, but pourable. If it’s too thick, add more milk by the teaspoon up to 3 teaspoons (1 tablespoon); if it’s too thin, add more confectioners sugar in 2 tablespoon increments. Pour over cake. Let sit for 20 minutes to set. Move cake to a serving plate before slicing and serving.
Leftover cake will keep covered at room temperature for up to three days or in the refrigerator for up to five.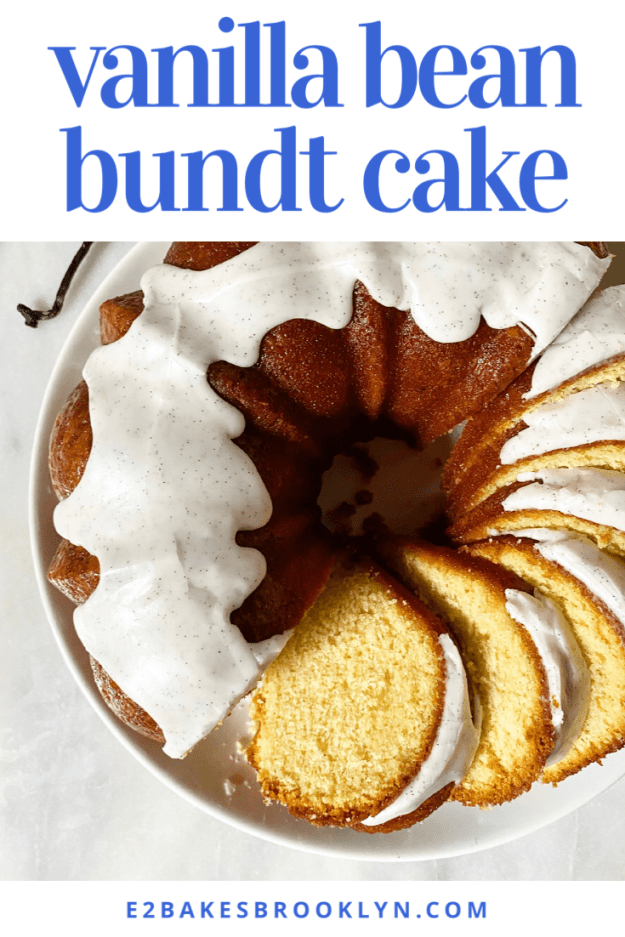
 I owe you an apology. The
  Sure, that cake is delicious—it’s cake!—but it’s not delicious enough to require four bowls, ample sifting, a whisk, a spatula, a mixer and whipped egg whites. Few things are.
 After being asked to make a few
  Simpler and better is exactly what you’ll find with this new, improved White Cake recipe. This rich, tender, fine-crumbed cake is a one-bowl endeavor, and while it does require a mixer, you don’t have to sift anything or whip egg whites. I’m calling it a huge win.
 This cake comes together differently than the others you’ll find on this site. Instead of the usual creaming method (creaming butter and sugar before adding eggs, dry ingredients and milk), this recipe is made using the reverse creaming method, which might be my new favorite way to make cakes. Let me walk you through the process.
 Start by combining flour, cornstarch, baking powder, salt and sugar in a large mixing bowl—the only mixing bowl you’ll need for this recipe. Give those a good stir with a whisk or a low mixer before adding all your softened butter.
 Next up, use your mixer to combine the two. This will take a few minutes and produce a rubbly, sandy-looking mixture. The purpose of doing this is to coat the flour with fat before adding the liquid ingredients. The butter creates a barrier that impedes gluten-development, producing a softer, more tender cake.

 And speaking of gluten-development, the last two steps are adding liquid ingredients (egg whites, extracts, and buttermilk), which are what will activate the gluten in the flour. Mix just until combined before dividing the batter into two pans and baking.
 Once the cake layers are cool, you may fill and frost them however you like. I kept it simple this time around with a white buttercream (just my vanilla buttercream with less vanilla) and went for the naked cake look.
 Ooooh. Ahhhhh.
 You’ll love this White Cake for its buttery vanilla-almond flavor, fine crumb, and did I mention it only requires one bowl?????!!!!!🙌😍💪🍰🎉
  It’s great on its own, but is also a wonderful blank slate for all sorts of applications. Feeling like
  Or maybe get brave and wild and do all three, because this White Cake is just that simple and just that good.


 I’ll admit that my heart sank to my ankles when I was asked to make “something like” the Milk Bar Birthday Cake for a first birthday party a few weeks ago.
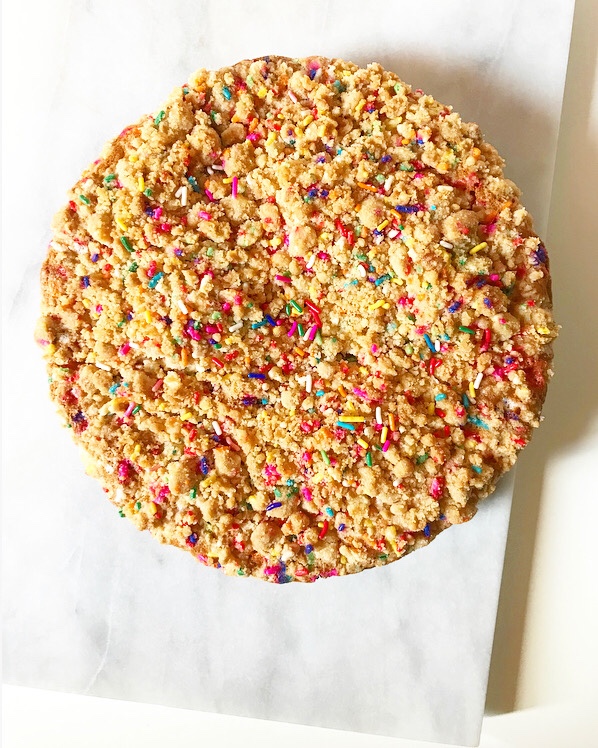

 It’s not that I have anything against Christina Tosi or
 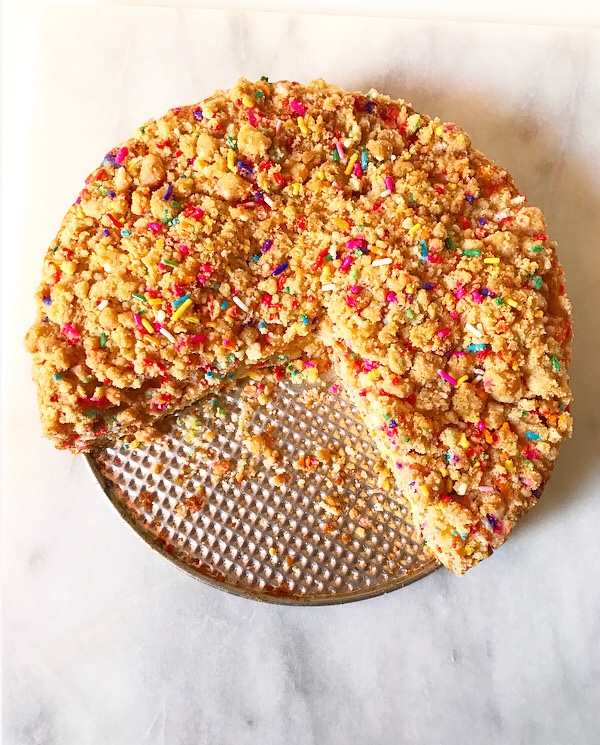 Long story short, I got it together, spent a lot of time looking at my copy of the
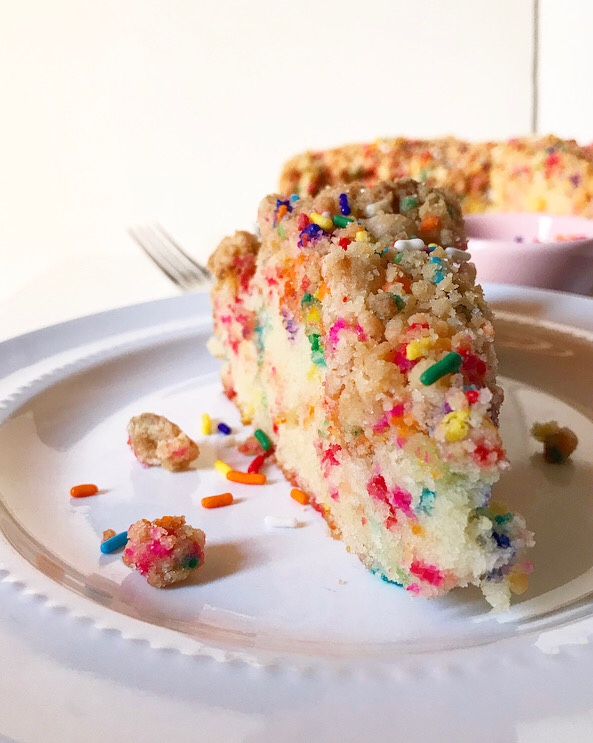
 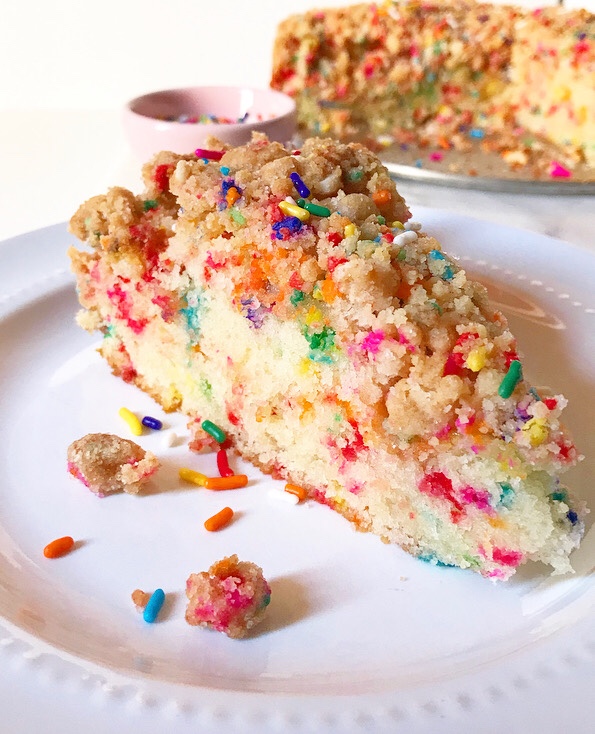 I have little intention of making it again because who has that kind of time??? But I will make time for one element: the Funfetti crumb. It’s got all the buttery crunch you’d expect in a shortbread or crispy sugar cookie, but it’s as simple as making the crumb topping for a coffee cake. And it’s colorful and happy and just the tiniest bit salty. And, well, connect the (rainbow sprinkle) dots.
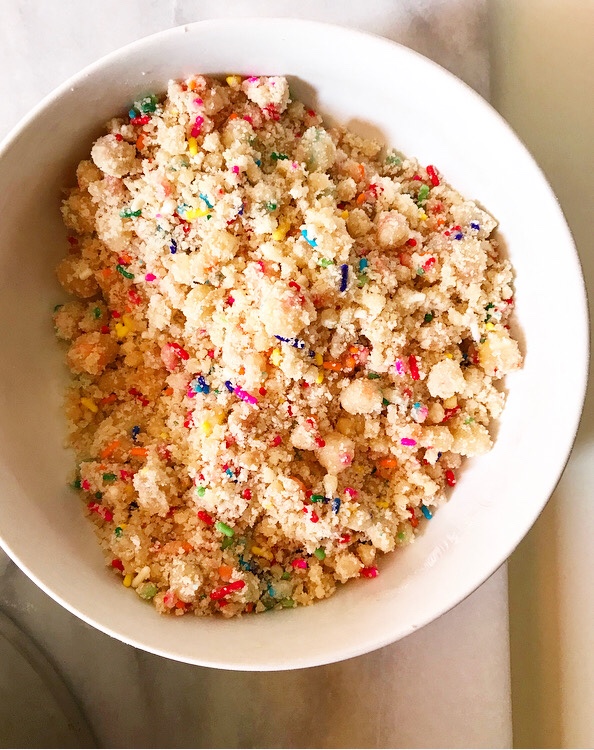
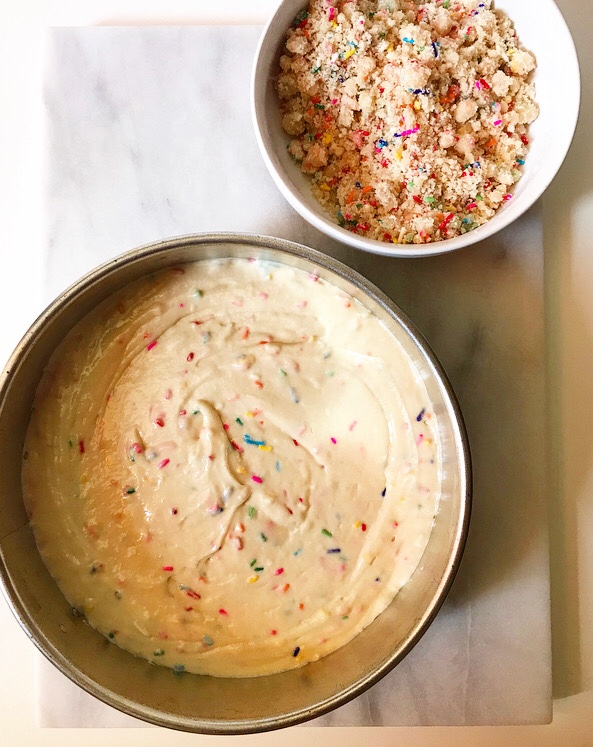
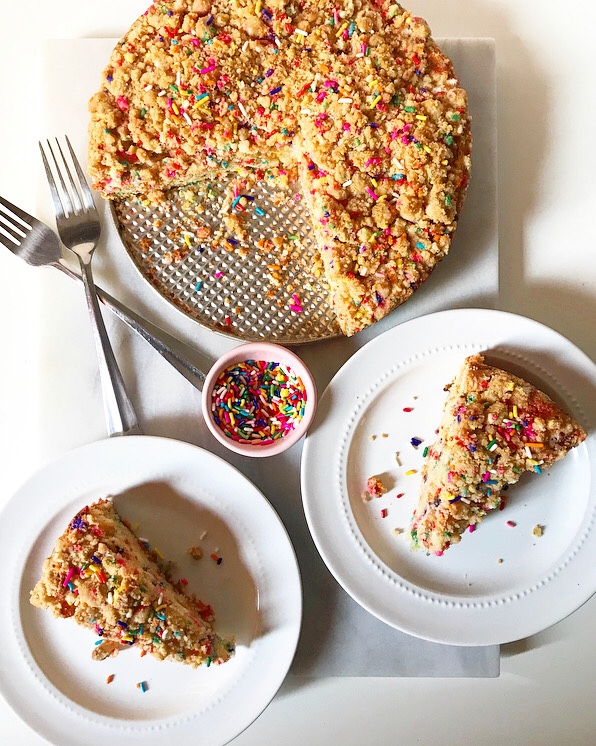
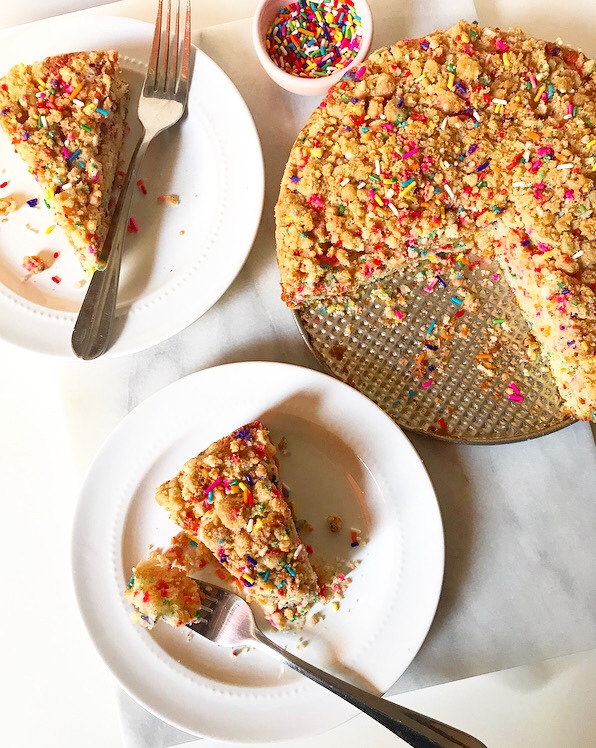
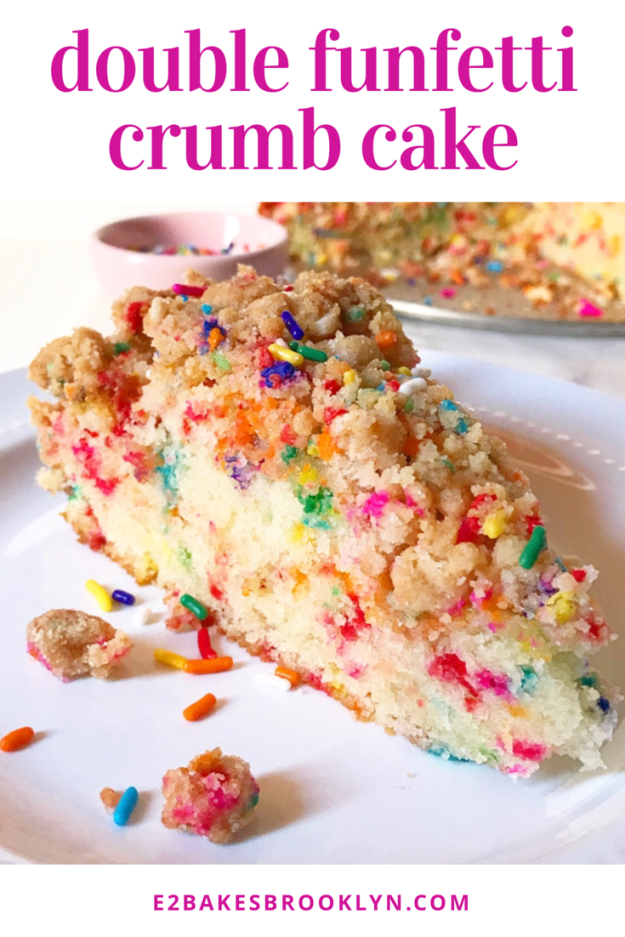
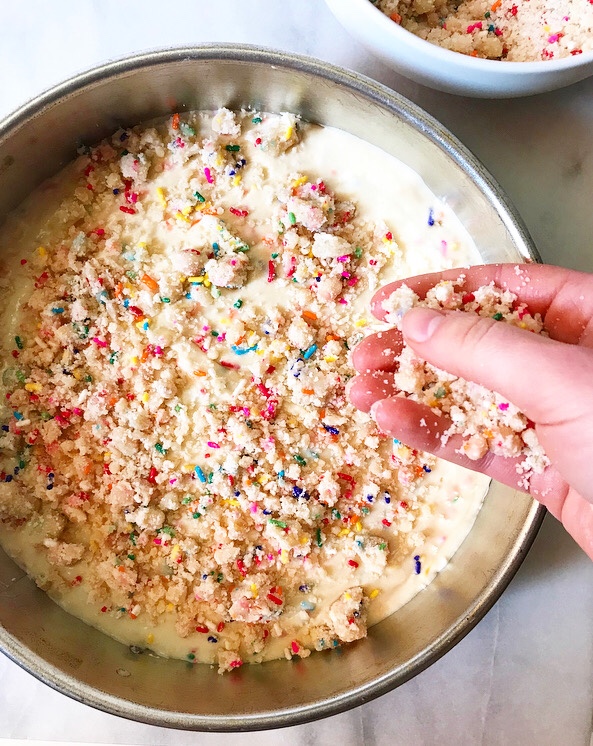 Double Funfetti Crumb Cake is exactly what it sounds like: tender sour cream Funfetti cake with a layer of Funfetti crumb baked on top. It’s the buttery, rainbow-speckled, no-cinnamon-allowed everyday coffee cake you didn’t know you wanted.
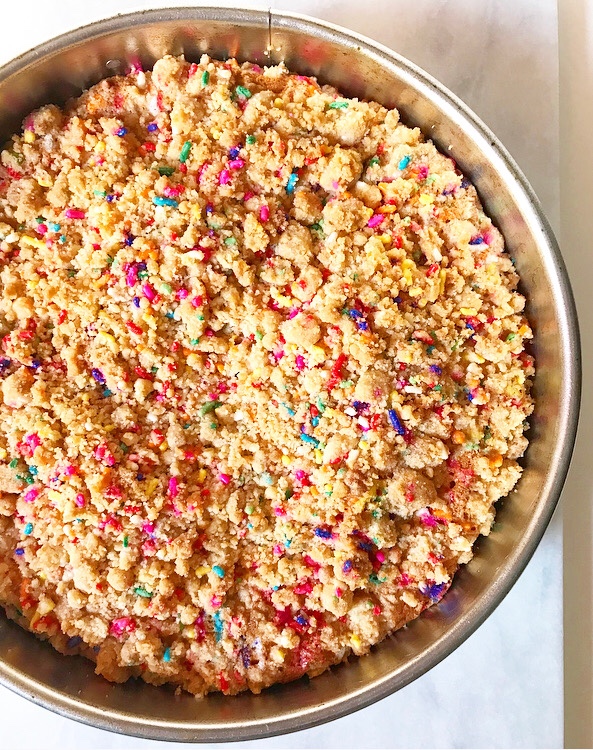

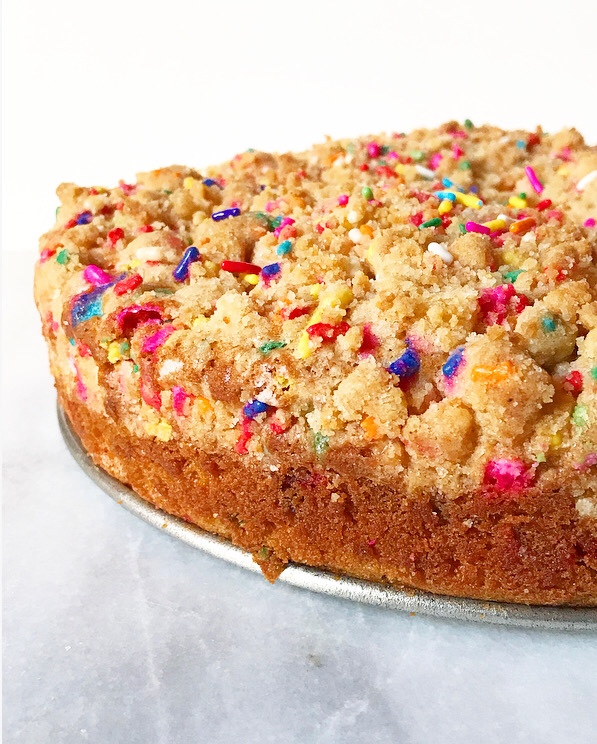 The cake is rich and dense, the crumb provides just the right amount of crisp-crunch, and the rainbow sprinkles (
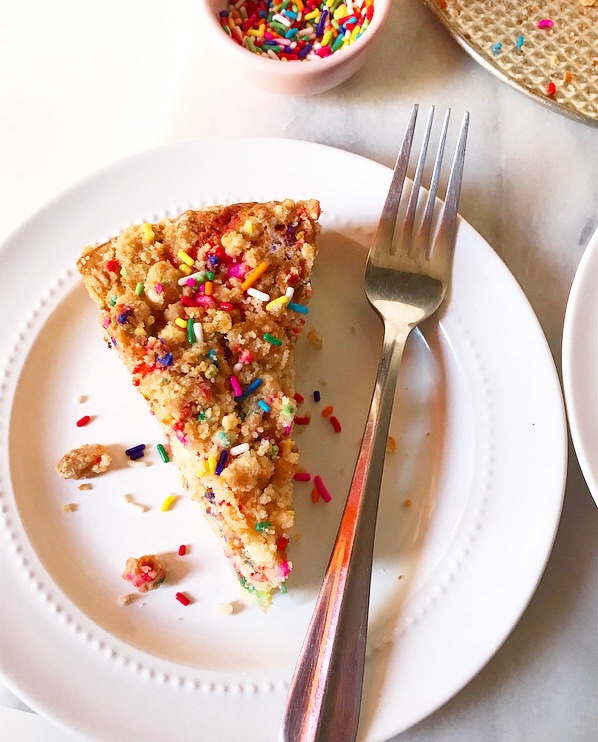 What? We all know that person. We may not totally understand their tastes but we respect them, and now we can make extra-fun cake for them to show them how much we love them.
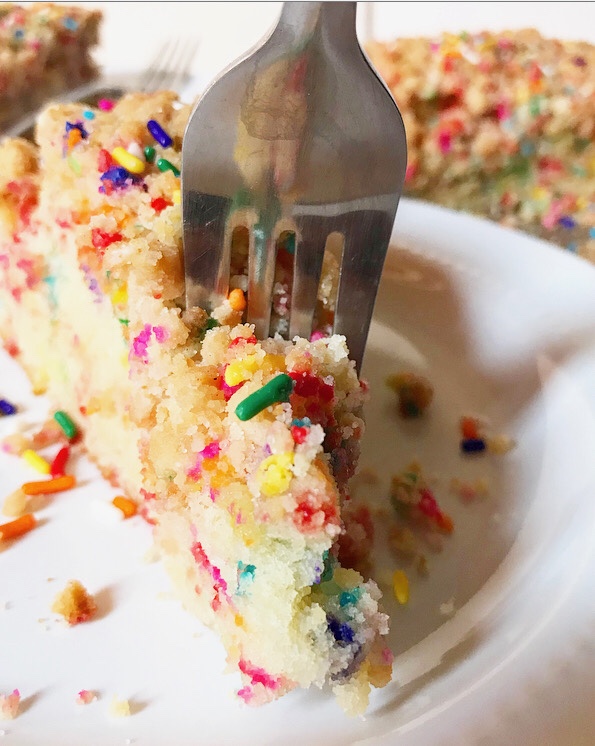
 …this took a weird turn. Happy Friday, dear readers! Make yourself a cake this weekend!
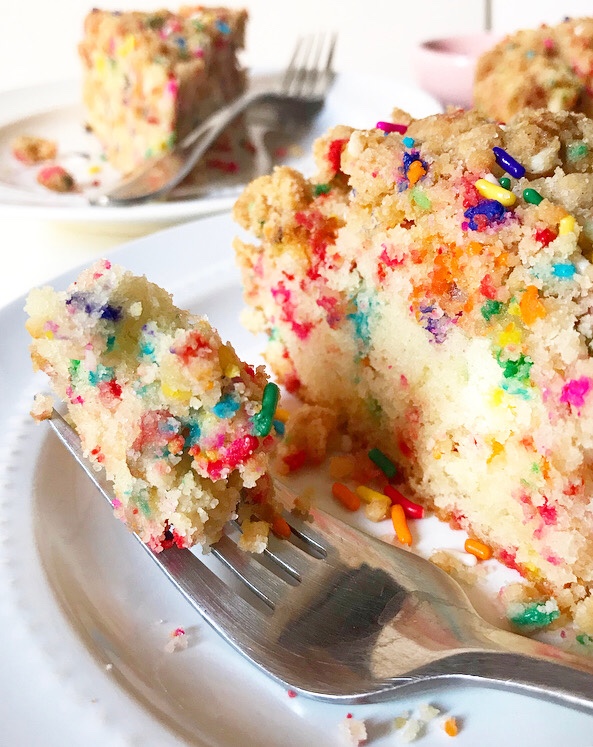


 I make a lot of cakes—a lot. In any given month, I make at least ten, plus any that are tested and posted on this blog. What can I say? I have friends who like to celebrate and like my cakes. I’m flattered.
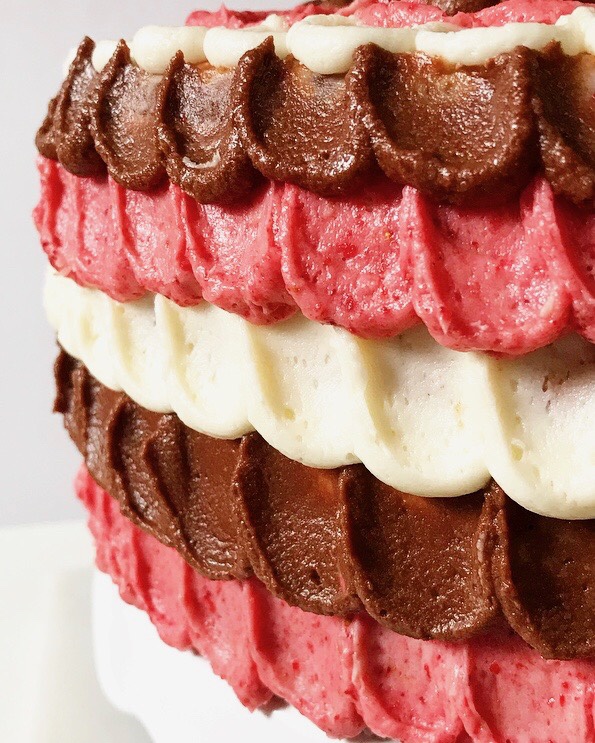 Of course, this means that making cake—something that once only brought joy—can sometimes be a slog. I don’t necessarily mind when baking feels like work (because it is my work), but I’d be lying if I said I couldn’t wait to come home and bake layers after a long day of blogging and personal cheffing. The joy understandably gets a little lost when I’m making a double batch of vanilla layers at 11pm on a Tuesday.
 But when inspiration strikes and I can be creative, it could be 4am and I’d be psyched to be baking. My roommate might not particularly like it, but I’d be in heaven.
 Such was the case last month when I made a cake for a
  And so that request for a strawberry element somehow meshed with vanilla and chocolate and became
  Y’all. Y’ALL. This cake. It is a thing. A real undertaking. A project best done over the course of two days. The most intricate cake work that’s ever been on this blog (aside from the
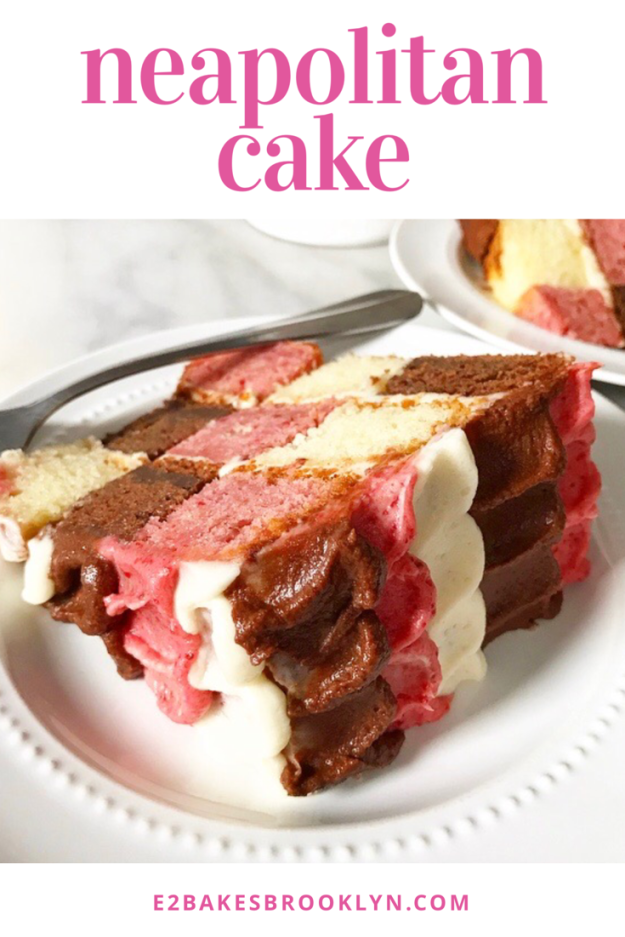
  But I am also completely obsessed with it. I mean, what’s not to love about this checkerboard chocolate, vanilla, and strawberry interior and the ruffled tricolor buttercream exterior? It’s the most fun!
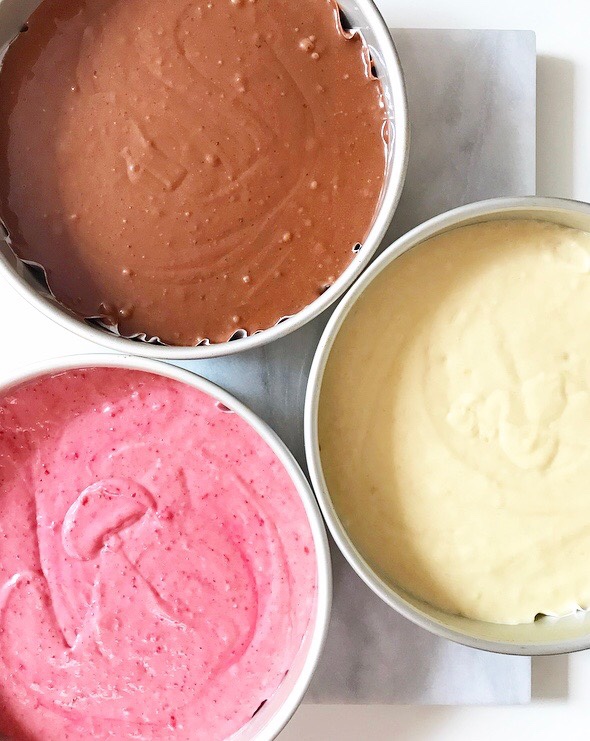 The cake layers are all made from one batter. Once it’s mixed together, it’s divided in thirds. One is left plain—that’s the vanilla layer. Another is spiked with freeze-dried strawberries, and the last with cocoa powder and melted chocolate.
 They’re baked, cooled, evened…
 …and then punched into rings and reassembled.
 And layered in a specific order with thin layers of vanilla buttercream.
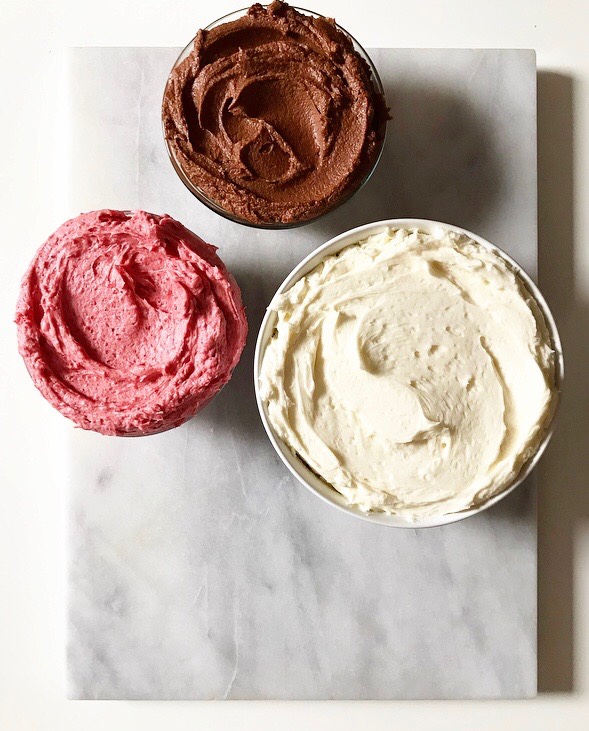
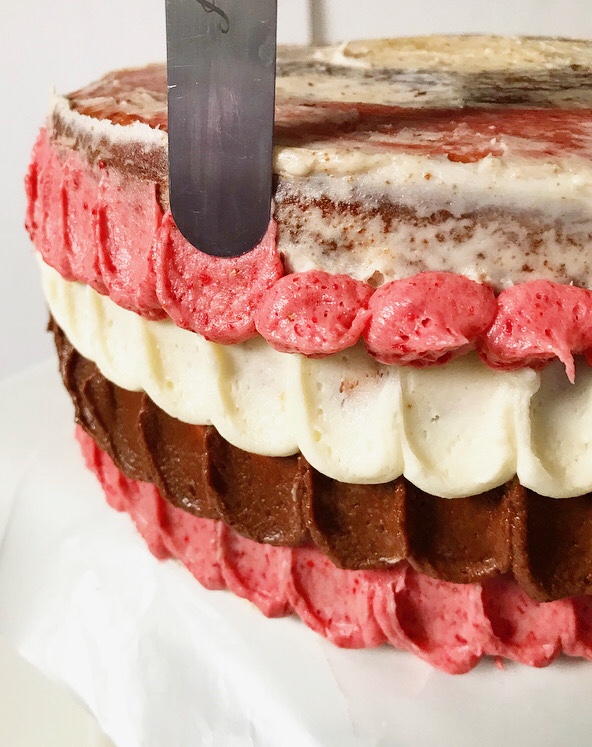


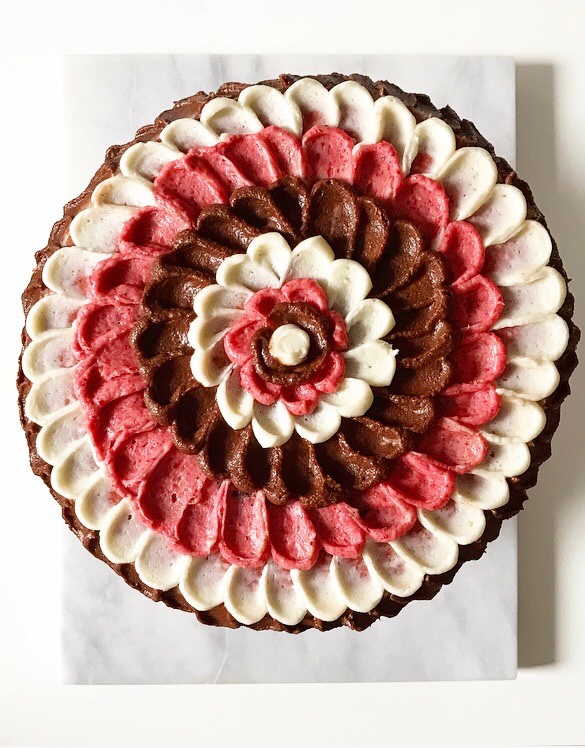 And then decorated in the most fun (and shockingly easy!) ruffle pattern. Or, you know, however you like.
 When all is said and done and sliced and served, all your friends’ minds will be blown at your Neapolitan Cake prowess. As they freaking should be.


 I must have a thing for sweetened condensed milk right now—this is the third post in a row that requires cracking open a can of the good stuff.
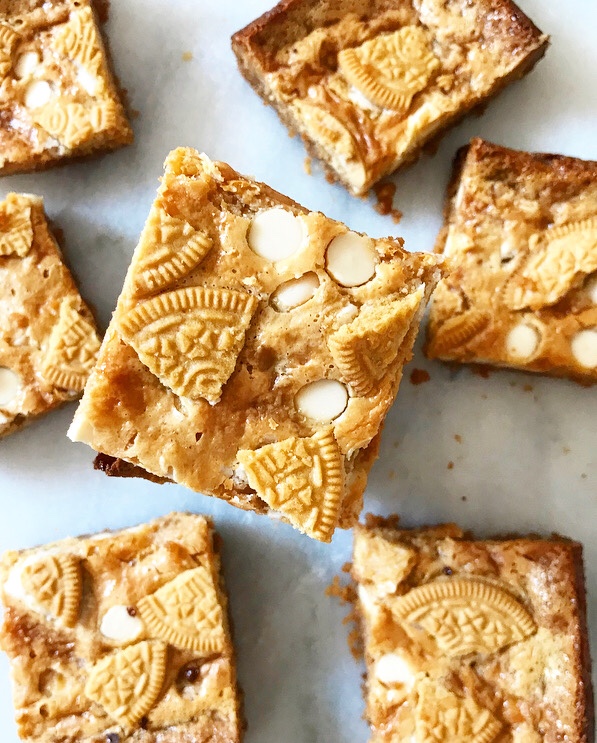 Can you blame me? It’s just so versatile! If you want something to be smooth, creamy, or structurally sound without a million ingredients, sweetened condensed milk is probably the ingredient you want. See exhibits
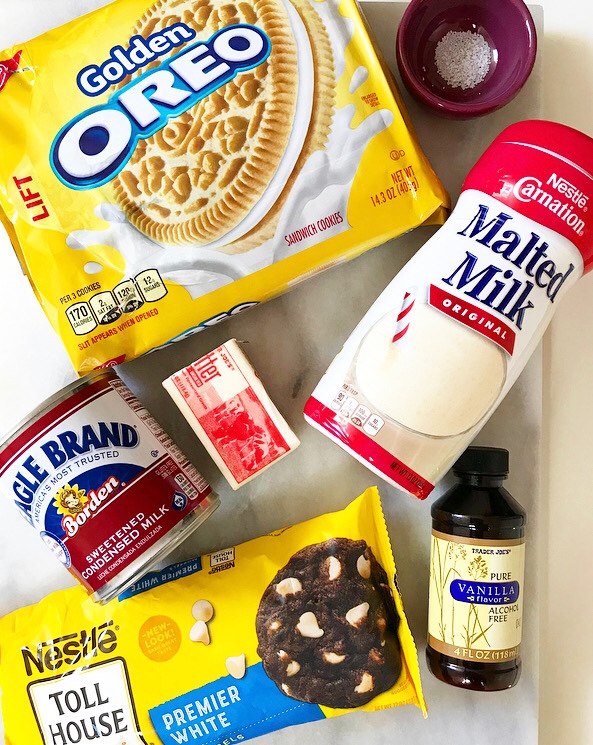
 Sweetened Condensed Milk is probably most popular as the key ingredient in Magic Bars (aka 7 Layer Bars, aka Hello Dollies). In those, it acts as a soft, chewy filling and a vehicle for various chocolate chips, nuts, and coconut. I don’t currently have a recipe for traditional Magic Bars—rest assured, you can find a million of them online—but I have taken the basic formula and put it on a
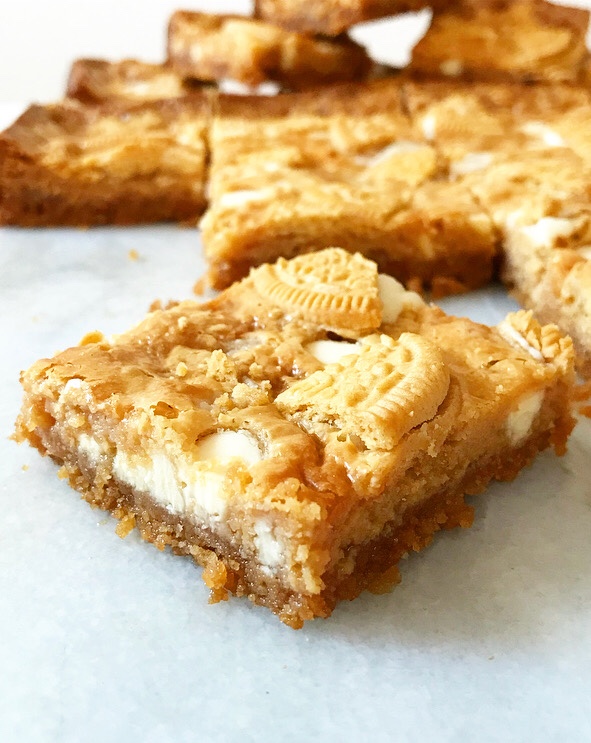
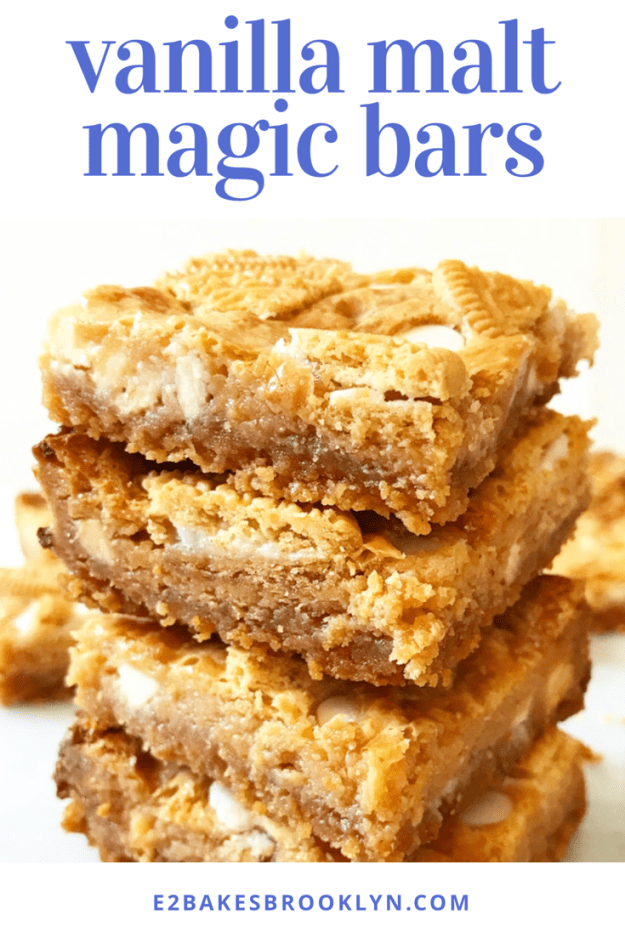
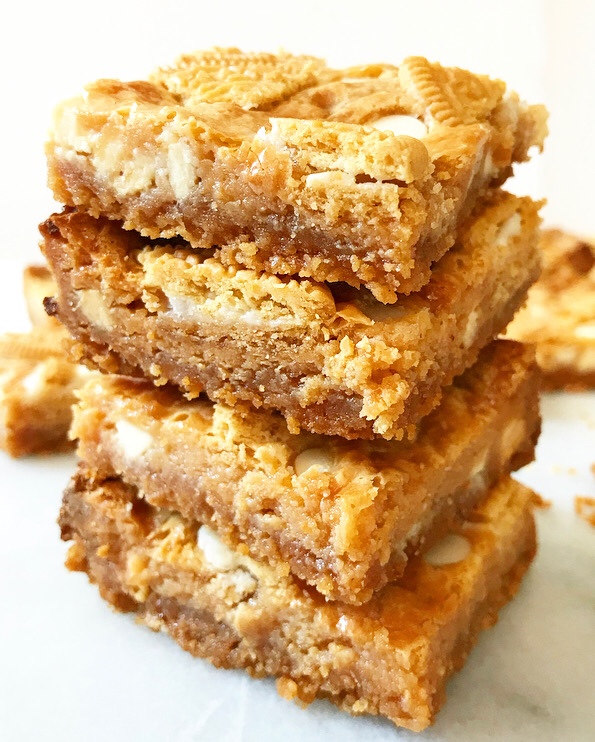
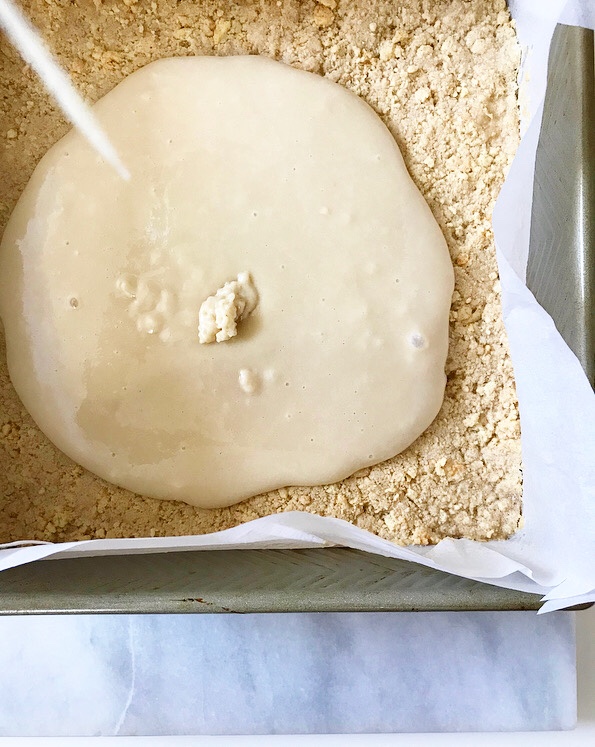
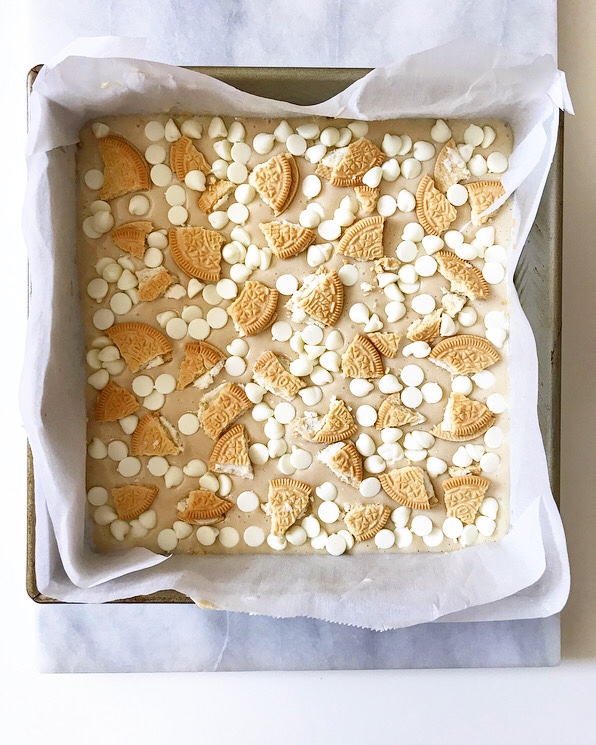
  That’s right—Vanilla Malt Magic Bars, y’all! They’re soft and chewy with a big vanilla malt flavor and a buttery cookie crumb crust. The filling is studded with white chocolate chips and broken pieces of Golden Oreo, and the tops are ever so slightly crackly thanks to the way sweetened condensed milk caramelizes in the oven.
 These bars require just seven ingredients and come together quickly and easily…again, because sweetened condensed milk makes things a snap.
 Oh, and they stay soft and delicious for days on end because…well, you know.