Aaaaand we’re back! As is my January blogging tradition, this month will be less about dessert and more about savory foods and weeknight meals—the “normal” stuff. One cannot live on holiday cookies alone (but lord knows I’ve tried).
To start us off, something I make all the time: eggs! Nary a week goes by when I don’t slap an egg on something and call it breakfast, lunch or dinner. In addition to being power-lifters in baking, eggs are an inexpensive, versatile, quick-cooking protein. I always have a couple dozen around!
Today, I’m going to walk you through how to make eggs five ways: scrambled, fried, poached, hard-boiled and soft-boiled. Why so many methods? Because I like options! Sometimes I want a delicate poached egg, other times a creamy hard-boiled egg is the ticket. It’s nice to know how to make ‘em both.
I have written all the instructions and proportions based on large eggs, which are what I keep for both baking and eating. If you are using medium or extra-large eggs, you may need to adjust some cook times. I’ve also written each method to reflect using only two eggs (what I usually eat), but the recipes can be multiplied unless stated otherwise.
While I know there are approximately 742 ways to scramble, fry, poach, and hard- and soft-boil eggs, these are the methods that have consistently worked for me. If you have tips or methods that work for you, please let me know in the comments or on social media! Oh, and let me know your favorite thing to throw an egg on! #putaneggonit am I right?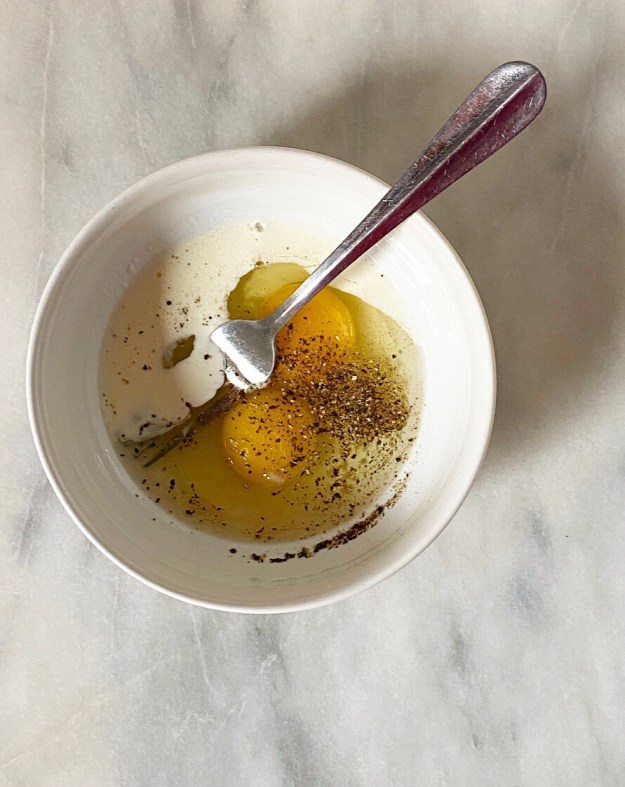

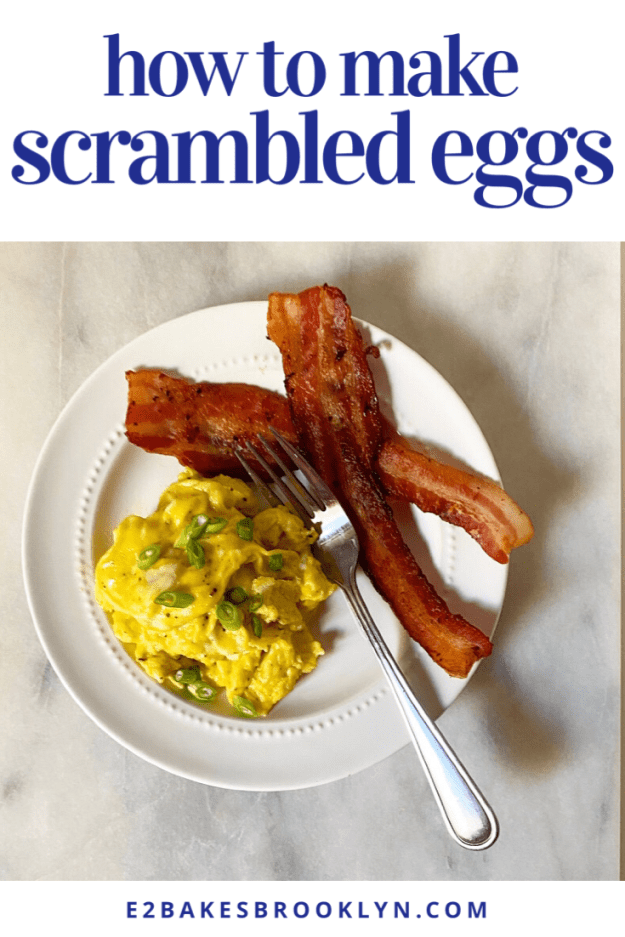
 Scrambled Eggs
What they are
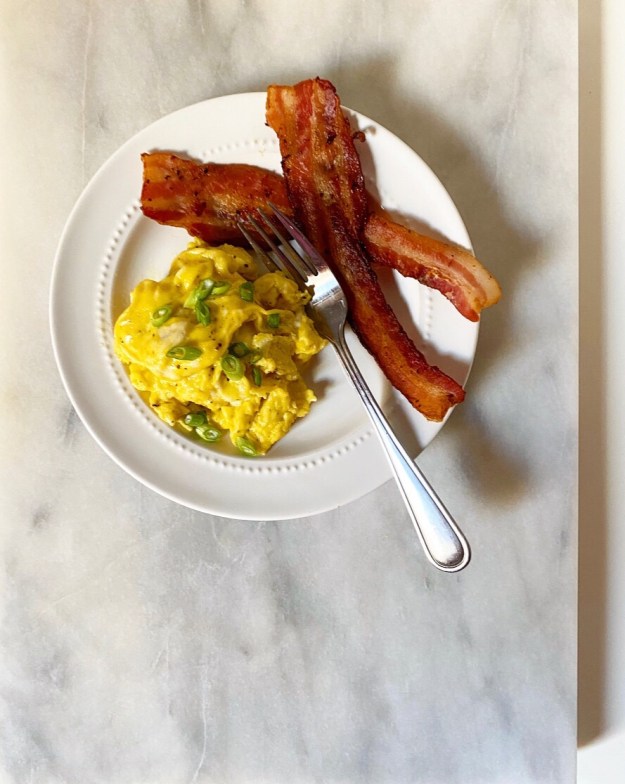
Eggs that have been beaten with cream, salt and pepper, until fully combined, then cooked low-and-slow, until fluffy, but not browned.
What you’ll need
2 large eggs
1 1/2 teaspoons heavy cream
pinch of salt (I use a scant 1/8 teaspoon fine sea salt)
a few grinds of black pepper
1 tablespoon butter, for cooking
How to make them
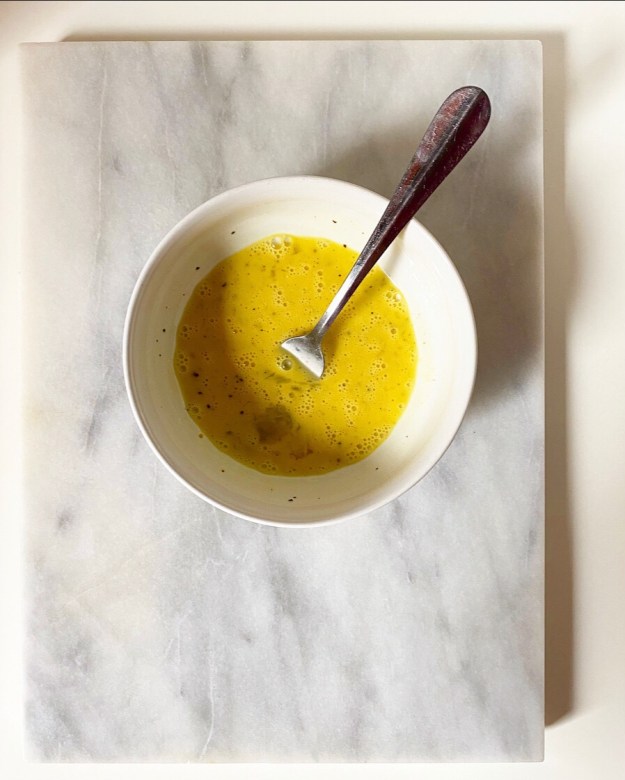
In a small mixing bowl, combine eggs, heavy cream, salt and pepper. Use a fork to whisk together until combined and even in color.
Heat a small-medium skillet over medium-low heat. Add butter and swirl to melt. It may foam a bit; just wait for any dramatic bubbling to subside.
Pour in eggs. Using a spatula, start at the outer edge of the pan and push the runny egg toward the center of the pan. Repeat this motion, moving your way around the pan over and over until large curds form. I recommend pulling the eggs off the heat when they still look a tiny bit underdone, so as not to overcook them. They will finish cooking off the heat (“carryover cooking”). Serve.
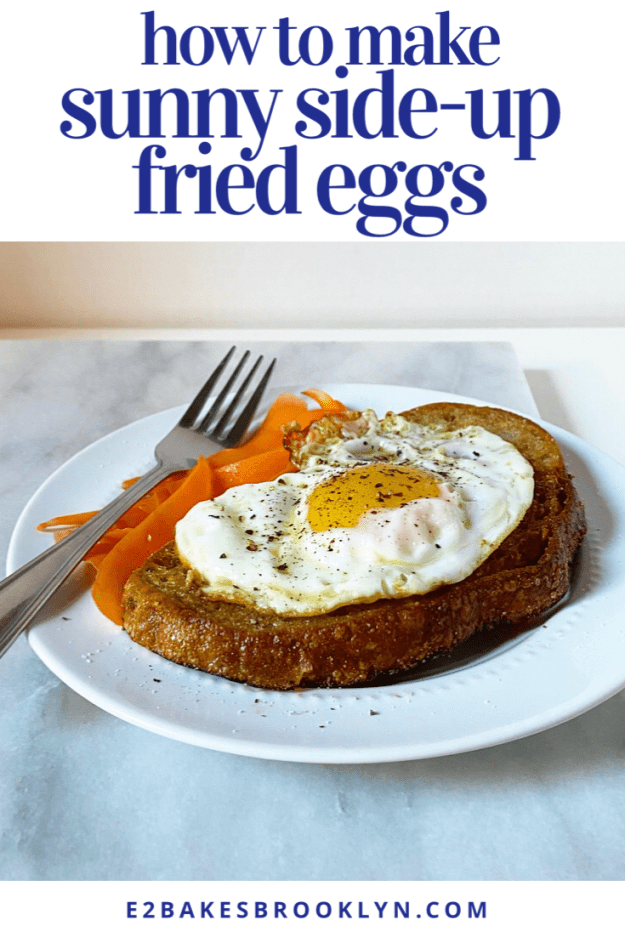
 Sunny Side-Up Fried Eggs
What they are
Eggs with yolks and whites still intact that have been quickly fried in oil (or butter, although I don’t care for the appearance of cooked milk solids on my fried eggs). The edges get lacy while the yolks stays runny and golden. They are called sunny side-up because the yolk resembles a bright golden sun.
For those concerned, there is no need to worry about the dreaded uncooked egg whites here—they’re basted with hot oil so that they set before the yolk becomes hard.
What you’ll need
2 large eggs
1 1/2 tablespoons oil (I prefer olive or canola oil)
salt and pepper, for serving
How to make them
Crack eggs into small bowls (one bowl per egg).
Heat oil in a medium skillet over medium heat, swirling to coat. Add eggs and let cook until whites are no longer transparent, but not set. They will sputter and pop quite a bit.
Use an oven mitt to lift/tilt the pan so that the hot oil collects at the edge of the pan, away from the eggs. Use a heatproof spoon to spoon oil over the eggs repeatedly until whites are set and the yolks are still jiggly. Edges should be turning golden.
Immediately remove eggs to plates and serve. I highly recommend garlic-rubbed toast as an accoutrement.
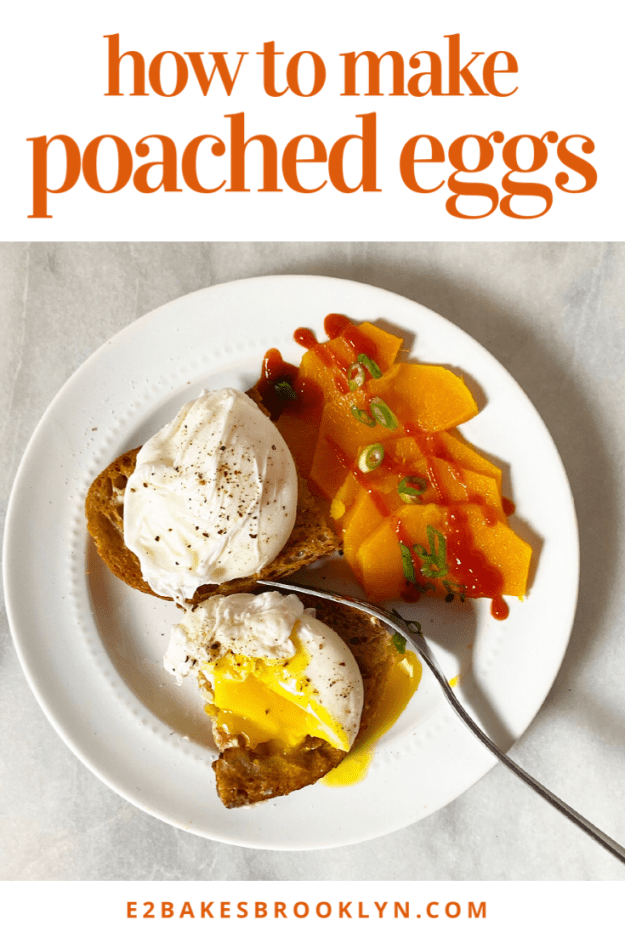
 Poached Eggs
What they are
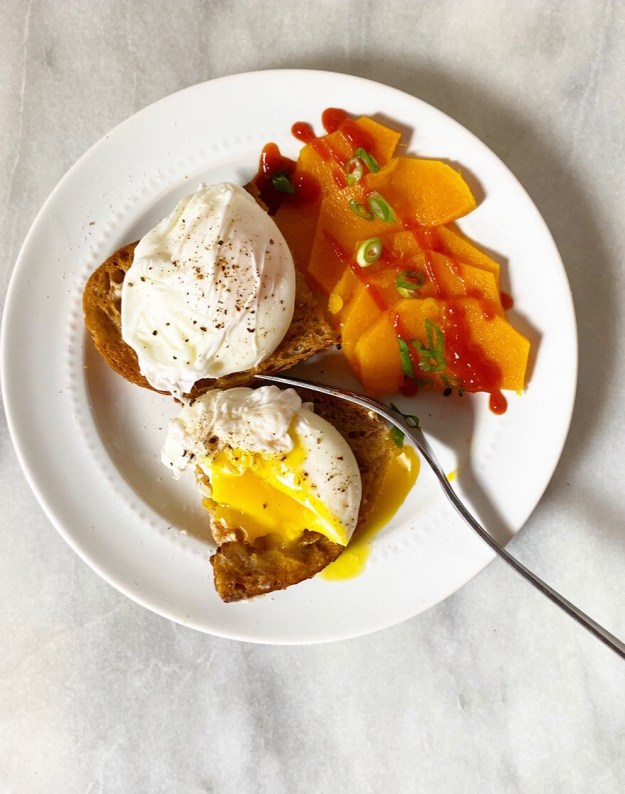
Eggs cooked in simmering (read: not boiling) water until the whites are set and the yolks are still runny, or otherwise cooked to your preference. Although it’s optional, I like to add a splash of vinegar to the water to help the whites set.
I do not recommend making more than 3 poached eggs at a time, as they are extremely time-sensitive. Nothing’s worse than chasing one around the pan with a slotted spoon, only to find that it’s over-cooked!
What you’ll need
water
2 large eggs
a splash (~1 teaspoon) white or apple cider vinegar (optional)
salt and pepper, for serving
How to make them
Fill a 4-quart pot 1/2-2/3 full of water and bring to a boil over high heat.
Crack egg(s) into small bowls (one bowl per egg). Line a small plate with paper towels.
Once water reaches a boil, reduce heat to medium or medium-low, so that it’s at a simmer. Add vinegar, if using.
Working quickly with one egg at a time, bring the bowl close to the surface of the water and pour it in. Immediately drag a slotted spoon under the egg to lift it slightly (this keeps it from sticking to the bottom and has the added benefit of helping the white wrap around the yolk in a pleasing way). Quickly repeat this process with remaining egg. Let simmer 3 minutes, until the whites are set but yolks are still runny. For harder cooked eggs, add 15-30 seconds to the cook time.
Use a slotted spoon to lift eggs out of the water and onto the paper towel-lined plate to drain. Remove eggs to serving plates and enjoy immediately.
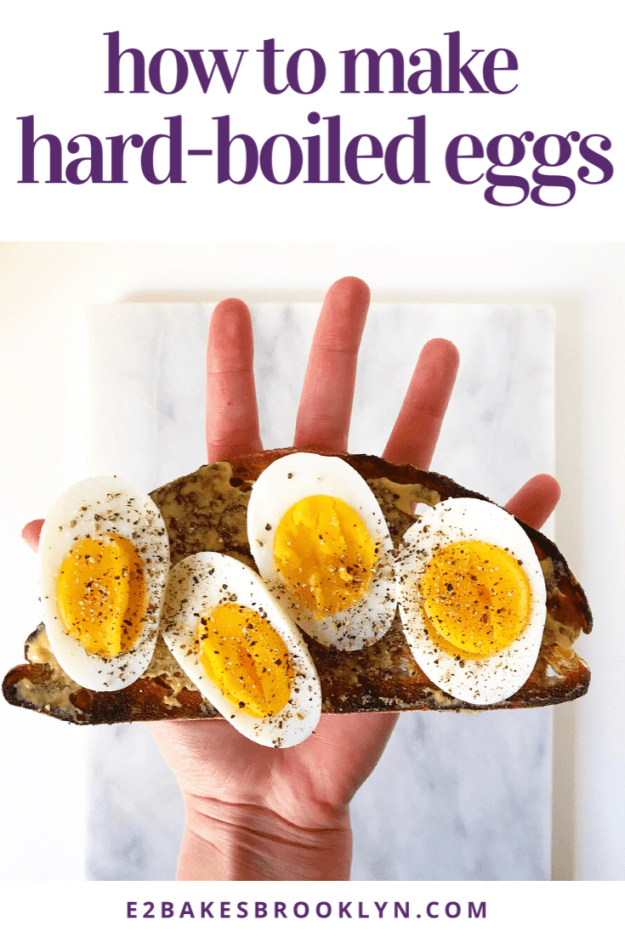
 Hard-Boiled Eggs
What they are
Eggs that have been cooked in their shells until both the whites and yolks are just set. No green-ringed yolks here! These can be made ahead and refrigerated in their shells for up to three days, so they’re great for on-the-go breakfasts or snacks, and making deviled eggs and egg salad, of course.
It’s as quick and easy to make twelve hard-boiled eggs as it is to make two. You can make as many as will fit in your pan.
What you’ll need
2-12 large eggs in their shells (based on need and pan space)
cold tap water
ice
How to make them
Place eggs in a single layer on the bottom of a deep pan. Add cold water to cover by about an inch. Place over high heat and bring to a rolling boil for 1 minute. Remove from heat, but let eggs sit in water for 9 minutes.
While eggs are still in the hot water, fill a bowl with cold water and add lots of ice. When the 9 minutes are up, use a spoon to lift eggs out of the hot water and into the ice bath. Let sit about 10 minutes, or until cooled.
To peel an egg, tap each narrow end of the egg shell on a hard surface, and then gently roll it on the surface to encourage cracking all the way around. Use your fingers to pick the shell away. Rinse with cold water, if needed. Enjoy.
Leftover eggs may be kept in their shells in the refrigerator for up to 3 days.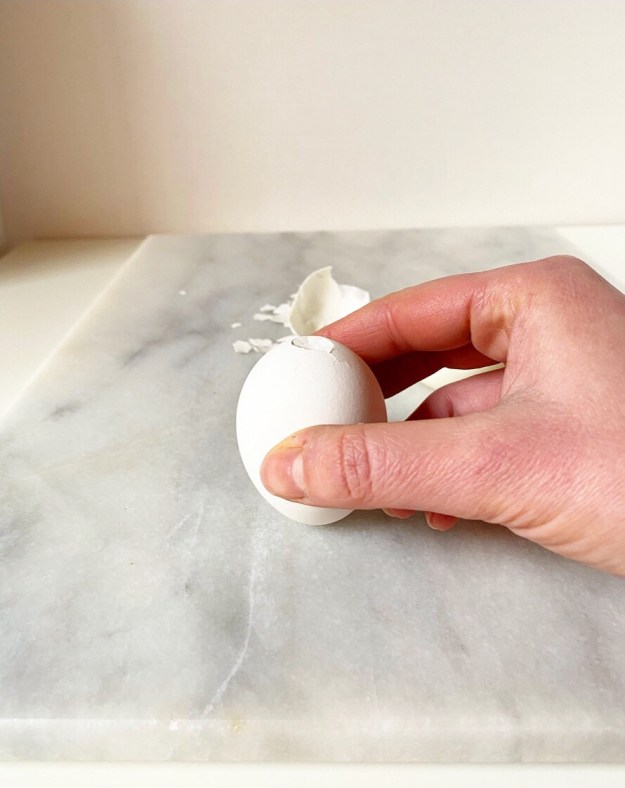

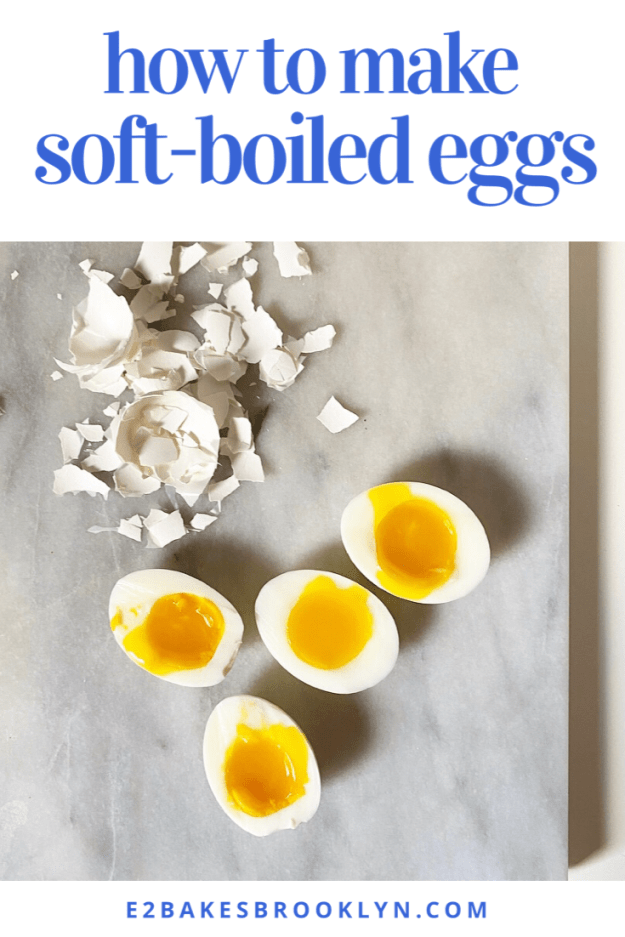
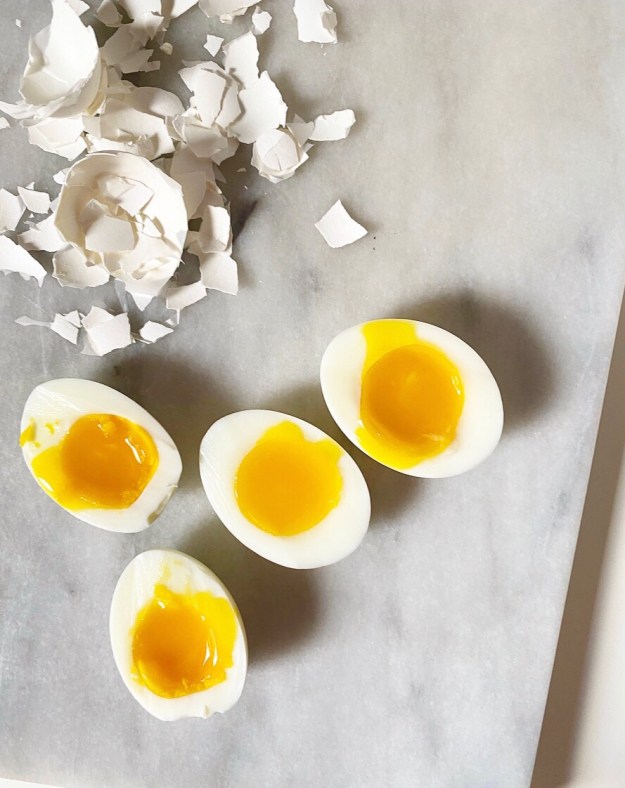 Soft-Boiled Eggs
What they are
Eggs that have been cooked in their shells in boiling water until the whites are just set, but the yolks are jammy. These can be made ahead and refrigerated in their shells for up to three days. These are great on toast, in salads or even in soup (think borscht and ramen).
As with hard-boiled eggs, it’s as quick and easy to make twelve soft-boiled eggs as it is to make two. You can make as many as will fit in your pan.
What you’ll need
2-12 large eggs in their shells (based on need and pan space)
water
ice
How to make them
Fill a deep pan 1/3-1/2 way (so that it’s deep enough to cover an egg). Bring to a boil over high heat. Carefully add eggs and boil for 6.5 minutes.
While eggs are boiling, fill a bowl with cold water and add lots of ice. When the 6.5 minutes are up, use a spoon to quickly and carefully move eggs from hot water to ice bath. Let cool 5-10 minutes, or until you can handle them, before removing from ice bath.
To peel an egg, tap each narrow end of the egg shell on a hard surface, and then gently roll it on the surface to encourage cracking all the way around. Use your fingers to pick the shell away. Rinse with cold water, if needed. Enjoy.
Leftover eggs may be kept in their shells in the refrigerator for up to 3 days.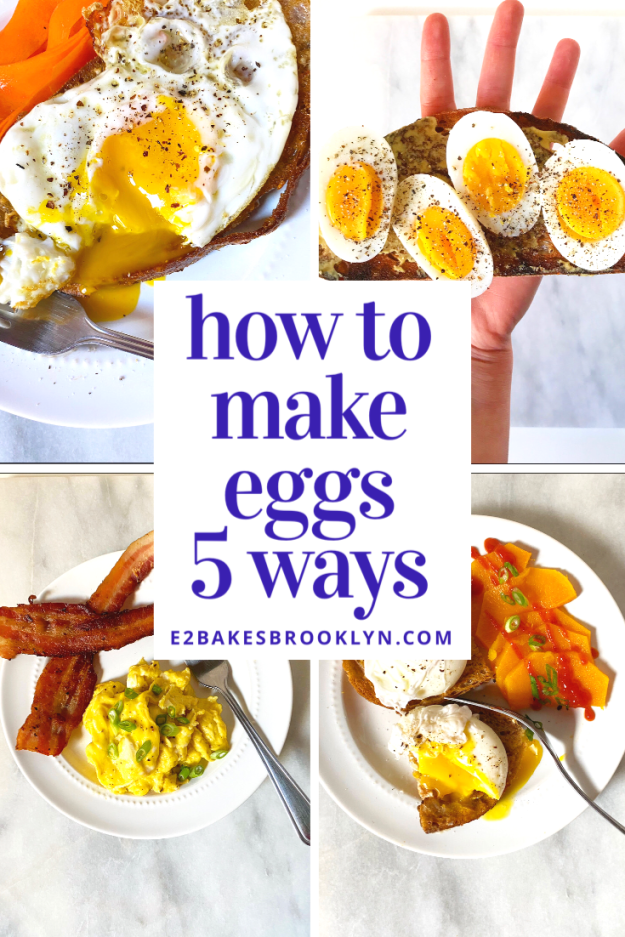
 I had something a bit more complicated planned for today’s post, but due to circumstances beyond my control (number of hours in a day, number of days in a week), I had to take the easy way out.
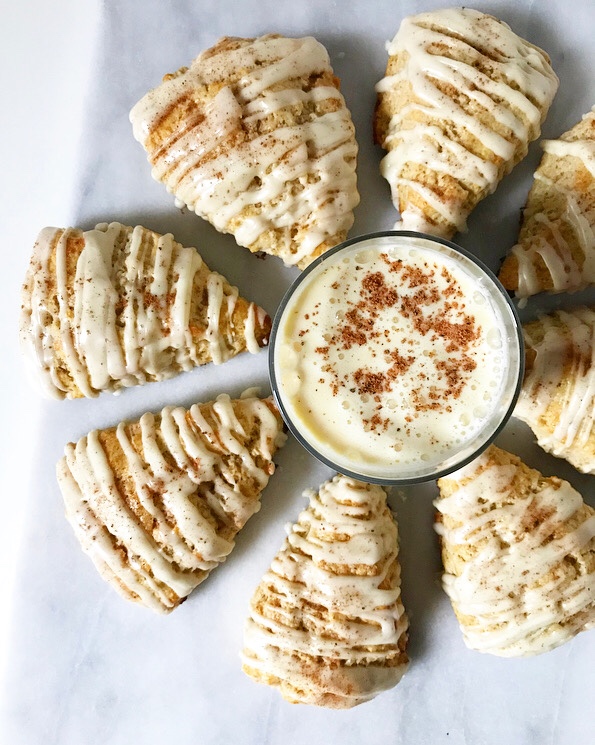
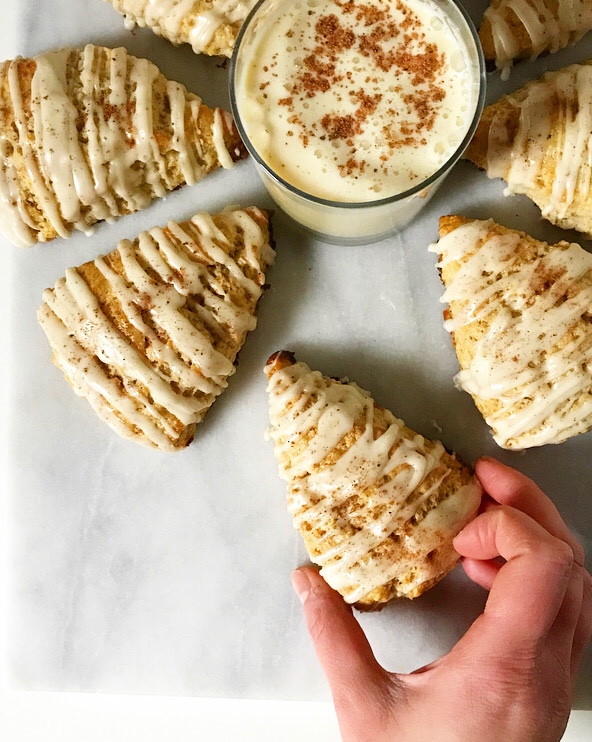 Lucky for all of us, the easy way out is through a warm batch of Eggnog Scones.
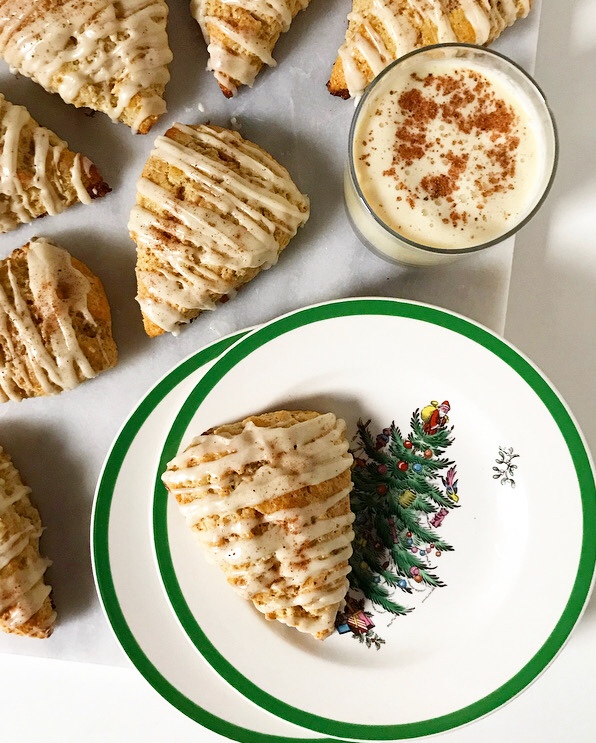 Y’all, these are goooood. We’re talking 8 springy, nubbly-edged breakfast treats made with eggnog and then topped with eggnog glaze—what’s not to love.?! I am not a fan of eggnog in its liquid state, but mix it into dough or whirl it into glaze and add warming spices, and I’m suddenly *very* interested.
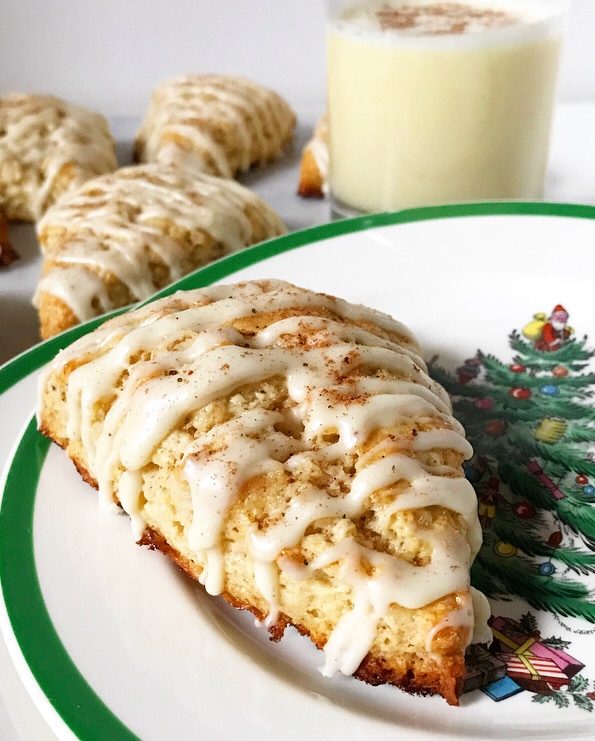 As with nearly all scones, these are a breeze to make. The dough comes together in ten minutes and bakes in fifteen. The glaze is technically optional, but it’s a snap to whisk up while the scones are cooling, and it’s delicious, of course. Creamy and lightly spiced, it’s the perfect accompaniment to the not-too-sweet scones. And that’s to say nothing of how satisfying it is to drizzle over the tops!
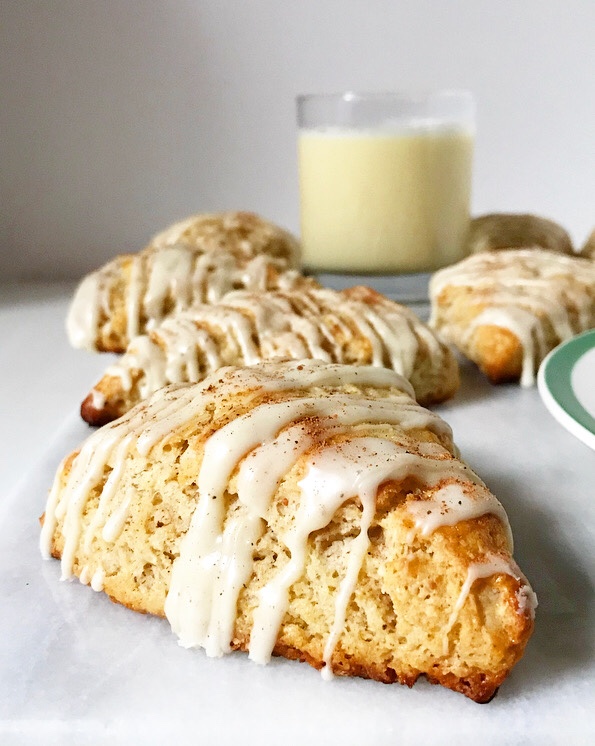 Speaking of satisfying, eating one…or one and a half…or two…of these with a big cup of coffee is, like, the best way to start a holiday morning. I’ve been so busy since I returned home from Thanksgiving that I keep forgetting that Christmas is almost here. When I’m eating an Eggnog Scone though, the holiday cheer is real. Real delicious, that is.
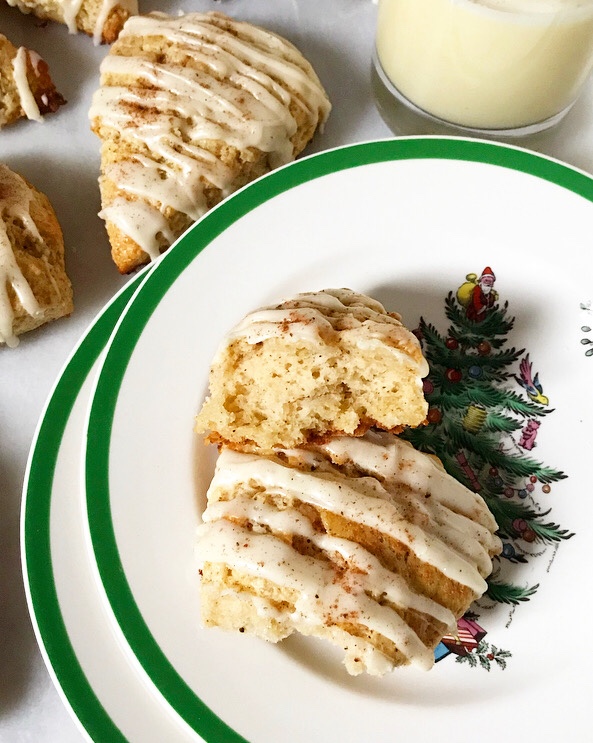


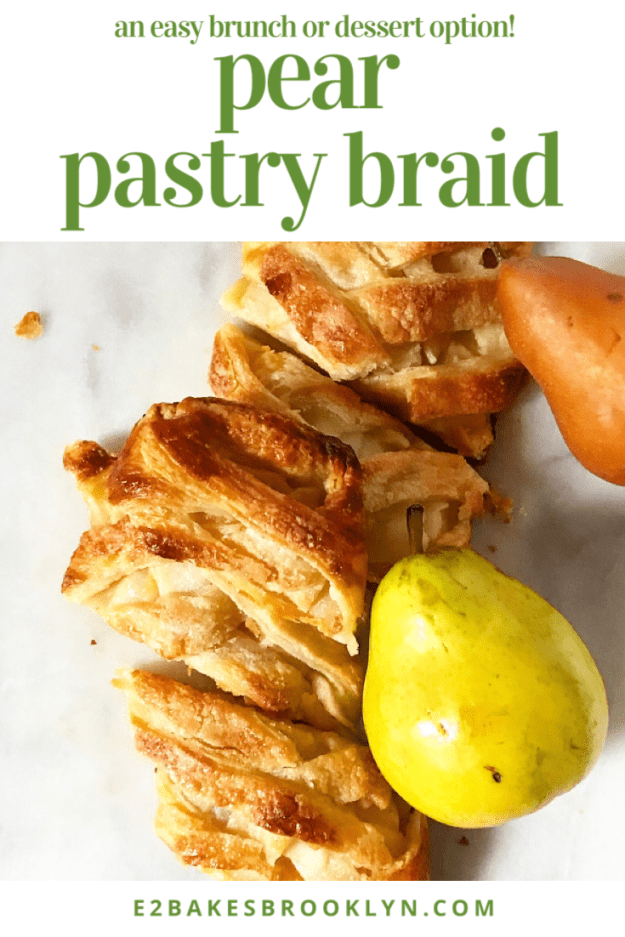
 It’s almost time for pie. Almost.
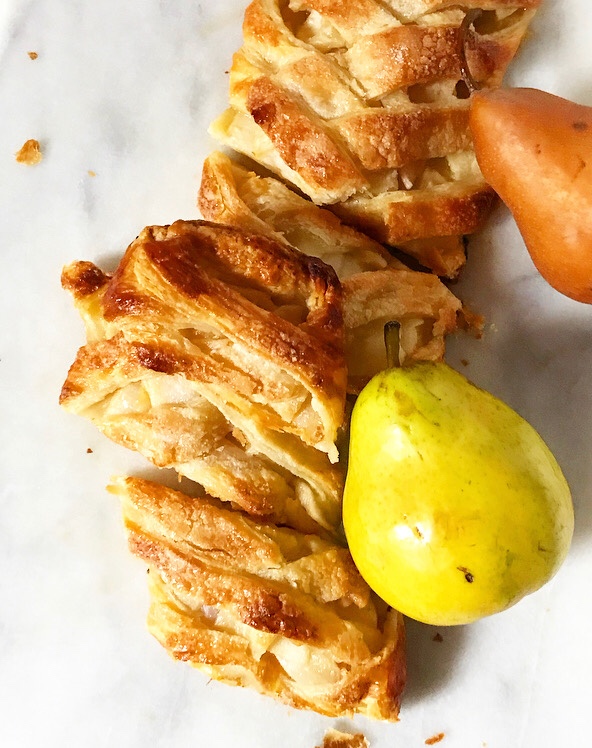
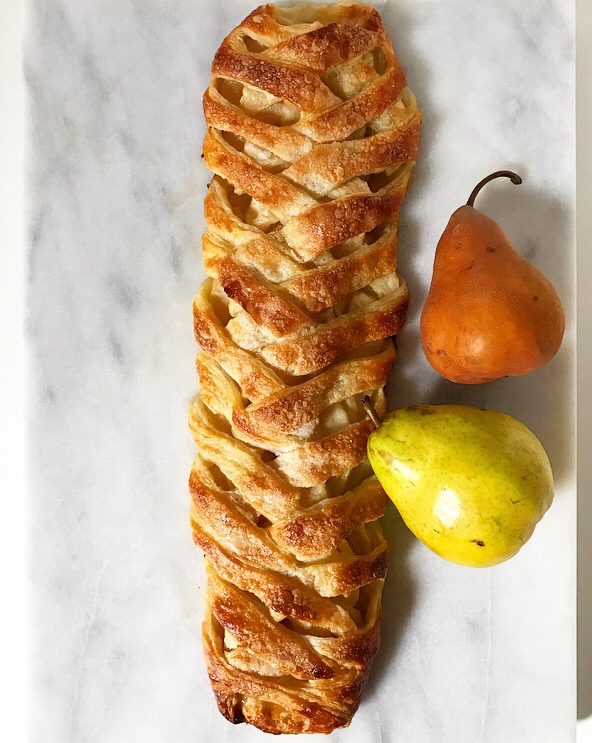 I mean, do you see this beautiful thing? Is it brunch food? Is it dessert? I don’t know. I don’t make the rules. I just make the pastry.
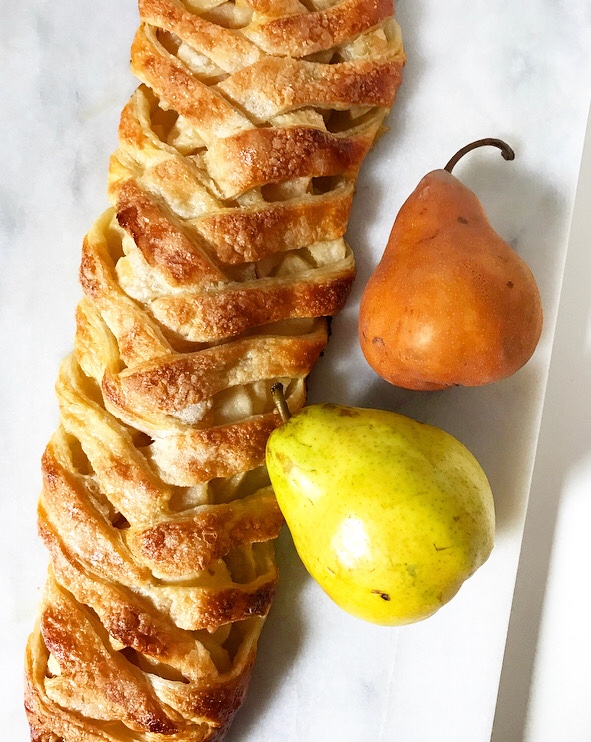 And oh, is this a good one. Pear Pastry Braid is super buttery and filled with tender pears that have been tossed with ginger, lemon, and a few tablespoons of sugar. Yum!
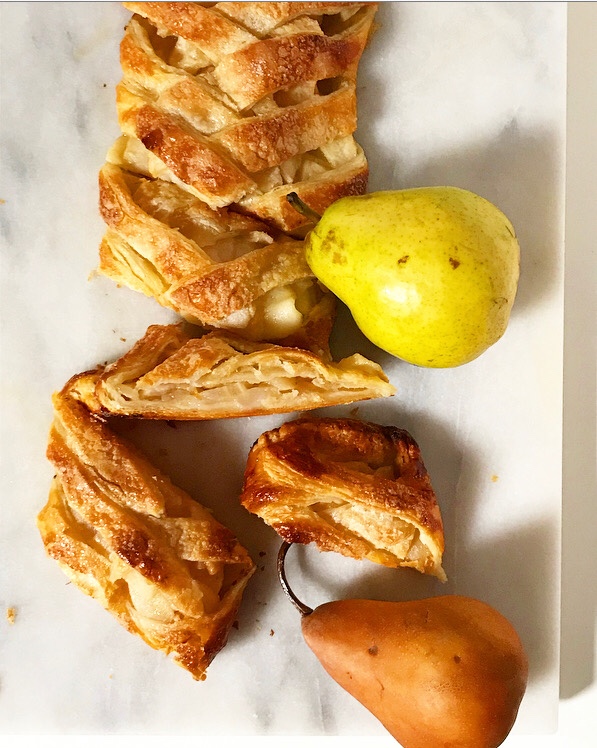 Don’t let these glamour shots deceive you–it’s surprisingly easy to make. Simply roll out a sheet of rough puff pastry (or the frozen thawed all-butter stuff), make a bunch of diagonal cuts down both long sides and fill the center with sliced pear filling.
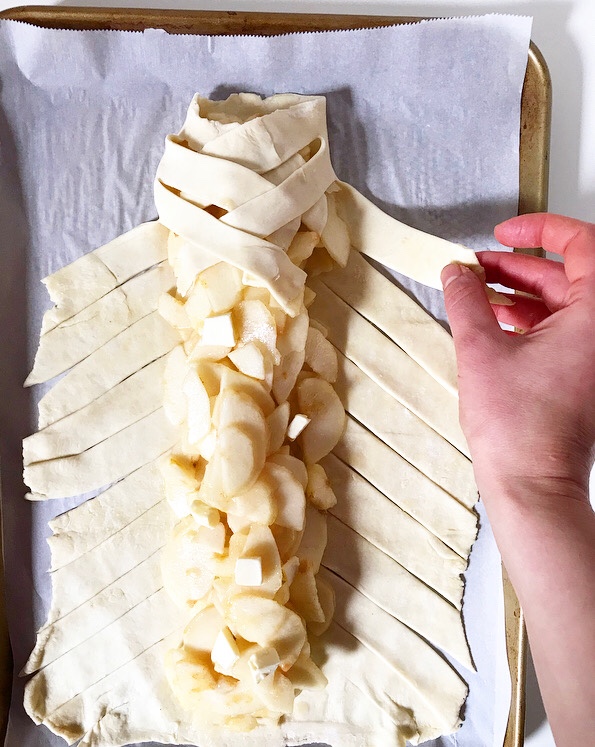
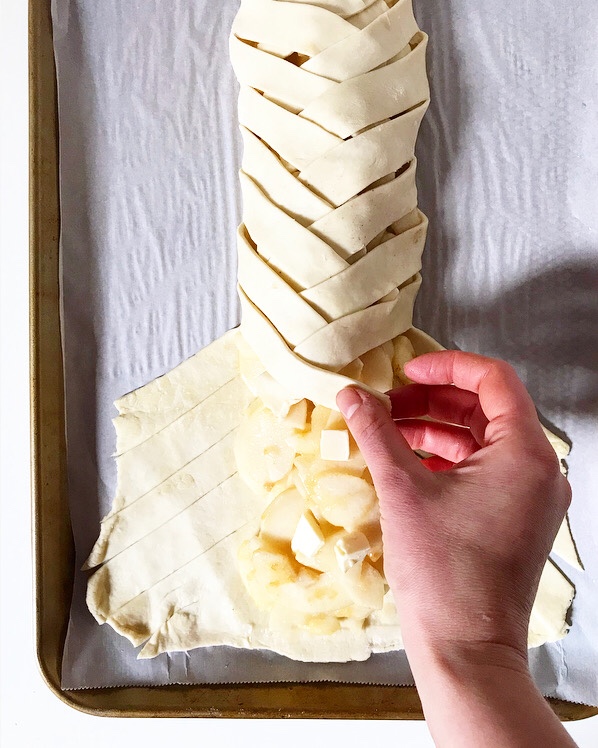 Alternating sides, carefully cover the filling with overlapping strips of dough, producing a braid-like appearance. Give it a brush of egg wash and a sprinkle of sugar, and then let it bake til golden.
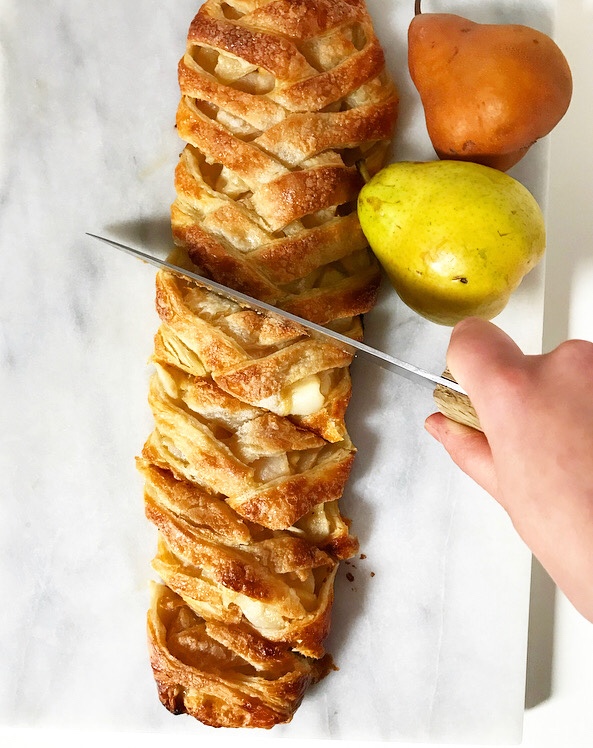 Sounds like a lot, but the time from when you start peeling pears to when you pull the finished pastry out of the oven is less than an hour. It can be sliced and served warm too, meaning that you don’t have to plan crazy far in advance (especially if you already have the pastry dough in the fridge). There’s so much planning around food this time of year that it’s kind of nice to have something you can make when the mood strikes or when someone says they’re going to pop by.
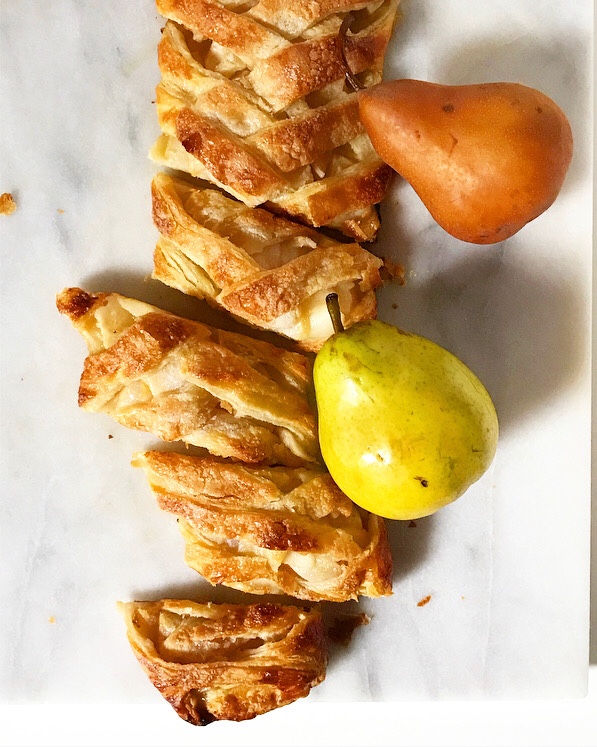 You know what else is nice? Eating a slice of sweet, flaky Pear Pastry Braid in your pajamas on a Saturday morning. Or a Saturday night. Or both.


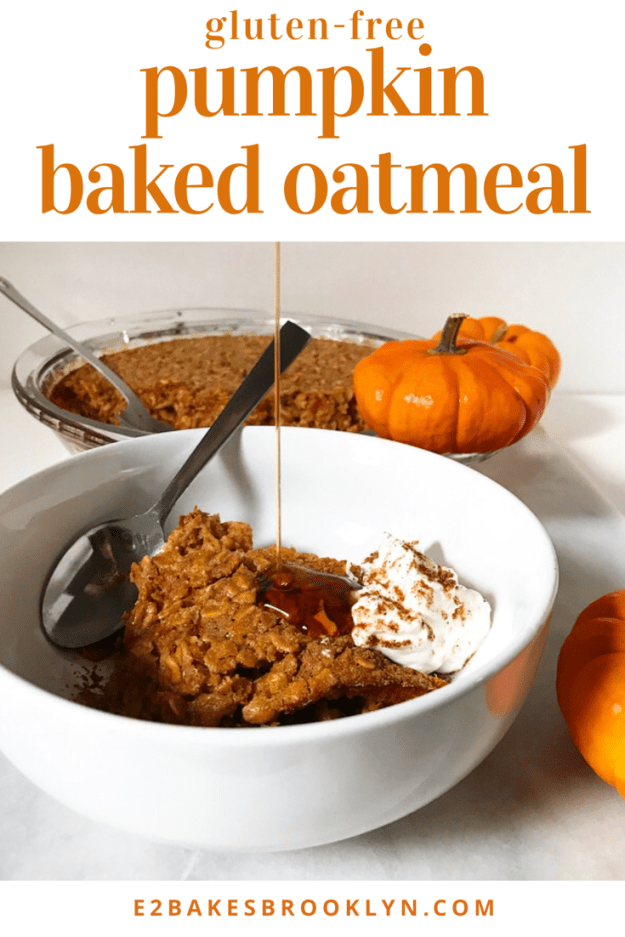
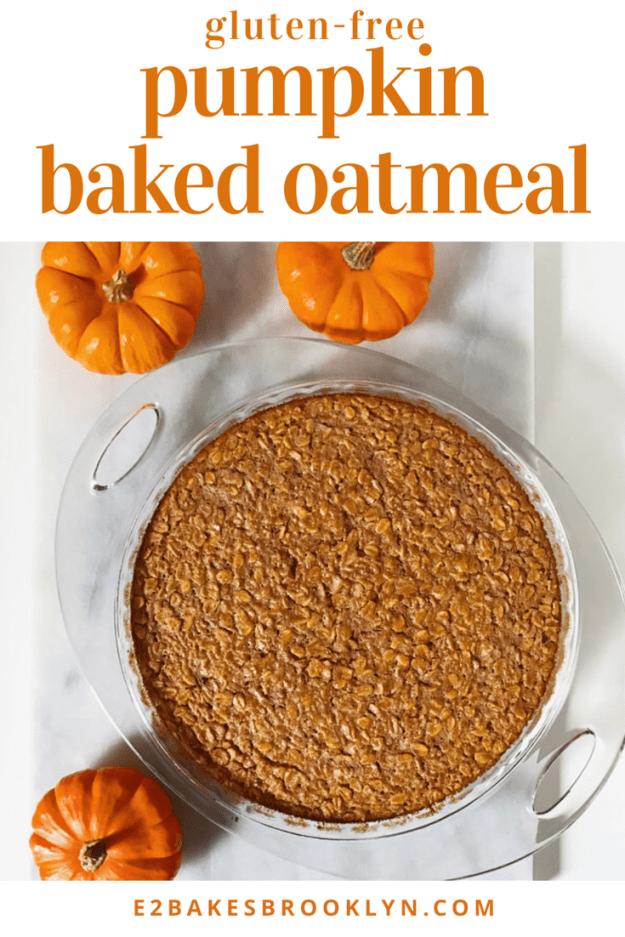
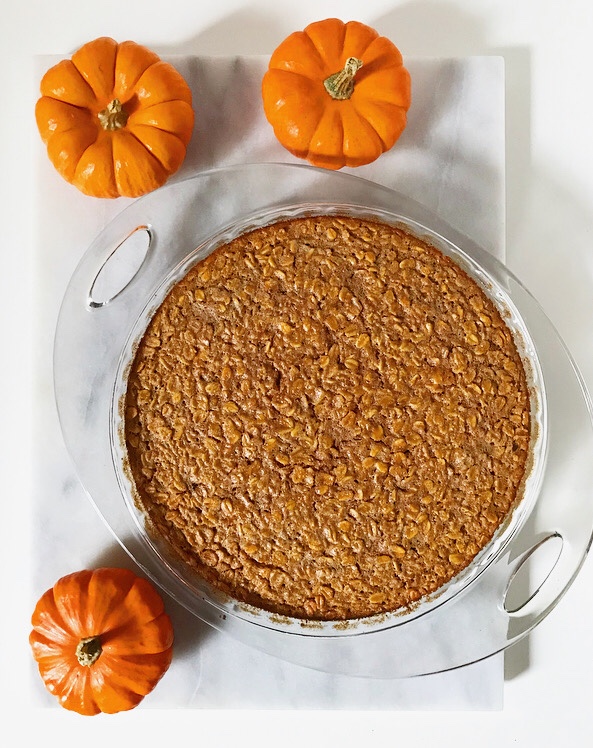 Some foods are easier to photograph than others and…well…
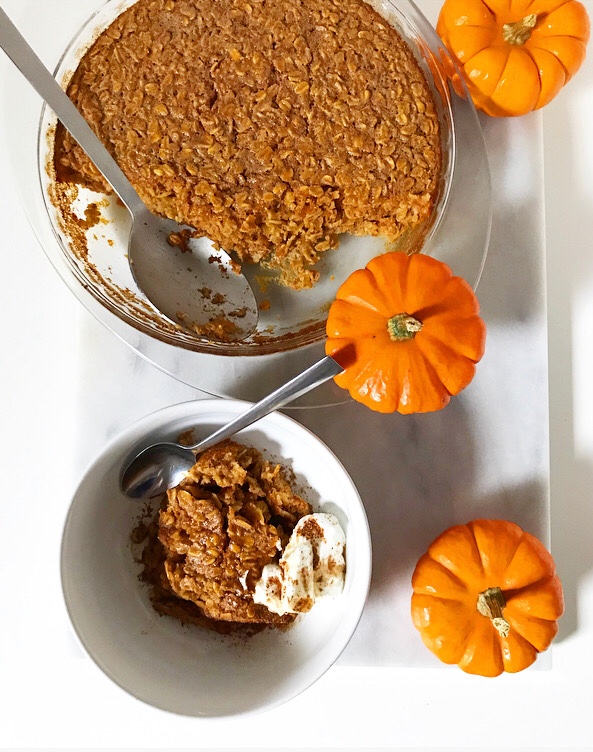 That said, what baked oatmeal lacks in aesthetic appeal (dull brown and lumpy 😬😬) it more than makes up in delicious whole grain flavor. This one is especially enticing—it’s made with a hefty scoop of pure pumpkin purée and big hit of pumpkin pie spice for maximum seasonal breakfast magic.
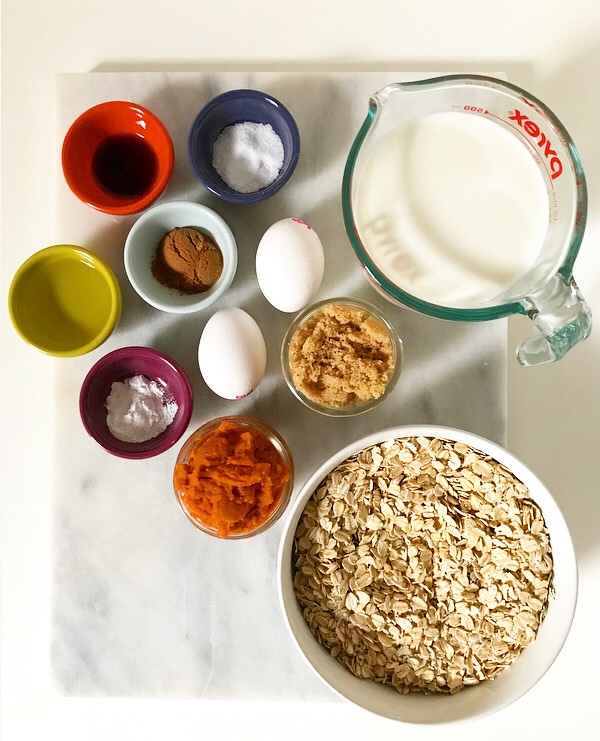
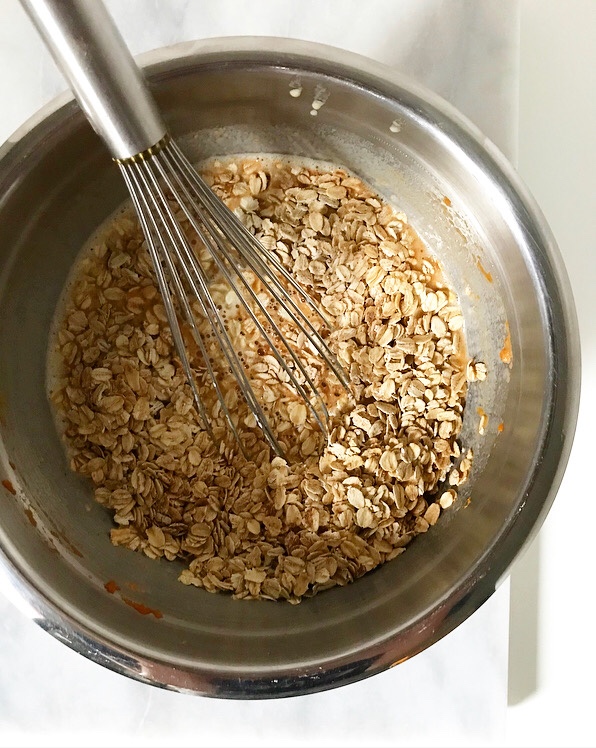
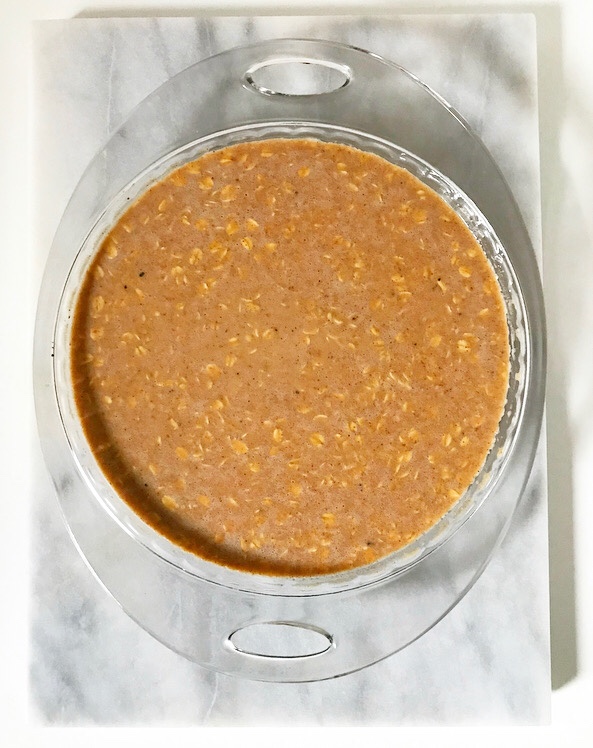
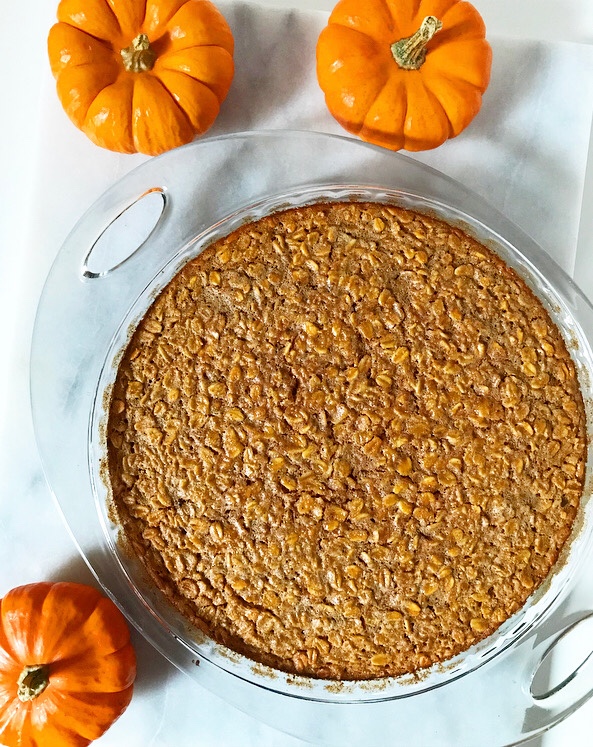 It’s also very easy to make. The most difficult (if you can even call it that) step is toasting the oats, and that requires little to no actual brain power. Just scatter the oats onto a pan, put them in the oven, and set a timer. Boom. Done.
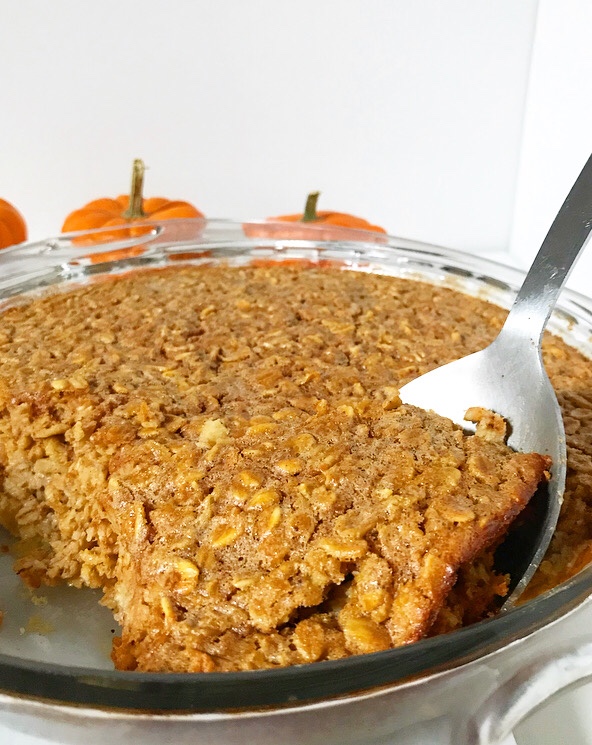 My favorite thing about Pumpkin Baked Oatmeal? It reheats like a dream! This, in addition to being filling and fairly good for you, makes it perfect for weekday breakfasts. Just heat individual portions as needed and enjoy.
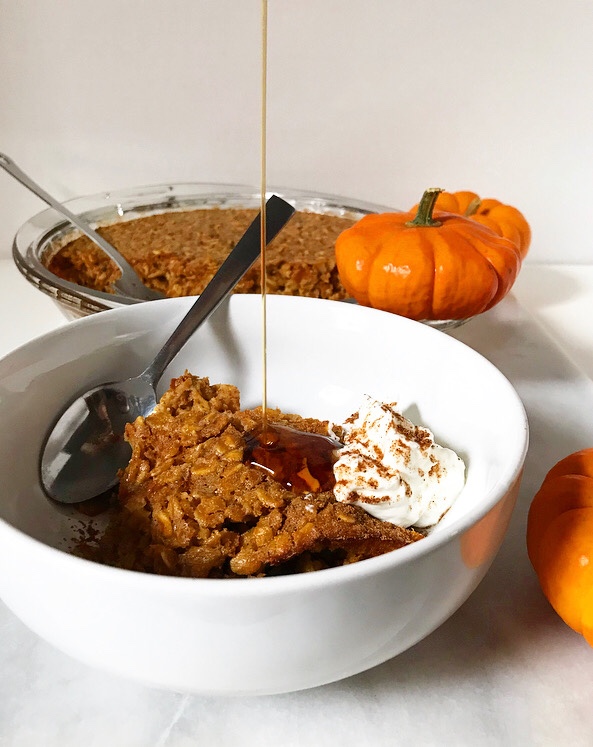 Of course, it’s also a great low-maintenance-but-still-“special” thing to make on the weekends. And I wouldn’t be disappointed to see it over the holidays.
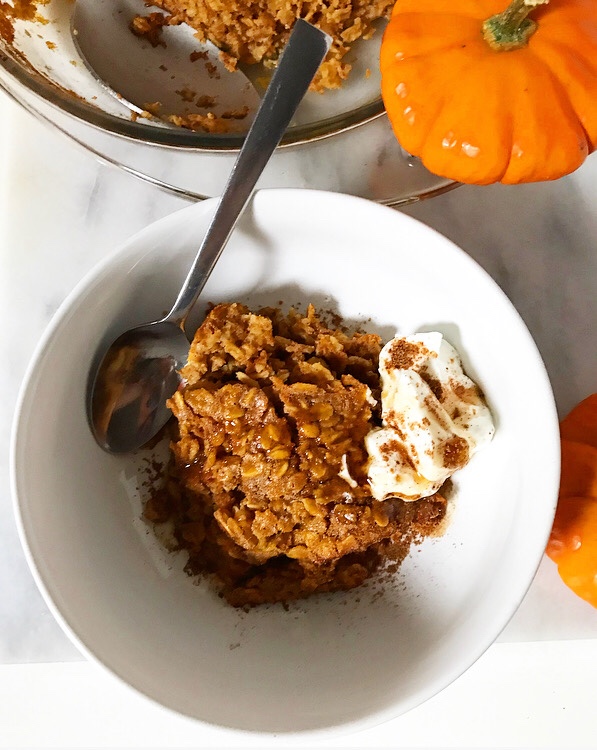
 There’s little rhyme or reason as to what I choose to blog—it’s usually just whatever I’ve felt like making lately. In case you hadn’t noticed, I’ve been on a bit of a breakfast kick. I’m not exactly sure how many fall breakfast options I think you need, but it’s at least three:
 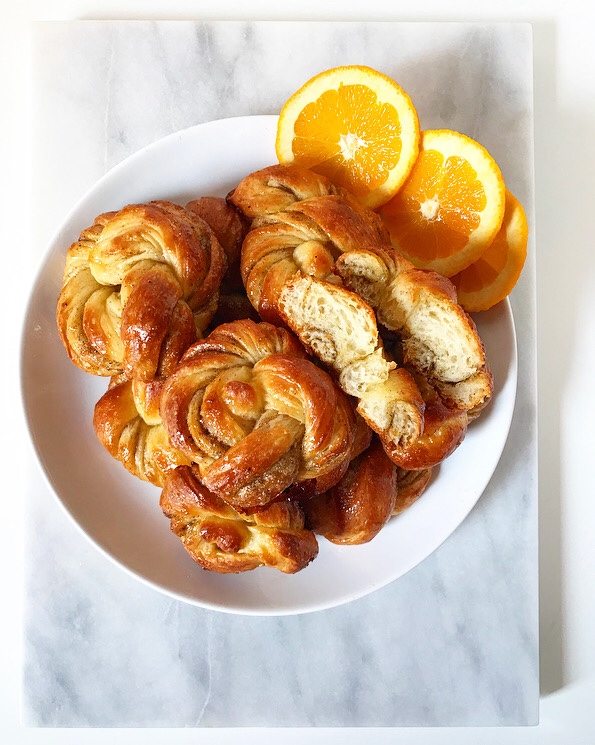 I mean, look at these sticky, swirly things! You need them. I need them. Preferably on Saturday morning alongside my daily French press.
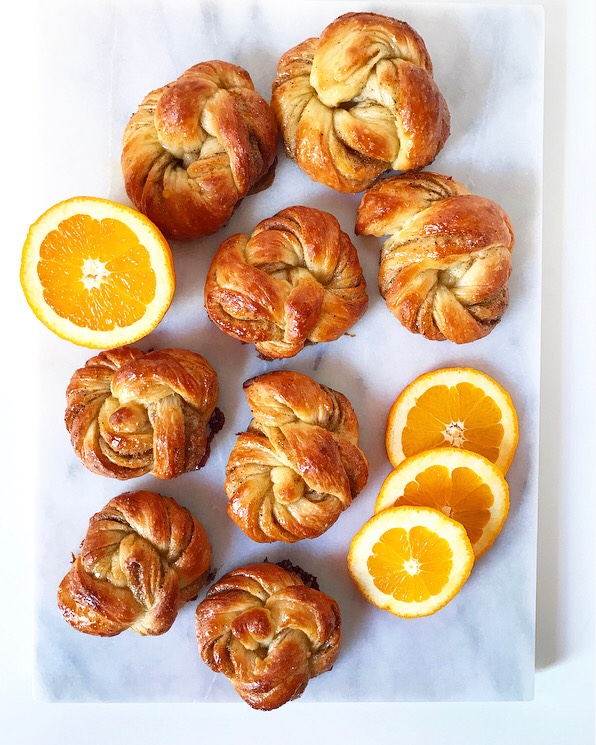 They’re flaky and fluffy, filled with a fragrant orange-cardamom sugar, and twisted to perfection. The crowning glory is a brush of orange-cardamom glaze as soon as the buns come out of the oven, which gives them an extra layer of flavor and their gleaming appearance.
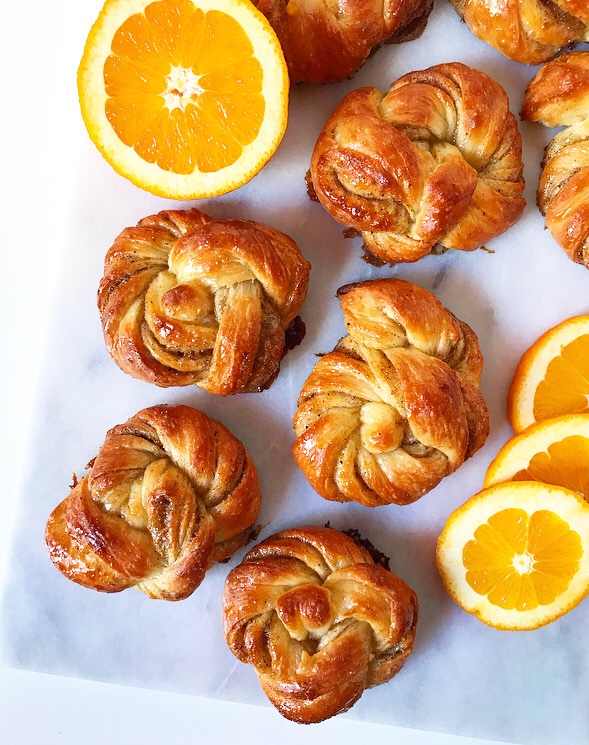 Oh, and they take two hours start-to-finish—a rarity in the from-scratch breakfast bun realm. And their twists? Much easier than they look. My motor skills are seriously lacking (I am comically bad with scissors), so if I can shape them, anyone can.
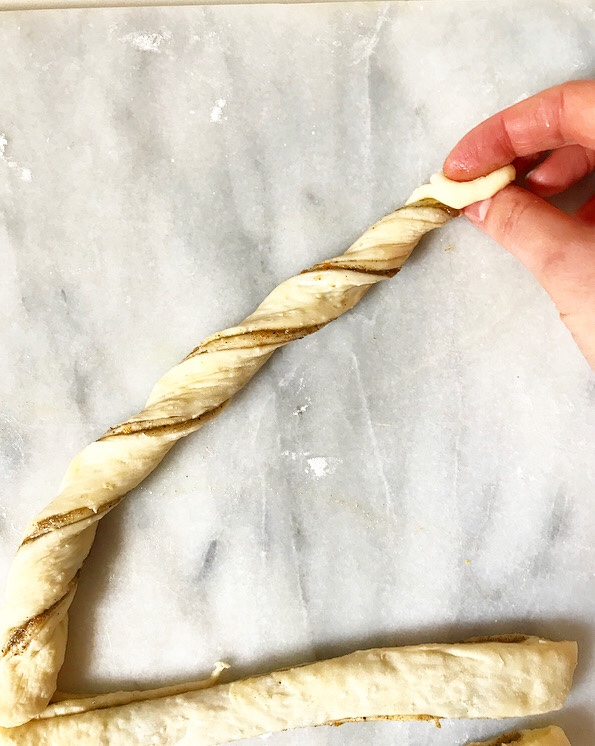

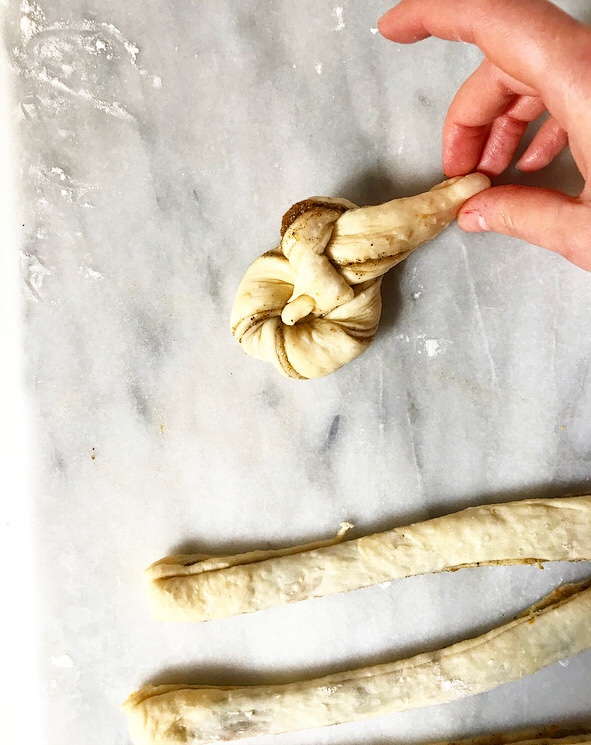
 Just twist a strip of dough and tie it in a knot. Boom, done.
 Even if you do it “wrong” (which is near-impossible), I promise they will still turn out beautifully. And even if they don’t (which is also near-impossible—can you see that I did this with one hand?), call ‘em rustic. That’s what I do. If anyone complains, eat theirs. That’s also what I do.
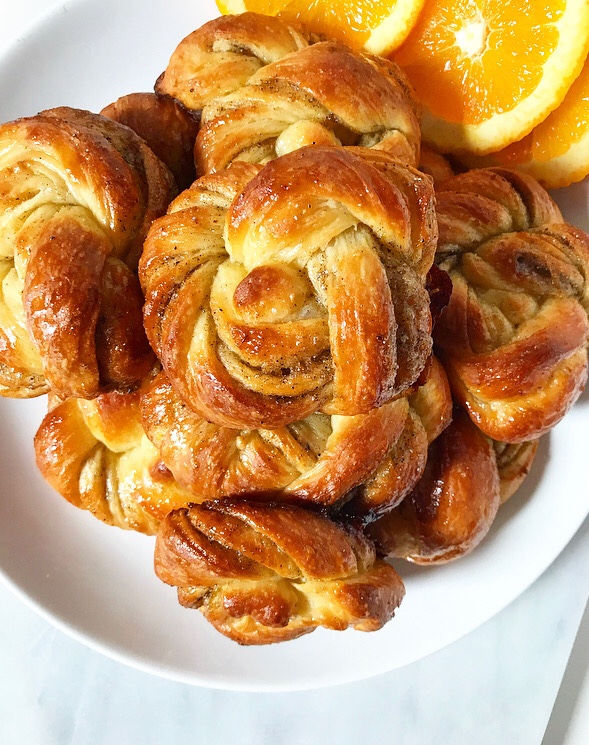 What?! You don’t need that negativity at breakfast.