Oat Crumble Banana Bread

 I almost didn’t share this recipe. Heck, I almost didn’t make this recipe.

Two weeks ago, I received an order for a hummingbird cake, so I went out and bought the necessary coconut, pecans, pineapple, and bananas. But things happen, and I had to cancel four days before the cake was scheduled for delivery; a friend of mine passed, and I was asked to cater the memorial. It was something to which I simply could not say “no.” So the bananas continued to brown, and the first half of the Fourth of July weekend was spent marathon-cooking with my friend, David, going to the service, and making sure all of the 100+ guests were fed. 

I got home Saturday night and noticed the browning bananas on my way to bed, figuring I’d throw them in something the next day. Sunday, my friend Liz came over to make pie, and the bananas were neglected again. I went into work unexpectedly on the Fourth of July, so no baking happened that day. 

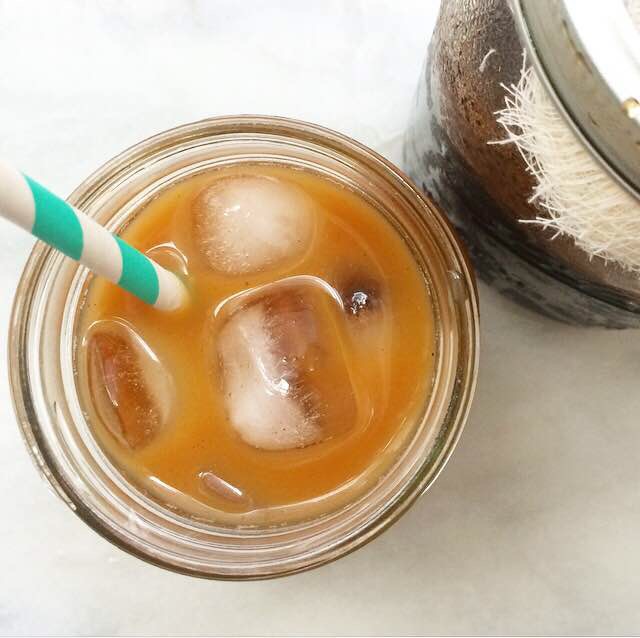
When I went to pour my cold brew on Tuesday morning, I noticed the little bunch of bananas drooping off my baker’s rack, brown and visibly soft, seemingly minutes away from being inedible. And so I peeled and mashed all four and gently stirred them into banana bread batter. I poured it into a loaf pan with every intention of keeping it plain…but that’s not really my style. Classic banana bread is great, but I’m the kind of baker who loves to add cinnamon swirls, layers of cheesecake, or at the very least, a handful of chocolate chips anywhere I can. But it’s hard to add any of that stuff once the batter’s in the pan and the oven is making your kitchen a sauna. I was about to tap the pan on the counter and slide it into the oven, but then I paused, grabbed a half-stick of butter I had leftover in the fridge, a canister of oats, and some walnuts, and mixed up a quick crumble to sprinkle over the top before baking. 

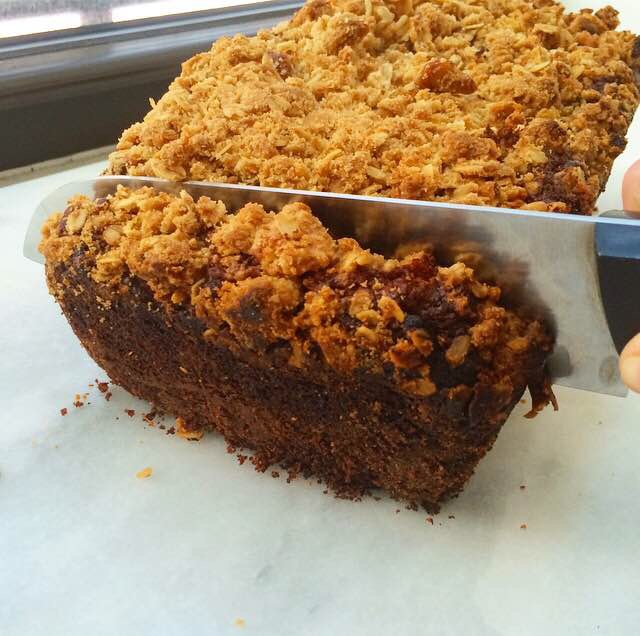
When I took the loaf out of the oven, I had no intention of posting the recipe. The oat crumble had huge, beautiful clusters, my whole apartment smelled of cinnamon and bananas, and I couldn’t wait to have a slice before heading to work, but who really needs another banana bread recipe? Once you have a good one, you make it over and over, forever-and-ever-amen. I already have a whole wheat version on here, and I wasn’t planning to add another anytime soon. Plus, I had a lemon cake on the docket. Again, I was not going to post this recipe. 

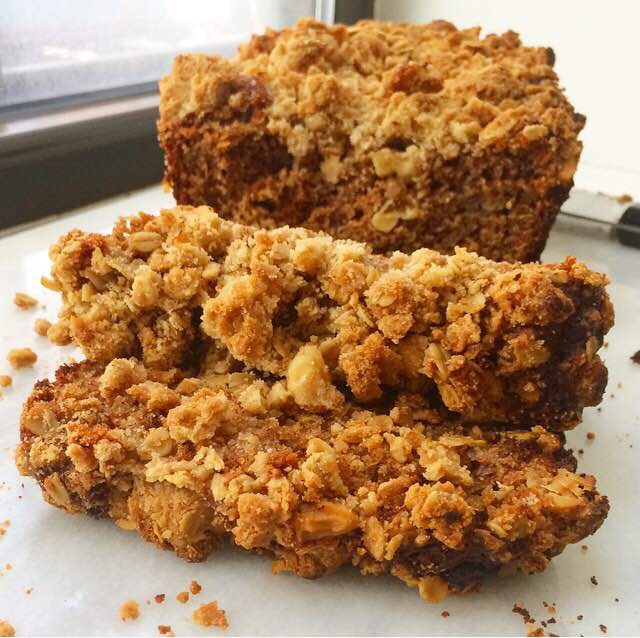
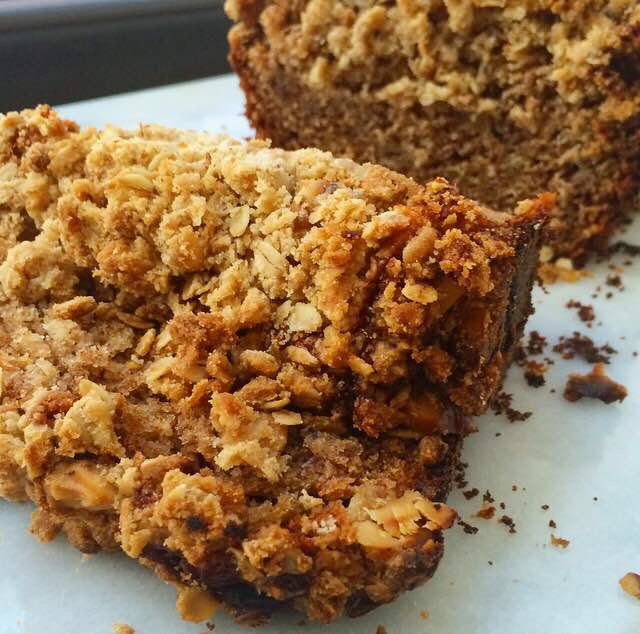
But then, I ate a slice. And I followed it with a second one. All afternoon at work, I thought about the soft cinnamon-banana bread base and the crispy, crunchy combination of oats, toasted walnuts, and brown sugar in the crumble. It really is perfection in a mouthful. And so the lemon cake got pushed to next week, and here I am posting a second banana bread recipe.

And that, my friends, is the very long story of how this Oat Crumble Banana Bread recipe came to appear on this blog. 

 Oat Crumble Banana Bread
makes one 9×5″ loaf

2 cups all-purpose flour
1 1/2 teaspoons baking powder
1 teaspoon baking soda
2 teaspoons ground cinnamon
1/4 teaspoon ground nutmeg
1 teaspoon Kosher or sea salt
1/2 cup neutral-flavored oil (I like canola)
1 cup light brown sugar, packed
2 large eggs, room temperature
1/2 cup plain yogurt (nonfat is fine)
4 large ripe bananas, mashed

Oat Crumble:
1/2 cup old fashioned oats
1/2 cup all-purpose flour
1/2 teaspoon ground cinnamon
1/3 cup light brown sugar
1/2 teaspoon Kosher or sea salt
2 tablespoons chopped walnuts (optional)
1/4 cup (1/2 stick) unsalted butter, cold, cut into cubes

Preheat the oven to 350F. Grease a 9×5″ loaf pan and line it with parchment, leaving a little overhang on the long sides. Grease the parchment. Set aside.

In a medium mixing bowl, whisk together the flour, baking powder, baking soda, cinnamon, nutmeg, and salt. Set aside.

In a large mixing bowl, whisk together oil and brown sugar, followed by eggs, plain yogurt, and mashed bananas. Pour the dry ingredients into the wet ingredients. Use a silicone spatula or wooden spoon to stir the batter together in no more than 20 strokes. There may be some small bits of visible flour–this is fine.

Pour the batter into the prepared loaf pan. Set aside while you prepare the oat crumble.

In a small mixing bowl, stir together oats, flour, cinnamon, light brown sugar, salt, and walnuts. Use a pastry blender (or two forks) to cut butter into dry ingredients until the largest pieces are the size of small peas. Use your fingers to scatter the crumble over the top of the banana bread batter. Tap the full pan on the counter five times before baking for 55-65 minutes, tenting with foil at the 30 minute mark. The banana bread is done when a toothpick inserted in the middle comes out with only a few moist crumbs.

Let the bread cool completely in the pan on a rack. Use the parchment overhang to lift the bread out of the pan onto a cutting board. Slice and serve.

Oat Crumble Banana Bread will keep in an airtight container at room temperature for up to ten days.

Mason Jar Cold Brew Coffee

 Every night, before I go to bed, I make coffee. No, not to enjoy right then–it’s for the next morning.

I don’t have any sort of fancy pot that has a timer, and woodland creatures don’t come all the way to Brooklyn to click any buttons. No, all I need is a mason jar, some cheesecloth, and a functional refrigerator to have my coffee ready to go the minute I wake up! 

Have you ever had cold brew coffee? I love it. The rich flavor and lack of acidity are absolutely divine on any summer day. A few years ago, I got really into making my own cold brew, but I hated pushing it through cheesecloth and a fine-mesh sieve to remove the grounds (and still finding some in my glass anyway). And all the methods I had seen at the time involved making enough for an army. I am one woman with eight pounds of butter and four dozen eggs in my fridge at all times–I don’t need two gallons of coffee in there too.

For the last several years, I have resorted to purchasing iced coffee twice a day (which adds up quickly) or making a warm pot of coffee and then letting it come to room temperature before pouring it over ice. The coffee itself was fine, but I longed for the deeper flavor of cold brew…sans annoying straining step and insane quantity. 

A few weeks ago, one of my favorite bloggers, Julie van Rosendaal, wrote a Facebook post about making cold brew in a mason jar…and all my wildest iced coffee dreams came true. I tried her method that night, and when I went to pour my coffee the next morning, I fell in love. 

The coffee is rich and smooth, absolutely perfect with a little cashew milk (my latest obsession). Her method makes just enough for one morning, so there isn’t any week-old coffee taking up space in the fridge, and the coffee is strained directly from jar-to-glass through a few layers of cheesecloth, so you won’t find any grounds in your glass.

The method is so easy that I’ve made cold brew everyday since! Here’s how I make Mason Jar Cold Brew Coffee:  

 I put freshly-ground coffee and water into a quart mason jar, screw on the lid, and shake it up to get everything distributed. I put it in the fridge, and then go straight to bed. 

The grounds steep in the water overnight, and I wake up to a ready-made jar of coffee. 

  All I have to do is exchange the lid for cheesecloth, and pour it into my favorite glass. I used a funnel here since the mouth of my glass is small enough that coffee might go everywhere but where I want it to! 

I add a splash of cashew milk, stir it up, and enjoy the start of the day.

So, take a little time tonight to make some coffee. You can thank me tomorrow. 

 Mason Jar Cold Brew Coffee
from Julie van Rosendaal
makes 3 cups

2/3 cup ground coffee
3 cups water

Special Equipment:
1 quart mason jar with lid and screw band
cheesecloth (I use one 8×5-inch piece folded in half)

For Serving:
milk of choice
cream
water

Pour ground coffee into the bottom of a quart mason jar. Fill with three cups of water. Put on the lid and screw band and shake to distribute coffee grounds. Refrigerate for 8-12 hours.

Remove lid and screw band. Coffee will have risen to the top of the jar and look muddy. Stir with a table knife or long spoon. Place four layers of cheesecloth over the top of the jar, making sure that there are no open gaps at the edges. Screw on screw band.

Fill a glass with ice cubes. Pour coffee through the cheesecloth into the glass until it is 2/3 full. Fill the glass the rest of the way with milk or cream, or water for black cold brew. Store leftovers in the refrigerator for up to 24 hours.

Blueberry Hand Pies

 How was your long weekend? Mine wasn’t really a weekend–I worked all but one day. Sunday, the one day I had completely off, my friend (also named Liz) came over and we made two pies for some Fourth of July barbecues she attended.

Liz and I rolled chilled dough and sliced fruit for fillings. We used a star cookie cutter to make the pies a little patriotic. We had a great time baking together, but at the end of the day we both came to the same conclusion: pie is a labor of love. You can’t just make pie on the fly. Nope. It takes about eight hours from the time you start making the dough to the time the finished product is cool enough to slice. 

I’m always up to make pie when I have the time, but it’s a little less fun when I know I’m not going to get to have any when the whole process is through. It’s especially disappointing when I’m making blueberry pie. Juicy blueberries spiked with cinnamon and lime and baked into a flaky crust–it’s the stuff of summertime dreams! But I am just one person. I do not need a whole pie sitting around. And so, after I put Liz and her pies into a cab, I set to work making these Blueberry Hand Pies. They’re classic blueberry pie, but in cute, convenient single servings 😊 

Blueberry Hand Pies start with my Cream Cheese Pie Dough. It’s super simple to put together and is flexible and easy with which to work. I’ve never had it tear, and that structural soundness is pretty important since it has to be cut, folded, and crimped! As with any pie dough, the key to working with this one is keeping it cold from the time you are cutting the butter and cream cheese into the flour to the minute it goes in the oven. If the dough becomes soft or sticky and any point in the hand pie-making process, refrigerate it for fifteen minutes before continuing. Taking the time to do this extra chilling will ensure super flaky crust.
 The dough is cut into 4 1/2-inch circles before being being filled with a combination of blueberries, a bit of sugar, cinnamon, salt, cornstarch, and lime. Then the edge of the dough is painted with a a semi-circle of egg wash before being folded in half and crimped with a fork. The hand pies are chilled while the oven heats up, then vented and painted with more egg wash before baking for 35-40 minutes, until glossy and golden. 
Where regular pies have to cool completely to room temperature before they can be sliced and served, these little Blueberry Hand Pies can be enjoyed just minutes after they come out of the oven! They’re fantastic by themselves, but I highly recommend enjoying one warm with vanilla ice cream! 

 Blueberry Hand Pies
makes 18 hand pies

1 recipe Cream Cheese Pie Dough,* chilled

Filling:
12 ounces fresh blueberries
1/3 cup granulated sugar
1 teaspoon ground cinnamon
4 1/2 teaspoons cornstarch or arrowroot powder
pinch of Kosher or sea salt
juice of one lime

Egg Wash:
1 large egg
1 tablespoon water

On a floured surface, roll chilled dough out to 1/4-inch thickness. Use a floured 4 1/2-inch round cutter* to cut circles out of the dough. Re-roll scraps as necessary to cut more circles. If dough gets too warm or sticky, place it in the refrigerator for 15 minutes. Place cut circles on a plate and refrigerate at least ten minutes.

Prepare the filling. Place blueberries in a large mixing bowl. Fold in sugar, cinnamon, cornstarch, and salt, followed by lime juice. Filling may seem dry. Set aside.

Make egg wash. In a small bowl, use a fork to whisk together egg and water. Set aside.

Line two baking sheets with parchment paper.

Assemble the hand pies. Lay a circle of dough on a floured surface. Place one tablespoon of the blueberry filling in the middle. Use a pastry brush to paint a semi-circle of egg wash on one half of the outer edge. Fold the unpainted half to meet the painted half, and press down lightly to seal. Crimp with a fork. Lay hand pie on prepared baking sheet. Continue making hand pies until all circles have been used. If anything gets too warm or sticky, refrigerate for at least fifteen minutes.

Once all pies are made, chill the baking pans in the refrigerator or freezer. Preheat oven to 375F. Once oven reaches temperature, remove full pans from refrigerator or freezer. Cut a small vent in each one* before painting with more egg wash. Bake for 35-40 minutes, tenting with foil at the 20 minute mark. Let hand pies cool on pans for fifteen minutes before removing to a rack to cool completely.

Hand pies may be served warm or room temperature. They are best the day they are made, but will keep in an airtight container at room temperature for up to three days or in the refrigerator for up to four days.

Notes:

1. You may use an pie dough recipe you like, or purchased refrigerated pie dough. This recipe requires enough dough for a double crust pie.
2. I use this 4 1/2-inch round cutter. If you do not have one, you may slice the dough into 5-inch squares, although you may get fewer total hand pies.
3. Pies may be frozen after they are vented. Lay them on parchment-lined pans and freeze until solid. Put them in a labeled freezer bag or container for up to two months. When you are ready to bake them, paint the pies with egg wash and bake them for an extra minute or two. No need to thaw.

M&Ms Sandwich Cookies

 If you haven’t noticed, I love sandwich cookies. This blog has existed for eight months, and I already have six sandwich cookie recipes in my recipe index. I mean, cookies and frosting together–does a more perfect dessert even exist?! 

Today’s sandwich cookies are my version of a favorite treat from my teenage years. Back then, I was on the high school dance team. Once classes were over for the day, I’d have thirty minutes to change and eat something before practice. Usually the whole team would go for some sort of fast food (ah, teenage metabolism), but occasionally, when everyone was attending tutorials or some other after-school program, I’d zip over to Ridgmar Mall, run to the cookie kiosk, and grab one or two (okay, okay, three!) miniature M&Ms sandwich cookies before driving back to school to dance off all the calories.

To this day, I get nostalgic for those soft cookies, M&Ms, and creamy vanilla filling. But I can’t remember the last time I was in a mall (one of the advantages of living in New York City). And as I always have fresh baked goods at home, I no longer stop for mass-produced treats. 

These days, if I want a few M&Ms Sandwich Cookies, I make them myself. They’re so much better than anything you could get at a mall. Soft, chewy cookies speckled with colorful milk chocolate M&Ms and sandwiched together with a smooth vanilla filling?! Yes. I’ll take three.

Most of my sandwich cookie recipes make five or six dozen very small cookies–far more than anyone really needs. This recipe makes a much more manageable two dozen sandwich cookies. If you’d like more, this recipe doubles very well.

Also, these cookies are slightly larger than my regular sandwich cookies. Where all of my other sandwich cookie recipes require you to scoop dough by the teaspoon, the cookies in this recipe are each made with 1/2 tablespoon (1 1/2 teaspoons) of dough. The larger scoops cut down on the time spent rolling dough and also allow for more M&Ms in every bite! 

I love working with M&Ms for holidays. There’s a perfect color combination for every occasion–red and green for Christmas, orange and black for Halloween, pastels for Easter. Since the Fourth of July is coming up next week, I went with the red, white, and blue variety for this batch! I think they’re pretty cute 😊 No matter which holiday you’re making these for (even if it’s just that it’s the end of a long week), I know these M&Ms Sandwich Cookies will be a hit!

 Want more M&Ms treats? Check out my M&Ms-Potato Chip Cookies!

M&Ms Sandwich Cookies
makes 2 dozen sandwich cookies

1 1/2 cups all-purpose flour
1 teaspoon cornstarch
1/2 teaspoon cream of tartar*
1/2 teaspoon baking powder
1/4 teaspoon baking soda
1/2 teaspoon Kosher or sea salt
1/2 cup (1 stick) unsalted butter, softened to room temperature
1/2 cup granulated sugar
1/4 cup light brown sugar
1 large egg, room temperature
1 teaspoon pure vanilla extract
1 cup M&Ms milk chocolate candies

Filling:
1/2 cup shortening (or room temperature unsalted butter)
2 1/2-3 cups confectioner’s sugar
pinch of Kosher or sea salt
2 teaspoons pure vanilla extract
1-2 tablespoons heavy cream

In a medium-large mixing bowl, whisk together flour, cornstarch, cream of tartar, baking powder, baking soda, and salt. Set aside.

In a large mixing bowl, use an electric mixer to beat butter until light and fluffy, about two minutes. Beat in granulated and light brown sugars, followed by egg and vanilla. Mix in dry ingredients in two installments, combining completely after each addition. With the mixer on low, add in M&Ms and mix for 10-15 seconds until they are evenly dispersed. Cover and chill dough for 90 minutes, or up to three days.

Preheat oven to 350F. Line two baking sheets with parchment.

Scoop chilled dough by the 1/2 tablespoon (1 1/2 teaspoons) and roll into balls. Set dough balls about two inches apart on prepared pans. Bake 7-8 minutes, until the tops are no longer shiny. Let cookies cool on pans for five minutes before removing to a rack to cool completely. Repeat with any remaining dough.

Make the filling. In a large mixing bowl, use an electric mixer to beat shortening (or butter) until fluffy. Beat in 2 1/2 cups confectioner’s sugar and salt. Mix in vanilla and 1 tablespoon heavy cream. If filling is too thin, add more confectioner’s sugar. If it’s too thin, add an extra tablespoon of heavy cream. If you would like to pipe the filling, spoon it into a piping bag and snip off a corner.

There are two options for filling:

1. To assemble a sandwich cookie by piping, apply filling by pipe a circle in the middle of the underside of one cookie, leaving about 1/4″ around the edge. Top with a second plain cookie, with the underside filling-side-in. Repeat until all cookies have been used.

2. To assemble a sandwich cookie by spreading, use an offset frosting knife to spread 1/2-1 teaspoon on the underside of one cookie. Top with a second plain cookie, with the underside filling-side-in. Repeat until all cookies have been used.

M&Ms Sandwich Cookies will keep in an airtight container at room temperature for up to a week.

Note:

There is no substitute for cream of tartar in this recipe.

Sweet Cherry Cheesecake Bars

 As far as summer fruit goes, I don’t think anything beats fresh cherries. Not even mango.

When cherries start showing up at the greenmarket, I get a flood of new ideas. Pairing them with rhubarb in pie, making syrup for homemade sodas, rolling them into sweet rolls. There are a million possibilities for every bag! Sometimes though, it’s fun to go with a classic like cherry cheesecake. But my kitchen is a sauna this time of year, and working with a water bath and a full springform pan sounds less than appealing. Plus, there’s the 24 hour chill–who has time for that?!

Enter these Sweet Cherry Cheesecake Bars: shortbread crust layered with tangy cheesecake and sweet cherry pie filling, topped with a simple almond streusel. They have all the flavor of the classic cheesecake, no water bath or seemingly-eternal wait required! They still take a little time (they have to chill, after all), but they are far less of a production than a traditional cheesecake–simple enough for a weekend treat, but perfect for parties, too! 

These bars have four layers, but none of them are difficult or time consuming to make. Start by making the shortbread crust. Mix together flour, sugar, and salt before cutting in a cold stick of butter. The mixture will be very dry and seem like it won’t bake up to much, but it will. Pour the mixture into a parchment-lined pan, spread it out to cover the entire bottom of the pan, and then press it down with your fingers until it is one even layer. It will still be powdery-looking, but it will pack down easily and hold together. Bake that for ten minutes–it won’t be fully cooked in that time, but this little step will prevent the crust from getting soggy from the cheesecake and cherry layers.

Once you put the shortbread crust in the oven, use the same bowl you used for the crust to make the streusel topping. No need to wash the bowl–the streusel has all the same ingredients as the crust, plus almonds. Mix together flour, sugar, salt, and sliced almonds, then cut in a stick of butter. Refrigerate the mixture to keep the butter cold while you prepare the cherries and cheesecake.

Remove the crust from the oven and set the pan on a rack to cool while you make the cherry layer. I basically use my favorite cherry pie filling recipe, but cut the quantity in half. Many cherry cheesecake recipes ask for canned cherry pie filling, but this is way better than anything you’ll find in the grocery store. Simply mix three cups of halved, pitted fresh sweet cherries with 1/2 cup of sugar, three tablespoons of cornstarch, a touch of nutmeg, and some salt. The cherries will release some liquid while you make the cheesecake layer.

The cheesecake comes together in less than five minutes. Beat some cream cheese with a bit of sugar. Mix in an egg, followed by a teaspoon of lemon juice and some vanilla. That’s it. It will be smooth, creamy, and absolutely gorgeous! 

By the time the cheesecake is ready, the shortbread crust should be at room temperature and ready for layering. Spread the cheesecake mixture over the crust, and tap the pan on the counter a few times to release any air bubbles. Scatter the cherries over the top of the cheesecake, leaving behind any liquid that has collected in the bottom of the bowl. Press down lightly to sort of nestle the cherries into the cheesecake. Remove the streusel from the refrigerator and sprinkle that over the cherries. Put the full pan in the oven to bake for about 45 minutes.

The last part is the most difficult by far. Let the full pan cool to room temperature, and then refrigerate it for at least four hours. Yes, it’s a long time, but you want that cheesecake layer to be nice and cold when you finally bite in! Room temperature cheesecake? No, thanks! I like to make these bars the night before I need them. That way, they’re thoroughly chilled when I get up, and all that’s left to do is slice them up and grab a fork! 

Look at all those gorgeous layers! The sweet cherries, tangy cheesecake, buttery shortbread crust, and crispy almond streusel are amazing together–the combination of cherries and cheesecake are a classic for a reason. These Sweet Cherry Cheesecake Bars are wonderful the way they are, but if you’re looking for a red, white, and blue dessert for Independence Day, you could swap fresh blueberries for one cup of the cherries. I don’t know about you, but watching fireworks while snacking on patriotic cheesecake bars is right up my alley. 

 Sweet Cherry Cheesecake Bars
makes one 8×8″ pan, about 9-16 bars

Shortbread Crust:
1 cup all-purpose flour
1/4 cup granulated sugar
pinch of Kosher or sea salt
1/2 cup (1 stick) unsalted butter, cold

Streusel:
1/2 cup all-purpose flour
1/4 cup granulated sugar
pinch of Kosher or sea salt
1/4 cup sliced almonds
1/4 cup unsalted butter, cold

Cherry Layer:
3 cups pitted, halved sweet cherries
1/2 cup granulated sugar
1/8 teaspoon ground nutmeg
3 tablespoons cornstarch
pinch of Kosher or sea salt

Cheesecake:
12 ounces (1 1/2 bricks) full-fat brick-style cream cheese
3 tablespoons granulated sugar
1 large egg, room temperature
1 teaspoon fresh lemon juice
2 teaspoons pure vanilla extract

Preheat oven to 375F. Grease a 9-inch square pan, line it with parchment, and grease again.

Make the shortbread crust. In a medium mixing bowl, whisk together flour, sugar, and salt. Use a pastry blender or two forks to cut butter into flour mixture until the largest pieces are the size of small peas. Mixture will be dry and crumbly with big pieces of butter, not a cohesive dough. Pour mixture into prepared pan and use clean dry fingers to press it into the pan. Bake ten minutes and then let cool completely.

While the crust is cooling, make the streusel. In a medium mixing bowl, whisk together flour, sugar, salt, and almonds. Use a pastry blender or two forks to cut butter into dry ingredients until the largest pieces are the size of small peas. Set in the refrigerator to chill.

Prepare the cherry layer. Place pitted, halved cherries in a large mixing bowl. Stir in sugar, nutmeg, cornstarch, and salt. Set aside.

Make the cheesecake. In a large mixing bowl, use an electric mixer to beat cream cheese until light and fluffy, about two minutes. Beat in sugar, followed by egg, lemon juice, and vanilla. Spread mixture over the cooled crust. Tap the full pan on the counter five times to release any air bubbles.

Scatter cherries on top of cheesecake layer, leaving any excess liquid in the bowl. Press down lightly to nestle the cherries into the cheesecake. Sprinkle chilled streusel mixture over the top of the cherries. Bake full pan at 375F for 40-45 minutes, tenting with foil at the 25 minute mark.

Let bars cool in the pan on a rack until they reach room temperature. Refrigerate the full pan for at least four hours. Use the parchment to lift the bars out of the pan and onto a cutting board. Use a chef’s knife to slice them.

Serve immediately, or keep the bars covered in the refrigerator for up to four days.