Bostock {Toasted Brioche with Almonds}

Bostock {Toasted Brioche with Almonds}​

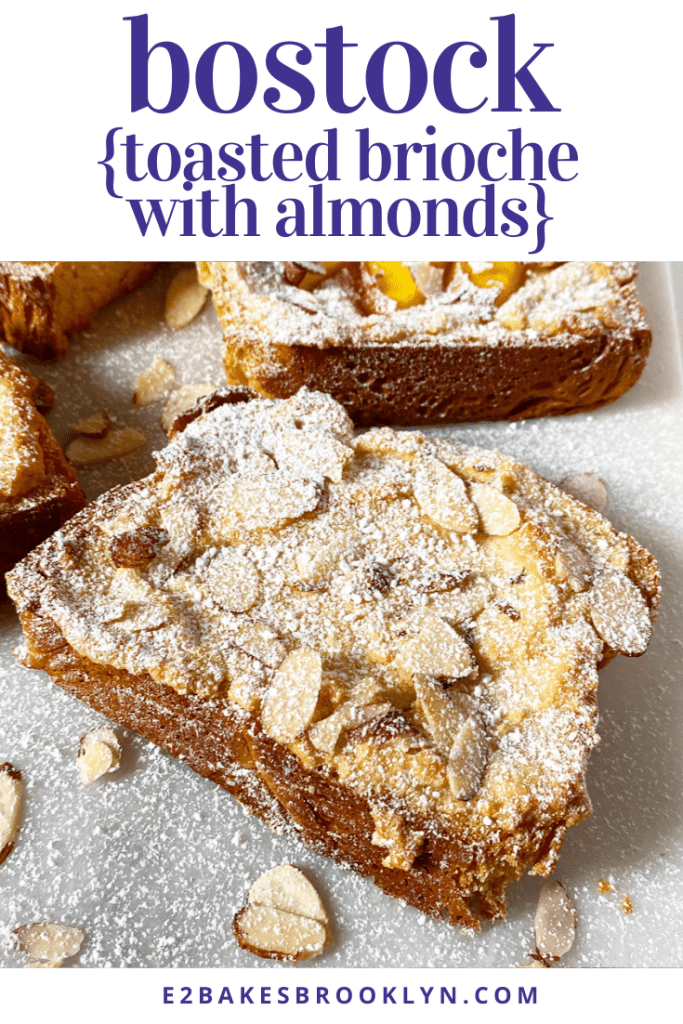
If you’ve ever seen fancy-looking Bostock in a bakery, you may be surprised to learn that it’s a snap to make as far as French pastry goes. The origin of the name is up for debate, but it’s sometimes also referred to as Brioche aux Amandes or “almond brioche.” All that is fine and good—almonds and brioche are enough of a selling point—but I was drawn to Bostock when I learned it’s not actually a pastry on its own, but instead a way to repurpose day-old bread. Yep, it’s the pastry equivalent of French toast! Bostock is nothing more than thick, day-old slices of brioche painted with simple syrup, topped with frangipane and sliced almonds (and sometimes seasonal fruit), and baked until golden.

Bostock {Toasted Brioche with Almonds}​

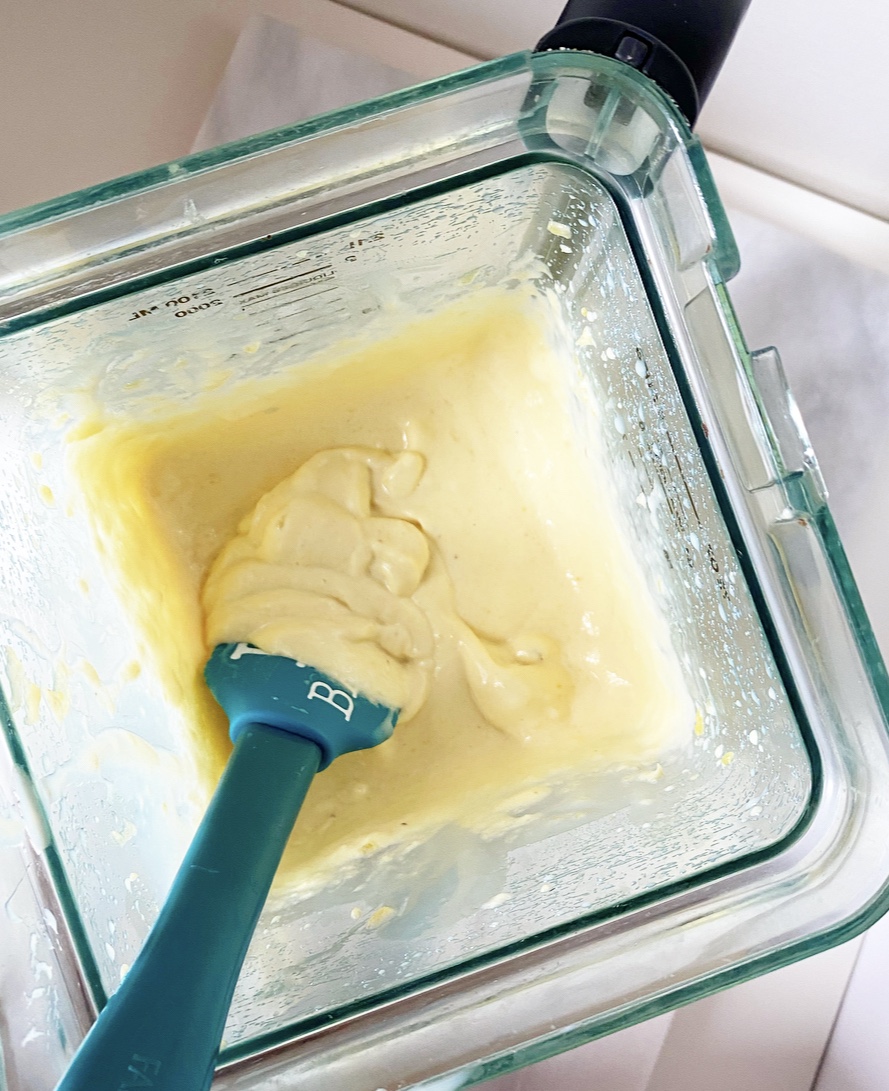
Permitting you are using store bought brioche, this recipe comes together very quickly. Simple syrup is made from equal volumes of sugar and water, and takes only five minutes to simmer. Frangipane, a sweet almond pastry cream made primarily of almond flour, sugar, butter and an egg, just needs two minutes in the blender. See? Quick and easy! Also, if you are more organized than I am, both elements can be made up to a week ahead—just make sure to let your frangipane come to room temperature before you try to spread it on the delicate brioche.

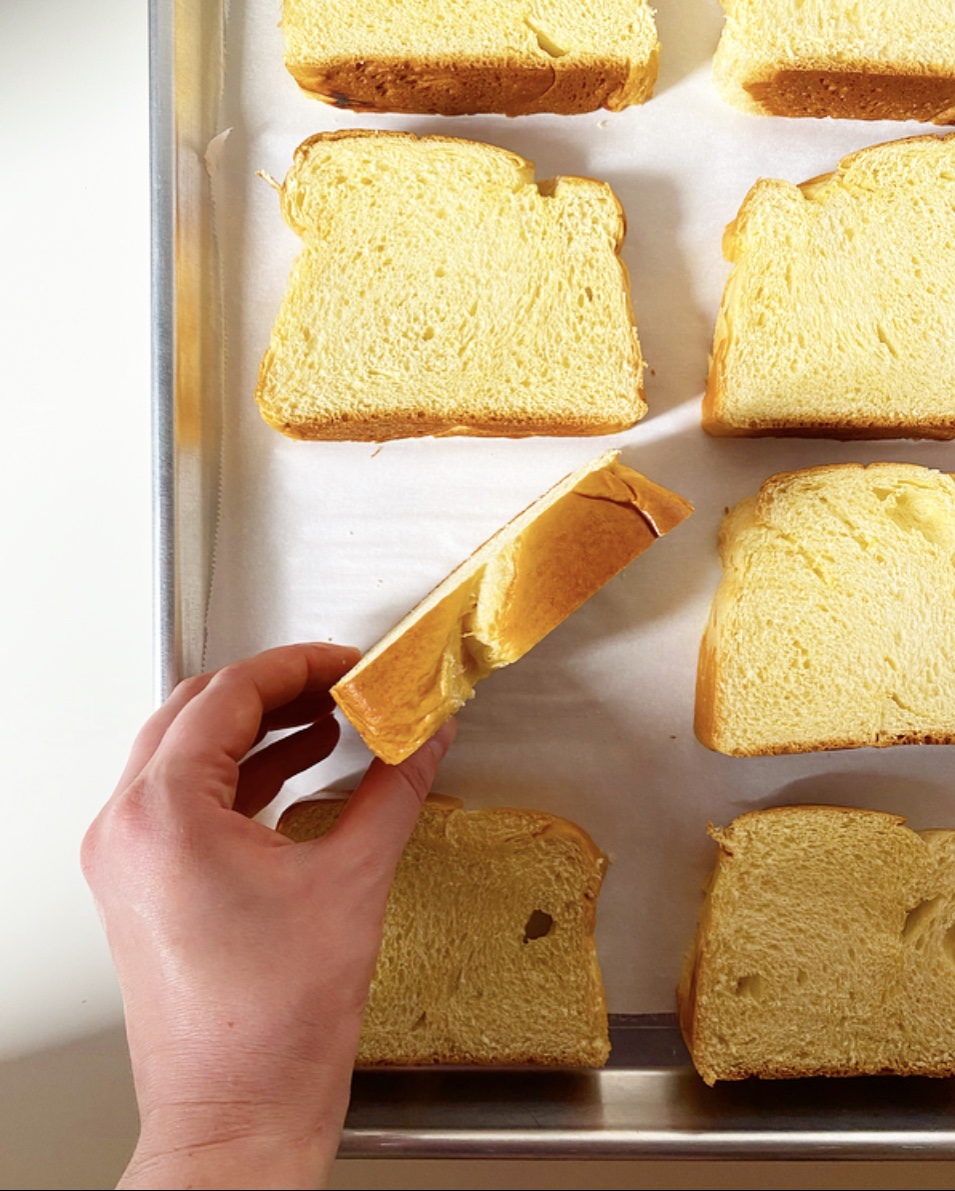
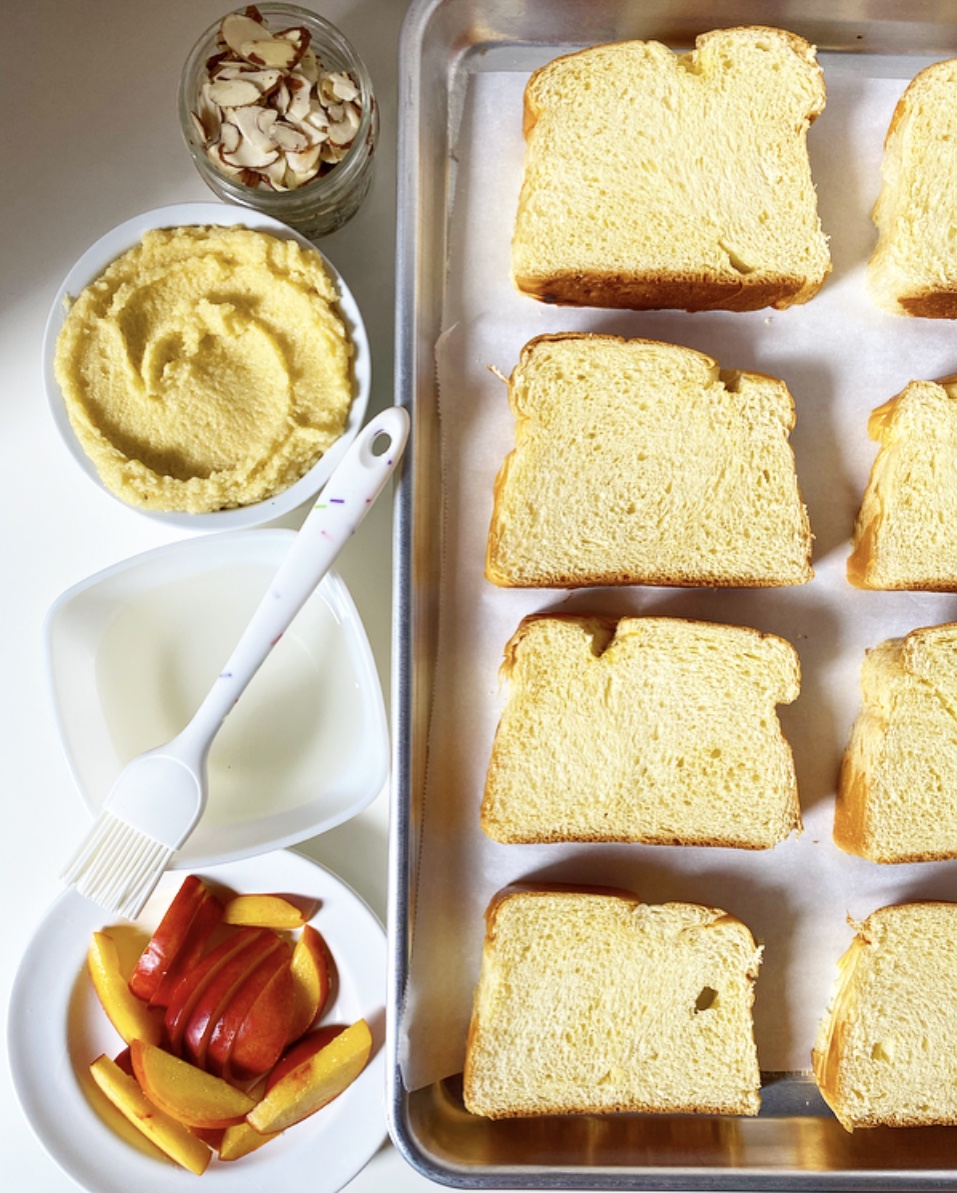
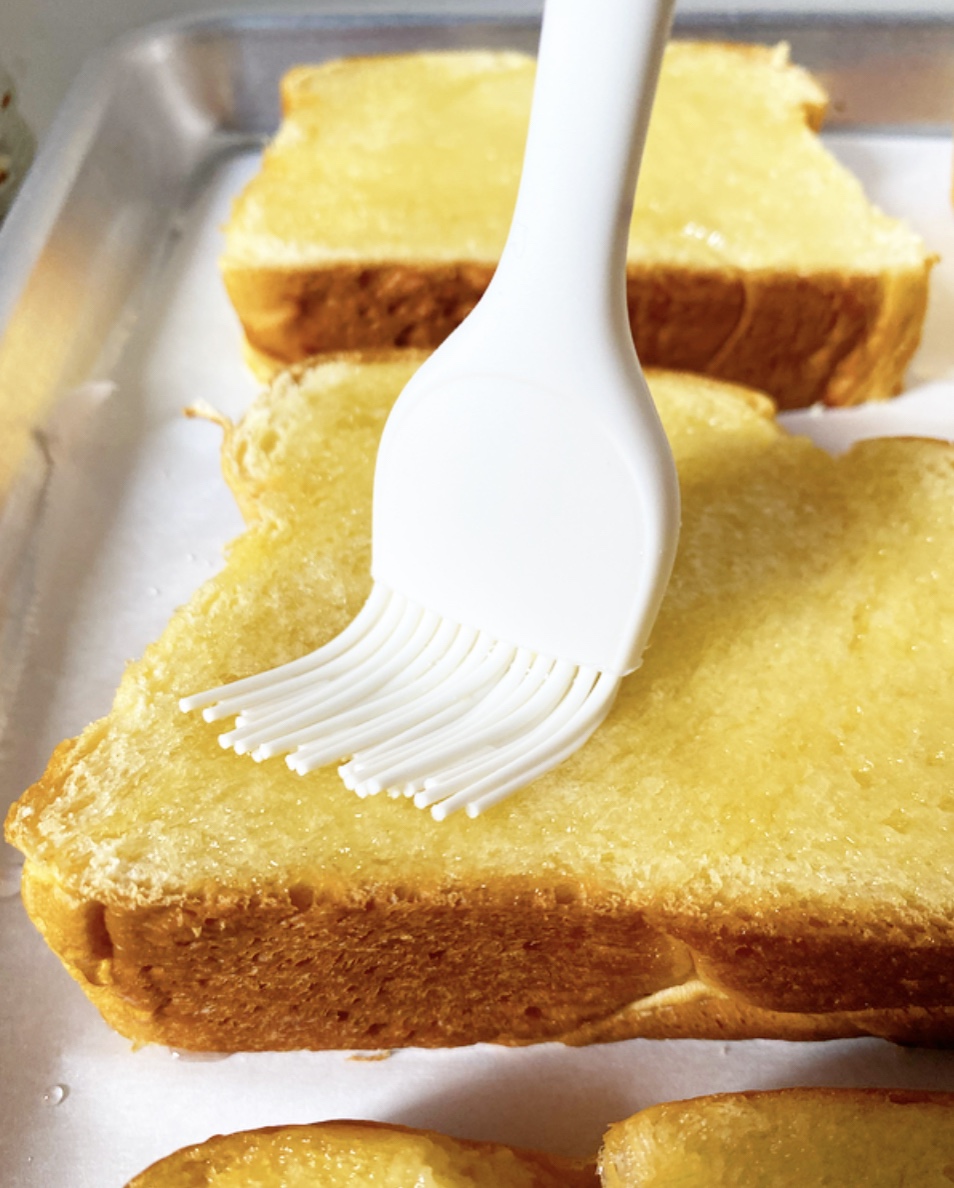
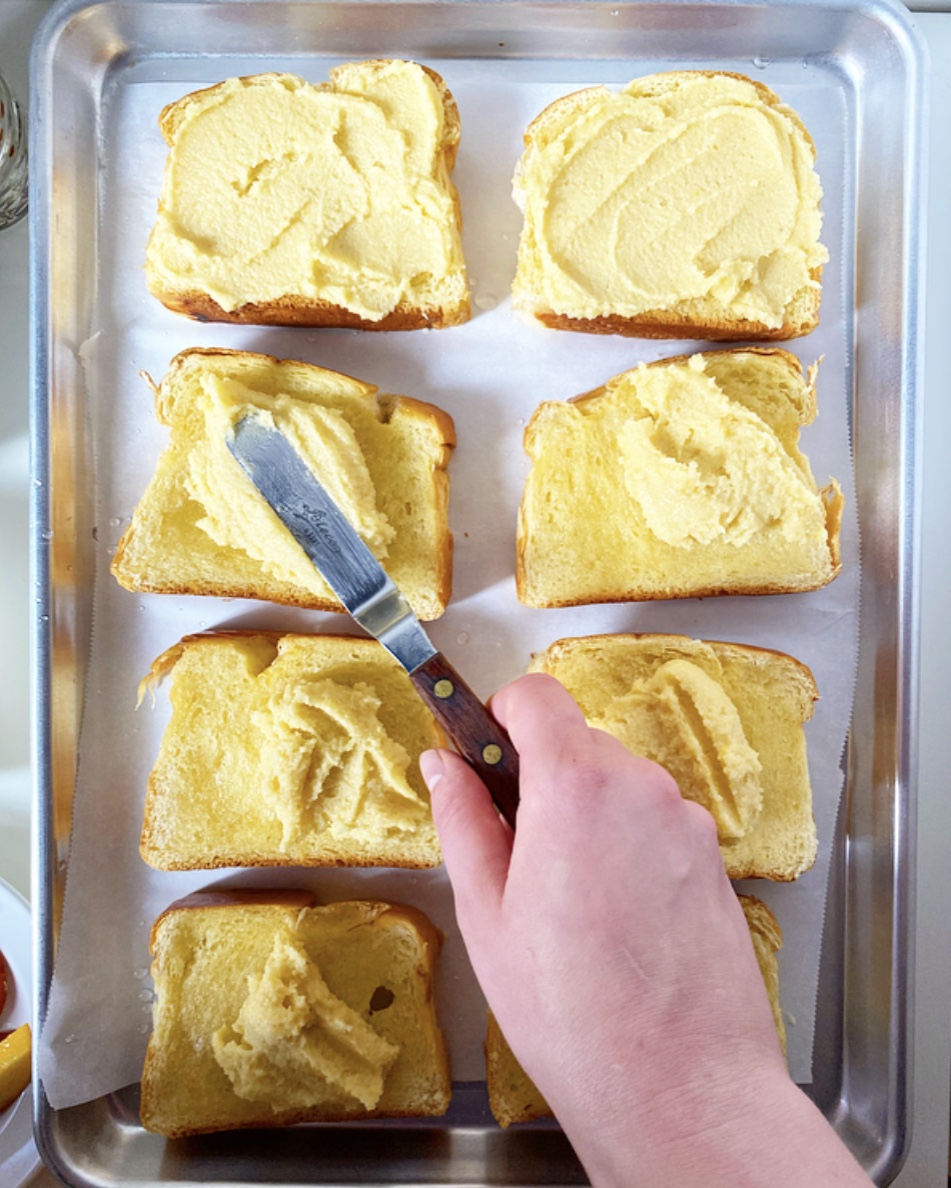
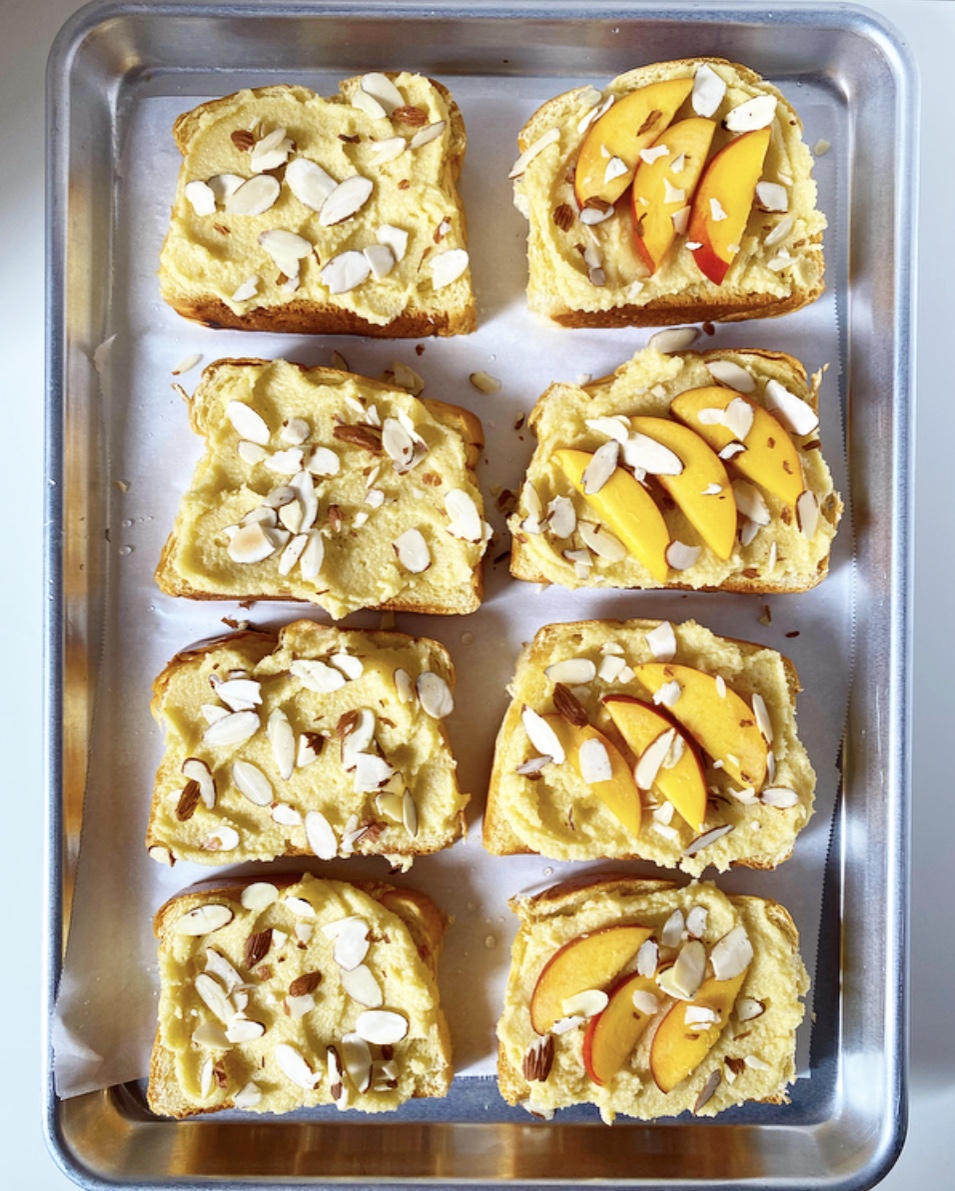
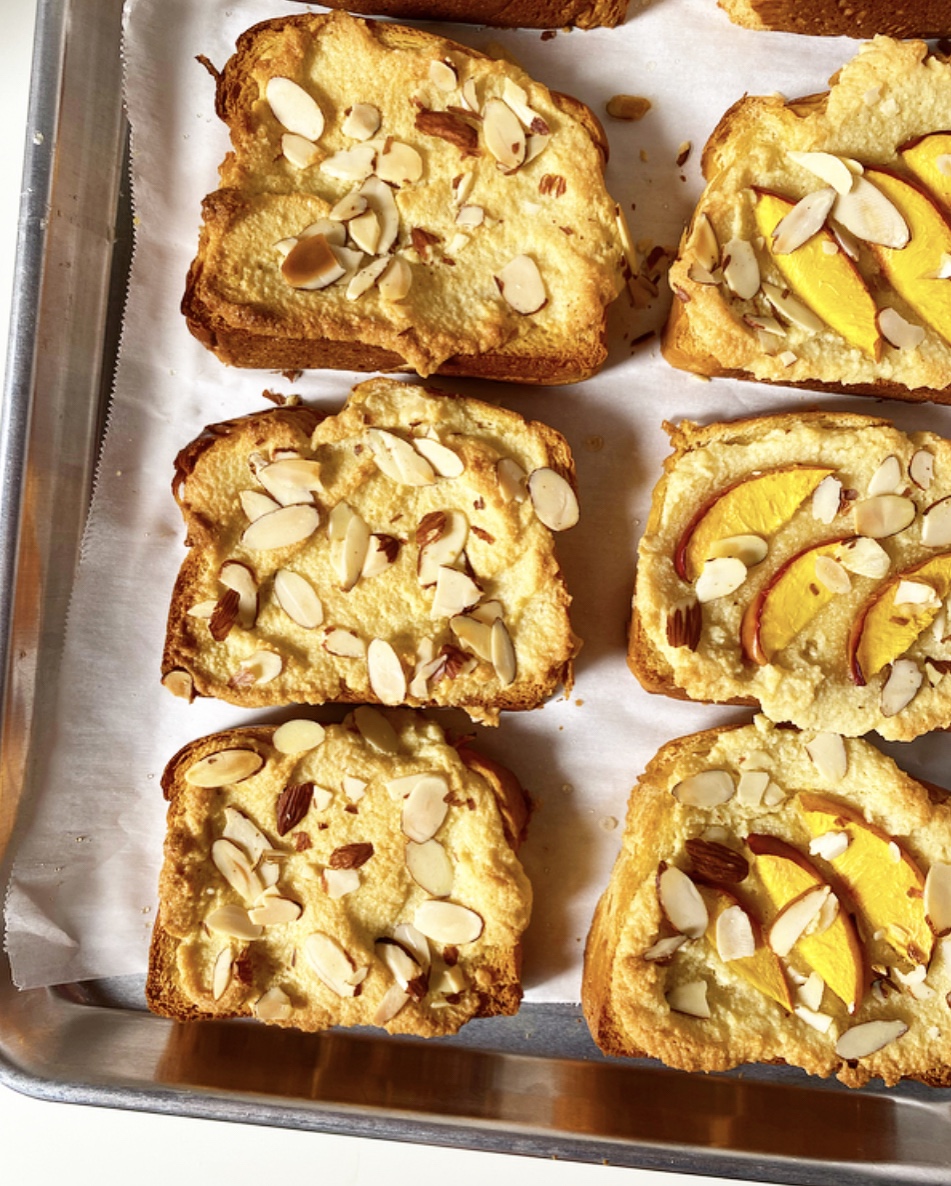
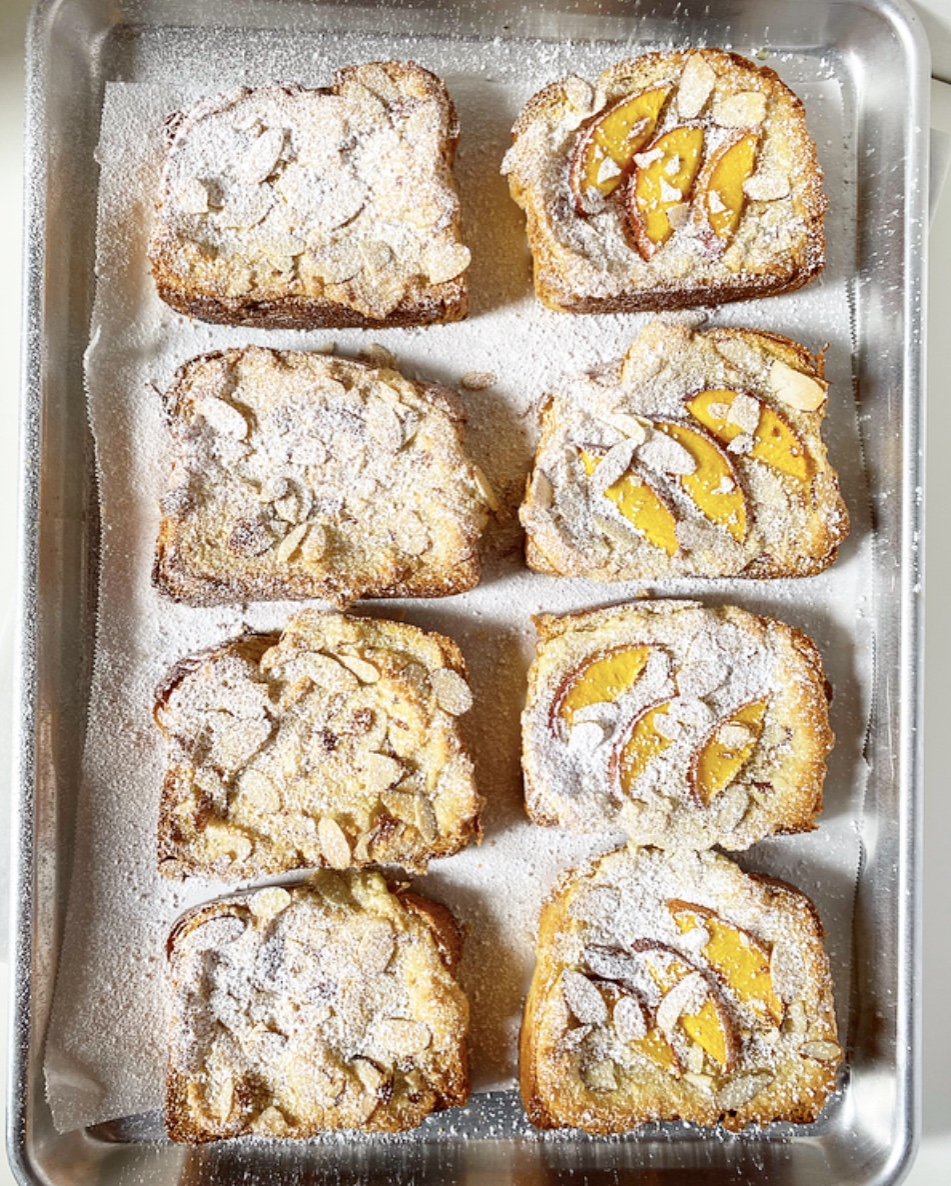
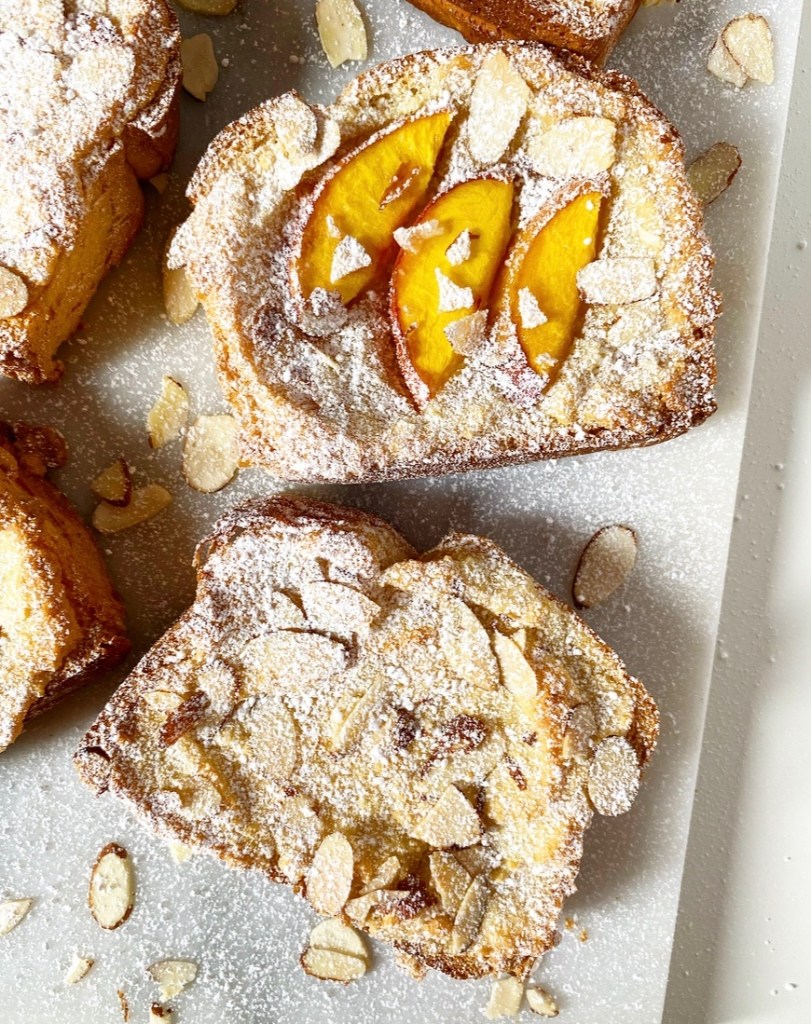
Assembly is easy as can be. Cut the stale brioche into 8 thick slices, then give each one a heavy brush of simple syrup and a luxurious smear of frangipane. Add some fresh fruit if you like, or don’t; I sliced up a nectarine for half my pastries. Sprinkle on some sliced almonds and bake your Bostock for 25-30 minutes, or until it’s puffed and browned a bit.

Bostock {Toasted Brioche with Almonds}​

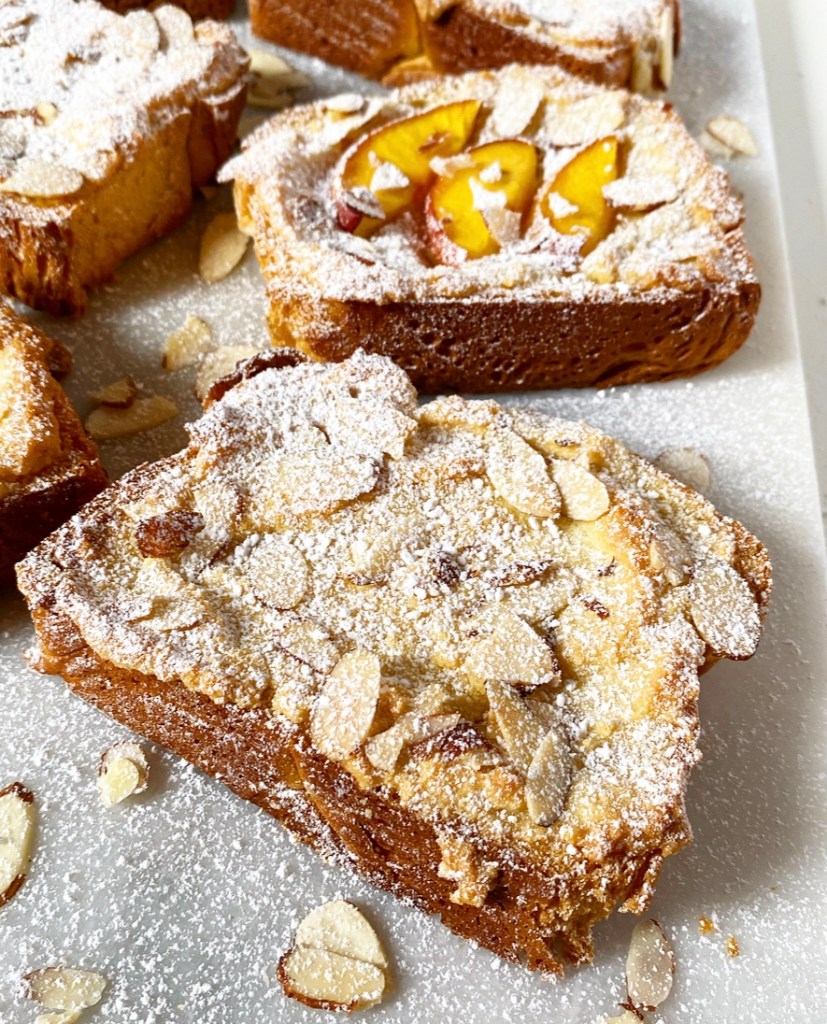
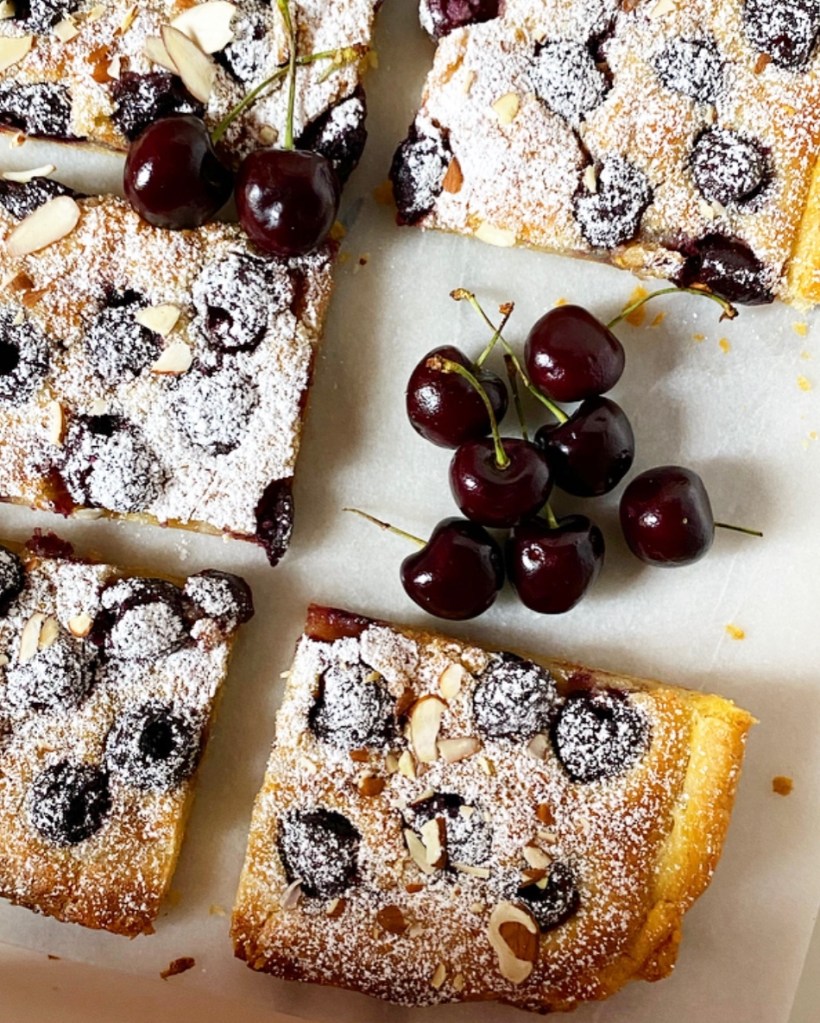
One more wonderful thing about Bostock? You don’t have to let it cool completely! Definitely don’t eat it straight out of the oven, but go right ahead and enjoy it warm with a (admittedly heavy) dusting of confectioner’s sugar. It’s crispy and toasty at the edges, and the frangipane squidges against your teeth in the most satisfying way. Bostock is softer at room temperature, but still pretty dang stellar. I haven’t seen many people tell you to eat it cold, but I’ll admit that I like the leftovers straight from the fridge, too.

Bostock {Toasted Brioche with Almonds}​

Like its spiritual cousin French toast, Bostock is a genius way to repurpose leftovers into something much greater than the sum of its parts. While the classic recipe is made with brioche, you could give the Bostock treatment to a number of leftover carbs. Challah, stale croissants, and day-old waffles come to mind. You could also swap out the simple syrup for warmed jam—I’m absolutely going to try matching the flavor with my seasonal fruit topping next time! Saturday morning double cherry Bostock, anyone?!

Bostock {Toasted Brioche with Almonds}​
Bostock {Toasted Brioche with Almonds}
makes 8 servings

Simple Syrup:
1/3 cup granulated sugar
1/3 cup water

Frangipane:
1 cup blanched almond flour or 4 ounces blanched almonds
1 tablespoon all-purpose flour
pinch of Kosher or sea salt
6 tablespoons granulated sugar
6 tablespoons unsalted butter, cold-ish room temperature, cut into cubes
1 large egg
1/2 teaspoon pure almond extract

For Assembly:
8 thick slices brioche, preferably a bit stale (mine were from 1 14oz loaf)
2 medium sliced nectarines or other seasonal fruit (optional)
2-3 tablespoons sliced almonds
2 tablespoons confectioner’s sugar

Arrange a rack in the center of the oven. Preheat the oven to 350F. Line a rimmed sheet pan with parchment paper. Set aside.

Make the simple syrup. Combine water and sugar in a small saucepan. Heat over medium heat, stirring occasionally, until sugar has dissolved. Remove from heat. Set aside.

Make the frangipane. In a food processor (or very good blender), pulse almond flour, all-purpose flour, salt and sugar together. Pulse in butter. Pour in egg and almond extract, and process until frangipane is a homogenous paste.

Place brioche slices in a single layer on the prepared pan. Brush each slice with simple syrup, making sure to use up all the syrup. Spread about 2 heaping tablespoons of frangipane over each slice of brioche, covering the entire top. Press in fruit, if using, then sprinkle on the sliced almonds.

Bake Bostock for 25-30 minutes, until the frangipane as begun to brown in places. Let cool on a rack for at least 15 minutes before dusting with confectioner’s sugar and serving slightly warm or at room temperature.

Bostock is best the day it’s made, but may be wrapped and kept in the refrigerator for a couple of days.
Bostock {Toasted Brioche with Almonds}​

Pineapple Upside-Down Cake Sherbet

Pineapple Upside-Down Cake Sherbet

Last year, I posted a recipe called Easiest Ever Mango Sherbet. The gist is that you blend frozen fruit and a can of sweetened condensed milk, then freeze it and scoop it like regular sherbet/ice cream…but you don’t have to have an ice cream machine, you know? And that’s ideal because I think if I bring another piece of equipment home, my beloved roommate will abandon me and I’ll have to build a house out of all my cake pans.

But I digress.

Today, I took that easy formula and complicated it in the very best way: the Pineapple Upside-Down Cake way! That’s right—all the flavors that you love in the undisputed queen of everyday cakes are packed into this cold, creamy, scoopable treat! The base is buttery brown sugar-roasted pineapple bliss, and every bite is filled with bits of vanilla cake, maraschino cherries and butterscotch sauce!

Pineapple Upside-Down Cake Sherbet starts with a whole pineapple. You could, of course, do this with about 2 1/2 pounds of pre-cut pineapple, but buying whole is much cheaper. Don’t fret—I’ve detailed how to slice up a pineapple in the recipe.

Once it’s sliced up, the pineapple is brushed with melted butter & brown sugar and roasted until tender, fragrant, and rich yellow in color. This concentrates the flavor and softens the fruit’s natural tartness. Also, it smells out-of-this-world good. Please resist eating half of it in one sitting so you can make it into no-churn sherbet, okay?!

After roasting, let your pineapple cool before freezing it. The sherbet base requires only frozen fruit and sweetened condensed milk—don’t try to take any shortcuts here! I find it easiest to freeze the pineapple by arranging it in one layer on a small sheet pan, then freezing until…well, frozen. You can do this a few days (or even weeks!) in advance; just transfer your frozen roasted pineapple into a freezer bag for longer storage.

Pineapple Upside-Down Cake Sherbet

Next up: blend the base! This is easy. Just combine your frozen roasted pineapple and sweetened condensed milk in a blender and blitz away! Pour half the creamy, pale yellow mixture in a loaf pan, then top it with Pineapple Upside-Down Cake mainstays like maraschino cherries, cubes of vanilla cake, and spoonfuls of brown sugary butterscotch. Repeat the layering with the remaining pineapple base and toppings and then freeze until scoopable. Finish it with more butterscotch and cherries, if desired. Pineapple bowl optional, but recommended.

One quick thing before I get to the recipe. This recipe has a lot of steps, but can be as easy or as complicated as you like. For instance, I baked my own vanilla cake and made a batch of butterscotch for this sherbet, but this recipe would work just as well with store bought pound cake and jarred butterscotch (or caramel sauce or dulce de leche). As with all the recipes on this site, we’re aiming for delicious and fun here. If making the base, some cake and butterscotch ceases making this process enjoyable, by all means take some shortcuts.

I won’t tell anyone. I’ll be too busy shoving bites of Pineapple Upside-Down Cake Sherbet into my face to even care.

Pineapple Upside-Down Cake Sherbet
makes about 8-10 servings

Roasted Pineapple:
1 whole pineapple (about 4 lbs)
3 tablespoons unsalted butter, melted
2 tablespoons light or dark brown sugar, packed
pinch of Kosher or sea salt

For the Sherbet Base:
1 14-ounce can sweetened condensed milk

For Assembly (all divided):
2/3 cup maraschino cherries, drained & cut into small pieces
3/4-1 cup butterscotch sauce (or caramel sauce)
1 1/2 cups 1/2-inch vanilla cake cubes (cake recipe below)

Roast the pineapple. Preheat the oven to 400F. Line a rimmed sheet pan with parchment. Set aside.

Place your pineapple on its side on a cutting board. Use a large, sharp chef’s knife to lop off the top & bottom. Move the pineapple so that it is standing on the flat spot where the bottom used to be. Use the knife to remove the rind (skin) in strips, being sure to also remove the brown dots beneath it. Slice around the core, then discard it so that only the flesh (good fruit) remains. Slice your pineapple flesh into spears, and then split each spear into 2 shorter spears. Place them in an even layer on the prepared sheet pan.

Place butter and brown sugar in a small microwave-safe bowl. Microwave in 30 second increments, stirring in between, until butter is melted and mixture is combined.

Brush half the butter & brown sugar mixture on the pineapple pieces. Roast pineapple 20 minutes. Flip the pieces and brush with remaining butter & brown sugar. Roast another 20 minutes. Cool pineapple completely.

Freeze the roasted pineapple. Line a rimmed sheet pan that will fit in your freezer with parchment. Arrange roasted pineapple pieces in one layer on the pan, then place the pan in the freezer for at least four hours or overnight. If not making sherbet immediately, remove frozen roasted pineapple to a freezer bag before returning to the freezer.

Make the sherbet base. Combine frozen roasted pineapple and sweetened condensed milk in a high-powered blender. Blend on high for about 1 minute, or until smooth and thick. Use a silicone spatula to scrape down the sides of the carafe as necessary.

Assemble the sherbet. Transfer half the sherbet base to a loaf pan or other vessel. Scatter with half the maraschino cherries and cake cubes. Drizzle on butterscotch sauce, or drop on by the spoonful. Top with remaining sherbet base, spreading it to the edges to cover the add-ins. Top with remaining cherries, cake cubes & butterscotch. Freeze 4-6 hours before scooping and enjoying.

Pineapple Upside-Down Cake Sherbet will keep covered in the freezer for up to a month.
Vanilla Cake
makes 1 9x5” layer

3/4 cups all-purpose flour
1 tablespoons cornstarch
1/4 teaspoon baking powder
1/8 teaspoon baking soda
1/2 teaspoon Kosher or sea salt
1/4 cup (1/2 stick) unsalted butter, softened to room temperature
1/4 cup granulated sugar
1/4 cup light brown sugar, packed
1 large eggs, room temperature
1 teaspoons pure vanilla extract
1/2 cup buttermilk (not skim or fat free), room temperature

Preheat oven to 350F. Grease a 9x5-inch loaf pan. Line with parchment, leaving some overhang on the two long sides for easy removal. Grease again. Set aside.

Make the cake batter. In a small mixing bowl, whisk together flour, cornstarch, baking powder, baking soda, salt, granulated sugar and light brown sugar. Set aside.

In a medium mixing bowl, cream butter with an electric mixer until light and fluffy, about two minutes. Beat in the egg. Mix in half the dry ingredients, followed by half the buttermilk. Add remaining dry ingredients followed by the remaining buttermilk. Scrape down the bowl as necessary.

Pour batter into prepared pan. Tap full pan on the counter five times to release any large air bubbles. Bake cakes 33-37 minutes, or until a toothpick inserted in the center comes out clean. Let cake cool in its pan for fifteen minutes. Use parchment overhang to lift cake onto a rack to cool completely. Peel off and discard parchment.

For Pineapple Upside-Down Cake Sherbet, you will only need about half this cake (1 1/2 cups 1/2-inch cubes). Use the other half for snacking, or triple wrap in plastic and freeze for up to 3 months.
Pineapple Upside-Down Cake Sherbet

Cherry Almond Tart

Cherry Almond Tart

Of all the wonderful things about cherry season—namely, that there are cherries everywhere and in everything—the lone drawback is that it’s quick. Cherries arrive in the produce section fast and furious, and then suddenly two months have passed and you’re googling pumpkin recipes again. Where does the time go?

Cherry Almond Tart

I have spent every summer of this blog’s brief existence trying to fill it with recipes highlighting every major warm weather fruit group. There are many (so, so many) berry recipes and a shocking number of peach desserts considering that I don’t care much for cooked stone fruit, but I’m happy if I nail down one cherry treat per year. Lucky for all of us, this year’s Cherry Almond Tart is a notch above the rest.

The secret? Frangipane aka almond pastry cream. It’s easy to make—it’s just a blend of almond flour (or whole blanched almonds), sugar, eggs and a few other baking staples—and is spread into a thin layer between rough puff pastry dough and a bevy of pitted whole cherries. As it bakes, this thin blanket of almond cream puffs up and nearly envelops the cherries, and gets a touch dark on top.

Cherry Almond Tart

The results are outstanding. Every bite is full of juicy, collapsed cherries, flaky pastry and a soft, thick layer of frangipane. I gilded the lily with some confectioner’s sugar and sliced almonds, but it truly needs no adornment. But, you know, ice cream is never a bad idea.

Cherry Almond Tart

Heads up that I’m on vacation this week! I’ll be taking Friday off to spend time with my family, but I have an epic ice cream recipe coming next Wednesday. Have a great week, y’all.

Cherry Almond Tart
Cherry Almond Tart
makes one tart, about 8-10 servings

Rough Puff Pastry*:
1 cup all-purpose flour
1/4 teaspoon Kosher or sea salt
5 ounces (10 tablespoons) unsalted European butter (I used Kerrygold)
1/4 cup water or milk of choice, very cold

Frangipane:
1 cup blanched almond flour or 4 ounces blanched almonds
1 tablespoon all-purpose flour
pinch of Kosher or sea salt
6 tablespoons granulated sugar
6 tablespoons unsalted butter, cold-ish room temperature, cut into cubes
1 large egg
1/2 teaspoon pure almond extract

For the Cherries:
2 1/2 cups whole sweet cherries, stemmed & pitted
2 tablespoons granulated sugar
1 tablespoon unsalted butter, cut into small pieces

Egg Wash:
1 large egg
1 teaspoon water

For Garnish:
2 tablespoons confectioner’s sugar
2 tablespoons sliced almonds

Note: If you’d like to use frozen (thawed) puff pastry instead of Rough Puff Pastry, start the recipe at the paragraph beginning “Make the tart.”

Make the Rough Puff Pastry. In a large mixing bowl, whisk together flour and salt. Use a pastry blender or two forks to cut butter into dry ingredients until the largest pieces are the size of small peas. Pour in cold water or milk and stir with a silicone spatula or wooden spoon until a shaggy dough forms.

Flour a surface and a rolling pin. Turn dough out onto surface, and use your hands to pat it into a rough rectangle. Roll the dough into an 8x10" rectangle. Fold dough in thirds, and give it one quarter turn. Roll into an 8x10" rectangle again, fold, and turn. Repeat rolling, folding, and turning until it has been done six times total. Wrap folded dough in plastic wrap and refrigerate for at least one hour, or up to 48 hours.

Make the tart. Place an oven rack in the center position. Preheat oven to 400F. Line a rimmed quarter-sheet pan or jelly roll pan with parchment.

Flour a surface and a rolling pin. Unfold dough. Roll dough out to 10x14-inch rectangle. Transfer dough to the prepared pan. Trim any excess overhang. Use your knife to score a rectangle on the dough, so that there is a 1/2-inch border on all sides. Dock the center rectangle of the dough with a fork. Refrigerate.

Make the frangipane. In a food processor (or very good blender), pulse almond flour, all-purpose flour, salt and sugar together. Pulse in butter. Pour in egg and almond extract, and process until frangipane is a homogenous paste.

Remove crust from the refrigerator. Use an offset spatula or the back of a spoon to spread frangipane in a thin layer all over the docked rectangle. Evenly scatter the cherries over the top. Sprinkle with sugar, then dot with butter.

Make the egg wash. Combine egg and water in a small bowl, then use a fork to whisk them together. Use a pastry brush (or a clean finger) to brush egg wash over exposed crust.

Bake tart for 28-30 minutes, until puffed and golden all over. Let cool completely in the pan on a rack. Remove to a cutting board. Use a large, sharp chef’s knife to slice the tart, then sift confectioner’s sugar over the top. Serve, garnished with sliced almonds, if desired.

Tart is best within 48 hours. Wrap leftovers and keep them in the refrigerator.
Cherry Almond Tart
Cherry Almond Tart
Cherry Almond Tart

Berry Whipped Cream

Berry Whipped Cream

I’m sure you’ve had berries with whipped cream, but have you ever had berries in whipped cream?

It’s as simple as taking one of my favorite ingredients, freeze dried berries, pulverizing them into a powder and then whipping them into fluffy pastel clouds of cream.

Berry Whipped Cream

So simple. So dreamy. So good. So perfect for piling onto a slice of Ricotta Cake and then shoveling into your mouth mostly with your fingers even though there are forks right there.

Berry Whipped Cream

I clearly made this with batch with all raspberries, but the recipe will work with any freeze dried berry (or other fruit) you like. Get colorful with it! Go pink with strawberries, indigo with blueberries, or maybe try the mixed berries I’ve been eyeing recently at Trader Joe’s! I don’t know what color they’d make exactly—some sort of purple—but I do know it would be delicious.

Berry Whipped Cream
(Any) Berry Whipped Cream
makes about 1 1/2 cups

~1/2 cup freeze dried berries of choice
1 cup heavy cream, very cold
1/2 teaspoon pure vanilla extract
3 tablespoons confectioner’s sugar

Place freeze dried berries in a food processor and process until they are powder, about 45-60 seconds. Alternatively, place the berries in a sealed zip-top bag and crush well with a rolling pin or other heavy object.

Measure out 2 tablespoons of pulverized berry powder, and reserve any remaining powder for another use.

In a medium-large mixing bowl, combine heavy cream, vanilla, confectioner’s sugar, and pulverized berries. Use an electric mixer to whip cream until stiff peaks form. Do not over whip (but if you do, just add a little more cream).

Load whipped cream into a piping bag fitted with a tip or scoop with a spoon and use as desired.

Leftover Berry Whipped Cream should be covered and refrigerated. It’s pretty stable, but may need to be lightly re-whipped before serving.
Berry Whipped Cream
Berry Whipped Cream
Berry Whipped Cream

Espresso Milkshakes

Espresso Milkshakes

I moved away from my hometown of Fort Worth, Texas, half my lifetime ago at 18. First it was to Sherman, Texas, where I went to college, and then straight to New York, where I’ve been for almost 14 years. The longest period of time I’ve spent “at home” in all those intervening years was three weeks between Christmas and a mid-January family wedding in 2017. While I will never (could never!) sever ties with the land of my birth, it’s always evident during my visits that it’s moved on just fine without me.

Espresso Milkshakes

In a lot of ways, it’s great. I don’t see the day-to-day, but I always show up to some new something. There’s excellent vintage shopping now. Magnolia is hoppin’. Many of my very favorite people (and one perfect miniature schnauzer) are there and keep me apprised of everything important. But for all the new stuff happening, old things have to change.

Espresso Milkshakes

Take the demise of my former favorite coffee shop, Four Star Coffee Bar, for instance. It was tucked into a strip mall on the west side until shortly after I moved to New York. I don’t remember exactly when it closed for good, but I do remember the last coffee I had there in August of 2007 and a whole lot of Saturday nights spent there with friends, listening to someone’s terrible ex-boyfriend play bad music and sipping espresso milkshakes. They were nothing more than shots of espresso and vanilla ice cream whirled together—basically smooth affogatos—but I think about them all the time. They’ve been on my to-make list for years! All it took was walking by the old storefront with my little sister a few weeks ago to finally get me to pull my blender off the shelf and get to it.

Now, I should say that this recipe isn’t a carbon copy of the original. For one thing, I don’t have an espresso machine, and for another, I’m basing this recipe entirely on a 14 year old memory. Still, the combination of dissolved instant espresso and vanilla ice cream is pretty dang good. These shakes are cold, smooth and creamy with plenty of espresso flavor, even if you use decaf.

Espresso Milkshakes
Espresso Milkshakes

I suppose you could class these up by buying/using an espresso machine to pull shots or alternatively, going to a coffee shop, getting espresso to-go, coming home, letting it cool and then blitzing it with ice cream…but that seems like a lot of work for something that can be made just as well with some stuff in a jar and warm tap water. Plus, if you make these the easy way at home, I can guarantee you won’t have to listen to anyone’s ex-boyfriend’s terrible band for even a second.

Sometimes change is a good thing.

Espresso Milkshakes
Espresso Milkshakes
makes 1 large or 2 small milkshakes

1 tablespoon instant espresso granules (decaf is fine)
1 tablespoon warm tap water
1 pint (2 cups) vanilla ice cream
4 tablespoons milk of choice (I used whole)
whipped cream, for garnish (optional)
chocolate covered espresso beans, for garnish (optional)

In a small bowl, use a fork to whisk together espresso granules and water until granules are dissolved. Combine espresso mixture, ice cream and milk in a high-powered blender. Blitz until smooth. If needed, add more milk by the tablespoon until the desired consistency is reached. Pour into glasses and garnish with whipped cream and/or chocolate-covered espresso beans, if desired. Serve immediately.
Espresso Milkshakes
Espresso Milkshakes
Espresso Milkshakes