I rarely post on days that aren’t Wednesday or Friday, but I really wanted to get this recipe on here in time for Christmas. Consider this extra post a little gift from me to you. We may not have done any holiday baking when I was a kid, but we still had plenty of Christmas food traditions. When I was growing up, my mom used to make a breakfast casserole every Christmas morning. While I was (and, honestly, continue to be) wary of any dish with “casserole” in the name, I made an exception for that one. Paired with Mom’s traditional all-citrus fruit salad,* it was impossible for even the pickiest of us to resist. It was so good that we didn’t complain when we were told we had to eat breakfast before opening our gifts. It was magic, I tell you.
*This is not a recipe—it’s literally just bite-sized pieces of navel orange and ruby red grapefruit with their membranes removed. Mix ‘em together in a bowl and chill overnight.  Now, you may have noticed that I am speaking about my mom’s breakfast casserole in the past tense. That’s because she stopped making it about ten years ago, right about the time that my sisters and I started wanting more input in our holiday menu.
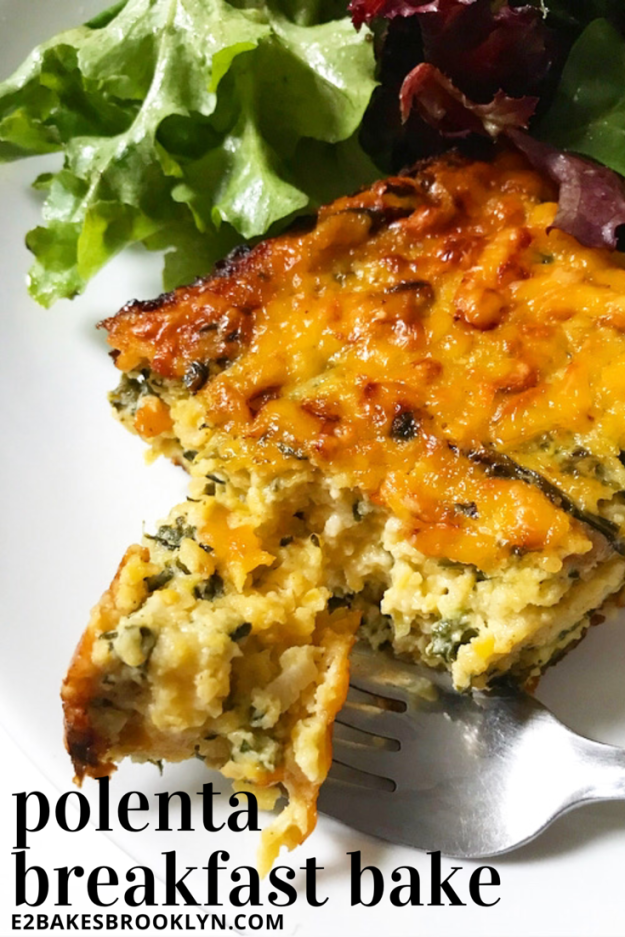
Another reason? Mom’s casserole was made with Bisquick. I have nothing personal against that mix—it’s responsible for every homemade pancake I ate as a child and I am forever grateful for its convenience—but I don’t use mixes these days.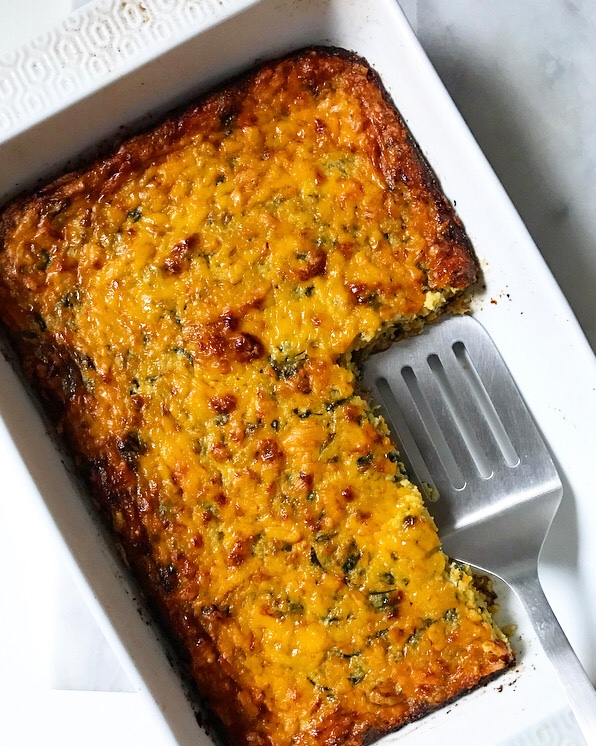 Long story short: today’s Polenta Breakfast Bake is an homage to the Christmas Morning Casserole of my childhood, minus the Bisquick, plus a creamy polenta base and some extra greens. It’s not my mom’s recipe, but it’s damn good.
 Also, it’s naturally gluten-free (thanks, coarse ground cornmeal!). And people think you’re fancy when you say you made polenta anything, so there’s that.
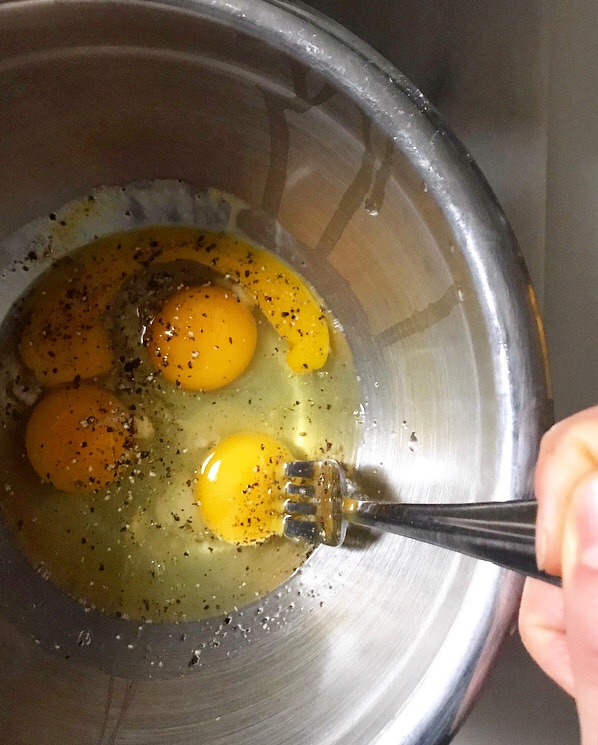
 My favorite thing about this recipe is that, like my mom’s, it doesn’t require any specific timetable. Flexibility is important when it comes to any holiday meal planning, but I am particularly opposed to any recipe that might require me to get up and start puttering around the kitchen when it’s still dark outside. I’ve said it before and I’ll say it again: sleep > baking (and, um, cooking too).
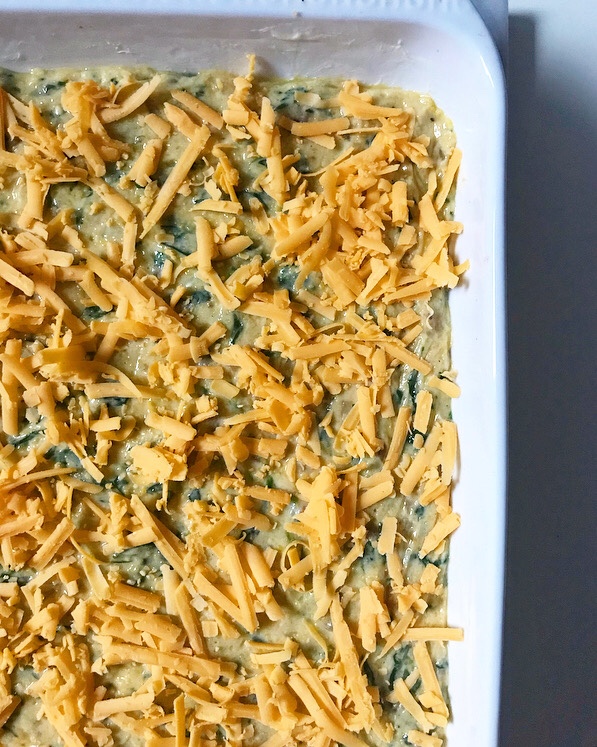
 This Polenta Breakfast Bake can be prepared morning-of, if you are an early bird, but I love that I can assemble it a day or two ahead and then just bake it for 25 minutes before serving. I have a hard time doing anything in the morning without the aid of coffee, but I can absolutely turn on the oven and bake a breakfast casserole for 25 minutes.
 Hot from the oven, this Polenta Breakfast Bake will be a little hard to slice cleanly, so feel free to scoop it instead. I was able to slice the casserole pictured after letting it cool for about half an hour, but I’d be happy to eat this stuff in any shape (or lack thereof). Leftovers keep very well in the refrigerator and will slice & reheat like a freaking dream.
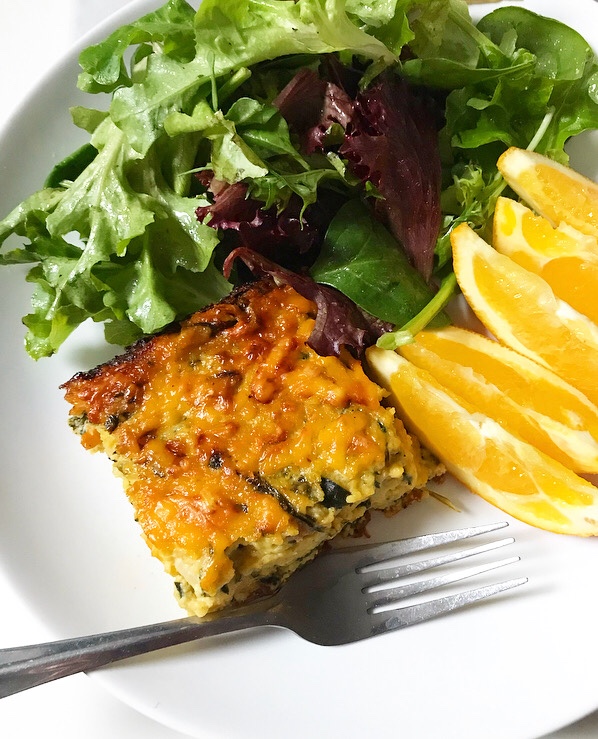 One last thing before I get to the recipe. Like all recipes on this site, I’ve made this Polenta Breakfast Bake to suit my own flavor preferences. I used breakfast sausage and cheddar cheese because those were prominent flavors in my mom’s recipe, but you can swap them for any meat and/or cheese you like in weights equal to those in the recipe. My only word of advice here is that if you choose to use bacon, remove it from the pan while you sauté the onion, garlic, and greens so that it doesn’t burn. Oh, and speaking of greens, feel free to leave ‘em out if you have picky eaters (or if breakfast vegetables just aren’t your thing).
That’s all a very long way of saying that you should take my favorite and make it yours ❤ 
Looking for more holiday breakfasts? Check out these overnight Cinnamon Rolls, this Eggnog Puff Pancake {Dutch Baby}, and this whole round-up of breakfast time favorites!
Polenta Breakfast Bake
makes 8-12 servings
2 1/2 cups water
2 cups milk (preferably whole)
1 1/4 teaspoons fine sea salt, divided
1 1/2 cups polenta or coarse ground cornmeal
8 ounces freshly shredded sharp cheddar cheese (2 cups), divided
1/4 teaspoon ground cayenne pepper (optional)
1 teaspoon prepared dijon mustard
2 tablespoons unsalted butter
2 teaspoons olive oil
8 ounces raw breakfast sausage, removed from casings
1 medium white onion, diced small
4 cloves garlic, minced
10-12 ounces fresh greens, roughly chopped (I used a mix of baby spinach and baby kale)
4 large eggs
1/4-1/2 teaspoon freshly ground black pepper (based on preference)
Grease a 9×13-inch pan or other large casserole dish (a broiler-safe one, if possible).
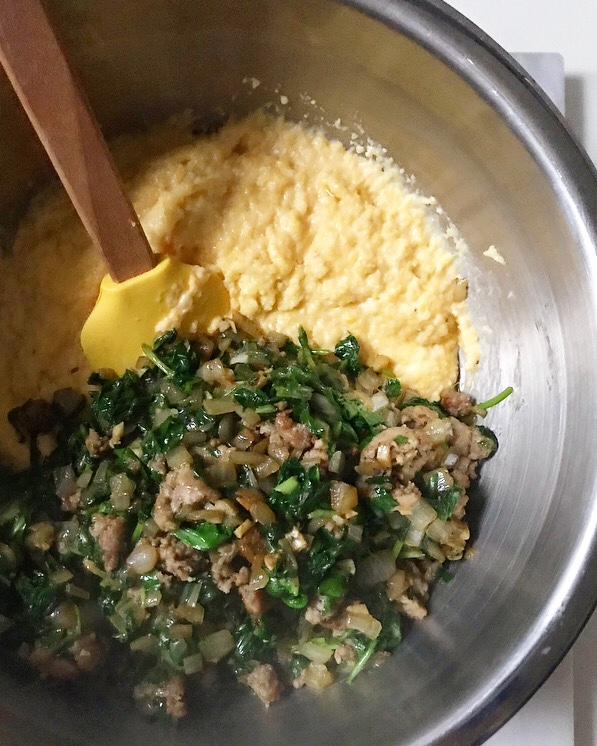
Make polenta. Bring water and milk to a simmer. Keep an eye on it, as milk can boil over dramatically without much notice. Add 1 teaspoon salt. Whisking constantly, add polenta in a thin stream. Reduce heat to medium-low, whisking very frequently for 25-30 minutes, until thick. Remove from heat. Whisk in 6 ounces (~1 1/2 cups) cheese, cayenne and dijon, followed by butter. Transfer to a heatproof bowl and let sit 15 minutes.
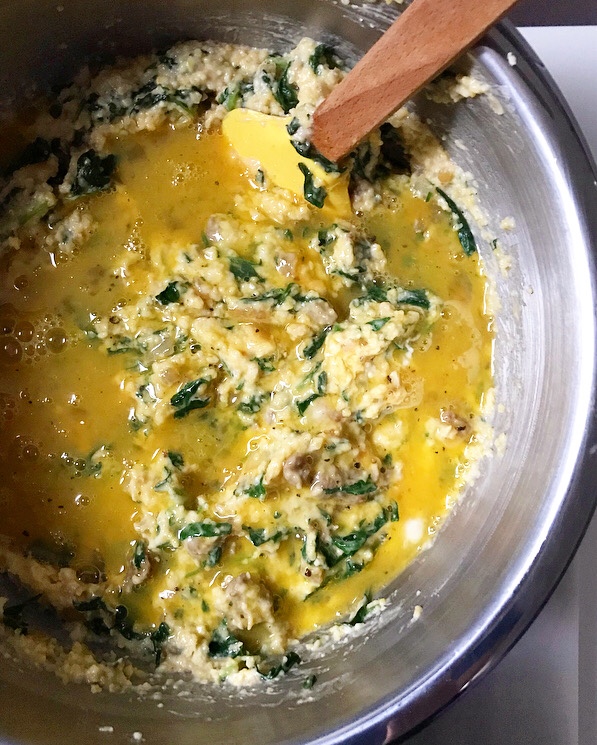
In a large skillet, heat olive oil over medium heat. Add breakfast sausage and cook, breaking it up with the edge of a spatula, until browned (about 8-10 minutes). Add diced onion and cook until soft, about 5 minutes. Add garlic and cook until fragrant, about 1 minute. Add about half the greens and let wilt. Add remaining greens and cook until wilted. Remove from heat. Stir mixture into polenta.
In a small bowl, use a fork to whisk together eggs, 1/4 teaspoon salt, and black pepper. Stir eggs into polenta mixture. Transfer everything to prepared pan. It may be covered and refrigerated at this point for up to 48 hours.
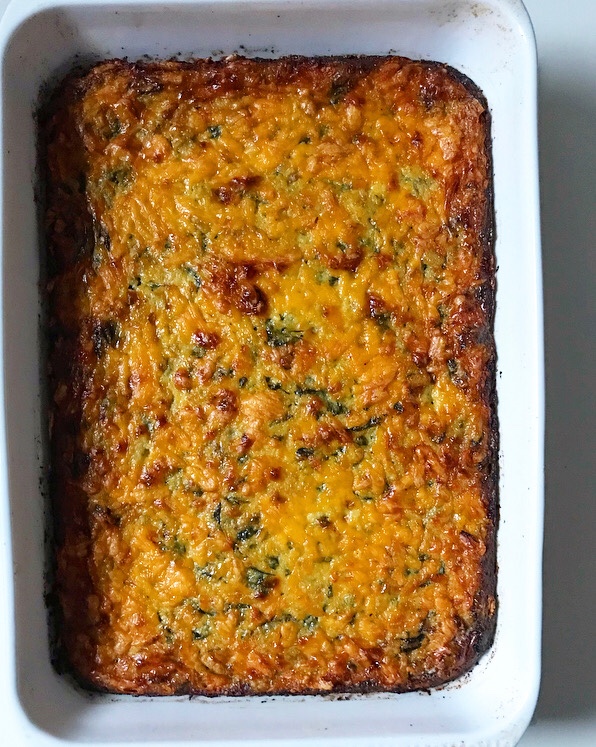
Preheat oven to 425F. Scatter remaining 2 ounces (~1/2 cup) of cheese over the top. Bake uncovered for 25 minutes, or until golden at the edges, and slightly puffed and a little jiggly in the center. For an extra golden top, broil for 1-2 minutes. If your dish is not broiler-safe, you can heat the oven to 475F with the casserole on the top rack. Watching it closely, let it cook 5-10 minutes, turning as needed, until cheese has browned in places.
Let casserole cool for a few minutes. Scoop or slice and serve. Casserole will slice like a dream once cooled.
Store leftovers in an airtight container in the refrigerator. Cold slices reheat well in the microwave.
Leftovers may be kept covered in the refrigerator for up to 4 days.


 Let me start by saying that I hope you all had a lovely Halloween, and that I’m so glad it’s over so we can talk about Thanksgiving food.
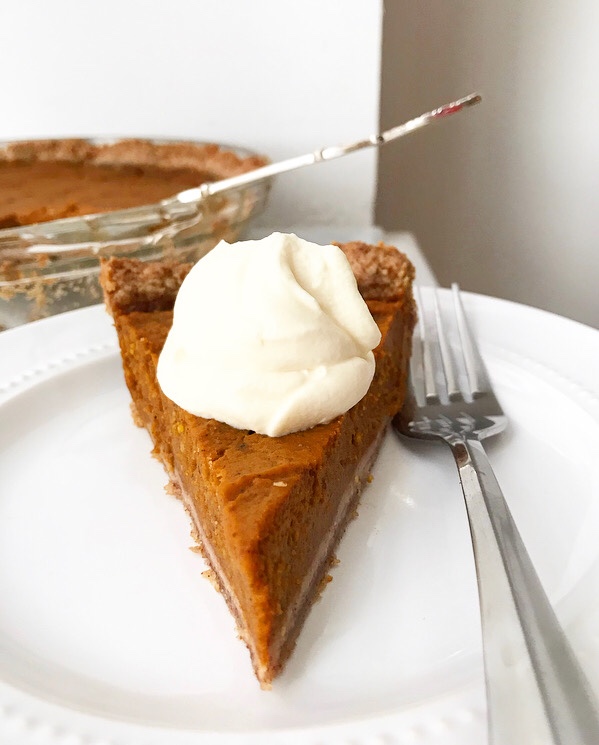 I got a little head start with Wednesday’s
 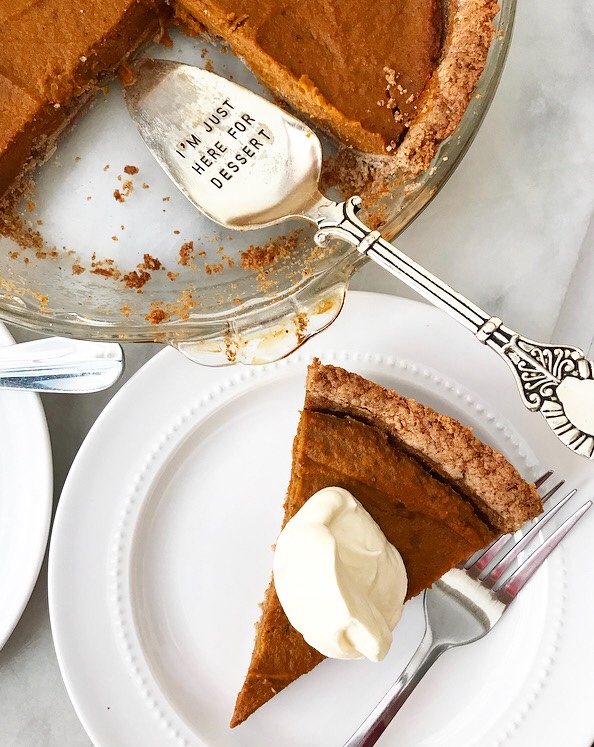 If you haven’t clicked away, never to return…well, good. More pie for us.
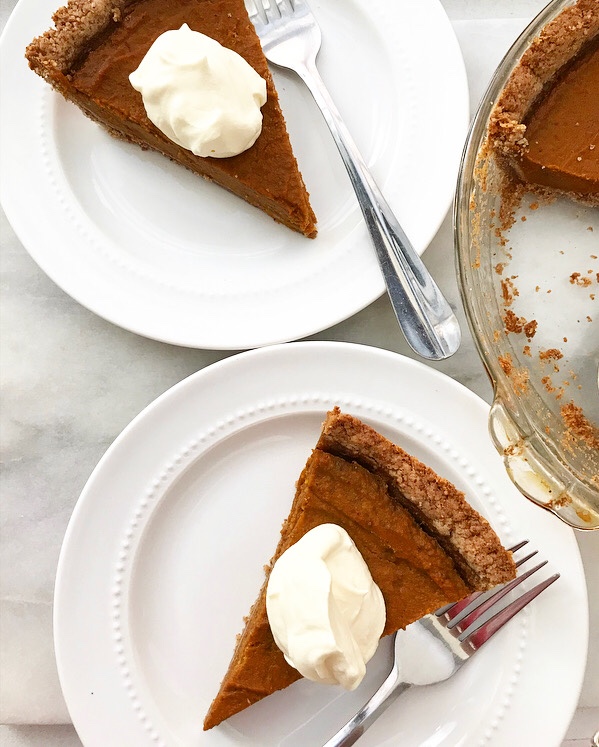
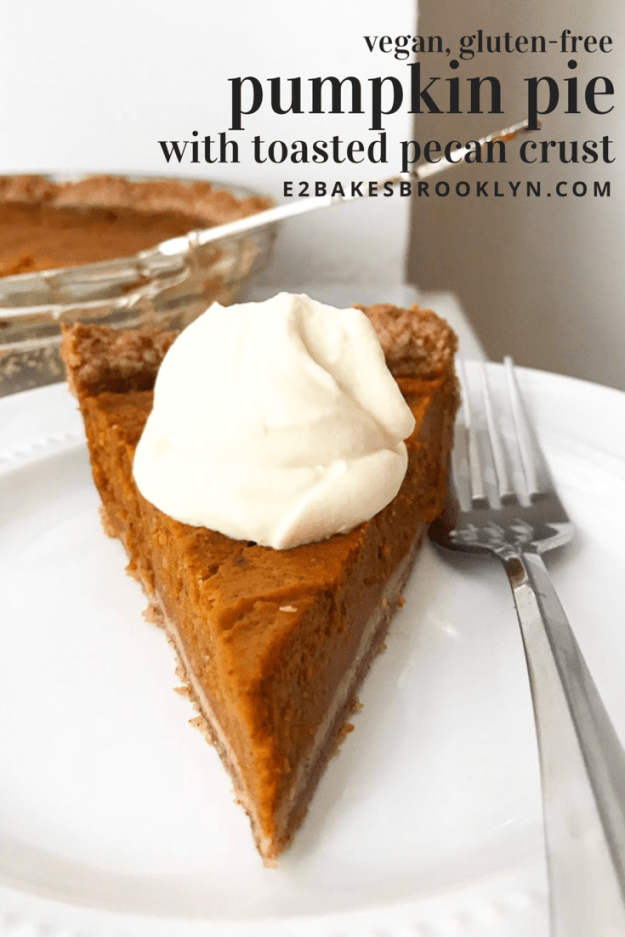
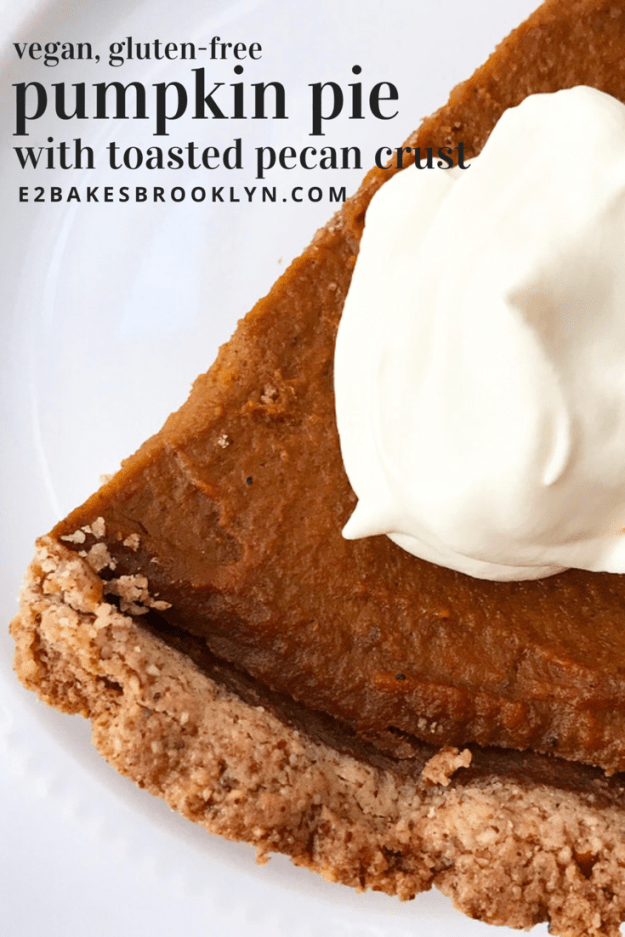
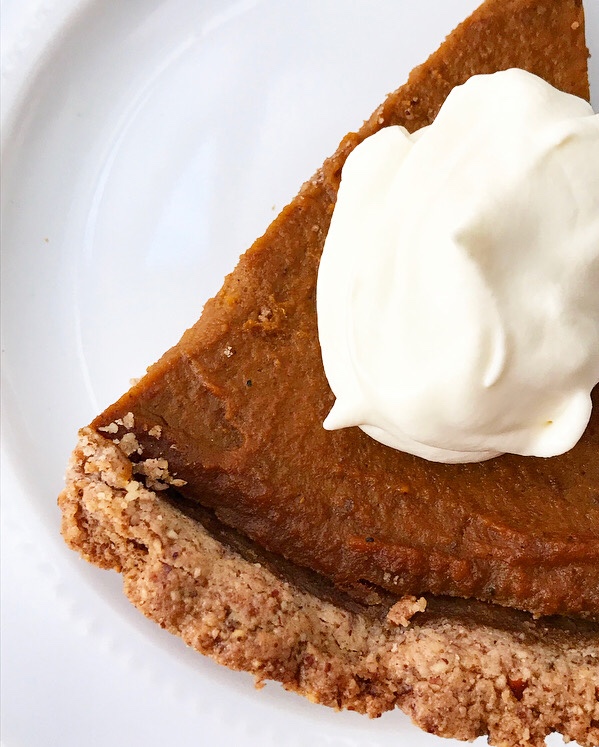 You see, for all the things that this pie is not, it is very much one thing: delicious. Like so good I’m not totally sure why we would eat any other pumpkin pie.
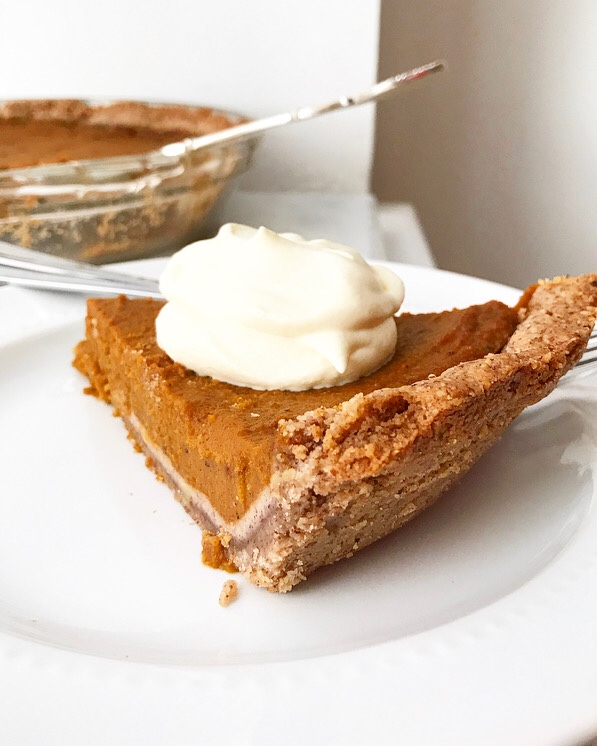 The filling is soft and sweet and perfectly spiced and the crust is mostly made of ground toasted pecans. GROUND TOASTED PECANS. And it’s a press-in crust—no rolling required. Does it get better than that?
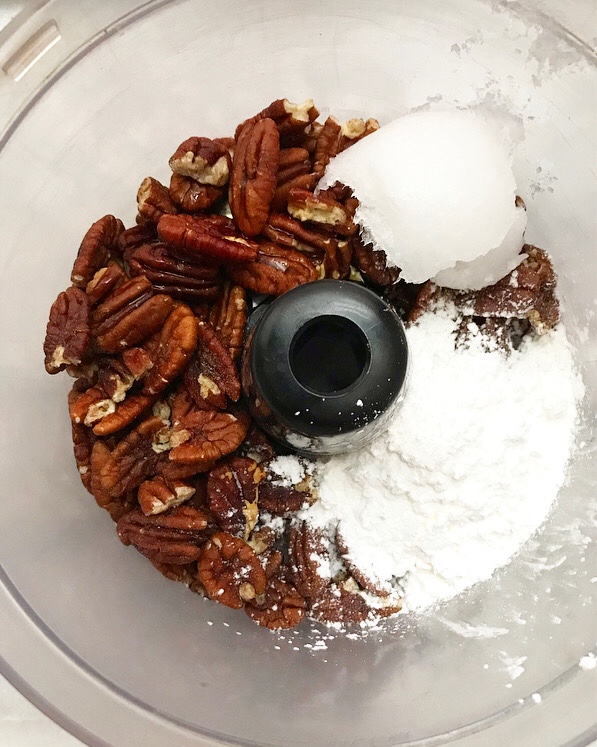
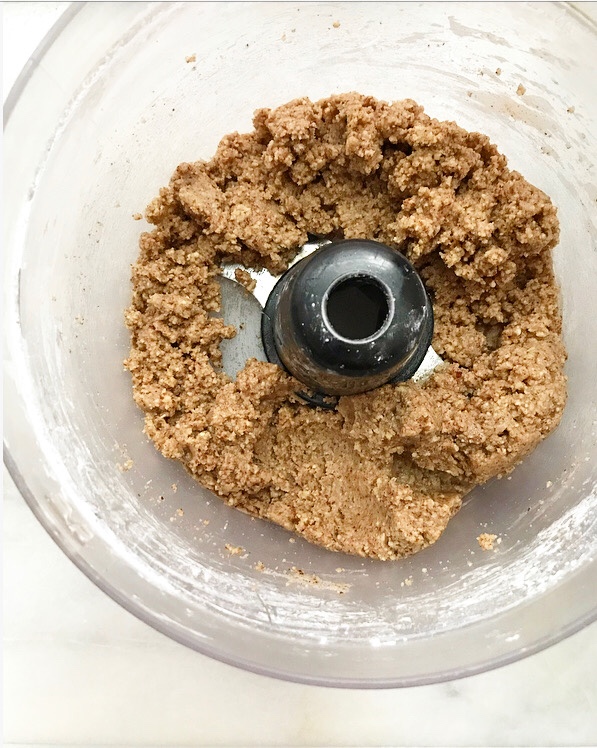
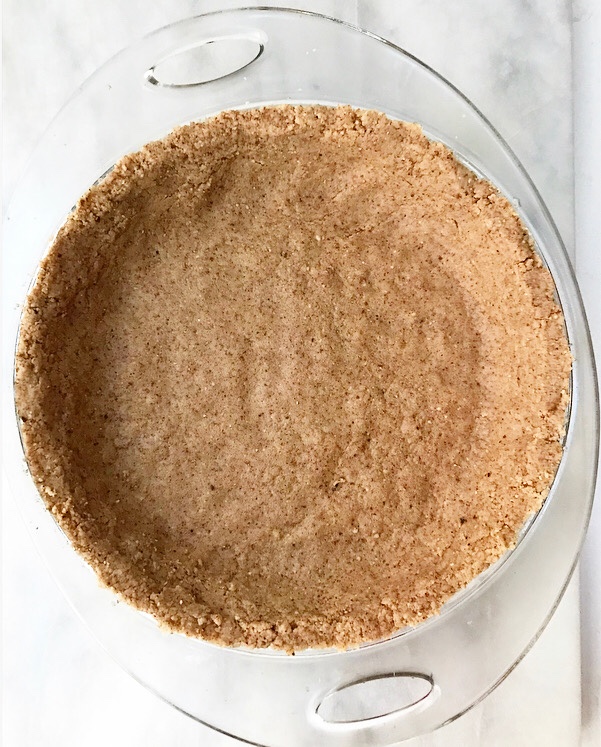 Both elements come together in the food processor.
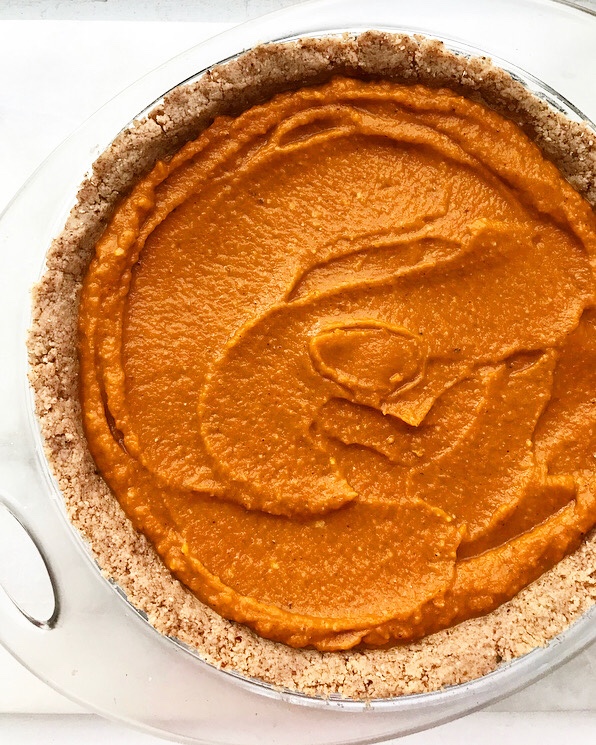 And the whole pie requires exactly nine ingredients.
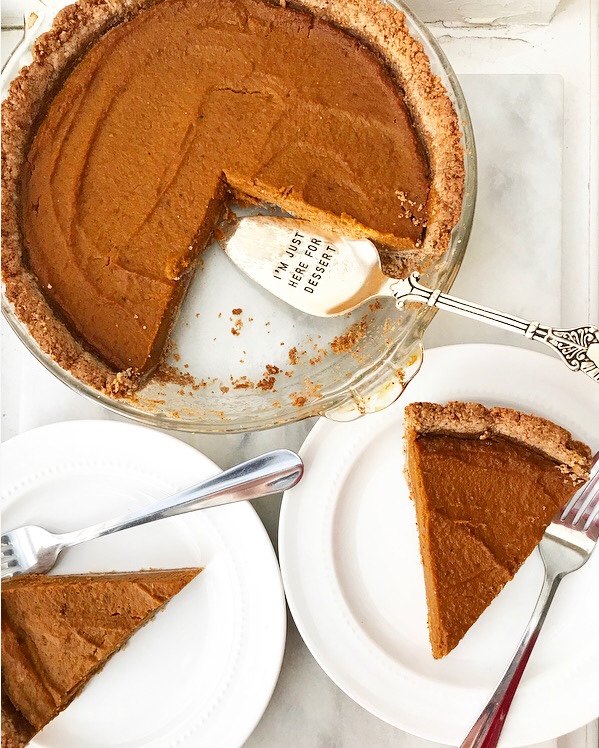 And it’s actually best if it’s made ahead, so you won’t have to give up valuable Thanksgiving Day oven space.
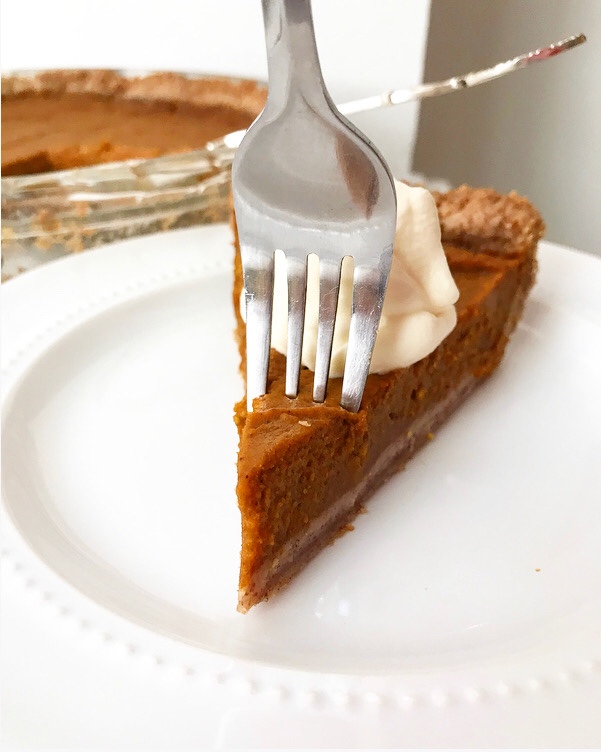 And, again, it’s vegan, gluten-free, and contains just enough sweetener to make it taste like dessert. And make no mistake, it does taste like dessert. I am not the sort of person who is going to get behind a recipe just because it’s “better for you.” Nope. It’s big flavor or go home here at E2 Bakes. If it happens to be somewhat nutritious, that’s just a bonus.
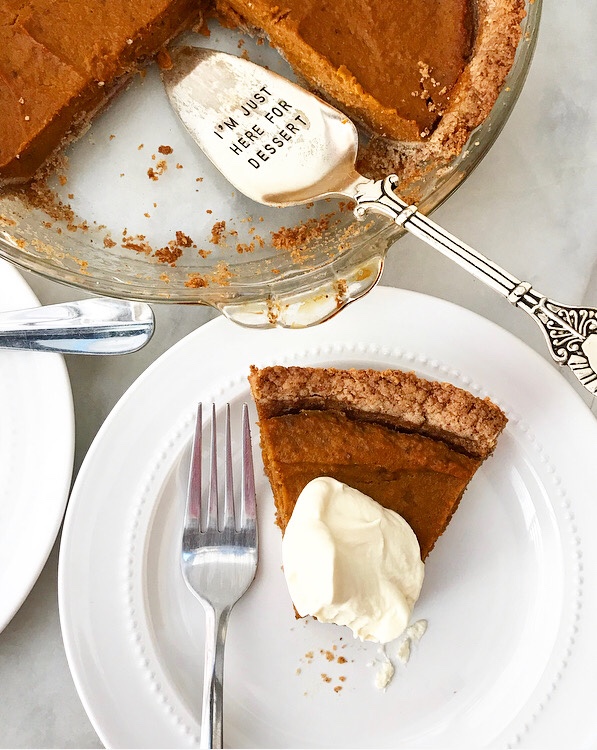 Have a great weekend, y’all ❤
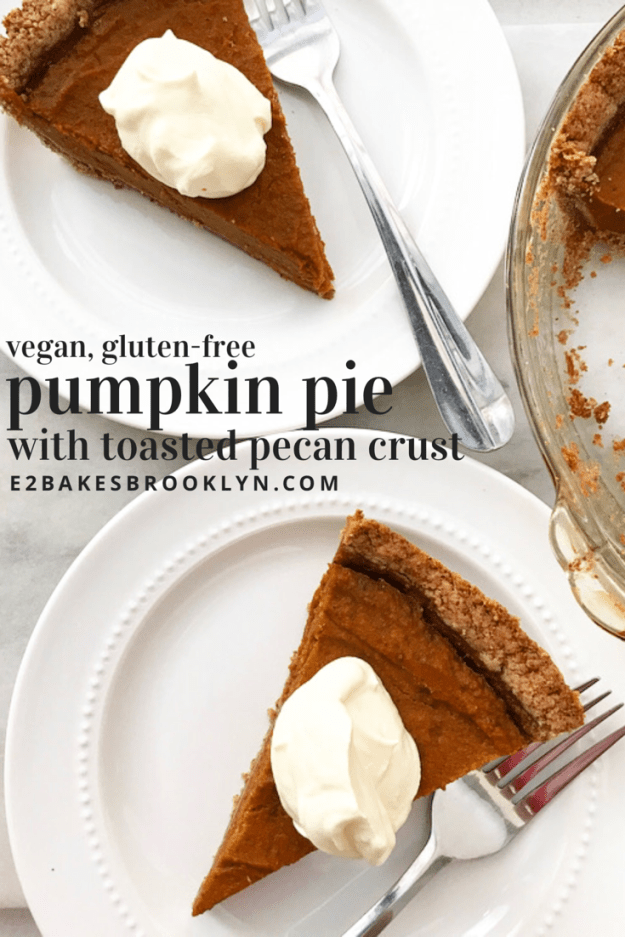
 In years past, I would take this time to go on about the number of posts/recipes I’ve written (332/322, if you care about that sort of thing) and how I had no idea that the blog would go on this long. I have a tendency toward sentimentality and I’m working on reining it in, but I’m not perfect yet…so, um, I’ll be brief. And then we’ll talk about Peanut Butter Mousse Cake.
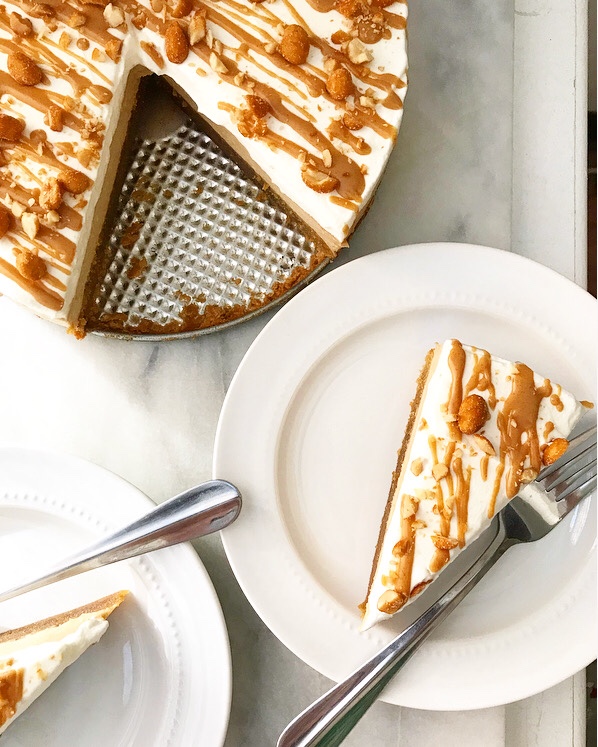 This blog is the thing of which I am proudest. I spend more time and energy working on content for this site than basically anything else, but it has been worth every late night and working weekend. I hope to continue baking and writing here for years to come.
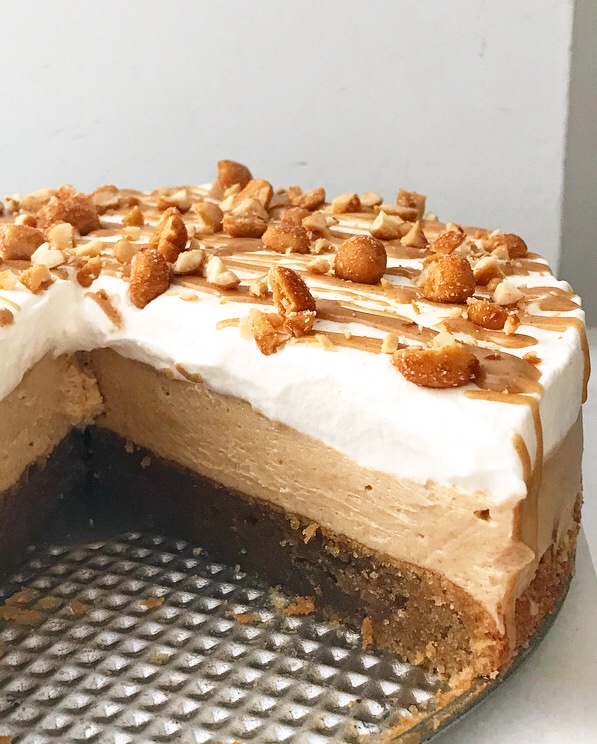 I blog because I love it, but it wouldn’t be nearly as much fun without y’all. Thank you for reading, commenting, providing encouragement and feedback, and making my recipes in your own kitchens!
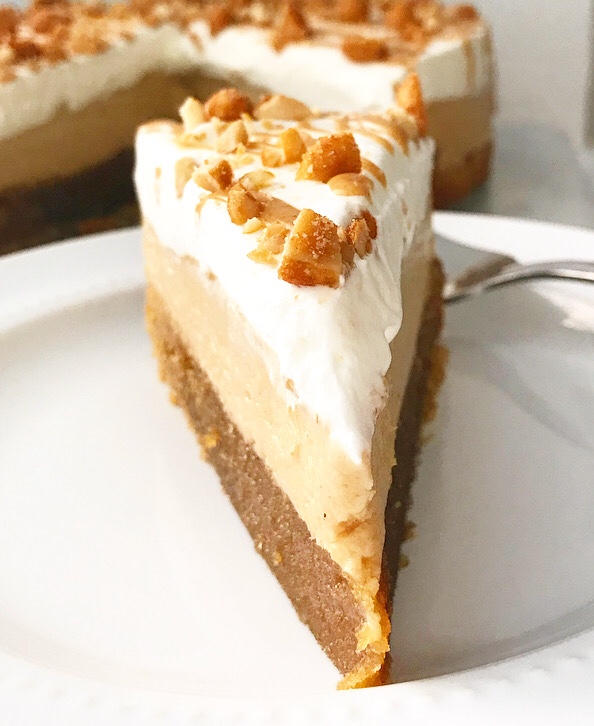 This community has grown by leaps and bounds over the last year. For those of you who are new around here, welcome! I’m glad you’re here.
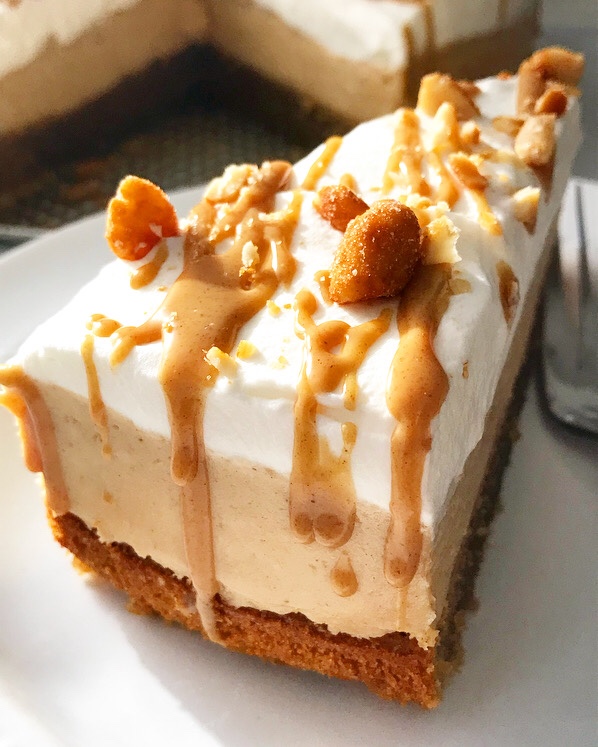 As for the future, lot of exciting things are coming in year four! Recipes, of course, but also bigger, better, blog-altering things. I can’t say much now, but know that good things are happening and I’m psyched to share them with you soon ❤
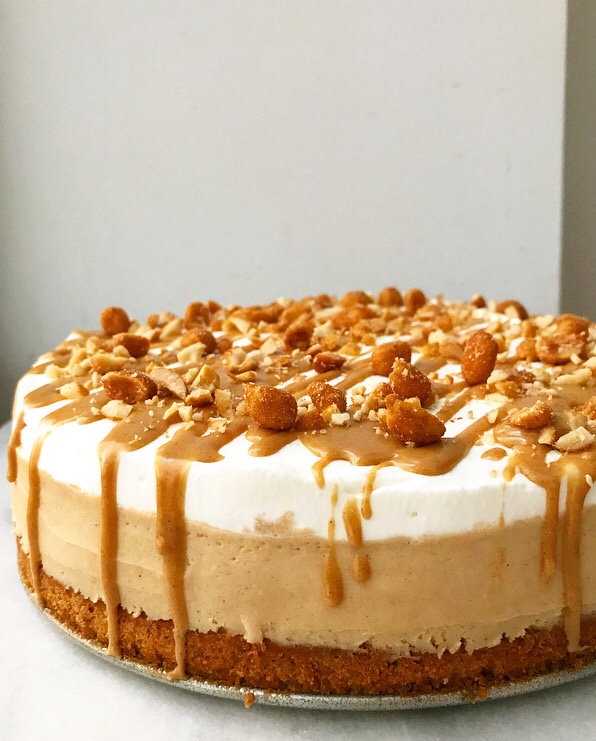
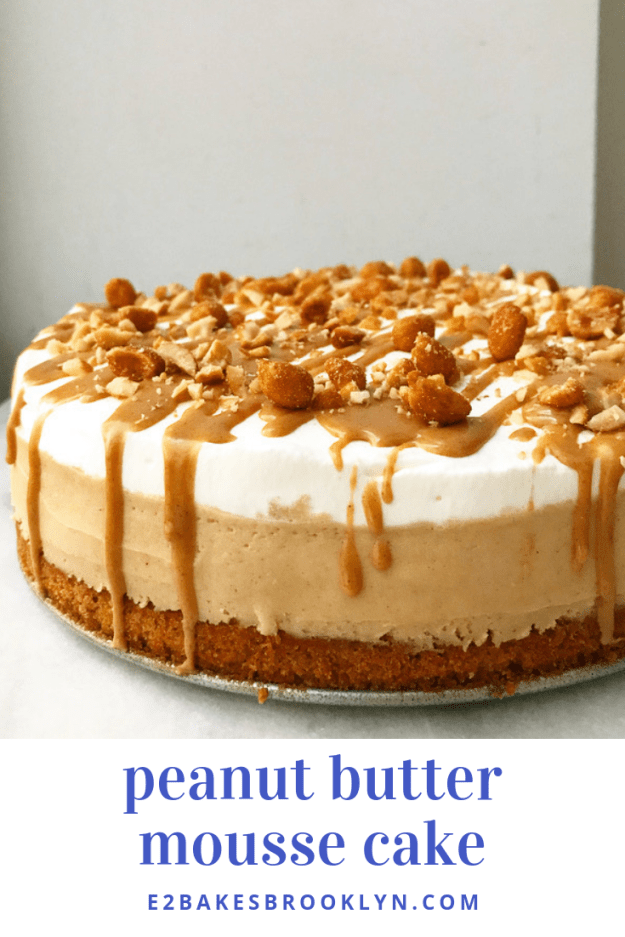
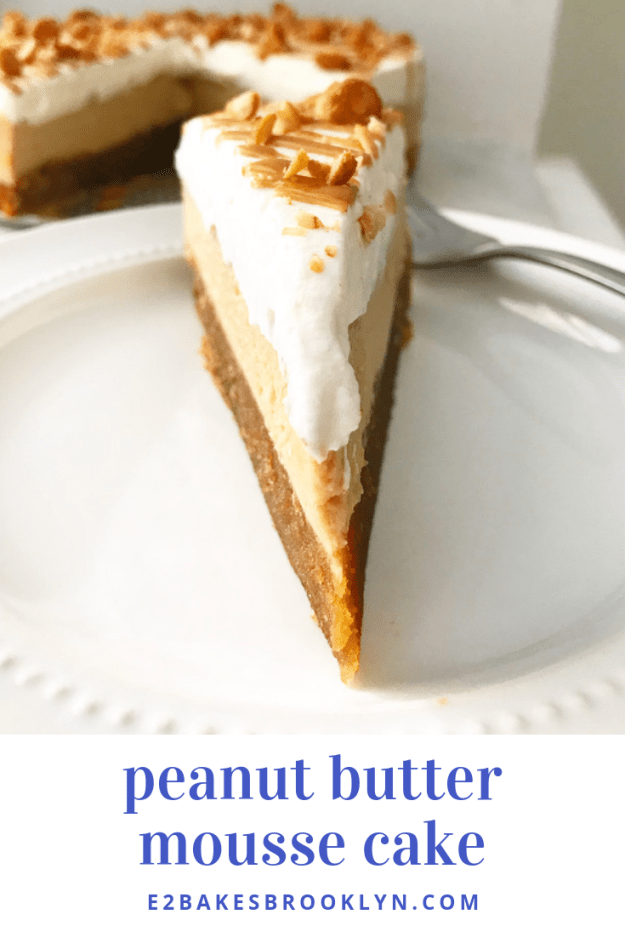
  For now though, let’s talk about Peanut Butter Mousse Cake. It’s the peanut butteriest peanut butter cake I’ve ever had. So. freaking. good!
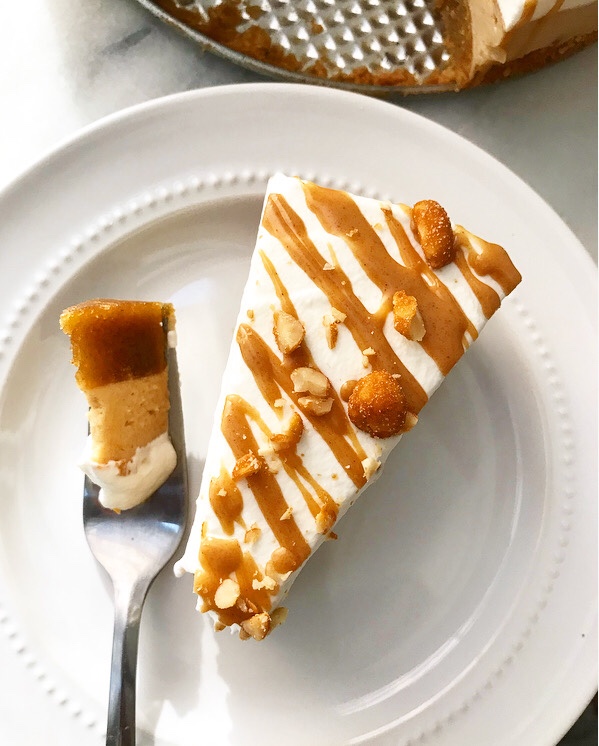
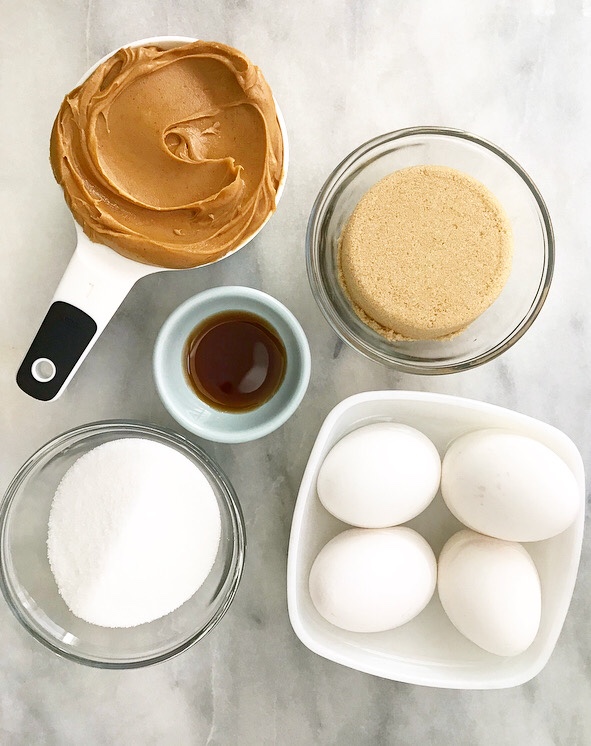
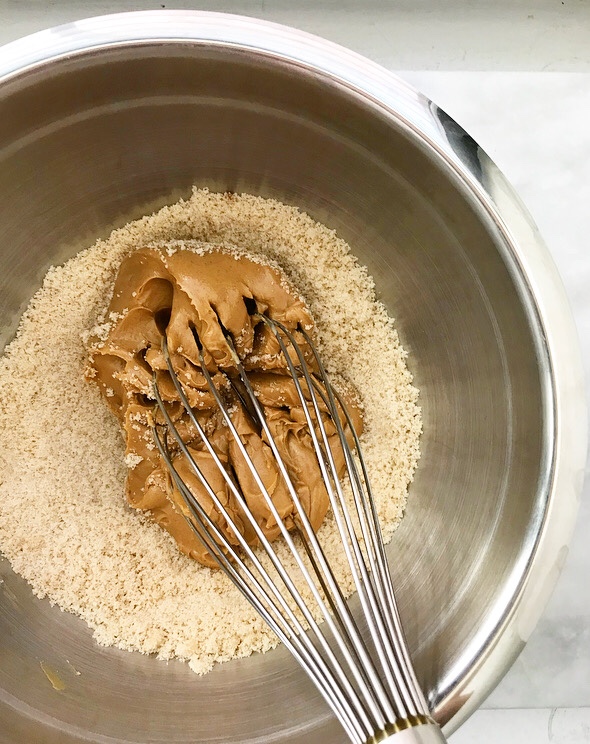
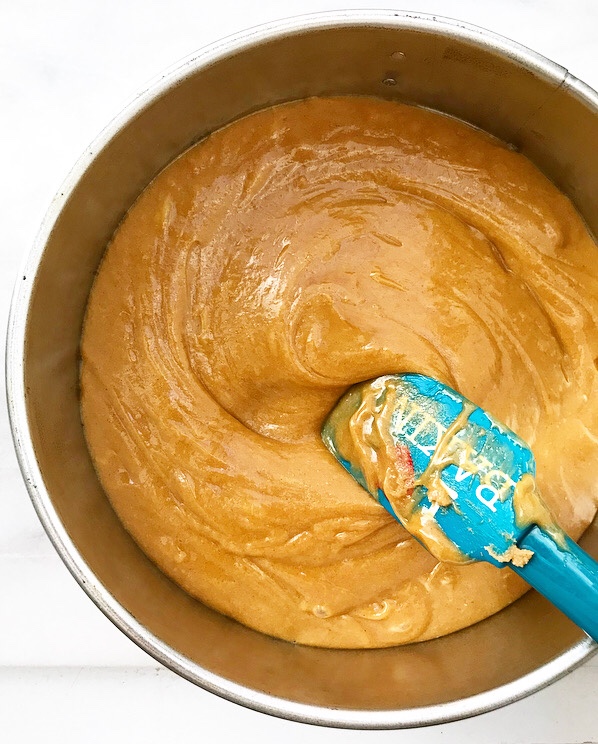
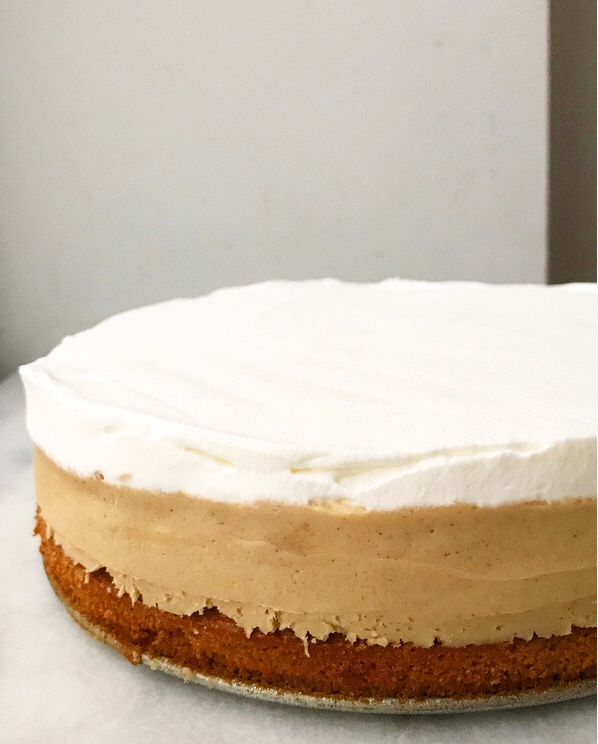
 It starts with a flourless peanut butter cake. This super-easy cake comes together with just five ingredients, one bowl, and a whisk. It’s rich and dense—since it relies on peanut butter and eggs for texture and structure, it’s like a cross between a cake, cookie, and a blondie. YUM.
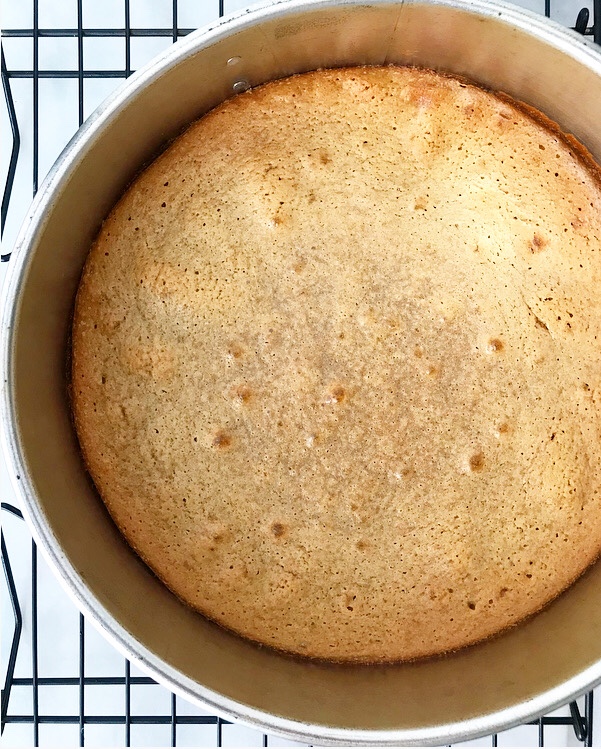
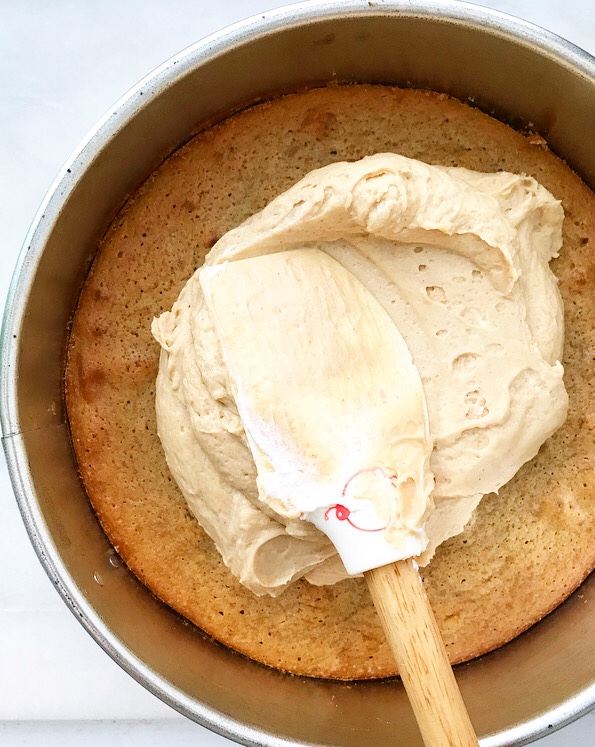 After the cake is baked and cooled, it’s topped with a thick layer of creamy peanut butter mousse. If this recipe looks familiar, that’s because it is—it’s the filling from my
 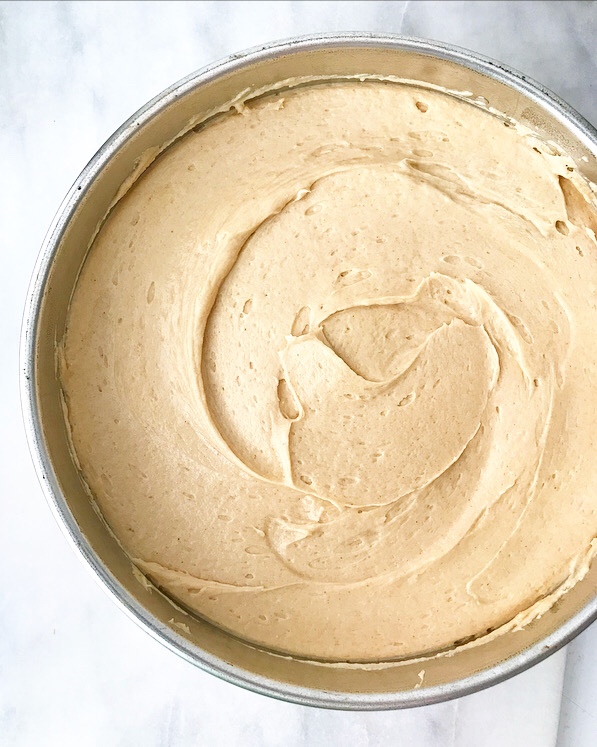 Spread the mousse layer on and chill the cake until everything is firm.
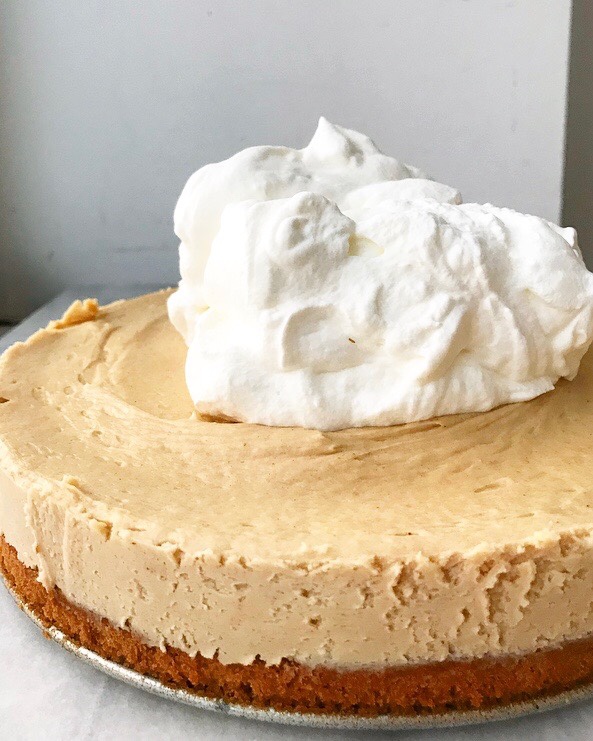
 Top it with a thick layer of whipped cream. Yaaaaaaas.
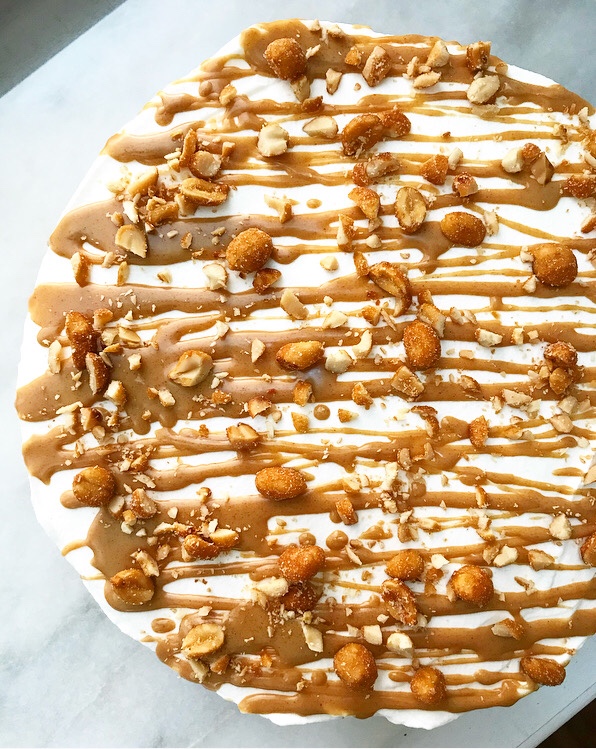 Don’t forget the peanut butter magic shell and honey roasted peanuts.
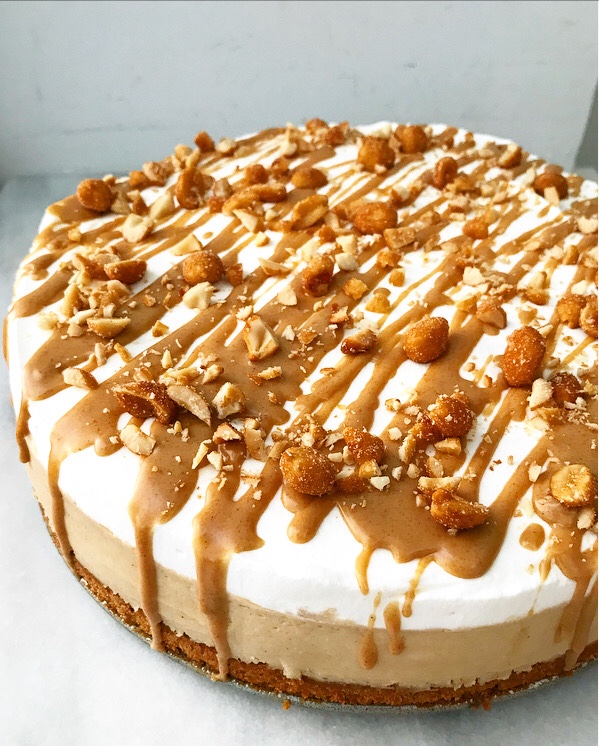 How gorgeous is that?! I love the triple-layered look.
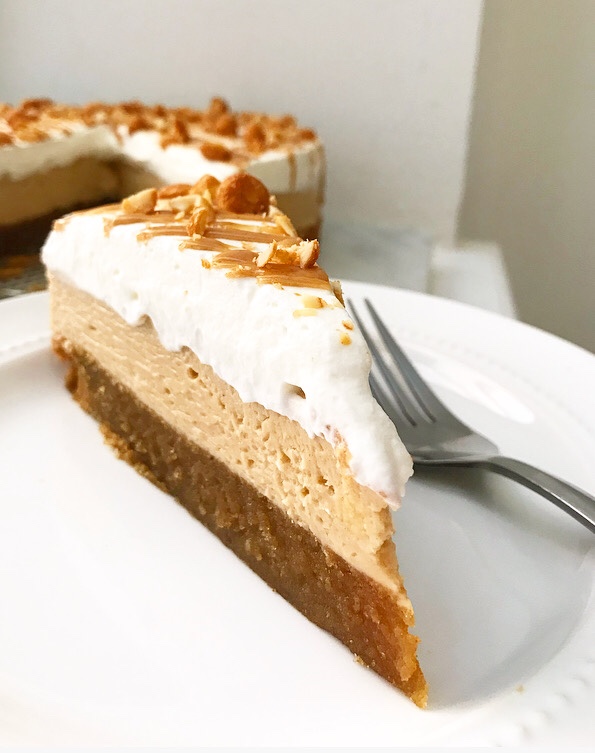 And the creamy, dreamy peanut butter flavor.
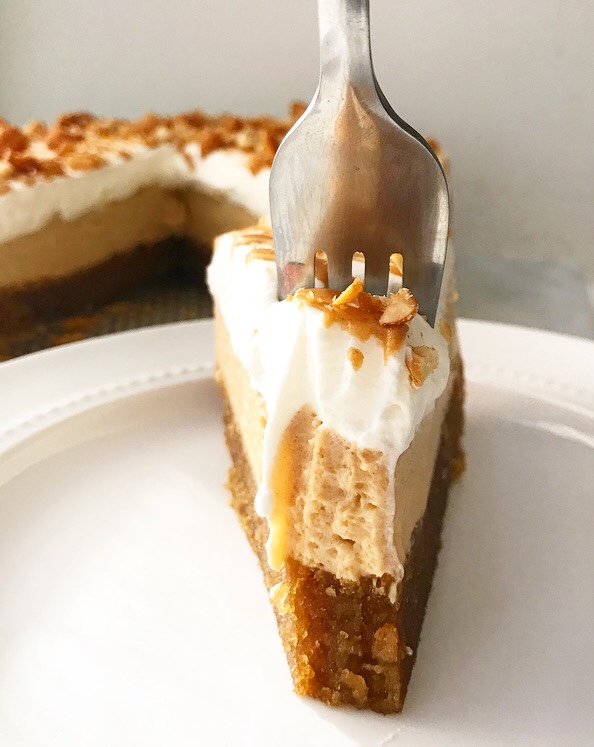 This cake is shockingly simple to make (don’t let the length of the recipe scare you away!) and perfect for nearly any occasion…
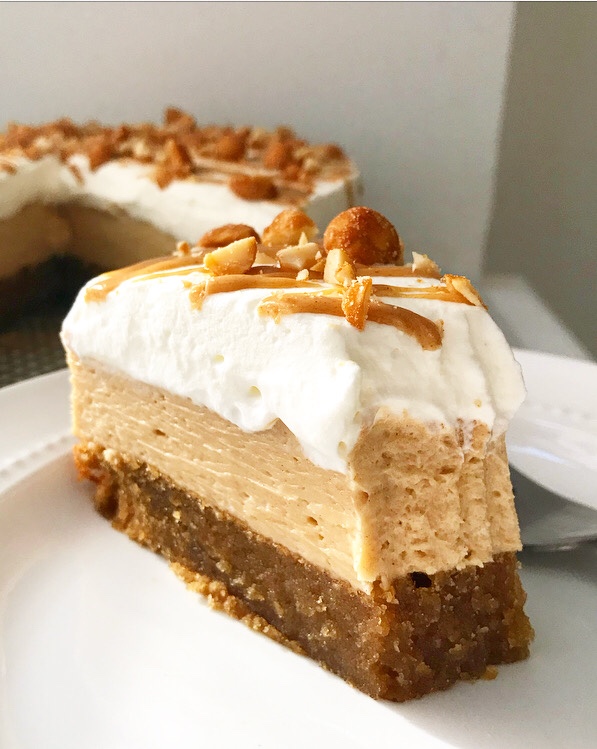
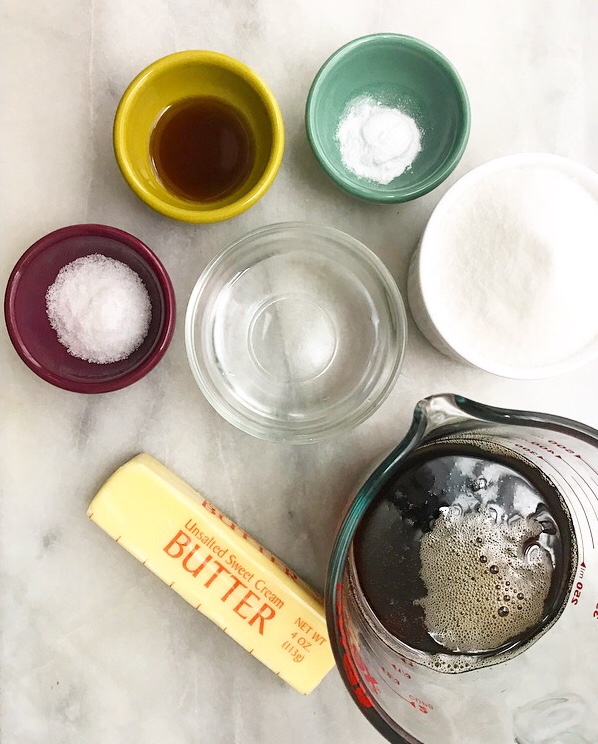
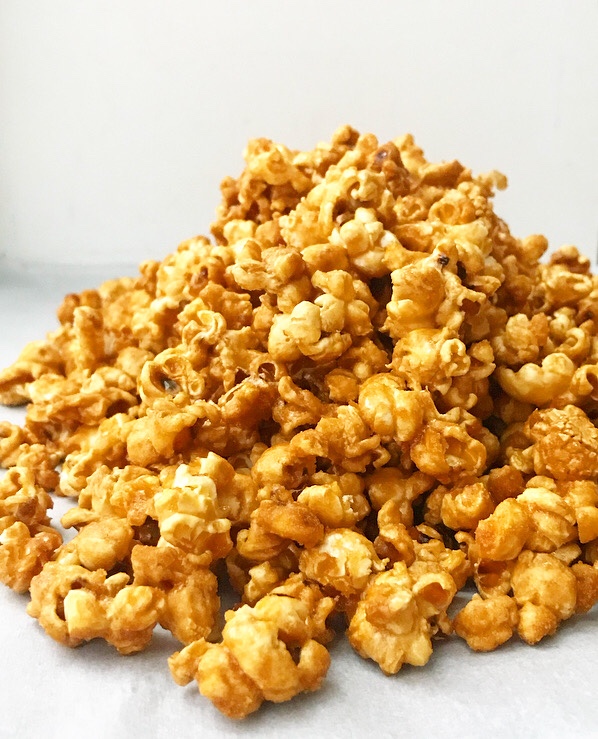
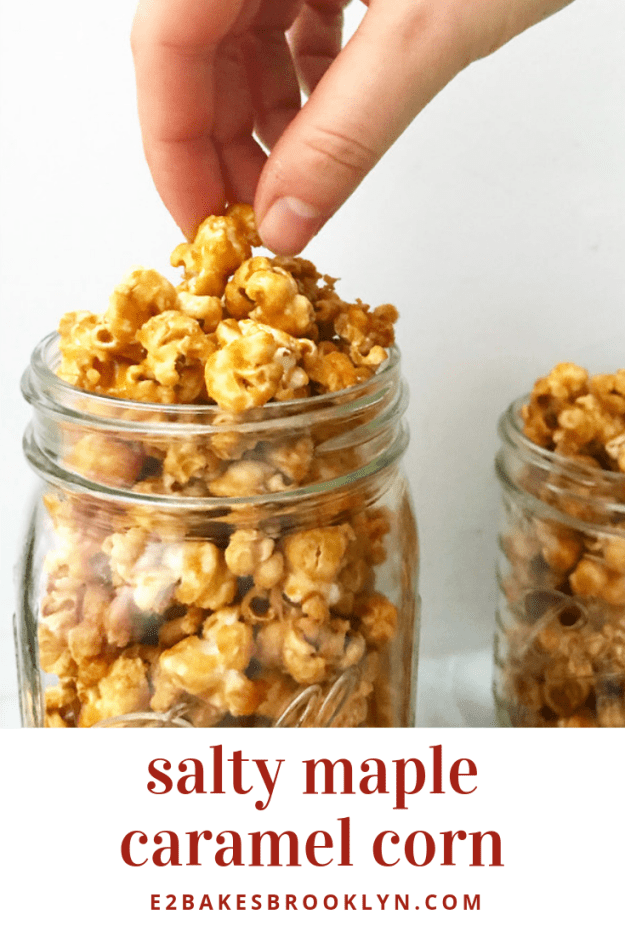
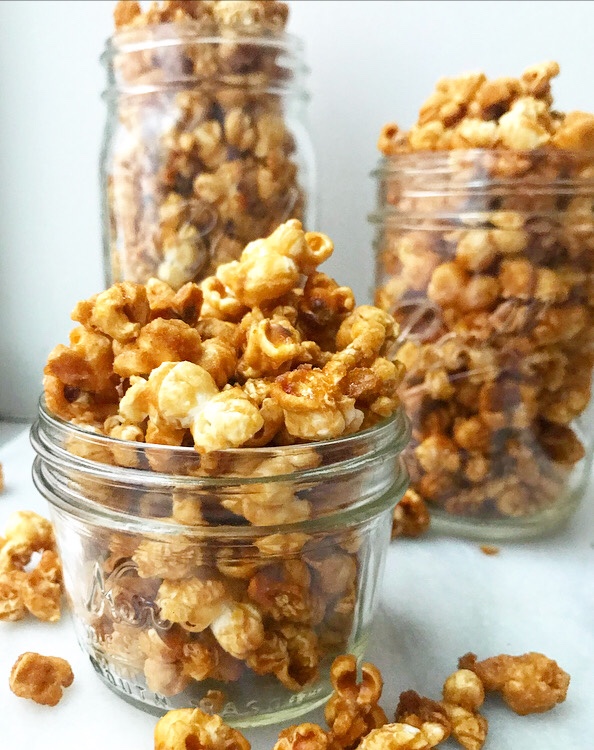 I’ve got maple syrup on my mind, y’all! Last week, it was in the form of a
 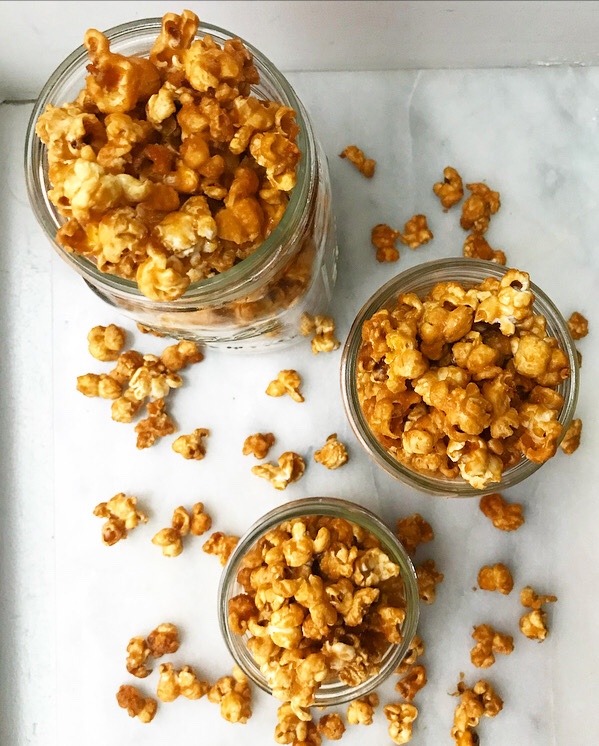 Y’all—this stuff is phenomenal. Phe-nom-e-nal. Crispy, crunchy, sweet and salty. Oh, and easy. Salty Maple Caramel Corn comes together in four simple steps.
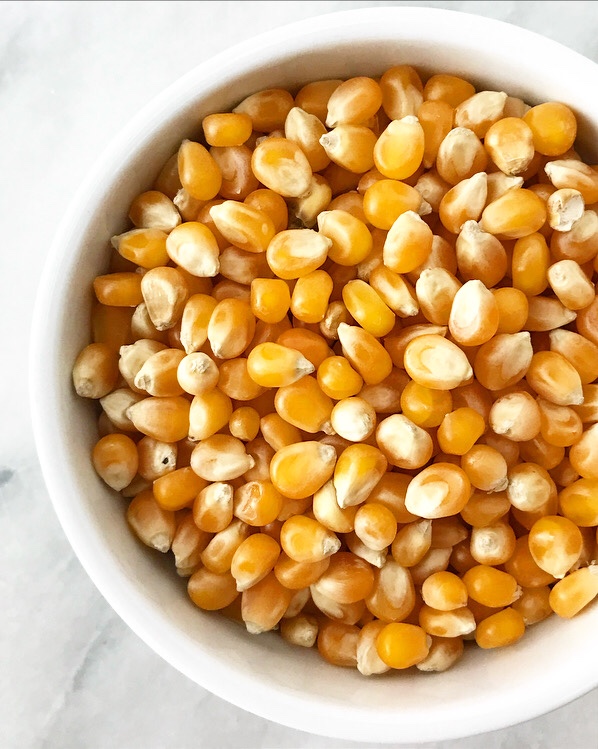


 For the same reasons, don’t touch any pieces of coated popcorn that fly out of the bowl during mixing. Wait until they cool for a few minutes before picking them up.
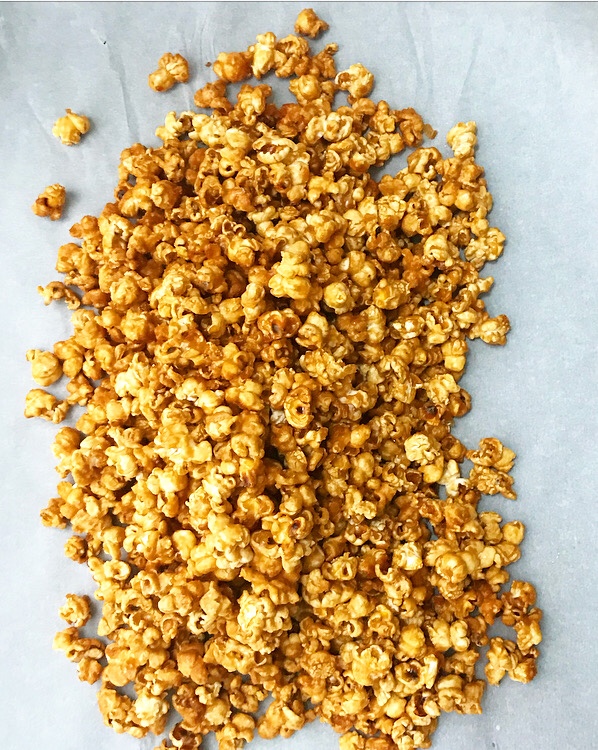
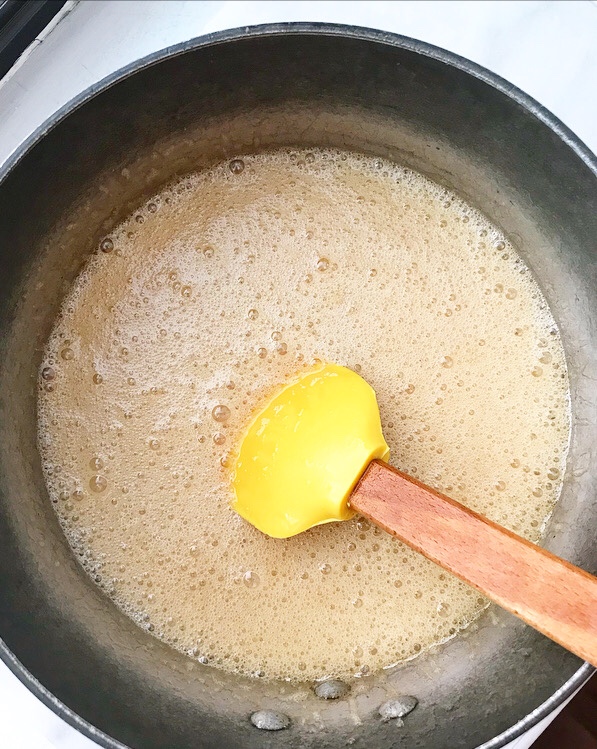
 The caramel corn will seem very wet at first, but will harden to a crispy, glossy finish. Once the hour is up, scatter the caramel corn onto a big piece of parchment and let it cool to room temperature. After that, snack away!
 You’re going to love this Salty Maple Caramel Corn! It’s a great sweet & salty snack or dessert. I think it would make for a wonderful finishing touch on a bowl of ice cream. You could even pile it high as a finishing touch on a
  I highly recommend making a batch over the next couple of days. It’s a guaranteed way to upgrade your weekend ❤
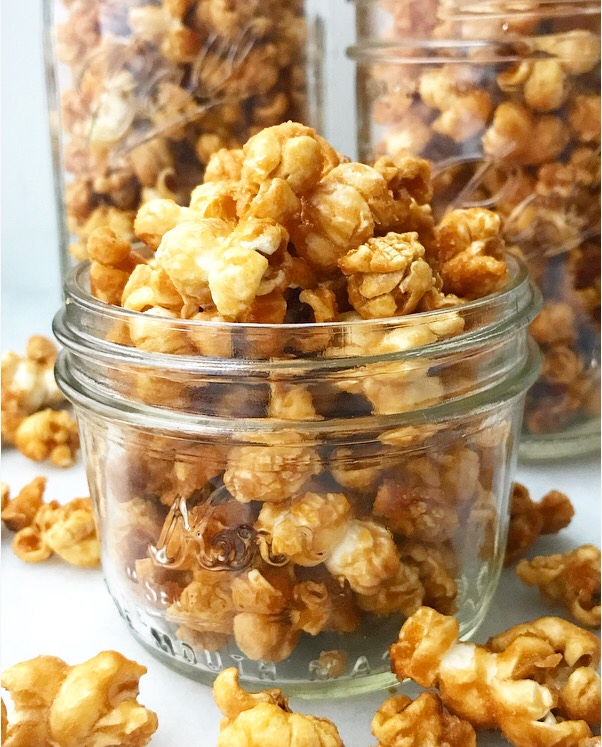


 Hello from
  VJ and I got here Saturday afternoon. It was supposed to be us and two more that day, but due to a work snafu, they didn’t join us until yesterday. Thank goodness for our other guest, my sister,
 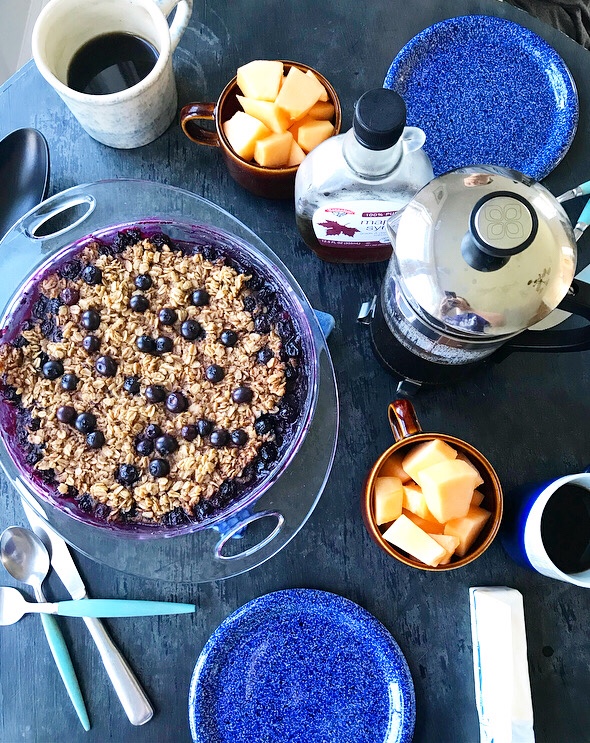 Since it’s just been the two of us these last few days, meals have been simple. As I’ve mentioned
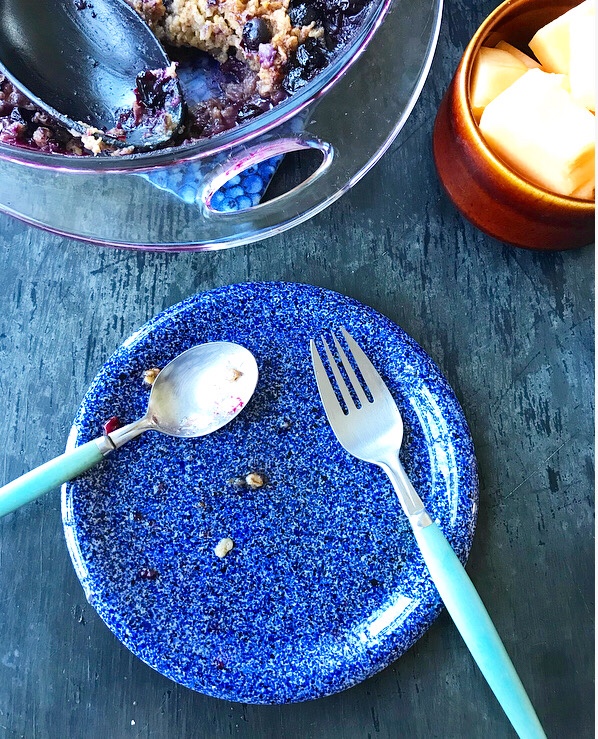
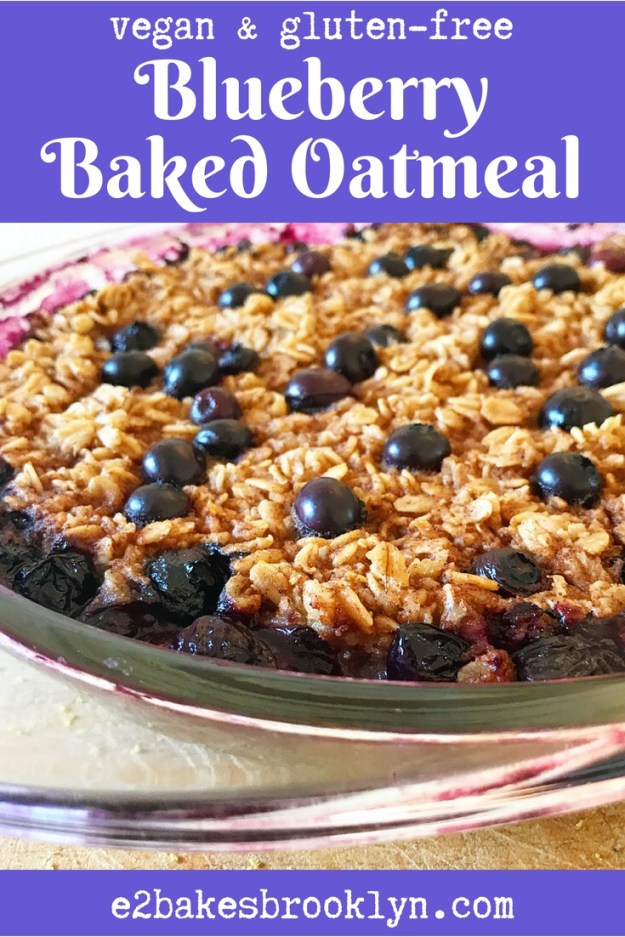
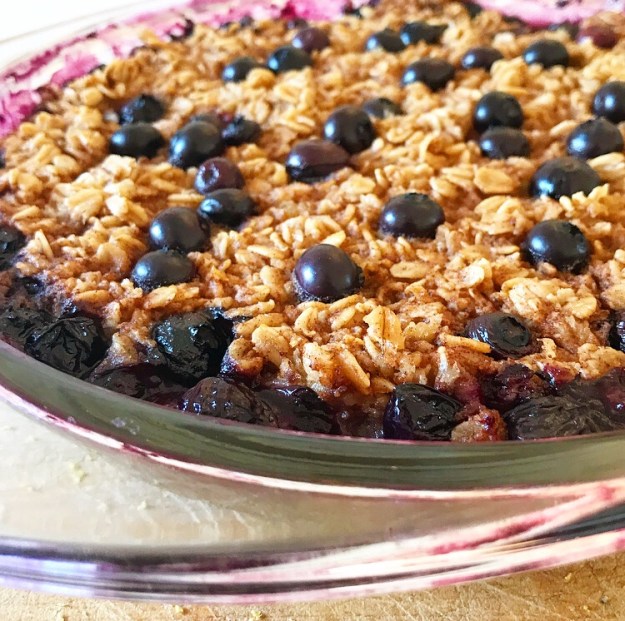
 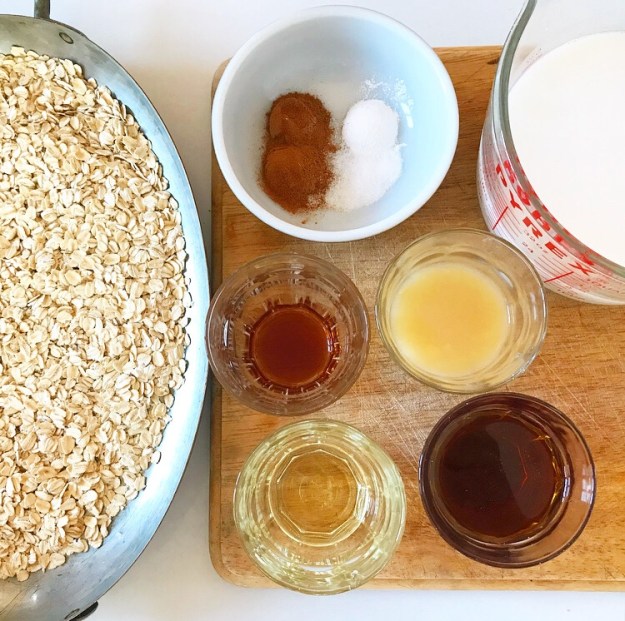 While everyone else I know was going to work Monday morning, I made this Blueberry Baked Oatmeal for us. Made with gluten-free old-fashioned oats, rice milk,* and
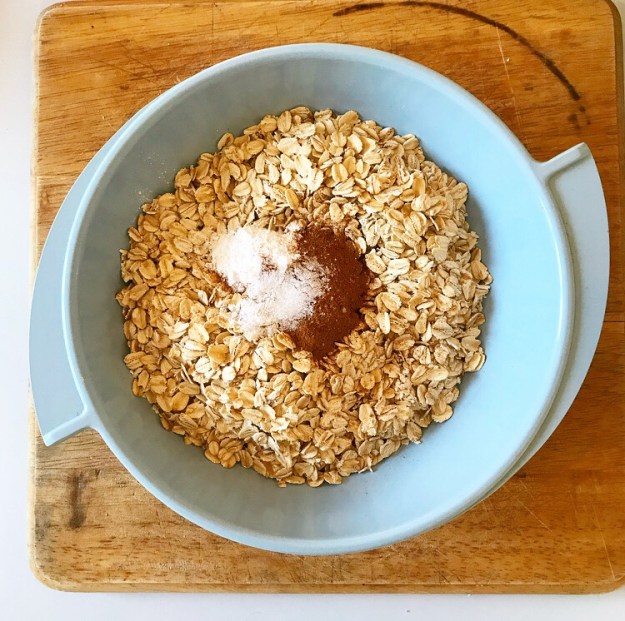
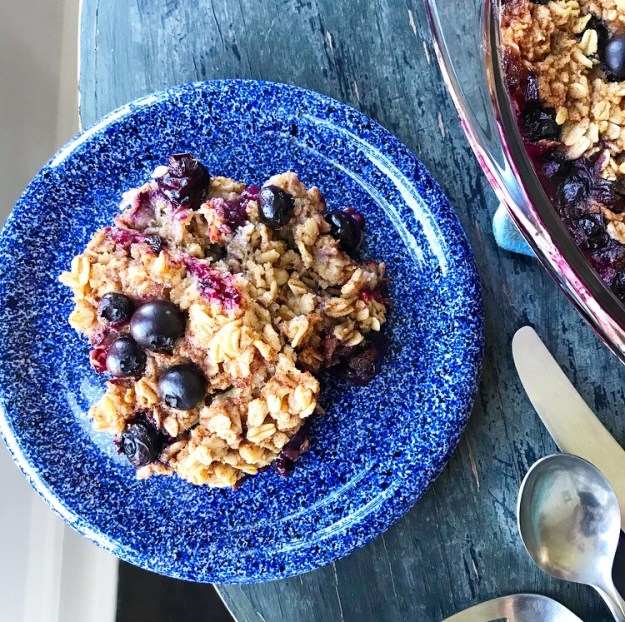
 This oatmeal is super simple to make. With just a few minutes of prep-work and 40 minutes of bake time, you’ll be rewarded with a rich, cinnamon-spiked oatmeal that is positively bursting with blueberries.
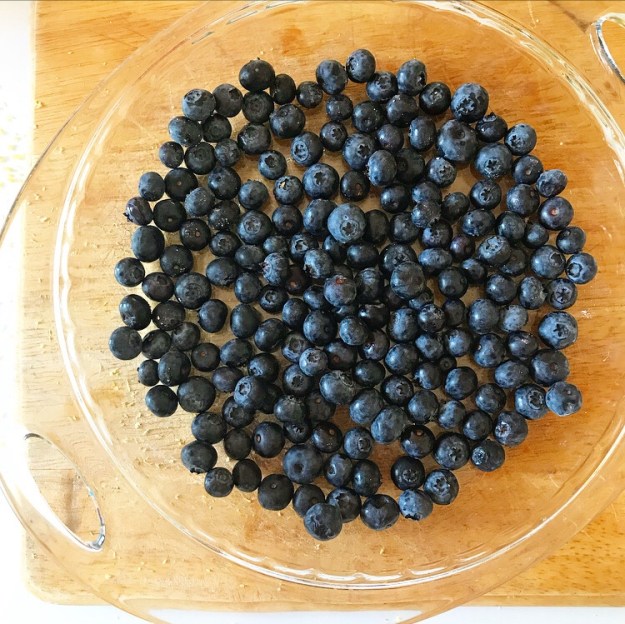
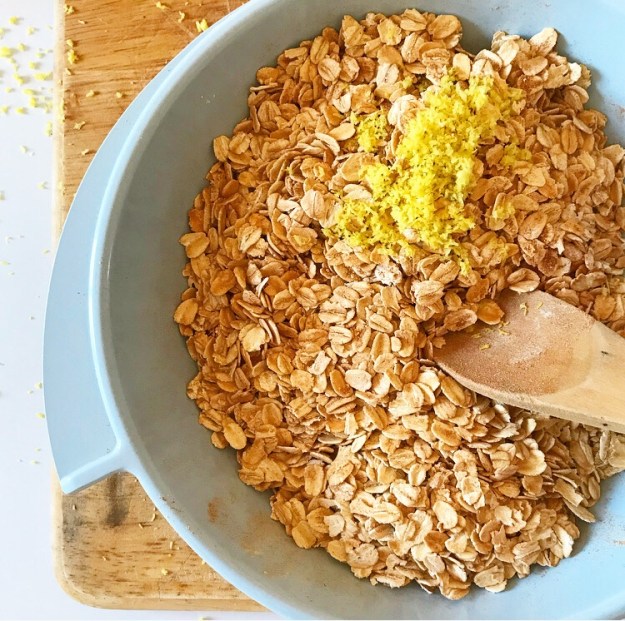
 You just need two bowls and a stirring implement to put it together, and you probably have all the ingredients already (with the possible exception of blueberries).
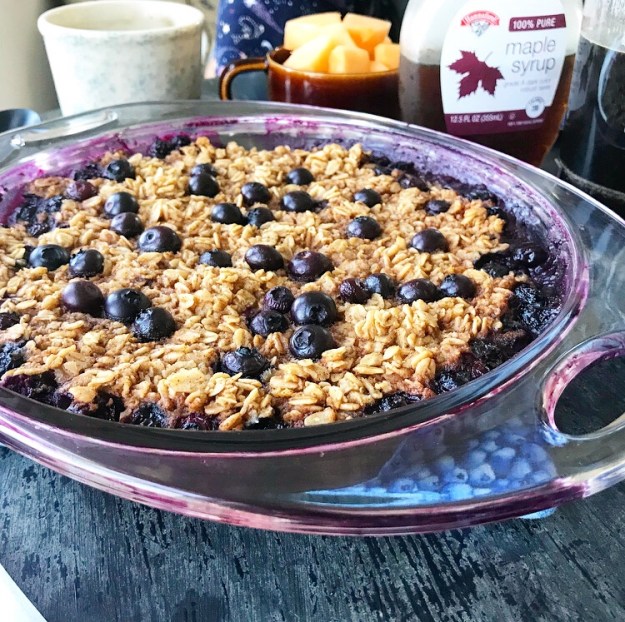
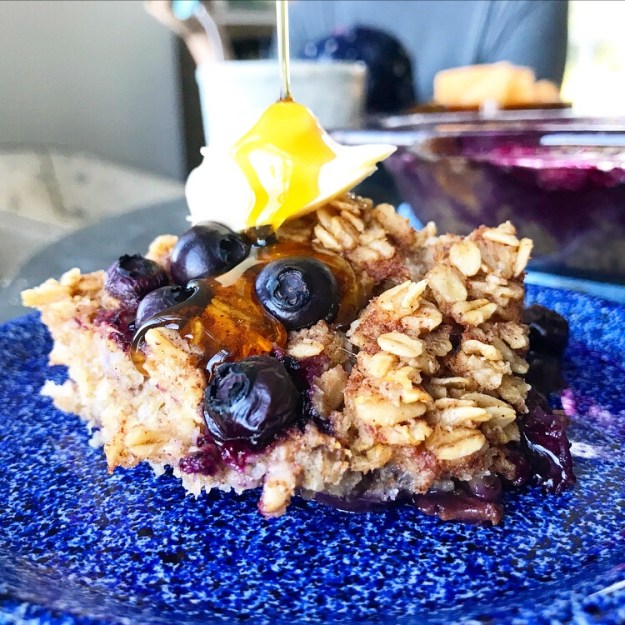 VJ and I prefer our oatmeal on the sweet side, so I used 1/2 cup maple syrup here. If you’d like a less-sweet breakfast, you can reduce it to 1/4 cup.
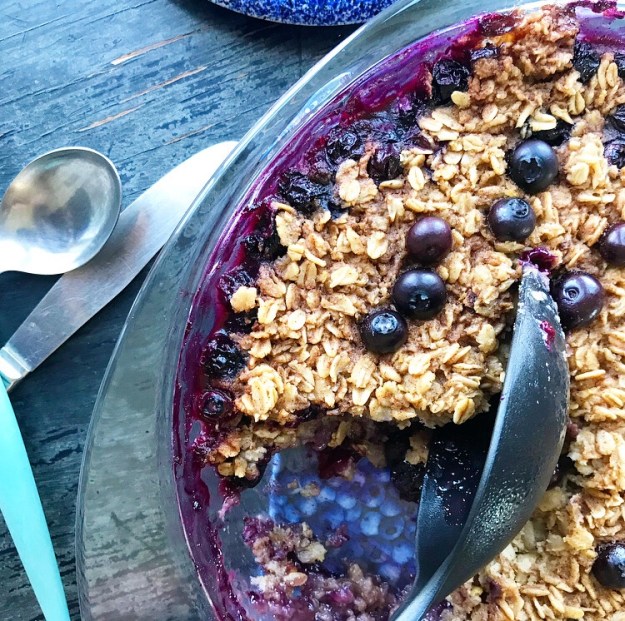 Feel free to add nuts or seeds (toast them with the oats!), or stir in coconut flakes or mashed banana. Everything we eat on Swan’s Island comes from one pre-ferry grocery trip on the mainland, so meals are paired down and simple. I like this oatmeal as-is with an additional drizzle of maple and a pat of butter, but that’s just me.
 As with many of the recipes on this site, this recipe can be made with many variations. Feel free to take my favorite and make it yours.