Sometimes you need a little treat. And if you’re me, sometimes is most times, and the treat can be anything from a mid-afternoon iced coffee to a theatre ticket to a puff pancake for dinner.
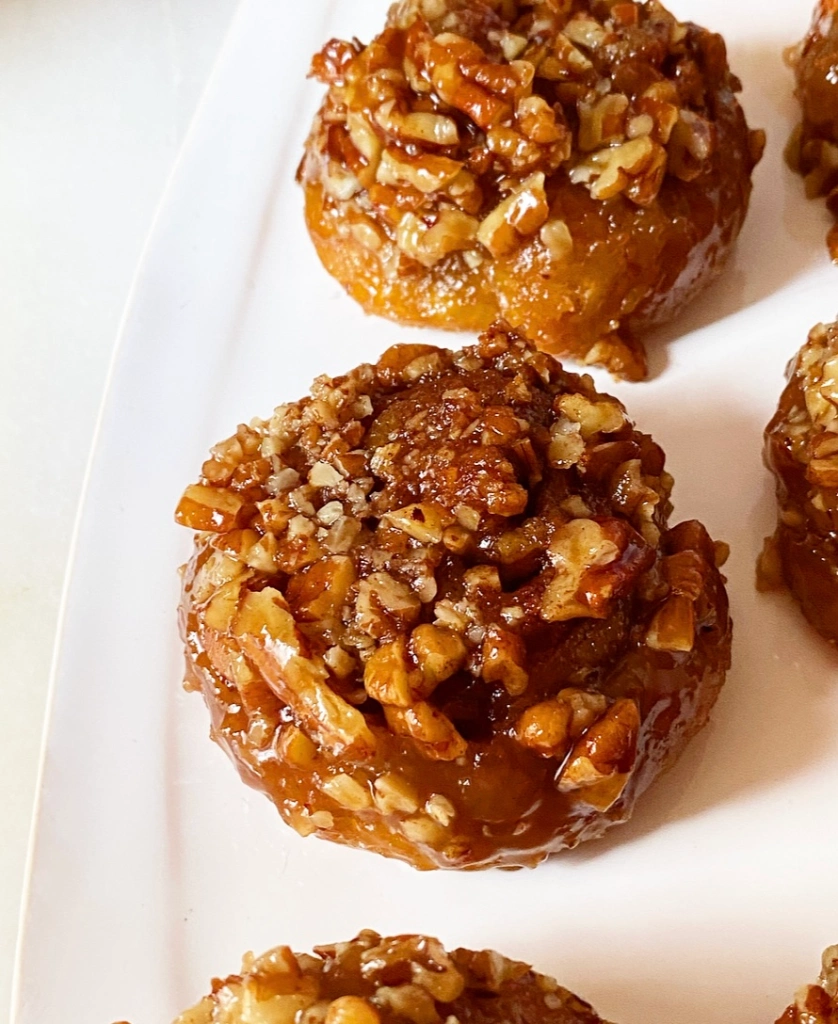
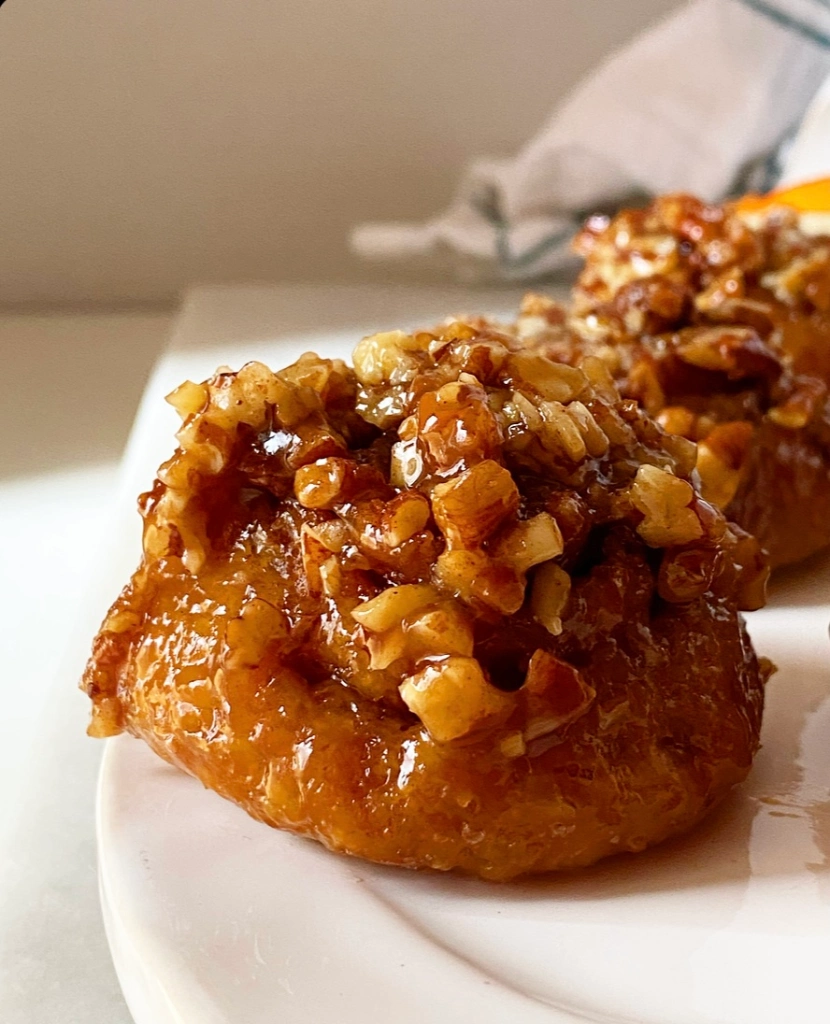
But lately it’s been these Small Batch No-Yeast Sticky Buns. They come together at the speed of light—as far as stick buns go, anyway. The whole process from breaking out the flour to flipping six buns out of a muffin pan takes all of 40 minutes.

The quick turnaround time is, of course, a result of leavening these little pastries with baking powder and baking soda instead of yeast. Rest assured that all the fluffy texture and cinnamon flavor you want are rolled up into these buns.
And they are, of course, topped with pecans suspended in a sticky butterscotch sauce. This concoction covers the entire surface and sinks down into the spirals. It’s beyond great.
So great, in fact, that I may need another batch around stat. Good thing that dream is only 40 minutes away from becoming reality.

Small Batch No-Yeast Sticky Buns
makes just 2 cinnamon rolls
Topping:
3 tablespoons chopped pecans, divided
1 1/2 tablespoons unsalted butter, cut into pieces
2 tablespoons light or dark brown sugar, packed
1 tablespoon milk of choice
2 teaspoons honey
pinch of Kosher or sea salt
Dough:
1/2 teaspoon apple cider vinegar
4 tablespoons milk of choice
1 1/2 tablespoon unsalted butter, cut into cubes
3/4 cup all-purpose flour
1 1/2 tablespoons light brown sugar, packed
3/8 teaspoons baking powder
1/4 teaspoon baking soda
1/2 teaspoon Kosher or sea salt
Filling:
1 1/2 tablespoon unsalted butter, melted
3 tablespoons light or dark brown sugar, packed
1 teaspoon ground cinnamon
small pinch of Kosher or sea salt
Preheat oven to 375F. Use butter to heavily grease 6 cups in a standard muffin tin.
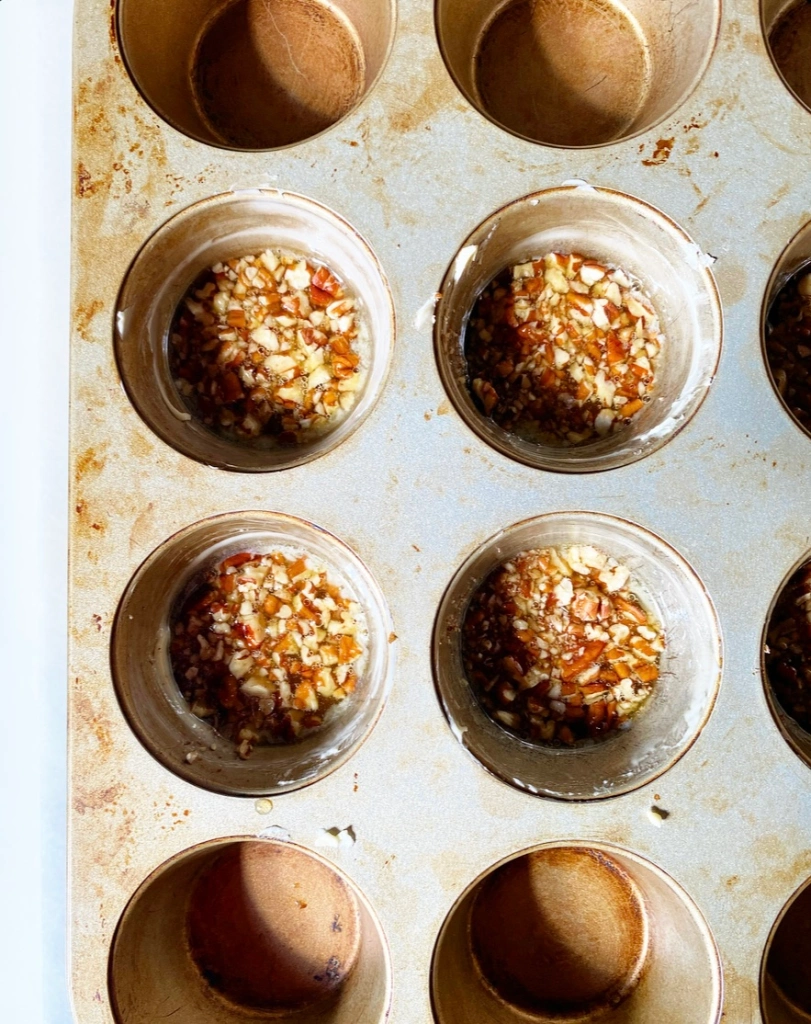
Prepare the topping. Put 1 1/2 teaspoons (1/2 tablespoon) chopped pecans in the bottom of each prepared muffin cup.
In a separate small bowl, combine remaining topping ingredients: butter, brown sugar, milk, honey (or maple syrup or light corn syrup), and salt. No need to stir. Set aside.
Make the dough. Combine vinegar, milk and butter a small microwave-safe bowl or liquid measuring cup. Microwave for 30 seconds, or until butter has melted. Stir and set aside.
In a small mixing bowl, use a fork to whisk together flour, brown sugar, baking powder, baking soda, and salt. Add milk mixture and stir until a dough forms. Let rest 5 minutes.
Meanwhile, make the filling. In a small bowl, use a fork to mix together melted butter, sugar, cinnamon, and salt. Set aside.
Grab the bowl with the remaining topping ingredients. Microwave it for 30 seconds and give it a stir. Microwave for an additional 30 seconds until it’s bubbling hot. Spoon the topping mixture over the pecans in the prepared muffin cups (about 1 tablespoon each).
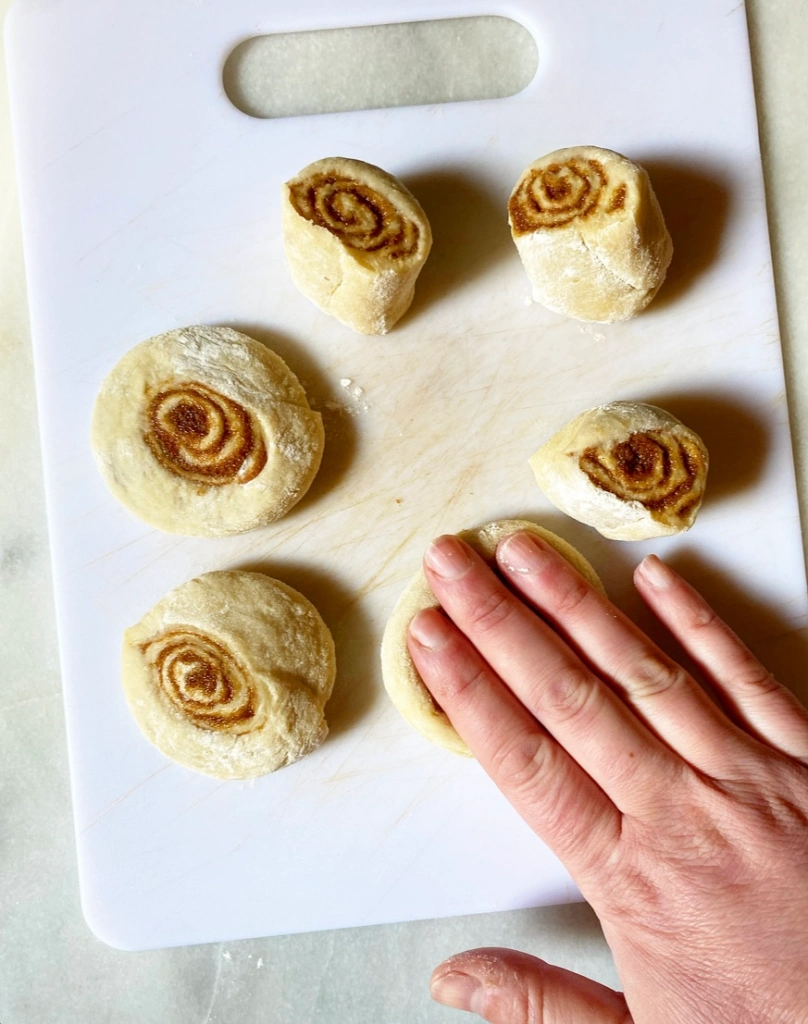
Flour a surface and a rolling pin. Turn dough onto the surface and roll into an 8x10 rectangle. Use the back of a spoon to spread filling over the top. Starting at a narrow end, roll each up tightly into a cylinder.
Use a large, sharp chef’s knife or bench scraper to slice the cylinder into 6 slices. Turn all rolls so that they are spiral-side up on the floured surface. Use the heel of your hand to press them down so that they are about half as tall and twice as wide as they were.
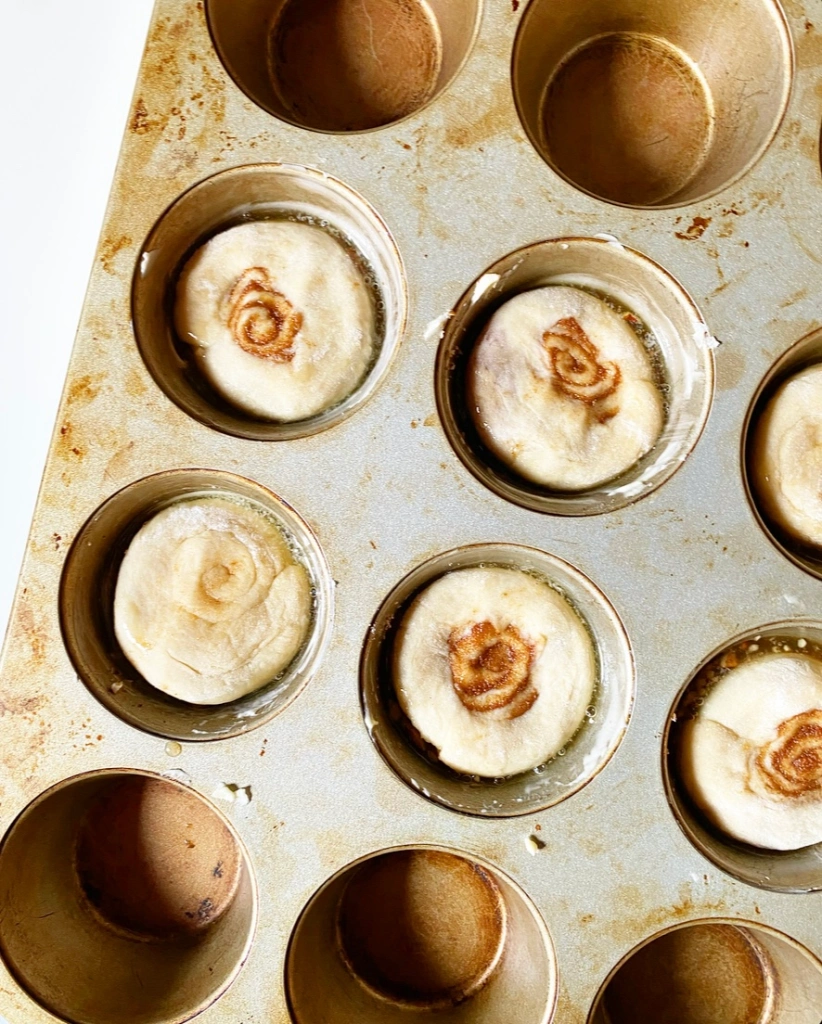
Place rolls in the prepared muffin cups. Press down on the tops to help the bottoms adhere to the sticky topping and pecans. Don’t worry that they look a little smushed, as they will rise up while baking. Bake rolls 15-16 minutes.
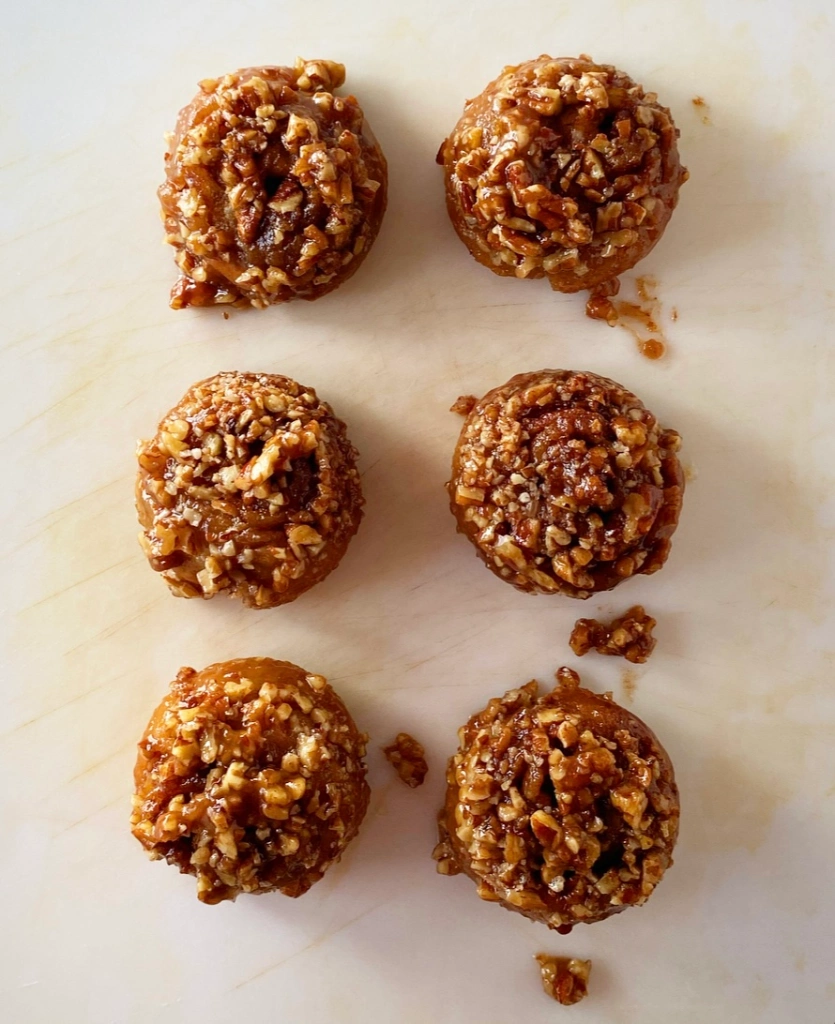
Once baked, let rolls cool in the pan for 1-2 minutes. Place a platter, cutting board or other plate upside down over the top of the rolls. Hold the pan and platter together tightly, then quickly invert so that the bottom of the pan is on top.
Lift the pan, revealing the sticky buns. Use a small spoon to add any remaining topping from the pan.
Serve rolls warm or at room temperature. Leftovers will keep covered for at room temperature for 1-2 days.

 I’ve been thinking about Texas a lot lately, partially because I haven’t been to visit my family in 14 months and also because there was a devastating winter weather/energy crisis all over the state last week. Truly, I was consumed with horror listening to the news and compulsively checking in with friends and family to make sure they were alright.
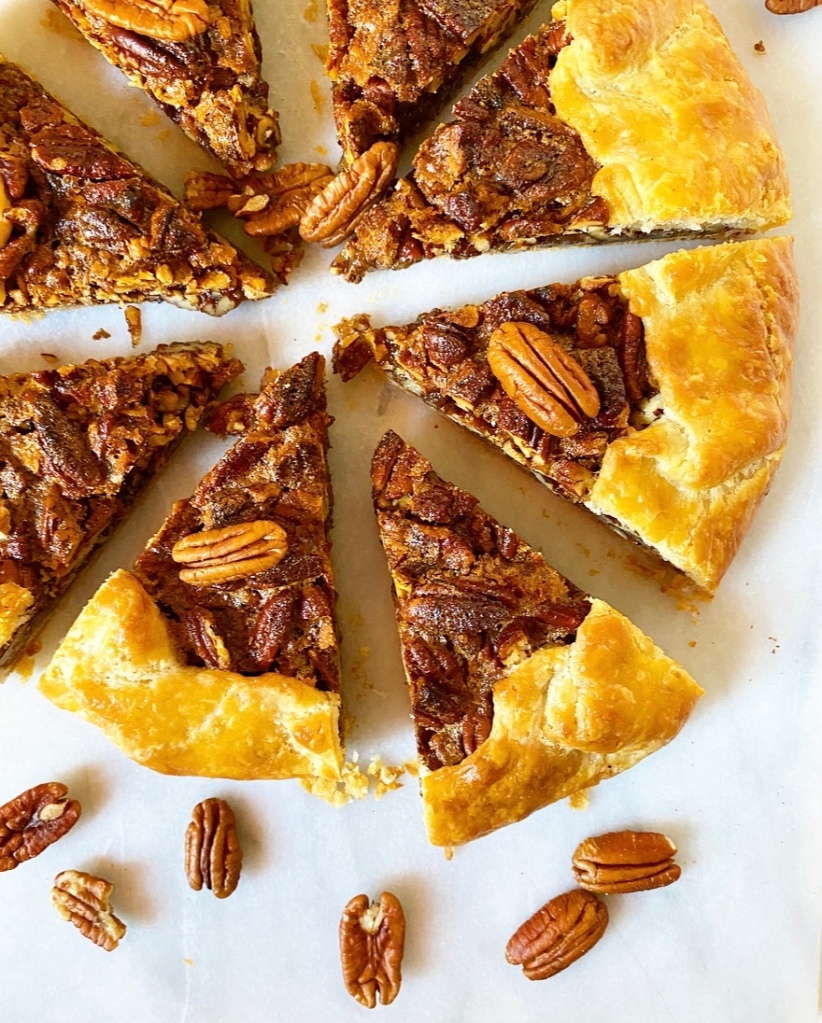
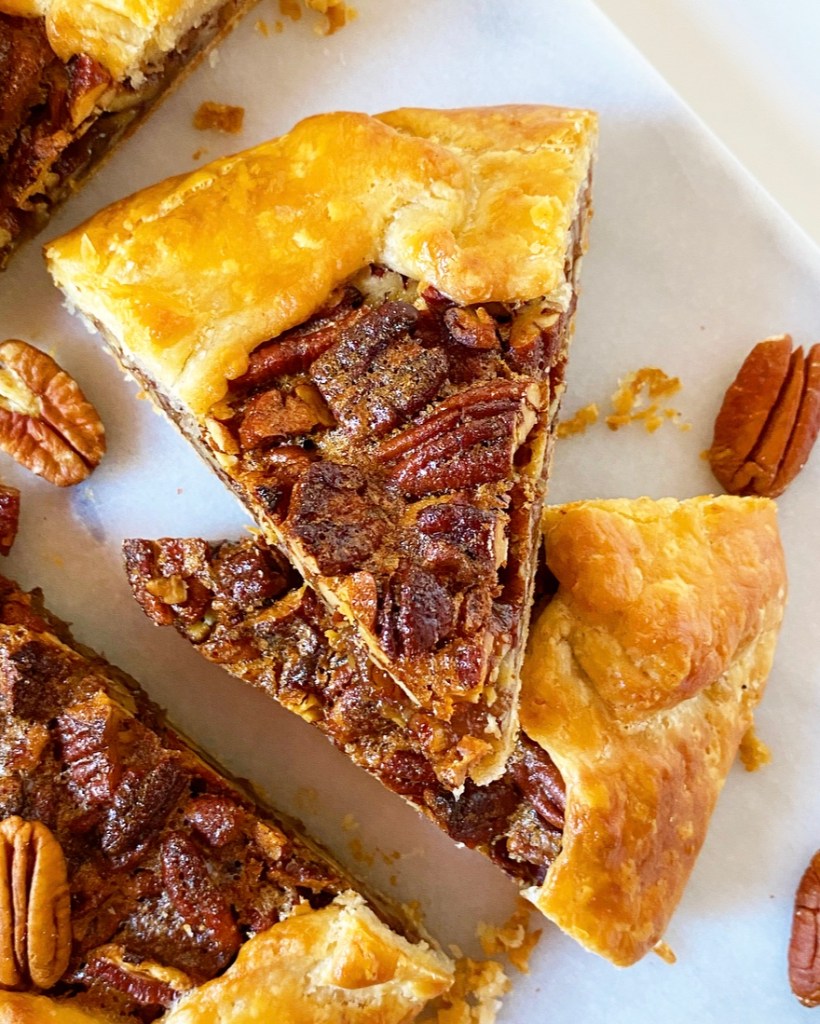
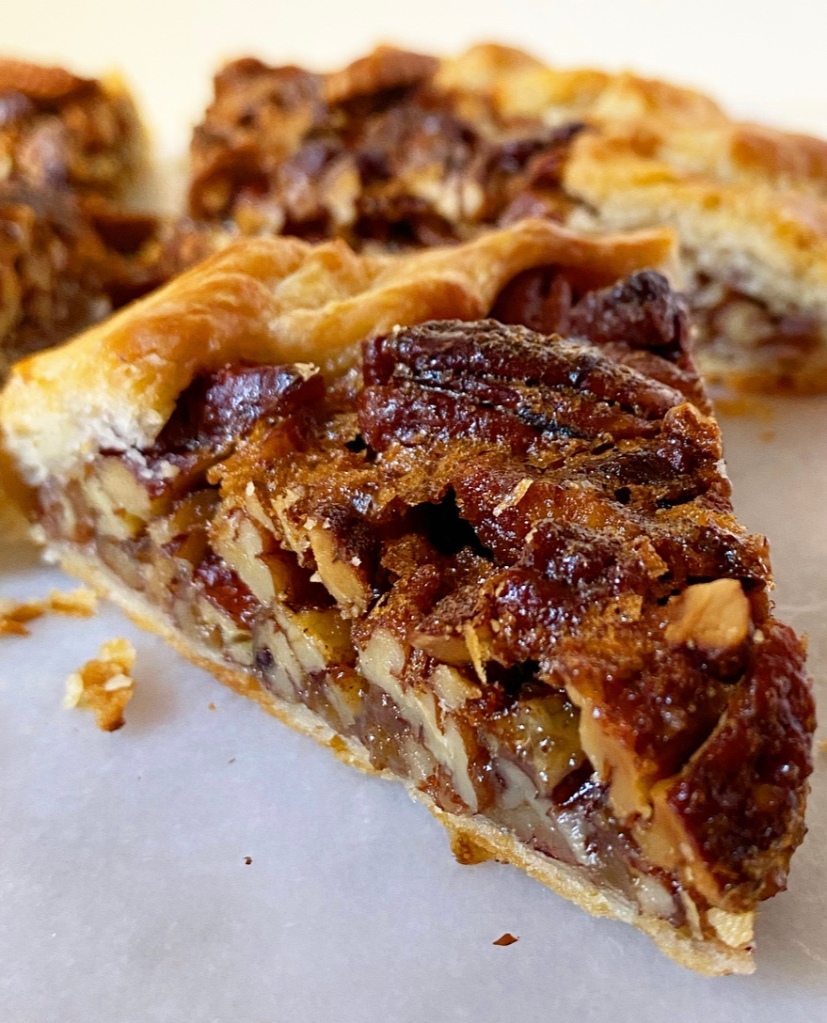
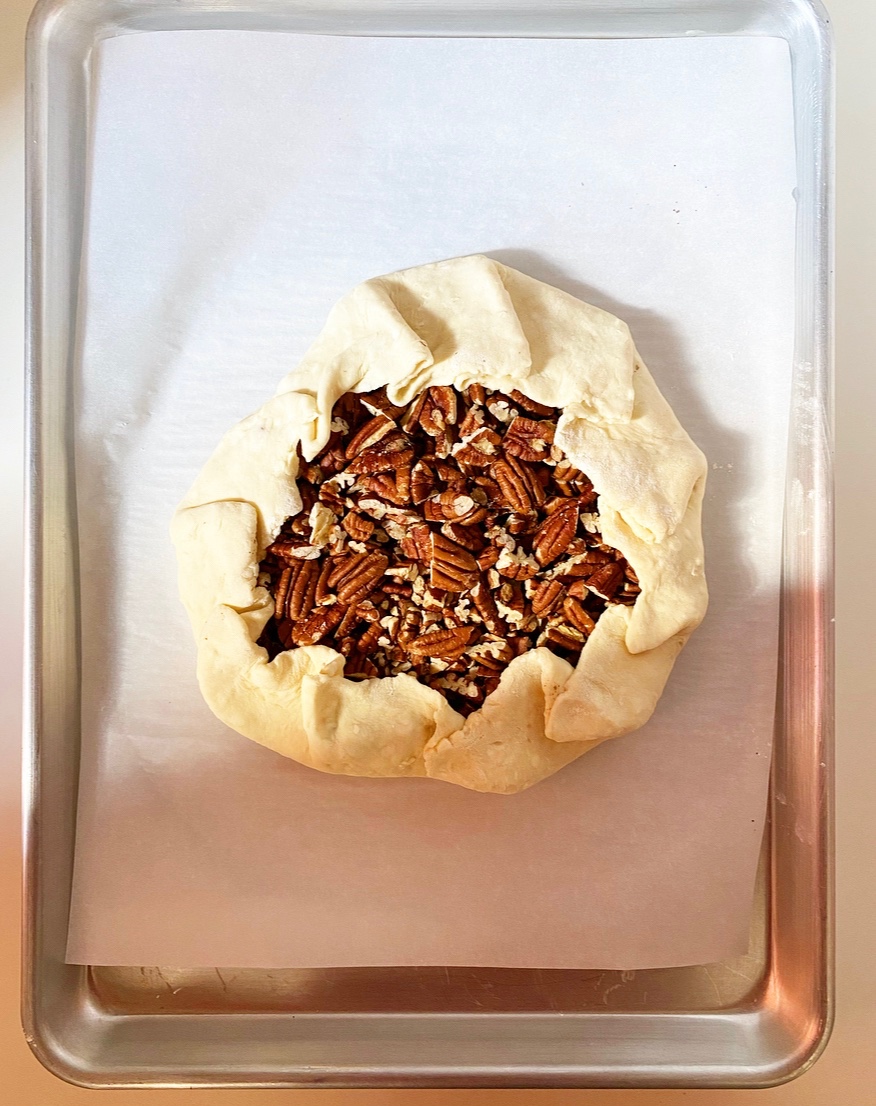
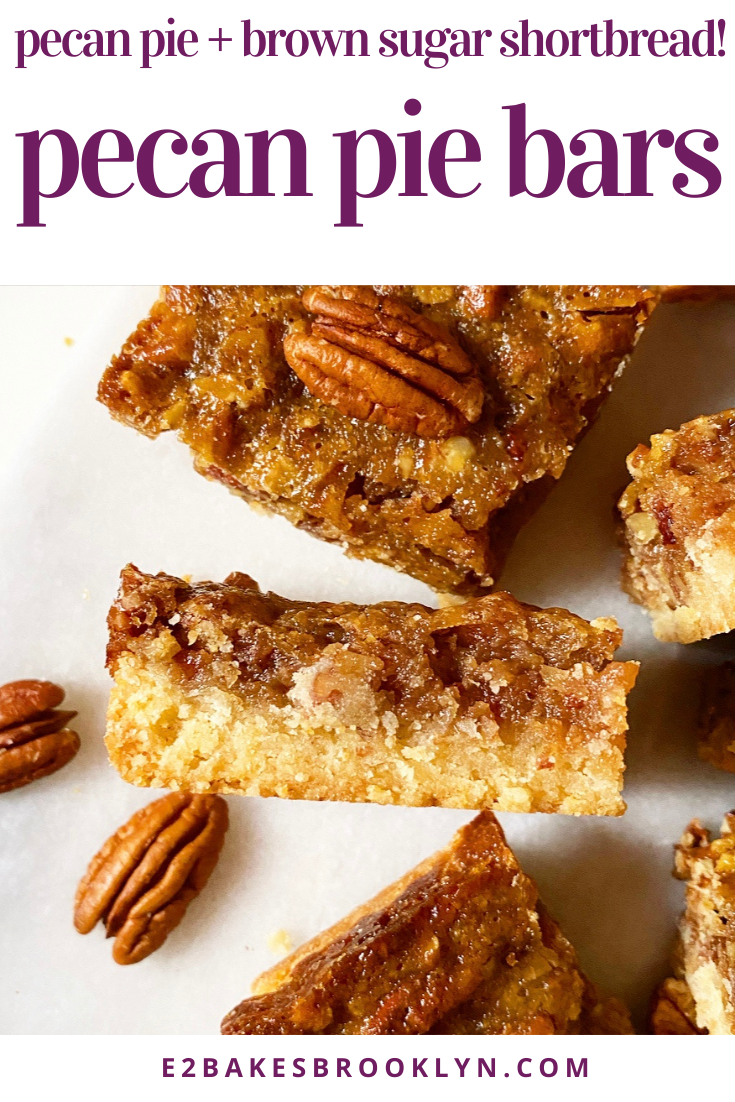
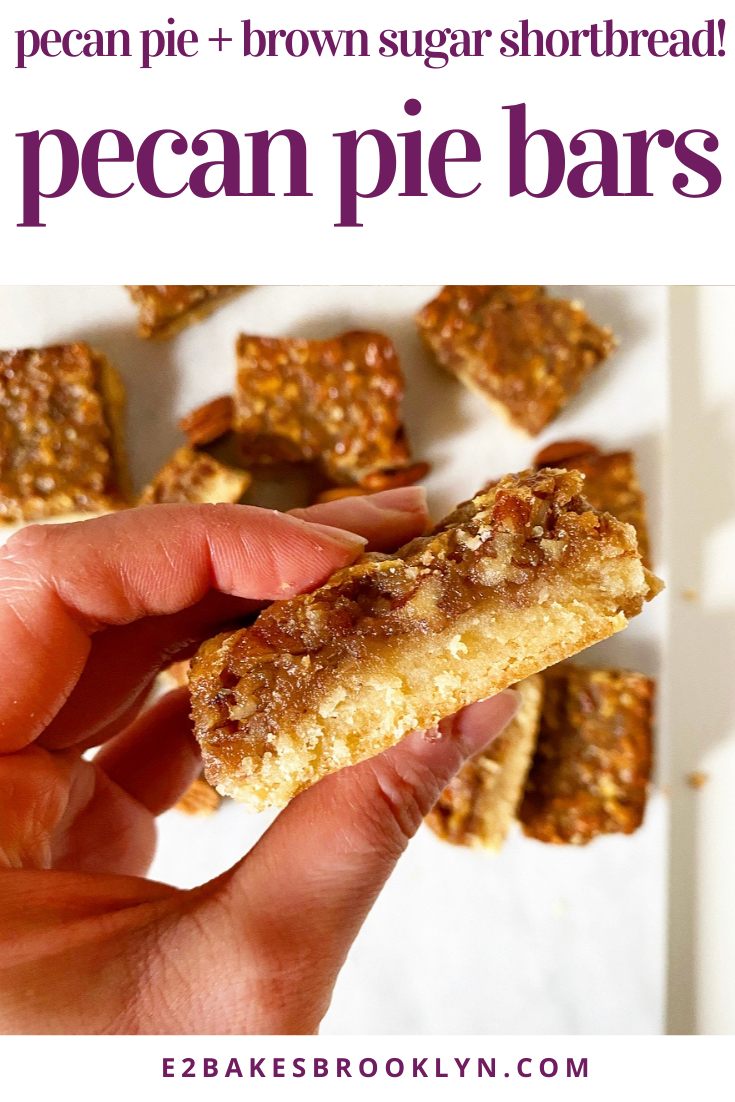
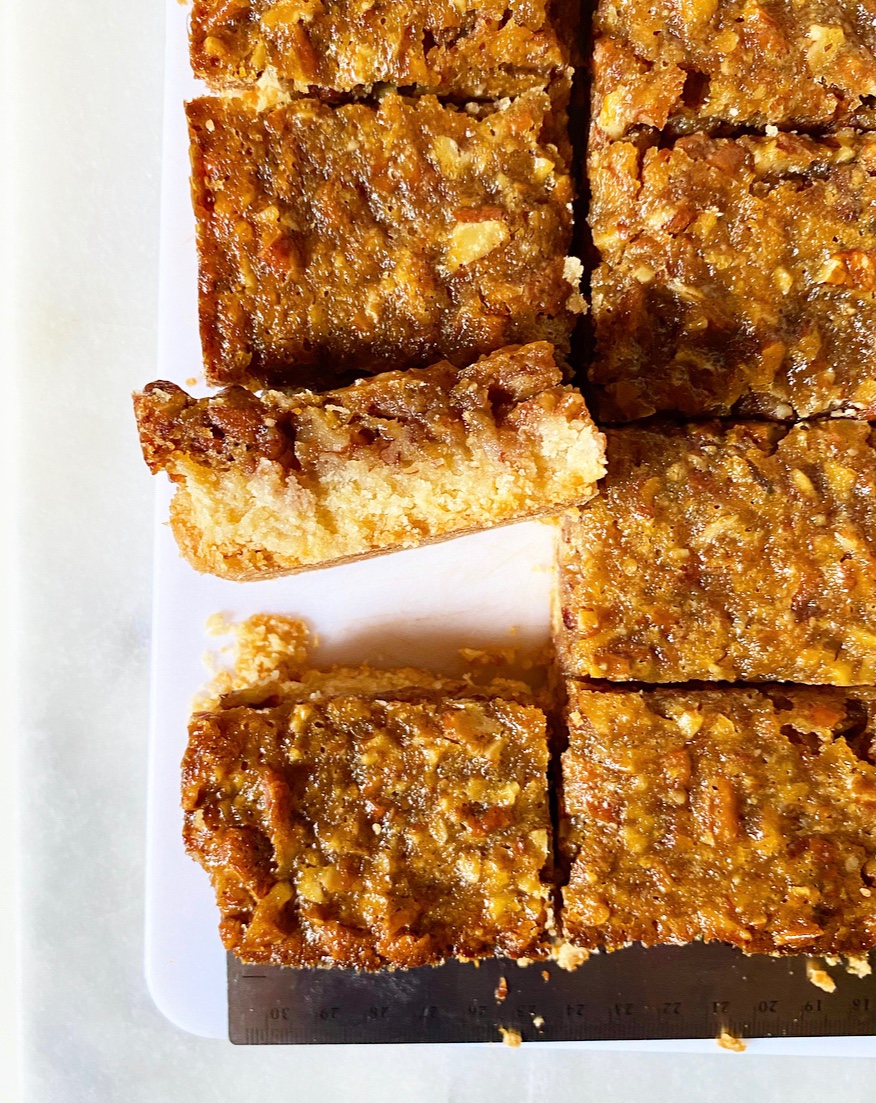 If you didn’t know, the pecan is the state nut of Texas (though we have a lot of men of note who might give it a run for its money). We call them “puh-cahns” in my neck of the woods and we put them in everything: chocolate chip cookies, sticky buns, Thanksgiving stuffing, you name it. The queen of all pecan desserts is obviously Pecan Pie, which (surprise!) happens to be the Texas state pie. It’s been declared by the Texas House of Representatives, so it’s legit.
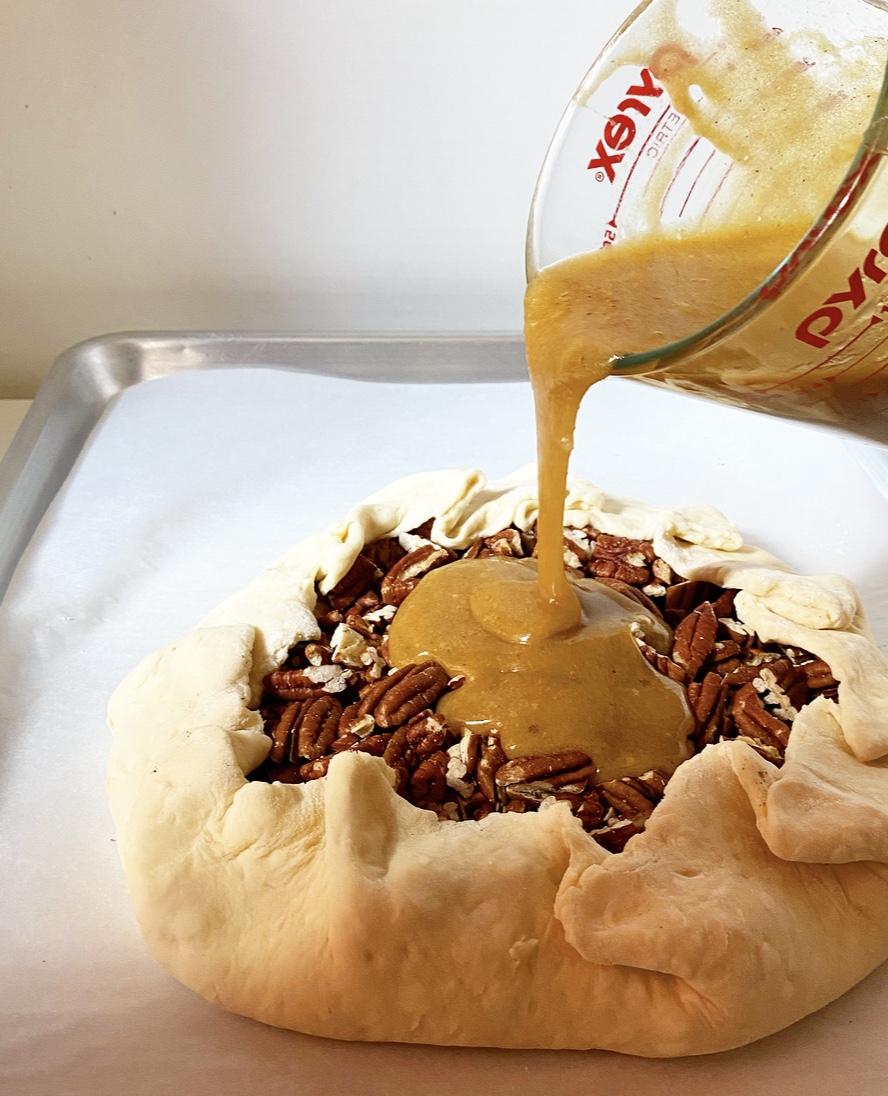
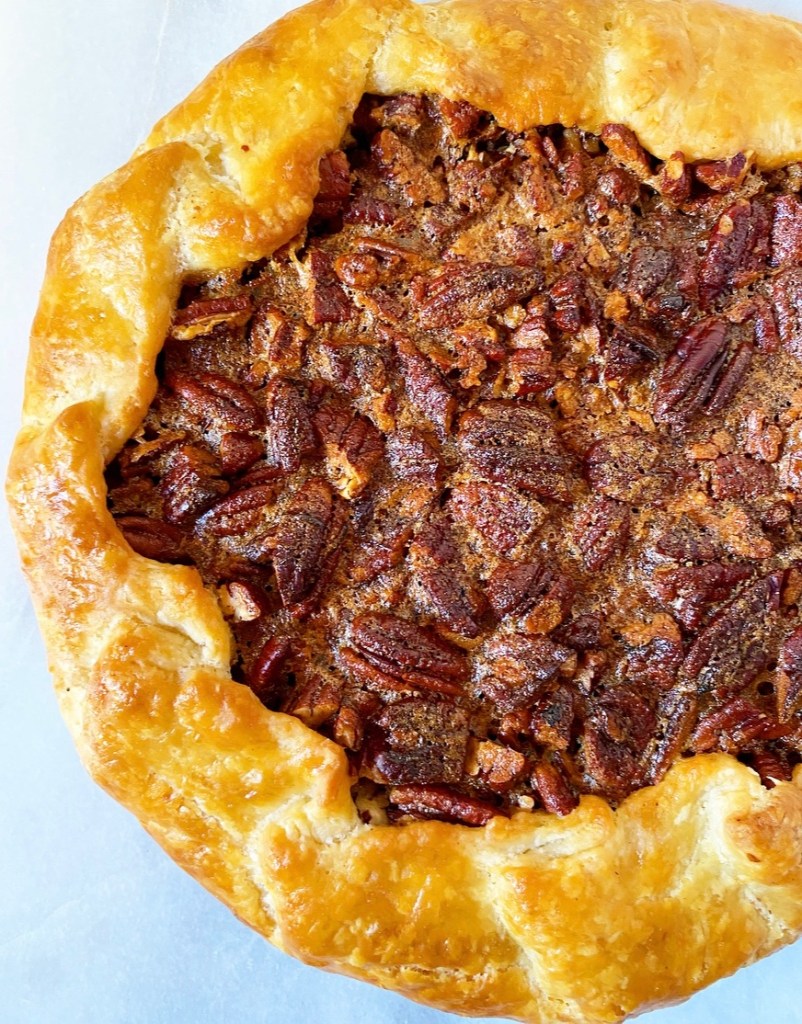
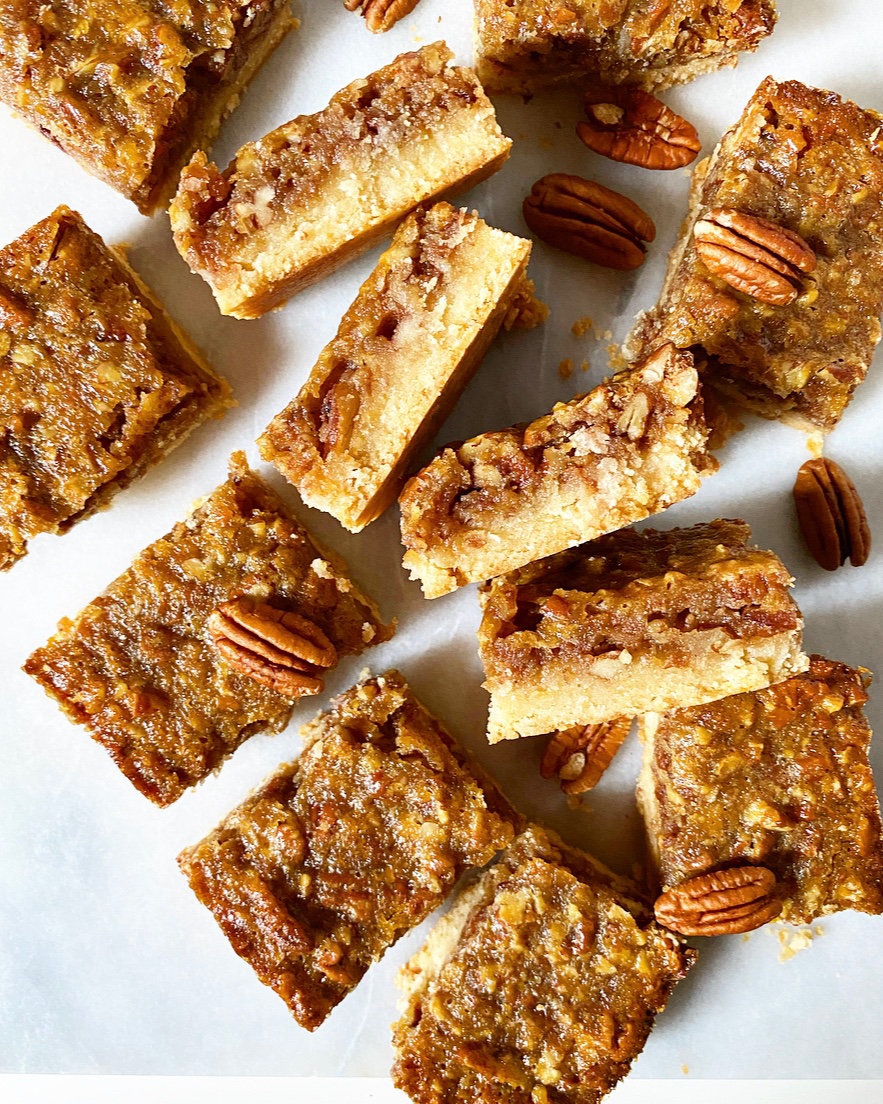 My Pecan Pie Bars are thick and buttery, with equal layers of brown sugar shortbread and sweet pecan pie filling. While some pecan pie bar recipes have a single layer of pecans perched on top of approximately 100 feet of sugar goo that goes everywhere the second you take a bite, that’s just not my style. Nope! These babies are packed to the gills with toasted pecans and will not disintegrate before you finish them. Handheld desserts shouldn’t require a fork and three napkins, y’all.
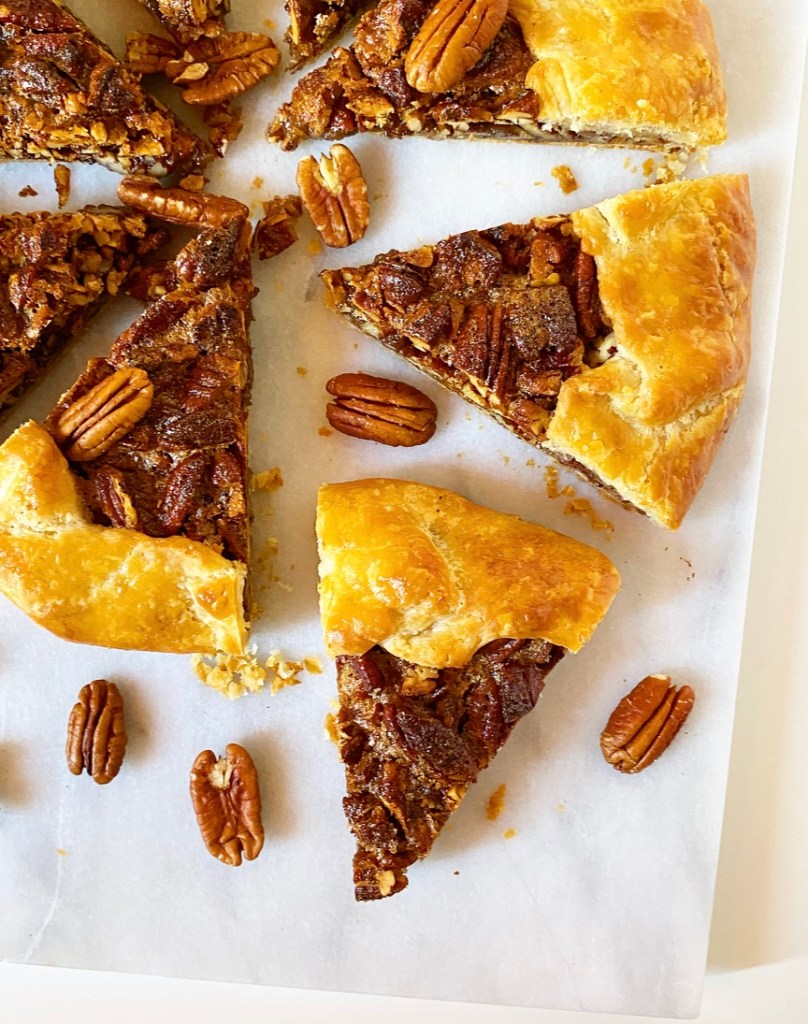
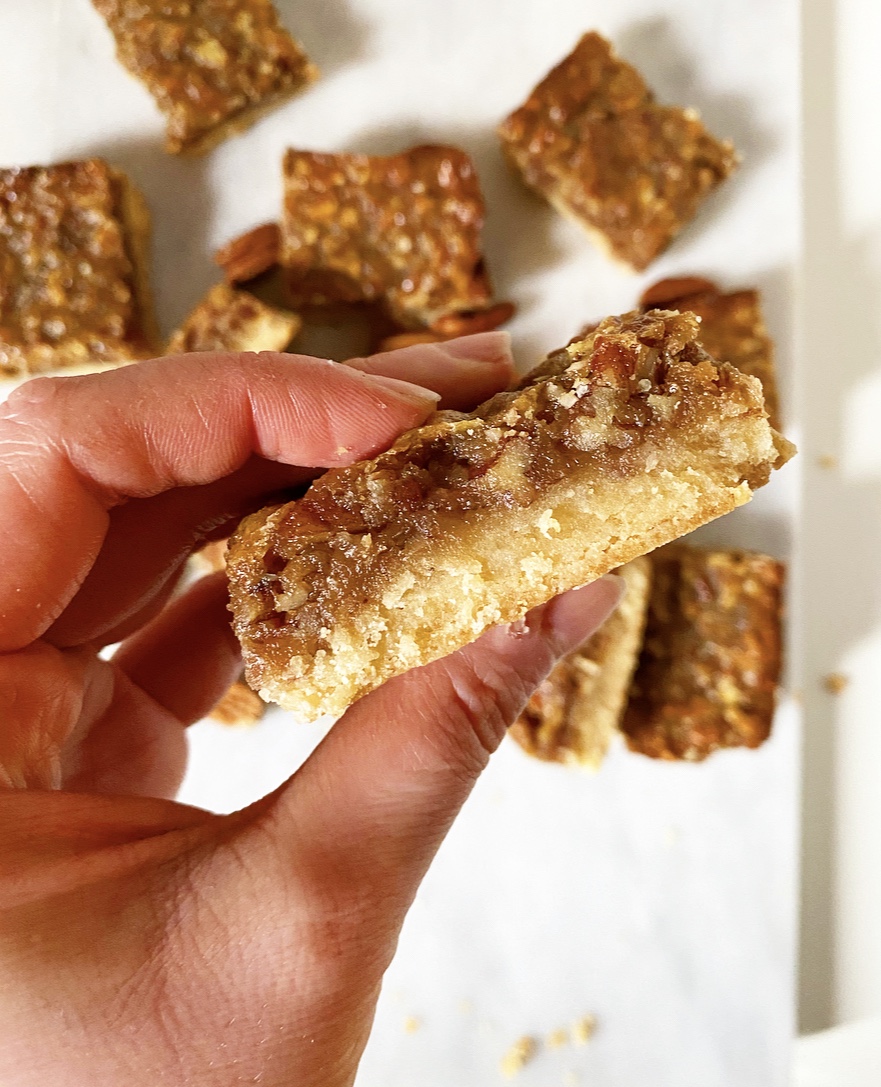 I prefer the pecans in my Pecan Pie (and adjacent desserts) to be chopped pretty thoroughly, but feel free to leave the pieces larger (or even whole) if that’s what makes you happy. You could also tile whole pecans on top of the filling before baking if a pretty topper is important to your Pecan Pie Bar enjoyment. As for me, I think these are pretty perfect as-is. They may not quite be the state pie of Texas, but they sure are delicious.
 If you’d like to make a donation to help with hunger, housing or damage from the events in Texas last week, please consider supporting
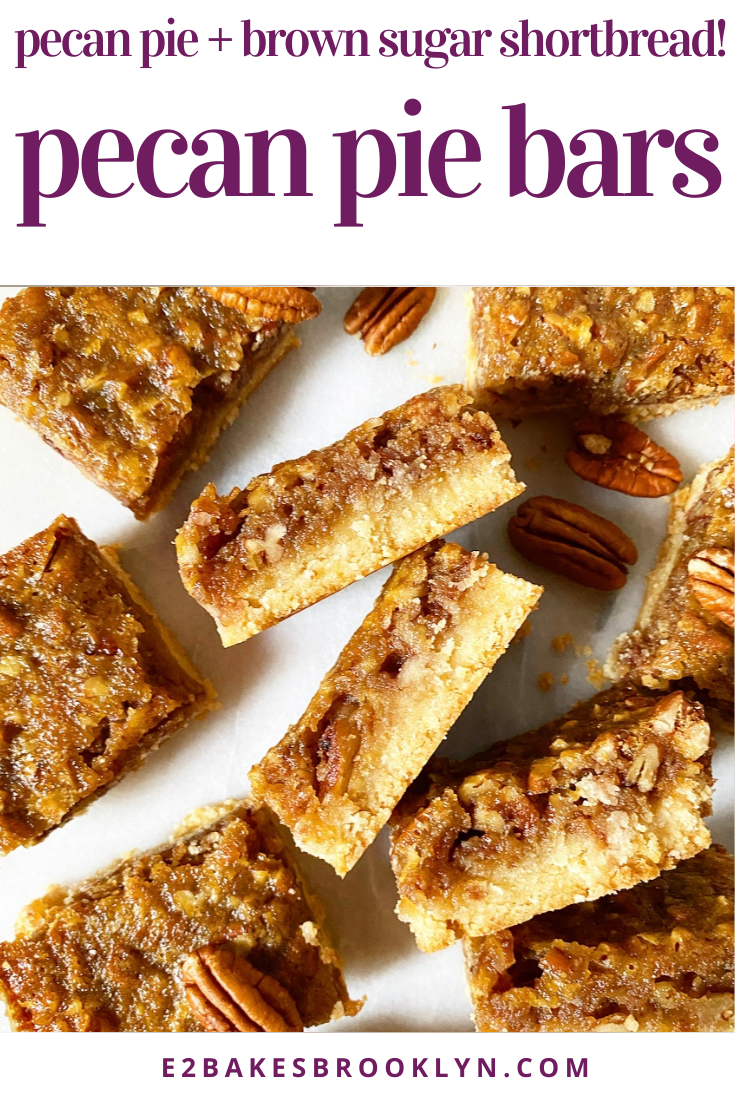
 Christmas in a pandemic is so strange. I mean, I’ve spent Christmas away from my immediate family before, but it’s always been with (ex-)boyfriends or friends. But this year, traveling and gathering don’t seem like great plans and I am deeply single, so Christmas alone it is.
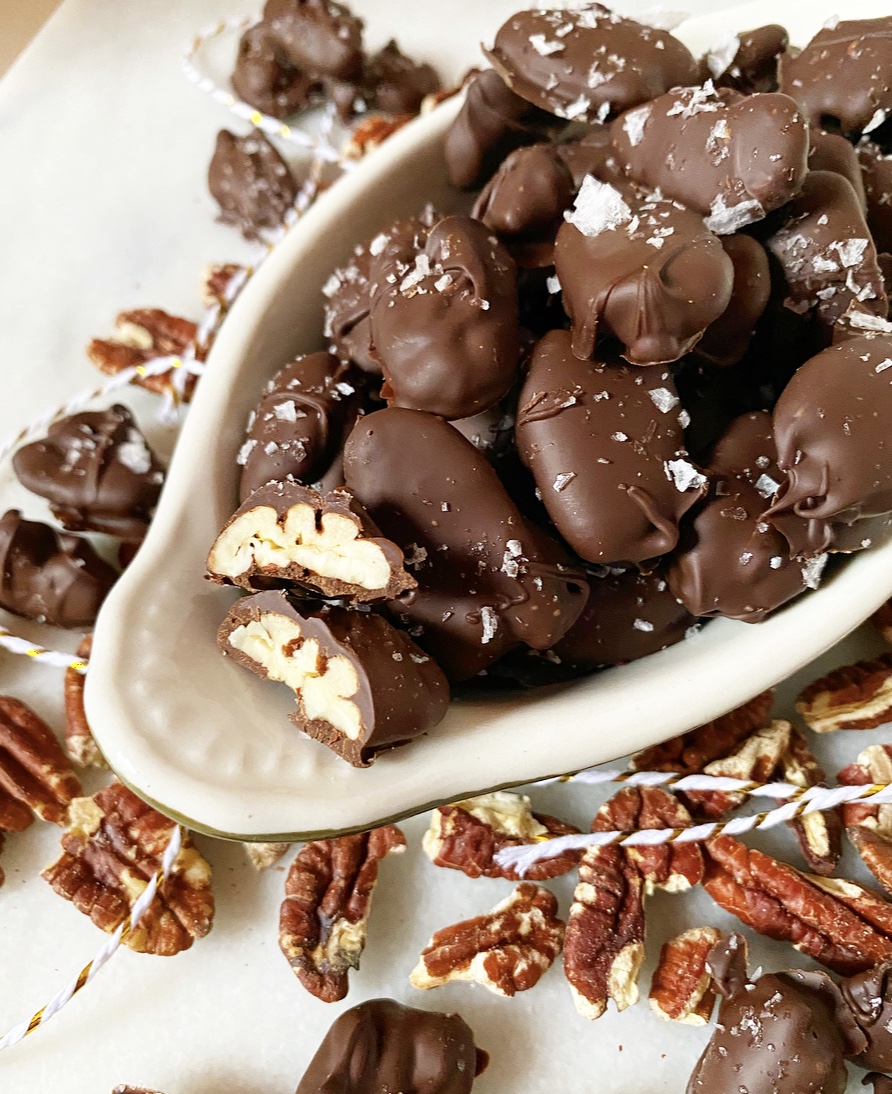
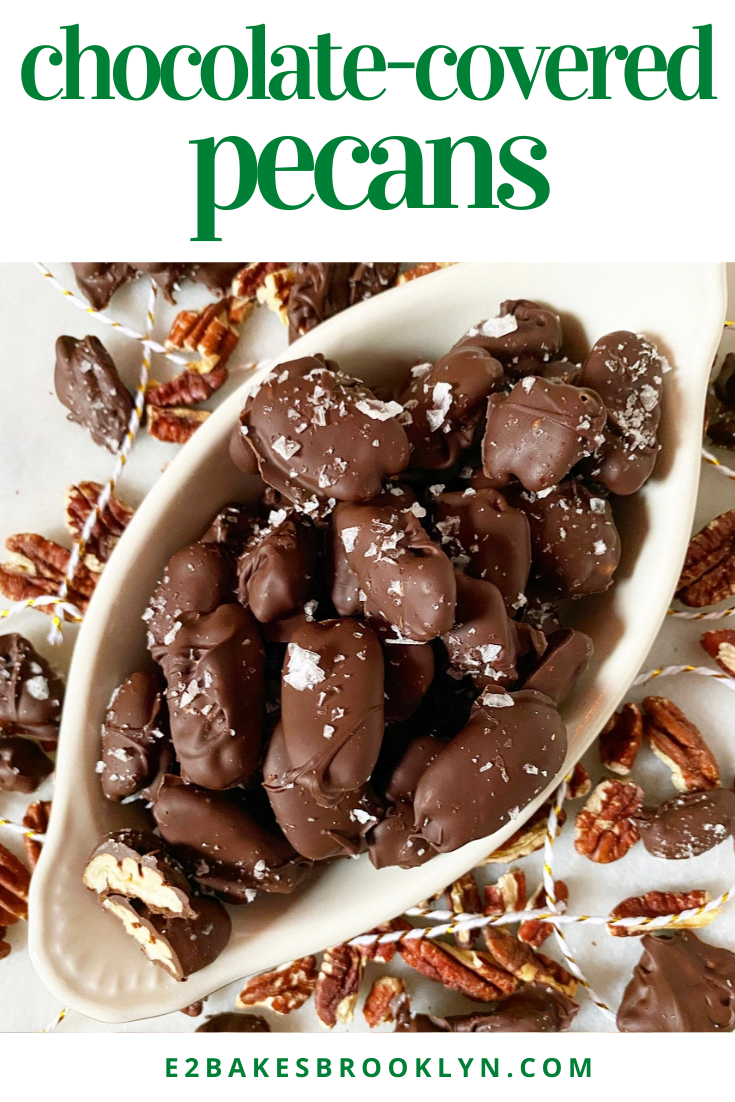
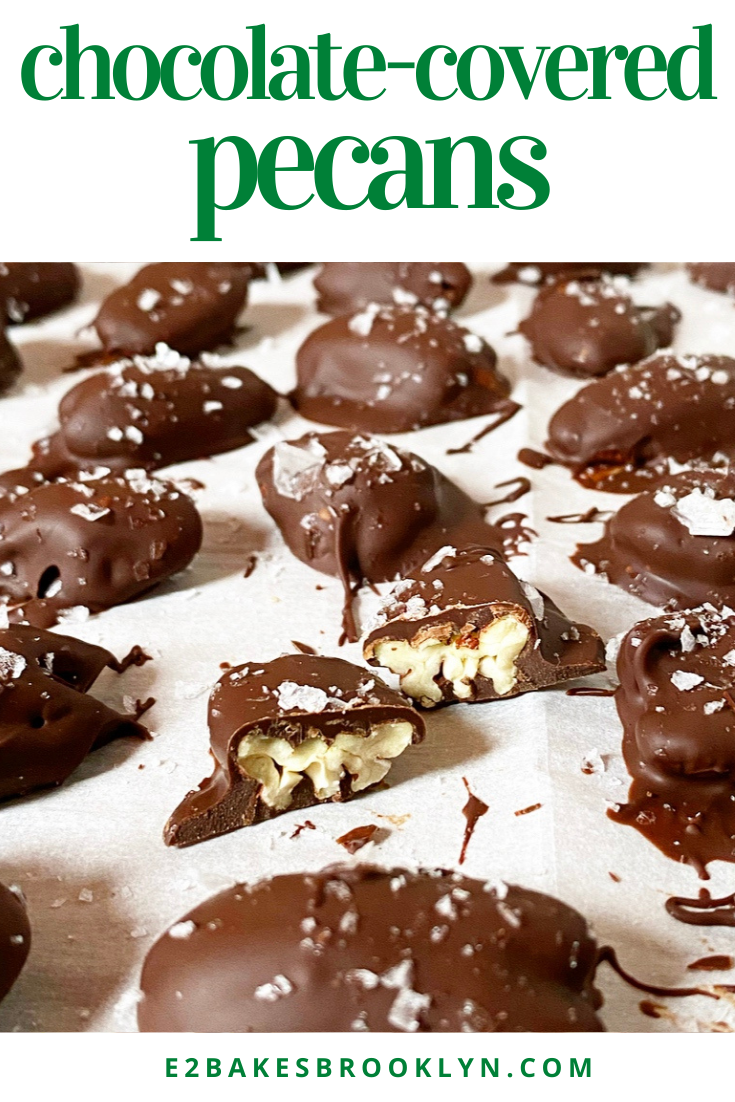
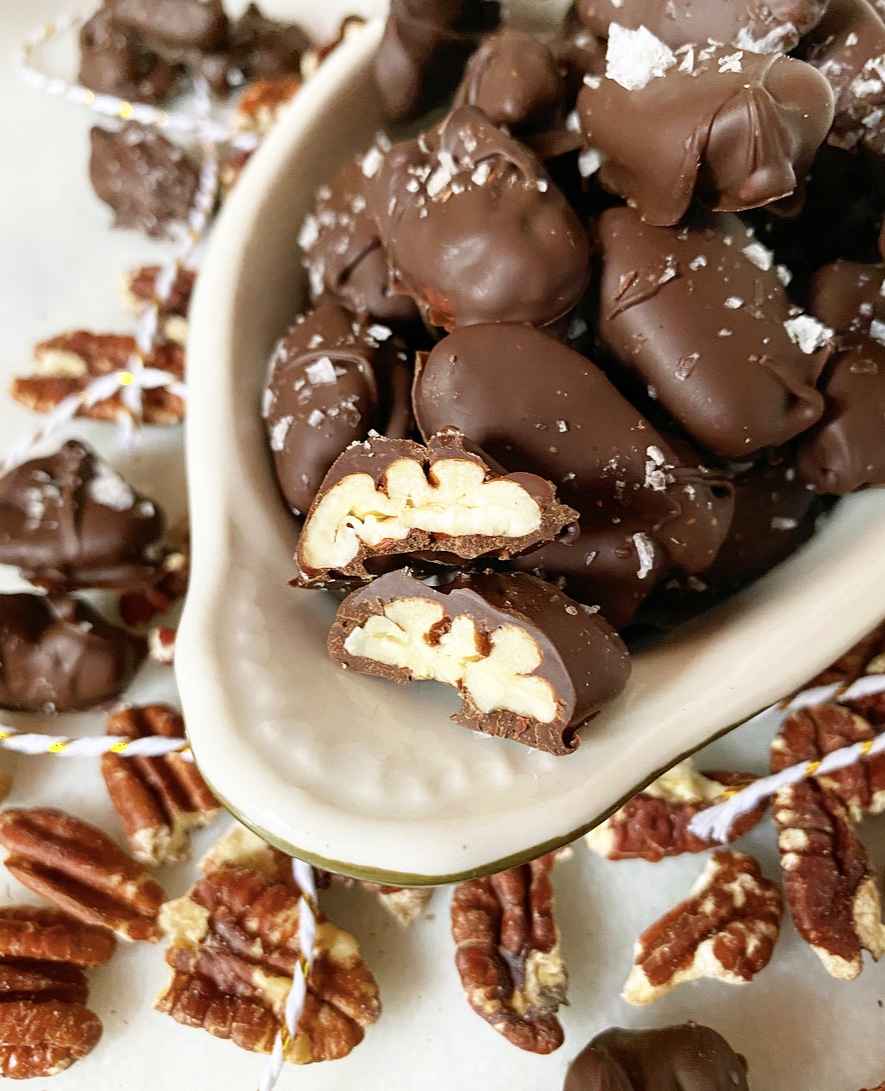 I’ve already had my pre-Christmas anticipatory-loneliness gloom and doom, and have now moved on to determining what will make this Christmas feel like…Christmas. Like, when I FaceTime my family, I’m going to wear my Christmas pajamas that match my sisters. And I’m going to take a walk. Maybe watch Love Actually for the 374th time. Perhaps make a pot roast. And I’m going to eat chocolate-covered pecans by the handful. It’s the Davenport way.
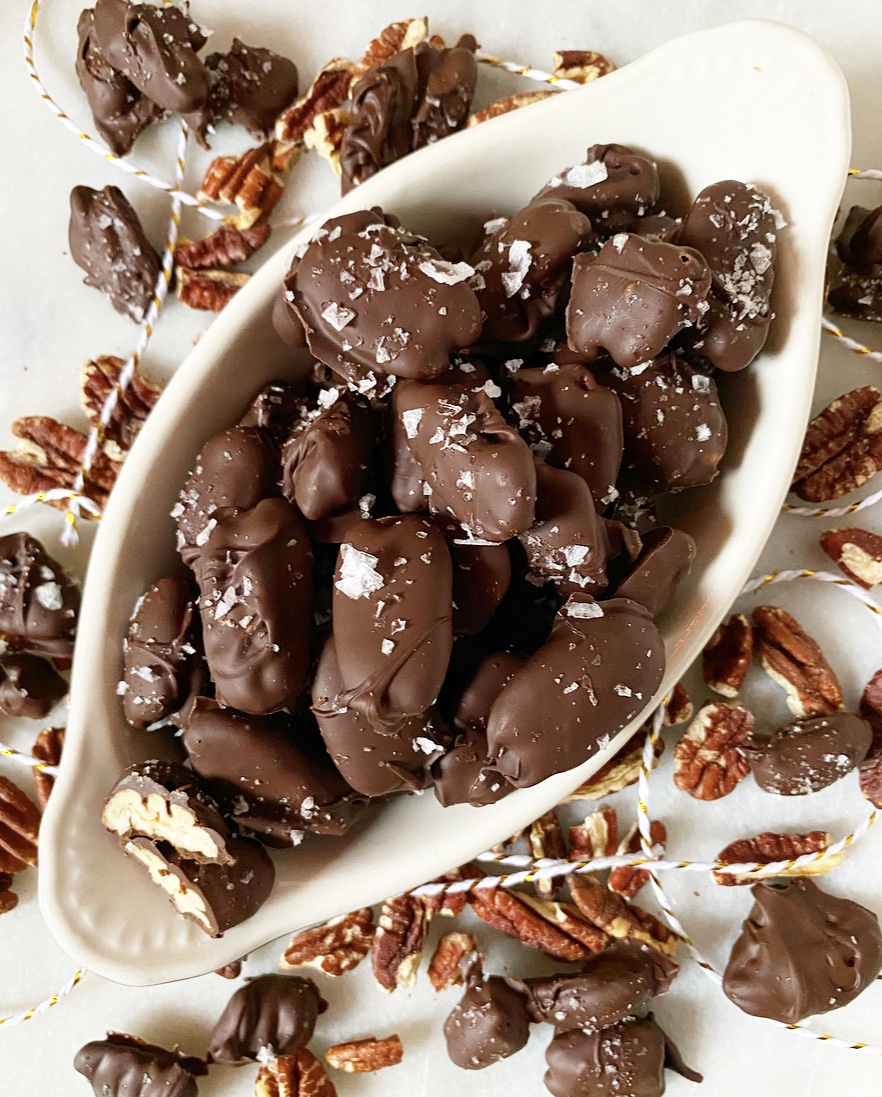 Chocolate-Covered Pecans have a
  Since my sisters and I all moved away, we’ve each been added to my dad’s chocolate-covered pecan Christmas list. It’s something I look forward to every year—my tin showing up a week or two before I fly home for the holiday break. Except, of course, that I’m not flying home this year. And for a brief moment, thanks to the notorious difficulties with shipping right now, I thought that my dad might have decided not to send chocolate-covered pecans in 2020.
 Thankfully that is not the case and my tin arrived on December 16th, but in that moment where I thought this tradition might be another casualty of 2020, I took the time to create my own recipe for Chocolate-Covered Pecans. I certainly wasn’t going to go without them. No way.
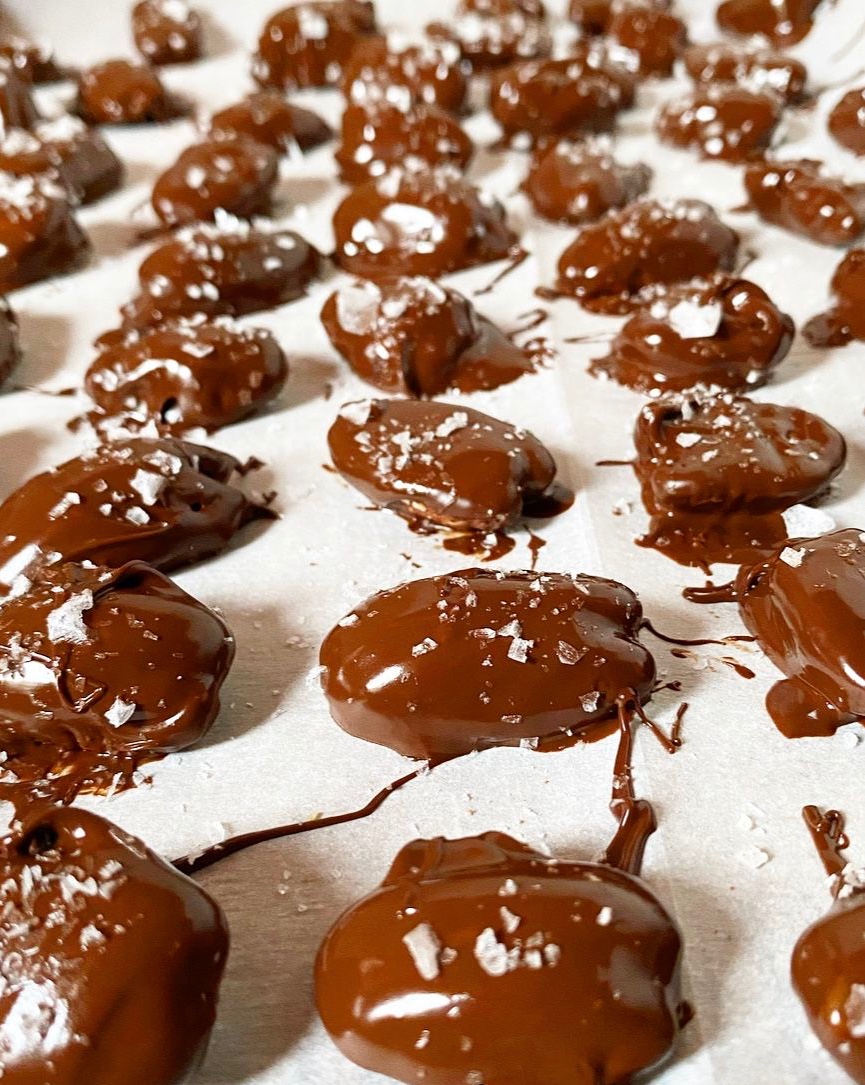 My Chocolate-Covered Pecans are the tiniest spin on my
  Merry Christmas! Happy Holidays! Whatever you do or don’t celebrate, I hope you find a way to enjoy the end of this challenging year. I’m taking Friday off for Christmas, but will be back next week with year-end round ups. Stay cozy, everyone.
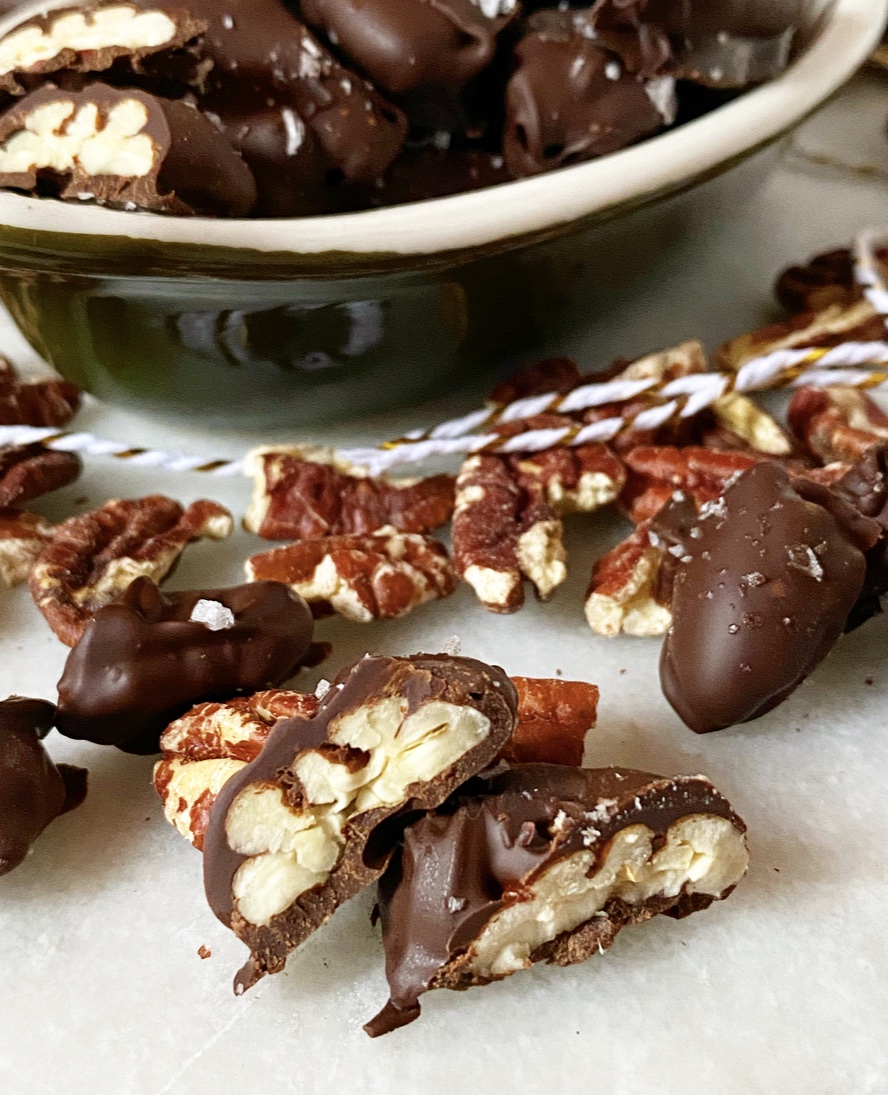

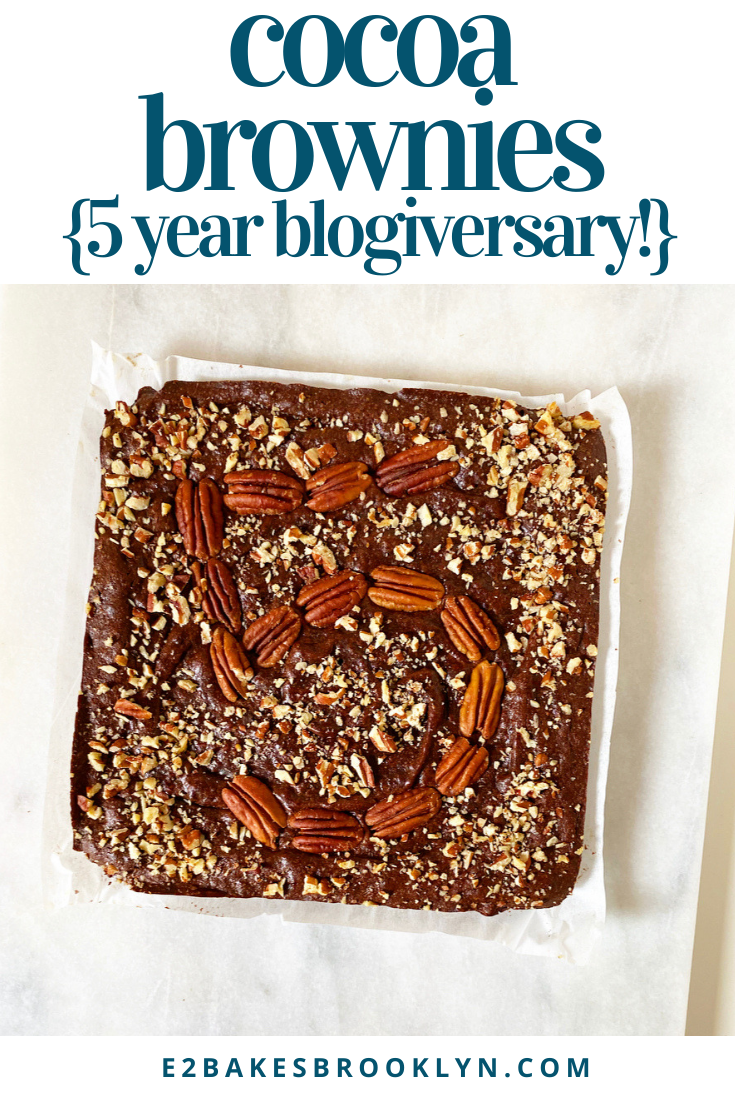
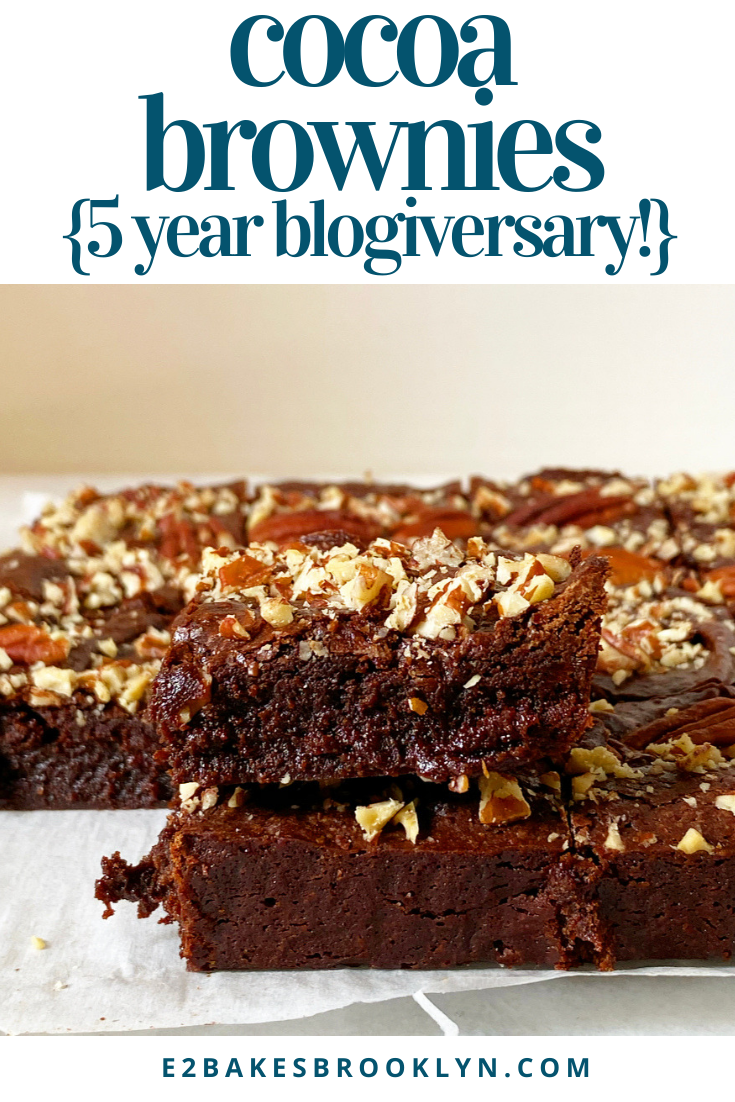
 E2 Bakes Brooklyn is five years old today! Yep, this little blog is exactly half a decade and 544 posts old. I can’t believe it.
 Today, I’m remaking the
 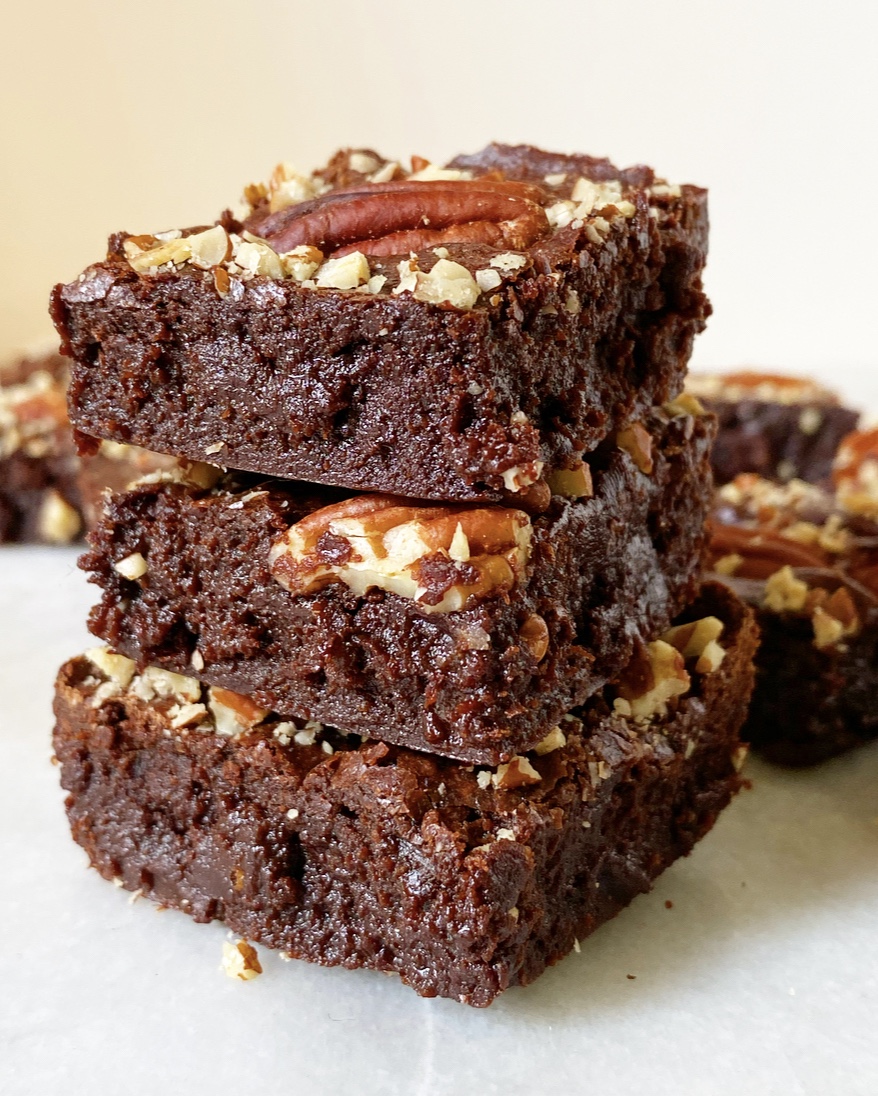 But still, do they warrant a repeat? Even on an anniversary? Well, call me nostalgic, but yes. And for the record, I’m not just revisiting my first post for nostalgia’s sake. As my favorite writer/comedian/
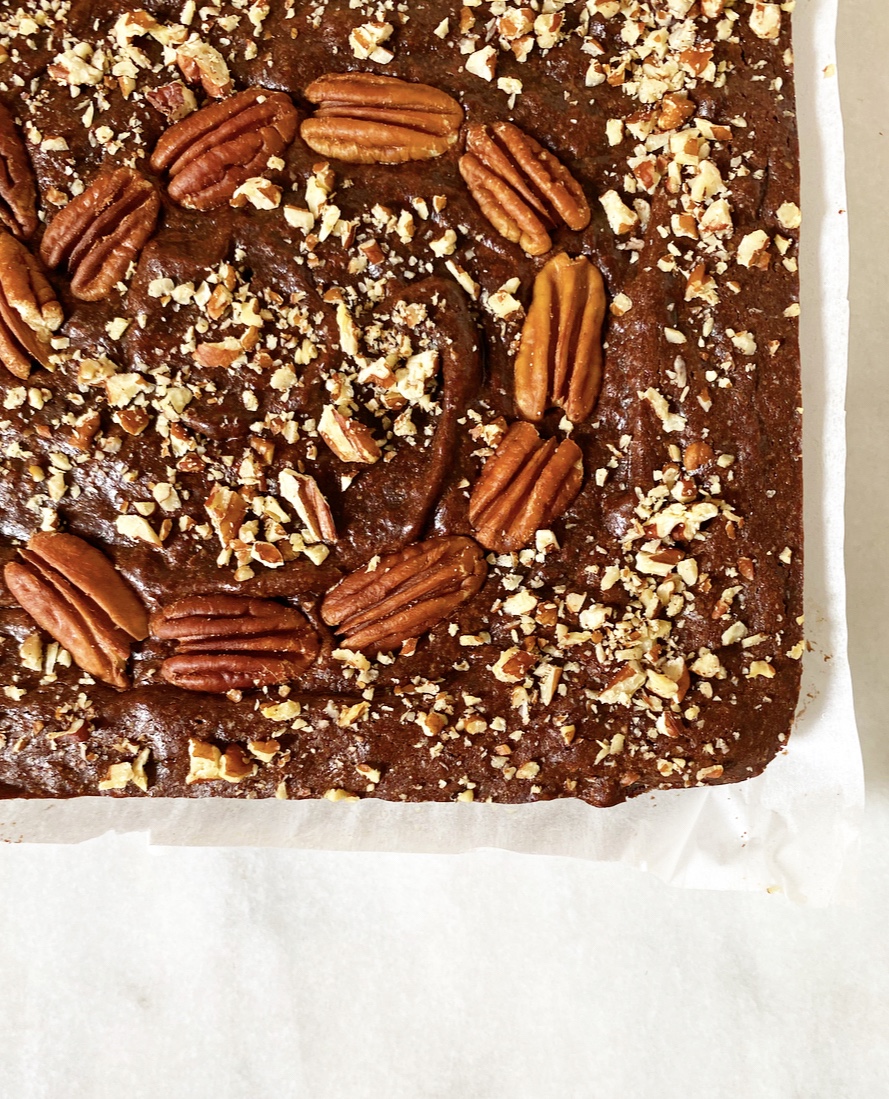
 I mean, I like my first post and the recipe, but the photos? Yikes. They’re not my
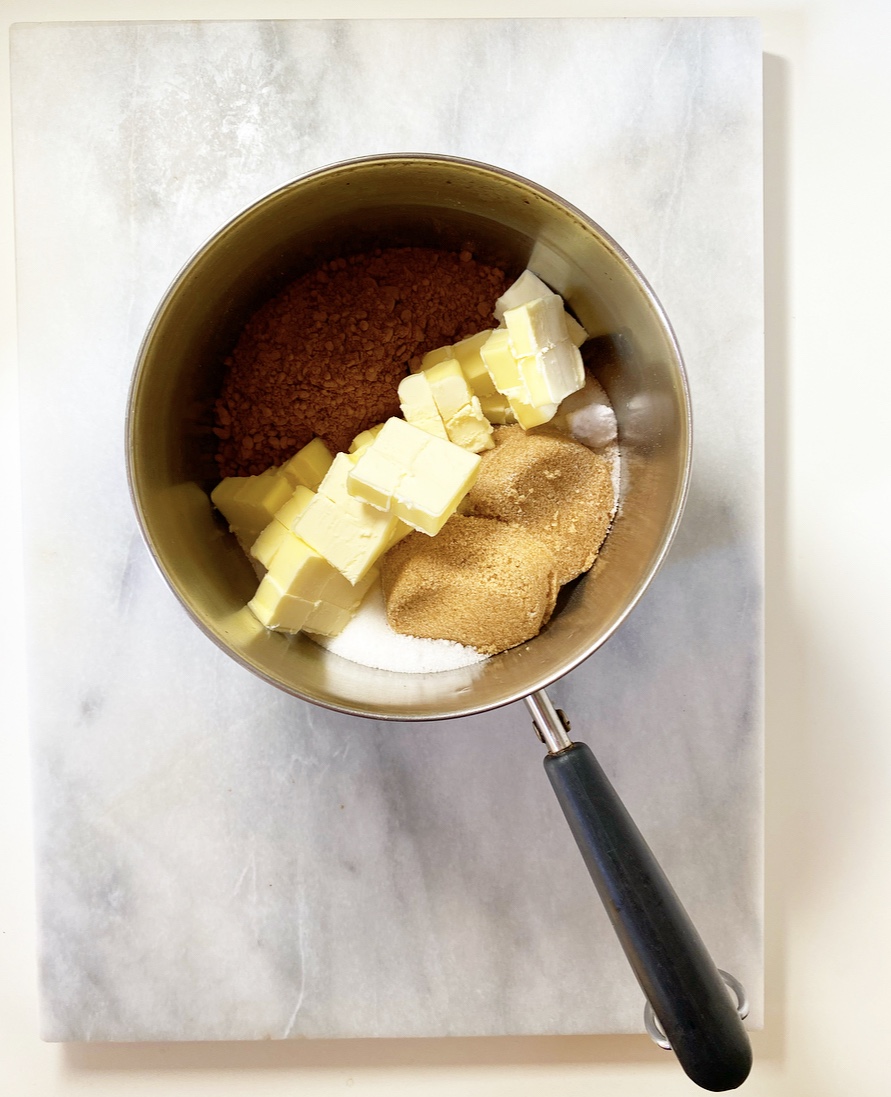
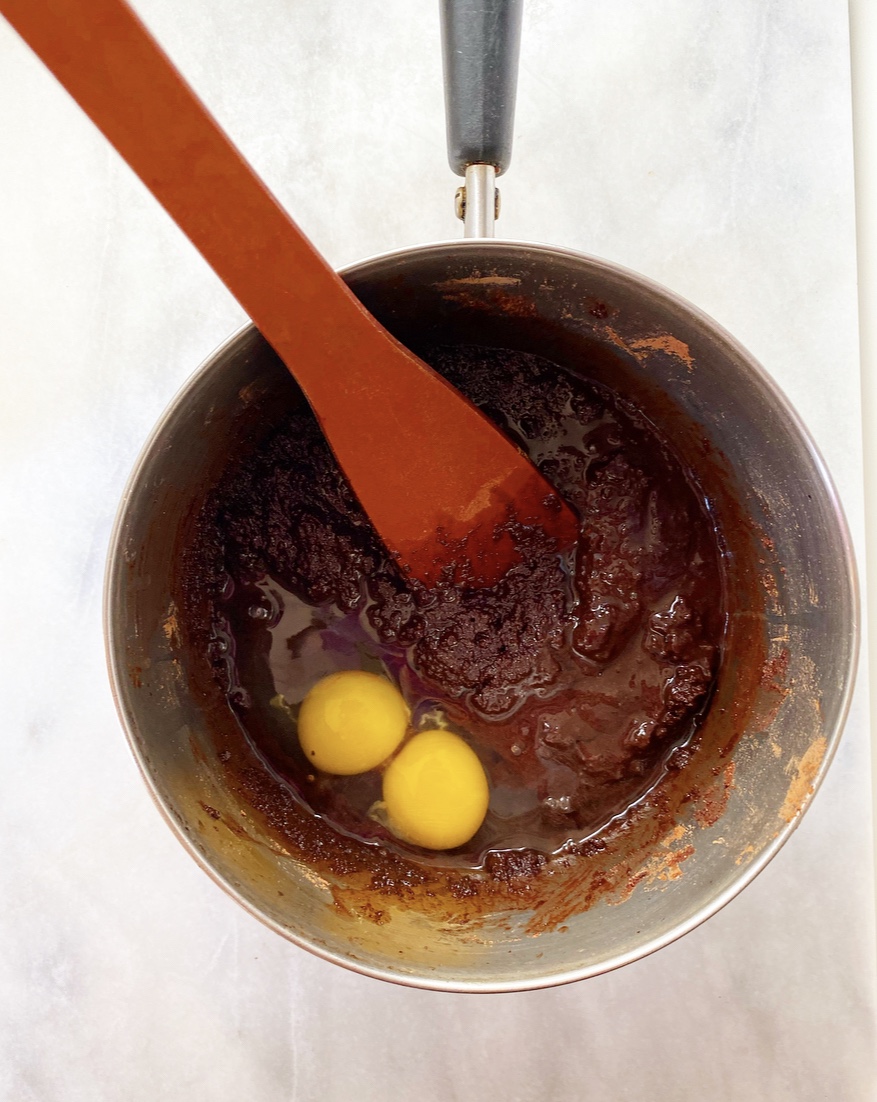
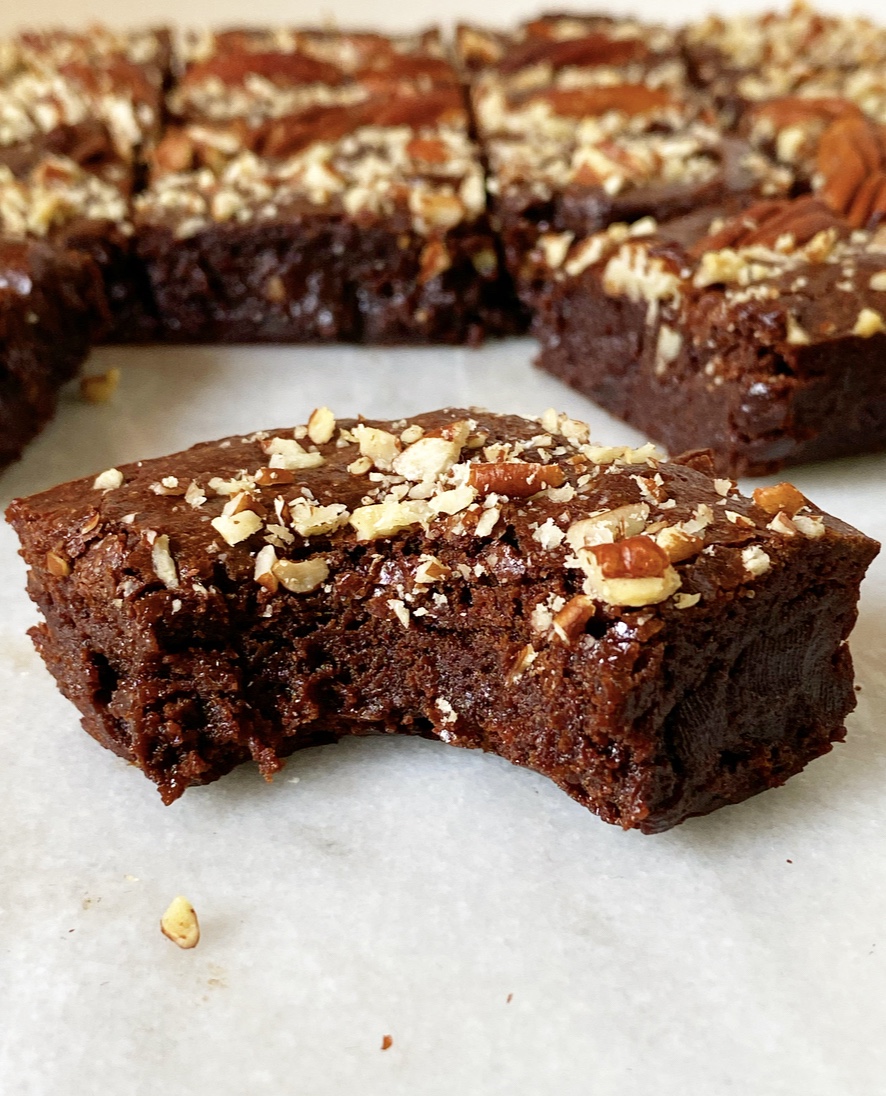
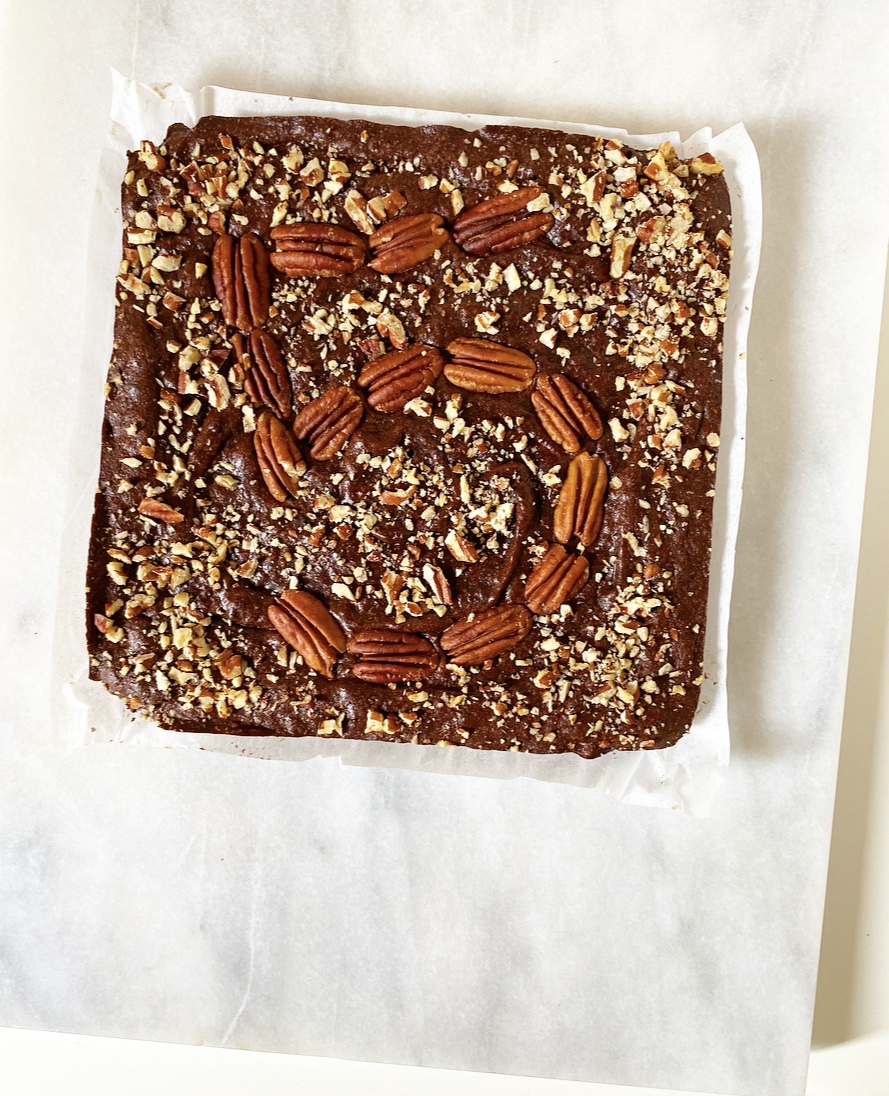
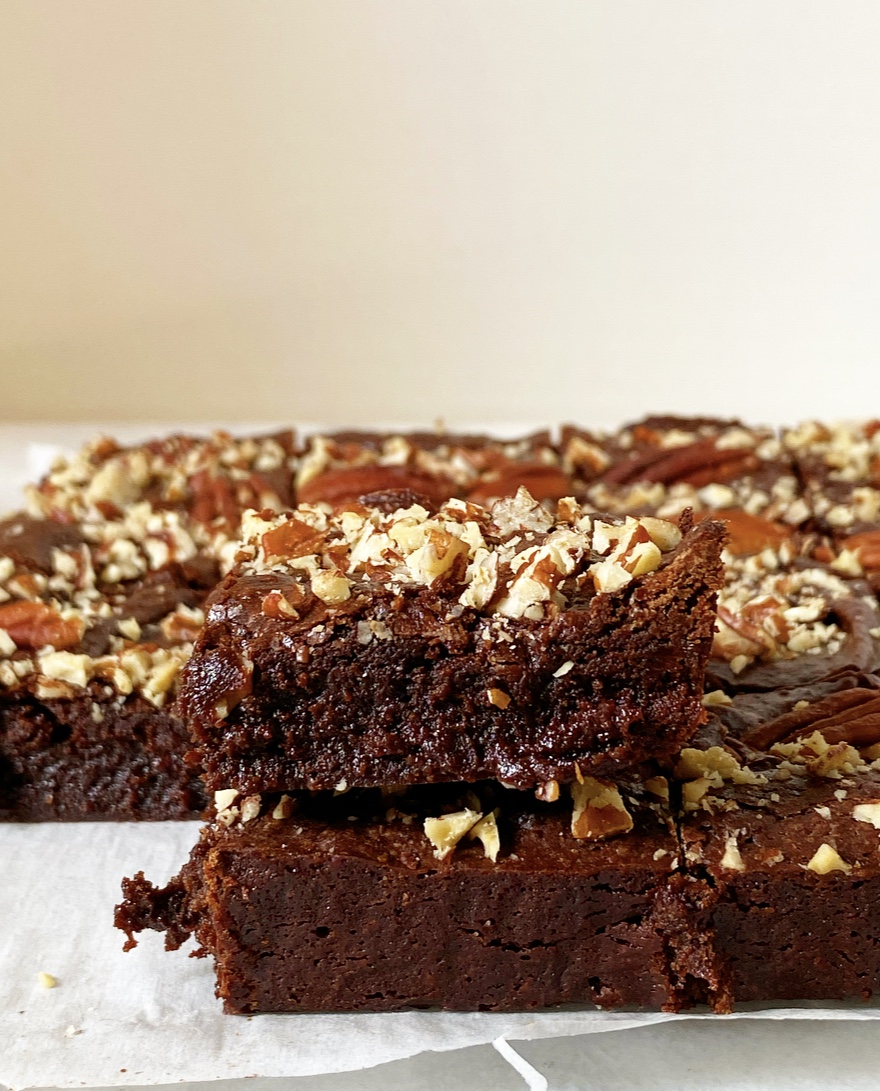
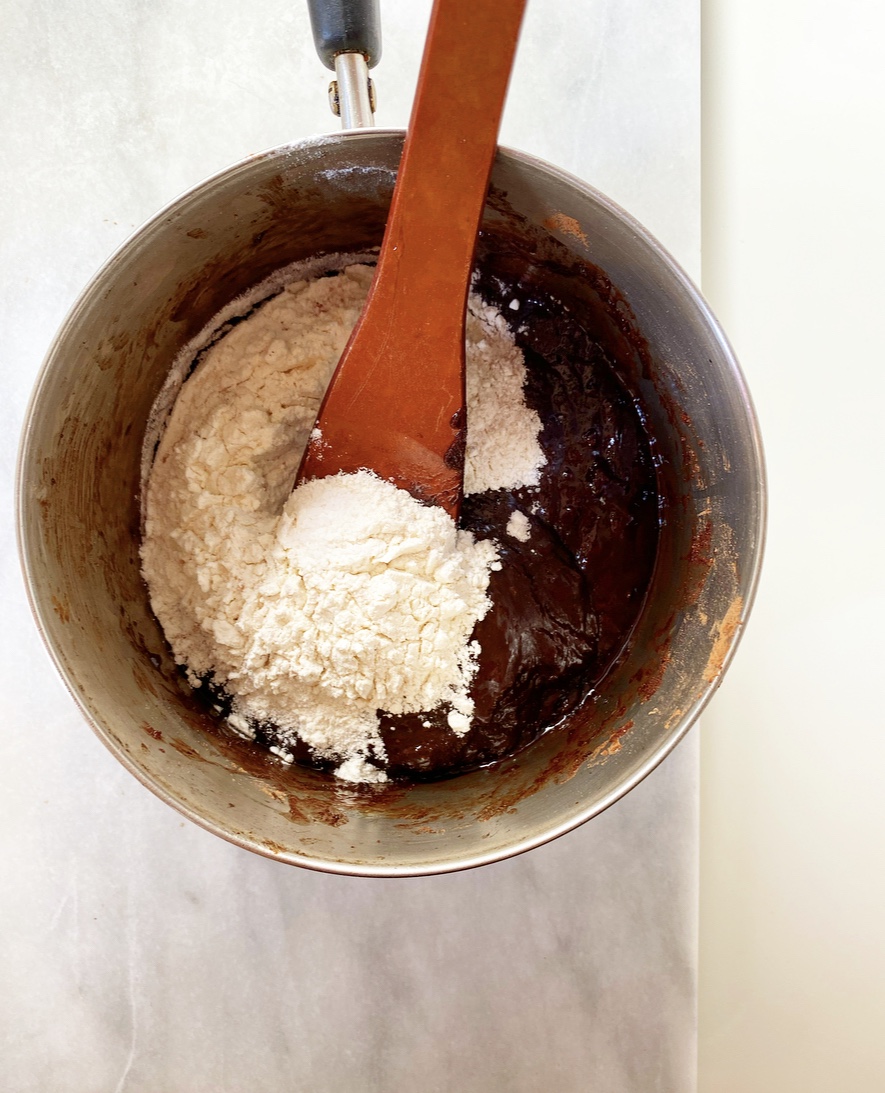 And baking? I’ve learned ten times as much about baking in the last five years as I have about photography. Still, these Cocoa Brownies didn’t need much of an update recipe-wise. In remaking them, I only made one major adjustment: I mixed them right in the pot where I bloomed (melted together) the butter, cocoa, and sugars. You can, of course, just mix the batter in a bowl, but why add more dishes if you don’t have to, am I right?! I simply waited for the cocoa mixture to cool a few minutes so I could add the eggs without scrambling them, then stirred in the dry ingredients. Then I just transferred the batter into an 8-inch square pan. Et voila!
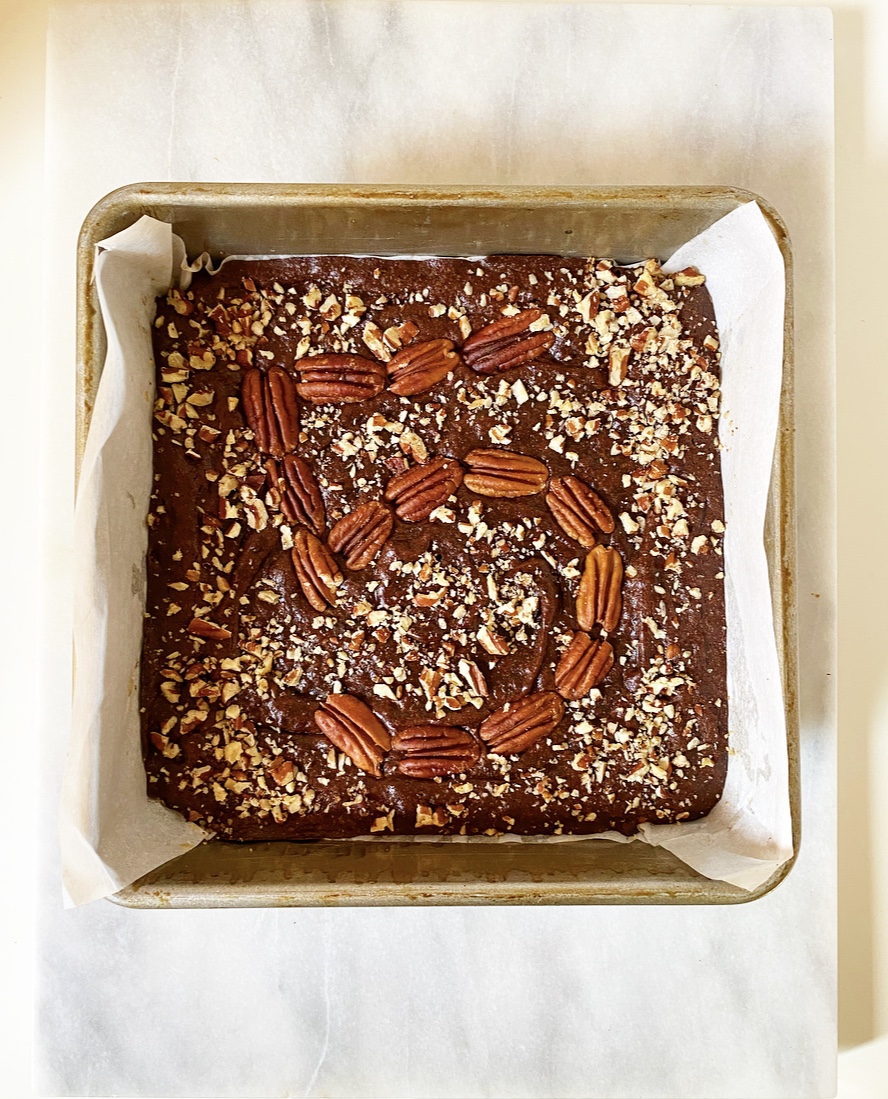 I decided to top this pan of goodness off with a pecan mosaic. My dad, the
 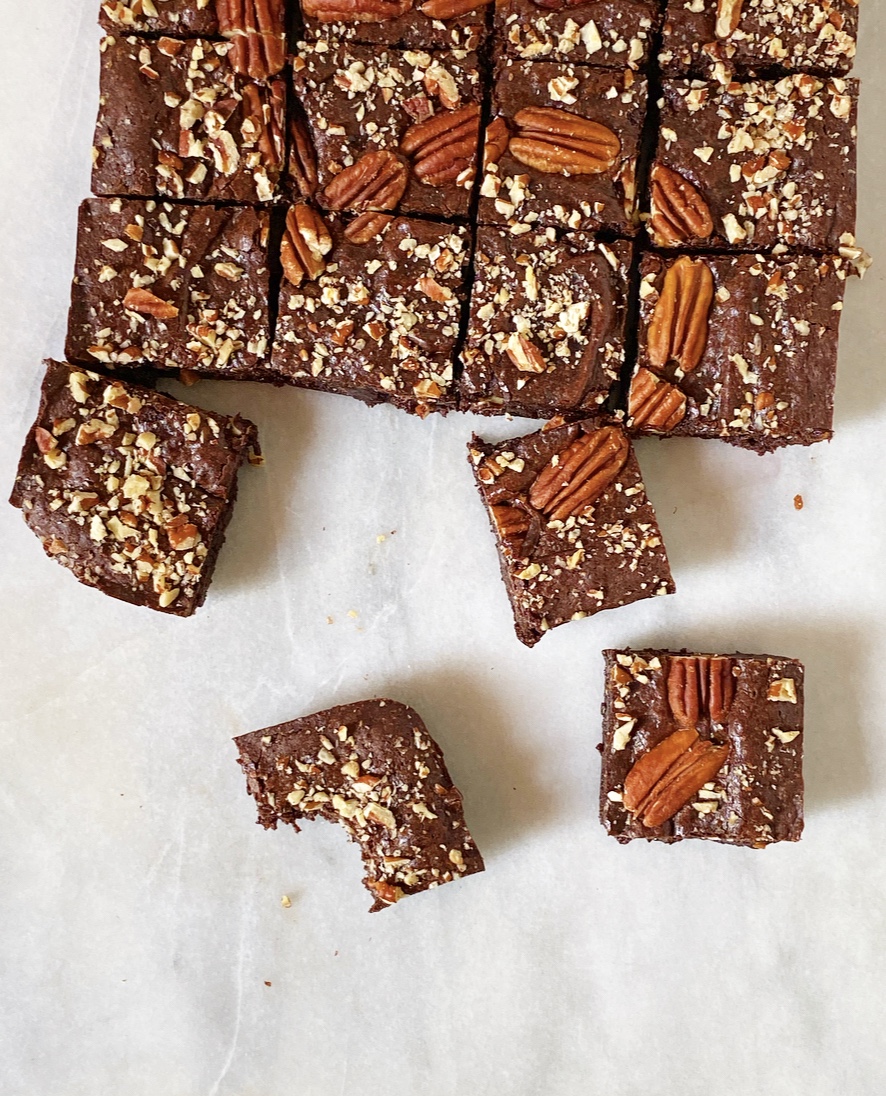 Cocoa Brownies bake in 30 minutes and cool in about an hour, making them the perfect simple treat for celebrating one of my biggest accomplishments to date—one that I couldn’t have done without you. This blog has helped me make new friends, reconnect with old ones, strengthen existing relationships, and interact with so many people that I truly would never have met if it weren’t for this compulsive home-baking and over-sharing habit of mine. Thank you for the kind notes, laughs, likes, questions, comments, and