 I’ve been meaning to put a Chicken Pot Pie on here for years, but inevitably I’d forget about it until the day before Thanksgiving (things to do with turkey leftovers!) or winter would slip away from me too quickly, and then it was summer, and who wants to make—let alone eat—a Chicken Pot Pie in July?
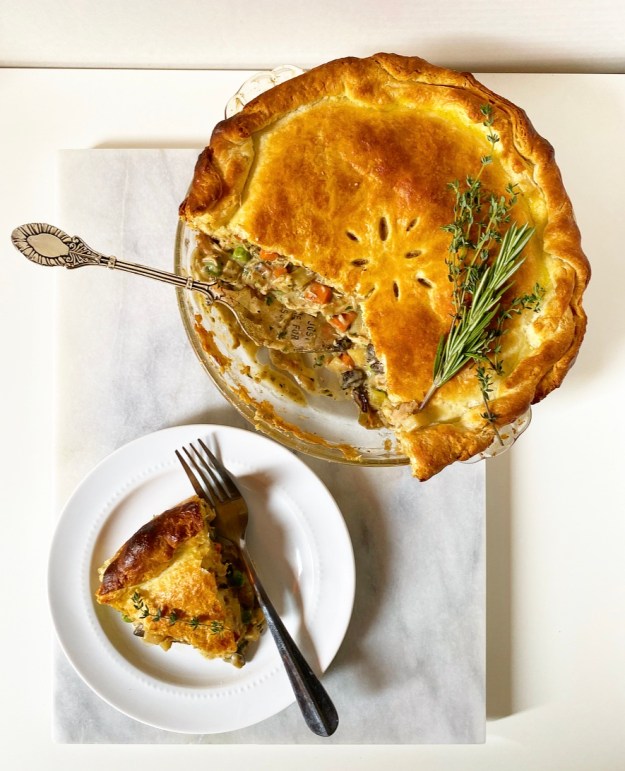
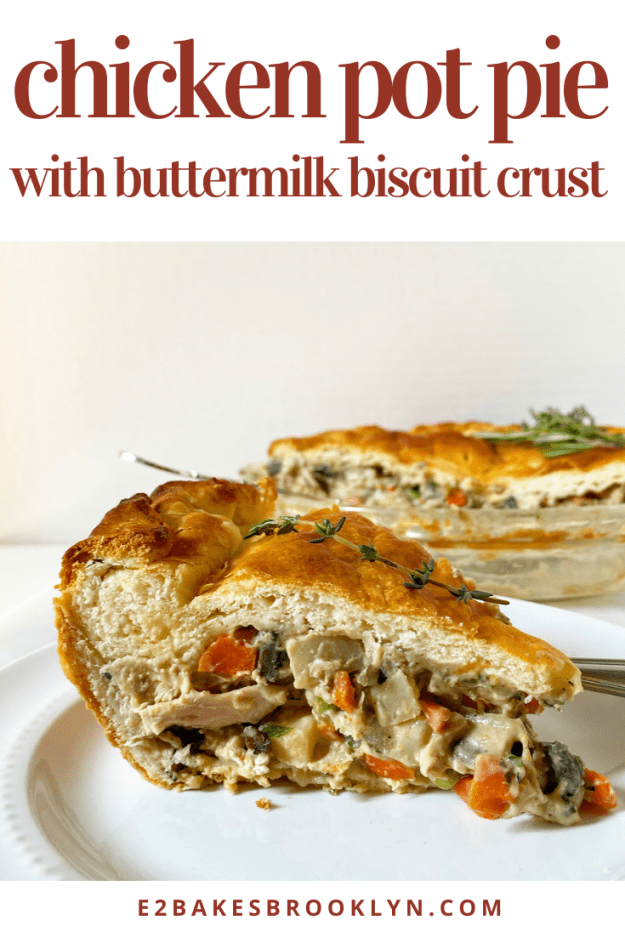
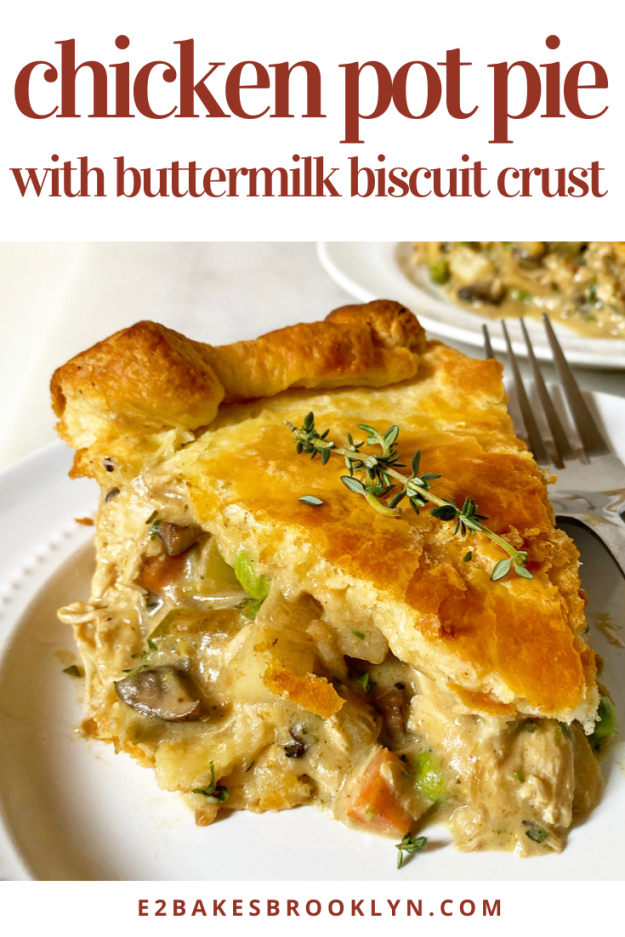
 Imagine my delight when the right timing and opportunity finally presented themselves a few weeks ago, when it seemed like every big-time food person in the world was making Tomato & Corn Pie with Biscuit Crust. The tomatoes and corn are wonderful and all, but nobody will be surprised to learn that I went to look at that recipe *specifically* to see the biscuit crust. I learned quickly that it was basically just buttermilk biscuit dough, and then I wondered if I could use my own buttermilk biscuit dough with the same results…and here we are. Chicken Pot Pie with Buttermilk Biscuit Crust, y’all. This is comfort food on steroids and it’s happening right here, right now.
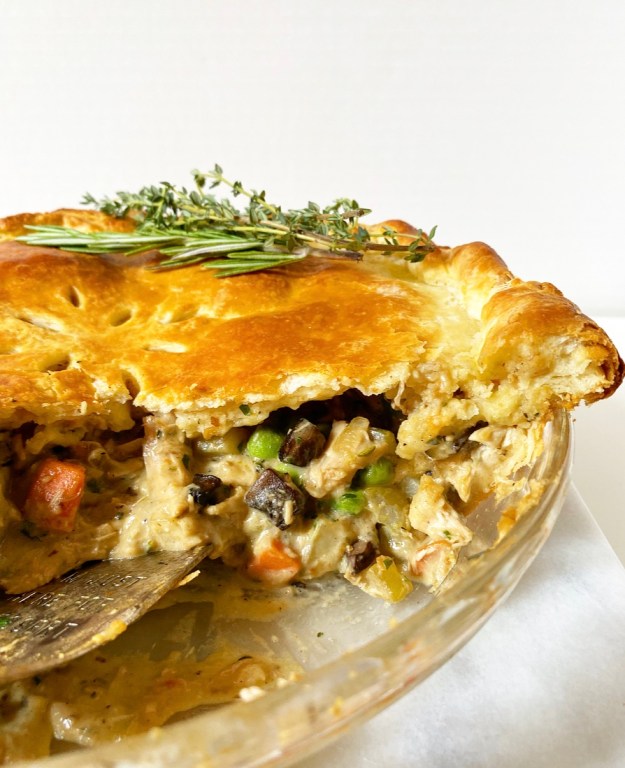 I started making pot pies
 one thousand years ago in 2008, when I was more inclined to use condensed cream-of-whatever soup as the gravy and crescent dough for the topper. My style and taste have evolved a lot (!) since then, and while I have made many Chicken Pot Pies in the ensuing twelve years, I don’t think any of them have been exactly alike. The filling is always based on what I’m in the mood for and what’s at the market.
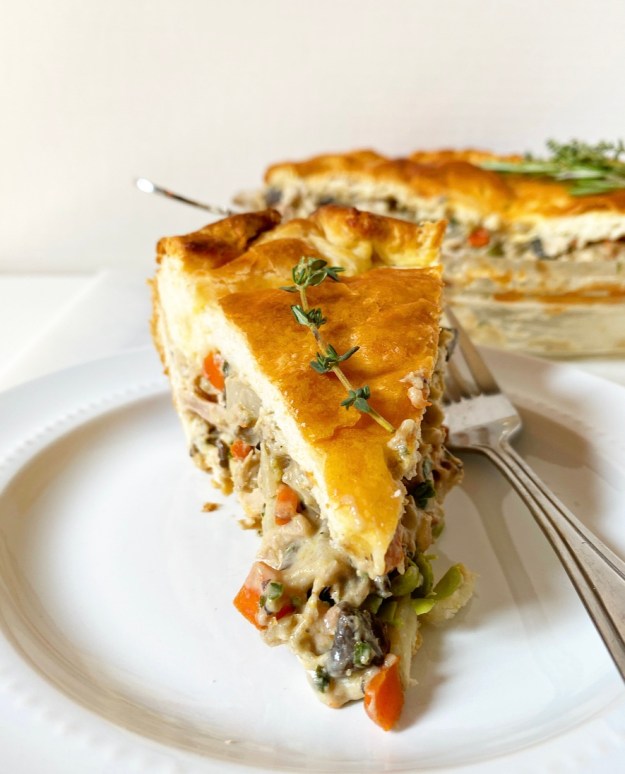
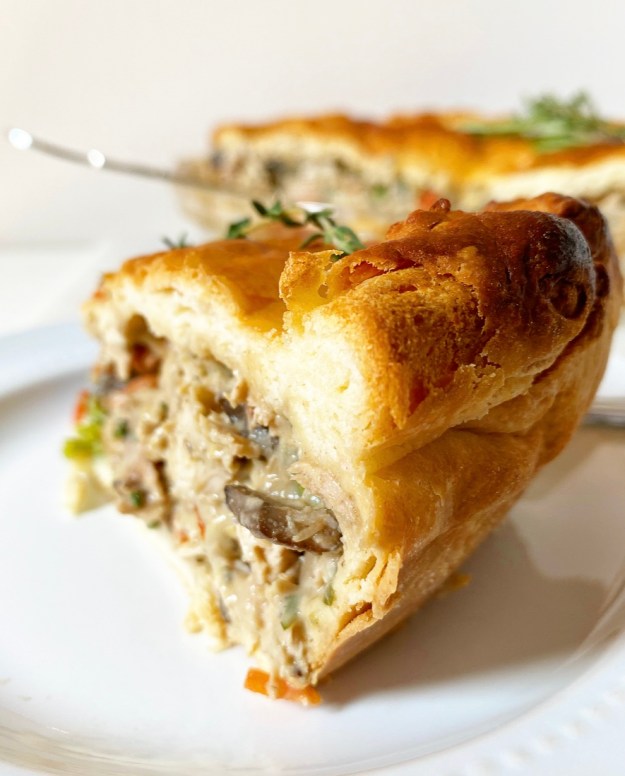
Today’s pie has both mushrooms and potatoes in addition to the usual carrot, celery, onion combo, but I’ve been known to swap in corn or a diced turnip when the mood strikes—there’s no wrong way to chicken pot pie. This is entirely about volume—3 cups of cooked chicken, 1 cup peas, 1 cup carrots, 1/2 cup each celery and onion, 1-1 1/2 cups whatever else (i.e. mushrooms, diced potato, corn, other root vegetables)—you just want it to add up to about 7 cups of “stuff” maximum so it all fits in your pan. I use a 2-inch deep pie plate for most things, but if yours is shallower, you may want to lean more toward 6 cups of stuff in your filling.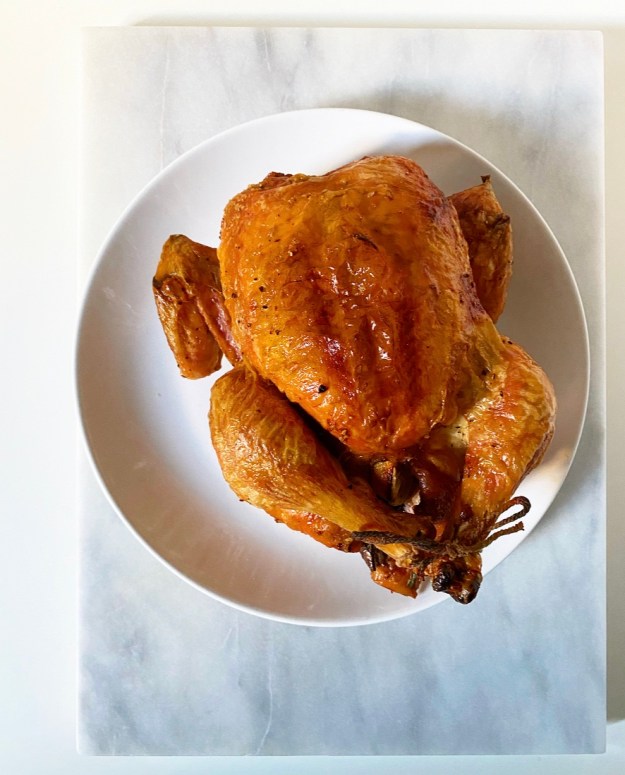
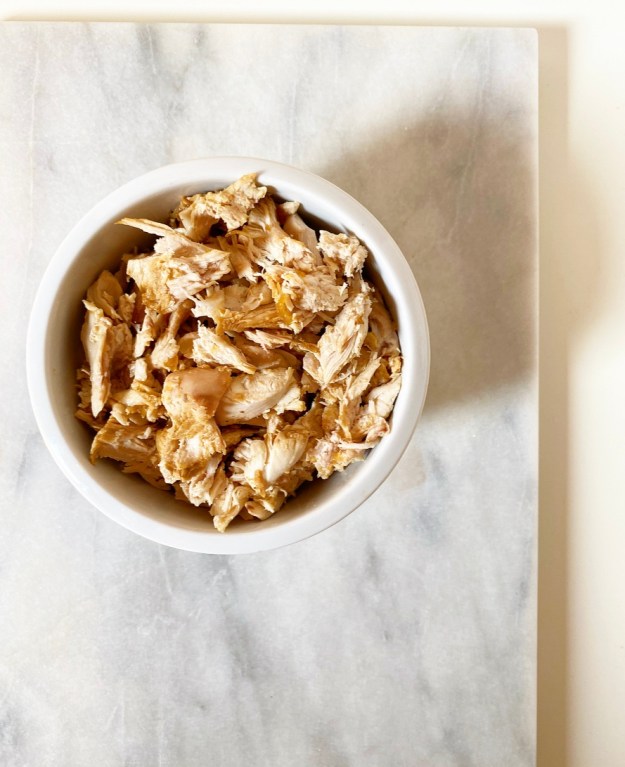 I won’t lie to you, a from-scratch Chicken Pot Pie can take a bit of time to prepare. All of the filling ingredients have to be cooked before they can be put together. This includes the chicken; I made a roast chicken the day before and used some of that, but you can use any cooked chicken you have on hand. This is a great way to repurpose leftovers!
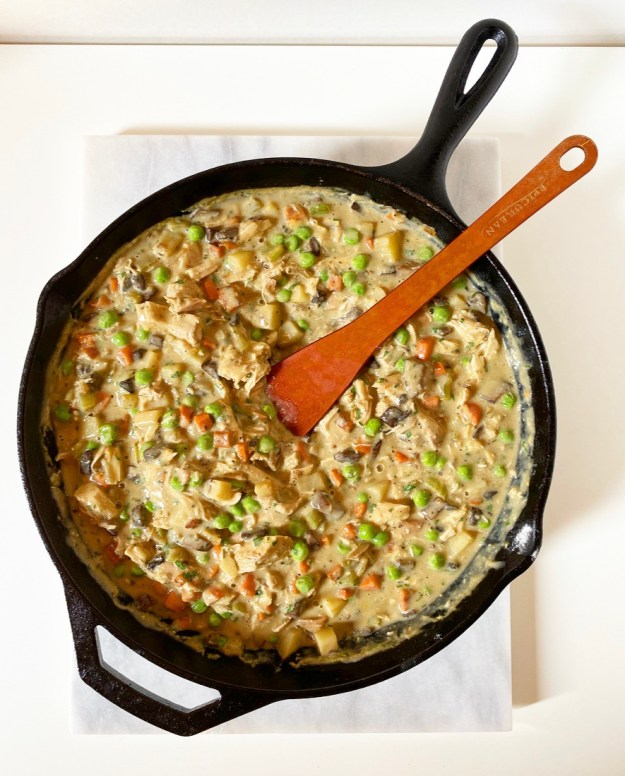 Once the various vegetables are cooked in butter until fork-tender, they all go in a big skillet together, and then you build the gravy on top of them. Stir in some flour (creating a sort of roux), then chicken stock, cream, dijon mustard, fresh herbs, salt and pepper. Simmer it all for ten minutes before removing the saucy, bubbling mix from the heat. Stir in your chicken and some frozen peas, then set your filling aside so you can roll out the buttermilk biscuit crust.
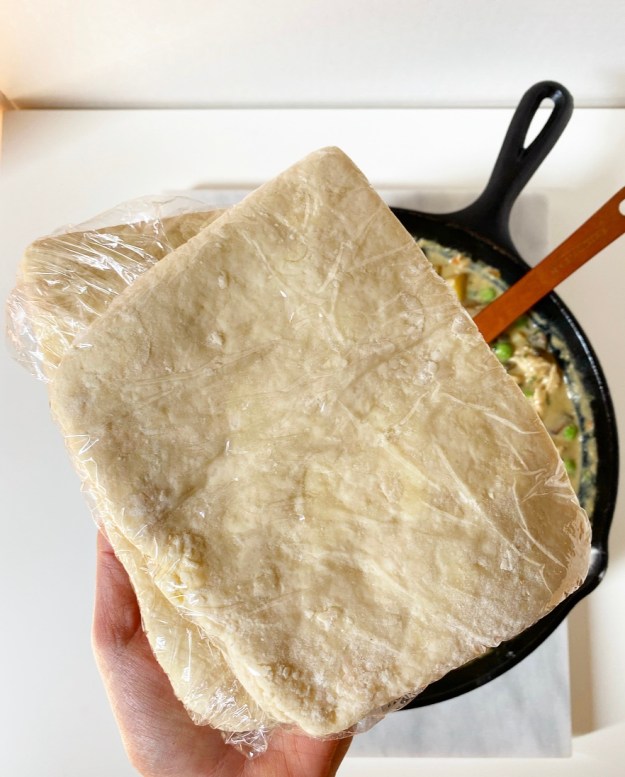
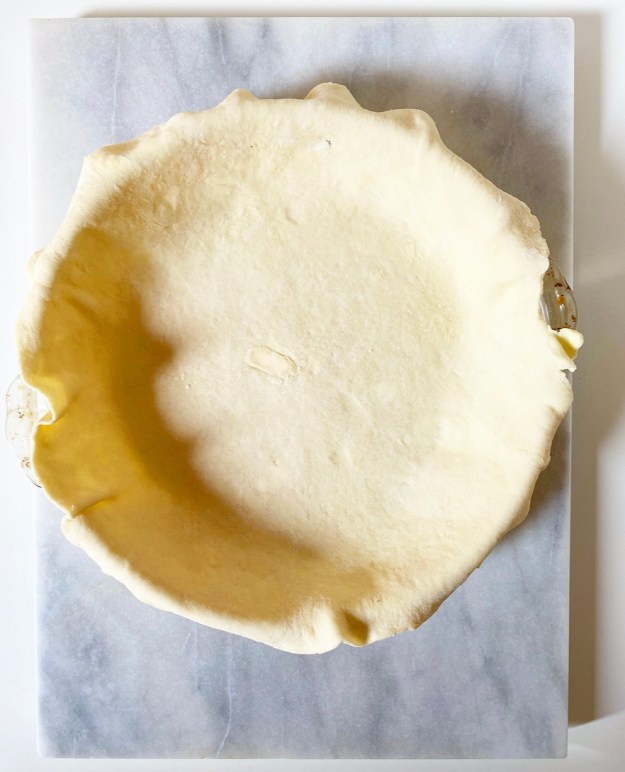 Oh yes, back to the buttermilk biscuit crust! It’s tender and flaky, and you’re going to freaking flip over how easy it is to make. The dough comes together exactly as it does when you’re making traditional biscuits, except after all the folds and turns it’s split in half and chilled while you make the filling. At this point, when the filling is cooling a bit, the dough is rolled out and fitted to the pan just like any other pie crust. As biscuit dough is softer and contains half the butter of most pie doughs, I found this remarkably easy with which to work.
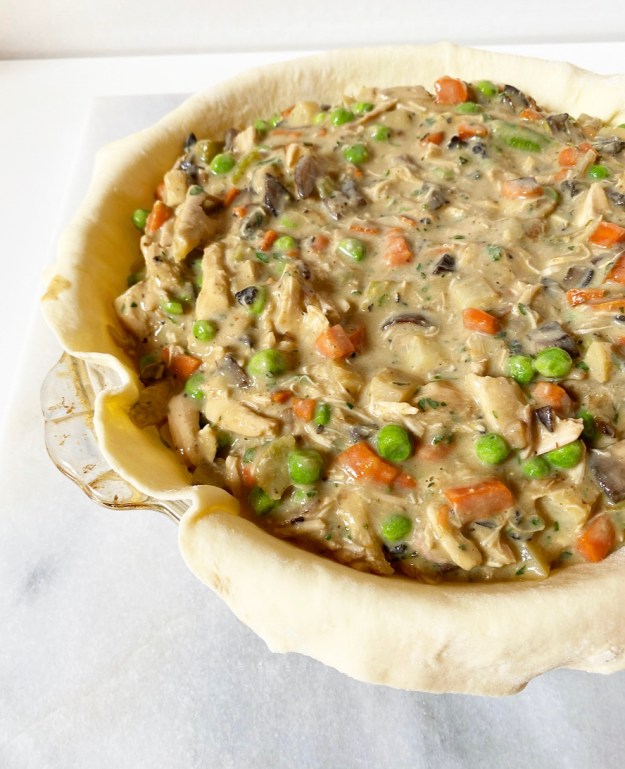 To finish off your Chicken Pot Pie, fill the bottom crust with your filling, then drape on the top crust, cut a few vents, paint the whole thing with egg wash, and bake it for about 30 minutes. Once your pie is burnished and bubbling, it’s time for dinner.
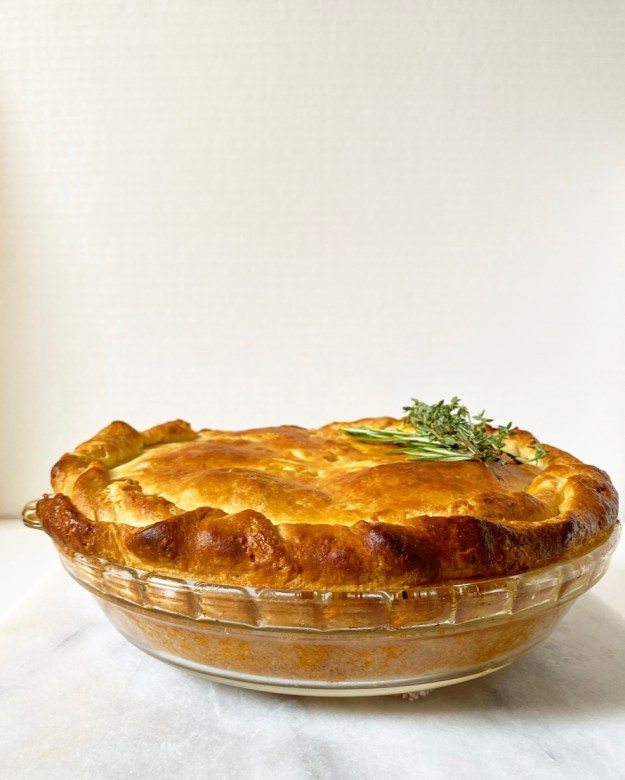 And oh, what a dinner it is. The filling is creamy and chickeny and rich, but never as heavy as I think it will be. The buttermilk biscuit crust is slightly puffed and perfectly browned, and retains distinct layers, just like it would in its traditional form.
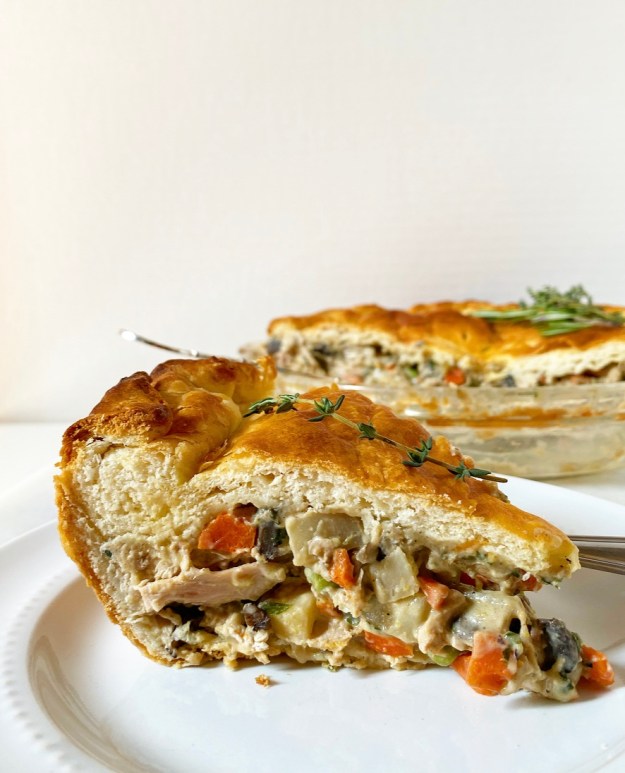 This is the best sort of Sunday dinner…or Monday through Thursday dinner if you, like me, have the enviable job of eating the whole thing yourself. Food blogger life isn’t always as glamorous as it seems, but I was happy to take this one for the team.
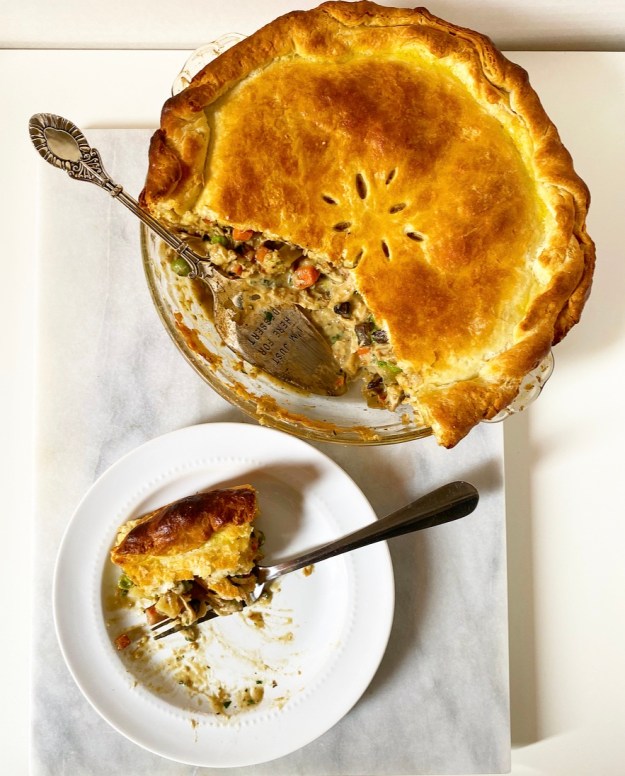
Chicken Pot Pie with Buttermilk Biscuit Crust
makes one 9-inch pie
Buttermilk Biscuit Crust:
2 cups all-purpose flour
1 tablespoon baking powder
1 tablespoon granulated sugar
1/2 teaspoon Kosher or sea salt
1/2 cup unsalted butter, very cold
3/4 cup buttermilk, very cold
Filling:
4 tablespoons unsalted butter, divided
8 ounces cremini mushrooms (or other mushrooms), cut into 1/2-inch pieces
1 teaspoon Kosher or sea salt, or to taste
1 cup diced carrot (about 2 medium), 1/2-inch pieces
1/2 cup diced celery, (about 1/2-2 stalks), 1/2-inch pieces
1/2 cup diced white onion, 1/2-inch pieces
3-5 cloves garlic, minced
1 small Yukon gold potato, peeled, 1/2-inch diced (about 1 cup)
1/4 cup water
1/3 cup all-purpose flour
1/2 teaspoon freshly ground black pepper, or to taste
2 teaspoons prepared Dijon mustard
1 tablespoon minced fresh thyme leaves
1 1/2 teaspoons (1/2 tablespoon) minced fresh rosemary, optional
1 tablespoon minced fresh parsley
2 1/4 cups chicken stock (I use Better than Bouillon)
1/2 cup heavy cream or half-and-half
3 cups cooked shredded chicken (or turkey), about 1 pound
1 cup frozen peas
Egg Wash:
1 large egg
1 teaspoon water
In a large mixing bowl, whisk together flour, baking powder, sugar, and salt. Set aside.
Cut your stick of butter into small cubes. Place all pieces into the bowl with the flour mixture. Using a pastry blender, cut cold butter into flour mixture until it is roughly the size of peas. Pour in cold buttermilk. Stir with a rubber spatula or wooden spoon until a shaggy dough forms.
Turn dough (and any unincorporated flour bits) out onto a floured surface. Flour your fingertips and pat the dough into a 1/2-inch thick rectangle. Fold dough in half, and turn one quarter turn. Pat out until it is 1/2-inch thick again. Repeat folding/quarter-turning/patting out until you have done it four times total. Re-flour your surface as necessary.
Slice dough in half and wrap each piece in plastic wrap. Chill while you prepare the filling.
Melt 2 tablespoons of butter in a large skillet over medium heat. Add mushrooms and a pinch of salt. Cook, stirring frequently, until browned and dramatically smaller. Set aside.
Add remaining 2 tablespoons of butter to the pan and swirl to coat. Add carrots, celery, onion, garlic, diced potato and 1/4 teaspoon of salt. Cook, stirring frequently, for about 10 minutes. Add water and cover pan with a lid (or a sheet of foil) for another 5 minutes. Vegetables are done when you can easily stab a piece of celery with a fork.
Add mushrooms back to the pan. Sprinkle on flour, 1/4 teaspoon salt, and pepper. Stir for about 2 minutes. Turn heat down to medium-low. Add mustard, thyme, rosemary, parsley, chicken stock and cream. Cook, stirring frequently, for 8-10 minutes, or until sauce thickens. Remove from heat. Stir in chicken and peas. Set filling aside while you roll out the crust.
Preheat oven to 400F. Lightly grease a pie plate.
Flour a surface and a rolling pin. Unwrap one half of the biscuit dough. Use rolling pin to roll dough to 1/8-inch thickness (about 14 inches in diameter for a 9-inch pie plate). For easiest rolling, roll dough in one direction, turning it one quarter-turn after each roll. Re-flour surface and rolling pin as needed.
To transfer to a pie plate, carefully fold dough into quarters. Place point in the center of the pie plate and carefully unfold. Fit it to the pan and trim any excess overhang (I didn’t have any). Fill with filling.
Repeat rolling process with the second half of the dough. Drape it over the filling, trim any excess overhang, and twist or crimp the edges as desired. Use a small knife to cut a few vents in a decorative pattern.
Make the egg wash. Combine egg and water in a small bowl. Whisk with a fork. Brush over all exposed crust.
Bake chicken pot pie for 30-32 minutes, until crust is deeply browned and filling is bubbling. Let cool 15 minutes before serving. Chicken pot pie will not slice cleanly.
Leftovers will keep covered in the refrigerator for up to four days. Leftovers will slice cleanly, as sauce thickens during cooling.
 Unsurprisingly, the way to my heart is through my stomach. I mean, I’m a food blogger–of course it is.
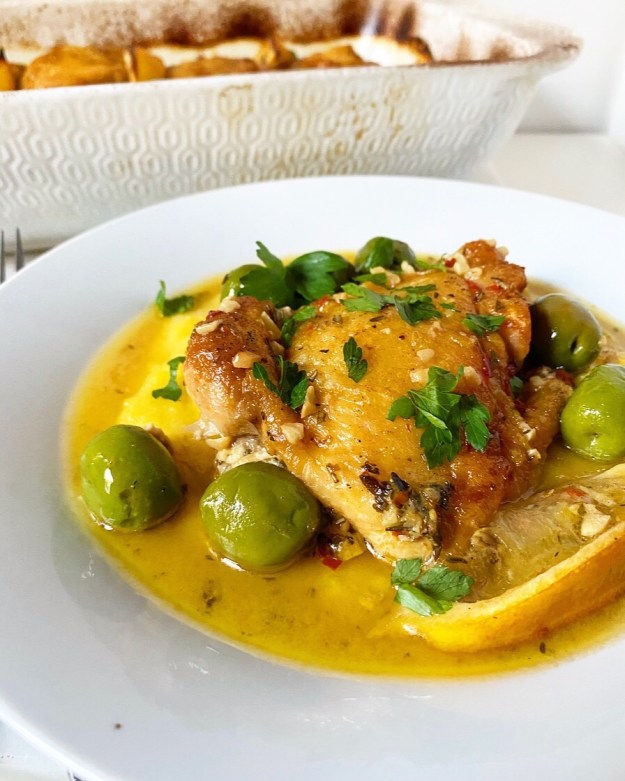
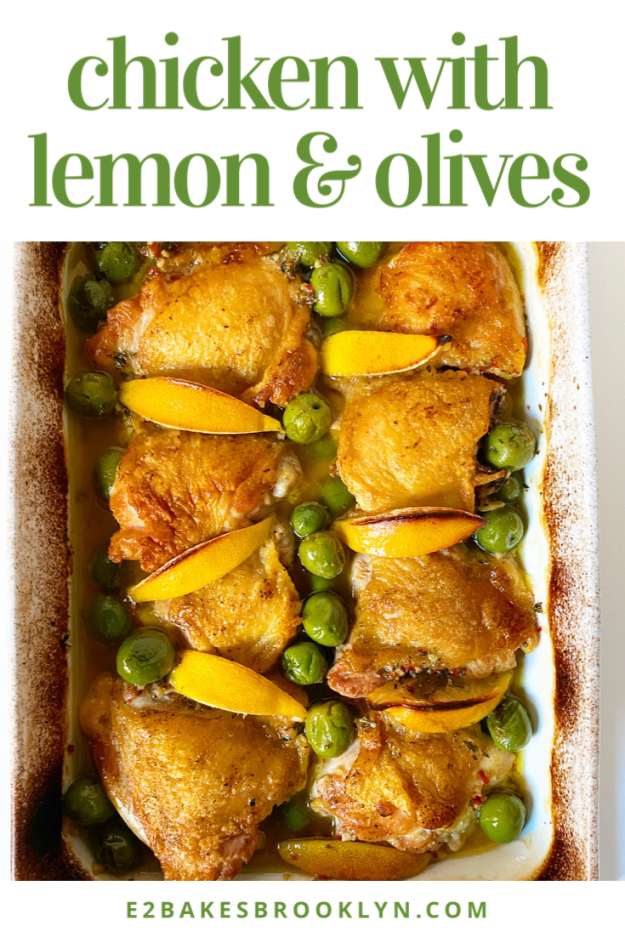
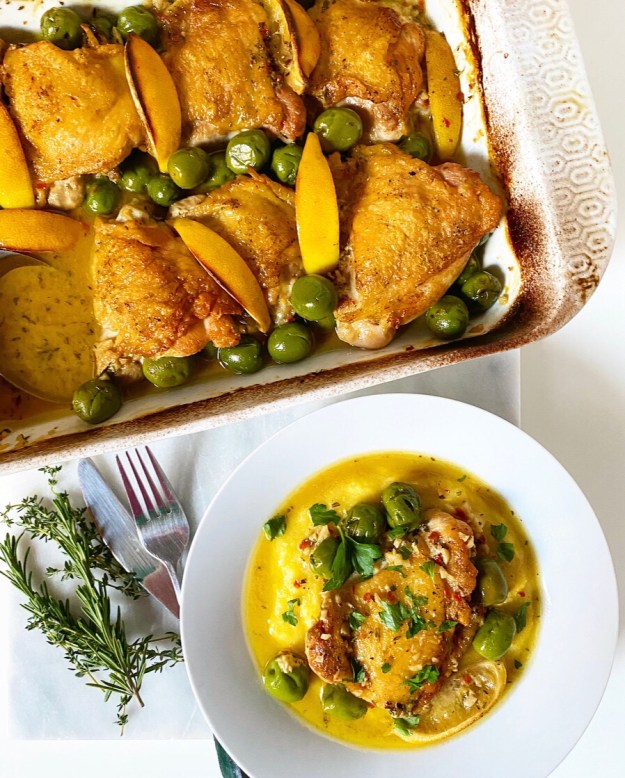 Today, we’re talking about Chicken with Lemon & Olives, which is a dream dinner for someone like me. It’s got crispy-skinned chicken thighs, briny roasted olives and a garlicky, herby, dijon-spiked lemon sauce, so…yeah, um, hi. Sign me up.

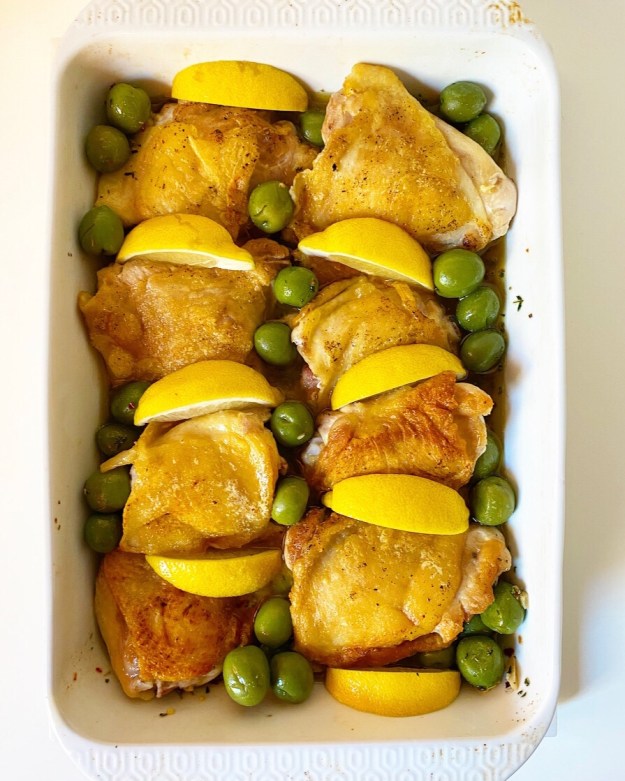 This dish, y’all. It’s so delicious. The sauce is tangy and acidic from the lemon and mustard, and rich (but not overly so) from the chicken and olive oil. And the olives—ohhhh, the olives. They’re cracked open before cooking so that all that tangy, schmaltzy sauce gets in there and gets a little briny and…well, it’s very good.
 Speaking of olives, I prefer to make this with castelveltranos because they’re my favorite. More of a kalamata person? Want to try a mix? Do what makes you happy. I used olives that still have their pits because, frankly, they always taste better. If you want to use pitted olives though, I won’t stop you. Just make sure to skip the step when you give them a thwack with the bottom of a cast iron skillet—nobody wants to clean that mess.
 I should note that the sauce stays on the thin side. If you’d like it to be thicker, you can reduce the amount of stock a bit when you pour it in, or remove the chicken, etc., and thicken it with a cornstarch slurry after roasting. Truly, the consistency of the sauce was the only thing I had reservations about during testing, but I like it as written. It nestles perfectly into a pile of
 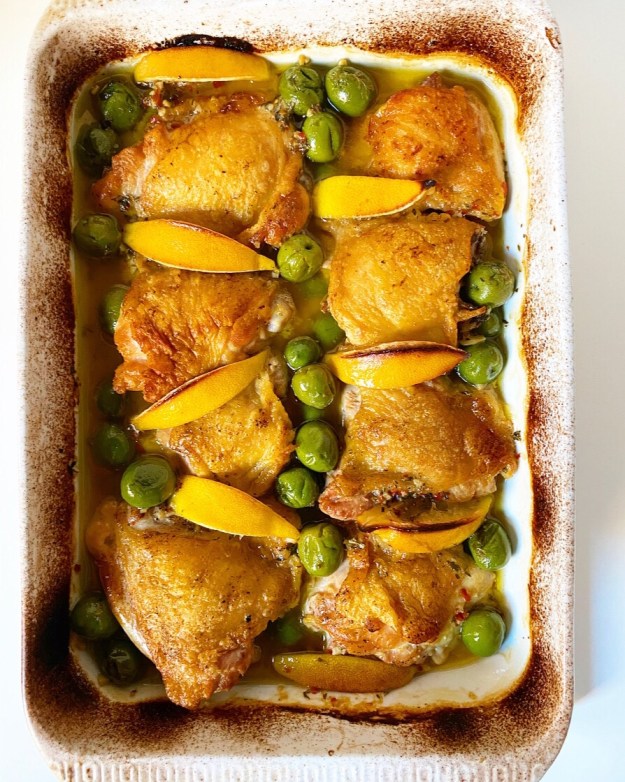 Can we discuss how absurdly beautiful this is? I love the golden chicken in contrast with the vibrant olives and roasted lemon wedges. This is definitely one of those mains that works as well for a
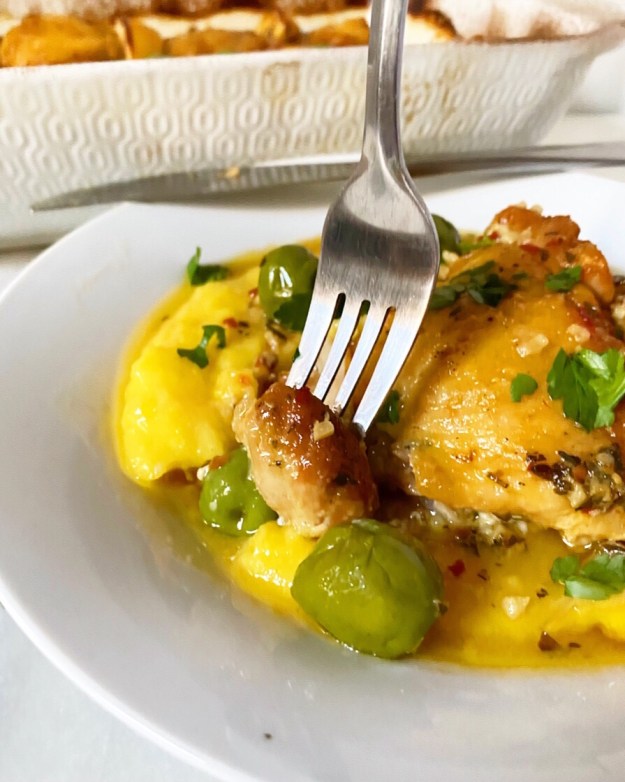


 Aaaaand we’re back! As is my January blogging tradition, this month will be less about dessert and more about savory foods and weeknight meals—the “normal” stuff. One cannot live on holiday cookies alone (but lord knows I’ve tried).
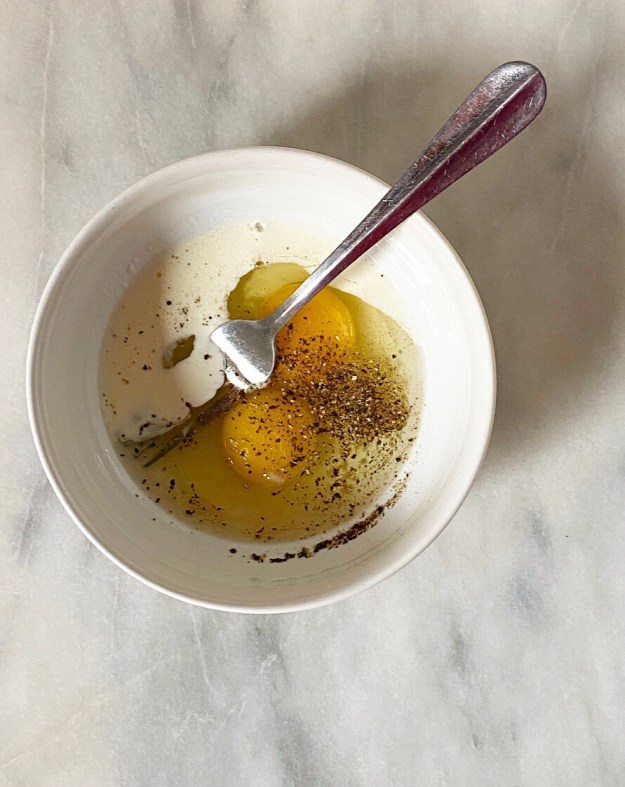
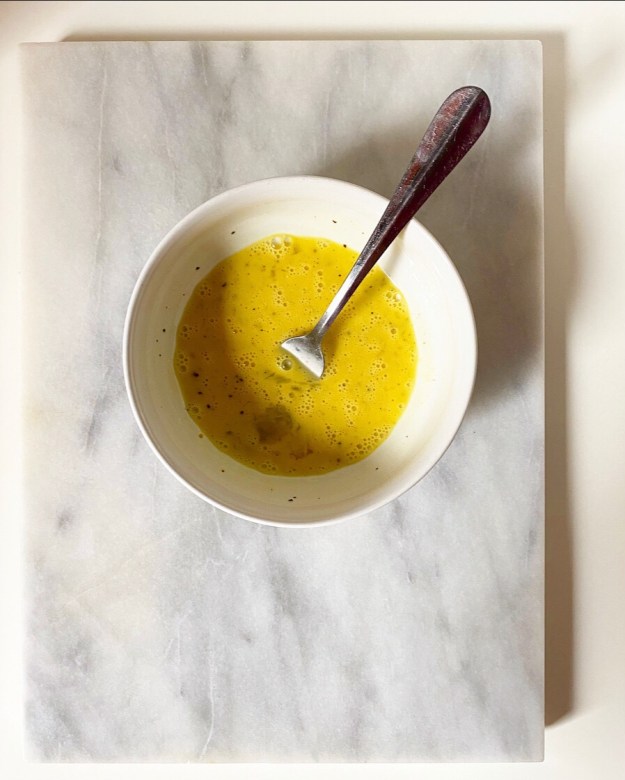

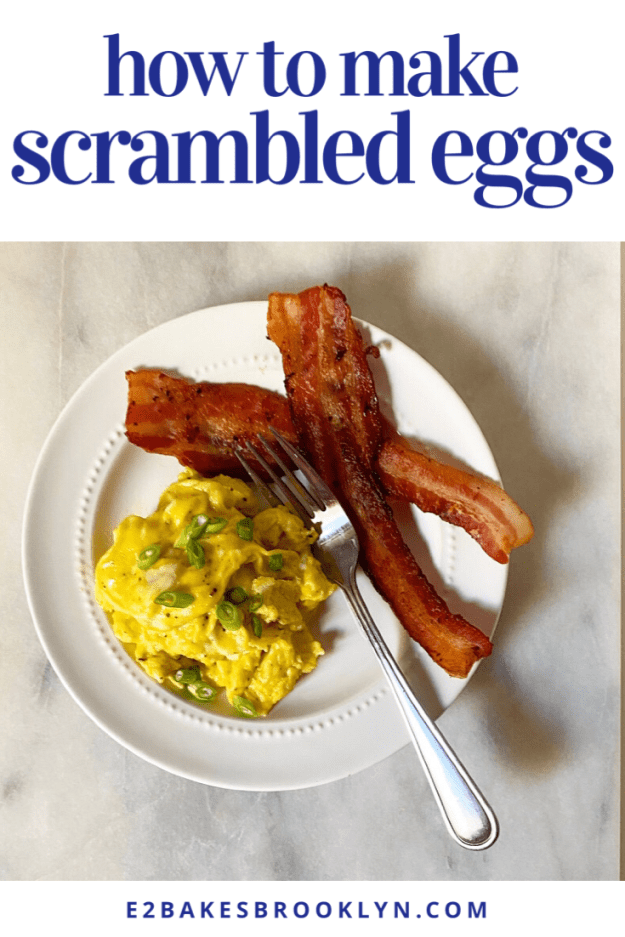
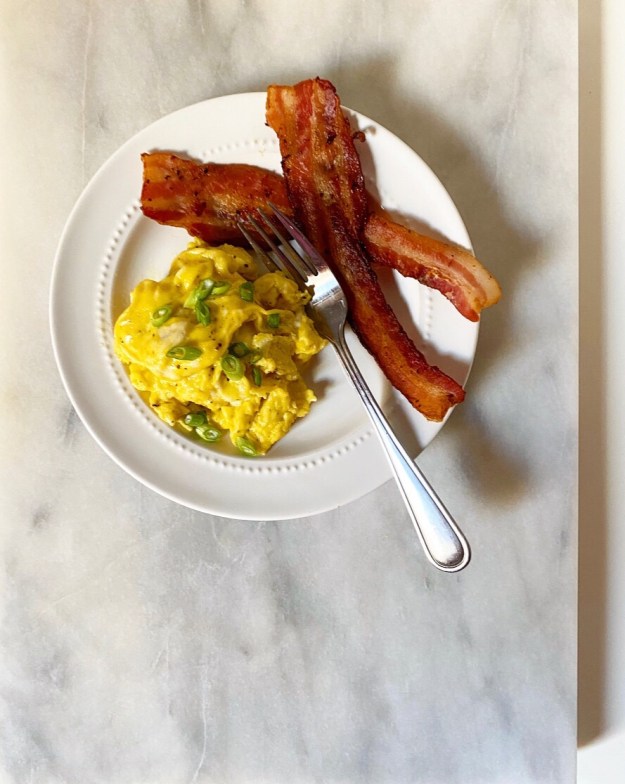 Scrambled Eggs
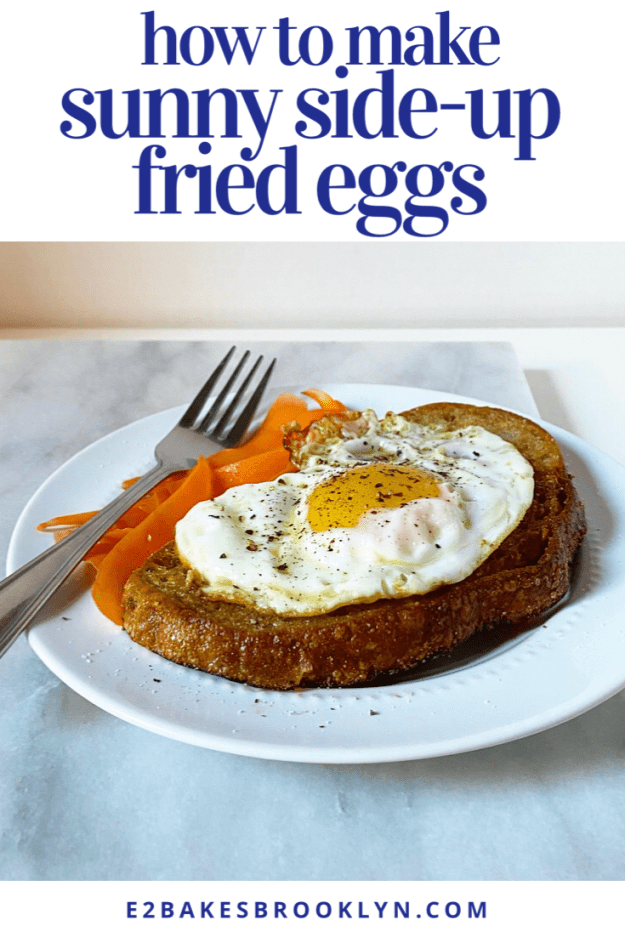
 Sunny Side-Up Fried Eggs
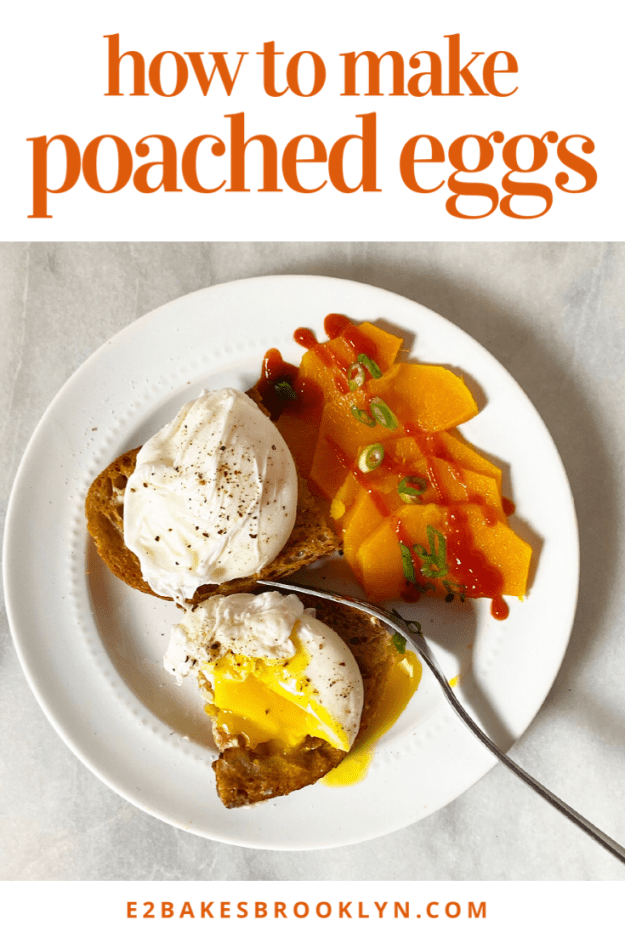
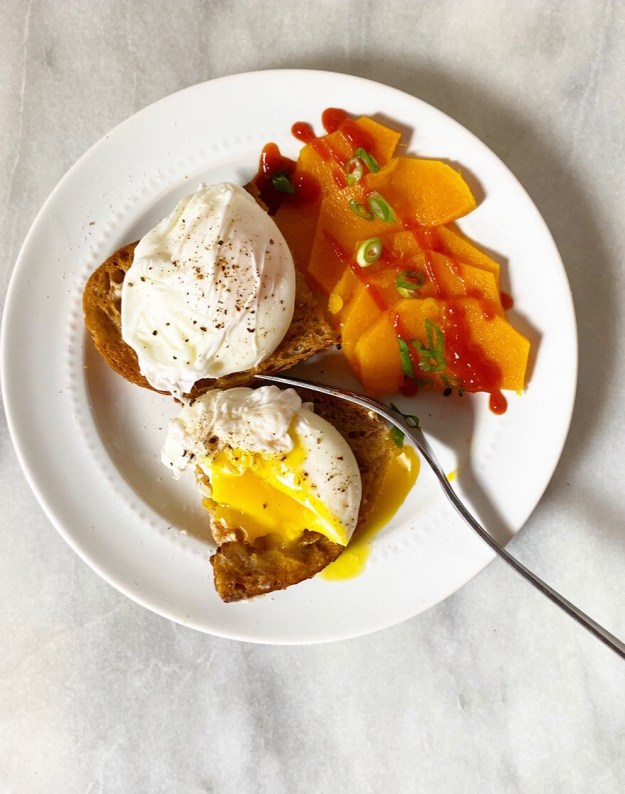 Poached Eggs
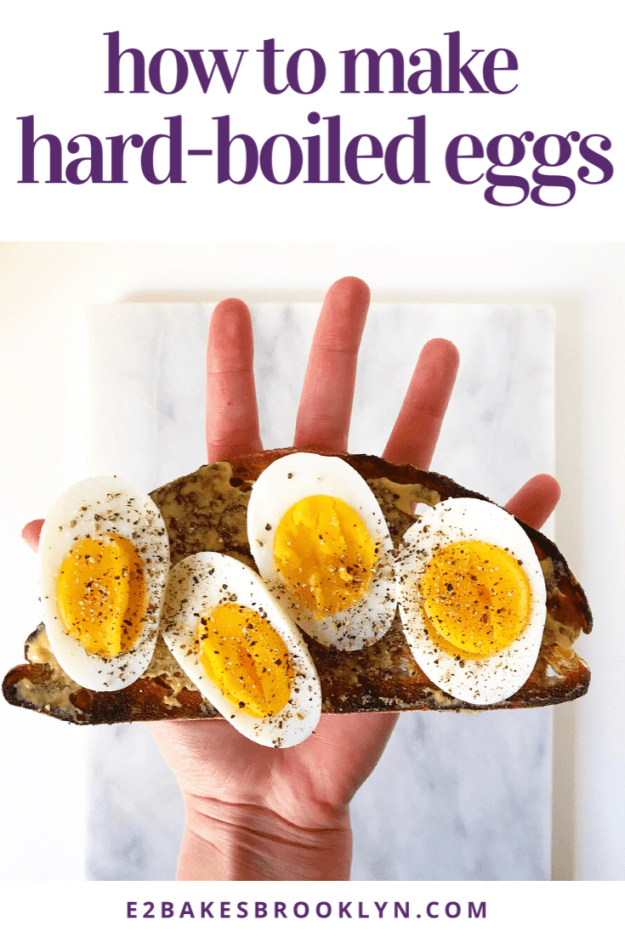
 Hard-Boiled Eggs
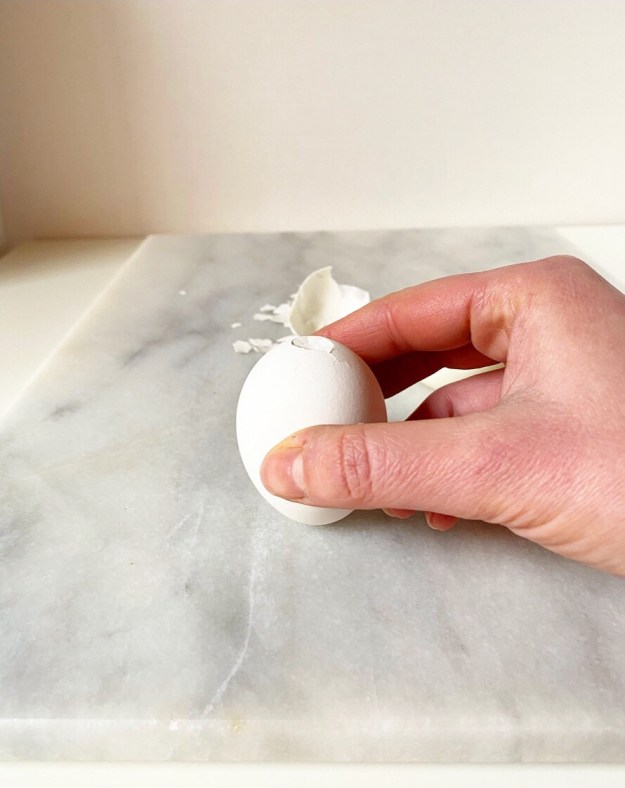

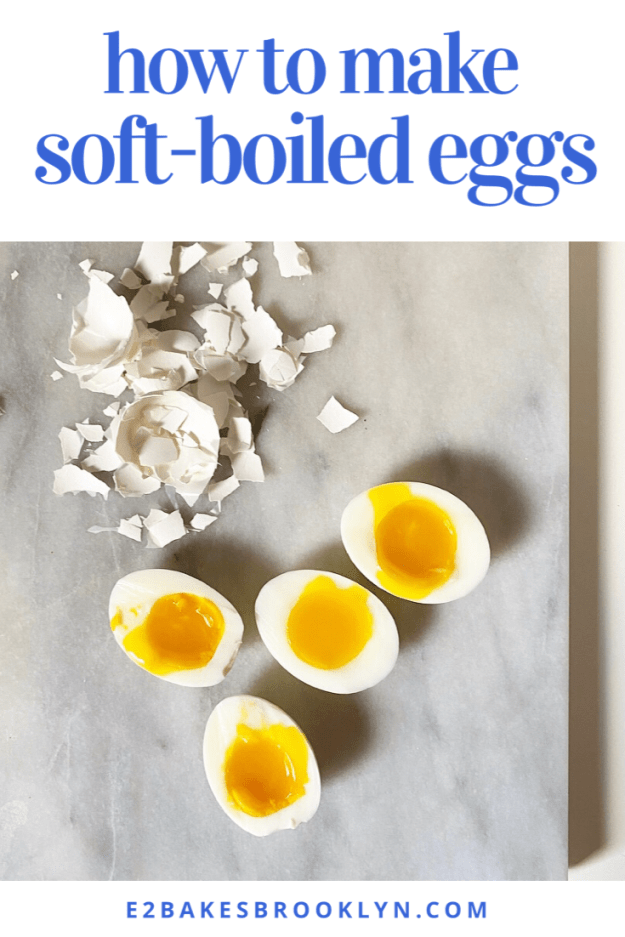
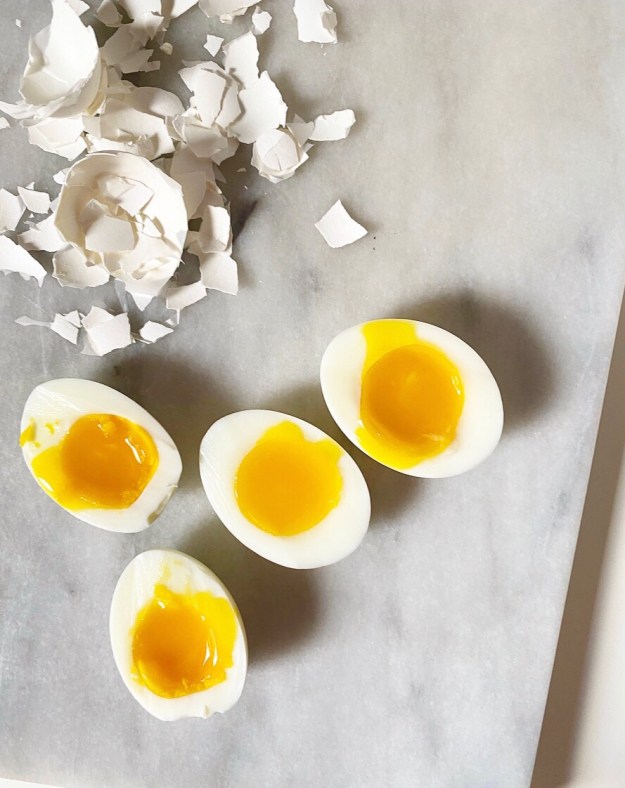 Soft-Boiled Eggs
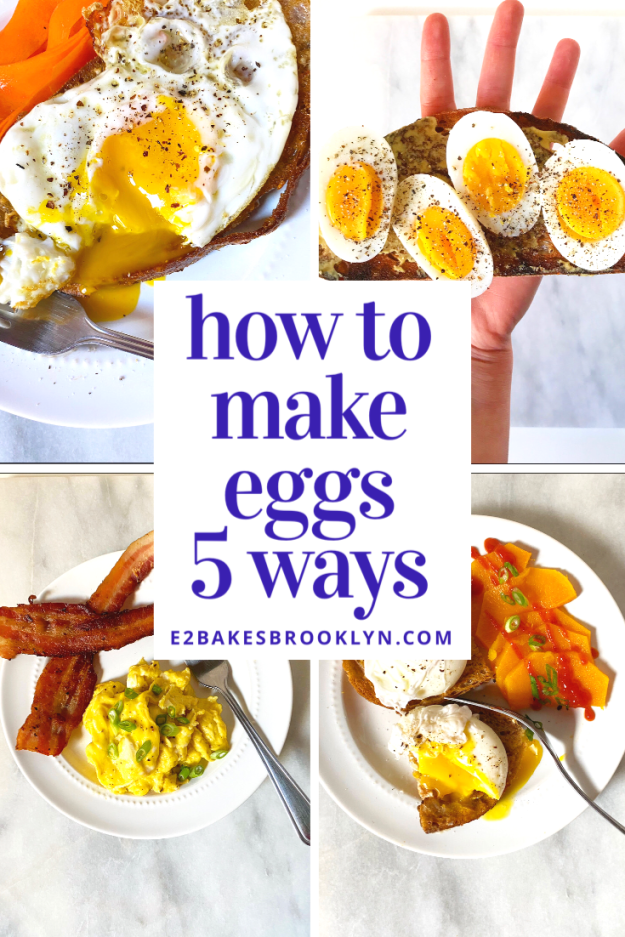


 When I first moved to New York and was in
 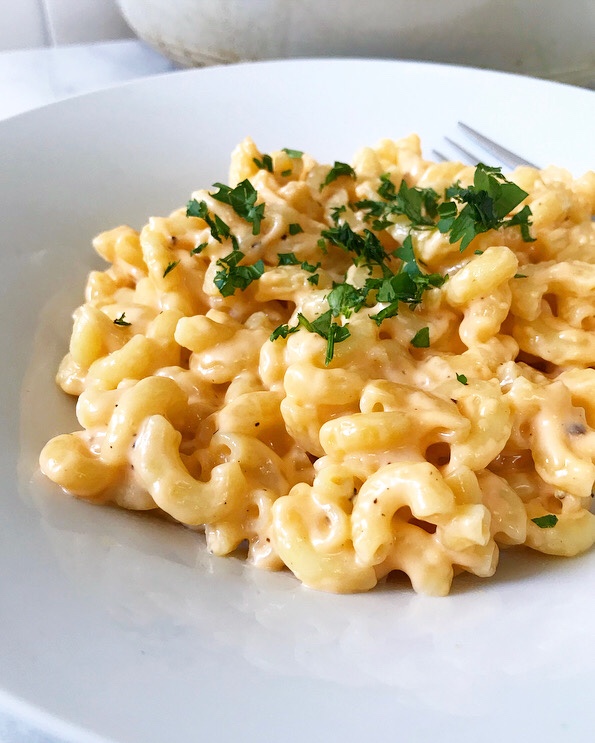 Unfortunately though, I’m not gifted with much else in that realm. I’m not confident enough to direct. I like to act, but was/am too timid to pursue it in any real way. My hearing is terrible, so sound is out. My arms aren’t strong enough to hold the boom mic for very long. Editing is just a “no.” The list of disqualifications goes on and on, save for one notable exception: I can cook. And so it was that the majority of my production course credits came from being craft services, a.k.a. the on-set caterer.
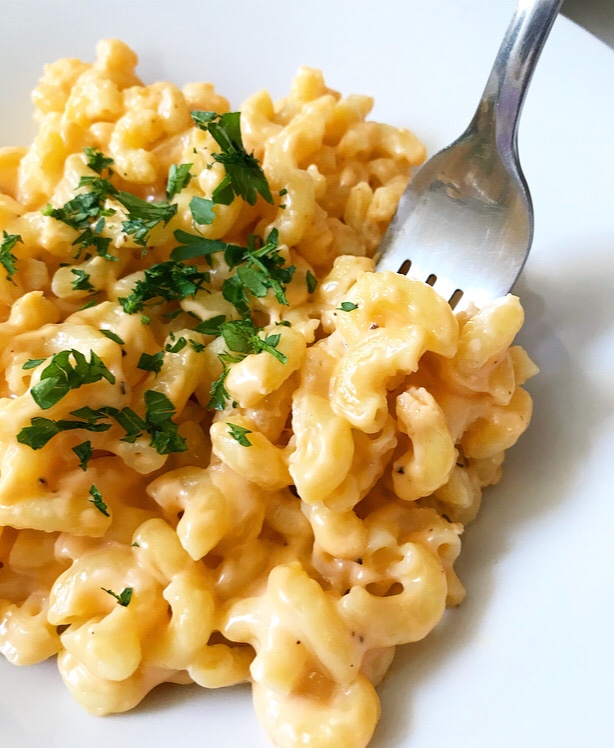
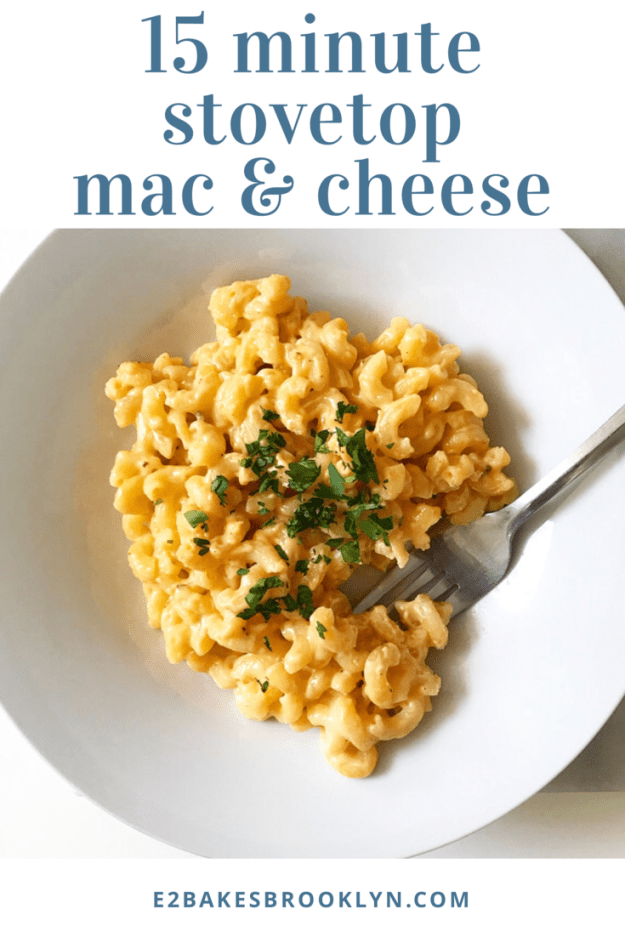
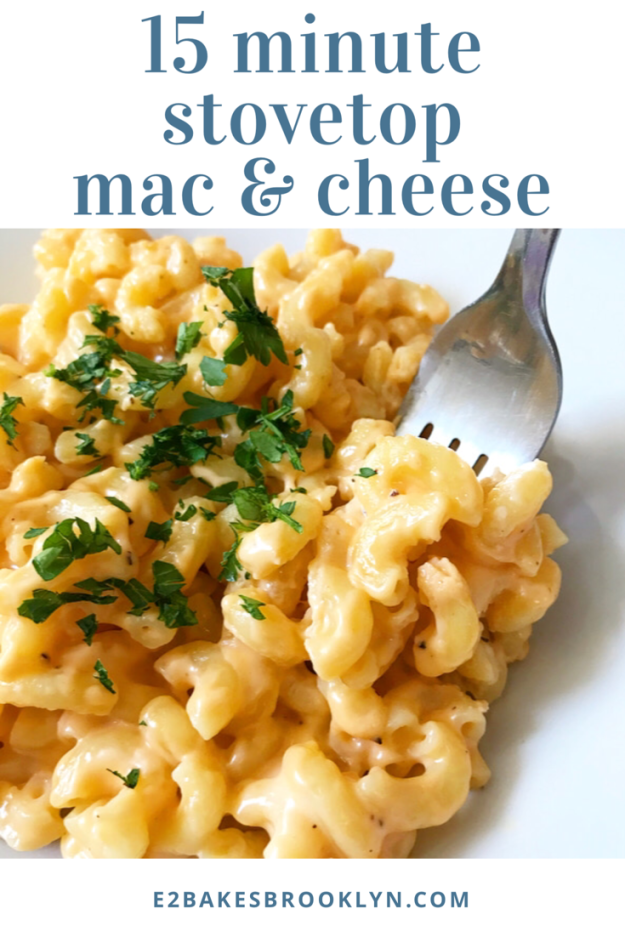
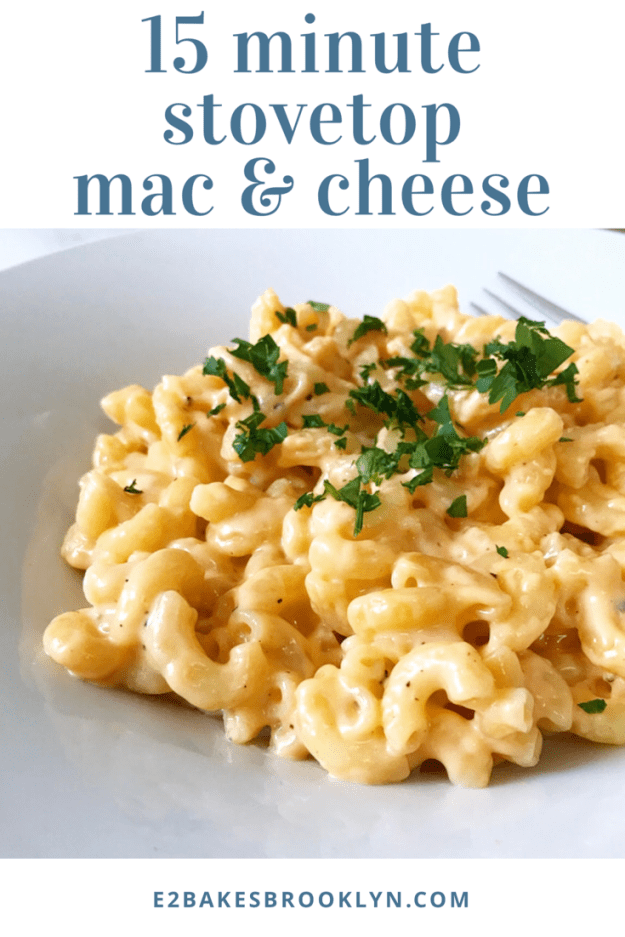
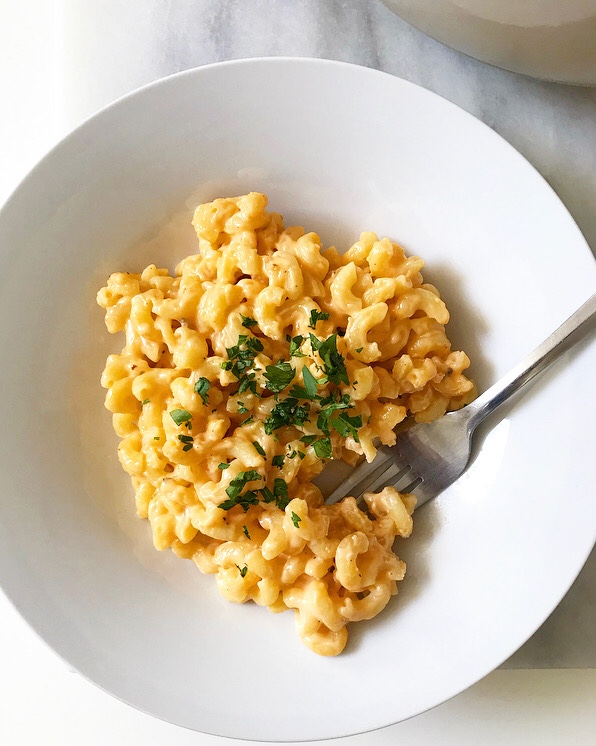
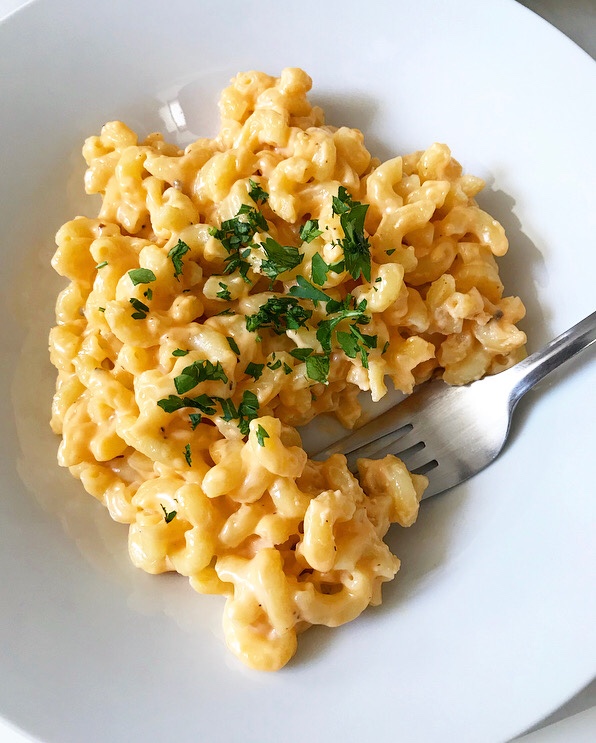 Now, being “crafty” for a student film isn’t the same as what you see when you spot film shoots on the streets of New York. Not even close. I didn’t have a truck or a crew; there was no oven or microwave. I was limited to what I could make in my Upper West Side apartment and transport in a cooler and what I could prepare on-set on a single electric burner. Oh, and it had to be cheap. Options were extremely limited—there were a lot of prepared salads and sandwiches—but my 15 Minute Stovetop Mac & Cheese was always a crowd pleaser.
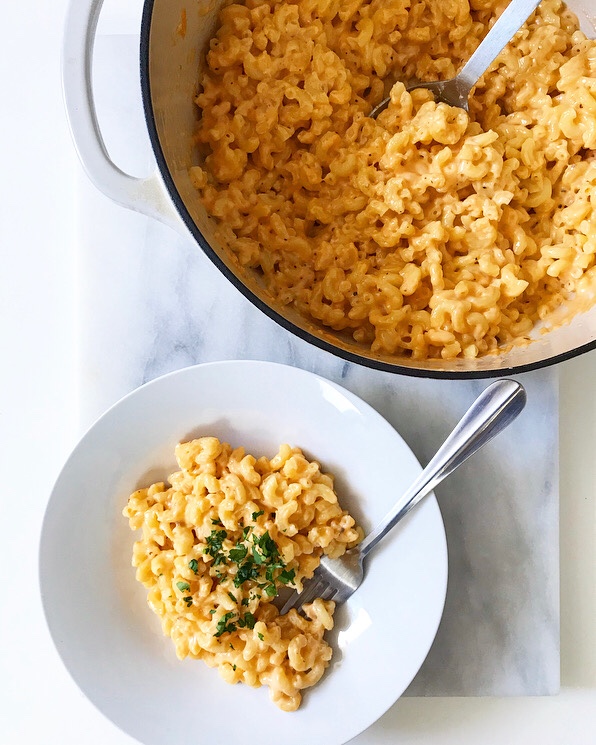 I mean, what’s not to love? This macaroni & cheese has all the cheesy flavor and creamy texture you want, but is less than half the work of most
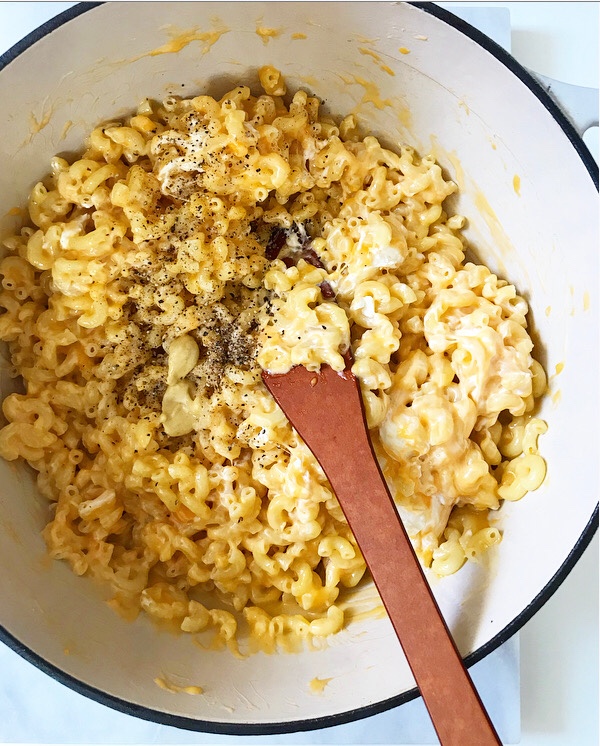
 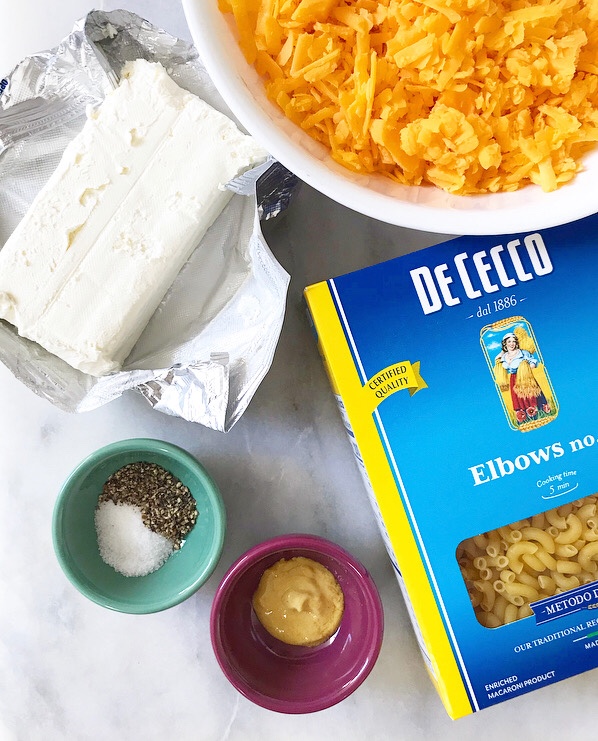 It also requires just six ingredients (seven, if you want to garnish with parsley) and two of them are salt and pepper. Whaaaaat. Since 15 Minute Stovetop Mac & Cheese is a from-scratch recipe, it will cost a few dollars more than the stuff in the blue box, but it’s also infinitely tastier. I’ll take real melted cheese over reconstituted powdered cheese any day. It’s not even a contest.
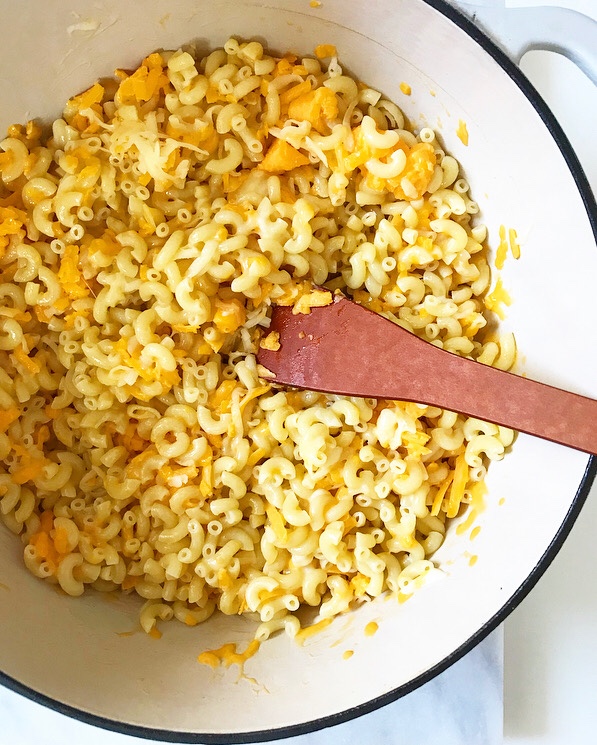

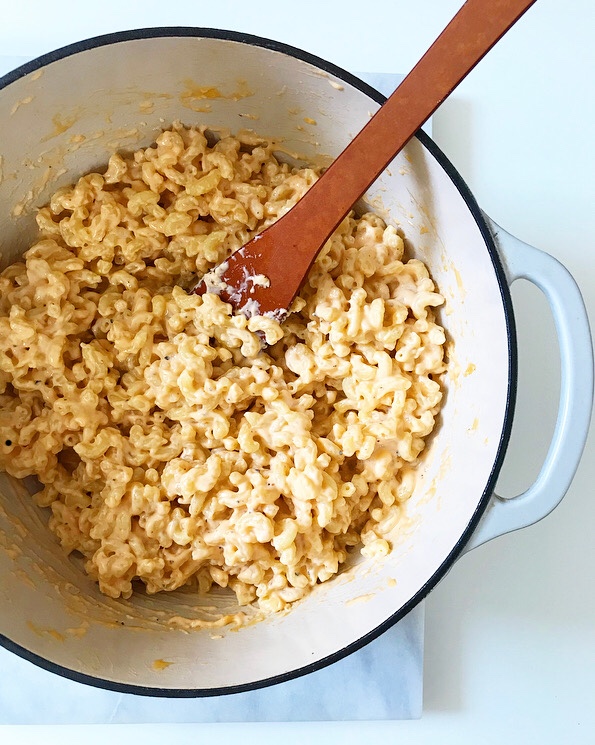 This recipe really does comes together in fifteen minutes, so it’s ideal for busy weeknights or filling a craving or feeding a bunch of student filmmakers on the fly.
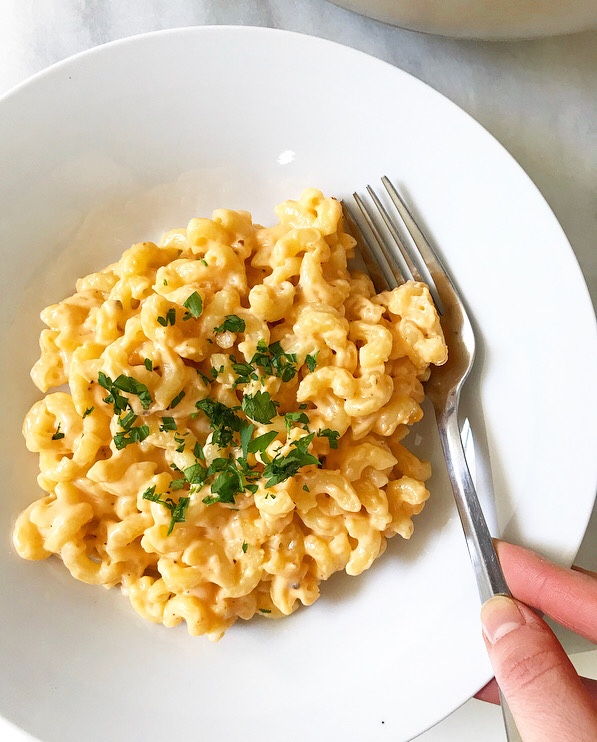 Right now, you’re just one pot, four steps, six ingredients, and fifteen minutes away from diving fork-first into a bowl of creamy, cheesy magic. What are you waiting for?!