Monthly Archives: June 2016

Banana Pudding Cookies

Banana Pudding CookiesWhen I first started out as a New York nanny, I worked for a family that lived in East Harlem. I took care of their baby girl, whom I affectionately called “Zu” (a nickname which bears no likeness to her actual name), from the time she was nine months old to when she was two and a half. And, oh, we had so much fun together. We read a million books, danced to Mary Poppins on vinyl, and I introduced her to the Peanuts (because Snoopy rules). We blew bubbles in the backyard, gave fist-bumps and high-fives, wore silly hats, and made cakes.

Well, I made the cakes. She did a lot of stirring ☺️ The point is that it was the best job I’d ever had up to that point. From the time I arrived everyday to the time I left, we were two peas in a pod.

Banana Pudding CookiesBut if you have children or have ever spent an extended period with anyone else’s children, you know that no matter how much fun you are having together, there comes a point where cabin fever sets in and you’d rather do anything than be in the house for two more minutes. When this happened, I’d put her in a baby carrier and we’d go find something to do. When it was nice, we’d go to the playground. When it was gross out, we’d go to Target and buy things I didn’t need. And sometimes, on very special occasions, we’d hop over to Evelyn’s Kitchen, a treasure of a bakery in East Harlem, for a treat to share.

Banana Pudding Cookies
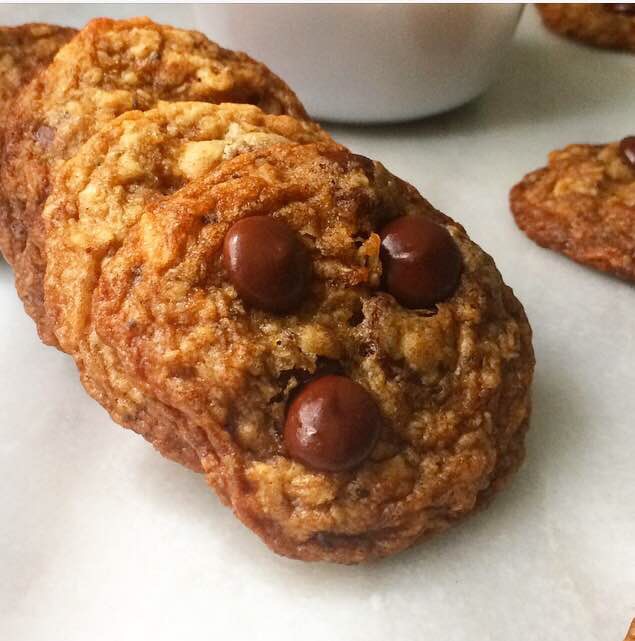
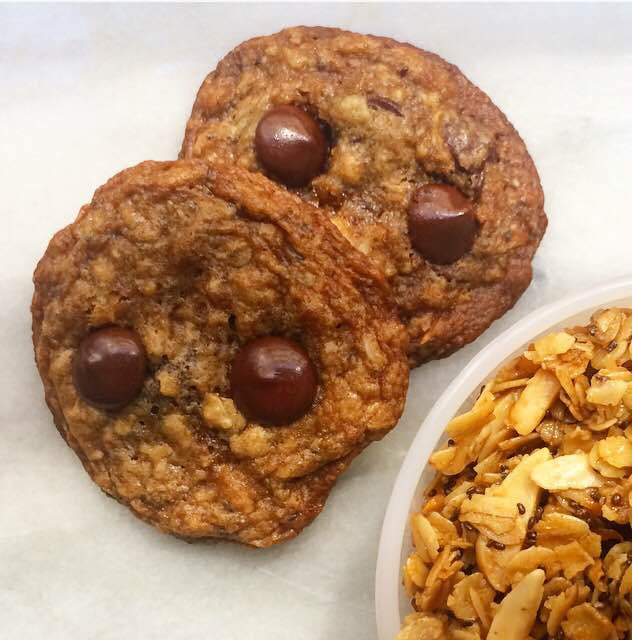
We always ordered the same thing, one Banana Pudding Pudgie. It’s a soft, chewy, white chocolate-studded cookie that tastes just like its namesake dessert. We’d go home and I’d cut it in quarters so she could grab them easily with her little fingers, and we’d enjoy it together before finding a new record to dance to. Those are some of my favorite memories ever. Just a simple little treat with my sweet, tiny friend.

When the time came for me to move on to a new family, I had no reason to frequent East Harlem or make trips to Evelyn’s Kitchen. This was a time when I was just getting into baking, and so I decided that I would figure out how to make Banana Pudding Pudgies at home. And it only took me fourteen months to get it right 😁😁😁 But I did, and for the last two years, whenever I get a hankering for a treat from Evelyn’s Kitchen, I save the subway fare I’d spend getting to and from East Harlem and make a batch of Banana Pudding Cookies instead.

Banana Pudding Cookies
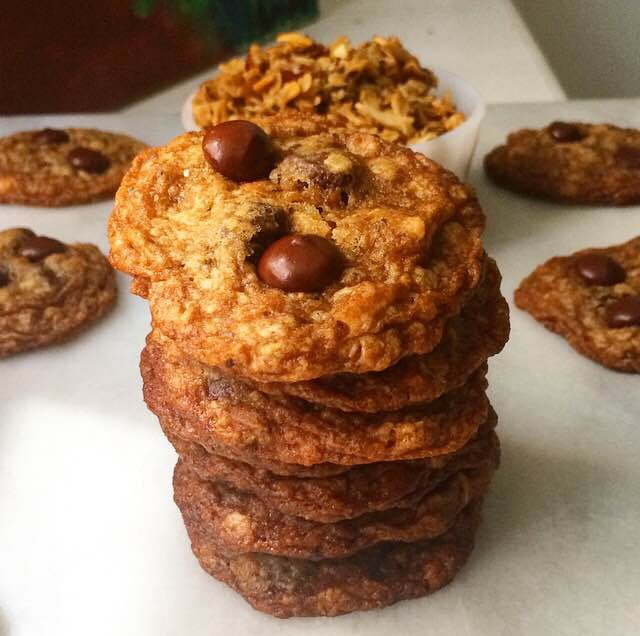
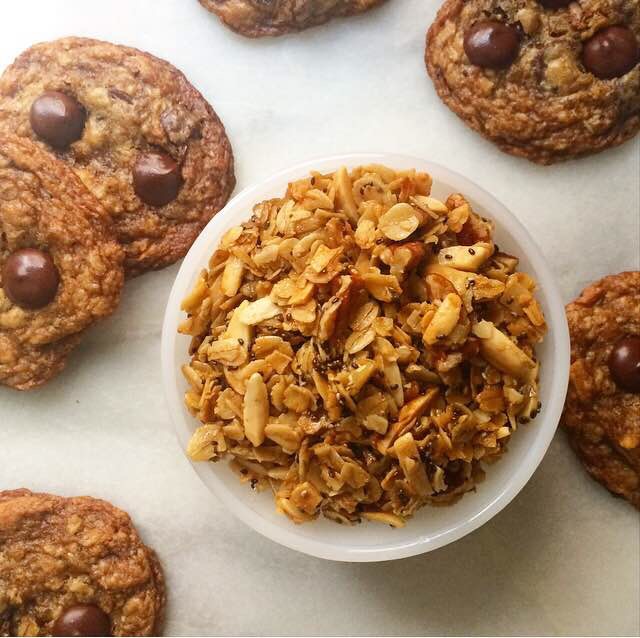
You guys, these cookies taste exactly like banana pudding. No, seriously. They literally taste exactly like the combination of vanilla pudding, bananas, vanilla wafers, and whipped cream that we grew up with. But they’re portable and much less messy 😊

There are a million pudding-based cookie recipes out there, but this one is different. It’s not made with instant pudding mix–I’ve found it makes these cookies dry and artificial-tasting. So, ditch the mix! Instead add the three main ingredients in instant mix (cornstarch, milk powder, and granulated sugar) individually, followed by a full tablespoon of vanilla extract to round everything out and give these cookies a classic pudding flavor. Combined with mashed ripe bananas and white chocolate chips, these cookies taste–and I can’t stress this enough–exactly like banana pudding.

My Banana Pudding Cookies are not as puffy as the cookies that inspired them, but they capture their flavor perfectly. Incredibly soft and chewy with strong banana and vanilla flavors, they’re the perfect cookies to make for cookouts or picnics, or anytime you are craving banana pudding. And if you have a sweet, tiny friend to share with, all the better.

Banana Pudding CookiesΒ Looking for more banana pudding? Check out my No-Churn Banana Pudding Ice Cream!

Banana Pudding Cookies
makes about 4 dozen cookies

2 1/2 cups all-purpose flour
1/4 cup cornstarch
1/4 cup non-fat dry milk powder
1 teaspoon baking soda
1 teaspoon Kosher or sea salt
1 cup (2 sticks) unsalted butter, softened to room temperature
3/4 cup light brown sugar, packed
1/2 cup granulated sugar
1 large egg, room temperature
1 1/2 medium ripe bananas, mashed (about 1/2 cup)
1 tablespoon pure vanilla extract
1 1/4 cups white chocolate chips

In a large mixing bowl, whisk together flour, cornstarch, milk powder, baking soda, and salt. Set aside.

In a separate large mixing bowl, use an electric mixer to beat butter until light and fluffy. Add light brown and granulated sugars and beat until combined. Mix in egg, followed by mashed banana and vanilla. Add dry ingredients in two installments, beating until combined. Mix in white chocolate chips.

Cover dough and chill in the refrigerator for at least two hours, or up to three days.

Preheat oven to 350F. Line two baking sheets with parchment.

Scoop dough by the tablespoon and roll into balls. Place dough balls at least two inches apart on prepared pans. Bake 8-10 minutes, until the edges are starting to turn golden and the tops are no longer raw looking. Let cookies cool on the pans for ten minutes before removing to a rack to cool completely. Cool baking sheets to room temperature before baking any remaining dough.

Cookies will keep in an airtight container at room temperature for up to a week.

Banana Pudding Cookies

Hummingbird Muffins

 Have you ever had Hummingbird Cake? If you aren’t from the south, there’s a good chance you haven’t. It’s a southern specialty, first published in Southern Living magazine in 1978 (and still their most requested recipe). It’s like carrot cake, but decidedly tropical–a spice cake full of banana, pineapple, coconut, and pecans, topped with cream cheese frosting. Oh, is it ever good. And with all that tropical fruit, it’s perfect for summer.

Warning: once you try Hummingbird Cake, you’ll want it all the time. Even for breakfast.

And really, why not?! I mean, there’s fruit in there. And nuts–hello, protein! But there’s also a lot of sugar, and frosting simply is not breakfast food…unless you’re having cinnamon rolls ☺️ And so, to satisfy my early-morning need for tropical spice cake, I took all the flavors of the southern classic and put them in a batch of muffins. And I swapped the frosting for a pecan streusel, just to make them appropriate for scarfing down at 7am.

The base for these Hummingbird Muffins is a riff on my favorite banana bread. I got the idea to soup-up the batter from my Insta-friend and fellow blogger, Megan. She took her favorite vegan banana muffins and made them into Hummingbird Cupcakes! Her idea is absolute genius, and when I was developing this recipe, I just had to steal it 😊 


The muffin base is soft and moist, a little nutty from the addition of white whole wheat flour, and full of cinnamon and banana flavors. It’s a simple no-mixer recipe that I absolutely swear by. Here, the batter is filled with crushed pineapple, sweetened shredded coconut, and chopped pecans before being spooned into muffin cups, topped with an easy pecan streusel, and baked until domed and golden brown.

Hummingbird Muffins are the best way to have cake for breakfast. Full of whole grain, cinnamon, fruit, and nuts, they’re healthy enough to grab for a quick breakfast, and delicious enough to keep you coming back for seconds. 

 Hummingbird Muffins
makes 14-16 standard muffins

1 cup all-purpose flour
1 cup white whole wheat flour*
1 1/2 teaspoons baking powder
1 teaspoon baking soda
2 teaspoons ground cinnamon
1 teaspoon Kosher or sea salt
1/2 cup coconut oil,* melted
1/2 cup light brown sugar, packed
1/2 cup granulated sugar
2 large eggs, room temperature
1/4 cup milk of choice*
2 teaspoons real vanilla extract
3 large ripe bananas, mashed
1/2 cup canned crushed pineapple in juice (not drained)
2/3 cup sweetened shredded coconut
2/3 cup pecans, chopped (optional)

Streusel:
1/2 cup all-purpose flour
1/4 cup light brown sugar, packed
1/4 cup pecans, chopped (optional)
1/2 teaspoon ground cinnamon
pinch of Kosher or sea salt
4 tablespoons unsalted butter, very cold

Preheat oven to 425F. Grease a standard muffin pan or line with muffin liners.

In a medium-large mixing bowl, whisk together all-purpose flour, white whole wheat flour, baking powder, baking soda, cinnamon, and salt. Set aside.

In a large mixing bowl, whisk together melted coconut oil, light brown sugar, and granulated sugar. Add eggs one at a time, combining completely after each addition. Whisk in vanilla, followed by mashed bananas, crushed pineapple, and milk.

Add dry ingredients to wet, and use a silicone spatula or wooden spoon to stir them together–no more than 20 strokes. Add coconut and pecans, and stir five additional strokes. Fill each muffin cup all the way to the top.

Make the streusel. In a small mixing bowl, use a fork to stir together flour, light brown sugar, pecans, cinnamon, and salt. Use a pastry blender (or two forks) to cut cold butter into dry ingredients until the largest pieces are the size of small peas. Place about 1 tablespoon of streusel on top of each filled muffin cup.

Tap full pan on the counter five times to release any large air bubbles. Place full pan in the oven. Bake for five minutes. Without opening the oven door, turn the oven temperature down to 375F and bake an additional 17-18 minutes. Tent with foil if anything starts to brown too quickly. Muffins are ready when a toothpick inserted in the center comes out clean.

Let muffins cool in pan for at least five minutes before removing to a rack to cool completely. Pan should return to room temperature before you bake any remaining batter.

Serve muffins immediately, or keep in an airtight container at room temperature for up to three days.

Notes:
1. White whole wheat flour may be replaced with an equal volume of whole wheat flour or all-purpose flour.
2. Melted coconut oil may be replaced with an equal volume of neutral-flavored oil, such as canola or vegetable.
3. I use whole milk, but 1% or 2% milk will also work. I do not recommend skim or fat free cow’s milk. You may also use a non-dairy milk.

Cinnamon Swirl Zucchini Bread

 Cinnamon Swirl Zucchini BreadIsn’t it funny how our tastes evolve as we age? Things that we were horrified by years ago become our favorites out of the blue, leaving us with no idea of when or why our opinions changed. Sometimes we don’t even notice that we’ve changed at all.

For instance, my mother ordered a slice of zucchini bread once on a family vacation eighteen years ago. We were in who-knows-where Pennsylvania at the crack of dawn, eating breakfast at a picnic table outside a white clapboard coffee shop. I have no memory of what I ordered, but I remember being taken aback when my mom sat down with that bread. 

Cinnamon Swirl Zucchini BreadIt was like I didn’t even know her anymore. Who was this woman, and why was she trying to ruin breakfast with vegetables? She offered me a bite and I recoiled in horror (internally, at least). Don’t get me wrong, I liked vegetables, but in my thirteen year-old mind, there was something utterly wrong about eating bread loaded with squash. 

Cinnamon Swirl Zucchini BreadBut times have changed. Here I am eighteen years later, writing a blog post about zucchini bread. I don’t know when I moved over to the dark green side, but I’m now a card-carrying member. I mean, what’s not to love about soft, sweet, cinnamon-scented quick bread? It’s perfect for breakfast or a snack or dessert. Sure, there’s zucchini in there, but aside from a few green flecks, it’s not even noticeable. It’s only there for moisture. And you could use buttermilk or sour cream or yogurt for that anytime of year, but when the produce aisles are exploding with ripe, reasonably-priced zucchini, why not take full advantage?!

This zucchini bread recipe is a total classic and would be great with a cup of chopped nuts stirred into the batter, but today, let’s get a little crazy and fill our quick bread with a tunnel of melted cinnamon-sugar. Yes, you read that correctly. This isn’t any old zucchini bread–this is Cinnamon Swirl Zucchini Bread! 

Cinnamon Swirl Zucchini BreadSo how do you get all that cinnamon-sugar goodness inside your quickbread? Well, it’s surprisingly easy. Once the simple no-mixer-required batter is stirred together, half of it is poured into the bottom of a loaf pan, then blanketed in cinnamon-sugar before the rest of the batter is layered on top. As the zucchini bread bakes, the cinnamon-sugar layer melts and moves as the bread rises. Once the loaf is completely cool, you can slice it up and see a little swirl of sweet cinnamon goodness throughout 😍 

Cinnamon Swirl Zucchini BreadOh yes, this Cinnamon Swirl Zucchini Bread is something that even little thirteen year-old me could get excited about. And who wouldn’t? It’s moist, sweet, lightly spiced quick bread swirled with melted cinnamon-sugar, and it comes with a small serving of vegetables that you can’t even taste. It’s the dream. 

Cinnamon Swirl Zucchini Bread Cinnamon Swirl Zucchini Bread
makes one 9×5″ loaf

For the pan:
1 tablespoon all-purpose flour
1 tablespoon neutral-flavored oil

Cinnamon Swirl:*
1/4 cup granulated sugar
1 tablespoon ground cinnamon

Zucchini Bread:
2 cups all-purpose flour
1 teaspoon ground cinnamon
1 1/2 teaspoons baking powder
1 teaspoon baking soda
1 teaspoon Kosher or sea salt
1/2 cup neutral-flavored oil (I use canola)
1/2 cup light brown sugar, packed
1/4 cup granulated sugar
2 large eggs, room temperature
2 teaspoons pure vanilla extract
2 cups shredded zucchini, not packed (about 1 1/2 large zucchini)

Preheat oven to 350F.

Grease the pan. In a small bowl, use a fork to whisk together flour and oil. Use a pastry brush to paint the entire inside of a 9×5″ loaf pan. Pour out any excess. Set aside.

Prepare the cinnamon swirl. In a separate small bowl, use a fork to whisk together granulated sugar and cinnamon. Set aside.

Make the zucchini bread. In a medium-large mixing bowl, whisk together flour, cinnamon, baking powder, baking soda, and salt. Set aside.

In a large mixing bowl, whisk together oil, light brown sugar, and granulated sugar. The mixture will be clumpy, like wet sand. Add eggs one-by-one, whisking to combine after each addition. Stir in vanilla, followed by shredded zucchini. Add dry ingredients, and stir just until combined (no more than 20-25 strokes).

Transfer half the batter into prepared pan. Sprinkle with all of the cinnamon swirl mixture. Top with the remaining batter, spreading to cover the cinnamon-sugar layer. Lightly tap the pan on the counter to release any large air bubbles. Bake 40-50 minutes, tenting with foil at the 20 minute mark. Bread is done when a toothpick inserted in the center comes out clean or with only a few moist crumbs.

Let zucchini bread cool completely in the pan on a wire rack. Once the bread is cool, run a small thin knife around the edges of the pan before inverting to release. Slice and serve.

Store bread in an airtight container at room temperature for up to five days.

Note:

If you don’t wish to use the cinnamon swirl, add an extra teaspoon of cinnamon to the zucchini bread batter.

Cinnamon Swirl Zucchini Bread

Granola Cookies

 By now, you all know how much I love granola. After a lifetime of insisting I hated it, I tried the homemade variety, and the rest is history. There is always a giant jar of the stuff on my counter, full of crispy, glossy oats and whatever odds and ends I can find in my cookie mix-in cabinet.

Yes, I have an entire cabinet dedicated to cookie mix-ins. Doesn’t everybody?! 😜 

My current batch is a play on my Maple Pecan Granola, made with pecans and almonds, large flaked coconut, chia seeds, and brown rice syrup to encourage a little clustering. I usually eat it with yogurt and fruit, but last week, I got a little crazy and bypassed the breakfast option in favor of cookies.

I took my favorite chewy oatmeal cookie base, swapped in granola for 2/3 of the quantity of oats, and threw in some chocolate chips. Within an hour (because this dough doesn’t require a chill!), I was biting into warm, chewy, chocolaty, nutty Granola Cookies. 

I love this recipe as-is, but I’ve already been dreaming up other flavors. How about peanut butter? Swap in 3/4 cup creamy peanut butter for one stick of the softened butter, and use my Peanut Butter Granola! Yum! If you like dried fruit in your granola, you could swap out some or all of the chocolate chips for raisins, dried cranberries, or anything else that strikes your fancy.

You guys, these Granola Cookies are so good that I’ve made three batches in five days. I’m out of granola mid-week and I’m not even miffed about it. Nope–changing my routine in the name of dessert has been totally worth it. And even if it weren’t, I could console myself with a cookie or two. 

 Granola Cookies
makes about 5 dozen cookies

1 1/2 cups all purpose flour
1/2 teaspoon ground cinnamon
1 teaspoon baking soda
1 teaspoon Kosher or sea salt
1 cup (2 sticks) unsalted butter, softened to room temperature
1 cup dark brown sugar, packed
1/2 cup granulated sugar
2 large eggs, room temperature
2 teaspoons pure vanilla extract
1 1/4 cup old-fashioned oats
2 1/2 cups granola (homemade or purchased)
1 1/2 cups semisweet chocolate chips

Preheat oven to 350F. Line two baking sheets with parchment paper. Set aside.

In a small-medium mixing bowl, whisk together flour, cinnamon, baking soda, and salt. Set aside.

In a large mixing bowl, use an electric mixer to beat butter until light and fluffy. Beat in dark brown and granulated sugars, followed by eggs and vanilla. Add flour mixture in two installments, mixing to combine. Beat in oats and granola, followed by chocolate chips. Drop dough by the tablespoon onto prepared baking sheets, making sure the mounds of dough are at least 2 inches apart.

Bake 4 minutes. Rotate the sheet pans top to bottom in the oven before baking for an additional 4-5 minutes. Cookies are done when the tops are no longer doughy-looking. Let cool on the pans for five minutes before removing to a rack to cool completely. Repeat baking process with any remaining dough.

Cookies will keep in an airtight container at room temperature for up to a week.

Chocolate Cake with Malted Chocolate Buttercream

 My birthday is this weekend! I’m going to be 31 😁 I feel a little old, but I’m also really enjoying this phase of my life. 

In my 31st year, I have:

  • seen my family on six separate occasions (together and individually), including my 30th birthday trip to Santa Fe, a super-secret surprise trip to Austin for E3’s birthday, and visits to NYC from my mom, both sisters, and sister-in-law. That’s the most time I’ve spent with them since I moved to NYC in 2007. The older I get, the more I appreciate the amazing people who made me who I am.
  • spent some time off the grid in Maine, and enjoyed it way more than I ever expected. I can’t wait to do it again in a few weeks.
  • catered a dinner party for 300 people. I had three amazing helpers, and it went off without a hitch despite the six weeks of panic that preceded it. I hope to do it again this year…because I am insane.
  • moved. And moving in New York is horrible. Heck, moving anywhere is horrible. But I love my new apartment. Shoutout to my mom for coming to help me on the coldest weekend ever.
  • navigated my way through some major life changes and lessons with some modicum of grace and dignity.
  • opened my own Netflix account. #adulting
  • realized that I am still figuring out who I am. I hope this never ends.
  • made a lot of cookies. And eaten a lot of cookies.
  • really fallen in love with my friendships. My friends really stepped up and took care of me this year when I didn’t feel like I could do it myself. There’s nothing like laughing ’til you cry when you feel like your life is a mess. Thanks, guys.
  • started a baking blog. I dreamt of having this blog for six years before hitting “publish.” Thank you for reading, liking, sharing, and making the recipes. Thank you for making this little corner of the Internet what it is: a place filled with sugar and ridiculousness. Without you, I’m just talking to myself. 

…that got a lot mushier than I intended. 

This weekend, I’ll be celebrating at a cookout with those I hold nearest and dearest. My friends are making dinner, and I can’t wait! They offered to make dessert too, but being me, I just couldn’t leave well enough alone. I’ll be there with pie 😊

Of course, I thought about cake, but with the heat we’ve been having, I am afraid the frosting would melt. But I just can’t let my birthday go by without cake, so I’ve been celebrating a little early with this Chocolate Cake with Malted Chocolate Buttercream. The cake is moist, fluffy, and so, so easy. The best part? No mixer required! I’ve been making this cake for two years, and I can safely say that it’s the best chocolate cake I’ve ever had. And that’s coming from a self-proclaimed vanilla person. 

The frosting is a tribute to one of my very favorite things: chocolate malts. Oh yes, I love a chocolate malt. I just *have* to have one at least twice a month. It only seems appropriate that I’d use it as inspiration for my birthday cake frosting. This is a super easy chocolate buttercream with a hefty dose of malted milk powder. It’s creamy, dreamy, chocolaty, malty magic. If malt isn’t your thing, I recommend replacing the cup of malted milk powder in the recipe with an additional cup of confectioner’s sugar. It’ll still be delicious 😊 

As for decorating, I went for a sort of naked cake approach here, using the bulk of the frosting to frost the top and fill the layers. This recipe makes enough frosting to fully frost and fill a two layer 9″ round cake, if you’d like to cover the whole thing. If you want to pipe, you’ll need to make 1.5 times the recipe. No matter which route you choose to go, your cake will be fantastic.

If you don’t have a reason to make cake this weekend, I give you full permission to use my birthday as an excuse. We’re Internet friends after all. And friends who eat Malted Chocolate Buttercream together stay together, right?!

Have a great weekend! 

 Chocolate Cake with Malted Chocolate Buttercream
cake recipe adapted from Sally’s Baking Addiction
makes one two layer 9″ round cake

For the pan:
2 tablespoons neutral-flavored oil (I use canola)
2 tablespoons natural unsweetened cocoa powder

Cake:
1 3/4 cups all purpose flour
3/4 cup natural unsweetened cocoa powder (not Dutch Process)
1 cup granulated sugar
3/4 cup light or dark brown sugar
1 teaspoon baking powder
2 teaspoons baking soda
1 teaspoon Kosher or sea salt
1/2 cup neutral-flavored oil (I use canola)
2 large eggs, room temperature
2 teaspoons pure vanilla extract
1 cup buttermilk (low fat is fine)*
1 cup strong, hot coffee (decaf is fine)

Frosting:
1 cup (2 sticks) unsalted butter, softened to room temperature
2 cups confectioner’s sugar
3/4 cup natural unsweetened cocoa powder
1 cup malted milk powder (I use Carnation)
pinch of Kosher or sea salt
1 teaspoon pure vanilla extract
3-4 tablespoons heavy cream

chocolate chips, for decorating (optional)

Preheat the oven to 350F. Grease the pans. In a small bowl, use a fork to whisk together oil and cocoa powder. Use a pastry brush to paint the entire insides of the pans with the mixture. Set aside.

Make the cake batter. In a large mixing bowl to sift together flour, cocoa powder, granulated sugar, brown sugar, baking powder, baking soda, and salt. Set aside.

In a separate large mixing bowl, whisk together oil and eggs, followed by vanilla, buttermilk, and coffee. Whisk in dry ingredients in three installments, just until combined. Divide batter evenly among the pans. Tap full pans on the counter five times to release any air bubbles. Bake 23-27 minutes, until a toothpick inserted in the middle comes out clean.

Let cakes cool in pans for ten minutes before running a small, thin knife around the edges. Invert cakes onto cooling racks and allow to cool to room temperature.

Make the frosting. In a large mixing bowl, use an electric mixer to beat butter until light and fluffy (about two minutes). Beat in confectioner’s sugar, followed by cocoa powder. Mix in malted milk powder and salt, scraping down the bowl as necessary. Add in vanilla and 3 tablespoons of heavy cream, and beat on high for two minutes. Add more cream by the tablespoon until desired consistency is reached. Fill the layers and frost as desired. Decorate with chocolate chips, if desired.

Frosted cake will keep covered at room temperature for up to two days, and in the refrigerator for up to a week.

Note:

If you don’t have buttermilk, put one tablespoon of white vinegar in the bottom of a liquid measuring cup, then pour milk up to the 2 cup mark. Stir and let sit for five minutes, until curdled. Use as instructed in the recipe. Do not use skim or fat free milk.