Monthly Archives: June 2016

M&Ms Sandwich Cookies

 If you haven’t noticed, I love sandwich cookies. This blog has existed for eight months, and I already have six sandwich cookie recipes in my recipe index. I mean, cookies and frosting together–does a more perfect dessert even exist?! 

Today’s sandwich cookies are my version of a favorite treat from my teenage years. Back then, I was on the high school dance team. Once classes were over for the day, I’d have thirty minutes to change and eat something before practice. Usually the whole team would go for some sort of fast food (ah, teenage metabolism), but occasionally, when everyone was attending tutorials or some other after-school program, I’d zip over to Ridgmar Mall, run to the cookie kiosk, and grab one or two (okay, okay, three!) miniature M&Ms sandwich cookies before driving back to school to dance off all the calories.

To this day, I get nostalgic for those soft cookies, M&Ms, and creamy vanilla filling. But I can’t remember the last time I was in a mall (one of the advantages of living in New York City). And as I always have fresh baked goods at home, I no longer stop for mass-produced treats. 

These days, if I want a few M&Ms Sandwich Cookies, I make them myself. They’re so much better than anything you could get at a mall. Soft, chewy cookies speckled with colorful milk chocolate M&Ms and sandwiched together with a smooth vanilla filling?! Yes. I’ll take three.

Most of my sandwich cookie recipes make five or six dozen very small cookies–far more than anyone really needs. This recipe makes a much more manageable two dozen sandwich cookies. If you’d like more, this recipe doubles very well.

Also, these cookies are slightly larger than my regular sandwich cookies. Where all of my other sandwich cookie recipes require you to scoop dough by the teaspoon, the cookies in this recipe are each made with 1/2 tablespoon (1 1/2 teaspoons) of dough. The larger scoops cut down on the time spent rolling dough and also allow for more M&Ms in every bite! 

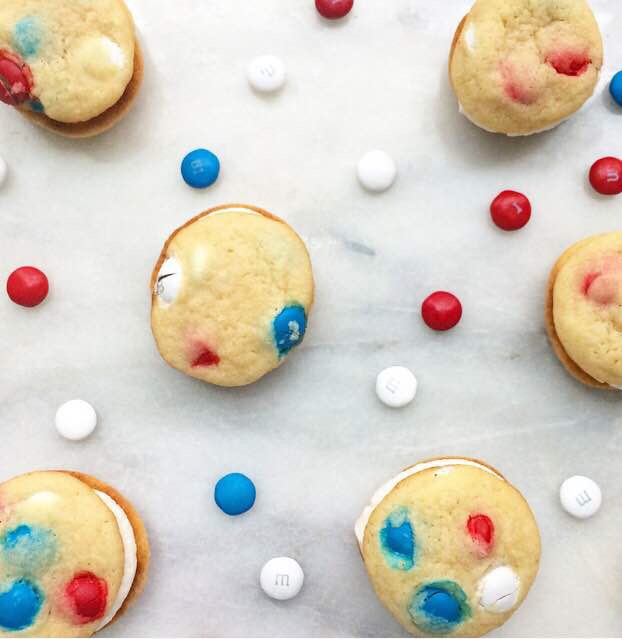
I love working with M&Ms for holidays. There’s a perfect color combination for every occasion–red and green for Christmas, orange and black for Halloween, pastels for Easter. Since the Fourth of July is coming up next week, I went with the red, white, and blue variety for this batch! I think they’re pretty cute 😊 No matter which holiday you’re making these for (even if it’s just that it’s the end of a long week), I know these M&Ms Sandwich Cookies will be a hit!

 Want more M&Ms treats? Check out my M&Ms-Potato Chip Cookies!

M&Ms Sandwich Cookies
makes 2 dozen sandwich cookies

1 1/2 cups all-purpose flour
1 teaspoon cornstarch
1/2 teaspoon cream of tartar*
1/2 teaspoon baking powder
1/4 teaspoon baking soda
1/2 teaspoon Kosher or sea salt
1/2 cup (1 stick) unsalted butter, softened to room temperature
1/2 cup granulated sugar
1/4 cup light brown sugar
1 large egg, room temperature
1 teaspoon pure vanilla extract
1 cup M&Ms milk chocolate candies

Filling:
1/2 cup shortening (or room temperature unsalted butter)
2 1/2-3 cups confectioner’s sugar
pinch of Kosher or sea salt
2 teaspoons pure vanilla extract
1-2 tablespoons heavy cream

In a medium-large mixing bowl, whisk together flour, cornstarch, cream of tartar, baking powder, baking soda, and salt. Set aside.

In a large mixing bowl, use an electric mixer to beat butter until light and fluffy, about two minutes. Beat in granulated and light brown sugars, followed by egg and vanilla. Mix in dry ingredients in two installments, combining completely after each addition. With the mixer on low, add in M&Ms and mix for 10-15 seconds until they are evenly dispersed. Cover and chill dough for 90 minutes, or up to three days.

Preheat oven to 350F. Line two baking sheets with parchment.

Scoop chilled dough by the 1/2 tablespoon (1 1/2 teaspoons) and roll into balls. Set dough balls about two inches apart on prepared pans. Bake 7-8 minutes, until the tops are no longer shiny. Let cookies cool on pans for five minutes before removing to a rack to cool completely. Repeat with any remaining dough.

Make the filling. In a large mixing bowl, use an electric mixer to beat shortening (or butter) until fluffy. Beat in 2 1/2 cups confectioner’s sugar and salt. Mix in vanilla and 1 tablespoon heavy cream. If filling is too thin, add more confectioner’s sugar. If it’s too thin, add an extra tablespoon of heavy cream. If you would like to pipe the filling, spoon it into a piping bag and snip off a corner.

There are two options for filling:

1. To assemble a sandwich cookie by piping, apply filling by pipe a circle in the middle of the underside of one cookie, leaving about 1/4″ around the edge. Top with a second plain cookie, with the underside filling-side-in. Repeat until all cookies have been used.

2. To assemble a sandwich cookie by spreading, use an offset frosting knife to spread 1/2-1 teaspoon on the underside of one cookie. Top with a second plain cookie, with the underside filling-side-in. Repeat until all cookies have been used.

M&Ms Sandwich Cookies will keep in an airtight container at room temperature for up to a week.

Note:

There is no substitute for cream of tartar in this recipe.

Sweet Cherry Cheesecake Bars

 As far as summer fruit goes, I don’t think anything beats fresh cherries. Not even mango.

When cherries start showing up at the greenmarket, I get a flood of new ideas. Pairing them with rhubarb in pie, making syrup for homemade sodas, rolling them into sweet rolls. There are a million possibilities for every bag! Sometimes though, it’s fun to go with a classic like cherry cheesecake. But my kitchen is a sauna this time of year, and working with a water bath and a full springform pan sounds less than appealing. Plus, there’s the 24 hour chill–who has time for that?!

Enter these Sweet Cherry Cheesecake Bars: shortbread crust layered with tangy cheesecake and sweet cherry pie filling, topped with a simple almond streusel. They have all the flavor of the classic cheesecake, no water bath or seemingly-eternal wait required! They still take a little time (they have to chill, after all), but they are far less of a production than a traditional cheesecake–simple enough for a weekend treat, but perfect for parties, too! 

These bars have four layers, but none of them are difficult or time consuming to make. Start by making the shortbread crust. Mix together flour, sugar, and salt before cutting in a cold stick of butter. The mixture will be very dry and seem like it won’t bake up to much, but it will. Pour the mixture into a parchment-lined pan, spread it out to cover the entire bottom of the pan, and then press it down with your fingers until it is one even layer. It will still be powdery-looking, but it will pack down easily and hold together. Bake that for ten minutes–it won’t be fully cooked in that time, but this little step will prevent the crust from getting soggy from the cheesecake and cherry layers.

Once you put the shortbread crust in the oven, use the same bowl you used for the crust to make the streusel topping. No need to wash the bowl–the streusel has all the same ingredients as the crust, plus almonds. Mix together flour, sugar, salt, and sliced almonds, then cut in a stick of butter. Refrigerate the mixture to keep the butter cold while you prepare the cherries and cheesecake.

Remove the crust from the oven and set the pan on a rack to cool while you make the cherry layer. I basically use my favorite cherry pie filling recipe, but cut the quantity in half. Many cherry cheesecake recipes ask for canned cherry pie filling, but this is way better than anything you’ll find in the grocery store. Simply mix three cups of halved, pitted fresh sweet cherries with 1/2 cup of sugar, three tablespoons of cornstarch, a touch of nutmeg, and some salt. The cherries will release some liquid while you make the cheesecake layer.

The cheesecake comes together in less than five minutes. Beat some cream cheese with a bit of sugar. Mix in an egg, followed by a teaspoon of lemon juice and some vanilla. That’s it. It will be smooth, creamy, and absolutely gorgeous! 

By the time the cheesecake is ready, the shortbread crust should be at room temperature and ready for layering. Spread the cheesecake mixture over the crust, and tap the pan on the counter a few times to release any air bubbles. Scatter the cherries over the top of the cheesecake, leaving behind any liquid that has collected in the bottom of the bowl. Press down lightly to sort of nestle the cherries into the cheesecake. Remove the streusel from the refrigerator and sprinkle that over the cherries. Put the full pan in the oven to bake for about 45 minutes.

The last part is the most difficult by far. Let the full pan cool to room temperature, and then refrigerate it for at least four hours. Yes, it’s a long time, but you want that cheesecake layer to be nice and cold when you finally bite in! Room temperature cheesecake? No, thanks! I like to make these bars the night before I need them. That way, they’re thoroughly chilled when I get up, and all that’s left to do is slice them up and grab a fork! 

Look at all those gorgeous layers! The sweet cherries, tangy cheesecake, buttery shortbread crust, and crispy almond streusel are amazing together–the combination of cherries and cheesecake are a classic for a reason. These Sweet Cherry Cheesecake Bars are wonderful the way they are, but if you’re looking for a red, white, and blue dessert for Independence Day, you could swap fresh blueberries for one cup of the cherries. I don’t know about you, but watching fireworks while snacking on patriotic cheesecake bars is right up my alley. 

 Sweet Cherry Cheesecake Bars
makes one 8×8″ pan, about 9-16 bars

Shortbread Crust:
1 cup all-purpose flour
1/4 cup granulated sugar
pinch of Kosher or sea salt
1/2 cup (1 stick) unsalted butter, cold

Streusel:
1/2 cup all-purpose flour
1/4 cup granulated sugar
pinch of Kosher or sea salt
1/4 cup sliced almonds
1/4 cup unsalted butter, cold

Cherry Layer:
3 cups pitted, halved sweet cherries
1/2 cup granulated sugar
1/8 teaspoon ground nutmeg
3 tablespoons cornstarch
pinch of Kosher or sea salt

Cheesecake:
12 ounces (1 1/2 bricks) full-fat brick-style cream cheese
3 tablespoons granulated sugar
1 large egg, room temperature
1 teaspoon fresh lemon juice
2 teaspoons pure vanilla extract

Preheat oven to 375F. Grease a 9-inch square pan, line it with parchment, and grease again.

Make the shortbread crust. In a medium mixing bowl, whisk together flour, sugar, and salt. Use a pastry blender or two forks to cut butter into flour mixture until the largest pieces are the size of small peas. Mixture will be dry and crumbly with big pieces of butter, not a cohesive dough. Pour mixture into prepared pan and use clean dry fingers to press it into the pan. Bake ten minutes and then let cool completely.

While the crust is cooling, make the streusel. In a medium mixing bowl, whisk together flour, sugar, salt, and almonds. Use a pastry blender or two forks to cut butter into dry ingredients until the largest pieces are the size of small peas. Set in the refrigerator to chill.

Prepare the cherry layer. Place pitted, halved cherries in a large mixing bowl. Stir in sugar, nutmeg, cornstarch, and salt. Set aside.

Make the cheesecake. In a large mixing bowl, use an electric mixer to beat cream cheese until light and fluffy, about two minutes. Beat in sugar, followed by egg, lemon juice, and vanilla. Spread mixture over the cooled crust. Tap the full pan on the counter five times to release any air bubbles.

Scatter cherries on top of cheesecake layer, leaving any excess liquid in the bowl. Press down lightly to nestle the cherries into the cheesecake. Sprinkle chilled streusel mixture over the top of the cherries. Bake full pan at 375F for 40-45 minutes, tenting with foil at the 25 minute mark.

Let bars cool in the pan on a rack until they reach room temperature. Refrigerate the full pan for at least four hours. Use the parchment to lift the bars out of the pan and onto a cutting board. Use a chef’s knife to slice them.

Serve immediately, or keep the bars covered in the refrigerator for up to four days.

Mango Upside-Down Cake

I know I just posted a mango recipe yesterday, but the universe seriously wants me to eat all the mangoes right now. Trader Joe’s has mango everything (even Joe-Joe’s!) and my beloved green market is positively bursting at the seams with them! And when they’re two for $3, how can I resist?!

I’ve been eating them with strawberries and lime, blitzing them into smoothies, making salsa, throwing dried mango into my granola and eating it with the fresh stuff. If there’s a way to eat a mango, I am doing it. I’m like Bubba in Forrest Gump…but with mango.

I usually enjoy my mangoes raw, but today I’m switching it up a little bit with this Mango Upside-Down Cake! It’s a soft brown sugar cake topped with thinly sliced mango and a simple brown sugar caramel. It’s super easy and perfect for entertaining this summer.

Since this cake is served upside-down, the mangoes are baked underneath the cake batter. This recipe starts with melting butter and dark brown sugar together until the sugar is no longer grainy. Once this happens, take the mixture off the heat, stir in some salt, and spread it over the bottom of the pan. Top the mixture with an even layer of thinly-sliced mango, cutting small pieces to fill in any large gaps.

Next comes the cake batter, which is basically my Vanilla Layer Cake batter with more brown sugar and the tiniest bit less vanilla extract. It’s a moist, soft, slightly dense cake that pairs perfectly with the juicy mango and caramel. Bake it all together for about 35 minutes, or until the smell of brown butter and caramelized mango makes you totally insane!
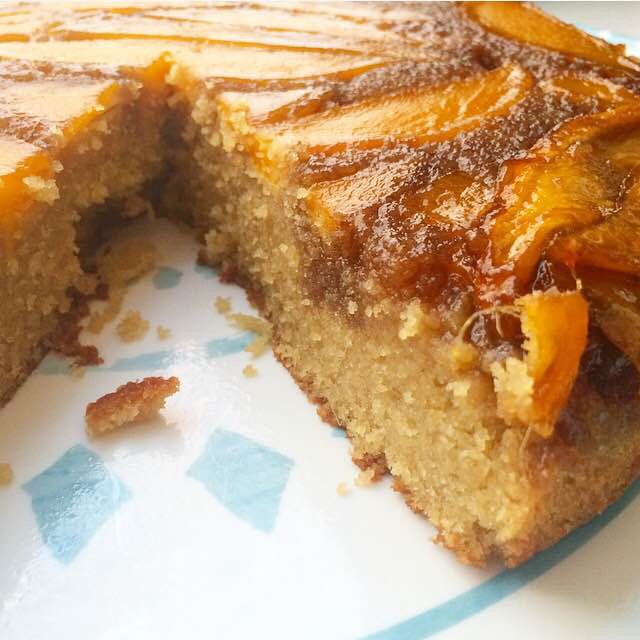
Let the cake cool in the pan for a few minutes before inverting it onto a cake stand or large serving plate. Don’t worry if a few pieces of mango stick to the pan–just use your fingers to nudge them back into place. Nobody will ever know it didn’t come out in one fell swoop.

 My favorite thing about this cake is that you don’t need to wait forever to serve it. There’s no worrying about melting buttercream or fretting over your piping skills. Nope. Mango Upside-Down Cake doesn’t require any decorating and can be served warm, room temperature, or cold! The cake pictured here was still slightly warm from the oven, and was amazing with a little scoop of coconut gelato.

Mango Upside-Down Cake is perfect for any occasion this summer, whether it’s Fourth of July, or that you came home from Trader Joe’s with eleven mangoes 😊

 Mango Upside-Down Cake
makes one 9-inch round cake

Mango Layer:
1/4 cup (1/2 stick) unsalted butter
2/3 cup dark brown sugar, packed
pinch of Kosher or sea salt
2 small (or 1 1/2 large) mangoes, thinly sliced

Cake:
1 1/2 cups all-purpose flour
2 tablespoons cornstarch
1/2 teaspoon baking powder
1/4 teaspoon baking soda
1/2 teaspoon Kosher or sea salt
1/2 cup (1 stick) unsalted butter, softened to room temperature
1/2 cup dark brown sugar
1/2 cup granulated sugar
2 large eggs, room temperature
2 teaspoons pure vanilla extract
1 cup buttermilk,* room temperature

For Serving:
Vanilla or Coconut Ice Cream

Preheat oven to 350F. Lightlu grease a 9-inch round cake pan with butter.

Make the mango layer. In a small saucepan, combine butter and dark brown sugar. Place over medium-low heat and stir constantly until butter and sugar are melted and no longer grainy, 3-5 minutes. Remove pan from heat and stir in salt. Pour mixture into prepared pan, using a silicone spatula to spread it over the entire bottom of the pan. Top the brown sugar mixture with one even layer of mango slices. Set aside.

Make the cake batter. In a small-medium mixing bowl, whisk together flour, cornstarch, baking powder, baking soda, and salt. Set aside.

In a large mixing bowl, beat butter with an electric mixer until light and fluffy, about 2 minutes. Beat in dark brown and granulated sugars. Add eggs one at a time, mixing completely after each addition. With the mixer on low, mix in vanilla and buttermilk. Add dry ingredients in two installments, scraping down the bowl as necessary.

Pour batter over mango layer, and spread with a silicone spatula to even out to top. Tap pan on the counter two or three times to release any large air bubbles. Bake 32-35 minutes, until a toothpick inserted in the middle comes out clean.

Let cake cool in the pan on a rack for 15 minutes. Run a small, thin knife around the edge of the pan a couple of times before inverting onto a cake stand or large serving plate mango layer-up.

Serve cake warm, room temperature, or cold.

Cake is best the day it’s baked, but will keep in the refrigerator for up to three days.

Note:

If you do not have buttermilk on hand, make your own! Pour one tablespoon of white vinegar or lemon juice in the bottom of a liquid measuring cup. Pour milk up to the 1 cup mark. Let sit five minutes before using as instructed in the recipe. I do not recommend using skim or fat free milk.

Mango Upside-Down Cake

Tropical Cashew Granola

 It’s officially summer, and I can’t wait to get to the beach. I’m only four weeks away from a trip to Maine with a bunch of friends–it can’t get here soon enough! It’s super woodsy and we definitely won’t see any palm trees, but that doesn’t mean we won’t be eating tons of tropical fruit while we’re up there.

How, you may ask, will we have tropical fruit in the wilds of Maine? In the form of my new favorite granola! 
Yes, I am that person who packs homemade granola into her luggage. And why wouldn’t I? It’s full of whole grains, nuts, and fruit, so it’s super satisfying. It’s also refined sugar-free, gluten free, and vegan, so this is one recipe that will fit all my friends’ various dietary needs.

Between easy breakfasts and snacks, I know we will go through the full two-quart batch in no time. I mean, who can resist this Tropical Cashew Granola?! It’s loaded with dried mango and pineapple, toasted coconut, and cashews–perfect for any day at the beach. 
Normally, I am not a huge fan of dried fruit (especially in granola), but I make exceptions for dried mango and pineapple. I’ll eat a whole six-ounce bag in a day! The sweet mango, tangy pineapple, and toasted coconut work incredibly well with the crunchy oats and cashews. A moderate amount of sweetener and a full teaspoon of salt keep it all just sweet enough to enjoy with your favorite yogurt and fresh fruit. I can’t get enough. 

Having made a lot of granola in the last few years, I can tell you that the homemade stuff is a snap to put together and infinitely better than any boxed variety. When you make something from scratch, you can control the ingredients and customize it to your taste.

For instance, I love my Maple Pecan Granola (which I used as the base for this recipe), but sometimes I want my granola to have more clusters than that recipe allows. So, I took the basic formula and swapped half the maple syrup for brown rice syrup. It’s super thick and allows the oats and cashews to cluster a bit without adding excessive amounts sweetener. And since brown rice syrup has a mild flavor, the maple is still front and center!

Tropical Cashew Granola is like summer in a bowl! Don’t be surprised if the combination of mango, pineapple, coconut, and buttery cashews has you packing a jar for your vacation, too! 

  Looking for more granola? Check out my Peanut Butter Granola!

Tropical Cashew Granola
makes about two quarts

1/3 cup olive oil
1/4 cup brown rice syrup*
1/4 cup pure maple syrup
1 teaspoon Kosher or sea salt
3 cups old-fashioned oats
2 cups raw unsalted cashews, chopped
1 cup unsweetened flaked coconut
6 ounces unsweetened dried mango, chopped into bite-size pieces
6 ounces unsweetened dried pineapple, chopped into bite-size pieces

Preheat oven to 300F. Line a baking sheet with parchment. Set aside.

In a large mixing bowl, whisk together olive oil, brown rice syrup, maple syrup, and salt. Use a silicone spatula or wooden spoon to fold in oats, cashews, and coconut. Spread mixture on prepared pan. Bake 40 minutes, stirring at the 15 and 30 minute marks to prevent burning.

When granola is done baking, let cool five minutes before stirring in dried mango and pineapple pieces. Let granola cool completely in the pan on a rack.

Store in an airtight container at room temperature for up to three weeks.

Note:

Brown rice syrup can be found near the honey and syrups at most well-stocked grocery stores, or on Amazon. If you cannot find it or do not wish to use it, you may use an equal volume of mild honey or maple syrup. Your granola will not have many clusters, but it will still be delicious.

Chocolate Chip-Pecan Brown Butter Blondies

 Father’s Day is this Sunday, and I’ve been thinking all day about what I would say about my dad. I mean, I’ve already said a lot–I wrote about him in my first blog post. But he’s such a great guy, I had to give him another. 

My dad is the kind of guy who taught his three daughters how to play golf, throw a baseball, and shoot hoops. But he also did the Father-Kid number at my dance recitals for seven years straight (and once in tights).

He works really hard and is always trying to better himself–intellectually, physically, in his chosen field, in relationships, you name it. His tagline is “Always go forward.” And he means it. Thank goodness that’s the line he uses most frequently–I don’t know how I would have worked “See that? *points to glass* That’s glass,” into this post. 

While my dad has had some success in his life, he is also one of the humblest people I’ve ever met. You can congratulate him on something he’s achieved and, after he thanks you, he’ll immediately turn the conversation to you and what you are achieving. This is something I try to emulate in every interaction I have.

I could go on and on about him, but let me just say this: my dad is a kind, sweet, compassionate, generous person. He has ambition coming out his ears. He loves my mom, his daughters, his friends, and his dog fiercely. If I become half the person he is, I will consider myself the luckiest girl on earth. 

My dad loves chocolate, especially brownies, and he always tops them with pecans that get super toasty while they bake. I’ve already made a pecan-topped brownie recipe on here though, so today, we’re going with blondies. But not just any blondies: Chocolate Chip-Pecan Brown Butter Blondies. They’re super chewy, filled with melty chocolate, and extra nutty from the toasted pecans and brown butter. 

I know my dad would love these and they’re so simple, he might even try to make them. The recipe only has eight ingredients and doesn’t require a mixer. It can be made start-to-finish in about forty minutes! The hardest part is browning the butter, and that takes almost no effort at all. You could make these blondies with regular melted butter and they would be great, but by taking the time to brown it, you add tons of rich, nutty flavor to the finished product. 

Browning butter is mostly letting butter melt over a burner and then letting it continue to cook until it turns a lovely shade of amber. The only real tip I have is not to take your eyes off the pan. Do not step away from the pan, even for a second. Butter can go from brown to burnt in the blink of an eye, and there are few things I hate more than wasting good ingredients.

To brown butter, start by melting a stick of butter in a light-colored saucepan over medium heat. Make sure to use a silver or white pan so you can clearly see the butter browning. Once the butter melts, it will start to bubble and crackle. Don’t be alarmed–this is just the water content evaporating. Once the crackling stops, swirl the pan occasionally for 4-7 minutes. You’ll see the milk solids in the butter gradually start to brown. You’ll know your brown butter is ready when you smell the most amazing, deeply nutty, buttery aroma coming from the pan. At this point, turn off the heat and pour the brown butter into a large mixing bowl. That’s it!

Mix your brown butter with brown sugar, an egg, some vanilla, flour, and salt. Fold in some toasted pecans and chocolate chips before spreading the batter into a pan and baking it for 20 minutes. Let the blondies cool to room temperature before slicing and serving. 

If I were going to be anywhere near the great state of Texas this weekend, I’d make these Chocolate Chip-Pecan Brown Butter Blondies and serve them warm with ice cream, just how my dad likes his brownies. They’re fantastic at room temperature too, and perfect for packing into a box to deliver to all the great dads in your life.

Happy Father’s Day, Daddio! 

 Chocolate Chip-Pecan Brown Butter Blondies
makes one 8×8″ pan, about 9-16 blondies

1/2 cup pecans, chopped
1/2 cup unsalted butter
1 cup light or dark brown sugar, packed
1 large egg, room temperature
1 1/2 teaspoons pure vanilla extract
1 cup all-purpose flour
pinch of Kosher or sea salt
1 cup semisweet chocolate chips

Preheat the oven to 350F. Grease an 8-inch square baking dish with butter, and dust with flour. Set aside.

Toast the pecans. Place pecans on a dry baking sheet. Place in the oven for 4-5 minutes, until fragrant. Let cool completely.

Brown the butter. Place butter in a light-colored saucepan over medium heat. Let butter melt. Butter will bubble and crackle as the water content evaporates. Swirl the pan frequently for 4-7 minutes, keeping an eye on the color. When the solids are turning brown and the butter is nutty and fragrant, remove the pot from the heat and immediately pour the brown butter into a large mixing bowl.

Add brown sugar to the brown butter and stir to combine (it will be thick and look like wet sand). Whisk in egg and vanilla. Use a silicone spatula to stir in flour and salt, scraping down the bowl as needed. Stir in chocolate chips and toasted pecans.

Spread batter into prepared pan and bake for 20-22 minutes, until a toothpick inserted in the center comes out mostly clean. Let blondies cool in the pan on a rack until they reach room temperature. Run a small, thin knife around the edge of the pan to release them (they should be sturdy enough to lift out of the pan in one piece). Slice and serve.

Blondies will keep in an airtight container at room temperature for up to a week.